

Page 1
1
How to Set Up Your JSA3800 Appliance
Juniper Secure Analytics 3800 (JSA3800) is an enterprise-class appliance that provides a
scalable network security management solution for medium-sized companies up to large
global organizations.
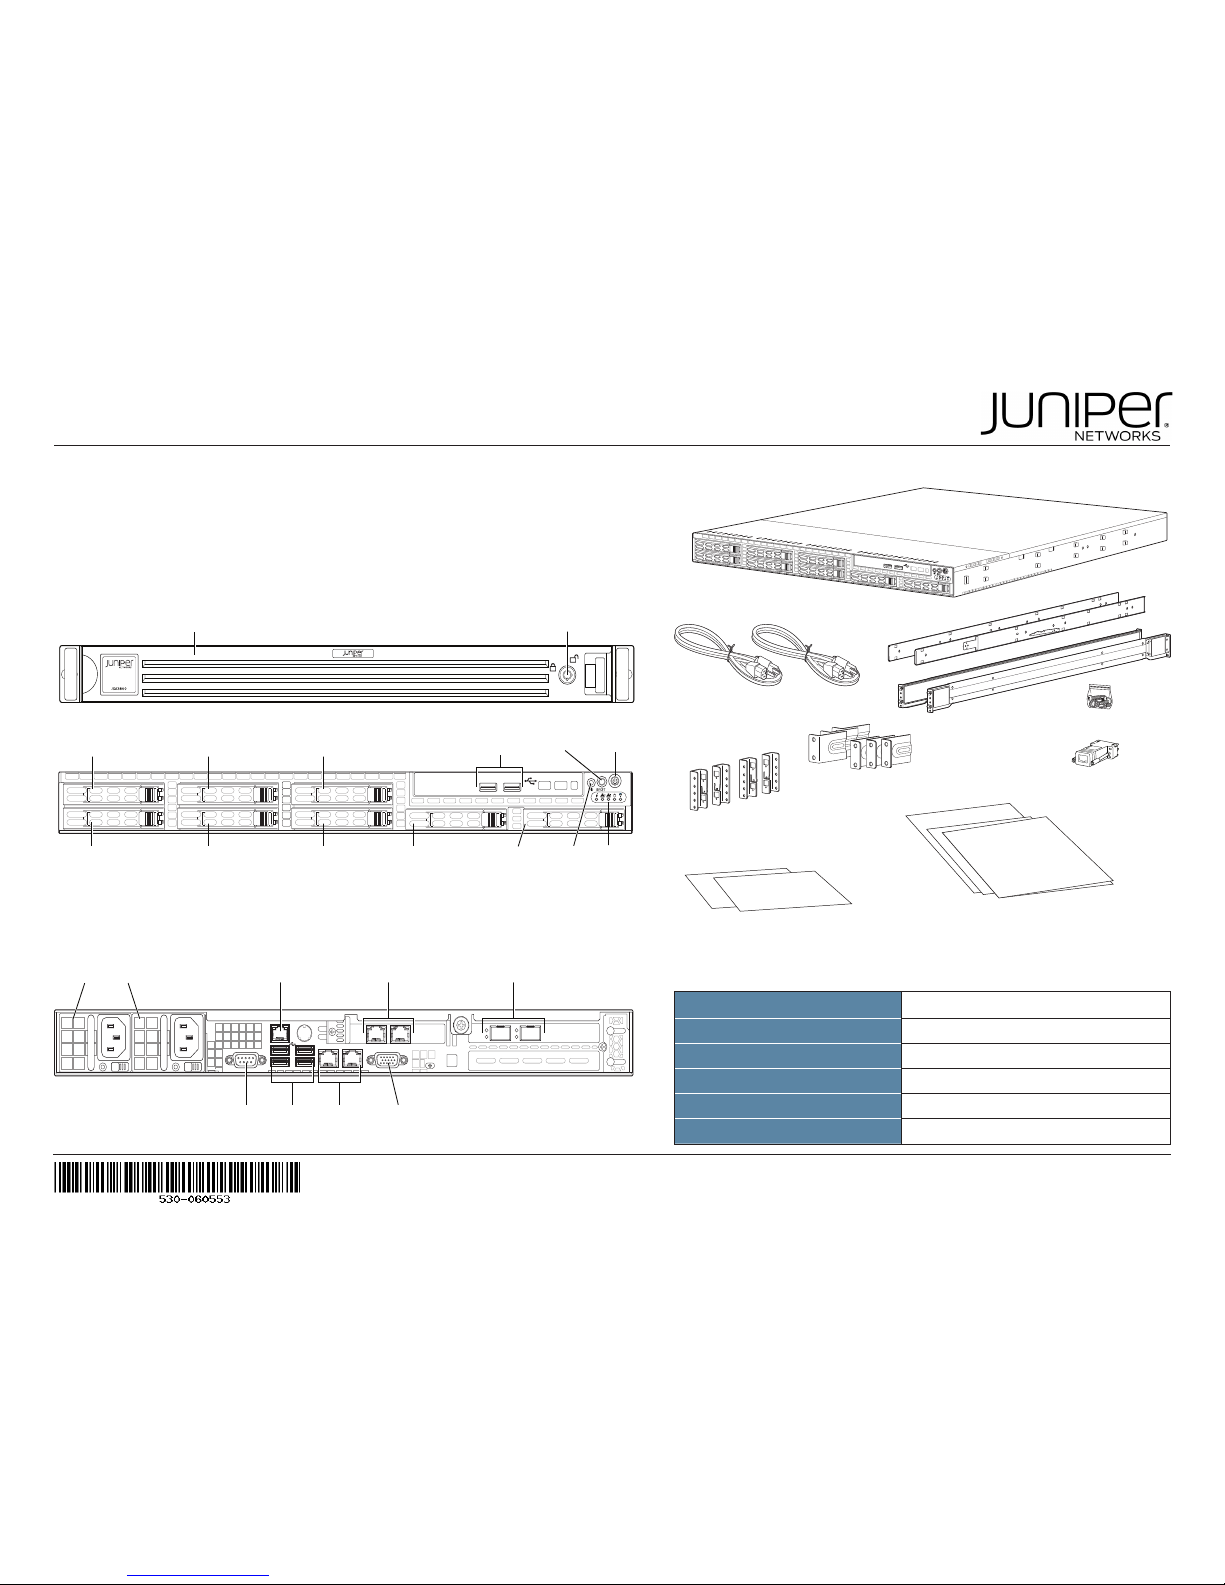
The JSA3800 appliance is a 1-U, rack-mountable chassis with AC power supplies (or optional DC power supplies), hot-swappable eight hard drives with 64 GB memory, and four
Gigabit Ethernet interfaces.
Dimensions (H x W x D)
1.7 in x 17.2 in. x 23.5 in.
Chassis weight
37 lb
Average power
203 W
Maximum thermal output
693 BTU/hour
Relative humidity
5% to 90%, noncondensing
Noise level
67.7 dB - 68.4 dB per EN ISO 7779
Physical Specications
Front Panel
JSA3800 Package Contents
g000602
JSA3800
Power cords
Rail adapters
L-brackets
Rail kit Rail kit screws
DB9 adapter
Warranty and Registration
Information
• End-User License Agreement
• Quick Start Guide
• Safety Guide
Back Panel
g000601
Power
supplies
VGA
port
USB
ports
Dedicated
IPMI LAN port
GB
ports
GB
ports
10GB+SFP
ports
COM
port
g000600
Power
button
Reset
button
LockFront bezel
USB
ports
Hard drive 1
Hard drive 0 Hard drive 7 LEDsUIDHard drive 6Hard drive 4Hard drive 2
Hard drive 3 Hard drive 5
Page 2

2
How to Set Up Your JSA3800 Appliance
g000603
INITIAL CONFIGURATION PROCESS
Verifying the
Settings
Connecting the
Management
Device
Configuring a
JSA3800
Appliance
Powering On
the Device
Gather Conguration Information
Gather the information about your network and conguration settings that
you will use for conguring the appliance.
Required
Host name
_________________________
Root password
_________________________
IP address
_________________________
Network mask address
_________________________
Subnet mask
_________________________
Default gateway
_________________________
Primary DNS server
_________________________
E-mail server
_________________________
Public IP address for networks
_________________________
Optional
Secondary DNS server
_________________________
Internal/external DMZ
_________________________
Network Address Translation
_________________________
Proxy servers
_________________________
Page 3
3
How to Set Up Your JSA3800 Appliance
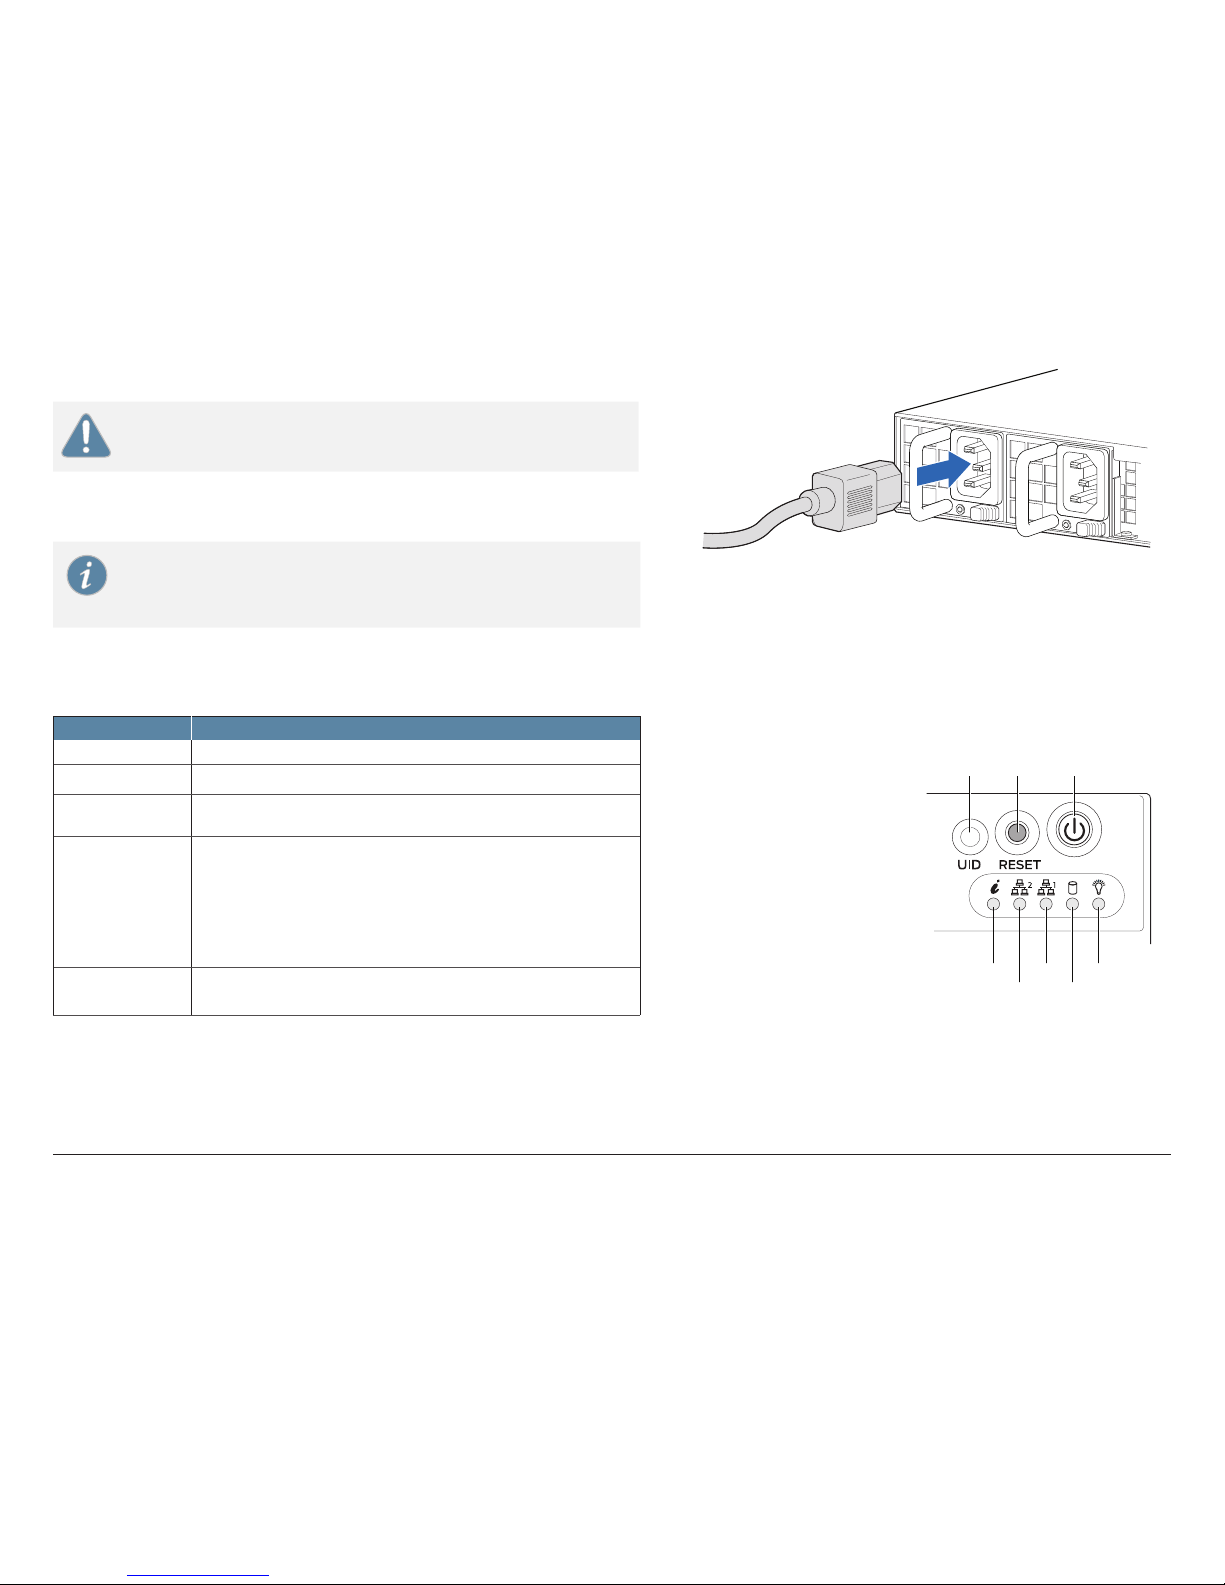
Step 1: Powering On the Appliance
CAUTION: Before connecting the appliance to the power supply, attach an
ESD strap to an ESD point and place the other end of the strap around your
bare wrist.
1. Plug the power cord into the AC receptacle on the rear panel.
If your appliance contains two power supplies, plug a power cord into each AC
receptacle.
NOTE: Grounding for the appliances is provided through the power supply
ground. Ensure that you connect the AC power supply module in the
appliance into a grounded AC power outlet by using an AC power cord (with
the grounding pin) appropriate for your geographical location.
2. Plug the other end of the power cord into a wall socket.
3. Press the Power button on the front panel.
4. Note the following indications.
LED State
Power Solid green—Indicates that the appliance is receiving power.
Hard drive Yellow—Indicates that the hard disk is in use (writing or reading data).
LAN • LAN1—Indicates Management interface activity when blinking.
• LAN2—Indicates DataShare interface activity when blinking.
Information • Red (blinking)—Indicates a fan failure.
• Solid red—Indicates an overheat condition, which might be caused by
cables obstructing the airow in the system or the ambient room
temperature being too warm.
• Red (slowly blinking)—Indicates a power failure.
• Solid blue—Indicates local UID button is depressed.
• Blue (blinking)—Indicates IPMI-activated UID.
Alert Amber—Indicates that the appliance is operating normally. The LED might
glow amber if a rescue conguration is not set and this is not a panic
condition.
g000606
g000604
Power
button
Reset
button
UID
Information
LAN2 HDD
LAN1 Power
Page 4

4
How to Set Up Your JSA3800 Appliance
Step 2: Connecting the Management Device
1. Connect external devices using the ports on the back panel of the appliance.
2. If you use a laptop, connect the laptop to the DB-9 serial console port on the back
panel.
3. Plug an Ethernet cable into the network port on the back panel.
4. Plug the straight-through cable into the console port.
NOTE: When using a laptop to connect to the appliance, you must use a
terminal program, such as HyperTerminal, to connect to the appliance.
5. Select the appropriate COM port to use.
6. Congure the following port settings:
• Bits per second = 9600
• Stop bits = 1
• Data bits = 8
• Parity = None
Ethernet port
g000605
Ethernet port
Step 3: Conguring a JSA3800 Appliance
1. At the console prompt, log in as root (default username) and no password is required
when you log in for the rst time.
NOTE: The username is case sensitive.
2. Press Enter. The End User License Agreement (EULA) appears.
3. Read the information and press the Spacebar to advance each window until you have
reached the end of the agreement.
4. Type YES to accept the agreement, then press Enter. The Appliance ID selection
window appears.
Page 5

5
How to Set Up Your JSA3800 Appliance
Selecting an Appliance ID and Tuning Your Appliance
1. Select the appliance ID and then press Enter to select Next.
2. Select one of the following setup types:
• normal—Default setup
• recovery—HA recovery setup
3. Select Next. The Tuning Template window appears.
4. Select Enterprise, and then select Next. The Date and Time
window appears.
Conguring Date and Time for Your Appliance
1. Select the method you want to use to set the date and time.
• Manual—Allows you to manually input the date and time. Select Next.
• Server—Allows you to specify your time server. Select Next.
2. Select your time zone continent or area, and then select Next.
3. Select your time zone region, and then select Next.
Selecting Internet Protocol and Conguring Your Appliance
1. Select one of the Internet protocols, IPv6 or IPv4.
2. Select Next. The Management Interface window appears.
3. Select port 0 as the management interface, and then select Next.
4. Enter the values for the following parameters:
• Hostname—Type a fully qualied domain name as the system hostname.
• IP Address, Network Mask, Gateway, and Primary DNS.
• Optional—Secondary DNS and Public IP.
• Email server—E-mail server name. If you do not have an e-mail server, specify the
local host in this eld.
5. Select Next. The New Root Password window appears.
6. Enter your new password, and select Next. The Conrm New Root Password window
appears.
Page 6

6
How to Set Up Your JSA3800 Appliance
Step 4: Verifying the Settings
Verify the appliance conguration settings in one of the following ways:
1. Open your Web browser.
2. Log in to JSA with the username admin and the password <root password>.
<root password> is the new root password that you set during the conguration
process.
3. Click Login To JSA.
With this step, you have successfully completed the conguration and your
JSA3800 appliance is ready for use.
7. Re-enter your new password to conrm, and select Finish. A series of messages
appears as JSA continues with the installation ; this process takes from three to ve
minutes. When the JSA installation process is complete, the message window appears.
8. Select OK to complete the installation.
9. Type exit and press Enter.
Page 7

7
How to Set Up Your JSA3800 Appliance
Powering O the Appliance
You can power off the appliance in one of the following ways:
• Graceful shutdown—Press and immediately release the Power button.
• Forced shutdown—Press the Power button, and hold it for 10 seconds.
Use this method only if the appliance is not responding to the graceful shutdown
method.
References
• JSA Product Documentation
http://www.juniper.net/techpubs/en_US/release-independent/jsa/
information-products/pathway-pages/jsa-series/product/
• JSA Hardware Documentation
http://www.juniper.net/techpubs/en_US/release-independent/jsa/
information-products/pathway-pages/hardware/jsa3800-index.html
• Technical Support
http://www.juniper.net/support/requesting-support.html
Page 8

Juniper Networks, Junos, Steel-Belted Radius, NetScreen, and ScreenOS are registered trademarks of Juniper Networks, Inc. in the United States and other countries. The Juniper Networks Logo, the Junos logo, and JunosE are trademarks of Juniper
Networks, Inc. All other trademarks, service marks, registered trademarks, or registered service marks are the property of their respective owners. Juniper Networks assumes no responsibility for any inaccuracies in this document. Juniper Networks reserves the
right to change, modify, transfer, or otherwise revise this publication without notice. Products made or sold by Juniper Networks or components thereof might be covered by one or more of the following patents that are owned by or licensed to Juniper Networks:
U.S. Patent Nos. 5,473,599, 5,905,725, 5,909,440, 6,192,051, 6,333,650, 6,359,479, 6,406,312, 6,429,706, 6,459,579, 6,493,347, 6,538,518, 6,538,899,6,552,918, 6,567,902, 6,578,186, and 6,590,785. Copyright © 2014, Juniper Networks, Inc. All rights reserved.
Printed in USA. Part Number: 530-060553 Rev. 01, December 2014.
 Loading...