

Page 1

J4300 and J6300 Services Router PIM
Installation Instructions
4 November 2004
Part No: 530-011519-01
Revision 1
This document describes how to remove and replace a Physical Interface Module
(PIM) on Juniper Networks J4300 and J6300 Services Routers. For hardware
installation and basic troubleshooting procedures for J-series Services Routers, see
the J-series Services Router User Guide.
Contents
Tools and Parts Required........................................................... 2
Replacing a PIM..................................................................... 2
Removing a PIM ............ ................ ................ ................ ... 2
Installing a PIM........ ................ ................ ................ ......... 3
List of Technical Publications ......... ................ .................. ........... 4
Requesting Support................................................................. 6
Revision History ..... ................ ................ ................ ............... 7
1
Page 2

J4300 and J6300 Services Router PIM Installation Instructions
Tools and Parts Required
To replace a component, you need the following tools and parts:
Electrostatic bag or antistatic mat
Electrostatic discharge (ESD) grounding wrist strap
Phillips (+) screwdriver, number 2
Replacing a PIM
Physical Interface Modules (PIMs) in J4300 and J6300 Services Routers are field
replaceable. The router must be powered off before the PIMs are removed or
installed. This section contains the following topics:
“Removing a PIM” on page 2
Removing a PIM
“Installing a PIM” on page 3
The PIMs are installed in the front of the Services Router. A PIM
weighslessthan1lb(0.5kg).
To remove a PIM (see Figure 1):
1. Place an electrostatic bag or antistatic mat on a flat, stable surface to receive
the PIM.
2. Attach an electrostatic discharge (ESD) grounding strap to your bare wrist and
connect the strap to the ESD point on the chassis, or to an outside ESD point if
the Services Router is disconnected from earth ground. For more information
about ESD, see the J-series Services Router User Guide.
3. Press and release the power button to power off the router. Verify that the
POWER ON LED blinks and then turns off.
4. Label the cables connected to the PIM so that you can later reconnect each
cable to the correct PIM.
5. Disconnect the cables from the PIM.
6. If necessary, arrange the cables to prevent them from dislodging or developing
stress points:
2 Removing a PIM
Secure the cable so that it is not supporting its own weight as it hangs
to the floor.
Place excess cable out of the way in a neatly coiled loop.
Use fasteners to maintain the shape of cable loops.
Page 3
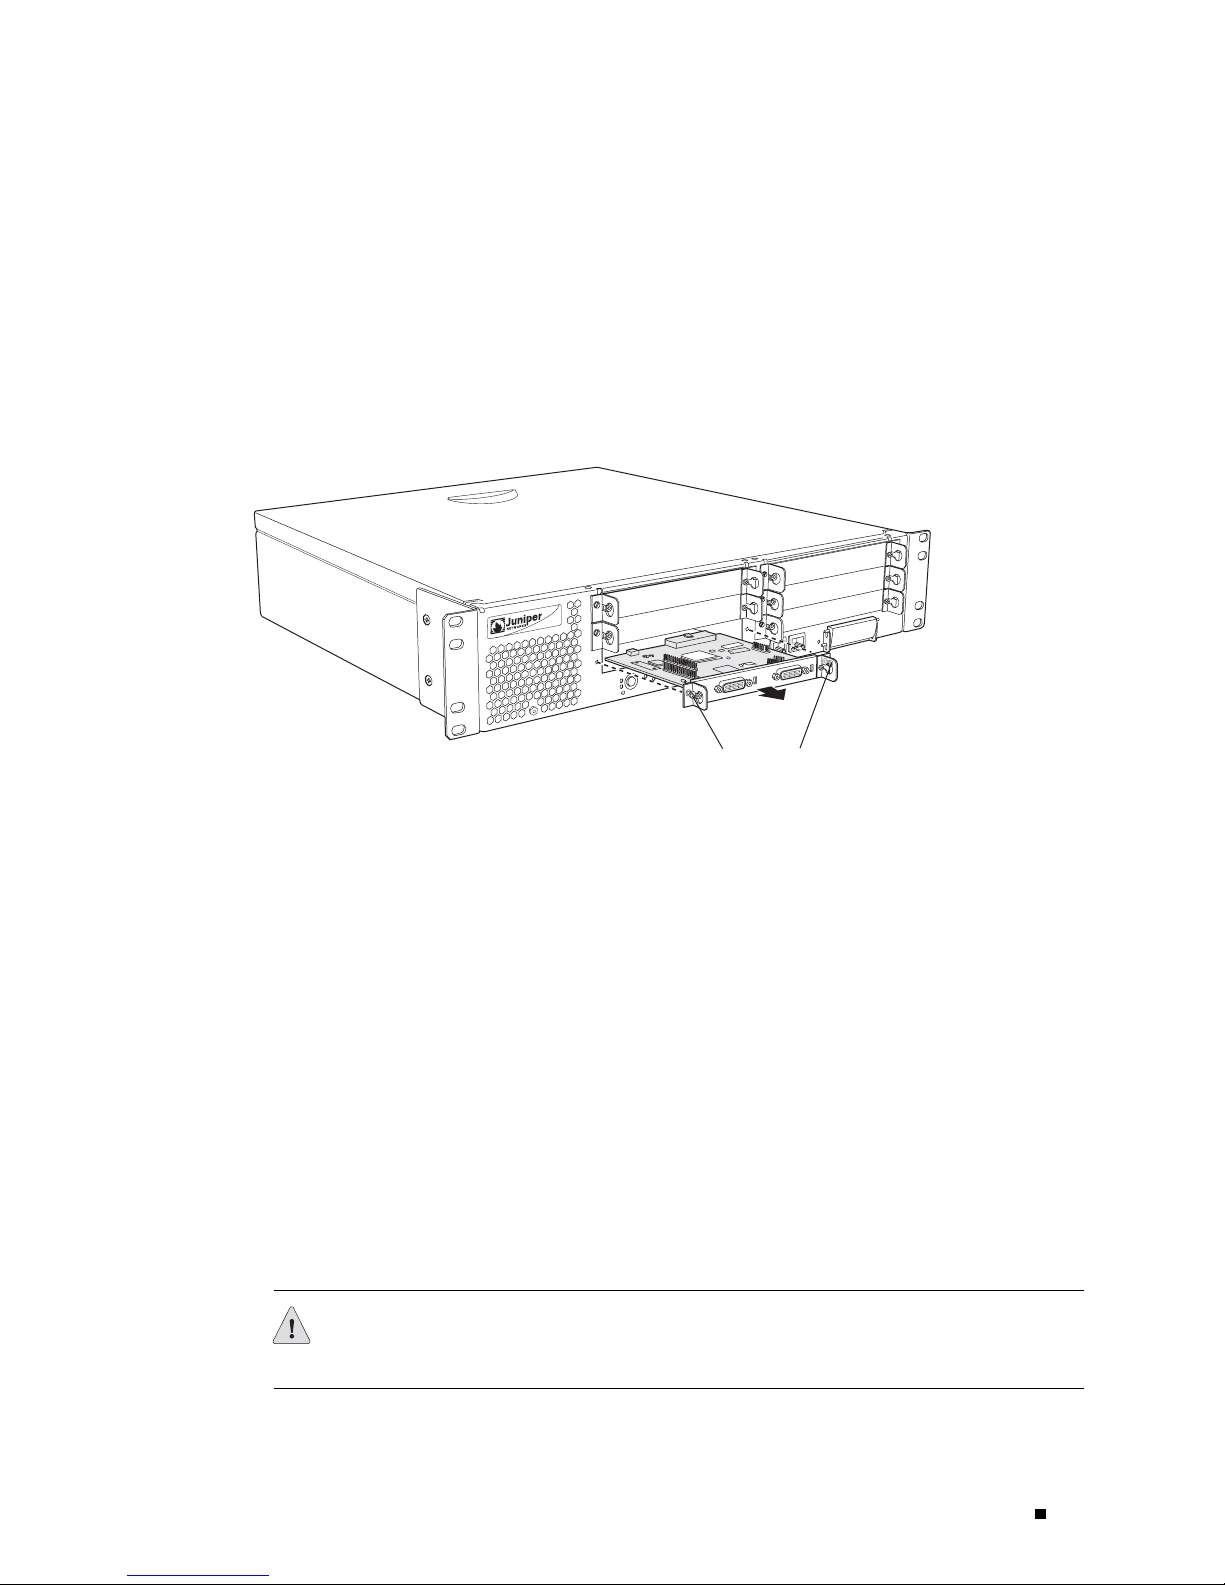
Figure 1: Removing a PIM
7. Loosen the captive screws on each side of t he PIM faceplate.
8. Grasp the handles on each side of the PIM faceplate and slide the PIM out of
the router. Place it in the electrostatic bag or on the antistatic mat.
9. If you are not reinstalling a PIM into the emptied slot, install a blank PIM panel
over the slot to maintain proper airflow .
Installing a PIM
SLOT 5/0
0
0
3
J4
SLOT 3/0
SLOT 1/0
M
R
A
L
A
N
O
R
E
W
O
P
E
L
O
S
N
O
C
IG
F
N
O
C
0
0
T
/1
O
0
L
1
S
B
S
U
L
S
IA
STATU
R
E
0
S
RT
PO
T
C
E
J
E
H
S
N
A
I
L
F
T
C
A
P
M
O
E
C
S
U
T
E
N
R
E
H
1
T
R
T
O
P
E
0
T
R
O
P
TUS
STA
PORT 1
g003539
Captive screws
To install a PIM (see Figure 2):
1. Attach an electrostatic discharge (ESD) grounding strap to your bare wrist and
connect the strap to the ESD point on the chassis, or to an outside ESD point if
the Services Router is disconnected from earth ground. For more information
about ESD, see the J-series Services Router User Guide.
2. Press and release the power button to power off the router. Verify that the
POWER ON LED blinks and then turns off.
3. Align the notches in the connector at the rear of the PIM with the notches in
the PIM slot in the Services Router, and then slide the PIM in until it lodges
firmly in the router.
CAUTION: Slide the PIM straight into the slot to avoid damaging the components
on the PIM.
Installing a PIM 3
Page 4

J4300 and J6300 Services Router PIM Installation Instructions
4. Tighten the captive screws on each side of the PIM faceplate.
5. Insert the appropriate cables into the cable connectors on the PIM.
6. If necessary, arrange the cables to prevent them from dislodging or developing
stress points:
Secure the cable so that it is not supporting its own weight as it hangs
to the floor.
Place excess cable out of the way in a neatly coiled loop.
Use fasteners to maintain the shape of cable loops.
7. Press and release the power button to power on the router. Verify that the
POWER ON LED lights steadily after you press the power button.
8. Verify that the PIM status LED lights steadily green to confirm that the PIM
is online.
Figure 2: Installing a PIM
You can also verify correct PIM functioning by issuing the
pic-status
command described in the JUNOS Protocols, Class of Service, and
System Basics Command Reference.
SLOT 5/0
0
0
3
4
J
SLOT 3/0
SLOT 1/0
M
R
A
L
A
N
O
R
E
W
O
P
E
L
O
S
N
O
C
IG
F
N
O
C
0
0
T
/1
O
0
L
1
S
B
S
U
L
S
IA
STATU
R
E
0
S
RT
PO
T
C
E
J
E
H
N
S
I
A
L
F
T
C
A
P
M
E
O
S
C
U
T
E
N
R
E
H
1
T
R
T
O
P
E
0
T
R
O
P
S
TU
STA
PORT 1
show chassis fpc
g003540
List of Technical Publications
Table 1 lists the software and hardware guides and release notes for Juniper
Networks routing platforms that use the JUNOS Internet software and d escribes
the contents of each book.
4 List of Technical Publications
Page 5

Table 1: Juniper Networks Technical Documentation
Book Description
JUNOS for J-series, M-series, and T-series Routing Platforms Configuration Guides
Feature Guide
Provides a detailed explanation and configuration examples for
several of the most complex features in the JUNOS software.
System Basics
Provides an overview of the JUNOS software and describes how to
install and upgrade the software. This manual also describes how
to configure system management functions and how to configure
the chassis, including user accounts, passwords, and redundancy.
Network Interfaces and Class of Service
Provides an overview of the network interface and class-of-service
functions of the JUNOS software and describes how to configure
the network interfaces on the router.
MPLS Applications
Provides an overview of traffic engineering concepts and describes
how to configure traffic engineering protocols.
Multicast Protocols
Provides an overview of multicast concepts and describes how to
configure multicast routing protocols.
Network Management
Provides an overview of network management concepts and
describes how to configure various network management features,
such as SNMP, accounting options, and cflowd.
Policy Framework
Provides an overview of policy concepts and describes how to
configure routing policy, firewall filters, and forwarding options.
Routing Protocols
Provides
an overview of routing concepts and describes how to
configure routing, routing instances, and unicast routing protocols.
Services Interfaces
Provides an overview of the services interfaces functions of the
JUNOS software and describes how to configure the services
interfaces on the router.
VPNs
Provides an overview and describes how to configure Layer 2 and
Layer 3 virtual private networks (VPNs), virtual private LAN service
(VPLS), and Layer 2 circuits. Provides configuration examples.
JUNOS References
Network and Services Interfaces Command
Reference
Describes the JUNOS Internet software operational mode
commands you use to monitor and troubleshoot network and
services interfaces on Juniper Networks routing platforms.
Protocols, Class of Service, and System Basics
Command Reference
Describes the JUNOS Internet software operational mode
commands you use to monitor and troubleshoot most aspects of
Juniper Networks routing platforms.
System Log Messages Reference
Describes how to access and interpret system log messages
generated by JUNOS software modules and provides a reference
page for each message.
JUNOScript API Documentation
JUNOScript API Guide
Describes how to use the JUNOScript application programming
interface (API) to monitor and configure Juniper Networks routers.
JUNOScript API Configuration Reference
Provides reference pages for the configuration tags in the
JUNOScript API.
JUNOScript API Operational Reference
Provides reference pages for the operational tags in the JUNOScript
API.
List of Technical Publications 5
Page 6

J4300 and J6300 Services Router PIM Installation Instructions
Book Description
JUNOS Comprehensive Index and Glossary
Comprehensive Index and Glossary
Hardware Documentation
Hardware Guide
PIC Guide
JUNOScope Documentation
JUNOScope Software User Guide
J-series Services Router Documentation
J-series Services Router User Guide
Release Notes
JUNOS Internet Software Release Notes
Hardware Release Notes
JUNOScope Software Release Notes
J-series Services Router Release Notes
Provides a complete index of all JUNOS Internet software books
and the JUNOScript API Guide. Also provides a comprehensive
glossary .
Describes how to install, maintain, and troubleshoot routers and
router components. Each platform has its own hardware guide.
Describes the router Physical Interface Cards (PICs). Each router
platform has its own PIC guide.
Describes the JUNOScope software graphical user interface (GUI),
how to install and administer the software, and how to use the
software to manage router configuration files and monitor router
operations.
Contains instructions for installing, configuring, and managing a
J-series Services Router. The guide explains how to prepare your
site for installation, unpack and install the hardware, power on the
router, configure secure routing, monitor network operations, and
perform routine maintenance.
Provide a summary of new features for a particular software
release. Software release notes also contain corrections and
updates to published JUNOS and JUNOScript manuals, provide
information that might have been omitted from the manuals, and
describe upgrade and downgrade procedures.
Describe the available documentation for the router platform
and summarize known problems with the hardware and
accompanying software. Each platform has its own release notes.
Contain
manual, provide information that might have been omitted from
the manual, and describe upgrade and downgrade procedures.
Briefly describe Services Router features, identify known hardware
problems, and provide upgrade and downgrade instructions
corrections and updates to the published JUNOScope
Requesting Suppor t
For technical support, open a support case using the Case Manager link at
http://www.juniper.net/suppor t/ or call 1-888-314-JTAC (within the United States) or
1-408-745-9500 (outside the United States).
For documentation issues, fill out the bug report form located at
http://www.juniper.net/techpubs/docbug/docbugrepor t.html.
6 Requesting Support
Page 7

Revision Histor y
4 November 2004—Revision 1.
Copyright © 2004, Junip
Juniper Networks, the Juniper Networks logo, NetSc reen, NetScreen Technologies, the NetScreen logo, NetScreen-Global Pro, ScreenOS, and
GigaScreen are registered trademarks of Juniper Networks, Inc. in th e United States and other countries.
The following are trademarks of Juniper Networks, Inc.: ERX, ESP, E-series, Instant Virtual Extranet, Internet Processor, J2300, J4300, J6300, J-Protect,
J-series,J-Web,JUNOS,JUNOScope,JUNOScript,JUNOSe,M5,M7i,M10,M10i,M20,M40,M40e,M160,M320,M-series,MMD,NetScreen-5GT,
NetScreen-5XP, NetScreen-5XT, NetScreen-25, NetScreen-50, NetScreen-204, NetScreen-208, NetScreen-500, N etS creen-520 0, NetScreen-5400,
NetScreen-IDP 10, NetScreen-IDP 100, NetScreen-IDP 500, NetScreen-Remote Security Client, NetScreen-Remote VPN Client, N etScreen-SA 1000 Series,
NetScreen-SA 3000 Series, NetScreen-SA 5000 Series, NetScreen-SA Central Manag er, N et Screen Secure Access, NetScreen-SM 3000, NetScreen-Security
Manager, NMC-RX, S DX, Stateful Signature, T320, T640, T-series, and TX Matrix . All other trademarks, service marks, registered trademarks, or registered
service mark s are the property of their respective owners. All specifications are subject to change without n otice. Juniper Networks assumes no responsibility
for any inaccuracies in this d ocument. Juniper Networks reserves the right to change, modify, transfer, or otherwise revise this publication withoutnotice.
er Networks, Inc. All r igh ts reserved.
Requesting Support 7
 Loading...