

Page 1

HealthBot Installation Guide
Published
2021-03-18
Page 2

Juniper Networks, Inc.
1133 Innovation Way
Sunnyvale, California 94089
USA
408-745-2000
www.juniper.net
Juniper Networks, the Juniper Networks logo, Juniper, and Junos are registered trademarks of Juniper Networks, Inc. in
the United States and other countries. All other trademarks, service marks, registered marks, or registered service marks
are the property of their respective owners.
Juniper Networks assumes no responsibility for any inaccuracies in this document. Juniper Networks reserves the right
to change, modify, transfer, or otherwise revise this publication without notice.
HealthBot Installation Guide
Copyright © 2021 Juniper Networks, Inc. All rights reserved.
The information in this document is current as of the date on the title page.
ii
YEAR 2000 NOTICE
Juniper Networks hardware and software products are Year 2000 compliant. Junos OS has no known time-related
limitations through the year 2038. However, the NTP application is known to have some difficulty in the year 2036.
END USER LICENSE AGREEMENT
The Juniper Networks product that is the subject of this technical documentation consists of (or is intended for use with)
Juniper Networks software. Use of such software is subject to the terms and conditions of the End User License Agreement
(“EULA”) posted at https://support.juniper.net/support/eula/. By downloading, installing or using such software, you
agree to the terms and conditions of that EULA.
Page 3

Table of Contents
1
About the Documentation | v
Documentation and Release Notes | v
Documentation Conventions | v
Documentation Feedback | viii
Requesting Technical Support | viii
Self-Help Online Tools and Resources | ix
Creating a Service Request with JTAC | ix
Installing HealthBot
HealthBot Installation Overview | 11
iii
HealthBot Installation Requirements | 11
HealthBot Hardware Requirements | 12
HealthBot Software Requirements | 12
Web Browser Requirements | 13
Network Requirements | 14
Network Device Requirements | 15
Multi-Node Installation | 19
Using the Interactive Installers | 20
Installing HealthBot On Ubuntu | 22
Installing HealthBot On CentOS | 30
Using the Silent Installer | 39
Starting and Stopping HealthBot | 42
Checking HealthBot Service Status | 43
Upgrading From HealthBot 3.X to HealthBot Release 3.2 | 45
Migration from HealthBot Release 2.X to 3.X | 46
Overview | 46
Case 1: HealthBot 2.X Single-node (Docker-compose) to HealthBot 3.X Single-node
(Docker-compose) Migration | 47
Case 2: Automated Migration from 2.X to 3.X (Kubernetes) | 48
Page 4

Case 3: Manual Migration from 2.X to 3.X (Kubernetes) | 49
2
Uninstalling or Reconfiguring HealthBot | 50
Uninstalling HealthBot | 50
Reconfiguring HealthBot | 52
HealthBot Command-Line Options | 53
Linux Kernel Upgrade Procedures
Ubuntu Kernel Upgrade | 57
CentOS Kernel Upgrade | 66
iv
Page 5
About the Documentation
IN THIS SECTION
Documentation and Release Notes | v
Documentation Conventions | v
Documentation Feedback | viii
Requesting Technical Support | viii
Use this guide to install Contrail HealthBot on a Linux server.
v
Documentation and Release Notes
To obtain the most current version of all Juniper Networks®technical documentation, see the product
documentation page on the Juniper Networks website at https://www.juniper.net/documentation/.
If the information in the latest release notes differs from the information in the documentation, follow the
product Release Notes.
Juniper Networks Books publishes books by Juniper Networks engineers and subject matter experts.
These books go beyond the technical documentation to explore the nuances of network architecture,
deployment, and administration. The current list can be viewed at https://www.juniper.net/books.
Documentation Conventions
Table 1 on page vi defines notice icons used in this guide.
Page 6
Table 1: Notice Icons
vi
DescriptionMeaningIcon
Indicates important features or instructions.Informational note
Caution
Indicates a situation that might result in loss of data or hardware
damage.
Alerts you to the risk of personal injury or death.Warning
Alerts you to the risk of personal injury from a laser.Laser warning
Indicates helpful information.Tip
Alerts you to a recommended use or implementation.Best practice
Table 2 on page vi defines the text and syntax conventions used in this guide.
Table 2: Text and Syntax Conventions
ExamplesDescriptionConvention
Fixed-width text like this
Italic text like this
Represents text that you type.Bold text like this
Represents output that appears on
the terminal screen.
Introduces or emphasizes important
•
new terms.
Identifies guide names.
•
Identifies RFC and Internet draft
•
titles.
To enter configuration mode, type
the configure command:
user@host> configure
user@host> show chassis alarms
No alarms currently active
A policy term is a named structure
•
that defines match conditions and
actions.
Junos OS CLI User Guide
•
RFC 1997, BGP Communities
•
Attribute
Page 7

Table 2: Text and Syntax Conventions (continued)
vii
ExamplesDescriptionConvention
Italic text like this
Text like this
< > (angle brackets)
| (pipe symbol)
Represents variables (options for
which you substitute a value) in
commands or configuration
statements.
Represents names of configuration
statements, commands, files, and
directories; configuration hierarchy
levels; or labels on routing platform
components.
variables.
Indicates a choice between the
mutually exclusive keywords or
variables on either side of the symbol.
The set of choices is often enclosed
in parentheses for clarity.
Configure the machine’s domain
name:
[edit]
root@# set system domain-name
domain-name
To configure a stub area, include
•
the stub statement at the [edit
protocols ospf area area-id]
hierarchy level.
The console port is labeled
•
CONSOLE.
stub <default-metric metric>;Encloses optional keywords or
broadcast | multicast
(string1 | string2 | string3)
# (pound sign)
[ ] (square brackets)
Indention and braces ( { } )
; (semicolon)
GUI Conventions
Indicates a comment specified on the
same line as the configuration
statement to which it applies.
Encloses a variable for which you can
substitute one or more values.
Identifies a level in the configuration
hierarchy.
Identifies a leaf statement at a
configuration hierarchy level.
rsvp { # Required for dynamic MPLS
only
community name members [
community-ids ]
[edit]
routing-options {
static {
route default {
nexthop address;
retain;
}
}
}
Page 8

Table 2: Text and Syntax Conventions (continued)
viii
ExamplesDescriptionConvention
Bold text like this
> (bold right angle bracket)
Represents graphical user interface
(GUI) items you click or select.
Separates levels in a hierarchy of
menu selections.
In the Logical Interfaces box, select
•
All Interfaces.
To cancel the configuration, click
•
Cancel.
In the configuration editor hierarchy,
select Protocols>Ospf.
Documentation Feedback
We encourage you to provide feedback so that we can improve our documentation. You can use either
of the following methods:
Online feedback system—Click TechLibrary Feedback, on the lower right of any page on the Juniper
•
Networks TechLibrary site, and do one of the following:
Click the thumbs-up icon if the information on the page was helpful to you.
•
Click the thumbs-down icon if the information on the page was not helpful to you or if you have
•
suggestions for improvement, and use the pop-up form to provide feedback.
E-mail—Send your comments to techpubs-comments@juniper.net. Include the document or topic name,
•
URL or page number, and software version (if applicable).
Requesting Technical Support
Technical product support is available through the Juniper Networks Technical Assistance Center (JTAC).
If you are a customer with an active Juniper Care or Partner Support Services support contract, or are
Page 9

covered under warranty, and need post-sales technical support, you can access our tools and resources
online or open a case with JTAC.
JTAC policies—For a complete understanding of our JTAC procedures and policies, review the JTAC User
•
Guide located at https://www.juniper.net/us/en/local/pdf/resource-guides/7100059-en.pdf.
Product warranties—For product warranty information, visit https://www.juniper.net/support/warranty/.
•
JTAC hours of operation—The JTAC centers have resources available 24 hours a day, 7 days a week,
•
365 days a year.
Self-Help Online Tools and Resources
For quick and easy problem resolution, Juniper Networks has designed an online self-service portal called
the Customer Support Center (CSC) that provides you with the following features:
Find CSC offerings: https://www.juniper.net/customers/support/
•
Search for known bugs: https://prsearch.juniper.net/
•
ix
Find product documentation: https://www.juniper.net/documentation/
•
Find solutions and answer questions using our Knowledge Base: https://kb.juniper.net/
•
Download the latest versions of software and review release notes:
•
https://www.juniper.net/customers/csc/software/
Search technical bulletins for relevant hardware and software notifications:
•
https://kb.juniper.net/InfoCenter/
Join and participate in the Juniper Networks Community Forum:
•
https://www.juniper.net/company/communities/
Create a service request online: https://myjuniper.juniper.net
•
To verify service entitlement by product serial number, use our Serial Number Entitlement (SNE) Tool:
https://entitlementsearch.juniper.net/entitlementsearch/
Creating a Service Request with JTAC
You can create a service request with JTAC on the Web or by telephone.
Visit https://myjuniper.juniper.net.
•
Call 1-888-314-JTAC (1-888-314-5822 toll-free in the USA, Canada, and Mexico).
•
For international or direct-dial options in countries without toll-free numbers, see
https://support.juniper.net/support/requesting-support/.
Page 10

1
CHAPTER
Installing HealthBot
HealthBot Installation Overview | 11
HealthBot Installation Requirements | 11
Using the Interactive Installers | 20
Using the Silent Installer | 39
Starting and Stopping HealthBot | 42
Checking HealthBot Service Status | 43
Upgrading From HealthBot 3.X to HealthBot Release 3.2 | 45
Migration from HealthBot Release 2.X to 3.X | 46
Uninstalling or Reconfiguring HealthBot | 50
HealthBot Command-Line Options | 53
Page 11
HealthBot Installation Overview
HealthBot is a highly automated and programmable device-level diagnostics and network analytics tool
that aggregates and correlates large volumes of time-sensitive telemetry data, providing a multidimensional
and predictive view of the network. HealthBot collects telemetry data using various methods, including
Junos Telemetry Interface, NETCONF, OpenConfig, SNMP, NetFlow, sFlow, and syslog.
This guide describes how to install HealthBot and is intended for network operators and administrators
who install, configure, and manage the network security infrastructure; it specifically explains how to:
Install HealthBot using the interactive or silent installer
•
Migrate HealthBot data from a previous (2.X) version
•
Start and stop HealthBot services, and check their status
•
Adjust HealthBot setup parameters
•
Reinstall and uninstall HealthBot
•
11
RELATED DOCUMENTATION
HealthBot Installation Requirements | 11
HealthBot Installation Requirements
IN THIS SECTION
HealthBot Hardware Requirements | 12
HealthBot Software Requirements | 12
Web Browser Requirements | 13
Network Requirements | 14
Network Device Requirements | 15
Multi-Node Installation | 19
Page 12

For HealthBot to install successfully, the following hardware and software components are required on
the host machine.
HealthBot Hardware Requirements
You can install HealthBot on either a physical or a virtual machine.
Proof-of-concept (POC) system—supports up to two device groups and three devices per device group:
RAM: 20 GB
•
Disk space: 100 GB available on the /var/ partition
•
Free disk space must be at least 20% of total disk space at all times.
•
CPU cores: 8
•
Production system (minimum system requirements):
12
RAM: 32 GB
•
Disk space: 250 GB SSD available on the /var/ partition
•
Free disk space must be at least 20% of total disk space at all times.
•
Recommended minimum IOPS for the disk(s): 1000
•
CPU cores: 16
•
NOTE: HealthBot is a cloud-native application that leverages a microservices-based architecture
that allows scale-out and multinode deployment. Depending on your specific requirements and
use case, you can add more nodes to the Kubernetes cluster.
See the scaling tool at https://apps.juniper.net/hb-sizing/ for more information on server configurations
for a given use case.
HealthBot Software Requirements
HealthBot installs on Ubuntu, RedHat Enterprise Linux (RHEL), and CentOS versions of Linux.
Page 13

For Ubuntu:
Ubuntu version 16.04.01 (Xenial Xerus) or 18.04.04 (Bionic Beaver)
•
For multi-node installation, the kernel version must be 4.4.19 or greater.
•
We recommend installing Ubuntu as one large disk partition.
•
If multiple partitions are used, HealthBot data is written to the /var/local/healthbot/ directory and
HealthBot log files are written to /var/lib/docker/containers.
Enter the following configuration line in the file /etc/sysctl.conf: vm.max_map_count=262144. Reboot
•
of the server may be required to make this setting take effect.
For RHEL:
RHEL version 7, Release 7.5 or later
•
The following system utilities must be installed manually if they are not already present:
•
tar, bash, ln, ssh-keygen, curl, vi, wget, openssl, openssh-server, and rsync
Enter the following configuration line in the file /etc/sysctl.conf: vm.max_map_count=262144. Reboot
•
of the server may be required to make this setting take effect.
13
For CentOS:
CentOS version 7, Release 7.3 or later
•
For multi-node installation, the kernel version must be 4.4.19 or greater.
•
The following system utilities must be installed manually if they are not already present:
•
tar, bash, ln, ssh-keygen, curl, vi, wget, openssl, openssh-server, and rsync
Enter the following configuration line in the file /etc/sysctl.conf: vm.max_map_count=262144. Reboot
•
of the server may be required to make this setting take effect.
Web Browser Requirements
HealthBot is supported on the following 64-bit web browsers:
Table 3: Supported Web Browsers
Supported Version(s) (Windows)Supported Version(s) (Macintosh)Browser
75 and later81 and laterChrome
65 and later65 and laterFirefox
Page 14

Table 3: Supported Web Browsers (continued)
Network Requirements
For Kubernetes-based installations, including multi-node installations:
•
All nodes must run NTP or other time-synchronization at all times.
•
14
Supported Version(s) (Windows)Supported Version(s) (Macintosh)Browser
7.1 and later7.1 and laterSafari
68 and later68 and laterOpera
80 and later80 and laterEdge
An Internet connection is required for all nodes during the initial Ubuntu (.deb) or CentOS/RedHat
•
(.rpm) software extraction process. This is not a requirement for the healthbot setup portion of the
installation
One static IP address per node.
•
An SSH server must be running on all nodes.
•
All nodes must be in the same subnet
•
For a multi-node installation, a virtual (unused) IP address in the same subnet as the nodes is needed.
•
This is the address on which the Web GUI is accessed.
A common SSH user name and password is needed for all nodes. The healthbot setup command
•
(discussed later) must be run as this user.
Docker version 18.09.3 or later is required
•
The command: sysctl -w net.bridge.bridge-nf-call-iptables=1 must be run on all nodes.
•
You can add the net.bridge.bridge-nf-call-iptables=1 to the file /etc/sysctl.conf to ensure that it
persists across reboots of the server.
For non-Kubernetes based installations:
•
Static IP address for the server.
•
An SSH server must be running on the server.
•
DNS is not required.
•
The command: sysctl -w net.bridge.bridge-nf-call-iptables=1 must be run on all nodes.
•
Page 15

You can add the net.bridge.bridge-nf-call-iptables=1 to the file /etc/sysctl.conf to ensure that it
persists across reboots of the server.
Open the following firewall ports, as appropriate:
•
JTI (native GPB), for telemetry collection - per your source and destination port settings
•
gRPC (OpenConfig), for telemetry collection - TCP port 32767
•
NETCONF/SSH, for telemetry collection - TCP port 830
•
SNMP, for telemetry collection - UDP port 161
•
Syslog messages - UDP port 514
•
NetFlow, for telemetry collection – UDP port of your choice.
•
Must be different for each NetFlow host.
NOTE: Default ports are listed above; adjust as needed if you use non-default ports.
15
Network Device Requirements
Junos Devices
HealthBot collects data from devices running Junos OS using multiple data collection methods, called
sensors. Each sensor type requires a certain Junos OS version, and configuration added to the devices, to
enable a connection to the HealthBot server.
Native GPB
Junos OS Version: 15.1 or later
•
Required configuration—configure a sensor profile for each relevant related rule in HealthBot:
•
##Streaming Server Profile
set services analytics streaming-server COLLECTOR-1 remote-address
<HealthBot-server-address>
set services analytics streaming-server COLLECTOR-1 remote-port 22000
##Export Profile
set services analytics export-profile EXP-PROF-1 local-address <local-router-IP>
set services analytics export-profile EXP-PROF-1 local-port 22001
set services analytics export-profile EXP-PROF-1 reporting-rate 30
set services analytics export-profile EXP-PROF-1 format gpb
set services analytics export-profile EXP-PROF-1 transport udp
Page 16

##Sensor Profile
set services analytics sensor SENSOR-1 server-name COLLECTOR-1
set services analytics sensor SENSOR-1 export-name EXP-PROF-1
set services analytics sensor SENSOR-1 resource <resource> # example
/junos/system/linecard/interface/
See Configuring a Junos Telemetry Interface Sensor for more information.
NetFlow (IPFIX)
Junos OS Version: 14.1R1 or later for MX Series Routers. For complete Junos version and platform
•
support information, see:
Configuring Flow Aggregation on MX, M, vMX and T Series Routers and NFX250 to Use Version 9
•
Flow Templates
Configuring Flow Aggregation to Use IPFIX Flow Templates on MX, vMX and T Series Routers, EX
•
Series Switches and NFX250, and SRX Devices
16
Understanding Inline Active Flow Monitoring - TechLibrary
•
Required configuration—
•
Configure a NetFlow v9 or IPFIX template
•
Apply the template to enable traffic sampling
•
Associate the sampling instance with the FPC
•
Specify which traffic interface to sample
•
The following samples are for an IPFIX configuration. Lines that start with “##” are comments and are used
to point out details in the configuration.
IPFIX Template Configuration
set services flow-monitoring version-ipfix template IPv4-TEMPLATE ipv4-template
Apply IPFIX Template to Enable Traffic Sampling
set forwarding-options sampling instance IPFIX-IPv4-INSTANCE input rate 10
set forwarding-options sampling instance IPFIX-IPv4-INSTANCE family inet
output flow-server 10.102.70.200 port 2055
set forwarding-options sampling instance IPFIX-IPv4-INSTANCE family inet
output flow-server 10.102.70.200 version-ipfix template IPv4-TEMPLATE
set forwarding-options sampling instance IPFIX-IPv4-INSTANCE family inet
output inline-jflow source-address 198.51.100.1
## 10.102.70.200 = HealthBot server
Page 17

## port 2055; use this value in HealthBot GUI (device group config)
## inline-jflow = Enable inline flow monitoring for traffic from the designated address
## 198.51.100.1 = traffic interface that does the exporting; use this value in HealthBot GUI (device config)
Associate Sampling Instance with the FPC
set chassis fpc 0 sampling-instance IPFIX-IPv4-INSTANCE
Specify the Traffic Interface to Sample and Direction of Sampled Traffic
set interfaces ge-0/0/0 unit 0 family inet sampling input
set interfaces ge-0/0/0 unit 0 family inet sampling output
OpenConfig
Junos OS Version: 16.1 or later
•
17
The OpenConfig sensor requires that the Junos device have the OpenConfig and network agent
•
packages installed. These packages are built into Junos OS Releases 18.2X75, 18.3, and later. For
releases between 16.1 and 18.2X75 or 18.3, you must install the packages.
To verify whether you have these packages, enter the following command:
user@host> show version | match "Junos:|openconfig|na telemetry"
Junos: 19.2R1.8
JUNOS na telemetry [19.2R1.8]
JUNOS Openconfig [19.2R1.8]
See Understanding OpenConfig and gRPC on Junos Telemetry Interface for more information.
Network agent is not supported on PPC platforms (MX104, MX80, and so on)
•
Required configuration:
•
set system services extension-service request-response grpc clear-text
iAgent (NETCONF)
Junos OS Version: 11.4 or later
•
Required configuration:
•
set system services netconf ssh
Page 18

SNMP
Junos OS Version: Any release
•
Required configuration:
•
set snmp community public
Syslog
Junos OS Version: Any release
•
Required configuration:
•
set system syslog host 10.10.10.1 any any
set system syslog host 10.10.10.1 allow-duplicates
set system syslog host 10.10.10.1 structured-data
## 10.10.10.1 = HealthBot server
18
BEST PRACTICE: Structured syslog is highly recommended because it avoids text parsing by
the HealthBot server.
Cisco Device Support
HealthBot can collect telemetry data from Cisco IOS XR devices. To use these devices with HealthBot,
you must configure the grpc server and the openconfig-interfaces sensors. HealthBot does not automatically
configure these for you.
The following example shows a sensor group sg1 created for gRPC dial-in configuration with the YANG
model for interfaces. An hbot_interfaces subscription associates the sg1 sensor group with an interval of
10 seconds to stream data.
NOTE: The following reference configuration is loaded on a device running Cisco IOS XR software
version 6.3.2.
!
grpc
port 32767
!
telemetry model-driven
sensor-group sg1
Page 19

sensor-path openconfig-interfaces:interfaces/interface
!
subscription hbot_interfaces_
sensor-group-id sg1 sample-interval 10000
!
!
ssh server v2
end
Multi-Node Installation
Starting with release 3.0.0 HealthBot uses Kubernetes for all HA/multi-node installations. In order to install
HealthBot on more than one server, you must install using Kubernetes. All of the needed configuration
for the clusters is performed by Kubernetes. During the setup phase of the installation process, you must
identify the Kubernetes master node and worker node(s). The following example shows the installation
command for an Ubuntu server.
19
$ sudo apt-get install -y /<path-to-deb-file>/healthbot-<version>.deb
$ sudo apt-get install -y /var/tmp/healthbot-3.0.0.deb
[sudo] password for user:
Reading package lists... Done
Building dependency tree
Reading state information... Done
Note, selecting 'healthbot' instead of '/var/tmp/healthbot-3.0.0.deb'
The following NEW packages will be installed:
healthbot
…
Unpacking healthbot (3.0.0) ...
…
Setting up healthbot (3.0.0) ...
…
RELATED DOCUMENTATION
Using the Interactive Installers | 20
Using the Silent Installer | 39
Page 20

Using the Interactive Installers
IN THIS SECTION
Installing HealthBot On Ubuntu | 22
Installing HealthBot On CentOS | 30
The HealthBot software package is available for download as a Debian (.deb) file for installation on Ubuntu,
or a Red Hat Package Manager (.rpm) file for installation on CentOS and RedHat Enterprise Linux (RHEL).
Before You Begin
You will need the following details for the installation:
20
Deployment type—Single node or multinode installation. Multinode installations are useful for load
•
distribution and scaling.
SSL certificate and private key—Supply your own key, or have HealthBot create one for you.
•
Host IP address—The server IP address, for SSH and Web UI access.
•
If you are installing HealthBot into an existing Kubernetes cluster, you need information about the
•
existing Kubernetes cluster:
Docker registry name
•
The path to a kubeconfig file configured with the existing cluster details
•
A user account with administrator privileges for the kubernetes cluster
•
Page 21

NOTE: The following points regarding installation on an existing Kubernetes cluster must be
considered:
HealthBot has only been qualified with the Calico container network interface (CNI). It should
•
work with other CNI plugins, but has not been tested.
If your Kubernetes cluster uses other CNI plugins, such as Flannel, you might notice long
•
playbook deployment times on some Kubernetes versions. One potential workaround, is to
disable transmit (tx) and receive (rx) checksum offloading on VXLAN interfaces. An example
of this, using Flannel: ethtool --offload flannel.1 tx off rx off.
For discussions regarding the latency issue, see:
Kubernetes Issue
•
Flannel Issue
•
LKML.ORG
•
If there are a large number of device groups in HealthBot, there is the possibility that some of
•
the Kubernetes pods might not get scheduled if the nodes are saturated by the maximum pods
per node limit. By default, this limit is 110 pods per node in most Kubernetes distributions.
21
As a workaround, you can increase the maximum pods per node setting. Refer to the
documentation from your Kubernetes distribution for details on how to modify this setting.
If your CNI plugin is configured with a static IP CIDR block for each node, make sure the
•
number of IP addresses in the block allocated to the node is at least double the size of the
maximum pods per node setting.
Additional requirements:
You must have a Juniper.net user account with permissions to download the HealthBot software package.
•
The HealthBot server must have access to the Internet during the software extraction process of
•
installation (.deb for Ubuntu or .rpm for CentOS/RedHat).
HealthBot creates a /var/local/healthbot/ directory as part of the installation process. This directory
contains all the HealthBot-related files. HealthBot also installs the minimum required version of the following
additional software packages, if they are not already present.
colorama
•
Docker Compose
•
Docker SDK for Python
•
Jinja2
•
pyaml
•
Page 22
Python 3
•
pip3
•
tqdm
•
distro
•
jsonpath_rw
•
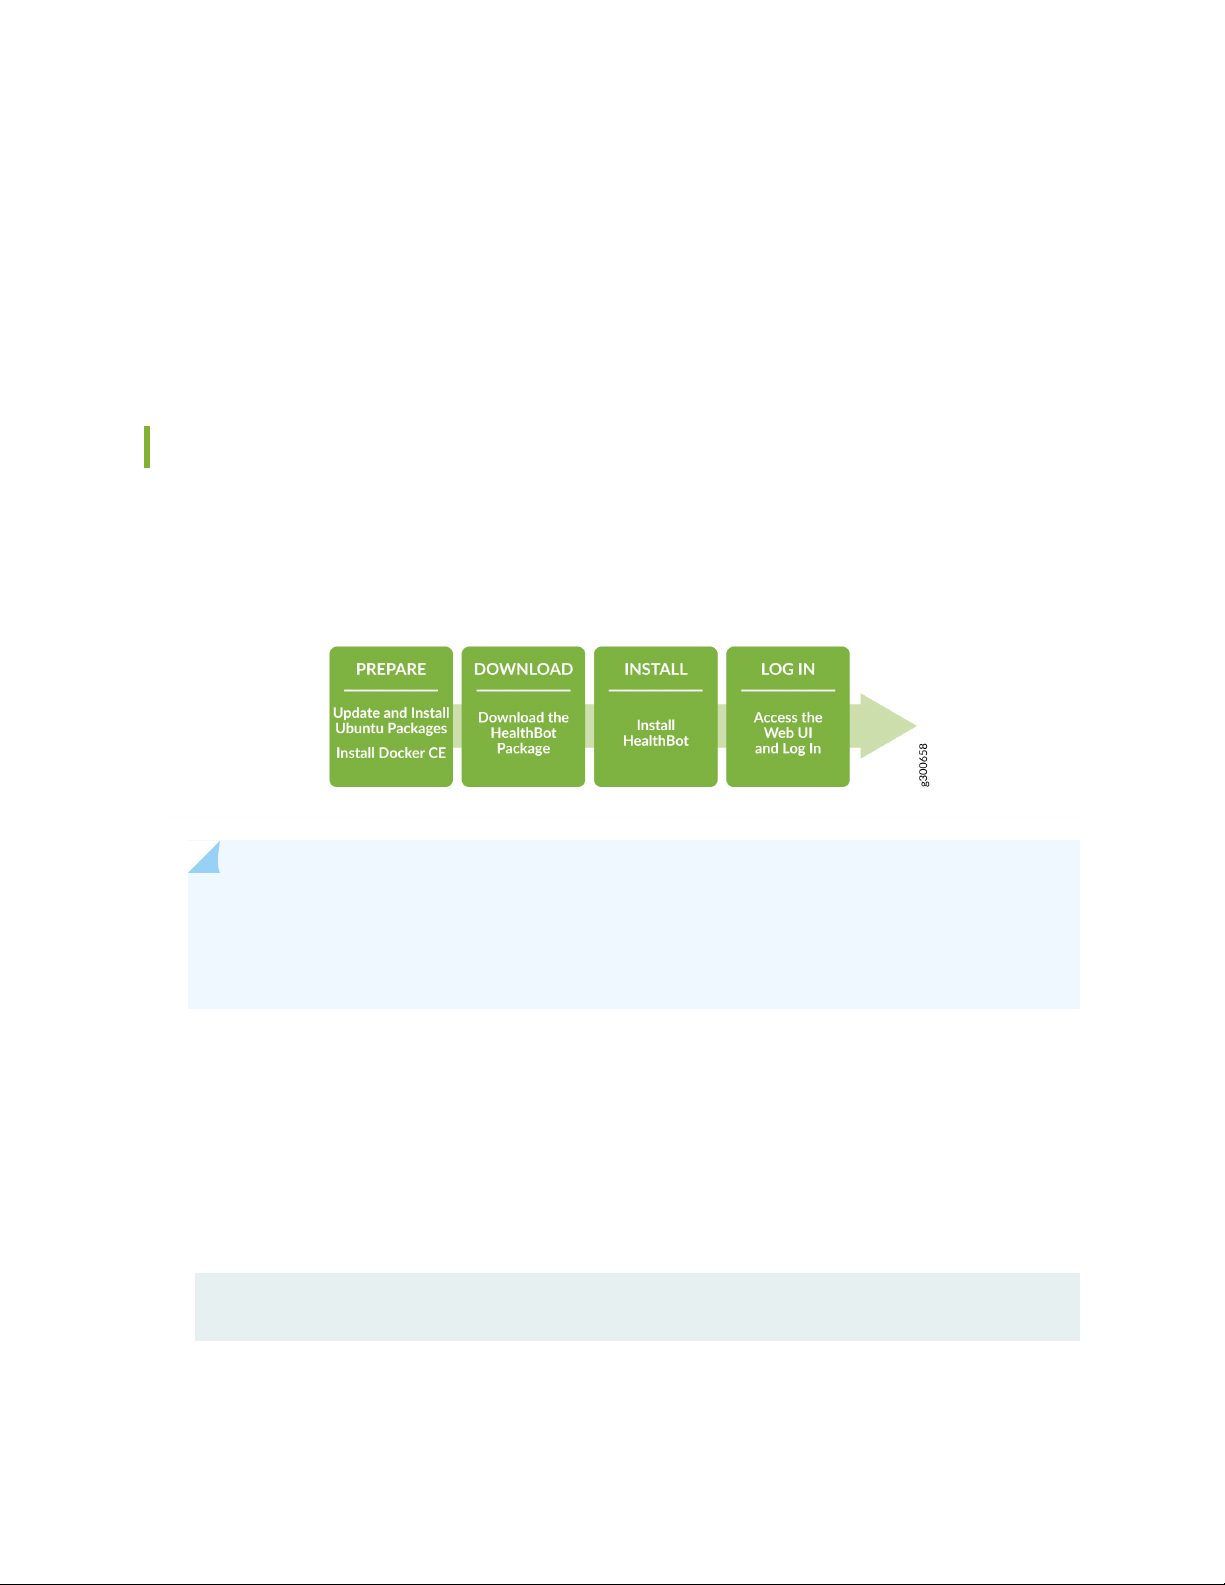
Installing HealthBot On Ubuntu
The general workflow for installing HealthBot on Ubuntu is shown in Figure 1 on page 22.
Figure 1: Installation Workflow - HealthBot on Ubuntu
22
NOTE: For multinode installations, perform the following tasks only on the primary node.
If you are logged in as root or using root privileges, remove the sudo portion of each command
below.
Part 1 - PREPARE
1. Ensure that you have at least 60GB of free disk space. We recommend 100GB of free disk space.
2. Set the environment variable, HB_EXTRA_MOUNT1, to allow HealthBot to access directories outside
of the /var/local/healthbot directory.
To set the environment variable:
root@hb_server:/ export HB_EXTRA_MOUNT1=/root/.kube/config
3. Ensure that the Ubuntu package lists on your host system are current.
Page 23

$ sudo apt-get update
4. (Optional) Install the wget package. This tool will be used later to download the HealthBot software
package. On some installations, wget is installed by default.
$ sudo apt-get install -y wget
5. Install Docker CE. The commands below will install the latest stable version on x86 machines. For full
instructions and information on other platforms, see Get Docker CE for Ubuntu.
$ sudo apt-get install -y apt-transport-https ca-certificates curl
gnupg-agent software-properties-common
$ curl -fsSL https://download.docker.com/linux/ubuntu/gpg | sudo apt-key
add $ sudo add-apt-repository "deb [arch=amd64]
https://download.docker.com/linux/ubuntu $(lsb_release -cs) stable"
$ sudo apt-get update
$ sudo apt-get install -y docker-ce docker-ce-cli containerd.io
23
6. (Optional) Add your user account to the Docker group. This is required for a later installation step.
If installing and running with root privileges, this step is not required.
$ sudo usermod -aG docker $USER
$ <Log out of the current session, and log back in>
Page 24

Part 2 - DOWNLOAD
1. Download the Contrail HealthBot package from the Juniper Networks software download page to a
temporary directory (like /var/tmp/) on the server. Note that downloading software requires a Juniper.net
account.
wget -O /<temp-directory>/healthbot-<version>.deb
"<URL-from-the-software-download-page>”
NOTE: You can also download the HealthBot package locally and push it to the server, if
preferred.
Part 3 - Online INSTALL
24
Page 25

1. Install the .deb package using the following format:
$ sudo apt-get install -y /<path-to-deb-file>/healthbot-<version>.deb
HealthBot checks that prerequisite software is installed on your host device during this step. If any
required software is not found, HealthBot will prompt you before installing those missing software
packages.
For example:
root@ubuntu:/var/tmp#
apt-get install -y /var/tmp/healthbot-3.2.0-1.deb
Reading package lists... Done
Building dependency tree
Reading state information... Done
Note, selecting 'healthbot' instead of '/var/tmp/healthbot-3.2.0-1.deb'
The following NEW packages will be installed:
healthbot
0 upgraded, 1 newly installed, 0 to remove and 0 not upgraded.
Need to get 0 B/6,599 MB of archives.
After this operation, 15.2 GB of additional disk space will be used.
Get:1 /var/tmp/healthbot-3.2.0-1.deb healthbot all 3.2.0 [6,599 MB]
Selecting previously unselected package healthbot.
(Reading database ... 121891 files and directories currently installed.)
Preparing to unpack /var/tmp/healthbot-3.2.0-1.deb ...
Unpacking healthbot (3.2.0) ...
Setting up healthbot (3.2.0) ...
25
NOTE: If you see the following error when running the sudo apt-get command, you can
ignore it:
“Can't drop privileges for downloading as file '/home/user/healthbot-3.0.0-1.deb' couldn't
be accessed by user '_apt'. - pkgAcquire::Run (13: Permission denied)”
For more information, see
https://bugs.launchpad.net/ubuntu/+source/aptitude/+bug/1543280.
2. (Optional) Offline INSTALL
Page 26

Starting with release 3.0.1, HealthBot supports offline installation for Kubernetes-based installations.
To enable an offline installation for the 3.0.X release, copy the file
/var/local/healthbot/offline/healthbot-offline.tgz to the /var/local/healthbot/ directory.
For release 3.1.0, download the file healthbot-offline-3.1.0.tgz from the HealthBot Downloads page.
Once downloaded, change the name of the file to healthbot-offline.tgz and place it in the
/var/local/healthbot directory.
If the installer finds the file in /var/local/healthbot, then it uses the contents of the file, rather than
going to the Internet, for the required Kubernetes files.
If you skip this step, you must have an Internet connection at the HealthBot server to complete
installation.
3. Enter sudo healthbot setup to configure your installation. You can also use sudo healthbot -v setup to
display more detailed information.
An example of the setup command from a single-node (docker-compose-based) installation:
root@ubuntu:/var/tmp#
26
healthbot setup
Setting new password for postgres db
Do you want to install on kubernetes? [y/N]
Please enter host IP address. This must be the IP address
for establishing SSH connection to the host: 10.10.10.135
Do you want system to create and use a self-signed SSL certificate? [Y/n]
[executing ..] openssl req -nodes -x509 -newkey rsa:4096 -keyout
/var/local/healthbot/certs/key.pem -out /var/local/healthbot/certs/cert.pem
-days 36525 -subj "/C=US/ST=Ca/L=Svl/O=Juniper Networks/OU=Org/CN=localhost"
-extensions SAN -reqexts SAN -config /tmp/ssl.conf
[executing ..] rm -f /tmp/ssl.conf
Use IPv6 Docker network? [y/N]
Enter subnet for IPv4 Docker network (optional):
Creating /var/local/healthbot/healthbot.conf config file..
Creating docker images. This might take some time...
100%| |
34/34 [05:04<00:00, 8.95s/it]
Docker images successfully created
Loading docker images. This may take some time..
100%| |
34/34 [17:58<00:00, 31.71s/it]
Docker images successfully loaded
Done making directories
Some parts of config or time series data from previous installation
Page 27

might not show up in this installation
Installation successful. Please run 'healthbot start'
NOTE: The setup stage of the installation asks about using IPv6 in the Docker network. This
is not required and is set to no by default. Only use this option if your network requires it.
An example of the setup command from a multi-node installation:
$ sudo healthbot setup
Setting new password for postgres db
Do you want to install on kubernetes? [y/N] Y
Checking disk space
Validating kernel version
Do you want system to create and use a self-signed SSL certificate? [Y/n]
Y
[executing ..] openssl req -nodes -x509 -newkey rsa:4096 -keyout
/var/local/healthbot/certs/key.pem -out /var/local/healthbot/certs/cert.pem
-days 36525 -subj "/C=US/ST=Ca/L=Svl/O=Juniper Networks/OU=Org/CN=localhost"
Creating /var/local/healthbot/healthbot.conf config file..
Creating docker images
Docker images successfully created
Loading docker images. This may take some time..
100%| |
32/32 [09:23<00:00, 17.60s/it]
Docker images successfully loaded
Done making directories
Enter hostnames/ip address of kubernetes master node: 10.102.70.202
Validating hostname: 10.102.70.202
[executing ..] ping 10.102.70.202 -c 1
Enter comma seperated hostnames/ip addresses of kubernetes worker nodes:
10.102.70.203, 10.102.70.200
Validating hostname: 10.102.70.203
[executing ..] ping 10.102.70.203 -c 1
Validating hostname: 10.102.70.200
[executing ..] ping 10.102.70.200 -c 1
Do you want to run HealthBot services on master node? [Y/n] Y
All nodes must be in same subnet. Abort the setup if all the nodes are not
within same subnet.
Please enter password for user "root" to connect to the nodes:
Confirm password:
A virtual IP is required to connect to HealthBot services
27
Page 28

Enter an unallocated virtual IP from same subnet: 10.102.70.201
Using pod CIDR: 10.244.0.0/16
Using service CIDR: 10.96.0.0/12
##############################################################################
# Pod CIDR and Service CIDR can be modified using one of the below approaches
# Interactive installation :
# - Set the environment variables "HB_POD_CIDR" and "HB_SERVICE_CIDR"
# - For non-root user, Use 'sudo -E' instead of 'sudo' to use the
# existing environment variables
# Silent installation :
# - Set the "pod_cidr" and "service_cidr" values in "healthbot.conf" file
#
# Post changing the configuration, Stop the healthbot services and reconfigure
# the healthbot using "healthbot reconfigure" command.
###############################################################################
Prepared cluster for new installation
All nodes validated successfully
Installed Kubernetes cluster successfully
[executing ..] kubectl label nodes 10.102.70.203 tsdb=10-102-70-203 --overwrite
Patching docker registry: key=, value=, operator=Exists, effect=NoSchedule
Patching docker registry: key=dedicated, value=tsdb, operator=Equal,
effect=NoExecute
Copied helper files to input directory
Pushing images to registry
Registry is ready
100%| |
32/32 [04:20<00:00, 8.15s/it]
Successfully pushed images to registry
Installation successful. Please run 'healthbot start'
28
HealthBot installation is now complete. If any errors occurred, they will be listed in the outputs above.
4. Enter healthbot start to start HealthBot services including the Web UI.
For example:
$ healthbot start
Stopping HealthBot
Subnet address for "healthbot" docker network: ['172.23.0.0/16']
Gateway address for "healthbot" docker network: ['172.23.0.1']
Page 29

###############################################################################
# Subnet and gateway address can be modified by changing the "subnet" and
# "gateway" value under "network" section in "healthbot.conf file.
#
# Post changing the configuration, Reconfigure the healthbot by executing
# "healthbot reconfigure" command
###############################################################################
Network creation success!
Starting services
Started services!
Waiting for influxdb ...
...
Waiting for influxdb ...
...
Waiting for influxdb ...
...
Waiting for influxdb ...
Waiting for influxdb ...
Initializing API Server. This may take some time..
API server is initialized
UI can be accessed at https://10.102.70.82:8080
29
5. Enter healthbot status to verify that the HealthBot services are up and running.
For example:
$ healthbot status
Name of service Status
--------------------------------------------alerta Up
api_server Up
debugger Up
gateway Up
grafana Up
hb_proxy_syslog Up
hbmon Up
influxdb_db Up
keycloak Up
license_client Up
mgd Up
postgres Up
redis Up
Page 30

reports Up
tsdb_shim Up
Part 4 - LOG IN
1. Open a browser and log in to the HealthBot Web UI using these credentials: username: admin password:
healthbot. These are one-time credentials. When you enter them, HealthBot prompts you to change
the password and gives instructions about the recommended length, case changes, and so on.
https://<server-IP>:8080
The login window is shown in Figure 2 on page 30.
Figure 2: HealthBot Login
30
Installing HealthBot On CentOS
The general workflow for installing HealthBot on CentOS is shown in Figure 3 on page 31.
Page 31

Figure 3: Installation Workflow - HealthBot on CentOS
NOTE: For multinode installations, perform the following tasks only on the primary node. If you
are logged in as root or using root privileges, remove the sudo portion of each command below.
Part 1 - PREPARE
1. This procedure assumes you are installing HealthBot using a non-root user. If this user does not already
have sudo privileges, set them now.
31
$ su
Password: <root-pwd>
# sudo usermod -aG wheel <non-root-username>
<stay logged in as root>
2. While logged in as root, set secure_path in the /etc/sudoers file to include /usr/local/bin/ so that sudo
will be able to locate the HealthBot script during the healthbot setup step, later in this procedure.
# visudo
<scroll down to Defaults secure_path = /sbin:/bin:/usr/sbin:/usr/bin>
<type i to enter edit mode>
<scroll to end of line and add :/usr/local/bin >
<type Esc, then :wq, and press Enter>
# exit
exit
$ <Log out of the current session, and log back in>
3. Install the epel-release repository. This is required for installing Python3 and other packages.
$ sudo yum install -y epel-release
4. Install the yum-utils package used for handling repositories and extending package management.
Page 32

$ sudo yum install -y yum-utils
5. Install the wget package. This tool will be used later to download the HealthBot software package.
$ sudo yum install -y wget
6. Verify the SELinux mode, and if set to enforcing change it to permissive. This is required to allow Docker
commands to execute later in this procedure.
$ getenforce
Enforcing
$ sudo setenforce 0
$ getenforce
Permissive
7. Install Docker CE. The commands below will install the latest stable version. For full instructions, see
Get Docker CE for CentOS.
32
$ sudo yum install -y yum-utils device-mapper-persistent-data lvm2
$ sudo yum-config-manager --add-repo
https://download.docker.com/linux/centos/docker-ce.repo
$ sudo yum install -y docker-ce docker-ce-cli containerd.io
8. Start Docker and enable it so that it launches on startup.
$ sudo systemctl start docker
$ sudo systemctl enable docker
9. Add your user account to the Docker group. This is required for a later installation step.
$ sudo usermod -aG docker $USER
$ <Log out of the current session, and log back in>
Page 33

Part 2 - DOWNLOAD
1. Download the Contrail HealthBot package from the Juniper Networks software download page to a
temporary directory (like /var/tmp) on the server. Note that downloading software requires a Juniper.net
account.
wget -O /<temp-directory>/healthbot-<version>.noarch.rpm
"<URL-from-the-software-download-page>”
NOTE: You can also download the HealthBot package locally and push it to the server, if
preferred.
Part 3 - INSTALL
1. Install the .rpm package using the following format:
33
$ sudo yum install -y /<path-to-rpm-file>/healthbot-<version>.noarch.rpm
HealthBot checks that prerequisite software is installed on your host device during this step. If any
required software is not found, HealthBot will prompt you before installing those missing software
packages. HealthBot uses an Internet connection to download any missing packages.
An example, from CentOS:
$ sudo yum install -y /var/tmp/healthbot-3.0.0-1.noarch.rpm
Loaded plugins: fastestmirror
Examining /var/tmp/healthbot-3.0.0-.1.noarch.rpm: healthbot-3.0.0-1.noarch
Marking /var/tmp/healthbot-3.0.0-1.noarch.rpm to be installed
…
…
Installing : healthbot-3.0.noarch 1/1
Verifying : healthbot-3.0.noarch 1/1
Installed:
healthbot.noarch 0:3.0.0-1
Complete!
2. (Optional) Offline INSTALL
Starting with release 3.0.1, HealthBot supports offline installation for Kubernetes-based installations.
To enable an offline installation, copy the file /var/local/healthbot/offline/healthbot-offline.tgz to the
/var/local/healthbot/ directory. If the installer finds the file in /var/local/healthbot, then it uses the
contents of the file, rather than going to the Internet, for the required Kubernetes files.
Page 34

If you skip this step, you must have an Internet connection at the HealthBot server to complete
installation.
3. Enter sudo healthbot setup to configure your installation. You can also use sudo healthbot -v setup to
display more detailed information.
$ sudo healthbot setup
Setting new password for postgres db
Do you want to install on kubernetes? [y/N] Y
Checking disk space
Validating kernel version
Do you want system to create and use a self-signed SSL certificate? [Y/n]
Y
[executing ..] openssl req -nodes -x509 -newkey rsa:4096 -keyout
/var/local/healthbot/certs/key.pem -out /var/local/healthbot/certs/cert.pem
-days 36525 -subj "/C=US/ST=Ca/L=Svl/O=Juniper Networks/OU=Org/CN=localhost"
Creating /var/local/healthbot/healthbot.conf config file..
Creating docker images
Docker images successfully created
Loading docker images. This may take some time..
100%| |
32/32 [09:23<00:00, 17.60s/it]
Docker images successfully loaded
Done making directories
Enter hostnames/ip address of kubernetes master node: 10.102.70.202
Validating hostname: 10.102.70.202
[executing ..] ping 10.102.70.202 -c 1
Enter comma seperated hostnames/ip addresses of kubernetes worker nodes:
10.102.70.203, 10.102.70.200
Validating hostname: 10.102.70.203
[executing ..] ping 10.102.70.203 -c 1
Validating hostname: 10.102.70.200
[executing ..] ping 10.102.70.200 -c 1
Do you want to run HealthBot services on master node? [Y/n] Y
All nodes must be in same subnet. Abort the setup if all the nodes are not
within same subnet.
Please enter password for user "root" to connect to the nodes:
Confirm password:
A virtual IP is required to connect to HealthBot services
Enter an unallocated virtual IP from same subnet: 10.102.70.201
Using pod CIDR: 10.244.0.0/16
Using service CIDR: 10.96.0.0/12
34
##############################################################################
Page 35

# Pod CIDR and Service CIDR can be modified using one of the below approaches
# Interactive installation :
# - Set the environment variables "HB_POD_CIDR" and "HB_SERVICE_CIDR"
# - For non-root user, Use 'sudo -E' instead of 'sudo' to use the
# existing environment variables
# Silent installation :
# - Set the "pod_cidr" and "service_cidr" values in "healthbot.conf" file
#
# Post changing the configuration, Stop the healthbot services and reconfigure
# the healthbot using "healthbot reconfigure" command.
###############################################################################
Prepared cluster for new installation
All nodes validated successfully
Installed Kubernetes cluster successfully
[executing ..] kubectl label nodes 10.102.70.203 tsdb=10-102-70-203 --overwrite
Patching docker registry: key=, value=, operator=Exists, effect=NoSchedule
Patching docker registry: key=dedicated, value=tsdb, operator=Equal,
effect=NoExecute
Copied helper files to input directory
Pushing images to registry
Registry is ready
100%| |
32/32 [04:20<00:00, 8.15s/it]
Successfully pushed images to registry
Installation successful. Please run 'healthbot start'
35
$ sudo healthbot setup
Setting new password for postgres db
Do you want to install on kubernetes? [y/N] N
Please enter host IP address. This must be the IP address
for establishing SSH connection to the host: [] 10.102.70.82
Do you want system to create and use a self-signed SSL certificate? [Y/n]
Y
[executing ..] openssl req -nodes -x509 -newkey rsa:4096 -keyout
/var/local/healthbot/certs/key.pem -out /var/local/healthbot/certs/cert.pem
-days 36525 -subj "/C=US/ST=Ca/L=Svl/O=Juniper Networks/OU=Org/CN=localhost"
Creating /var/local/healthbot/healthbot.conf config file..
Creating docker images
Docker images successfully created
Loading docker images. This may take some time..
100%| |
32/32 [03:32<00:00, 6.64s/it]
Page 36

Docker images successfully loaded
Done making directories
Generating new ssh keys
Successfully generated ssh keys
Some parts of config or time series data from previous installation
might not show up in this installation
Installation successful. Please run 'healthbot start'
HealthBot installation is now complete. If any errors occurred, they will be listed in the outputs above.
4. Enter healthbot start to start HealthBot services including the Web UI.
$ healthbot start
Stopping HealthBot
Generated service manifests
Updated orchestrator details
Successfully started redis
Started configmanager successfully
Successfully published files to config manager
Restarted config manager successfully
Started load balancer
Started configmanager successfully
Started postgres cluster successfully
Deployed services successfully
Started all services successfully
Created default databases
UI can be accessed at https://10.102.70.201:8080
36
$ healthbot start
Stopping HealthBot
Subnet address for "healthbot" docker network: ['172.18.0.0/16']
Gateway address for "healthbot" docker network: ['172.18.0.1']
###############################################################################
# Subnet and gateway address can be modified by changing the "subnet" and
# "gateway" value under "network" section in "healthbot.conf file.
#
# Post changing the configuration, Reconfigure the healthbot by executing
# "healthbot reconfigure" command
###############################################################################
Page 37

Network creation success!
Starting services
Started services!
Waiting for influxdb ...
...
Waiting for influxdb ...
...
Waiting for influxdb ...
Waiting for influxdb ...
Initializing API Server. This may take some time..
API server is initialized
UI can be accessed at https://10.102.70.82:8080
5. Enter healthbot status to verify that the HealthBot services are up and running.
For example:
37
$ healthbot status
Name of service Status
--------------------------------------------------------------------alerta Up
api_server Up
configmanager Up
debugger Up
gateway Up
grafana Up
hb_proxy_syslog Up
hbmon Up
influxdb(10.102.70.200) Up
influxdb(10.102.70.203) Up
keycloak Up
license_client Up
metallb Up
mgd Up
postgres Up
redis Up
reports Up
tsdb_shim Up
6. Reset the SELinux mode to enforcing, if applicable.
Page 38

$ getenforce
Permissive
$ sudo setenforce 1
$ getenforce
Enforcing
Part 4 - LOG IN
1. Open a browser and log in to the HealthBot Web UI using the credentials: Username: admin, Password:
healthbot. These are one-time credentials. When you enter them, HealthBot prompts you to change
the password and gives instructions about the recommended length, case changes, and so on.
https://<server-IP>:8080
The login window is shown in Figure 4 on page 38.
38
Figure 4: HealthBot Login Window
Page 39

Using the Silent Installer
HealthBot provides a silent installer as a convenient way to streamline the installation process without
requiring user intervention.
To use the silent installer, you can use the default configuration file, included in the downloaded .deb or
.rpm package, or create your own custom configuration. The default configuration file, healthbot.conf, is
located on the HealthBot server in the /var/local/healthbot/ after the interactive installation is complete.
The following is an example configuration file.
############### Multi-node settings for Kubernetes installations ###############
# Absence of multi-node key indicates single node installation.
# Un-comment below for multi-node installation. Refer documentation
# for more information. This is not a mandatory key.
multi_node:
cluster:
master_nodes: [10.102.70.202]
worker_nodes: [10.102.70.203, 10.102.70.200]
allow_master_scheduling: True
load_balancer_ip: 10.102.70.201
ssh_user: user
ssh_pw: <Insert Password>
pod_cidr: 10.244.0.0/16
service_cidr: 10.96.0.0/12
39
############### Single node settings for docker-compose installations
###############
############### Container network settings ###############
# Refer: https://docs.docker.com/engine/reference/commandline/network_create/
# For single-node installation, we use default driver.
# Un-comment below if you want to control subnet of healthbot's containers.
# If devices in your network have IP address from the private IP address
# block, use this option to avoid IP address conflict of containers with
# network devices.
# This is not a mandatory key.
# network:
# subnet: 10.11.0.0/16
# gateway: 10.11.0.2
Page 40

############### Master settings ###############
# Specify below host's ip address on which sshd is listening on the default
# port. Don't use localhost or loop-back address. This is a mandatory key for
# single node docker-compose based installation.
# host_ip: <Insert host IP here>
# Specify below HTTPS certificate and private key file location.
# This is a mandatory key.
https:
cert_file: /var/local/healthbot/certs/cert.pem
key_file: /var/local/healthbot/certs/key.pem
Customizing the configuration file is self-explanatory. Just uncomment or edit the necessary lines. For
example, to change from a single-node installation to a multinode installation, change the following lines
from:
40
#multi_node:
# cluster:
# master_nodes: []
# worker_nodes: []
# allow_master_scheduling: True
# load_balancer_ip: <Insert unused IP here>
# ssh_user: <Insert username here>
# ssh_pw: <Insert password here>
# pod_cidr: 10.244.0.0/16
# service_cidr: 10.96.0.0/12
to:
multi_node:
cluster:
master_nodes: [10.102.70.200]
worker_nodes: [10.102.70.82]
allow_master_scheduling: True
load_balancer_ip: 10.102.70.201
ssh_user: hbuser
Page 41

ssh_pw: password1
pod_cidr: 10.244.0.0/16
service_cidr: 10.96.0.0/12
How to Perform a Silent Installation
To run the silent installer package:
1. Follow the steps for installing the HealthBot package as described in “Using the Interactive Installers”
on page 20 until you reach the setup step.
2. Edit your custom configuration file and change the setting values as needed. You can use the file
/var/local/healthbot/healthbot.conf as a starting point.
3. Run the silent installer using the following command:
41
$ sudo healthbot setup -c <path and filename to custom configuration file>
For example:
$ sudo healthbot setup -c $HOME/healthbot/healthbot-custom.conf
NOTE: The sudo healthbot setup -c command prompts you for user credentials. If you do
not want to be prompted, add the credential information to your custom configuration file.
For example:
username: <username>
password: <password>
Any errors that occur during the installation are displayed in the terminal window.
RELATED DOCUMENTATION
HealthBot Installation Requirements | 11
Using the Interactive Installers | 20
Page 42

Starting and Stopping HealthBot
To start HealthBot, enter the following command:
$ healthbot start
This command starts the common services, starts the services for all device groups and networks groups,
and then launches the HealthBot Web UI. For example:
user@server $ healthbot start
Stopping HealthBot
Subnet address for "healthbot" docker network: ['172.18.0.0/16']
Gateway address for "healthbot" docker network: ['172.18.0.1']
###############################################################################
# Subnet and gateway address can be modified by changing the "subnet" and
# "gateway" value under "network" section in "healthbot.conf file.
#
# Post changing the configuration, Reconfigure the healthbot by executing
# "healthbot reconfigure" command
###############################################################################
42
Network creation success!
Starting services
Started services!
Waiting for influxdb ...
...
Waiting for influxdb ...
...
Waiting for influxdb ...
Waiting for influxdb ...
Initializing API Server. This may take some time..
API server is initialized
UI can be accessed at https://10.102.70.82:8080
You can use the healthbot -v start command to display detailed information on your screen.
To stop the HealthBot application, enter the following command:
$ healthbot stop
Page 43

This command stops all HealthBot services, including the device group and network group services. This
command does not close the HealthBot Web UI if it is open. For example:
user@server $ healthbot stop
Remove group healthbot
Success
RELATED DOCUMENTATION
Uninstalling or Reconfiguring HealthBot | 50
HealthBot Command-Line Options | 53
43
Checking HealthBot Service Status
A dedicated service, healthbot_hbmon, monitors the state of HealthBot. It monitors the CPU and memory
usage of the individual HealthBot services in terms of percentages, and triggers an alarm at predefined
settings. Alarms are viewable on the HealthBot Web UI. For example, for both CPU and memory usage:
100% or greater is critical.
•
95-100% is major.
•
75-95% is minor.
•
If the state goes from critical to normal, the alarm is automatically closed. For more information about
monitoring alarms, see Alarms and Notifications.
To view the default HealthBot services, use the healthbot status command:
$ healthbot status
Name of service Status
--------------------------------------------alerta Up
api_server Up
debugger Up
gateway Up
grafana Up
hb_proxy_syslog Up
Page 44

hbmon Up
influxdb_db Up
keycloak Up
license_client Up
mgd Up
postgres Up
redis Up
reports Up
tsdb_shim Up
Similarly, the healthbot status --device-group healthbot and healthbot status --network-group healthbot
commands show the default HealthBot services. For example:
$ healthbot status -–device-group healthbot
Name of service Status
--------------------------------------------alerta Up
api_server Up
debugger Up
gateway Up
grafana Up
hb_proxy_syslog Up
hbmon Up
influxdb_db Up
keycloak Up
license_client Up
mgd Up
postgres Up
redis Up
reports Up
tsdb_shim Up
44
$ healthbot status -–network-group healthbot
Name of service Status
--------------------------------------------alerta Up
api_server Up
debugger Up
gateway Up
grafana Up
hb_proxy_syslog Up
hbmon Up
influxdb_db Up
Page 45

keycloak Up
license_client Up
mgd Up
postgres Up
redis Up
reports Up
tsdb_shim Up
After the device groups and network groups are defined, you can view their services. The following example
shows HealthBot services running on a device group named edge and a network group named 13vpn:
$ healthbot status --device-group edge
Name of service Status
--------------------------kapacitor Up
jtimon Up
45
$ healthbot status --network-group l3vpn
Name of service Status
--------------------------------------------------kapacitor Up
analytical_engine Up
The HealthBot Web UI displays the names of the device groups and network groups you created.
RELATED DOCUMENTATION
HealthBot Command-Line Options | 53
Alarms and Notifications
Upgrading From HealthBot 3.X to HealthBot Release
3.2
If your installed version is HealthBot Release 3.0, or HealthBot Release 3.0.1, or HealthBot Release 3.1,
you can follow the instructions mentioned in “Using the Interactive Installers” on page 20 to upgrade to
HealthBot Release 3.2.
Page 46

NOTE: When you run the sudo healthbot setup command, you need not enter the installation
configuration as the installer already has the required information.
Migration from HealthBot Release 2.X to 3.X
IN THIS SECTION
Overview | 46
Case 1: HealthBot 2.X Single-node (Docker-compose) to HealthBot 3.X Single-node (Docker-compose)
Migration | 47
46
Case 2: Automated Migration from 2.X to 3.X (Kubernetes) | 48
Case 3: Manual Migration from 2.X to 3.X (Kubernetes) | 49
Overview
You can only upgrade (migrate) to version 3.X from version 2.X. Upgrade from previous versions is not
supported.
HealthBot 2.X was based entirely on docker and docker-compose for the management of the back end
microservices for both single-node and multi-node installations. Starting with HealthBot release 3.0.0,
Kubernetes is used to manage the docker components in multi-node installations. This change introduces
some incompatibilities between the existing 2.X data and the new 3.X formats, specifically:
The underscore, “_”, character is no longer supported for Device Group or Network Group names.
•
Device Group and Network Group names are no longer case-sensitive. So, in 3.X, the names DeviceGroup
•
and deviceGroup are considered the same.
Differences in the time-series databases (TSDB) between the versions can cause problems.
•
We have implemented procedures for detecting these incompatibilities and transforming the data during
specific data migration processes.
The following three use cases describe procedures for migrating the 2.X data into a 3.X installation.
Page 47

WARNING: The procedures and functions outlined below are provided only on a
best-effort basis. There is no guarantee that the data will migrate without some errors.
In the event that the migration function encounters incompatibilities that it cannot
resolve, an alert message regarding the need for manual intervention is displayed.
Ensure that you are familiar with “HealthBot Installation Requirements” on page 11 and “Using the
Interactive Installers” on page 20. These topics provide greater detail about some of the steps outlined in
the procedures below.
Case 1: HealthBot 2.X Single-node (Docker-compose) to HealthBot 3.X Single-node (Docker-compose) Migration
47
NOTE: Single-node HealthBot installations are not recommended for production systems. If you
perform this type of upgrade, you cannot upgrade later to a multi-node installation with
Docker-compose.
Before you begin, you must have:
A working 2.X installation
•
Downloaded either the .deb file for Ubuntu or the .rpm file for CentOS to a temporary location on your
•
2.X server
See “Using the Interactive Installers” on page 20 for details.
The commands that you need to run to perform the migration on Ubuntu are:
$ sudo apt-get install -y /<path-to-deb-file>/healthbot-<version>.deb
$ sudo healthbot setup
Answer “n” to the question about using Kubernetes.
The setup procedure contains the functions needed to detect the incompatibilities and transform the data.
If incompatibilities are discovered, you are asked to confirm the data transformation attempt.
$ healthbot start
Page 48

Check to see if your data was properly migrated.
The commands that you need to run to perform the migration on CentOS are:
sudo yum install -y /<path-to-rpm-file>/healthbot-<version>.rpm
sudo healthbot setup
Answer “n” to the question about using Kubernetes.
The setup procedure contains the functions needed to detect the incompatibilities and transform the data.
If incompatibilities are discovered, you are asked to confirm the data transformation attempt.
$ healthbot start
Check to see if your data was properly migrated.
48
Case 2: Automated Migration from 2.X to 3.X (Kubernetes)
Before you begin, you must have:
A working HealthBot 2.X installation
•
Run $ healthbot stop on the 2.X server
•
Downloaded either the .deb file for Ubuntu or the .rpm file for CentOS to your 3.X server
•
See “Using the Interactive Installers” on page 20 for details.
Run the interactive installers on your 3.X server.
•
During the $ sudo healthbot setup phase of the install, answer “Y” to the question about installing with
Kubernetes.
See “Using the Interactive Installers” on page 20 for details.
When healthbot setup reports success, do not run healthbot start. Instead, run the following commands:
Run $ healthbot migrate --host <ip address or hostname of 2.X installation>
•
For example: $ healthbot migrate --host 10.209.11.124
The migration function immediately prompts you for an ssh username and password to use to connect
to the 2.X server. The credentials you provide must have root privileges. Once connected to the 2.X
server, it collects the following files needed for migration and places them in the appropriate directories
on the new server:
Configuration files
•
TSDB files
•
Page 49

Helper files
•
Once collected, the migration function scans the configuration and TSDB files for incompatibilities. If
any are found, it tries to transform them to make them compatible with HealthBot 3.X.
Run $ healthbot start
•
Check to see if your data migrated properly.
•
Case 3: Manual Migration from 2.X to 3.X (Kubernetes)
Before you begin, you must have:
A working HealthBot 2.X installation
•
Run $ healthbot stop on the 2.X server
•
49
Downloaded either the .deb file for Ubuntu or the .rpm file for CentOS to your 3.X server
•
See “Using the Interactive Installers” on page 20 for details.
Run the interactive installers on your 3.X server.
•
During the $ sudo healthbot setup phase of the install, answer “Y” to the question about installing with
Kubernetes.
See “Using the Interactive Installers” on page 20 for details.
When healthbot setup reports success, do not run healthbot start. Instead, run the following commands
on the 2.X server:
$ tar czf /tmp/influx.tgz /var/local/healthbot/etc/data/influxdb
•
$ tar czf /tmp/helper.tgz /var/local/healthbot/input
•
$ scp /tmp/helper.tgz /tmp/influx.tgz /var/local/healthbot/config/healthbot.json <username>@<ip
•
or hostname of 3.x server>:</writable/directory/on/3.x/server>
For example: $ scp /tmp/helper.tgz /tmp/influx.tgz /var/local/healthbot/config/healthbot.json
user@10.100.101.12:/var/tmp/ where user is a valid username on the host with permission to write
in the /var/tmp/ directory.
On the 3.X server, run: $ healthbot migrate -c </path/to/healthbot.json> -t </path/to/influx.tgz> -hf
•
</path/to/helper.tgz>
Page 50

For example: $ healthbot migrate -c /var/tmp/healthbot.json -t /var/tmp/influx.tgz -hf
/var/tmp/helper.tgz
The migration function scans the configuration and TSDB files for incompatibilities. If any are found,
it requests confirmation from the user before it tries to transform them to make them compatible with
HealthBot 3.X.
Run $ healthbot start
•
Check to see if your data migrated properly.
•
Uninstalling or Reconfiguring HealthBot
50
IN THIS SECTION
Uninstalling HealthBot | 50
Reconfiguring HealthBot | 52
This section describes the following tasks:
Uninstalling HealthBot
HealthBot on Ubuntu
To uninstall HealthBot on Ubuntu, enter the following command:
$ sudo apt-get [remove|purge] healthbot
The remove and purge options both perform the same action. You can use either to uninstall HealthBot.
For example:
$ sudo apt-get purge healthbot
HealthBot on CentOS
Page 51

NOTE: When uninstalling HealthBot on CentOS, you might see warnings indicating that some
of the package files are not found. You can safely ignore these warnings.
To uninstall HealthBot on CentOS:
1. Verify the SELinux mode, and if set to enforcing change it to permissive. This is required to allow the
uninstall procedure to run.
$ getenforce
Enforcing
$ sudo setenforce 0
$ getenforce
Permissive
2. Uninstall the HealthBot package and its components using the following format:
51
$ sudo yum remove <healthbot-package-name>
For example:
$ yum list installed | grep healthbot
healthbot.noarch 2.0-2.1 installed
$ sudo yum remove healthbot.noarch
sudo yum remove healthbot.noarch
Loaded plugins: fastestmirror
Resolving Dependencies
--> Running transaction check
---> Package healthbot.noarch 0:2.0-2.1 will be erased
…
<answer ‘y’ to prompts as needed>
…
Running transaction
…
Removed healthbot
Erasing : healthbot-2.0-2.1.noarch 1/1
Verifying : healthbot-2.0-2.1.noarch 1/1
Removed:
healthbot.noarch 0:2.0-2.1
Complete!
Page 52

NOTE: This procedure does not uninstall all of the software dependencies that were installed
for HealthBot during installation.
3. Reset the SELinux mode to enforcing, if applicable.
$ getenforce
Permissive
$ sudo setenforce 1
$ getenforce
Enforcing
52
Reconfiguring HealthBot
Use the healthbot reconfigure command to:
Change from a single-node installation to a multinode installation, or vice versa
•
Change the HealthBot server’s IP address
•
Change SSL certificates
•
Change or recover the username or password
•
For example:
$ sudo healthbot reconfigure
Do you want a single or multi node installation? [S/m] s
Do you want to reconfigure IP address? [y/N]n
Do you want to reconfigure SSL certificates? [y/N]n
Creating /var/local/healthbot/healthbot.conf config file..
Do you want to reconfigure username/password? [y/N]y
Creating a new healthbot user
Username [user]: admin
Password: <password>
Confirm password: <password>
[executing ..] sysctl vm.max_map_count
Loading docker images. This may take some time..
...
Page 53

Docker images successfully loaded
Making some default directories
Done making directories
Generating new ssh keys
Successfully generated ssh keys
Installation successful. Please run 'healthbot start'
$ healthbot start
Starting common services....
Started common services!
Waiting for influxdb ...
Waiting for influxdb ...
Initializing API Server, This may take some time. Sleeping for 80s..
API server is initialized
UI can be accessed at https://<machine-IP>:8080
53
You can also reconfigure HealthBot using a configuration file. For example:
sudo healthbot reconfigure -c /path/configuration-file.conf
In this example, HealthBot is reconfigured to whatever settings are defined in the configuration file. For
more information on the configuration file, see “Using the Silent Installer” on page 39
HealthBot Command-Line Options
Use -h (help) to view all available command-line options for the healthbot command.
root@healthbot-server:~# healthbot
usage: healthbot.py [-h] [-v] [-nc]
{ansible,setup,reconfigure,status,remove,start,stop,uninstall,gen-compose,list-plugins,load-plugin,remove-plugin,modify-uda-engine,modify-udf-engine,restart,cli,copy,logs,mgd,migrate,tsdb,add-node,remove-node,get-nodes,runtime,cluster-health,patch,version,publish-license-files,publish-keycloak-files,connection-state-reset,k,debug,reset-password,sync-channel-to-master,sync-channel,get-k8s-dashboard-token,postgres,reload-udp-ingest-common-config,cluster-exec}
...
positional arguments:
{ansible,setup,reconfigure,status,remove,start,stop,uninstall,gen-compose,list-plugins,load-plugin,remove-plugin,modify-uda-engine,modify-udf-engine,restart,cli,copy,logs,mgd,migrate,tsdb,add-node,remove-node,get-nodes,runtime,cluster-health,patch,version,publish-license-files,publish-keycloak-files,connection-state-reset,k,debug,reset-password,sync-channel-to-master,sync-channel,get-k8s-dashboard-token,postgres,reload-udp-ingest-common-config,cluster-exec}
Page 54

sub-command help
setup Setup healthbot
reconfigure Reconfigure healthbot
status Show healthbot status
remove Remove/Delete services for a group
start Start healthbot. This command will start common
services and services for configured device and
network groups
stop Stop all running healthbot services
uninstall Uninstall healthbot
gen-compose Generate compose files of services for the given group
list-plugins List plugins available in Healthbot
load-plugin Load a plugin
remove-plugin Remove a plugin
modify-uda-engine Modify UDA engine
modify-udf-engine Modify UDF engine
restart Restart the service(s) for a group
cli Gain cli access to a service
logs Access service logs
mgd Spin up MGD container for writing rules
migrate Migrate the configuration, helper files and tsdb
tsdb update TSDB settings
add-node add new worker nodes to kubernetes cluster. eg:
healthbot add-node node1 node2
remove-node remove existing worker nodes from kubernetes cluster.
eg: healthbot remove-node node1
get-nodes Get the list of nodes in current kubernetes cluster
runtime print runtime details
cluster-health Check cluster health
patch patch healthbot service
version Print healthbot version information
publish-license-files
Publish license files
publish-keycloak-files
Publish keycloak files
connection-state-reset
Command to reset connection states manually
k Run kubectl commands
debug Debug healthbot
reset-password Reset password for a user
sync-channel-to-master
Force sync config manager's channel to master node
(applicable for Kubernetes environment)
sync-channel Force sync given channel to all nodes (applicable for
54
Page 55

Kubernetes environment)
get-k8s-dashboard-token
Prints kubernetes dashboard token
postgres Postgres commands
reload-udp-ingest-common-config
This command helps a service reload its config. Its
support is very limited now
cluster-exec Execute commands on nodes
optional arguments:
-h, --help show this help message and exit
-v, --verbose Increase output verbosity
-nc, --no-color No color
You can also use -h with an option to view more information. For example:
55
$ healthbot status -h
usage: healthbot status [-h]
[--network-group NETWORK_GROUP | --device-group
DEVICE_GROUP]
[-j]
optional arguments:
-h, --help show this help message and exit
--network-group NETWORK_GROUP
Show network group status
--device-group DEVICE_GROUP
Show device group status
-j, --json Display data in JSON format.
RELATED DOCUMENTATION
Starting and Stopping HealthBot | 42
Uninstalling or Reconfiguring HealthBot | 50
Page 56

2
CHAPTER
Linux Kernel Upgrade Procedures
Ubuntu Kernel Upgrade | 57
CentOS Kernel Upgrade | 66
Page 57

Ubuntu Kernel Upgrade
This addendum to the HealthBot 3.0.0 Installation Guide is for those who need to upgrade the kernel
version of their Ubuntu 16.04 server to 4.4.19 or later to meet the requirements for HealthBot installation.
This document assumes that you are familiar with apt, the software packaging system on Ubuntu.
For those of you who would prefer to watch the commands get executed:
Video: Ubuntu Kernel Upgrade
The kernel upgrade process involves the following steps:
Confirm current kernel version
•
Update the apt repositories on the server.
•
Upgrade existing software packages to the latest versions.
•
57
Find and install latest kernel
•
Reboot to load new kernel
•
Verify that the system is running on the new kernel
•
To perform a kernel upgrade, you must be logged in to your server as the root user or be able to obtain
root privileges using the sudo -s command. The commands in the rest of the procedure assume that you
are logged in as root or have issued the sudo -s command.
Page 58

To confirm the existing kernel versionapt repositories:
root@server# uname -msr
•
Linux 4.4.0-178-generic x86_64
Since the existing kernel is below the required version, we must upgrade the kernel on this server.
Begin the kernel upgrade procedure by updating the apt repositories.
To update apt repositories:
58
Page 59

root@server# apt update
•
root@pete:/home/probbins# apt update
Get:1 http://repo.juniper.net/Ubuntu/stable/JNPR/xenial jnpr InRelease [3,166
B]
Hit:2 http://us.archive.ubuntu.com/ubuntu xenial InRelease
Get:3 http://security.ubuntu.com/ubuntu xenial-security InRelease [109 kB]
Get:5 http://us.archive.ubuntu.com/ubuntu xenial-updates InRelease [109 kB]
Hit:4 https://packages.cloud.google.com/apt kubernetes-xenial InRelease
Get:6 http://security.ubuntu.com/ubuntu xenial-security/main amd64 Packages [863
kB]
Get:7 http://us.archive.ubuntu.com/ubuntu xenial-backports InRelease [107 kB]
Hit:8 https://download.docker.com/linux/ubuntu xenial InRelease
Get:9 http://us.archive.ubuntu.com/ubuntu xenial-updates/main amd64 Packages
[1,140 kB]
Get:10 http://security.ubuntu.com/ubuntu xenial-security/main i386 Packages [659
kB]
Get:11 http://us.archive.ubuntu.com/ubuntu xenial-updates/main i386 Packages
[918 kB]
Get:12 http://security.ubuntu.com/ubuntu xenial-security/main Translation-en
[324 kB]
Get:13 http://us.archive.ubuntu.com/ubuntu xenial-updates/universe amd64 Packages
[797 kB]
Get:14 http://security.ubuntu.com/ubuntu xenial-security/universe amd64 Packages
[491 kB]
Get:15 http://us.archive.ubuntu.com/ubuntu xenial-updates/universe i386 Packages
[721 kB]
Get:16 http://security.ubuntu.com/ubuntu xenial-security/universe i386 Packages
[422 kB]
Get:17 http://security.ubuntu.com/ubuntu xenial-security/universe Translation-en
[201 kB]
Get:18 http://security.ubuntu.com/ubuntu xenial-security/multiverse amd64 Packages
[6,092 B]
Get:19 http://security.ubuntu.com/ubuntu xenial-security/multiverse i386 Packages
[6,248 B]
Fetched 6,878 kB in 15s (437 kB/s)
Reading package lists... Done
Building dependency tree
Reading state information... Done
48 packages can be upgraded. Run 'apt list --upgradable' to see them.
W: Target Packages (stable/binary-amd64/Packages) is configured multiple times
in /etc/apt/sources.list:55 and
/etc/apt/sources.list.d/download_docker_com_linux_ubuntu.list:1
W: Target Packages (stable/binary-all/Packages) is configured multiple times in
/etc/apt/sources.list:55 and
59
Page 60

/etc/apt/sources.list.d/download_docker_com_linux_ubuntu.list:1
W: Target Translations (stable/i18n/Translation-en_US) is configured multiple
times in /etc/apt/sources.list:55 and
/etc/apt/sources.list.d/download_docker_com_linux_ubuntu.list:1
W: Target Translations (stable/i18n/Translation-en) is configured multiple times
in /etc/apt/sources.list:55 and
/etc/apt/sources.list.d/download_docker_com_linux_ubuntu.list:1
N: Skipping acquire of configured file 'stable/binary-i386/Packages' as repository
'https://download.docker.com/linux/ubuntu xenial InRelease' doesn't support
architecture 'i386'
W: Target Packages (stable/binary-amd64/Packages) is configured multiple times
in /etc/apt/sources.list:55 and
/etc/apt/sources.list.d/download_docker_com_linux_ubuntu.list:1
W: Target Packages (stable/binary-all/Packages) is configured multiple times in
/etc/apt/sources.list:55 and
/etc/apt/sources.list.d/download_docker_com_linux_ubuntu.list:1
W: Target Translations (stable/i18n/Translation-en_US) is configured multiple
times in /etc/apt/sources.list:55 and
/etc/apt/sources.list.d/download_docker_com_linux_ubuntu.list:1
W: Target Translations (stable/i18n/Translation-en) is configured multiple times
in /etc/apt/sources.list:55 and
/etc/apt/sources.list.d/download_docker_com_linux_ubuntu.list:1
60
Page 61

If you examine the output above, you’ll see that 48 packages are eligible for upgrade.
To upgrade existing software packages, including kernel upgrades:
61
Page 62

root@server# apt upgrade -y
•
Reading package lists... Done
Building dependency tree
Reading state information... Done
Calculating upgrade... Done
The following packages were automatically installed and are no longer required:
linux-headers-4.4.0-174 linux-headers-4.4.0-174-generic
linux-image-4.4.0-174-generic
linux-modules-4.4.0-174-generic linux-modules-extra-4.4.0-174-generic
Use 'sudo apt autoremove' to remove them.
The following NEW packages will be installed:
linux-headers-4.4.0-178 linux-headers-4.4.0-178-generic
linux-image-4.4.0-178-generic
linux-modules-4.4.0-178-generic linux-modules-extra-4.4.0-178-generic
The following packages will be upgraded:
apport distro-info-data git git-man kubeadm kubectl kubelet libcups2 libgd3
libglib2.0-0 libglib2.0-data libicu55
libldap-2.4-2 libpam-systemd libprocps4 libpulse0 libpython2.7-minimal
libpython2.7-stdlib libpython3.5
libpython3.5-dev libpython3.5-minimal libpython3.5-stdlib libsystemd0 libudev1
linux-base linux-firmware
linux-generic linux-headers-generic linux-image-generic linux-libc-dev procps
python2.7 python2.7-minimal
python3-apport python3-distupgrade python3-problem-report python3.5
python3.5-dev python3.5-minimal sosreport
systemd systemd-sysv ubuntu-release-upgrader-core udev vim vim-common
vim-runtime vim-tiny
48 upgraded, 5 newly installed, 0 to remove and 0 not upgraded.
Need to get 228 MB of archives.
After this operation, 311 MB of additional disk space will be used.
Get:1 http://us.archive.ubuntu.com/ubuntu xenial-updates/main amd64 systemd-sysv
amd64 229-4ubuntu21.28 [12.3 kB]
Get:2 http://security.ubuntu.com/ubuntu xenial-security/main amd64 libpulse0
amd64 1:8.0-0ubuntu3.12 [253 kB]
Get:3 http://us.archive.ubuntu.com/ubuntu xenial-updates/main amd64 libpam-systemd
amd64 229-4ubuntu21.28 [115 kB]
Get:7 http://us.archive.ubuntu.com/ubuntu xenial-updates/main amd64 libsystemd0
amd64 229-4ubuntu21.28 [206 kB]
Get:4 https://packages.cloud.google.com/apt kubernetes-xenial/main amd64 kubelet
amd64 1.18.2-00 [19.5 MB]
Get:8 http://us.archive.ubuntu.com/ubuntu xenial-updates/main amd64 systemd
amd64 229-4ubuntu21.28 [3,639 kB]
Get:5 https://packages.cloud.google.com/apt kubernetes-xenial/main amd64 kubectl
62
Page 63

amd64 1.18.2-00 [8,825 kB]
Get:6 https://packages.cloud.google.com/apt kubernetes-xenial/main amd64 kubeadm
amd64 1.18.2-00 [8,162 kB]
Get:9 http://us.archive.ubuntu.com/ubuntu xenial-updates/main amd64 udev amd64
229-4ubuntu21.28 [993 kB]
Get:10 http://us.archive.ubuntu.com/ubuntu xenial-updates/main amd64 libudev1
amd64 229-4ubuntu21.28 [54.8 kB]
Get:11 http://us.archive.ubuntu.com/ubuntu xenial-updates/main amd64 libprocps4
amd64 2:3.3.10-4ubuntu2.5 [32.9 kB]
Get:12 http://us.archive.ubuntu.com/ubuntu xenial-updates/main amd64 procps
amd64 2:3.3.10-4ubuntu2.5 [222 kB]
Get:13 http://us.archive.ubuntu.com/ubuntu xenial-updates/main amd64 python3.5-dev
amd64 3.5.2-2ubuntu0~16.04.10 [413 kB]
Get:14 http://us.archive.ubuntu.com/ubuntu xenial-updates/main amd64
libpython3.5-dev amd64 3.5.2-2ubuntu0~16.04.10 [37.3 MB]
Get:15 http://us.archive.ubuntu.com/ubuntu xenial-updates/main amd64 libpython3.5
amd64 3.5.2-2ubuntu0~16.04.10 [1,360 kB]
Get:16 http://us.archive.ubuntu.com/ubuntu xenial-updates/main amd64 python3.5
amd64 3.5.2-2ubuntu0~16.04.10 [165 kB]
Get:17 http://us.archive.ubuntu.com/ubuntu xenial-updates/main amd64
libpython3.5-stdlib amd64 3.5.2-2ubuntu0~16.04.10 [2,135 kB]
Get:18 http://us.archive.ubuntu.com/ubuntu xenial-updates/main amd64
python3.5-minimal amd64 3.5.2-2ubuntu0~16.04.10 [1,597 kB]
Get:19 http://us.archive.ubuntu.com/ubuntu xenial-updates/main amd64
libpython3.5-minimal amd64 3.5.2-2ubuntu0~16.04.10 [525 kB]
Get:20 http://us.archive.ubuntu.com/ubuntu xenial-updates/main amd64 libglib2.0-0
amd64 2.48.2-0ubuntu4.6 [1,120 kB]
Get:21 http://us.archive.ubuntu.com/ubuntu xenial-updates/main amd64 python2.7
amd64 2.7.12-1ubuntu0~16.04.11 [224 kB]
Get:22 http://us.archive.ubuntu.com/ubuntu xenial-updates/main amd64
libpython2.7-stdlib amd64 2.7.12-1ubuntu0~16.04.11 [1,884 kB]
Get:23 http://us.archive.ubuntu.com/ubuntu xenial-updates/main amd64
python2.7-minimal amd64 2.7.12-1ubuntu0~16.04.11 [1,261 kB]
Get:24 http://us.archive.ubuntu.com/ubuntu xenial-updates/main amd64
libpython2.7-minimal amd64 2.7.12-1ubuntu0~16.04.11 [338 kB]
Get:25 http://us.archive.ubuntu.com/ubuntu xenial-updates/main amd64
distro-info-data all 0.28ubuntu0.14 [4,674 B]
Get:26 http://us.archive.ubuntu.com/ubuntu xenial-updates/main amd64 linux-base
all 4.5ubuntu1.1~16.04.1 [18.1 kB]
Get:27 http://us.archive.ubuntu.com/ubuntu xenial-updates/main amd64 vim amd64
2:7.4.1689-3ubuntu1.4 [1,036 kB]
Get:28 http://us.archive.ubuntu.com/ubuntu xenial-updates/main amd64 vim-tiny
amd64 2:7.4.1689-3ubuntu1.4 [446 kB]
Get:29 http://us.archive.ubuntu.com/ubuntu xenial-updates/main amd64 vim-runtime
63
Page 64

all 2:7.4.1689-3ubuntu1.4 [5,169 kB]
Get:30 http://us.archive.ubuntu.com/ubuntu xenial-updates/main amd64 vim-common
amd64 2:7.4.1689-3ubuntu1.4 [103 kB]
Get:31 http://us.archive.ubuntu.com/ubuntu xenial-updates/main amd64
libglib2.0-data all 2.48.2-0ubuntu4.6 [131 kB]
Get:32 http://us.archive.ubuntu.com/ubuntu xenial-updates/main amd64 libicu55
amd64 55.1-7ubuntu0.5 [7,650 kB]
Get:33 http://us.archive.ubuntu.com/ubuntu xenial-updates/main amd64 libldap-2.4-2
amd64 2.4.42+dfsg-2ubuntu3.8 [159 kB]
Get:34 http://us.archive.ubuntu.com/ubuntu xenial-updates/main amd64
ubuntu-release-upgrader-core all 1:16.04.30 [30.5 kB]
Get:35 http://us.archive.ubuntu.com/ubuntu xenial-updates/main amd64
python3-distupgrade all 1:16.04.30 [104 kB]
Get:36 http://us.archive.ubuntu.com/ubuntu xenial-updates/main amd64
python3-problem-report all 2.20.1-0ubuntu2.23 [10.5 kB]
Get:37 http://us.archive.ubuntu.com/ubuntu xenial-updates/main amd64
python3-apport all 2.20.1-0ubuntu2.23 [80.1 kB]
Get:38 http://us.archive.ubuntu.com/ubuntu xenial-updates/main amd64 apport all
2.20.1-0ubuntu2.23 [121 kB]
Testing for an existing GRUB menu.lst file ... found: /boot/grub/menu.lst
Searching for splash image ... none found, skipping ...
done
64
Page 65

user@server# apt install --install-recommends linux-generic-hwe-16.04
Reading package lists... Done
Building dependency tree
Reading state information... Done
The following packages were automatically installed and are no longer required:
linux-headers-4.4.0-174 linux-headers-4.4.0-174-generic
linux-image-4.4.0-174-generic
linux-modules-4.4.0-174-generic linux-modules-extra-4.4.0-174-generic
Use 'sudo apt autoremove' to remove them.
The following additional packages will be installed:
linux-headers-4.15.0-99 linux-headers-4.15.0-99-generic
linux-headers-generic-hwe-16.04
linux-image-4.15.0-99-generic linux-image-generic-hwe-16.04
linux-modules-4.15.0-99-generic
linux-modules-extra-4.15.0-99-generic thermald
Suggested packages:
fdutils linux-hwe-tools
The following NEW packages will be installed:
linux-generic-hwe-16.04 linux-headers-4.15.0-99 linux-headers-4.15.0-99-generic
linux-headers-generic-hwe-16.04
Found kernel: /vmlinuz-4.13.0-26-generic
Found kernel: /vmlinuz-4.4.19-040419-generic
Found kernel: /vmlinuz-4.4.0-178-generic
Found kernel: /vmlinuz-4.4.0-174-generic
Replacing config file /run/grub/menu.lst with new version
Updating /boot/grub/menu.lst ... done
65
/etc/kernel/postinst.d/zz-update-grub:
Generating grub configuration file ...
Found linux image: /boot/vmlinuz-4.15.0-99-generic
Found initrd image: /boot/initrd.img-4.15.0-99-generic
Found initrd image: /boot/initrd.img-4.4.19-040419-generic
Found linux image: /boot/vmlinuz-4.4.0-178-generic
Found initrd image: /boot/initrd.img-4.4.0-178-generic
Found linux image: /boot/vmlinuz-4.4.0-174-generic
Found initrd image: /boot/initrd.img-4.4.0-174-generic
done
Processing triggers for dbus (1.10.6-1ubuntu3.5) ...
Processing triggers for systemd (229-4ubuntu21.28) ...
Processing triggers for ureadahead (0.100.0-19.1) ...
Page 66

As you can see from the output above, multiple kernels were available on this server. The apt install
command with the –install-recommends flag found the available kernels and prepared the grub menu
so that you can choose which kernel to boot from at boot time.
The new kernel is now available but not running. To load the new kernel, you must reboot the server.
user@server# reboot
•
After reboot, confirm the running kernel.
user@server# uname -msr
•
Linux 4.15.0-99-generic x86_64
RELATED DOCUMENTATION
66
CentOS Kernel Upgrade | 66
HealthBot Installation Guide
CentOS Kernel Upgrade
This addendum to the HealthBot 3.0.0 Installation Guide is for those who need to upgrade the kernel
version of their CentOS 7 server to 4.4.19 to meet the requirements for HealthBot installation. This
document assumes that you are familiar with yum and rpm, the software package management systems
on CentOS and RedHat, as well as the Grub boot manager.
For those who prefer to watch the commands as they are executed:
Video: CentOS Kernel Upgrade
The kernel upgrade process involves the following steps:
Confirm the current kernel version
•
Update existing software packages to the latest versions
•
Install GPG key for ElRepo software repository
•
Install the ElRepo software repository
•
Confirm the latest kernel in ElRepo software repository
•
Page 67

Install the latest kernel
•
Reboot to load new kernel
•
Verify that the system is running on the new kernel
•
Edit Grub configuration
•
Install Grub configuration
•
Reboot
•
To perform a kernel upgrade, you must be logged in to your server as the root user or be able to obtain
root privileges using the sudo su command. The commands in the rest of the procedure assume that you
are logged in as root or have issued the sudo -s command.
67
Page 68

root@server# uname -msr
•
Linux 3.10.0-1062.18.1.el7.x86_64 x86_64
Since the existing kernel is below the required version, we must upgrade the kernel on this server.
Begin the kernel upgrade procedure by updating the yum repositories and installed software packages.
To update yum repositories and installed software packages:
68
Page 69

root@server# yum -y update
•
Loaded plugins: fastestmirror
Loading mirror speeds from cached hostfile
* base: mirror.sfo12.us.leaseweb.net
* elrepo: linux-mirrors.fnal.gov
* extras: mirror.fileplanet.com
* updates: mirror.sfo12.us.leaseweb.net
Resolving Dependencies
--> Running transaction check
---> Package bind-export-libs.x86_64 32:9.11.4-16.P2.el7_8.2 will be updated
---> Package bind-export-libs.x86_64 32:9.11.4-16.P2.el7_8.3 will be an update
---> Package bind-libs-lite.x86_64 32:9.11.4-16.P2.el7_8.2 will be updated
---> Package bind-libs-lite.x86_64 32:9.11.4-16.P2.el7_8.3 will be an update
---> Package bind-license.noarch 32:9.11.4-16.P2.el7_8.2 will be updated
---> Package bind-license.noarch 32:9.11.4-16.P2.el7_8.3 will be an update
---> Package binutils.x86_64 0:2.27-43.base.el7 will be updated
---> Package binutils.x86_64 0:2.27-43.base.el7_8.1 will be an update
---> Package containerd.io.x86_64 0:1.2.13-3.1.el7 will be updated
---> Package containerd.io.x86_64 0:1.2.13-3.2.el7 will be an update
---> Package device-mapper.x86_64 7:1.02.164-7.el7_8.1 will be updated
---> Package device-mapper.x86_64 7:1.02.164-7.el7_8.2 will be an update
---> Package device-mapper-event.x86_64 7:1.02.164-7.el7_8.1 will be updated
---> Package device-mapper-event.x86_64 7:1.02.164-7.el7_8.2 will be an update
---> Package device-mapper-event-libs.x86_64 7:1.02.164-7.el7_8.1 will be updated
---> Package device-mapper-event-libs.x86_64 7:1.02.164-7.el7_8.2 will be an
update
---> Package device-mapper-libs.x86_64 7:1.02.164-7.el7_8.1 will be updated
---> Package device-mapper-libs.x86_64 7:1.02.164-7.el7_8.2 will be an update
---> Package kernel.x86_64 0:3.10.0-1127.8.2.el7 will be installed
---> Package kernel-tools.x86_64 0:3.10.0-1127.el7 will be updated
---> Package kernel-tools.x86_64 0:3.10.0-1127.8.2.el7 will be an update
---> Package kernel-tools-libs.x86_64 0:3.10.0-1127.el7 will be updated
---> Package kernel-tools-libs.x86_64 0:3.10.0-1127.8.2.el7 will be an update
---> Package lvm2.x86_64 7:2.02.186-7.el7_8.1 will be updated
---> Package lvm2.x86_64 7:2.02.186-7.el7_8.2 will be an update
---> Package lvm2-libs.x86_64 7:2.02.186-7.el7_8.1 will be updated
---> Package lvm2-libs.x86_64 7:2.02.186-7.el7_8.2 will be an update
---> Package python-perf.x86_64 0:3.10.0-1127.el7 will be updated
---> Package python-perf.x86_64 0:3.10.0-1127.8.2.el7 will be an update
---> Package systemd.x86_64 0:219-73.el7_8.5 will be updated
---> Package systemd.x86_64 0:219-73.el7_8.6 will be an update
---> Package systemd-libs.x86_64 0:219-73.el7_8.5 will be updated
---> Package systemd-libs.x86_64 0:219-73.el7_8.6 will be an update
---> Package systemd-sysv.x86_64 0:219-73.el7_8.5 will be updated
69
Page 70

---> Package systemd-sysv.x86_64 0:219-73.el7_8.6 will be an update
---> Package yum-plugin-fastestmirror.noarch 0:1.1.31-53.el7 will be updated
---> Package yum-plugin-fastestmirror.noarch 0:1.1.31-54.el7_8 will be an update
---> Package yum-utils.noarch 0:1.1.31-53.el7 will be updated
---> Package yum-utils.noarch 0:1.1.31-54.el7_8 will be an update
--> Finished Dependency Resolution
Dependencies Resolved
==============================================================================================================================
Package Arch Version
Repository Size
==============================================================================================================================
Installing:
kernel x86_64 3.10.0-1127.8.2.el7
updates 50 M
Updating:
bind-export-libs x86_64 32:9.11.4-16.P2.el7_8.3
updates 1.1 M
bind-libs-lite x86_64 32:9.11.4-16.P2.el7_8.3
updates 1.1 M
bind-license noarch 32:9.11.4-16.P2.el7_8.3
updates 89 k
binutils x86_64 2.27-43.base.el7_8.1
updates 5.9 M
containerd.io x86_64 1.2.13-3.2.el7
docker-ce-stable 25 M
device-mapper x86_64 7:1.02.164-7.el7_8.2
updates 295 k
device-mapper-event x86_64 7:1.02.164-7.el7_8.2
updates 191 k
device-mapper-event-libs x86_64 7:1.02.164-7.el7_8.2
updates 190 k
device-mapper-libs x86_64 7:1.02.164-7.el7_8.2
updates 324 k
kernel-tools x86_64 3.10.0-1127.8.2.el7
updates 8.0 M
kernel-tools-libs x86_64 3.10.0-1127.8.2.el7
updates 8.0 M
lvm2 x86_64 7:2.02.186-7.el7_8.2
updates 1.3 M
lvm2-libs x86_64 7:2.02.186-7.el7_8.2
updates 1.1 M
70
Page 71

python-perf x86_64 3.10.0-1127.8.2.el7
updates 8.0 M
systemd x86_64 219-73.el7_8.6
updates 5.1 M
systemd-libs x86_64 219-73.el7_8.6
updates 416 k
systemd-sysv x86_64 219-73.el7_8.6
updates 94 k
yum-plugin-fastestmirror noarch 1.1.31-54.el7_8
updates 34 k
yum-utils noarch 1.1.31-54.el7_8
updates 122 k
Transaction Summary
=============================================================================================================
Install 1 Package
Upgrade 19 Packages
71
Total download size: 117 M
Downloading packages:
Delta RPMs disabled because /usr/bin/applydeltarpm not installed.
(1/20): bind-license-9.11.4-16.P2.el7_8.3.noarch.rpm
| 89 kB 00:00:00
(2/20): bind-libs-lite-9.11.4-16.P2.el7_8.3.x86_64.rpm
| 1.1 MB 00:00:00
(3/20): bind-export-libs-9.11.4-16.P2.el7_8.3.x86_64.rpm
| 1.1 MB 00:00:01
(4/20): device-mapper-1.02.164-7.el7_8.2.x86_64.rpm
| 295 kB 00:00:00
(5/20): device-mapper-event-1.02.164-7.el7_8.2.x86_64.rpm
| 191 kB 00:00:00
(6/20): device-mapper-event-libs-1.02.164-7.el7_8.2.x86_64.rpm
| 190 kB 00:00:00
(7/20): device-mapper-libs-1.02.164-7.el7_8.2.x86_64.rpm
| 324 kB 00:00:00
(8/20): containerd.io-1.2.13-3.2.el7.x86_64.rpm
| 25 MB 00:00:02
(9/20): binutils-2.27-43.base.el7_8.1.x86_64.rpm
| 5.9 MB 00:00:08
(10/20): kernel-tools-3.10.0-1127.8.2.el7.x86_64.rpm
| 8.0 MB 00:00:08
(11/20): kernel-tools-libs-3.10.0-1127.8.2.el7.x86_64.rpm
| 8.0 MB 00:00:08
(12/20): lvm2-2.02.186-7.el7_8.2.x86_64.rpm
Page 72

| 1.3 MB 00:00:01
(13/20): systemd-libs-219-73.el7_8.6.x86_64.rpm
| 416 kB 00:00:00
(14/20): systemd-sysv-219-73.el7_8.6.x86_64.rpm
| 94 kB 00:00:00
(15/20): yum-plugin-fastestmirror-1.1.31-54.el7_8.noarch.rpm
| 34 kB 00:00:00
(16/20): yum-utils-1.1.31-54.el7_8.noarch.rpm
| 122 kB 00:00:00
(17/20): lvm2-libs-2.02.186-7.el7_8.2.x86_64.rpm
| 1.1 MB 00:00:03
(18/20): systemd-219-73.el7_8.6.x86_64.rpm
| 5.1 MB 00:00:07
(19/20): kernel-3.10.0-1127.8.2.el7.x86_64.rpm
| 50 MB 00:00:36
(20/20): python-perf-3.10.0-1127.8.2.el7.x86_64.rpm
| 8.0 MB 00:00:27
---------------------------------------------------------------------------------------------------------Total
2.6 MB/s | 117 MB 00:00:44
Running transaction check
Running transaction test
Transaction test succeeded
Running transaction
Updating : systemd-libs-219-73.el7_8.6.x86_64
1/39
Updating : systemd-219-73.el7_8.6.x86_64
2/39
Updating : 7:device-mapper-libs-1.02.164-7.el7_8.2.x86_64
3/39
Updating : 7:device-mapper-1.02.164-7.el7_8.2.x86_64
4/39
Updating : 7:device-mapper-event-libs-1.02.164-7.el7_8.2.x86_64
5/39
Updating : 7:device-mapper-event-1.02.164-7.el7_8.2.x86_64
6/39
Updating : 7:lvm2-libs-2.02.186-7.el7_8.2.x86_64
7/39
Updating : kernel-tools-libs-3.10.0-1127.8.2.el7.x86_64
8/39
Updating : 32:bind-license-9.11.4-16.P2.el7_8.3.noarch
9/39
Updating : 32:bind-libs-lite-9.11.4-16.P2.el7_8.3.x86_64
10/39
72
Page 73

Updating : kernel-tools-3.10.0-1127.8.2.el7.x86_64
11/39
Updating : 7:lvm2-2.02.186-7.el7_8.2.x86_64
12/39
Updating : containerd.io-1.2.13-3.2.el7.x86_64
13/39
Updating : systemd-sysv-219-73.el7_8.6.x86_64
14/39
Updating : 32:bind-export-libs-9.11.4-16.P2.el7_8.3.x86_64
15/39
Updating : python-perf-3.10.0-1127.8.2.el7.x86_64
16/39
Updating : yum-utils-1.1.31-54.el7_8.noarch
17/39
Installing : kernel-3.10.0-1127.8.2.el7.x86_64
18/39
Updating : binutils-2.27-43.base.el7_8.1.x86_64
19/39
Updating : yum-plugin-fastestmirror-1.1.31-54.el7_8.noarch
20/39
Cleanup : systemd-sysv-219-73.el7_8.5.x86_64
21/39
Cleanup : containerd.io-1.2.13-3.1.el7.x86_64
22/39
Cleanup : yum-utils-1.1.31-53.el7.noarch
23/39
Cleanup : yum-plugin-fastestmirror-1.1.31-53.el7.noarch
24/39
Cleanup : 7:lvm2-2.02.186-7.el7_8.1.x86_64
25/39
Cleanup : 7:lvm2-libs-2.02.186-7.el7_8.1.x86_64
26/39
Cleanup : 7:device-mapper-event-1.02.164-7.el7_8.1.x86_64
27/39
Cleanup : 7:device-mapper-event-libs-1.02.164-7.el7_8.1.x86_64
28/39
Cleanup : 7:device-mapper-libs-1.02.164-7.el7_8.1.x86_64
29/39
Cleanup : 7:device-mapper-1.02.164-7.el7_8.1.x86_64
30/39
Cleanup : systemd-219-73.el7_8.5.x86_64
31/39
Cleanup : kernel-tools-3.10.0-1127.el7.x86_64
32/39
73
Page 74

Cleanup : 32:bind-libs-lite-9.11.4-16.P2.el7_8.2.x86_64
33/39
Cleanup : 32:bind-license-9.11.4-16.P2.el7_8.2.noarch
34/39
Cleanup : kernel-tools-libs-3.10.0-1127.el7.x86_64
35/39
Cleanup : systemd-libs-219-73.el7_8.5.x86_64
36/39
Cleanup : 32:bind-export-libs-9.11.4-16.P2.el7_8.2.x86_64
37/39
Cleanup : python-perf-3.10.0-1127.el7.x86_64
38/39
Cleanup : binutils-2.27-43.base.el7.x86_64
39/39
Verifying : containerd.io-1.2.13-3.2.el7.x86_64
1/39
Verifying : 32:bind-license-9.11.4-16.P2.el7_8.3.noarch
2/39
Verifying : yum-plugin-fastestmirror-1.1.31-54.el7_8.noarch
3/39
Verifying : 7:device-mapper-1.02.164-7.el7_8.2.x86_64
4/39
Verifying : 32:bind-libs-lite-9.11.4-16.P2.el7_8.3.x86_64
5/39
Verifying : kernel-tools-3.10.0-1127.8.2.el7.x86_64
6/39
Verifying : systemd-sysv-219-73.el7_8.6.x86_64
7/39
Verifying : 7:device-mapper-event-1.02.164-7.el7_8.2.x86_64
8/39
Verifying : systemd-libs-219-73.el7_8.6.x86_64
9/39
Verifying : binutils-2.27-43.base.el7_8.1.x86_64
10/39
Verifying : systemd-219-73.el7_8.6.x86_64
11/39
Verifying : kernel-3.10.0-1127.8.2.el7.x86_64
12/39
Verifying : 7:lvm2-libs-2.02.186-7.el7_8.2.x86_64
13/39
Verifying : kernel-tools-libs-3.10.0-1127.8.2.el7.x86_64
14/39
Verifying : 7:lvm2-2.02.186-7.el7_8.2.x86_64
15/39
74
Page 75

Verifying : 7:device-mapper-libs-1.02.164-7.el7_8.2.x86_64
16/39
Verifying : yum-utils-1.1.31-54.el7_8.noarch
17/39
Verifying : python-perf-3.10.0-1127.8.2.el7.x86_64
18/39
Verifying : 32:bind-export-libs-9.11.4-16.P2.el7_8.3.x86_64
19/39
Verifying : 7:device-mapper-event-libs-1.02.164-7.el7_8.2.x86_64
20/39
Verifying : 7:device-mapper-event-1.02.164-7.el7_8.1.x86_64
21/39
Verifying : systemd-219-73.el7_8.5.x86_64
22/39
Verifying : 32:bind-libs-lite-9.11.4-16.P2.el7_8.2.x86_64
23/39
Verifying : 7:device-mapper-event-libs-1.02.164-7.el7_8.1.x86_64
24/39
Verifying : 7:device-mapper-libs-1.02.164-7.el7_8.1.x86_64
25/39
Verifying : 32:bind-export-libs-9.11.4-16.P2.el7_8.2.x86_64
26/39
Verifying : 32:bind-license-9.11.4-16.P2.el7_8.2.noarch
27/39
Verifying : binutils-2.27-43.base.el7.x86_64
28/39
Verifying : 7:device-mapper-1.02.164-7.el7_8.1.x86_64
29/39
Verifying : kernel-tools-3.10.0-1127.el7.x86_64
30/39
Verifying : kernel-tools-libs-3.10.0-1127.el7.x86_64
31/39
Verifying : 7:lvm2-2.02.186-7.el7_8.1.x86_64
32/39
Verifying : systemd-sysv-219-73.el7_8.5.x86_64
33/39
Verifying : yum-utils-1.1.31-53.el7.noarch
34/39
Verifying : python-perf-3.10.0-1127.el7.x86_64
35/39
Verifying : 7:lvm2-libs-2.02.186-7.el7_8.1.x86_64
36/39
Verifying : containerd.io-1.2.13-3.1.el7.x86_64
37/39
75
Page 76

Verifying : systemd-libs-219-73.el7_8.5.x86_64
38/39
Verifying : yum-plugin-fastestmirror-1.1.31-53.el7.noarch
39/39
Installed:
kernel.x86_64 0:3.10.0-1127.8.2.el7
Updated:
bind-export-libs.x86_64 32:9.11.4-16.P2.el7_8.3 bind-libs-lite.x86_64
32:9.11.4-16.P2.el7_8.3 bind-license.noarch 32:9.11.4-16.P2.el7_8.3
binutils.x86_64 0:2.27-43.base.el7_8.1
containerd.io.x86_64 0:1.2.13-3.2.el7 device-mapper.x86_64
7:1.02.164-7.el7_8.2 device-mapper-event.x86_64
7:1.02.164-7.el7_8.2 device-mapper-event-libs.x86_64 7:1.02.164-7.el7_8.2
device-mapper-libs.x86_64 7:1.02.164-7.el7_8.2 kernel-tools.x86_64
0:3.10.0-1127.8.2.el7 kernel-tools-libs.x86_64
0:3.10.0-1127.8.2.el7 lvm2.x86_64 7:2.02.186-7.el7_8.2
lvm2-libs.x86_64 7:2.02.186-7.el7_8.2 python-perf.x86_64
0:3.10.0-1127.8.2.el7 systemd.x86_64 0:219-73.el7_8.6
systemd-libs.x86_64 0:219-73.el7_8.6
systemd-sysv.x86_64 0:219-73.el7_8.6
yum-plugin-fastestmirror.noarch 0:1.1.31-54.el7_8 yum-utils.noarch
0:1.1.31-54.el7_8
76
Complete!
If you examine the output above, you’ll see that 19 packages were upgraded and a new kernel with
the same major release number (3) as the existing kernel was installed.
CentOS does not provide the latest available kernel versions in its software repository. Therefore, the
ElRepo (elrepo) software repository is used. Additionally, CentOS requires all software to be signed; so you
must install the elrepo GPG signature key before installing the elrepo repository.
Installing the elrepo GPG signature key requires a single rpm command which returns no output if successful:
root@server# rpm --import https://www.elrepo.org/RPM-GPG-KEY-elrepo.org
•
root@server# rpm -Uvh https://www.elrepo.org/elrepo-release-7.0-4.el7.elrepo.noarch.rpm
•
Retrieving https://www.elrepo.org/elrepo-release-7.0-4.el7.elrepo.noarch.rpm
Preparing... ################################ [100%]
Updating/Installing...
Page 77

1:elrepo-release-7.0-4.el7.elrepo ################################
[100%]
77
Page 78

root@server# yum list available --disablerepo='*' --enablerepo=elrepo-kern
•
Loaded plugins: fastestmirror
* elrepo-kernel: linux-mirrors.fnal.gov
Available Packages
kernel-lt.x86_64 4.4.219-1.el7.elrepo
elrepo-kernel
kernel-lt-devel.x86_64 4.4.219-1.el7.elrepo
elrepo-kernel
kernel-lt-doc.noarch 4.4.219-1.el7.elrepo
elrepo-kernel
kernel-lt-headers.x86_64 4.4.219-1.el7.elrepo
elrepo-kernel
kernel-lt-tools.x86_64 4.4.219-1.el7.elrepo
elrepo-kernel
kernel-lt-tools-libs.x86_64 4.4.219-1.el7.elrepo
elrepo-kernel
kernel-lt-tools-libs-devel.x86_64 4.4.219-1.el7.elrepo
elrepo-kernel
kernel-ml.x86_64 5.6.6-1.el7.elrepo
elrepo-kernel
kernel-ml-devel.x86_64 5.6.6-1.el7.elrepo
elrepo-kernel
kernel-ml-doc.noarch 5.6.6-1.el7.elrepo
elrepo-kernel
kernel-ml-headers.x86_64 5.6.6-1.el7.elrepo
elrepo-kernel
kernel-ml-tools.x86_64 5.6.6-1.el7.elrepo
elrepo-kernel
kernel-ml-tools-libs.x86_64 5.6.6-1.el7.elrepo
elrepo-kernel
kernel-ml-tools-libs-devel.x86_64 5.6.6-1.el7.elrepo
elrepo-kernel
perf.x86_64 5.6.6-1.el7.elrepo
elrepo-kernel
python-perf.x86_64 5.6.6-1.el7.elrepo
elrepo-kernel
78
Notice the names of the available kernels and tools in the output. The exact versions available will likely
differ from what is shown in the example above. The -lt kernels (and tools) are stable, long-term kernels.
The -ml kernels (and tools) are mainline release kernels with shorter support terms but more frequent
releases.
Page 79

BEST PRACTICE: We recommend using a -lt releases for stability.
After reboot, confirm the running kernel.
79
Page 80

root@server# yum --enablerepo=elrepo-kernel install kernel-lt
•
Loaded plugins: fastestmirror
Loading mirror speeds from cached hostfile
* base: mirror.sfo12.us.leaseweb.net
* elrepo: linux-mirrors.fnal.gov
* elrepo-kernel: linux-mirrors.fnal.gov
* extras: mirror.fileplanet.com
* updates: mirror.sfo12.us.leaseweb.net
elrepo-kernel | 2.9 kB
00:00:00
elrepo-kernel/primary_db | 1.9 MB
00:00:00
Resolving Dependencies
--> Running transaction check
---> Package kernel-lt.x86_64 0:4.4.223-1.el7.elrepo will be installed
--> Finished Dependency Resolution
80
Dependencies Resolved
===============================================================================================
Package Arch Version Repository
Size
===============================================================================================
Installing:
kernel-lt x86_64 4.4.223-1.el7.elrepo elrepo-kernel
39 M
Transaction Summary
===============================================================================================
Install 1 Package
Total download size: 39 M
Installed size: 180 M
Is this ok [y/d/N]: y
Downloading packages:
kernel-lt-4.4.223-1.el7.elrepo.x86_64.rpm | 39 MB
00:00:08
Running transaction check
Running transaction test
Transaction test succeeded
Running transaction
Installing : kernel-lt-4.4.223-1.el7.elrepo.x86_64 1/1
Verifying : kernel-lt-4.4.223-1.el7.elrepo.x86_64 1/1
Page 81

Installed:
kernel-lt.x86_64 0:4.4.223-1.el7.elrepo
81
Page 82

Complete!
root@server# reboot
•
We do not show the output from the reboot command.
root@server# uname -msr
•
Linux 4.4.223-1.el7.elrepo.x86_64 x86_64
We don’t know exactly how Grub is configured on your server. The following procedure is, therefore,
•
generic. The goal is to have the boot loader (grub) use the new kernel whenever you reboot. Since the
previous steps put the new kernel at the top of the list of kernels, in position 0 (zero); we configure
grub to use the kernel listed in that position by default.
82
Use the text editor of your choice to edit the file: /etc/default/grub. (Editors include vi, nano, and
emacs.)
Change the line that says:
GRUB_DEFALT=<some-value>
To:
GRUB_DEFAULT=0
Save the file.
The edited grub configuration needs to be installed so that the server will use it at boot time.
Page 83

root@server# grub2-mkconfig -o /boot/grub2/grub.cfg
•
Generating grub configuration file ...
Found linux image: /boot/vmlinuz-4.4.223-1.el7.elrepo.x86_64
Found initrd image: /boot/initramfs-4.4.223-1.el7.elrepo.x86_64.img
Found linux image: /boot/vmlinuz-3.10.0-1127.8.2.el7.x86_64
Found initrd image: /boot/initramfs-3.10.0-1127.8.2.el7.x86_64.img
Found linux image: /boot/vmlinuz-3.10.0-1127.el7.x86_64
Found initrd image: /boot/initramfs-3.10.0-1127.el7.x86_64.img
Found linux image: /boot/vmlinuz-3.10.0-1062.18.1.el7.x86_64
Found initrd image: /boot/initramfs-3.10.0-1062.18.1.el7.x86_64.img
Found linux image: /boot/vmlinuz-3.10.0-957.el7.x86_64
Found initrd image: /boot/initramfs-3.10.0-957.el7.x86_64.img
Found linux image: /boot/vmlinuz-0-rescue-cceb16d4ef4e4e84af1fa8bad95bacb8
Found initrd image: /boot/initramfs-0-rescue-cceb16d4ef4e4e84af1fa8bad95bacb8.img
done
The new kernel is now operational. The last step is to confirm that grub uses the new kernel at reboot.
83
root@server# reboot
•
RELATED DOCUMENTATION
Ubuntu Kernel Upgrade | 57
HealthBot Installation Guide
 Loading...