


 Loading...
EX2300-CandEX2300SwitchesHardwareGuide
Modified: 2017-11-09
Copyright © 2017, Juniper Networks, Inc.

Juniper Networks, Inc.
1133 Innovation Way Sunnyvale, California 94089 USA
408-745-2000 www.juniper.net
Juniper Networks, the Juniper Networks logo, Juniper, and Junos are registered trademarks of Juniper Networks, Inc. and/or its affiliates in the United States and other countries. All other trademarks may be property of their respective owners.
Juniper Networks assumes no responsibility for any inaccuracies in this document. Juniper Networks reserves the right to change, modify, transfer, or otherwise revise this publication without notice.
EX2300-C and EX2300 Switches Hardware Guide
Copyright © 2017 Juniper Networks, Inc. All rights reserved.
The information in this document is current as of the date on the title page.
YEAR 2000 NOTICE
Juniper Networks hardware and software products are Year 2000 compliant. Junos OS has no known time-related limitations through the year 2038. However, the NTP application is known to have some difficulty in the year 2036.
END USER LICENSE AGREEMENT
The Juniper Networks product that is the subject of this technical documentation consists of (or is intended for use with) Juniper Networks software. Use of such software is subject to the terms and conditions of the End User License Agreement (“EULA”) posted at http://www.juniper.net/support/eula/. By downloading, installing or using such software, you agree to the terms and conditions of that EULA.
ii |
Copyright © 2017, Juniper Networks, Inc. |

Table of Contents
|
About the Documentation . . . . . . . . . . . . . . . . . . . . . . . . . . . . . . . . . . . . . . . . . . . |
xvii |
|
Documentation and Release Notes . . . . . . . . . . . . . . . . . . . . . . . . . . . . . . . . |
xvii |
|
Supported Platforms . . . . . . . . . . . . . . . . . . . . . . . . . . . . . . . . . . . . . . . . . . . . |
xvii |
|
Documentation Conventions . . . . . . . . . . . . . . . . . . . . . . . . . . . . . . . . . . . . . |
xvii |
|
Documentation Feedback . . . . . . . . . . . . . . . . . . . . . . . . . . . . . . . . . . . . . . . . |
xix |
|
Requesting Technical Support . . . . . . . . . . . . . . . . . . . . . . . . . . . . . . . . . . . . . |
xx |
|
Self-Help Online Tools and Resources . . . . . . . . . . . . . . . . . . . . . . . . . . . |
xx |
|
Opening a Case with JTAC . . . . . . . . . . . . . . . . . . . . . . . . . . . . . . . . . . . . . |
xx |
Part 1 |
Overview |
|
Chapter 1 |
System Overview . . . . . . . . . . . . . . . . . . . . . . . . . . . . . . . . . . . . . . . . . . . . . . . . . . |
. 3 |
|
EX2300 Switches Hardware Overview . . . . . . . . . . . . . . . . . . . . . . . . . . . . . . . . . . |
. 3 |
|
EX2300 Switches First View . . . . . . . . . . . . . . . . . . . . . . . . . . . . . . . . . . . . . . . |
. 3 |
|
Uplink Ports . . . . . . . . . . . . . . . . . . . . . . . . . . . . . . . . . . . . . . . . . . . . . . . . . . . . |
. 4 |
|
Console Ports . . . . . . . . . . . . . . . . . . . . . . . . . . . . . . . . . . . . . . . . . . . . . . . . . . |
. 4 |
|
Cable Guard . . . . . . . . . . . . . . . . . . . . . . . . . . . . . . . . . . . . . . . . . . . . . . . . . . . |
. 4 |
|
Security Slot . . . . . . . . . . . . . . . . . . . . . . . . . . . . . . . . . . . . . . . . . . . . . . . . . . . |
. 5 |
|
Power over Ethernet (PoE) Ports . . . . . . . . . . . . . . . . . . . . . . . . . . . . . . . . . . . |
. 5 |
|
Front Panel of an EX2300 Switch . . . . . . . . . . . . . . . . . . . . . . . . . . . . . . . . . . |
. 5 |
|
Rear Panel of an EX2300 Switch . . . . . . . . . . . . . . . . . . . . . . . . . . . . . . . . . . . |
. 8 |
|
EX2300 Switch Models . . . . . . . . . . . . . . . . . . . . . . . . . . . . . . . . . . . . . . . . . . . . . . |
. 11 |
|
EX2300 Switch Hardware and CLI Terminology Mapping . . . . . . . . . . . . . . . . . . . |
13 |
Chapter 2 |
Chassis Components and Descriptions . . . . . . . . . . . . . . . . . . . . . . . . . . . . . . . |
15 |
|
Chassis Physical Specifications for EX2300 Switches . . . . . . . . . . . . . . . . . . . . . . |
15 |
|
Chassis Status LEDs in EX2300 Switches . . . . . . . . . . . . . . . . . . . . . . . . . . . . . . . . |
16 |
|
Management Port LEDs in EX2300 Switches . . . . . . . . . . . . . . . . . . . . . . . . . . . . . |
20 |
|
RJ-45 Network Port LEDs and Uplink Port LEDs in EX2300 Switches . . . . . . . . . |
. 21 |
Chapter 3 |
Cooling System and Airflow . . . . . . . . . . . . . . . . . . . . . . . . . . . . . . . . . . . . . . . . |
25 |
|
Cooling System and Airflow in an EX2300 Switch . . . . . . . . . . . . . . . . . . . . . . . . . |
25 |
|
Airflow Direction in EX2300 Switches with 24 Ports with PoE Capability . . . |
25 |
|
Airflow Direction in EX2300 Switches with 48 Ports with PoE Capability . . . |
26 |
|
Airflow Direction in EX2300 Switches without PoE Capability . . . . . . . . . . . . |
27 |
Chapter 4 |
Power Supplies . . . . . . . . . . . . . . . . . . . . . . . . . . . . . . . . . . . . . . . . . . . . . . . . . . . |
29 |
|
Power Supply in EX2300 Switches . . . . . . . . . . . . . . . . . . . . . . . . . . . . . . . . . . . . . |
29 |
Copyright © 2017, Juniper Networks, Inc. |
iii |

EX2300-C and EX2300 Switches Hardware Guide
Chapter 5 |
Viewing System Information . . . . . . . . . . . . . . . . . . . . . . . . . . . . . . . . . . . . . . . |
. 31 |
|
Dashboard for EX Series Switches . . . . . . . . . . . . . . . . . . . . . . . . . . . . . . . . . . . . . |
. 31 |
|
Graphical Chassis Viewer . . . . . . . . . . . . . . . . . . . . . . . . . . . . . . . . . . . . . . . . . |
32 |
|
System Information Panel . . . . . . . . . . . . . . . . . . . . . . . . . . . . . . . . . . . . . . . . |
33 |
|
Health Status Panel . . . . . . . . . . . . . . . . . . . . . . . . . . . . . . . . . . . . . . . . . . . . . |
35 |
|
Capacity Utilization Panel . . . . . . . . . . . . . . . . . . . . . . . . . . . . . . . . . . . . . . . . . |
37 |
|
Alarms Panel . . . . . . . . . . . . . . . . . . . . . . . . . . . . . . . . . . . . . . . . . . . . . . . . . . . |
37 |
|
File System Usage . . . . . . . . . . . . . . . . . . . . . . . . . . . . . . . . . . . . . . . . . . . . . . . |
38 |
|
Chassis Viewer . . . . . . . . . . . . . . . . . . . . . . . . . . . . . . . . . . . . . . . . . . . . . . . . . |
38 |
Part 2 |
Site Planning, Preparation, and Specifications |
|
Chapter 6 |
Preparation Overview . . . . . . . . . . . . . . . . . . . . . . . . . . . . . . . . . . . . . . . . . . . . . . |
53 |
|
Site Preparation Checklist for EX2300 Switches . . . . . . . . . . . . . . . . . . . . . . . . . . |
53 |
|
Environmental Requirements and Specifications for EX Series Switches . . . . . . . |
55 |
|
General Site Guidelines . . . . . . . . . . . . . . . . . . . . . . . . . . . . . . . . . . . . . . . . . . . . . . |
59 |
|
Site Electrical Wiring Guidelines . . . . . . . . . . . . . . . . . . . . . . . . . . . . . . . . . . . . . . . |
59 |
|
Chassis Physical Specifications for EX2300 Switches . . . . . . . . . . . . . . . . . . . . . |
60 |
|
Rack Requirements . . . . . . . . . . . . . . . . . . . . . . . . . . . . . . . . . . . . . . . . . . . . . . . . . . |
61 |
|
Requirements for Mounting an EX2300 Switch On or Under a Desk or Other |
|
|
Level Surface or On a Wall . . . . . . . . . . . . . . . . . . . . . . . . . . . . . . . . . . . . . . . . |
62 |
|
Cabinet Requirements . . . . . . . . . . . . . . . . . . . . . . . . . . . . . . . . . . . . . . . . . . . . . . . |
63 |
|
Clearance Requirements for Airflow and Hardware Maintenance for EX2300 |
|
|
Switches . . . . . . . . . . . . . . . . . . . . . . . . . . . . . . . . . . . . . . . . . . . . . . . . . . . . . . |
64 |
Chapter 7 |
Power Specifications and Requirements . . . . . . . . . . . . . . . . . . . . . . . . . . . . . |
69 |
|
Power Specifications for EX2300 Switches . . . . . . . . . . . . . . . . . . . . . . . . . . . . . . |
69 |
|
AC Power Cord Specifications for EX2300 Switches . . . . . . . . . . . . . . . . . . . . . . . |
70 |
|
Calculating the EX Series Switch Fiber-Optic Cable Power Budget . . . . . . . . . . . . |
72 |
|
Calculating the EX Series Switch Fiber-Optic Cable Power Margin . . . . . . . . . . . . |
72 |
Chapter 8 |
Transceiver and Cable Specifications . . . . . . . . . . . . . . . . . . . . . . . . . . . . . . . . |
75 |
|
Pluggable Transceivers Supported on EX2300 Switches . . . . . . . . . . . . . . . . . . . . |
75 |
|
Pluggable Transceivers Supported on EX Series Switches . . . . . . . . . . . . . . . . . . . |
76 |
|
SFP+ Direct Attach Copper Cables for EX Series Switches . . . . . . . . . . . . . . . . . . |
80 |
|
Cable Specifications . . . . . . . . . . . . . . . . . . . . . . . . . . . . . . . . . . . . . . . . . . . . . |
81 |
|
List of DAC Cables Supported on EX Series Switches . . . . . . . . . . . . . . . . . . . |
81 |
|
Standards Supported by These Cables . . . . . . . . . . . . . . . . . . . . . . . . . . . . . . |
82 |
|
Management Cable Specifications . . . . . . . . . . . . . . . . . . . . . . . . . . . . . . . . . . . . . |
82 |
|
Understanding EX Series Switches Fiber-Optic Cable Signal Loss, Attenuation, |
|
|
and Dispersion . . . . . . . . . . . . . . . . . . . . . . . . . . . . . . . . . . . . . . . . . . . . . . . . . |
83 |
|
Signal Loss in Multimode and Single-Mode Fiber-Optic Cable . . . . . . . . . . . |
83 |
|
Attenuation and Dispersion in Fiber-Optic Cable . . . . . . . . . . . . . . . . . . . . . . |
83 |
Chapter 9 |
Pinout Specifications . . . . . . . . . . . . . . . . . . . . . . . . . . . . . . . . . . . . . . . . . . . . . . |
85 |
|
Console Port Connector Pinout Information . . . . . . . . . . . . . . . . . . . . . . . . . . . . . . |
85 |
|
USB Port Specifications for an EX Series Switch . . . . . . . . . . . . . . . . . . . . . . . . . . |
86 |
|
Mini-USB Port Pinout Specifications . . . . . . . . . . . . . . . . . . . . . . . . . . . . . . . . . . . . |
87 |
|
RJ-45 Management Port Connector Pinout Information . . . . . . . . . . . . . . . . . . . . |
88 |
iv |
Copyright © 2017, Juniper Networks, Inc. |

Table of Contents
|
RJ-45 Port, QSFP+ Port, SFP+ Port, and SFP Port Connector Pinout |
|
|
Information . . . . . . . . . . . . . . . . . . . . . . . . . . . . . . . . . . . . . . . . . . . . . . . . . . . |
. 88 |
|
SFP+ Uplink Port Connector Pinout Information for an EX2300 Switch . . . . . . . |
. 93 |
|
RJ-45 to DB-9 Serial Port Adapter Pinout Information . . . . . . . . . . . . . . . . . . . . . |
94 |
Chapter 10 |
Planning the Virtual Chassis . . . . . . . . . . . . . . . . . . . . . . . . . . . . . . . . . . . . . . . . |
95 |
|
Planning EX2300 Virtual Chassis . . . . . . . . . . . . . . . . . . . . . . . . . . . . . . . . . . . . . . |
95 |
|
Understanding EX2300 Virtual Chassis Hardware Configuration . . . . . . . . . . . . . |
96 |
Part 3 |
Initial Installation and Configuration |
|
Chapter 11 |
Unpacking the Switch . . . . . . . . . . . . . . . . . . . . . . . . . . . . . . . . . . . . . . . . . . . . . |
99 |
|
Unpacking an EX2300 Switch . . . . . . . . . . . . . . . . . . . . . . . . . . . . . . . . . . . . . . . . |
99 |
|
Parts Inventory (Packing List) for an EX2300 Switch . . . . . . . . . . . . . . . . . . . . . . |
100 |
|
Registering Products—Mandatory for Validating SLAs . . . . . . . . . . . . . . . . . . . . . |
101 |
Chapter 12 |
Installing the Switch . . . . . . . . . . . . . . . . . . . . . . . . . . . . . . . . . . . . . . . . . . . . . . |
103 |
|
Installing and Connecting an EX2300 Switch . . . . . . . . . . . . . . . . . . . . . . . . . . . . |
103 |
|
Mounting an EX2300 Switch . . . . . . . . . . . . . . . . . . . . . . . . . . . . . . . . . . . . . . . . . |
104 |
|
Mounting an EX2300 Switch on a Desk or Other Level Surface . . . . . . . . . . . . . . |
105 |
|
Mounting an EX2300-C Switch Under a Desk or Other Level Surface by Using |
|
|
Screws . . . . . . . . . . . . . . . . . . . . . . . . . . . . . . . . . . . . . . . . . . . . . . . . . . . . . . . |
107 |
|
Mounting an EX2300 Switch on Two Posts of a Rack or Cabinet . . . . . . . . . . . . . |
112 |
|
Mounting an EX2300 Switch on Four Posts of a Rack or Cabinet . . . . . . . . . . . . . |
114 |
|
Mounting an EX2300 Switch on a Wall . . . . . . . . . . . . . . . . . . . . . . . . . . . . . . . . . |
118 |
|
Mounting an EX2300-C Switch on a Wall . . . . . . . . . . . . . . . . . . . . . . . . . . . . |
118 |
|
MountinganEX2300SwitchExcepttheEX2300-24MPandEX2300-48MP |
|
|
Models and the EX2300-C Switch on a Wall . . . . . . . . . . . . . . . . . . . . . |
122 |
|
Mounting an EX2300-C Switch on or Under a Surface Made of Ferrous |
|
|
Material . . . . . . . . . . . . . . . . . . . . . . . . . . . . . . . . . . . . . . . . . . . . . . . . . . . . . . |
126 |
|
Mounting an EX2300 Switch in a Recessed Position in a Rack or Cabinet . . . . . . |
131 |
Chapter 13 |
Connecting the Switch to Power . . . . . . . . . . . . . . . . . . . . . . . . . . . . . . . . . . . . |
133 |
|
Connecting Earth Ground to an EX Series Switch . . . . . . . . . . . . . . . . . . . . . . . . . |
133 |
|
Parts and Tools Required for Connecting an EX Series Switch to Earth |
|
|
Ground . . . . . . . . . . . . . . . . . . . . . . . . . . . . . . . . . . . . . . . . . . . . . . . . . . . |
133 |
|
Special Instructions to Follow Before Connecting Earth Ground to a |
|
|
Switch . . . . . . . . . . . . . . . . . . . . . . . . . . . . . . . . . . . . . . . . . . . . . . . . . . . . |
137 |
|
Connecting Earth Ground to an EX Series Switch . . . . . . . . . . . . . . . . . . . . . |
139 |
|
Connecting AC Power to an EX2300 Switch . . . . . . . . . . . . . . . . . . . . . . . . . . . . . |
140 |
|
Connecting DC Power to an EX2300 Switch . . . . . . . . . . . . . . . . . . . . . . . . . . . . . |
143 |
Chapter 14 |
Connecting the Switch to the Network . . . . . . . . . . . . . . . . . . . . . . . . . . . . . . |
147 |
|
Connecting a Device to a Network for Out-of-Band Management . . . . . . . . . . . . |
147 |
|
Connecting a Device to a Management Console by Using an RJ-45 |
|
|
Connector . . . . . . . . . . . . . . . . . . . . . . . . . . . . . . . . . . . . . . . . . . . . . . . . . . . . |
148 |
|
ConnectinganEXSeriesSwitchtoaManagementConsolebyUsingtheMini-USB |
|
|
Type-B Console Port . . . . . . . . . . . . . . . . . . . . . . . . . . . . . . . . . . . . . . . . . . . . |
149 |
|
Connecting a Fiber-Optic Cable . . . . . . . . . . . . . . . . . . . . . . . . . . . . . . . . . . . . . . . |
151 |
Copyright © 2017, Juniper Networks, Inc. |
v |

EX2300-C and EX2300 Switches Hardware Guide
Chapter 15 |
Performing Initial Configuration . . . . . . . . . . . . . . . . . . . . . . . . . . . . . . . . . . . . |
153 |
|
EX2300 Switch Default Configuration . . . . . . . . . . . . . . . . . . . . . . . . . . . . . . . . . . |
153 |
|
Connecting and Configuring an EX Series Switch (CLI Procedure) . . . . . . . . . . . |
159 |
|
Connecting and Configuring an EX Series Switch (J-Web Procedure) . . . . . . . . . |
162 |
|
Reverting to the Default Factory Configuration for the EX Series Switch . . . . . . . |
167 |
|
Reverting to the Factory-Default Configuration by Using the LCD Panel . . . |
168 |
|
RevertingtotheFactory-DefaultConfigurationbyUsingtherequestsystem |
|
|
zeroize Command . . . . . . . . . . . . . . . . . . . . . . . . . . . . . . . . . . . . . . . . . . |
168 |
|
Reverting to the Factory-Default Configuration by Using the load |
|
|
factory-default Command . . . . . . . . . . . . . . . . . . . . . . . . . . . . . . . . . . . . |
169 |
|
Reverting to the Factory-Default Configuration by Using the Factory |
|
|
Reset/Mode button on EX2300 and EX3400 Switches . . . . . . . . . . . . . |
170 |
Part 4 |
Installing, Maintaining, and Replacing Components |
|
Chapter 16 |
Replacing Transceiver . . . . . . . . . . . . . . . . . . . . . . . . . . . . . . . . . . . . . . . . . . . . . |
175 |
|
Installing a Transceiver . . . . . . . . . . . . . . . . . . . . . . . . . . . . . . . . . . . . . . . . . . . . . . |
175 |
|
Removing a Transceiver . . . . . . . . . . . . . . . . . . . . . . . . . . . . . . . . . . . . . . . . . . . . |
. 177 |
Chapter 17 |
Maintaining and Replacing Fiber-Optic Cable . . . . . . . . . . . . . . . . . . . . . . . . |
181 |
|
Connecting a Fiber-Optic Cable . . . . . . . . . . . . . . . . . . . . . . . . . . . . . . . . . . . . . . |
. 181 |
|
Disconnecting a Fiber-Optic Cable from a Device . . . . . . . . . . . . . . . . . . . . . . . . . |
182 |
|
Maintaining Fiber-Optic Cables . . . . . . . . . . . . . . . . . . . . . . . . . . . . . . . . . . . . . . . |
183 |
Chapter 18 |
Contacting Customer Support and Returning the Chassis or |
|
|
Components . . . . . . . . . . . . . . . . . . . . . . . . . . . . . . . . . . . . . . . . . . . . . . . . . . . . . |
185 |
|
Returning an EX2300 Switch or Component for Repair or Replacement . . . . . . |
185 |
|
Locating the Serial Number on an EX2300 Switch or Component . . . . . . . . . . . |
186 |
|
Listing the Switch and Components Details with the CLI . . . . . . . . . . . . . . . |
186 |
|
Locating the Chassis Serial Number ID Label on an EX2300 Switch . . . . . . |
187 |
|
Contacting Customer Support to Obtain Return Material Authorization . . . . . . . |
187 |
|
Packing an EX2300 Switch or Component for Shipping . . . . . . . . . . . . . . . . . . . |
188 |
|
Packing a Switch for Shipping . . . . . . . . . . . . . . . . . . . . . . . . . . . . . . . . . . . . |
189 |
|
Packing Switch Components for Shipping . . . . . . . . . . . . . . . . . . . . . . . . . . . |
190 |
Part 5 |
Troubleshooting |
|
Chapter 19 |
Alarms and System Log Messages . . . . . . . . . . . . . . . . . . . . . . . . . . . . . . . . . . |
193 |
|
Understanding Alarm Types and Severity Levels on EX Series Switches . . . . . . . |
193 |
|
Chassis Component Alarm Conditions on EX2300 Switches . . . . . . . . . . . . . . . |
194 |
|
Checking Active Alarms with the J-Web Interface . . . . . . . . . . . . . . . . . . . . . . . . |
196 |
|
Monitoring System Log Messages . . . . . . . . . . . . . . . . . . . . . . . . . . . . . . . . . . . . . |
197 |
Chapter 20 |
Troubleshooting Switch Components . . . . . . . . . . . . . . . . . . . . . . . . . . . . . . |
203 |
|
Troubleshooting PoE Voltage Injection Failure in EX2300, EX3400, or EX4300 |
|
|
Switch Models with PoE Capability . . . . . . . . . . . . . . . . . . . . . . . . . . . . . . . . |
203 |
|
Troubleshooting Storage Issues While Upgrading Junos OS in EX2300 and |
|
|
EX3400 Switches . . . . . . . . . . . . . . . . . . . . . . . . . . . . . . . . . . . . . . . . . . . . . . |
203 |
|
Troubleshooting Temperature Alarms in EX Series Switches . . . . . . . . . . . . . . . |
205 |
vi |
Copyright © 2017, Juniper Networks, Inc. |

Table of Contents
Part 6 |
Safety and Compliance Information |
|
Chapter 21 |
General Safety Guidelines and Warnings . . . . . . . . . . . . . . . . . . . . . . . . . . . . |
213 |
|
General Safety Guidelines and Warnings . . . . . . . . . . . . . . . . . . . . . . . . . . . . . . . . |
213 |
|
Definitions of Safety Warning Levels . . . . . . . . . . . . . . . . . . . . . . . . . . . . . . . . . . . |
214 |
|
Qualified Personnel Warning . . . . . . . . . . . . . . . . . . . . . . . . . . . . . . . . . . . . . . . . . |
216 |
|
Warning Statement for Norway and Sweden . . . . . . . . . . . . . . . . . . . . . . . . . . . . |
217 |
Chapter 22 |
Fire Safety Requirements . . . . . . . . . . . . . . . . . . . . . . . . . . . . . . . . . . . . . . . . . . |
219 |
|
Fire Safety Requirements . . . . . . . . . . . . . . . . . . . . . . . . . . . . . . . . . . . . . . . . . . . . |
219 |
|
Fire Suppression . . . . . . . . . . . . . . . . . . . . . . . . . . . . . . . . . . . . . . . . . . . . . . . |
219 |
|
Fire Suppression Equipment . . . . . . . . . . . . . . . . . . . . . . . . . . . . . . . . . . . . . . |
219 |
Chapter 23 |
Installation Safety Guidelines and Warnings . . . . . . . . . . . . . . . . . . . . . . . . . |
221 |
|
Installation Instructions Warning . . . . . . . . . . . . . . . . . . . . . . . . . . . . . . . . . . . . . . |
221 |
|
Chassis Lifting Guidelines . . . . . . . . . . . . . . . . . . . . . . . . . . . . . . . . . . . . . . . . . . . |
222 |
|
Restricted Access Warning . . . . . . . . . . . . . . . . . . . . . . . . . . . . . . . . . . . . . . . . . . . |
222 |
|
Ramp Warning . . . . . . . . . . . . . . . . . . . . . . . . . . . . . . . . . . . . . . . . . . . . . . . . . . . . |
224 |
|
Rack-Mounting and Cabinet-Mounting Warnings . . . . . . . . . . . . . . . . . . . . . . . . |
224 |
|
Wall-Mounting Warnings for EX2300 Switches . . . . . . . . . . . . . . . . . . . . . . . . . . |
228 |
|
Grounded Equipment Warning . . . . . . . . . . . . . . . . . . . . . . . . . . . . . . . . . . . . . . . |
228 |
Chapter 24 |
Radiation and Laser Safety Guidelines and Warnings . . . . . . . . . . . . . . . . . |
231 |
|
Laser and LED Safety Guidelines and Warnings . . . . . . . . . . . . . . . . . . . . . . . . . . |
231 |
|
General Laser Safety Guidelines . . . . . . . . . . . . . . . . . . . . . . . . . . . . . . . . . . . |
231 |
|
Class 1 Laser Product Warning . . . . . . . . . . . . . . . . . . . . . . . . . . . . . . . . . . . . |
232 |
|
Class 1 LED Product Warning . . . . . . . . . . . . . . . . . . . . . . . . . . . . . . . . . . . . . |
232 |
|
Laser Beam Warning . . . . . . . . . . . . . . . . . . . . . . . . . . . . . . . . . . . . . . . . . . . . |
232 |
|
Radiation from Open Port Apertures Warning . . . . . . . . . . . . . . . . . . . . . . . . . . . |
233 |
Chapter 25 |
Maintenance and Operational Safety Warnings . . . . . . . . . . . . . . . . . . . . . . |
235 |
|
Maintenance and Operational Safety Guidelines and Warnings . . . . . . . . . . . . . |
235 |
|
Battery Handling Warning . . . . . . . . . . . . . . . . . . . . . . . . . . . . . . . . . . . . . . . . |
235 |
|
Jewelry Removal Warning . . . . . . . . . . . . . . . . . . . . . . . . . . . . . . . . . . . . . . . |
236 |
|
Lightning Activity Warning . . . . . . . . . . . . . . . . . . . . . . . . . . . . . . . . . . . . . . . |
237 |
|
Operating Temperature Warning . . . . . . . . . . . . . . . . . . . . . . . . . . . . . . . . . . |
238 |
|
Product Disposal Warning . . . . . . . . . . . . . . . . . . . . . . . . . . . . . . . . . . . . . . . |
239 |
Chapter 26 |
Electrical Safety Guidelines and Warnings . . . . . . . . . . . . . . . . . . . . . . . . . . . |
241 |
|
General Electrical Safety Guidelines and Warnings . . . . . . . . . . . . . . . . . . . . . . . |
241 |
|
Action to Take After an Electrical Accident . . . . . . . . . . . . . . . . . . . . . . . . . . . . . . |
242 |
|
Prevention of Electrostatic Discharge Damage . . . . . . . . . . . . . . . . . . . . . . . . . . |
243 |
|
AC Power Electrical Safety Guidelines . . . . . . . . . . . . . . . . . . . . . . . . . . . . . . . . . |
244 |
|
AC Power Disconnection Warning . . . . . . . . . . . . . . . . . . . . . . . . . . . . . . . . . . . . . |
245 |
|
DC Power Electrical Safety Guidelines for Switches . . . . . . . . . . . . . . . . . . . . . . |
246 |
|
DC Power Disconnection Warning . . . . . . . . . . . . . . . . . . . . . . . . . . . . . . . . . . . . |
249 |
|
DC Power Grounding Requirements and Warning . . . . . . . . . . . . . . . . . . . . . . . . |
250 |
|
DC Power Wiring Sequence Warning . . . . . . . . . . . . . . . . . . . . . . . . . . . . . . . . . . . |
251 |
|
DC Power Wiring Terminations Warning . . . . . . . . . . . . . . . . . . . . . . . . . . . . . . . . |
253 |
|
Multiple Power Supplies Disconnection Warning . . . . . . . . . . . . . . . . . . . . . . . . . |
254 |
|
TN Power Warning . . . . . . . . . . . . . . . . . . . . . . . . . . . . . . . . . . . . . . . . . . . . . . . . . |
254 |
Copyright © 2017, Juniper Networks, Inc. |
vii |

EX2300-C and EX2300 Switches Hardware Guide
Chapter 27 |
Agency Approvals and Compliance Statements . . . . . . . . . . . . . . . . . . . . . |
257 |
|
Agency Approvals for EX Series Switches . . . . . . . . . . . . . . . . . . . . . . . . . . . . . . . |
257 |
|
Compliance Statements for EMC Requirements for EX Series Switches . . . . . . |
258 |
|
Canada . . . . . . . . . . . . . . . . . . . . . . . . . . . . . . . . . . . . . . . . . . . . . . . . . . . . . . |
258 |
|
European Community . . . . . . . . . . . . . . . . . . . . . . . . . . . . . . . . . . . . . . . . . . . |
259 |
|
Israel . . . . . . . . . . . . . . . . . . . . . . . . . . . . . . . . . . . . . . . . . . . . . . . . . . . . . . . . |
259 |
|
Japan . . . . . . . . . . . . . . . . . . . . . . . . . . . . . . . . . . . . . . . . . . . . . . . . . . . . . . . . |
259 |
|
Korea . . . . . . . . . . . . . . . . . . . . . . . . . . . . . . . . . . . . . . . . . . . . . . . . . . . . . . . . |
260 |
|
United States . . . . . . . . . . . . . . . . . . . . . . . . . . . . . . . . . . . . . . . . . . . . . . . . . |
260 |
|
FCC Part 15 Statement . . . . . . . . . . . . . . . . . . . . . . . . . . . . . . . . . . . . . . . . . . |
260 |
|
Nonregulatory Environmental Standards . . . . . . . . . . . . . . . . . . . . . . . . . . . . |
261 |
|
Compliance Statements for Acoustic Noise for EX Series Switches . . . . . . . . . . |
262 |
viii |
Copyright © 2017, Juniper Networks, Inc. |

List of Figures
Part 1 |
Overview |
|
Chapter 1 |
System Overview . . . . . . . . . . . . . . . . . . . . . . . . . . . . . . . . . . . . . . . . . . . . . . . . . . |
. 3 |
|
Figure 1: Front Panel of an EX2300-C Switch with 12 Gigabit Ethernet Ports with |
|
|
PoE Capability . . . . . . . . . . . . . . . . . . . . . . . . . . . . . . . . . . . . . . . . . . . . . . . . . . |
. 6 |
|
Figure 2: Front Panel of an EX2300-C Switch with 12 Gigabit Ethernet Ports |
|
|
without PoE Capability . . . . . . . . . . . . . . . . . . . . . . . . . . . . . . . . . . . . . . . . . . . |
. 6 |
|
Figure 3: Front Panel of an EX2300 Switch with 24 Gigabit Ethernet Ports with |
|
|
PoE Capability . . . . . . . . . . . . . . . . . . . . . . . . . . . . . . . . . . . . . . . . . . . . . . . . . . |
. 7 |
|
Figure 4: Front Panel of an EX2300 Switch with 48 Gigabit Ethernet Ports with |
|
|
PoE Capability . . . . . . . . . . . . . . . . . . . . . . . . . . . . . . . . . . . . . . . . . . . . . . . . . . |
. 8 |
|
Figure 5: Rear Panel of an EX2300-C Switch with 12 Gigabit Ethernet Ports with |
|
|
PoE Capability . . . . . . . . . . . . . . . . . . . . . . . . . . . . . . . . . . . . . . . . . . . . . . . . . . |
. 8 |
|
Figure 6: Rear Panel of an EX2300-C Switch with 12 Gigabit Ethernet Ports |
|
|
without PoE Capability . . . . . . . . . . . . . . . . . . . . . . . . . . . . . . . . . . . . . . . . . . . |
. 9 |
|
Figure 7: Rear Panel of an AC-Powered EX2300 Switch with 24 Gigabit Ethernet |
|
|
Ports with PoE Capability . . . . . . . . . . . . . . . . . . . . . . . . . . . . . . . . . . . . . . . . . |
10 |
|
Figure8:RearPanelofanAC-PoweredEX2300Switchwith24GigabitEthernet |
|
|
Ports without PoE Capability . . . . . . . . . . . . . . . . . . . . . . . . . . . . . . . . . . . . . . |
10 |
|
Figure 9: Rear Panel of a DC-Powered EX2300 Switch with 24 Gigabit Ethernet |
|
|
Ports . . . . . . . . . . . . . . . . . . . . . . . . . . . . . . . . . . . . . . . . . . . . . . . . . . . . . . . . . . |
10 |
|
Figure10:RearPanelofanAC-PoweredEX2300Switchwith48GigabitEthernet |
|
|
Ports with PoE Capability . . . . . . . . . . . . . . . . . . . . . . . . . . . . . . . . . . . . . . . . . |
. 11 |
|
Figure11:RearPanelofanAC-PoweredEX2300Switchwith48GigabitEthernet |
|
|
Ports without PoE Capability . . . . . . . . . . . . . . . . . . . . . . . . . . . . . . . . . . . . . . |
. 11 |
Chapter 2 |
Chassis Components and Descriptions . . . . . . . . . . . . . . . . . . . . . . . . . . . . . . . |
15 |
|
Figure 12: Chassis Status LEDs in EX2300-C Switches . . . . . . . . . . . . . . . . . . . . . . |
16 |
|
Figure 13: Chassis Status LEDs in EX2300 Switches Except the EX2300-C, |
|
|
EX2300-24MP and EX2300-48MP Models . . . . . . . . . . . . . . . . . . . . . . . . . . . |
17 |
|
Figure 14: Chassis Status LEDs in EX2300-24MP and EX2300-48MP Models . . . |
18 |
|
Figure 15: LEDs on the Management Port on EX2300-C Switches . . . . . . . . . . . . |
20 |
|
Figure 16: LEDs on the Management Port on EX2300 Switches Except |
|
|
EX2300-24MP and EX2300-48MP Models . . . . . . . . . . . . . . . . . . . . . . . . . . |
20 |
|
Figure 17: LEDs on RJ-45 Network Ports . . . . . . . . . . . . . . . . . . . . . . . . . . . . . . . . . . |
21 |
|
Figure 18: LEDs on the Uplink Ports in EX2300-C Switches . . . . . . . . . . . . . . . . . . |
21 |
|
Figure19:LEDsontheUplinkPortsinanEX2300SwitchesExcepttheEX2300-C |
|
|
Switches . . . . . . . . . . . . . . . . . . . . . . . . . . . . . . . . . . . . . . . . . . . . . . . . . . . . . . |
22 |
|
Figure 20: Port Mode LEDs on EX2300 Switches . . . . . . . . . . . . . . . . . . . . . . . . . . |
22 |
Chapter 3 |
Cooling System and Airflow . . . . . . . . . . . . . . . . . . . . . . . . . . . . . . . . . . . . . . . . |
25 |
Copyright © 2017, Juniper Networks, Inc. |
ix |

EX2300-C and EX2300 Switches Hardware Guide
|
Figure 21: Airflow Direction in EX2300 Switches with 24 Ports with PoE |
|
|
Capability . . . . . . . . . . . . . . . . . . . . . . . . . . . . . . . . . . . . . . . . . . . . . . . . . . . . |
. 26 |
|
Figure 22: Airflow Direction in EX2300 Switches with 48 Ports with PoE |
|
|
Capability . . . . . . . . . . . . . . . . . . . . . . . . . . . . . . . . . . . . . . . . . . . . . . . . . . . . . |
. 27 |
|
Figure 23: Airflow Direction in EX2300 Switches with 24 Ports without PoE |
|
|
Capability . . . . . . . . . . . . . . . . . . . . . . . . . . . . . . . . . . . . . . . . . . . . . . . . . . . . |
. 28 |
Part 2 |
Site Planning, Preparation, and Specifications |
|
Chapter 6 |
Preparation Overview . . . . . . . . . . . . . . . . . . . . . . . . . . . . . . . . . . . . . . . . . . . . . |
. 53 |
|
Figure 24: Clearance Requirements for Airflow and Hardware Maintenance for |
|
|
EX2300-C Switches . . . . . . . . . . . . . . . . . . . . . . . . . . . . . . . . . . . . . . . . . . . . . |
64 |
|
Figure 25: Clearance Requirements for Airflow and Hardware Maintenance for |
|
|
EX2300 Switches Except EX2200-C Switches . . . . . . . . . . . . . . . . . . . . . . . . |
65 |
|
Figure 26: Airflow Direction in EX2300 Switches with 24 Ports with PoE |
|
|
Capability . . . . . . . . . . . . . . . . . . . . . . . . . . . . . . . . . . . . . . . . . . . . . . . . . . . . . |
66 |
|
Figure 27: Airflow Direction in EX2300 Switches with 48 Ports with PoE |
|
|
Capability . . . . . . . . . . . . . . . . . . . . . . . . . . . . . . . . . . . . . . . . . . . . . . . . . . . . . |
66 |
|
Figure 28: Airflow Direction in EX2300 Switches without PoE Capability . . . . . . . |
67 |
Chapter 7 |
Power Specifications and Requirements . . . . . . . . . . . . . . . . . . . . . . . . . . . . . |
69 |
|
Figure 29: AC Plug Types . . . . . . . . . . . . . . . . . . . . . . . . . . . . . . . . . . . . . . . . . . . . . |
. 71 |
Chapter 8 |
Transceiver and Cable Specifications . . . . . . . . . . . . . . . . . . . . . . . . . . . . . . . . |
75 |
|
Figure 30: SFP+ Direct Attach Copper Cables for EX Series Switches . . . . . . . . . |
. 81 |
Part 3 |
Initial Installation and Configuration |
|
Chapter 12 |
Installing the Switch . . . . . . . . . . . . . . . . . . . . . . . . . . . . . . . . . . . . . . . . . . . . . . |
103 |
|
Figure 31: Attaching a Cable Guard to an EX2300-C Switch . . . . . . . . . . . . . . . . |
106 |
|
Figure 32: Securing the EX2300-C Switch by Using the Security Slot . . . . . . . . . |
107 |
|
Figure 33: Attaching a Cable Guard to an EX2300-C Switch . . . . . . . . . . . . . . . . |
109 |
|
Figure34:MeasurementsforInstallingMountingScrewsforMountingEX2300-C |
|
|
Switches Under a Desk or Other Level Surface by Using Screws . . . . . . . . . . |
110 |
|
Figure 35: Mounting the EX2300-C Switch Under a Desk or Other Level Surface |
|
|
by Using Screws . . . . . . . . . . . . . . . . . . . . . . . . . . . . . . . . . . . . . . . . . . . . . . . . . |
111 |
|
Figure 36: Securing the EX2300-C Switch by Using the Security Slot . . . . . . . . . . |
111 |
|
Figure 37: Attaching the Mounting Bracket Along the Front of the Switch . . . . . . |
113 |
|
Figure 38: Mounting the Switch on Two Posts of a Rack . . . . . . . . . . . . . . . . . . . . |
114 |
|
Figure 39: Attaching the Front-Mounting Bracket to the Side Mounting-Rail . . . . |
116 |
|
Figure 40: Attaching the Side Mounting-Rail to the Switch Chassis . . . . . . . . . . . |
116 |
|
Figure 41: Mounting the Switch to the Front Posts of a Rack . . . . . . . . . . . . . . . . . |
117 |
|
Figure 42: Sliding the Rear Mounting-Blades into the Side Mounting-Rail . . . . . . |
117 |
|
Figure 43: Attaching a Cable Guard to an EX2300-C Switch . . . . . . . . . . . . . . . . |
119 |
|
Figure 44: Measurements for Installing Mounting Screws for Mounting an |
|
|
EX2300-C Switch on a Wall . . . . . . . . . . . . . . . . . . . . . . . . . . . . . . . . . . . . . . |
120 |
|
Figure 45: Mounting an EX2300-C Switch on a Wall . . . . . . . . . . . . . . . . . . . . . . . |
121 |
|
Figure 46: Securing the EX2300-C Switch by Using the Security Slot . . . . . . . . . |
121 |
|
Figure 47: Attaching Wall-Mount Brackets to an EX2300 Switch Except the |
|
|
EX2300-24MP and EX2300-48MP Models and the EX2300-C Switch . . . . |
123 |
x |
Copyright © 2017, Juniper Networks, Inc. |
List of Figures
|
Figure 48: Measurements for Installing Mounting Screws to Mount an EX2300 |
|
|
Switch Except the EX2300-24MP and EX2300-48MP Models and the |
|
|
EX2300-C Switch on a Wall . . . . . . . . . . . . . . . . . . . . . . . . . . . . . . . . . . . . . . |
125 |
|
Figure 49: Mounting an EX2300 Switch Except the EX2300-24MP and |
|
|
EX2300-48MP Models and the EX2300-C Switch on a Wall . . . . . . . . . . . . |
126 |
|
Figure 50: Attaching a Cable Guard to an EX2300-C Switch . . . . . . . . . . . . . . . . |
128 |
|
Figure 51: Attaching Rubber Pads to an EX2300-C Switch . . . . . . . . . . . . . . . . . . |
128 |
|
Figure 52: Attaching the Magnet Mount Sheet to an EX2300-C Switch . . . . . . . |
129 |
|
Figure53:MountinganEX2300-CSwitchonorUnderaSurfaceMadeofFerrous |
|
|
Material . . . . . . . . . . . . . . . . . . . . . . . . . . . . . . . . . . . . . . . . . . . . . . . . . . . . . . |
130 |
|
Figure 54: Securing the EX2300-C Switch by Using the Security Slot . . . . . . . . . |
130 |
Chapter 13 |
Connecting the Switch to Power . . . . . . . . . . . . . . . . . . . . . . . . . . . . . . . . . . . . |
133 |
|
Figure 55: Connecting the Grounding Lug to a Switch Mounted on Four Posts of |
|
|
a Rack . . . . . . . . . . . . . . . . . . . . . . . . . . . . . . . . . . . . . . . . . . . . . . . . . . . . . . . |
138 |
|
Figure 56: Connecting a Grounding Cable to an EX Series Switch . . . . . . . . . . . . |
139 |
|
Figure 57: Connecting an AC Power Cord Retainer Clip to the AC Power Cord |
|
|
Inlet on EX2300-C Switches . . . . . . . . . . . . . . . . . . . . . . . . . . . . . . . . . . . . . . |
142 |
|
Figure 58: Connecting an AC Power Cord Retainer Clip to the AC Power Cord |
|
|
Inlet on EX2300 Switches Except the EX2300-C, EX2300-24MP, and |
|
|
EX2300-48MP Models . . . . . . . . . . . . . . . . . . . . . . . . . . . . . . . . . . . . . . . . . . |
142 |
|
Figure59:ConnectinganACPowerCordtotheACPowerCordInletonEX2300-C |
|
|
Switches . . . . . . . . . . . . . . . . . . . . . . . . . . . . . . . . . . . . . . . . . . . . . . . . . . . . . . |
142 |
|
Figure 60: Connecting an AC Power Cord to the AC Power Cord Inlet on EX2300 |
|
|
Switches Except EX2300-C Switches . . . . . . . . . . . . . . . . . . . . . . . . . . . . . . |
142 |
|
Figure 61: Securing the Ring Lugs On the Power Cables to the Terminals on the |
|
|
DC Power Supply . . . . . . . . . . . . . . . . . . . . . . . . . . . . . . . . . . . . . . . . . . . . . . . |
144 |
Chapter 14 |
Connecting the Switch to the Network . . . . . . . . . . . . . . . . . . . . . . . . . . . . . . |
147 |
|
Figure 62: RJ-45 Connector on an Ethernet Cable . . . . . . . . . . . . . . . . . . . . . . . . . |
147 |
|
Figure 63: Connecting a Device to a Network for Out-of-Band Management . . . |
148 |
|
Figure 64: RJ-45 Connector on an Ethernet Cable . . . . . . . . . . . . . . . . . . . . . . . . |
148 |
|
Figure 65: Connecting a Device to a Management Console Through a Console |
|
|
Server . . . . . . . . . . . . . . . . . . . . . . . . . . . . . . . . . . . . . . . . . . . . . . . . . . . . . . . . |
149 |
|
Figure 66: Connecting a Device Directly to a Management Console . . . . . . . . . . |
149 |
|
Figure 67: Connecting a Fiber-Optic Cable to an Optical Transceiver Installed in |
|
|
a Device . . . . . . . . . . . . . . . . . . . . . . . . . . . . . . . . . . . . . . . . . . . . . . . . . . . . . . . |
151 |
Chapter 15 |
Performing Initial Configuration . . . . . . . . . . . . . . . . . . . . . . . . . . . . . . . . . . . . |
153 |
|
Figure 68: LCD Panel in an EX3200, EX4200, EX4500, EX4550, or EX8200 |
|
|
Switch . . . . . . . . . . . . . . . . . . . . . . . . . . . . . . . . . . . . . . . . . . . . . . . . . . . . . . . |
164 |
|
Figure 69: LCD Panel in an EX4300 Switch . . . . . . . . . . . . . . . . . . . . . . . . . . . . . . |
164 |
|
Figure 70: EX Series Switch LCD Panel . . . . . . . . . . . . . . . . . . . . . . . . . . . . . . . . . |
168 |
Part 4 |
Installing, Maintaining, and Replacing Components |
|
Chapter 16 |
Replacing Transceiver . . . . . . . . . . . . . . . . . . . . . . . . . . . . . . . . . . . . . . . . . . . . . |
175 |
|
Figure 71: Installing a Transceiver . . . . . . . . . . . . . . . . . . . . . . . . . . . . . . . . . . . . . . |
177 |
|
Figure 72: Removing an SFP, SFP+, XFP, or a QSFP+ Transceiver . . . . . . . . . . . . |
179 |
Chapter 17 |
Maintaining and Replacing Fiber-Optic Cable . . . . . . . . . . . . . . . . . . . . . . . . |
181 |
Copyright © 2017, Juniper Networks, Inc. |
xi |

EX2300-C and EX2300 Switches Hardware Guide
|
Figure 73: Connecting a Fiber-Optic Cable to an Optical Transceiver Installed in |
|
|
a Device . . . . . . . . . . . . . . . . . . . . . . . . . . . . . . . . . . . . . . . . . . . . . . . . . . . . . . |
182 |
Chapter 18 |
Contacting Customer Support and Returning the Chassis or |
|
|
Components . . . . . . . . . . . . . . . . . . . . . . . . . . . . . . . . . . . . . . . . . . . . . . . . . . . . . |
185 |
|
Figure 74: Location of the Serial Number ID Label on EX2300-C Switches . . . . . |
187 |
|
Figure 75: Location of the Serial Number ID Label on EX2300 Switches Except |
|
|
EX2300-C Switches . . . . . . . . . . . . . . . . . . . . . . . . . . . . . . . . . . . . . . . . . . . . |
187 |
Part 6 |
Safety and Compliance Information |
|
Chapter 26 |
Electrical Safety Guidelines and Warnings . . . . . . . . . . . . . . . . . . . . . . . . . . . |
241 |
|
Figure 76: Placing a Component into an Antistatic Bag . . . . . . . . . . . . . . . . . . . . |
244 |
xii |
Copyright © 2017, Juniper Networks, Inc. |

List of Tables
About the Documentation . . . . . . . . . . . . . . . . . . . . . . . . . . . . . . . . . . . . . . . . . xvii
Table 1: Notice Icons . . . . . . . . . . . . . . . . . . . . . . . . . . . . . . . . . . . . . . . . . . . . . . . . xviii
Table 2: Text and Syntax Conventions . . . . . . . . . . . . . . . . . . . . . . . . . . . . . . . . . . xviii
Part 1 |
Overview |
|
Chapter 1 |
System Overview . . . . . . . . . . . . . . . . . . . . . . . . . . . . . . . . . . . . . . . . . . . . . . . . . . |
. 3 |
|
Table 3: EX2300 Switch Models . . . . . . . . . . . . . . . . . . . . . . . . . . . . . . . . . . . . . . . |
. 12 |
|
Table 4: CLI Equivalents of Terms Used in Documentation for EX2300 |
|
|
Switches . . . . . . . . . . . . . . . . . . . . . . . . . . . . . . . . . . . . . . . . . . . . . . . . . . . . . . . |
13 |
Chapter 2 |
Chassis Components and Descriptions . . . . . . . . . . . . . . . . . . . . . . . . . . . . . . . |
15 |
|
Table 5: Physical Specifications of the EX2300 Switch Chassis . . . . . . . . . . . . . . . |
15 |
|
Table 6: Chassis Status LEDs in EX2300 Switches Except the EX2300-24MP |
|
|
and EX2300-48 MP Models . . . . . . . . . . . . . . . . . . . . . . . . . . . . . . . . . . . . . . . |
17 |
|
Table 7: Chassis Status LEDs in EX2300-24MP and EX2300-48 MP Models . . . . |
19 |
|
Table 8: Link/Activity LED on the Management Port on EX2300 Switches . . . . . . |
21 |
|
Table 9: Status LED on the Management Port on EX2300 Switches . . . . . . . . . . . |
21 |
|
Table 10: Link/Activity LED on the RJ-45 Network Ports and the Uplink Ports in |
|
|
EX2300 Switches . . . . . . . . . . . . . . . . . . . . . . . . . . . . . . . . . . . . . . . . . . . . . . . |
22 |
|
Table 11: Status LED on the RJ-45 Network Ports in EX2300 Switches . . . . . . . . . |
23 |
|
Table 12: Status LED on the Uplink Ports in EX2300 Switches . . . . . . . . . . . . . . . . |
23 |
Chapter 4 |
Power Supplies . . . . . . . . . . . . . . . . . . . . . . . . . . . . . . . . . . . . . . . . . . . . . . . . . . . |
29 |
|
Table 13: Power Consumed by EX2300 Switches . . . . . . . . . . . . . . . . . . . . . . . . . . |
29 |
Chapter 5 |
Viewing System Information . . . . . . . . . . . . . . . . . . . . . . . . . . . . . . . . . . . . . . . . |
31 |
|
Table 14: Details of a Virtual Chassis Member Switch . . . . . . . . . . . . . . . . . . . . . . |
32 |
|
Table 15: Status of a Member Switch in a Virtual Chassis . . . . . . . . . . . . . . . . . . . |
33 |
|
Table 16: System Information . . . . . . . . . . . . . . . . . . . . . . . . . . . . . . . . . . . . . . . . . |
33 |
|
Table 17: Health Status . . . . . . . . . . . . . . . . . . . . . . . . . . . . . . . . . . . . . . . . . . . . . . . |
35 |
|
Table 18: Capacity Utilization . . . . . . . . . . . . . . . . . . . . . . . . . . . . . . . . . . . . . . . . . . |
37 |
|
Table 19: Chassis Viewer for EX2200 Switches . . . . . . . . . . . . . . . . . . . . . . . . . . . |
38 |
|
Table 20: Chassis Viewer for EX2200-C Switches . . . . . . . . . . . . . . . . . . . . . . . . . |
39 |
|
Table 21: Chassis Viewer for EX3200, EX3300, and EX4200 Switches . . . . . . . . . |
39 |
|
Table 22: Chassis Viewer for EX4300 Switches . . . . . . . . . . . . . . . . . . . . . . . . . . . . |
41 |
|
Table 23: Chassis Viewer for EX4500 Switches . . . . . . . . . . . . . . . . . . . . . . . . . . . |
42 |
|
Table 24: Chassis Viewer for EX4550 Switches . . . . . . . . . . . . . . . . . . . . . . . . . . . |
43 |
|
Table 25: Chassis Viewer for EX4600 Switches . . . . . . . . . . . . . . . . . . . . . . . . . . . |
45 |
|
Table 26: Chassis Viewer for EX6210 Switches . . . . . . . . . . . . . . . . . . . . . . . . . . . |
45 |
|
Table 27: Chassis Viewer for EX8208 Switches . . . . . . . . . . . . . . . . . . . . . . . . . . . |
46 |
|
Table 28: Chassis Viewer for EX8216 Switches . . . . . . . . . . . . . . . . . . . . . . . . . . . |
48 |
Copyright © 2017, Juniper Networks, Inc. |
xiii |

EX2300-C and EX2300 Switches Hardware Guide
|
Table 29: Chassis Viewer for XRE200 External Routing Engines . . . . . . . . . . . . . |
. 48 |
Part 2 |
Site Planning, Preparation, and Specifications |
|
Chapter 6 |
Preparation Overview . . . . . . . . . . . . . . . . . . . . . . . . . . . . . . . . . . . . . . . . . . . . . |
. 53 |
|
Table 30: Site Preparation Checklist . . . . . . . . . . . . . . . . . . . . . . . . . . . . . . . . . . . |
. 53 |
|
Table 31: EX Series Switch Environmental Tolerances . . . . . . . . . . . . . . . . . . . . . . |
55 |
|
Table 32: Site Electrical Wiring Guidelines . . . . . . . . . . . . . . . . . . . . . . . . . . . . . . . |
60 |
|
Table 33: Physical Specifications of the EX2300 Switch Chassis . . . . . . . . . . . . . |
60 |
|
Table 34: Rack Requirements and Specifications . . . . . . . . . . . . . . . . . . . . . . . . . |
62 |
|
Table 35: Cabinet Requirements and Specifications . . . . . . . . . . . . . . . . . . . . . . . |
63 |
Chapter 7 |
Power Specifications and Requirements . . . . . . . . . . . . . . . . . . . . . . . . . . . . . |
69 |
|
Table 36: AC Power Supply Electrical Specifications for EX2300 Switches . . . . . |
69 |
|
Table37:DCPowerSupplyElectricalSpecificationsforEX2300Switches(Except |
|
|
EX2300-C, EX2300-24MP, and EX2300-48MP Switches) . . . . . . . . . . . . . . |
70 |
|
Table 38: AC Power Cord Specifications . . . . . . . . . . . . . . . . . . . . . . . . . . . . . . . . |
. 71 |
|
Table 39: Estimated Values for Factors Causing Link Loss . . . . . . . . . . . . . . . . . . |
73 |
Chapter 8 |
Transceiver and Cable Specifications . . . . . . . . . . . . . . . . . . . . . . . . . . . . . . . . |
75 |
|
Table 40: Specifications of Cables to Connect to Management Devices . . . . . . . |
82 |
Chapter 9 |
Pinout Specifications . . . . . . . . . . . . . . . . . . . . . . . . . . . . . . . . . . . . . . . . . . . . . . |
85 |
|
Table 41: Console Port Connector Pinout Information . . . . . . . . . . . . . . . . . . . . . . |
85 |
|
Table 42: Mini-USB Type-B Console Port Pinout Information . . . . . . . . . . . . . . . . |
87 |
|
Table 43: RJ-45 Management Port Connector Pinout Information . . . . . . . . . . . . |
88 |
|
Table 44: 10/100/1000BASE-T Ethernet Network Port Connector Pinout |
|
|
Information . . . . . . . . . . . . . . . . . . . . . . . . . . . . . . . . . . . . . . . . . . . . . . . . . . . . |
88 |
|
Table 45: SFP Network Port Connector Pinout Information . . . . . . . . . . . . . . . . . |
89 |
|
Table 46: SFP+ Network Port Connector Pinout Information . . . . . . . . . . . . . . . . |
90 |
|
Table 47: QSFP+ Network Port Connector Pinout Information . . . . . . . . . . . . . . . . |
91 |
|
Table 48: Connector Pinout Information for the 10-Gigabit Ethernet Uplink |
|
|
Port . . . . . . . . . . . . . . . . . . . . . . . . . . . . . . . . . . . . . . . . . . . . . . . . . . . . . . . . . . |
93 |
|
Table 49: RJ-45 to DB-9 Serial Port Adapter Pinout Information . . . . . . . . . . . . . |
94 |
Part 3 |
Initial Installation and Configuration |
|
Chapter 11 |
Unpacking the Switch . . . . . . . . . . . . . . . . . . . . . . . . . . . . . . . . . . . . . . . . . . . . . |
99 |
|
Table 50: Parts List for EX2300 Switches . . . . . . . . . . . . . . . . . . . . . . . . . . . . . . . |
100 |
Chapter 12 |
Installing the Switch . . . . . . . . . . . . . . . . . . . . . . . . . . . . . . . . . . . . . . . . . . . . . . |
103 |
|
Table 51: EX2300 Switch Mounting Methods . . . . . . . . . . . . . . . . . . . . . . . . . . . . |
104 |
Chapter 13 |
Connecting the Switch to Power . . . . . . . . . . . . . . . . . . . . . . . . . . . . . . . . . . . . |
133 |
|
Table 52: Parts and Tools Required for Connecting an EX Series Switch to Earth |
|
|
Ground . . . . . . . . . . . . . . . . . . . . . . . . . . . . . . . . . . . . . . . . . . . . . . . . . . . . . . . |
134 |
|
Table 53: Special Instructions to Follow Before Connecting Earth Ground to a |
|
|
Switch . . . . . . . . . . . . . . . . . . . . . . . . . . . . . . . . . . . . . . . . . . . . . . . . . . . . . . . . |
137 |
Part 5 |
Troubleshooting |
|
Chapter 19 |
Alarms and System Log Messages . . . . . . . . . . . . . . . . . . . . . . . . . . . . . . . . . . |
193 |
xiv |
Copyright © 2017, Juniper Networks, Inc. |

List of Tables
|
Table 54: Alarm Terms . . . . . . . . . . . . . . . . . . . . . . . . . . . . . . . . . . . . . . . . . . . . . |
. 193 |
|
Table 55: Alarm Conditions on EX2300 Switches . . . . . . . . . . . . . . . . . . . . . . . . . |
195 |
|
Table 56: Summary of Key Alarm Output Fields . . . . . . . . . . . . . . . . . . . . . . . . . . |
197 |
|
Table 57: Filtering System Log Messages . . . . . . . . . . . . . . . . . . . . . . . . . . . . . . . |
198 |
|
Table 58: Viewing System Log Messages . . . . . . . . . . . . . . . . . . . . . . . . . . . . . . . |
200 |
Chapter 20 |
Troubleshooting Switch Components . . . . . . . . . . . . . . . . . . . . . . . . . . . . . . |
203 |
|
Table 59: show chassis environment Output Fields . . . . . . . . . . . . . . . . . . . . . . . |
206 |
|
Table 60: show chassis temperature-thresholds Output Fields . . . . . . . . . . . . . |
207 |
|
Table 61: Causes and Remedies for Temperature Alarms . . . . . . . . . . . . . . . . . . |
208 |
Copyright © 2017, Juniper Networks, Inc. |
xv |

EX2300-C and EX2300 Switches Hardware Guide
xvi |
Copyright © 2017, Juniper Networks, Inc. |

About the Documentation
•Documentation and Release Notes on page xvii
•Supported Platforms on page xvii
•Documentation Conventions on page xvii
•Documentation Feedback on page xix
•Requesting Technical Support on page xx
Documentation and Release Notes
To obtain the most current version of all Juniper Networks® technical documentation, see the product documentation page on the Juniper Networks website at http://www.juniper.net/techpubs/.
If the information in the latest release notes differs from the information in the documentation, follow the product Release Notes.
Juniper Networks Books publishes books by Juniper Networks engineers and subject matter experts. These books go beyond the technical documentation to explore the nuances of network architecture, deployment, and administration. The current list can be viewed at http://www.juniper.net/books.
Supported Platforms
For the features described in this document, the following platforms are supported:
• EX2300
Documentation Conventions
Table 1 on page xviii defines notice icons used in this guide.
Copyright © 2017, Juniper Networks, Inc. |
xvii |
EX2300-C and EX2300 Switches Hardware Guide
Table 1: Notice Icons
Icon |
Meaning |
Description |
|
Informational note |
Indicates important features or instructions. |
|
Caution |
Indicates a situation that might result in loss of data or hardware damage. |
|
Warning |
Alerts you to the risk of personal injury or death. |
|
Laser warning |
Alerts you to the risk of personal injury from a laser. |
|
Tip |
Indicates helpful information. |
|
Best practice |
Alerts you to a recommended use or implementation. |
Table 2 on page xviii defines the text and syntax conventions used in this guide.
Table 2: Text and Syntax Conventions
Convention |
Description |
Bold text like this |
Represents text that you type. |
Fixed-width text like this |
Represents output that appears on the |
|
|
terminal screen. |
|
Italic text like this |
• Introduces or emphasizes important |
|
|
|
new terms. |
|
• |
Identifies guide names. |
|
• |
IdentifiesRFCandInternetdrafttitles. |
Italic text like this |
Represents variables (options for which |
|
|
you substitute a value) in commands or |
|
|
configuration statements. |
|
Examples
To enter configuration mode, type the configure command:
user@host> configure
user@host> show chassis alarms
No alarms currently active
•A policy term is a named structure that defines match conditions and actions.
•Junos OS CLI User Guide
•RFC1997, BGPCommunitiesAttribute
Configure the machine’s domain name:
[edit]
root@# set system domain-name domain-name
xviii |
Copyright © 2017, Juniper Networks, Inc. |

About the Documentation
Table 2: Text and Syntax Conventions (continued)
Convention |
Description |
Text like this |
Represents names of configuration |
|
statements, commands, files, and |
|
directories;configurationhierarchylevels; |
|
or labels on routing platform |
|
components. |
Examples
•To configure a stub area, include the stub statement at the [edit protocols ospf area area-id] hierarchy level.
•TheconsoleportislabeledCONSOLE.
< > (angle brackets) |
Encloses optional keywords or variables. |
| (pipe symbol) |
Indicates a choice between the mutually |
|
exclusive keywords or variables on either |
|
side of the symbol. The set of choices is |
|
often enclosed in parentheses for clarity. |
stub <default-metric metric>;
broadcast | multicast
(string1 | string2 | string3)
# (pound sign) |
Indicates a comment specified on the |
rsvp { # Required for dynamic MPLS only |
|
samelineastheconfigurationstatement |
|
|
to which it applies. |
|
[ ] (square brackets) |
Encloses a variable for which you can |
|
substitute one or more values. |
Indention and braces ( { } ) |
Identifies a level in the configuration |
|
hierarchy. |
; (semicolon) |
Identifies a leaf statement at a |
|
configuration hierarchy level. |
GUI Conventions
Bold text like this |
Representsgraphicaluserinterface(GUI) |
|
items you click or select. |
> (bold right angle bracket) |
Separates levels in a hierarchy of menu |
|
selections. |
community name members [ community-ids ]
[edit] routing-options {
static {
route default { nexthop address; retain;
}
}
}
•In the Logical Interfaces box, select
All Interfaces.
•To cancel the configuration, click
Cancel.
In the configuration editor hierarchy, select Protocols>Ospf.
Documentation Feedback
We encourage you to provide feedback, comments, and suggestions so that we can improve the documentation. You can provide feedback by using either of the following methods:
•Online feedback rating system—On any page of the Juniper Networks TechLibrary site athttp://www.juniper.net/techpubs/index.html,simplyclickthestarstoratethecontent, and use the pop-up form to provide us with information about your experience.
Alternately, you can use the online feedback form at http://www.juniper.net/techpubs/feedback/.
Copyright © 2017, Juniper Networks, Inc. |
xix |

EX2300-C and EX2300 Switches Hardware Guide
•E-mail—Sendyourcommentstotechpubs-comments@juniper.net.Includethedocument or topic name, URL or page number, and software version (if applicable).
Requesting Technical Support
TechnicalproductsupportisavailablethroughtheJuniperNetworksTechnicalAssistance Center (JTAC). If you are a customer with an active J-Care or Partner Support Service support contract, or are covered under warranty, and need post-sales technical support, you can access our tools and resources online or open a case with JTAC.
•JTAC policies—For a complete understanding of our JTAC procedures and policies, review the JTAC User Guide located at http://www.juniper.net/us/en/local/pdf/resource-guides/7100059-en.pdf.
•Product warranties—For product warranty information, visit http://www.juniper.net/support/warranty/.
•JTAC hours of operation—The JTAC centers have resources available 24 hours a day, 7 days a week, 365 days a year.
Self-Help Online Tools and Resources
For quick and easy problem resolution, Juniper Networks has designed an online self-service portal called the Customer Support Center (CSC) that provides you with the following features:
•Find CSC offerings: http://www.juniper.net/customers/support/
•Search for known bugs: https://prsearch.juniper.net/
•Find product documentation: http://www.juniper.net/documentation/
•Find solutions and answer questions using our Knowledge Base: http://kb.juniper.net/
•Download the latest versions of software and review release notes: http://www.juniper.net/customers/csc/software/
•Search technical bulletins for relevant hardware and software notifications: http://kb.juniper.net/InfoCenter/
•Join and participate in the Juniper Networks Community Forum: http://www.juniper.net/company/communities/
•Open a case online in the CSC Case Management tool: http://www.juniper.net/cm/
Toverifyserviceentitlementbyproductserialnumber,useourSerialNumberEntitlement (SNE) Tool: https://entitlementsearch.juniper.net/entitlementsearch/
Opening a Case with JTAC
You can open a case with JTAC on the Web or by telephone.
•Use the Case Management tool in the CSC at http://www.juniper.net/cm/.
•Call 1-888-314-JTAC (1-888-314-5822 toll-free in the USA, Canada, and Mexico).
xx |
Copyright © 2017, Juniper Networks, Inc. |
About the Documentation
For international or direct-dial options in countries without toll-free numbers, see http://www.juniper.net/support/requesting-support.html.
Copyright © 2017, Juniper Networks, Inc. |
xxi |

EX2300-C and EX2300 Switches Hardware Guide
xxii |
Copyright © 2017, Juniper Networks, Inc. |

PART 1
Overview
•System Overview on page 3
•Chassis Components and Descriptions on page 15
•Cooling System and Airflow on page 25
•Power Supplies on page 29
•Viewing System Information on page 31
Copyright © 2017, Juniper Networks, Inc. |
1 |

EX2300-C and EX2300 Switches Hardware Guide
2 |
Copyright © 2017, Juniper Networks, Inc. |

CHAPTER 1
System Overview
•EX2300 Switches Hardware Overview on page 3
•EX2300 Switch Models on page 11
•EX2300 Switch Hardware and CLI Terminology Mapping on page 13
EX2300 Switches Hardware Overview
Juniper Networks EX Series Ethernet Switches provide scalable connectivity for the enterprise market, including branch offices, campus locations, and data centers. The Juniper Networks EX2300 Ethernet Switches run the Juniper Networks Junos operating system (Junos OS), which provides Layer 2 and Layer 3 switching, routing, and security services.
EX2300 switches provide connectivity for low-density environments.
This topic describes:
•EX2300 Switches First View on page 3
•Uplink Ports on page 4
•Console Ports on page 4
•Cable Guard on page 4
•Security Slot on page 5
•Power over Ethernet (PoE) Ports on page 5
•Front Panel of an EX2300 Switch on page 5
•Rear Panel of an EX2300 Switch on page 8
EX2300 Switches First View
EX2300 switches are available in models with 12 or 24, or 48 built-in network ports that supportRJ-45cableconnectors.Thecompact,fanlessEX2300-Cswitcheshave12RJ-45 network ports.
Copyright © 2017, Juniper Networks, Inc. |
3 |

EX2300-C and EX2300 Switches Hardware Guide
EX2300 switches provide:
•Up to four 10-Gigabit Ethernet uplink ports that support small form-factor pluggable plus (SFP+) transceivers and small form-factor pluggable (SFP) transceivers.
•12(inEX2300-Cswitches),24,or48built-inGigabitEthernetRJ-45networkportswith 10/100/1000 BASE-T connectors.
•Virtual Chassis capability—You can connect up to four EX2300 switches (including EX2300-C switches) to form one unit that you manage as a single chassis, called a
Virtual Chassis.
•Power over Ethernet (PoE) or Power over Ethernet Plus (PoE+) on all RJ-45 network ports (in PoE-capable models).
Uplink Ports
EX2300-C switches have two 10-Gigabit Ethernet uplink ports that support SFP and SFP+ transceivers. EX2300 switches except the EX2300-C switch model and the have four 10-Gigabit Ethernet uplink ports that support SFP and SFP+ transceivers. You can use these uplink ports as network ports or configure these ports as Virtual Chassis ports (VCPs) and use them to connect up to four switches by using SFP+ transceivers to form a Virtual Chassis.
NOTE: You cannot form a Virtual Chassis by using SFP transceivers.
For forming a Virtual Chassis, you must explicitly configure an uplink port on each of the switches to be connected as a VCP. See Setting an Uplink Port on an EX Series Switch as a Virtual Chassis Port (CLI Procedure).
For information about the supported optical and copper interfaces, see “Pluggable
Transceivers Supported on EX2300 Switches” on page 75.
Console Ports
EX2300switcheshavetwoconsoleports—anRJ-45consoleportandaMini-USBType-B console port. The RJ-45 port accepts a cable that has an RJ-45 connector and the Mini-USB Type-B port accepts a Mini-B plug (5-pin) connector to connect the switch to a console management device.
Cable Guard
On an EX2300-C switch, you can install a cable guard to secure the cables connected to the switch. The cable guard has slots in the front of it through which you can pass all the cables to prevent them from being accidently unplugged or removed after they are connected. See “Mounting an EX2300 Switch on a Desk or Other Level Surface” on page 105, “Mounting an EX2300-C Switch Under a Desk or Other Level Surface by Using Screws” on page 107, and “Mounting an EX2300-C Switch on or Under a Surface Made of Ferrous Material” on page 126.
4 |
Copyright © 2017, Juniper Networks, Inc. |

Chapter 1: System Overview
Security Slot
An EX2300-C switch has a security slot on the right panel of the chassis. You can use the security slot to lock and secure the chassis in the installation site with a standard cable lock. See “Mounting an EX2300 Switch on a Desk or Other Level Surface” on page 105, “Mounting an EX2300-C Switch Under a Desk or Other Level Surface by Using Screws” on page 107, and “Mounting an EX2300-C Switch on or Under a Surface Made of Ferrous Material” on page 126.
Power over Ethernet (PoE) Ports
EX2300switchesareavailablewithorwithoutPoE/PoE+capability.Modelsthatsupport PoE/PoE+ provide that support on all RJ-45 network ports. PoE ports provide electrical current to devices—such as IP phones, wireless access points, and security cameras—through network cables, thus eliminating the need for separate power cords for those devices. Uplink ports do not support PoE.
NOTE: IEEE 802.3at class 4 powered devices require category 5 or higher
Ethernet cables.
TheremainderofthistopicusesthetermPoEtorefertobothPoEandPoE+unlessthere is a need to distinguish between the two.
Front Panel of an EX2300 Switch
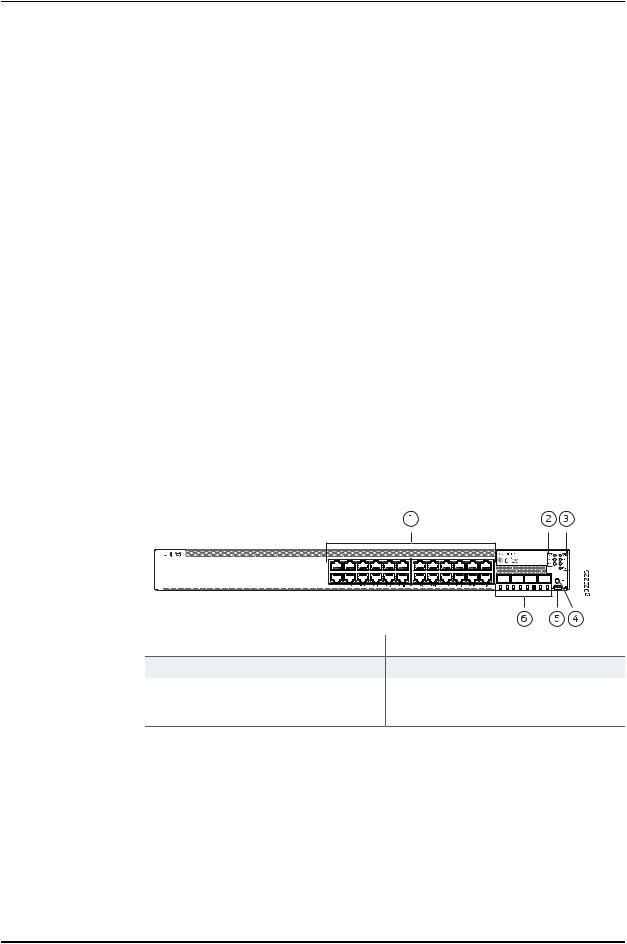
The front panel of an EX2300-C switch consists of the following components:
•RJ-45 network ports—depending on the switch model, either of:
•12 10/100/1000 BASE-T Gigabit Ethernet ports with PoE/PoE+ capability in EX2300-C-12P
•12 10/100/1000 BASE-T Gigabit Ethernet ports without PoE capability in EX2300-C-12T
•One USB port
•One management Ethernet port
•Three chassis status LEDs
•Four port status mode LEDs in models with PoE capability and three port status mode LEDs in models without PoE capability
•One Factory Reset/Mode button
•One mini-USB console port
•One RJ-45 console port
Copyright © 2017, Juniper Networks, Inc. |
5 |

EX2300-C and EX2300 Switches Hardware Guide
•Two built-in 10-Gigabit Ethernet uplink ports. You can use the uplink ports to forward network traffic or configure them as VCPs to interconnect EX2300 switches into a Virtual Chassis.
•One electrostatic discharge (ESD) point
Figure 1 on page 6 shows the front panel of an EX2300-C switch with 12 Gigabit Ethernet ports with PoE capability and Figure 2 on page 6 shows the front panel of an EX2300-C switch with 12 Gigabit Ethernet ports without PoE capability.
Figure 1: Front Panel of an EX2300-C Switch with 12 Gigabit Ethernet
Ports with PoE Capability
1—RJ-45 network ports |
6—Factory Reset/Mode button |
2—USB port |
7—Mini-USB console port |
3—Management Ethernet port |
8—RJ-45 console port |
4—Chassis status LEDs |
9—10-Gigabit Ethernet uplink ports |
5—Port status mode LEDs. The LED labeled |
10—ESD point |
PoE is present only on models with PoE |
|
capability. |
|
Figure 2: Front Panel of an EX2300-C Switch with 12 Gigabit Ethernet
Ports without PoE Capability
1—RJ-45 network ports |
6—Factory Reset/Mode button |
2—USB port |
7—Mini-USB console port |
3—Management Ethernet port |
8—RJ-45 console port |
4—Chassis status LEDs |
9—10-Gigabit Ethernet uplink ports |
5—Port status mode LEDs |
10—ESD point |
6 |
Copyright © 2017, Juniper Networks, Inc. |
Chapter 1: System Overview
The front panel of EX2300 switches except the EX2300-C switch models consists of the following components:
•RJ-45 network ports—depending on the switch model, either of:
•24 or 48 10/100/1000 BASE-T Gigabit Ethernet ports without PoE capability in the EX2300-24T, EX2300-24T-DC and EX2300-48T models
•24 or 48 10/100/1000 BASE-T Gigabit Ethernet ports with PoE/PoE+ capability in the EX2300-24P and EX2300-48P model
•Three chassis status LEDs
•Four port status mode LEDs in models with PoE capability and three port status mode LEDs in models without PoE capability
•One Factory Reset/Mode button
•One mini-USB console port
•Four built-in 10-Gigabit Ethernet uplink ports . You can use these ports to forward network traffic or configure them into VCPs to interconnect EX2300 switches into a Virtual Chassis.
Figure 3 on page 7 shows the front panel of an EX2300 switch with 24 Gigabit Ethernet ports with PoE capability and Figure 4 on page 8 shows the front panel of an EX2300 switch with 48 Gigabit Ethernet ports.
Figure3:FrontPanelofanEX2300Switchwith24GigabitEthernetPorts with PoE Capability
1—RJ-45 network ports |
4—Factory Reset/Mode button |
2—Chassis status LEDs |
5—Mini-USB console port |
3—Port status mode LEDs. The LED labeled |
6—10-Gigabit Ethernet uplink ports |
PoE is present only on models with PoE |
|
capability. |
|
Copyright © 2017, Juniper Networks, Inc. |
7 |
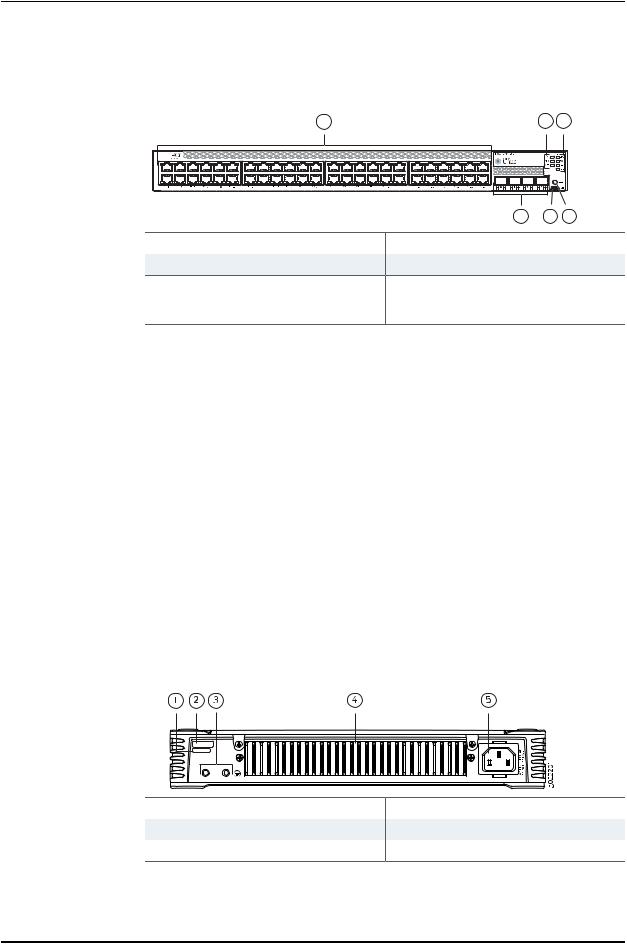
EX2300-C and EX2300 Switches Hardware Guide
Figure4:FrontPanelofanEX2300Switchwith48GigabitEthernetPorts with PoE Capability
1 |
2 |
3 |
g022291 |
6 5 4
1—RJ-45 network ports |
4—Factory Reset/Mode button |
2—Chassis status LEDs |
5—Mini-USB console port |
3—Port status mode LEDs. The LED labeled |
6—10-Gigabit Ethernet uplink ports |
PoE is present only on models with PoE |
|
capability. |
|
Rear Panel of an EX2300 Switch
The rear panel of an EX2300-C switch consists of the following components:
•Serial number ID label
•CLEI code label
•One protective earthing terminal
•Heatsink
•One AC power cord inlet
Figure 5 on page 8 shows the rear panel of an EX2300-C switch with 12 Gigabit Ethernet ports with PoE capability and Figure 6 on page 9 shows the rear panel of an EX2300-C switch with 12 Gigabit Ethernet ports without PoE capability.
EX2300-C switches being fanless models have no exhaust openings. EX2300 switches have vents on the top of the chassis. The PoE models have a heatsink installed in the rear panel to dissipate heat, while non-PoE models have no heatsink.
Figure5:RearPanelofanEX2300-CSwitchwith12GigabitEthernetPorts with PoE Capability
1—CLEI code label |
4—Heatsink—only in PoE models |
2—Serial number ID label |
5—AC power cord inlet |
3—Protective earthing terminal |
|
8 |
Copyright © 2017, Juniper Networks, Inc. |
Loading...