

Page 1

ATP Cloud
Published
2021-03-31
Juniper Advanced Threat Prevention Cloud
Administration Guide
Page 2

Juniper Networks, Inc.
1133 Innovation Way
Sunnyvale, California 94089
USA
408-745-2000
www.juniper.net
Juniper Networks, the Juniper Networks logo, Juniper, and Junos are registered trademarks of Juniper Networks, Inc. in
the United States and other countries. All other trademarks, service marks, registered marks, or registered service marks
are the property of their respective owners.
Juniper Networks assumes no responsibility for any inaccuracies in this document. Juniper Networks reserves the right
to change, modify, transfer, or otherwise revise this publication without notice.
ATP Cloud Juniper Advanced Threat Prevention Cloud Administration Guide
Copyright © 2021 Juniper Networks, Inc. All rights reserved.
The information in this document is current as of the date on the title page.
ii
YEAR 2000 NOTICE
Juniper Networks hardware and software products are Year 2000 compliant. Junos OS has no known time-related
limitations through the year 2038. However, the NTP application is known to have some difficulty in the year 2036.
END USER LICENSE AGREEMENT
The Juniper Networks product that is the subject of this technical documentation consists of (or is intended for use with)
Juniper Networks software. Use of such software is subject to the terms and conditions of the End User License Agreement
(“EULA”) posted at https://support.juniper.net/support/eula/. By downloading, installing or using such software, you
agree to the terms and conditions of that EULA.
Page 3

Table of Contents
1
About the Documentation | xi
Documentation and Release Notes | xi
Documentation Conventions | xi
Documentation Feedback | xiv
Requesting Technical Support | xiv
Self-Help Online Tools and Resources | xv
Creating a Service Request with JTAC | xv
Overview and Installation
Juniper Advanced Threat Prevention Cloud Overview | 2
iii
Juniper Advanced Threat Prevention Cloud | 2
About Juniper Advanced Threat Prevention Cloud | 2
Juniper ATP Cloud Features | 3
How the SRX Series Device Remediates Traffic | 5
Juniper ATP Cloud Use Cases | 7
Licensing | 8
How is Malware Analyzed and Detected? | 8
Analyzing and Detecting Malware | 8
Cache Lookup | 9
Antivirus Scan | 9
Static Analysis | 10
Dynamic Analysis | 10
Machine Learning Algorithm | 10
Threat Levels | 11
Licensing | 11
Page 4

About Policy Enforcer | 12
2
Policy Enforcer | 12
Install Juniper Advanced Threat Cloud Prevention | 14
Juniper Advanced Threat Prevention Cloud Installation Overview | 14
Managing the Juniper Advanced Threat Prevention Cloud License | 14
Obtaining the Premium License Key | 15
License Management and SRX Series Devices | 16
Juniper ATP Cloud Premium Evaluation License for vSRX | 16
License Management and vSRX Deployments | 17
High Availability | 18
Registering a Juniper Advanced Threat Prevention Cloud Account | 19
Downloading and Running the Juniper Advanced Threat Prevention Cloud Script | 24
The Web Portal and Enrolling SRX Series Devices
iv
The Juniper ATP Cloud Web Portal | 31
Juniper Advanced Threat Prevention Cloud Configuration Overview | 31
Juniper Advanced Threat Prevention Cloud Web UI Overview | 34
Accessing the Web UI | 34
Dashboard Overview | 37
Reset Password | 38
Recover Realm Name | 40
Enroll SRX Series Devices | 43
Enrolling an SRX Series Device With Juniper Advanced Threat Prevention Cloud | 43
Enrolling an SRX Series Device without the Juniper ATP Cloud Web Portal | 47
Removing an SRX Series Device From Juniper Advanced Threat Prevention Cloud | 49
Searching for SRX Series Devices Within Juniper Advanced Threat Prevention Cloud | 50
Juniper Advanced Threat Prevention Cloud RMA Process | 53
Device Information | 53
Cloud Feeds for Juniper Advanced Threat Prevention Cloud: More Information | 54
Page 5

Configure
3
Allowlists and Blocklists | 57
Allowlist and Blocklist Overview | 57
Creating Allowlists and Blocklists | 59
Email Scanning: Juniper ATP Cloud | 65
Email Management Overview | 65
Email Management: Configure SMTP | 67
Email Management: Configure IMAP | 70
Email Scanning: SRX Series Device | 74
Configuring the SMTP Email Management Policy on the SRX Series Device | 74
Configuring the IMAP Email Management Policy on the SRX Series Device | 80
v
Configuring Reverse Proxy on the SRX Series Device | 88
File Inspection Profiles | 92
File Inspection Profiles Overview | 92
Creating File Inspection Profiles | 94
Adaptive Threat Profiling | 97
Adaptive Threat Profiling Overview | 97
Overview | 97
Configure Adaptive Threat Profiling | 100
Deploy Adaptive Threat Profiling | 101
Use Case Examples | 104
Threat Detection Use Case 1 | 104
Asset Classification Use Case | 107
Create an Adaptive Threat Profiling Feed | 108
SecIntel Feeds | 111
SecIntel Feeds Overview | 112
Juniper SecIntel Feeds Overview | 118
Page 6

Global Configurations | 119
4
Global Configuration for Infected Hosts | 119
Configuring Threat Intelligence Sharing | 122
Configuring Trusted Proxy Servers | 124
Realm Overview | 125
Realms and Tenant Systems | 125
Configuration Overview | 126
SRX Series and Tenant System Enrollment | 126
Realm Management | 127
Tenant Systems: Security-Intelligence and Anti-Malware Policies | 129
Tenant System Support for SecIntel Feeds | 129
Tenant System Support for AAMW | 130
Security Profile CLI | 132
vi
Enable Logging | 132
Enable Mist with Juniper ATP Cloud | 133
Monitor and Take Action
Audit | 136
Viewing Audit Logs | 136
Reports | 145
Reports Overview | 145
Configure Report Definitions | 149
Hosts | 151
Hosts Overview | 151
Host Details | 154
Identifying Infected Hosts | 156
Compromised Hosts: More Information | 156
About Block Drop and Block Close | 160
Host Details | 161
Automatic Lowering of Host Threat Level or Removal from Infected Hosts Feed | 162
Configuring the SRX Series Devices to Block Infected Hosts | 163
Page 7

Threat Sources | 167
Threat Sources Overview | 167
Threat Source Details | 168
Identify Hosts Communicating with Command and Control Servers | 172
Command and Control Servers: More Information | 172
Configuring the SRX Series Device to Block Outbound Requests to a C&C Host | 175
File Scanning | 178
HTTP File Download Overview | 178
HTTP File Download Details | 180
File Summary | 181
HTTP Downloads | 182
Sample STIX Report | 183
vii
Manual Scanning Overview | 183
File Scanning Limits | 185
SMB File Download Overview | 186
SMB File Download Details | 188
File Summary | 189
SMB Downloads | 190
Email Scanning | 191
Email Attachments Scanning Overview | 191
Email Attachments Scanning Details | 192
File Summary | 194
SMTP Quarantine Overview: Blocked Emails | 195
IMAP Block Overview | 197
Telemetry | 199
Telemetry Overview | 199
Telemetry Details | 201
Page 8

Encrypted Traffic Insights | 204
5
Encrypted Traffic Insights Overview | 204
Encrypted Traffic Insights and Detection | 205
Workflow | 206
Configurations on SRX Series Devices | 207
Encrypted Traffic Insights Details | 208
Policies on the SRX Series Device
Configure Juniper ATP Cloud Policies on the SRX Series Device | 212
Juniper Advanced Threat Prevention Cloud Policy Overview | 212
Enabling Juniper ATP Cloud for Encrypted HTTPS Connections | 215
Example: Configuring a Juniper Advanced Threat Prevention Cloud Policy Using the CLI | 216
Unified Policies | 221
Explicit Web Proxy Support | 223
viii
Configure IP-Based Geolocations on the SRX Series Device | 225
Geolocation IPs and Juniper Advanced Threat Prevention Cloud | 225
Configuring Juniper Advanced Threat Prevention Cloud With Geolocation IP | 226
Integrate Amazon Web Services GuardDuty with vSRX Firewalls | 228
Integrate AWS GuardDuty with vSRX Firewalls | 228
Solution Overview | 228
Workflow to Integrate AWS GuardDuty with vSRX Firewalls | 230
Set up AWS Environment | 231
Configure vSRX Firewall | 235
Configure DNS Sinkhole on the SRX Series Device | 239
DNS Sinkhole for Disallowed Domains | 239
Overview | 239
Benefits | 239
Configure DNS Request Filtering | 240
Page 9

Administration
6
7
Juniper ATP Cloud Administration | 244
Modifying My Profile | 244
Creating and Editing User Profiles | 245
Application Tokens Overview | 247
Creating Application Tokens | 247
Multi-Factor Authentication Overview | 249
Configure Multi-Factor Authentication for Administrators | 249
Enable Multi-Factor Authentication | 250
Verification Codes for Multi-Factor Authentication: Mobile SMS | 251
Verification Codes for Multi-Factor Authentication: Email | 251
Unlock a User | 252
ix
Troubleshoot
Troubleshooting Topics | 254
Juniper Advanced Threat Prevention Cloud Troubleshooting Overview | 254
Troubleshooting Juniper Advanced Threat Prevention Cloud: Checking DNS and Routing
Configurations | 255
Troubleshooting Juniper Advanced Threat Prevention Cloud: Checking Certificates | 258
Troubleshooting Juniper Advanced Threat Prevention Cloud: Checking the Routing Engine
Status | 260
request services advanced-anti-malware data-connection | 262
request services advanced-anti-malware diagnostic | 264
Troubleshooting Juniper Advanced Threat Prevention Cloud: Checking the application-identification
License | 268
Viewing Juniper Advanced Threat Prevention Cloud System Log Messages | 269
Configuring traceoptions | 270
Viewing the traceoptions Log File | 272
Turning Off traceoptions | 272
Juniper Advanced Threat Prevention Cloud Dashboard Reports Not Displaying | 273
Juniper Advanced Threat Prevention Cloud RMA Process | 274
Page 10

More Documentation
8
ATP Cloud Tech Library Page Links | 276
Links to Documentation on Juniper.net | 276
x
Page 11
About the Documentation
IN THIS SECTION
Documentation and Release Notes | xi
Documentation Conventions | xi
Documentation Feedback | xiv
Requesting Technical Support | xiv
Use this guide to configure, monitor, and manage Juniper ATP Cloud features to protect all hosts in your
network against evolving security threats.
xi
Documentation and Release Notes
To obtain the most current version of all Juniper Networks®technical documentation, see the product
documentation page on the Juniper Networks website at https://www.juniper.net/documentation/.
If the information in the latest release notes differs from the information in the documentation, follow the
product Release Notes.
Juniper Networks Books publishes books by Juniper Networks engineers and subject matter experts.
These books go beyond the technical documentation to explore the nuances of network architecture,
deployment, and administration. The current list can be viewed at https://www.juniper.net/books.
Documentation Conventions
Table 1 on page xii defines notice icons used in this guide.
Page 12
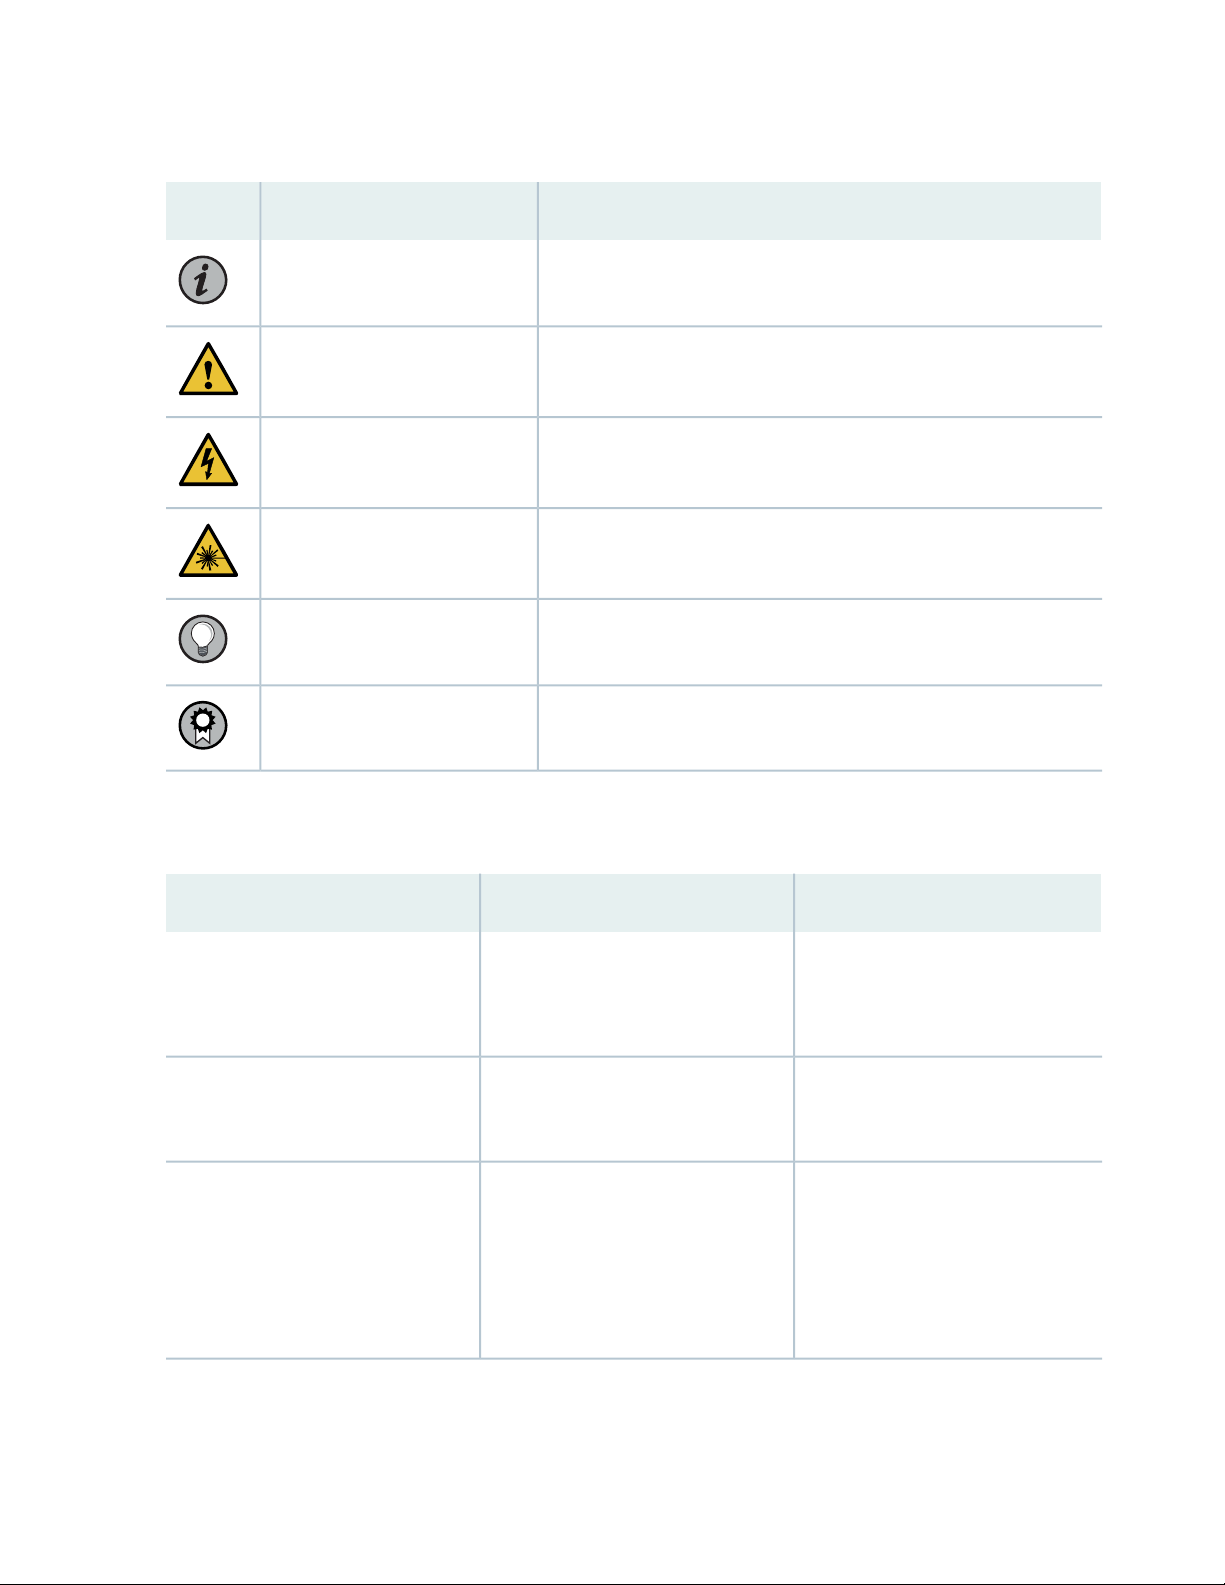
Table 1: Notice Icons
xii
DescriptionMeaningIcon
Indicates important features or instructions.Informational note
Caution
Indicates a situation that might result in loss of data or hardware
damage.
Alerts you to the risk of personal injury or death.Warning
Alerts you to the risk of personal injury from a laser.Laser warning
Indicates helpful information.Tip
Alerts you to a recommended use or implementation.Best practice
Table 2 on page xii defines the text and syntax conventions used in this guide.
Table 2: Text and Syntax Conventions
ExamplesDescriptionConvention
Fixed-width text like this
Italic text like this
Represents text that you type.Bold text like this
Represents output that appears on
the terminal screen.
Introduces or emphasizes important
•
new terms.
Identifies guide names.
•
Identifies RFC and Internet draft
•
titles.
To enter configuration mode, type
the configure command:
user@host> configure
user@host> show chassis alarms
No alarms currently active
A policy term is a named structure
•
that defines match conditions and
actions.
Junos OS CLI User Guide
•
RFC 1997, BGP Communities
•
Attribute
Page 13

Table 2: Text and Syntax Conventions (continued)
xiii
ExamplesDescriptionConvention
Italic text like this
Text like this
< > (angle brackets)
| (pipe symbol)
Represents variables (options for
which you substitute a value) in
commands or configuration
statements.
Represents names of configuration
statements, commands, files, and
directories; configuration hierarchy
levels; or labels on routing platform
components.
variables.
Indicates a choice between the
mutually exclusive keywords or
variables on either side of the symbol.
The set of choices is often enclosed
in parentheses for clarity.
Configure the machine’s domain
name:
[edit]
root@# set system domain-name
domain-name
To configure a stub area, include
•
the stub statement at the [edit
protocols ospf area area-id]
hierarchy level.
The console port is labeled
•
CONSOLE.
stub <default-metric metric>;Encloses optional keywords or
broadcast | multicast
(string1 | string2 | string3)
# (pound sign)
[ ] (square brackets)
Indention and braces ( { } )
; (semicolon)
GUI Conventions
Indicates a comment specified on the
same line as the configuration
statement to which it applies.
Encloses a variable for which you can
substitute one or more values.
Identifies a level in the configuration
hierarchy.
Identifies a leaf statement at a
configuration hierarchy level.
rsvp { # Required for dynamic MPLS
only
community name members [
community-ids ]
[edit]
routing-options {
static {
route default {
nexthop address;
retain;
}
}
}
Page 14
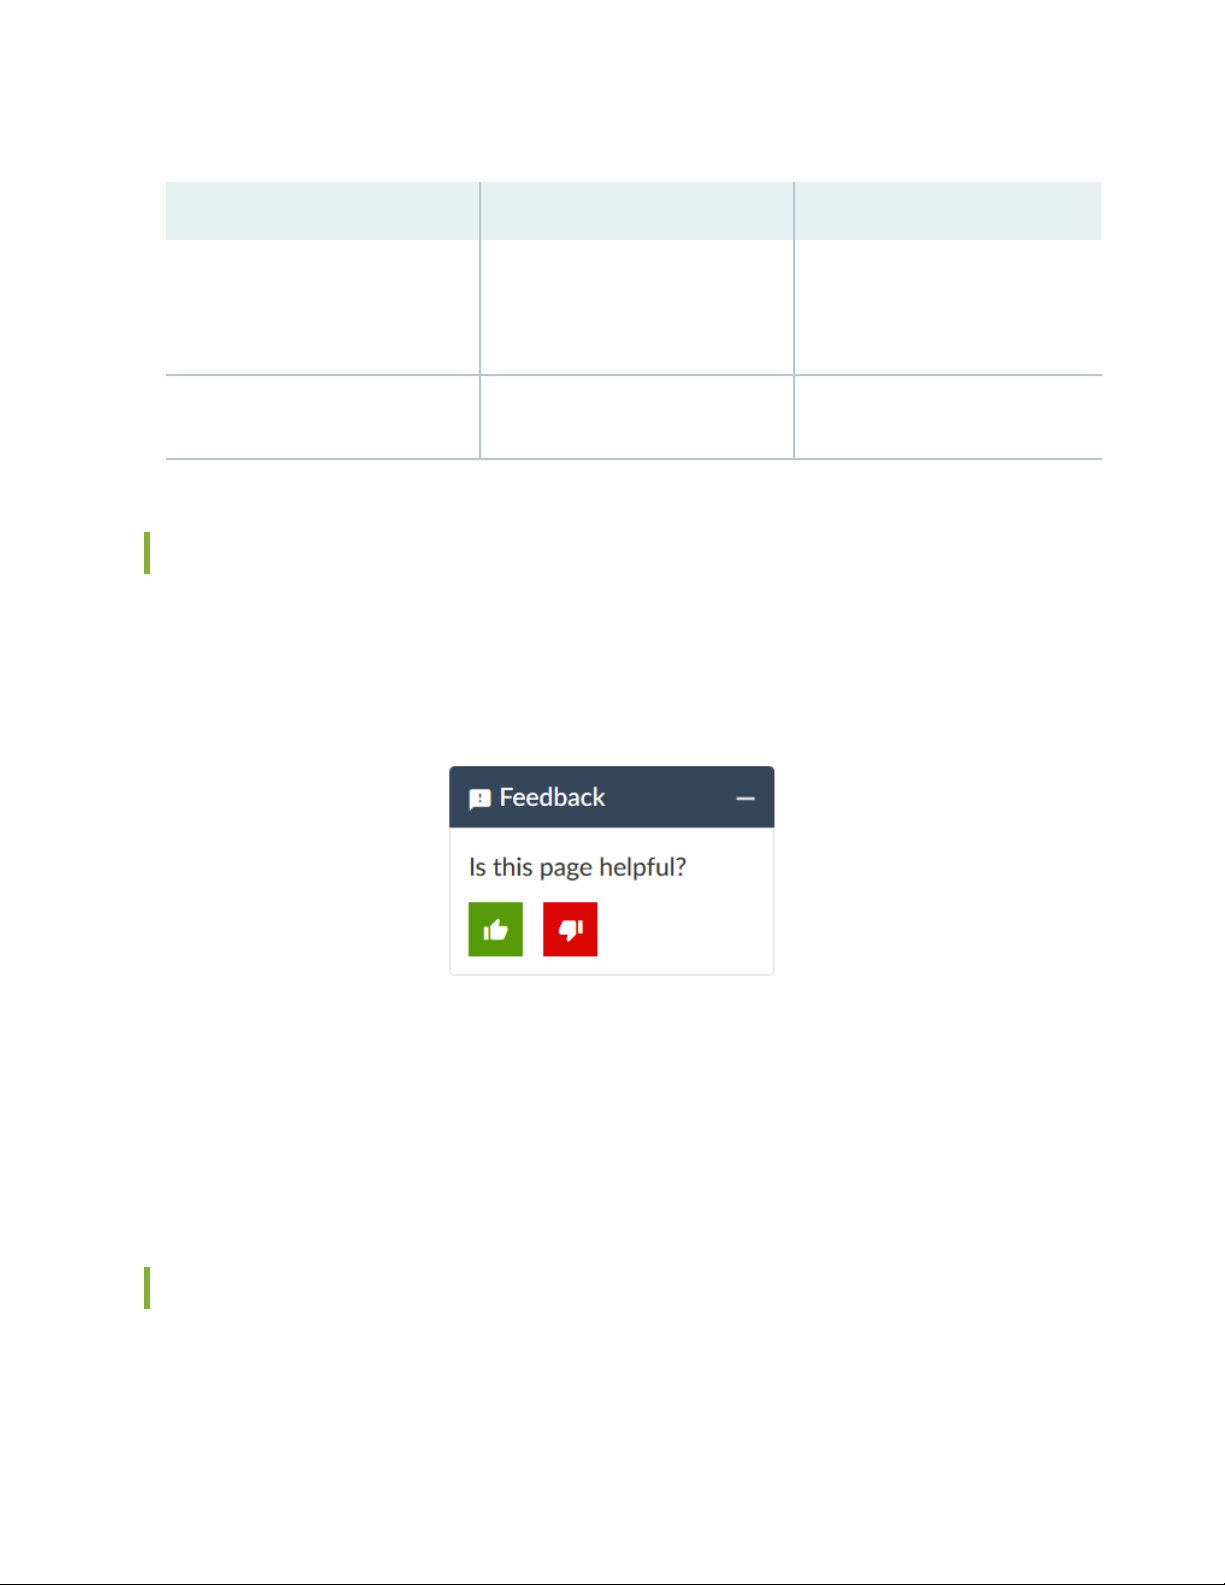
Table 2: Text and Syntax Conventions (continued)
xiv
ExamplesDescriptionConvention
Bold text like this
> (bold right angle bracket)
Represents graphical user interface
(GUI) items you click or select.
Separates levels in a hierarchy of
menu selections.
In the Logical Interfaces box, select
•
All Interfaces.
To cancel the configuration, click
•
Cancel.
In the configuration editor hierarchy,
select Protocols>Ospf.
Documentation Feedback
We encourage you to provide feedback so that we can improve our documentation. You can use either
of the following methods:
Online feedback system—Click TechLibrary Feedback, on the lower right of any page on the Juniper
•
Networks TechLibrary site, and do one of the following:
Click the thumbs-up icon if the information on the page was helpful to you.
•
Click the thumbs-down icon if the information on the page was not helpful to you or if you have
•
suggestions for improvement, and use the pop-up form to provide feedback.
E-mail—Send your comments to techpubs-comments@juniper.net. Include the document or topic name,
•
URL or page number, and software version (if applicable).
Requesting Technical Support
Technical product support is available through the Juniper Networks Technical Assistance Center (JTAC).
If you are a customer with an active Juniper Care or Partner Support Services support contract, or are
Page 15

covered under warranty, and need post-sales technical support, you can access our tools and resources
online or open a case with JTAC.
JTAC policies—For a complete understanding of our JTAC procedures and policies, review the JTAC User
•
Guide located at https://www.juniper.net/us/en/local/pdf/resource-guides/7100059-en.pdf.
Product warranties—For product warranty information, visit https://www.juniper.net/support/warranty/.
•
JTAC hours of operation—The JTAC centers have resources available 24 hours a day, 7 days a week,
•
365 days a year.
Self-Help Online Tools and Resources
For quick and easy problem resolution, Juniper Networks has designed an online self-service portal called
the Customer Support Center (CSC) that provides you with the following features:
Find CSC offerings: https://www.juniper.net/customers/support/
•
Search for known bugs: https://prsearch.juniper.net/
•
xv
Find product documentation: https://www.juniper.net/documentation/
•
Find solutions and answer questions using our Knowledge Base: https://kb.juniper.net/
•
Download the latest versions of software and review release notes:
•
https://www.juniper.net/customers/csc/software/
Search technical bulletins for relevant hardware and software notifications:
•
https://kb.juniper.net/InfoCenter/
Join and participate in the Juniper Networks Community Forum:
•
https://www.juniper.net/company/communities/
Create a service request online: https://myjuniper.juniper.net
•
To verify service entitlement by product serial number, use our Serial Number Entitlement (SNE) Tool:
https://entitlementsearch.juniper.net/entitlementsearch/
Creating a Service Request with JTAC
You can create a service request with JTAC on the Web or by telephone.
Visit https://myjuniper.juniper.net.
•
Call 1-888-314-JTAC (1-888-314-5822 toll-free in the USA, Canada, and Mexico).
•
For international or direct-dial options in countries without toll-free numbers, see
https://support.juniper.net/support/requesting-support/.
Page 16

1
PART
Overview and Installation
Juniper Advanced Threat Prevention Cloud Overview | 2
Install Juniper Advanced Threat Cloud Prevention | 14
Page 17
CHAPTER 1
Juniper Advanced Threat Prevention Cloud Overview
IN THIS CHAPTER
Juniper Advanced Threat Prevention Cloud | 2
How is Malware Analyzed and Detected? | 8
About Policy Enforcer | 12
Juniper Advanced Threat Prevention Cloud
2
IN THIS SECTION
About Juniper Advanced Threat Prevention Cloud | 2
Juniper ATP Cloud Features | 3
How the SRX Series Device Remediates Traffic | 5
Juniper ATP Cloud Use Cases | 7
Licensing | 8
About Juniper Advanced Threat Prevention Cloud
Juniper®Advanced Threat Prevention Cloud (Juniper ATP Cloud)is a security framework that protects all
hosts in your network against evolving security threats by employing cloud-based threat detection software
with a next-generation firewall system. See Figure 1 on page 3.
Page 18

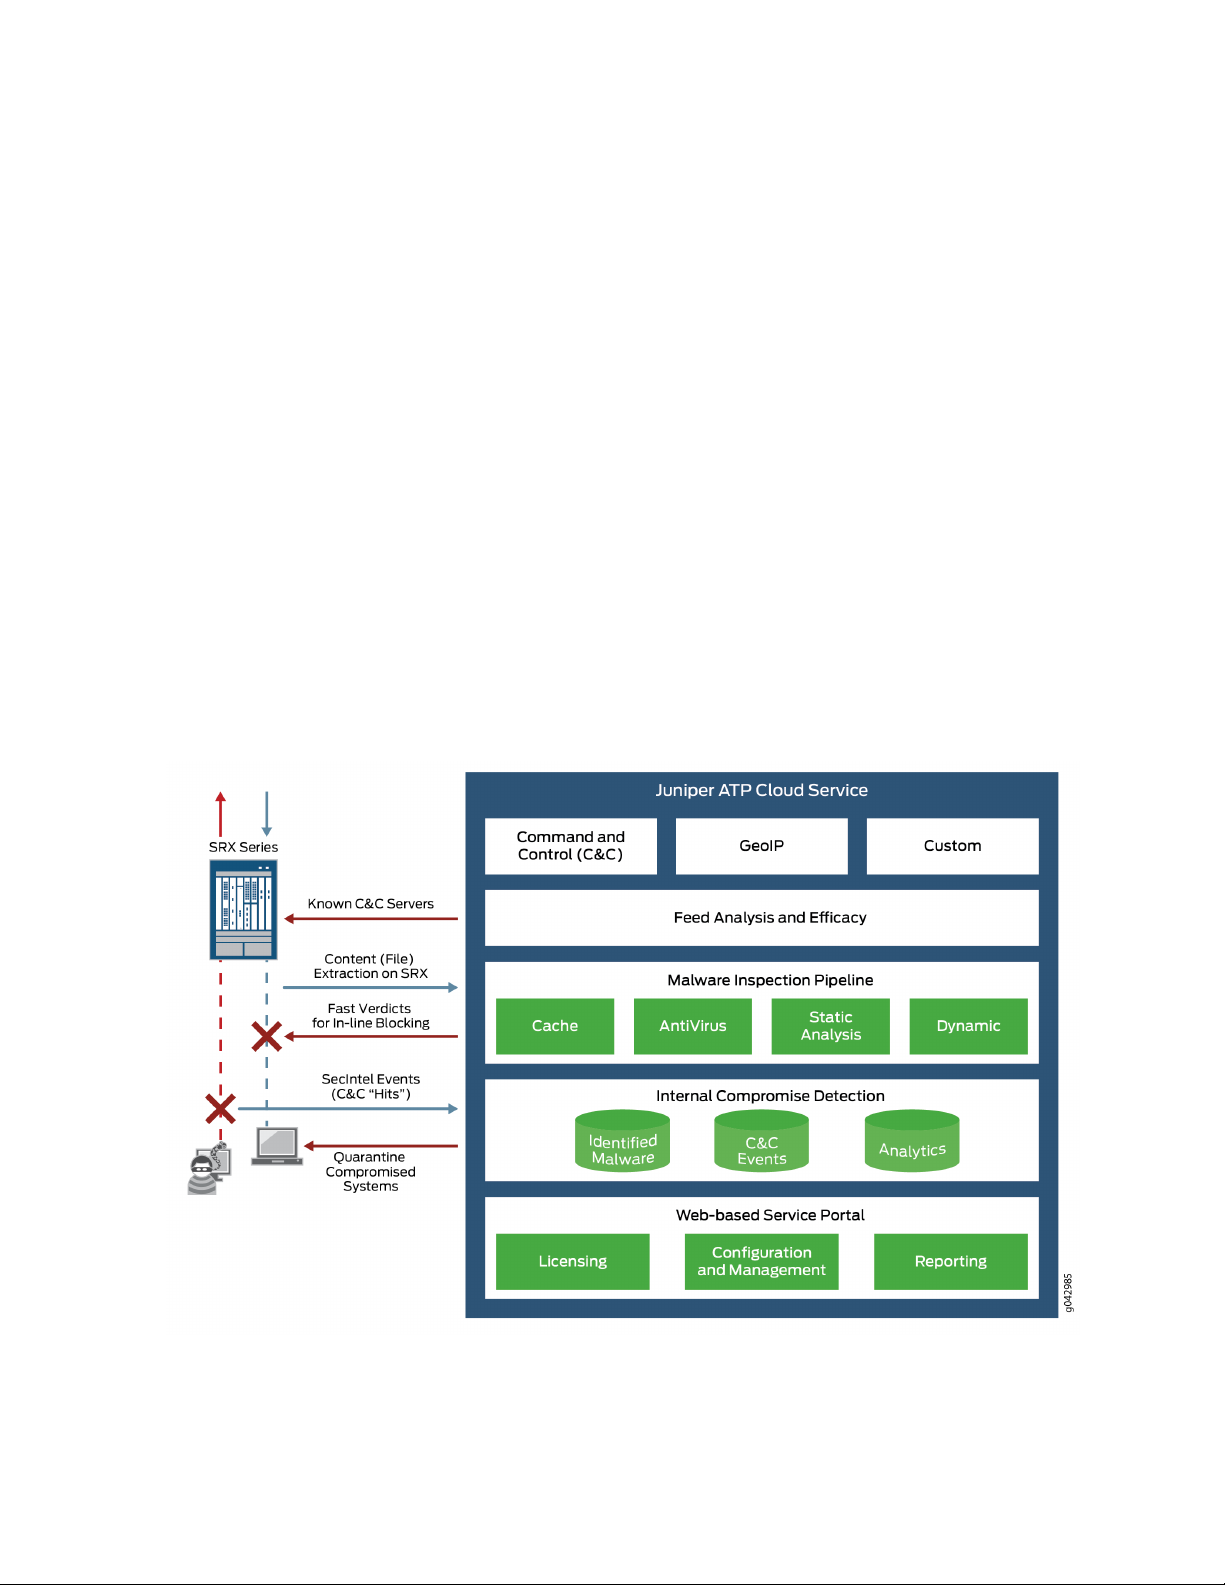
Figure 1: Juniper ATP Cloud Overview
Juniper ATP Cloud protects your network by performing the following tasks:
3
The SRX Series device extracts potentially malicious objects and files and sends them to the cloud for
•
analysis.
Known malicious files are quickly identified and dropped before they can infect a host.
•
Multiple techniques identify new malware, adding it to the known list of malware.
•
Correlation between newly identified malware and known Command and Control (C&C) sites aids analysis.
•
The SRX Series device blocks known malicious file downloads and outbound C&C traffic.
•
Juniper ATP Cloud supports the following modes:
Layer 3 mode
•
Tap mode
•
Transparent mode using MAC address. For more information, see Transparent mode on SRX Series
•
devices.
Secure wire mode (high-level transparent mode using the interface to directly passing traffic, not by
•
MAC address.) For more information, see Understanding Secure Wire.
Juniper ATP Cloud Features
Juniper ATP Cloud is a cloud-based solution. Cloud environments are flexible and scalable, and a shared
environment ensures that everyone benefits from new threat intelligence in near real-time. Your sensitive
data is secured even though it is in a cloud shared environment. Security analysts can update their defense
when new attack techniques are discovered and distribute the threat intelligence with very little delay.
Page 19
In addition, Juniper ATP Cloud offers the following features:
Integrated with the SRX Series device to simplify deployment and enhance the anti-threat capabilities
•
of the firewall.
Delivers protection against “zero-day” threats using a combination of tools to provide robust coverage
•
against sophisticated, evasive threats.
Checks inbound and outbound traffic with policy enhancements that allow users to stop malware,
•
quarantine infected systems, prevent data exfiltration, and disrupt lateral movement.
High availability to provide uninterrupted service.
•
Scalable to handle increasing loads that require more computing resources, increased network bandwidth
•
to receive more customer submissions, and a large storage for malware.
Provides deep inspection, actionable reporting, and inline malware blocking.
•
APIs for C&C feeds, allowlist and blocklist operations, and file submission. See the Threat Intelligence
•
Open API Setup Guide for more information.
Figure 2 on page 4 lists the Juniper ATP Cloud components.
4
Figure 2: Juniper ATP Cloud Components
Table 3 on page 5 briefly describes each Juniper ATP Cloud component’s operation.
Page 20

Table 3: Juniper ATP Cloud Components
OperationComponent
5
Command and control (C&C) cloud
feeds
GeoIP cloud feeds
Infected host cloud feeds
Allowlist, blocklists and custom
cloud feeds
SRX Series device
C&C feeds are essentially a list of servers that are known command and control
for botnets. The list also includes servers that are known sources for malware
downloads.
GeoIP feeds is an up-to-date mapping of IP addresses to geographical regions.
This gives you the ability to filter traffic to and from specific geographies in
the world.
Infected hosts indicate local devices that are potentially compromised because
they appear to be part of a C&C network or other exhibit other symptoms.
A allowlist is simply a list of known IP addresses that you trust and a blocklist
is a list that you do not trust.
NOTE: Custom feeds are not supported in this release.
Submits extracted file content for analysis and detected C&C hits inside the
customer network.
Performs inline blocking based on verdicts from the analysis cluster.
Performs malware analysis and threat detection.Malware inspection pipeline
Inspects files, metadata, and other information.Internal compromise detection
Service portal (Web UI)
Graphics interface displaying information about detected threats inside the
customer network.
Configuration management tool where customers can fine-tune which file
categories can be submitted into the cloud for processing.
How the SRX Series Device Remediates Traffic
The SRX Series devices use intelligence provided by Juniper ATP Cloud to remediate malicious content
through the use of security policies. If configured, security policies block that content before it is delivered
to the destination address.
For inbound traffic, security policies on the SRX Series device look for specific types of files, like .exe files,
to inspect. When one is encountered, the security policy sends the file to the Juniper ATP Cloud cloud for
inspection. The SRX Series device holds the last few KB of the file from the destination client while Juniper
ATP Cloud checks if this file has already been analyzed. If so, a verdict is returned and the file is either
sent to the client or blocked depending on the file’s threat level and the user-defined policy in place. If the
Page 21
cloud has not inspected this file before, the file is sent to the client while Juniper ATP Cloud performs an
exhaustive analysis. If the file’s threat level indicates malware (and depending on the user-defined
configurations) the client system is marked as an infected host and blocked from outbound traffic. For
more information, see “How is Malware Analyzed and Detected?” on page 8.
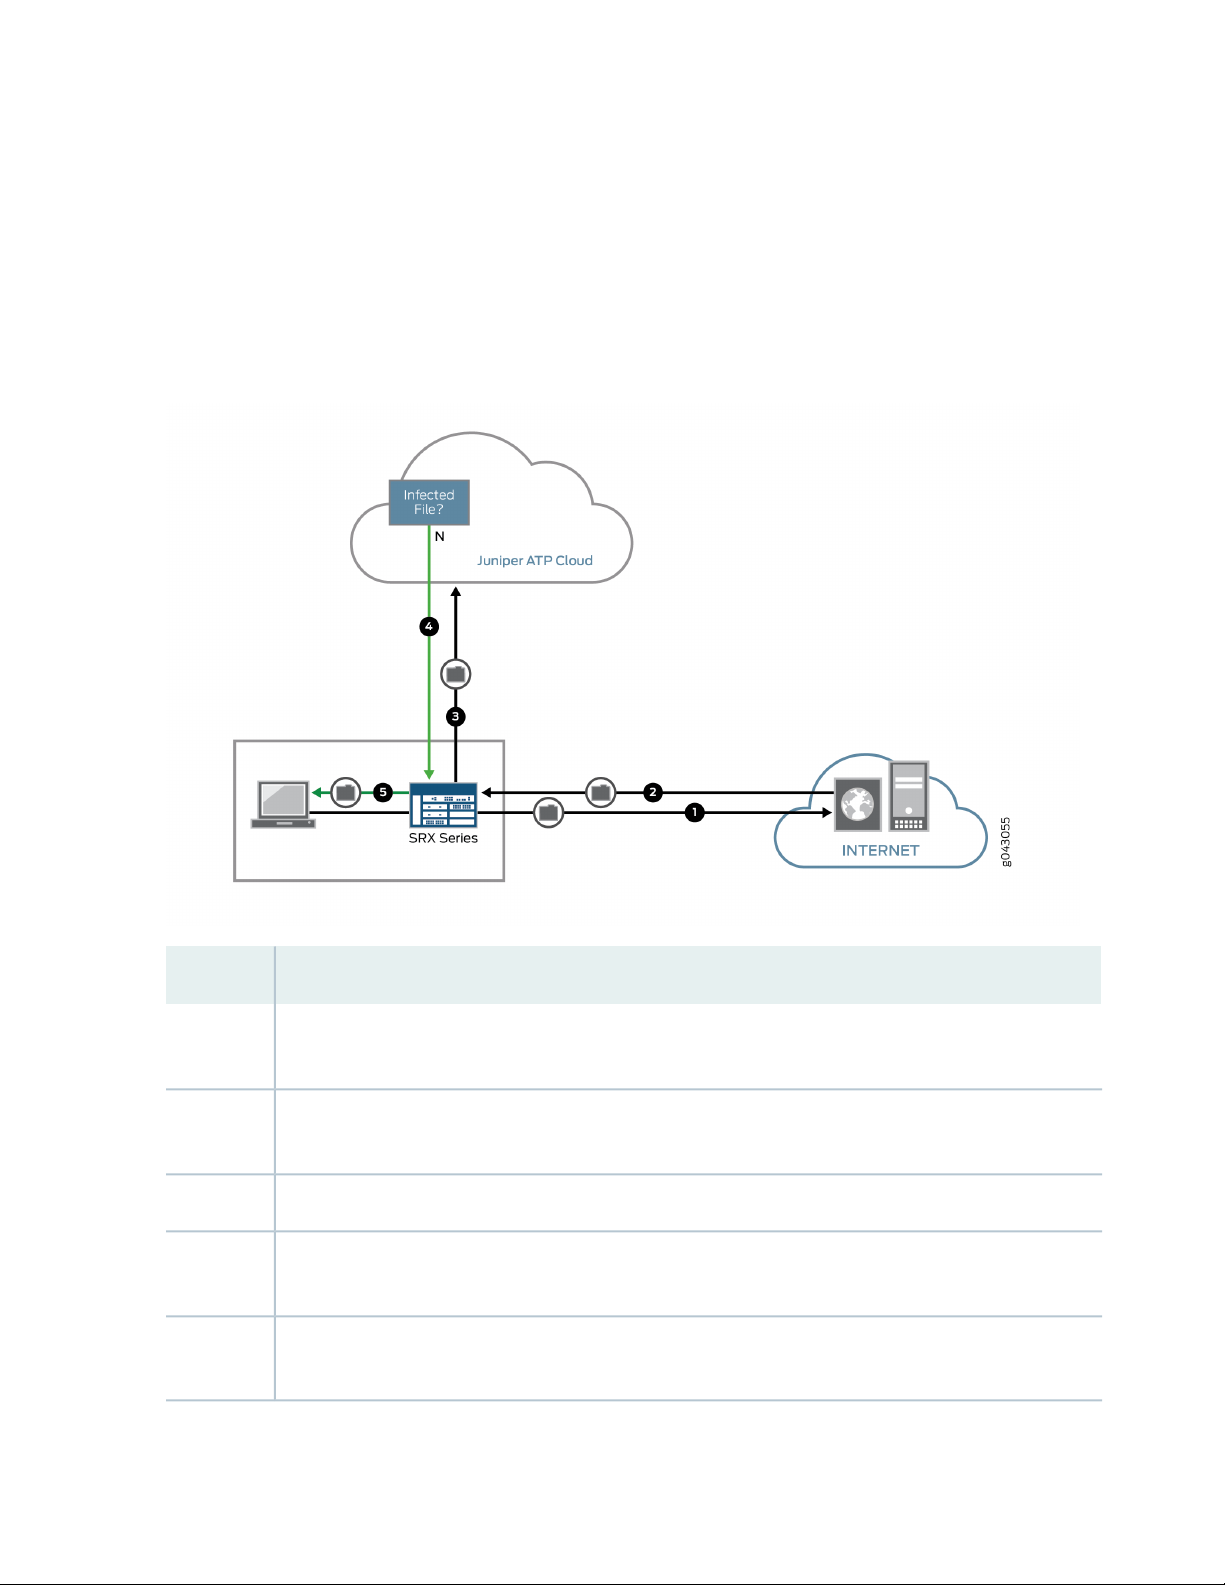
Figure 3 on page 6 shows an example flow of a client requesting a file download with Juniper ATP Cloud.
Figure 3: Inspecting Inbound Files for Malware
6
DescriptionStep
1
2
4
5
A client system behind an SRX Series devices requests a file download from the Internet. The SRX Series
device forwards that request to the appropriate server.
The SRX Series device receives the downloaded file and checks its security profile to see if any additional
action must be performed.
The downloaded file type is on the list of files that must be inspected and is sent to the cloud for analysis.3
Juniper ATP Cloud has inspected this file before and has the analysis stored in cache. In this example,
the file is not malware and the verdict is sent back to the SRX Series device.
Based on user-defined policies and because this file is not malware, the SRX Series device sends the file
to the client.
Page 22
For outbound traffic, the SRX Series device monitors traffic that matches C&C feeds it receives, blocks
these C&C requests, and reports them to Juniper ATP Cloud. A list of infected hosts is available so that
the SRX Series device can block inbound and outbound traffic.
Juniper ATP Cloud Use Cases
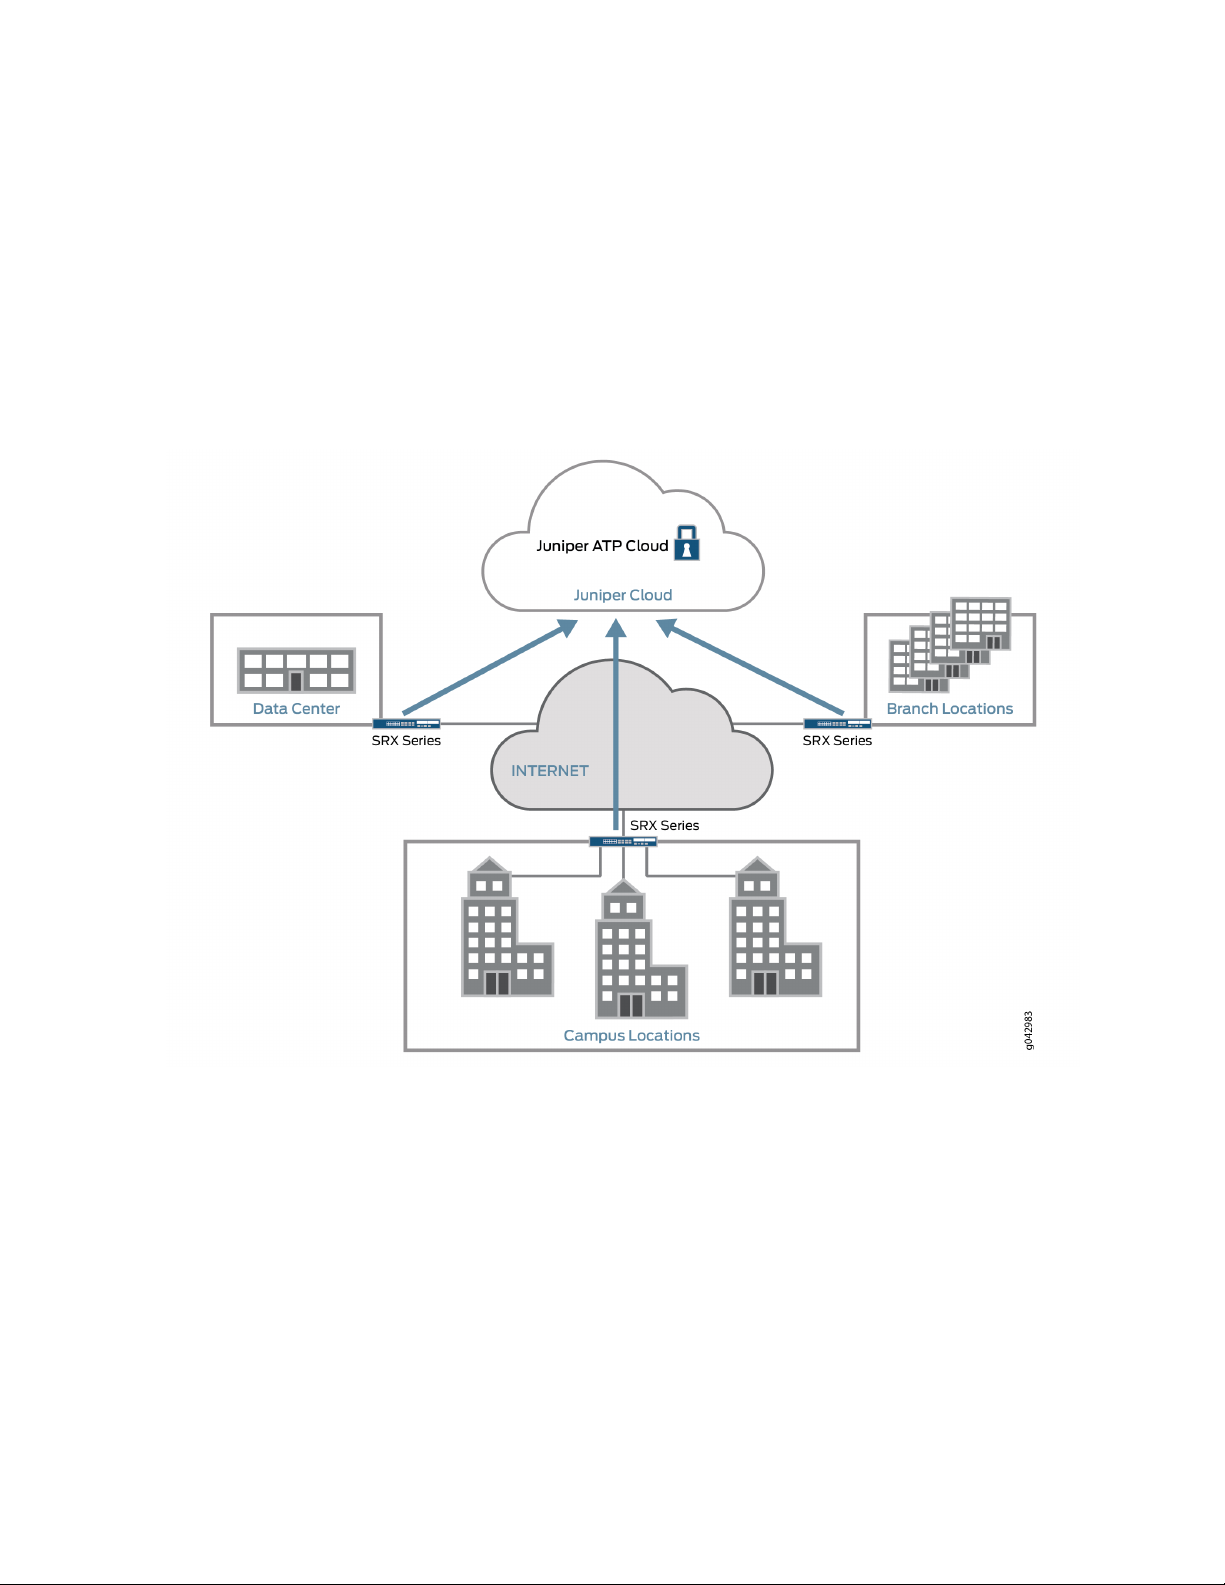
Juniper ATP Cloud can be used anywhere in an SRX Series deployment. See Figure 4 on page 7.
Figure 4: Juniper ATP Cloud Use Cases
7
Campus edge firewall—Juniper ATP Cloud analyzes files downloaded from the Internet and protects
•
end-user devices.
Data center edge—Like the campus edge firewall, Juniper ATP Cloud prevents infected files and application
•
malware from running on your computers.
Branch router—Juniper ATP Cloud provides protection from split-tunneling deployments. A disadvantage
•
of split-tunneling is that users can bypass security set in place by your company’s infrastructure.
Page 23
Licensing
Juniper ATP Cloud has three service levels: Free, Basic (feed only), and Premium. No license is required
for the free version, but you must obtain a license for Basic and Premium levels.
To understand more about Juniper ATP Cloud licenses, see Licenses for Juniper Advanced Threat Prevention
(ATP) Cloud. Please refer to the Licensing Guide for general information about License Management.
Please refer to the product Data Sheets for further details, or contact your Juniper Account Team or
Juniper Partner.
How is Malware Analyzed and Detected?
IN THIS SECTION
Analyzing and Detecting Malware | 8
8
Cache Lookup | 9
Antivirus Scan | 9
Static Analysis | 10
Dynamic Analysis | 10
Machine Learning Algorithm | 10
Threat Levels | 11
Licensing | 11
Analyzing and Detecting Malware
Juniper ATP Cloud uses a pipeline approach to analyzing and detecting malware. If an analysis reveals that
the file is absolutely malware, it is not necessary to continue the pipeline to further examine the malware.
See Figure 5 on page 9.
Page 24
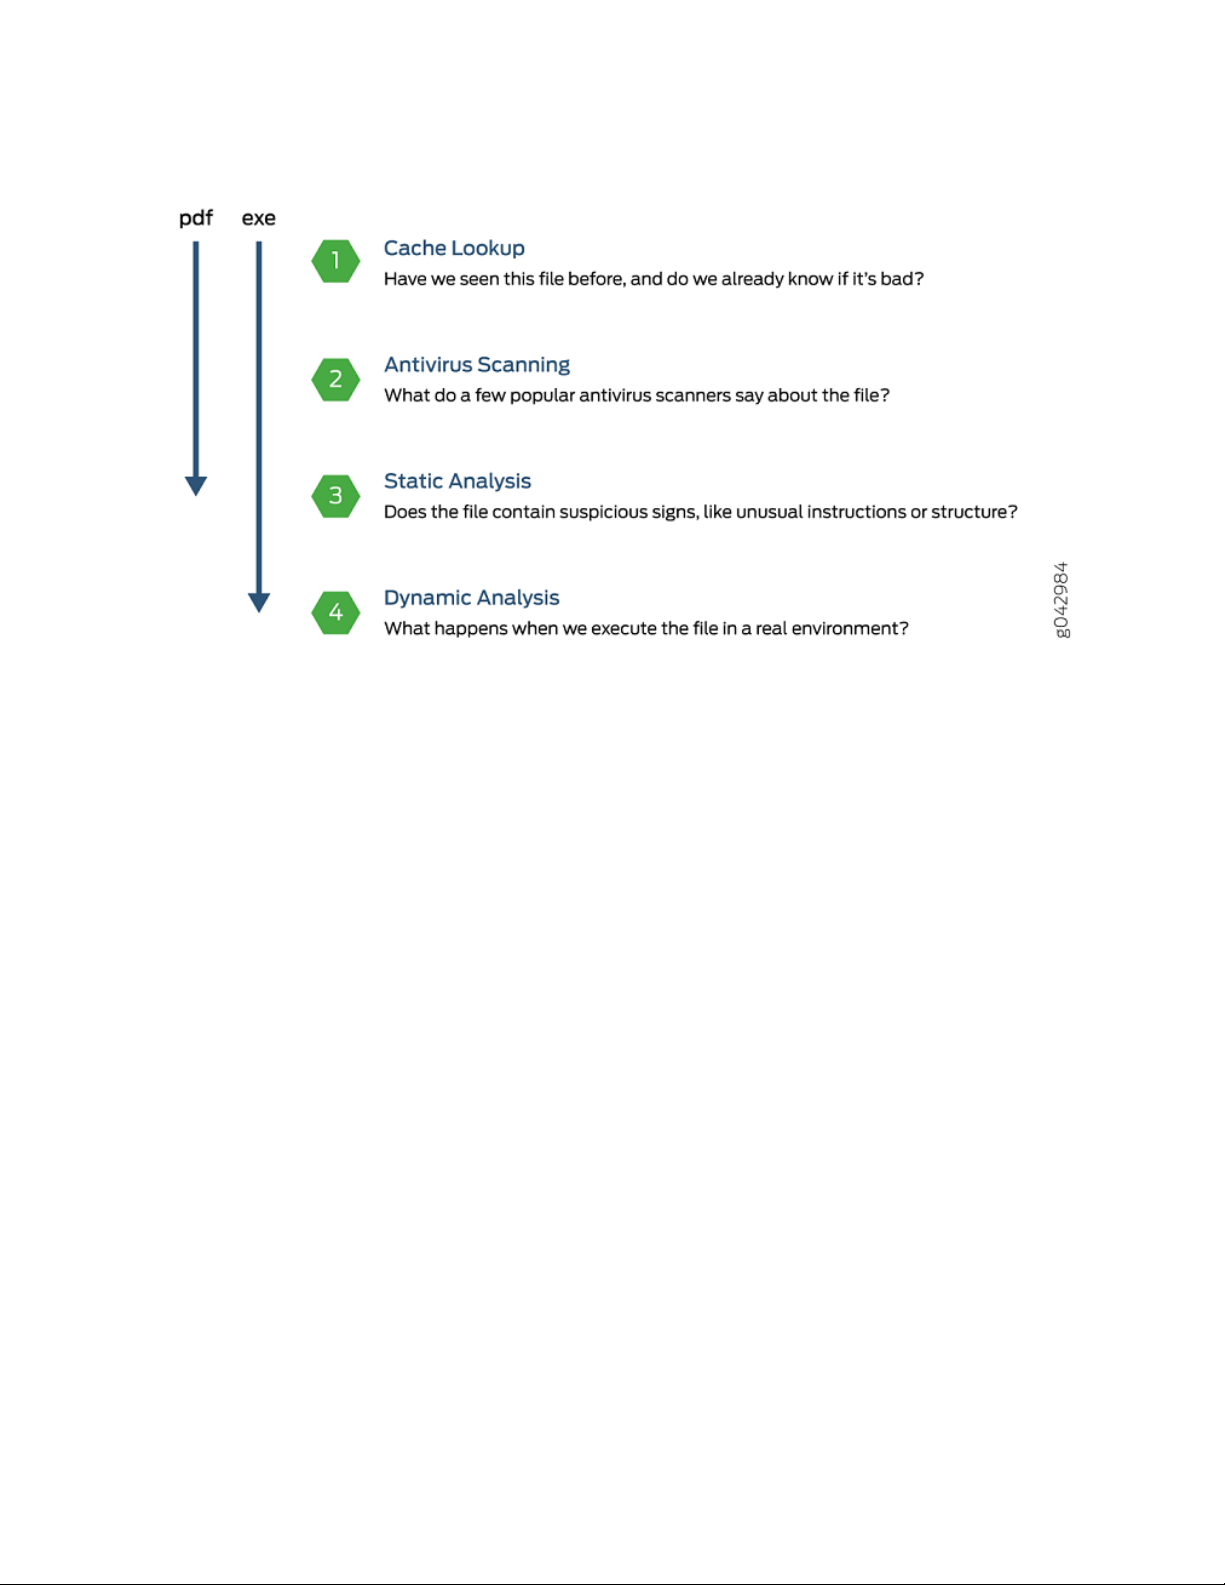
Figure 5: Example Juniper ATP Cloud Pipeline Approach for Analyzing Malware
9
Each analysis technique creates a verdict number, which is combined to create a final verdict number
between 1 and 10. A verdict number is a score or threat level. The higher the number, the higher the
malware threat. The SRX Series device compares this verdict number to the policy settings and either
permits or denies the session. If the session is denied, a reset packet is sent to the client and the packets
are dropped from the server.
Cache Lookup
When a file is analyzed, a file hash is generated, and the results of the analysis are stored in a database.
When a file is uploaded to the Juniper ATP Cloud cloud, the first step is to check whether this file has
been looked at before. If it has, the stored verdict is returned to the SRX Series device and there is no
need to re-analyze the file. In addition to files scanned by Juniper ATP Cloud, information about common
malware files is also stored to provide faster response.
Cache lookup is performed in real time. All other techniques are done offline. This means that if the cache
lookup does not return a verdict, the file is sent to the client system while the Juniper ATP Cloud cloud
continues to examine the file using the remaining pipeline techniques. If a later analysis returns a malware
verdict, then the file and host are flagged.
Antivirus Scan
The advantage of antivirus software is its protection against a large number of potential threats, such as
viruses, trojans, worms, spyware, and rootkits. The disadvantage of antivirus software is that it is always
behind the malware. The virus comes first and the patch to the virus comes second. Antivirus is better at
defending familiar threats and known malware than zero-day threats.
Page 25

Juniper ATP Cloud utilizes multiple antivirus software packages, not just one, to analyze a file. The results
are then fed into the machine learning algorithm to overcome false positives and false negatives.
Static Analysis
Static analysis examines files without actually running them. Basic static analysis is straightforward and
fast, typically around 30 seconds. The following are examples of areas static analysis inspects:
Metadata information—Name of the file, the vendor or creator of this file, and the original data the file
•
was compiled on.
Categories of instructions used—Is the file modifying the Windows registry? Is it touching disk I/O APIs?.
•
File entropy—How random is the file? A common technique for malware is to encrypt portions of the
•
code and then decrypt it during runtime. A lot of encryption is a strong indication a this file is malware.
The output of the static analysis is fed into the machine learning algorithm to improve the verdict accuracy.
Dynamic Analysis
10
The majority of the time spent inspecting a file is in dynamic analysis. With dynamic analysis, often called
sandboxing, a file is studied as it is executed in a secure environment. During this analysis, an operating
system environment is set up, typically in a virtual machine, and tools are started to monitor all activity.
The file is uploaded to this environment and is allowed to run for several minutes. Once the allotted time
has passed, the record of activity is downloaded and passed to the machine learning algorithm to generate
a verdict.
Sophisticated malware can detect a sandbox environment due to its lack of human interaction, such as
mouse movement. Juniper ATP Cloud uses a number of deception techniques to trick the malware into
determining this is a real user environment. For example, Juniper ATP Cloud can:
Generate a realistic pattern of user interaction such as mouse movement, simulating keystrokes, and
•
installing and launching common software packages.
Create fake high-value targets in the client, such as stored credentials, user files, and a realistic network
•
with Internet access.
Create vulnerable areas in the operating system.
•
Deception techniques by themselves greatly boost the detection rate while reducing false positives. They
also boosts the detection rate of the sandbox the file is running in because they get the malware to perform
more activity. The more the file runs the more data is obtained to detect whether it is malware.
Machine Learning Algorithm
Juniper ATP Cloud uses its own proprietary implementation of machine learning to assist in analysis.
Machine learning recognizes patterns and correlates information for improved file analysis. The machine
Page 26

learning algorithm is programmed with features from thousands of malware samples and thousands of
goodware samples. It learns what malware looks like, and is regularly re-programmed to get smarter as
threats evolve.
Threat Levels
Juniper ATP Cloud assigns a number between 0-10 to indicate the threat level of files scanned for malware
and the threat level for infected hosts. See Table 4 on page 11.
Table 4: Threat Level Definitions
DefinitionThreat Level
Clean; no action is required.0
Low threat level.1 - 3
Medium threat level.4 - 6
11
High threat level.7 -10
For more information on threat levels, see the Juniper ATP Cloud Web UI online help.
Licensing
Juniper ATP Cloud has three service levels: Free, Basic (feed only), and Premium. No license is required
for the free version, but you must obtain a license for Basic and Premium levels.
To understand more about Juniper ATP Cloud licenses, see Licenses for Juniper Advanced Threat Prevention
(ATP) Cloud. Please refer to the Licensing Guide for general information about License Management.
Please refer to the product Data Sheets for further details, or contact your Juniper Account Team or
Juniper Partner.
RELATED DOCUMENTATION
Juniper Advanced Threat Prevention Cloud | 2
Dashboard Overview | 37
Page 27

About Policy Enforcer
IN THIS SECTION
Policy Enforcer | 12
Policy Enforcer
View the Policy Enforcer data sheet (This takes you out of the help center to the Juniper web site):
https://www.juniper.net/assets/fr/fr/local/pdf/datasheets/1000602-en.pdf
Policy Enforcer provides centralized, integrated management of all your security devices (both physical
and virtual), giving you the ability to combine threat intelligence from different solutions and act on that
intelligence from one management point.
12
It also automates the enforcement of security policies across the network and quarantines infected
endpoints to prevent threats across firewalls and switches. It works with cloud-based Juniper Advanced
Threat Prevention (Juniper ATP) Cloud to protect both perimeter-oriented threats as well as threats within
the network. For example, if a user downloads a file from the Internet and that file passes through an SRX
firewall, the file can be sent to the Juniper ATP Cloud cloud for malware inspection (depending on your
configuration settings.) If the file is determined to be malware, Policy Enforcer identifies the IP address
and MAC address of the host that downloaded the file. Based on a user-defined policy, that host can be
put into a quarantine VLAN or blocked from accessing the Internet.
Policy Enforcer provides the following:
Pervasive Security—Combine security features and intelligence from devices across your network,
•
including switches, routers, firewalls, to create a “secure fabric” that leverages information you can use
to create policies that address threats in real-time and into the future. With monitoring capabilities, it
can also act as a sensor, providing visibility for intra- and inter-network communications.
User Intent-Based Policies—Create policies according to logical business structures such as users, user
•
groups, geographical locations, sites, tenants, applications, or threat risks. This allows network devices
(switches, routers, firewalls and other security devices) to share information, resources, and when threats
are detected, remediation actions within the network.
Threat Intelligence Aggregation—Gather threat information from multiple locations and devices, both
•
physical and virtual, as well as third party solutions.
Figure 6 on page 13 illustrates the flow diagram of Policy Enforcer over a traditional SRX configuration.
Page 28
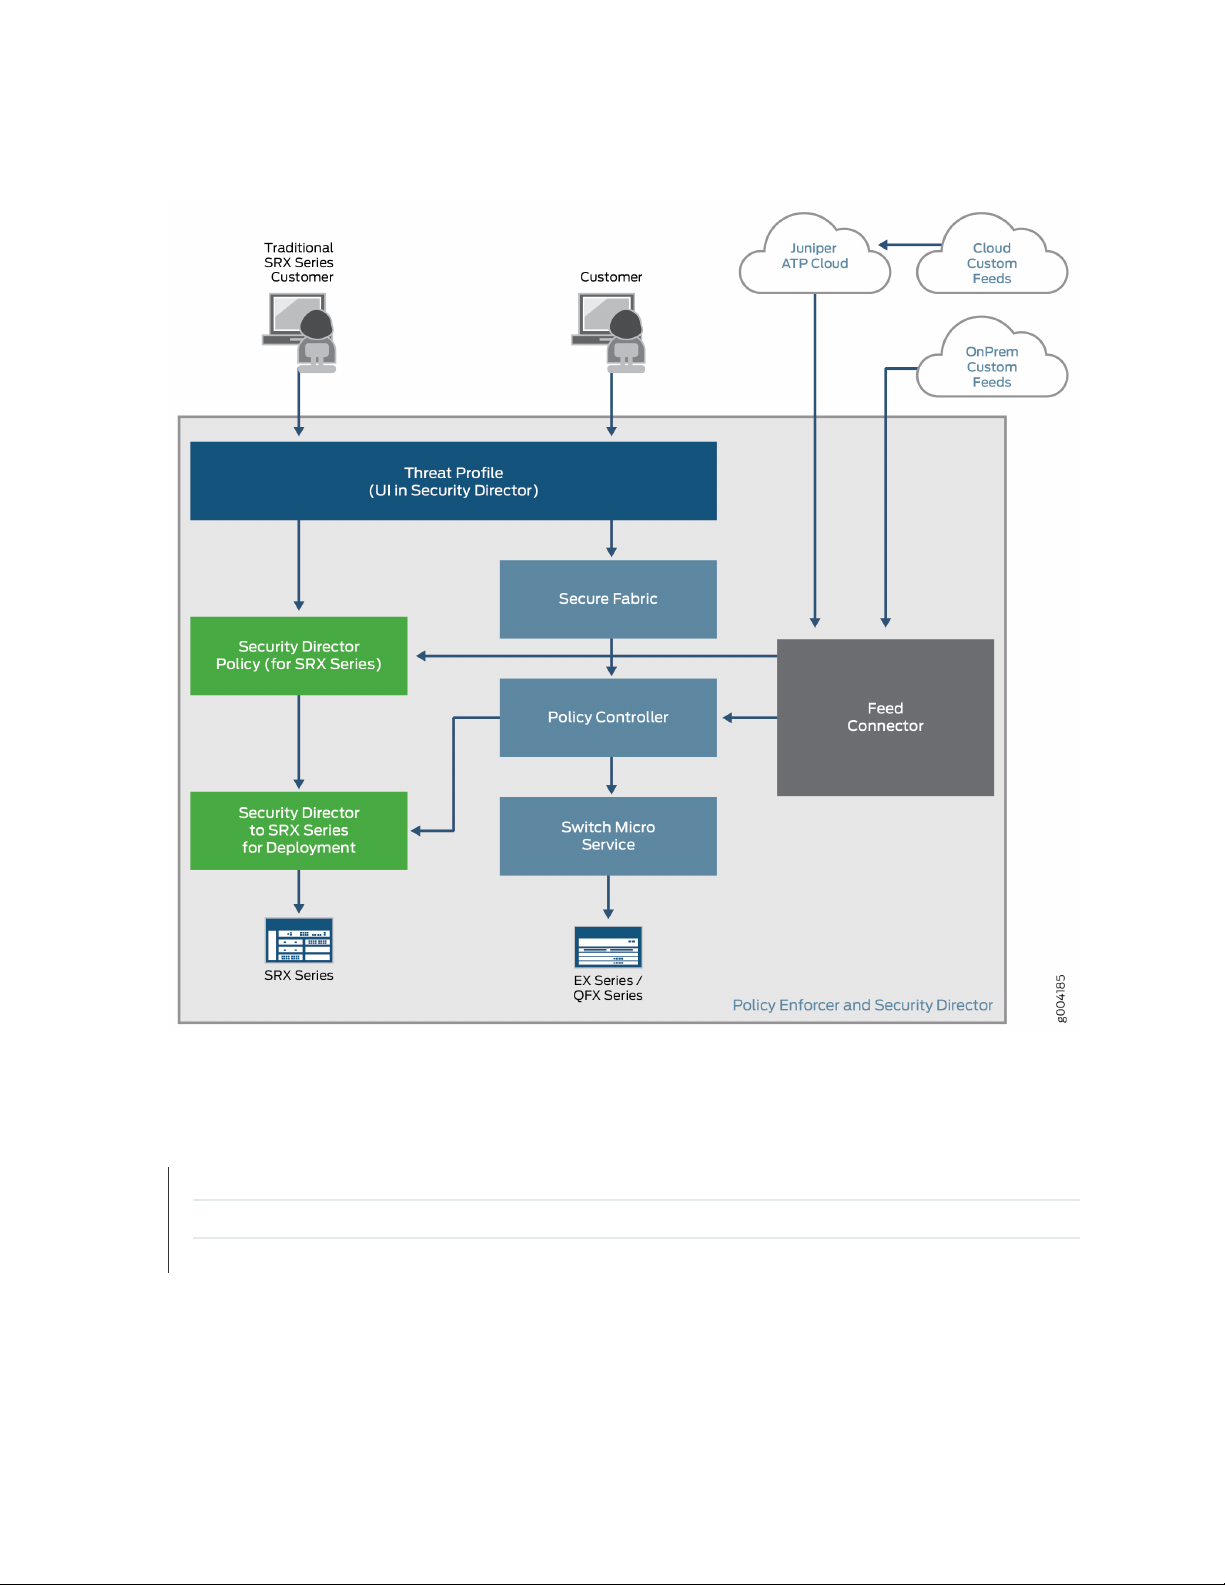
Figure 6: Comparing Traditional SRX Customers to Policy Enforcer Customers
13
RELATED DOCUMENTATION
Hosts Overview | 151
Host Details | 154
Dashboard Overview | 37
Page 29
CHAPTER 2
Install Juniper Advanced Threat Cloud Prevention
IN THIS CHAPTER
Juniper Advanced Threat Prevention Cloud Installation Overview | 14
Managing the Juniper Advanced Threat Prevention Cloud License | 14
Registering a Juniper Advanced Threat Prevention Cloud Account | 19
Downloading and Running the Juniper Advanced Threat Prevention Cloud Script | 24
14
Juniper Advanced Threat Prevention Cloud Installation Overview
Although Juniper ATP Cloud is a free add-on to an SRX Series device, you must still enable it prior to using
it. To enable Juniper ATP Cloud, perform the following tasks:
1. (Optional) Obtain a Juniper ATP Cloud premium license. See Licenses for Juniper Advanced Threat
Prevention (ATP) Cloud. This link takes you to the Juniper Licensing Guide.
2. Register an account on the Juniper ATP Cloud cloud Web portal. See “Registering a Juniper Advanced
Threat Prevention Cloud Account” on page 19.
3. Download and run the Juniper ATP Cloud script on your SRX Series device. See “Downloading and
Running the Juniper Advanced Threat Prevention Cloud Script” on page 24.
Managing the Juniper Advanced Threat Prevention Cloud License
IN THIS SECTION
Obtaining the Premium License Key | 15
License Management and SRX Series Devices | 16
Juniper ATP Cloud Premium Evaluation License for vSRX | 16
Page 30

License Management and vSRX Deployments | 17
High Availability | 18
This topic describes how to install the Juniper ATP Cloud premium license onto your SRX Series devices
and vSRX deployments. You do not need to install the Juniper ATP Cloud free license as these are included
your base software. Note that the free license has a limited feature set (see Juniper Advanced Threat
Prevention Cloud License Types and “File Scanning Limits” on page 185).
When installing the license key, you must use the license that is specific your device type. For example,
the Juniper ATP Cloud premium license available for the SRX Series device cannot be used on vSRX
deployments.
Obtaining the Premium License Key
15
The Juniper ATP Cloud premium license can be found on the Juniper Networks product price list. The
procedure for obtaining the premium license entitlement is the same as for all other Juniper Network
products. The following steps provide an overview.
1. Contact your local sales office or Juniper Networks partner to place an order for the Juniper ATP Cloud
premium license.
After your order is complete, an authorization code is e-mailed to you. An authorization code is a unique
16-digit alphanumeric used in conjunction with your device serial number to generate a premium license
entitlement.
2. (SRX Series devices only) Use the show chassis hardware CLI command to find the serial number of
the SRX Series devices that are to be tied to the Juniper ATP Cloud premium license.
[edit]
root@SRX# run show chassis hardware
Hardware inventory:
Item Version Part number Serial number Description
Chassis CM1915AK0326 SRX1500
Midplane REV 09 750-058562 ACMH1590 SRX1500
Pseudo CB 0
Routing Engine 0 BUILTIN BUILTIN SRX Routing Engine
FPC 0 REV 08 711-053832 ACMG3280 FEB
PIC 0 BUILTIN BUILTIN 12x1G-T-4x1G-SFP-4x10G
Page 31

Look for the serial number associated with the chassis item. In the above example, the serial number
is CM1915AK0326.
3. Open a browser window and go to https://license.juniper.net.
4. Click Login to Generate License Keys and follow the instructions.
NOTE: You must have a valid Juniper Networks Customer Support Center (CSC) account to
log in.
License Management and SRX Series Devices
Unlike other Juniper Networks products, Juniper ATP Cloud does not require you to install a license key
onto your SRX Series device. Instead, your entitlement for a specific serial number is automatically
transferred to the cloud server when you generate your license key. It may take up to 24 hours for your
activation to be updated in the Juniper ATP Cloud cloud server.
16
Juniper ATP Cloud Premium Evaluation License for vSRX
The 30-day Juniper ATP Cloud countdown premium evaluation license allows you to protect your network
from advanced threats with Juniper ATP Cloud. The license allows you to use Juniper ATP Cloud premium
features for 30-days without having to install a license key. After the trial license expires, the connection
to the Juniper ATP Cloud cloud is broken and you will no longer be able to use any Juniper ATP Cloud
features.
Instructions for downloading the trial license are here: https://www.juniper.net/us/en/dm/free-vsrx-trial/.
NOTE: The 30-day trial license period begins on the day you install the evaluation license.
To continue using Juniper ATP Cloud features after the optional 30-day period, you must purchase
and install the date-based license; otherwise, the features are disabled.
After installing your trial license, set up your realm and contact information before using Juniper ATP
Cloud. For more information, see Registering a Juniper Advanced Threat Prevention Cloud Account.
Page 32

License Management and vSRX Deployments
Unlike with physical SRX Series devices, you must install Juniper ATP Cloud premium licenses onto your
vSRX. Installing the Juniper ATP Cloud license follows the same procedure as with most standard vSRX
licenses.
The following instructions describe how to install a license key from the CLI. You can also add a new license
key with J-Web (see Managing Licenses for vSRX.)
NOTE: If you are reinstalling a Juniper ATP Cloud license key on your vSRX, you must first
remove the existing Juniper ATP Cloud license. For information on removing licenses on the
vSRX, see Managing Licenses for vSRX.
To install a license key from the CLI:
1. Use the request system license add command to manually paste the license key in the terminal.
17
user@vsrx> request system license add terminal
[Type ^D at a new line to end input,
enter blank line between each license key]
JUNOS123456 aaaaaa bbbbbb cccccc dddddd eeeeee ffffff
cccccc bbbbbb dddddd aaaaaa ffffff aaaaaa
aaaaaa bbbbbb cccccc dddddd eeeeee ffffff
cccccc bbbbbb dddddd aaaaaa ffffff
JUNOS123456: successfully added
add license complete (no errors)
NOTE: You can save the license key to a file and upload the file to the vSRX file system
through FTP or Secure Copy (SCP), and then use the request system license add file-name
command to install the license.
2. (Optional) Use the show system license command to view details of the licenses.
Example of a premium license output:
Page 33

root@host> show system license
License identifier: JUNOS123456
License version: 4
Software Serial Number: 1234567890
Customer ID: JuniperTest
Features:
Sky ATP - Sky ATP: Cloud Based Advanced Threat Prevention on SRX
firewalls
date-based, 2016-07-19 17:00:00 PDT - 2016-07-30 17:00:00 PDT
Example of a free license output:
root@host> show system license
License identifier: JUNOS123456
License version: 4
Software Serial Number: 1234567890
Customer ID: JuniperTest
Features:
Virtual Appliance - Virtual Appliance permanent
18
3. The license key is installed and activated on your vSRX.
High Availability
Before enrolling your devices with the Juniper ATP Cloud cloud, set up your HA cluster as described in
your product documentation. For vSRX deployments, make sure the same license key is used on both
cluster nodes. When enrolling your devices, you only need to enroll one node. The Juniper ATP Cloud
cloud will recognize this is an HA cluster and will automatically enroll the other node.
Page 34

Registering a Juniper Advanced Threat Prevention Cloud Account
To create a Juniper ATP Cloud account, you must first have a Customer Support Center (CSC) user account.
For more information, see Creating a User Account.
When setting up your Juniper ATP Cloud account, you must come up with a realm name that uniquely
identifies you and your company. For example, you can use your company name and your location, such
as Juniper-Mktg-Sunnyvale, for your realm name. Realm names can only contain alphanumeric characters
and the dash (“-”) symbol.
To create a Juniper ATP Cloud administrator account:
19
Page 35

1. Open a Web browser, type your location specific URL and press Enter. (This example is for the United
States. See “Juniper Advanced Threat Prevention Cloud Web UI Overview” on page 34 for all portal
hostnames by location.)
https://amer.sky.junipersecurity.net
The management interface login page appears. See Figure 7 on page 20.
Figure 7: Juniper ATP Cloud Login
20
2. Click Create a security realm.
The authentication window appears. See Figure 8 on page 21.
3. Enter your single sign-on (SSO) or CSC username and password and click Next. This is the same username
and password as your CSC account.
The security realm window appears. See Figure 8 on page 21.
Page 36

Figure 8: Creating Your Juniper ATP Cloud Realm Name
21
4. Enter your unique realm name, company name, and optionally a description. Then press Next.
NOTE: Verify your realm name before clicking Next. Currently there is no way to delete
realms through the Web UI.
The contact information window appears. See Figure 9 on page 22.
Page 37

Figure 9: Entering Your Juniper ATP Cloud Contact Information
22
5. Enter your contact information and click Next. Should Juniper Networks need to contact you, the
information you enter here is used as your contact information.
The credentials window appears. See Figure 10 on page 23.
Page 38

Figure 10: Creating Your Juniper ATP Cloud Credentials
23
6. Enter a valid e-mail address and password. This will be your log in information to access the Juniper
ATP Cloud management interface.
7. Click Finish.
You are automatically logged in and taken to the dashboard.
If you forget your password, you have two options:
Create a new account on a new realm and re-enroll your devices.
•
Contact Juniper Technical Support to reset your password.
•
Page 39

RELATED DOCUMENTATION
Enrolling an SRX Series Device without the Juniper ATP Cloud Web Portal | 47
Downloading and Running the Juniper Advanced Threat Prevention Cloud Script
The Juniper ATP Cloud uses a Junos OS operation (op) script to help you configure your SRX Series device
to connect to the Juniper ATP Cloud cloud service. This script performs the following tasks:
Downloads and installs certificate authority (CAs) licenses onto your SRX Series device.
•
Creates local certificates and enrolls them with the cloud server.
•
Performs basic Juniper ATP Cloud configuration on the SRX Series device.
•
Establishes a secure connection to the cloud server.
•
24
NOTE:
Juniper ATP Cloud requires that both your Routing Engine (control plane) and Packet Forwarding
•
Engine (data plane) can connect to the Internet but the “to-cloud” connection should not go
through the management interface, for example, fxp0. You do not need to open any ports on
the SRX Series device to communicate with the cloud server. However, if you have a device
in the middle, such as a firewall, then that device must have ports 8080 and 443 open.
The SRX Series device uses the default inet.0 routing table and an interface part of inet.0 as
•
source-interface for control-plane connection from SRX Series device to ATP Cloud. If the
only Internet-facing interface on SRX Series device is part of a routing instance, then we
recommend that you add a static route pointing to the routing instance. Else, the control
connection will fail to establish.
Juniper ATP Cloud requires that your SRX Series device host name contain only alphanumeric
ASCII characters (a-z, A-Z, 0-9), the underscore symbol ( _ ) and the dash symbol ( - ).
For SRX340, SRX345 and SRX500M Series devices, you must run the set security forwarding-process
enhanced-services-mode command and reboot the device before running the op script or before running
the request services advanced-anti-malware enroll command.
user@host# set security forwarding-process enhanced-services-mode
Page 40

To download and run the Juniper ATP Cloud script:
NOTE: As of Junos Release 19.3R1, there is another way to enroll the SRX series device without
having to interact with the ATP Cloud Web Portal. You run the “enroll” command from the SRX
and it performs all the necessary enrollment steps. See “Enrolling an SRX Series Device without
the Juniper ATP Cloud Web Portal” on page 47
1. In the Web UI, click Devices and then click Enroll.
The Enroll window appears. See Figure 11 on page 25.
Figure 11: Enrolling Your SRX Series Device
25
2. Copy the highlighted contents to your clipboard and click OK.
NOTE: When enrolling devices, Juniper ATP Cloud generates a unique op script for each
request. Each time you click Enroll, you’ll get slightly different parameters in the ops script.
The screenshot above is just an example. Do not copy the above example onto your SRX
device. Instead, copy and paste the output you receive from your Web UI and use that to
enroll your SRX devices.
3. Paste this command into the Junos OS CLI of the SRX Series device you want to enroll with Juniper
ATP Cloud and press Enter. Your screen will look similar to the following.
Page 41

root@mysystem> op url http://skyatp.argon.junipersecurity.net/bootstrap/
enroll/6e797dc797d26129dae46f17a7255650/jpz1qkddodlcav5g.slax
Version JUNOS Software Release [15.1-X49] is valid for bootstrapping.
Going to enroll single device for SRX1500: P1C_00000067 with hostname mysystem...
Updating Application Signature DB...
Wait for Application Signature DB download status #1...
Communicate with cloud...
Configure CA...
Request aamw-secintel-ca CA...
Load aamw-secintel-ca CA...
Request aamw-cloud-ca CA...
Load aamw-cloud-ca CA...
Retrieve CA profile aamw-ca...
Generate key pair: aamw-srx-cert...
Enroll local certificate aamw-srx-cert with CA server #1...
Configure advanced-anti-malware services...
Communicate with cloud...
Wait for aamwd connection status #1...
SRX was enrolled successfully!
26
NOTE: If for some reason the ops script fails, disenroll the device (see Disenrolling an SRX
Series Device from Juniper Advanced Threat Prevention Cloud) and then re-enroll it.
4. In the management interface, click Devices.
The SRX Series device you enrolled now appears in the table. See Figure 12 on page 26.
Figure 12: Example Enrolled SRX Series Device
5. (optional) Use the show services advanced-anti-malware status CLI command to verify that connection
is made to the cloud server from the SRX Series device. Your output will look similar to the following.
Page 42

root@host> show services advanced-anti-malware status
Server connection status:
Server hostname: https://skyatp.argon.junipersecurity.net
Server port: 443
Control Plane:
Connection Time: 2015-11-23 12:09:55 PST
Connection Status: Connected
Service Plane:
fpc0
Connection Active Number: 0
Connection Failures: 0
Once configured, the SRX Series device communicates to the cloud through multiple persistent connections
established over a secure channel (TLS 1.2) and the SRX device is authenticated using SSL client certificates.
As stated earlier, the script performs basic Juniper ATP Cloud configuration on the SRX Series device.
These include:
27
NOTE: You should not copy the following examples and run them on your SRX Series device.
The list here is simply to show you what is being configured by the ops script. If you run into
any issues, such as certificates, rerun the ops script again.
Creating a default profile.
•
Establishing a secured connection to the cloud server. The following is an example. Your exact URL is
•
determined by your geographical region. Refer to this table.
Customer Portal URLLocation
Customer Portal: https://amer.sky.junipersecurity.netUnited States
Customer Portal: https://euapac.sky.junipersecurity.netEuropean Union
Customer Portal: https://apac.sky.junipersecurity.netAPAC
Customer Portal: https://canada.sky.junipersecurity.netCanada
set services advanced-anti-malware connection url
https://amer.sky.junipersecurity.net (this URL is only an example and will not
work for all locations).
set services advanced-anti-malware connection authentication tls-profile aamw-ssl
Page 43

Configuring the SSL proxy.
•
set services ssl initiation profile aamw-ssl trusted-ca aamw-secintel-ca
set services ssl initiation profile aamw-ssl client-certificate aamw-srx-cert
set services security-intelligence authentication tls-profile aamw-ssl
set services advanced-anti-malware connection authentication tls-profile aamw-ssl
set services ssl initiation profile aamw-ssl trusted-ca aamw-cloud-ca
Configuring the cloud feeds (allowlists, blocklists and so forth.)
•
set services security-intelligence url https://cloudfeeds.sky.junipersecurity.net/
api/manifest.xml
set services security-intelligence authentication tls-profile aamw-ssl
Juniper ATP Cloud uses SSL forward proxy as the client and server authentication. Instead of importing
the signing certificate and its issuer’s certificates into the trusted-ca list of client browsers, SSL forward
proxy now generates a certificate chain and sends this certificate chain to clients. Certificate chaining helps
to eliminate the need to distribute the signing certificates of SSL forward proxy to the clients because
clients can now implicitly trust the SSL forward proxy certificate.
28
The following CLI commands load the local certificate into the PKID cache and load the certificate-chain
into the CA certificate cache in PKID, respectively.
user@root> request security pki local-certificate load filename ssl_proxy_ca.crt key sslserver.key
certificate-id ssl-inspect-ca
user@root> request security pki ca-certificate ca-profile-group load ca-group-name ca-group-name
filename certificate-chain
where:
ssl_proxy_ca.crt (Signing certificate)—Is the SSL forward proxy certificate signed by the administrator or
by the intermediate CA.
sslserver.key—Is the key pair.
ssl-inspect-ca—Is the certificate ID that SSL forward proxy uses in configuring the root-ca in the SSL
forward proxy profile.
certificate-chain—Is the file containing the chain of certificates.
Page 44

The following is an example of SSL forward proxy certificate chaining used by the op script.
request security pki local-certificate enroll certificate-id aamw-srx-cert ca-profile aamw-ca
challenge-password *** subject CN=4rrgffbtew4puztj:model:sn email email-address
request security pki ca-certificate enroll ca-profile aamw-ca
Note that you cannot enroll the SRX Series device to Juniper ATP Cloud if the SRX device is in FIPS mode
due to a PKI limitation.
To check your certificates, see “Troubleshooting Juniper Advanced Threat Prevention Cloud: Checking
Certificates” on page 258. We recommend that you re-run the op script if you are having certificate issues.
29
Page 45

2
PART
The Web Portal and Enrolling SRX
Series Devices
The Juniper ATP Cloud Web Portal | 31
Enroll SRX Series Devices | 43
Page 46
CHAPTER 3
The Juniper ATP Cloud Web Portal
IN THIS CHAPTER
Juniper Advanced Threat Prevention Cloud Configuration Overview | 31
Juniper Advanced Threat Prevention Cloud Web UI Overview | 34
Dashboard Overview | 37
Reset Password | 38
Recover Realm Name | 40
31
Juniper Advanced Threat Prevention Cloud Configuration Overview
Table 5 on page 31 lists the basic steps to configure Juniper ATP Cloud.
NOTE: These steps assume that you already have your SRX Series device(s) installed, configured,
and operational at your site.
Table 5: Configuring Juniper ATP Cloud
For information, seeDescriptionTask
(optional) Update the
administrator profile
Update your administrator profile to add more users with
administrator privileges to your security realm and to set
the thresholds for receiving alert emails. A default
administrator profile is created when you register an
account.
This step is done in the Web UI.
Advanced Threat Prevention Cloud
Administrator Profile Overview
Page 47

Table 5: Configuring Juniper ATP Cloud (continued)
32
For information, seeDescriptionTask
Enroll your SRX
Series devices
Set global
configurations
(optional) Create
allowlists and
blocklists
Select the SRX Series devices to communicate with Juniper
ATP Cloud. Only those listed in the management interface
can send files to the cloud for inspection and receive
results.
This step is done in the Web UI and on your SRX Series
device.
threshold and optionally, e-mail accounts when certain
thresholds are reached. For example, you can send e-mails
to an IT department when thresholds of 5 are met and
send e-mails to an escalation department when thresholds
of 9 are met.
Create allowlists and blocklists to list network nodes that
you trust and don’t trust. Allowlisted websites are trusted
websites where files downloaded from do not need to be
inspected. Blocklisted websites are locations from which
downloads should be blocked. Files downloaded from
websites that are not in the allowlist or blocklist are sent
to the cloud for inspection.
“Enrolling an SRX Series Device
With Juniper Advanced Threat
Prevention Cloud” on page 43
Web UI tooltips and online helpSelect Configure > Global Configuration to set the default
“Allowlist and Blocklist
Overview” on page 57
(optional) Create the
Juniper ATP Cloud
profile
(optional) Identify
compromised hosts
This step is done in the Web UI.
Juniper ATP Cloud profiles define which file types are to
be sent to the cloud for inspection. For example, you may
want to inspect executable files but not documents. If you
don’t create a profile, the default one is used.
This step is done in the Web UI.
Compromised hosts are systems where there is a high
confidence that attackers have gained unauthorized access.
Once identified, Juniper ATP Cloud recommends an action
and you can create security policies to take enforcement
actions on the inbound and outbound traffic on these
infected hosts.
This step is done on the SRX Series device.
Juniper Advanced Threat
Prevention Cloud Profile Overview
“Compromised Hosts: More
Information” on page 156
Page 48

Table 5: Configuring Juniper ATP Cloud (continued)
33
For information, seeDescriptionTask
(optional) Block
outbound requests to
a C&C host
Configure the
Advanced
Anti-Malware Policy
on the SRX Series
Device
Configure the
Security Intelligence
Policy on the SRX
Series Device
The SRX Series device can intercept and perform an
enforcement action when a host on your network tries to
initiate contact with a possible C&C server on the Internet.
This step is done on the SRX Series device.
NOTE: Requires Juniper ATP Cloud premium license.
Advanced anti-malware security policies reside on the SRX
Series device and determine which conditions to send files
to the cloud and what to do when a file when a file
receives a verdict number above the configured threshold.
This step is done on the SRX Series device.
Create the security intelligence policies on the SRX Series
device to act on infected hosts and attempts to connect
with a C&C server.
This step is done on the SRX Series device.
“Command and Control Servers:
More Information” on page 172
“Juniper Advanced Threat
Prevention Cloud Policy
Overview” on page 212
“Configuring the SRX Series
Devices to Block Infected Hosts”
on page 163
“Configuring the SRX Series
Device to Block Outbound
Requests to a C&C Host” on
page 175
Enable the firewall
policy
Create your SRX Series firewall policy to filter and log
traffic in the network using the set security policies
from-zone to-zone CLI commands.
This step is done on the SRX Series device.
“Configuring the SRX Series
Devices to Block Infected Hosts”
on page 163
“Configuring the SRX Series
Device to Block Outbound
Requests to a C&C Host” on
page 175
“Example: Configuring a Juniper
Advanced Threat Prevention
Cloud Policy Using the CLI” on
page 216
You can optionally use APIs for C&C feeds, allowlist and blocklist operations, and file submission. See the
Threat Intelligence Open API Setup Guide for more information.
Page 49

NOTE:
The cloud sends data, such as your Juniper ATP Cloud allowlists, blocklists and profiles, to the
SRX Series device every few seconds. You do not need to manually push your data from the
cloud to your SRX Series device. Only new and updated information is sent; the cloud does not
continually send all data.
Juniper Advanced Threat Prevention Cloud Web UI Overview
The Juniper ATP Cloud Web UI is a web-based service portal that lets you monitor malware download
through your SRX Series devices. The Web UI is hosted by Juniper Networks in the cloud. There is no
separate download for you to install on your local system.
34
NOTE: If you are a licensed Junos Space Security Director, you can use Security Director 16.1
and later screens to set up and use Juniper ATP Cloud. For more information using Security
Director with Juniper ATP Cloud, see the Policy Enforcer administration guide and the Security
Director online help. The remainder of this guide refers to using Juniper ATP Cloud with the
Web UI.
You can perform the following tasks with the Web UI:
Monitoring—Display information about scanned files whether clean or malware, infected hosts including
•
their current and past threats, and blocked access to known C&C sites.
Configuring—Create and view allowlists and blocklists that list safe or harmful network nodes, and profiles
•
that define what file types to submit to Juniper ATP Cloud for investigation.
Reporting—Use the dashboard to view and drill into various reports, such as most infected file types,
•
top malwares identified, and infected hosts.
The Web UI has infotips that provide information about a specific screen, field or object. To view the
infotip, hover over the question mark (?) without clicking it. See.
Accessing the Web UI
To access the Juniper ATP Cloud Web UI:
1. Open a Web browser that has Hypertext Transfer Protocol (HTTP) or HTTP over Secure Sockets Layer
(HTTPS) enabled.
Page 50

For information on supported browsers and their version numbers, see the Juniper Advanced Threat
Prevention Cloud Supported Platforms Guide.
2. Type in the URL for the customer portal and press Enter.
The customer portal hostname varies by location. Please refer to the following table:
Customer Portal URLLocation
Customer Portal: https://amer.sky.junipersecurity.netUnited States
Customer Portal: https://euapac.sky.junipersecurity.netEuropean Union
Customer Portal: https://apac.sky.junipersecurity.netAPAC
Customer Portal: https://canada.sky.junipersecurity.netCanada
The Web UI login page appears. See Figure 13 on page 36.
35
Page 51

Figure 13: Juniper ATP Cloud Web UI Login Page
36
3. On the login page, type your username (your account e-mail address), password, and realm name and
click Log In.
The Web UI Dashboard page appears.
NOTE: Users can login to Juniper ATP Cloud using different realms. You can manage realms
using the Configure > Global Configuration > Realm Management page. See “Realm Overview”
on page 125. You must be a system administrator to see the Realm Management page. See
“Creating and Editing User Profiles” on page 245 for information on role-based access control.
To terminate your session at any time, click the icon in the upper-right corner and click Logout.
Page 52

Dashboard Overview
The Juniper Advanced Threat Prevention Cloud Web UI is a Web-based service portal that lets you monitor
malware downloaded through your SRX Series devices.
The Web UI for Juniper ATP Cloud includes a dashboard that provides a summary of all gathered information
on compromised content and hosts. Drag and drop widgets to add them to your dashboard. Mouse over
a widget to refresh, remove, or edit the contents.
NOTE: The data on the Web UI dashboard is updated on hourly checks; it does not get updated
in real-time.
In addition, you can use the dashboard to:
Navigate to the File Scanning page from the Top Scanned Files and Top Infected Files widgets by clicking
•
the More Details link.
37
Navigate to the Hosts page from the Top Compromised Hosts widget by clicking the More Details link.
•
Navigate to the Command and Control Servers page from the C&C Server Malware Source Location
•
widget.
NOTE: C&C and GeoIP filtering feeds are only available with the Basic-Threat Feed or Premium
license. For information on other licensed features, see Juniper Advanced Threat Prevention Cloud
License Types.
Available dashboard widgets are as follows:
Table 6: Juniper ATP Cloud Dashboard Widgets
DefinitionWidget
Top Malware Identified
Top Compromised Hosts
A list of the top malware found based on the number of times the malware is
detected over a period of time. Use the arrow to filter by different time frames.
A list of the top compromised hosts based on their associated threat level and
blocked status.
Top Infected File Types
A graph of the top infected file types by file extension. Examples: exe, pdf, ini,
zip. Use the arrows to filter by threat level and time frame.
Page 53

Table 6: Juniper ATP Cloud Dashboard Widgets (continued)
DefinitionWidget
38
Top Infected File Categories
Top Scanned File Types
Top Scanned File Categories
C&C Server and Malware Source
A graph of the top infected file categories. Examples: executables, archived files,
libraries. Use the arrows to filter by threat level and time frame.
A graph of the top file types scanned for malware. Examples: exe, pdf, ini, zip.
Use the arrows to filter by different time frames.
A graph of the top file categories scanned for malware. Examples: executables,
archived files, libraries. Use the arrows to filter by different time frames.
A color-coded map displaying the location of Command and Control servers or
other malware sources. Click a location on the map to view the number of detected
sources.
RELATED DOCUMENTATION
Reset Password | 38
Juniper Advanced Threat Prevention Cloud | 2
How is Malware Analyzed and Detected? | 8
Hosts Overview | 151
HTTP File Download Overview | 178
Command and Control Servers Overview
Reset Password
If you forget your password to login to the Juniper ATP Cloud dashboard, you can reset it using a link sent
by email when you click Forgot Password from the Juniper ATP Cloud login screen. The following section
provides details for resetting your password securely over email.
To reset your password you must enter the realm name and a valid email address.
•
Once you receive your password reset email, the link expires immediately upon use or within one hour.
•
If you want to reset your password again, you must step through the process to receive a new link.
Use this process if you have forgotten your password. If you are logged into the dashboard and want
•
to change your password, you can do that from the Administration > My Profile page. See “Modifying
My Profile” on page 244 for those instructions.
Page 54

To reset your Juniper ATP Cloud dashboard password, do the following:
1. Click the Forgot Password link on the Juniper ATP Cloud dashboard login page.
2. In the screen that appears, enter the Email address associated with your account.
3. Enter the Realm name.
4. Click Continue. An email with a link for resetting your password is sent. Note that the link expires within
one hour of receiving it.
5. Click the link in the email to go to the Reset Password page.
6. Enter a new password and then enter it again to confirm it. The password must contain an uppercase
and a lowercase letter, a number, and a special character.
7. Click Continue. The password is now reset. You should receive an email confirming the reset action.
You can now login with the new password.
39
RELATED DOCUMENTATION
Modifying My Profile | 244
Creating and Editing User Profiles | 245
Dashboard Overview | 37
Page 55

Recover Realm Name
If you forget your realm name to login to the Juniper ATP Cloud portal, you can recover the realm name
using the following methods:
See the confirmation e-mail that is sent to you when you create a new realm. The e-mail now contains
•
the realm name. Here's a sample:
Welcome to Juniper ATP Cloud!
You have successfully created your ATP Cloud Security Realm. Below is your
information:
You email ID: user@juniper.net
Realm Name: " realm123"
You may save the Realm name for future use for login purpose as ATP Cloud login
expects Realm name as an input.
40
You can login now using link: https://xxxxxxxx
Please do not reply to this automated message and contact JTAC if you have any
questions.
Thank you,
Your friendly Juniper ATP Cloud robot.
Click Forgot Realm link from the Juniper ATP Cloud login page.
•
The following section provides details to recover the realm name using the Juniper ATP Cloud web portal.
NOTE: To recover the realm name you must enter a valid e-mail address.
Page 56

To recover the realm name from the ATP Cloud web portal:
1. Open a Web browser, type in the URL for the ATP Cloud web portal, and press Enter.
The login page appears as shown in Figure 14 on page 41.
Figure 14: Juniper ATP Cloud Web UI Login Page
41
2. Click the Forgot Realm link.
A pop-up appears asking you to confirm navigation to customer support center to provide Juniper SSO
credentials.
3. Click Continue.
The customer support center login page appears.
4. Enter the e-mail address that you provided while creating the realm and click Next.
Page 57

A pop-up message is displayed with the status of realm recovery.
If the e-mail address has realms associated with it, an e-mail is sent to your registered e-mail address
•
with the list of associated realms. Here's a sample:
An email message has been sent to user@juniper.net with the names of all ATP
Cloud Realms associated with this email address.
Here's a sample e-mail for realm recovery:
Welcome to Juniper ATP Cloud !
Based on your request please find below Realms created by you with Juniper ATP
Cloud till date.
Your email ID : <Juniper-Networks-Account>
42
Realm names: REALM-1, REALM-2, RELAM-3…REALM-N
You may save the Realm name for future use for login purpose as ATP Cloud login
expects Realm name as an input.
You can login now using link: <realm-recovery link>
Please do not reply to this automated message and contact JTAC if you have any
questions.
Thank you,
Your friendly Juniper ATP Cloud robot
If no realms are associated with the e-mail address, then you will see the following message:
•
There are no realms created by login user@juniper.net.
5. Click OK to login to the ATP Cloud portal with the realm name.
RELATED DOCUMENTATION
Reset Password | 38
Dashboard Overview | 37
Page 58
CHAPTER 4
Enroll SRX Series Devices
IN THIS CHAPTER
Enrolling an SRX Series Device With Juniper Advanced Threat Prevention Cloud | 43
Enrolling an SRX Series Device without the Juniper ATP Cloud Web Portal | 47
Removing an SRX Series Device From Juniper Advanced Threat Prevention Cloud | 49
Searching for SRX Series Devices Within Juniper Advanced Threat Prevention Cloud | 50
Juniper Advanced Threat Prevention Cloud RMA Process | 53
Device Information | 53
Cloud Feeds for Juniper Advanced Threat Prevention Cloud: More Information | 54
43
Enrolling an SRX Series Device With Juniper Advanced Threat Prevention Cloud
Only devices enrolled with Juniper ATP Cloud can send files for malware inspection.
Before enrolling a device, check whether the device is already enrolled. To do this, use the Devices screen
or the Device Lookup option in the Web UI (see “Searching for SRX Series Devices Within Juniper Advanced
Threat Prevention Cloud” on page 50). If the device is already enrolled, disenroll it first before enrolling it
again.
NOTE: If a device is already enrolled in a realm and you enroll it in a new realm, none of the
device data or configuration information is propagated to the new realm. This includes history,
infected hosts feeds, logging, API tokens, and administrator accounts.
NOTE: In the Enrolled Devices page, you can view the realm with which the device is associated.
From the Realm Management page, you can change that realm association or attach new realms.
See “Realm Management” on page 127 for configuration details.
Page 59
As of Junos Release 19.3R1, there is another way to enroll the SRX Series device without having to interact
with the ATP Cloud Web Portal. You run the “enroll” command from the SRX and it performs all the
necessary enrollment steps. See “Enrolling an SRX Series Device without the Juniper ATP Cloud Web
Portal” on page 47
Juniper ATP Cloud uses a Junos OS operation (op) script to help you configure your SRX Series device to
connect to the Juniper Advanced Threat Prevention Cloud service. This script performs the following tasks:
Downloads and installs certificate authority (CAs) licenses onto your SRX Series device.
•
Creates local certificates and enrolls them with the cloud server.
•
Performs basic Juniper ATP Cloud configuration on the SRX Series device.
•
Establishes a secure connection to the cloud server.
•
NOTE: Juniper Advanced Threat Prevention Cloud requires that both your Routing Engine
(control plane) and Packet Forwarding Engine (data plane) can connect to the Internet. Juniper
Advanced Threat Prevention Cloud requires the following ports to be open on the SRX Series
device: 80, 8080, and 443.
44
WARNING: If you are configuring explicit web proxy support for SRX Series
services/Juniper ATP Cloud connections, you must enroll SRX Series devices to Juniper
ATP Cloud using a slightly different process, see “Explicit Web Proxy Support” on
page 223.
To enroll a device in Juniper ATP Cloud using the Web Portal, do the following:
1. Click the Enroll button on the Devices page.
2. Copy the command to your clipboard and click OK.
3. Paste the command into the Junos OS CLI of the SRX Series device you want to enroll with Juniper
ATP Cloud and press Enter. (Note that this command must be run in operational mode.)
NOTE: If the script fails, disenroll the device (see instructions for disenrolling devices) and then
re-enroll it.
Page 60

NOTE: (Optional) Use the show services advanced-anti-malware status CLI command to verify
that a connection is made to the cloud server from the SRX Series device.
Once configured, the SRX Series device communicates to the cloud through multiple persistent connections
established over a secure channel (TLS 1.2) and the SRX Series device is authenticated using SSL client
certificates.
In the Juniper ATP Cloud Web UI Enrolled Devices page, basic connection information for all enrolled
devices is provided, including serial number, model number, tier level (free or not) enrollment status in
Juniper ATP Cloud, last telemetry activity, and last activity seen. Click the serial number for more details.
In addition to Enroll, the following buttons are available:
Table 7: Button Actions
DefinitionActions
45
Enroll
Disenroll
NOTE: Running the Enroll or Disenroll command will commit any uncommitted configuration changes on the SRX
Series device.
NOTE: Generating a new Enroll or Disenroll command invalidates any previously generated commands.
Device Lookup
Remove
Use the Enroll button to obtain a enroll command to run on eligible SRX Series
devices. This command enrolls them in Juniper ATP Cloud and is valid for 7
days. Once enrolled, SRX Series device appears in the Devices and
Connections list.
Use the Disenroll button to obtain a disenroll command to run on SRX Series
devices currently enrolled in Juniper ATP Cloud. This command removes
those devices from Juniper ATP Cloud enrollment and is valid for 7 days.
Use the Device Lookup button to search for the device serial number(s) in
the licensing database to determine the tier (premium, feed only, free) of the
device. For this search, the device does not have to be currently enrolled in
Juniper ATP Cloud.
Removing an SRX Series device is different than disenrolling it. Use the
Remove option only when the associated SRX Series device is not responding
(for example, hardware failure). Removing it, disassociates it from the cloud
without running the Junos OS operation (op) script on the device (see Enrolling
and Disenrolling Devices). You can later enroll it using the Enroll option when
the device is again available.
Page 61

For HA configurations, you only need to enroll the cluster primary. The cloud will detect that this is a
cluster and will automatically enroll both the primary and backup as a pair. Both devices, however, must
be licensed accordingly. For example, if you want premium features, both devices must be entitled with
the premium license.
NOTE: Juniper ATP Cloud supports both active-active and active-passive cluster configurations.
The passive (non-active) node does not establish a connection to the cloud until it becomes the
active node.
NOTE: The License Expiration column contains the status of your current license, including
expiration information. There is a 60 day grace period after the license expires before the SRX
Series device is disenrolled from Juniper ATP Cloud.
46
RELATED DOCUMENTATION
Juniper Advanced Threat Prevention Cloud RMA Process | 53
Removing an SRX Series Device From Juniper Advanced Threat Prevention Cloud | 49
Searching for SRX Series Devices Within Juniper Advanced Threat Prevention Cloud | 50
Device Information | 53
Page 62

Enrolling an SRX Series Device without the Juniper ATP Cloud Web Portal
Starting in Junos OS Release 19.3R1, you can use the request services advanced-anti-malware enroll
command on the SRX Series to enroll a device to the Juniper ATP Cloud Web Portal. With this command,
you do not have to perform any enrollment tasks on the Web Portal itself. All enrollment is done from the
CLI on the SRX.
Enrollment establishes a secure connection between the Juniper ATP Cloud cloud server and the SRX
Series device. It also performs basic configuration tasks such as:
Downloads and installs certificate authorities (CAs) onto your SRX Series device
•
Creates local certificates and enrolls them with the cloud server
•
Establishes a secure connection to the cloud server
•
NOTE: Juniper Advanced Threat Prevention Cloud requires that both your Routing Engine
(control plane) and Packet Forwarding Engine (data plane) can connect to the Internet. You do
not need to open any ports on the SRX Series device to communicate with the cloud server.
However, if you have a device in the middle, such as a firewall, then that device must have ports
80, 8080, and 443 open.
47
Also note, the SRX Series device must be configured with DNS servers in order to resolve the
cloud URL.
Using the device enrollment command on the SRX Series device, request services advanced-anti-malware
enroll, you can enroll the device to an existing realm or create a new realm and then enroll to it.
Here is an example configuration that creates a new realm and then enrolls to that realm.
root@host> request services advanced-anti-malware enroll
1. Enroll the SRX Series device to Juniper ATP Cloud (CLI only):
user@host> request services advanced-anti-malware enroll
Please select geographical region from the list:
1. North America
2. European Region
3. Canada
4. Asia Pacific
Your choice: 1
Page 63

2. Select an existing realm or create a new realm:
Enroll SRX to:
1. A new SkyATP security realm (you will be required to create it first)
2. An existing SkyATP security realm
If you select option 1 to create a new realm, the steps are as follows:
You are going to create a new Sky ATP realm, please provide the required information:
•
Please enter a realm name (This should be a name that is meaningful to your organization. A realm
•
name can only contain alphanumeric characters and the dash symbol. Once a realm is created, it
cannot be changed):
Real name: example-company-a
Please enter your company name:
•
Company name: Example Company A
Please enter your e-mail address. This will be your username for your Sky ATP account:
•
48
Email: me@example-company-a.com
Please setup a password for your new Sky ATP account (It must be at least 8 characters long and
•
include both uppercase and lowercase letters, at least one number, at least one special character):
Password: **********
Verify: **********
Please review the information you have provided:
•
Region: North America
New Realm: example-company-a
Company name: Example Company A
Email: me@example-company-a.com
Create a new realm with the above information? [yes,no]
•
yes
Device enrolled successfully!
If you select option 2 to use an existing realm, the steps are as follows:
NOTE: You must enter a valid username and password for the existing realm as part of the
enrollment procedure.
Page 64

Enter the name of the existing realm:
•
Please enter a realm name.
Realm name: example-company-b
Please enter your company name:
•
Company name: Example Company B
Enter your email adddress/username for the realm. This is the email address that was previously
•
created when setting up the realm.
Please enter your e-mail address. This will be your username for your Sky ATP account:
Enter the password for the realm. This is the password that was previously created when setting up
•
the realm.
Password:********
Enroll device to the realm above? [yes,no] yes
•
Device enrolled successfully!
49
You can use the show services advanced-anti-malware status CLI command on your SRX Series device
to verify that a connection has been made to the cloud server from the SRX Series device.
Once enrolled, the SRX Series device communicates to the cloud through multiple, persistent connections
established over a secure channel (TLS 1.2) and the SRX Series device is authenticated using SSL client
certificates.
RELATED DOCUMENTATION
Enrolling an SRX Series Device With Juniper Advanced Threat Prevention Cloud | 43
Removing an SRX Series Device From Juniper Advanced Threat Prevention Cloud
If you no longer want an SRX Series device to send files to the cloud for inspection, use the disenroll option
to disassociate it from Juniper Advanced Threat Prevention Cloud. The disenroll process generates an ops
script to be run on SRX Series devices and resets any properties set by the enroll process.
To disenroll an SRX Series device:
1. Select the check box associated with the device you want to disasssociate and click Disenroll.
2. Copy the highlighted command to your clipboard and click OK.
Page 65

3. Paste this command into the Junos OS CLI of the device you want to disenroll and press Enter.
You can re-enroll this device at a later time using the Enroll option.
RELATED DOCUMENTATION
Searching for SRX Series Devices Within Juniper Advanced Threat Prevention Cloud | 50
Enrolling an SRX Series Device With Juniper Advanced Threat Prevention Cloud | 43
Device Information | 53
Searching for SRX Series Devices Within Juniper Advanced Threat Prevention Cloud
50
You can search for any SRX Series device enrolled within your security realm of Juniper Advanced Threat
Prevention Cloud using the Device Lookup option. This option also a way for you to view the type of
license the device is using: basic, premium, or free. .
NOTE: With this release, you can only search for device using serial numbers.
To search for devices enrolled with Juniper Advanced Threat Prevention Cloud:
1. From the Web UI, select Devices.
2. Click Device Lookup.
The Device Lookup window appears. See Figure 15 on page 51.
Page 66

Figure 15: Searching for a Device in the Web UI
51
3. Enter the serial number of the device you want to search for and click Next. You can enter multiple
serial numbers, separating each entry with a comma. For more information, see the infotips.
NOTE: The Web UI does not check for valid serial numbers. If you enter an invalid serial
number, the results will come back empty. If you enter multiple serial numbers and one is an
invalid number, the results will come back empty.
The search results window appears. See Figure 16 on page 52.
Page 67

Figure 16: Example Device Search Results
52
4. (Optional) Click a serial number to view details about that device.
RELATED DOCUMENTATION
Device Information | 53
Enrolling an SRX Series Device With Juniper Advanced Threat Prevention Cloud | 43
Removing an SRX Series Device From Juniper Advanced Threat Prevention Cloud | 49
Searching for SRX Series Devices Within Juniper Advanced Threat Prevention Cloud | 50
Page 68
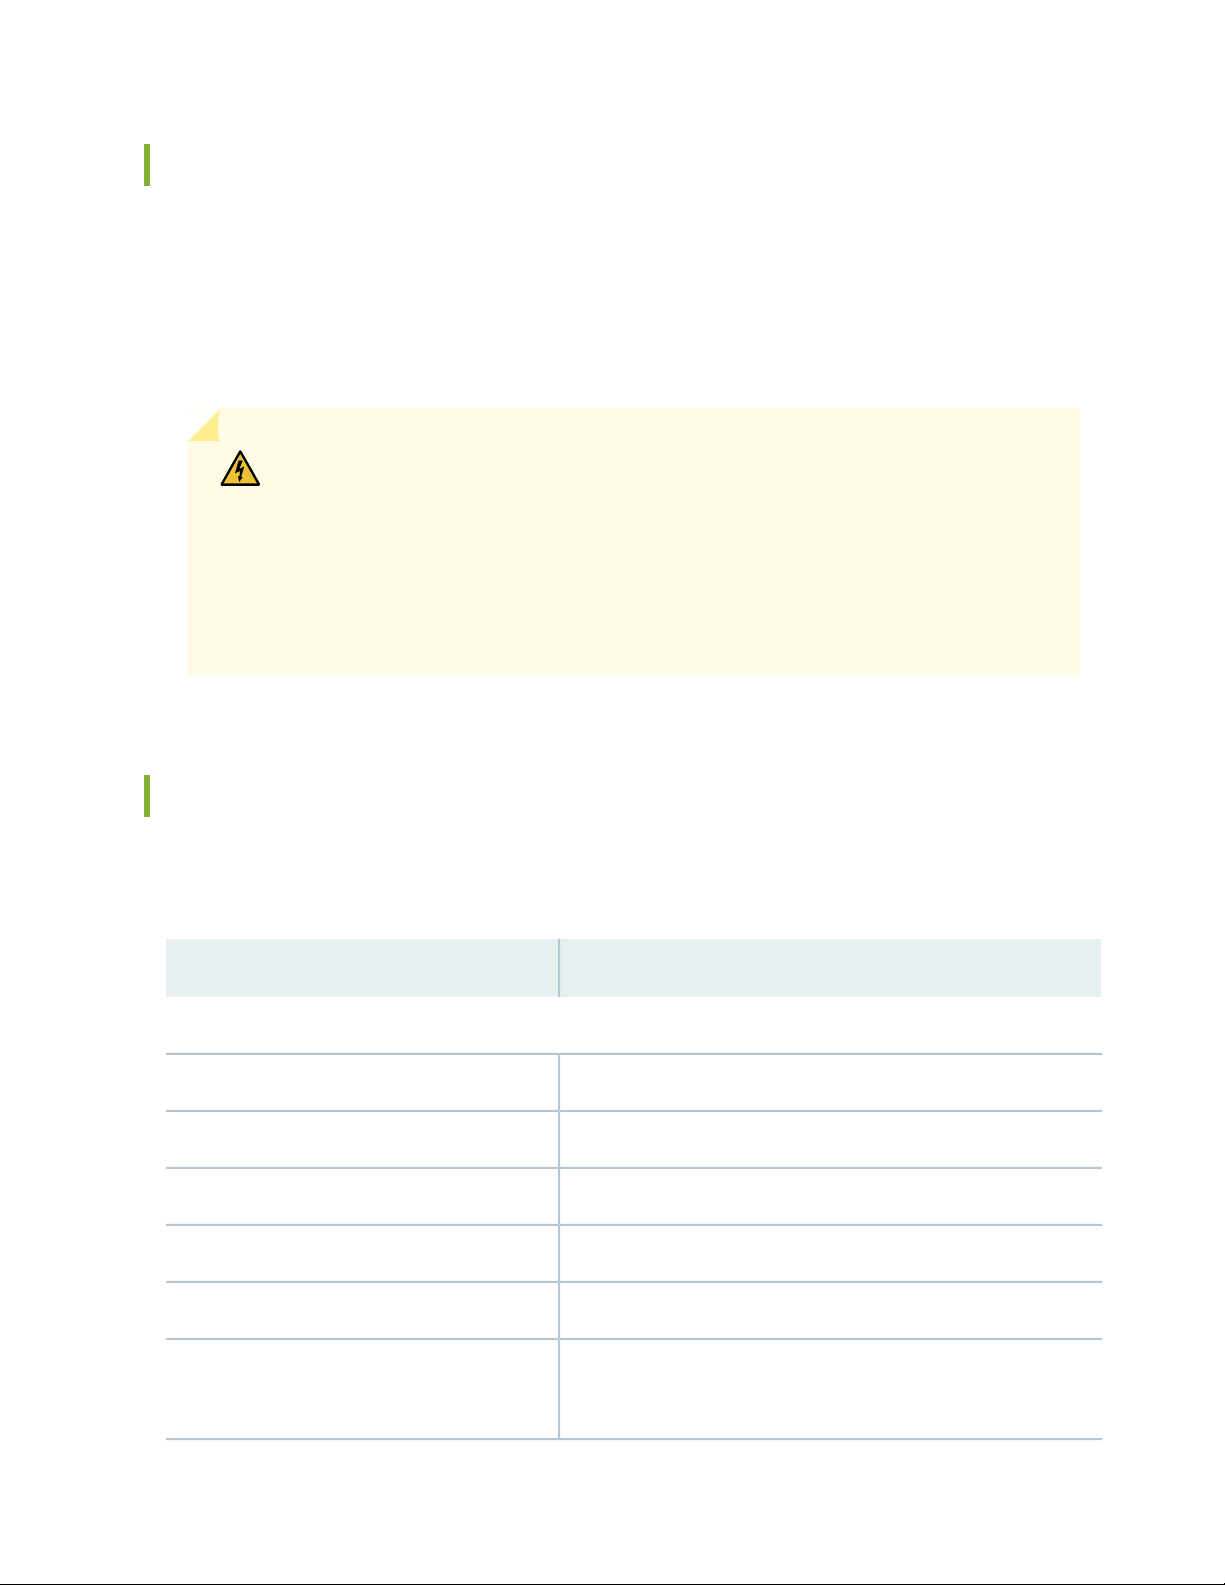
Juniper Advanced Threat Prevention Cloud RMA Process
On occasion, because of hardware failure, a device needs to be returned for repair or replacement. For
these cases, contact Juniper Networks, Inc. to obtain a Return Material Authorization (RMA) number and
follow the RMA Procedure.
Once you transfer your license keys to the new device, it may take up to 24 hours for the new serial
number to be registered with the Juniper ATP Cloud cloud service.
WARNING: After any serial number change on the SRX Series device, a new RMA
serial number needs to be re-enrolled with Juniper ATP Cloud cloud. This means that
you must enroll your replacement unit as a new device. See “Enrolling an SRX Series
Device With Juniper Advanced Threat Prevention Cloud” on page 43. Juniper ATP
Cloud does not have an “RMA state”, and does not see these as replacement devices
from a configuration or registration point of view. Data is not automatically transferred
to the replacement SRX Series device from the old device.
53
Device Information
Use this page to view the following information on the selected SRX Series device.
Table 8: Device Information Fields
DefinitionField
Device Information
SRX Series device serial numberSerial Number
Host name of the device.Host
SRX Series device model numberModel Number
License type: Free, Feed only, Premium.Tier
SRX Series device JunOS versionOS Version
Submission Status
Allowed or Paused. This indicates whether the device can submit
files to Juniper ATP Cloud or if it has reached its daily limit. (At this
time, the limit is 10,000 files per day for premium accounts.)
Page 69

Table 8: Device Information Fields (continued)
Configuration Information
54
DefinitionField
Global Config
Profile Config
Global Whitelist
Global Blocklist
Customer Whitelist
Customer Blocklist
Connection Type
The Device and Cloud fields indicate the version numbers of each
list, both on the device and in the cloud. You can compare them to
see if they are in sync.
The time when the last telemetry submission was received.Telemetry
The time when the last file submission was received.Submission
The time when the last Command and Control event was received.C&C Event
RELATED DOCUMENTATION
Enrolling an SRX Series Device With Juniper Advanced Threat Prevention Cloud | 43
Removing an SRX Series Device From Juniper Advanced Threat Prevention Cloud | 49
Searching for SRX Series Devices Within Juniper Advanced Threat Prevention Cloud | 50
Cloud Feeds for Juniper Advanced Threat Prevention Cloud: More Information
The cloud feed URL is set up automatically for you when you run the op script to configure your SRX Series
device. See “Downloading and Running the Juniper Advanced Threat Prevention Cloud Script” on page 24.
There are no further steps you need to do to configure the cloud feed URL.
Page 70

If you want to check the cloud feed URL on your SRX Series device, run the show services
security-intelligence URL CLI command. Your output should look similar to the following:
root@host# show services security-intelligence url
https://cloudfeeds.sky.junipersecurity.net/api/manifest.xml
If you do not see a URL listed, run the ops script again as it configures other settings in addition to the
cloud feed URL.
SRX Series Update Intervals for Cloud Feeds
The following table provides the update intervals for each feed type. Note that when the SRX Series device
makes requests for new and updated feed content, if there is no new content, no updates are downloaded
at that time.
NOTE: You can run the request services security-intelligence download command to manually
download updates before the next interval, although this is not recommended.
55
Table 9: Feed Update Intervals
SRX Update Intervals (in seconds)FeedsCategory
1,800Juniper FeedsCommand and Control
1,800Integrated Feeds
1,800Customer Feeds
435,600geoip_countryGeoIP
3,600Customer FeedsWhitelist
3,600Customer FeedsBlocklist
60Infected HostsInfected Hosts
1,800Customer FeedsIPFilter
1,800Office 365
Page 71

3
PART
Configure
Allowlists and Blocklists | 57
Email Scanning: Juniper ATP Cloud | 65
Email Scanning: SRX Series Device | 74
File Inspection Profiles | 92
Adaptive Threat Profiling | 97
SecIntel Feeds | 111
Global Configurations | 119
Page 72

CHAPTER 5
Allowlists and Blocklists
IN THIS CHAPTER
Allowlist and Blocklist Overview | 57
Creating Allowlists and Blocklists | 59
Allowlist and Blocklist Overview
57
An allowlist contains known trusted IP addresses, Hashes, Email addresses, and URLs. Content downloaded
from locations on the allowlist does not have to be inspected for malware. A blocklist contains known
untrusted IP addresses and URLs. Access to locations on the blocklist is blocked, and therefore no content
can be downloaded from those sites.
Benefits of Allowlists and Blocklists
Allowlist allows users to download files from sources that are known to be safe. Allowlist can be added
•
to in order to decrease false positives.
Blocklists prevent users from downloading files from sources that are known to be harmful or suspicious.
•
The Custom allowlists or custom blocklists allow you to add items manually. Both are configured on the
Juniper ATP Cloud cloud server. The priority order is as follows:
1. Custom allowlist
2. Custom blocklist
If a location is in multiple lists, the first match wins.
Allowlists and blocklists support the following types:
URL
•
IP address
•
Hostname
•
Hash file
•
Page 73

NOTE:
For IP and URL, The Web UI performs basic syntax checks to ensure your entries are valid.
•
The cloud feed URL for allowlists and blocklists is set up automatically for you when you run
•
the op script to configure your SRX Series device. See “Downloading and Running the Juniper
Advanced Threat Prevention Cloud Script” on page 24.
A hash is a unique signature for a file generated by an algorithm. You can add custom allowlist
•
and blocklist hashes for filtering, but they must be listed in a text file with each entry on a
single line. You can only have one running file containing up to 15,000 file hashes. For upload
details see “Creating Allowlists and Blocklists” on page 59. Note that Hash lists are slightly
different than other list types in that they operate on the cloud side rather than the SRX Series
device side. This means the web portal is able to display hits on hash items.
The SRX series device makes requests approximately every two hours for new and updated feed content.
If there is nothing new, no new updates are downloaded.
58
Use the show security dynamic-address instance advanced-anti-malware CLI command to view the
IP-based allowlists and blocklists on your SRX Series device. There is no CLI command to show the
domain-based or URL-based allowlists and blocklists at this time.
Example show security dynamic-address instance advanced-anti-malware
user@host>show security dynamic-address instance advanced-anti-malware
No. IP-start IP-end Feed Address
1 x.x.x.0 x.x.x.10 custom_whitelist ID-80000400
2 x.x.0.0 x.x.0.10 custom_blacklist ID-80000800
Instance advanced-anti-malware Total number of matching entries: 2
If you do not see your updates, wait a few minutes and try the command again. You might be outside the
Juniper ATP Cloud polling period.
Once your allowlists or blocklists are created, create an advanced anti-malware policy to log (or don’t log)
when attempting to download a file from a site listed in the blocklist or allowlist files. For example, the
following creates a policy named aawmpolicy1 and creates log entries.
set services advanced-anti-malware policy aamwpolicy1 blacklist-notification log
set services advanced-anti-malware policy aamwpolicy1 whitelist-notification log
RELATED DOCUMENTATION
Page 74

Creating Allowlists and Blocklists | 59
Creating Allowlists and Blocklists
Access these pages from Configure > Allowlists or Blocklists.
Use these pages to configure custom trusted and untrusted lists. You can also upload hash files.
Content downloaded from locations on the allowlist is trusted and does not have to be inspected for
malware. Hosts cannot download content from locations on the blocklist, because those locations are
untrusted.
Read the “Allowlist and Blocklist Overview” on page 57 topic.
•
Decide on the type of item you intend to define: URL, IP, Hash, Domain
•
Review current list entries to ensure the item you are adding does not already exist.
•
59
If you are uploading hash files, the files must be in a text file with each hash on its own single line.
•
To create Juniper ATP Cloud allowlists and blocklists:
1. Select Configuration > Allowlists or Blocklists.
2. For either Allowlist or Blocklist, select one of the following tabs: IP , URL, Hash File, Email Sender, C&C
Server, or Encrypted Traffic and enter the required information. See the tables below.
NOTE: Encrypted Traffic option is available only under Allowlists menu.
3. Click OK.
Refer to the following tables for the data required by each tab.
IP
When you create a new IP list item, you must choose the Type of list: IP. You can do this by selecting the
type in the navigation pane or by choosing it from a pulldown list in the Create window. Depending on
the type, you must enter the required information. See the following table.
Page 75

Table 10: IP and URL Configuration
60
GuidelineSetting
IP
NOTE: To edit an existing allowlist or blocklist URL entry, select the check box next to the entry you want to edit and
click the pencil icon.
Enter the IPv4 or IPv6 IP address. For example: 1.2.3.4 or
0:0:0:0:0:FFFF:0102:0304. CIDR notation and IP address ranges are also
accepted.
Any of the following IPv4 formats are valid: 1.2.3.4, 1.2.3.4/30, or 1.2.3.4-1.2.3.6.
Any of the following IPv6 formats are valid: 1111::1, 1111::1-1111::9, or
1111:1::0/64.
NOTE: Address ranges: No more than a block of /16 IPv4 addresses and /48
IPv6 addresses are accepted. For example, 10.0.0.0-10.0.255.255 is valid, but
10.0.0.0-10.1.0.0 is not.
Bitmasks: The maximum amount of IP addresses covered by bitmask in a subnet
record for IPv4 is 16 and for IPv6 is 48. For example, 10.0.0.0/15 and 1234::/47
are not valid.
URL
When you create a new URL list item, you must choose the Type of list: URL. You can do this by selecting
the type in the navigation pane or by choosing it from a pulldown list in the Create window. Depending
on the type, you must enter the required information. See the following table.
Table 11: URL Configuration
GuidelineSetting
URL
NOTE: To edit an existing allowlist or blocklist URL entry, select the check box next to the entry you want to edit and
click the pencil icon.
Enter the URL using the following format: juniper.net. Wildcards and protocols
are not valid entries. The system automatically adds a wildcard to the beginning
and end of URLs. Therefore juniper.net also matches a.juniper.net, a.b.juniper.net,
and a.juniper.net/abc. If you explicitly enter a.juniper.net, it matches
b.a.juniper.net, but not c.juniper.net. You can enter a specific path. If you enter
juniper.net/abc, it matches x.juniper.net/abc, but not x.juniper.net/123.
Hash File
When you upload a hash file, it must be in a text file with each hash on its own single line. You can only
have one running hash file. To add to it or edit it, see the instructions in the following table.
Page 76

Table 12: Hash File Upload and Edit
GuidelineField
You can add custom allowlist and blocklist hashes for filtering, but they must be listed in a text file with each entry
on a single line. You can only have one running hash file containing up to 15,000 file hashes. This is the “current” list,
but you can add to it, edit it, and delete it at any time.
61
SHA-256 Hash Item
To add to hash entries, you can upload several text files and they will
automatically combine into one file. See all, merge, delete and replace options
below.
Download—Click this button to download the text file if you want to view or
edit it.
You have the following options from the pulldown:
Replace current list—Use this option when you want to change the existing
•
list, but do not want to delete it entirely. Download the existing file, edit it,
and then upload it again.
Merge with current list—Use this option when you upload a new text file and
•
want it to combine with the existing text file. The hashes in both files combine
to form one text file containing all hashes.
Delete from current list—Use this option when you want to delete only a
•
portion of the current list. In this case, you would create a text file containing
only the hashes you want to remove from the current list. Upload the file
using this option and only the hashes in the uploaded file are deleted from
the current active list.
Delete All or Delete Selected—Sometimes it’s more efficient to delete the
current list rather than downloading it and editing it. Click this button to delete
the current selected list or all lists that have been added and accumulated here.
This says either Allowlist or Blocklist.Source
The month, date, year, and time when the hash file was last uploaded or edited.Date Added
Email Sender
Add email addresses to be allowlisted or blocklisted if found in either the sender or recipient of an email
communication. Add addresses one at a time using the + icon.
Page 77

Table 13: Email Sender
62
GuidelineField
Email address
If an email matches the blocklist, it is considered to be malicious and is handled the same way as an email with a
malicious attachment. The email is blocked and a replacement email is sent. If an email matches the allowlist, that
email is allowed through without any scanning. See “SMTP Quarantine Overview: Blocked Emails” on page 195.
It is worth noting that attackers can easily fake the “From” email address of an email, making blocklists a less effective
way to stop malicious emails.
Enter an email address in the format name@domain.com. Wildcards and partial
matches are not supported, but if you want to include an entire domain, you
could enter only the domain as follows: domain.com
C&C Server
When you allowlist a C&C server, the IP or hostname is sent to the SRX Series devices to be excluded
from any security intelligence blocklists or C&C feeds (both Juniper’s global threat feed and third party
feeds). The server will also now be listed under the C&C allowlist management page.
You can enter C&C server data manually or upload a list of servers. That list must be a text file with each
IP or Domain on its own single line. The text file must include all IPs or all Domains, each in their own file.
You can upload multiple files, one at a time.
NOTE: You can also manage allowlist and blocklist entries using the Threat Intelligence API.
When adding entries to the allowlist/blocklist data, these will be available in the Threat Intelligence
API under the following feed names: “whitelist_domain” or “whitelist_ip”, and “blacklist_domain”
or “blacklist_ip.” See the Juniper ATP Cloud Threat Intelligence Open API Setup Guide for details
on using the API to manage any custom feeds.
Table 14: C&C Server
GuidelineField
Type
IP or Domain
Select IP to enter the IP address of a C&C server that you want to add to the
allowlist. Select Domain to allowlist an entire domain on the C&C server list.
For IP, enter an IPv4 or IPv6 address. An IP can be IP address, IP range or IP
subnet. For domain, use the following syntax: juniper.net. Wildcards are not
supported.
Enter a description that indicates why an item has been added to the list.Description
Page 78

Table 14: C&C Server (continued)
GuidelineField
You can also allowlist C&C servers directly from the C&C Monitoring page details view. See Command and Control
Server Details.
WARNING: Adding a C&C server to the allowlist automatically triggers a remediation process to update any affected
hosts (in that realm) that have contacted the whiltelisted C&C server. All C&C events related to this allowlisted server
will be removed from the affected hosts’ events, and a host threat level recalculation will occur.
If the host score changes during this recalculation, a new host event appears describing why it was rescored. (For
example, “Host threat level updated after C&C server 1.2.3.4 was cleared.”) Additionally, the server will no longer
appear in the list of C&C servers because it has been cleared.
Encrypted Traffic
You can specify the IP address or domain names that you want to allowlist from encrypted traffic analysis.
Use this tab to add, modify, or delete the allowlists for encrypted traffic analysis.
63
Table 15: Encrypted Traffic
GuidelineField
Select whether you want to specify the IP address or domain name for the allowlist.Type
Enter the IP address or domain name for the allowlist.IP or Domain
NOTE: Juniper ATP Cloud periodically polls for new and updated content and automatically
downloads it to your SRX Series device. There is no need to manually push your allowlist or
blocklist files.
Use the show security dynamic-address instance advanced-anti-malware command to view the
custom allowlist and blocklist on SRX Series devices.
user@host>show security dynamic-address instance advanced-anti-malware
No. IP-start IP-end Feed Address
1 x.x.x.0 x.x.x.10 custom_whitelist ID-80000400
2 x.x.0.0 x.x.0.10 custom_blacklist ID-80000800
Instance advanced-anti-malware Total number of matching entries: 2
Page 79

RELATED DOCUMENTATION
Allowlist and Blocklist Overview | 57
SecIntel Feeds Overview | 112
64
Page 80

CHAPTER 6
Email Scanning: Juniper ATP Cloud
IN THIS CHAPTER
Email Management Overview | 65
Email Management: Configure SMTP | 67
Email Management: Configure IMAP | 70
Email Management Overview
65
With Email Management, enrolled SRX devices transparently submit potentially malicious email attachments
to the cloud for inspection. Once an attachment is evaluated, Juniper ATP Cloud assigns the file a threat
score between 0-10 with 10 being the most malicious.
NOTE: If an email contains no attachments, it is allowed to pass without any analysis.
Benefits of Email Management
Allows attachments to be checked against allowlists and blocklists.
•
Prevents users from opening potential malware received as an email attachment.
•
Configure Juniper ATP Cloud to take one of the following actions when an email attachment is determined
to be malicious:
For SMTP
Quarantine Malicious Messages—If you select to quarantine emails with attachments found to be
•
malicious, those emails are stored in the cloud in an encrypted form and a replacement email is sent to
the intended recipient. That replacement email informs the recipient of the quarantined message and
provides a link to the Juniper ATP Cloud quarantine portal where the email can be previewed. The
recipient can then choose to release the email by clicking a Release button (or request that the
administrator release it) or Delete the email.
Deliver malicious messages with warning headers added—When you select this option, headers are
•
added to emails that most mail servers recognize and filter into Spam or Junk folders.
Page 81

Permit—You can select to permit the email and the recipient receives it intact.
•
For IMAP
Block Malicious Messages—Block emails with attachments that are found to be malicious.
•
Permit—You can select to permit the email and the recipient receives it intact.
•
Figure 17: Email Management Overview
66
Quarantine Release
If the recipient selects to release a quarantined email, it is allowed to pass through the SRX series with a
header message that prevents it from being quarantined again, but the attachments are placed in a
password-protected ZIP file. The password required to open the ZIP file is also included as a separate
attachment. The administrator is notified when the recipient takes an action on the email (either to release
or delete it).
If you configure Juniper ATP Cloud to have the recipient send a request to the administrator to release
the email, the recipient previews the email in the Juniper ATP Cloud quarantine portal and can select to
Delete the email or Request to Release. The recipient receives a message when the administrator takes
action (either to release or delete the email.)
Blacklist and Whitelist
Emails are checked against administrator-configured blocklists and allowlists using information such as
Envelope From (MAIL FROM), Envelope To (RCPT TO), Body Sender, Body Receiver. If an email matches
Page 82

the allowlist, that email is allowed through without any scanning. If an email matches the blocklist, it is
considered to be malicious and is handled the same way as an email with a malicious attachment.
RELATED DOCUMENTATION
Email Management: Configure SMTP | 67
Creating Allowlists and Blocklists | 59
SMTP Quarantine Overview: Blocked Emails | 195
Email Management: Configure SMTP
Access this page from Configure > Email Management > SMTP.
Read the “Email Management Overview” on page 65 topic.
•
67
Decide how malicious emails are handled: quarantined, delivered with headers, or permitted.
•
1. Select Configure > Email Management > SMTP.
2. Based on your selections, configuration options will vary. See the tables below.
Table 16: Configure Quarantine Malicious Messages
GuidelineSetting
Action to take
Quarantine malicious messages—When you select to quarantine malicious
email messages, in place of the original email, intended recipients receive
a custom email you configure with information on the quarantining. Both
the original email and the attachment are stored in the cloud in an
encrypted format.
Page 83

Table 16: Configure Quarantine Malicious Messages (continued)
GuidelineSetting
68
Release option
Recipients can release email—This option provides recipients with a link
•
to the Juniper ATP Cloud quarantine portal where they can preview the
email. From the portal, recipients can select to Release the email or
Delete it. Either action causes a message to be sent to the administrator.
NOTE: If a quarantined email has multiple recipients, any individual
recipient can release the email from the portal and all recipients will
receive it. Similarly, if one recipient deletes the email from the portal, it
is deleted for all recipients.
Recipients can request administrator to release email—This option also
•
provides recipients with a link to the Juniper ATP Cloud quarantine
portal where they can preview the email. From the portal, recipients
can select to Request to Release the email or Delete it. Either choice
causes a message to be sent to the administrator. When the administrator
takes action on the email, a message is sent to the recipient.
NOTE: When a quarantined email is released, it is allowed to pass through
the SRX series with a header message that prevents it from being
quarantined again, but the attachment is placed inside a
password-protected zip file with a text file containing the password that
the recipient must use to open the file.
Email Notifications for End Users
Learn More Link URL
Subject
Custom Message
Custom Link Text
If you have a corporate web site with further information for users, enter
that URL here. If you leave this field blank, this option will not appear to
the end user.
When an email is quarantined, the recipient receives a custom message
informing them of their quarantined email. For this custom message, enter
a subject indicating a suspicious email sent to them has been quarantined,
such as "Malware Detected."
Enter information to help email recipients understand what they should
do next.
Enter custom text for the Juniper ATP Cloud quarantine portal link where
recipients can preview quarantined emails and take action on them.
Page 84

Table 16: Configure Quarantine Malicious Messages (continued)
GuidelineSetting
69
Buttons
Click Preview to view the custom message that will be sent to a recipient
•
when an email is quarantined. Then click Save.
Click Reset to clear all fields without saving.
•
Click Save if you are satisfied with the configuration.
•
Table 17: Configure Deliver with Warning Headers
GuidelineSetting
Action to take
SMTP Headers
Deliver malicious messages with warning headers added—When you select
to deliver a suspicious email with warning headers, you can add headers
to emails that most mail servers will recognize and filter into spam or junk
folders.
X-Distribution (Bulk, Spam)—Use this header for messages that are sent
•
to a large distribution list and are most likely spam. You can also select
“Do not add this header.”
X-Spam-Flag—This is a common header added to incoming emails that
•
are possibly spam and should be redirected into spam or junk folders.
You can also select “Do not add this header.”
Subject Prefix—You can prepend headers with information for the
•
recipient, such as "Possible Spam."
Buttons
Click Reset to clear all fields without saving.
•
Click OK if you are satisfied with the configuration.
•
Table 18: Permit
GuidelineSetting
Action to take
Permit—You can select to permit the message and no further configuration
is required.
Administrators Who Receive Notifications
To send notifications to administrators when emails are quarantined or released from quarantine:
1. Click the + sign to add an administrator.
2. Enter the administrator's email address.
3. Select the Quarantine Notification check box to receive those notifications.
Page 85

4. Select the Release Notifications check box to receive those notifications.
5. Click OK.
RELATED DOCUMENTATION
Email Management Overview | 65
SMTP Quarantine Overview: Blocked Emails | 195
Configuring the SMTP Email Management Policy on the SRX Series Device | 74
Email Management: Configure IMAP
To access this page, navigate to Configure > Email Management > IMAP.
70
Read the “Email Management Overview” on page 65 topic.
•
Decide how malicious emails are handled. For IMAP, the available options are to block or permit email.
•
Unlike SMTP, there is no quarantine option for IMAP and no method for previewing a blocked email.
1. Select Configure > Email Management > IMAP.
2. Based on your selections, configuration options will vary. See the tables below.
Page 86

Table 19: Configure Block Malicious Messages
GuidelineSetting
71
Action to take
Permit download of attachments—Allow email attachments, either from
•
all IMAP servers or specific IMAP servers, through to their destination.
NOTE: In Permit mode, black and allowlists are not checked. Emails
from blocklisted addresses are not sent to the cloud for scanning. They
are allowed through to the client.
Block download of attachments—Block email attachments, either from
•
all IMAP servers or specific IMAP servers, from reaching their destination.
NOTE: In Block mode, black and allowlists are checked. Emails from
blocklisted addresses are blocked. Emails from allowlisted addresses are
allowed through to the client.
Recipients can send a request to an administrator to release the email.
Enter the email address to which recipients should send a release request.
NOTE: If a blocked email has multiple recipients, any individual recipient
can request to release the email and all recipients will receive it.
When you select to block email attachments, in place of the original email,
intended recipients receive a custom email you configure with information
on the block action. Both the original email and the attachment are stored
in the cloud in an encrypted format.
IMAP Server
IMAP Servers
Email Notifications for End Users
All IMAP Servers—The permitting or blocking of email attachments
•
applies to all IMAP servers.
Specific IMAP Server—The permitting or blocking of email attachments
•
applies only to IMAP servers with hostnames that you add to a list. A
configuration section to add the IMAP server name appears when you
select this option.
When you add IMAP servers to the list, it is sent to the SRX Series device
to filter emails sent to Juniper ATP Cloud for scanning. For emails that are
sent for scanning, if the returned score is above the set policy threshold
on the SRX, then the email is blocked.
Select the Specific IMAP Server option above and click the + sign to add
IMAP server hostnames to the list.
NOTE: You must use the IMAP server hostname and not the IP address.
Page 87

Table 19: Configure Block Malicious Messages (continued)
GuidelineSetting
72
Learn More Link URL
Subject
Custom Message
Custom Link Text
Buttons
If you have a corporate web site with further information for users, enter
that URL here. If you leave this field blank, this option will not appear to
the end user.
When an email is blocked, the recipient receives a custom message
informing them of their blocked email. For this custom message, enter a
subject indicating a suspicious email sent to them has been blocked, such
as "Malware Detected."
Enter information to help email recipients understand what they should
do next.
Enter custom text for the Juniper ATP Cloud quarantine portal link where
recipients can preview blocked emails and take action on them.
•
•
•
Administrators Who Receive Notifications
Click Preview to view the custom message that will be sent to a recipient
when an email is blocked. Then click Save.
Click Reset to clear all fields without saving.
Click Save if you are satisfied with the configuration.
To send notifications to administrators when emails are blocked or released from quarantine:
1. Click the + sign to add an administrator.
2. Enter the administrator's email address and click OK.
3. Once the administrator is created, you can uncheck or check which notification types the administrator
will receive.
Block Notifications—When this check box is selected, a notification is sent when an email is blocked.
•
Unblock Notifications—When this check box is selected, a notification is sent when a user releases
•
a blocked email.
RELATED DOCUMENTATION
IMAP Block Overview | 197
Email Management Overview | 65
Page 88

Configuring the IMAP Email Management Policy on the SRX Series Device | 80
73
Page 89

CHAPTER 7
Email Scanning: SRX Series Device
IN THIS CHAPTER
Configuring the SMTP Email Management Policy on the SRX Series Device | 74
Configuring the IMAP Email Management Policy on the SRX Series Device | 80
Configuring Reverse Proxy on the SRX Series Device | 88
Configuring the SMTP Email Management Policy on the SRX Series Device
74
Unlike file scanning policies where you define an action permit or action block statement, with SMTP email
management the action to take is defined in the Configure > Email Management > SMTP window. All
other actions are defined with CLI commands as before.
Shown below is an example policy with email attachments addressed in profile profile2.
user@host# show services advanced-anti-malware
...
policy policy1 {
http {
inspection-profile default_profile; # Global profile
action permit;
}
smtp {
inspection-profile profile2; # Profile2 applies to SMTP email
notification {
log;
}
}
verdict-threshold 8; # Globally, a score of 8 and above indicate possible
malware
fallback-options {
action permit;
notification {
log;
Page 90

}
}
default-notification {
log;
}
whitelist-notification {
log;
}
blacklist-notification {
log;
}
fallback-options {
action permit; # default is permit and no log.
notification log;
}
}
...
75
In the above example, the email profile (profile2) looks like this:
user@host> show services advanced-anti-malware profile
Advanced anti-malware inspection profile:
Profile Name: profile2
version: 1443769434
disabled_file_types:
{
application/x-pdfa: [pdfa],
application/pdf: [pdfa],
application/mbox: []
},
disabled_categories: [java, script, documents, code],
category_thresholds: [
{
category: executable,
min_size: 512,
max_size: 1048576
},
{
category: library,
min_size: 4096,
max_size: 1048576
}]
Page 91

The firewall policy is similar to before. The AAMW policy is place in trust to untrust zone. .See the example
below.
user@host# show security policies from-zone trust to-zone untrust {
policy p1 {
match {
source-address any;
destination-address any;
application any;
}
then {
permit {
application-services {
advanced-anti-malware-policy policy1;
ssl-proxy {
profile-name ssl-proxy1;
}
}
}
}
}
}
76
Shown below is another example, using the show services advanced-anti-malware policy CLI command.
In this example, emails are quarantined if their attachments are found to contain malware. A verdict score
of 8 and above indicates malware.
user@root> show services advanced-anti-malware policy policy1
Advanced-anti-malware configuration:
Policy Name: policy1
Default-notification : No Log
Whitelist-notification: Log
Blacklist-notification: Log
Fallback options:
Action: permit
Notification: Log
Inspection-profile: profile2
Applications: HTTP
Verdict-threshold: 8
Action: block
Notification: Log
Protocol: SMTP
Verdict-threshold: 8
Page 92

Action: User-Defined-in-Cloud (quarantine)
Notification: Log
Inspection-profile: profile2
Optionally you can configure forward and reverse proxy for server and client protection, respectively. For
example, if you are using SMTPS, you may want to configure reverse proxy. For more information on
configuring reverse proxy, see “Configuring Reverse Proxy on the SRX Series Device” on page 88.
# show services ssl
initiation { # for cloud connection
profile srx_to_sky_tls_profile_name {
trusted-ca sky-secintel-ca;
client-certificate sky-srx-cert;
}
}
proxy {
profile ssl-client-protection { # for forward proxy
root-ca ssl-inspect-ca;
actions {
ignore-server-auth-failure;
log {
all;
}
}
}
profile ssl-server-protection { # for reverse proxy
server-certificate ssl-server-protection;
actions {
log {
all;
}
}
}
}
77
Use the show services advanced-anti-malware statistics CLI command to view statistical information
about email management.
user@host> show services advanced-anti-malware statistics
Advanced-anti-malware session statistics:
Session interested: 3291750
Page 93

Session ignored: 52173
Session hit blacklist: 0
Session hit whitelist: 0
Total HTTP HTTPS SMTP SMTPS
Session active: 52318 0 0 52318 0
Session blocked: 0 0 0 0 0
Session permitted: 1354706 0 0 1354706 0
Advanced-anti-malware file statistics:
Total HTTP HTTPS SMTP SMTPS
File submission success: 83134 0 0 83134 0
File submission failure: 9679 0 0 9679 0
File submission not needed: 86104 0 0 86104 0
File verdict meets threshold: 65732 0 0 65732 0
File verdict under threshold: 16223 0 0 16223 0
File fallback blocked: 0 0 0 0 0
File fallback permitted: 4512 0 0 4512 0
File hit submission limit: 0 0 0 0 0
78
Advanced-anti-malware email statistics:
Total SMTP SMTPS
Email processed: 345794 345794 0
Email permitted: 42722 42722 0
Email tag-and-delivered: 0 0 0
Email quarantined: 9830 9830 0
Email fallback blocked: 0 0 0
Email fallback permitted: 29580 29580 0
Email hit whitelist: 0 0 0
Email hit blacklist: 0 0 0
As before, use the clear services advanced-anti-malware statistics CLI command to clear the above
statistics when you are troubleshooting.
For debugging purposes, you can also set SMTP trace options.
user@host# set services advanced-anti-malware traceoptions flag smtp
Before configuring the SMTP threat prevention policy, make sure you have done the following:
Define the action to take (quarantine or deliver malicious messages) and the end-user email notification
•
in the Configure > Email Management > SMTP window.
Page 94

(Optional) Create a profile in the Configure > Device Profiles window to indicate which email attachment
•
types to scan. Or, you can use the default profile.
The following steps show the minimum configuration. To configure the threat prevention policy for SMTP
using the CLI:
1. Create the Juniper ATP Cloud policy.
In this example, the policy name is smtppolicy1.
•
user@host# set services advanced-anti-malware policy smtppolicy1
Associate the policy with the SMTP profile. In this example, it is the default_profile profile.
•
user@host# set services advanced-anti-malware policy smtppolicy1
inspection-profile default_profile
79
Configure your global threshold. If a verdict comes back equal to or higher than this threshold, then
•
it is considered to be malware. In this example, the global threshold is set to 7.
user@host# set services advanced-anti-malware policy smtppolicy1
verdict-threshold 7
Apply the SMTP protocol and turn on notification.
•
user@host# set services advanced-anti-malware policy smtppolicy1 smtp
notification log
If the attachment has a verdict less than 7, create log entries.
•
set services advanced-anti-malware policy smtppolicy1 default-notification log
When there is an error condition, send the email to the recipient and create a log entry.
•
set services advanced-anti-malware policy smtppolicy1 fallback-options action
permit
set services advanced-anti-malware policy smtppolicy1 fallback-options
notification log
Page 95

2. Configure the firewall policy to enable the advanced anti-malware application service.
[edit security zones]
user@host# set security policies from-zone untrust to-zone trust policy 1 then
permit application-services advanced-anti-malware smtppolicy1
3. In this example, we will configure the reverse proxy.
For reverse proxy:
Load the CA certificate.
•
Load the server certificates and their keys into the SRX Series device certificate repository.
•
user@host> request security pki local-certificate load filename /cf0/cert1.pem
key /cf0/key1.pem certificate-id server1_cert_id
80
Attach the server certificate identifier to the SSL proxy profile.
•
user@host# set services ssl proxy profile server-protection-profile
server-certificate server1_cert_id
Configuring the IMAP Email Management Policy on the SRX Series Device
Unlike file scanning policies where you define an action permit or action block statement, with IMAP email
management the action to take is defined in the Configure > Email Management > IMAP window. All other
actions are defined with CLI commands as before.
NOTE: In the IMAP window on Juniper ATP Cloud, you can select all IMAP servers or specific
IMAP servers and list them. Therefore the IMAP configuration sent to the SRX Series device has
a flag called “process_all_traffic” which defaults to True, and a list of IMAP servers, which may
be empty. In the case where “process_all_traffic” is set to True, but there are servers listed in
the IMAP server list, then all servers are processed regardless of the server list. If
“process_all_traffic” is not set to True, only the IMAP servers in the server list are processed.
Shown below is an example policy with email attachments addressed in profile profile2.
Page 96

user@host# show services advanced-anti-malware
...
policy policy1 {
http {
inspection-profile default_profile; # Global profile
action permit;
}
imap {
inspection-profile profile2; # Profile2 applies to IMAP email
notification {
log;
}
}
verdict-threshold 8; # Globally, a score of 8 and above indicate possible
malware
fallback-options {
action permit;
notification {
log;
}
}
default-notification {
log;
}
whitelist-notification {
log;
}
blacklist-notification {
log;
}
fallback-options {
action permit; # default is permit and no log.
notification log;
}
}
...
81
In the above example, the email profile (profile2) looks like this:
user@host> show services advanced-anti-malware profile
Advanced anti-malware inspection profile:
Profile Name: profile2
version: 1443769434
Page 97

disabled_file_types:
{
application/x-pdfa: [pdfa],
application/pdf: [pdfa],
application/mbox: []
},
disabled_categories: [java, script, documents, code],
category_thresholds: [
{
category: executable,
min_size: 512,
max_size: 1048576
},
{
category: library,
min_size: 4096,
max_size: 1048576
}]
82
The firewall policy is similar to before. The AAMW policy is place in trust to untrust zone. See the example
below.
user@host# show security policies from-zone trust to-zone untrust {
policy p1 {
match {
source-address any;
destination-address any;
application any;
}
then {
permit {
application-services {
advanced-anti-malware-policy policy1;
ssl-proxy {
profile-name ssl-proxy1;
}
}
}
}
}
}
Page 98

Shown below is another example, using the show services advanced-anti-malware policy CLI command.
In this example, emails are quarantined if their attachments are found to contain malware. A verdict score
of 8 and above indicates malware.
user@root> show services advanced-anti-malware policy
Advanced-anti-malware configuration:
Policy Name: policy1
Default-notification : Log
Whitelist-notification: No Log
Blacklist-notification: No Log
Fallback options:
Action: permit
Notification: Log
Protocol: HTTP
Verdict-threshold: recommended (7)
Action: block
Notification: No Log
Inspection-profile: default
Protocol: SMTP
Verdict-threshold: recommended (7)
Action: User-Defined-in-Cloud (permit)
Notification: Log
Inspection-profile: default
Protocol: IMAP
Verdict-threshold: recommended (7)
Action: User-Defined-in-Cloud (permit)
Notification: Log
Inspection-profile: test
83
Optionally you can configure forward and reverse proxy for server and client protection, respectively. For
example, if you are using IMAPS, you may want to configure reverse proxy. For more information on
configuring reverse proxy, see “Configuring Reverse Proxy on the SRX Series Device” on page 88.
# show services ssl
initiation { # for cloud connection
profile srx_to_sky_tls_profile_name {
trusted-ca sky-secintel-ca;
client-certificate sky-srx-cert;
}
}
proxy {
profile ssl-client-protection { # for forward proxy
Page 99

root-ca ssl-inspect-ca;
actions {
ignore-server-auth-failure;
log {
all;
}
}
}
profile ssl-server-protection { # for reverse proxy
server-certificate ssl-server-protection;
actions {
log {
all;
}
}
}
}
84
Use the show services advanced-anti-malware statistics CLI command to view statistical information
about email management.
user@host> show services advanced-anti-malware statistics
Advanced-anti-malware session statistics:
Session interested: 3291750
Session ignored: 52173
Session hit blacklist: 0
Session hit whitelist: 0
Total HTTP HTTPS SMTP SMTPS IMAP
IMAPS
Session active: 52318 0 0 52318 0 0
0
Session blocked: 0 0 0 0 0 0
0
Session permitted: 1354706 0 0 1354706 0 0
0
Advanced-anti-malware file statistics:
Total HTTP HTTPS SMTP SMTPS
IMAP IMAPS
File submission success: 83134 0 0 83134 0
0 0
File submission failure: 9679 0 0 9679 0
0 0
Page 100

File submission not needed: 86104 0 0 86104 0
0 0
File verdict meets threshold: 65732 0 0 65732 0
0 0
File verdict under threshold: 16223 0 0 16223 0
0 0
File fallback blocked: 0 0 0 0 0
0 0
File fallback permitted: 4512 0 0 4512 0
0 0
File hit submission limit: 0 0 0 0 0
0 0
Advanced-anti-malware email statistics:
Total SMTP SMTPS IMAP IMAPS
Email processed: 345794 345794 0 0 0
Email permitted: 42722 42722 0 0 0
Email tag-and-delivered: 0 0 0 0 0
Email quarantined: 9830 9830 0 0 0
Email fallback blocked: 0 0 0 0 0
Email fallback permitted: 29580 29580 0 0 0
Email hit whitelist: 0 0 0 0 0
Email hit blacklist: 0 0 0 0 0
85
As before, use the clear services advanced-anti-malware statistics CLI command to clear the above
statistics when you are troubleshooting.
For debugging purposes, you can also set IMAP trace options.
user@host# set services advanced-anti-malware traceoptions flag imap
Before configuring the IMAP threat prevention policy, make sure you have done the following:
Define the action to take (block or deliver malicious messages) and the end-user email notification in
•
the Configure > Email Management > IMAP window.
(Optional) Create a profile in the Configure > Device Profiles window to indicate which email attachment
•
types to scan. Or, you can use the default profile.
The following steps show the minimum configuration. To configure the threat prevention policy for IMAP
using the CLI:
1. Create the Juniper ATP Cloud policy.
 Loading...