

Page 1

Getting to Know the Archer
Note to user: Always use a stylus when using the archer; do not use a pen or pencil. If you lose
or break the stylus let us know and we will mail you a new one. Instead of using the stylus you
can then use the buttons at the bottom of the archer to input data until a new stylus comes in.
Also do not open the archer up for any reason, if there is something wrong with the hardware
send it back to use and we will mail you a replacement.
Included in this box:
1 Archer Unit with stylus (pen thing)
1 Power charger indoor
1 Power charger car
1 Cord to sync archer unit with the computer (chances are you will never have to use this)
Page 2
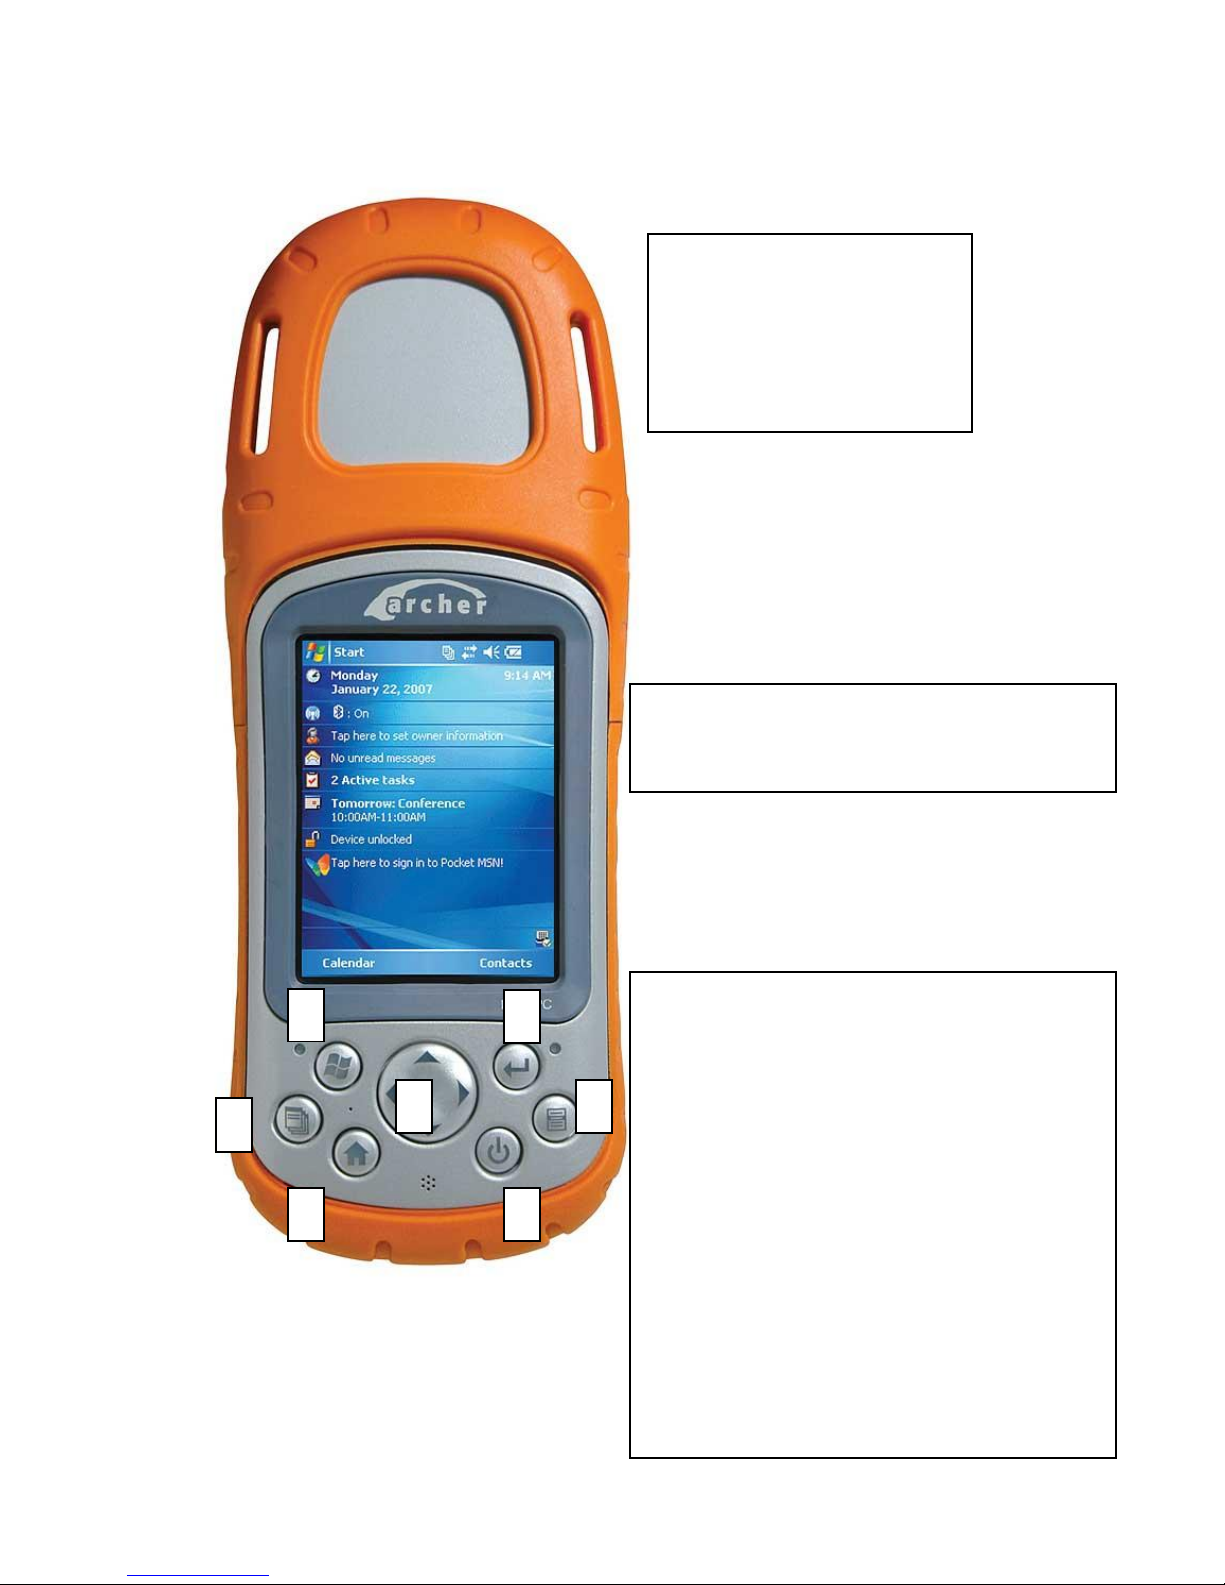
The Archer:
The touchpad and computer screen. It works
just like a mini windows computer except it
has a touch screen.
The top of the archer is where
the GPS receiver is. Try and
keep this pointing up at all
times to receive the best
signal for the most accurate
points.
5 3 1 2 6 4 7
1) Windows button, clicking this will open the
start menu.
2) Enter button, this works like and enter key
on a keyboard.
3) Settings button, this opens up a settings
window that lets you see what programs are
running as well as an option to stop them.
4) File button, this allows you see to see what
option you have when your in a program.
5) Home button, clicking this button will take
you back to the main screen.
6) Arrow buttons, these work just like arrow
keys on a keyboard.
7) Power button, this turns on and off the
archer, as well as puts it into sleep mode or
brings it out of sleep mode.
Page 3
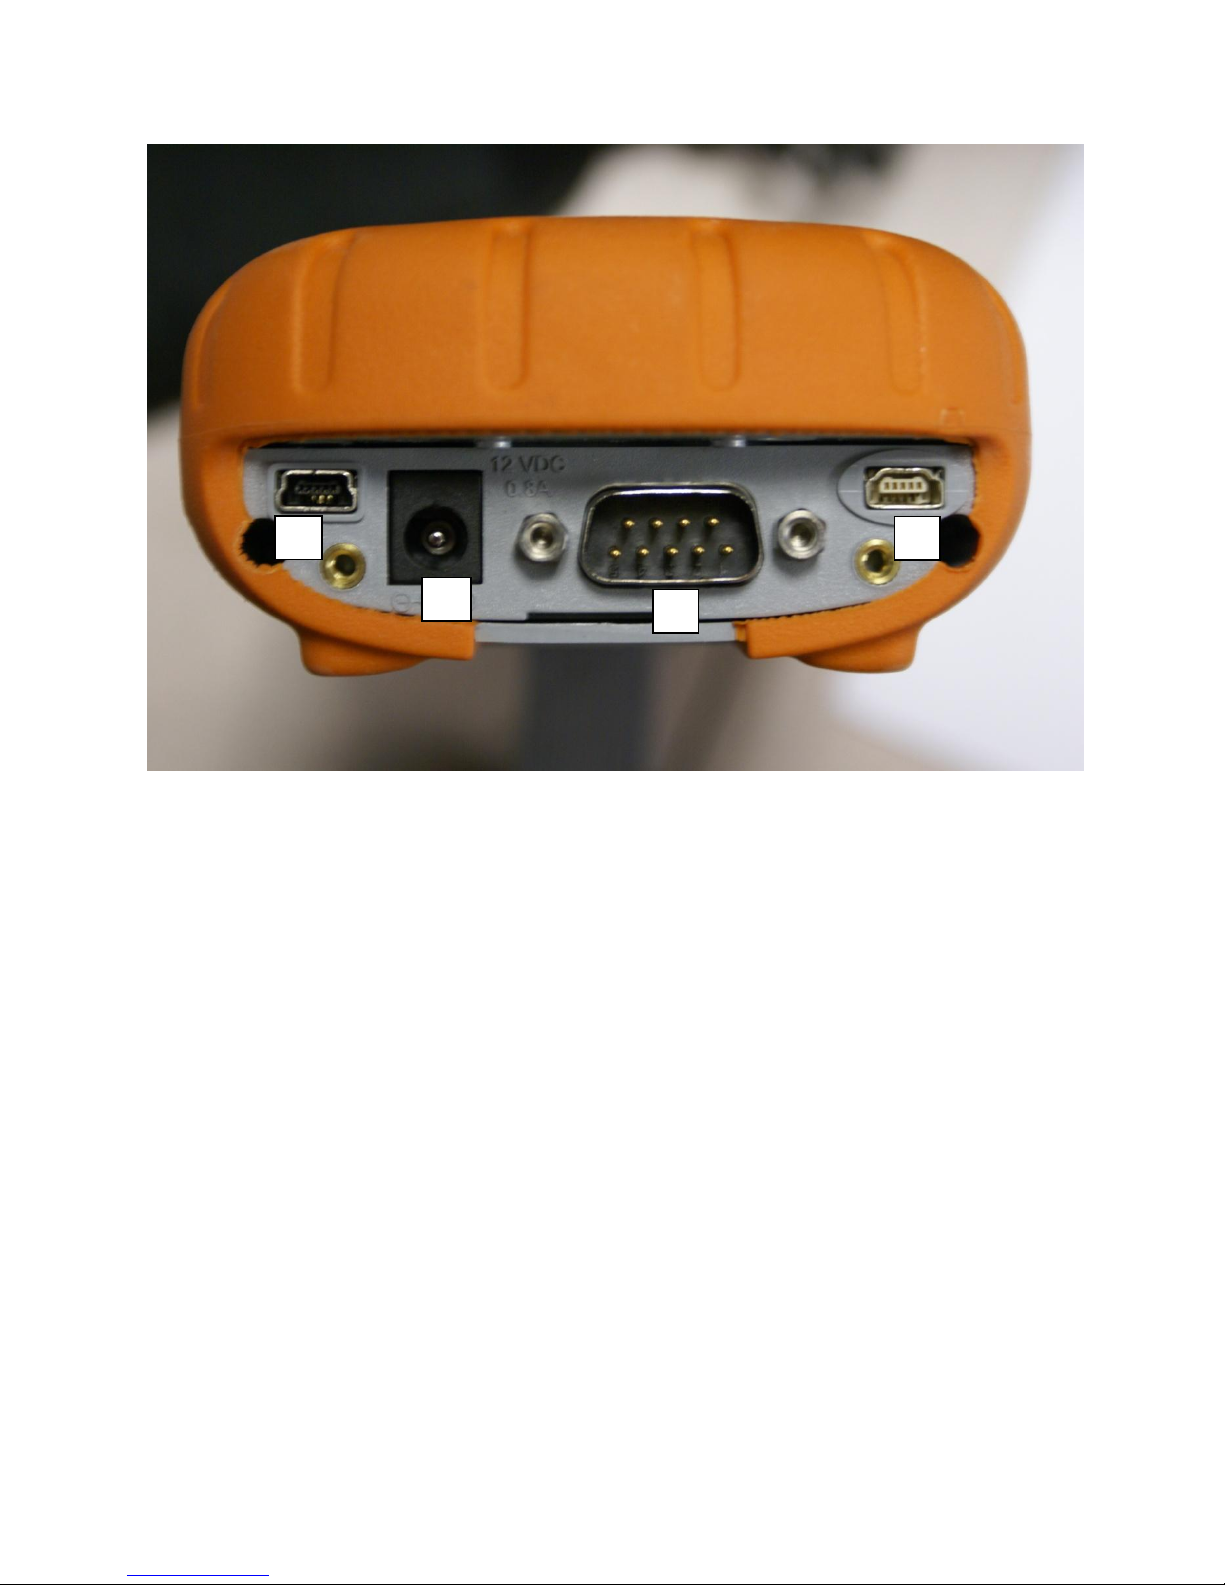
A
B C D
The slots:
Slot A:
This is where you plug the usb cord to connect your computer to the GPS unit so you can
transfer data to and from the unit.
Slot B:
This is where the power cord plugs into to charge the unit, both the car and ac power supply plug
into here.
Slot C:
This is a RGB slot to plug a computer monitor or projector into, this is used for presentations and
will not be used out in the field.
Slot D:
This another spot where you plug a cord that connects the GPS unit to your computer however
this is for a different kind of cord than the one we will be using so it will not be used.
Page 4
Make sure all these are closed tight when out in the field it is what helps keep the unit water
proof and rugged.
Powering the archer on and off:
To turn the device on click the power button, a green light should turn on and the archer will take
a few minutes to boot up. To power down the archer hold the power button until a shut down
screen appears on the archer.(usually takes about 3 seconds) Then click on the shut down button
and click yes when it asks you, as long as you have saved your data.
Sleep mode:
It is not necessary to completely shut down the archer when driving from site to site. When
moving from one site to another you can click the power button and the unit should enter sleep
mode. To return from sleep mode click the power button again, and give it a few seconds to load
up the main screen. Be sure to power down the unit at the end of the day because sleep mode still
uses power and if left in sleep mode through the night it may not have any battery charge left.
Also if the unit is inactive for a period of time (3-5minutes) it will enter sleep mode.
Hard shut down:
If the unit freezes and you can not shut down the way stated above then, hold the power key
down for about 10 to 15 seconds and the unit will turn off. Wait about 30 seconds before turning
the unit back on.
Using ArcGIS Mobile 10.0
With the GETAC and Archer Units
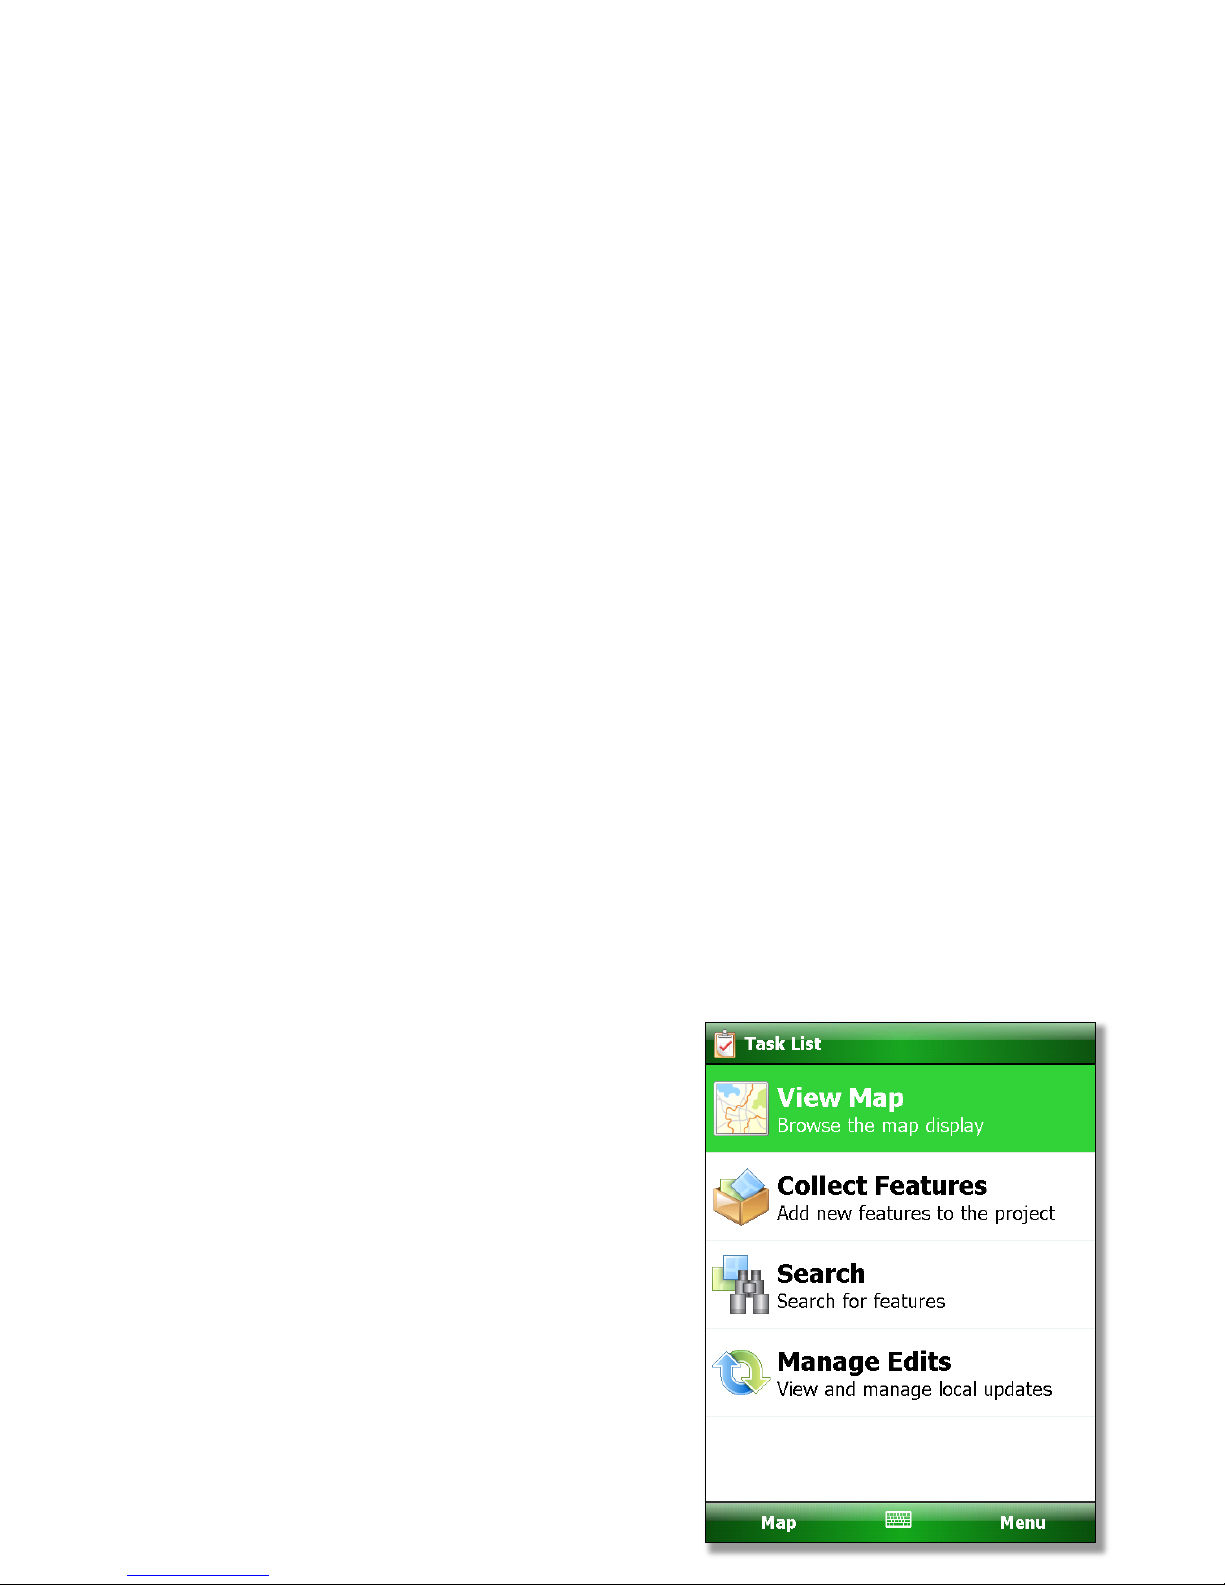
OPENING ARCGIS MOBILE
1) Tap on the Start Menu and select ArcGIS Mobile 10.0
from the program list.
2) After the loading screen, you will find that the project
has automatically started and the Task List is
displayed.
3) The following options will be given:
a. View Map
i. Map (bottom-left)
b. Collect Features (for collecting data points)
c. Search Features
d. Manage Edits
Page 5

e. Menu (bottom-right)
THE TASK LIST:
(tapping Tasks in the bottom-left will result in this screen)
Here’s a breakdown of the functions of each tool:
1) View Map
(Selecting Map in the bottom-left of the Task List
will do the same thing)
a. Zooming and Panning
i. The plus sign zooms you in and the
minus sign zooms you out. You have to
click on the button and then using the
stylus draw a box around the area you
want to zoom on.
ii. To pan, simply press the stylus on the
screen and drag; do it firmly, otherwise
the screen will redraw only half way. If
that happens, zoom in or out or pan
again and it will redraw correctly.
iii. NOTE: Try to avoid using the rocker to
pan and zoom. It is a known issue with
the unit, and will most likely result in a
system crash. Please use the stylus.
b. Identify
i. If pressed, you will be able to touch any point on the screen and layers will be
identified, whether they are points, lines or polygons. Press again to turn off.
c. Menu (bottom-right)
i. Show Lat/Long on Map
1. If GPS is active and this is checked, the Lat/Long will be visible on the
map. Uncheck to turn off.
ii. Zoom to Full Extent
1. Select this to zoom out to entire project extent.
iii. Go To A Location
1. Use this to manually set a lat/long navigational waypoint. See Using the
GPS in Navigation later on in this manual.
iv. Pan*
v. Zoom In*
vi. Zoom Out*
vii. GPS (discussed in greater detail later in this manual)
1. Keep GPS in View
a. Centers the map on the current GPS position if GPS is active.
Page 6
2. GPS Status
a. Accesses the GPS menu, used to turn on/off the GPS.
b. Displays current lat/long position as well as positional accuracy
(PDOP).
viii. Browse
ix. Identify
1. Alternate way to select identify tool.
x. Measure…
Note: Units can be changed with Menu >> Display In
1. Measure Length
a. Gives the total length between two specified points.
2. Measure Area
a. Gives the total area of a drawn box.
3. Measure Features
a. Gives a list and various attributes of features within a drawn box.
xi. Layer Visibility
1. Shows which layers are visible in map view.
2. Check or uncheck each as needed.
xii. Help Tip
*These are unnecessary to use in the menu. Use the +/- and panning features on the map.
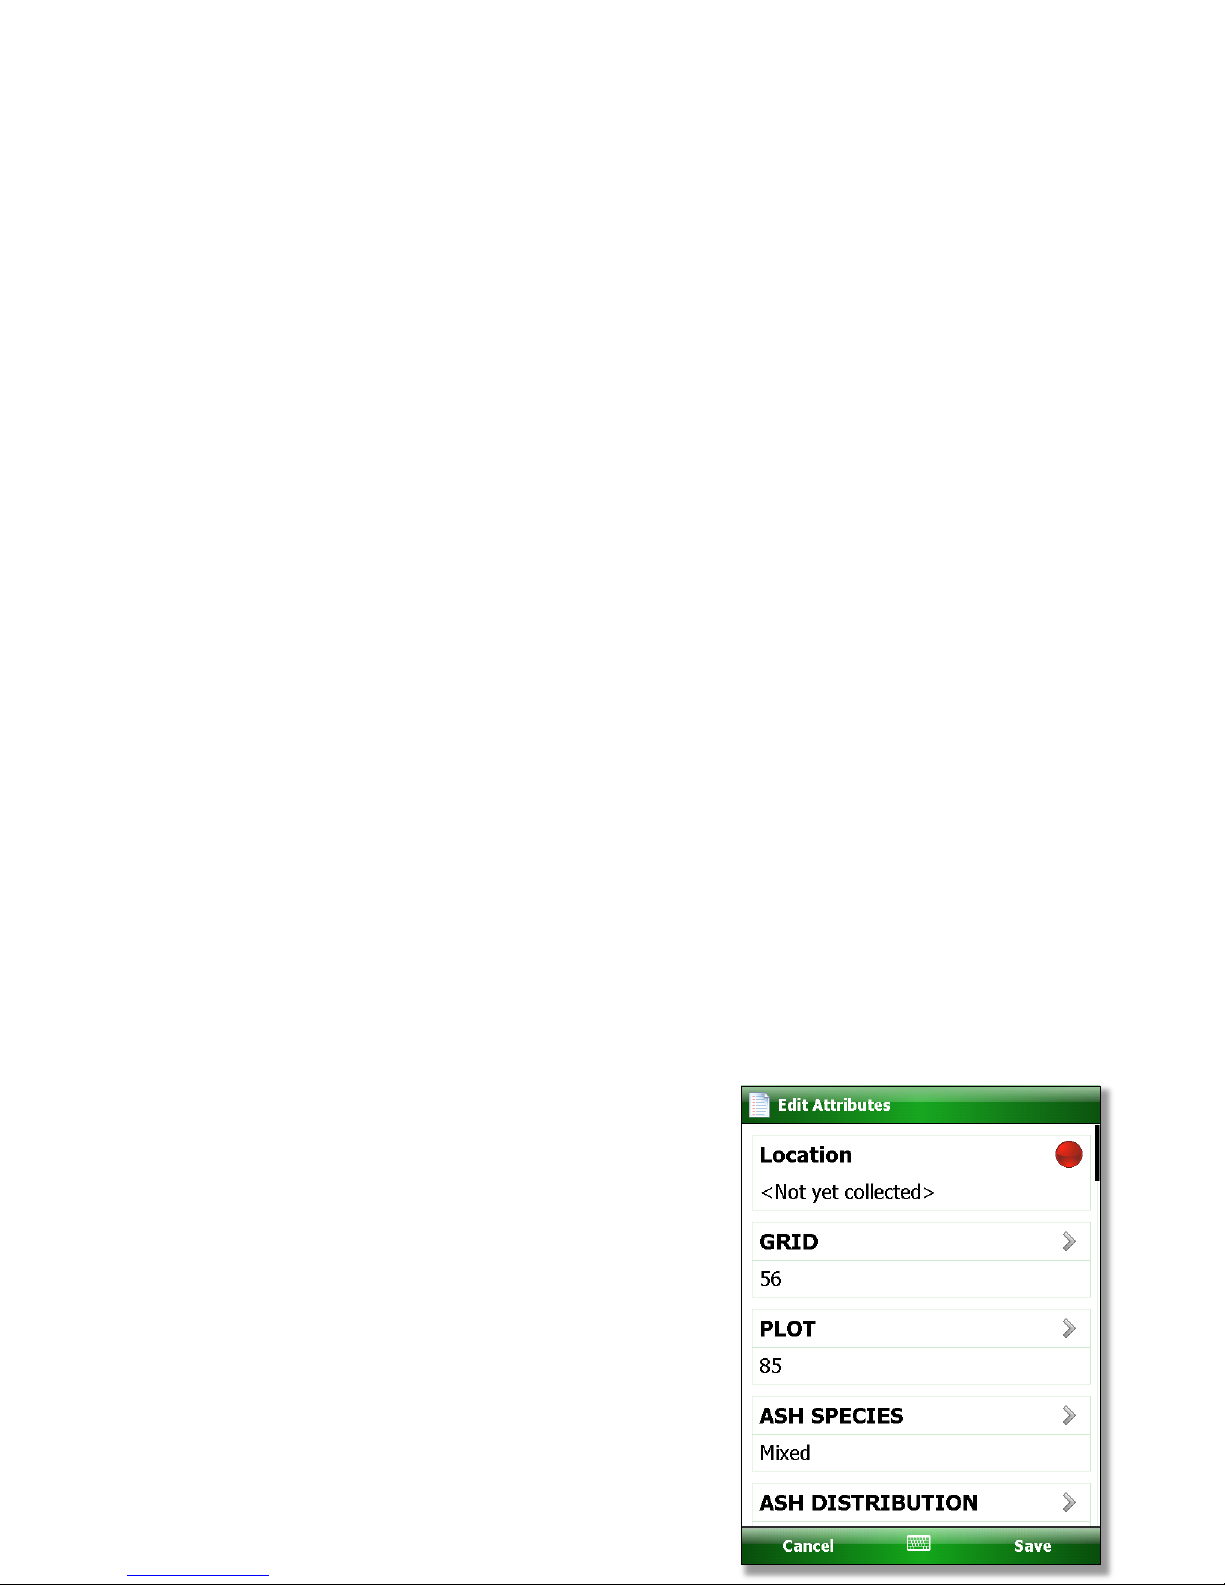
2) Collect Features
Note: If you wish to take point using the GPS, you must first turn it on.
a. Before taking a point, make sure the GPS PDOP is in an acceptable range (1-3 is the
best).
b. When selecting Collect Features from the Task List, a screen will come up asking you to
select the category of point you wish to take (example: Ash Inventory, AT Establishment,
etc.)
i. By tapping the point type, it will bring up the point attribute screen. The GPS will
run in the background, averaging points. This allows the user to save time by
entering data while the GPS is recording
location. Once 5 points are averaged, and
the necessary information is filled out, you
will be allowed to save the point and
progress.
c. With the attribute form, always be thorough. More
importantly, be consistent in your data collection.
i. Once you fill out all of the necessary
information, tap Save.
d. GPS is the only method of collecting points on
these units.
Page 7

e. If you want to stop collecting features or switch to a different feature click on Cancel in
the bottom-left corner. This will take you back to the Task List
f. If you make a mistake and need to delete or edit a feature, see the section at the end of
this manual.
3) Search
(This function allows you to search through existing points in the unit.)
a. Choose the feature you wish to begin searching for.
b. Select Refine Search when prompted.
i. Change search area to “Entire Map”.
ii. Add Criteria
1. Specify details by typing in some text or choosing a specific attribute to
search by.
2. These criteria can be changed or deleted at any point during the search.
iii. If you wish to search a new feature click the menu button and choose “Start
Over…”
iv. When finished, select “Show Results” at the top-right or go to Menu >> Show
Results…
4) Manage Edits
(Manage Edits is the method by which your changes will be linked back to the server.)
a. Get Data
i. Retrieves data from the ASETS server.
ii. After selecting this option, a menu will ask the user to select which layers to
download from the server. Check all that apply and tap Next. The user will then
be asked to define a refresh area. Always choose Entire Map, otherwise, you
could only download part of the necessary data.
b. View Updates
i. Used to view local edits since last sync.
c. Post Updates
i. Posts updates from the GETAC/Archer to
the server.
5) Menu (Bottom-right of the Task List)
a. Settings
i. GPS
1. This will open up the GPS settings
menu discussed later in a separate
section.
ii. Snapping
Page 8

1. This is used to adjust settings related to drawing feature geometry. The
average user will rarely, if ever, deal with this menu.
iii. Synchronization
1. Make sure Auto Post is set to “Never”.
b. Close Project
i. Closes the current project and opens up a list of available projects to choose from.
ii. Menu (bottom-right)
1. Download Project
a. This is not the proper way to download projects from the ASETS
2. Delete Project
a. Please never delete projects (for obvious reasons).
3. About ArcGIS Mobile…
4. Exit ArcGIS
a. Exits the application.
c. About ArcGIS Mobile
i. Contains version information.
d. Exit Application
i. Exits ArcGIS 10.0
server. It would be best to avoid using this tool.
TURNING ON THE GPS AND CHECKING STATUS
The GPS is the means through which all location data will be recorded in the GETAC/Archer. The
GPS is set by default to not connect on startup. It will have to be manually switched on at the
start of each ArcGIS Mobile session. These are the various paths to get to the GPS settings
screen:
Task List >> Menu (bottom-right) >> Settings… >> GPS
OR
View Map >> Menu (bottom-right) >> GPS >> GPS Status
If this screen says there is no GPS receiver connected, it means that it needs to be turned on.
Select “Connect to GPS” to connect. Do not change and of the other settings on this page. Once
the GPS is connected, you will notice that GPS Status is now viewable. This is where the PDOP
connection statuses are found. Check this periodically, although the GPS is prevented from
connecting with any PDOP greater than 5.0. PDOPs of less than 3.0 are ideal.
If the PDOP is greater than 5.0 and is not connecting, try exiting ArcGIS and restarting the unit.
Also, try and hold the GPS above you while you take the point. If this does not work try to find
an area with less canopy cover or away from buildings.
- To disconnect from the GPS, go to the GPS settings screen and tap Disconnect from
GPS.
Page 9

USING THE GPS IN NAVIGATION
ArcGIS 10.0 is equipped with a way to navigate between points using the built-in GPS in ways much
more advanced than earlier versions. This Navigation Extension provides users straight-line
navigation functions when working on land. It helps users navigate from their current location to
a specified waypoint.
The user can use this feature by either specifying a destination by entering lat/long or selecting a
point on the map.
To access point navigation from View Map, go to menu and select “Go to a Location”.
There are three ways to start navigation:
Enter lat/long and the user will be guided to that specific location by distance and bearing.
Or, from the navigation page, click the Map button, which will take the user to the map.
- Click on the map to set a destination (shown as a red dot).
- You can zoom in/out the map to locate the destination.
Page 10

- When destination is located, click Accept, back to the navigation page for navigation
information (as above) or menu >> cancel, back to navigation page without
specifying a new destination.
Another method of navigation is through the Search or Identify tools.
Navigate to a point feature from a feature list page
- From a feature list page (identify result page, search result page).
- Click on a feature, in the pop-up context menu, select “Navigate to this Location”
- The application takes you to the navigation page and the location of this point feature will
be set as the destination.
- From the Navigation page, click the “Map” button, takes you to the map page, you will
see
Page 11

a red dot on the selected feature. This is the specified destination.
EDITING OR DELETING A POINT
Imagine that you are in the field and you have made a duplicate point, or the wrong type of point for
the current project (i.e. things that merely editing a point would not help). There is a way to
delete that point. First, in the Map View, make sure that “Identify” is checked. Draw a box
around the point on the screen. The identify results screen pops up and lists the features
contained within that drawn box. The base layers such as “Michigan” may be listed, but just
ignore them. Tap the point. A menu will pop up and give the option of viewing attributes,
browsing on map, deleting, and navigating to this location.
To edit attributes, select View Attributes, then the Edit button in the bottom-right corner.
To delete the point from memory, select Delete Feature.
o NOTE: Make sure you have selected the correct point. There is no “undo delete”
button.
Select any other point that needs to be edited or deleted. When finished selecting, uncheck
“Identify”. This tool can be extremely annoying if left on.
LEAVING THE ARCGIS MOBILE APPLICATION
To leave the application you have to be at the main tasks page and then select exit application from
the menu tab in the lower left corner. Let is load for a few moments and it will take you back to
the main screen. ArcGIS Mobile automatically saves changes. You can now safely shut down
the GETAC/Archer by turning off the device and plugging it in, so that the battery can charge.
NOTE: do not let your battery completely deplete, as it could erase everything on the
GETAC/Archer. The batteries last for a long time and with the auto sleep mode you will not lose
a charge while in the field unless you forget to charge the GETAC/Archer at the end of the day
or while driving to sites.
Synchronizing Using Active Sync
This guide is for computers with an operating system Windows XP or older, for
computers with operating systems running a newer operating system than Windows XP see the
Synchronizing using Windows Mobile Device Center Guide
First connect your GPS unit to the computer and this screen should pop up: Note the first
time you connect to the device it may take a few minutes to install the drivers. Click ok
Page 12

Then this screen is going to appear and just hit cancel.
Page 13

Once you click cancel this screen should be on your desktop
Page 14

Note that is says connected and the little arrows are green, if it does not say connected try
making sure the cord is securely plugged into the computer’s USB port and into the GPS unit. If
it still says disconnected then try plugging the cord into a different USB port, if this does not
work try restarting the computer and GPS unit.
At this point you no longer need to do anything with the windows mobile device center,
and can now start navigating on the GPS unit.
Open your start menu and open ArcGIS Mobile10:
Page 15

Once the project is loaded up click on the manage edits tab:
Click the menu button in the lower right hand side this will have two option, to either
post updates and to get data.
Page 16

You can do three things here, the first is to view any updates on the device that is
anything that has been added deleted or changed from the last time you got data. To post the
updates choose the post updates button. It will then post any of the updates from your device,
putting a check mark next to the feature layer when it’s successful. When it’s completely
finished it will say that post updates operation was successful.
After posting updates you can then get data so that your points are up to date to what
others have been doing out in the field. Click on the get data button and it brings you to this
screen
Page 17

Each box you put a checkmark in will then get updates on the device so you have all the
points everyone else is taking as well as you. Note only check the boxes that are being collect,
things like lakes or major roads do not need to be updated and checking these will cause you
GPS unit to chug a lot longer (couple hours) and possibly crash. Once you have all the boxes
selected you wish to get data for click ok and it will bring you to this screen.
Click entire map, and let the unit chug when its finished it will say get data succeeded.
Close ArcGIS Mobile 10 and you can unplug the unit from your computer, make sure you charge
the unit overnight so that it is ready to go for the morning.
Page 18

Synchronizing Using Windows Mobile Device Center
This guide is for computers with an operating system newer than Windows XP, for
computers with operating systems running Windows XP or older see the Synchronizing using
active sync guide.
First connect your GPS unit to the computer and this screen should pop up: Note the first
time you connect to the device it may take a few minutes to install the drivers. Also there is
going to be another screen that pops up that you can say the never option again and it will not
come back.
Once your at this screen you will notice the little connected check mark, it will not be
there if the device is not connected for whatever reason. If its plug in but not appearing try
checking the cord that’s plug into the GPS unit and the usb in the computer. If both cords are
plugged in securely, and it is still not working try a different usb port on your computer. If this
does not solve the problem try restarting the computer and GPS unit.
When you have a connection click on the “Connect without setting up your device”
window, and this will bring you to this screen.
Page 19

At this point you no longer need to do anything with the windows mobile device center,
and can now start navigating on the GPS unit.
Open your start menu and open ArcGIS Mobile10:
Page 20

Once the project is loaded up click on the manage edits tab:
Click the menu button in the lower right hand side this will have two option, to either
post updates and to get data.
Page 21

You can do three things here, the first is to view any updates on the device that is
anything that has been added deleted or changed from the last time you got data. To post the
updates choose the post updates button. It will then post any of the updates from your device,
putting a check mark next to the feature layer when it’s successful. When it’s completely
finished it will say that post updates operation was successful.
After posting updates you can then get data so that your points are up to date to what
others have been doing out in the field. Click on the get data button and it brings you to this
screen
Page 22

Each box you put a checkmark in will then get updates on the device so you have all the
points everyone else is taking as well as you. Note only check the boxes that are being collect,
things like lakes or major roads do not need to be updated and checking these will cause you
GPS unit to chug a lot longer (couple hours) and possibly crash. Once you have all the boxes
selected you wish to get data for click ok and it will bring you to this screen.
Click entire map, and let the unit chug when its finished it will say get data succeeded.
Close ArcGIS Mobile 10 and you can unplug the unit from your computer, make sure you charge
the unit overnight so that it is ready to go for the morning.
 Loading...