

Page 1

Juniper Agile Licensing Guide
Published
2021-03-26
Page 2

Juniper Networks, Inc.
1133 Innovation Way
Sunnyvale, California 94089
USA
408-745-2000
www.juniper.net
Juniper Networks, the Juniper Networks logo, Juniper, and Junos are registered trademarks of Juniper Networks, Inc. in
the United States and other countries. All other trademarks, service marks, registered marks, or registered service marks
are the property of their respective owners.
Juniper Networks assumes no responsibility for any inaccuracies in this document. Juniper Networks reserves the right
to change, modify, transfer, or otherwise revise this publication without notice.
Juniper Agile Licensing Guide
Copyright © 2021 Juniper Networks, Inc. All rights reserved.
The information in this document is current as of the date on the title page.
ii
YEAR 2000 NOTICE
Juniper Networks hardware and software products are Year 2000 compliant. Junos OS has no known time-related
limitations through the year 2038. However, the NTP application is known to have some difficulty in the year 2036.
END USER LICENSE AGREEMENT
The Juniper Networks product that is the subject of this technical documentation consists of (or is intended for use with)
Juniper Networks software. Use of such software is subject to the terms and conditions of the End User License Agreement
(“EULA”) posted at https://support.juniper.net/support/eula/. By downloading, installing or using such software, you
agree to the terms and conditions of that EULA.
Page 3

Table of Contents
1
2
About the Documentation | vi
Documentation and Release Notes | vi
Documentation Conventions | vi
Documentation Feedback | ix
Requesting Technical Support | ix
Self-Help Online Tools and Resources | x
Creating a Service Request with JTAC | x
Juniper Agile Licensing Overview
Juniper Agile Licensing Overview | 12
Juniper Agile Licensing Overview | 12
iii
Benefits of Juniper Agile Licensing | 12
Understand Juniper Agile Licensing | 13
Components of Juniper Agile Licensing | 13
Juniper Agile Licensing Workflow for Procuring and Managing Licenses | 16
Procuring and Managing Licenses | 16
Juniper Agile License Management | 18
Juniper Agile License Management | 19
Licensing Models | 19
Setting Up the Juniper Agile License Manager
Installing the Juniper Agile License Manager | 22
System Requirements for the Juniper Agile License Manager | 22
Software Specifications | 22
Hardware Specifications | 23
Method of connecting to the Juniper Agile License Manager | 23
Downloading the Juniper Agile License Manager | 24
Creating the License Manager Redundancy Group | 24
Downloading the Fingerprint Identity File | 26
Page 4

Installing the Juniper Agile License Manager | 26
3
4
Uninstalling the Juniper Agile License Manager | 30
Uninstall the Juniper Agile License Manager | 30
Managing Juniper Agile License Manager
Managing the Juniper Agile License Manager | 33
Activating and Deploying Software Entitlements to the Juniper Agile License Manager | 33
Viewing the Juniper Agile License Manager Status | 34
Viewing Feature and License Information in Juniper Agile License Manager | 35
Juniper Agile License Manager Redundancy Group Overview | 37
Benefits of a License Manager Redundancy Group | 39
Adding Juniper Agile License Managers to a Redundancy Group | 39
Deleting Existing Juniper Agile License Managers from a Redundancy Group | 41
Moving a Software Entitlement from One License Manager to a Different License Manager | 43
iv
Configuring Licenses
Configuring Licenses in Junos OS using Network Licensing Mode | 45
Manage Licenses Using Network License Mode | 45
Configuring Licenses on vMX Virtual Routers | 45
Managing vMX Licenses | 46
Adding a License | 47
Deleting a License | 48
Managing cRPD Licenses | 49
Managing cSRX Licenses | 51
Add license using a license file | 51
Add license using a license key | 52
Managing vSRX Licenses Using Standalone Mode | 54
Add License Using a License File | 54
Add License Using a License Key | 55
Managing QFX5220-32CD, QFX5220-128C, PTX10003-80C, and PTX10003-160C Devices
License | 57
Page 5

Troubleshooting Juniper Agile License Manager
5
Troubleshooting the Juniper Agile License Manager | 61
Troubleshooting the Juniper Agile License Manager | 61
Installation Fails for Non-Root Users | 61
Invalid or Corrupt Agile License Manager ID File | 62
Error Checking Status of Agile License Manager | 62
Agile License Manager Starts as Follower Instead of Leader | 63
v
Page 6
About the Documentation
IN THIS SECTION
Documentation and Release Notes | vi
Documentation Conventions | vi
Documentation Feedback | ix
Requesting Technical Support | ix
Juniper Networks introduced the Juniper Agile Licensing Portal to install and manage licenses for hardware
and software features. Juniper Agile Licensing is the new and improved license management system to
simplify the license management in a network.
vi
Documentation and Release Notes
To obtain the most current version of all Juniper Networks®technical documentation, see the product
documentation page on the Juniper Networks website at https://www.juniper.net/documentation/.
If the information in the latest release notes differs from the information in the documentation, follow the
product Release Notes.
Juniper Networks Books publishes books by Juniper Networks engineers and subject matter experts.
These books go beyond the technical documentation to explore the nuances of network architecture,
deployment, and administration. The current list can be viewed at https://www.juniper.net/books.
Documentation Conventions
Table 1 on page vii defines notice icons used in this guide.
Page 7
Table 1: Notice Icons
vii
DescriptionMeaningIcon
Indicates important features or instructions.Informational note
Caution
Indicates a situation that might result in loss of data or hardware
damage.
Alerts you to the risk of personal injury or death.Warning
Alerts you to the risk of personal injury from a laser.Laser warning
Indicates helpful information.Tip
Alerts you to a recommended use or implementation.Best practice
Table 2 on page vii defines the text and syntax conventions used in this guide.
Table 2: Text and Syntax Conventions
ExamplesDescriptionConvention
Fixed-width text like this
Italic text like this
Represents text that you type.Bold text like this
Represents output that appears on
the terminal screen.
Introduces or emphasizes important
•
new terms.
Identifies guide names.
•
Identifies RFC and Internet draft
•
titles.
To enter configuration mode, type
the configure command:
user@host> configure
user@host> show chassis alarms
No alarms currently active
A policy term is a named structure
•
that defines match conditions and
actions.
Junos OS CLI User Guide
•
RFC 1997, BGP Communities
•
Attribute
Page 8

Table 2: Text and Syntax Conventions (continued)
viii
ExamplesDescriptionConvention
Italic text like this
Text like this
< > (angle brackets)
| (pipe symbol)
Represents variables (options for
which you substitute a value) in
commands or configuration
statements.
Represents names of configuration
statements, commands, files, and
directories; configuration hierarchy
levels; or labels on routing platform
components.
variables.
Indicates a choice between the
mutually exclusive keywords or
variables on either side of the symbol.
The set of choices is often enclosed
in parentheses for clarity.
Configure the machine’s domain
name:
[edit]
root@# set system domain-name
domain-name
To configure a stub area, include
•
the stub statement at the [edit
protocols ospf area area-id]
hierarchy level.
The console port is labeled
•
CONSOLE.
stub <default-metric metric>;Encloses optional keywords or
broadcast | multicast
(string1 | string2 | string3)
# (pound sign)
[ ] (square brackets)
Indention and braces ( { } )
; (semicolon)
GUI Conventions
Indicates a comment specified on the
same line as the configuration
statement to which it applies.
Encloses a variable for which you can
substitute one or more values.
Identifies a level in the configuration
hierarchy.
Identifies a leaf statement at a
configuration hierarchy level.
rsvp { # Required for dynamic MPLS
only
community name members [
community-ids ]
[edit]
routing-options {
static {
route default {
nexthop address;
retain;
}
}
}
Page 9

Table 2: Text and Syntax Conventions (continued)
ix
ExamplesDescriptionConvention
Bold text like this
> (bold right angle bracket)
Represents graphical user interface
(GUI) items you click or select.
Separates levels in a hierarchy of
menu selections.
In the Logical Interfaces box, select
•
All Interfaces.
To cancel the configuration, click
•
Cancel.
In the configuration editor hierarchy,
select Protocols>Ospf.
Documentation Feedback
We encourage you to provide feedback so that we can improve our documentation. You can use either
of the following methods:
Online feedback system—Click TechLibrary Feedback, on the lower right of any page on the Juniper
•
Networks TechLibrary site, and do one of the following:
Click the thumbs-up icon if the information on the page was helpful to you.
•
Click the thumbs-down icon if the information on the page was not helpful to you or if you have
•
suggestions for improvement, and use the pop-up form to provide feedback.
E-mail—Send your comments to techpubs-comments@juniper.net. Include the document or topic name,
•
URL or page number, and software version (if applicable).
Requesting Technical Support
Technical product support is available through the Juniper Networks Technical Assistance Center (JTAC).
If you are a customer with an active Juniper Care or Partner Support Services support contract, or are
Page 10

covered under warranty, and need post-sales technical support, you can access our tools and resources
online or open a case with JTAC.
JTAC policies—For a complete understanding of our JTAC procedures and policies, review the JTAC User
•
Guide located at https://www.juniper.net/us/en/local/pdf/resource-guides/7100059-en.pdf.
Product warranties—For product warranty information, visit https://www.juniper.net/support/warranty/.
•
JTAC hours of operation—The JTAC centers have resources available 24 hours a day, 7 days a week,
•
365 days a year.
Self-Help Online Tools and Resources
For quick and easy problem resolution, Juniper Networks has designed an online self-service portal called
the Customer Support Center (CSC) that provides you with the following features:
Find CSC offerings: https://www.juniper.net/customers/support/
•
Search for known bugs: https://prsearch.juniper.net/
•
x
Find product documentation: https://www.juniper.net/documentation/
•
Find solutions and answer questions using our Knowledge Base: https://kb.juniper.net/
•
Download the latest versions of software and review release notes:
•
https://www.juniper.net/customers/csc/software/
Search technical bulletins for relevant hardware and software notifications:
•
https://kb.juniper.net/InfoCenter/
Join and participate in the Juniper Networks Community Forum:
•
https://www.juniper.net/company/communities/
Create a service request online: https://myjuniper.juniper.net
•
To verify service entitlement by product serial number, use our Serial Number Entitlement (SNE) Tool:
https://entitlementsearch.juniper.net/entitlementsearch/
Creating a Service Request with JTAC
You can create a service request with JTAC on the Web or by telephone.
Visit https://myjuniper.juniper.net.
•
Call 1-888-314-JTAC (1-888-314-5822 toll-free in the USA, Canada, and Mexico).
•
For international or direct-dial options in countries without toll-free numbers, see
https://support.juniper.net/support/requesting-support/.
Page 11

1
CHAPTER
Juniper Agile Licensing Overview
Juniper Agile Licensing Overview | 12
Juniper Agile License Management | 18
Page 12

Juniper Agile Licensing Overview
12
SUMMARY
Learn about Juniper Agile Licensing, an improved
license management system to activate, install, manage,
and monitor licenses on Juniper Networks devices in
a network.
Juniper Agile Licensing Overview
IN THIS SECTION
Benefits of Juniper Agile Licensing | 12
Understand Juniper Agile Licensing | 13
IN THIS SECTION
Juniper Agile Licensing Overview | 12
Juniper Agile Licensing Workflow for Procuring
and Managing Licenses | 16
Components of Juniper Agile Licensing | 13
Benefits of Juniper Agile Licensing
Provides an intuitive user experience and simplified operational processes.
•
Provides seamless lifecycle management of licenses.
•
Offers flexible license administration and deployment.
•
Enables monitoring of software usage through centralized administrator and reporting.
•
Allows users to proactively adjust usage based on real-time reporting.
•
Provides consistent license management workflow for all Juniper products.
•
Page 13

Understand Juniper Agile Licensing
Juniper Networks introduced the Juniper Agile Licensing solution to provide an efficient way for customers
and partners to manage licenses for hardware and software features. To use a licensed feature, you need
to purchase and activate a license that corresponds to that feature and deploy that license so that it can
be utilized by the software during normal operation. You can administer and manage the licenses through
the Juniper Agile Licensing Portal. The portal provides an intuitive task-based user interface that provides
full lifecycle management of licenses.
Juniper Agile Licensing ensures that features are used in compliance with Juniper's End User License
Agreement. There are currently two main modes for deploying licenses:
Standalone mode allows you to activate a license on a single hardware device or software instance. Such
•
a license can only be used by the instance on which it is activated. Sharing a license with multiple instances
is not permissible.
Network mode provides a centralized system for deploying licenses to a network of devices or software
•
instances. The Juniper Agile License Manager software runs on your network and provides a local
repository of licenses that are dynamically consumed by devices as required. License Manager also
monitors license usage and can synchronize that usage data with Juniper to enable enhanced monitoring
and compliance reporting.
13
Support for each deployment mode varies by product. Both deployment modes enable efficient management
of both subscription and perpetual licenses and may enable combinations of features and capacity depending
on the specific license purchased.
Components of Juniper Agile Licensing
Figure 1 on page 14 shows the architecture of Juniper Agile Licensing.
Page 14

Figure 1: Juniper Agile Licensing Workflow
Juniper Agile
License Manager
Start Server
vMX
vMX
Juniper Agile
License Manager CLI
Fingerprint Identity
File Download
Customer Network
Admin
Customer
Juniper Agile
Licensing
Portal
Juniper Entitlement
Management System
Juniper Networks
Customer
2
1
3
4
5
vMX
Internet
g200019
Entitlements
• View account-wide
entitlements for your
Juniper Networks
products.
• Display your software
license purchases
that are linked to your
company account
associations and
awaiting activation.
Activations
• Activate quickly from
the portal home page.
• Activate from the My
Entitlements section.
• Download and send them
through email.
• View related information
about activated
entitlements.
RMA Tool
• Transfer license keys
from a defective to a
replacement device.
14
1. Juniper Agile Licensing Portal
Figure 2: Juniper Agile Licensing Portal Features
The Juniper Agile Licensing Portal provides the features shown in Figure 2 on page 14.
You use the Juniper Agile Licensing Portal to activate and deliver the required license keys for products
you have purchased.
Page 15

Depending on the type of license, the fulfillment e-mail you receive from Juniper after purchase of a
license indicates whether your device can be used without installing license keys. If you need to install
license keys, you can view and activate the purchased entitlements in the Agile Licensing Portal.
NOTE: In some cases, the fulfillment e-mail might include a license key, in which case it is
not necessary to manage the entitlement through the Agile Licensing Portal.
2. Juniper Entitlement Management System
The Juniper Agile Entitlement Management System is a repository of all your entitlements. It simplifies
the licensing life cycle by providing a centralized license management interface that you can access
using the Agile Licensing Portal.
3. Juniper Agile License Manager
The Agile License Manager is a software application that runs on your network and provides a local
repository of licenses that are dynamically consumed by devices as required. License Manager also
monitors license usage and can synchronize that usage data with Juniper to enable enhanced monitoring
and compliance reporting.
15
NOTE: Redundancy is not used if only one Agile License Manager is configured. The configured
Agile License Manager is the leader for the operations. Redundancy is enabled if more than
one Agile License Manager is configured. One Agile License Manager act as a leader and all
the other Agile License Managers acts as followers for all operations.
Juniper Agile License Manager CLI
You can start and stop the Juniper Agile License Manager through the CLI. You can also access additional
administrative functions through the CLI.
Page 16
Juniper Agile Licensing Workflow for Procuring and Managing Licenses
Procuring and Managing Licenses
IN THIS SECTION
Download, install, and configure Agile License Managers (including redundancy) | 17
Configure Network Devices to Use Agile License Managers | 17
Purchase Licenses from Juniper Networks | 17
Manage Entitlements using the Agile Licensing Portal | 18
16
For procuring and managing licenses, Juniper Agile Licensing comprises the following phases:
The phases of the licensing life cycle are shown in Figure 3 on page 17.
Page 17
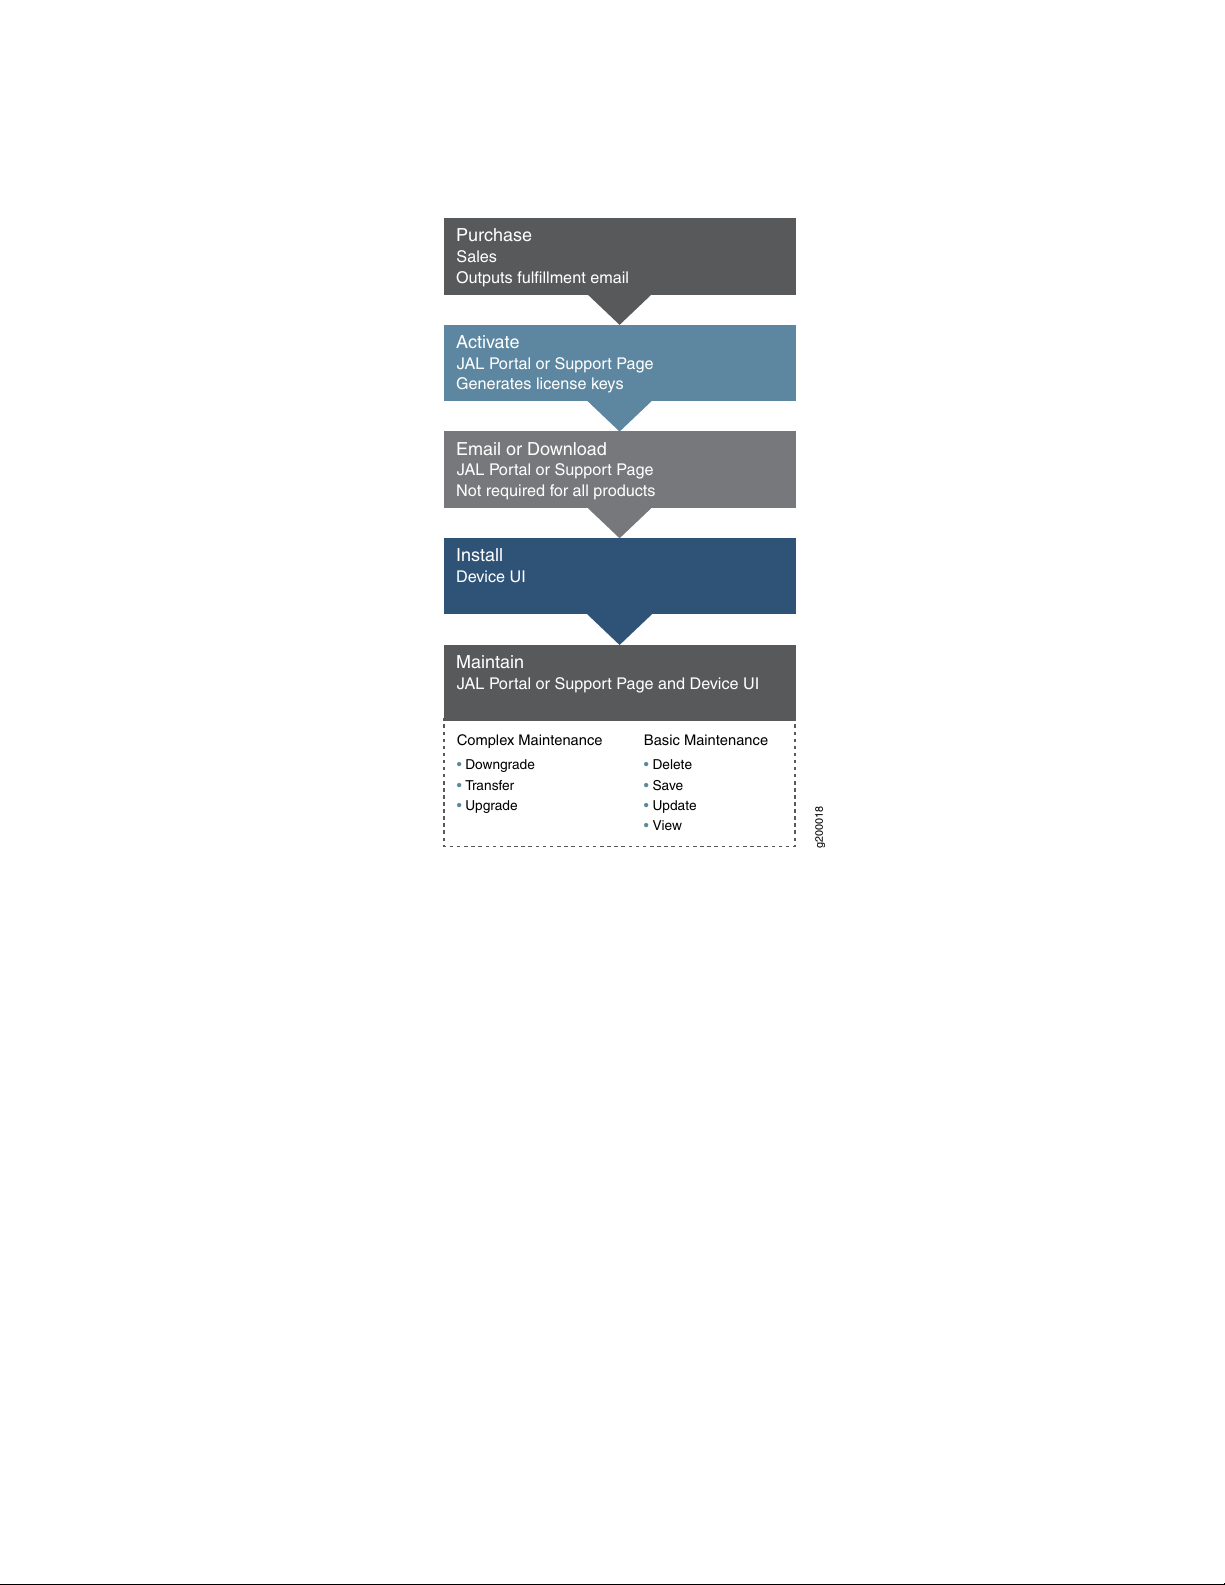
Figure 3: Licensing Phases
g200018
Device UI
Install
JAL Portal or Support Page
Not required for all products
Email or Download
Generates license keys
JAL Portal or Support Page
Activate
Outputs fulfillment email
Sales
Purchase
Sales
Basic Maintenance
• Delete
• Save
• Update
• View
Complex Maintenance
• Downgrade
• Transfer
• Upgrade
JAL Portal or Support Page and Device UI
Maintain
17
Download, install, and configure Agile License Managers (including redundancy)
You can download Juniper Agile License Manager software from Juniper’s Software Download Web site.
Install the Agile License Manager software on a physical server or virtual machine on your network, and
establish a connection to the Agile Entitlement Management System through the public cloud. This
connection is highly secure and requires only a single outgoing HTTPS port to be enabled. After installing
the Agile License Manager software, configure individual Agile License Managers and Agile License Manager
Redundancy Group (for redundancy) through the Agile Licensing Portal.
Log in to the Agile Licensing Portal to create a redundancy server group, download the fingerprint identity
file, and associate the created redundancy server group with entitlements.
Configure Network Devices to Use Agile License Managers
Juniper devices and software applications dynamically obtain active license tokens from Agile License
Managers. Configure the devices and software applications to communicate with the Agile License Managers
within their network and to obtain the active license tokens.
Purchase Licenses from Juniper Networks
Licenses to use Juniper software are purchased through Juniper’s standard sales order process. After
meeting with your Sales Representative or Juniper Partner, submit a sales order to Juniper. License sales
Page 18

order lines will send you an e-mail that includes your activation code and Software Support Reference
Number (SSRN) relating to your entitlements. The system creates entitlements associated with your user
account (e-mail ID) that you can subsequently manage through the Juniper Agile Licensing Portal.
Depending on the type of license, access the Agile Licensing Portal to activate license keys or send the
keys by e-mail to yourself.
NOTE: Keep a record of your SSRN, which is used as a proof of purchase and for support
entitlement purposes.
Manage Entitlements using the Agile Licensing Portal
You use the information from the fulfillment e-mail to activate your entitlements. This process generates
software license activation keys (license keys) that you can install on devices directly, or automatically
synchronize to previously installed Agile License Managers.
18
NOTE: Some software licenses can be only activated, and do not generate or require a license
activation key to be installed on the device. Refer to the fulfillment e-mail that you receive after
purchase for this information.
Juniper Agile License Management
IN THIS SECTION
Juniper Agile License Management | 19
Page 19

Juniper Agile License Management
IN THIS SECTION
Licensing Models | 19
Table 3 on page 19 lists licensing tasks and links to procedures where you can perform those tasks. Complex
tasks require you to use both the Juniper Agile Licensing portal (or Support page) and a user interface to
the device.
Table 3: Licensing Tasks Used to Manage Your Licenses
LinkLicensing Task
19
View entitlements, activate
products to generate licenses, and
mail or download licenses.
(Juniper Agile Licensing Portal or
Support page)
Licensing
Manage Product Licenses (select product to launch Juniper Agile Licensing Portal
or Support page)
Junos Configuration for Enabling Network License ModeEnable network mode for Agile
Adding a LicenseInstall license keys on a device.
Deleting a LicenseDelete license keys on a device.
Licensing Models
Juniper Agile Licensing supports two models described in Table 4 on page 19.
Table 4: Juniper Agile Licensing Models
DescriptionLicensing Model
Subscription
Prepaid, term-based licenses that enable the right to use for a fixed duration. At the
end of the subscription period, customers must renew the subscription or the license
is deemed out of compliance.
Prepaid licenses that are activated in perpetuity for the life of the product or device.Perpetual
Page 20

Juniper Agile Licensing supports the license types described in Table 5 on page 20. Unless otherwise
stated, license types apply to Juniper Networks customers and potential customers.
Table 5: Types of Juniper Agile Licenses
TermPurposeLicense Type
20
Use in a production environmentProduction
Perpetual: In perpetuity
Subscription: 1 or 3 years
90 daysMarketing of Juniper Networks productsTrial
Page 21

2
CHAPTER
Setting Up the Juniper Agile License
Manager
Installing the Juniper Agile License Manager | 22
Uninstalling the Juniper Agile License Manager | 30
Page 22

Installing the Juniper Agile License Manager
IN THIS SECTION
System Requirements for the Juniper Agile License Manager | 22
Downloading the Juniper Agile License Manager | 24
Creating the License Manager Redundancy Group | 24
Downloading the Fingerprint Identity File | 26
Installing the Juniper Agile License Manager | 26
System Requirements for the Juniper Agile License Manager
22
IN THIS SECTION
Software Specifications | 22
Hardware Specifications | 23
Method of connecting to the Juniper Agile License Manager | 23
This section presents an overview of requirements for the Juniper Agile License Manager.
Software Specifications
Table 6 on page 22 lists the system software requirements specification for the Juniper Agile License
Manager.
Table 6: Software Requirements for Agile License Manager
SpecificationOperating System
Ubuntu Linux 16.x and later Linux VM or physical machine.Linux
Page 23

The Juniper Agile License Manager needs to be installed on a machine with access to internet. If there is
a firewall Agile License Manager needs to have access to https://p1-ems.jnpr.sentinelcloud.com/YPServer
URL.
Hardware Specifications
Table 7 on page 23 lists the hardware requirements specification for the Juniper Agile License Manager.
Table 7: Hardware Requirements for Juniper Agile License Manager
SpecificationComponent
X86-64 processor and laterProcessor type
200 MBHard disk space
128 MBRAM
23
Method of connecting to the Juniper Agile License Manager
Broadcast Method
Here the device will
auto-discover available Agile
License Manager in the subnet
for fetching the license
Named License Manager
Method
In this method device will
connected to the configured
Agile License Manager
This method is applicable only if the devices and the
•
Agile License Managers are in the same subnet.
If there is single Agile License Manager available in the
•
local subnet then user can use this method, else, if there
are more than one Agile License Managers in the subnet,
then user cannot predict which Agile License Manager
is connected to which device.
User can change the Agile License Managers at any time
•
and no configuration changes are required in the device.
This method is applicable if the Agile License Manager
•
is outside the local subnet
This method can be used when user has multiple Agile
•
License Manager groups within the subnet and user
wants to have predictability with respect to the device's
selection of Agile license Manager.
User is already aware which Agile License Manager to
•
be used, then this method can be used.
Junos OS
ConfigurationSelecting CriteriaMethod of Connecting
# set system license
network-mode
# set system license
network-mode
#set system license
network-server
address server-address
Page 24

Downloading the Juniper Agile License Manager
The Juniper Agile License Manager is available for downloading from the Juniper Networks Support website
at Juniper Agile License Manager. The package file is in agile-license-manager-linux-x86-X.X.X.tgz format.
The signed part of the filename indicates that the software is delivered in signed packages that contain
digital signatures, Secure Hash Algorithm (SHA-1), and Message Digest 5 (MD5) checksums. A package is
installed only if the checksum within it matches the hash recorded in its corresponding file.
All Juniper Networks software images are signed for validation. Extensions are sh, tgz, gz, img, iso, and so
on.
The Juniper Agile License Manager package consists of various files such as copyrights information, readme,
license configuration, install, uninstall.
Creating the License Manager Redundancy Group
24
To create a Licensing Manager Redundancy Group, perform the following steps:
1. Log in to the Juniper Agile Licensing Portal.
2. Click License Managers.
3. Click Create Group.
Figure 4: Juniper Agile Licensing Portal Home Page
4. Enter the Agile License Manager Group name in the text box provided.
Enter the names of the Agile License Managers you want to add to the group in the text boxes provided.
Page 25

NOTE: You can provide up to four Agile License Manager names for a redundancy group.
Figure 5: Create New License Manager Group
25
5. Click Create Group to create the License Manager Redundancy Group.
Page 26

Downloading the Fingerprint Identity File
The fingerprint identity file is used for identification and entitling the desired software licenses to be
deployed to your Juniper Agile License Manager.
NOTE: To generate the fingerprint identity file, there must be an active License Manager Group.
To download the fingerprint identity file for your Agile License Manager, perform the following steps:
1. Log in to the Juniper Agile Licensing Portal.
2. Click License Managers. When the names of the License Manager Groups names are displayed, navigate
to the License Manager group for which you want to download the fingerprint file.
3. Click Download Fingerprint.
26
Figure 6: Juniper Agile License Manager Group - Download Fingerprint
The fingerprint identity file is downloaded to your system and is ready to upload in the Juniper Agile
License Manager.
Installing the Juniper Agile License Manager
Juniper Networks provides high-performance network devices that create a responsive and trusted
environment for accelerating the deployment of services and applications over a single network. Some
software and hardware features require a license to activate the feature. Using the Juniper Agile License
Manager you can install, manage, and monitor the licenses.
Page 27

To install the Agile License Manager, perform the following steps:
1. Download the Agile License Manager from the Juniper Support Website. For more information, see
“Downloading the Juniper Agile License Manager” on page 24.
2. Copy the downloaded file to the /var/tmp location in the Agile License Manager system using the scp
agile-license-server-linux-x86-64-x.y.z.tgz root@192.0.2.0:/var/tmp command.
Provide the password when prompted.
[test.test] scp agile-license-manager-linux-x86-x.y.z.tgz
root@198.51.100.0:/var/tmp
root@198.51.100.0's password:
agile-license-manager-linux-x86-x.y.z.tgz
100% 13MB 13.3MB/s
00:01
27
3. Verify that the Agile License Manager package is copied to the /var/tmp location in the Agile License
Manager system using the cd /var/tmp ls command.
root@test:/var/tmp# ls
agile-license-manager-linux-x86-x.y.z.tgz
systemd-private-aa7ed19468e34b75a043b73e92c0f841-systemd-timesyncd.service-XkL9ZN
systemd-private-a5b889e4d9e7491e9301c555462df462-colord.service-j95cAX
systemd-private-f497c488fb174398aaaba6603e0a6e26-colord.service-YeKITE
systemd-private-a5b889e4d9e7491e9301c555462df462-rtkit-daemon.service-Txbfuk
systemd-private-f497c488fb174398aaaba6603e0a6e26-rtkit-daemon.service-ngne8Y
systemd-private-aa7ed19468e34b75a043b73e92c0f841-colord.service-adVtpA
systemd-private-f497c488fb174398aaaba6603e0a6e26-systemd-timesyncd.service-59aZGa
systemd-private-aa7ed19468e34b75a043b73e92c0f841-rtkit-daemon.service-CxhZVO
4. Extract the copied file using the # tar -xvzf agile-license-manager-linux-x86-x.y.z.tgz command.
/var/tmp # tar -xvzf agile-license-manager-linux-x86-x.y.z.tgz
x agile-license-manager-linux-x86-x.y.z/
x agile-license-manager-linux-x86-x.y.z/docs/
x agile-license-manager-linux-x86-x.y.z/docs/todo
x agile-license-manager-linux-x86-x.y.z/uninstall64.sh
x agile-license-manager-linux-x86-x.y.z/install64.sh
x agile-license-manager-linux-x86-x.y.z/lserv_advance_config.xml
x agile-license-manager-linux-x86-x.y.z/copyrights/
x agile-license-manager-linux-x86-x.y.z/copyrights/copyrights_
Page 28

x agile-license-manager-linux-x86-x.y.z/linux/
x agile-license-manager-linux-x86-x.y.z/linux/lserv64_junipernetworks
x agile-license-manager-linux-x86-x.y.z/linux/lserv64_junipernetworks.rc
x agile-license-manager-linux-x86-x.y.z/linux/start64.sh
x agile-license-manager-linux-x86-x.y.z/linux/sntlcloudps64_junipernetworks.rc
x agile-license-manager-linux-x86-x.y.z/linux/install_util64
x agile-license-manager-linux-x86-x.y.z/linux/sntlcloudps64_junipernetworks
x agile-license-manager-linux-x86-x.y.z/linux/LicenseAgreement
x agile-license-manager-linux-x86-x.y.z/linux/cacert.pem
x agile-license-manager-linux-x86-x.y.z/linux/stop64.sh
x agile-license-manager-linux-x86-x.y.z/linux/tools/
x agile-license-manager-linux-x86-x.y.z/linux/tools/lswhere64
x agile-license-manager-linux-x86-x.y.z/linux/tools/rlftool64
x agile-license-manager-linux-x86-x.y.z/linux/tools/lsmon64
x agile-license-manager-linux-x86-x.y.z/linux/tools/README
x agile-license-manager-linux-x86-x.y.z/README
28
5. Run the install64.sh [ [--accept-agreement]` [--simple 198.51.100.0] [--server-id-file
lserv_server_identity_junipernetworks.xml] [--install-path /opt/license]] [--force] [--host-name JAL-LS]
] command to accept the license agreement and install the Juniper Agile License Manager.
--acccept-agreement : To accept the license agreement implicitly without
reading the content if it is already read and accepted.
--simple [-S] : The installation type will be simple, without any
redundancy support, provide local server IP for Agile License Manager to use.
--advance [-A] : The installation type will be advance (default) with
redundant server support, then server configuration file is mandatory to be
provided.
--server-id-file [-I] : The server identity file downloaded from JAL portal.
--install-path [-P] : The folder path where the server installation have
to be copied, preferably can be /opt/license.
--force : Force installation, example: deleting existing
installation content.
--host-name [-H] : The Host friendly name to be used for local server,
the name have to same name used in the EMS Server Group configuration in JAL
portal.
--help : Usage help.
Installation (without redundancy)
•
# sudo ./install64.sh --accept-agreement -S 192.0.2.0 -I lserv_server_identity_junipernetworks.xml
-P /opt/license --force -H agile-license-server-01
Page 29

Installation (with redundancy)
•
# sudo ./install64.sh --accept-agreement -A lserv_advance_config.xml -I
lserv_server_identity_junipernetworks.xml -P /opt/license --force -H agile-license-server-01
Note: After you accept the license agreement, the usage data from Agile License Manager is sent to
Juniper EMS server.
The following details are sent from Agile License Manager is sent to Juniper EMS server.
Usage Generation Date (in UTC): Time stamp when the usage data was sent from Agile License
•
Manager to Juniper EMS server.
Usage Collection Date (in UTC): Time stamp when the usage data was collected at the device.
•
Transaction Type: Session login, session logout, and session refresh.
•
Entitlement ID: The entitlement to which the licensed feature belongs.
•
Product Key: 1:1 association with the entitlement ID to identify the entitlement that was purchased
•
from Juniper Networks.
29
Customer Identifier: Your Juniper Networks ID.
•
Product: The product SKU to which the licensed feature belongs.
•
Feature: The consumed feature ID.
•
User: The device username which consumes the licensed feature (typically the Junos root user)
•
Consumed User Limit: Quantity of the licensed feature requested from the Agile License Manager.
•
Consumed Usage Count: Quantity of the licensed feature actually consumed by the device.
•
Session ID: Internal identifier of the current license lease session.
•
Product Model: Juniper Networks product model name. For example - vMX, PTX10003, or MX480.
•
Chassis Serial Number: Device or application serial number.
•
License IDs: License identifier.
•
Software Serial Number: Juniper business-system assigned license serial number.
•
6. Navigate to /opt/license/AgileLicenseManager/x.y.z and run the sudo ./start.sh command to start the
Agile License Manager. Run the sudo ./stop.sh command to stop the Agile License Manager.
Start the Agile License Manager using the # /opt/license/AgileLicenseManager/x.y.z> sudo ./start.sh
•
command.
Starting Agile License Manager...
Initializing Agile License Manager for junipernetworks.
12/28/18 10:42:30 Please wait, sleeping for 30 sec to allow redundant servers
to synchronize...
Page 30

12/28/18 10:43:00 Server redundancy synch in progress.. (82) Status : UNKNOWN
12/28/18 10:43:00 Please wait, sleeping for 30 sec to allow redundant servers
to synchronize...
12/28/18 10:43:30 Server redundancy synch complete (2), Status : LEADER
Agile License Manager for junipernetworks is running.
Starting Agile Cloud Plugin Service...
Initializing Agile Cloud Plugin Service for junipernetworks.
Agile Cloud Plugin Service for junipernetworks is running.
Stop the Agile License Manager using the # /opt/license/AgileLicenseManager/x.y.z> sudo ./stop.sh
•
command.
Trying to stop Agile License Manager if its running!
Stopping Agile License Manager for junipernetworks.
Successfully stopped Agile License Manager for junipernetworks.
Trying to stop Agile Cloud Plugin Service if its already running!
Stopping Agile Cloud Plugin Service for junipernetworks.
Successfully stopped Agile Cloud Plugin Service for junipernetworks.
30
7. Optionally, check the status of the Agile License Manager by using the sudo ./lswhere64 command.
For more information, see “Viewing the Juniper Agile License Manager Status” on page 34.
Uninstalling the Juniper Agile License Manager
IN THIS SECTION
Uninstall the Juniper Agile License Manager | 30
Uninstall the Juniper Agile License Manager
To uninstall the Juniper Agile License Manager, run the uninstall64.sh.command
Page 31

NOTE: When you uninstall the Agile License Manager, licensed features running on the configured
devices might stop working.
31
Page 32

3
CHAPTER
Managing Juniper Agile License
Manager
Managing the Juniper Agile License Manager | 33
Page 33

Managing the Juniper Agile License Manager
IN THIS SECTION
Activating and Deploying Software Entitlements to the Juniper Agile License Manager | 33
Viewing the Juniper Agile License Manager Status | 34
Viewing Feature and License Information in Juniper Agile License Manager | 35
Juniper Agile License Manager Redundancy Group Overview | 37
Adding Juniper Agile License Managers to a Redundancy Group | 39
Deleting Existing Juniper Agile License Managers from a Redundancy Group | 41
Moving a Software Entitlement from One License Manager to a Different License Manager | 43
33
Activating and Deploying Software Entitlements to the Juniper Agile License Manager
After you have downloaded and configured the Juniper Agile License Manager application and installed
the fingerprint file on the Agile License Manager, you can activate and deploy your software entitlements
to your Agile License Manager.
To activate and deploy your software entitlements to your Juniper Agile License Manager, perform the
following steps:
1. Log in to the Juniper Agile Licensing Portal.
2. Navigate to the My Entitlements section on the landing page.
3. Click the Activate button next to the entitlement that you want to deploy to your Agile License Manager.
NOTE: The full quantity of the entitlement must be available to activate an entitlement to
an Agile License Manager (that is, when the Used column shows 0, the full quantity is available
for you to deploy).
Page 34

4. In the Product Activation screen, select the Software Version and the quantity to activate, and choose
the License Manager Group to which you want to deploy this license. You can add any useful information
in the Notes field. Click Activate.
34
When the activation is complete, the following screen is displayed:
5. Click Activate. Once complete, the screen will display as shown below:
Viewing the Juniper Agile License Manager Status
You can check the status of the Juniper Agile License Manager by using the lswhere tool.
Page 35

The command lswhere64 displays the version and the configured IP addresses of the Agile License Manager.
contrail-ubm-test:/opt/license/AgileLicenseServer/1.0.0.2/tools> sudo ./lswhere64
Sentinel RMS Development Kit 9.3.0.0041 Search Tool For License Servers
Copyright (C) 2018 SafeNet, Inc.
Server Address : 192.0.2.0
Server Address : 192.0.2.1
Viewing Feature and License Information in Juniper Agile License Manager
35
You can view feature information license type, and license information in Agile License Manager by using
the lsmon tool. The output of the sudo ./lsmon64 localhost shows the following information:
contrail-ubm-test:/opt/license/AgileLicenseServer/192.0.2.0/tools> sudo ./lsmon64
localhost
[sudo] password for test:
Sentinel RMS Development Kit 9.3.0.0041 Application Monitor
Copyright (C) 2018 SafeNet, Inc.
[Contacting Sentinel RMS Development Kit server on host "localhost"]
|- Feature Information
|- Feature name : "166"
|- Feature version : ""
|- License type : "Normal License"
|- Commuter license allowed : NO
|- Maximum concurrent user(s) : 1000
|- Unreserved tokens in use : 0
|- Reserved tokens in use : 0
|- Available reserved : 0
|- Soft limit on users : Unlimited
|- License start date : Mon Nov 26 14:48:00 2018
|- Expiration date : Sun Feb 24 15:03:00 2019
Page 36

|- Check time tamper : No
|- Application-server locking : Server-locked license.
|- Server #1 locking code : Primary = 400-*$ABC123
|- Additive/exclusive/aggregate : Aggregate license(Additive without
restrictions).
|- Token lifetime (heartbeat) : 900 secs (15 min(s))
|- Allowed on VM : YES
|- License Information
|- License Hash : $ABC123
|- License type : "Normal License"
|- License storage name :
/opt/license/AgileLicenseServer/192.0.2.0/lservrc
|- License status : Active
|- Commuter license allowed : NO
|- Maximum concurrent user(s) : 1000
|- Soft limit on users : Unlimited
|- License start date : Mon Nov 26 14:48:00 2018
|- Expiration date : Sun Feb 24 15:03:00 2019
|- Check time tamper : No
|- Application-server locking : Server-locked license.
|- Server #1 locking code : Primary = 400-*$ABC123
|- Additive/exclusive/aggregate : Aggregate license(Additive without
restrictions).
|- Token lifetime (heartbeat) : 900 secs (15 min(s))
|- Allowed on VM : YES
36
|- Feature Information
|- Feature name : "221"
|- Feature version : ""
|- License type : "Normal License"
|- Commuter license allowed : NO
|- Maximum concurrent user(s) : 10
|- Unreserved tokens in use : 0
|- Reserved tokens in use : 0
|- Available reserved : 0
|- Soft limit on users : Unlimited
|- License start date : Mon Nov 26 14:48:00 2018
|- Expiration date : Sun Feb 24 15:03:00 2019
|- Check time tamper : No
|- Application-server locking : Server-locked license.
|- Server #1 locking code : Primary = 400-*$ABC123
|- Additive/exclusive/aggregate : Aggregate license(Additive without
Page 37

restrictions).
|- Token lifetime (heartbeat) : 900 secs (15 min(s))
|- Allowed on VM : YES
|- License Information
|- License Hash : $ABC123
|- License type : "Normal License"
|- License storage name :
/opt/license/AgileLicenseServer/192.0.2.0/lservrc
|- License status : Active
|- Commuter license allowed : NO
|- Maximum concurrent user(s) : 10
|- Soft limit on users : Unlimited
|- License start date : Mon Nov 26 14:48:00 2018
|- Expiration date : Sun Feb 24 15:03:00 2019
|- Check time tamper : No
|- Application-server locking : Server-locked license.
|- Server #1 locking code : Primary = 400-*$ABC123
|- Additive/exclusive/aggregate : Aggregate license(Additive without
restrictions).
|- Token lifetime (heartbeat) : 900 secs (15 min(s))
|- Allowed on VM : YES
37
Juniper Agile License Manager Redundancy Group Overview
Juniper Agile License Manager Redundancy Group provides high availability of the Juniper Agile License
Manager. Two or more Agile License Managers operate as a single Agile License Manager for uninterrupted
licensing operations.
Page 38

Figure 7: Juniper Agile License Manager Redundancy Group
g300520
Redundant License Manager
License
Manager
Admin
License
Manager
License
Manager
Follower
Follower
Follower
Leader
License
Manager
Non-redundant License Manager
License
Manager
Admin
Leader
38
In a redundancy group, configuration files and dynamic runtime session states are synchronized between
the Agile License Mangers. Therefore, all the Agile License Managers in the group operate like a single
Agile License Manager, providing device, interface, and service-level redundancy.
The redundancy mode is disabled if only one Agile License Manager is configured. The redundancy mode
is enabled if more than one Agile License Manager is configured.
We recommend that you set up a Agile License Manager Redundancy Group with redundant (more than
one) license managers.
Page 39

Benefits of a License Manager Redundancy Group
Provides high availability between devices when connecting branch and remote site links to larger
•
corporate offices. By leveraging the redundancy group, enterprises can ensure connectivity in the event
of device or link failure.
Adding Juniper Agile License Managers to a Redundancy Group
Adding a new Juniper Agile License Manager to a redundancy group provides high availability. This includes
synchronization of configuration files, licenses, and the dynamic runtime session states between the Agile
License Managers.
To add a new Juniper Agile License Manager to the redundancy group, perform the following steps:
1. Log in to Juniper Agile Licensing Portal.
39
2. Click License Managers. The License Manager Groups names are displayed, navigate to License Manager
group for which you want to add a new Agile License Manager.
3. Click Add a Server.
Figure 8: Juniper Agile License Manager Group
4. Enter the Agile License Manager name in the Server Name fields.
Page 40

Figure 9: Add License Manager to Juniper Agile License Manager Group
40
5. Click Save Changes. The new Agile License Manager is now listed on the License Manager Groups
page.
Figure 10: Juniper Agile License Manager Group
Page 41

Deleting Existing Juniper Agile License Managers from a Redundancy Group
Deleting a Juniper Agile License Manager from a redundancy group disables high availability. The deletion
also, impacts the synchronization of configuration files, licenses, and the dynamic runtime session states
between the Agile License Managers.
To delete an existing Juniper Agile License Manager from a redundancy group:
1. Log in to Juniper Agile Licensing Portal.
2. Click License Managers. The License Manager Groups names are displayed, navigate to License Manager
group for which you want to delete the Agile License Manager.
3. Click Remove a Server.
Figure 11: Juniper Agile License Manager Group
41
Page 42

4. Select the Agile License Manager name from the list displayed.
42
5. Click Save Changes to delete the selected Agile License Manager from the redundancy group.
Page 43

Moving a Software Entitlement from One License Manager to a Different License Manager
You can move the license entitlements from once License Manager to a different License Manager whenever
required.
To move the software entitlements from one License Manager to other, follow the steps:
•
Log in to Juniper Agile Licensing Portal.
•
Navigate to My Activations page.
•
Locate the activation that you want to move from one License Manager to a different License Manager.
•
Click Revoke, on the right side of the activation.
•
Once the activation has been revoked, the license will automatically be removed from the License
•
Manager.
The revoked quantity will now be returned to the entitlement and visible within the My Entitlements
•
section on Agile Licensing portal home page.
43
The entitlement can be activated against a different License Manager using the activation workflow.
•
To move software entitlements to another License Manager Group, use the steps in the “Activating and
•
Deploying Software Entitlements to the Juniper Agile License Manager” on page 33.
Page 44

4
CHAPTER
Configuring Licenses
Configuring Licenses in Junos OS using Network Licensing Mode | 45
Page 45

Configuring Licenses in Junos OS using Network Licensing Mode
IN THIS SECTION
Manage Licenses Using Network License Mode | 45
Configuring Licenses on vMX Virtual Routers | 45
Managing vMX Licenses | 46
Managing cRPD Licenses | 49
Managing cSRX Licenses | 51
Managing vSRX Licenses Using Standalone Mode | 54
Managing QFX5220-32CD, QFX5220-128C, PTX10003-80C, and PTX10003-160C Devices License | 57
45
Manage Licenses Using Network License Mode
In network mode, the device automatically requests a license from the Juniper Agile License Manager that
is installed on the network.
1. Enable network mode for Juniper Agile Licensing.
# set system license network-mode
2. Configure the Juniper Agile License Manager IP address to retrieve the required licenses.
# set system license network-server address server-name or server-ip
In network mode, the device fetches the licenses from Juniper Agile License Manager.
Configuring Licenses on vMX Virtual Routers
Configure the licenses that are available in Juniper Agile License Manager on a vMX device.
1. Log in to the vMX device and enter configuration mode.
2. Set the chassis license along with the type of license required.
Page 46

# set chassis license scale ?
Possible completions:
advance Advance license
base Base license
premium Premium license
3. Set the chassis license bandwidth in Mbps.
# set chassis license bandwidth ?
Possible completions:
<bandwidth> Configure bandwidth of FPC in Mbps
Managing vMX Licenses
46
IN THIS SECTION
Adding a License | 47
Deleting a License | 48
You must add a license to use vMX features. The licensed features are enforced based on the license you
purchased.
Starting in Junos OS Release 17.4 for AWS, you must add a license if you are using vMX in the Bring Your
Own License (BYOL) model.
If you upgrade from a BASE package license to an ADVANCE or PREMIUM package license or if you
downgrade from an ADVANCE or PREMIUM package license to a BASE package license, you must restart
the routing protocol process (restart routing). If your configuration has logical systems, you must restart
the routing protocol process for all logical systems (restart routing logical-system logical-system-name).
If you need to move your vMX installation to another host, you must remove vMX from the current host
before installing vMX and adding the license on the new host.
Page 47

Adding a License
To add a license key to the vMX:
1. Copy the license activation key file to the VCP and add the license key by specifying the filename.
user@vmx> request system license add filename
Or, you can copy and paste the license activation key directly to add the license key. For example:
user@vmx> request system license add terminal
XXXXXXX XXXXXX XXXXXX XXXXXX XXXXXX XXXXXX XXXXXX
XXXXXX XXXXXX XXXXXX XXXXXX XXXXXX XXXXXX
XXXXXX XXXXXX
2. Verify that the license is installed. VMX-BANDWIDTH indicates the licensed bandwidth (in Mbps) and
VMX-SCALE indicates the application package. (VMX-SCALE 1 is the BASE package, VMX-SCALE 2 is
the ADVANCE package, and VMX-SCALE 3 is the PREMIUM package.) This information is also listed
as Features in the Licenses installed section. For example, this output indicates that the 40G perpetual
license for the PREMIUM application package is installed.
47
user@vmx> show system license
License usage:
Licenses Licenses Licenses Expiry
Feature name used installed needed
scale-subscriber 0 1000 0 permanent
scale-l2tp 0 1000 0 permanent
scale-mobile-ip 0 1000 0 permanent
VMX-BANDWIDTH 40000 40000 0 permanent
VMX-SCALE 3 3 0 permanent
Licenses installed:
License identifier: JUNOS640113
License version: 4
Software Serial Number: XXXXXXX
Customer ID: vMX-Juniper
Features:
vmx-bandwidth-40g - vmx-bandwidth-40g
permanent
vmx-feature-premium - vmx-feature-premium
permanent
Page 48

3. Verify the configured bandwidth for PFE traffic matches the licensed bandwidth (VMX-BANDWIDTH).
The current and average bandwidth are also displayed.
user@vmx> show pfe statistics traffic bandwidth
Configured Bandwidth : 40000000000 bps
Bandwidth : 0 bps
Average Bandwidth : 0 bps
Deleting a License
To delete a vMX license:
1. Display the installed licenses.
user@vmx> show system license installed
48
License identifier: JUNOS640113
License version: 4
Features:
vmx-bandwidth-40g - vmx-bandwidth-40g
permanent
vmx-feature-premium - vmx-feature-premium
permanent
2. Delete the license.
user@vmx> request system license delete license-identifier
For example:
user@vmx> request system license delete JUNOS640113
3. Verify that the license is deleted.
user@vmx> show system license
License usage:
Licenses Licenses Licenses Expiry
Feature name used installed needed
scale-subscriber 0 1000 0 permanent
scale-l2tp 0 1000 0 permanent
Page 49

scale-mobile-ip 0 1000 0 permanent
Licenses installed: none
Managing cRPD Licenses
You must add a license to use cRPD features. The licensed features are enforced based on the license you
purchased.
There are two methods to add license on containerized routing protocol process (cRPD).
Adding a License to cRPD
Method 1:
49
To add a license key to the cRPD:
1. Copy the license activation key file to the VCP and add the license key by specifying the filename.
user@crpd> request system license add filename
Or, you can copy and paste the license activation key directly to add the license key. For example:
user@crpd> request system license add terminal
XXXXXXXXX XXXXXXXXXX XXXXXXXXXX XXXXXXXXXX XXXXXXXXXX XXXXXXXXXX
XXXXXXXXXX XXXXXXXXXX XXXXXXXXXX XXXXXXXXXX XXXXXXXXXX
XXXXXXXXXX XXXXXXXXXX
2. Verify the installed license.
user@crpd> show system license
show system license
License usage:
Licenses Licenses Licenses Expiry
Feature name used installed needed
containerized-rpd-standard 1 1 0 2020-06-05
23:59:00 UTC
Licenses installed:
License identifier: XXXXXXXX-XXXX-XXXX-XXXX-XXXXXXXXXXXX
License SKU: CRPD-STD
Page 50

License version: 1
Order Type: commercial
Customer ID: |**CustomerId**|
Features:
containerized-rpd-standard - Containerized routing protocol daemon with
standard features
date-based, 2019-06-06 00:00:00 UTC - 2020-06-05 23:59:00 UTC
Method 2:
To add a license key to the cRPD:
1. Copy the license activation key file to the VCP and add the license key by specifying the filename.
user@crpd# set system license keys key “XXXXXXXXX XXXXXXXXXX XXXXXXXXXX XXXXXXXXXX
XXXXXXXXXX XXXXXXXXXX ........XXXXXXXXXX XXXXXXXXXX”
50
2. Verify the installed license.
user@crpd> show system license
show system license
License usage:
Licenses Licenses Licenses Expiry
Feature name used installed needed
containerized-rpd-standard 0 1 0 2020-06-05
23:59:00 UTC
Licenses installed:
License identifier: XXXXXXXX-XXXX-XXXX-XXXX-XXXXXXXXXXXX
License SKU: CRPD-STD
License version: 1
Order Type: commercial
Customer ID: |**CustomerId**|
Features:
containerized-rpd-standard - Containerized routing protocol daemon with
standard features
date-based, 2019-06-06 00:00:00 UTC - 2020-06-05 23:59:00 UTC
Page 51

Managing cSRX Licenses
IN THIS SECTION
Add license using a license file | 51
Add license using a license key | 52
There are two methods to add license on cSRX.
Add license using a license file
To add a license file to the cSRX:
51
1. Copy the license activation key file to the VCP and add the license key by specifying the filename.
user@csrx> request system license add filename
Or, you can copy and paste the license activation key directly to add the license key. For example:
user@csrx> request system license add terminal
XXXXXXXXX XXXXXXXXXX XXXXXXXXXX XXXXXXXXXX XXXXXXXXXX XXXXXXXXXX
XXXXXXXXXX XXXXXXXXXX XXXXXXXXXX XXXXXXXXXX XXXXXXXXXX
XXXXXXXXXX XXXXXXXXXX
2. Verify the installed license.
user@csrx> show system license
show system license
License usage:
Licenses Licenses Licenses Expiry
Feature name used installed needed
anti_spam_key_sbl 0 1 0 2024-12-04
23:59:00 UTC
idp-sig 0 1 0 2024-12-04
23:59:00 UTC
appid-sig 0 1 0 2024-12-04
23:59:00 UTC
av_key_sophos_engine 0 1 0 2024-12-04
Page 52

23:59:00 UTC
wf_key_websense_ewf 0 1 0 2024-12-04
23:59:00 UTC
cSRX 1 1 0 2024-12-04
23:59:00 UTC
Licenses installed:
License identifier: XXXXXXXX-XXXX-XXXX-XXXX-XXXXXXXXXXXX
License SKU: S-CSRX-A2-5
License version: 1
Order Type: commercial
Customer ID: |**CustomerId**|
License count: 1
Features:
idp-sig - IDP Signature
date-based, 2019-12-06 00:00:00 UTC - 2024-12-04 23:59:00 UTC
av_key_sophos_engine - Anti Virus with Sophos Engine
date-based, 2019-12-06 00:00:00 UTC - 2024-12-04 23:59:00 UTC
appid-sig - APPID Signature
date-based, 2019-12-06 00:00:00 UTC - 2024-12-04 23:59:00 UTC
cSRX - Containerized Firewall
date-based, 2019-12-06 00:00:00 UTC - 2024-12-04 23:59:00 UTC
anti_spam_key_sbl - Anti-Spam
date-based, 2019-12-06 00:00:00 UTC - 2024-12-04 23:59:00 UTC
wf_key_websense_ewf - Web Filtering EWF
date-based, 2019-12-06 00:00:00 UTC - 2024-12-04 23:59:00 UTC
52
Add license using a license key
To add a license key to the cSRX:
1. Copy the license activation key file to the VCP and add the license key by specifying the filename.
user@csrx# set system license keys key “XXXXXXXXX XXXXXXXXXX XXXXXXXXXX XXXXXXXXXX
XXXXXXXXXX XXXXXXXXXX ........XXXXXXXXXX XXXXXXXXXX”
2. Verify the installed license.
user@csrx> show system license
show system license
License usage:
Page 53

Licenses Licenses Licenses Expiry
Feature name used installed needed
anti_spam_key_sbl 0 1 0 2024-12-04
23:59:00 UTC
idp-sig 0 1 0 2024-12-04
23:59:00 UTC
appid-sig 0 1 0 2024-12-04
23:59:00 UTC
av_key_sophos_engine 0 1 0 2024-12-04
23:59:00 UTC
wf_key_websense_ewf 0 1 0 2024-12-04
23:59:00 UTC
cSRX 1 1 0 2024-12-04
23:59:00 UTC
Licenses installed:
License identifier: XXXXXXXX-XXXX-XXXX-XXXX-XXXXXXXXXXXX
License SKU: S-CSRX-A2-5
License version: 1
Order Type: commercial
Customer ID: |**CustomerId**|
License count: 1
Features:
idp-sig - IDP Signature
date-based, 2019-12-06 00:00:00 UTC - 2024-12-04 23:59:00 UTC
av_key_sophos_engine - Anti Virus with Sophos Engine
date-based, 2019-12-06 00:00:00 UTC - 2024-12-04 23:59:00 UTC
appid-sig - APPID Signature
date-based, 2019-12-06 00:00:00 UTC - 2024-12-04 23:59:00 UTC
cSRX - Containerized Firewall
date-based, 2019-12-06 00:00:00 UTC - 2024-12-04 23:59:00 UTC
anti_spam_key_sbl - Anti-Spam
date-based, 2019-12-06 00:00:00 UTC - 2024-12-04 23:59:00 UTC
wf_key_websense_ewf - Web Filtering EWF
date-based, 2019-12-06 00:00:00 UTC - 2024-12-04 23:59:00 UTC
53
Page 54

Managing vSRX Licenses Using Standalone Mode
IN THIS SECTION
Add License Using a License File | 54
Add License Using a License Key | 55
There are two methods to add licenses on vSRX.
Add License Using a License File
To add a license file to vSRX:
54
1. Copy the license activation key file to the Virtual Chassis Port (VCP) and add the license key by specifying
the filename.
user@vSRX> request system license add filename
Or, you can copy and paste the license activation key directly to add the license key. For example:
user@vSRX> request system license add terminal
XXXXXXXXX XXXXXXXXXX XXXXXXXXXX XXXXXXXXXX XXXXXXXXXX XXXXXXXXXX
XXXXXXXXXX XXXXXXXXXX XXXXXXXXXX XXXXXXXXXX XXXXXXXXXX
XXXXXXXXXX XXXXXXXXXX
2. Verify the installed license.
user@vSRX> show system license
License usage:
Licenses Licenses Licenses Expiry
Feature name used installed needed
anti_spam_key_sbl 0 1 0 30 days
idp-sig 0 1 0 30 days
appid-sig 0 1 0 30 days
av_key_sophos_engine 0 1 0 30 days
logical-system 1 3 0 permanent
wf_key_websense_ewf 0 1 0 30 days
Page 55

Virtual Appliance 1 1 0 59 days
remote-access-ipsec-vpn-client 0 2 0 permanent
Licenses installed:
License identifier: XXXX-XXXX-XXXXX-XXXX
License version: 4
Software Serial Number: $ABC123
Customer ID: |**CustomerId**|
Features:
idp-sig - IDP Signature
count-down, Original validity: 30 days
wf_key_websense_ewf - Web Filtering EWF
count-down, Original validity: 30 days
anti_spam_key_sbl - Anti-Spam
count-down, Original validity: 30 days
appid-sig - APPID Signature
count-down, Original validity: 30 days
av_key_sophos_engine - Anti Virus with Sophos Engine
count-down, Original validity: 30 days
55
License identifier: XXXX-XXXX-XXXXX-XXXX
License version: 4
Software Serial Number: $ABC123
Customer ID: |**CustomerId**|
Features:
Virtual Appliance - Virtual Appliance
count-down, Original validity: 60 days
Add License Using a License Key
To add a license key to vSRX:
1. Copy the license activation key file to the VCP and add the license key by specifying the filename.
user@vSRX# set system license keys key “XXXXXXXXX XXXXXXXXXX XXXXXXXXXX XXXXXXXXXX
XXXXXXXXXX XXXXXXXXXX ........XXXXXXXXXX XXXXXXXXXX”
2. Verify the installed license.
user@vSRX> show system license
Page 56

License usage:
Licenses Licenses Licenses Expiry
Feature name used installed needed
anti_spam_key_sbl 0 1 0 30 days
idp-sig 0 1 0 30 days
appid-sig 0 1 0 30 days
av_key_sophos_engine 0 1 0 30 days
logical-system 1 3 0 permanent
wf_key_websense_ewf 0 1 0 30 days
Virtual Appliance 1 1 0 59 days
remote-access-ipsec-vpn-client 0 2 0 permanent
Licenses installed:
License identifier: XXXX-XXXX-XXXXX-XXXX
License version: 4
Software Serial Number: $ABC123
Customer ID: |**CustomerId**|
Features:
idp-sig - IDP Signature
count-down, Original validity: 30 days
wf_key_websense_ewf - Web Filtering EWF
count-down, Original validity: 30 days
anti_spam_key_sbl - Anti-Spam
count-down, Original validity: 30 days
appid-sig - APPID Signature
count-down, Original validity: 30 days
av_key_sophos_engine - Anti Virus with Sophos Engine
count-down, Original validity: 30 days
56
License identifier: XXXX-XXXX-XXXXX-XXXX
License version: 4
Software Serial Number: $ABC123
Customer ID: |**CustomerId**|
Features:
Virtual Appliance - Virtual Appliance
count-down, Original validity: 60 days
Page 57

Managing QFX5220-32CD, QFX5220-128C, PTX10003-80C, and PTX10003-160C Devices License
You must add a license to use QFX5220-32CD, QFX5220-128C, PTX10003-80C, and PTX10003-160C
devices features. The licensed features are enforced based on the license you purchased.
To manage a license on the QFX5220-32CD, QFX5220-128C, PTX10003-80C, and PTX10003-160C
devices, use below methods:
Using operational command on the device, see “Step-by-Step Procedure” on page 57.
•
Using network mode, see “Manage Licenses Using Network License Mode” on page 45
•
You cannot install license on the device, when the device using network mode.
There are two methods to add license on QFX5220-32CD, QFX5220-128C, PTX10003-80C, and
PTX10003-160C devices.
Add license using a license file:
57
To add a license key to the QFX5220-32CD, QFX5220-128C, PTX10003-80C, and PTX10003-160C
devices:
1. Copy the license activation key file to the VCP and add the license key by specifying the filename.
user@qfx> request system license add filename
Or, you can copy and paste the license activation key directly to add the license key. For example:
user@qfx> request system license add terminal
XXXXXXXXX XXXXXXXXXX XXXXXXXXXX XXXXXXXXXX XXXXXXXXXX XXXXXXXXXX
XXXXXXXXXX XXXXXXXXXX XXXXXXXXXX XXXXXXXXXX XXXXXXXXXX
XXXXXXXXXX XXXXXXXXXX
2. Verify the installed license.
user@qfx> show system license
show system license
License usage:
Licenses Licenses Licenses Expiry
Feature name used installed needed
esi-lag 0 1 0 permanent
l3static 1 0 1 invalid
Page 58

Licenses installed:
License identifier: XXXXXXXX-XXXX-XXXX-XXXXX-XXXXXXXXXXXX
License SKU: DEV-SKU-jnpr
License version: 1
Order Type: commercial
Software Serial Number: xxxxxxxx-xxxx
Customer ID: JUNIPER NETWORKS
License count: 1
Features:
esi-lag - ESI-LAG
permanent
Add license using a license key:
To add a license key to the QFX5220-32CD, QFX5220-128C, PTX10003-80C, and PTX10003-160C
devices:
58
1. Copy the license activation key file to the VCP and add the license key by specifying the filename.
user@qfx# set system license keys key “XXXXXXXXX XXXXXXXXXX XXXXXXXXXX XXXXXXXXXX
XXXXXXXXXX XXXXXXXXXX ........XXXXXXXXXX XXXXXXXXXX”
2. Verify the installed license.
user@qfx> show system license
show system license
License usage:
Licenses Licenses Licenses Expiry
Feature name used installed needed
esi-lag 0 1 0 permanent
l3static 1 0 1 invalid
Licenses installed:
License identifier: XXXXXXXX-XXXX-XXXX-XXXXX-XXXXXXXXXXXX
License SKU: DEV-SKU-jnpr
License version: 1
Order Type: commercial
Software Serial Number: xxxxxxxx-xxxx
Customer ID: JUNIPER NETWORKS
License count: 1
Page 59

Features:
esi-lag - ESI-LAG
permanent
For more information on install, save, and delete the license, see Managing Licenses.
Release History Table
DescriptionRelease
59
17.4
Starting in Junos OS Release 17.4 for AWS, you must add a license if you are using vMX
in the Bring Your Own License (BYOL) model.
Page 60

5
CHAPTER
Troubleshooting Juniper Agile License
Manager
Troubleshooting the Juniper Agile License Manager | 61
Page 61

Troubleshooting the Juniper Agile License Manager
IN THIS SECTION
Troubleshooting the Juniper Agile License Manager | 61
Troubleshooting the Juniper Agile License Manager
IN THIS SECTION
Installation Fails for Non-Root Users | 61
61
Invalid or Corrupt Agile License Manager ID File | 62
Error Checking Status of Agile License Manager | 62
Agile License Manager Starts as Follower Instead of Leader | 63
This topic provides a general guide to troubleshooting some typical problems you might encounter.
Installation Fails for Non-Root Users
Problem
When a non-root user tries to install the Agile License Manager by invoking the following install script, an
error message is displayed during the installation process.
$ ./install64.sh -S 10.221.133.158 -I ../LicenseManagerIdentity.xml --accept-agreement --force -P
/opt/license -H agile-license-server-03
./install64.sh must be run as root
Solution
On Ubuntu devices use the sudo prefix to provide root access to the installation or log in as root user.
Page 62

$ sudo ./install64.sh -S 10.221.133.158 -I ../LicenseManagerIdentity.xml --accept-agreement --force -P
/opt/license -H nari-agile-license-server-03
Operating System: Linux
Host Name: nari-agile-license-server-03
Installation type: SIMPLE
Customer ID: e58400d1-f33f-11e8-acbb-066d655a3c76
License Manager ID file: ../LicenseManagerIdentity.xml
Installation Path: /opt/license/AgileLicenseManager/0.0.1
Installing Agile License Manager 0.0.1 in directory
/opt/license/AgileLicenseManager/0.0.1.
Copying Agile License Manager 0.0.1 files to /opt/license/AgileLicenseManager/0.0.1.
Agile License Manager installed successfully.
Invalid or Corrupt Agile License Manager ID File
62
Problem
When you try to install the Agile License Manager by invoking the following install script, an error is
displayed during the installation process.
$ sudo ./install64.sh -S 10.221.133.158 -I ../LicenseManagerIdentity.xml --accept-agreement --force -P
/opt/license -H nari-agile-license-server-03
Invalid license manager ID file.
Solution
The issues occurs because of a corrupted or edited LicenseManagerIdentity.xml file is downloaded from
the Agile Licensing Portal. The user must not edit the file. If the file is corrupted, download the file again
from the portal and perform the installation.
Error Checking Status of Agile License Manager
Problem
The message Error checking...133 is seen when the .Agile License Server is started.
# sudo ./start64.sh
sudo: unable to resolve host blrserver01
Page 63

# Do not remove the following line, or various programs
Trying to stop Agile License Manager if its already running!
Stopping Agile License Manager for junipernetworks.
Agile License Manager for junipernetworks is already stopped.
Trying to stop Agile Cloud Plugin Service if its already running!
Stopping Agile Cloud Plugin Service for junipernetworks.
Agile Cloud Plugin Service for junipernetworks is already stopped.
Starting Agile License Manager...
Initializing Agile License Manager for junipernetworks.
03/04/19 12:35:55 Please wait, sleeping for 30 sec to allow redundant License
Managers to synchronize.
03/04/19 12:36:25 Error checking status of License Manager : 133
03/04/19 12:36:25 Continuing further, for starting SCP
Agile License Manager for junipernetworks is running.
63
Solution
Issue is due to the servers configured in server group are not able resolve, either it could be local server
name or other servername in the group.
Say there are blrserver01, blrserver02, blrserver03 servers in server group and only blrserver01 is being
used and others are dummy server then you need to add the entries in /etc/hosts file as below. The entries
are required to ensure all the hostnames are able to resolve.
10.221.129.23 blrserver01
10.1.1.2 blrserver02
10.1.1.3 blrserver03
Agile License Manager Starts as Follower Instead of Leader
When you start an Agile License Manager that is the LEADER (per the preference order it should start as
the LEADER) by using the #sudo ./start64.sh command, it starts as FOLLOWER. The following output is
displayed:
Trying to stop Agile License Manager if its already running!
Stopping Agile License Manager for junipernetworks.
Successfully stopped Agile License Manager for junipernetworks.
Trying to stop Agile Cloud Plugin Service if its already running!
Stopping Agile Cloud Plugin Service for junipernetworks.
Page 64

Please wait....
Successfully stopped Agile Cloud Plugin Service for junipernetworks.
Starting Agile License Manager...
Initializing Agile License Manager for junipernetworks.
03/04/19 12:58:22 Please wait, sleeping for 30 sec to allow redundant License
Managers to synchronize.
03/04/19 12:58:52 License Manager redundancy synch in progress.. (82) Status :
UNKNOWN
03/04/19 12:58:52 Please wait, sleeping for 30 sec to allow redundant License
Managers to synchronize.
03/04/19 12:59:22 License Manager redundancy synch complete (2), Status : FOLLOWER
Agile License Manager for junipernetworks is running.
Starting Agile Cloud Plugin Service...
Initializing Agile Cloud Plugin Service for junipernetworks.
Agile Cloud Plugin Service for junipernetworks is running.
64
Solution
When server is started, there will be LEADER/FOLLOWER election among the servers configured in the
lserv_advance_config.xml file used in the installation with -A option to denote multiple servers in the
redundancy setup.
<licenseServerRedundancy>
<!-- Server details consisting name and IP are configured in the order sequence
of preference
Maximum allowed servers are 4 in a redundat server group, the minimum is
2. -->
<licenseServer>
<serverName>agile-license-server-01</serverName>
<serverIP>10.1.1.1</serverIP>
</licenseServer>
<licenseServer>
<serverName>agile-license-server-02</serverName>
<serverIP>10.1.1.2</serverIP>
</licenseServer>
<licenseServer>
<serverName>agile-license-server-03</serverName>
<serverIP>10.1.1.3</serverIP>
</licenseServer>
Page 65

<licenseServer>
<serverName>agile-license-server-04</serverName>
<serverIP>10.1.1.4</serverIP>
</licenseServer>
</licenseServerRedundancy>
During the RMS server LEADER election, the order of preference is as per the order of the servers listed
in the previous output, and whichever server is up and is running with the License Manager setup will take
the LEADER role. For example, if agile-license-server-01 is down, then agile-license-server-02 will take
the LEADER role. When agile-license-server-01 is back online, it will take back the LEADER role.
However, during initialization, the Agile License Manager status shown might be transient and might change
after a few seconds depending on the availability of the other Agile License Managers in the group.
You can verify the Agile License Manager status by running the following command at any time when the
Agile License Manager is running.
65
# sudo ./lsmon64 -d -l localhost
Pool Info:
<?xml version="1.0" encoding="UTF-8" standalone="no"?>
<sentinelInfo>
<serverPool>
<server>
<type>LEADER</type>
<status>UP</status>
<hostName></hostName>
<ipAddress>10.221.129.23</ipAddress>
</server>
<server>
<type>FOLLOWER</type>
<status>DOWN</status>
<hostName></hostName>
<ipAddress>10.1.1.2</ipAddress>
</server>
<server>
<type>FOLLOWER</type>
<status>DOWN</status>
<hostName></hostName>
<ipAddress>10.1.1.3</ipAddress>
</server>
Page 66

</serverPool>
</sentinelInfo>
66
 Loading...