

Page 1
USER’S MANUAL
Page 2

Copyright ©February 2018 Juniper Systems, Inc. All rights
reserved. Information is subject to change without notice.
Juniper Systems® is a registered trademark of Juniper
Systems, Inc. 4VetJ Ultrasound Scanner™, EmberEquine
Ultrasound Reproduction Solution™, EmberEquine Field
Software™, and Mesa 2 Rugged Tablet™ are recognized
trademarks of Juniper Systems, Inc.
Windows, Windows 10, and the Windows logo are
trademarks or registered trademarks of Microsoft
Corporation in the United States and/or other countries.
Adobe® Acrobat® and Adobe® Reader® are registered
trademarks of Adobe Systems Incorporated in the United
States and/or other countries.
The names of other companies and products mentioned
herein may be the trademarks of their respective owners.
WARNING! This symbol indicates that failure to follow
!
directions could result in serious injury.
CAUTION: This symbol indicates that failure to follow
!
directions could result in damage to equipment or loss of
information.
Part Number 27208-00
The 4VetJ is jointly manufactured by Dramiński S.A., ul.
Owocowa 17, 10-860 Olsztyn, Poland and Juniper Systems,
Inc. It is distributed by Juniper Systems, Inc. in the U.S.
tel: 435.753.1881
1132 W. 1700 N. Logan, UT 84321
ii 4VetJ Ultrasound Scanner User’s Manual
web: www.junipersys.com
l
Page 3

Contents
1 Getting Started 1
System Over view 2
Features of the 4VetJ Ultrasound Scanner 3
Probes 4
Battery Pack and AC Power Supply 5
Display and Touchscreen 6
Perform Initial Tasks 6
Clean and Disinfect the 4VetJ and Components 10
Prepare the Animal 11
Safety of Use 11
2 4VetJ Settings and Functions 13
Elements of the Basic Panel 14
Active Fields 16
Imaging Modes 16
Optimize Image Parameters 19
Freeze 22
Cine Loops 22
Measurements 22
Optimization of B+M and M modes 31
Saving and Uploading Images and Cine Loops 31
Patient Data Function 34
Needle Echo Enhancement Tool 36
Full Screen 36
Printing Images 36
Presets 37
Look 39
Clinic 40
Info 40
Time 42
Display 42
Contents iii
Page 4

Audio 43
Measurements 43
DICOM 44
Wi-Fi 45
Troubleshooting 46
A Clean, Store, Transport, and Recycle 49
Clean and Disinfect 50
Store 51
Transport or Ship 51
Recycle 52
B Warranty and Repair Information 53
Limited Product Warranty 54
Repairs, Upgrades, and Evaluations 57
C Warnings, Regulatory Information, and
Licensing 59
Product Warnings! 60
D Specications 63
Index 67
iv 4VetJ Ultrasound Scanner User’s Manual
Page 5

CHAPTER
Getting Started
1
Page 6

Getting Started
System Overview
The Draminski 4VetJ Ultrasound Scanner™ from Juniper
Systems is a diagnostic tool used in veterinary medicine.
Clear ultrasound images and other parameters can be
captured on the resistive touchscreen during an exam and
saved.
The compact dimensions and ergonomic design allow the
4VetJ to be used as a mobile or stationary device. Use the
4VetJ to evaluate the physiological condition of specic
organs during gynecological and obstetrical exams as well
as conduct exams of the musculosketetal system, lungs, etc.
The standard 4VetJ includes the following components:
Ultrasound scanner
Endorectal linear probe and cord for obstectrical exams
(other probes are available as options)
Rechargeable Li-Ion battery pack (internal)
AC power supply and charger
Stylus and tether
Durable carrying case
You can also attach a keyboard, mouse, printer, or extra
monitor to the 4VetJ using the appropriate connector ports.
The 4VetJ can be used as a stand-alone unit or as part of
our EmberEquine Ultrasound Reproduction Solution™.
This manual focuses on the 4VetJ Ultrasound Scanner.
EmberEquine Ultrasound Reproduction Solution
An EmberEquine solution includes the 4VetJ and a Mesa
2 Rugged Tablet™ running EmberEquine software. Exams
are performed on mares using the 4VetJ ultrasound to view
and save images with measurements. This information is
transferred to the Mesa 2 running EmberEquine software.
Exam records and images are saved on the Mesa 2 and
can be pushed to the Microsoft Cloud for secure storage
and to provide wide access to animal data.
2 4VetJ Ultrasound Scanner User’s Manual
Page 7

Features of the 4VetJ Ultrasound Scanner
Front View
1
1 Resistive Touchscreen
2 Handle
3 Probe Cord Strap
4 Stylus with Tether
2 3
4
5
6
7
8
5 Door to Connector Ports
6 Stylus Holder
7 Speaker
8 On/O Button
Connector Ports
1
2
3
4
5
1 Ethernet Port
2 HDMI Port
3 USB 2.0 Port
4 USB 3.0 Port (higher speed)
5 Door to Connector Ports
Chapter 1 Getting Started 3
Page 8
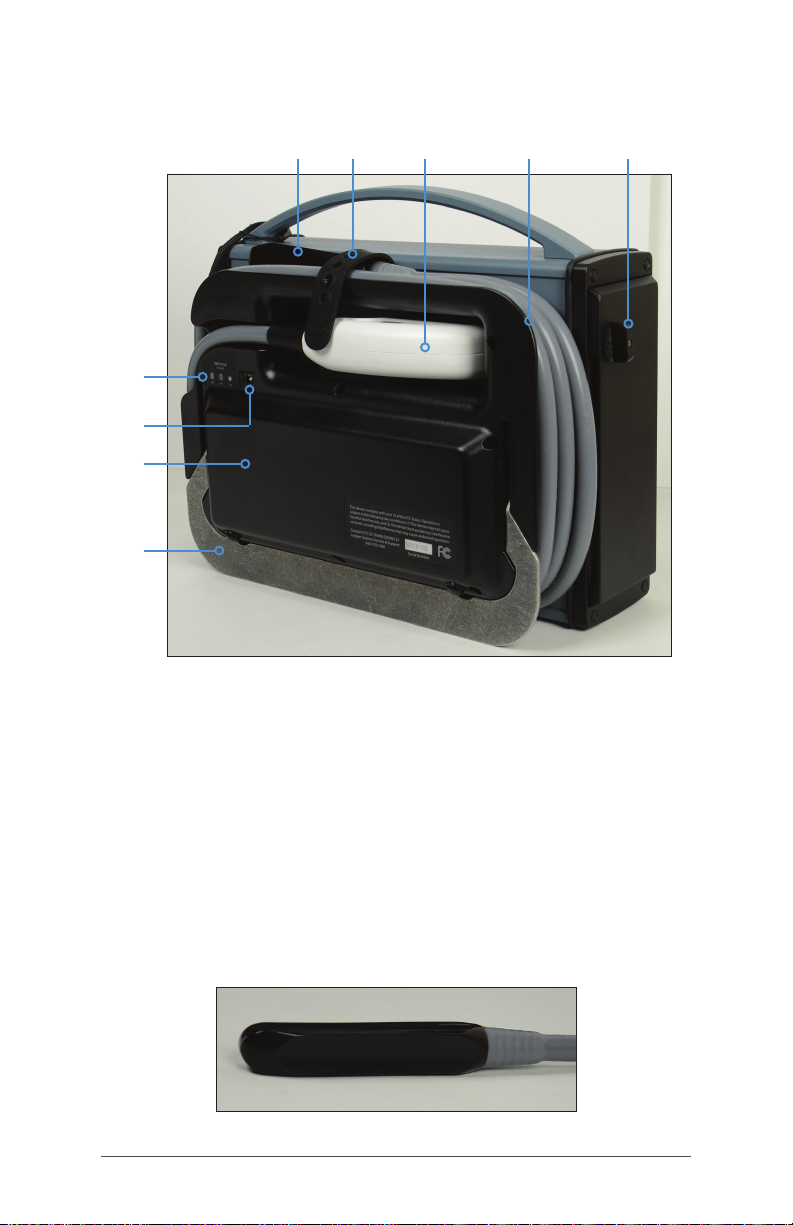
Back View
1
2
3
4
6 7 8
5
9
1 Battery Charge Indicators
- green = fully charged
- orange = charging
- red = external power applied
2 Power Input Jack
3 Battery Pack (internal)
4 Tilt Stand (adjustable)
5 Probe
6 Cord Strap
7 Probe Connector (attached
to socket)
8 Probe Cord Wrap
9 Probe Connector Lock
(locked position)
Probes
A standard 4VetJ comes with an endorectal linear probe,
4-9 MHz, for pregnancy and gynecological exams on large
animals like cattle or horses.
4 4VetJ Ultrasound Scanner User’s Manual
Page 9
There is a 7.6 foot long cord with the probe on one end and
a probe connector on the other end. The 4VetJ is shipped
with the probe connector attached to the probe socket
and the cord wrapped around the probe cord wrap.
We also offer the following probes for varying veterinary
needs (contact your sales representative):
Convex, 2–8 MHz
Microconvex, 4–9 MHz
Linear, 60 mm 5–10 MHz
Linear, 40 mm 6–14 MHz
Battery Pack and AC Power Supply
The 4VetJ has an internal, rechargeable, Li-Ion battery
pack that lasts 6 + hours. It is not user replaceable. An AC
power supply and charger is included. The battery can be
charged during use.
CAUTION: Always use the AC power supply included with
!
the 4VetJ to charge the battery pack or power the unit. The
use of any other power supply unit can cause harm to the
user or permanently damage the device.
All maintenance work must be carried out when the power
supply is disconnected.
In order to avoid the risk of an electric shock, the device
must be connected to a power outlet with protective
grounding.
Chapter 1 Contents 5
Page 10

Display and Touchscreen
The high quality LCD display produces clear, high resolution
images in a variety of conditions. The resistive touchscreen
enables the operation of the 4VetJ software with a gloved
hand or a stylus. Many tasks, like measurements, are best
performed with the stylus.
Note: If you are using your ngers, make sure you are
pressing hard enough on the touchscreen for your
selections and measurements to be recognized. Use a light
touch when the stylus is used.
Perform Initial Tasks
Before you use the 4VetJ for an exam, perform the tasks
described in this section.
Review Documentation
Owner’s manuals (4VetJ, EmberEquine, Mesa 2), quick start
guides, videos, Windows and Ember license agreements,
release notes, and other documents are available on our
website at: www.junipersys.com/emberequine/support.
If you have an EmberEquine system, the manuals are
also located on the Mesa 2 Rugged Tablet in the Ember
Help folder tile located in the Windows Start menu. View,
download, and print documents as desired. (You need a
PDF reader on the device you are viewing documents with.
Options include the Windows 10 Edge browser and Adobe
Reader, which is available from Adobe’s website at: www.
adobe.com.)
Documentation will be updated during the lifetime of the
products. Compare version numbers on the inside covers to
see if a document has changed.
Charge the Battery Pack
When you rst receive the 4VetJ, we recommend that you
fully charge the internal battery pack. Follow these steps:
1. Turn the 4VetJ off while the battery pack is being
charged to shorten the time it takes to reach a full
charge.
6 4VetJ Ultrasound Scanner User’s Manual
Page 11
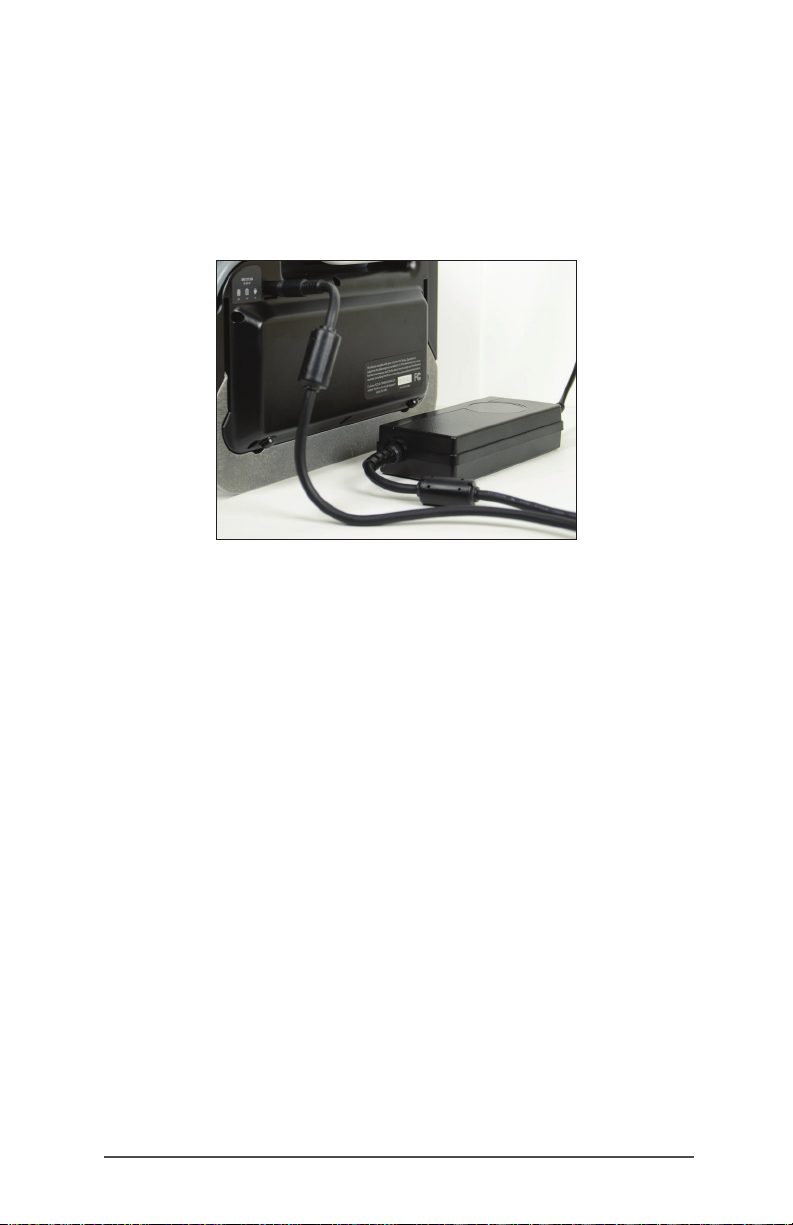
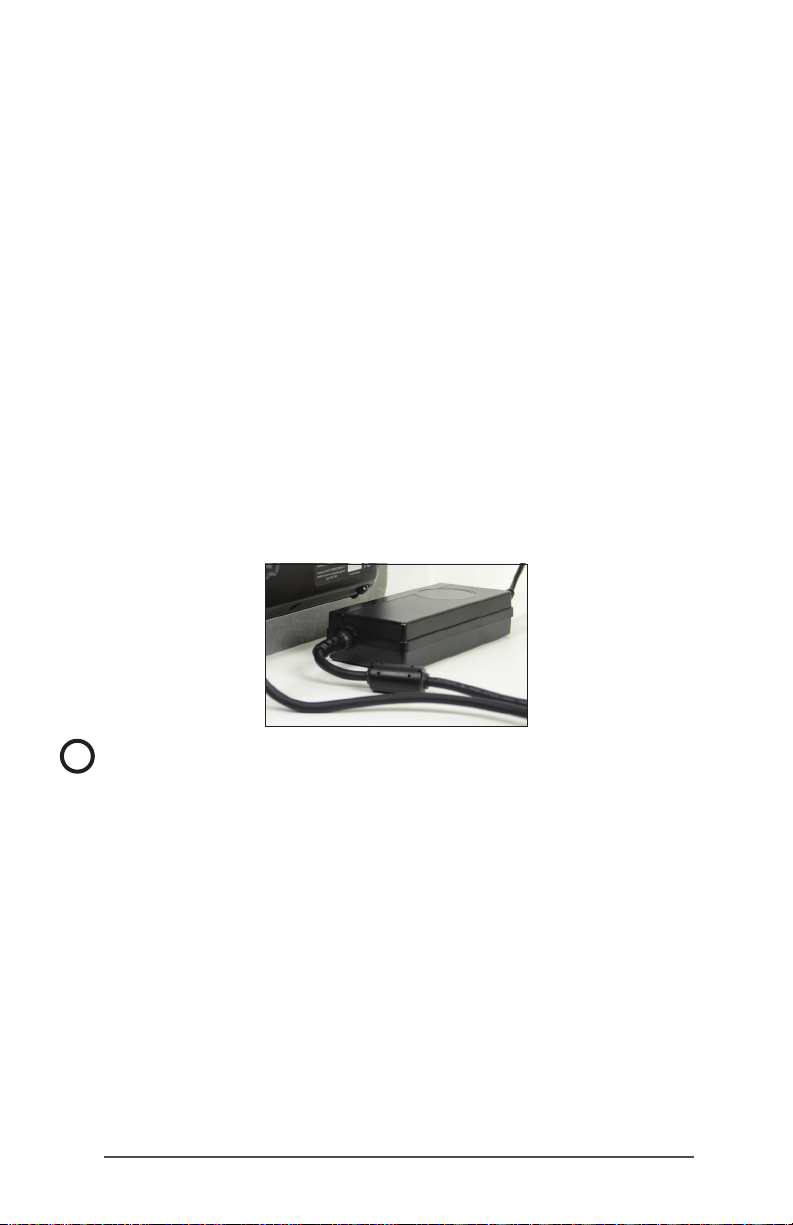
2. Use the AC power supply included with the 4VetJ to
charge the battery pack or power the unit. Plug the
AC adapter into a wall socket. Plug the power input
end into the DC power input jack on the back of the
4VetJ. Verify that the red and orange battery charge
indicators are on.
3. Charge the battery pack at room temperature (68° F or
20° C) for 6 hours for the rst charge.
Power Options
You can operate the 4VetJ while you are charging it, but it
takes longer to charge the battery pack. If the 4VetJ is off,
a completely discharged battery pack takes about 4 to 5
hours to charge. If the 4VetJ is in use while charging, it takes
about 20% longer to fully charge the battery.
Battery Indicators
When the 4VetJ is turned on, the battery charge level shown
on the status bar at the top of the display does not report
the correct charge until the battery pack is fully charged
for the rst time. After the battery pack is fully charged, the
indicator shows the correct charge.
A low battery message might be shown in the middle of the
screen that tells you to charge the battery pack.
There are three battery charge indicators on the back of
the 4VetJ that indicate the following:
Off: The LEDs are always off when the AC power adapter
is not applied.
Chapter 1 Contents 7
Page 12

Red: When the power supply is plugged in, the red LED
immediately lights up.
Orange or Green: Within a few seconds either the orange
or green LED lights up. Orange indicates that the battery
pack is charging. Green indicates a full charge.
Note: If the 4VetJ is left on when it is not being used and it is
not being powered by the AC adapter, the battery pack is
completely discharged and the 4VetJ automatically shuts
off.
Attach or Remove a Probe
To remove or replace a probe, follow these steps:
1. The 4VetJ can be on or off when a probe is removed or
replaced.
2. Unhook the probe and cord strap, and unwind the
probe cord from the cord wrap.
3. Unlock the probe by turning the probe connector lock
counter-clockwise to a horizontal position (see the
symbols near the lock).
!
CAUTION: Handle the probe, connector, and cord with
care to avoid mechanical damage. Do not drop, hit,
or scrub the probe head. Protect the probe connector
from dirt and moisture (it is not waterproof). Avoid
excessive force, bending, and pulling of the cord.
8 4VetJ Ultrasound Scanner User’s Manual
Page 13
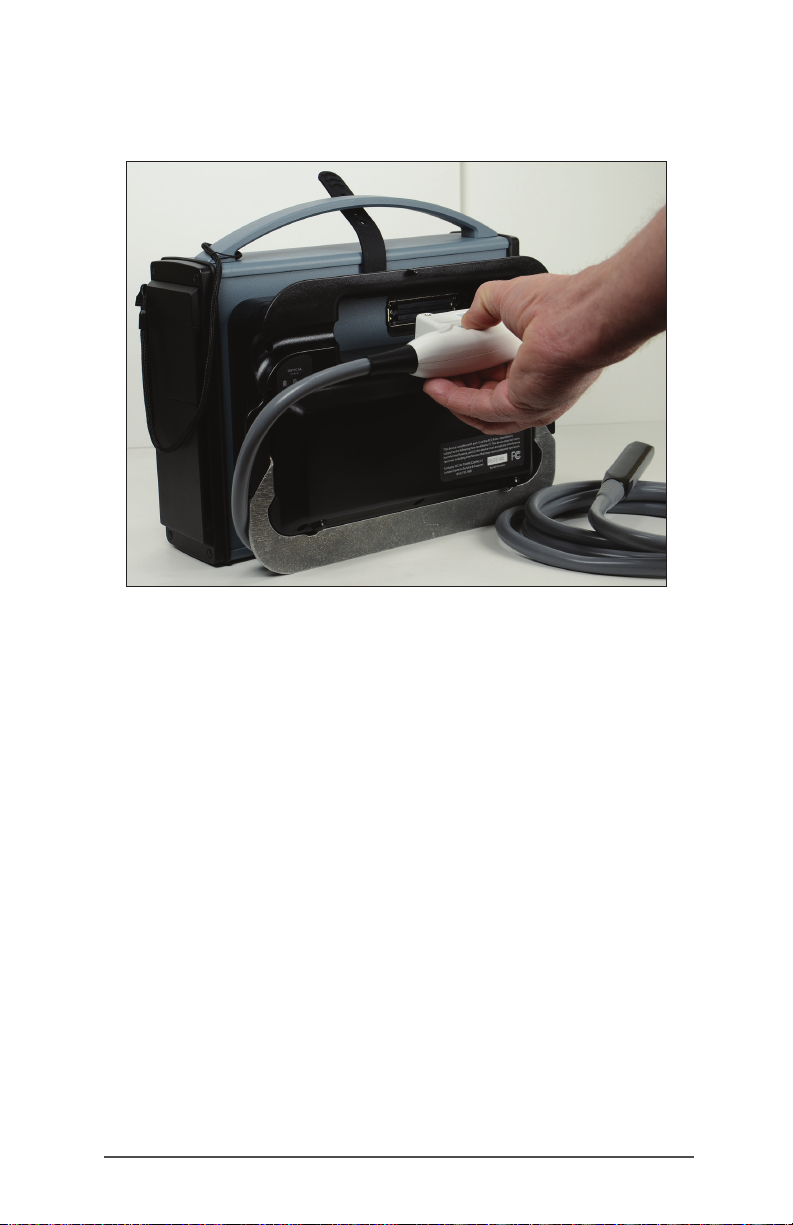
4. Pull the probe connector free from the socket. A
message saying Probe OFF appears on the display.
With the probe removed, certain functions are no longer
available.
Note: If you are not going to have a probe attached
to the 4VetJ, slide the socket cover closed to keep out
debris.
5. Attach the probe connector into the socket for the
probe you are attaching.
6. Lock the probe in place by turning the lock clockwise
to a vertical position. The probe type is recognized
automatically by the system. A message saying Probe
ON appears on the display.
Note: It can take a minute or more for the new probe to
be recognized. You might need to restart the 4VetJ.
7. Wrap the probe and cord around the probe cord wrap
and hold it in place with the cord strap. The probe is
ready to be used or stored.
Note: The cord wrap is designed for the endorectal
linear probe. The cord length of other probes requires
Chapter 1 Contents 9
Page 14

the cord to be doubled back near the probe to allow
the probe to be held in place under the cord strap.
!
CAUTION: The crystals in the probes have a limited life.
If the 4VetJ is running but no exam is being done, either
turn the unit off or unhook the probe from the probe
socket. This helps extend the life of the crystals.
Clean and Disinfect the 4VetJ and Components
The 4VetJ and probe should be cleaned and disinfected
before each use and before they are stored, transported, or
sent to our service department for servicing or repairs.
CAUTION: It is important to note that the 4VetJ and the
!
probe connector are not waterproof. Use caution when
cleaning or disinfecting them.
In addition to the information below regarding the cleaning
and disinfecting of the 4VetJ and components, refer to
Appendix A, Clean, Store, Transport, and Recycle.
4VetJ
The 4VetJ must be powered off and unplugged for thorough
cleaning. Use warm water or a mild cleaning solution on the
casing. Remember that the 4VetJ is not waterproof.
Touchscreen
For dr y cleaning of the touchscreen, rub it with a soft cloth.
Avoid substances that can scratch or damage the screen.
For damp cleaning use a spray or foam agent designed for
such use, warm water, or a mild detergent.
Probe
Clean and disinfect the probe before each examination.
The probe and cord are waterproof. The probe connector
(which attaches to the probe socket) is not waterproof, so
use caution when you are cleaning or disinfecting the area
near it. Do not scrub the head of the probe. Clean it gently
with a soft cloth and a mild cleaning solution approved for
ultrasound probes. Do not use concentrated, aggressive, or
abrasive agents or substances like alcohol or bleach that
could deteriorate the probe head.
10 4VetJ Ultrasound Scanner User’s Manual
Page 15

Prepare the Animal
Preparing animals for ultrasonography varies depending on
the animal, the type of exam being done, and the type of
probe being used.
WARNING! It is assumed by Draminski and Juniper Systems,
!
Inc. that the user of this equipment is properly trained to
safely and correctly perform ultrasonography on animals.
Special, certied gel designed for ultrasound examinations
must be used. Using other substances may be dangerous
for the animal and cause undesirable effects. It can also
have a negative inuence on the head of the probe. Proper
gelling improves penetration of the signals and helps obtain
correct and more legible images.
For external probes, prepare the skin of the animal in the
area to be examined. You might need to shave fur and
wipe the area with a disinfecting agent. Cover the skin of
the patient with the gel.
Safety of Use
Review the following list of safety issues before using the
4VetJ. More safety information is located in Appendix C,
Warnings, Regulatory Information, and Licensing.
The 4VetJ ultrasound is only for use on animals. It is not for
human use.
The 4VetJ is a mobile computer with solid construction.
Handle the touch panel, probe, and other components
carefully to avoid mechanical damage.
To limit the inuence of acoustic energy emitted by the
ultrasound probe on the operator and the animal, follow
the recommended standards of ultrasound examinations.
Technical inspection of the 4VetJ by the manufacturer
every two years is recommended to help guarantee the
highest level of performance and safety.
Carry out periodic inspections of the probe, cable
and the connector. If mechanical damage is found or
suspected, it is necessary to send these components to
the manufacturer for servicing.
Chapter 1 Contents 11
Page 16

Do not modify the device.
The warranty is void if unauthorized repairs are done.
The 4VetJ should be used for diagnostic purposes only.
The device is not recommended for esophageal
examinations.
Do not use the 4VetJ near explosive devices.
Ultrasound exams should not be carried out in
conjunction with a debrillator.
Avoid exposing the device to strong sunlight or heat for
extended periods of time.
During examinations the device should not be
connected to LAN (via Ethernet).
In order to avoid the risk of electric shock, never mix
water and electricity. Install Ground Fault Circuit
Interrupters (GFCI). Make sure you’re using the right size
circuit breakers and fuses.
Before transporting or shipping the 4VetJ and
components, they must be protected against damage.
The carrying case offers protection when it is properly
packed and securely closed and latched.
Make sure that nothing is touching the touch panel
except for the carrying case lid during shipping or severe
screen damage can occur. Put the stylus in the stylus
holder and place the stylus tether where it won’t touch
the screen.
12 4VetJ Ultrasound Scanner User’s Manual
Page 17

2CHAPTER
4VetJ Settings and
Functions
Page 18
4VetJ Settings and Functions
This chapter discusses the 4VetJ settings and functions that
can be used for ultrasound examinations.
WARNING! Ultrasound examinations using the 4VetJ and
!
probesmustbeconductedbyqualiedandproperly
trained personnel.
Press and release the on/off button . It takes about 60
seconds for the system to load, then the basic panel is
shown.
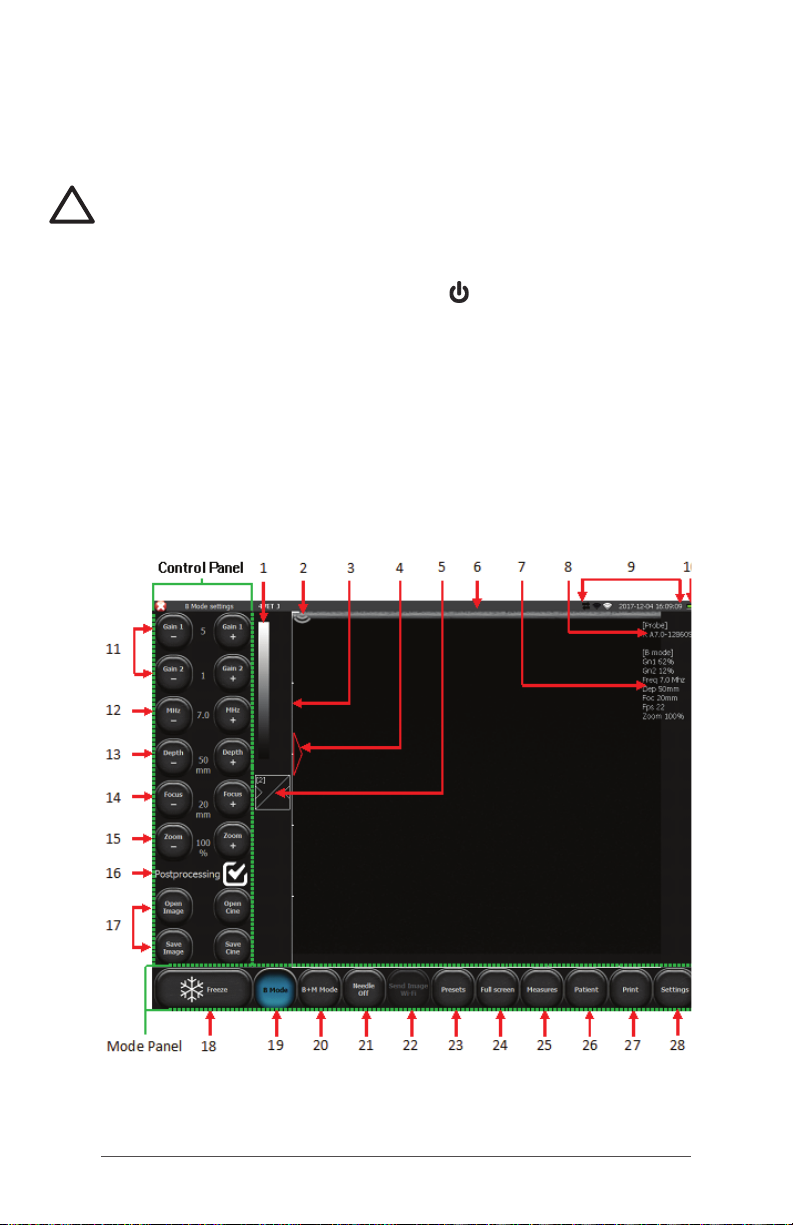
Elements of the Basic Panel
During an examination, use the buttons on the basic panel
and subsequent screens to set up operating parameters
and to complete specic tasks. These settings, indicators,
modes, and functions are described in more detail in this
chapter.
14 4VetJ Ultrasound Scanner User’s Manual
Page 19

1. Grey scale indicator / change negative - positive
2. Probe marker indicator (direction)
3. Ruler
4. Indicator of focus level
5. Gamma setting button
6. Name of practice or user and currently used preset
7. List of current working parameters
8. Information about the probe that is currently being used
9. Symbols showing communication status between 2
devices, Wi-Fi hotspot and Wi-Fi access status, date and
time
10. Battery charge indicator
Control Panel
11. Gain adjustment: Gain 1 – general gain; Gain 2 – far
eld gain
12. Probe frequency adjustment
13. Scanning depth adjustment
14. Focus level adjustment
15. Zoom level adjustment
16. Postprocessing on/off (adjust this in Settings/Look)
17. Loading and saving images and cine loops
Mode Panel
18. Freeze button (freezing/unfreezing of the image)
19. Selection of imaging mode: B, B+B, 4B
20. Selection of imaging mode: M, B+M
21. Needle echo enhancement tool
22. Send Image to the Mesa 2 via Wi-Fi (option)
23. Presets
24. Full screen mode
25. Menu of measurements
26. Patient’s data
2 7. Print images
28. Settings, additional options
Chapter 2 4VetJ Settings and Functions 15
Page 20
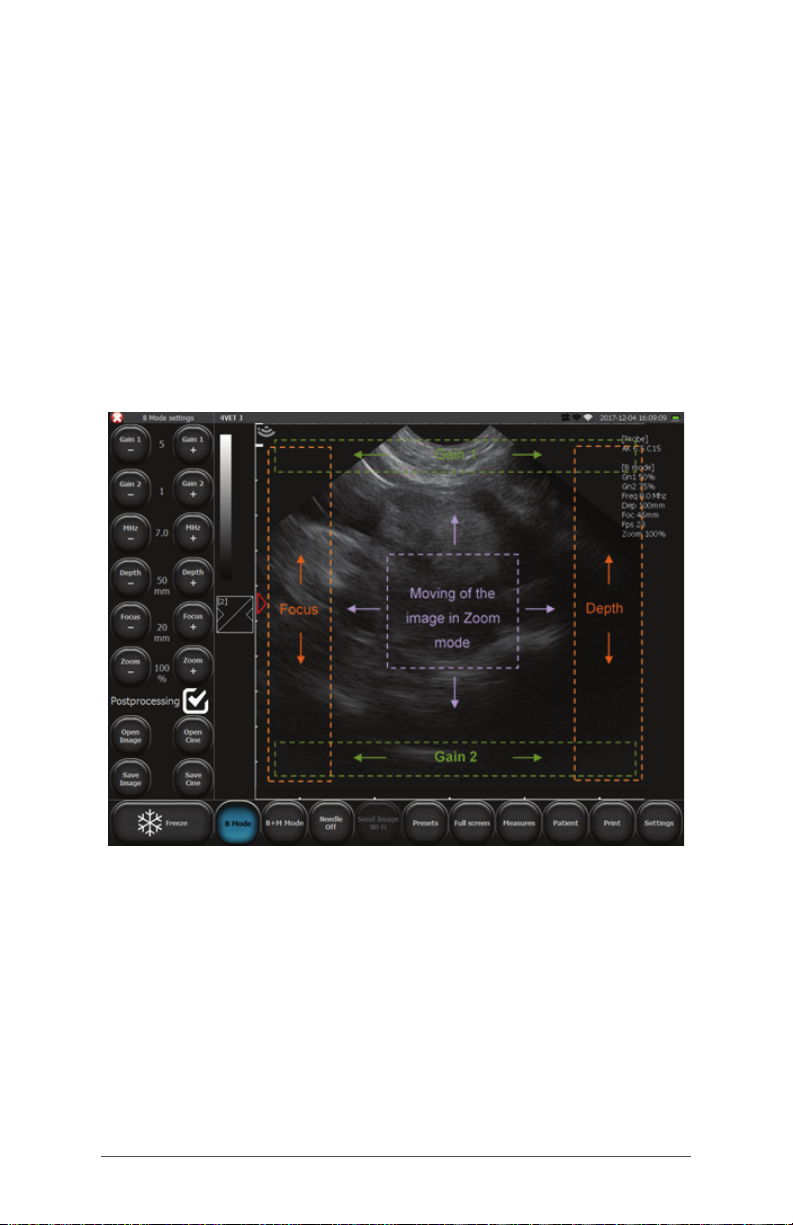
Active Fields
Active elds are areas on the image used to change
parameter settings with the use of your nger or stylus
instead of using buttons located in the control panel.
Within the image sector the following active elds can be
changed:
General gain
Gain in the far eld
Level of focus
Depth of scanning
Imaging Modes
The basic activities associated with the operating modes
are described in this section.
Modes B, B+B, and 4B
Press the B mode button. From the submenu that appears,
select the mode associated with the desired screen view.
16 4VetJ Ultrasound Scanner User’s Manual
Page 21
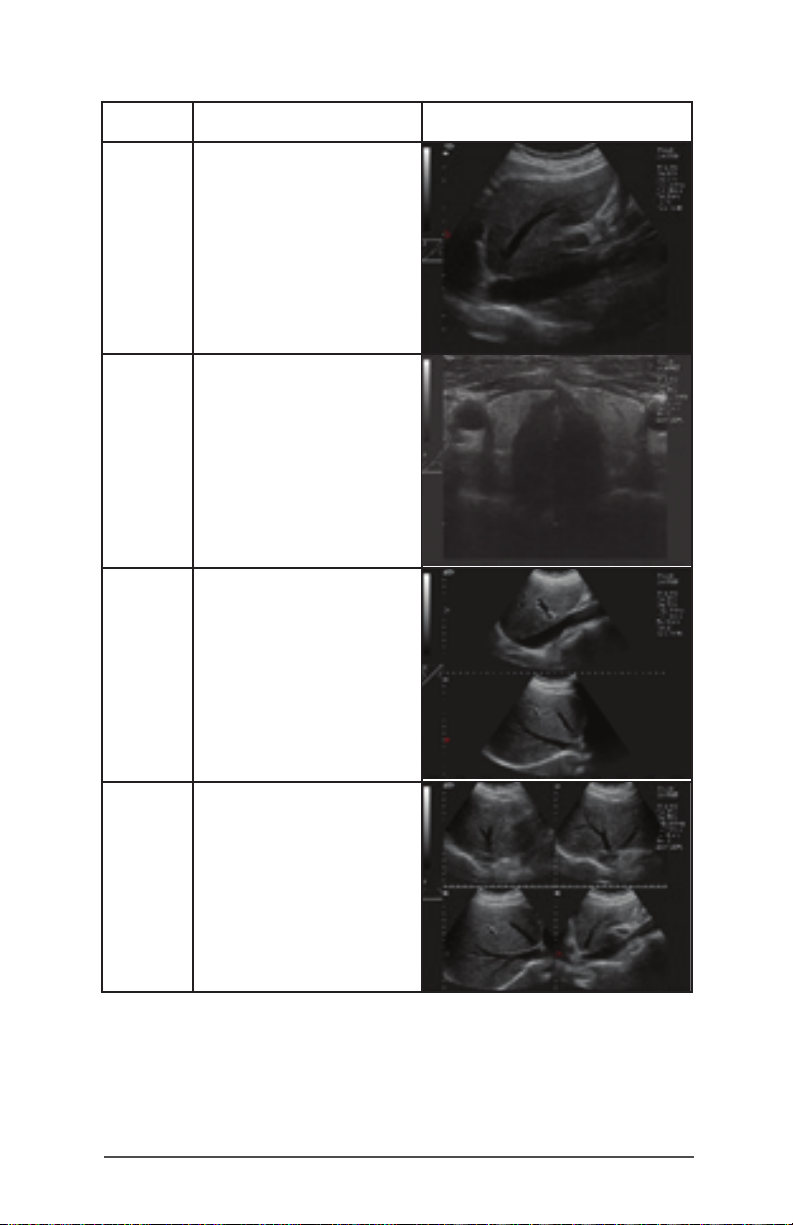
Mode Description Sample Screen View
B Starts B mode
B B From the submenu,
starts B+B mode
where windows are
next to each other in
a horizontal position
B
B
From the submenu,
starts B+B mode
where windows are
next to each other in
a vertical position
BB
BB
From the submenu,
starts 4B mode
Movement in the Zoom mode
In the B+B and 4B modes active elds are located in each
window.
Chapter 2 4VetJ Settings and Functions 17
Page 22
Switching Between Windows in B+B and 4B Modes.
To activate the next window, double click on its window. If
this is done during the examination, the previous window is
frozen.
When the images in both windows are frozen, switching
a window causes the frozen image to relocate from the
previously active window to the newly activated window.
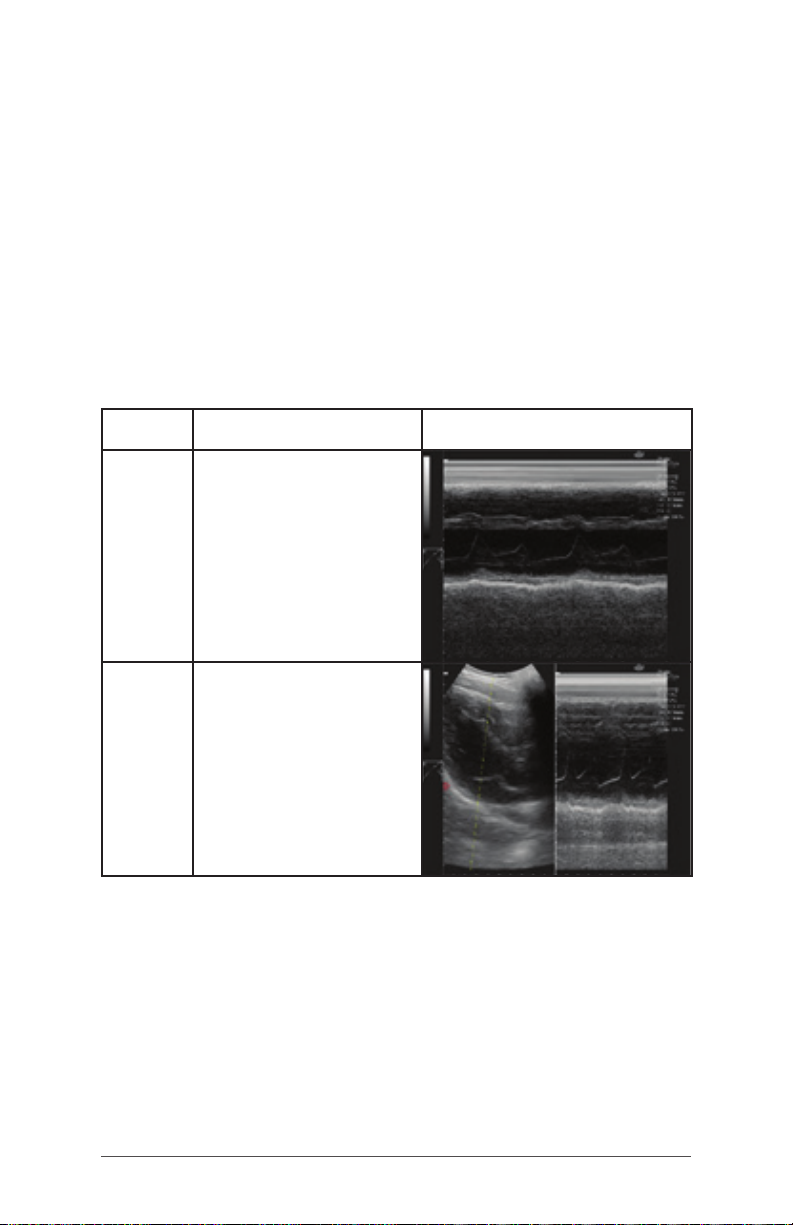
Modes B+M and M
Press the B+M mode button. To switch to M mode, from the
dropdown menu that appears, select M mode.
Mode Description Sample Screen View
B+M Starts B+M mode
M
18 4VetJ Ultrasound Scanner User’s Manual
Select from the
dropdown menu
Page 23

Optimize Image Parameters
To optimize the image parameters, refer to instructions that
fol l ow.
Gain Levels
The [Gain 1] and [Gain 2] buttons have adjustment ranges
from 1 to 8. Increases of the gain value cause the image
to become brighter. Adjust gain levels depending on your
needs, the type of the examination, and the depth of
penetration of external light conditions.
You can also adjust gain levels with your ngers or the stylus.
Gain 1 can be adjusted in the active eld located at the
top of the scanning sector. Gain 2 can be adjusted at the
bottom of the sector.
Probe Frequency
The 4Vet operates with broadband probes that are able to
emit signals of different frequencies.
The range of available frequencies depends on the type of
the probe. Refer to Appendix D, Specications.
To change the signal frequency, use the [MHz -] and [MHZ +]
buttons in the control panel.
Chapter 2 4VetJ Settings and Functions 19
Page 24

Penetration Depth
The depth of penetration is set with the help of the [Depth
–] and [Depth +] buttons. The depth of scanning is set
depending on the location of the examined organs. The
depth of the beam penetration depends in its frequency.
The higher the frequency is, the lower its range of
penetration is.
You can also change the penetration depth by moving a
nger or the stylus in the active eld at the right edge of the
sector of scanning.
Focusing the Beam
The [Focus -] and [Focus +] buttons are used to set the
focus of the ultrasound beam. The image presented on the
screen is the sharpest on the level of the beam focusing.
The level of focus is indicated by a red triangle located on
the left side of the sector. To obtain the best effects, set
the focus on the level corresponding to the location of the
examined object.
Focus adjustment can also be performed using a nger or
the stylus in the vertical active eld located on the left side
of the sector.
The scanner also has automatic dynamic focusing, so the
image is sharp in the whole range of the scanning.
20 4VetJ Ultrasound Scanner User’s Manual
Page 25

Zoom
The [Zoom -] and [Zoom +] buttons are used to magnify the
image in real time and after it is frozen. The following zoom
levels can be used: 120, 140, 160, 180, 200, 220, 240, 260, 280,
and 300%. It is also possible to reduce the sector down to
60% and 80% of its standard size.
Gamma Level
The gamma adjustment lets you change the grey scale
setting for an image in real time. First it must be frozen or
uploaded on the screen from a previously saved image or
cine loop.
When you press the [Gamma] setting button, the list of
available grey scale settings appears.
Balanced display of all tones
Domination of bright tones Domination of dark tones
High contrast
Select the desired level by pressing on the appropriate icon.
A black and white bar located above the [Gamma] button
indicates the current grey scale setting.
Negative (color inversion)
To invert colors from positive to negative, double click the
bar showing the grey scale setting.
Chapter 2 4VetJ Settings and Functions 21
Page 26

Freeze
To freeze an image, press the [Freeze] button. The image is
frozen in a split second, and the button changes color. To
unfreeze the image and return to scanning, press [Freeze]
again.
Cine Loops
A cine loop is a video loop which consists of 256 frames. You
can play about 14 seconds of an examination.
When an image is frozen, in the lower right portion of the
screen [<I] and [I>] buttons are shown. They are used to
manage cine loops. To play a cine loop, press and hold the
[I>] button. You can wind a loop frame by frame by quickly
pressing [I>].
To play or rewind a cine loop frame by frame, press the [<I]
button.
Measurements
Next to the sector of scanning, there is a ruler with a scale of
1 cm that shows the size of an object being observed in real
time.
Press the [Measures] button on the mode panel to see
which measuring options are available.
[Grid] – The grid provides approximate measurements to
an image
[Narrowing] – This measurement determines the
narrowing of an image
22 4VetJ Ultrasound Scanner User’s Manual
Page 27

[Volume] – Volume is calculated using three
measurements
[Length] – Length is measured between two indicators
[Area] – This measurement provides the area and
circumference of an object of any shape
[Ellipse surface] – An ellipse is applied on an object to
calculate the surface area and circumference
[Clear] – This button clears the screen of measuring
elements
[OB/GYN] – A set of measurements used in obstetric
examinations; biometric measurements are available for
different species of animals
Grid
When you press [Grid], a window that says “Show grid”
is shown. Select this option and the sector of imaging is
covered by the grid. Approximate measurements are shown
(the grid scale is 1 cm).
Narrowing
In order to determine narrowing, obtain a longitudinal
section of the narrowing object. Put two measurement
sections between the boarders of the object – one before
the narrowing, the other in the place of the biggest
narrowing. The result is presented automatically as a
percentage.
Volume
In order to carry out proper volume measurement, it is
necessar y to measure the length, depth and width of the
object. To do it, you need to obtain sections in planes:
longitudinal and lateral. To obtain two planes in one image,
use B+B mode.
Put three measuring sections in the image. The scanner
automatically calculates the volume of the object on the
basis of these measurements. The result is presented in cm3.
Chapter 2 4VetJ Settings and Functions 23
Page 28

Length
When an image is frozen, the ability to measure length
becomes available. Up to ve lengths can be measured on
one image.
Some measurements are shown beneath the imaging sector
After pressing point A and then point B, a line appears
connecting these two points. A number identies each
measurement.
The magnifying glass facilitates the measurement of small
ares. It appears at the indicated measuring point when
you press and hold your nger on the screen. When you
remove your nger from the screen, the magnifying glass
disappears and another measuring point appears.
Results of the measurements are shown below the imaging
sector in mm with an accuracy of up to 0.1 mm.
Area
Measure the area and circumference of an object by
outlining the object with a nger or the stylus without
removing it until the shape is closed and you tap on the
24 4VetJ Ultrasound Scanner User’s Manual
Page 29

point where you started the line. The result is shown in sq. cm
below the imaging sector.
Ellipse Surface
Apply an ellipse on the object in three points. The rst two
points should be located on the poles of the long axis
with the third one on one of the poles of the short axis.
This measurement provides the information needed to
calculate the surface area and the circumference. The
result is given in sq. cm for the surface area and in cm for
the circumference.
Gynecological and Obstetrical Measurements
Age of Fetus
To estimate the age of a fetus, press [Measures] and select
[Ob./GYN]. Then select [Aging tables], Select the proper
measurement, and mark measuring points on the screen.
The scanner automatically calculates an approximate age
of the fetus in days.
Horse Fetus Measurements
[Horse DC] - Head diameter in mm and days. Available
between the 90th and 200th day of pregnancy.
Chapter 2 4VetJ Settings and Functions 25
Page 30

[Horse DO] - Eye diameter in mm and days. Availabile
between the 90th and 330th day of pregnancy.
[Horse DSG] - Size of the gestational sac in mm and days.
Availabile between the 9th to 45th day of pregnancy.
Sheep Fetus Measurements
[SHEEP LCC] – Crown (rump length) in mm and days.
Availabilite from the 30th to 70th day of pregnancy.
Lama Fetus Measurements
[LAMA DBP] – Biparietal diameter in mm and days.
Available between the 75th and 240th day of pregnancy.
Pig Fetus Measurements
[SOWS LCC] – Crown (rump length) in mm and days.
Available from the 20th to the 50th day of pregnancy.
Cow Fetus Measurements
[COW DBP] – Biparietal diameter (the head diameter is
measured along the fontanelle) in mm and days. Available
from the 65th to the 200th day of pregnancy.
[COW LCC] – Crown (rump length) in mm and days.
Available from the 30th to the 80th day of pregnancy.
Dog Fetus Measurements
[DOG GS small] – Gestational sac of a small dog in mm and
days. Available from the 24th to the 40th day of pregnancy.
[DOG GS medium] – Gestational sac of middle size dog in
mm and days. Available from the 24th to the 40th day of
pregnancy.
[DOG BPD small] – Biparietal diameter of a small dog in mm
and days. Available after the 40th day of pregnancy.
[DOG BPD medium] – Biparietal diameter of a middle
size dog in mm and days. Available after the 40th day of
pregnancy.
Cat Fetus Measurements
[Cat >30 HD] – Head diameter in mm and days. Available
after the 30th day of pregnancy. Measure in the same
plane as for CRL. Over the 35th day of pregnancy, measure
in the same plane as for biparietal diameter.
26 4VetJ Ultrasound Scanner User’s Manual
Page 31

[Cat >30 BD] – Abdomen diameter in mm and days.
Available after the 30th day of pregnancy. The
measurement should be performed on the level of the liver.
[ Cat <30 CRL] – Crown (rump length) in mm and days.
Available from the 26th to the 30th day of pregnancy.
[Cat <30 GSD] – Gestational sac in mm and days. Available
starting the 16th day of pregnancy.
Cardiology
[HR] – Number of Heart Beats Per Minute
The measurement is performed in the M mode. Mark a
section on the screen that covers two full cycles of the heart
rate. The scanner automatically calculates the number of
heart beats per minute in bpm.
[LA/Ao] – Left Atrium Diameter to Aorta Diameter Ratio
The measurement can be carried out in the B or M mode.
Mark two sections on the screen:
1. Ao – aorta diameter (measured in diastole)
2. LAd – left atrium size (measured in systole)
[LV] – Left Ventricle Parameters
These measurements are carried out in the B+M mode:
- End-diastolic volume of the left ventricle EDV
- End-systolic volume of the left ventricle ESV
- Fractional shortening FS
- Ejection fraction EF
In the diagram, nd the place
where the left ventricle is in
diastole.
Mark the rst two measuring
points determining the width of
the interventricular septum (IVSd),
Start with the border between the
right ventricle and the wall of the
septum.
Next, mark the point determining
the left ventricle lumen. The 4VetJ automatically determines
the section between the interventricular septum and the
Chapter 2 4VetJ Settings and Functions 27
Page 32

wall of the septum, allowing LVDd to be obtained. The last
measuring point is located on the exterior border of the free
wall of the left ventricle. The 4VetJ automatically determines
the section corresponding to left the ventricular free wall in
diastole (LVFWd).
Repeat the same activities on the diagram in the location
of systole.
When all the eight measuring points are marked, the
scanner automatically provides results for EDV, ESV, FS and
EF.
The result of EDV is calculated on the basis of the equation
EDV = (7 x LVIDd³)/(2.4 + LVIDd) and is given in ml.
The result of ESV is calculated on the basis of the equation
ESV = (7 x LVIDs³)/(2.4 + LVIDs) and is given in ml.
[V Simpson’s LVAM-LVAP method] – Left ventricle volume
measured by Simpson’s method based on LVAM and LVAP.
The measurement is carried out in the B (4B) mode.
Make the left ventricle more visible on the longitudinal and
cross sections on the level of the mitral valve, with the cross
section on the level of the papillary muscles.
Mark the measurements in the following order:
1. Left ventricle length in longitudinal section (LVL),
2. Surface area (in the form of the ellipse) in a cross section
on the level of the mitral valve (LVAM),
3. Surface area (in the form of the ellipse) in a cross section
on the level of papillary muscles(LVAP).
The result is calculated on the basis of the equation V = (LVL
/ 3) x (LVAM + (LVAM+LVAP)/2 + LVAP/3) and is given in ml.
28 4VetJ Ultrasound Scanner User’s Manual
Page 33

[V Simpson’s single plane method] – Left Ventricle Volume
Measured by Simpson’s Single Plane Method
The measurement is carried out in the apical four-chamber
view.
Move your nger or the stylus to counter the
lumen of the left ventricle.
The scanner automatically connects the initial
and the nal points of the counter.
The counter is automatically applied with the
lines parallel to its base and the long axis of the
ventricle.
The scanner calculates the left ventricle volume on the
basis of the long axis of the ventricle, the number of
perpendicular lines, and their size. The result is given in ml.
[V Bullet] – Left Ventricle Volume Measured by Bullet Method.
The measurement is carried out in the B+B mode.
Obtain cross sections of the left ventricle in the long axis
and the short axis on the level of the mitral valve.
Mark these measurements:
1. Distances in the long axis of the left ventricle (LVL),
2. Surface area of the left ventricle (ellipse) in the cross
section on the level of the mitral valve (LVAM).
The result is calculated on the basis of the equation V = (5 /
6) x LVL x LVAM and is given in ml.
Chapter 2 4VetJ Settings and Functions 29
Page 34

Editing Measurements
You can change the location of the marked measuring
points.
When measuring points are being set, a window with
navigation buttons appears in the upper left-hand corner of
the screen (see the yellow dotted line in the image shown
above).
You can use these buttons to change the location of the
point marked with a red cross in the example.
To switch to the next measuring point, press [A/B].
Press [Magnifying glass] to turn this function on or off.
To delete a single measurement select [Del]. A previous
measurement is activated.
Press [X] to turn the navigation buttons off.
The measurement panel can be moved to any place on
the screen by selecting the middle of the window with your
nger or the stylus and moving it to the desired location.
30 4VetJ Ultrasound Scanner User’s Manual
Page 35

Clear
When [Clear] is pressed, all of the elements of a
measurement and the results are removed from the screen.
Measurement elements are also deleted when you unfreeze
an image in the B mode or switch to the B mode from the
other modes.
Optimization of B+M and M modes
Selection of the sweep speed in M mode
To select the sweep speed, press the [B+M Mode] button.
Above the button a submenu appears where you can
select one of the following values: 1s, 2s, 3s, 4s.
Moving the M line
The M line is applied on the B mode image. To change its
location, drag it with a nger to the desired location.
Switching between M and B+M mode
After pressing [B+M mode], a submenu appears on the
screen. The button [M/B+M] is used to switch between the
B+M and M modes.
Saving and Uploading Images and Cine Loops
This function saves frozen images and cine loops to the
internal memory of the scanner.
Animal data and descriptions can also be added and
saved.
Notice: Remember to download the images and cine
loops to external memory devices regularly and clear the
memory of the scanner.
Saving an Image or Cine Loop
To save an image or cine loop, rst freeze it from the basic
panel using the [Freeze] button then press [Save Image] or
[Save Cine].
A dialogue box appears with a virtual keyboard. You can
enter patient data when saving an image or cine loop.
Chapter 2 4VetJ Settings and Functions 31
Page 36

The button [Clear data] clears elds which are lled with
data copied from the previous exam.
The [Save] button saves your information and [Cancel]
deletes it.
You can enter data into the patient record before an
examination starts. See Patient Data Function later in this
chapter.
Uploading an Image or Cine Loop
To upload an image or cine loop saved in the scanner’s
memory to the basic panel or external data storage media,
press the [Open Image] or [Open Cine] button on the basic
panel. Press the box for Images and/or Cines at the top
of the screen until a check mark appears. A screen with
a list of the saved images and/or cine loops is shown with
functions along the bottom. Select the desired image or
cine loop by pressing the box next to it until a check mark
appears, then press the[Load] button in the bottom left
corner.
Note: This process can be used to transfer images and
records from the 4VetJ to a Mesa 2 running EmberEquine
software via Wi-Fi. Cine Loops cannot be sent via Wi-Fi.
32 4VetJ Ultrasound Scanner User’s Manual
Page 37

Manage saved images and cine loops using the following
functions:
[Load] – Loads the image or cine loop to the basic panel
[Filter] – Switches on the search by name function
[Select all] – Selects all of the images from the list
[Unselect all] – Deselects all of the images from the list
[Send Image Wi-Fi] - Sends images and records to a Mesa
2 (communication and software must be set up rst)
[Send USB] – Allows data to be exported to external
data storage media (the button is activated as soon as
external memory is connected to the scanner)
[Edit] – Allows editing of the description and patient data
associated with the saved image
[Delete] – Deletes the selected image from the computer
memory
[Close] – Returns to scanning
Quick Filtering of Saved Data
You can change the order of the les displayed in the
list of images or cine loops by name, surname, date,
or description. Press on the title of the eld you want to
change. If you select Surname, for example, data are
displayed in alphabetical order on the basis of the patients’
surnames. Press on the same eld again and the entries are
shown in reverse order.
Send Image to the Mesa 2 Via Wi-Fi (Option)
This function allows you to transfer images and records (not
cine loops) from the 4VetJ to the Mesa 2 Rugged Tablet. You
need to have an EmberEquine solution to do this. For details
on how to set up Wi-Fi and make a transfer. refer to the
EmberEquine manual located on the Mesa 2 in the Ember
Help folder tile located in the Windows Start menu or on our
website at www.junipersys.com/emberequine/support.
Export Data to External Storage Media
Images and cine loops can be transferred to a USB storage
media like a thumb drive or external hard drive. Follow
these steps:
1. Connect the storage media to the 4VetJ’s USB port.
Chapter 2 4VetJ Settings and Functions 33
Page 38

2. On the basic panel press the [Open Image] or [Open
Cine] button.
3. A screen with a list of the saved images or cine loops is
shown (see previous graphic).
4. To select an image, go to the rst column, Name, and
press on the box next to the name of the item you want
to export. A check mark appears next to the selection.
Press the [Send USB] button. A window showing export
progress is shown.
5. When exporting nishes, choose one of these options:
a. [Close] – Closes the window, but does not
disconnect the external memory, so further
exporting is possible.
b. [Close and eject] – closes the window and allows
you to safely disconnect the external memory from
the system.
Notice: When exporting les, the system creates a folder
called“BF32 save” on the external drive along with a folder
with the date exporting occurred. Separate folders are
created for exported images and cine loops.
Export Images and Cine Loops into DICOM les
You can export data into DICOM les. From the basic panel
press the [Settings] button, then the /DICOM/ tab.
Press either the [Save USB cine in DICOM] or [Save USB
image in DICOM] button. Going forward, data is exported
onto USB storage devices in a DICOM le format.
Patient Data Function
You can enter data into the patient record before
an examination starts. All the data that is entered is
automatically assigned to the saved images and cine
loops.
34 4VetJ Ultrasound Scanner User’s Manual
Page 39

Press the [Patient] button from the basic panel. The
following dialogue box with a virtual keyboard is shown.
Enter the desired patient data.
The [Save] button saves your information and [Cancel]
deletes it.
By selecting the option [Always ask about patient’s data],
this dialogue box appears every time you save an image
or cine loop. If this option is not selected, this dialogue
box does not appear and saved images are attributed to
previously entered data.
Importing Data From the DICOM the Modality Work List
Open the patient record by pressing on the [Patient] button
on the basic panel. Press /Dicom MWL/. The Modality Work
List with patients expecting to be examined opens. Select a
particular patient on the list, and press [Load].
Note: To import patient data from the Modality Work List,
the scanner has to be congured correctly to work with a
DICOM printer. See DICOM under Advanced Settings later
in this chapter.
Chapter 2 4VetJ Settings and Functions 35
Page 40

Needle Echo Enhancement Tool
This function is only available when a linear probe is
connected. It enhances the echo of the needle in a
patient’s body. This function is useful with the “in plane”
method.
In order to activate this option, press [Needle OFF]. The
button changes its name into [Needle in plane right]. The
ultrasound beam steers to the right side of the imaging
sector. This option improves the visibility of the needle
inserted from the right side of the image.
Pressing the button again activates the option [Needle
in plane left], which improves the visibility of the needle
inserted from the left side of the image.
To switch this function off, press [Needle in plane left]. The
button changes to [Needle OFF].
Full Screen
This function hides the control panel and the mode panel,
allowing the image to ll the full screen. Press the [Full
screen] button on the basic panel.
In full screen mode you can:
Use active elds of gain, focus and depth of scanning
Change gamma settings
Freeze an image
Save images and cine loops
Perform measurements
Printing Images
To print images, you need to install the proper printer drivers.
The scanner has default printer drivers for a Mitsubishi P95D.
If multiple printers have been set up to use with the scanner,
select a printer from the list before printing.
36 4VetJ Ultrasound Scanner User’s Manual
Page 41

Printing During the Examination
To print an image during the examination, freeze the image
and then press [Print] from the basic panel.
In the right bottom corner of the screen a window with print
preview appears.
Press [Print] in the print preview window to print the image,
or [Clear] to decline printing.
Printing Saved Images
To print the previously saved image, upload it on the screen
then press [Print].
In the right bottom corner of the screen a window with print
preview appears.
Press [Print] to print the image or [Clear] to decline printing.
Printing Multiple Images on One Sheet
You can print up to four images on one sheet of paper by
following these steps:
Freeze the image -> press [Print] -> unfreeze the image
and continue the examination -> freeze the image -> press
[Print]. Repeat this activity until a relevant number of images
appear in the print preview window. When you are ready,
press the [Print] button located in the print preview window.
Presets
Presets Activation
The 4VetJ scanner has presets for the liver, kidneys,
abdominal cavity, aorta, thyroid gland, supercial
blood vessels, lungs, musculoskeletal system and hips
examinations.
To activate preset, press the [Presets] button on the basic
panel. A list of available presets appears. Press on the
desired preset name, and the preset is activated.
You can also activate presets from the Preset Management
window using the [Load preset] button.
Chapter 2 4VetJ Settings and Functions 37
Page 42

Saving Presets
This function lets you save your favorite settings under the
user name. It can also be used to save optimal settings for
examination of a particular organ.
To add a new preset, rst optimize the settings of the
scanner (gain 1 and 2, frequency, depth of scanning,
focus, zoom and gamma). Then press the [Presets] button
and select [Manage presets]. A dialogue box appears for
adding, deleting, editing and switching on presets.
On the right side of the window, the current settings of the
scanner appears. To save it, press [New preset]. A window
appears where you can enter the name of the preset. Press
[OK]. The preset is saved and appears on the list in the
Manage Presets window.
To delete the preset, open the Manage Presets window and
select the name of the preset, then press [Delete preset].
38 4VetJ Ultrasound Scanner User’s Manual
Page 43

Settings
You can perform extra functions in [Settings]. Press the
[Settings] button on the basic panel. The row of tabs shown
vertically along the left side provide the options that follow.
Look
In the /Look/ tab there are tools used to modify the
appearance of the basic panel.
Select or deselect the following options by pressing on the
button before the option or from a list:
Averaging frames
Tool panel on right
Invert left
<->
right, Invert up <-> down (changing
orientation of the image up-bottom, right-left; change of
the image orientation is signalled by moving the marker
which corresponds to the marker on the probe)
Show mouse cursor
Full screen
Lock Settings PIN
Enable option “one button” to save and load les
Chapter 2 4VetJ Settings and Functions 39
Page 44

Language: select from the pull-down list
Probe: select from a list of probe options
Postprocessing on or off
Postprocessing Level- or Level+
Skin options: Select Color background (Color light, Color
dark), Theme name, and Theme default
Enable Option “One Button” to Save and Load Files
When this option is activated, the buttons [Load image]
and [Load cine] change their function depending on the
probe’s activity.
During an examination, the buttons load an image or cine
loop.
When an image or cine loop is frozen, the same buttons
save the image or the cine loop.
On the tool panel, buttons for [Print] and [Quick save] are
available.
[Quick save] is used to save a frozen image directly onto
external memory storage like a USB drive.
Postprocessing
Turn this on for speckle reduction, contrast enhancement,
and edge sharpening. You can adjust it with the Level- and
Level+ buttons.
Clinic
The /Clinics/ tab on the right side of the appearance
settings screen lets you enter the name of the practice or
the doctor’s name. The name appears on the basic panel
in the upper information bar above the image window.
Info
The /Info/ tab shows information about the software,
hardware, network, and license. The following functions can
also be performed:
Update the software of the scanner
Select the printer from the list of connected printers
40 4VetJ Ultrasound Scanner User’s Manual
Page 45

Select the style of name creation for the les exported to
external memory storage
Reset the ultrasound scanner system
Update the Scanner Software
Over time, the 4VetJ software could be updated. We
recommend that you use updates that are tested by us to
avoid potential problems. Follow these steps:
1. The 4VetJ software update that was last tested is listed
on our website at: www.junipersys.com/emberequine/
downloads.
Example: February 2018 4VetJ software update 116
2. To see which software version is currently running on
the 4VetJ, On the 4VetJ, press [Settings]. On the Settings
screen, press the /Info/ tab.
3. An update screen appears.
The software version loaded on the 4VetJ is shown at the
top. Example: Update 4VetJ Last ofcial version: 116
4. If this number matches the number shown in step 1, no
update is needed. If a lower number is shown, you can
update the software.
5. Connect the 4VetJ to the internet using Wi-Fi or connect
a LAN cable to the socket on the scanner.
6. Press /Select version/ as shown in step 3. A list of
software versions available is shown. Select the version
you want to update to, then press /Update selected
onLine/ at the top of the screen.
7. The system starts loading the update. After the software
is loaded, the new version is automatically installed.
Wait until the software starts before you do anything.
Chapter 2 4VetJ Settings and Functions 41
Page 46

Select a Printer
If drivers are installed for more than one printer, select the
printer you are going to use. Select the /Info/ tab. In the eld
“Set printer” select the printer connected to the scanner
from the pull down list.
If you want to be asked which printer to use before each
printing, in the eld “Set printer” select “Select printer while
printing.”
Selection of Name Creation Style of the Exported Files
The system automatically gives names to exported les.
By default les are named in accordance with the date of
the examination, e.g. 20140112_14081415837, where 20140112
is a date, and 14081415837 is the time.
File names can be set up in the following styles:
<Date_Time>
<Date_Time><Surname><Name>
<Date_Time><Name><Surname>
<Date_Time><Surname><Name><Description>
<Date_Time><Name><Surname><Description>
To select the style of name creation of the exported les,
press [select the /Info/ tab. In the eld “Save lename
format” select the desired format for names from the
pull down list. The scanner saves the settings for the style
automatically.
Time
Press [Settings]. The /Time/ tab is used to update the date
and time for the system.
Press [Set Date and Time] to enter the current date and
time.
Display
In the /Display/ tab there are options to set the brightness of
the display and calibration of the touch panel.
42 4VetJ Ultrasound Scanner User’s Manual
Page 47

Touch Panel (Touchscreen) Calibration
The 4VetJ touchscreen has a default calibration.
If the system malfunctions, it is possible that the touchscreen
has become uncalibrated. You can suspect that this is the
case if the accuracy is low when a measurement is made,
for example.
To calibrate the panel, enter the Settings menu and choose
the /Display/ tab. Press the [Calibration touch panel]
button.
The system shows the message: “Do you want to allow this
app to make changes to your device?.” Follow these steps:
1. Press [Yes]. A window with the touch panel settings is
shown.
2. A Touch Panel Device List is shown. On the left of the
window, buttons for Device Addition, Basic Setting,
Touch Setting, Mouse Setting, and Tool Setting are
shown. List Update, and Monitor conguration options
are shown beneath the Device List. Select the bookmark
[Basic settings] on the left of the window.
3. In the section “Calibration” press the button [4Point].
4. The software shows four points in a sequence, which
should be touched in the middle.
5. When the last point is touched, an [OK] button appears.
Press it to end calibration.
6. Close the calibration software by pressing [Exit] in the
bottom left corner of the window.
Audio
The /Audio/ tab is used to set the level of the sound volume.
To test the level of sound volume, press [Test Doppler].
Measurements
The /Measures/ tab is used to modify the list of the displayed
parameters in the Aging tables.
To stop displaying these measurement, deselect the eld.
Chapter 2 4VetJ Settings and Functions 43
Page 48

DICOM
The /DICOM/ tab lets you congure and save information
regarding a DICOM printer, MWL, and storage. See the
details that follow.
DICOMPrinterConguration
In the DICOM Printer section, enter the following
information:
Host – name of the DICOM server that the printer is
connected to
Port – the port number on the DICOM server that the
scanner is to be connected to
AET – name of the service on the DICOM server (this eld
can be empty, unless the service name is not directly
determined on the server.
Once the information is entered, press the “Enable DICOM
printer” option. Conrm the entered changes with the [Save
DICOM Settings] button at the bottom of the screen.
DICOMModalityWorklistCongurations
In the DICOM Modality Worklist (MWL) section, enter
information similar to DICOM Printer Conguration.
In the eld “Codepage” select the code served by the
DICOM server from the pull down list. You must get this
information from your DICOM service provider.
Once the information is entered, press the “Enable Modality
Worklist” option. Conrm the entered changes with the
[Save DICOM Settings] button at the bottom of the screen.
DataStorageConguration
In the DICOM Storage section, enter the same information
you entered in the DICOM Modality Worklist (MWL) section.
Once the information is entered, press the “Enable DICOM
Storage” option. Conrm the entered changes with the
[Save DICOM Settings] button at the bottom of the screen.
44 4VetJ Ultrasound Scanner User’s Manual
Page 49

Wi-Fi
The /Wi-Fi/ tab displays information about hosted network
Wi-Fi (portable Wi-Fi hotspot) with options to start, stop, set
up passwords, and auto start. A list of available Wi-Fi access
points is also shown that you can connect to, disconnect
from, or forget. Auto connect can be selected.
Note: Details on how to use Wi-Fi to link the 4VetJ with a
Mesa 2 running EmberEquine software are given in the
EmberEquine manual, which is available on the Mesa 2
in the Ember Help folder tile located in the Windows Start
menu. It is also located on our website at www.junipersys.
com/emberequine/support.
Chapter 2 4VetJ Settings and Functions 45
Page 50

Troubleshooting
Problem Basic Check
The 4VetJ
ultrasound won’t
start when I push
the on/off button.
The device starts,
but the operating
system does not
start
The proper image
is not shown or the
image is disturbed
If you are operating it with the
battery, verify that the battery
reached a full charge before
operation.
If you are using the AC power
supply, check the cable and make
sure it is property connected to
a wall outlet and the 4VetJ. The
red battery LED should be on. You
can also try disconnecting the unit
from external power and powering
it on using battery power.
See if an external storage device
like a USB ash drive is connected
to the USB port. If a device is
connected, disconnect it, switch
the 4VetJ off, and switch it on
again.
If you are running on battery
power, plug in the AC power
supply. The battery could be
deeply discharged.
Make sure that the probe is
properly connected to the unit.
Disconnect and connect it again.
Make sure that the probe
connector lock is in the vertical,
locked position.
The probe type should be
recognized automatically by the
system. See if the probe symbol
and number on the information
bar on the display corresponds
to the symbol and number on the
connected probe.
46 4VetJ Ultrasound Scanner User’s Manual
Page 51

Problem Basic Check
The image is too
bright or too dark
Check the level of gain and
gamma and make sure that they
are set correctly.
There are visible,
moving spots on
the image
If you are running the 4VetJ on
battery power, try running it using
the AC power supply.
If you are running the 4VetJ using
the AC power supply, try plugging
the power supply into another
socket or unplug the AC power
supply and run the 4VetJ on
battery power.
The charge
indicator does not
come on when the
AC power supply is
plugged in
Check the AC power supply. Make
sure the cords, the connector that
goes into the 4VetJ, and the power
plug that goes into the wall socket
are in good condition.
Make sure that the wall outlet
works. Try a different outlet.
The 4VetJ only runs
for a short amount
of time when using
battery power
The battery might not be fully
charged. Make sure that the green
battery LED on the 4VetJ comes on
before unplugging the unit from
the AC power supply.
The operating environment
temperature is too low. The
operating temperature range is:
+50°F to +113°F (+10°C to +45°C).
A message on
the screen says
“Probe OFF” which
is disturbing an
examination
Make sure that the probe is
properly connected to the unit.
Disconnect and connect it again.
Make sure that the probe
connector lock is in the vertical,
locked position. The message
“Probe ON” should appear.
Chapter 2 4VetJ Settings and Functions 47
Page 52

Problem Basic Check
Messages on
Turn the device off and on again.
the screen are
disturbing an
examination
The 4VetJ casing,
elements, probe,
or connecting
cables could
Perform a thorough visual
inspection, then contact our
service department and follow
their recommendations.
have mechanical
damage
If none of the basic activities solves the issues you are
having or other problems appear, contact our service
department (see Appendix B, Warranty and Repair
Information for details).
48 4VetJ Ultrasound Scanner User’s Manual
Page 53

Clean, Store,
Transport, and
Recycle
AAPPENDIX
Page 54

Clean, Store, Transport, and Recycle
Follow the instructions in this chapter to properly clean,
store, transport, and recycle the 4VetJ and components.
Clean and Disinfect
The 4VetJ and probe should be cleaned and disinfected
before each use and before they are stored, transported,
or sent to our service department for servicing or repairs.
They can get contaminated while being used, including by
infectious agents.
CAUTION: The 4VetJ is not waterproof. During wet cleaning
!
and disinfecting, be cautious and pay special attention to
openings like the connector and battery charging ports
and the probe socket. The device should be powered
off and unplugged during a thorough cleaning and
disinfecting. Use an agent approved to disinfect medical
devices. The personnel performing disinfection on the
equipment should wear protective gloves and clothes.
4VetJ Ultrasound Scanner
Clean the body of the 4VetJ after use with a soft cloth or a
paper towel using warm water or a mild cleaning solution to
avoid mechanical damage.
The surface of the device should be disinfected with an
agent approved to disinfect medical devices. Foam or
spray agents are recommended,
After wet cleaning or disinfecting of the 4VetJ, dry it with a
soft cloth.
Touchscreen
When you clean or disinfect the touchscreen, it is important
to use substances that will not damage the surface of the
screen. Use a soft cloth and avoid rubbing it with anything
abrasive that could scratch it.
50 4VetJ Ultrasound Scanner User’s Manual
Page 55

Probe
Clean and disinfect the probe before each examination.
The probe and cord are waterproof. The probe connector
(which attaches to the probe socket) is not waterproof,
so use caution when you are cleaning or disinfecting the
probe and cord to avoid getting the probe connector wet.
Do not scrub the head of the probe. Clean it gently with
an approved substance, warm water, or a mild cleaning
solution. Do not use concentrated, aggressive, or abrasive
agents or substances like alcohol or bleach that could
permanently damage the head of the probe.
Store
To store the 4VetJ and components when they are not
in use, charge the battery pack at least 50% or keep it
plugged into AC power using the power supply provided
with the 4VetJ. Store it in a cool, dry location away from
dirt or moisture and where the touch panel, probe socket,
probe connector, and probe are not damaged. The
storage temperature range is +41°F to 113°F (+5°C to +45°C).
If the 4VetJ is not charged while it is powered down and the
battery is discharged, the unit turns off.
Note: Data and programs are secure as long as they have
been saved, even if the battery pack becomes discharged.
The 4VetJ does not depend on the battery to store data for
extended periods.
Charge the 4VetJ before you use it after a storage period.
Transport or Ship
Before transporting or shipping the 4VetJ and components,
they must be protected against damage. The carrying case
offers protection when it is properly packed and securely
closed and latched.
Special protection is required for the ultrasound probe and
the touchscreen. Protect them from impact, pressure, or
abrasive substances that could cause damage.
Appendix A Clean, Store, Transport, and Recycle 51
Page 56

Make sure that nothing is touching the touchscreen during
shipping (except for the protective case). Put the stylus in
the holder on the 4VetJ and place the stylus tether where it
won’t touch the screen.
Make sure that the 4VetJ is turned off.
Attach the probe to the 4VetJ and lock it. Wrap the cord
around the probe cord wrap.
Note: Some probes might not t into the shipping container
when stored around the cord wrap. They can be removed
and placed in the accessory slots inside the case.
WARNING! The 4VetJ cannot be shipped on a commercial
!
airline. The internal Li-Ion battery is 259Wh, which is greater
than what is allowed by TSA or airline regulations. You must
ship it using a ground carrier.
Recycle
When the 4VetJ and the AC power supply are no longer
usable, they must not be disposed of with municipal waste.
It is your responsibility to dispose of your waste equipment
by handing it over to a designated collection point for the
recycling of waste electrical and electronic equipment.
Inform them that there is an internal Li-Ion battery pack
inside the 4VetJ.
52 4VetJ Ultrasound Scanner User’s Manual
Page 57

BAPPENDIX
Warranty and Repair
Information
Page 58

Warranty and Repair Information
Limited Product Warranty
Two Year Warranty
Juniper Systems, Inc. (“JS”) warrants that the Draminski
4VetJ Ultrasound Scanner, internal battery, and probe shall
be free from defects in materials and workmanship, under
normal intended use, for a period of 24 months from the
date of shipment.
Ninety Day Warranty
JS warrants that accessories shall be free from defects in
materials and workmanship, under normal intended use, for
a period of ninety (90) days from the date of shipment:
Warranty Exclusions
This warranty shall not apply if:
(i) the product has been set up improperly or has been
improperly installed or calibrated,
(ii) the product is operated in a manner that is not in
accordance with the user documentation,
(iii) the product is used for a purpose other than for which it
was designed,
(iv) the product has been used in environmental conditions
outside of those specied for the product,
(v) the product has been subject to any modication,
alteration, or change by or on behalf of customer (except
and unless modied, changed or altered by JS or under
direct supervision of JS),
(vi) the defect or malfunction results from misuse or
accident,
(vii) the serial number on the product has been tampered
with or removed, or
(viii) the product has been opened or tampered with in any
way
54 4VetJ Ultrasound Scanner User’s Manual
Page 59

Parts that are excessively worn are not covered under
warranty. These may include, but are not limited to, the
touchscreen.
This warranty is exclusive and JS will not assume and hereby
expressly disclaims any further warranties, whether express
or implied, including, without limitation, any warranty as
to merchantability, tness for a particular purpose, non-
infringement or any warranties arising from the course of
performance, dealing, or usage of trade. JS specically
makes no warranties as to the suitability of its products for
any particular application. JS makes no warranties that
Its products will meet your requirements or will work in
combination with any hardware or products provided by
third parties
The operation of its products will be uninterrupted or error
free
All defects in the product will be corrected.
JS shall not be responsible for software, rmware,
information, or memory data contained in, stored on,
or integrated with any products returned to JS for repair,
whether under warranty or not.
Remedy
In the event a defect in materials or workmanship is
discovered and reported to JS within the specied warranty
period, after evaluation by a technician at a certied repair
center, JS will, at its option, repair the defect or replace the
defective part or product. Replacement products may be
new or reconditioned. JS warrants any replaced or repaired
product for a period of ninety (90) days from the date of
return shipment, or through the end of the original warranty
period, whichever is longer.
Appendix B Warranty and Repair Information 55
Page 60

Limitation of Liability
To the fullest extent allowed by law, the obligation of JS
shall be limited to the repair or replacement of the product.
JS shall in no event be liable for special, incidental, or
consequential, indirect, special or punitive damages of any
kind, or for loss of revenue or prots, loss of business, loss of
information or data, or other nancial loss arising out of or
in connection with the sale, installation, maintenance, use,
performance, failure, or interruption of any product. Any
responsibility and/or liability of JS shall, in connection with a
warranted product, be limited in the maximum amount to
the original purchase price.
Governing Law
This warranty is governed by the laws of Utah, U.S.A. and
excludes the United Nations Convention on Contracts for
the International Sale of Goods. The courts of Utah shall
have exclusive personal jurisdiction in case of any disputes
arising out of or in connection with this warranty.
Warranty Status
You can check the warranty status of the 4VetJ on our
website at www.junipersys.com/Juniper-Systems-Rugged-
Handheld-Computers/support/Warranty/Check-WarrantyStatus.
Warranty Repairs
Warranty information for the 4VetJ Ultrasound is located on
our website at http://www.junipersys.com/Juniper-Systems-
Rugged-Handheld-Computers/support/Warranty/StandardTerms-and-Conditions.
Standard repair orders and are valid for 30 days from the
date issued. If you will not be sending the product to us
immediately, please wait to request a repair until closer to
the time when you are ready to send us the product.
Services and Materials Provided Under Warranty
Analysis of problem by service technician
Labor and materials required to x defective parts
Functional analysis performed after repair
56 4VetJ Ultrasound Scanner User’s Manual
Page 61

Shipping costs to return device to customer
JS strives to provide full repair services for our products.
However, in some rare cases (depending on the repair
need), it may not be possible to perform a repair due to an
unforeseen discontinuation or lack of supplied parts from
third-party vendors. Our policy is that we will do what is best
and most benecial for our customers and company.
Repairs, Upgrades, and Evaluations
CAUTION: Do not attempt to repair the 4VetJ yourself. This
!
action voids the warranty.
We recommend that you have the service department
perform a technical review of the 4VetJ every two years to
help guarantee the safety of the patients (animals).
Information about repairs, upgrades, and evaluations is
located on our website at www.junipersys.com/Juniper-
Systems-Rugged-Handheld-Computers/support/Repairs/
Repair-Policies-Instructions. You can locate a repair center,
submit a repair order, check repair status, view terms
and conditions, get shipping instructions, and view lead
times. For warranty repairs, make sure you are within the
applicable warranty period.
Before returning a unit, please get permission by submitting
a repair order form on our website at www.junipersys.
com/design/junipersys/rma_request.php and waiting
for conrmation. An RMA is generated and shipping
instructions are sent to you. You can also contact a repair
center directly. Be prepared to provide the following
information:
4VetJ serial number) printed on the label on the back of
the unit)
Name and shipping address of company
Best contact method (phone, fax, email, cell/mobile)
Clear, highly-detailed description of the repair or
upgrade
Appendix B Warranty and Repair Information 57
Page 62

Credit card/ purchase order number and billing address
(for a repair or upgrade that is not covered by the
standard warranty or an extended warranty policy)
You must clean and disinfect the 4VetJ and probe before
returning them to our service department. Refer to
Appendix A, Clean, Store, Transport, and Recycle for details.
WARNING! The 4VetJ cannot be shipped on a commercial
!
airline. The internal Li-Ion battery is 259Wh, which is
greater than what is allowed by TSA or airline regulations.
You must ship it using a ground carrier. See Appendix A,
Transportation, Storage, Maintenance, and Recycling for
details on how to package and ship the 4VetJ.
58 4VetJ Ultrasound Scanner User’s Manual
Page 63

CAPPENDIX
Warnings,
Regulatory
Information, and
Licensing
Page 64

Warnings, Regulatory Information,
Licensing
Product Warnings!
!
Follow the warnings listed below to use the 4VetJ, battery,
and AC power supply safely. Please review additional
warnings shown towards the end of Chapter 1, Getting
Started.
4VetJ and Internal Battery Pack
The 4VetJ cannot be shipped on a commercial airline. The
internal Li-Ion battery is 259Wh, which is greater than what is
allowed by TSA or airline regulations. You must ship it using a
ground carrier.
The 4VetJ contains a lithium-ion rechargeable battery pack.
It is not user replaceable.
To reduce the risk of re or burns, do not disassemble, crush,
puncture, short external contacts, or expose the unit to re.
Do not disassemble or open, crush, bend or deform,
puncture or shred the unit.
Do not modify or remanufacture the unit, attempt to insert
foreign objects, immerse or expose to water or other liquids,
expose to re, explosion or other hazard.
Only use the unit with a charging system that has been
qualied with the system per this standard. Use of
unqualied components or accessories may present a risk
of re, explosion, leakage, or other hazard.
The battery must be replaced by a service center only with
another battery that has been qualied with the system.
Avoid dropping the unit. If it is dropped, especially on a
hard surface, and you suspect damage, send it to a service
center for inspection.
Improper battery use may result in a re, explosion or other
hazard.
60 4VetJ Ultrasound Scanner User’s Manual
Page 65

AC Power Supply
To reduce the risk of personal injury, electrical shock, re or
damage to the equipment, follow this information:
Only use the power supply provided with the 4VetJ. Using
other power supplies could be a re hazard as well as
damage the device and void the warranty.
Plug the AC power supply into an electrical outlet that is
properly grounded and easily accessible at all times.
Do not place anything on the AC power supply or any
of the other cables. Arrange them so that no one can
accidentally step on or trip over them.
Do not pull on a cord or cable. When unplugging the wall
charger from the electrical outlet, pull on the plug, not the
cord.
There are no user serviceable parts inside.
The input power plug is the disconnect device to remove
power.
This product is intended for continuous operation.
This product is not suitable for operation in the presence of
a ammable anesthetic mixture with air or with oxygen or
with nitrous oxide.
This product is not protected against the ingress of water.
To clean and disinfect the unit, wipe the surface with a cloth
slightly dampened with mild detergent or normal hospital
bactericides. Do not immerse the unit. Do not clean the unit
with isopropyl alcohol or other solvents.
CerticationsandStandards
United States
This device complies with Part 15 of the FCC Rules.
Operation is subject to the following two conditions:
The device may not cause harmful interference.
This device must accept any interference received,
including interference that may cause undesired
operation.
Appendix C Warnings, Regulatory Information, and Licensing 61Appendix C Warnings, Regulatory Information, and Licensing 61
Page 66

In compliance with the FCC rules, 47 CFR 15.105(b), the
user must be notied that this equipment has been tested
and found to comply with the limits for a Class B digital
device, pursuant to part 15 of the FCC Rules. These limits are
designed to provide reasonable protection against harmful
interference in a residential installation. This equipment
generates, uses and can radiate radio frequency energy
and, if not installed and used in accordance with the
instructions, may cause harmful interference to radio
communications. However, there is no guarantee that
interference will not occur in a particular installation. If this
equipment does cause harmful interference to radio or
television reception, which can be determined by turning
the equipment off and on, the user is encouraged to try to
correct the interference by one or more of the following
measures:
Reorient or relocate the receiving antenna.
Increase the separation between the equipment and
rece iver.
Connect the equipment into an outlet on a circuit
different from that to which the receiver is connected.
Consult the dealer or an experienced radio/TV
technician for help.
In compliance with the FCC rules, 47 CFR 15.21, the user
must be notied that changes or modications to the 4VetJ
that are not expressly approved by the manufacturer could
void the user’s authority to operate the equipment.
Only approved accessories may be used with this
equipment. In general, all cables must be high quality,
shielded, correctly terminated, and normally restricted
to two meters in length. Wall chargers approved for
this product employ special provisions to avoid radio
interference and should not be altered or substituted.
Radio Frequency Safety
This equipment complies with radiation exposure limits set
forth for an uncontrolled environment. This transmitter must
not be co-located or operating in conjunction with any
other antenna or transmitter.
62 4VetJ Ultrasound Scanner User’s Manual
Page 67

APPENDIX
Specications
D
Page 68

4VetJSpecications
Note: Specications are subject to change without notice.
FEATURE SPECIFICATION
Imaging Modes B, B+B, 4B, B+M
English, French, German, Spanish,
Brazilian Portuguese are built in;
other languages are available for
download
Probes and
Frequencies
Image
Management
Image
Adjustment
Presets Customizable
Grayscale 256 shades
Processing Speckle reduction
User Interface Languages: English, Spanish, French,
Convex, 2-8 MHz
Microconvex, 409 MHz
Linear, 50 mm, 5-10 MHz
Linear, 40 mm 5-14 MHz
Endorectal, 4-9 MHz
Dynamic focus
Image freezing
Zoom 50-300%, 20% per step
Full screen viewing
Gain 1 and 2
Frequency
Depth
Focus
Gamma
Frame averaging
Negative
Needle visualization enhancement
(linear probes)
Mare pregnancy and uterus
Equine tendons
Cat abdomen
Small/Medium/Large dog abdomen
Contrast enhancement
Edge sharpening
Arabic, Croatian, German, Korean,
Polish, Russian
64 4VetJ Ultrasound Scanner User’s Manual
Page 69

Measurements Basic: Area, distance,k elipse, grid,
stenosis, volume
Obstretric: Horse DC; horse DO; horse
DSG; sheep LLC; Lama DBP; Sow LCC;
cow DBP; cow LLC; small/medium
dog GS; dog BPD medium; cat>30
HD, BD, CRL, and GSD
Operating
Windows 10
System
Monitor and
Functions
Resistive touch panel
LCD display
Control
Memory and
Images
100 GB
Images and cine loops include
description, date, and patient data
Data Transfer
DICOM 3.0
Standard
Data Export Wi-Fi 802.11 b/g/n 2.4 GHz
USB
External Ports USB 3.0
USB 2.0
LAN
HDMI
Power Supply AC adapter
Input: 50-60Hz, 90-264 VAC
Output: 18V DC/5A
Li-Ion battery pack (not user
removeable), 14.4V, 259Wh, 18Ah
Operates 6+hours on one charge
Full charge in 5 hours, 70% charge in
3-4 hours
Low-battery indicator graphic
Led Indicators
Temperature
Specications
Operating Temperature: +50°F to
+113°F (+10°C to +45°C).
Storage Temperature: +41°F to 113°F
(+5°C to +45°C)
Appendix D Specications 65
Page 70

Components
Included
4VetJ ultrasound
Probe with cord wrap
Rechargeable Li-Ion battery pack
(internal)
AC Power supply
4-position tilt stand
Durable transport case
Stylus
66 4VetJ Ultrasound Scanner User’s Manual
Page 71

Index
Page 72

Index
A
AC Power Supply 5, 61
Active Fields 16
Area 23, 24, 65
Audio 43
B
Basic Panel 14
Control Panel 15
Mode Panel 15
Battery Charge Indicators 4, 7
Battery Pack 4, 5, 6, 60
Battery Charge Indicators 4
Battery Indicators 7
B+B Mode 15, 16, 17, 18, 23, 29, 64
C
Cardiology 27
CAUTION 5, 8, 10, 50, 57
Certications and Standards 61
Cine Loop 22, 31, 32
Cleaning 10, 49, 50, 51,
Clinic Information 40
Commercial Airline. 52, 58, 60. See also Shipping
Components, Standard 2
Connector Ports 3
Control Panel 15
D
Depth – 20
Depth + 20
DICOM 34, 35, 44, 65
Disinfecting 10, 11, 50, 51
Display 6, 10, 42, 43
Documentation 6
Draminski 2, 11, 54
E
Ellipse 23, 25
68 4VetJ Ultrasound Scanner User’s Manual
Page 73

Ember Equine Ultrasound Reproduction Solution
Microsoft Cloud 2
EmberEquine Ultrasound Reproduction Solution 2
EmberEquine Software 2
Mesa 2 Rugged Tablet™ 2
Ethernet Port 3
Exported File Names 42
External Storage Media 33
F
Favorite Settings 38
Focus - 20
Focus + 20
Focusing the Beam 20
Freeze 15, 22, 31, 36, 37
Full Screen 36
G
Gain Levels 19
Gamma 15, 21, 64
Gamma Level 21
Grid 22, 23
Gynecological and Obstetrical Measurements 25
H
HDMI Port 3
I
Image Parameters 19
Images 15, 19, 31, 32, 33, 34, 64
Indicators 7, 15, 47, 65
Info 40
Invert Colors 21
L
Length 23, 24
Look 39
Index 69
Page 74

M
Measurements 22, 25, 26, 30, 42, 65
Editing 30
Measures 22, 25, 43
Mesa 2 Rugged Tablet 2, 6, 33
Microsoft Cloud 2
Mode Panel 15
Modes 16, 18, 64
Mode 4B 16
Mode B 16
Mode B+B 16
Mode B+M 18
Mode M 18
Optimization 31
N
Narrowing 22, 23
Needle Echo Enhancement Tool 36
Negative Color 21
O
One Button Option 40
P
Patient Record 34
Penetration Depth 20
Positive Color 21
Postprocessing 15, 20
Prepare the Animal 11
Presets 37
Print 15, 37, 40
Printer 42
Probe Frequency 19
Probes 4, 51, 64
Attach or Remove a Probe 8
Probe Cord Wrap 9
Signal Frequency
Product Warnings 60
R
Radio Frequency Safety 62
70 4VetJ Ultrasound Scanner User’s Manual
Page 75

Recycle 52
Repairs 56, 57
S
Sa fe t y 11, 62
Save Favorite Settings 38
Scanner Software 41
Settings 39
Shipping 12, 51, 52, 57
Store 10, 49, 50, 51, 58
T
Time 42
Touch Panel 43
Touchscreen 2,6, 0, 43, 50, 51, 52, 55
Transport 10, 49, 50, 51, 58
Troubleshooting 46
U
USB Port 3
V
Volume 23, 29
W
WA R N I N G ! 11, 14, 52, 58, 60
Warranty 48, 53, 54, 56
Wi-Fi 15, 32, 33, 41, 45, 65
Z
Zoom 15, 17, 21, 64
Index 71
 Loading...