

Page 1
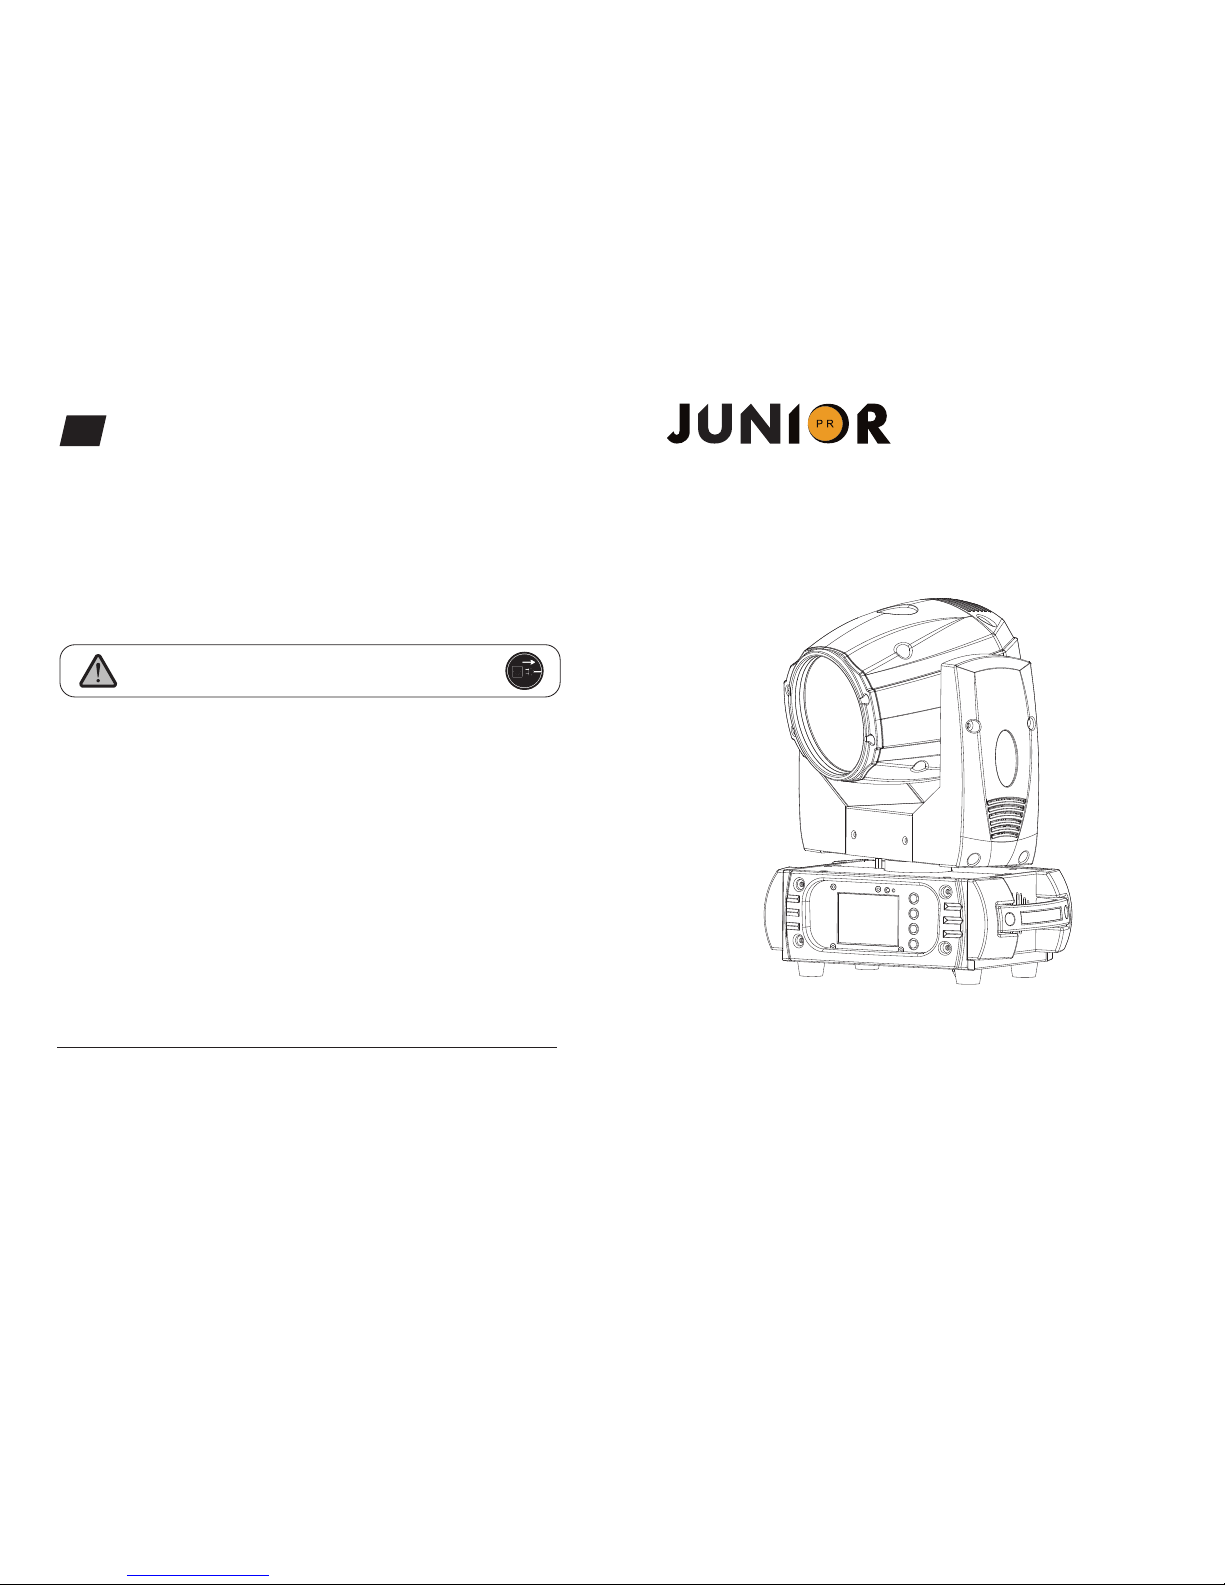
JNR 150L Wash
JNR-8153
PR LIGHTI NG LTD.
http:// www.p r-lighting.com
1582 Xing ye Avenue, Nancun Pany u
Guangzh ou, 511442 China
TEL: +86- 20-39 95 2888
The f ollow ing poi nts hav e to be co nside red dur ing th e insp ectio n:
1) Al l screw s for in stall ing the d evice s or parts of the d evice h ave to be t ight ly conn ected
and m ust not b e corro ded.
2) Th ere mus t not be a ny defo rmati ons on t he hous ing, co lor len ses, fi xatio ns and
ins talla tion sp ots (ce iling , suspe nsion , truss ing).
3) Me chani cally m oved pa rts m ust no t show a ny tra ces of w eari ng and m ust not r otat e with
unb alan ces.
4) The ele ctric power supp ly cables must not show any dam age, materia l fatig ue or sediments.
Fur ther i nstr ucti ons de pendi ng on the i nstal latio n spot an d usage h ave to be a dher ed by a
ski lled in stall er and an y safet y probl ems ha ve to be re move d.
In or der to m ake th e ligh ts in go od cond ition a nd exte nd the l ife tim e, we sug gest a re gula r
cle aning t o the li ghts.
1) Cl ean the i nside a nd outs ide len s each we ek to avo id the w eakn eness o f the li ghts d ue to
acc umula tion of d ust.
2) Cl ean the f an each w eek .
3) A de taile d elect ric che ck by app roved e lect rica l engin eer eac h three m onth , make s ure
tha t the cir cuit c ontac ts are in g ood co ndit ion, pr even t the po or cont act of ci rcui t from
ove rhea ting.
We re comm end a fr eque nt cle anin g of the de vice . Plea se use a mo ist, li nt- fre e clot h. Neve r
use a lcoho l or solv ents .
The re are no s erv icea ble pa rts i nsid e the de vice . Plea se refe r to the i nstr uctio ns unde r
“In stall ation i nstru ction s”.
Sho uld you n eed any s pare parts, p leas e order g enui ne par ts from your l ocal d eale r.
MAINTENANCE AND CLEANING
10
Di scon nec t from m ain s befo re sta rti ng mai nte nanc e ope rati on.
CAUTIO N
Page 2
.01 .
If the dev ice ha s been expo sed to t emperat ure ch anges due t o envi ronment al cha nges,
do not swi tch it o n immedia tely. T he ari sin g cond ensatio n could dam age th e device.
Leave th e devi ce switch ed off u ntil i t has re ach ed roo m temp erature .
This dev ice fa lls under p rote ction-c lass I . The refo re it is e ssentia l that t he de vice b e
earthe d.
The elec tric c onnecti on must car ry ou t by qualif ied pe rso n.
The devi ce sha ll only be us ed with rat e volt age and frequen cy.
Make sure t hat the ava ilab le voltag e is not h igher tha n stated at t he end o f this m anual.
Make sure t he power co rd is ne ver crimp ed or da maged by sh arp edges . If thi s would
be the cas e, rep lacemen t of the c able m ust b e done b y an author ized d eal er.
Always d isco nnect fro m the ma ins, when t he device i s not in u se or b efor e clea nin g it.
Only han dle th e power cor d by the p lug. Neve r pull o ut the plug b y tugging t he pow er
cord.
During i niti al start-up so me smoke or smell m ay ari se. T his is a n ormal process a nd
does not n eces sarily me an that the d evic e is de fect ive, it sho uld de crease gr adua lly.
Please d on't pr oject the b eam on to combus tibl e sub stan ces.
Fixtures can not be inst alle d on combus tible sub stan ces , keep m ore th an 50c m
distan ce wit h wall for sm ooth air fl ow, so there shoul d be no shelt er for f ans and
ven til atio n for heat ra diat ion .
If the ext erna l flexibl e cabl e or co rd of this lum inai re is damag ed, it s hal l be exc lusivel y
rep laced by th e manu fac ture r or his s ervice a gent o r a sim ilar q ualifie d person in o rder
to av oid a hazar d.
This dev ice ha s lef t the factory in p erfect co ndit ion . In ord er to ma intain th is
condit ion an d to ensure a safe op eration , it is ab sol utel y nece ssa ry fo r the us er to
follow t he saf ety instr uctions a nd war ning note s writ ten in this u ser manua l.
CAUTIO N
Bec aref ul with y our ope ratio ns.With a da ngero us volt age you c ansuf fer a
dan gerou s elec tric s hock w hen to uchin g wires !
IM PO RTANT
Dam ages ca used b y the di srega rd of thi s user ma nual ar e not sub ject t o warr anty.
The d ealer w ill not a ccept l iabil ity for a ny resu lting d efect s or pro blem s.
SAFETY INSTRUCTIONS
1
DMX CHANNELS
9
0-2 55
0-2 55
0-2 55
0-2 55
0-2 25
226 -235
236 -255
0-3 1
32- 63
64- 95
96- 127
128 -159
160 -191
192 -223
224 -255
0.2 55
0-2 55
0-2 55
0-2 55
0-2 55
0-1 9
20- 29
30- 39
40- 79
80- 89
90- 99
100 -119
120 -139
140 -159
160 -179
180 -199
200 -219
220 -239
240 -255
PAN mo veme nt
Fin e contr ol of PAN mo veme nt
For wards i nfini te PAN rot atio n fro m slow t o fast
TILT move men t
Max t o min spe ed
Bla ckout b y movem ent
No fu nctio n
Shu tter cl osed
Shu tter op en
Str obe eff ect sl ow to f ast
Shu tter op en
Pul se-ef fect i n seq uenc es slo w to fas t
Shu tter op en
Ran dom str obe eff ect sl ow to f ast
Shu tter op en
Dim mer 0%. ..100 %
0-1 00%Re d dimme r from da rk to bri ght
0-1 00%Gr een dim mer fro m dark to b right
0-1 00%Bl ue dimm er from d ark to br ight
0-1 00%Wh ite dim mer fro m dark to b right
No Fu nctio n
No Fu nctio n
No Fu nctio n
No Fu nctio n
All m otor re set
Sca n motor r eset
Int ernal p rogra m 1
Int ernal p rogra m 2
Int ernal p rogra m 3
Int ernal p rogra m 4
Int ernal p rogra m 5
Int ernal p rogra m 6
Int ernal p rogra m 7
Int ernal s ound ro gram 1
Mod e/CH
Valu es
Des cript ion
16b
1
2
3
4
5
6
7
8
9
10
11
12
PAN
PAN- fine
TILT
TILT- fine
Spe ed PAN/
TILT
Shu tter
Dim mer
Red
Gre en
Blu e
Whi te
Spe cial
fun ction
8b
1
2
3
4
5
6
7
8
9
10
Fun ction
.10 .
Page 3
Thank yo u for ch oosing ou r JNR 15 0L Was h. For your o wn saf ety, p leas e read t his
manual b efor e install ing th e device. T his manua l cove rs th e impo rta nt inform atio n
on insta llat ion and app licatio ns. Pl eas e inst all and ope rate t he fixtur e with f ollowin g
instru ctio ns. Meanw hile, ple ase ke ep thi s man ual we ll for futu re nee ds.
The is made of a new typ e of hig h temp erature s tren gth of
engine erin g plastic s and cast al umin um ca sing w ith nice ou tloo k. The fix ture i s
design ed and m anufact ured s trictly f ollowin g CE sta ndards, c ompl ying with
internatio nal stand ard DM X512 protocol . It’s av aila ble i ndep endentl y cont rolled
and link able w ith each ot her for ope rati on. And it is a pplicab le for l arge-sc ale li ve
perfor mances, t heat er, stu dio, nigh tclu bs and disc os.
The adopts 1 PCS 4- IN-1 150W L EDs which f eatu res high br ight nes s
and stab ilit y. Please ca refu lly unpack it whe n you re ceive the f ixtu re and chec k
whethe r it is da maged dur ing the tra nspo rta tion. And p lease che ck whe ther the
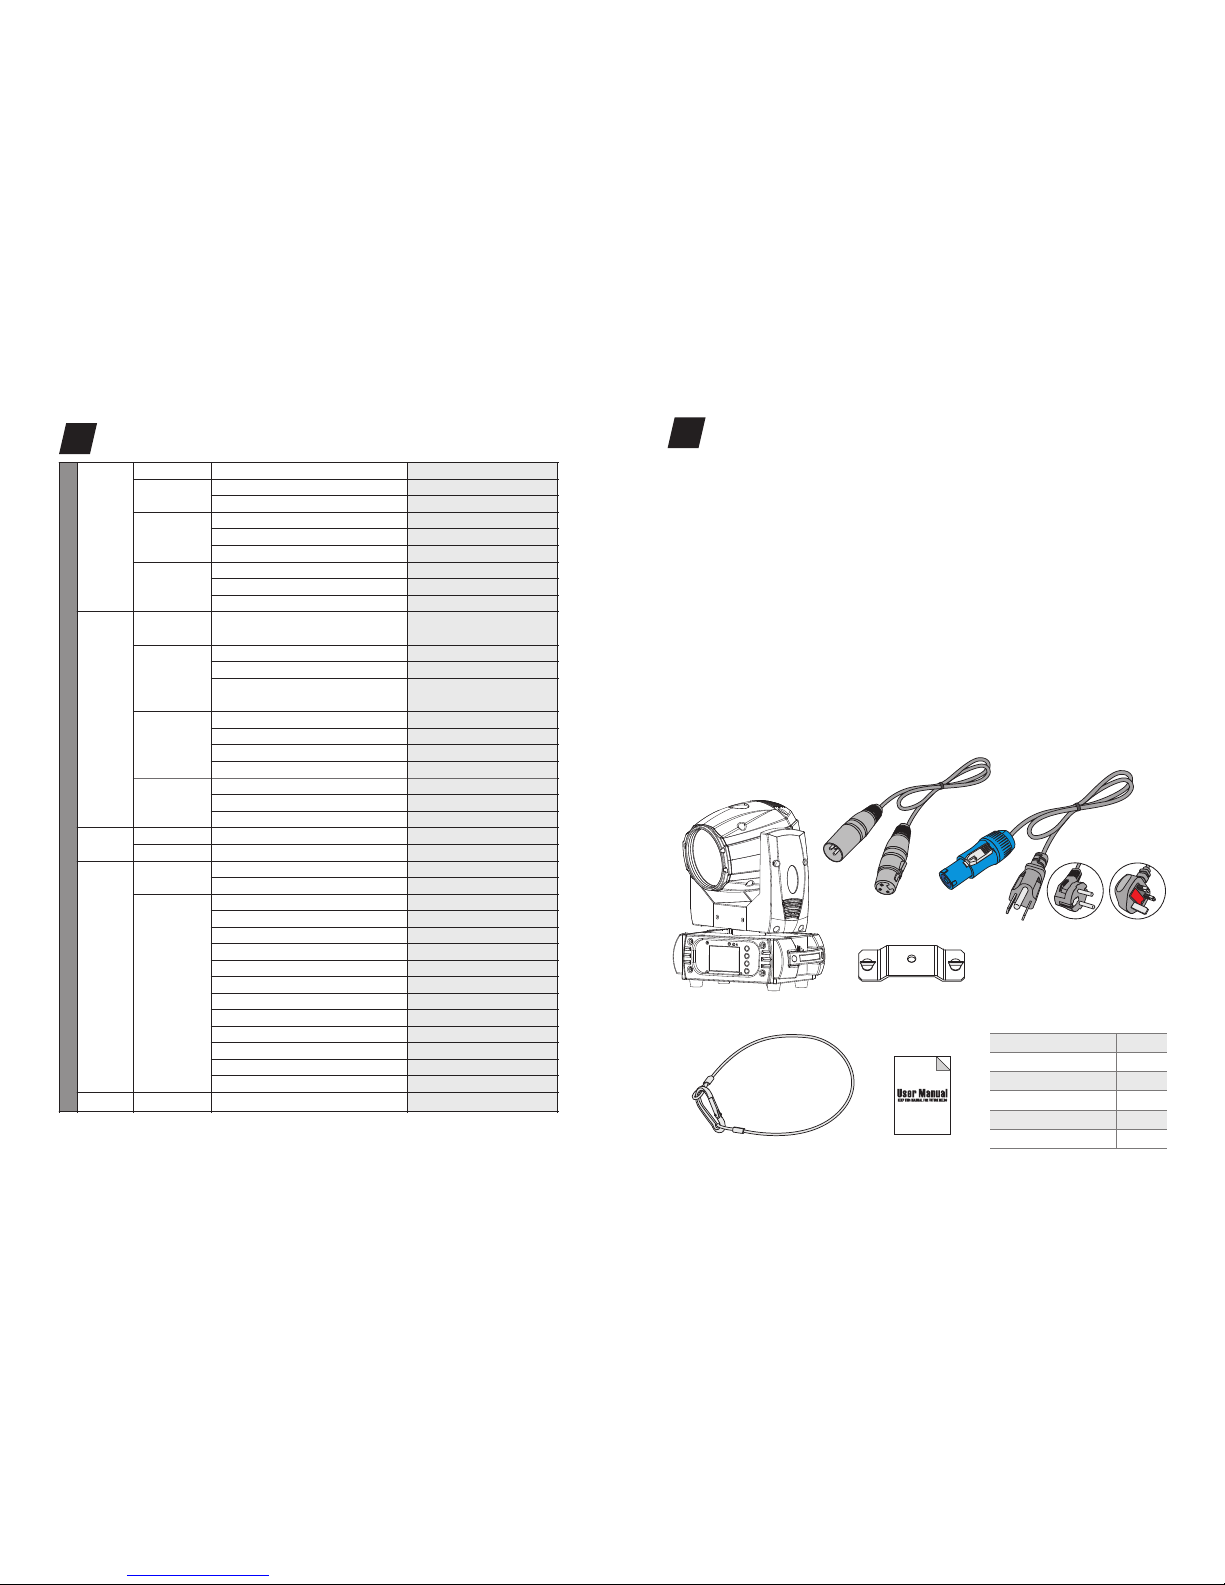
follow ing it ems are inc lude d inside th e box:
JNR 150L Wa sh
JNR 150L Wa sh
.02 .
UNPACKING
2
①
JNR 1 50L Was h
Sig nal Cab le
Power Cable
Ome ga Clam p
Saf ety Cab le
Use r Manua l
1PC
1PC
1PC
1PC
1PC
1PC
①
②
③
④
⑤
⑥
④
⑤
⑥
②
③
Euro Standard
UK Standard
USA Standard
OPT IONAL
.09 .
MENU OPERATIONS
8
001 -XXX
CH1 2
CH1 0
Pro gram 1~ 8
Alo ne
Mas ter
Yes/N o
Wir e DMX
Wir eless D MX
Act W DMX & Out
Rev erse Pa n (On/O ff)
Pro gram 1~ 8
Alo ne
Mas ter
Rev erse Til t (On/O ff)
Sel ect Pan 6 30°/540° / 360°
Sel ect Tilt 2 70°/180°/ 90°
Mic s ensit ivity 0 ~99%
OFF S ignal M ode (On /Off)
XXX℃/℉
V1. 0~v9. 9
Total R eset
Pan /Tilt Re set
PAN=X XX... ...
Pan
Pan F ine
Tilt
Tilt -Fine
Mov e Speed
Str obe
Dim mer
Gre en
Red
Whi te
Blu e
000 -255
Dmx Ad dress
Cha nnel Mo de
Aut o Run
Mus ic Cont rol
Res et Defa ult
Sig nal Set
Pan /Tilt
UI SE T
Tempe ratur e
Sof tware Ve rsion
Res et
Cha nnel
Cal ibrat ion
MEN U
Fun ction
Mod e
Opt ion
Inf ormat ion
Man ual
Con trol
ADVANC ED
(Acces s Code 08 8)
DMX a ddress s ettin g
Sta ndard ch annel
Vect or chan nel
Alon e Mode
Soun d Mode
Over loadi ng fact ory all
para mete rs
Wrie D MX Inpu t
Wrie less DM X Input
Wire less DM X input , Wire DM X
outp ut sign al at the s ame tim e
Pan sc an reve rse
Pro gram
Pro gram
Alon e Mode
Soun d Mode
Tilt s can rev erse
Pan an gle sel ect
Tilt a ngle se lect
Mic se nsiti vity Se tting
No DMX s ignal ,Keep t he orig inal
Stat e(No) Reset s tate
Cur rent tem perat ure
Soft ware ve rsion
Res et all
Pan/ Tilt re set
Cha nnel val ue cont rol
Pan
Pan Fi ne
Tilt
Tilt -Fine
Move S peed
Str obe
Dim mer
Gree n
Red
Whit e
Blue
Cali brati on Func tion
Page 4
.03 .
Specific ations
Input Vol tage :
LED Quan titi es:
Control Sign al:
Control Chan nel:
Power Con sumptio n:
Dimens ions :
Pac king D imensio ns:
Net Weigh t:
Gro ss Wei ght:
Fe atu res
AC9 0-260V 50 /60Hz
DMX512 ,mas ter-sla ve and s ound acti vate d or aut o operati on
10/12 DM X Chan nels USIT T DMX -512
135W
260(D) *150 (W)*348 (H)mm
345(D) *235 (W)*445 (H)mm
5.54kg
7.56kg
1*1 50W COB 4 -in-1 L ED(RG BW)
FEATURES & SPECIFICATIONS
3
A 150W COB 4-in- 1 LED la mp (RGBW)
50000 Ho urs li fe span and l ow pow er co nsum ption
8/1 6 Bit s moot h and preci se res olut ion f or PAN/ TILT mo vement
360°/5 40°/ 630° PAN and 90°/1 80°/ 270° TILT mov emen t
PAN/ TILT in ver sion a vail abl e
Scan pos itio n mem ory , auto r epos ition after unexpe cted m ovement
Specif ic hig h precisi on 26° optic len s inte gra ted in a a lum-oxidize d refl ector
Improved opt ics an d fla t beam f ield
Infini te col or mixing c apab ility (CM Y)
Pure and even co lor co verage
0-1 00% S moot h linear LE D dimmer
25T/se c high s peed LED sh utte r/strob e effe ct with var iabl e speed
Pre set va riable/ random st robe a nd dimmin g puls e eff ect
10/12 DM X chan nels USIT T DMX -512
DMX512 , mast er-slav e, and s ound acti vate d cont rollabl e or aut o operati on
(7 built -in pr ogra ms)
DMX recorder a nd edi t functio n inte grated
2.4 ” TFT LC D dis play ( 320*240 pix) w ith 4 c ontr ol but tons
Displa y inve rte d capa ble
POWRECON con nector IN /OUT
3-P in XL R conn ectors IN /OUT
Low nois e fan co oling sys tem
Consta nt tem perature read out an d managem ent funct ion
-35℃- 45℃ max ambie nt tem per atur e
IP20 protect ion ra ting
55dB at 3’dB rati ng
1*1/4 tu rn fas tening Om ega cl amp
1*S afe ty att achment p oint
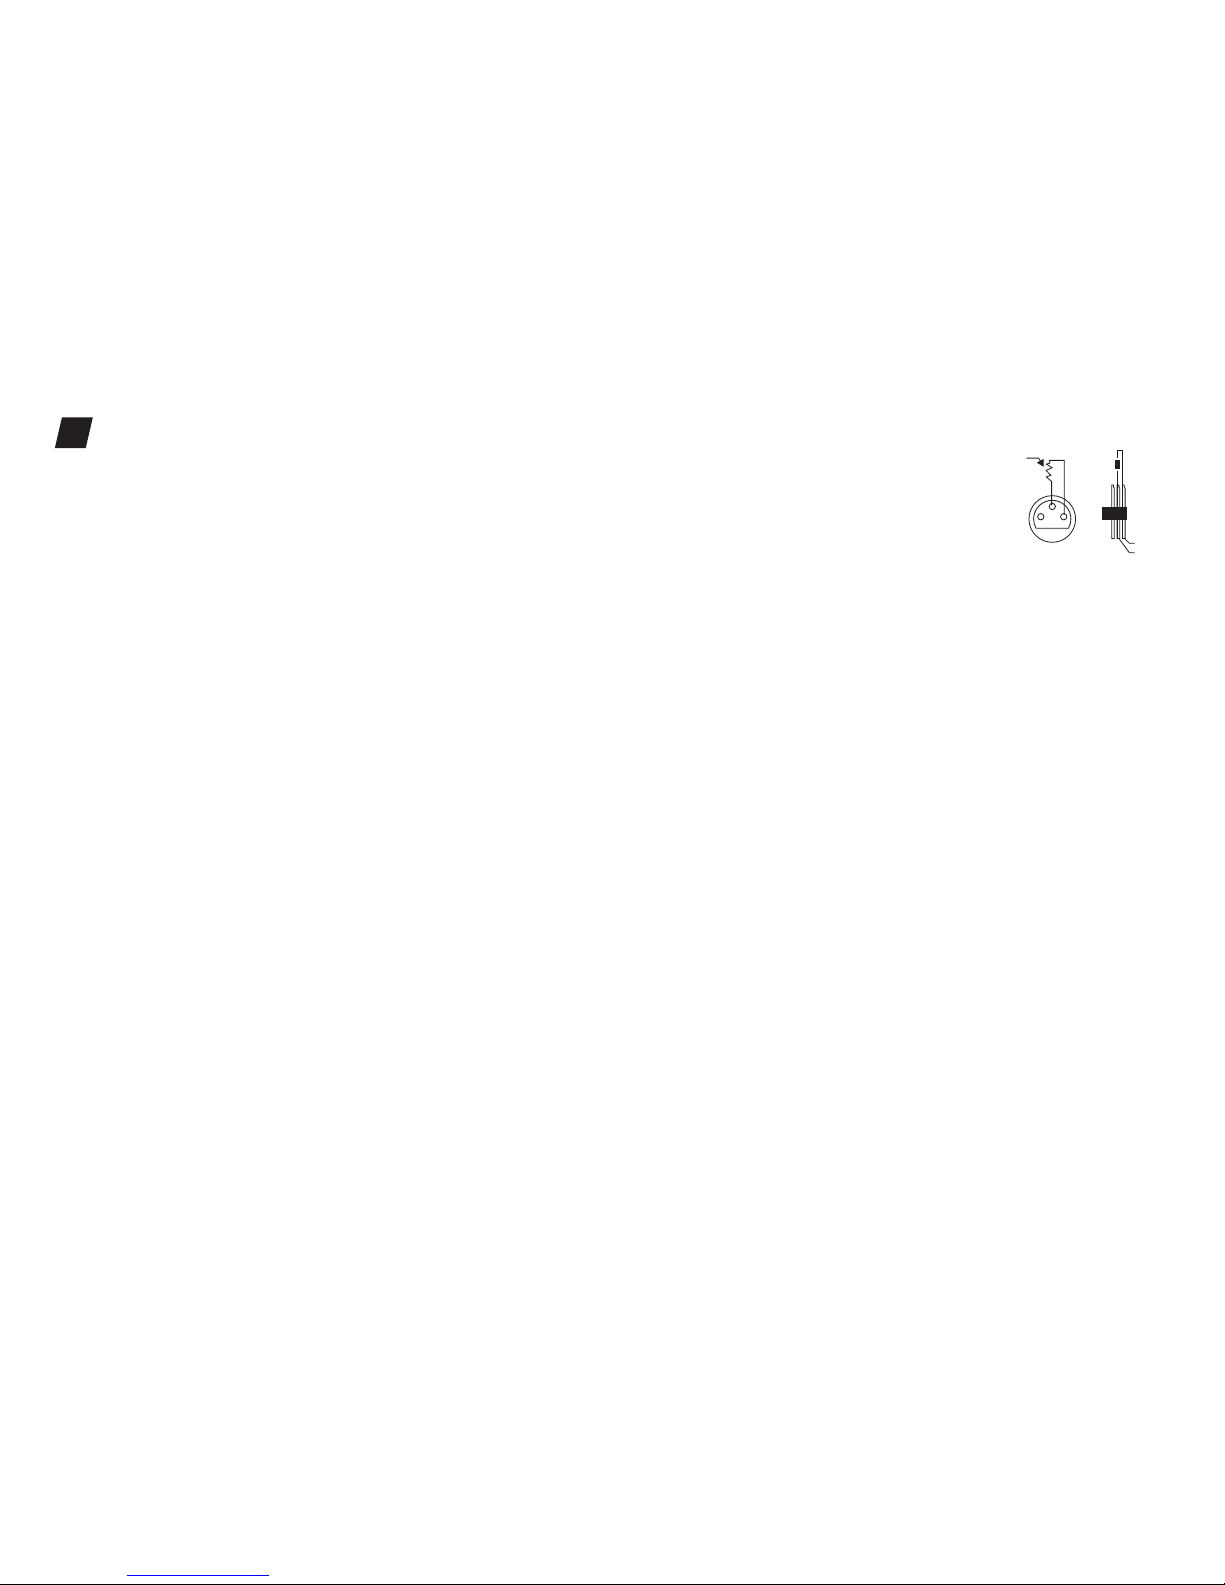
For inst alla tions whe re the D MX cable ha s to run a l ong
distan ce or is i n an electr ically no isy en vironme nt, su ch as
in a disco theq ue, it is rec omme nded to use a D MX
ter minator. Th is he lps in p reve nti ng cor ruption of the
digita l cont rol signa l by ele ctrical n oise. The D MX
ter minator i s simp ly an X LR plu g with a 120 Ω re sist or
connec ted be tween pin s 2 and 3, which is th en plugge d
into the o utpu t XLR socket of the last fi xture in the chai n.
Please s ee ill ust rati ons below.
1
2
3
PIN 3
PIN 2
120 Ω
•
•
•
•
•
•
•
•
•
•
•
•
•
•
•
•
•
•
•
•
•
•
•
•
•
•
•
.08 .
Page 5
.04 .
PHOTOMETRIC DATA
4
5°Beam Angle LUX 0.0929=FC×
Photometric Beam Angle Data
174 / 1870
27 / 297 7 / 77
1m (3 .3ft)
3m (9 .8ft) 5m (1 6.4ft )0m (0 ft)
(FC/LUX)
245 / 2640 41/ 440 9/ 93
245 / 2640
338 /4180
42 / 451
71 / 770
9/ 93
11 / 118
971 / 10450 169 / 1815 31 / 330
R
G
B
W
RGB W
26°
12 / 132
17/ 187
18 / 198
29 / 308
77/ 825
7m (2 3.0ft )
.07 .
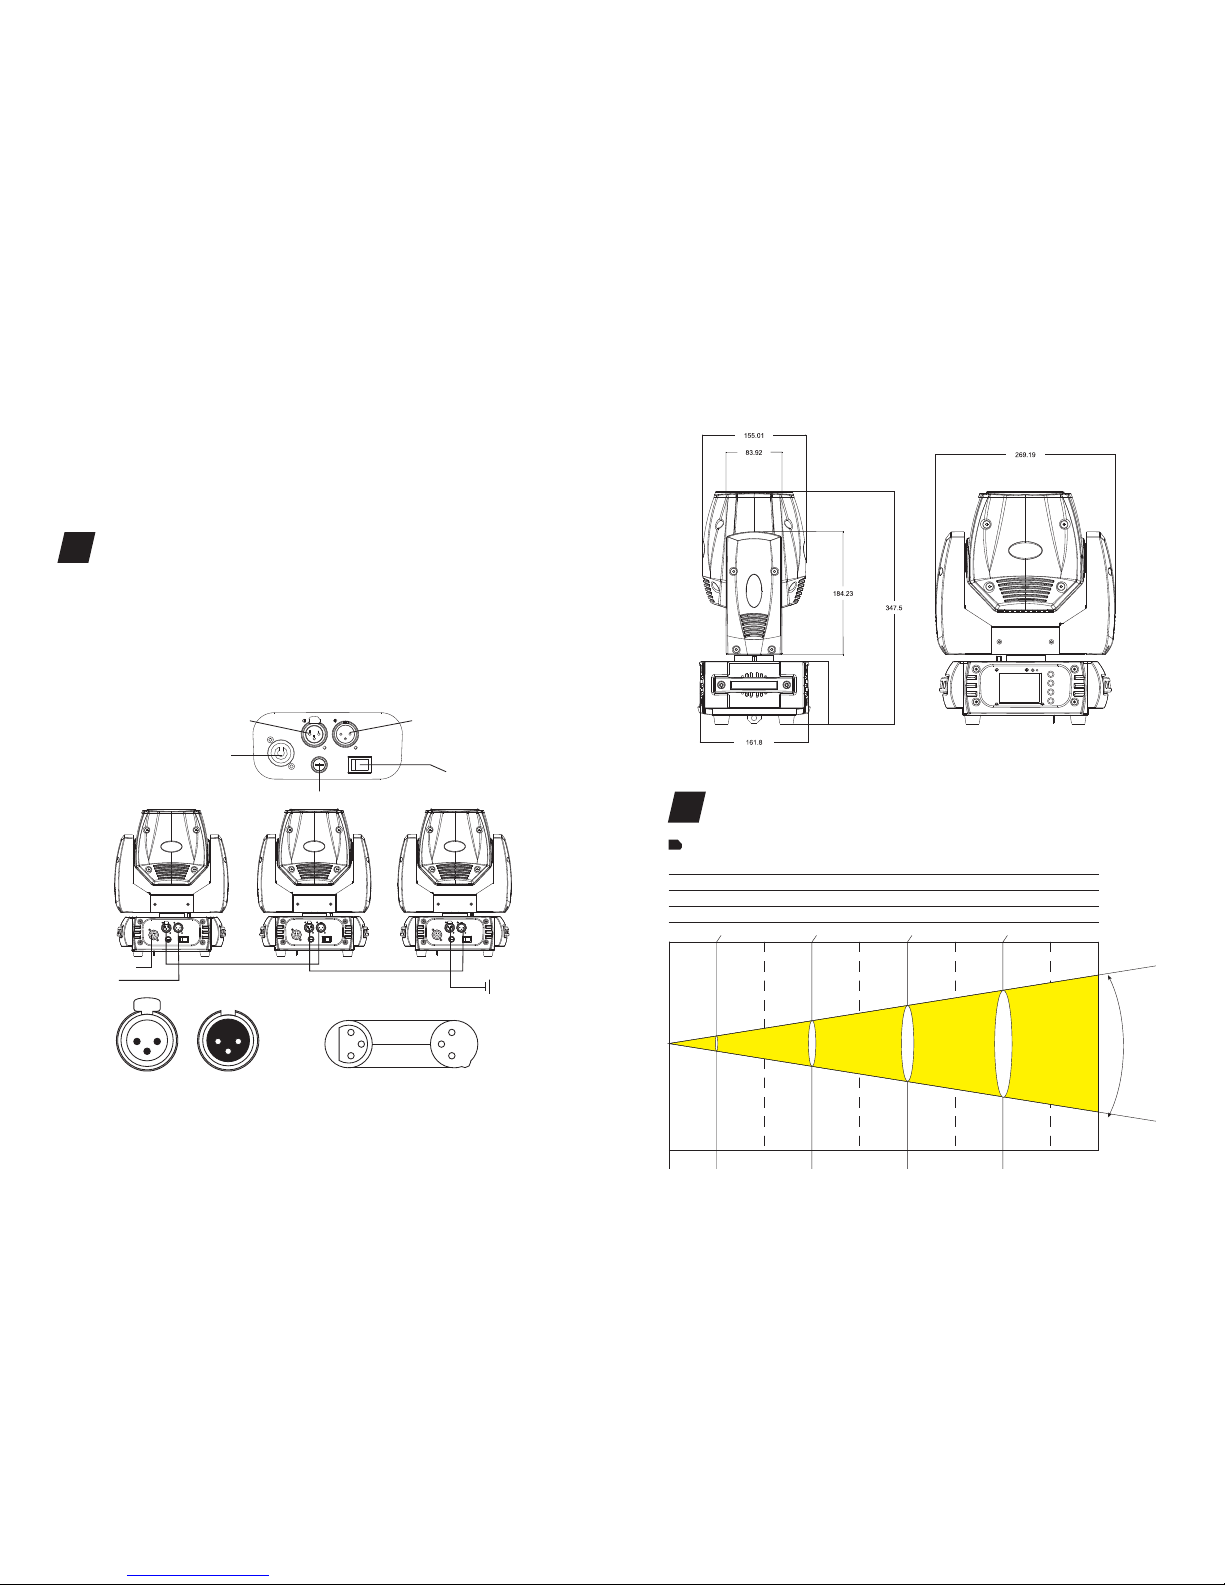
DMX O utput
3-P in XLR So cket
DMX I nput
3-P in XLR So cket
1:G round
2:D ata(- )
3:D ata(+ )
1 2
3
12
3
1
2
3
1
2
3
COM MON
DMX +
DMX -
DMX 512 IN
3-P IN XLR
DMX 512 OUT
3-P IN XLR
2 1
Reg ardl ess of t he riggin g opti on yo u choo se for your , always b e sure
to se cure your f ixtu re wit h a saf ety ca ble. The fi xtur e prov ide s a buil t-in rigg ing po int
for a safe ty cab le on the han ging brac ket as i llus tra ted ab ove. B e sure to onl y use th e
design ated r igging po int fo r the s afet y cable and n ever s ecure a saf ety ca ble to a
carrying ha ndle .
JNR 150L Wa sh
Con nect the provided XLR cabl e to the fem ale 3 -pin X LR output o f your c ontroller and
the othe r side t o the male 3- pin XL R inp ut of th e movi ng head. You can cha in mul tiple
Moving head together throu gh seria l link ing. T he cable ne eded shou ld be tw o core ,
screened cab le with XLR i nput a nd output c onnecto rs. Pl ease refe r to the d iagram
below.
DMX-512 con nection with DM X terminator
DMX-512 CONTROL CONNECTIONS
7
POW ER IN
DMX I N
FUS E
POW ER IN
DMX I N
DMX O UT
POW ER SWIT CH
Page 6
· The is for was h effe ct for on-s ite de cor atio n purpose .
· Don’t tu rn on th e fixture i f it’s be en throug h seve re tem perature diff eren ce like
af ter tr ansport ati on bec ause it mig ht dam age t he lig ht due to the e nvir onment
change s. So ma ke sur e to ope rate the fi xtur e until it is i n norm al temper ature.
· This lig ht sho uld be keep a way fr om str ong shaki ng dur ing any tra nsportatio n or
moveme nt.
· Don’t pu ll up th e light by on ly the head , or it mi ght c ause d amages to t he
mechan ical p art s.
· Don’t ex pose t he fixtur e in ove rheat, mo istu re or envir onme nt with too m uch du st
when ins tall ing it. And d on’t lay an y powe r cables on t he floor. Or it m igh t caus e
electronic s hock to the peopl e.
· Make sure t he instal lation pl ace is i n goo d safe ty condit ion be fore inst alli ng th e
fixture.
· Make sure t o put the saf ety ch ain a nd che ck whethe r the sc rews are screwe d
pro perly whe n install ing th e fixture .
· Make sure t he lens are i n good c onditio n. It’s recommen ded to r eplace th e unit s if
there are a ny da mage s or severe scrat ch.
· Make sure t he fixtur e is ope rated by qu alif ied p erso nnel who kn ows the fix ture
before using .
· Kee p the origi nal pa ckages if a ny sec ond s hipm ent is need ed.
· Don’t tr y to chan ge th e fixt ures w ith out an y instruc tion by the m anuf acturer o r
the appo inte d repa iring age ncie s.
· It is not in w arra nty range i f there are an y mal func tions fro m not fo llowing t he
user man ual to o perate or a ny ill egal oper atio n, li ke sho ck sho rt ci rcui t, el ectr onic
shock, lamp b roke , etc.
JNR 150L Wa sh
.05 .
OPERATION INSTRUCTIONS
5
Cautio ns: Fo r add ed pro tect ion mount t he fix tures in ar eas ou tside wal king p aths,
seatin g area s, or in areas were the fix ture m ight be rea ched b y unautho rized
person nel.
Before mount ing the fix ture t o any su rfa ce, make sure that the in stallat ion ar ea can
hold a min imum p oin t load of 10 tim es the d evi ce’s we ight.
Fixture inst allatio n must a lways be se cure d with a seco ndary safety a ttac hme nt, su ch
as an appropri ate sa fety cabl e.
INSTALLATIONS
6
Never st and di rect ly be low th e device wh en mou nti ng, re movi ng, o r ser vici ng the
fixture.
fro m a ceiling , or set on a fla t leve l sur face ( see i llus tration b elow ). Be s ure th is fix ture
is ke pt at least 0 .5m (1 .5 ft ) away from any fla mmable ma teri als (deco rati on etc.).
Always u se and i nstall th e supplie d safe ty ca ble as a s afety mea sure t o prev ent
accide ntal d amage and /or injur y in the event t he cla mp fa ils.
Mounti ng poi nts : Over head moun ting r equires exten sive e xperien ce, inclu ding
amongs t othe rs ca lcul ating wor king l oad limit s, a fin e kno wled ge of th e install ation
materi al bei ng used, an d peri odi c safe ty inspec tion o f all insta llat ion m ater ial an d the
fixture. If yo u lack t hes e qual ificati ons, d o not a ttem pt the inst alla tio n your self.
Improper ins tallati on can r esult in bo dily i njury.
Be sure to compl ete al l rigging a nd ins tal lati on pro ced ures b efor e connect ing th e
main pow er cor d to the a ppro pri ate wa ll out let .
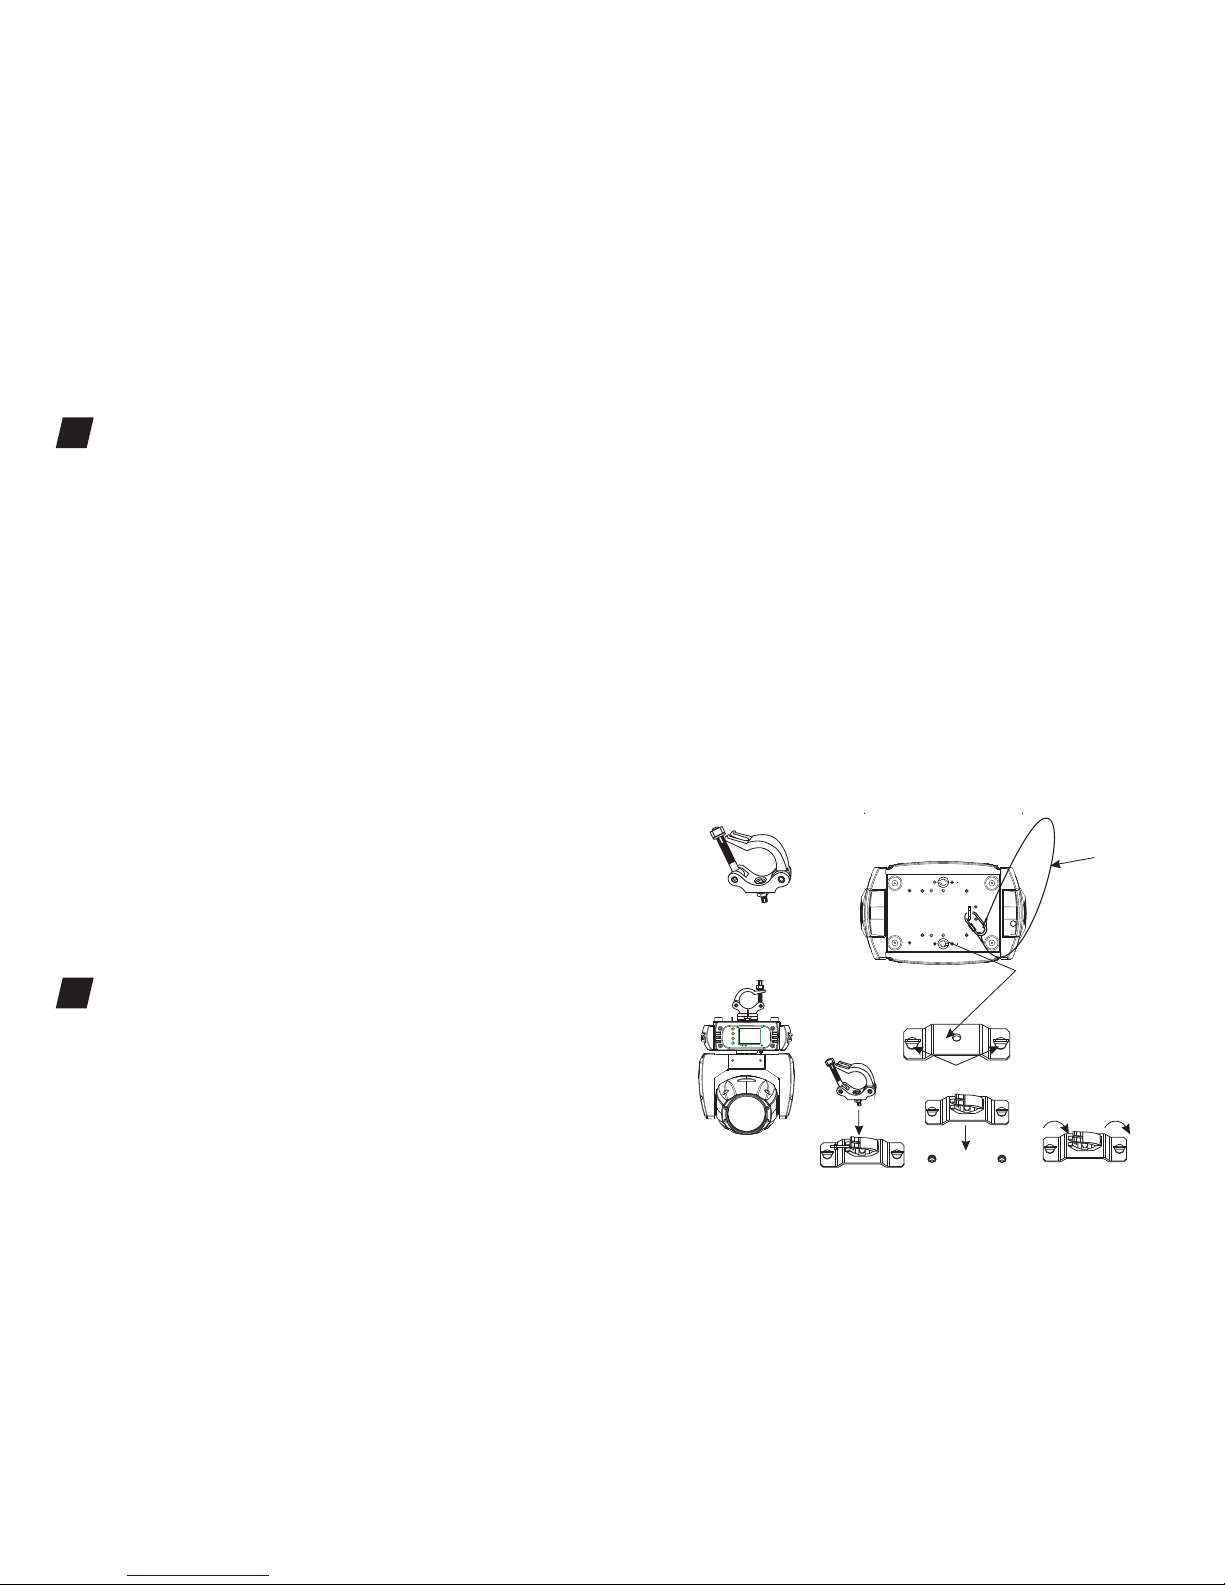
Clamp mo unti ng: T he p rovi des a un iqu e moun ting brac ket as sembly
that int egra tes th e bot tom of t he bas e, and t he safety c able rigg ing po int i n one un it
(see the i llus tration b elow). Wh en mou nti ng thi s fixture to trus s be sur e to secure an
appropriat ely ra ted clamp t o the in cluded om ega bracket usi ng a M10 s crew fitted
through the ce nter h ole of t he “o mega b racket”. As an add ed safety m easu re be sure
to at tached at l east one proper ly rated sa fety c able to the f ixtu re usi ng on of the
safety c able r igging po int integ rate d in the b ase assem bly.
JNR 150L Wa sh
.06 .
②
① Ome ga Brac ket
② Sat ety Cla mp
③ Saf ety Cab le
④ 1/4 Tu rn Quic k-Loc k Faste ners
①
③
④
1/4 Tur n 1/4 Tur n
 Loading...