

Page 1

Quick Start Guide
Smart Visu Server
Page 2

Philips HUE
HOW DO I CONNECT PHILIPS HUE?
Sonos
HOW DO I CONNECT SONOS?
Astro function
HOW DO I ADJUST THE ASTRO FUNCTION?
Remote access
HOW DO I SET UP REMOTE ACCESS?
Content
Page 3
How do I connect Philips Hue?
Smart Visu Server
Page 4
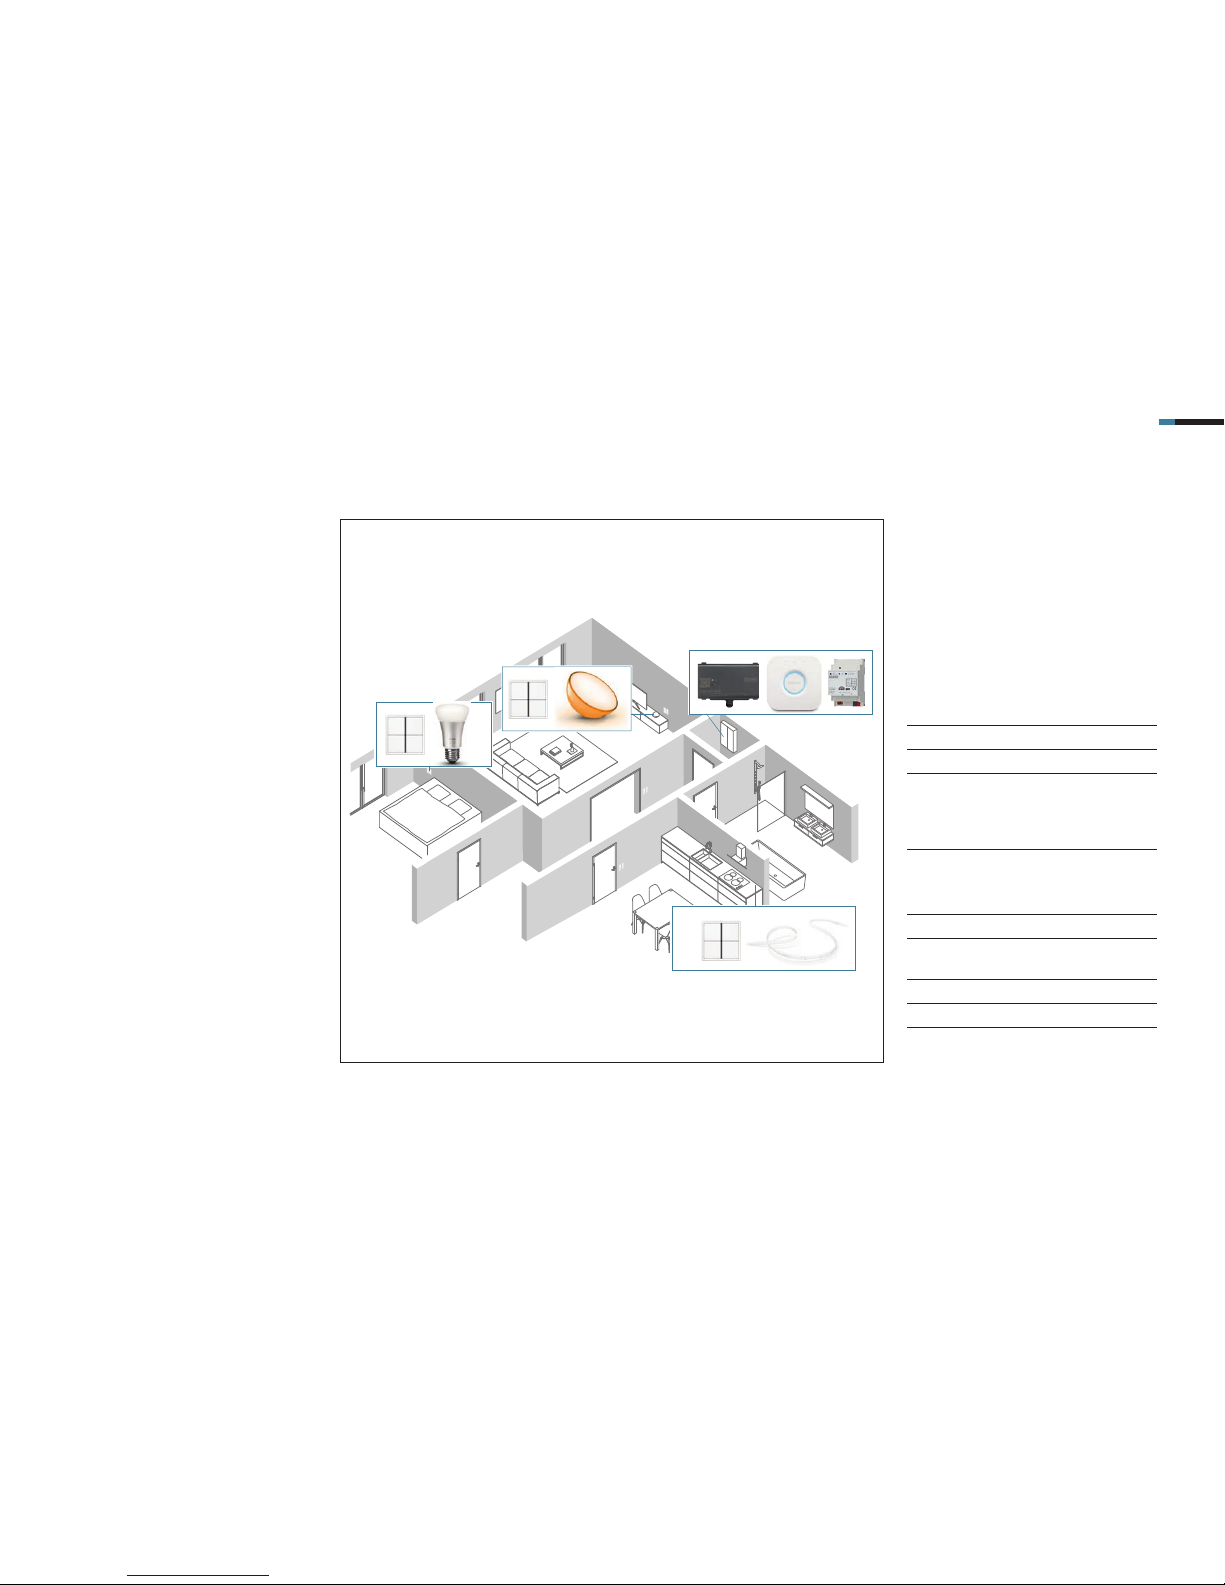
SMART VISU SERVER + PHILIPS HUE 2
Feel-good lighting with the Smart Visu
Server:
With the integration of the Philips Hue
colour lighting system, you simply
create individual light scenes with
your fi nger tip on your smart phone. In
addition, it can be controlled with the
JUNG KNX push-button modules.
These instructions explain the
individual steps to commission it and
to use it on the basis of an example.
1. Introduction
COMPONENTS
JUNG
ITEM NO: QUAN-
TITY
Smart Visu Server SV SERVER 1
KNX IP interface IPS 200 REG 1
KNX Standard
push-button
sensor module,
4-gang
4074 TSM 3
COMPONENTS
PHILIPS
ITEM NO QUAN-
TITY
Hue Bridge – 1
Hue White
Ambiance E27
– 1
Hue Go – 1
Hue Lightstrip – 1
Page 5

SMART VISU SERVER + PHILIPS HUE 3
Philips Hue can be integrated into
your JUNG Smart Visu Server
with just a few steps.
The table here gives an overview of
the necessary steps.
On the following pages, the
individual steps are described
in detail.
STEP PAGE
1. Download Philips Hue app 4
2. Install the Philips Hue Bridge 4
3. Add the Philips Hue Bridge to the app 4
4. Make light setup 5
5. Make room setup 6
6. Set brightness and colours 7
7. Add additional lamps 8
8. Create more rooms and allocate lamps 9
9. Connect the Smart Visu Server to the IP network 12
10. Connect the Philips Hue Bridge to the Smart Visu Server 13
11. Connect the Philips Hue lamps to the Smart Visu Server 13
12. Edit Philips Hue lamps 14
13. Configure actions 15
14. Save project 17
2. Overview
Page 6
SMART VISU SERVER + PHILIPS HUE 4
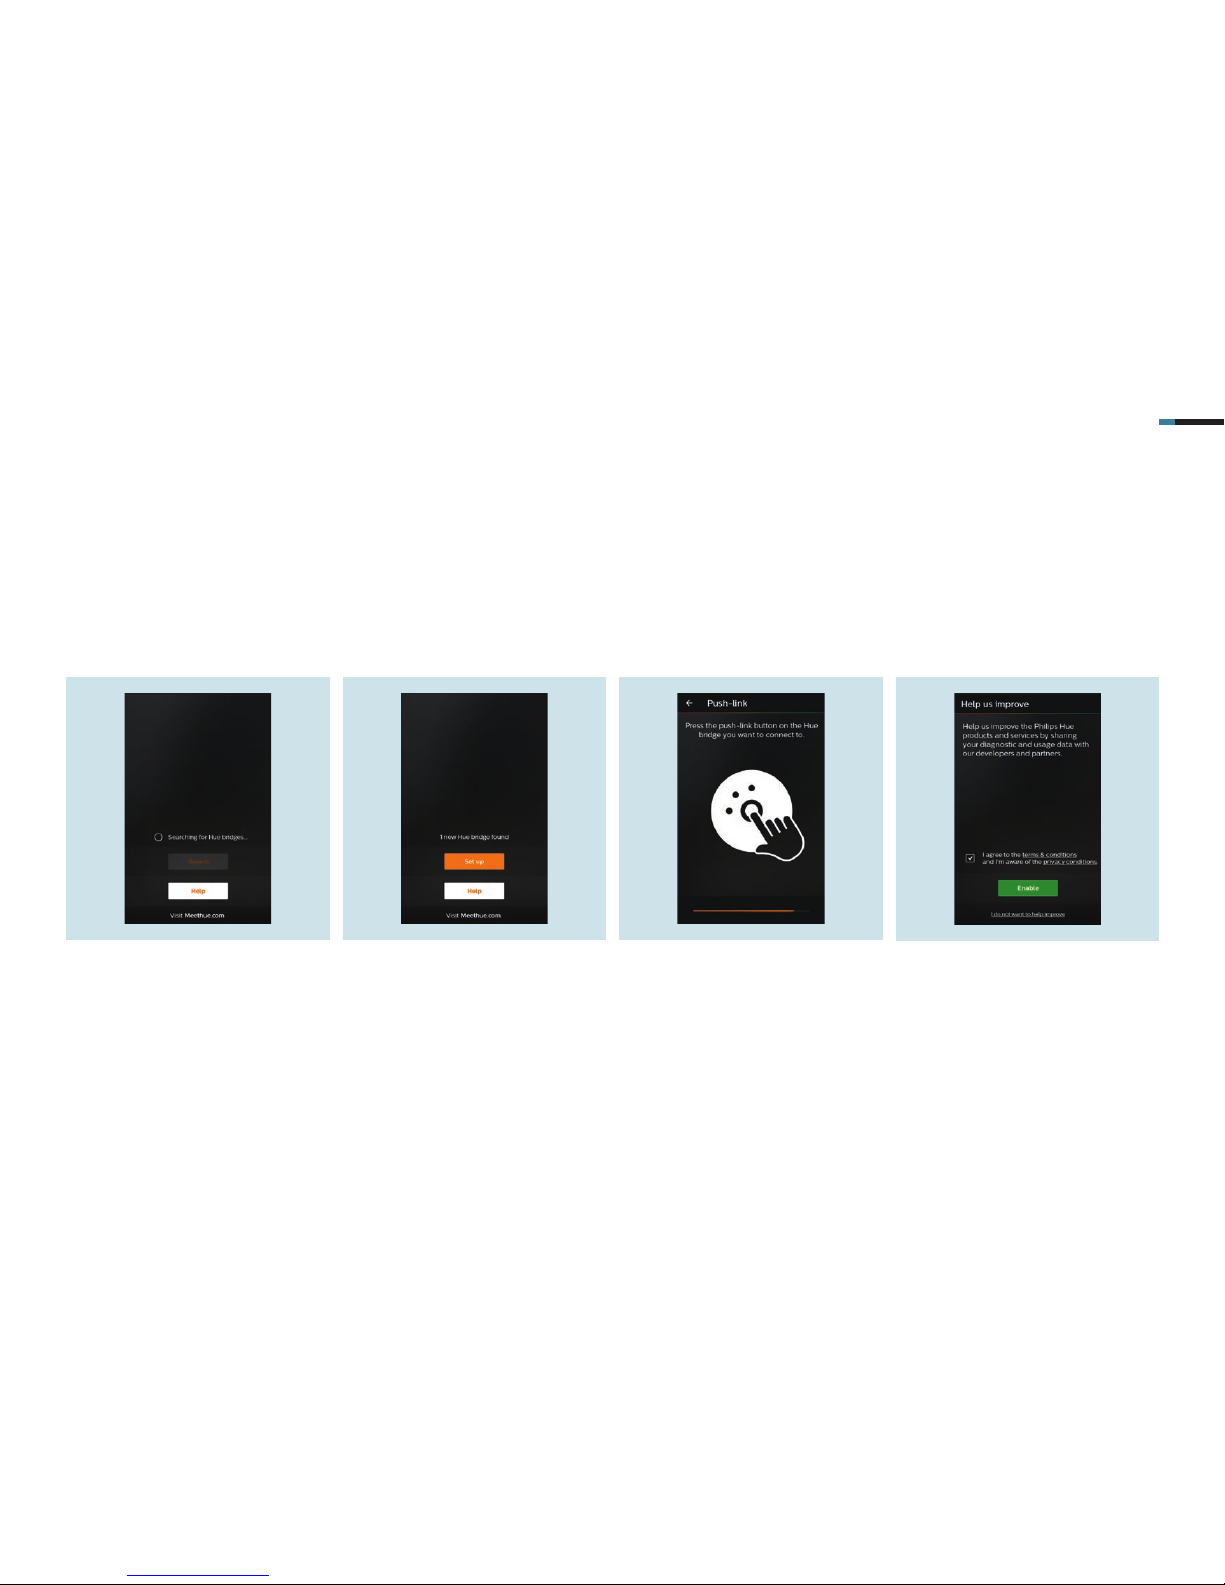
1. Open the Hue app. The search for
a new Bridge starts automatically. If
this is not the case, press the Search
button.
3. Commissioning Philips Hue
Install the Philips Hue App on your smartphone and integrate the Hue Bridge to your home network.
3.1 Initial operation
For the initial operation, in normal circumstances there is no confi gured Hue Bridge present. The initial operation of the Philips Hue is carried out as follows:
2. As soon as a Bridge is found, select
Set up.
3. Connect the Bridge to the Hue app. 4. Accept the terms of use and press
Enable.
Page 7
SMART VISU SERVER + PHILIPS HUE 5
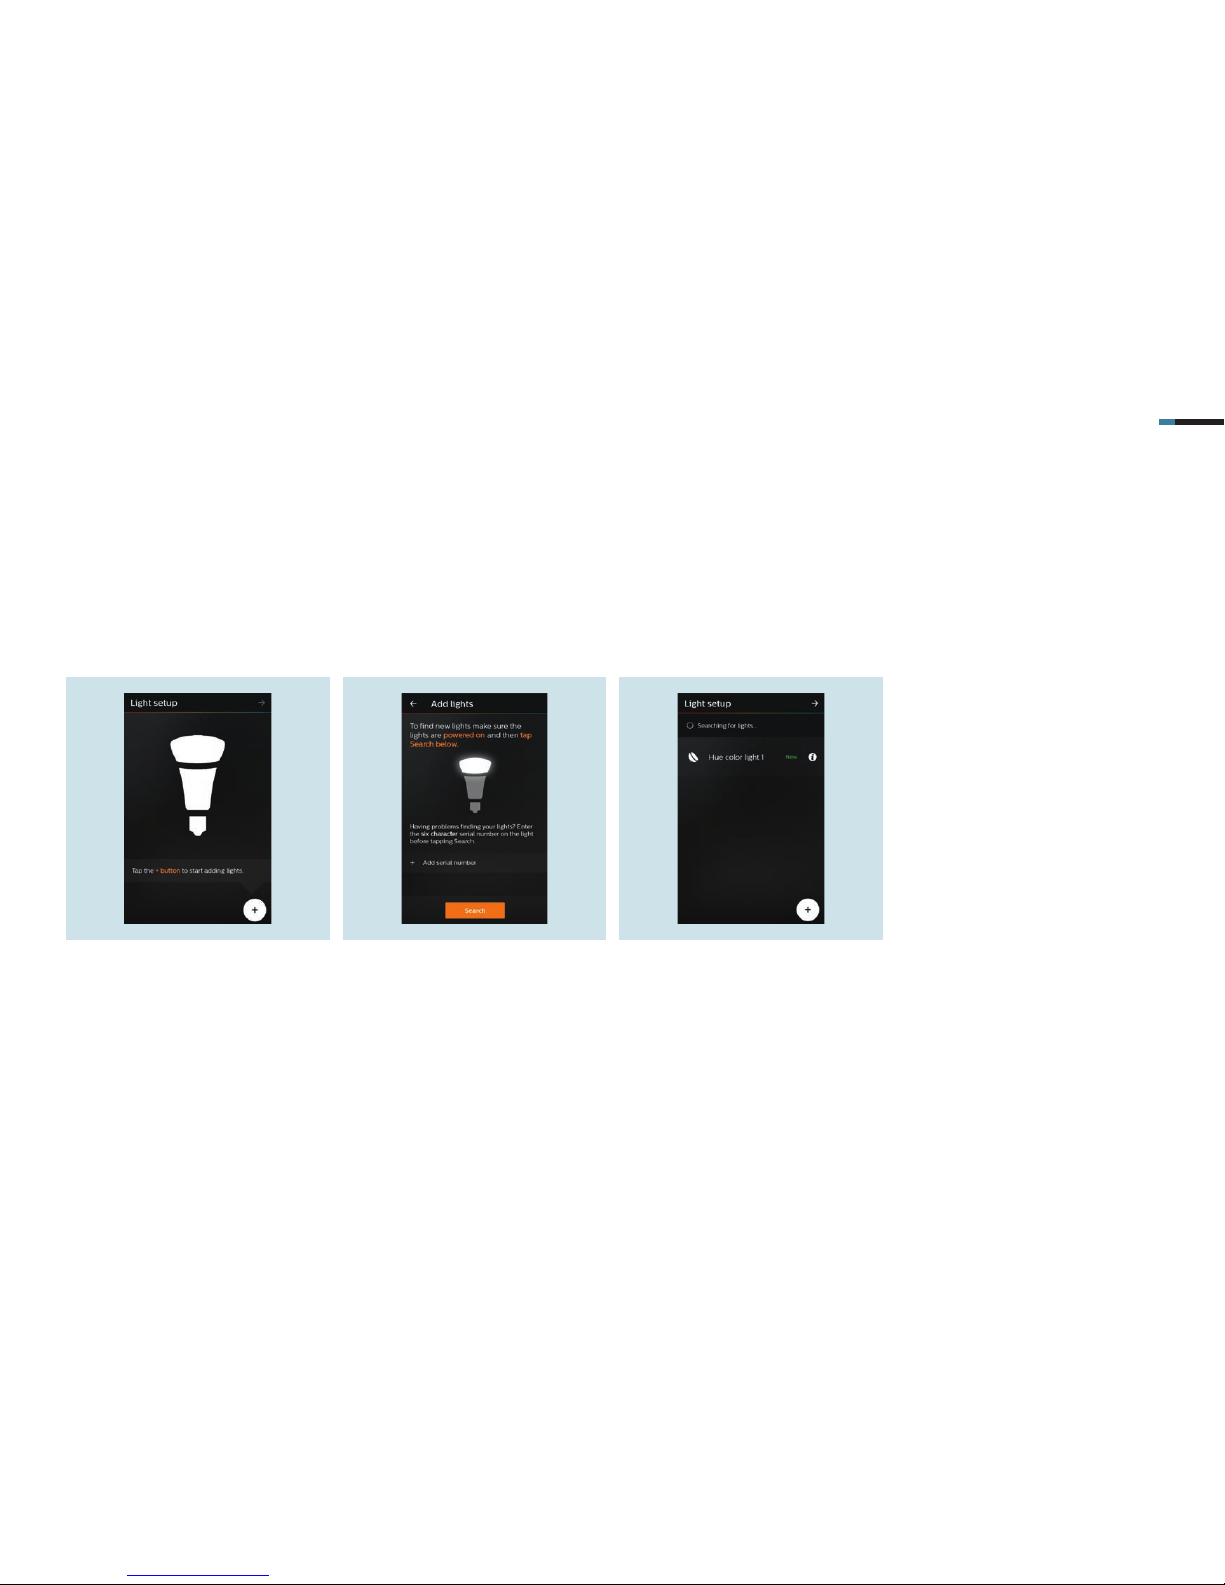
1. Use + to add new lamps to the net-
work.
3.2 Light setup
After you have connected the Bridge to the Hue app and you have accepted the terms of use, fi rst make the light and room setup.
2. Select Search to open the network
and to display the available lamps.
3. The list displays all available lamps.
Confi rm with to continue with commissioning.
Page 8
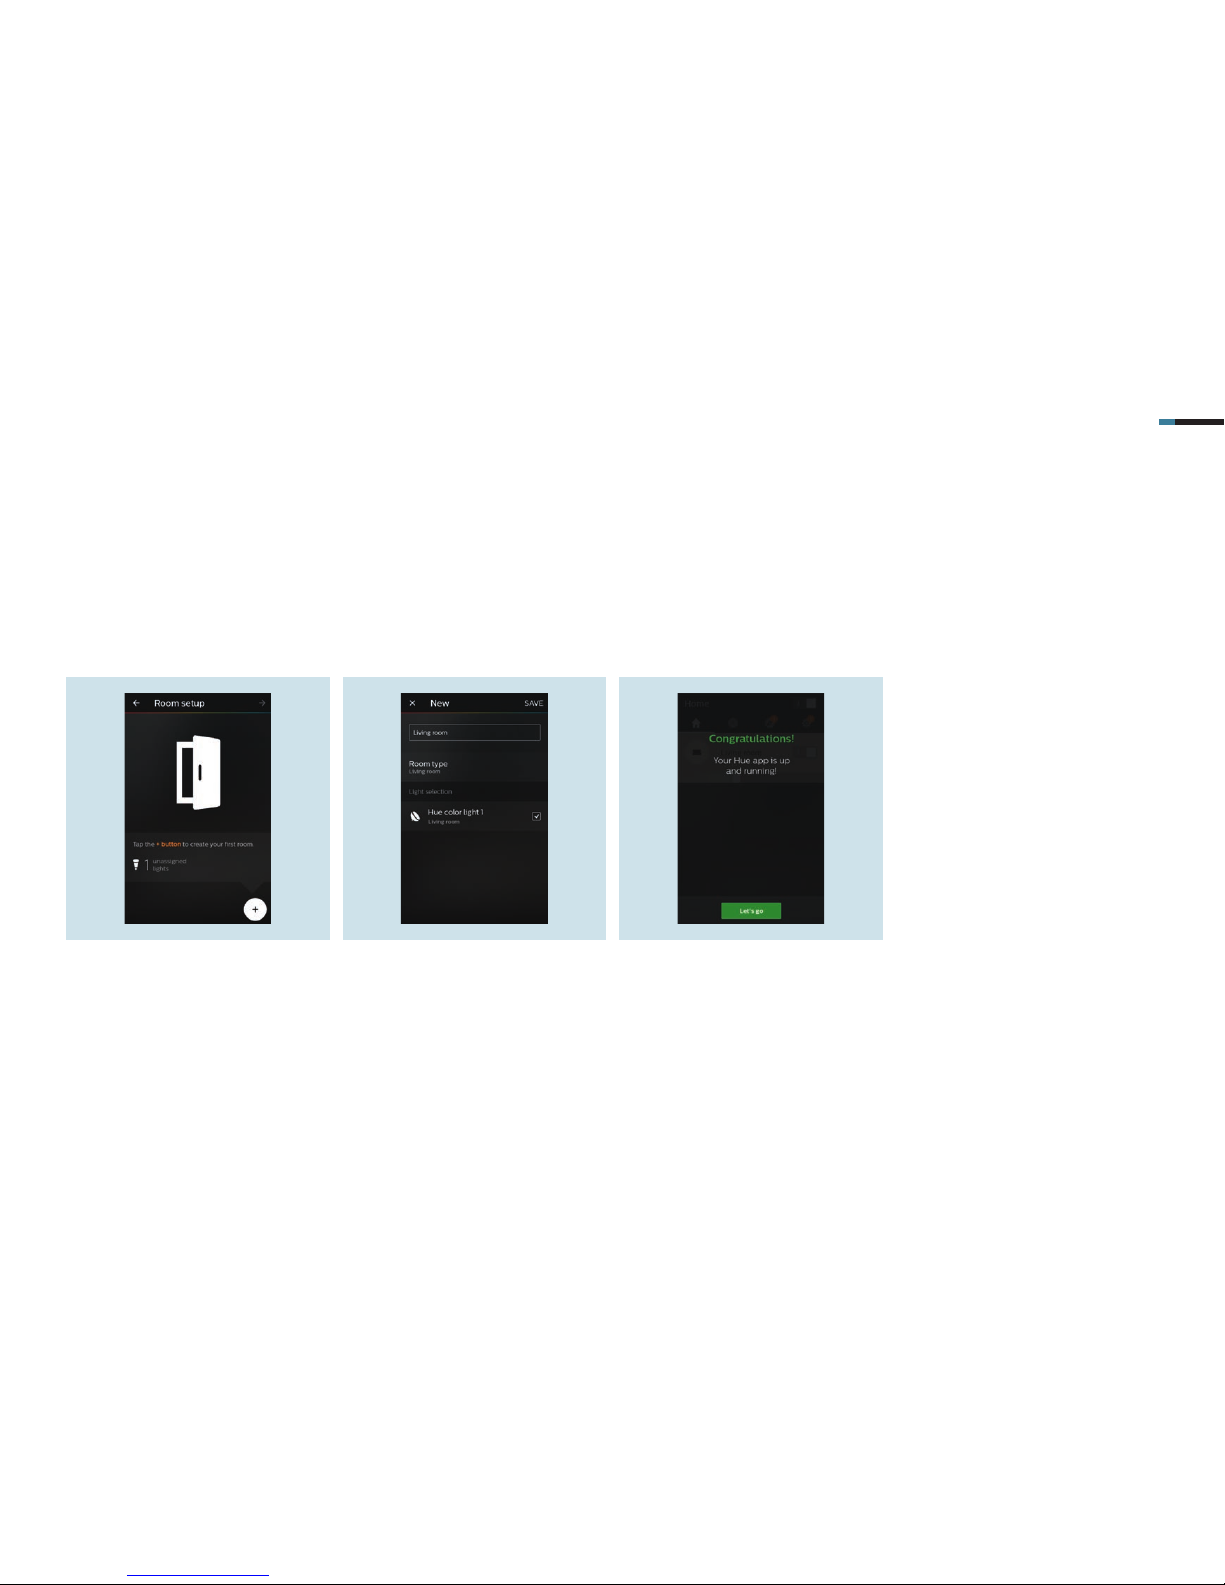
SMART VISU SERVER + PHILIPS HUE 6
1. Add your new rooms using +.
3.3 Room setup
As soon as you have confi rmed the selected lamps, you come automatically to the room settings.
2. Name your room and specify the
Room type. Use to add lamps to
your room.
3. Save your confi guration with Save.
4. Setting up the Philips Hue is
complete. Press Let’s go to control
your Philips Hue installation.
Page 9
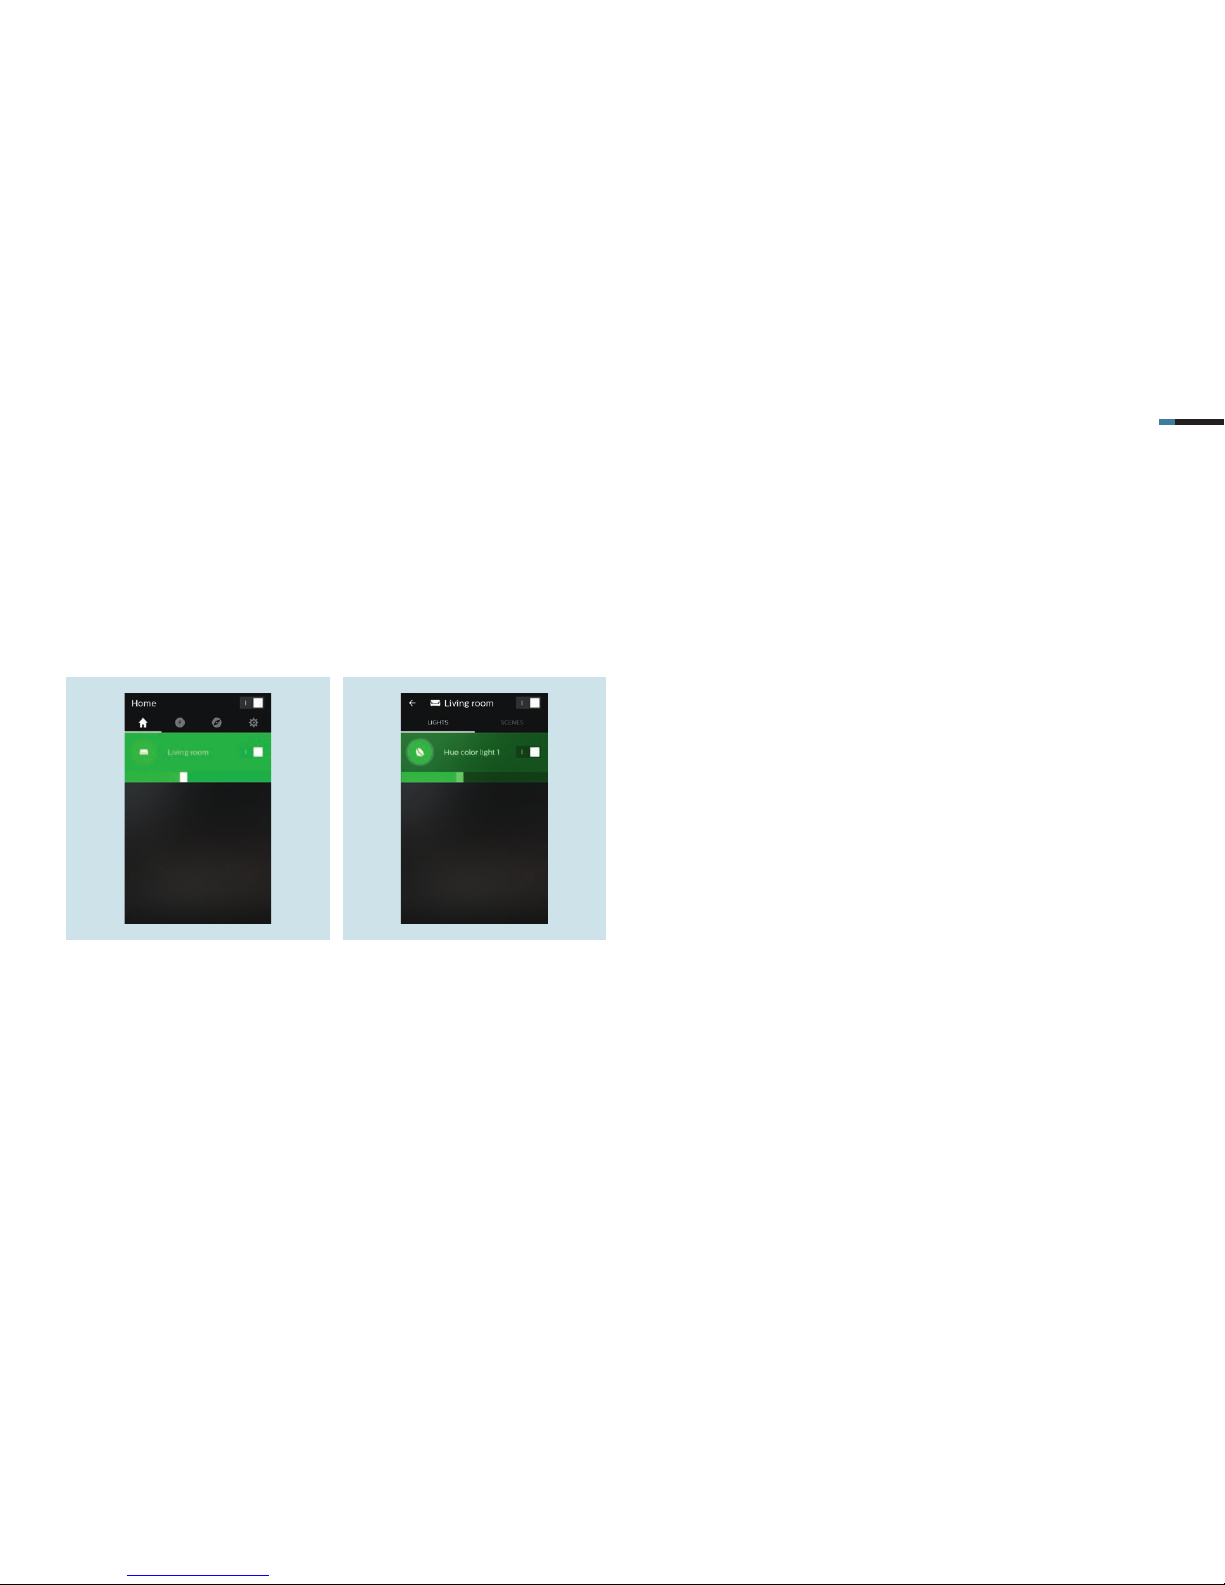
SMART VISU SERVER + PHILIPS HUE 7
1. Using the Home menu, select the
desired room.
3.4 Setting brightness and colour
You can now set the brightness and colour of the lamps for each room.
2. Set the Brightness and the Colour of
the selected lamps to your requirements.
Page 10
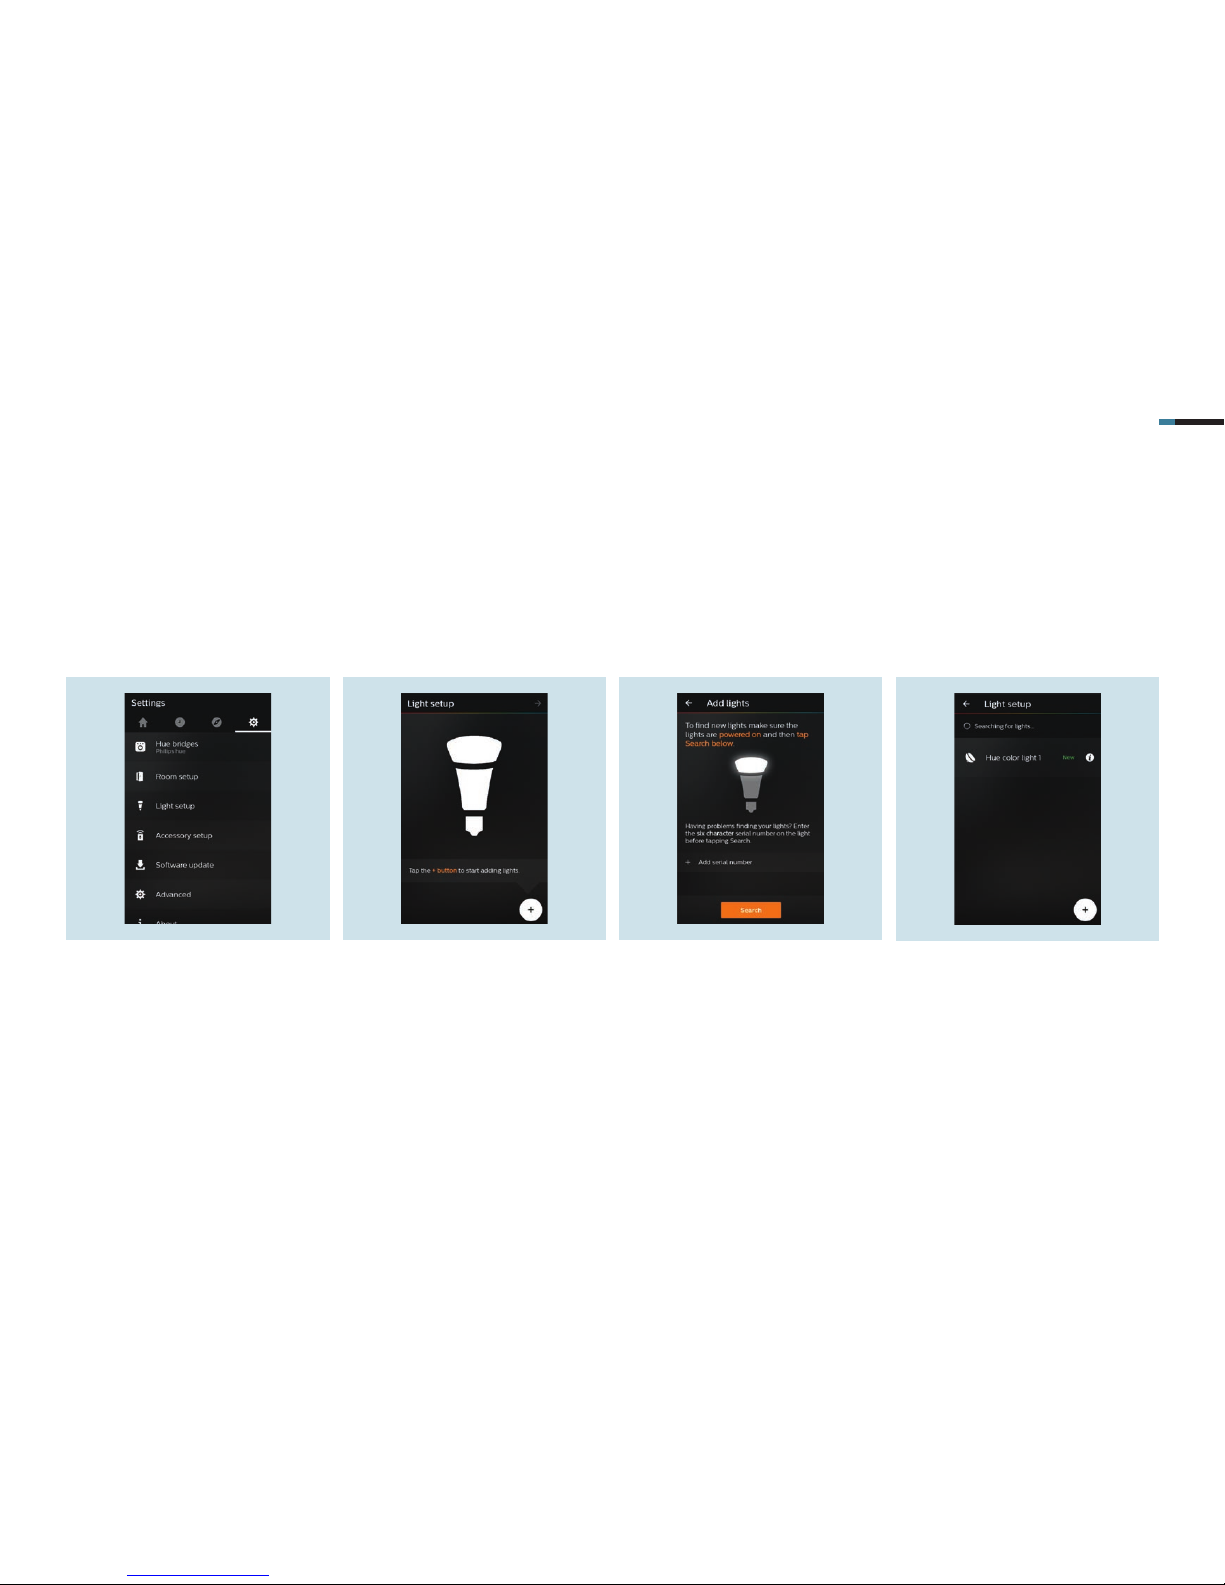
SMART VISU SERVER + PHILIPS HUE 8
1. Select the Light setup.
3.5 Adding additional lamps
Check that all Philips Hue lamps are switched on.
2. Use + to add new lamps to the
network.
3. Select Search to open the network
and to display the available lamps.
4. All accessible lamps are displayed in
the list. Use + to restart the search.
Page 11
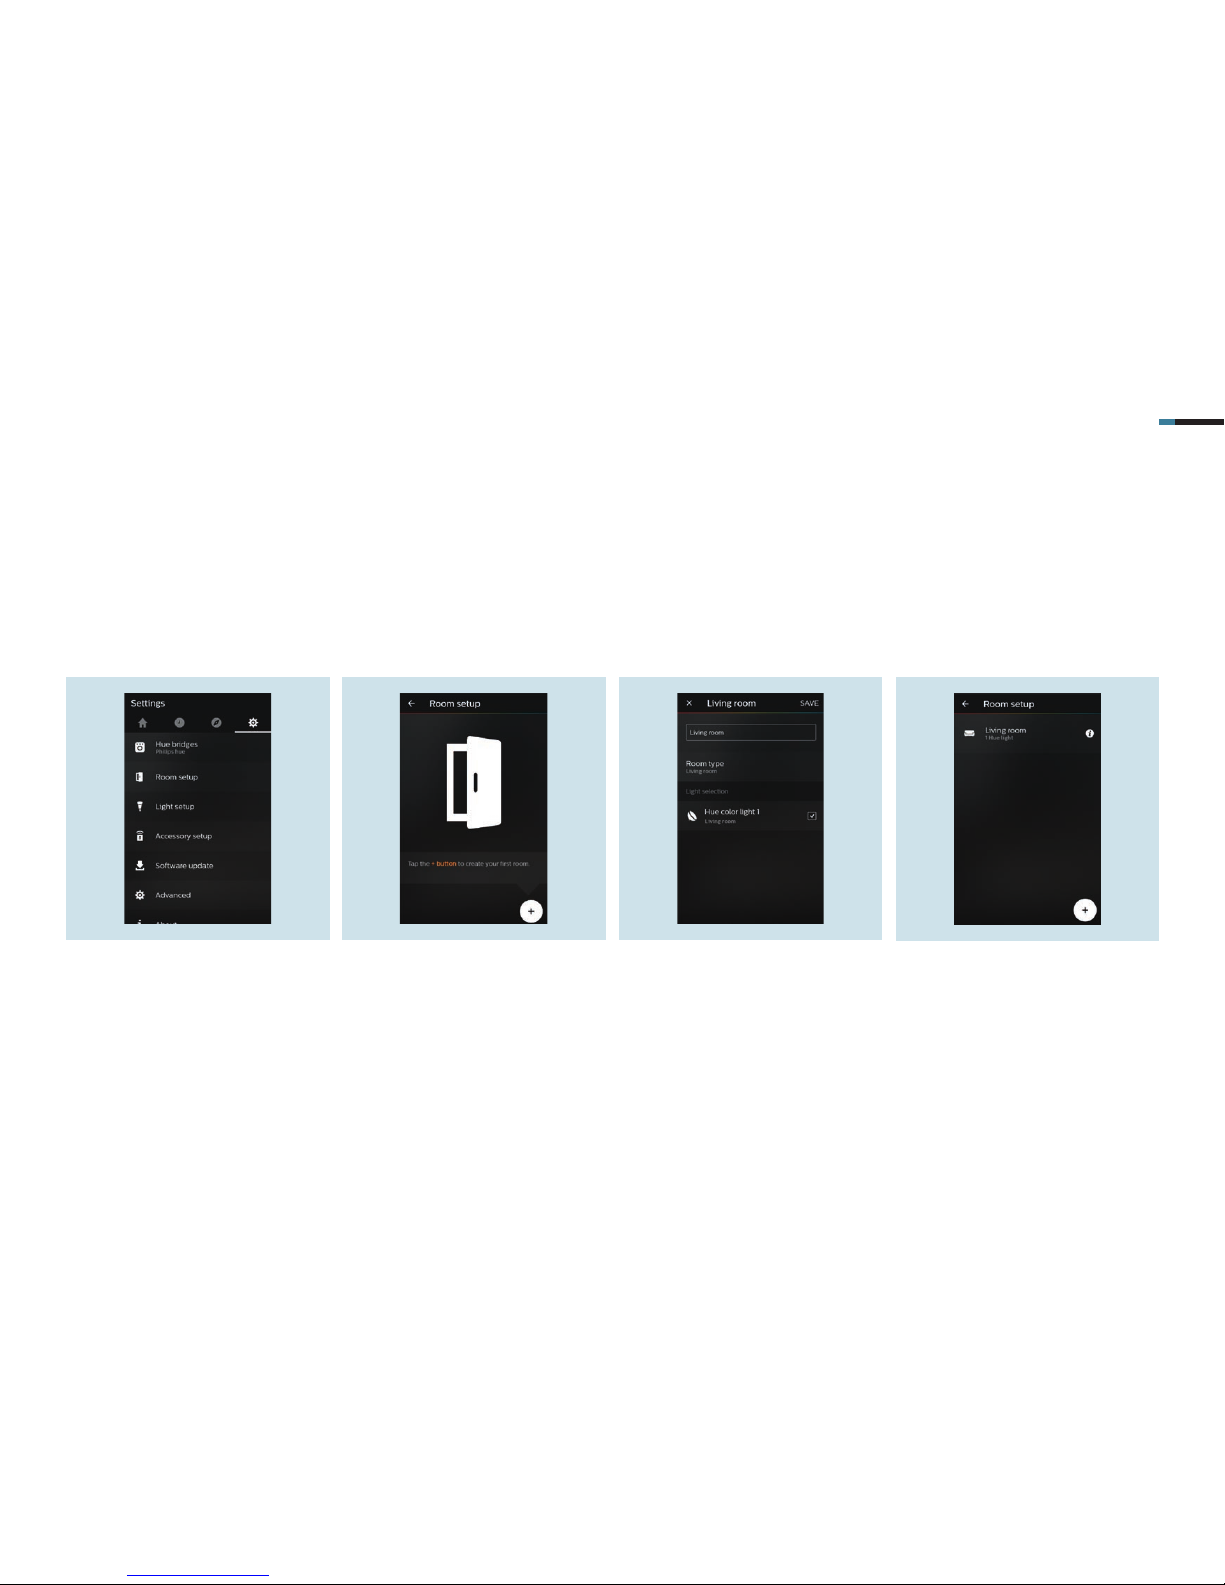
SMART VISU SERVER + PHILIPS HUE 9
1. Select the Room setup.
3.6 Creating more rooms and allocating lamps
Now you can create one or more rooms where there are Philips Hue lamps.
2. Add your new room using +. 3. Name your room and specify the
Room type. Use to add lamps to
your room.
4. Save your confi guration with Save.
5. The list displays all rooms created.
Add new rooms using +.
Page 12
SMART VISU SERVER + PHILIPS HUE 10
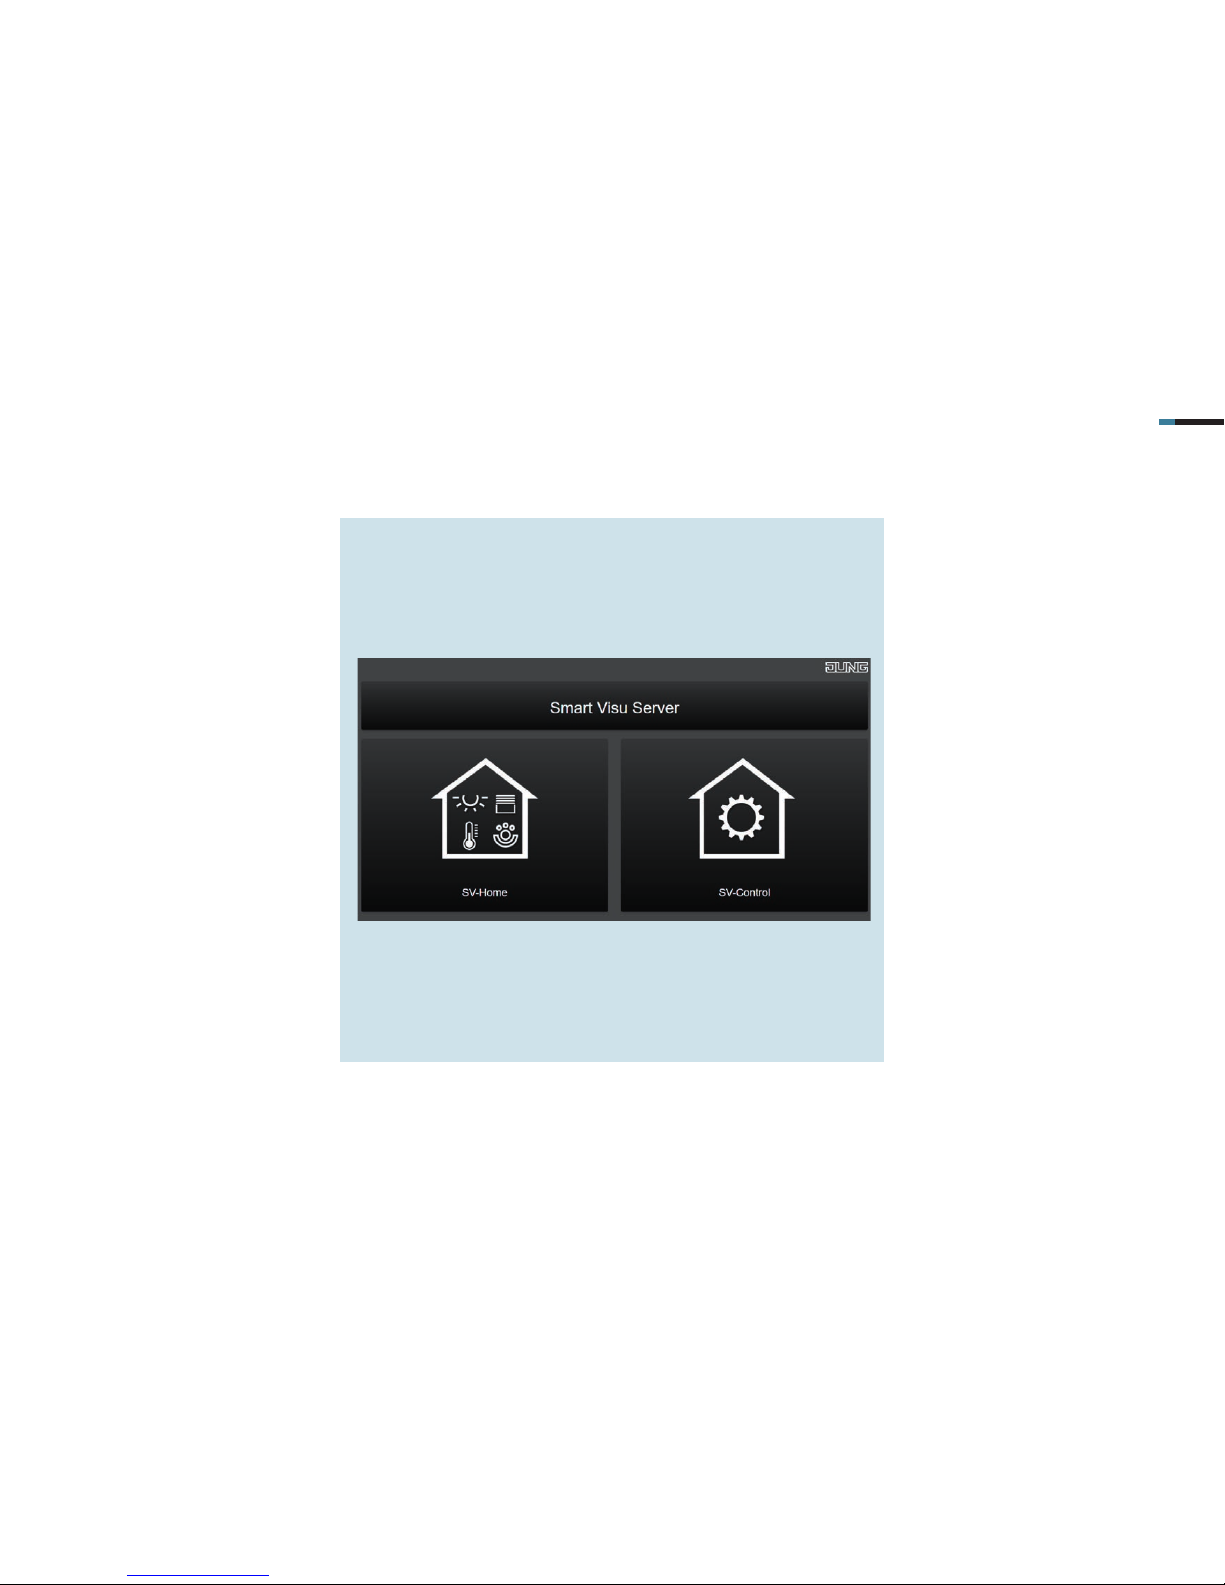
4. The Smart Visu Server
The Smart Visu (SV) Server gives you
the choice of two different areas on
the start page:
SV-Home:
operation and visualisation
SV-Control:
editing and setting
Page 13
SMART VISU SERVER + PHILIPS HUE 11
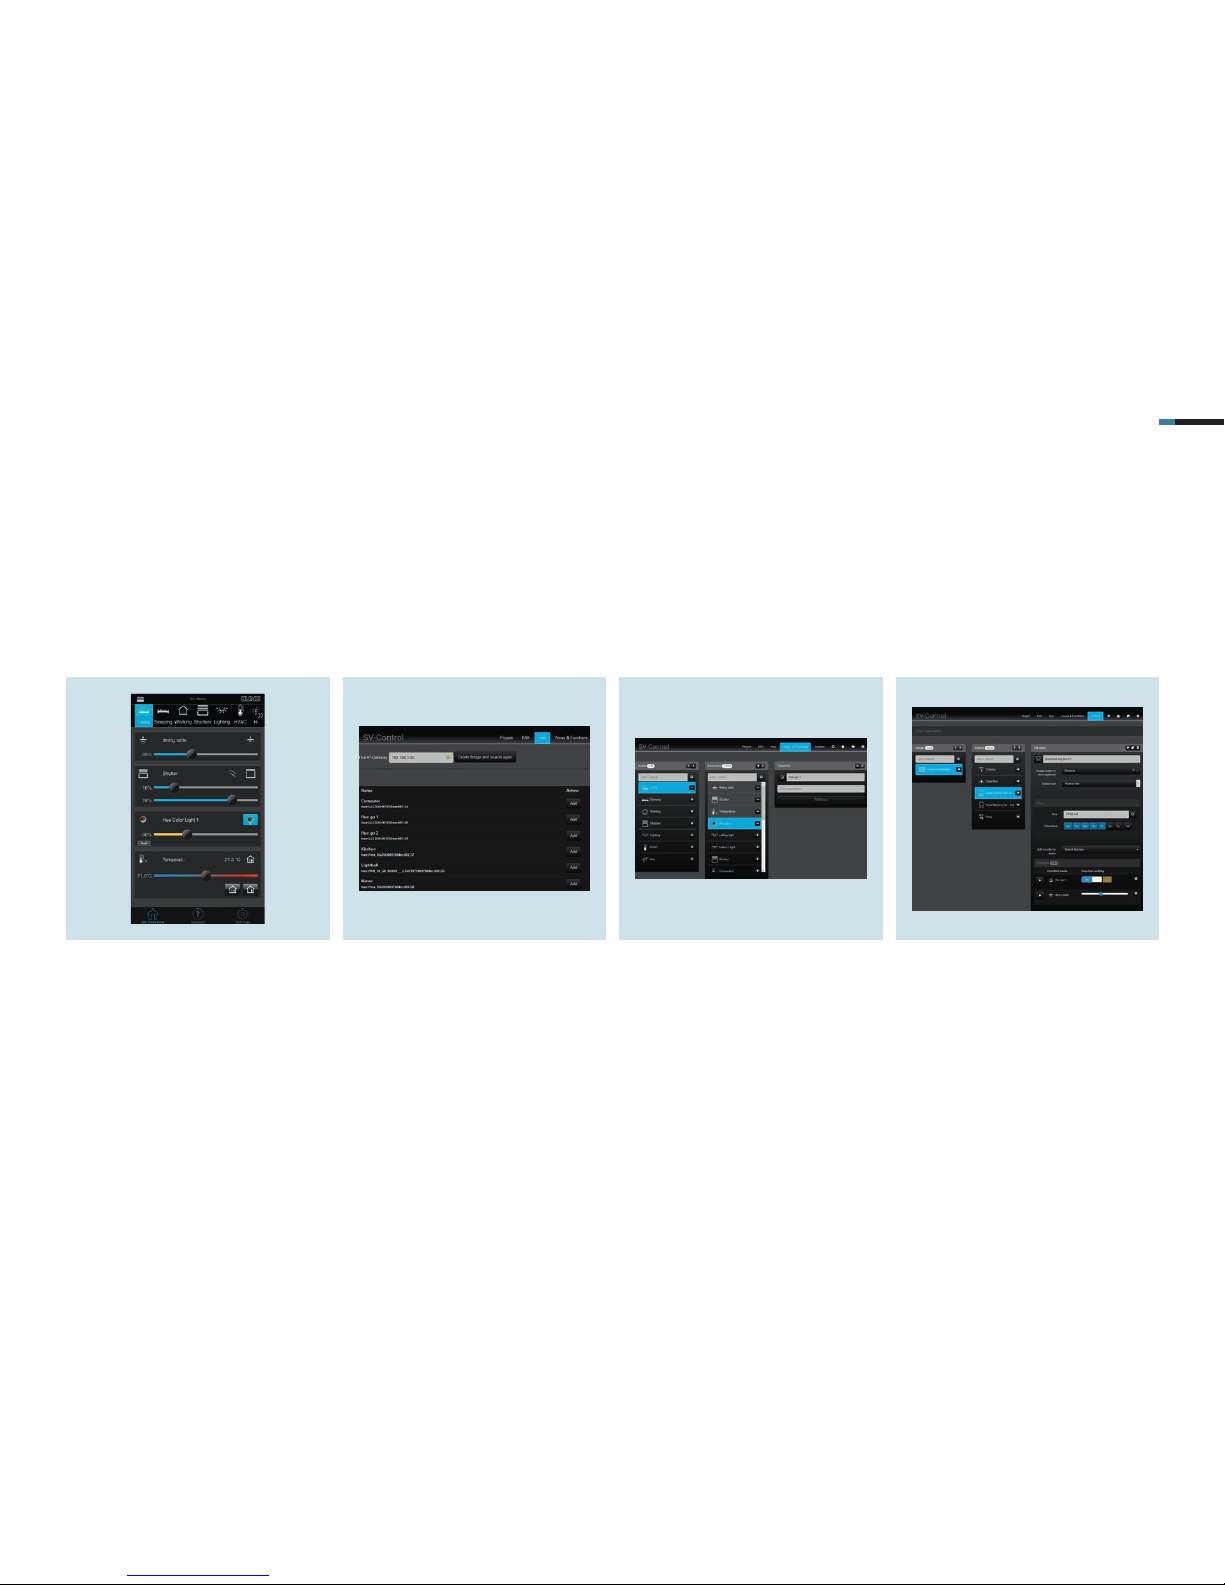
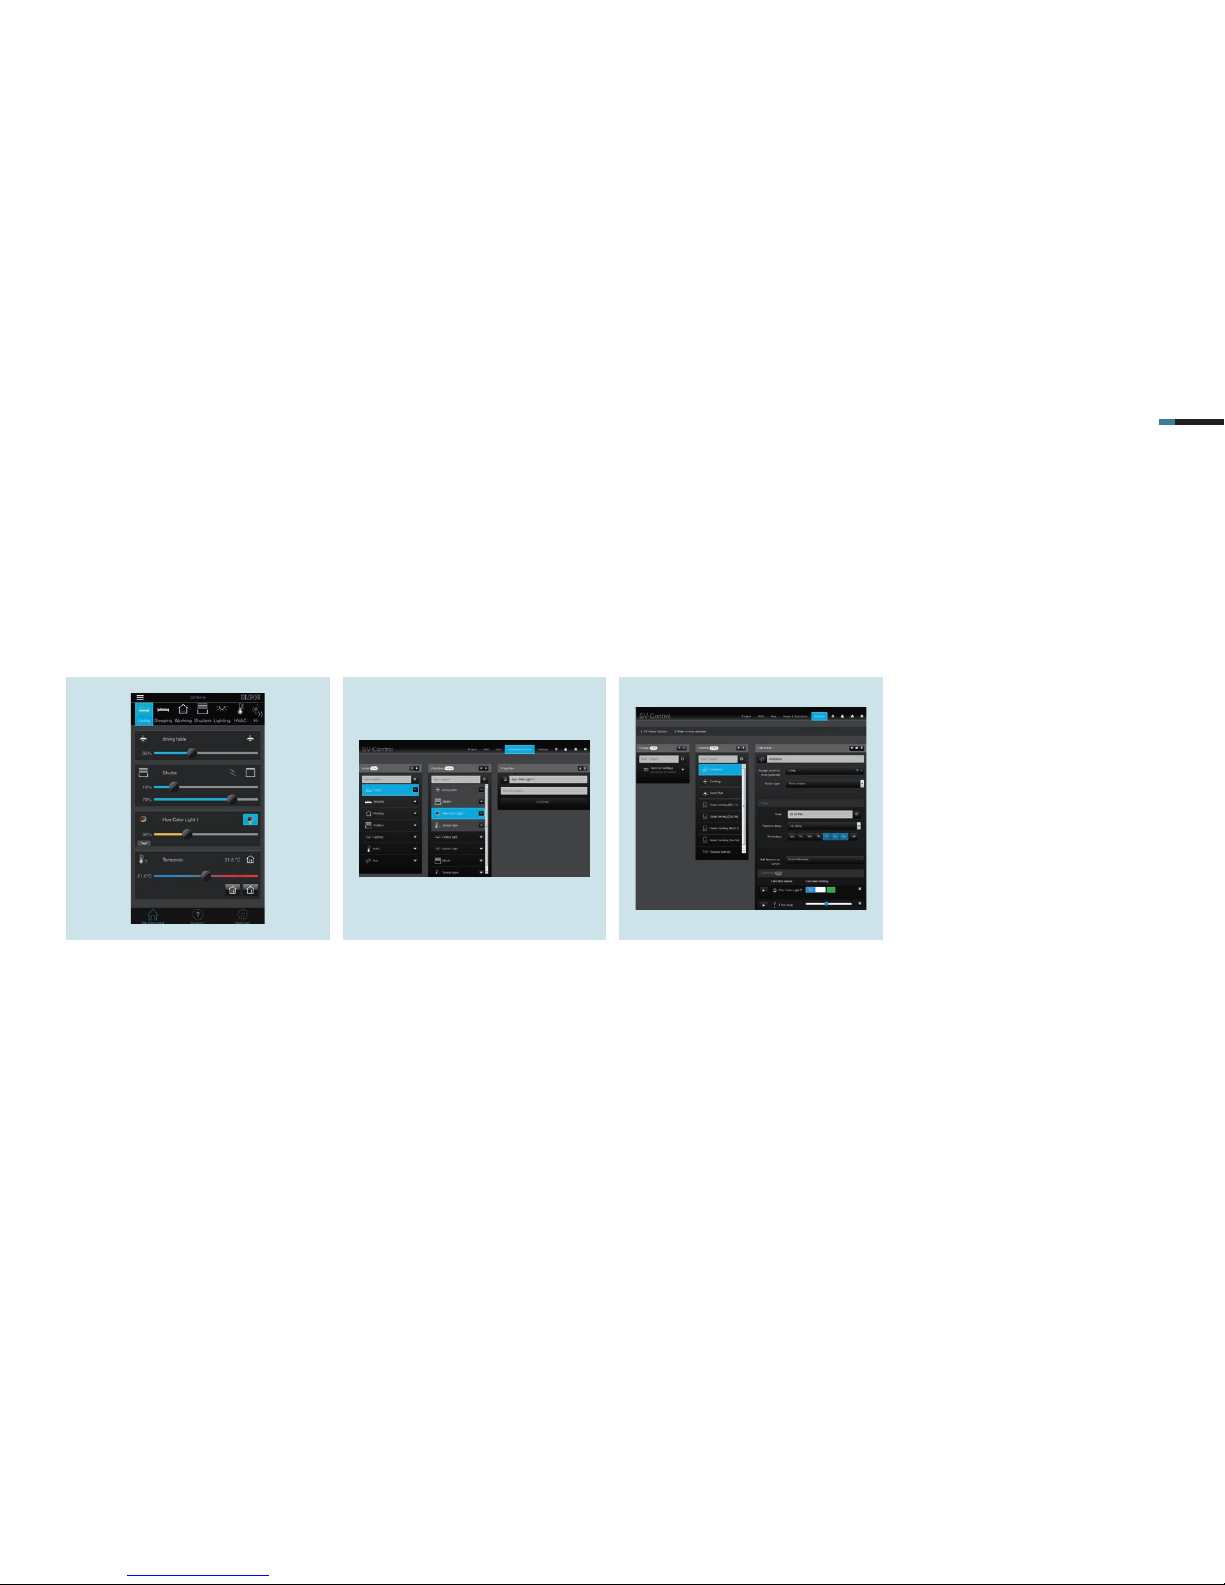
SV-Home is the operating and visualis-
ation interface with which you can operate your Hue lamps and make colour,
brightness and ambiance settings for
your rooms as well as calling actions
(scenes).
4.1 Functions of the Smart Visu Server
On this page you get a short overview of the functions of the SV Server. On the following pages you will find out how to commission the SV Server, make lamp settings and
how to create actions.
In the SV-Control you can search for Hue
lamps and add them to the SV Server
(pair) and also remove them.
Afterwards, you can edit the lamps and
allocate them to their rooms.
Furthermore, in the SV-Control on the
Areas & Functions tab, you can create
functions such as switching and dimming for your lamps, blinds, etc.
Using SV-Control, create actions in
which, for example, lamps illuminate on
specific days, at specific times, with a
colour set by you.
Page 14
SMART VISU SERVER + PHILIPS HUE 12
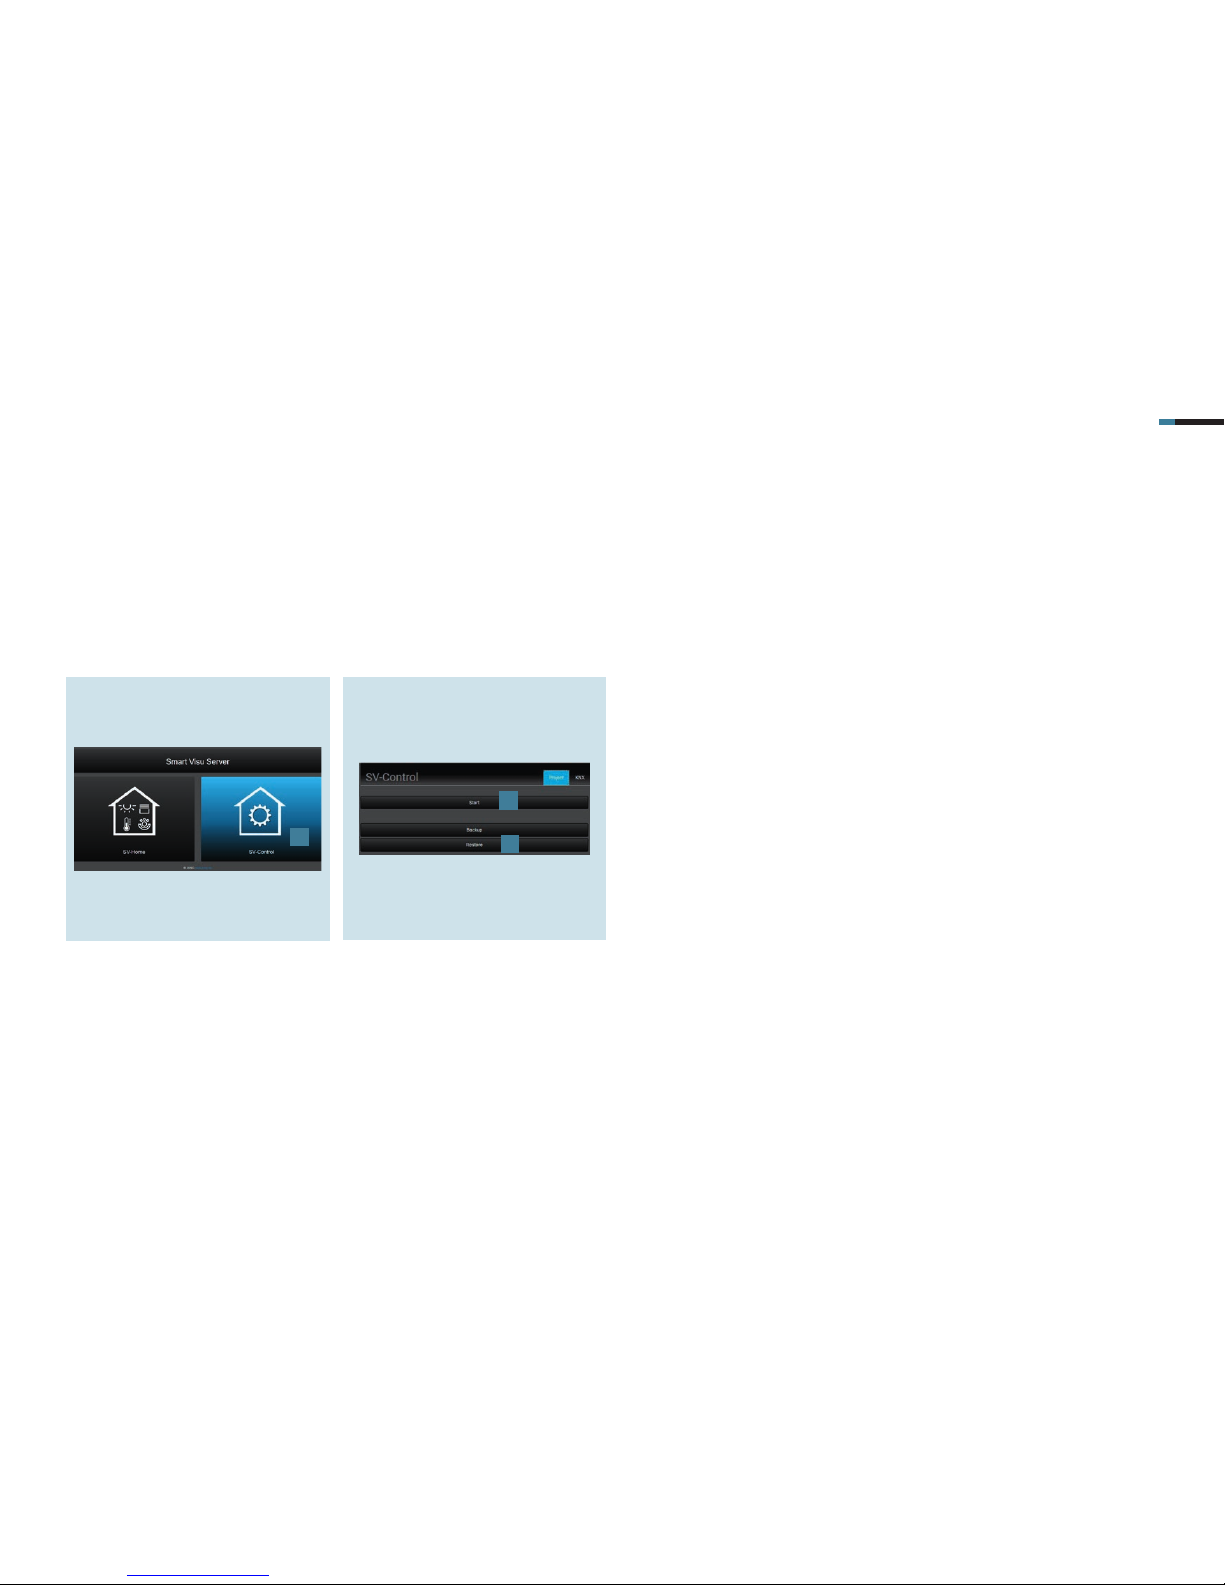
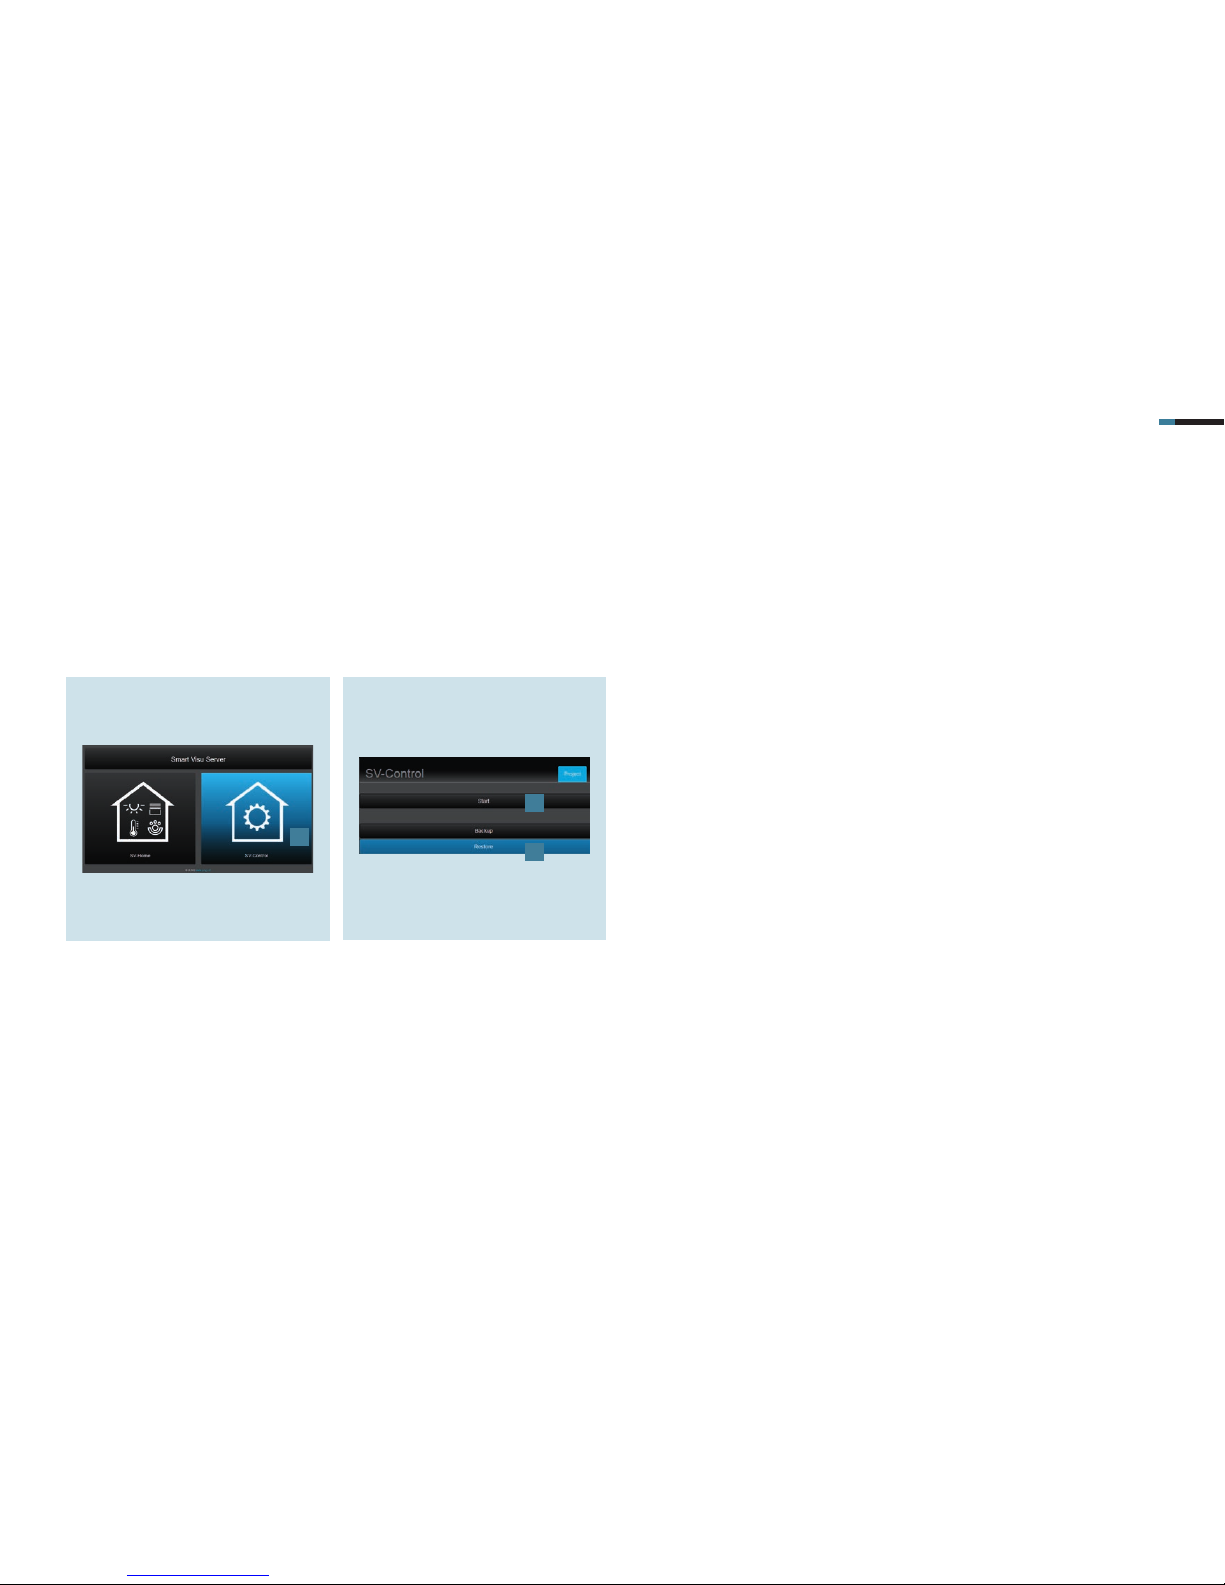
1. Select the SV-Control button [1].
5. Commissioning Smart Visu Server
After you have started operating the Philips Hue System, connect the Smart Visu (SV) Server to your home network.
Call the SV Server in the web browser of your end device (PC, laptop, tablet).
To do so, enter the address http://sv-server.local or the IP address of the SV Server allocated by the router.
If the SV Server is protected by a password, enter this.
2. Create a new project with Start [2] or
import an existing one with Restore
[3] and navigate to the Hue tab.
1
2
3
Page 15
SMART VISU SERVER + PHILIPS HUE 13
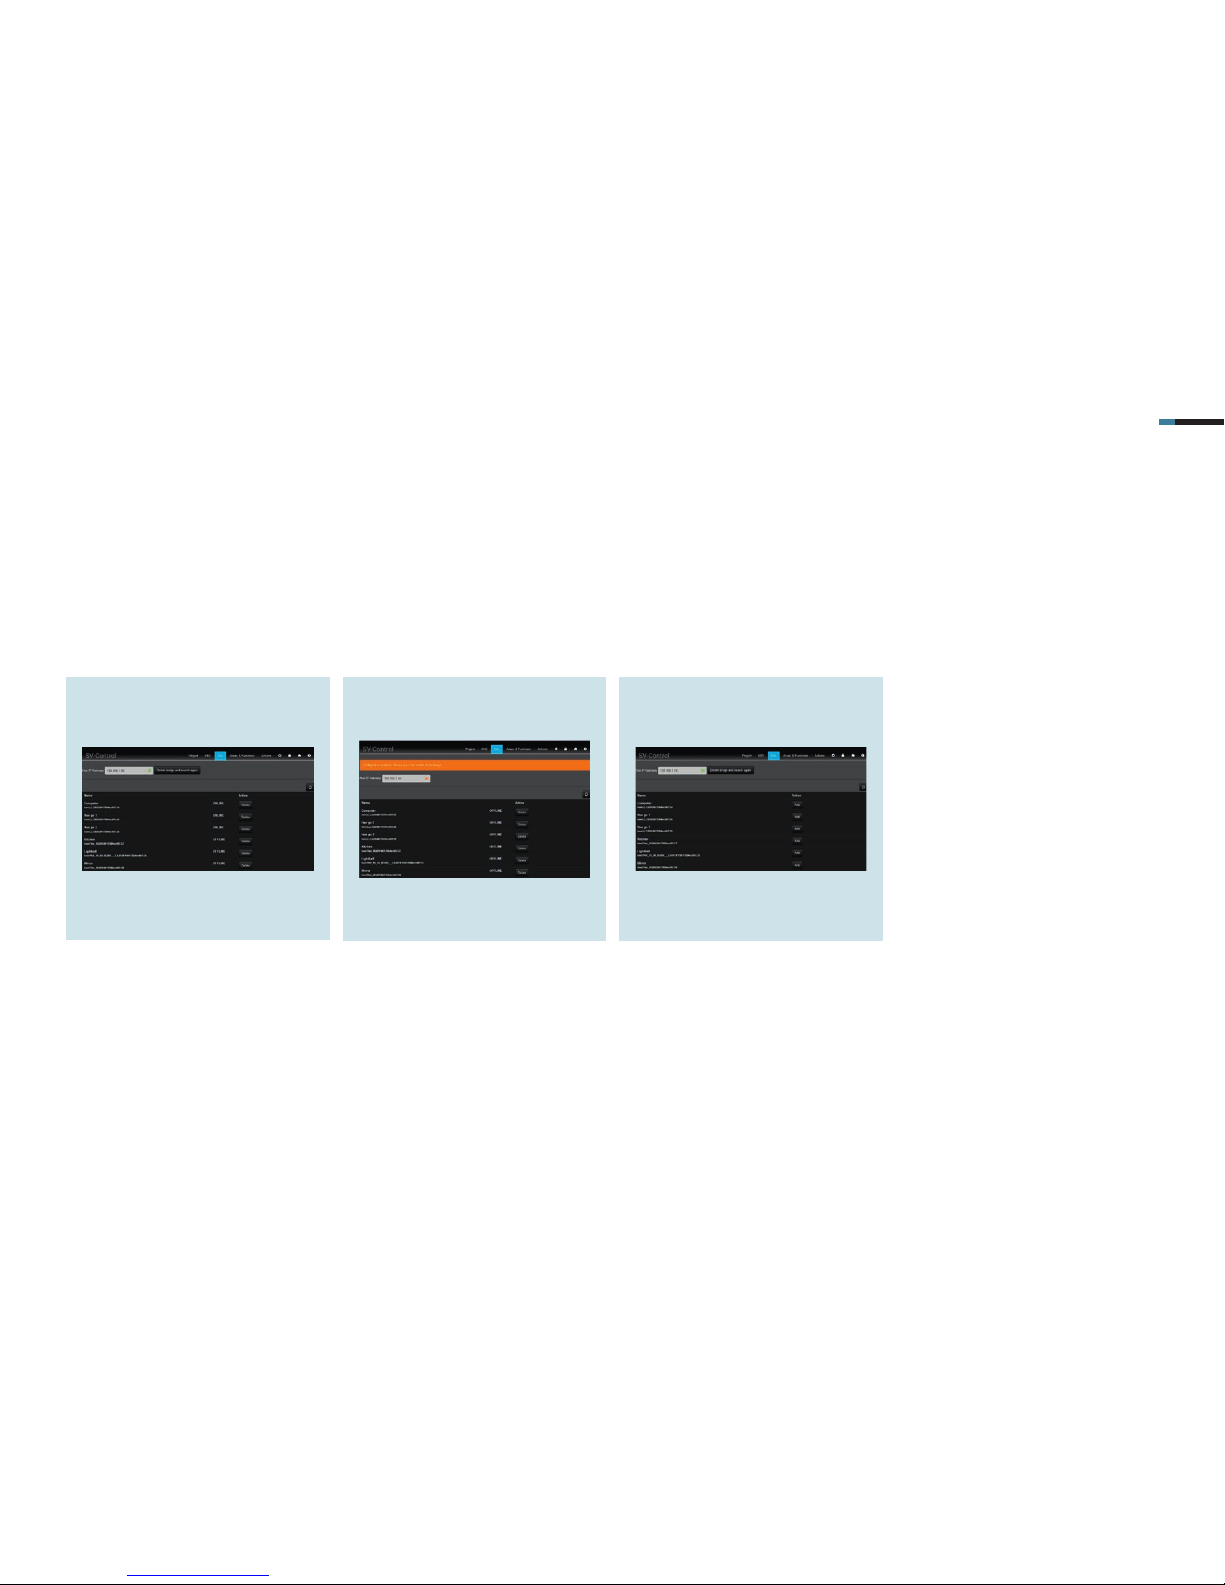
1. The SV Server automatically recog-
nises the IP address of the Hue Bridge
and displays it in the Hue IP Gateway
field.
5.1 Configuration of a Hue application – general configuration
The following explains how to connect Philips Hue to the Smart Visu Server.
2. If the Bridge is not automatically
recognised, enter the IP address
manually or delete the Bridge and
start the search again.
3. Select Add to pair lamps with the SV
Server.
Page 16

SMART VISU SERVER + PHILIPS HUE 14
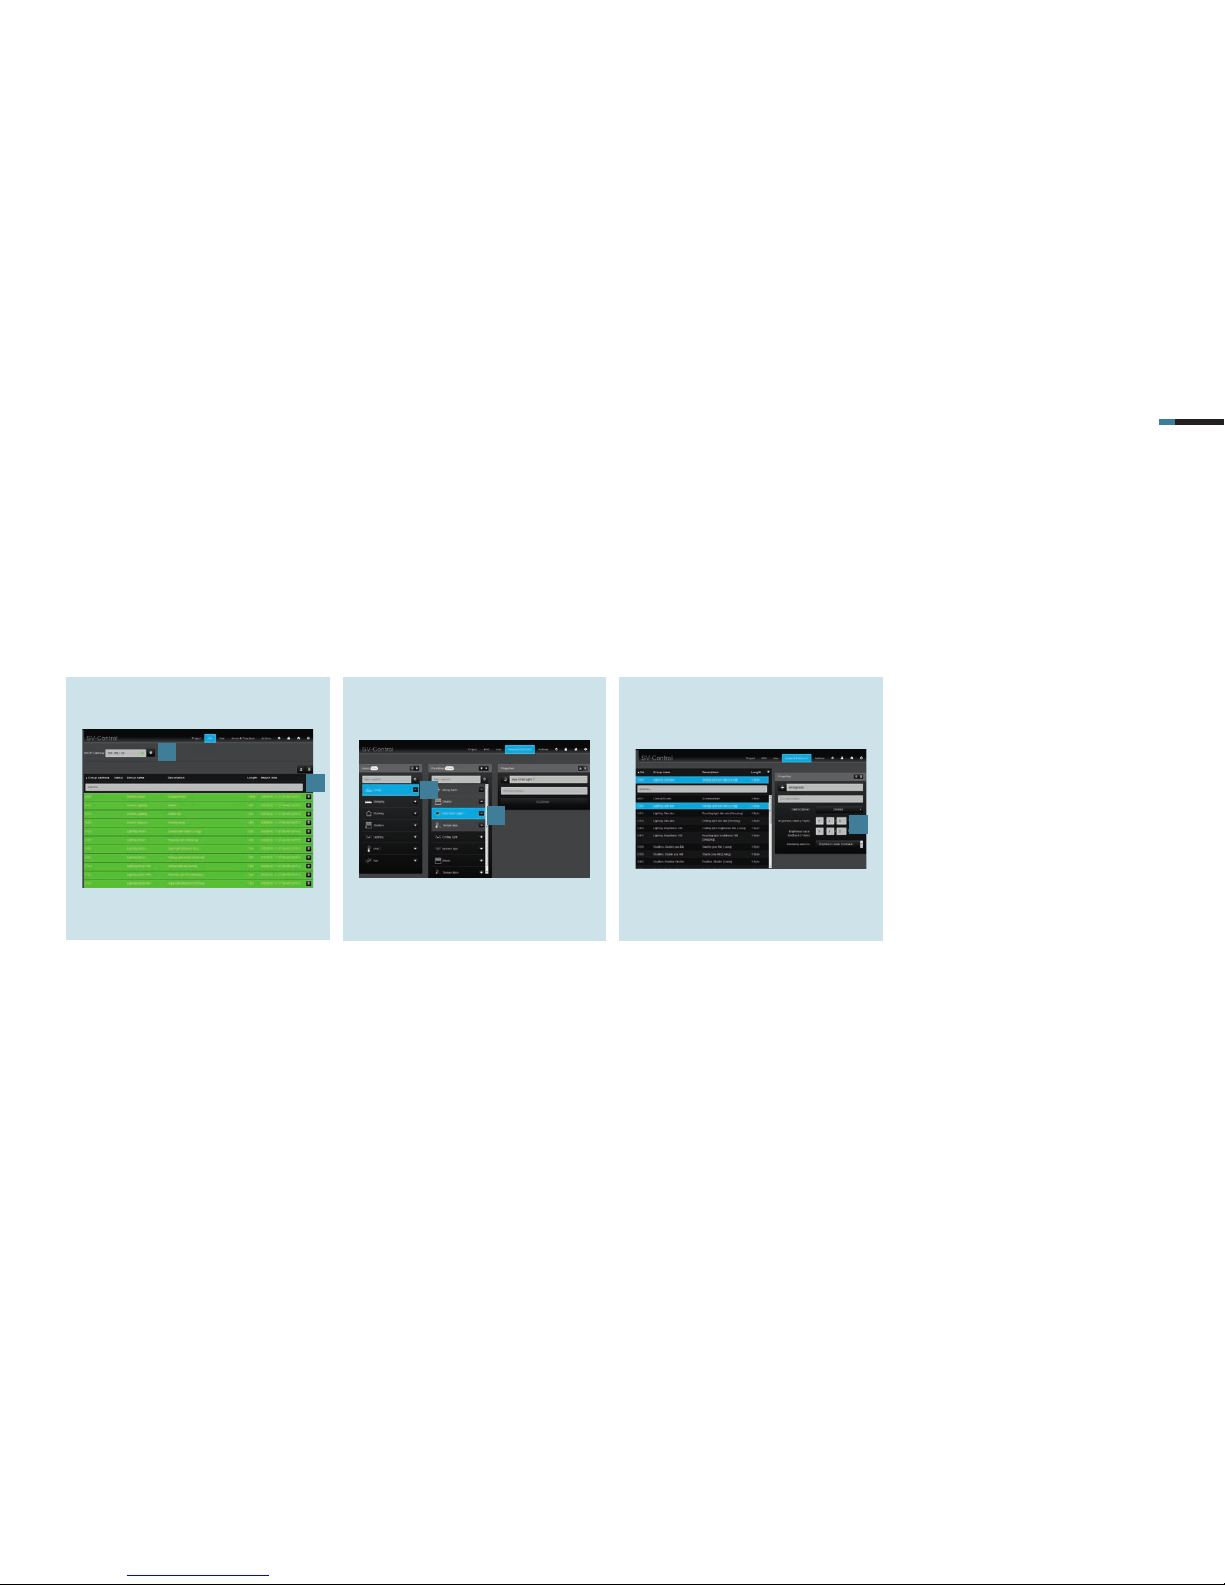
1. Select your Hue lamp [1] under Areas
& Functions.
5.2 Editing the Hue lamps
You can now set the brightness and colours of your Hue lamps with the SV Server.
2. Create a Room [2] under Areas �
functions and add the Hue lamp [3]
to the selected room.
3. Control the Hue lamps in the
SV Home according to your wishes.
1
2
3
Page 17
SMART VISU SERVER + PHILIPS HUE 15
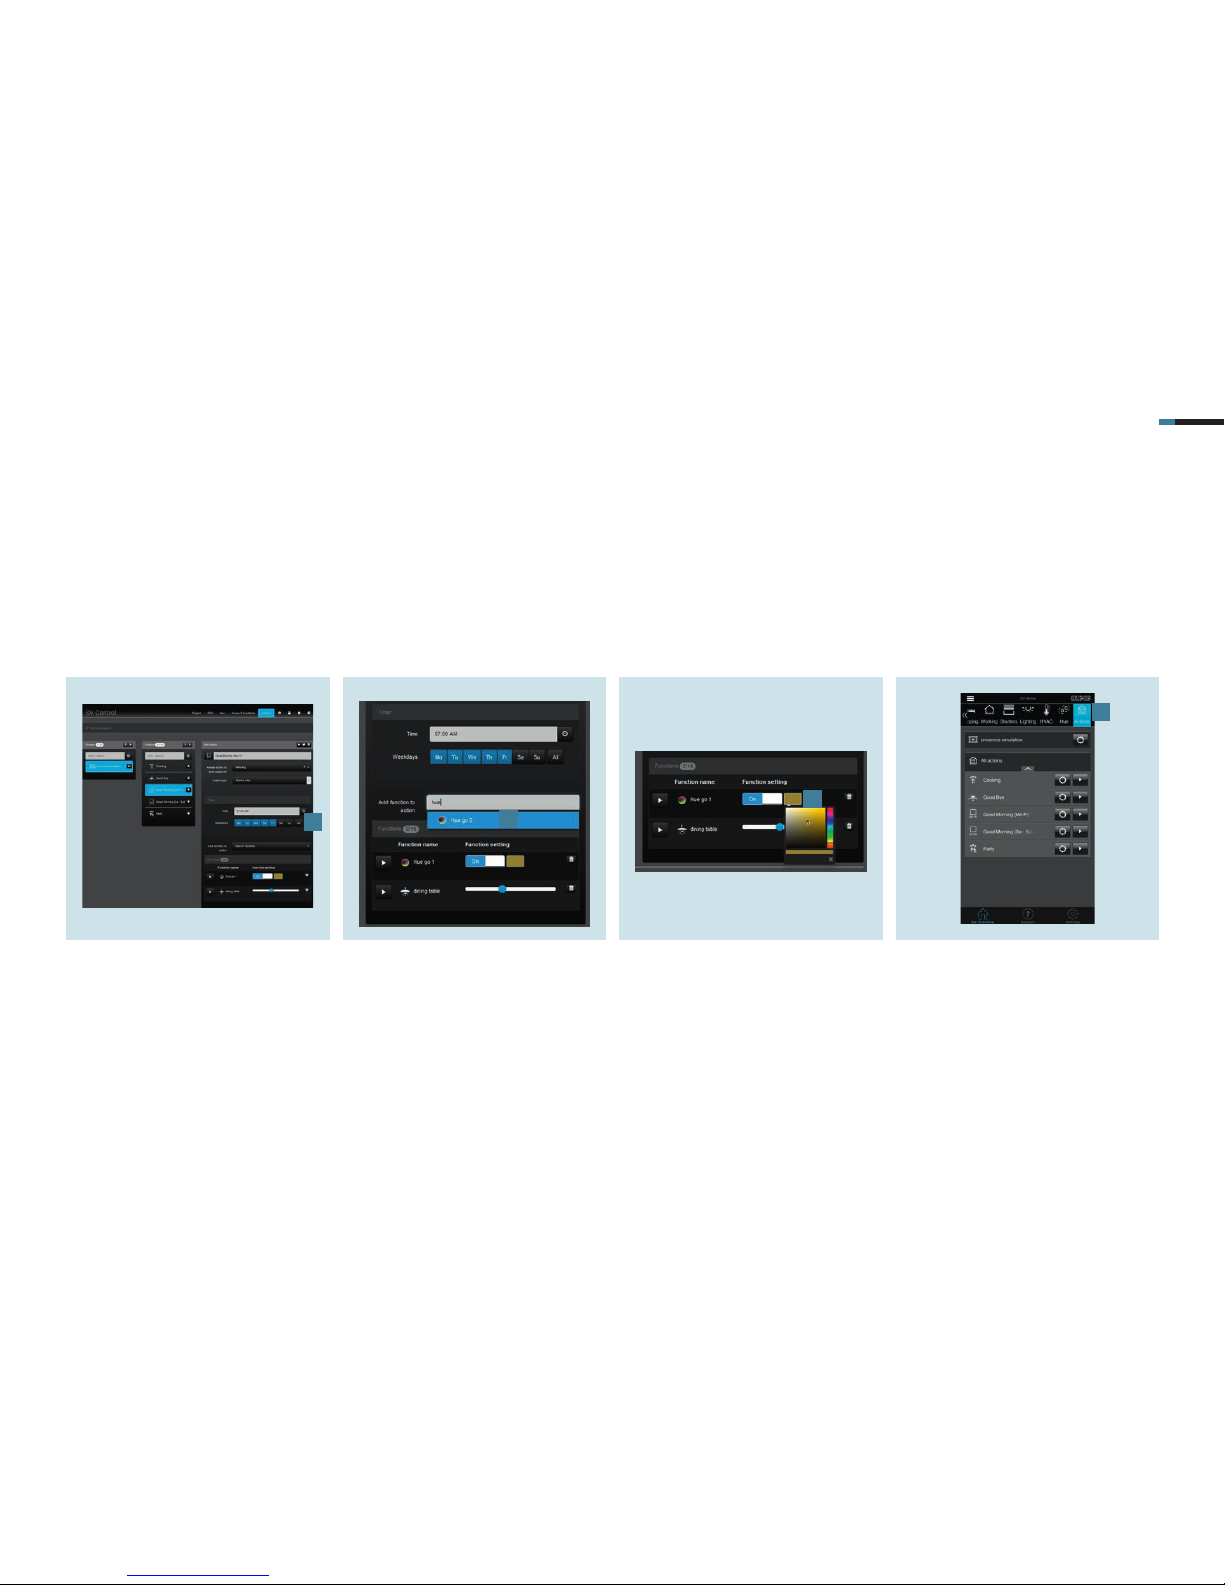
1. Create the action in the Actions tab
and select the time schedule action
type. Programme the timer [1], e.g.:
Mo – Fr 07:00
Bedroom
2. Assign the Action to a room (Area).
6. Hue system and actions
The actions allow you to create scenes for the Hue system that are retrieved on a schedule, event or user basis. Two application examples are described.
6.1 “Good morning [Mo – Fr]” action
This action switches the lighting for your room at a specified time. In addition, a defined light colour is set for when the action is triggered.
3. Add the appropriate Functions (Hue
lamps) [2] to the action.
4. Set the desired Ambiance[3]. Select
the colour, saturation and brightness
in the colour area with the crosshairs.
5. After you have saved the action, it can
be called in the SV-Home under
Actions [4].
1
2
3
4
Page 18
SMART VISU SERVER + PHILIPS HUE 16
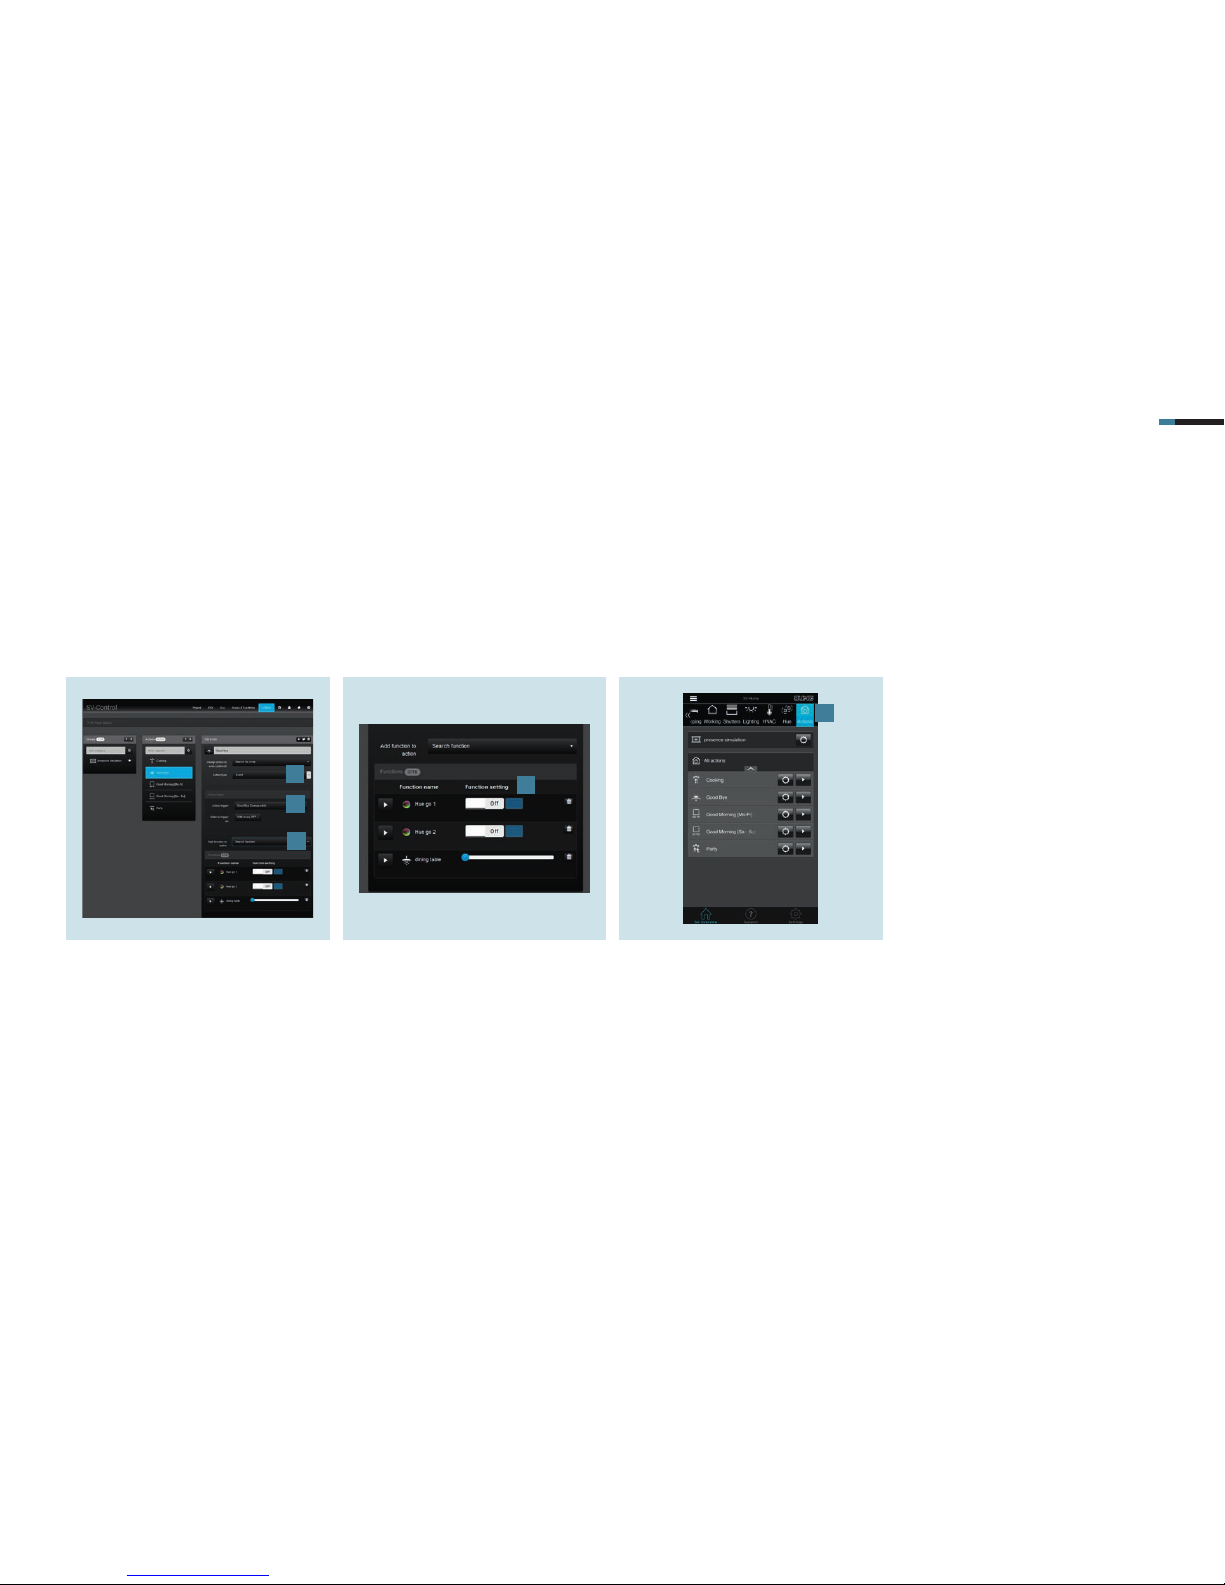
1. Create the action in the Actions tab,
allocate the action as necessary
to an area and select the type of
action as Event [1].
2. Select an Action trigger. Here, for
example, “Switch Good Bye”
push-button and define the state for
triggering the action: “State OFF”[2].
3. Add the appropriate Functions – here
Hue lamps – [3] to the action.
6.2 “Goodbye” action
This action is to switch off all Hue lamps when leaving the apartment by pressing a button.
4. Specify which Status the functions
(Hue lamps) have when triggered [4],
e.g.:
Lamp off
Brightness/dimming value 0 per-
cent
5. After you have saved the action, it can
be called in the SV-Home under
Actions [5] and via the KNX button.
1
2
3
4
5
Page 19
SMART VISU SERVER + PHILIPS HUE 17
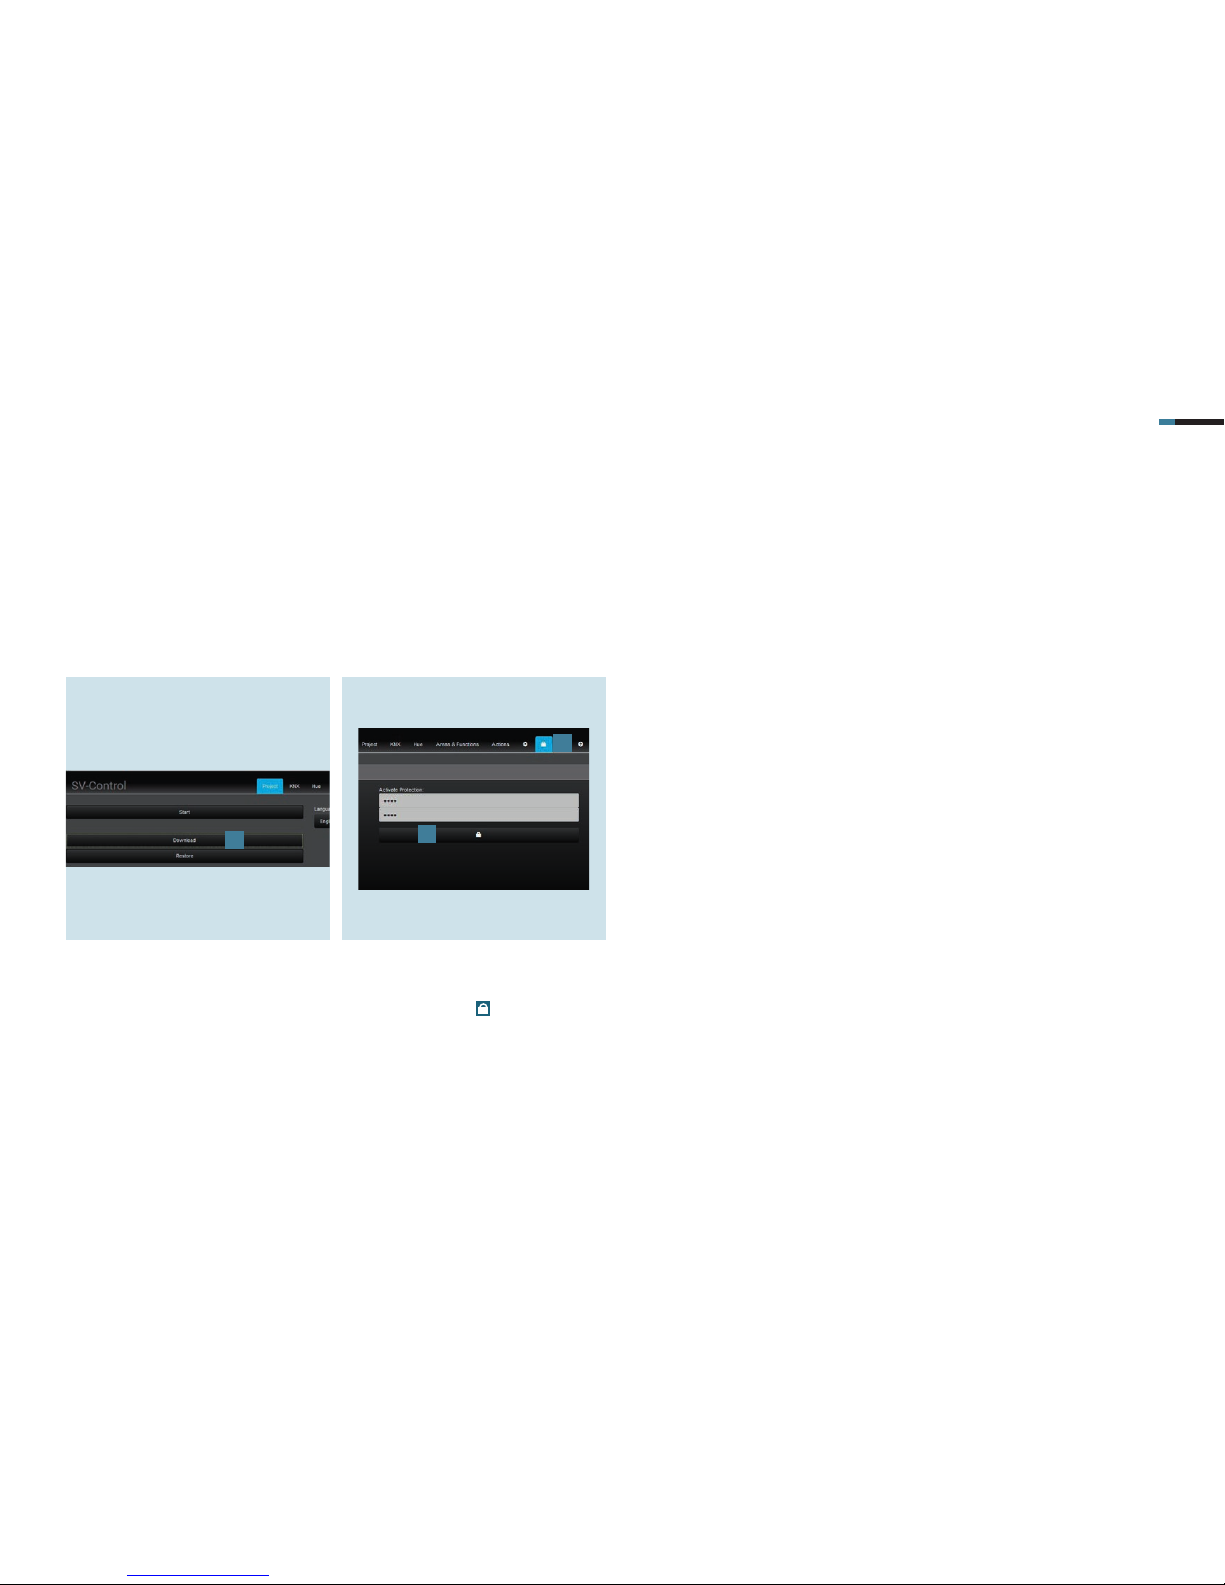
1. To save your project file, call SV-Con-
trol. Save the project and your
configuration under Download [1] in
the Project tab.
7. Saving the project
Congratulations – Philips Hue has now been connected to the Smart Visu Server in accordance with the installation example and is set up.
Don’t forget to save your project data and activate access protection!
2. To reactivate the access protection
for your system, call up the access
control page with
[2].
3. Enter the password and activate the
protection by clicking on the selected
area [3].
1
2
3
Page 20
How do I connect Sonos?
Smart Visu Server
Page 21
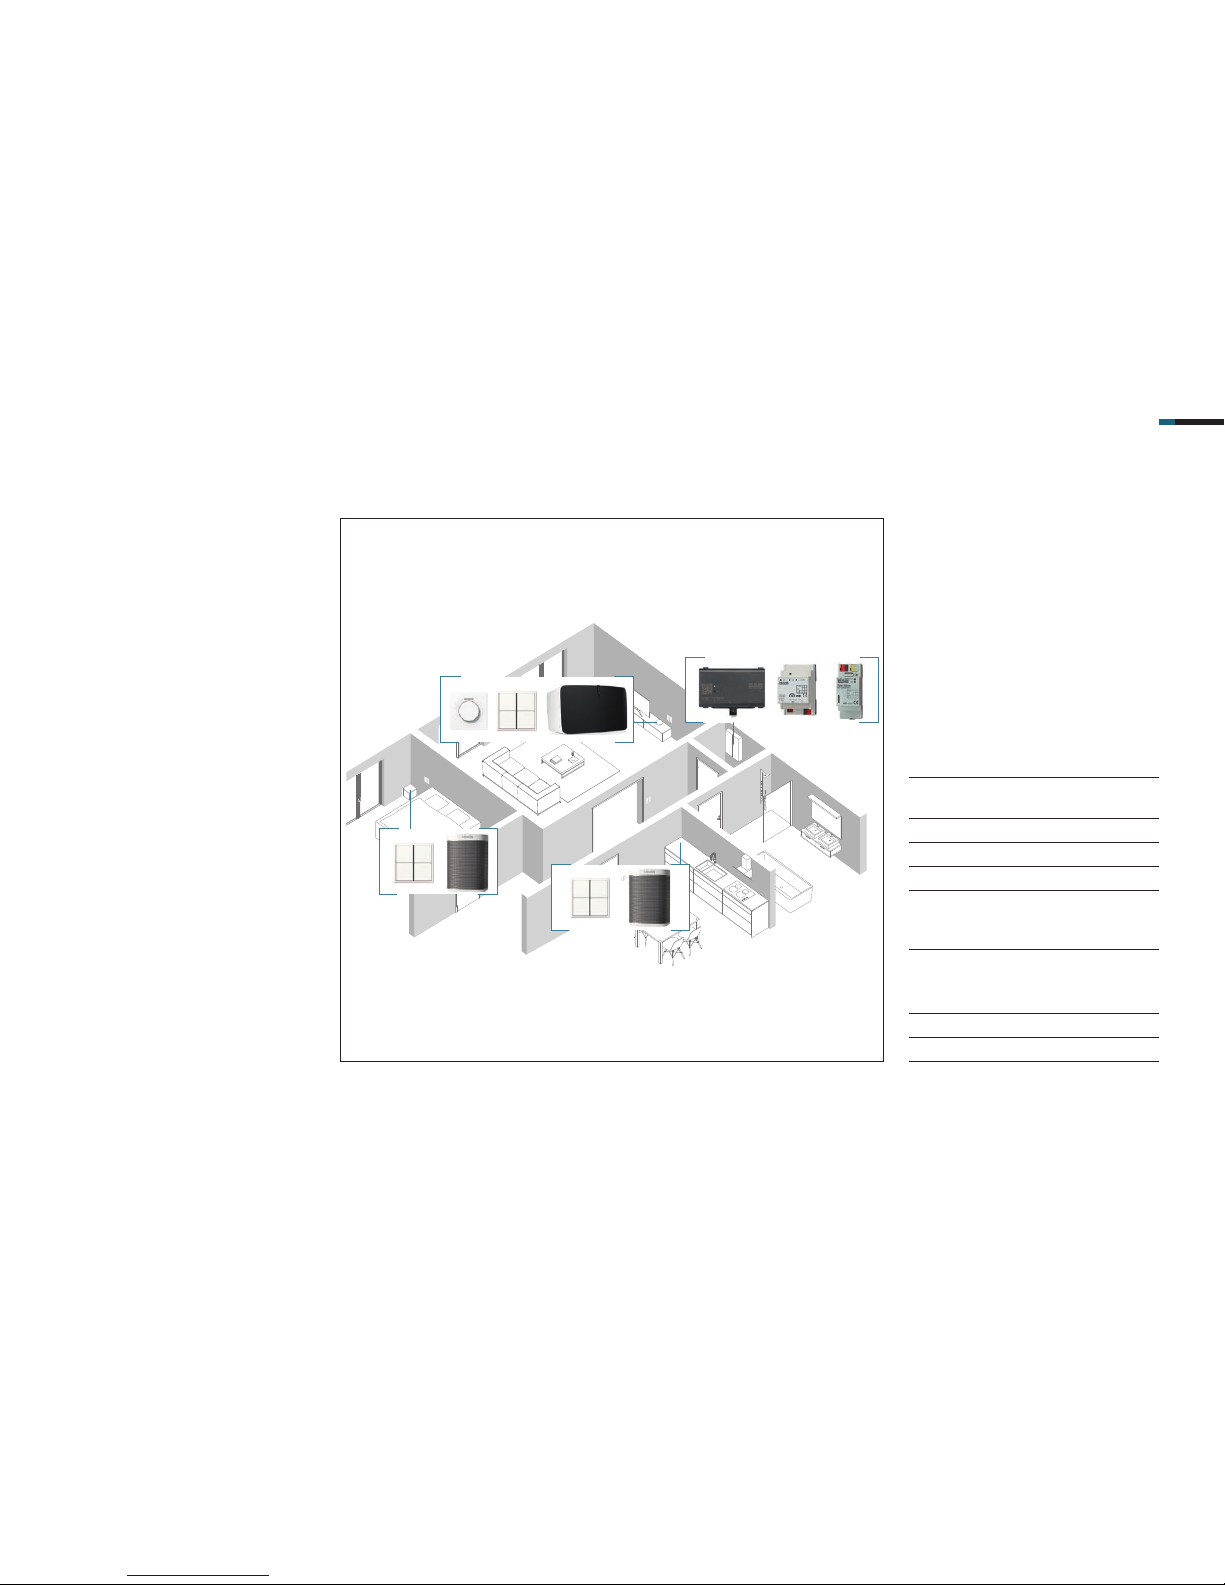
SMART VISU S ERVER + SONOS 2
Outstanding sound thanks to the KNX
Sonos Gateway:
With the KNX Sonos Gateway you can
conveniently control your Sonos
system.
Simply start playing your music using
the JUNG KNX push-button modules or
set the sound level comfortably with
the JUNG KNX rotary sensor. Thanks to
the JUNG Smart Visu Server, in addition
you can easily visualise and operate
your system.
These instructions explain the
individual steps commissioning and
using it on the basis of an example.
1. Introduction
COMPONENTS
JUNG
REFERENCE NOQUAN-
TITY
KNX Sonos
Gateway
MR-SONOS REG
1
Smart Visu Server SV Server 1
KNX IP interface IPS 200 REG 1
KNX rotary sensor DS 4092 TS 1
KNX Universal
push-button module, 4-gang
4194 TSM 3
COMPONENTS
SONOS
REFERENCE NOQUAN-
TITY
Sonos Play: 5 – 1
Sonos Play: 1 – 2
Page 22

SMART VISU S ERVER + SONOS 3
Sonos can be integrated into your
JUNG Smart Visu Server with just a few
steps.
The table here gives an overview of the
necessary steps.
The individual steps are described in
detail on the following pages.
STEP PAGE
1. Download the Sonos app 4
2. Set up Sonos devices 4
3. Add the network or drive path of the music library 5
4. Create a playlist 6
5. Set up a radio station 7
6. Add playlists and radio stations to the Sonos favourites 8
7. Put KNX Sonos Gateway into operation using ETS 9
8. Configure the music sources for the KNX Sonos Gateway using the web interface 11
9. Connect the Smart Visu Server to the IP network 14
10. Connect Sonos system to Smart Visu Server 15
11. Set up areas and functions 16
12. Configure actions 17
13. Save project 20
2. Overview
Page 23
SMART VISU S ERVER + SONOS 4
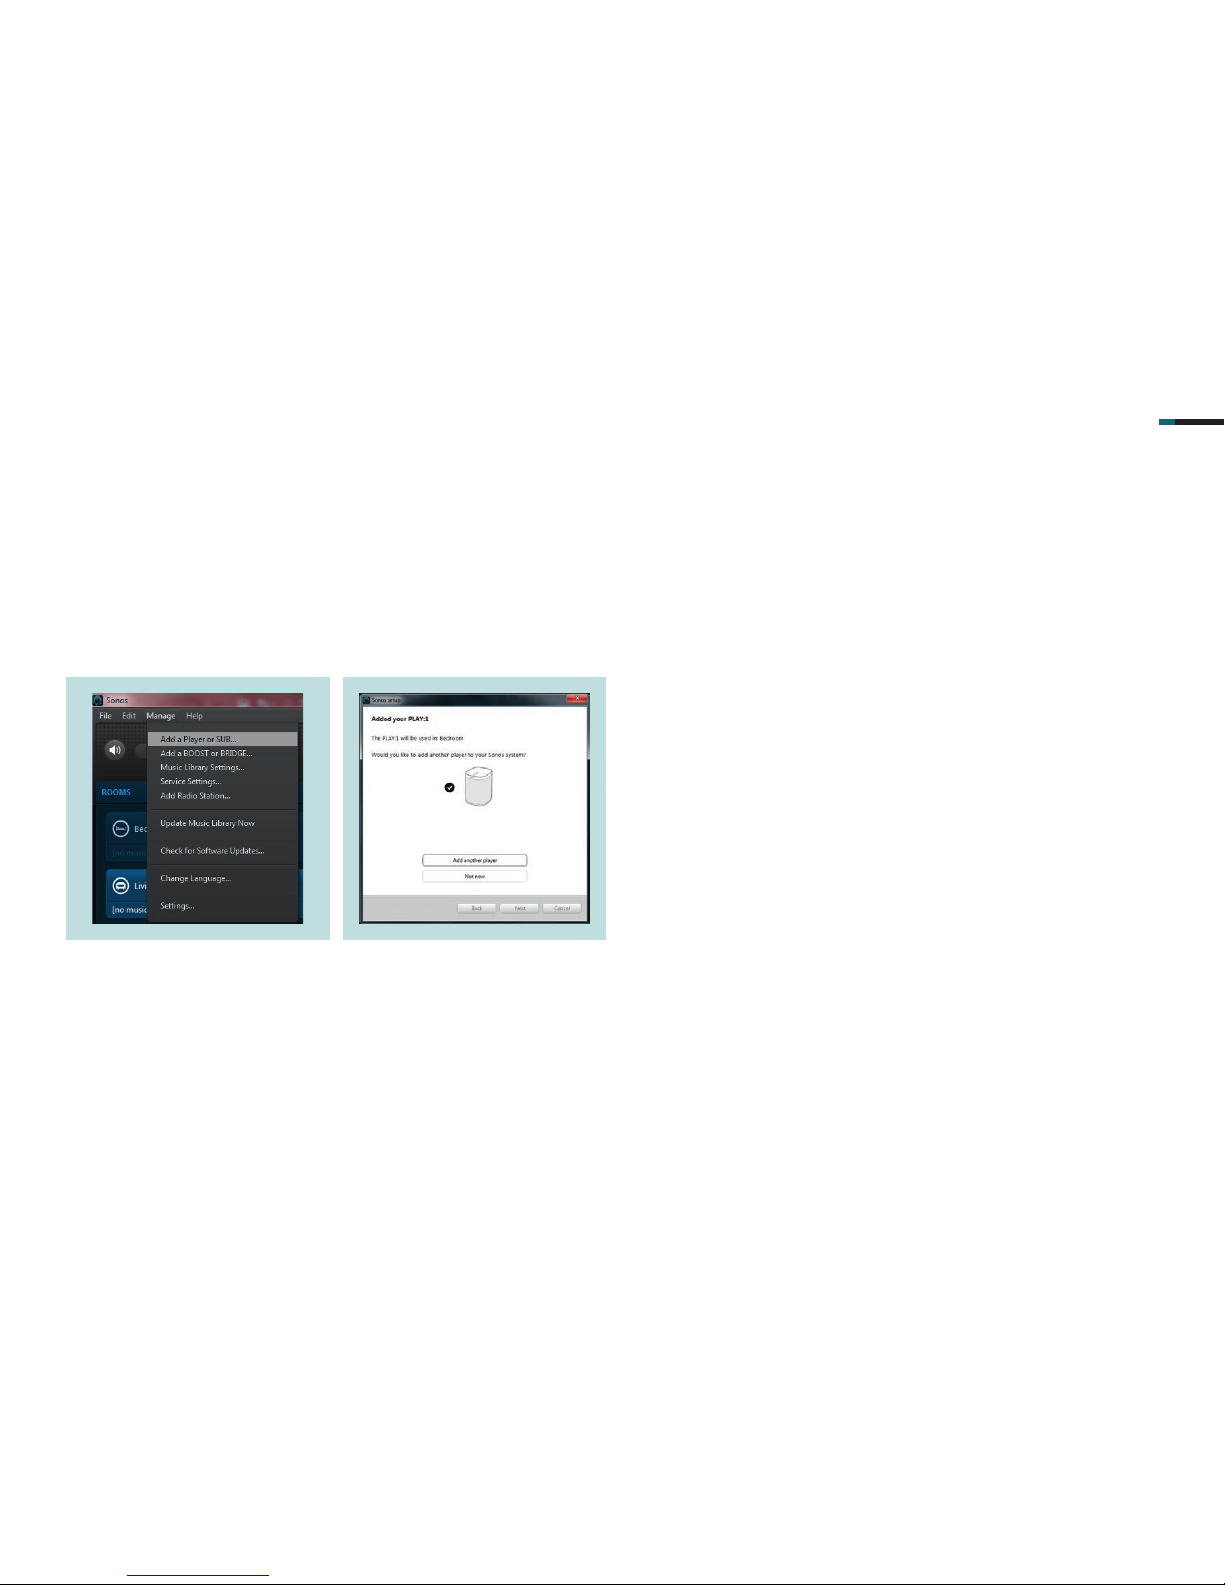
. Open the controller and then Add a
Player or SUB option in the Manage
tab.
3. Commissioning Sonos
Install the Sonos app (Sonos Controller) on your computer or smart phone and set up the Sonos devices.
Note: During initial operation, in normal circumstances no Sonos device has been set up. Follow the instructions of the app!
3.1 Add other Sonos devices
You can add other Sonos devices as soon as you have put the fi rst Sonos device into operation.
Note: The following pages are based on the Sonos desktop app for Windows computers.
. The Sonos app guides you automati-
cally through the set-up of your Sonos
device. After all the instructions for the
installation have been followed, you
receive the following message.
Page 24
SMART VISU S ERVER + SONOS 5
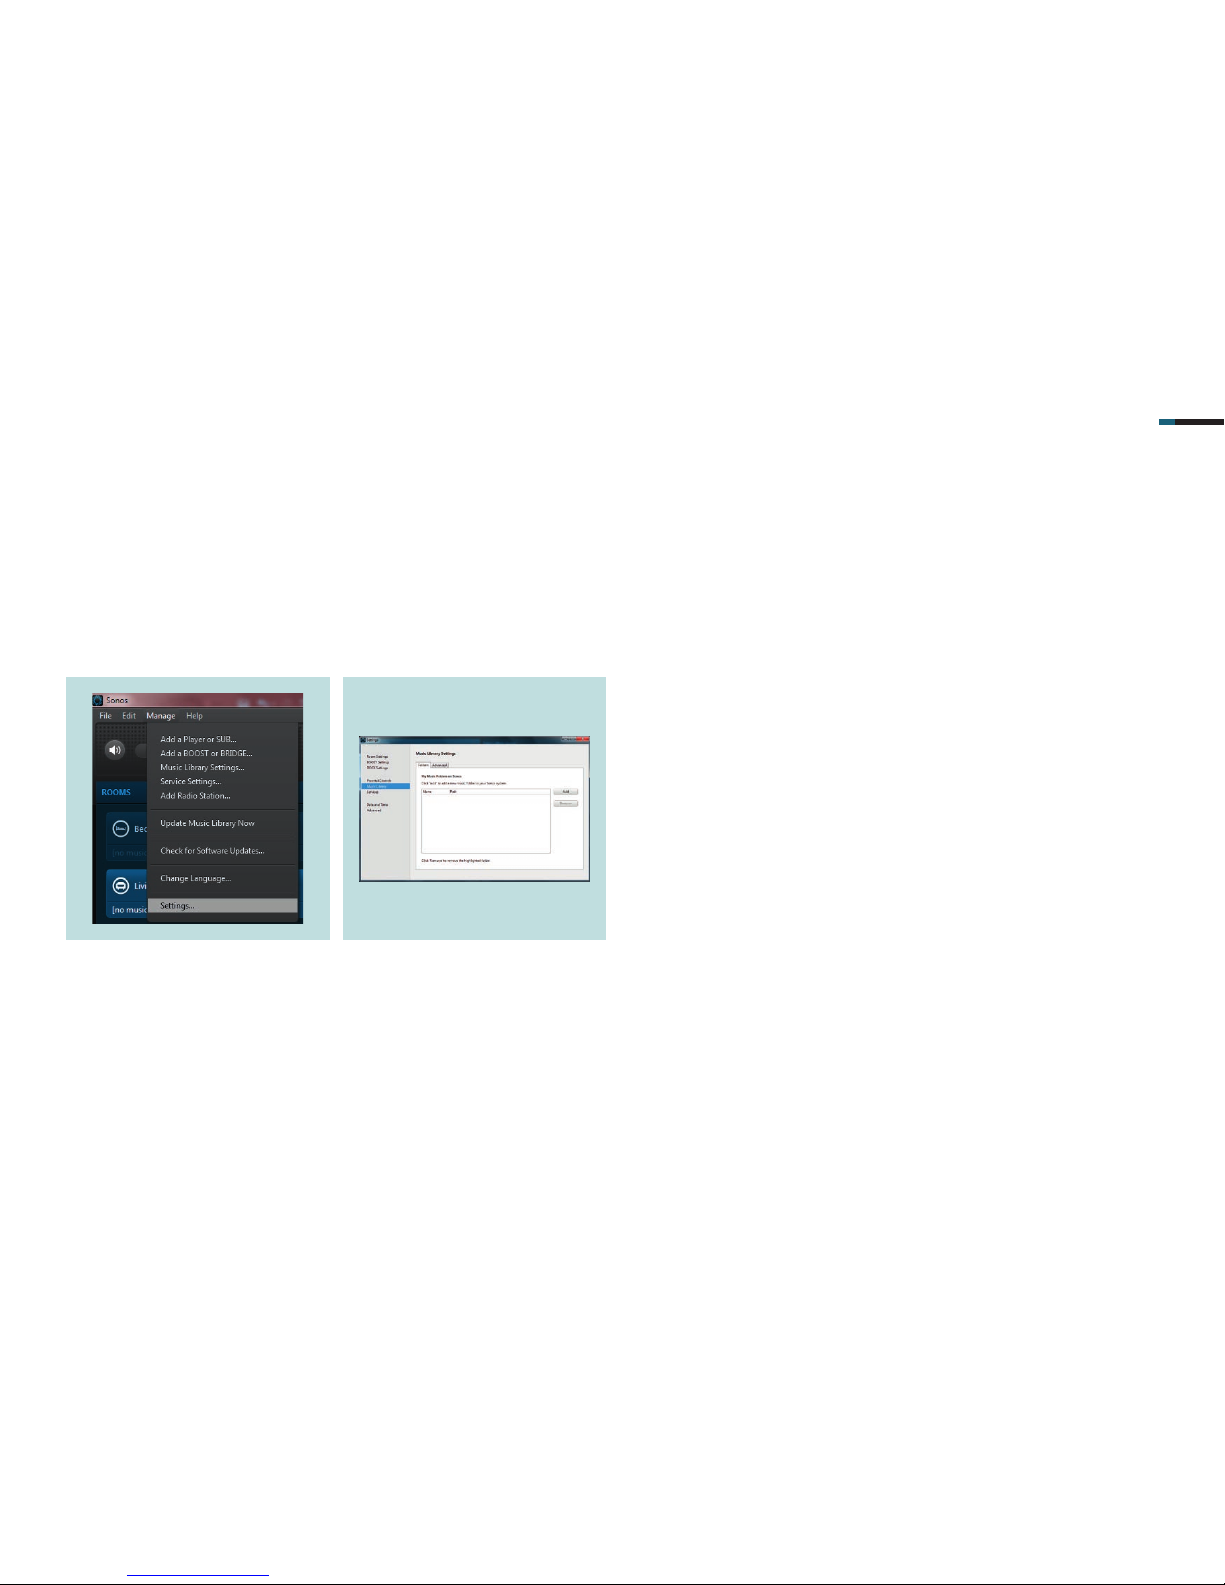
. Open the Settings option in the
Manage tab.
3.2 Setting up the music library
Specify in the controller which audio fi les should be played or where the source directory in which the audio fi les are saved can be found.
. A pop-up menu opens. Select the
Music library menu point. Enter the
path to the drive or network device
where your music is stored using Add.
Page 25
SMART VISU S ERVER + SONOS 6
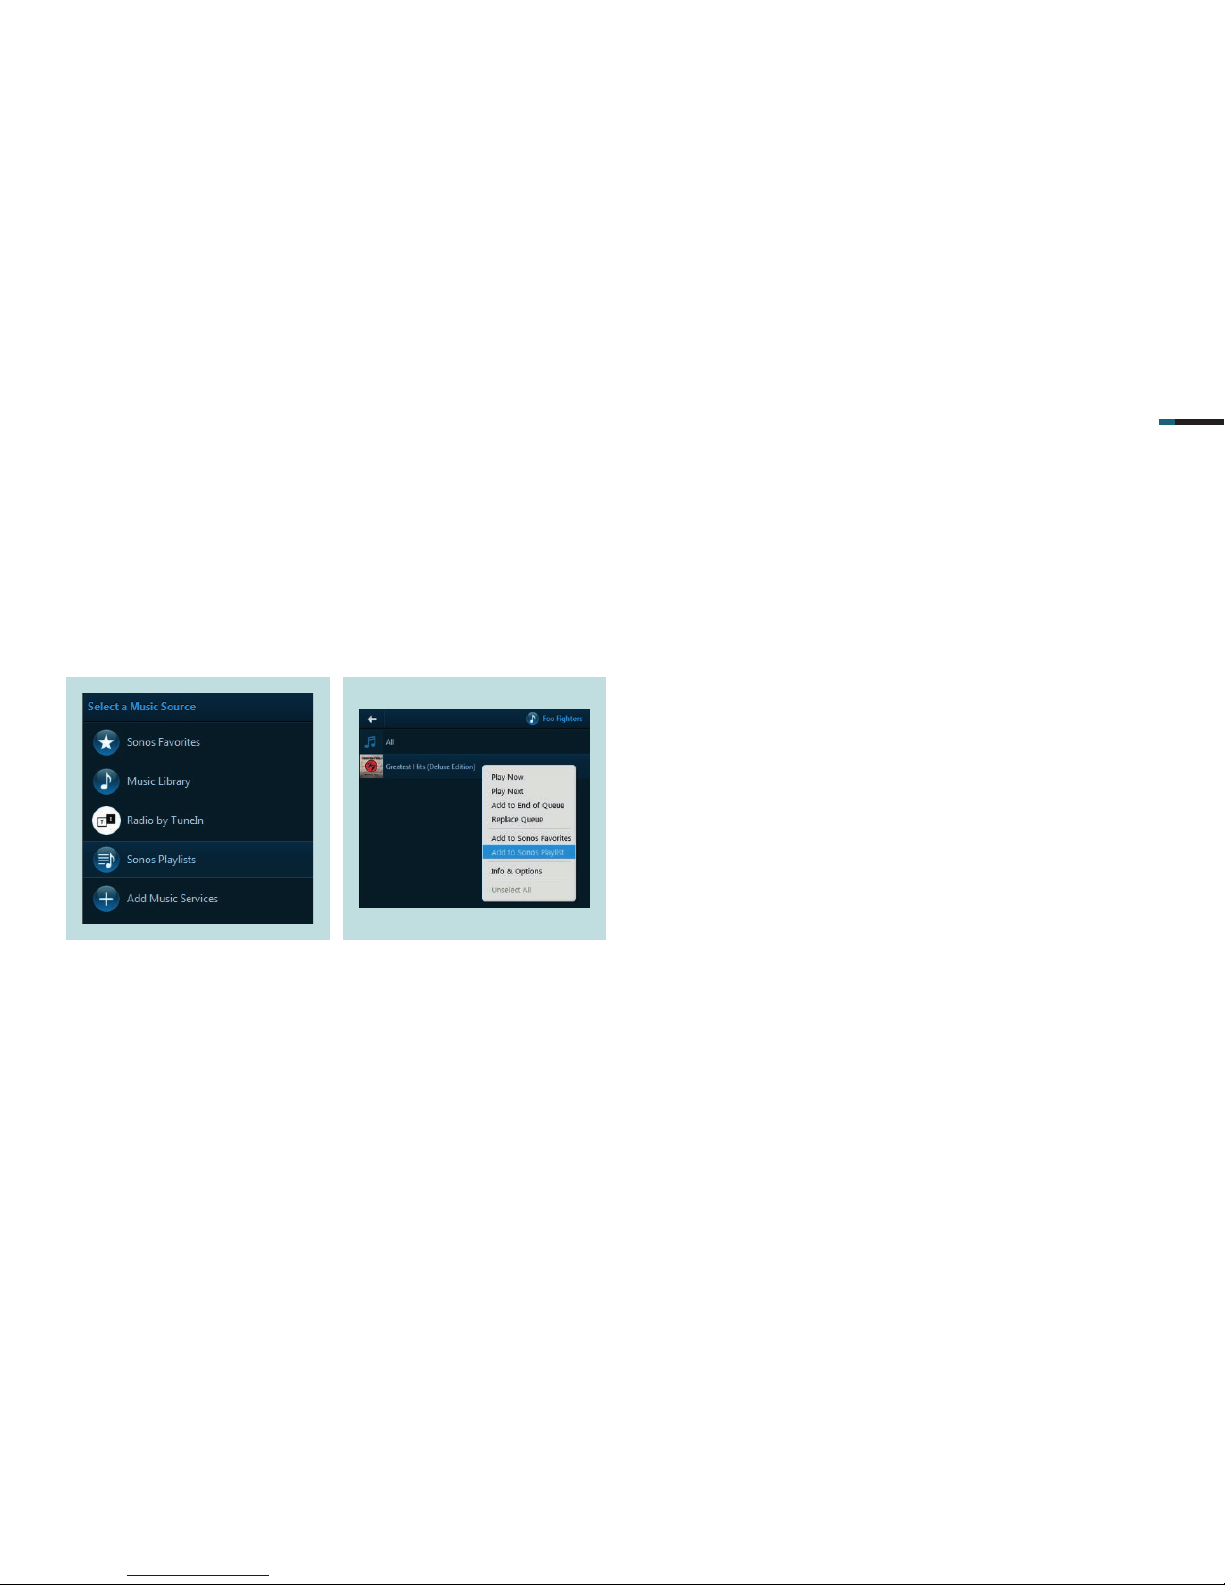
. Click on Sonos Playlists and select New
Playlist to create a playlist. Then name
the playlist.
3.3 Creating a playlist
In the next step, create the playlists that you want to play with Sonos using the controller.
. Afterwards, add the music tracks to
the newly created playlist. To do so,
select the songs you want in the controller by right-clicking and click on
Add to Sonos Playlist.
Page 26
SMART VISU S ERVER + SONOS 7
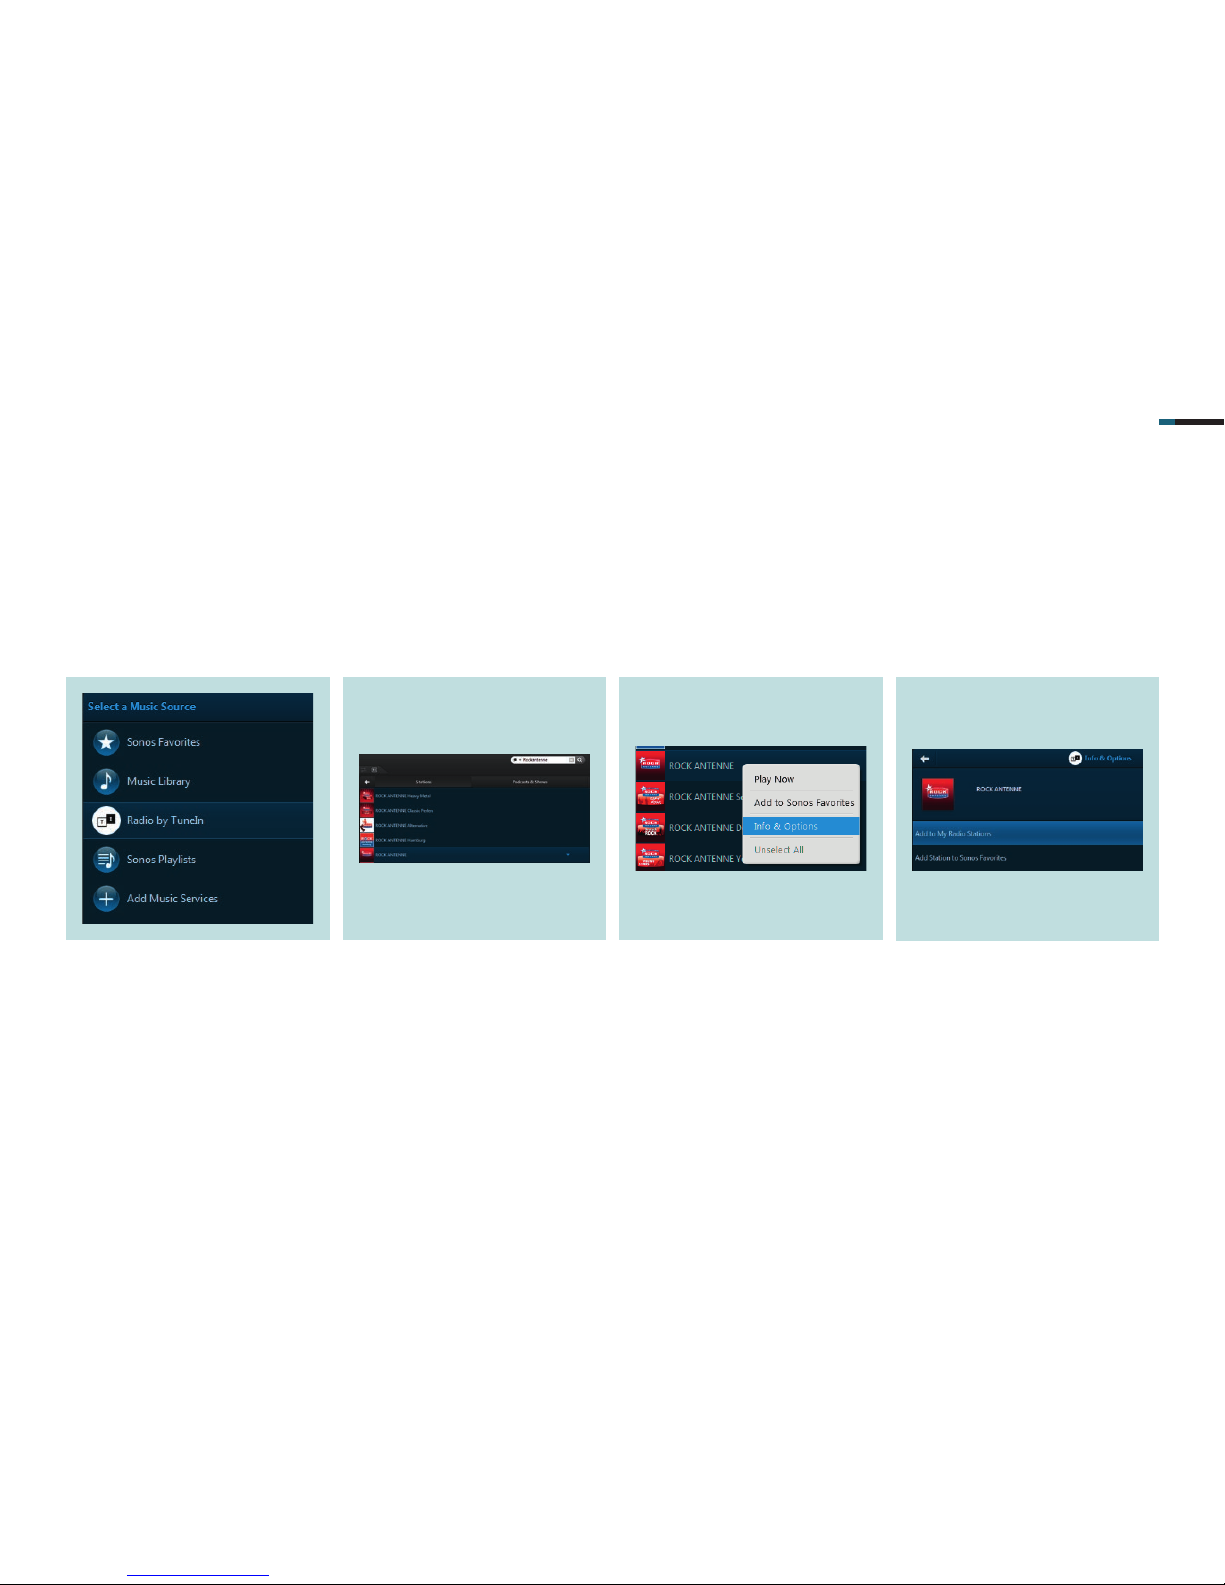
. Under Music sources , select the Radio
by TuneIn item.
3.4 Setting up a radio station
Alternatively, you can also set up a radio station that you would like to play with Sonos.
. Then enter the name of the desired
radio station in the Search fi eld at top
right.
. Now store the radio station for your
Sonos system. To do so, right-click on
the radio station to be stored and select Info Options.
. Then click on Add to My Radio Stations.
The radio station is now stored.
Page 27
SMART VISU S ERVER + SONOS 8
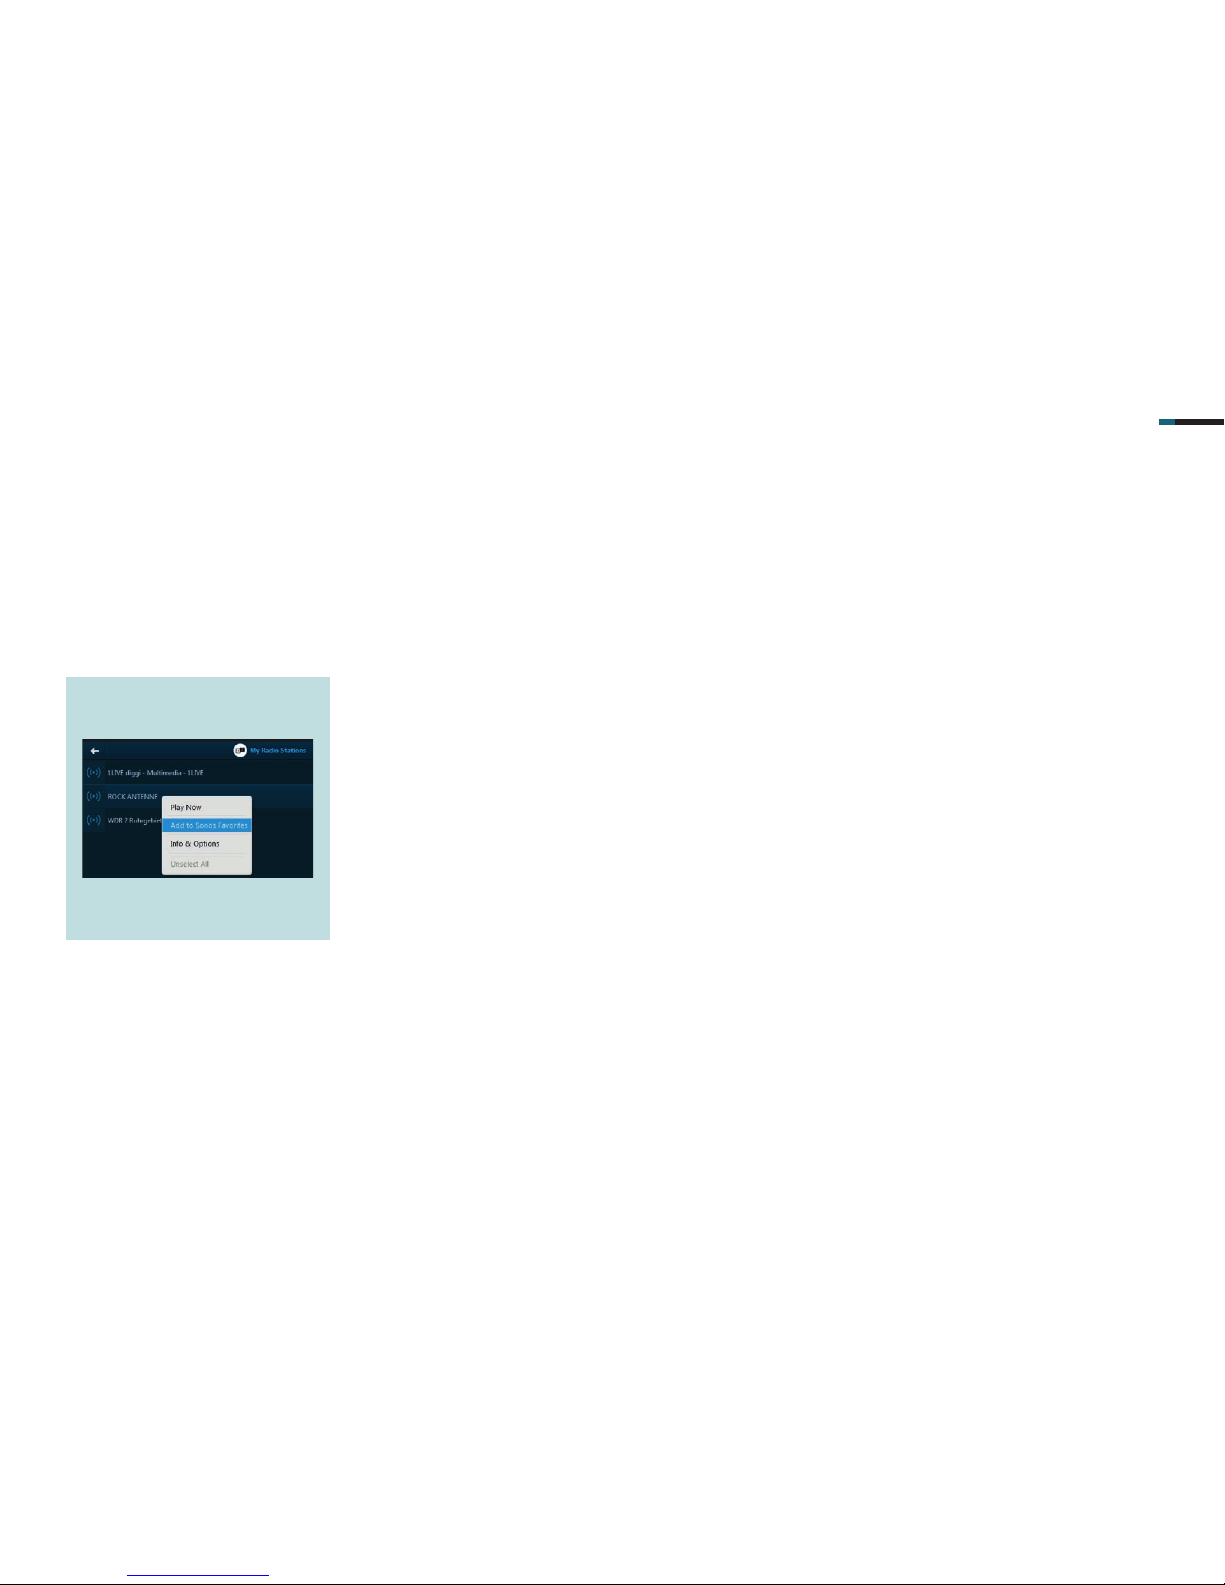
. Select a created playlist (Sonos Play-
list) or a radio station (My radio sta-
tions) by right-clicking and then click
on Add to Sonos Favorites.
3.5 Adding playlists and radio stations to the Sonos favourites
As soon as you have confi gured your playlists and radio stations, add these to your Sonos favourites.
This is required for further commissioning and enables quick access to your favourite music.
Page 28
SMART VISU S ERVER + SONOS 9
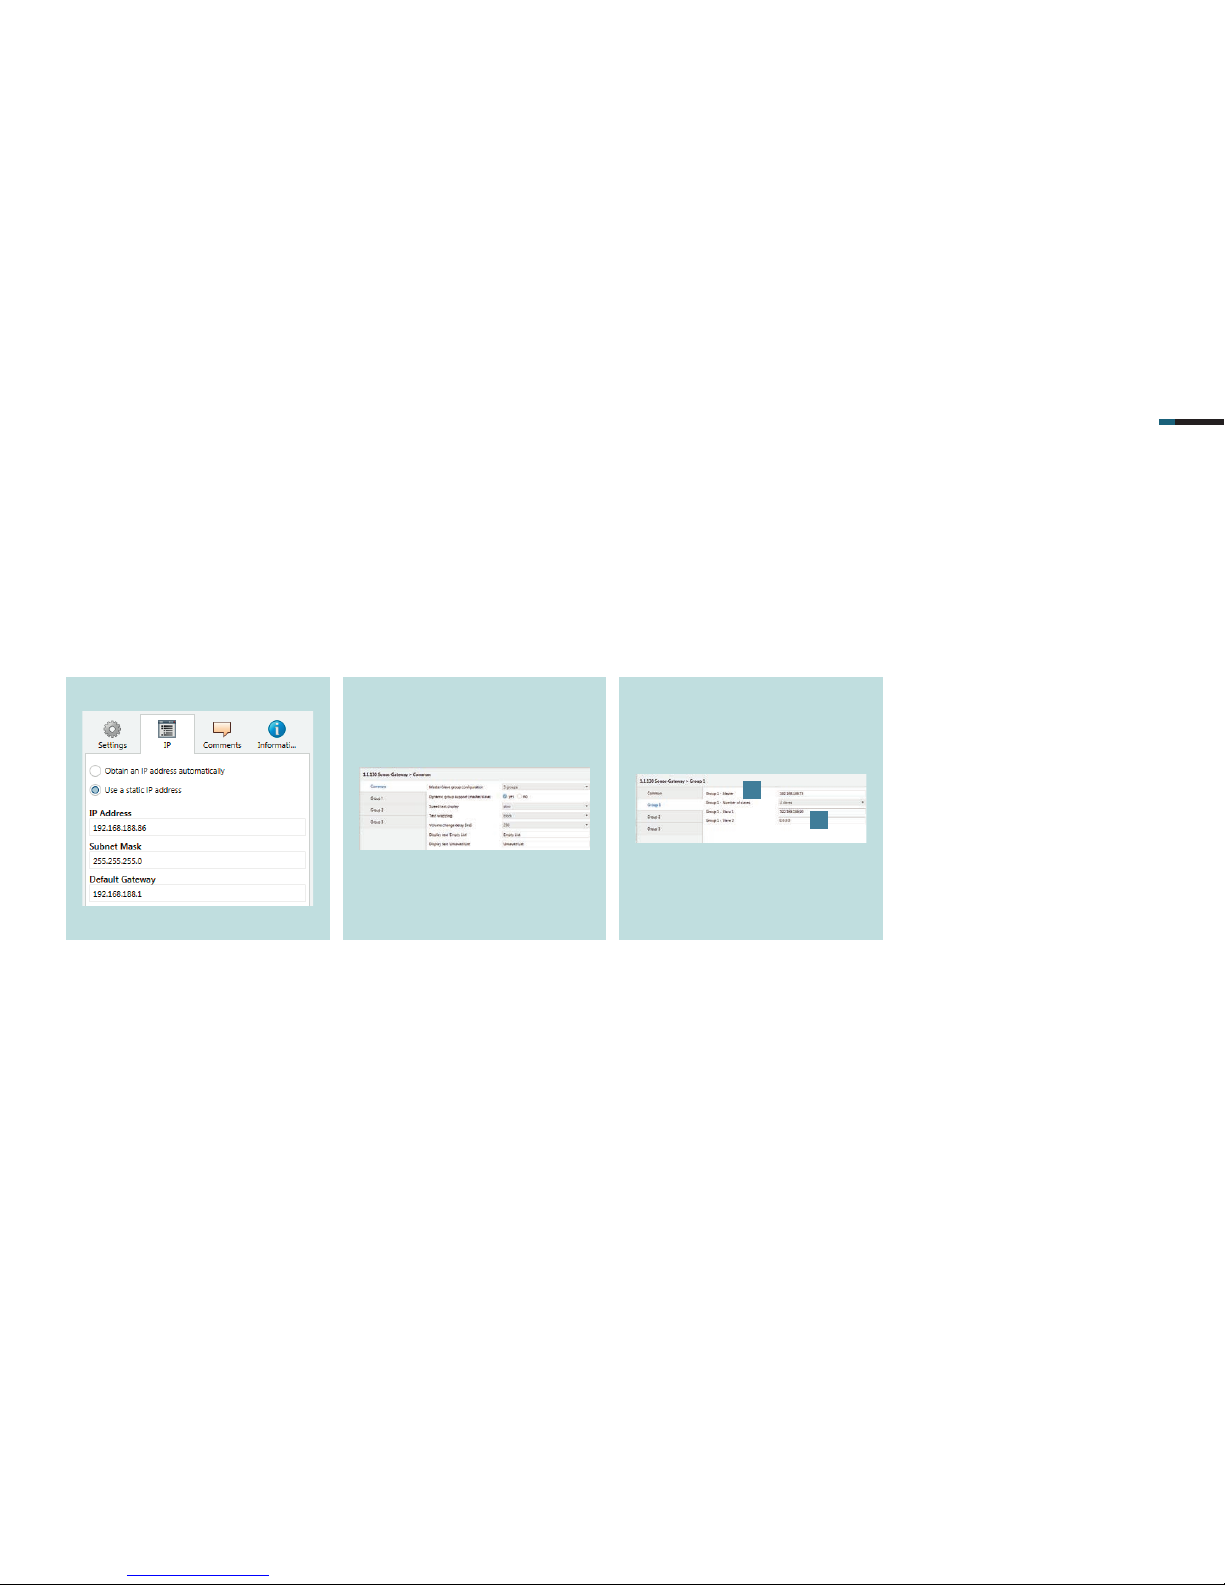
. Enter the allocated IP address in the
KNX Sonos Gateway and the appro-
priate subnet mask and standard
gateway.
4. Commissioning the JUNG KNX Sonos Gateway
After you have set up your Sonos system, confi gure the KNX Sonos Gateway. Commissioning is explained in the following pages.
4.1 Confi guring the JUNG KNX Sonos Gateway with the Engineering Tool Software (ETS)
Connect the gateway with the KNX bus and then connect it to the IP network using Ethernet (LAN).
Obtain an IP address automatically from the router or allocate a fi xed IP address yourself.
Starten ETS and create a new project or open an existing one. Import the required KNX devices and call the KNX Sonos Gateway.
. In the Parameters tab, specify the
number of groups required (Sonos
devices) under Common.
. Defi ne a master for each group or for
each room. Enter the IP address of the
desired Sonos device in the Group X
– Master [] ro w.
. In the Group X – number of Slaves row,
enter the desired number of slave
devices. In the same way as with the
Master device, then enter the
IP addresses of the slave devices in the
respective Group X – Slaves row [].
1
2
Page 29

SMART VISU S ERVER + SONOS 10
4.2 Communication objects JUNG KNX Sonos Gateway
The JUNG KNX Sonos Gateway has numerous communication objects and allows extensive operation of the Sonos system.
All objects relevant to the installation example are listed in the two tables below.
These objects are required in the SV Server for visualisation and operation later.
GLOBAL FO R GROUPS
FUNCTION TYPE KNX FUNKTION KNX GROUP ADDRESSES
WRITE SIZE (DPT) READ SIZE (DPT)
Multimedia Playlist mode Volume control 1 byte (5.001) Volume status 1 byte (5.001)
Playlist name/Song titel/Album 14 bytes (16.0 01)
Play 1 bit (1.010) Playing status 1 bit (1.010)
Next/previous playlist 1 bit (1.007)
Next/previous title 1 bit (1.007)
Repeat all 1 bit (1.003) Play mode status “Repeat all” 1 bit (1.003)
Shuffle 1 bit (1.003) Shuffle mode status 1 bit (1.003)
Select playlist 1 byte (5.010) Current playlist 1 byte (5.010)
SPECIFIC TO SLAVES
Slave 1 – change group membership 1 bit (1.001) Slave 1 – group membership 1 bit (1.001)
Slave 2 – change group membership 1 bit (1.001) Slave 2 – group membership 1 bit (1.001)
Page 30
SMART VISU S ERVER + SONOS 11
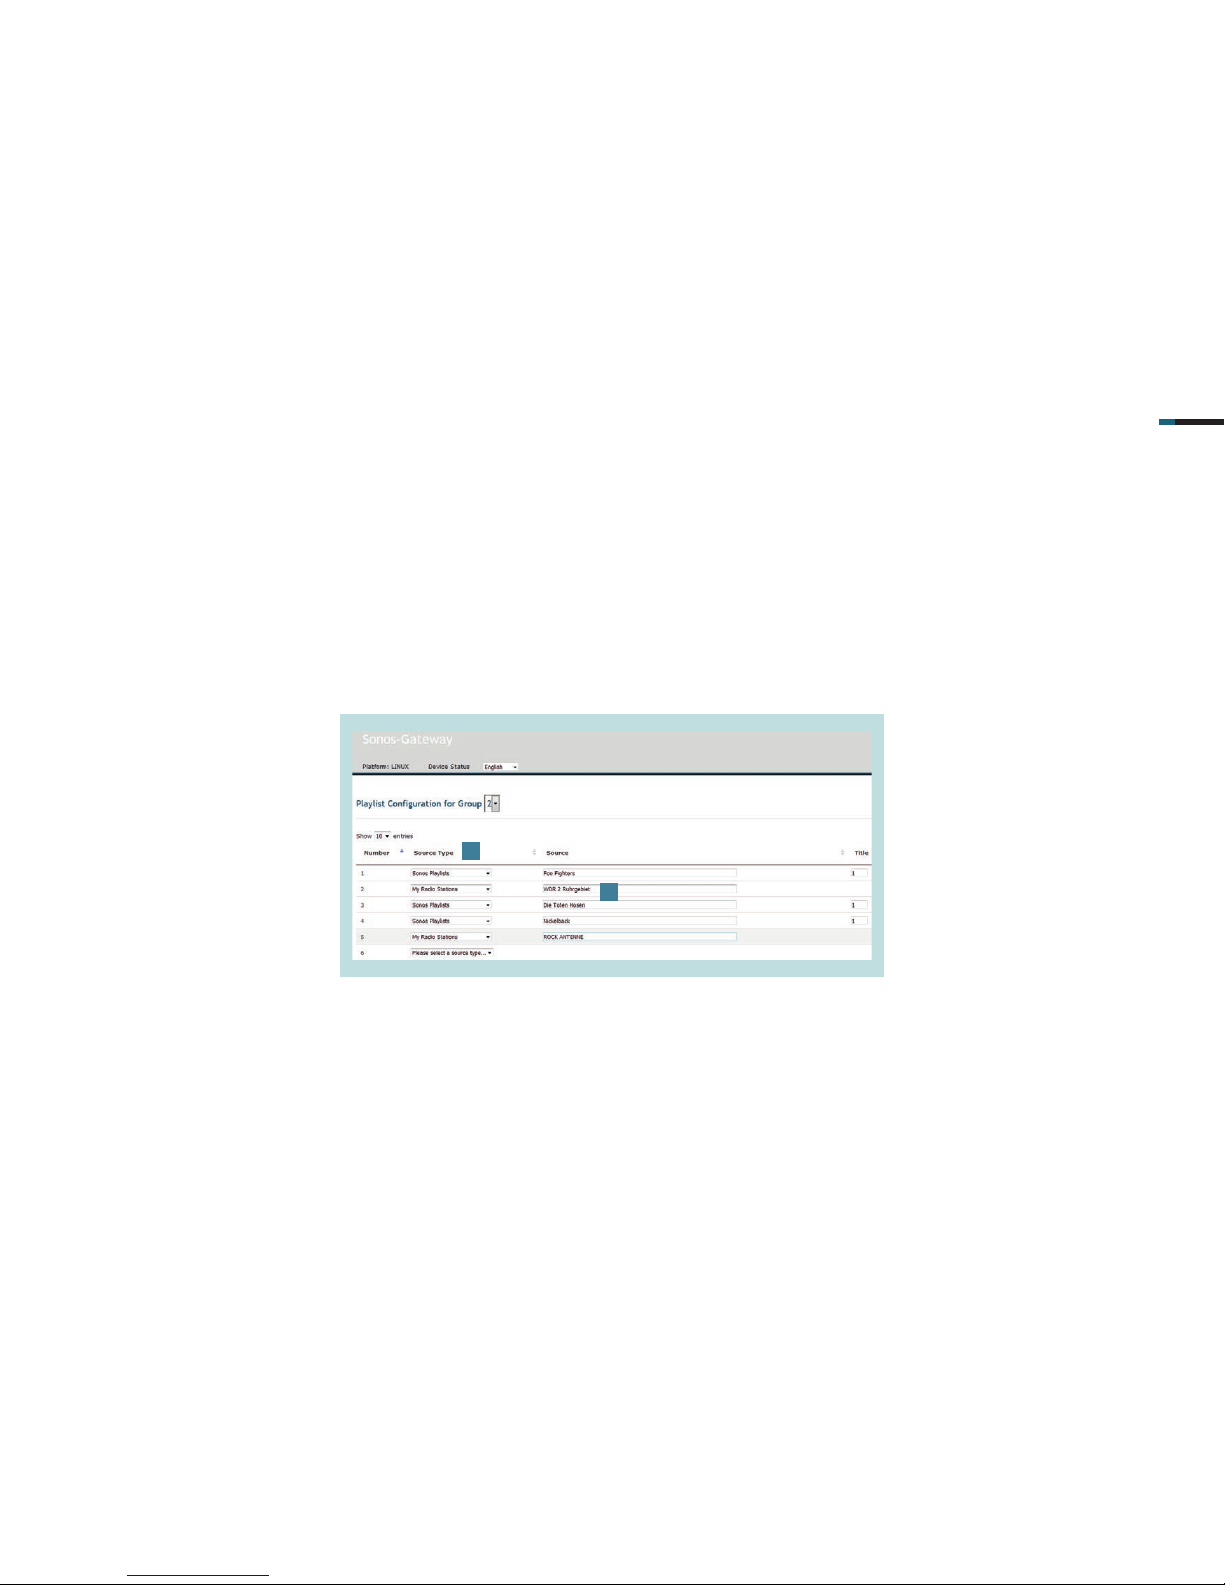
. Select a Group.
. Enter the Playlists previously created and saved in the controller as well as
Radio stations at the desired position in the list.
. Enter the S ourc e Type [] and the Source [].
. When you have confi gured new music sources in the controller, update the KNX
Sonos Gateway by refreshing or reloading the web page.
4.3 Confi guration of the music sources for the KNX Sonos Gateway using the web interface
So that you can conveniently switch between the different music sources and control your Sonos system comfortably without a controller, in the next step you store the
music sources for the KNX Sonos Gateway using the web interface of the gateway.
Enter the IP address of the KNX Sonos Gateway into your browser, which calls up the confi guration page.
Save the music sources there for all of your groups (Sonos devices).
1
2
Page 31
SMART VISU S ERVER + SONOS 12
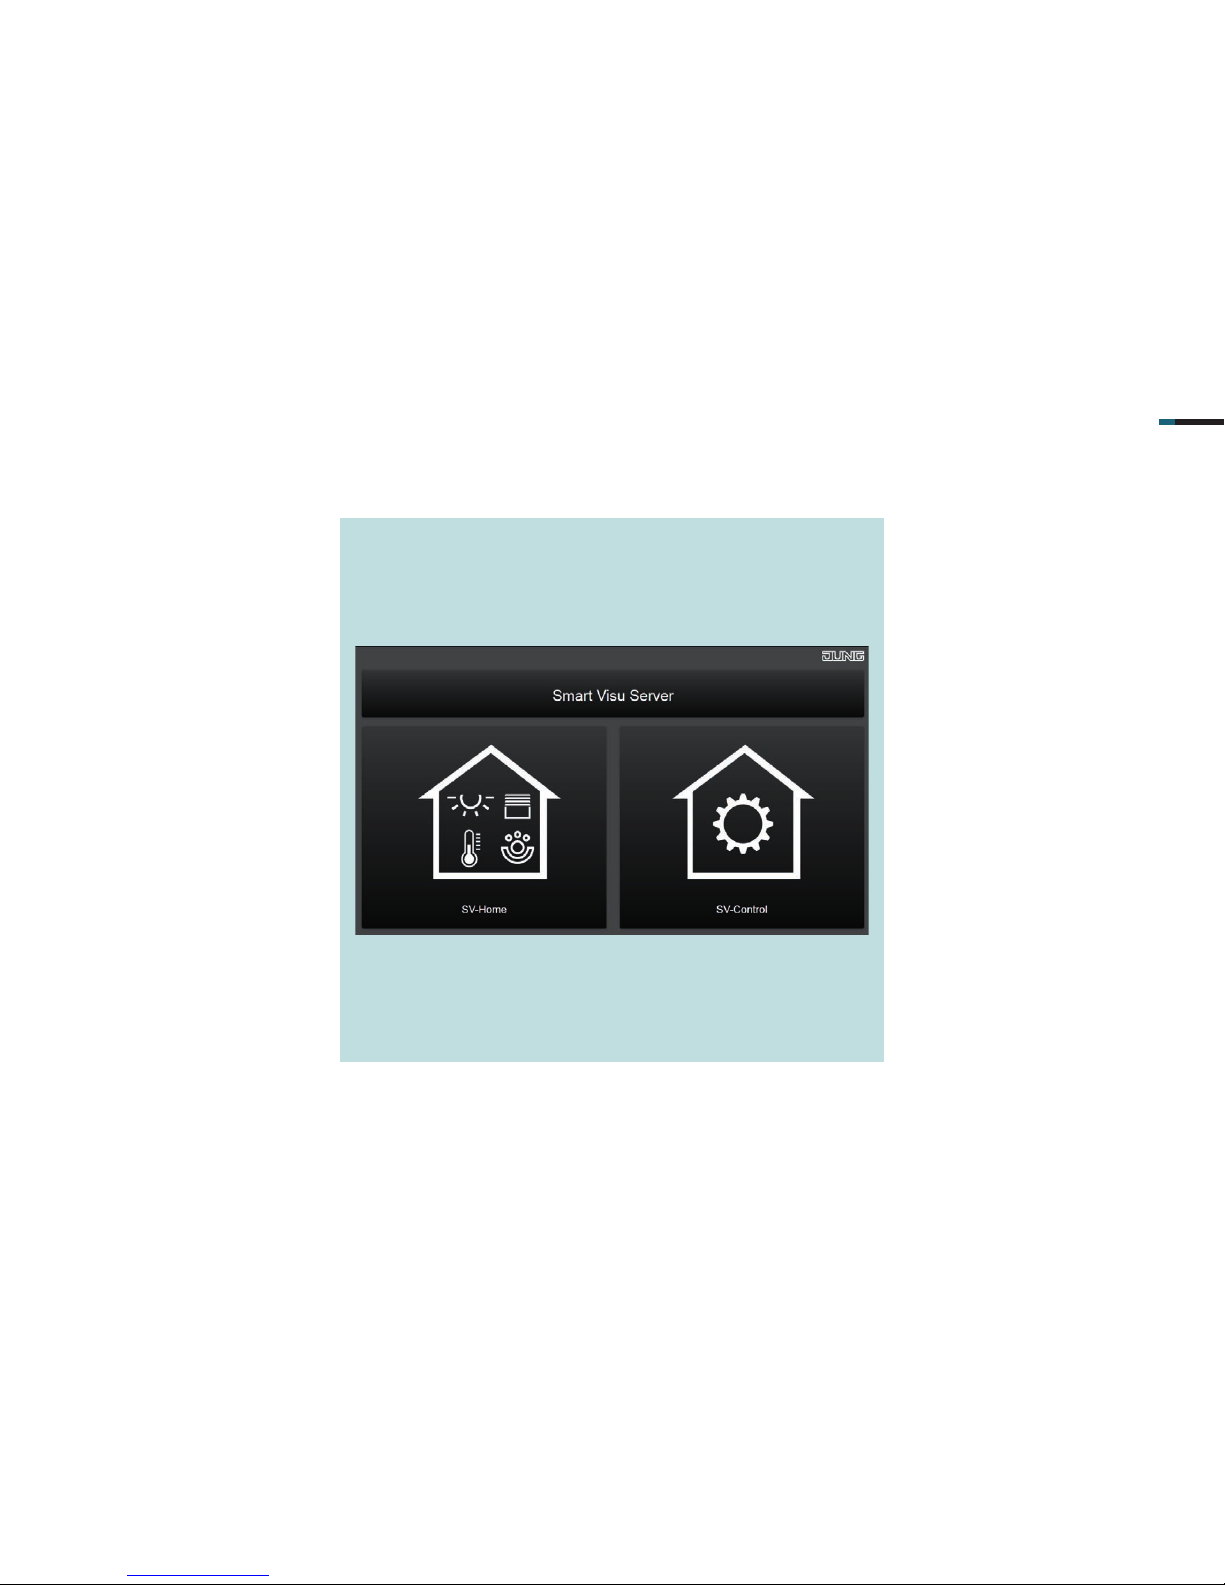
5. The Smart Visu Server
The Smart Visu (SV) Server gives you
the choice of two different areas on
the start page:
SV Home:
operation and visualisation
SV Control:
editing and setting
Page 32
SMART VISU S ERVER + SONOS 13
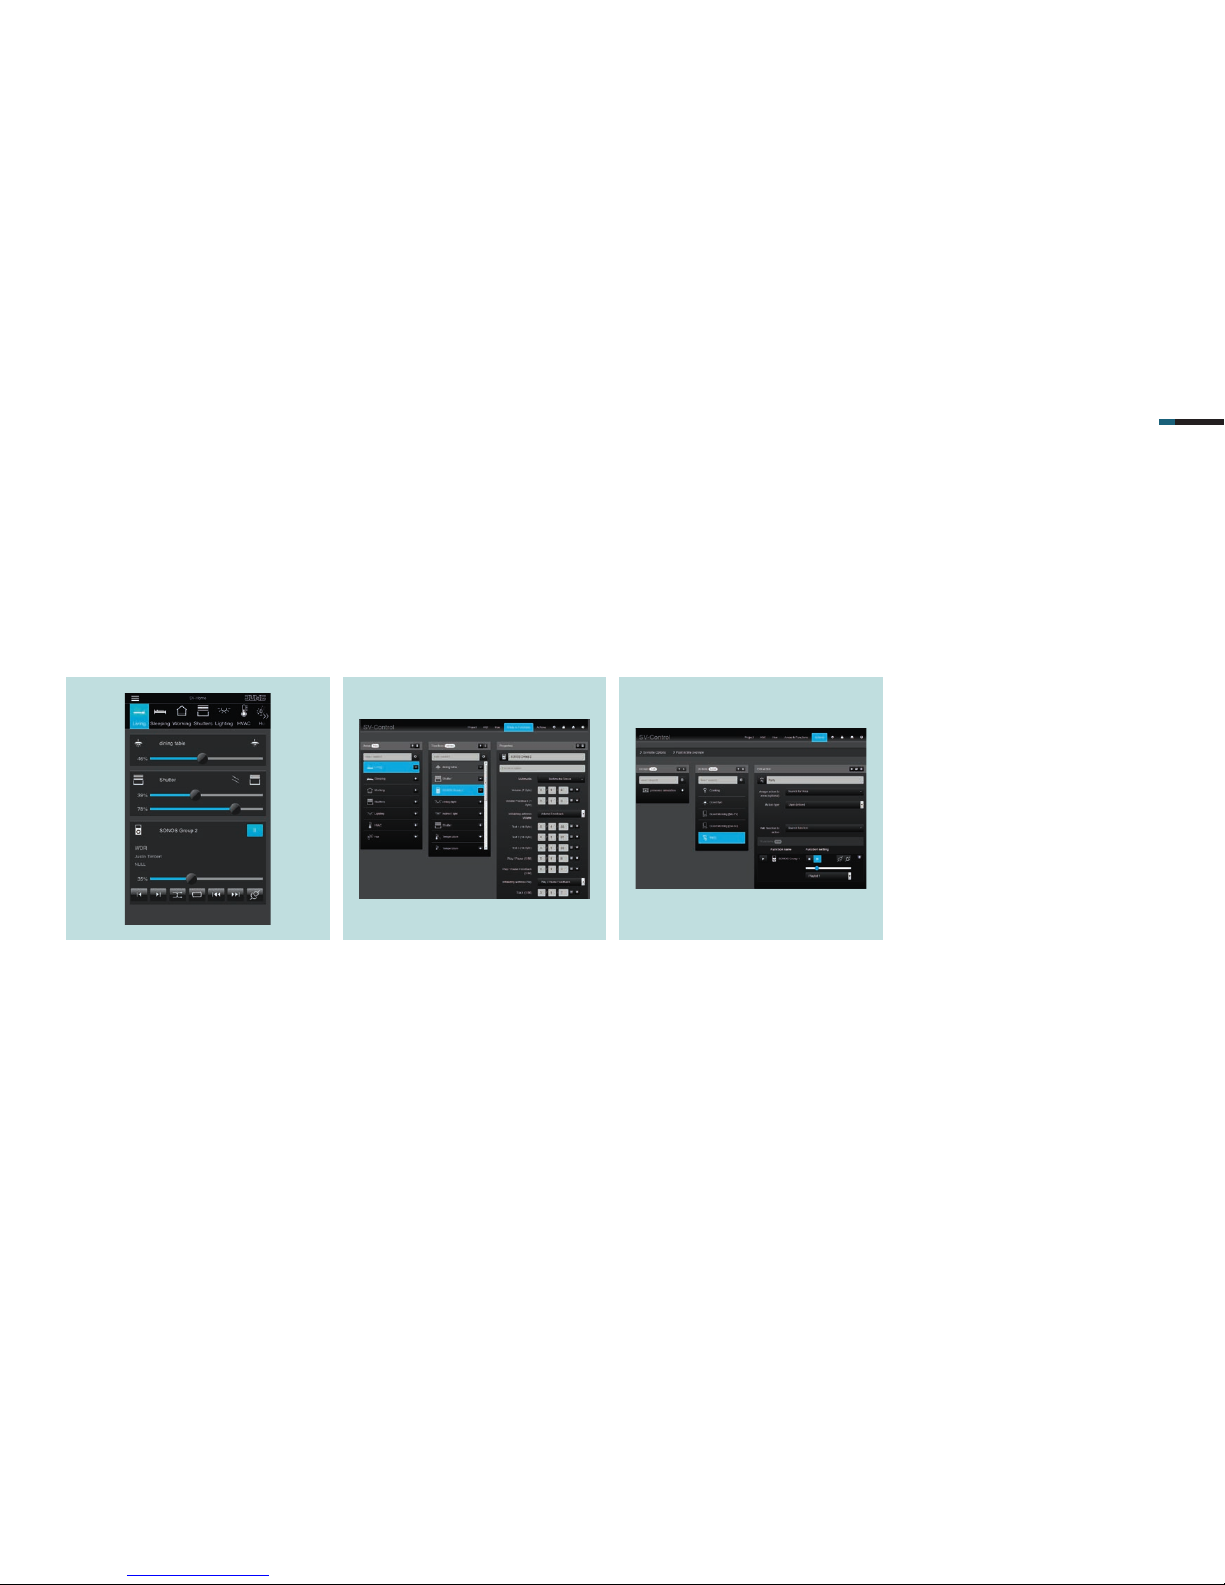
In the SV Home, you can set the volume
of your Sonos devices in the respective
rooms, start and stop play, select
playlists and tracks and combine
multiple devices.
5.1 Functions of the Smart Visu Server
On this page you get a short overview of the functions of the SV Server.
On the following pages you will fi nd out how to put the SV Server into operation, integrate Sonos and create actions.
In the SV Control, create your rooms with
Areas & Functions, allocate your Sonos
devices to the rooms and save the group
addresses of your KNX Sonos Gateway.
Using SV Control, create actions by, for
example, having your Sonos device playing music on specifi c days, at specifi c
times at a volume set by you.
Page 33
SMART VISU S ERVER + SONOS 14
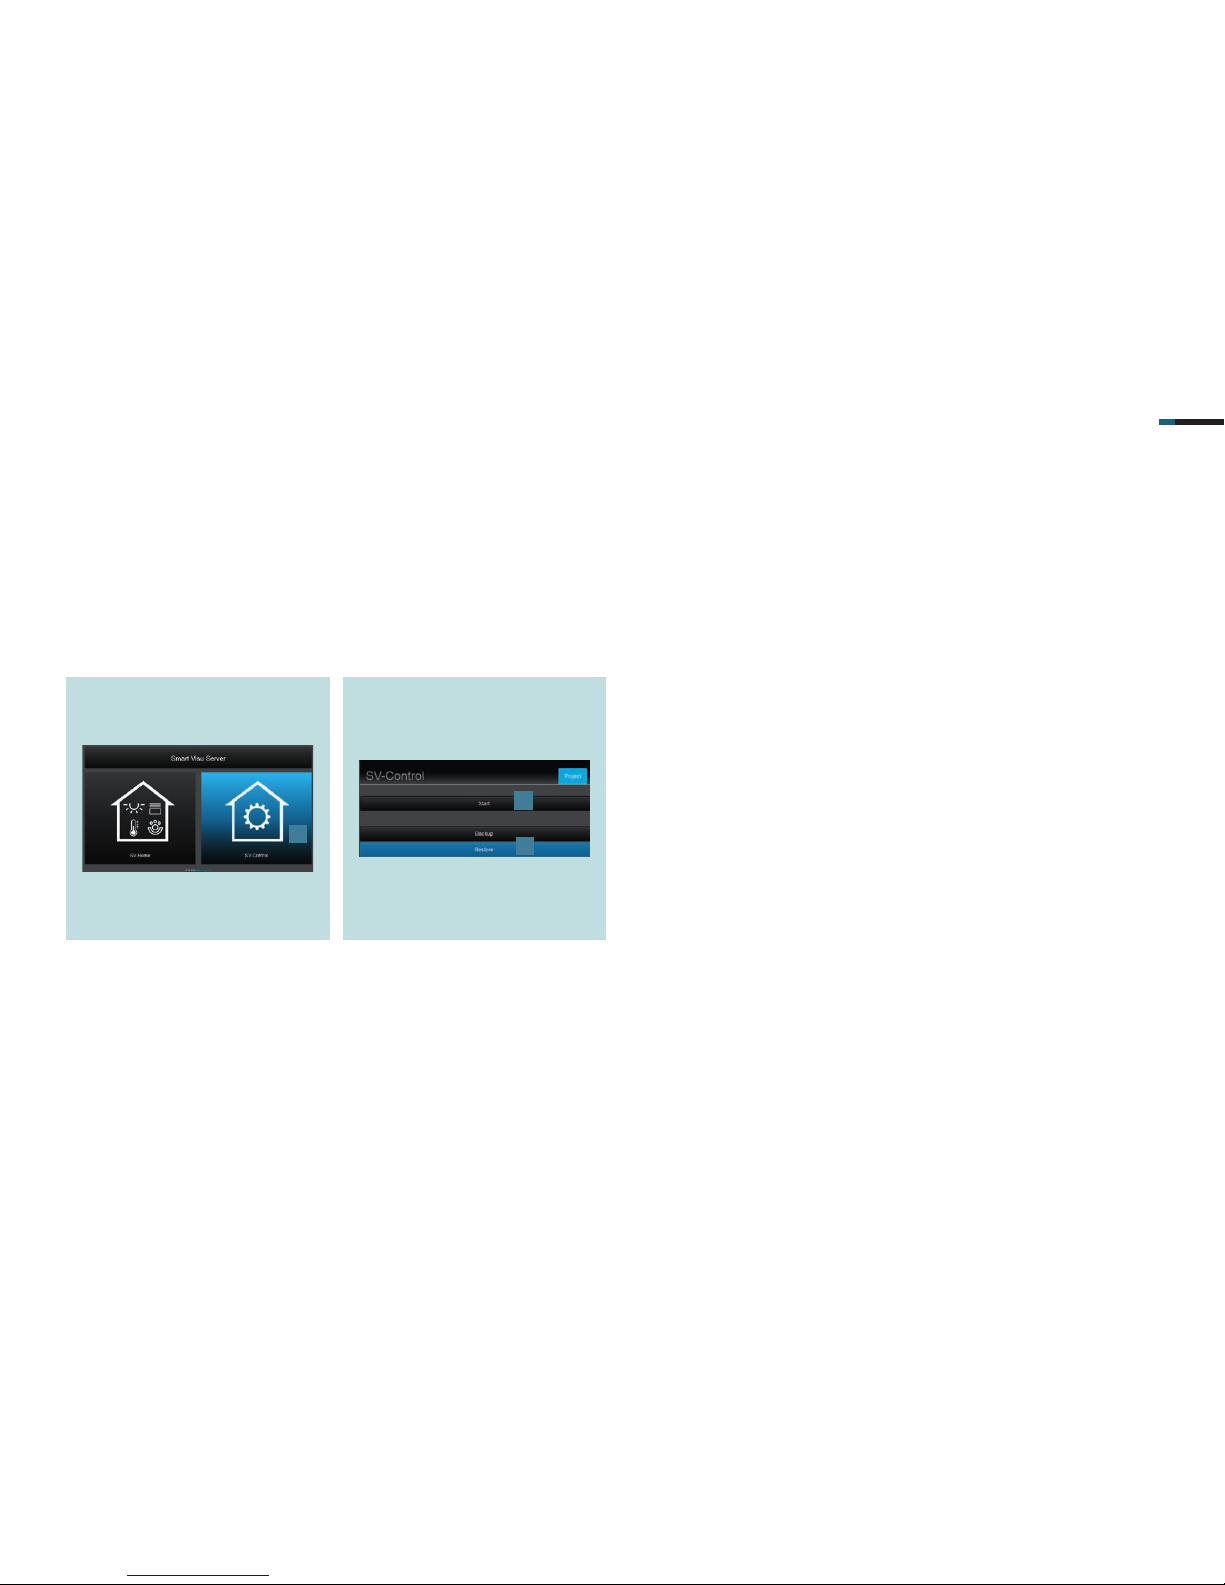
. Select the SV Control b ut to n [].
6. SV Server commissioning
Now, after you have set up the KNX Sonos Gateway, integrate the Smart Visu (SV) Server in your home network.
Call the SV Server using the web browser of your terminal device (PC, laptop, tablet).
To do so, enter the address http://sv-server.local or the IP address of the SV Server allocated by the router.
If the SV Server is protected by a password, enter this.
. Create a new project with Start [] or
import an existing one with Restore []
and navigate to the KNX tab.
1
2
3
Page 34
SMART VISU S ERVER + SONOS 15
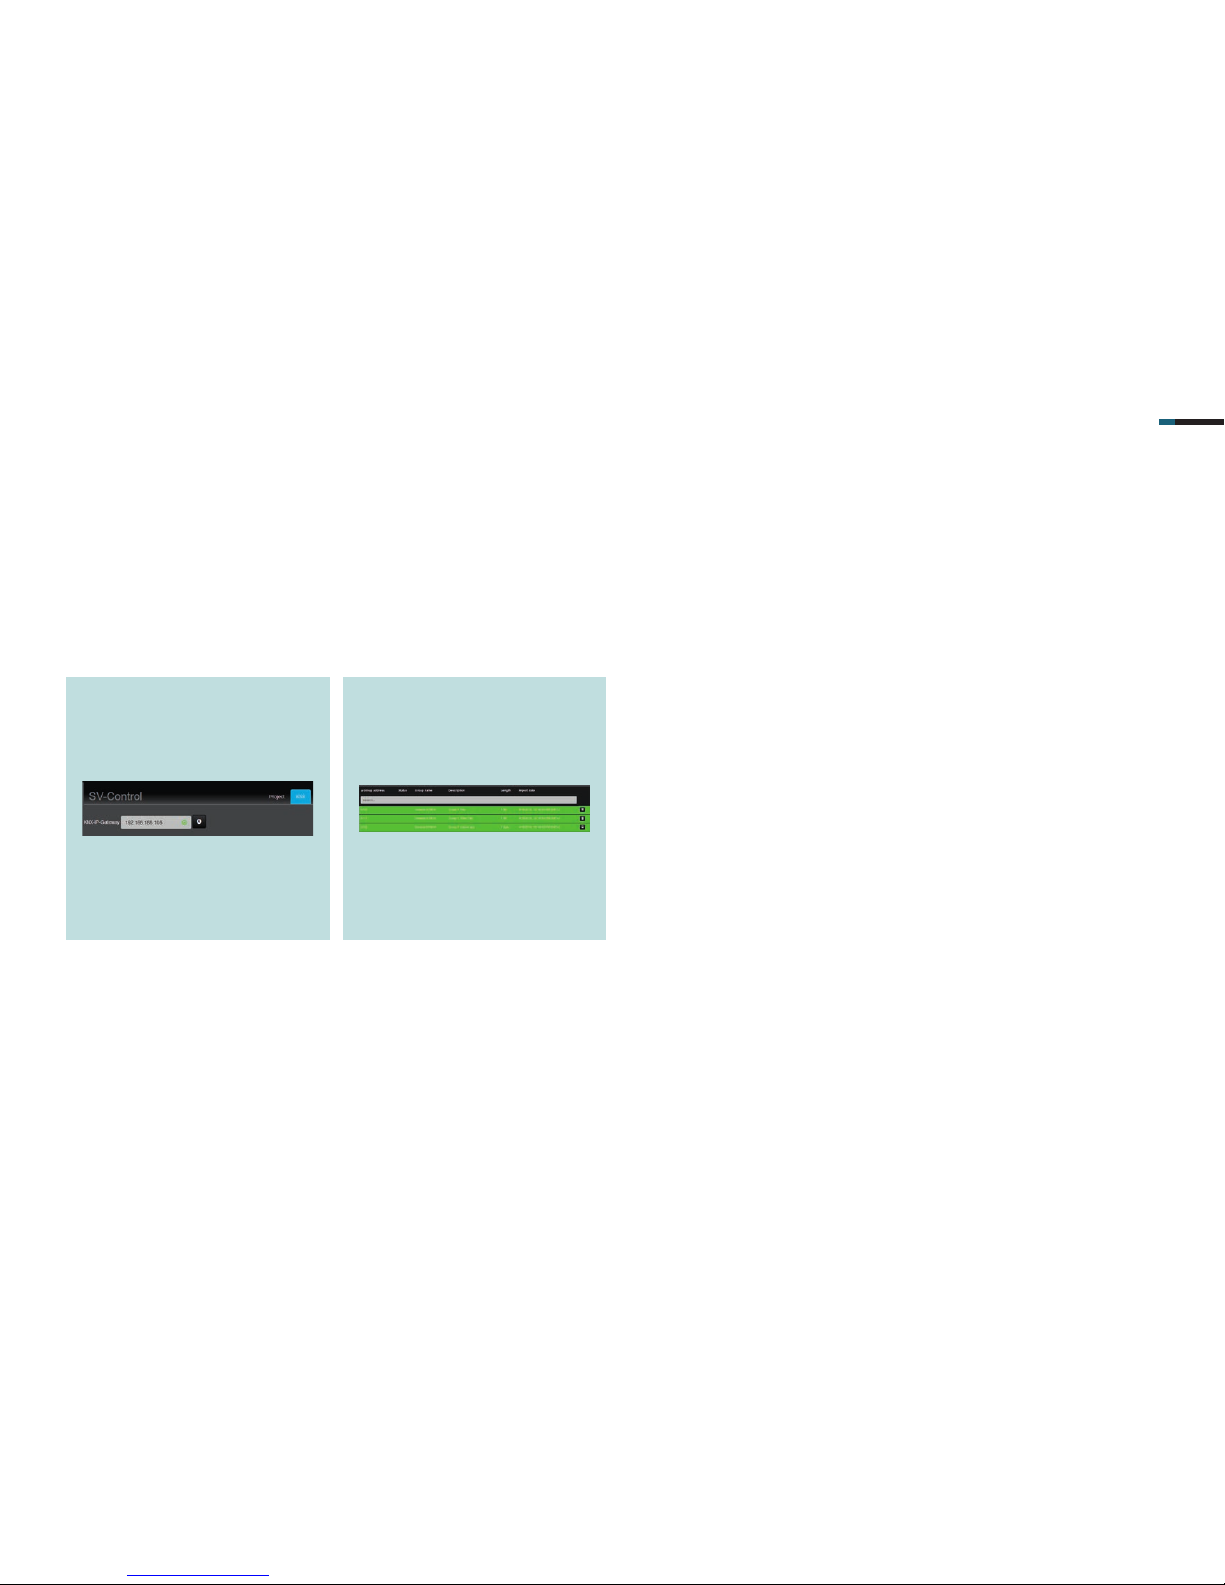
. Enter the IP address of the KNX IP inter-
face in the KNX IP Gateway fi eld on the
KNX tab.
6.1 Confi guration of a Sonos application – general confi guration
The connection of the Sonos system to the Smart Visu Server is explained below.
. Next, import the necessary group
addresses for the Sonos applications.
Page 35
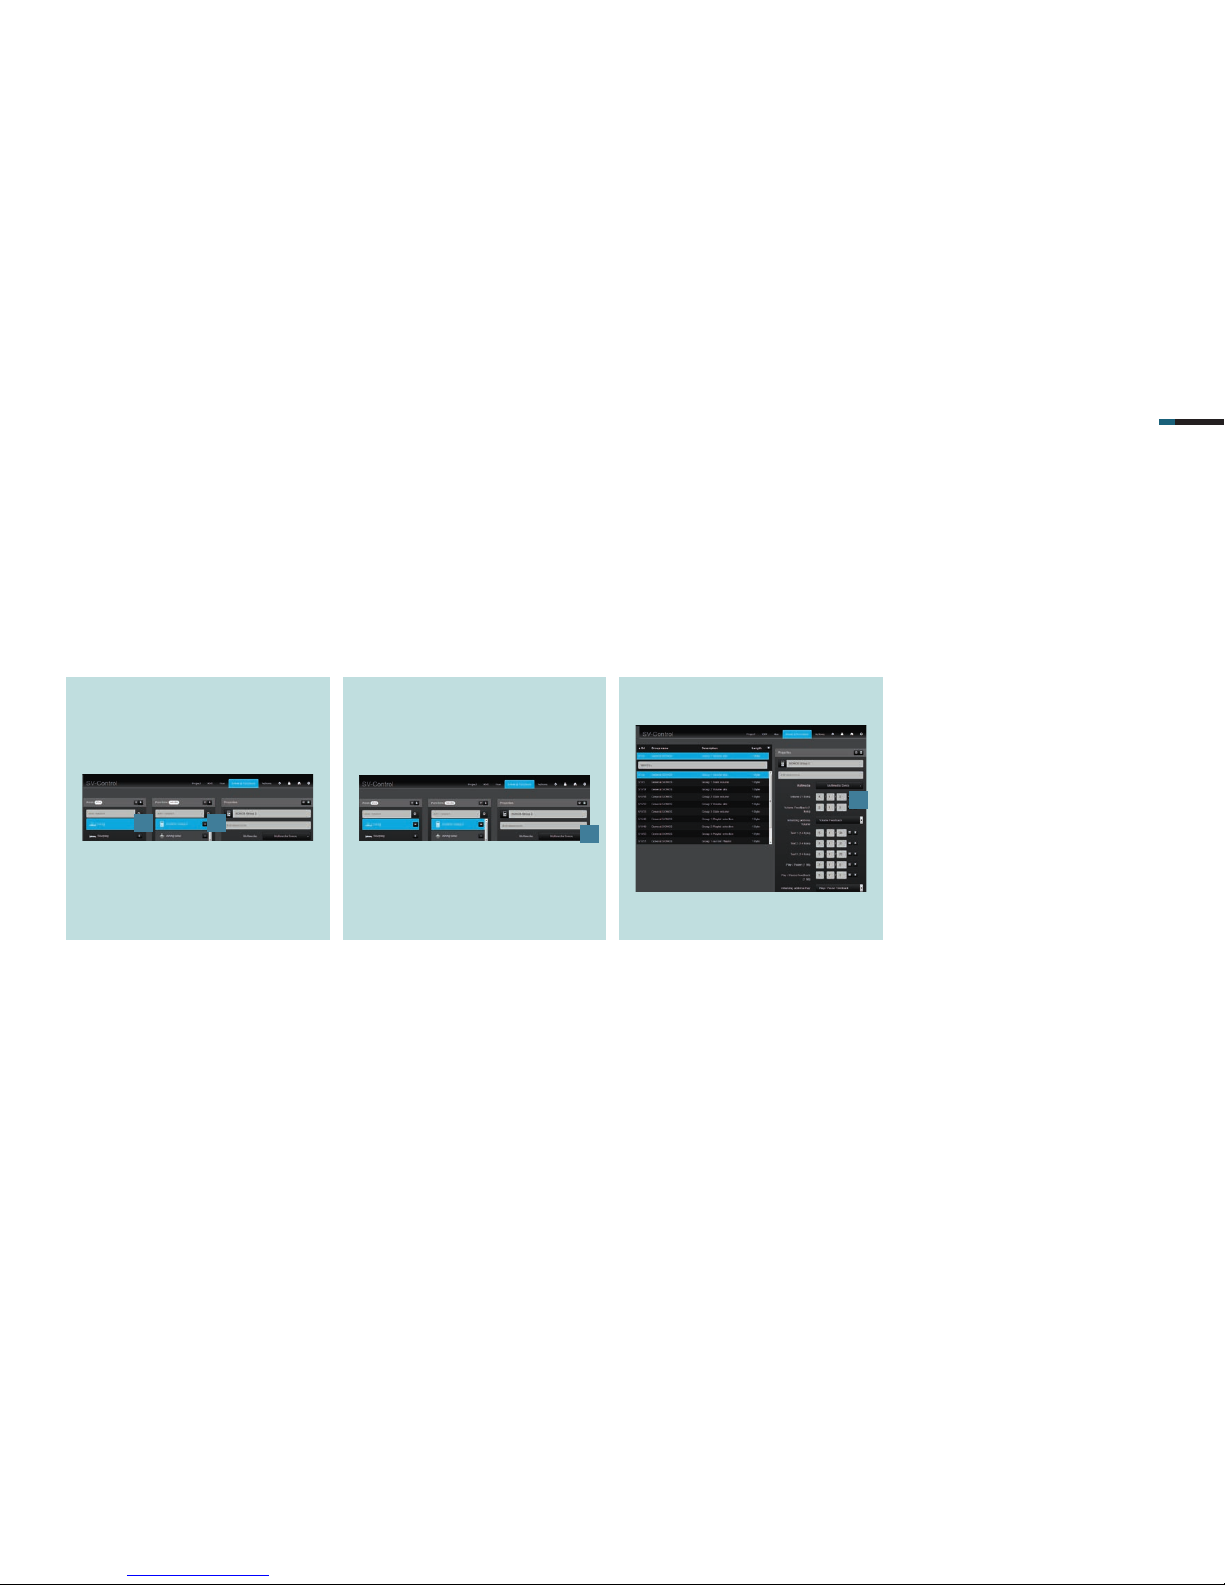
SMART VISU S ERVER + SONOS 16
. Create the rooms (areas) [] and
Sonos devices (functions) [] under
Areas Functions.
6.2 Create areas and functions
After you have established the connection to the KNX bus, you now create areas and functions in the SV Server for your Sonos devices.
. Use the Multimedia function for the
Sonos device and then select
Multimedia Sonos [].
. Allocate the appropriate group
addresses [] to the function.
Use the table on page as a guide.
. Repeat the steps for all Sonos devices.
1
2
3
4
Page 36
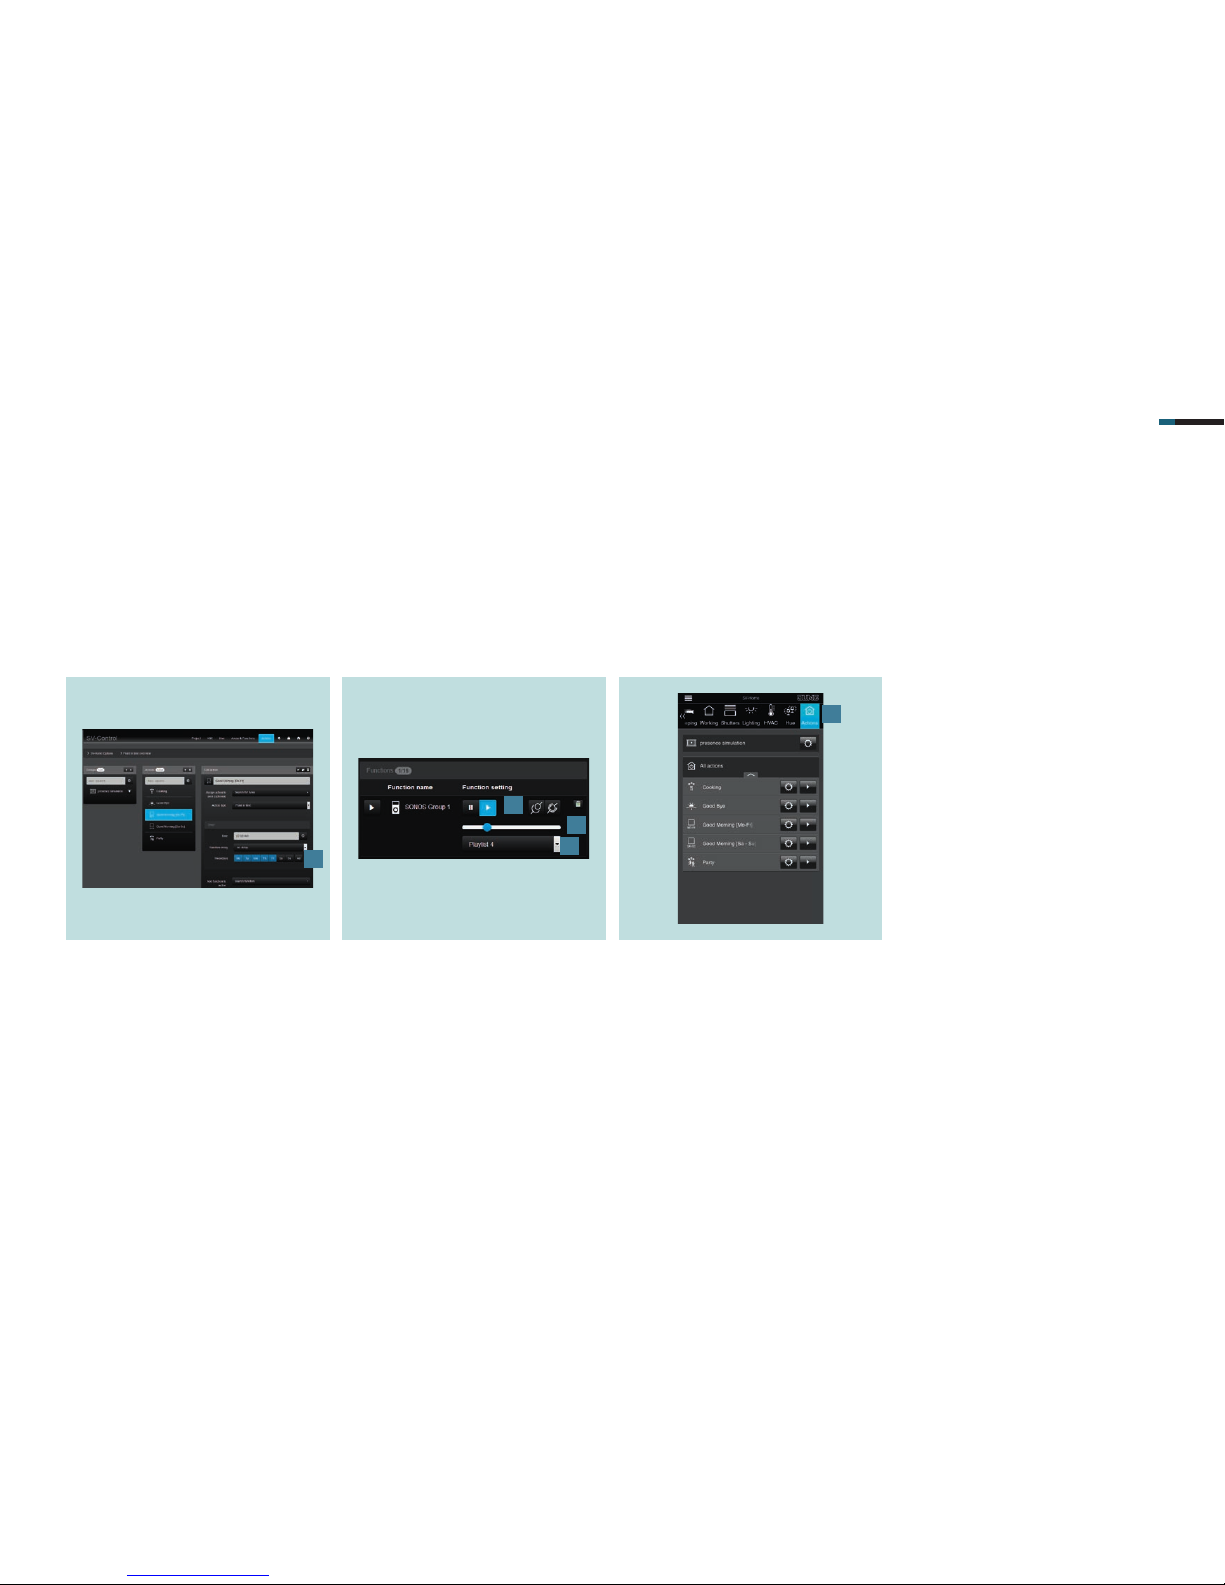
SMART VISU S ERVER + SONOS 17
. Create the action in the Actions tab
and select the Time Schedule action
type. Program the Timer [], e. g.:
Mo – Fr 7:00 a. m.
Bedroom
7. Sonos system and actions
Using the actions, you can create scenes for the Sonos system that are called according to time, event or user control.
Three application examples are described for this.
7.1 “Good morning [Mo – Fr]” action
This action plays a playlist or other music source at a particular time.
It plays a specifi c radio station at a previously specifi ed weekday and time.
. Add the functions to the action with
Add function to action. Select the
approriate Sonos Group here, e. g.:
Sonos Group 1 (bedroom)
. Activate the button [], adjust the
volume [] and select the radio station
using the appropriate playlist [].
. Under Actions [] in SV Home activate
the action using .
1
2
3
4
5
Page 37
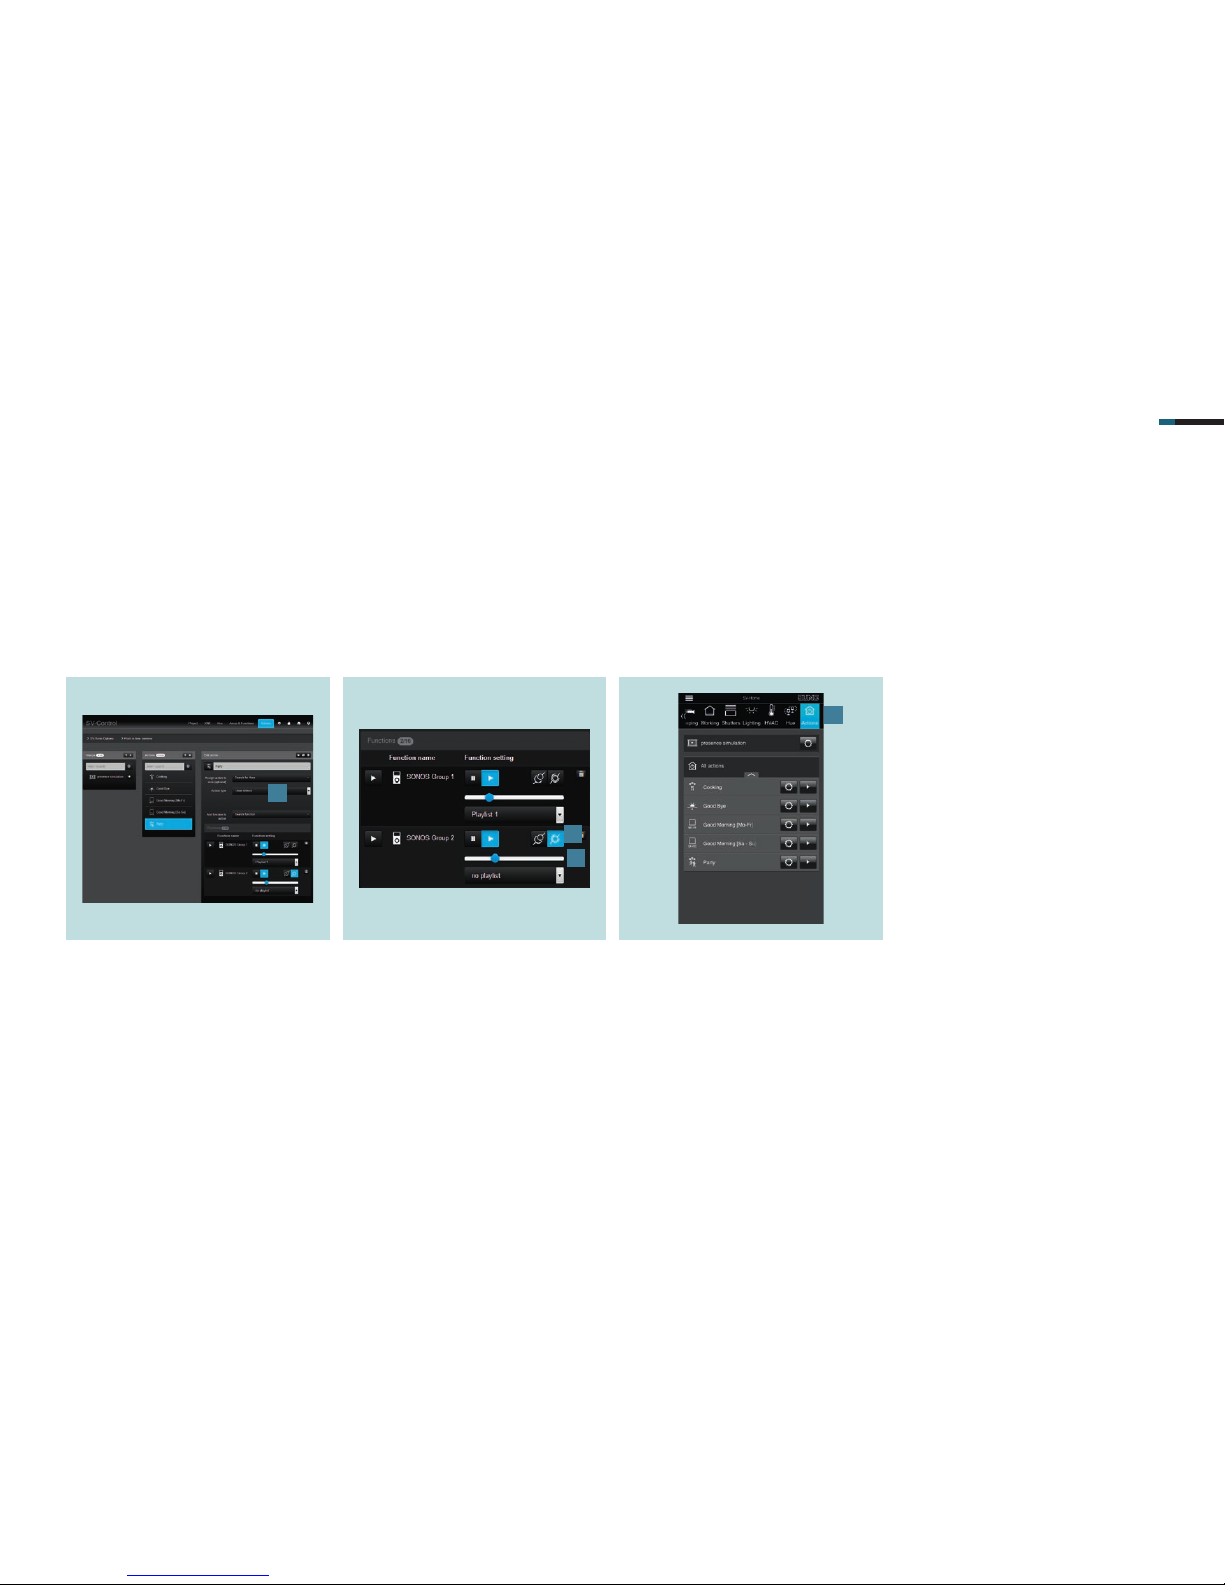
SMART VISU S ERVER + SONOS 18
. Create the action in the Actions tab.
. Allocate the action as necessary
to an area and select the type of
action as User defi ned [] .
7.2 “Party mode” action
This action is for connecting your Sonos devices with each other. In this case, one device acts as the master, while the others
are slaves. As a result, all devices play the music source or playlist of the master.
. Add the functions to the action with
Add function to action. Select the
desired Sonos Groups here that
should be paired later, e.g.:
Master: Sonos Group 1
Slaves: Sonos Groups 2 + 3
. Activate the Pair button [] and adjust
the volume [] of the slave devices
according to your wishes.
. Under Actions [] in SV Home, activate
the action using .
1
2
3
4
Page 38
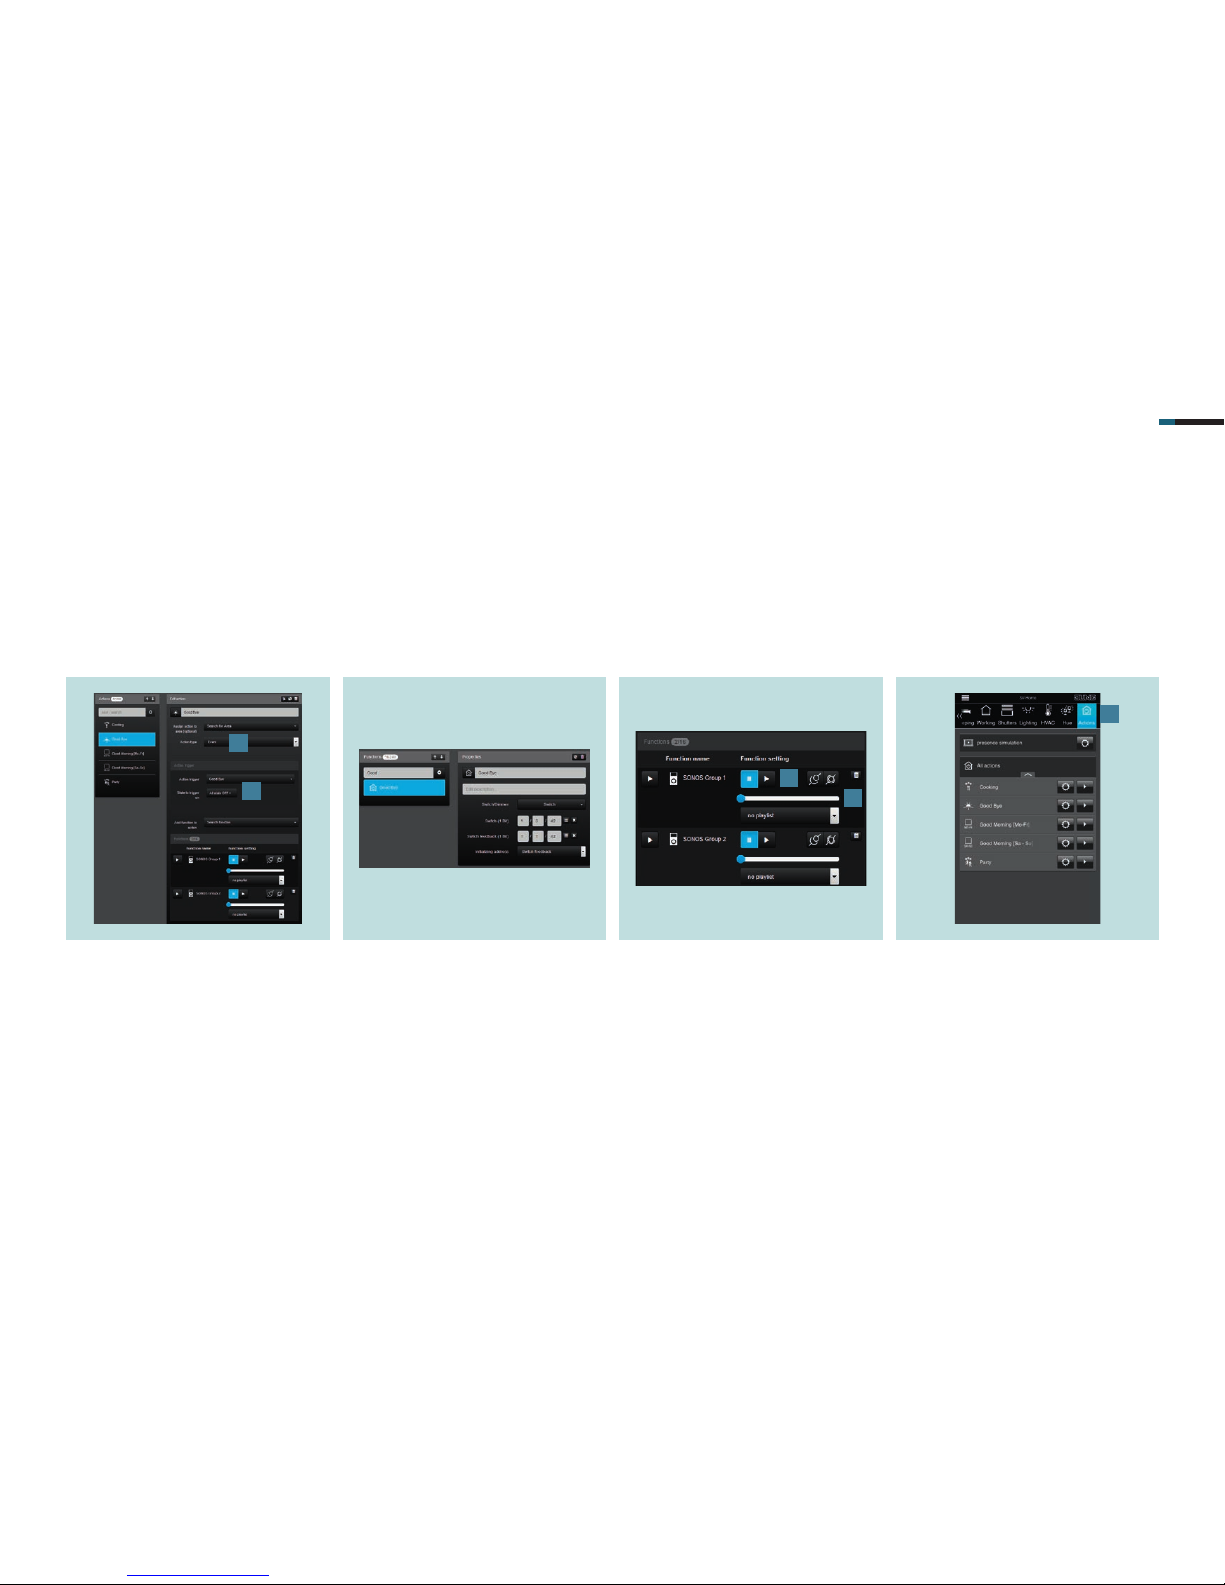
SMART VISU S ERVER + SONOS 19
. Create the action in the Actions tab.
. Allocate the action to an area as
necessary and select the type of
action as Event-dependent [].
. Select an action trigger here, e. g. the
“Switch Good Bye” push-button and
defi ne the state for triggering the
action:
„At state OFF“ [].
7.3 “Goodbye” action
This action should mute your Sonos devices when leaving the home by pressing a button.
. The Action trigger is a function that
you create previously under Areas
and Functions. It triggers the action.
. Add the functions to the action with
Add function to action. Select all
Sonos groups here that should be
muted. Press the Pause button [] and
set the Volume to percent [].
. Under Actions [] in SV Home, activate
the action using .
1
2
3
4
5
Page 39
SMART VISU S ERVER + SONOS 20
8. Saving the project
Congratulations – Sonos has now been connected to the Smart Visu Server in accordance with the installation example and is set up.
Do not forget to backup your project data and activate the access protection!
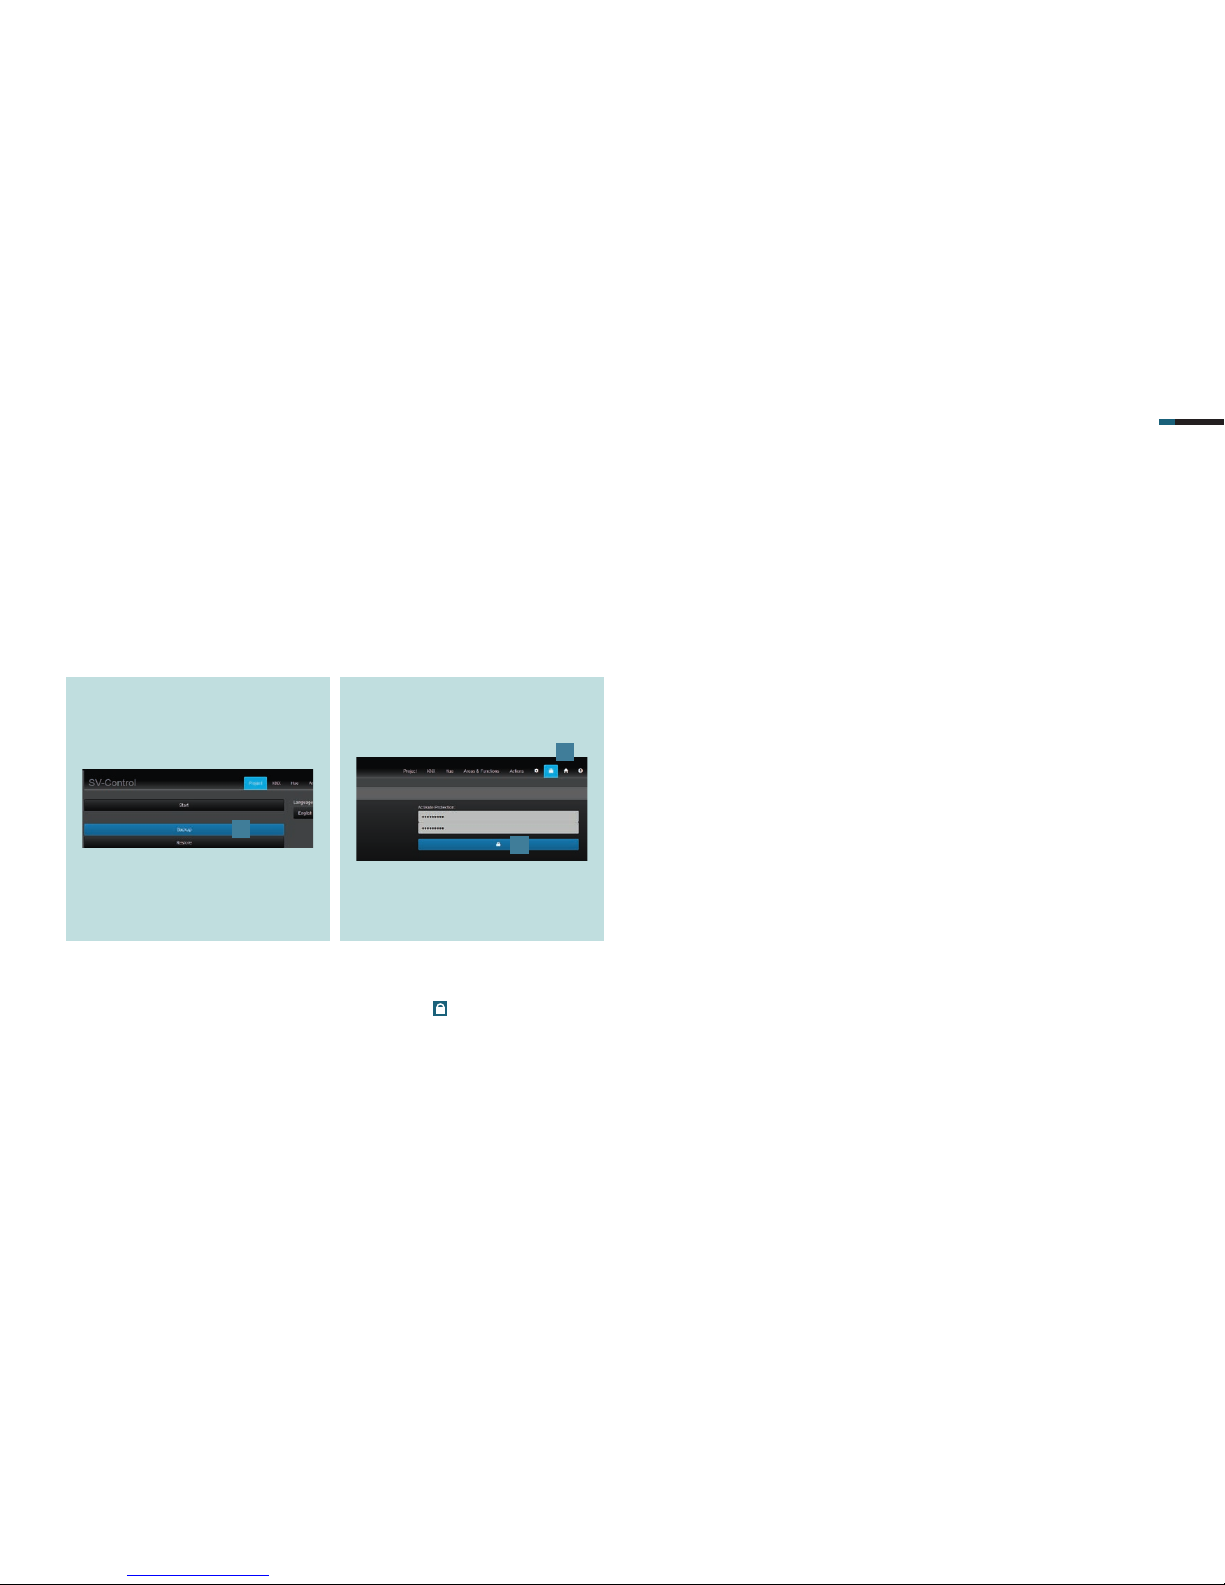
. Call SV Control to backup your project
fi le. Save the project and your confi guration under Backup [] in the Project
tab.
. To reactivate the access protection for
your system, call the access protection
page using
[].
. Enter the password and activate the
protection by clicking on the selected
area [].
1
2
3
Page 40
How do I adjust the astro function?
Smart Visu Server
Page 41
SMART VISU SERVER + ASTRO FUNCTION 2
Automatically adjust the switching
times to the sun positions in the course
of the year with the JUNG Smart Visu
Server: this is not a problem thanks to
the astro function!
The astro function makes it possible for
you to reliably and conveniently control
shading and lighting depending on
sunrise and sunset. The set-up in your
JUNG Smart Visu Server is also quick
and easy.
This quick start guide explains the
individual steps of commissioning and
operation using an example.
1. Introduction
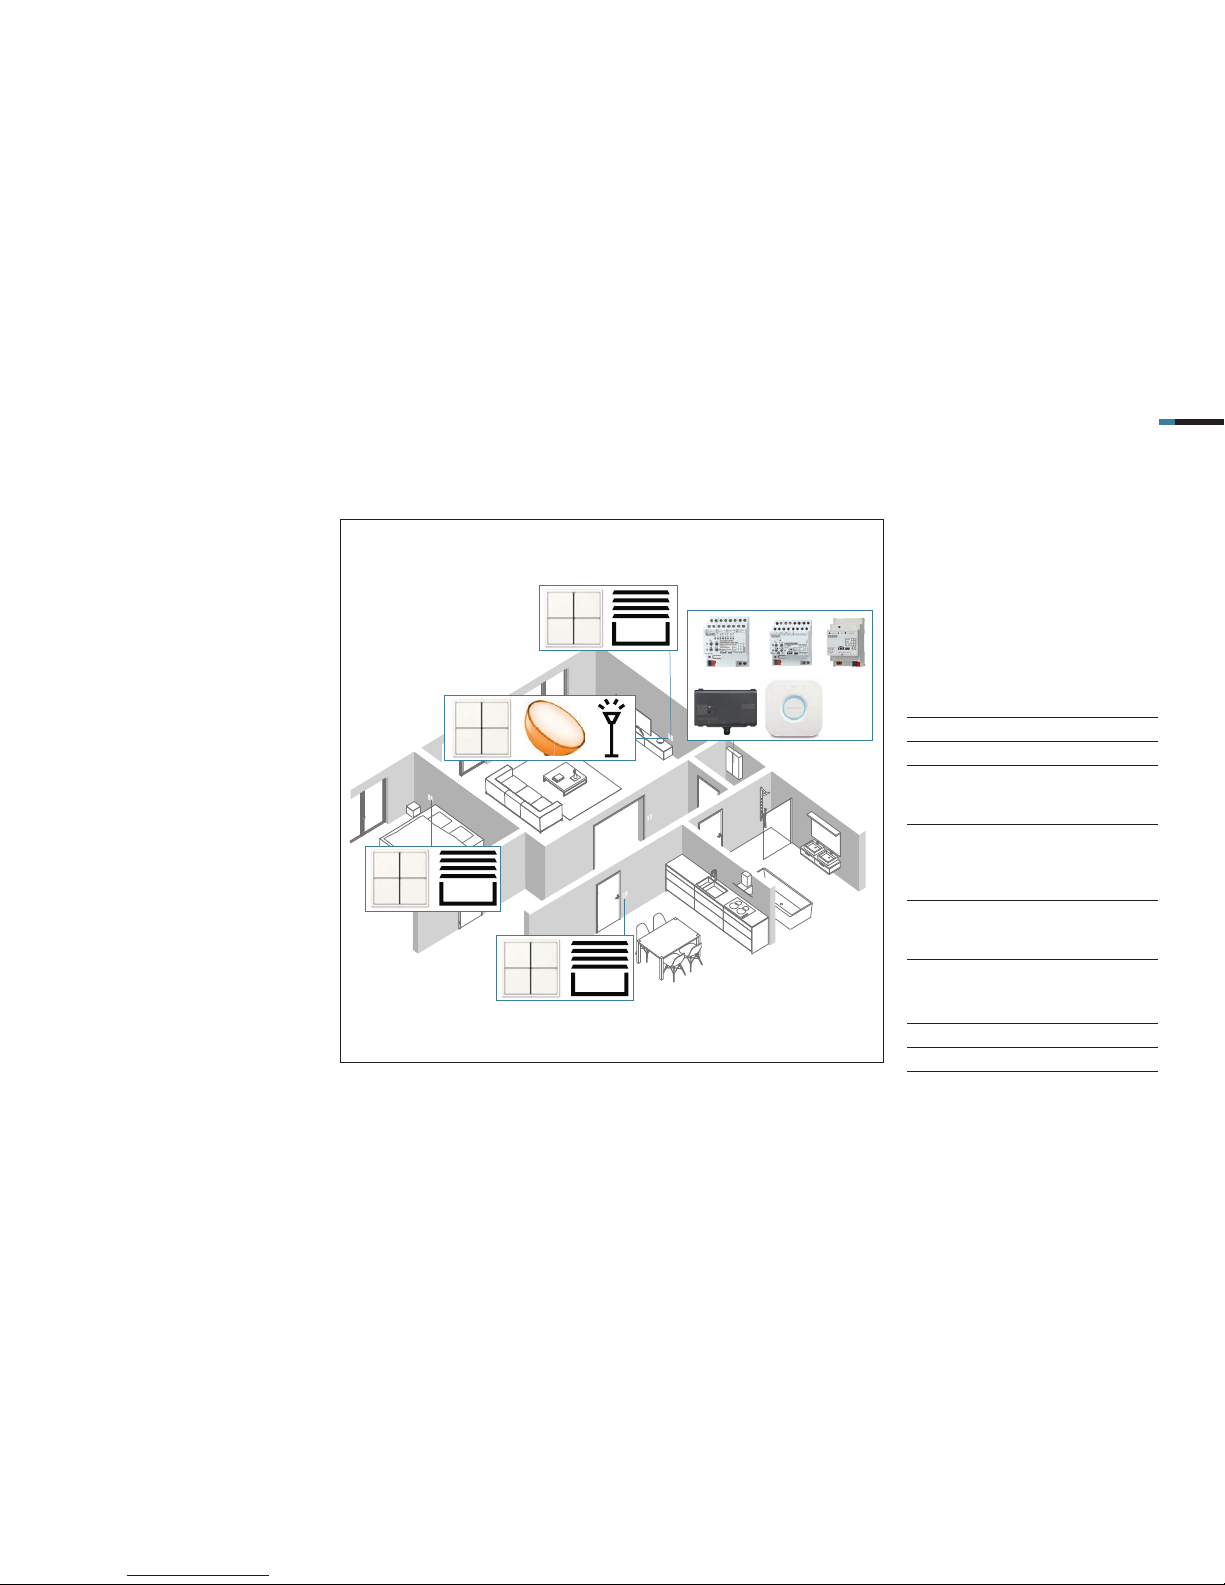
COMPONENTS
JUNG
REFERENCE
NO.
QUANTITY
Smart Visu Server SV SERVER 1
KNX IP interface IPS200REG 1
KNX Universal
push-button
module, 4-gang
4194 TSM 4
KNX switch actuator,
8-gang
KNX blind actuator,
4-gang
2308.16
REGHE
1
KNX LED Universal
dimming actuator,
1-gang
3901 REGHE 1
COMPONENTS
PHILIPS
REFERENCE
NO.
QUANTITY
Hue Bridge – 1
Hue Go – 1
Page 42

SMART VISU SERVER + ASTRO FUNCTION 3
The astro function can be integrated
into your JUNG Smart Visu Server with
just a few steps.
The table here gives an overview of
the necessary steps.
The individual steps are described in
detail on the following pages.
STEP PAGE
1. Connect the Smart Visu Server to the IP network 6
2. Set up areas and functions 7
3. Input location coordinates for astro function 8
4. Configure actions 9
5. Save project 11
2. Overview
Page 43
SMART VISU SERVER + ASTRO FUNCTION 4
3. The Smart Visu Server
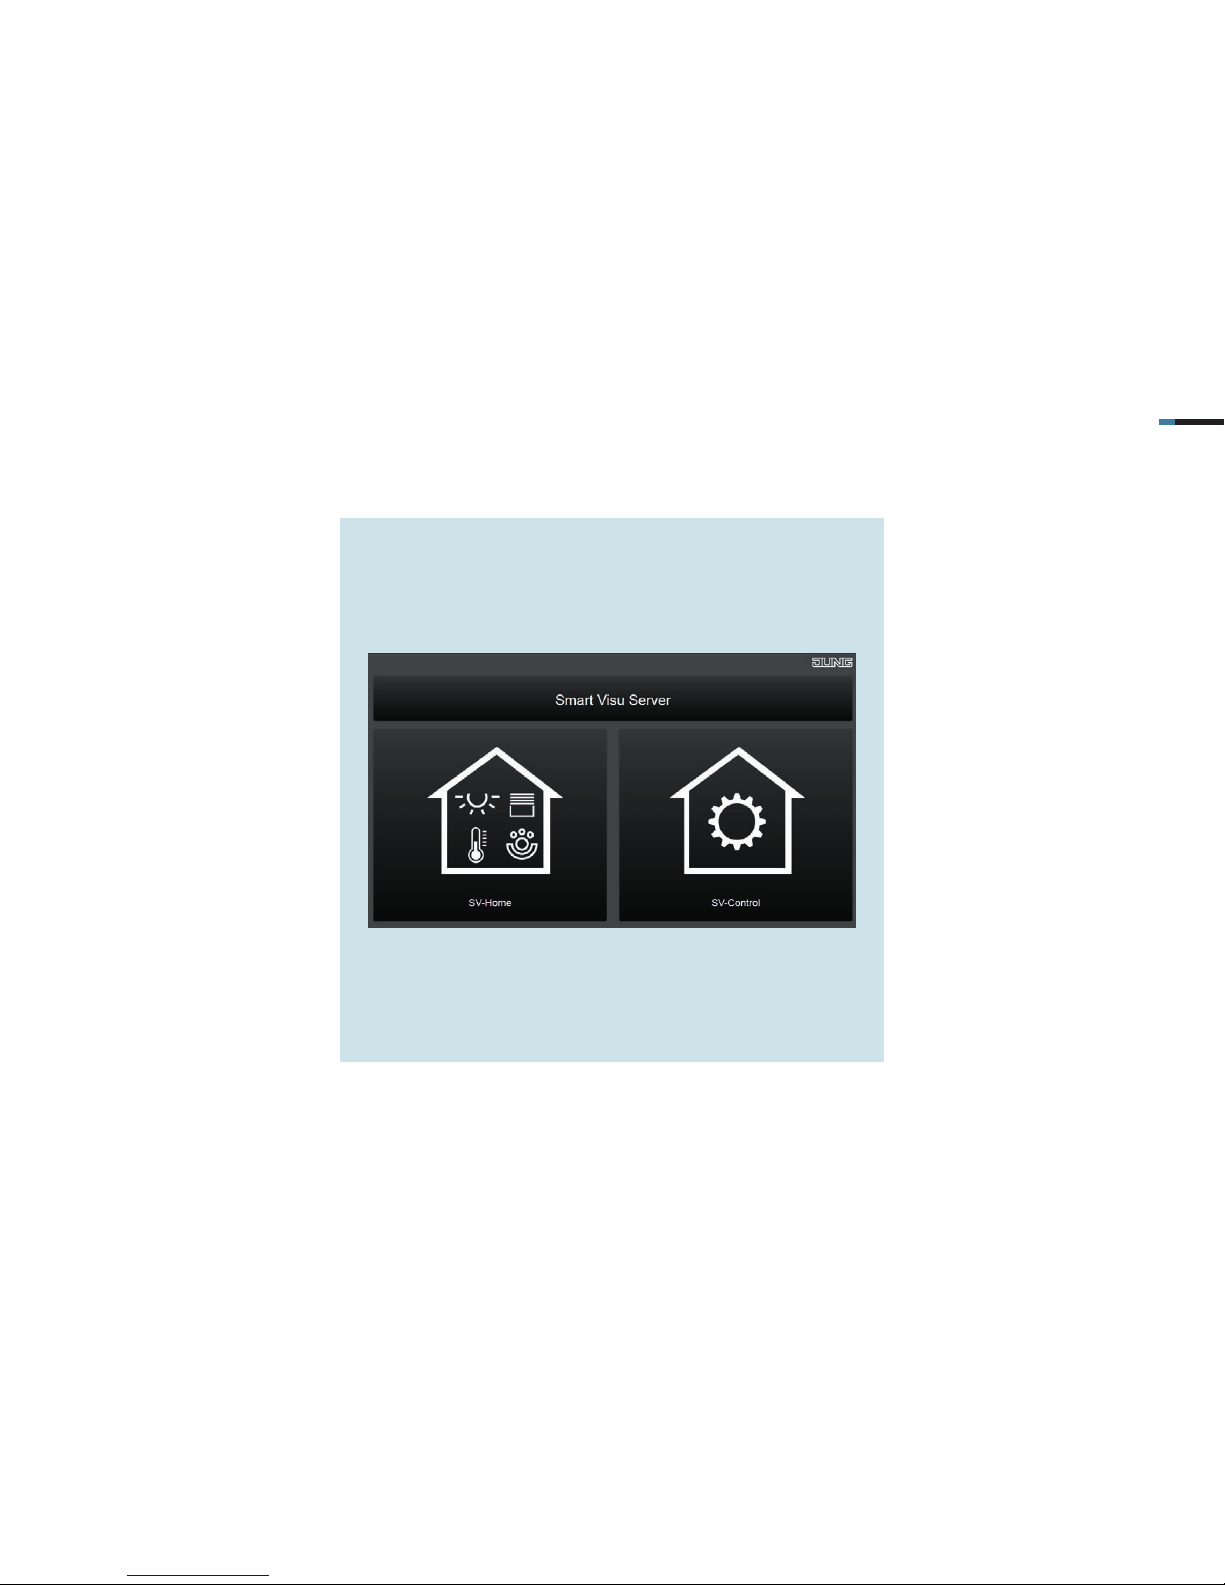
The Smart Visu (SV) Server gives you
the choice between two different
areas on the start page.
SV Home:
operation and visualisation
SV Control:
editing and setting
Page 44
SMART VISU SERVER + ASTRO FUNCTION 5
SV Home is the operating and visualis-
ation interface, using which you control
and operate your home and call up
actions (scenes).
3.1 Functions of the Smart Visu Server
This page gives you a short overview of the functions of the SV Server. On the following pages you will fi nd out how to commission the SV Server and how to create ares,
functions and actions.
You create your rooms in SV Control.
you can also create functions such as
switching and dimming for your lighting
in the Areas & Functions tab.
Afterwards, you add the functions to
your rooms.
Using SV-Control, create actions in
which, for example, lamps illuminate on
specifi c days, at specifi c times, with a
colour set by you.
Page 45
SMART VISU SERVER + ASTRO FUNCTION 6
1. Select the SV Control button [1].
4. Commissioning Smart Visu Server
Integrate the Smart Visu (SV) Server in your home network.
Call the SV Server via the web browser of your terminal device (PC, laptop, tablet).
To do so, enter the address http://sv-server.local or the IP address of the SV Server allocated by the router.
If the SV Server is protected by a password, enter this.
2. Create a new project with Start [2] or
import an existing one with Restore [3]
and navigate to the KNX tab.
1
2
3
Page 46
SMART VISU SERVER + ASTRO FUNCTION 7
1. On the KNX tab, enter the IP address
of the KNX IP interface in the KNX IP
Gateway [1] fi eld.
2. Then import the required group
addresses [2].
4.1 Create areas and functions
After you have established the connection to the KNX bus, you now create areas and functions in the SV Server.
Note: The following is based on a confi gured system with already created functions and rooms.
3. You can create rooms (areas) [3] and
functions [4] in the Areas & Functions
tab.
4. Allocate the appropriate group
addresses [5] to the function.
1
2
3
4
5
Page 47
SMART VISU SERVER + ASTRO FUNCTION 8
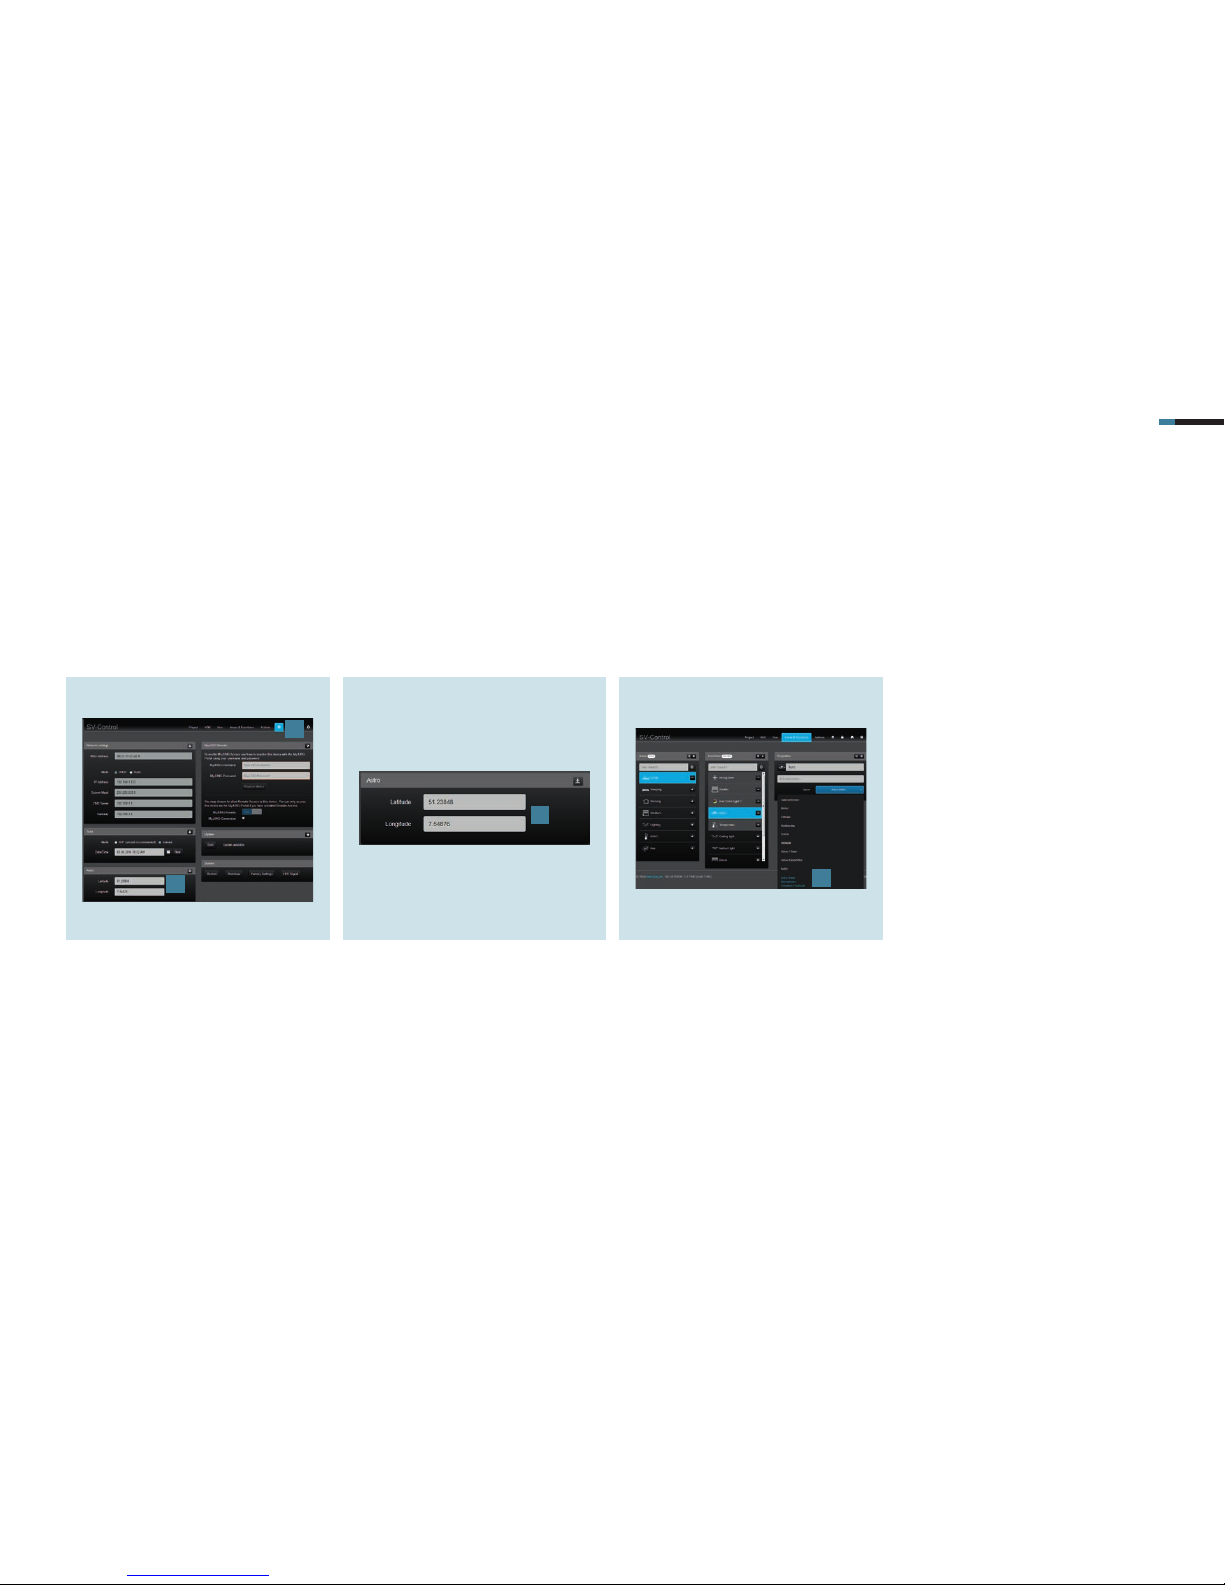
1. Navigate in SV Control to the
Confi guration Management tab [1].
You will fi nd the input fi eld Astro [2]
there at the bottom left.
5. Astro function
The astro function in SV Home reliably shows you the sunrise and sunset times as well as moon phases and the current sun position.
5.1 Enter location coordinates
First, enter the location coordinates (latitude and logitude) of your home system.
Note: You can research the location coordinates using various services on the World Wide Web (e.g. www.gps-coordinates.net).
2. Enter the location coordinates
(latitude and longitude [3].
3. Optionally, select between the
function types astro times, moon
phaseor elevation / azimuth [4]. You
decide which information you would
like to see later in SV Home.
1
2
3
4
4
Page 48
SMART VISU SERVER + ASTRO FUNCTION 9
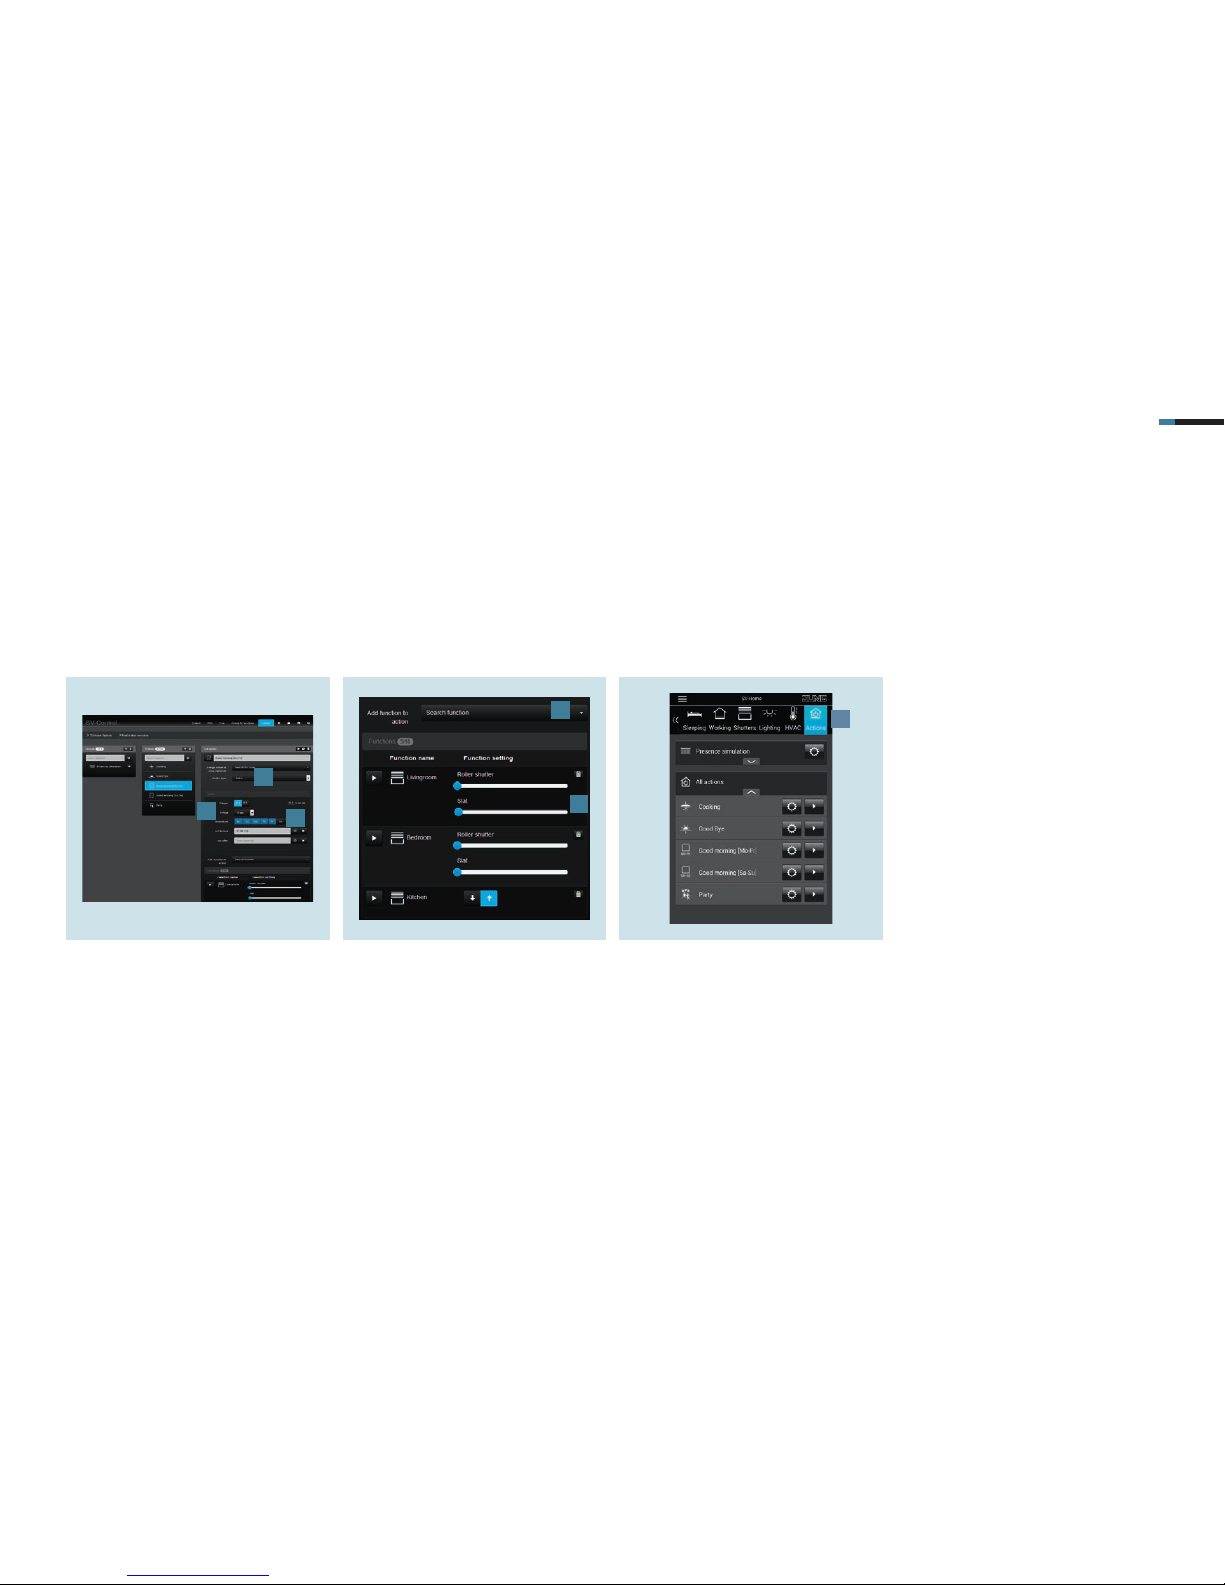
1. Create an action in the Actions tab
and select the Astro [1] action type.
Select the Sunrise [2] trigger and the
desired weekdays [3] including
Conditions:
No shift (0 minutes)
Mo – Fr
Not before 7:00 a.m.
6. Astro function and actions
Using the actions, you can create scenes, and using the astro action type, you can realise automatic processes for the control of your home at sunrise or sunset. You also
have the possibility to move the switch-on time or include conditions. Two application examples are described for this.
6.1 Action “Good morning [Mo – Fr]”
This action should automatically raise the blinds at sunrise, however not before 7:00 a.m.
2. Add the appropriate functions [4] to
the action.
3. Adjust the desired states using the
sliders [5], e.g.:
Blind position 0%
Slat 0%
4. After you have saved the action, it can
be called in SV Home under Actions [6].
1
2
3
4
5
6
Page 49
SMART VISU SERVER + ASTRO FUNCTION 10
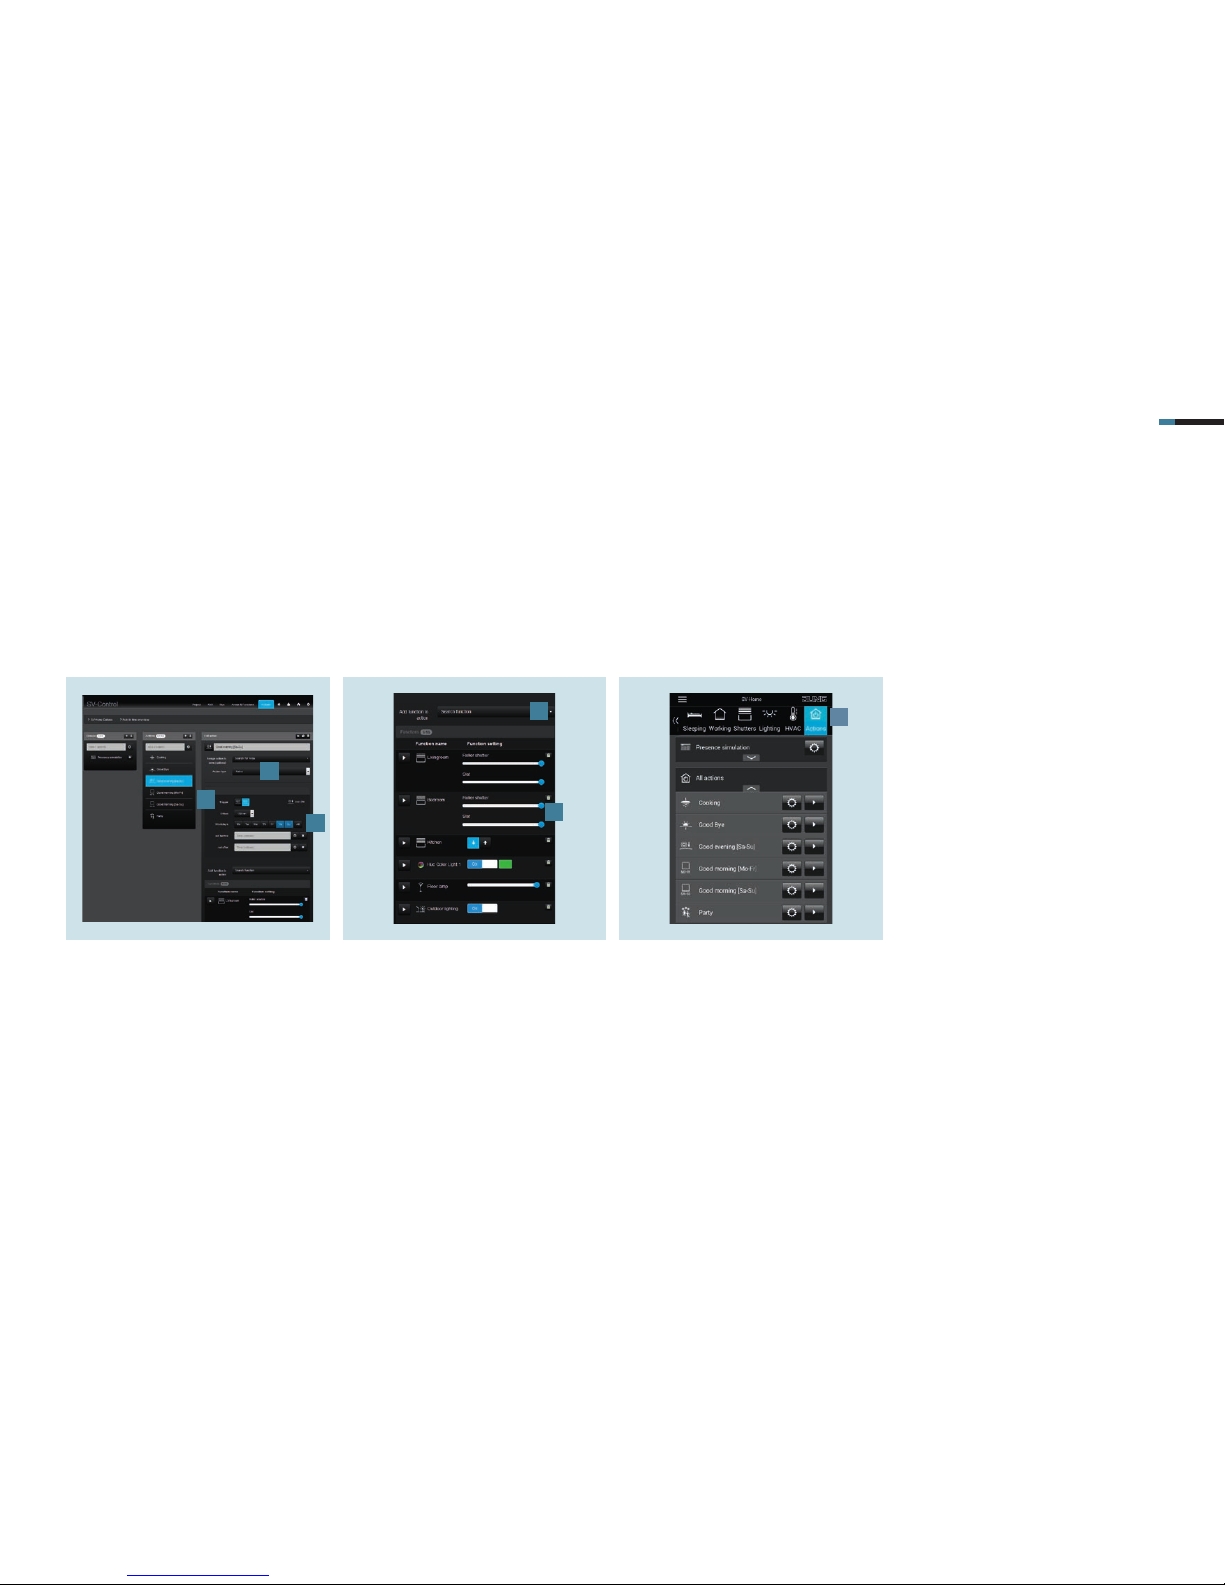
1. Create an action in the Actions tab
and select the Astro [1] action type.
Select the Sunset [2] trigger and the
desired weekdays [3] including
Conditions:
Shift -30 minutes
Sa & Su
6.2 Action “Good evening [Sa – Su]”
This action should automatically lower the blinds at the weekend at sunset, put the lighting in the living room into a relaxed ambiance and switch on the outdoor
lighting. The action already starts half an hour before sunset.
2. Add the appropriate functions [4] –
here blinds and lighting – to the
action.
3. Adjust the desired states using the
sliders [5], e.g.:
Blind position 100%
Slat 100 %
Lighting on or 100 %
4. After you have saved the action, it can
be called in SV Home under Actions [6].
1
2
3
4
5
6
Page 50
SMART VISU SERVER + ASTRO FUNCTION 11
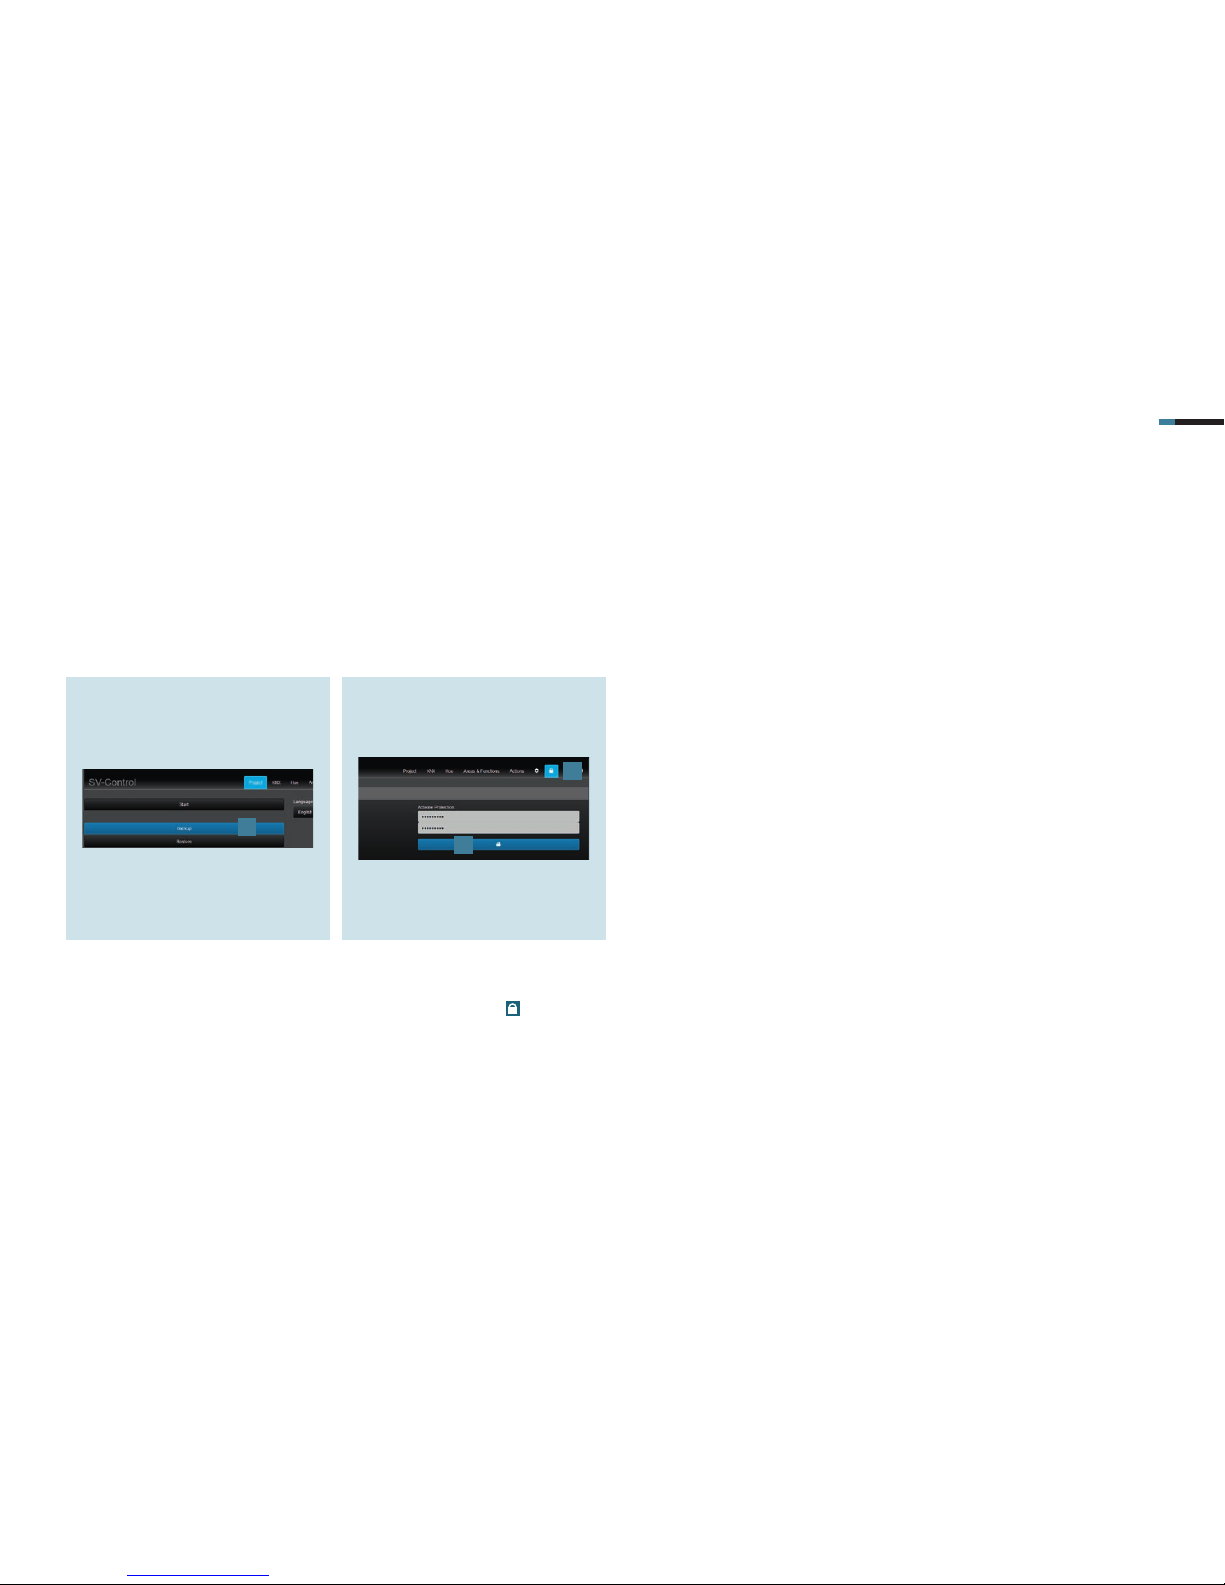
1. Call SV Control to backup your project
fi le. Save the project and your confi guration under Backup [1] in the Project
tab.
7. Saving the project
Congratulations – you now know how you can set up and use the astro function to automatically and conveniently control your home depending on the sun position
using the Smart Visu Server!
Before you start the visualisation, do not forget to save your confi guration and activate the password protection again.
2. To reactivate the access protection
for your system, call the access
protection page using
[2].
3. Enter the password and activate the
protection by clicking on the selected
area [3].
1
2
3
Page 51

Smart Visu Server
How do I set up remote access?
Page 52
SMART VISU S ERVER + REMOTE ACCES S 2
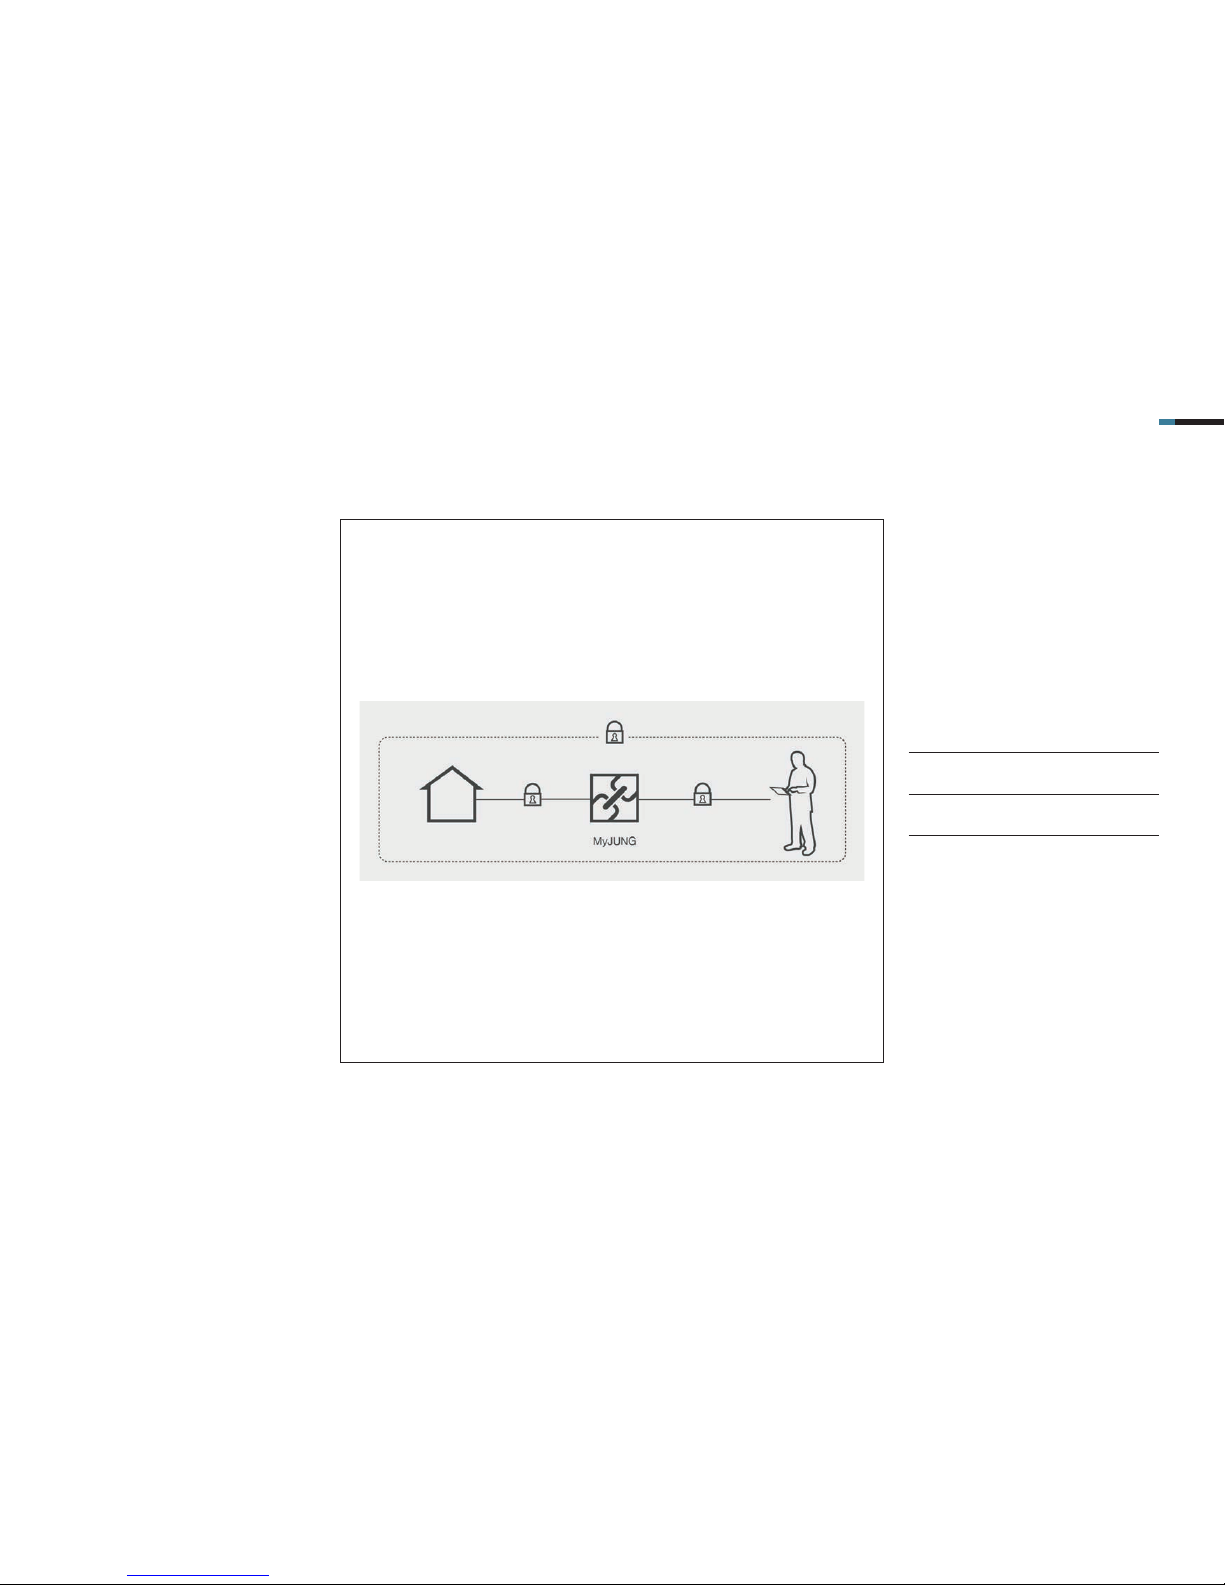
Convenient and secure remote access:
With the remote access of the SV
server, you can visualise, control and
adapt your home system to your
requirements at any time and from
any location.
This quick start guide explains the
individual steps of commissioning and
operation using an example.
1. Introduction
COMPONENTS
JUNG
PART NO: QUAN-
TITY
Smart Visu
Server
SV-SERVER 1
Remote
subscription
SV-SERVER-L12 1
Page 53

SMART VISU S ERVER + REMOTE ACCES S 3
The MyJUNG remote access for your
SV Server can be set up in a few steps.
The table here gives an overview of the
necessary steps.
The individual steps are described in
detail on the following pages.
STEP PAGE
1. Register at the MyJUNG por tal 4
2. Purchase remote access for your Smart Visu Server 5
3. Call Smart Visu Server locally via web browser 6
4. Open SV Control and register device 7
5. Activate remote access via MyJUNG portal 8
6. Set up remote access on terminal devices (Windows PC, Android or iOS device) 9
2. Overview
Page 54
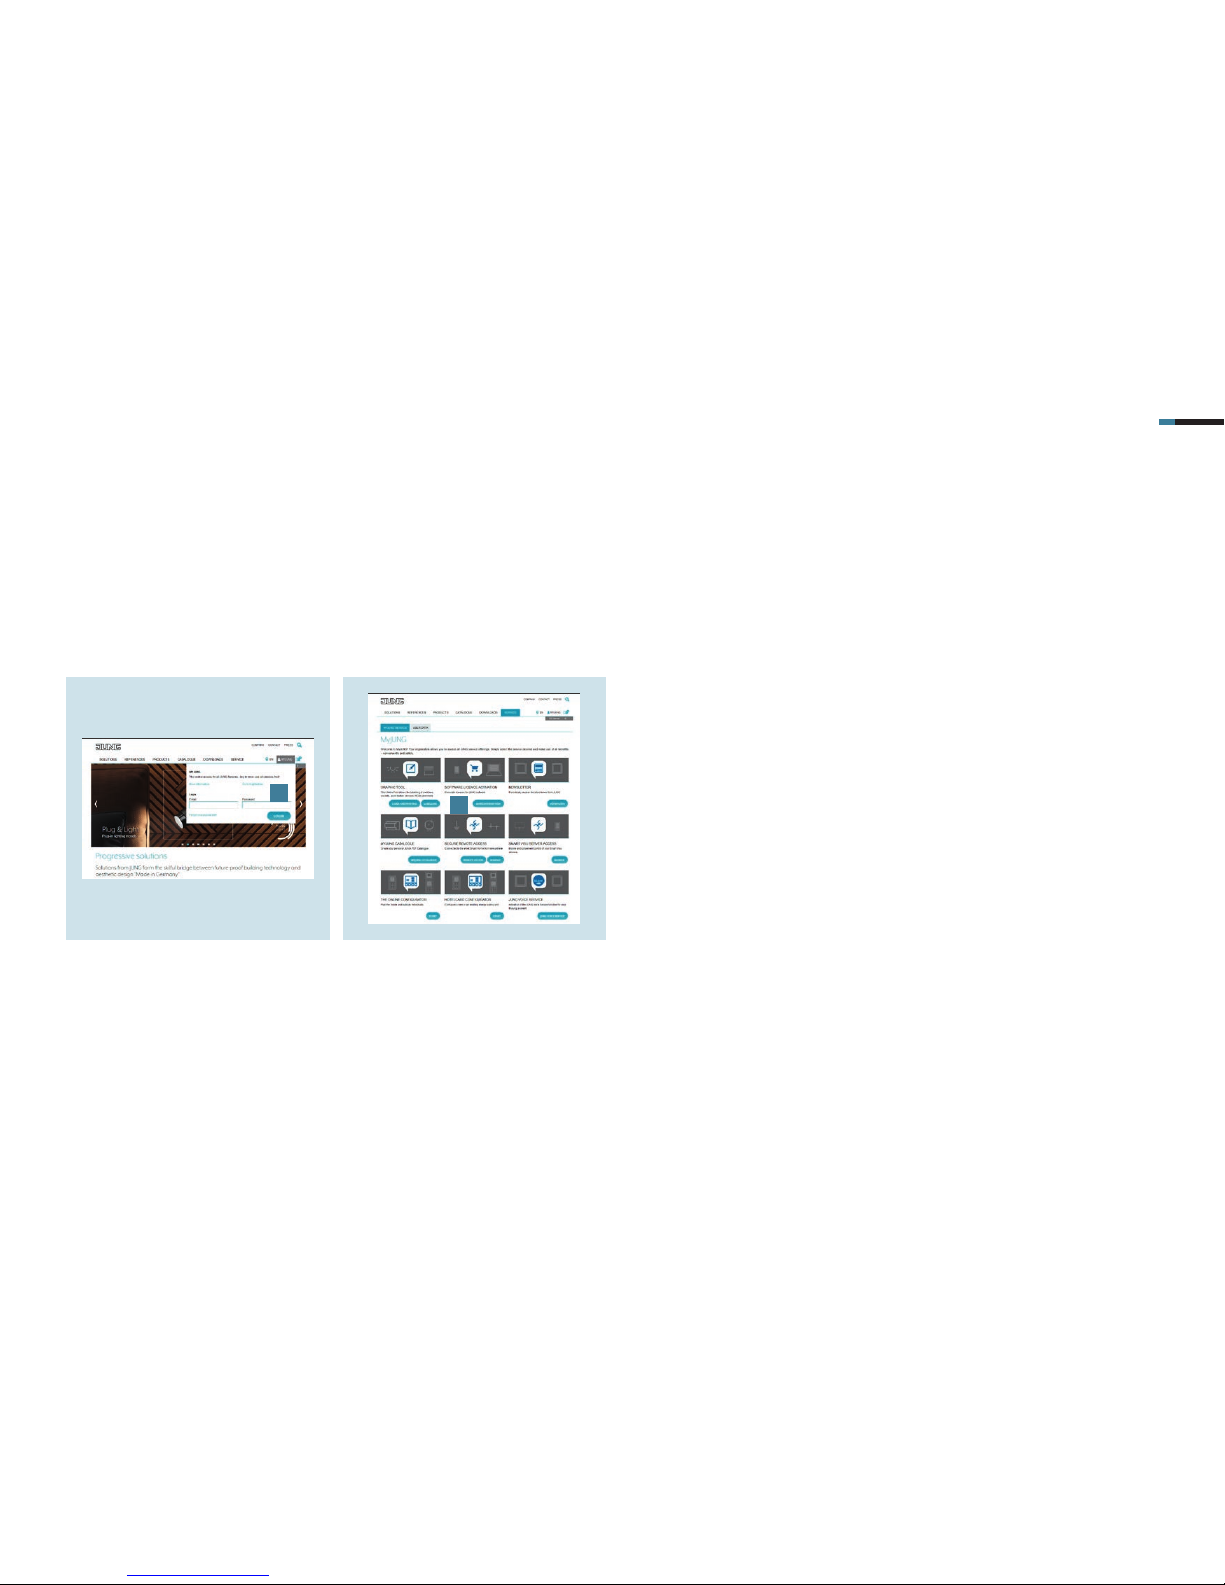
SMART VISU S ERVER + REMOTE ACCES S 4
1. Log in to the MyJUNG portal or register
as a new user [1].
3. Activation of the remote access using the MyJUNG portal
First, open the MyJUNG portal on the JUNG website.
2. Select More Information [2] in the
Software Licence Sales selection field
to purchase a remote access license.
1
2
Page 55
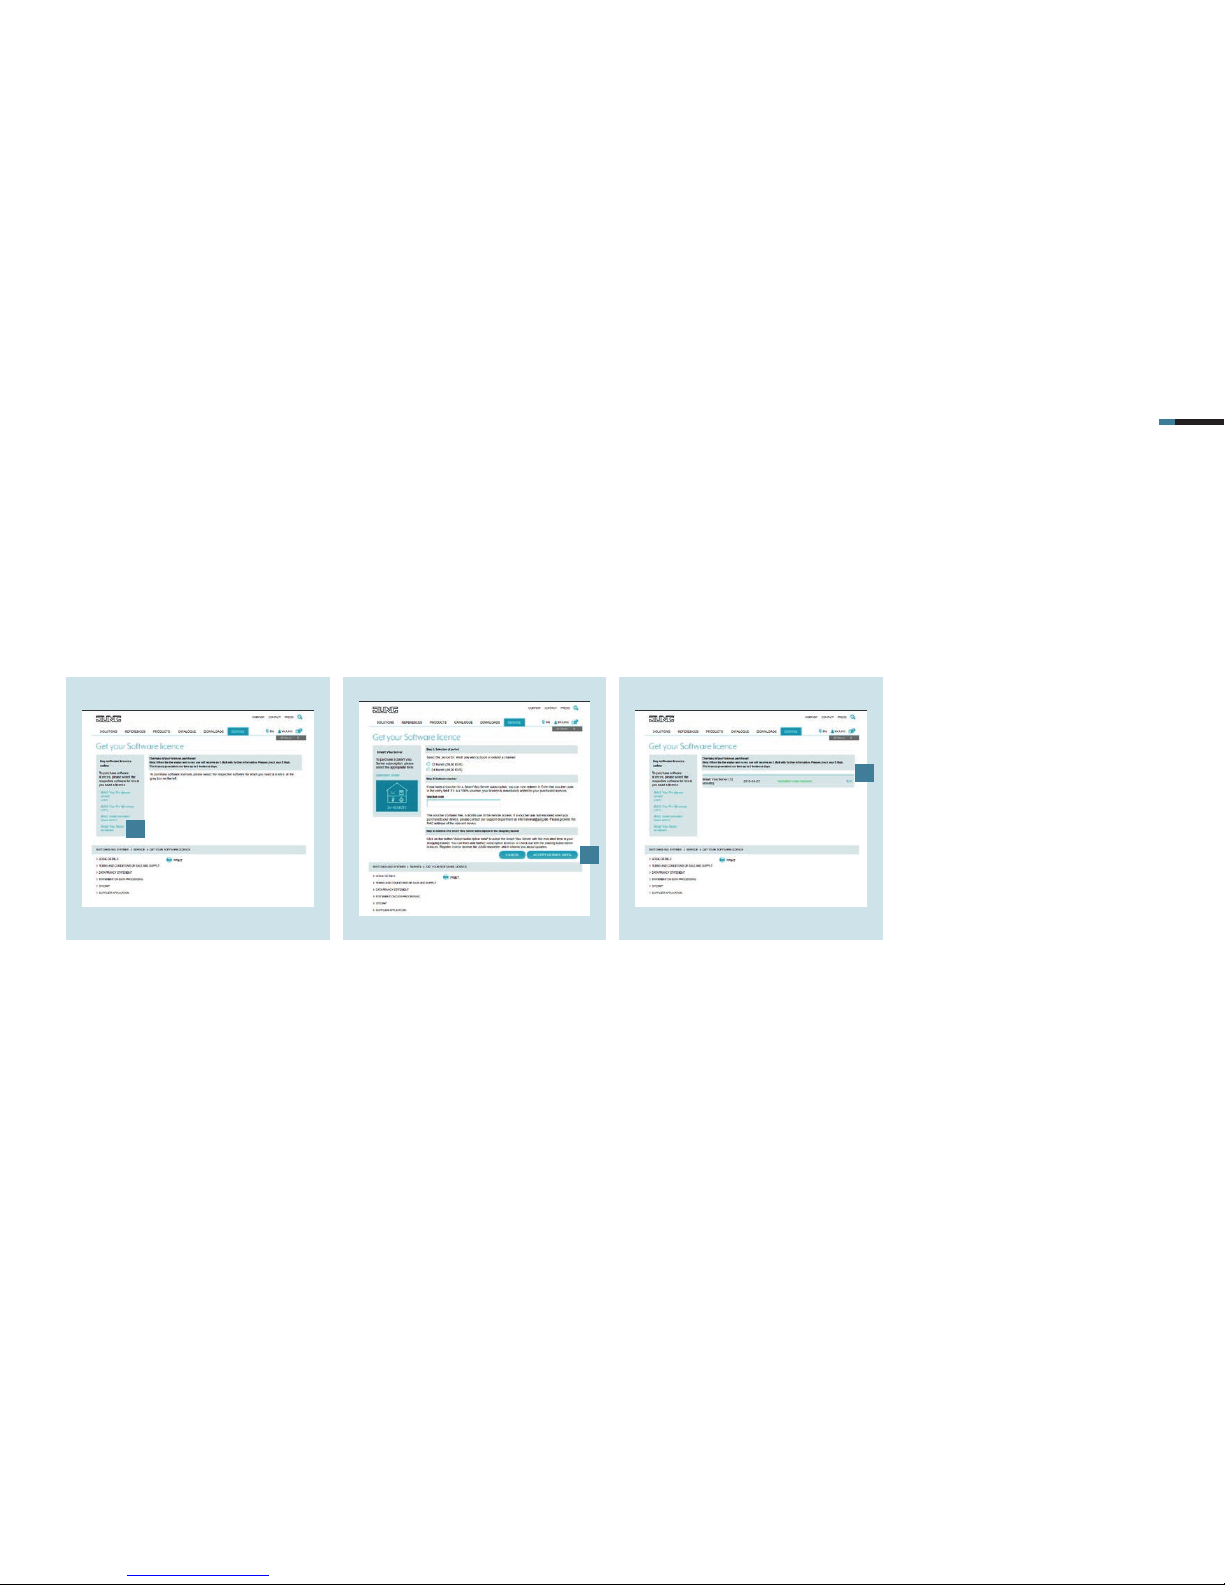
SMART VISU S ERVER + REMOTE ACCES S 5
1. Select the licence purchase for Smart
Visu Server [1] in Soft ware Licence
Sales.
3.1 Licence purchase
You see the products for which you can purchase additional software or licences in Software Licence Sales.
2. Purchase remote access for 12 or 24
months or enter a voucher code.
Confirm the licence purchase with
Accept licence data [2].
3. The following overview shows your
purchased Licences [3].
1
2
3
Page 56
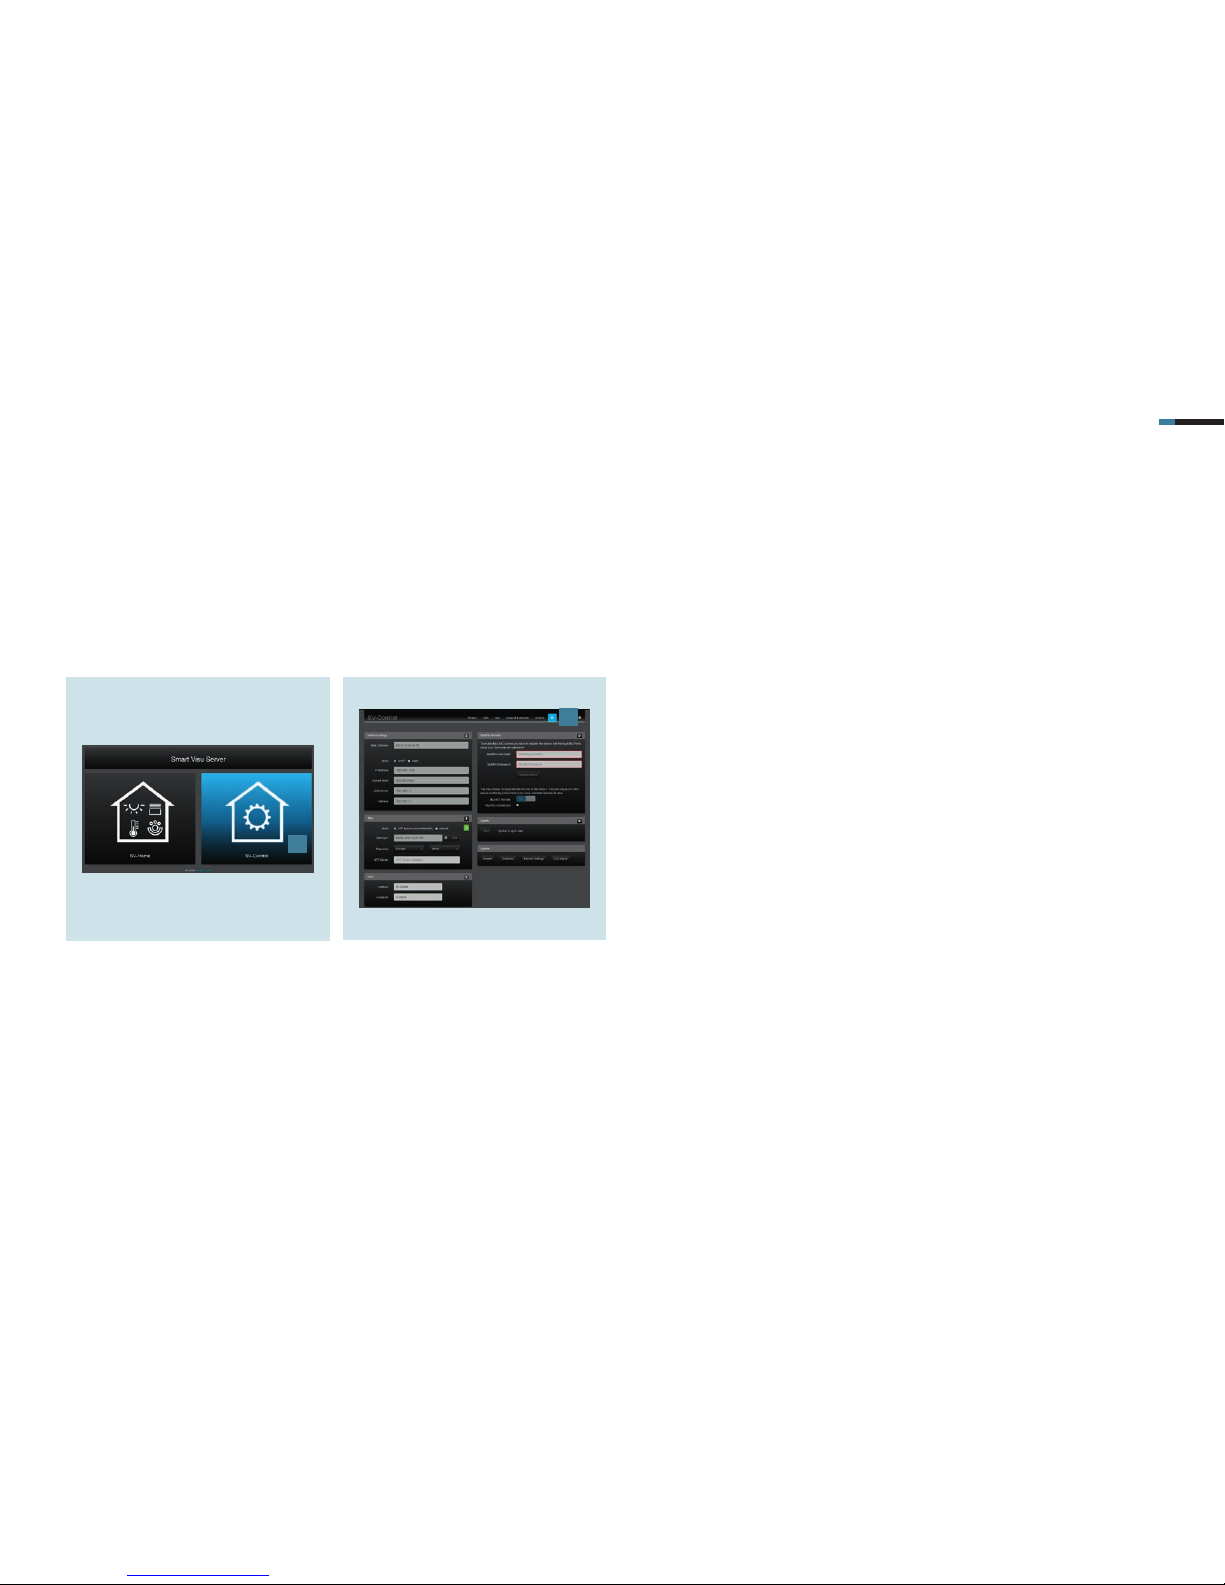
SMART VISU S ERVER + REMOTE ACCES S 6
1. Select the SV Control button [1].
4. Activation of the remote access in Smart Visu Server
After you have purchased a licence, now activate the remote access on your Smart Visu Server.
Call the SV Server in the web browser of your terminal device (PC, laptop, tablet).
To do so, enter the address http://sv-server.local or the IP address of the SV Server allocated by the router.
If the SV Server is protected by a password, enter this.
2. Navigate in SV Control to the Configu-
ration Management tab [2].
1
2
Page 57
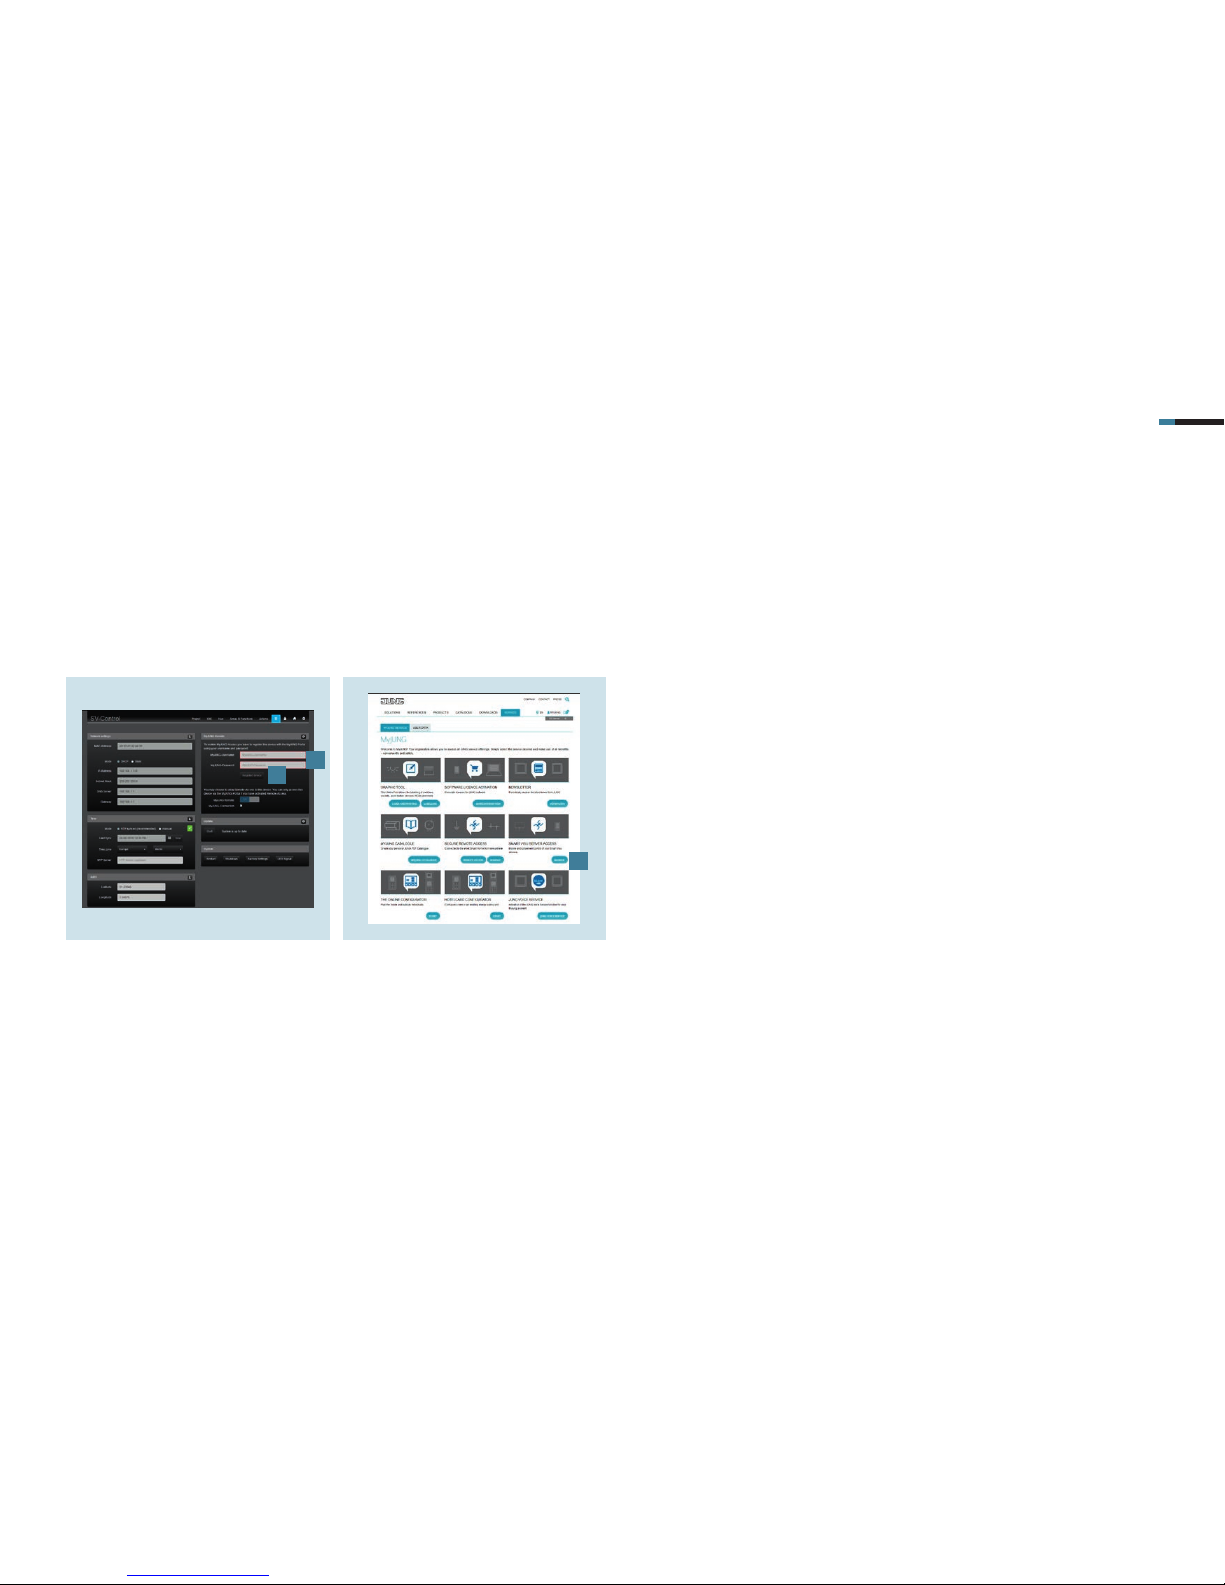
SMART VISU S ERVER + REMOTE ACCES S 7
1. Enter your user name and the
associated password [1].
Then confirm the input by clicking on
the Register device but ton [2].
4.1 Register device
Register your device in the Configuration Management tab. Log in to MyJUNG with your user data for the final activation.
2. In MyJUNG, click on the Manage but-
ton in the Smart Visu Server Remote
Access selection field [3].
1
2
3
Page 58
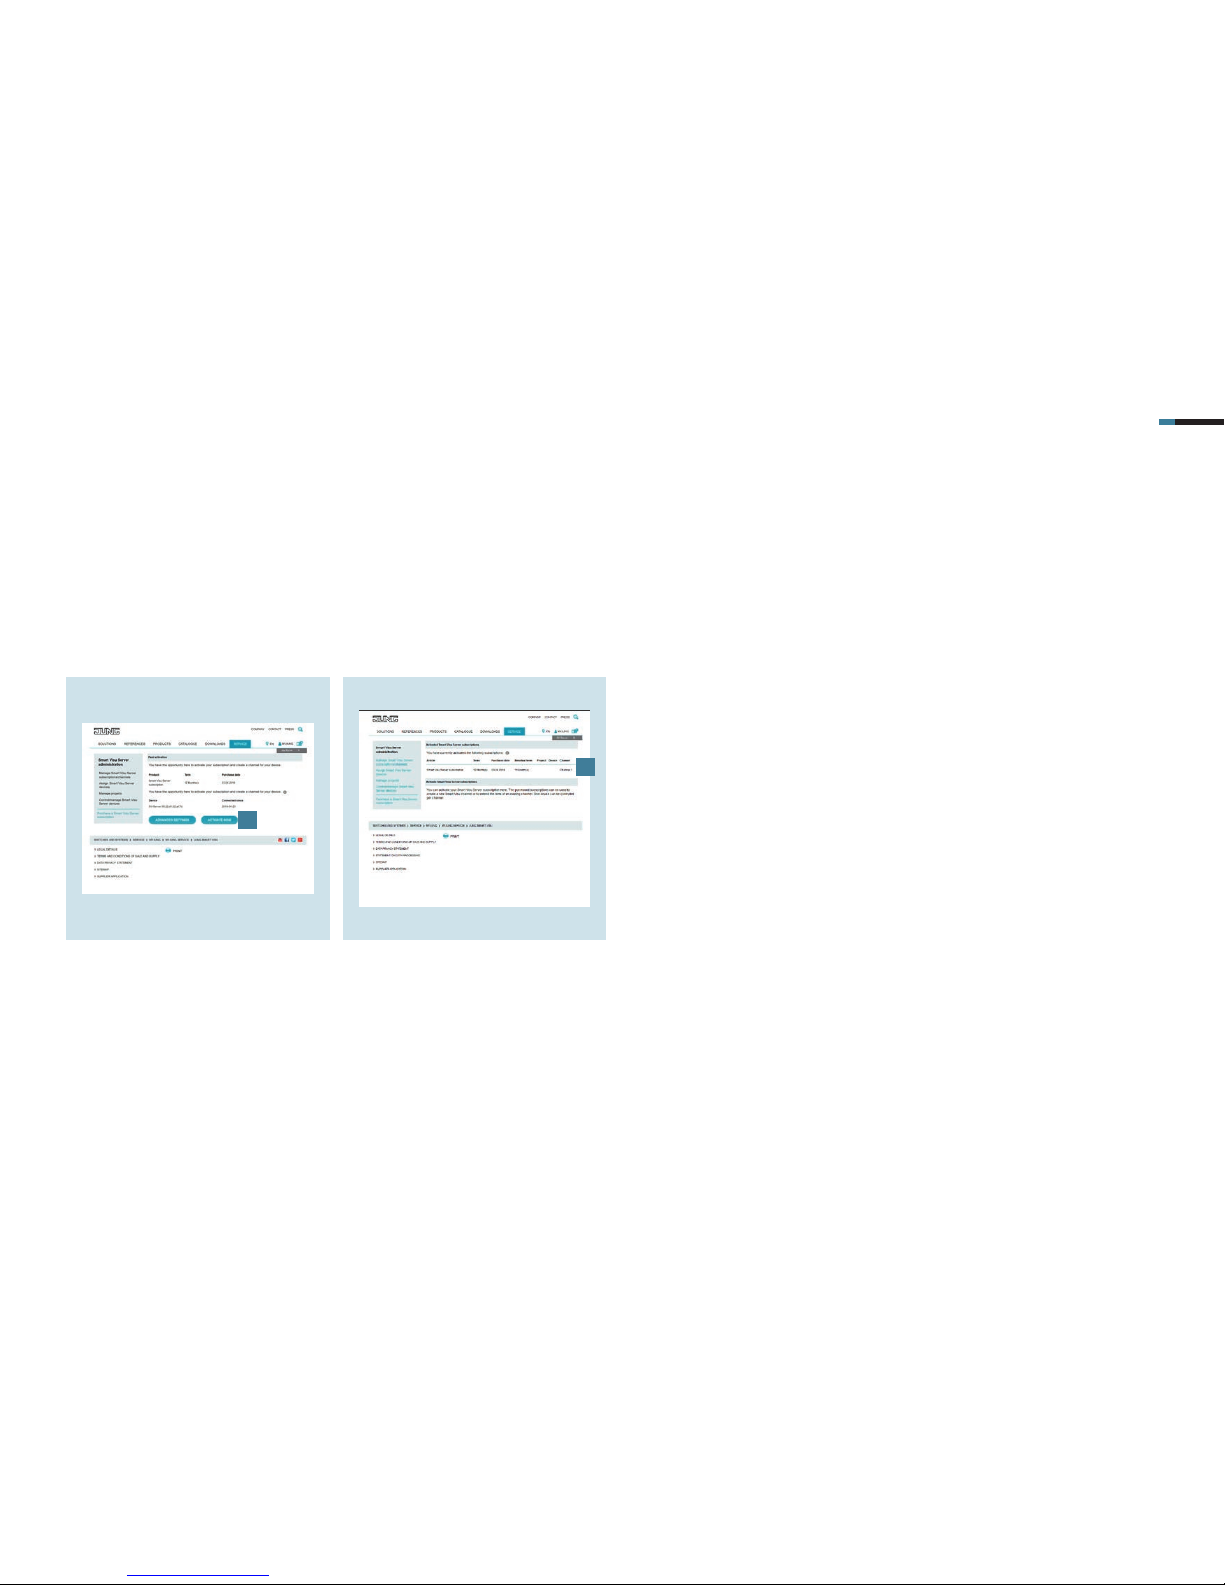
SMART VISU S ERVER + REMOTE ACCES S 8
1. Activate the remote access by clicking
on the Activate Now but ton [1].
4.2 Activate remote access
The activation of remote access is performed in the following steps.
2. There you see important information
about your MyJUN G remote access [2].
1
2
Page 59
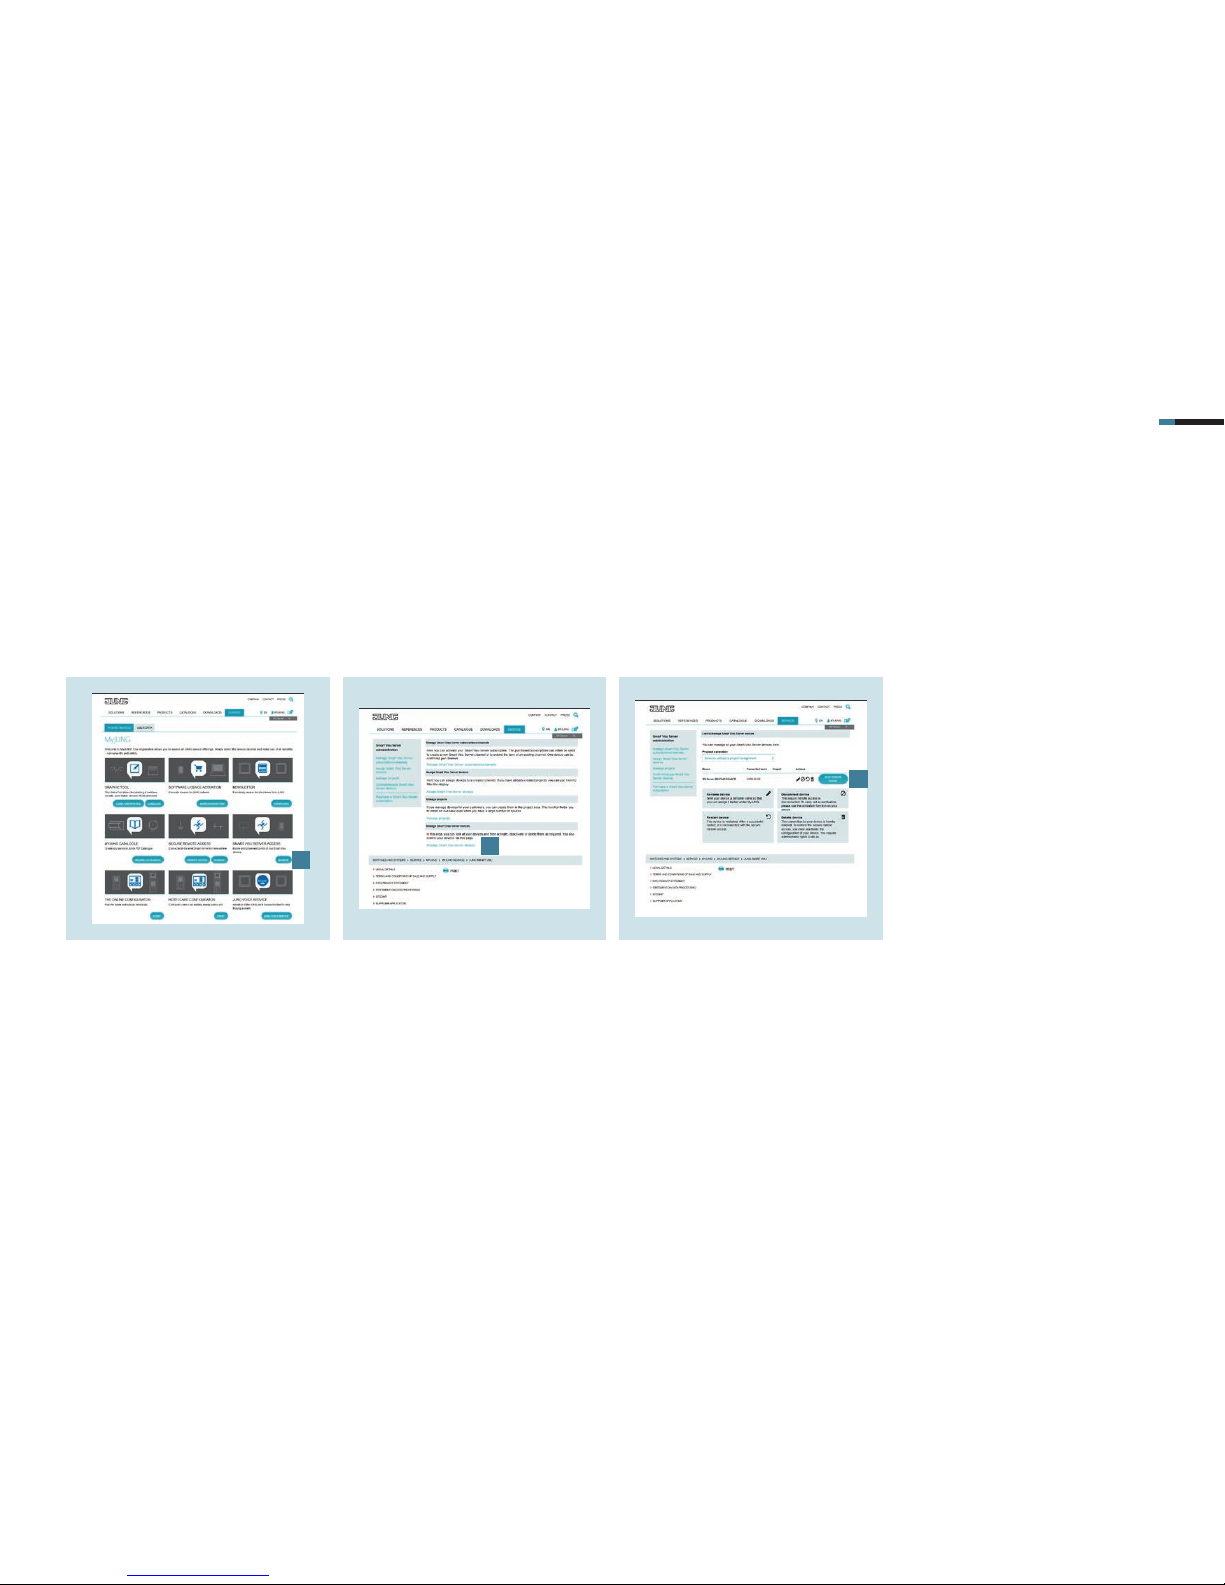
SMART VISU S ERVER + REMOTE ACCES S 9
1. Click on the Manage button [1] in the
Smart Visu Server Access selection
field.
4.3 Remote access using PC
The control of your home system via remote access is secure and platform-independent. The following pages describe how to set up remote access for your SV server
with various terminal devices, starting with a PC.
2. Select Manage Smart Visu Server [2]
there.
3. Select the Start remote access button
[3] to establish the connection to your
home system.
1
2
3
Page 60
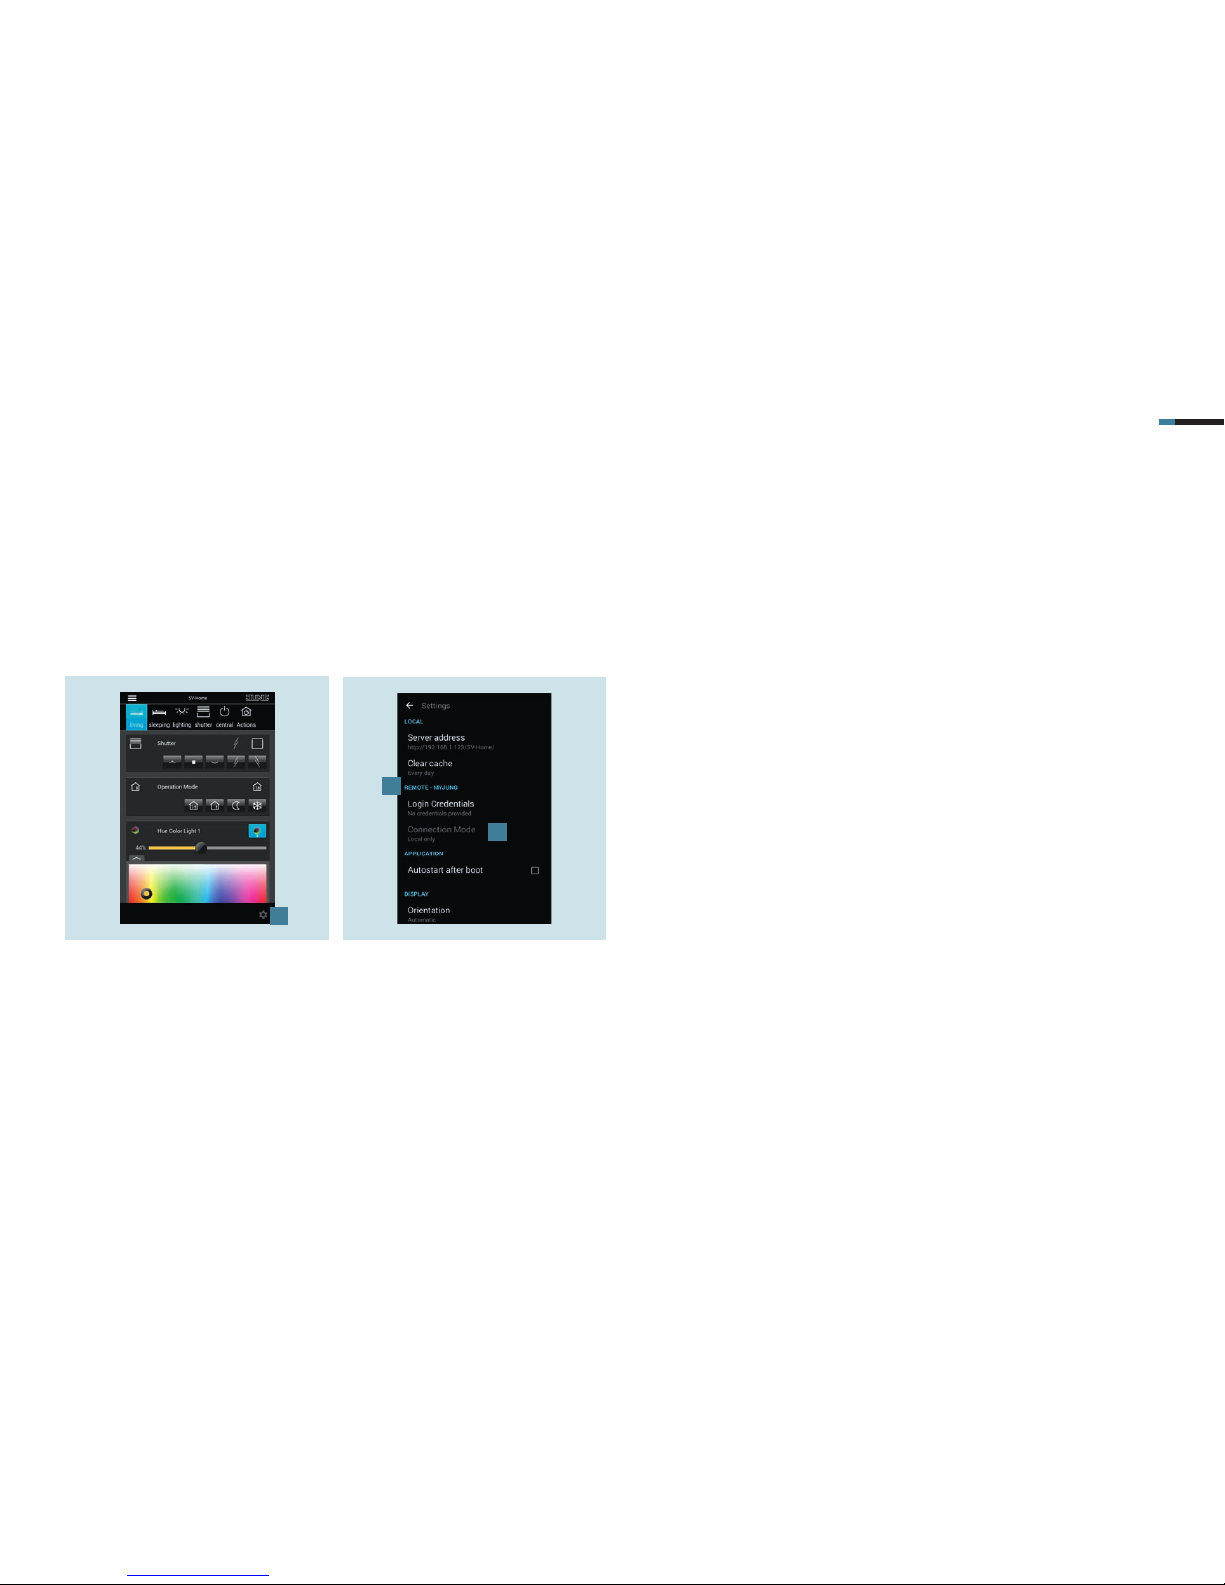
SMART VISU S ERVER + REMOTE ACCES S 1 0
1. Open the SV Server app and call the
app settings using the gear [1].
4.4 Remote access using Android
Perform the following steps to set up remote access for your SV server using the Android app.
2. Enter your access details for the
remote access under REMOTE –
MyJUNG [2].
3. Select the Automatic [3] connection
mode in the standard case. If
required, the connection to the home
system can also be Only local or
exclusively via MyJUNG.
1
2
3
Page 61
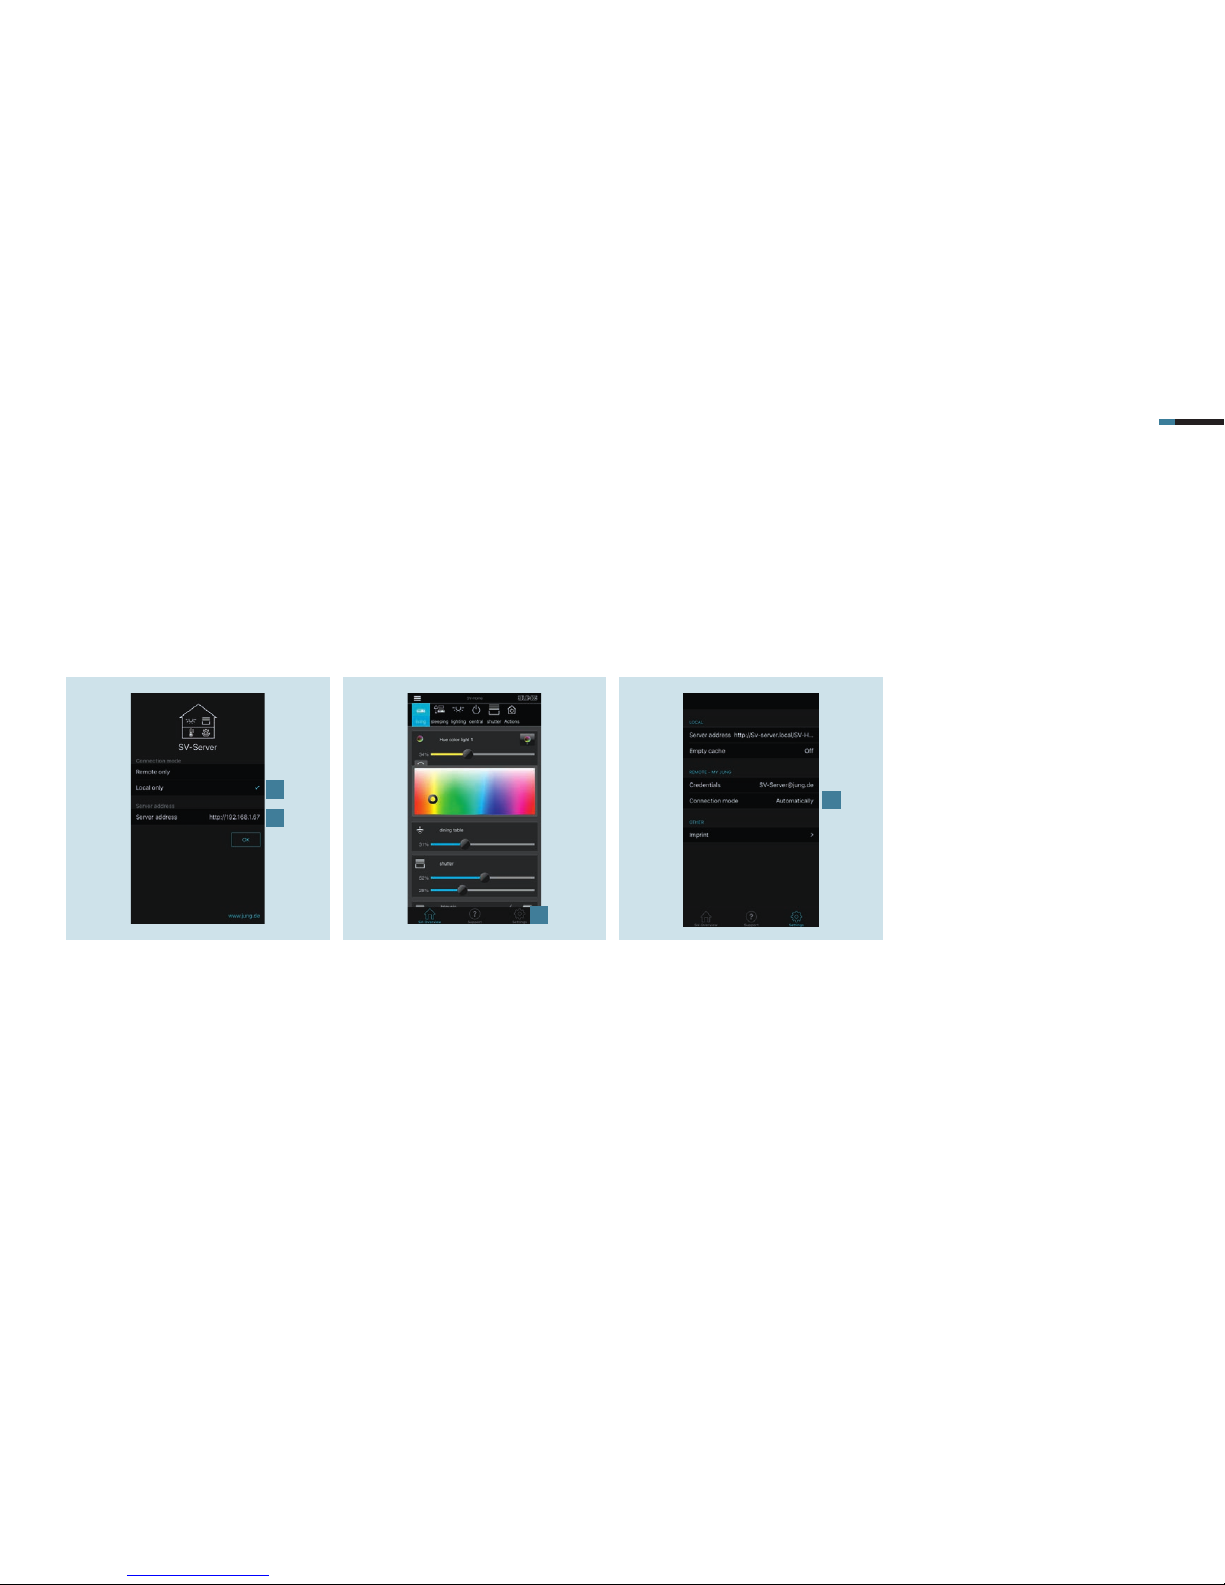
SMART VISU S ERVER + REMOTE ACCES S 11
1. On the first start of the app, select the
Local only [1] connection mode and
enter the IP address of the SV Server [2].
2. Then enter your access details for the
remote access under Only Remote
and confirm your entries with OK. You
can now control your home system
locally or remotely.
4.5 Remote access using iOS
Perform the following steps to set up remote access for your SV server using the iOS app.
3. Call the app settings using the gear
[3].
4. Select the Automatically [4] connection
mode in the standard case. If required,
the connection to the home system
can also be Local only or exclusively
via MyJUNG.
1
2
3
4
Page 62

SMART VISU S ERVER + REMOTE ACCES S 12
5. Completion of setting up Smart Visu Server remote access
Congratulations – you have successfully set up remote access for your Smart Visu Server.
With the SV Server remote access, you now always have your home under control.
Your data will be treated securely and confidentially and are subject to the strict European data protection regulations. JUNG expressly declares that personal data will
not be passed on to third parties.
Page 63

SMART VISU S ERVER + PHILIP S HUE 18
ALBRECHT JUNG GMBH & CO. KG
Volmestraße 1
58579 Schalksmühle
Deutschland
Telefon +49 (0) 23 55 / 80 65 56
Telefax +49 (0) 23 55 / 80 62 55
E-Mail [email protected]
JUNG.DE
Haben Sie noch Fragen?
Wir beraten Sie gern.
 Loading...