

Page 1

ALBRECHT JUNG GMBH & CO. KG
Volmestraße 1
58579 Schalksmühle
www.jung.de
Rauchwarnmelder
Smoke alarm device
Art.-Nr.: RWM 100 WW
D
Seite 2 - 15
GB
Page 16 - 27
Page 2
2
1
I.
II.
IV.
III.
Page 3
I.
I. II. III.
3
2
3
Page 4
4
4
Page 5

INHALT
5
Standortauswahl 7
Inbetriebnahme 8
Montage 8
Klebemontage 8
Bohrmontage 9
Prüfung und Wartung 9
Batteriestörungsmeldung 10
Mögliche Ursachen für einen
Störalarm 11
Allgemeine Sicherheitshinweise 12
Dekoration 13
Bestimmungsgemäße
Verwendung 13
CE-Konformität 14
Gewährleistung 15
Entsorgung 15
Page 6

Was tun, wenn es brennt?
• Bewahren Sie Ruhe.
• Warnen Sie alle Mitbewohner.
• Helfen Sie Kindern, behinderten, älteren
und kranken Menschen.
• Schließen Sie alle Fenster und Türen hinter
sich.
• Verlassen Sie umgehend das Haus.
• Benutzen Sie keine Aufzüge.
• Alarmieren Sie die Feuerwehr.
Page 7
DANKE !
Wir freuen uns, dass Sie sich für
unser Produkt entschieden haben
und danken Ihnen für Ihr
Vertrauen!
Sie haben eine gute Wahl
Getroffen.
Dieser Heimrauchwarnmelder ist
mit größter Sorgfalt entwickelt und
hergestellt worden, um dazu
beizutragen, dass Sie rechtzeitig
auf die Gefahr eines Brandes
aufmerksam werden.
Dieses Heft gilt als Bedienungs-,
Montage- und Wartungsanleitung.
Bitte lesen Sie es vollständig
durch und beachten alle Hinweise
und Abbildungen, weil somit die
bestmögliche Handhabung des
Gerätes erreicht wird.
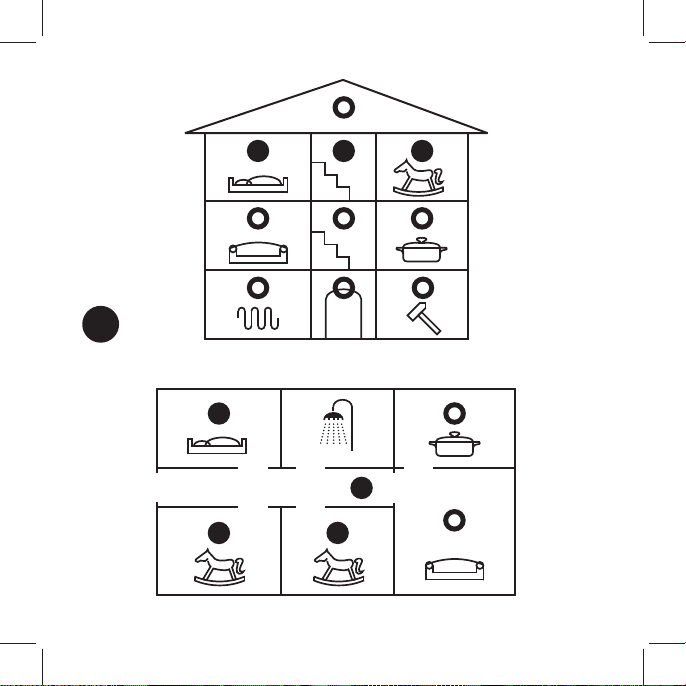
STANDORTAUSWAHL
Rauchwarnmelder sollten als
Mindestausstattung in allen
Schlafräumen, Kinderzimmern und
7
Fluren, die als Fluchtwege dienen,
jeweils in der Raummitte an der
Zimmerdecke installiert werden
(Abb. 4).
Wählen Sie den höchst gelegenen Montageort mit einem
Mindestabstand von 50 cm zu
umliegenden Wänden,
Möbelstücken und Lampen.
Eine optimale Ausstattung
erreichen Sie, wenn die Geräte
auch in allen übrigen Räumen
sowie in den Treppenfl uren
installiert werden (Abb. 4). Dieses
Gerät ist auch für den Einsatz in
Küchen (Brandherd Nummer eins!)
geeignet!
In Waschräumen (Bad,Toilette etc.)
ist ein Rauchwarnmelder in der
Regel wegen der geringen
Brandgefahr nicht erforderlich.
Im Falle eines Brandes erkennt
dieses Gerät frühzeitig den
aufsteigenden Brandrauch und
Page 8

8
auch den damit verbundenen
Temperaturanstieg im Raum. Um
Sie rechtzeitig zu warnen, ertönt
dann ein lauter Alarmton. Dieses
Signal können Sie, sofern Sie
einen ernsthaften Anlass zur Flucht
ausschließen, vorübergehend
(ca.10 min) deaktivieren bzw. auch
vor Auslösen des Alarmes
unterdrücken, indem Sie die
Prüf- und Stopp-Taste
(Abb. 1, Punkt IV.) des Gerätes
sanft andrücken. Gute Belüftung
der Räume ist dann ratsam und
wird der erneuten Alarmauslösung
vorbeugen.
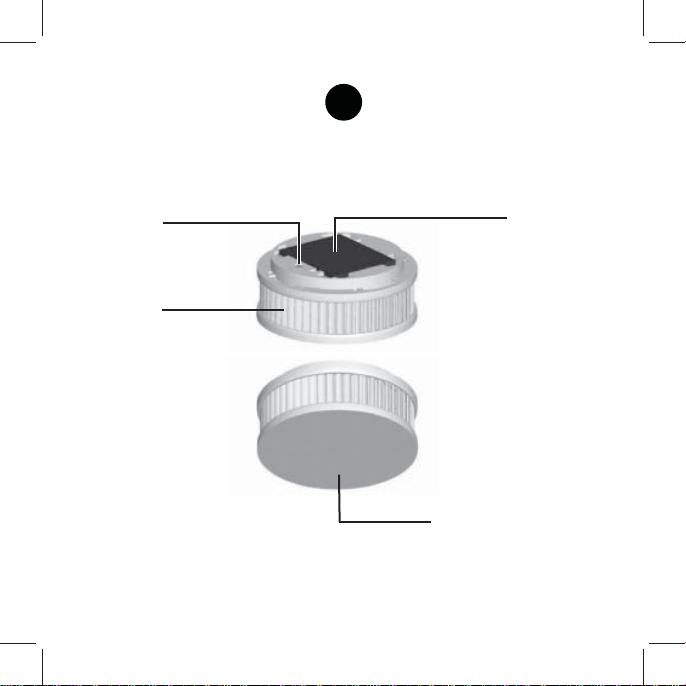
INBETRIEBNAHME
Entfernen Sie bitte zuerst etwaige
Aktivierungssicherungen (wie z.B.
einen Splint) und stellen
sicher,dass die
Aktivierungssicherung nicht ins
innere des Gerätes gelangt!
Drücken Sie dann die
Aktivierungstaste (Abb. 1, Punkt I.)
des Gerätes. Diese Taste muss
nach dem Eindrücken mit dem
Gehäuse des Gerätes abschließen!
Zur Bestätigung, dass Ihr
Rauchwarnmelder nun aktiviert ist,
ertönt nach der Aktivierung ein
kurzer Prüfton.
Dieser Prüfton wird wiederholt,
wenn Sie die Prüf- und Stopp-Taste
(Abb. 1, Punkt IV.) drücken und ist
ein Hinweis, dass das Gerät
betriebsbereit ist.
MONTAGE
Der Rauchwarnmelder wird von
einem Magnet-Träger gehalten
(Abb. 1, Punkt III.) Es gibt zwei im
Folgenden beschriebene
Möglichkeiten, diesen Träger an
der Decke zu befestigen. Bitte
achten Sie darauf, dass der
Magnet nur von einer Seite
magnetisch anziehend wirkt!
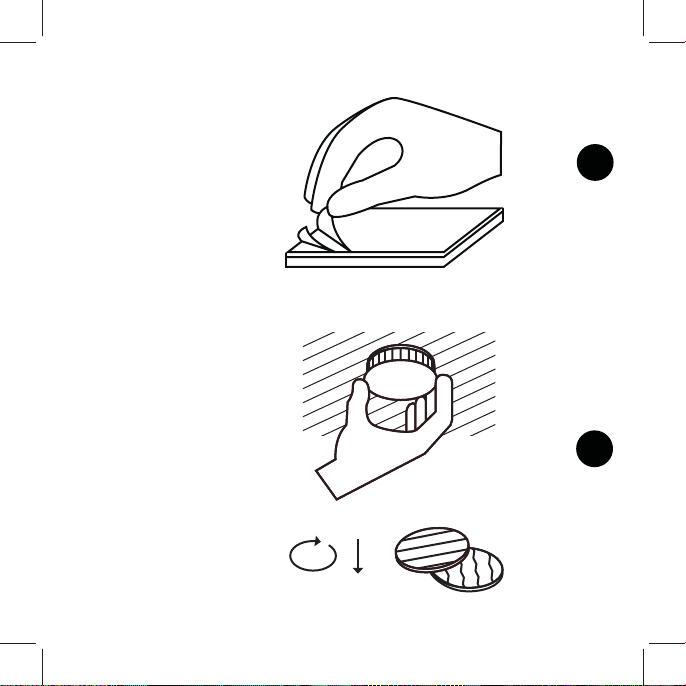
Klebemontage:
Für eine Klebemontage des
Gerätes darf ausschließlich der
dem Produkt beiliegende
Page 9

Klebewerkstoff eingesetzt werden!
Der Montageort muss fest, trocken
und frei von Fett, Staub und losen
Anstrichen etc. sein. Entfernen Sie,
wie in Abbildung 2 gezeigt, den
Informationsaufkleber und die
Schutzfolie vom aufgetragenen
Klebewerkstoff und drücken den
Magnetträger für ca. 10 Sekunden
fest an die Montageposition.
Anschließend können Sie das
Gerät auf den Magnet-Träger (Abb.
1, Punkt III.) aufsetzen. Die
Endfestigkeit der Klebeverbindung
wird nach ca. 72 Stunden erreicht.
Bohrmontage:
Bohren Sie an der Montagepositon
mit einem 6-mm-Bohrer ein Loch
und führen Sie den beiliegenden
6-mm-Dübel in das Bohrloch ein.
Nun führen Sie die beiligende
5-mm-Senkkopf-Schraube durch
die Unterseite des in Abbildung 2
dargestellten Magnet-Trägers, so
dass die Schraube beim Eindrehen
in den Dübel einen ebenen
Abschluss in dem Magnet-Träger
9
(Abb. 1, Punkt III.) fi ndet (Schraube
durch perforierte Bohrung stechen).
Die Schraube muss gänzlich in die
dafür bestimmte Vertiefung des
Magnet-Trägers (Abb. 1, Punkt III.)
eingedreht werden, um einen
sicheren Halt des Gerätes zu
erreichen! Die Schraube bitte nur
so fest anziehen, dass sich der
Magnetträger dabei nicht
verformt/wölbt!
PRÜFUNG UND WARTUNG
Dieser Rauchwarnmelder prüft
seine Funktionsbereitschaft einmal
pro Minute selbstständig. Das
Gerät regelt zudem die
Empfi ndlichkeit seiner
Detektionsoptik in Abhängigkeit
von Umgebungs einfl üssen
automatisch nach.
Sofern die Energiereserve des
Rauchwarnmelders angebrochen
ist oder die Detektionsoptik so sehr
verunreinigt ist, dass eine weitere
Nachregelung nicht mehr möglich
Page 10

10
ist, meldet das Gerät diese
Zustände frühzeitig, so dass Ihnen
ausreichend Zeit gegeben ist, den
Rauchwarnmelder durch ein neues
Gerät zu ersetzen.
Bitte achten Sie unbedingt darauf,
dass die Lufteinlässe am umlaufenden Rand des Rauchwarnmelders niemals durch Staub,
Schmutz, Farbe oder Klebeband
etc. beeinträchtigt werden!
Um sicher zu stellen, dass das
Gerät betriebsbereit ist, sollten Sie
regelmäßig, mindestens einmal pro
Monat, die Prüf- und Stopp-Taste
(Abb. 1, Punkt IV.) drücken und so
einen Probealarm auslösen.
Achten Sie dabei darauf, dass das
Gerät unbeschädigt und fest an
seinem Montageort angebracht ist,
und die Raucheinlass-Lamellen
(Abb. 1, Punkt II.) gänzlich frei von
Fremdkörpern sind.
Nützliche Hinweise zur regelmäßigen Wartung und der Wahl der
optimalen Montageposition fi nden
Sie auch in der Anwendungsnorm
für Rauchwarnmelder DIN 14676.
BATTERIESTÖRUNGSMELDUNG
Sofern ca. alle 90 Sekunden ein
einfacher kurzer Hinweiston (Piep)
abgegeben wird, ist die BatterieReserve erreicht.
Sofern ca. alle 90 Sekunden ein
zweifacher kurzer Hinweiston
(Piep-Piep) abgegeben wird, kann
das Gerät nicht länger die
Verunreinigung der
Detektionsoptik ausgleichen.
Jeder Hinweiston lässt sich jeweils
durch Betätigen der Prüf-undStopp-Taste (Abb. 1, Punkt IV.)
vorübergehend (24 Stunden)
deaktivieren.
Wenn der Rauchwarnmelder einen
der beiden zuvor beschriebenen
Hinweistöne abgibt, kann das
Gerät noch für maximal 60 Tage
seine Warnleistung erbringen und
sollte daher unbedingt vor Ablauf
dieser verbleibenden 60 Tage
ersetzt werden!
Page 11

werden.
11
MÖGLICHE URSACHEN FÜR
EINEN STÖRALARM
• Sehr starke Koch-,Wasser- und/
oder Bratendämpfe sowie Raum-,
Duft- und Insektenspray bzw.
Blüten-, Bau-, Schleif- oder
Feinstaub sind direkt in das Gerät
gelangt.
• Extreme Temperaturschwankungen oder sehr starke elektromagnetische Strahlung wirken in der
direkten Umgebung des Rauchwarnmelders auf das Gerät ein.
• Zigarettenrauch löst nur dann
einen Alarm aus, wenn der Rauch
aus unmittelbarer Nähe direkt oder
in sehr extremer Konzentration in
den Rauchwarnmelder gelangt.
Um einen Störalarm des Rauchwarnmelders zu vermeiden, sollte
das Gerät vor den hier benannten
Umgebungseinfl üssen geschützt
• Ein oder mehrere sehr kleine
Insekten bzw. andere
Kleinstorganismen haben die
Insektenschutz-Barrieren des
Gerätes überwunden. Hier kann
eine vorsichtige Reinigung des
Gerätes mittels eines
Staubsaugers Abhilfe schaffen.
Beim Kochen oder bei starker
Wasserdampfentwicklung in der
Nähe des Rauchwarnmelders ist
stets auf gute Belüftung der Räume
zu achten.
Ein Störalarm ist durch sanften
Druck der Prüf- und Stopp-Taste
(Abb. 1, Punkt IV.) und durch gutes
Belüften der Räume abzustellen
bzw. zu verhindern.
Bitte informieren Sie ihre Nachbarn
über einen Störalarm, damit nicht
unnötig die Feuerwehr alarmiert
wird!
Page 12

12
ALLGEMEINE SICHERHEITSHINWEISE
Rauchwarnmelder unterstützen
dabei, Brände frühzeitig zu
bemerken, können jedoch weder
ein Feuer löschen, noch die
Entstehung eines Brandes
verhindern und auch nicht die
Feuerwehr alarmieren.
Rauchwarnmelder geben, wenn
Gefahr durch Brandgase besteht,
einen lauten Alarmton ab, der Sie
auf die Gefahr aufmerksam macht.
Trotz größter Sorgfalt bei der Herstellung der Rauchwarnmelder
besteht die Möglichkeit, dass eine
Funktionsstörung auftreten und ein
Gerät daher nicht oder nicht
rechtzeitig den ggf. entstandenen
Brand melden kann!
Die üblichen Vorsichtsregeln im
Umgang mit Feuer, brennbaren
Materialien und technischen
Geräten sind stets zu beachten!
Dieses Gerät ist ein geschlossenes
System. Ein wie auch immer
gearteter Eingriff in das Gerät hat
neben dem Verlust jeglicher ggf.
bestehender Garantieleistungen
auch die Folge, dass das Gerät
nicht mehr gemäß seiner
Bestimmung eingesetzt werden
kann und darf! Bitte öffnen Sie das
Gerät auf keinen Fall, weil Ihnen
daraus ein Verletzungsrisiko
entstehen kann!
Ein Batteriewechsel ist nicht
erforderlich und technisch
ausgeschlossen.
Bitte schützen Sie das Gerät,
insbesondere bei
Renovierungsarbeiten, aber auch
generell, vor Nässe, Kälte, Hitze,
Feinstaub, Fett-, Nikotin- und
Lackdämpfen sowie Anstrichmitteln
wie beispielsweise Wandfarben,
Klebstoffen und Schmutz jeglicher
Art. Bei Renovierungs-, Bau- und
Schleifarbeiten sollte der
Rauchwarnmelder durch leichten
vertikalen Zug von dem
Page 13

Magnet-Träger (Abb. 1, Punkt III.)
gelöst und geschützt aufbewahrt
werden.
Nach Beendigung der Arbeiten
denken Sie unbedingt daran, den
Rauchwarnmelder wieder auf dem
Magnet-Träger (Abb. 1, Punkt III.)
einzurasten!
BITTE BEACHTEN SIE
UNBEDINGT:
Nur wenn sich das Gerät an seiner
vorgesehenen Montageposition
befi ndet, unverschmutzt, unbe-
schädigt und aktiviert ist, kann es
seine u.U. lebensrettende
Warnleistung erbringen!
DEKORATION
Die Prüf- und Stopp-Taste (Abb. 1,
Punkt IV.) des Rauchwarnmelders
ist abnehmbar und kann zur
Anpassung des Gerätes an die
Raumgestaltung dekoriert werden
(Abb. 3).
Bitte dekorieren Sie ausschließlich
diese abnehmbare Fläche des
13
Gerätes und keinesfalls andere
Bereiche!
Achtung! Die umlaufenden
Raucheinlass-Lamellen (Abb. 1,
Punkt II.) müssen stets frei bleiben
und dürfen niemals verdeckt
werden!
Das Typschild des Gerätes befi ndet
sich unter diesem leicht abnehmbaren Deckel.
BESTIMMUNGSGEMÄSSE
VERWENDUNG
Verwenden Sie das Gerät
aus schließlich für den Zweck für
den es gebaut und konzipiert
wurde! Jede andere Verwendung
gilt als nicht bestimmungsgemäß!
Dieses Gerät darf nur für
folgende(n) Zweck(e) verwendet
werden:
• Feuer- bzw. Rauchdetektion in
privaten Haushalten
• Dieser Rauchwarnmelder besitzt
Page 14

14
eine Hitzewarnfunktion. Es ist
jedoch kein Wärmemelder im Sinne
der EN 54-5.
CE-KONFORMITÄT
Dieses Produkt ist nach Direktive
89/106 EWG gemäß
EN14604:2005/AC:2008 als
Bauprodukt geprüft und zertifi ziert.
Die Produktion wird durch
regelmäßige und unabhängige
Kontrollen auf unveränderte
Einhaltung der gesetzlichen und
normativen Vorgaben überwacht.
1772-CPD-120724
Page 15

GEWÄHRLEISTUNG
Technische und formale
Änderungen am Produkt, soweit
sie dem technischen Fortschritt
dienen, behalten wir uns vor.
Wir leisten Gewähr im Rahmen der
gesetzlichen Bestimmungen.
Bitte schicken Sie das Gerät
portofrei mit einer
Fehlerbeschreibung an unser
Service Center.
ALBRECHT JUNG GMBH & CO. KG
Volmestraße 1
58579 Schalksmühle
Telefon: +49.23 55.8 06-0
Telefax: +49.23 55.8 06-2 04
kundencenter@jung.de
www.jung.de
SERVICE CENTER
Kupferstr. 17-19
44532 Lünen
Germany
ENTSORGUNG:
15
Dieses Produkt darf gemäß
ElektroG nicht in den Hausmüll
gelangen. Bitte senden Sie das zu
entsorgende Gerät an den
Hersteller zur weiteren Verwertung
oder geben es bei Ihrem regionalen
Entsorgungsunternehmen ab. Bitte
beachten Sie, dass durch nicht
ordnungsgemäße Entsorgung die
Umwelt geschädigt werden kann!
Page 16

1
I.
II.
IV.
III.
Page 17

I.
I. II. III.
17
2
3
Page 18

18
4
Page 19

CONTENT
19
Choice of location 21
Commissioning 22
Installation 22
Adhesive installation 22
Drilling installation 22
Testing and maintenance 23
Battery reserve alarm 24
Possible causes of a
false alarm 24
General safety instructions 25
Decoration 26
Correct use 26
CE Conformity 26
Warranty 27
Disposal 27
Page 20

20
What should I do if there is a fi re?
• Keep calm.
• Warn all residents.
• Help children and any disabled, elderly or
sick people.
• Close all windows and doors behind you.
• Leave the house immediately.
• Do not use any lifts.
• Notify the fi re brigade.
Page 21

THANK YOU!
We are pleased that you have
chosen our product, and thank you
for putting your trust in us! You
have made a good choice. This
smoke alarm device for the home
has been developed and manufactured with great care to help ensure
that you are alerted on time to the
danger of fi re. Please read these
operating instructions fully, and
observe all directions. This is the
best way to ensure the best
possible handling of this device.
CHOICE OF LOCATION
Smoke alarm devices should be
installed as minimum in equipment
in the middle of each room on the
ceiling in all bedrooms, children’s
rooms, and corridors that serve as
escape routes. Choose the highest
possible point to install, with a
minimum distance of 50 cm to the
surrounding walls, furniture and
lamps.
21
For an optimum in equipment,
also install devices in all the rest of
the rooms as well as in staircases
(fi g. 4). This device is also suitable
for use in kitchens (fi re hazard no.
1). A smoke alarm device is usually
not necessary in washrooms
(bathroom, WC, etc.) because of
the minimal risk of fi re.
When a fi re occurs, this device
automatically detects early on in
the room the rising smoke from
the fi re, and also the rise in
temperature which is associated
with this. A loud alarm signal will
then sound to warn you on time.
You can temporarily deactivate
this signal (approx. 10 min.) in
cases where you determine there
is no serious reason for escape, or
respectively, suppress the
triggering of the alarm signal by
softly pressing the test and stop
button on the device (fi g. 1 - IV.). It
is recommended that the rooms
Page 22

22
are then well aired out; this will also
prevent renewed triggering of the
alarm.
COMMISSIONING
First remove any activation locks
(such as a cotter pin) and ensure
that the activation lock does not get
into the inside of the unit! Then
press the activation button (Fig.
1- I).
Press the activation button. After
pressing this button it must be fl ush
with the housing of the device. A
short test tone is sounded after
activation to verify that your smoke
alarm device is now activated. This
test tone is repeated when you
press the test and stop button (fi g.
1 - IV.) and serves as signal the
device is operational.
INSTALLATION
The smoke alarm device is held by
a magnetic mount (fi g. 1 - III.).
Described as follows, there are two
ways to attach the magnetic mount
to the ceiling. Please note that the
magnet attracts magnetically from
only one side.
Adhesive Installation:
When mounting the device using
adhesive, only use the adhesive
supplied with the product.
The area where the device is to be
mounted must be fi rm, dry and free
of grease, dust, loose coats of paint
etc. Remove the sticker and the
protective fi lm from the pre-applied
adhesive as shown in fi gure 2 and
press the magnet holder fi rmly onto
the area where the device is to be
mounted for around 10 seconds.
You can then mount the device
onto the magnet holder (fi g. 1,
no. III). The adhesive bond will
reach its fi nal strength after approx.
72 hours.
Drilling Installation:
At the location for installation drill a
hole using a 6 mm bit, and insert
Page 23

the included 6 mm anchor into the
hole. Now, push the included 5 mm
fl athead screw through the
underside of the magnetic mount
(fi g. 1 - III.) so that when the screw
is screwed into the anchor it is fl ush
with the magnetic mount. The
screw must be screwed fully into
the recess for this in the magnetic
mount (fi g. 1 - III.) to ensure a
secure hold! Please do not tighten
the screw so much, that the
magnetic mount deforms/buckles!
TESTING AND MAINTENANCE
This smoke alarm device checks its
operational readiness on its own,
once per minute. The device also
adjusts the sensitivity of its
detection optics automatically,
depending on the infl uencing
factors in its environment. When
the smoke detector begins to use
its energy reserves, or if the
detection optics are so dirty that
further readjustment is not possible
anymore, the device indicates
these conditions early on so that
23
you have ample time to replace the
smoke alarm device. Please be
very careful to ensure that the air
holes around the edge of the
smoke alarm device are never
impaired by dust, dirt, paint, or
tape, etc! You should press the test
and stop button (fi g. 1 - IV.)
regularly, but a minimum of once
per month, and thus trigger a test
signal, to ensure that the device is
operational. While doing this,
inspect the device to ensure it is
undamaged and fi rmly mounted in
place, and that the smoke intake
fi ns are completely free of foreign
particles. In the application
standard for smoke alarm devices,
DIN 14676, you will fi nd useful
directions for regular maintenance
and the selection of an optimum
installation location.
Page 24

24
BATTERY RESERVE ALARM
If a simple, short signal tone (peep)
is sounded every approx. 90
seconds, this means that it has
reached its battery reserves. If a
double, short signal tone (peeppeep) is sounded every approx. 90
seconds, this means that the
device is not capable anymore of
compensating for soiling of the
detection optics. Each signal tone
can be temporarily (24 hours)
deactivated by pressing the test
and stop button (fi g. - IV.). If the
smoke alarm device sounds one of
the two previously described signal
tones, the device can function as a
warning device for a maximum of
60 days, and for this reason it is
important to replace it before the
remaining 60 days expire!
POSSIBLE CAUSES OF A FALSE
ALARM
• Very strong cooking, water and/or
frying vapours or room, perfume
and insect sprays, pollen, fi ne dust
or dust from construction or
sanding have found their way
directly into the device.
• Extreme temperature fl uctuations
or very strong electromagnetic
radiation are present directly
nearby the smoke alarm device.
• Cigarette smoke only triggers an
alarm if the smoke fi nds its way into
the smoke alarm device from very
close by or in very high
concentrations.
• The device should be protected
against the infl uences in the
environment named here in order
to prevent the smoke alarm device
from giving a false alarm.
When cooking or in the case of
heavy water vapour generation
near the smoke alarm device, care
must always be taken to ensure
good ventilation of the rooms. A
false alarm can be
remedied, or hindered, by a soft
Page 25

press on the test and stop button
(fi g. 1 - IV.) and by good ventilation
of the rooms.
Please notify your neighbours in
the case of a false alarm so that
the fi re brigade is not alerted
unnecessarily!
GENERAL SAFETY
INSTRUCTIONS
Smoke alarms help to alert you to a
fi re early on, but they cannot
extinguish a fi re nor prevent a fi re
from starting, and they also cannot
alert the fi re brigade. When a risk
of gases from a fi re exists, the
smoke alarm device sounds a loud
alarm signal that alerts you to the
danger.
Despite the great care taken in the
manufacture of the smoke alarm
device, the possibility of a
malfunction cannot be ruled out
that would make the device
incapable of alerting you to the
possible fi re, or only too late!
Common precautions when dealing
with fi re, combustible materials
25
and technical devices must always
be observed!
This device is a closed system.
Any tampering with the inside of
the device whatsoever results not
only in the loss of all possibly
existing guarantees, but also that
the device can and may not be
used anymore for its intended
purpose! Please do not open the
device under any circumstances,
because this could cause a risk of
injury!
A change of batteries is not
necessary and also technically
impossible. When renovating, but
also in general, please protect the
device against moisture, cold,
heat, fi ne dust, grease, nicotine
and paint fumes, and coating
materials such as e.g. wall paint,
and adhesives, and dirt of any
kind. When carrying out renovation, construction or sanding work,
the smoke alarm device should be
taken off the magnetic mount
Page 26

26
(fi g. 1 - III.) by a light, vertical pull
downwards, and stored away in a
protected location.
Don’t forget to hang up the smoke
alarm device again on the magnetic
mount (fi g. - III.) after work is
fi nished.
PLEASE NOTE WITHOU T FAIL:
The unit can only give its warning
that may be life-saving under
certain circumstances if the unit is
in its intended installation position
and is clean and undamaged and
has been activated.
DECORATION
The test and stop button (fi g. 1- IV.)
of the smoke alarm device is
removable and can be decorated to
adapt the device to the decoration
in the room. Please decorate only
this removable surface of the
device, and never any other parts of
it!
Attention! The surrounding smoke
intake fi ns (fi g. 1 - II.) must always
be kept free and must never be
covered over!
The type plate of the device can be
found under this easily removable
cover.
CORRECT USE
Only use the unit for the purpose
for which it had been designed and
built. Any other form of use shall be
regarded as inappropriate and
incorrect! This unit may only be
used for the following purposes:
• Detection of fi re and smoke in
private households
• This smoke alarm has a heat
warning function. However, it is not
a heat alarm within the meaning of
EN 54-5.
CE CONFORMITY
This product is tested and certifi ed
as building product according to
EN 14604:2005/AC:2008 in
compliance with Directive 89/106
Page 27

EWG. Production is monitored by
regular and independent checks for
consistent compliance to the legal
and normative requirements.
WARRANTY
We reserve the right to make
changes to the technology and
shape of the product if they
represent a technical advance. We
offer a warranty within the scope of
the legal requirements. Please
send the unit to our Service Centre
with a description of the error
(postage at our cost).
ALBRECHT JUNG GMBH & CO. KG
Volmestraße 1
58579 Schalksmühle
Telefon: +49.23 55.8 06-0
Telefax: +49.23 55.8 06-2 04
kundencenter@jung.de
www.jung.de
SERVICE CENTER
Kupferstr. 17-19
44532 Lünen, Germany
DISPOSAL:
27
According to the German Electrical
and Electronic Equipment law
(ElektroG) this product may not be
disposed of in household waste.
Please send the unit to be
disposed of back to the maker for
recycling or hand it in to a regional
disposal company. Please note that
there will be harmful effects on the
environment if you do not dispose
of this unit properly!
1772-CPD-120724
Page 28

28
JUNG 0024072500 09.2012
 Loading...