

Page 1
Standard / Universal automatic switch 2.2 m
Universal automatic switch 2.2 m
Art. No. : ..3281-1..
Standard automatic switch 2.2 m
Art. No. : ..3281..
Operating instructions
1 Safety instructions
Electrical devices may only be mounted and connected by electrically skilled
persons.
Serious injuries, fire or property damage possible. Please read and follow manual fully.
Do not press on the sensor window. Device can be damaged.
The device is not suitable for use as a burglar alarm or other alarm.
Caution. Damage to sensors may result due to high thermal radiation. Avoid direct
sunlight penetration in the sensor window.
These instructions are an integral part of the product, and must remain with the end
customer.
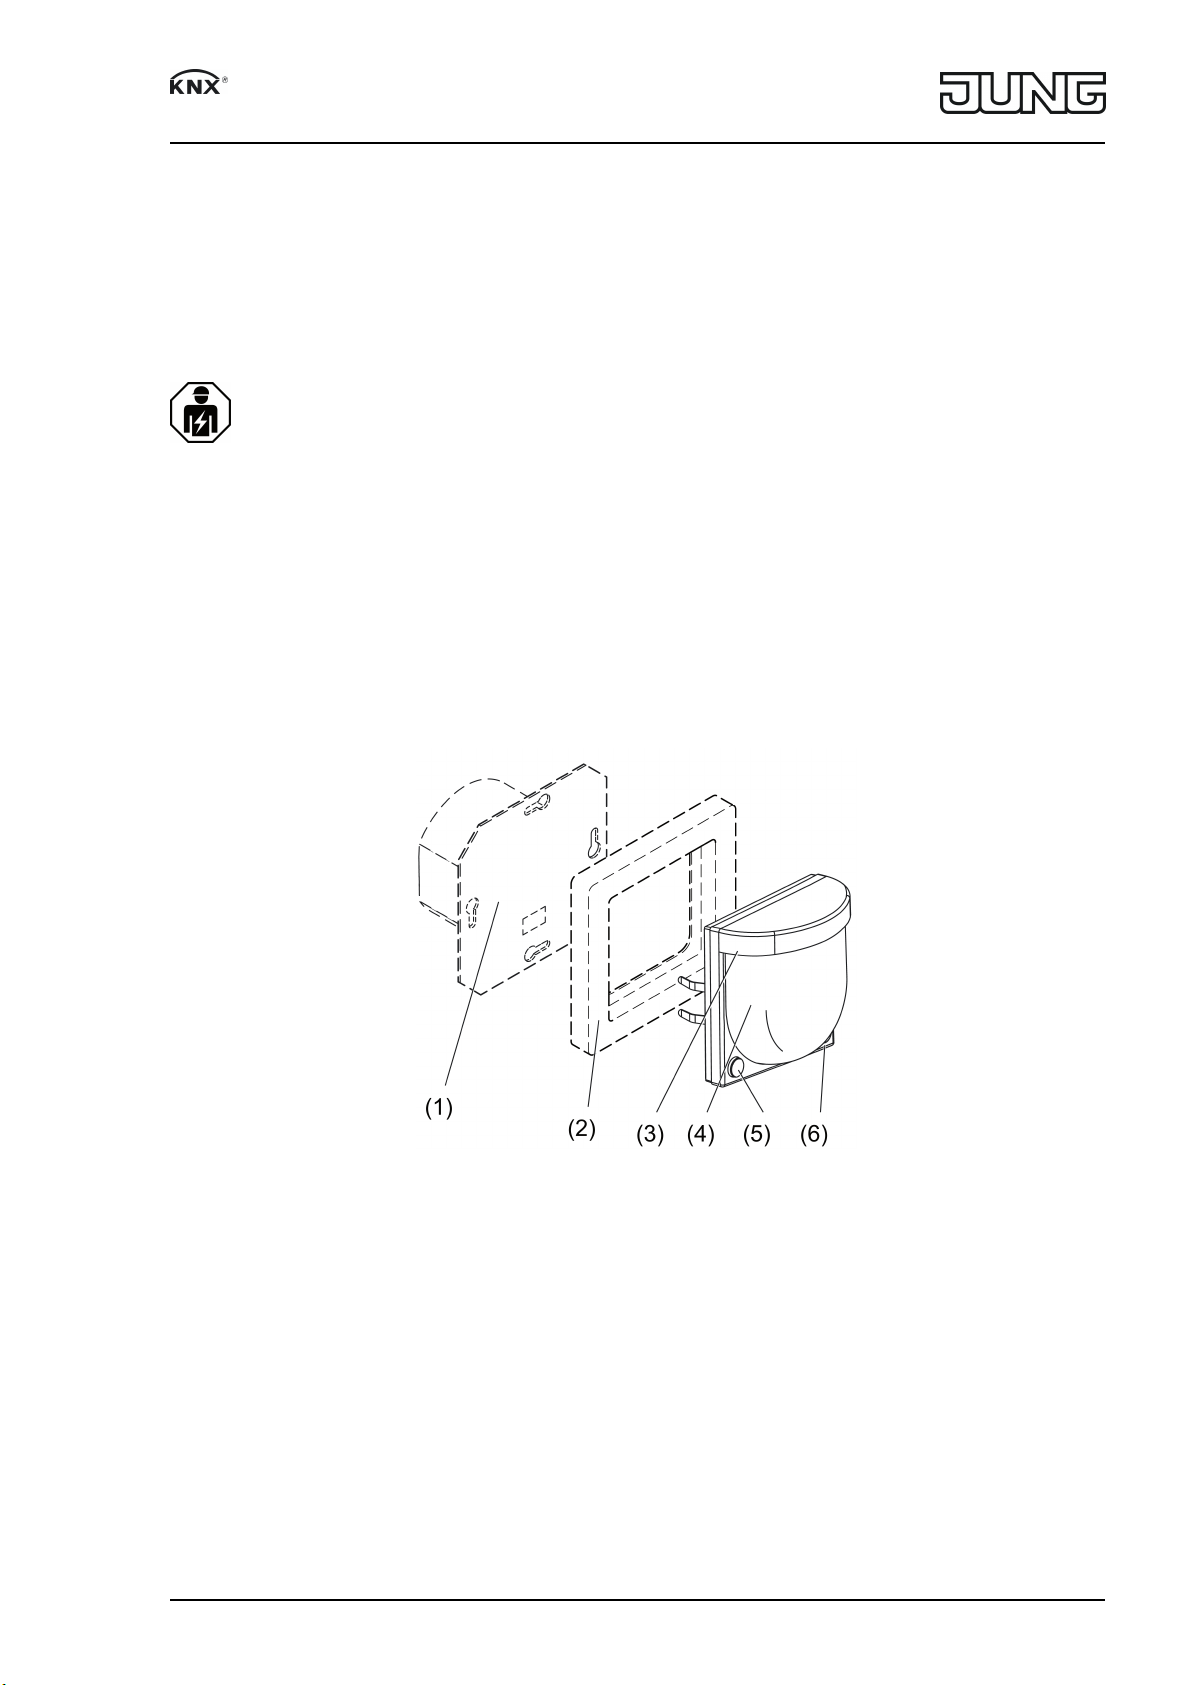
2 Device components
Figure 1: Device components
32597103
j0082597103
1/9
30.05.2017
Page 2

Standard / Universal automatic switch 2.2 m
Figure 2: Adjuster Sens. (rear side)
(1) Bus coupler 3 (accessory)
(2) Frame
(3) Motion detector
(4) Sensor window
(5) Button O / AUTO
(6) Button I / AUTO
(7) Adjuster Sens.
3 Function
System information
This device is a product of the KNX system and complies with the KNX directives. Detailed
technical knowledge obtained in KNX training courses is a prerequisite to proper understanding.
The function of this device depends upon the software. Detailed information on loadable
software and attainable functionality as well as the software itself can be obtained from the
manufacturer´s product database.
Planning, installation and commissioning of the device are carried out with the aid of KNXcertified software. Full functionality with KNX commissioning software version ETS4.2 and
higher.
An updated version of the product database and technical descriptions are available on our
Internet website.
Intended use
- Requirement-oriented control of lighting and other electrical consumers
- Mounting on bus coupler 3 (accessory)
i Recommendation: Use air-tight appliance boxes.
Product characteristics
- Automatic switching of light, depending on heat motion and ambient brightness
- 2 PIR sensors
- Detection area 180°
- Integrated brightness sensor
- Adjustable switch-off brightness
- Output functions: Switching, value transmitter, light scene extension, staircase function,
switching with forced position, operating mode setting for room temperature controller
- Extension of the detection area by way of operating several devices as main unit or
extension unit
- Adjuster for manual adjustment of sensitivity
- Status LED
- Manual switching on the device
Additional characteristics of "Universal" version:
- Manual operation with IR remote control possible (accessories)
- Detection field can be dimmed by 50% (parameter setting)
32597103
j0082597103
2/9
30.05.2017
Page 3
Standard / Universal automatic switch 2.2 m
- 5 function blocks for motion detection each with 2 outputs
- Function blocks switchable, e.g. for day/night operation
- Brightness sensor function with 3 limiting values
- Alarm when unplugging from the bus coupler
- Temperature measurement
4 Operation
Switching the light on manually
o Press the AUTO / I button.
Switching the light off manually
o Press the O / AUTO button.
Switching on the Automatic operating mode
Prerequisite: The green or yellow LED lights.
ON or OFF operating mode is active.
o Press the O / AUTO or AUTO / I button.
The LED goes out.
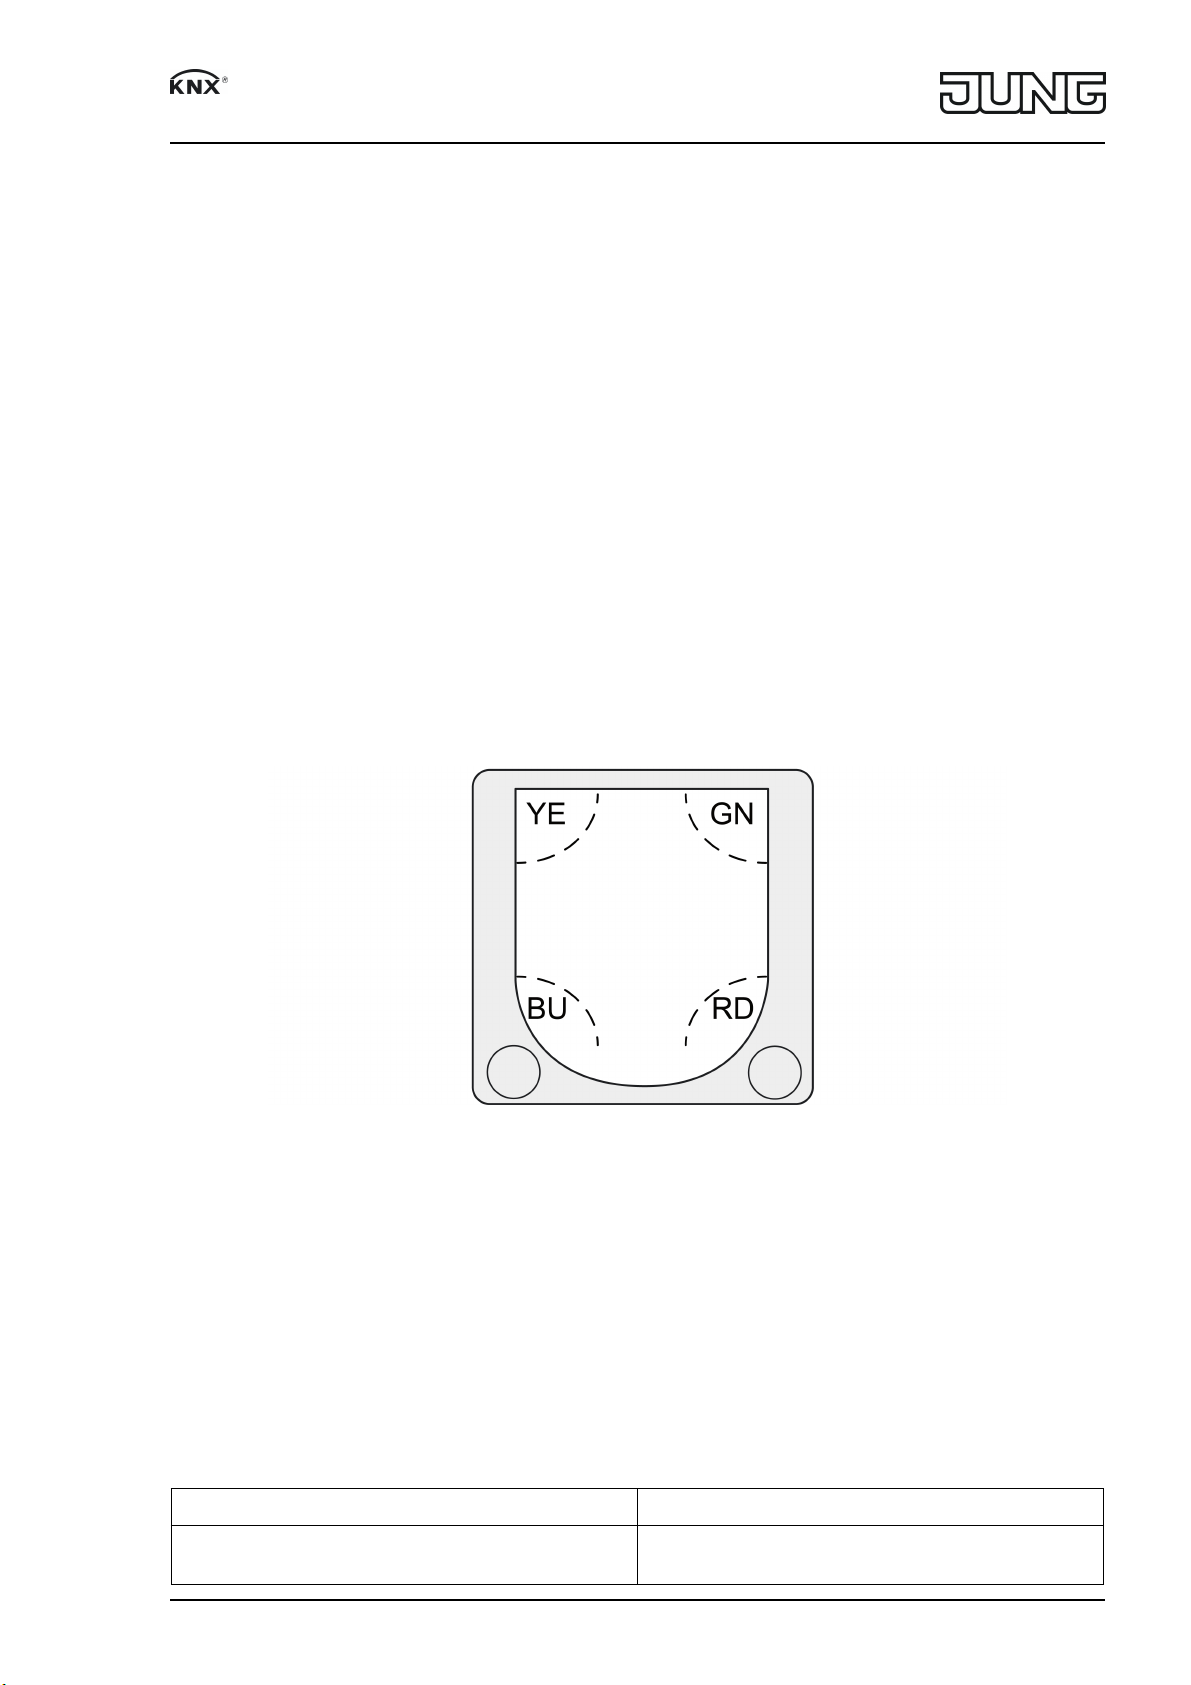
Status LED
Behind the sensor window (4) there are status LEDs for indicating different states of
operation(figure 3).
Figure 3: Status LED
YE Yellow. OFF operating mode is active.
GN Green. ON operating mode is active.
BU Blue. Movement detected (parameter-dependent).
or
IR reception (oy for "Universal" version)
RD Red. Programming mode is active.
5 IR remote control
Only for "Universal" version:
Function buttons IR remote control
Button Function
¿ Detection of a motion is sent for function block
1. The automatic mode is exited.
32597103
j0082597103
3/9
30.05.2017
Page 4

Standard / Universal automatic switch 2.2 m
Á End of a motion is sent for function block 1.
The automatic mode is exited.
À The automatic mode is activated again for
function block 1.
The ON state is first exited after a new motion
detection.
Adjustable buttons IR remote control
Button Function
´ Increasing sensitivity
² Reducing sensitivity
³ Resetting sensitivity to presetting
Ê Function block 1: Brightness threshold 10 lx
Ë Function block 1: Brightness threshold 50 lx
Ì Function block 1: Brightness threshold 150 lx
Í Function block 1: Brightness independent
operation
É Function block 1: Set current brightness as
brightness threshold
10 SEK, 30 SEK, 2 MIN, 5 MIN, 30 MIN Function block 1: Extend minimum run-on-time
(10 seconds) by the selected value
START, STOP Function block 1: Extend minimum run-on-time
(10 seconds) individually
Set-up buttons of IR remote control
Button Function
Ù Walking test – Check detection field
Ú Reset sensitivity, brightness threshold and
run-on-time to presetting. Press for at least 3
seconds
Operation with IR remote control
If enabled, function block 1 can be operated manually by remote control. In manual operation,
brightness and motion detection for function block 1 are switched off until automatic mode is
reset.
o Switch on, e.g. light: Press the ¿ button.
o Switch off, e.g. light: Press the Á button.
o Set automatic mode: Press the À button.
Manually changing settings with IR remote control
If enabled, individual settings for function block 1 can be changed during operation using a
remote control.
Sensitivity:
o Increase sensitivity by one level: Press the ´ button.
o Decrease sensitivity by one level: Press the ² button.
o Recall set sensitivity again: Press ³ button.
i The manual adjustment of sensitivity by the adjuster Sens. (7) is overwritten by the IR-
remote control and vice versa.
32597103
j0082597103
4/9
30.05.2017
Page 5
Standard / Universal automatic switch 2.2 m
Brightness threshold:
o Change brightness threshold: Depending on requirement, press Ê button, Ë button, Ì
button or Í button.
o Set current brightness as brightness threshold: Press É button.
Run-on-time: The preset run-on-time of 10 seconds can be extended individually.
o Extend run-on-time: Depending on requirement, press 10 SEK button, 30 SEK button, 2
MIN button, 5 MIN button or 30 MIN button. Other values can be set with the START/STOP
buttons.
6 Information for electrically skilled persons
DANGER!
Mortal danger of electric shock.
Cover up live parts in the installation environment.
6.1 Fitting and electrical connection
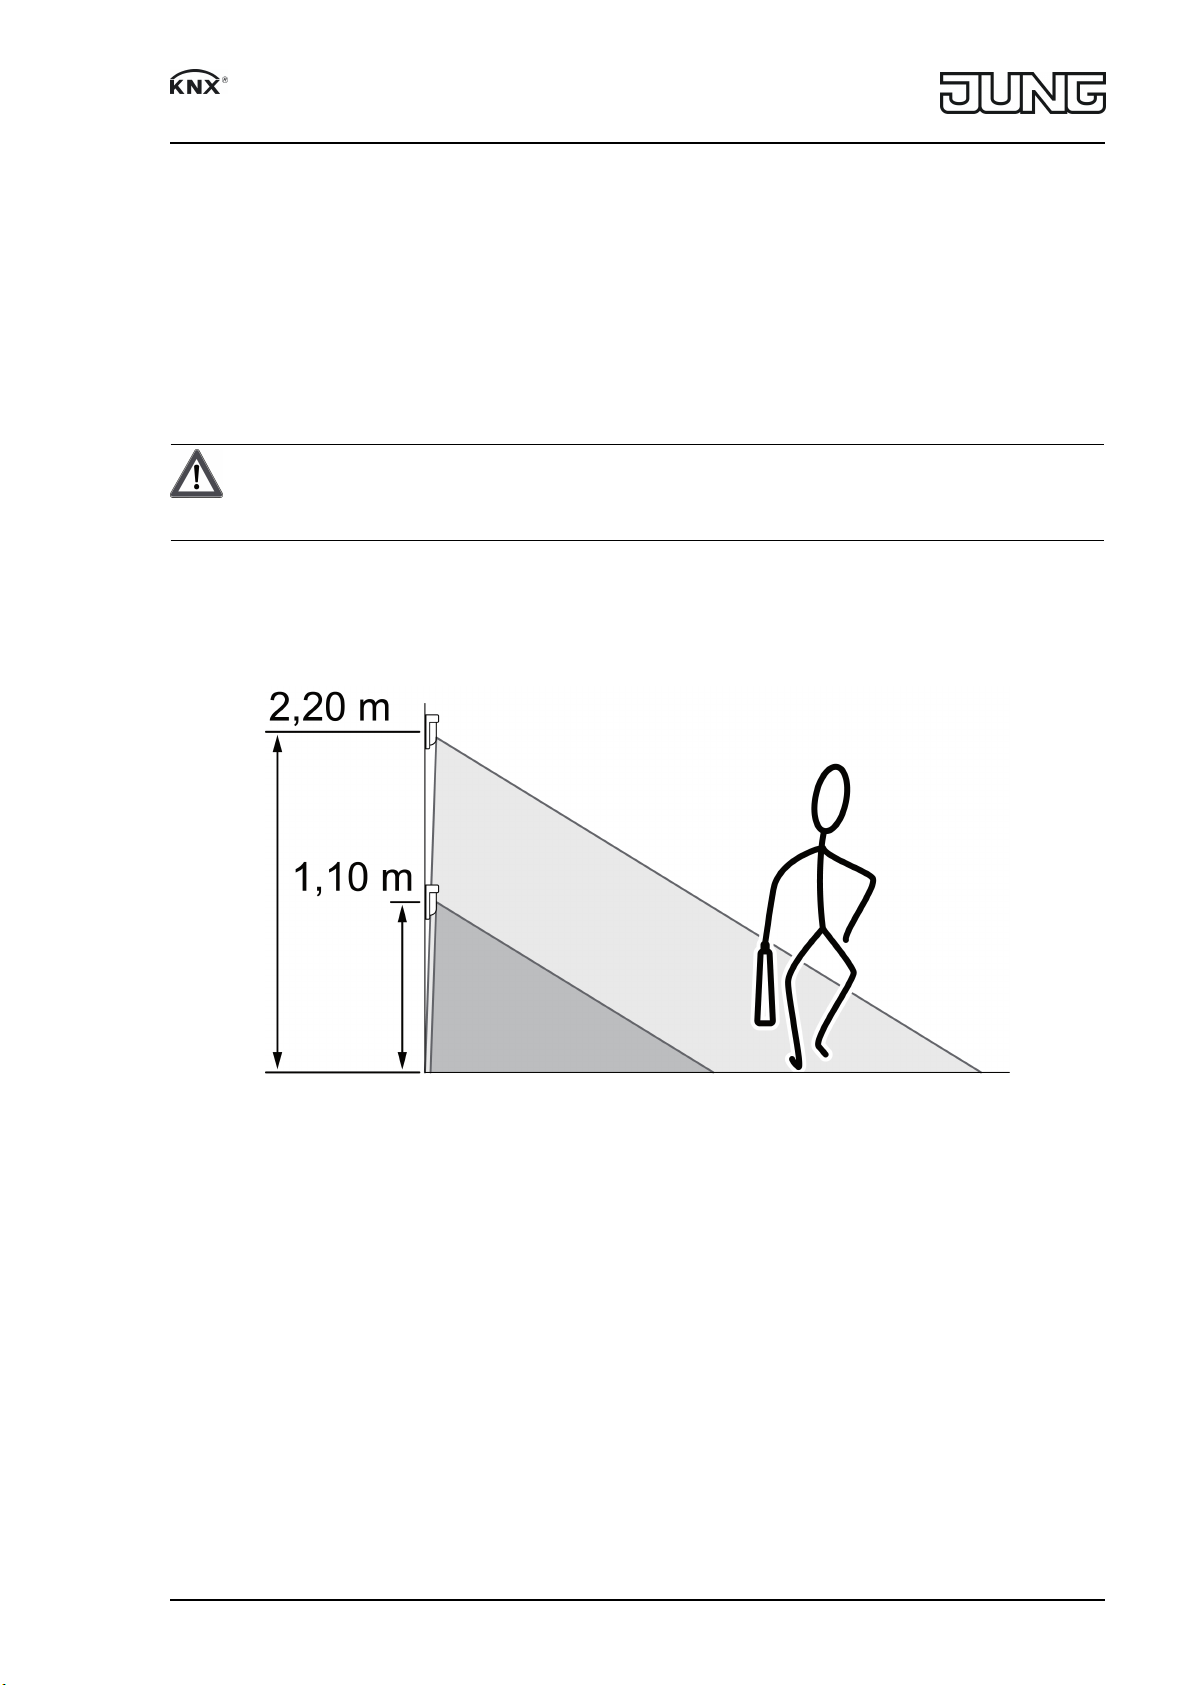
Detection field and range
Figure 4: Detection field and mounting height
The size of the detection area depends on the mounting height(figure 4)and on the direction of
motion –(figure 5) ... (figure 8). As the distance to the detector increases, the detection density
and sensitivity decrease.
32597103
j0082597103
5/9
30.05.2017
Page 6

Standard / Universal automatic switch 2.2 m
Figure 5: Range with tangential direction of motion, mounting height 2.20 m
32597103
j0082597103
Figure 6: Range with radial direction of motion, mounting height 2.20 m
6/9
30.05.2017
Page 7

Standard / Universal automatic switch 2.2 m
Figure 7: Range with tangential direction of motion, mounting height 1.10 m
Figure 8: Range with radial direction of motion, mounting height 1.10 m
Selecting installation location
o Select a vibration-free installation location. Vibrations can lead to unwanted switching.
o To achieve optimum range, choose an installation location that is transversal to the
direction of motion.
o Avoid interference sources in the detection area. Interference sources, e.g. heaters,
ventilation, air conditioners, and cooling light bulbs can lead to unwanted detections.
Fitting the device
Prerequisite: Bus coupler (1) is mounted in an appliance box and connected.
o Install the motion detector (3) with frame (2) onto the bus coupler (1) in the correct
orientation.
6.2 Commissioning
Load physical address and application program
o Press the AUTO / I button for approx. 5 seconds until the red LED in the lens lights up.
32597103
j0082597103
7/9
30.05.2017
Page 8

Standard / Universal automatic switch 2.2 m
o Assign physical address.
The red LED goes out.
o Write the physical address on the device label.
o Load the application program into the device.
i In case of active temperature measurement ("Universal" version) compare the temperature
measurement.
Testing the detection area
In the case of main units and extensions, check the detection areas of the devices individually.
Precondition: The device is installed and connected. The physical address is loaded.
o Activate the walking test:
Activate the parameter "Walking test after ETS programming" and download the
application software.
The device now operates brightness-independently. The PIR sensors are active according
to their programmed sensitivity.
o Pace off the detection field, paying attention to reliable detection and interference sources.
Any motions detected are displayed by the blue LED.
o Limit the detection area as required. Adjust sensitivity with adjuster Sens. or IR remote
control, or change the programming.
o Deactivate the parameter "Walking test after ETS programming" and download the
application software.
Only for "Universal" version:
i If enabled, the walking test function can be activated with the button Test of the IR remote
control.
7 Appendix
7.1 Technical data
Commissioning mode S-mode
Current consumption KNX 3 ... 10mA
Ambient temperature -25 ... +55°C
Storage/transport temperature -25 ... +70°C
Relative humidity 10 ... 100% (No moisture condensation)
Protection class III
Installation height 1.10 / 2.20m
Detection angle 180°
Detection field (mounting at 2.20 m)
Tangential movements approx. 12 x 12 m
Radial movememtns approx. 8×8 m
Detection field (mounting at 1.10 m)
Tangential movements approx. 6 x 6 m
Radial movememtns approx. 4×4 m
Brightness sensor
Measuring range approx. 1 ... 1000lx
Temperature sensor
Measuring range approx. -20 ... +55°C
Accuracy ± 1K
7.2 Accessories
Bus coupling unit 3 Art. No. 2073U
IR remote control Art. No. KNXPMFBIR
Sealing kit for automatic switch 180° 2.20 m Art. No. AS..50DS
32597103
j0082597103
8/9
30.05.2017
Page 9

Standard / Universal automatic switch 2.2 m
7.3 Warranty
The warranty follows about the specialty store in between the legal framework as provided for
by law.
ALBRECHT JUNG GMBH & CO. KG
Volmestraße 1
58579 Schalksmühle
GERMANY
Telefon: +49 2355 806-0
Telefax: +49 2355 806-204
kundencenter@jung.de
www.jung.de
32597103
j0082597103
9/9
30.05.2017
 Loading...