

Page 1
eNet radio hand-held transmitter with display, 24-gang
eNet radio hand-held transmitter with display, 24-gang
Art. No. : FMHSD24
Operating instructions
1 Safety instructions
Electrical devices may only be mounted and connected by electrically skilled
persons.
Serious injuries, fire or property damage possible. Please read and follow manual fully.
Keep button cells out of reach of children! If button cells are swallowed, get medical help
immediately.
Risk of explosion! Do not throw button cells into a fire.
Risk of explosion! Do not replace a used battery with a primary battery, e.g. lithium
button cell.
Fire hazard! Operation exclusively with the power supplies listed under accessories
The radio communication takes place via a non-exclusively available transmission path,
and is therefore not suitable for safety-related applications, such as emergency stop and
emergency call.
These instructions are an integral part of the product, and must remain with the end
customer.
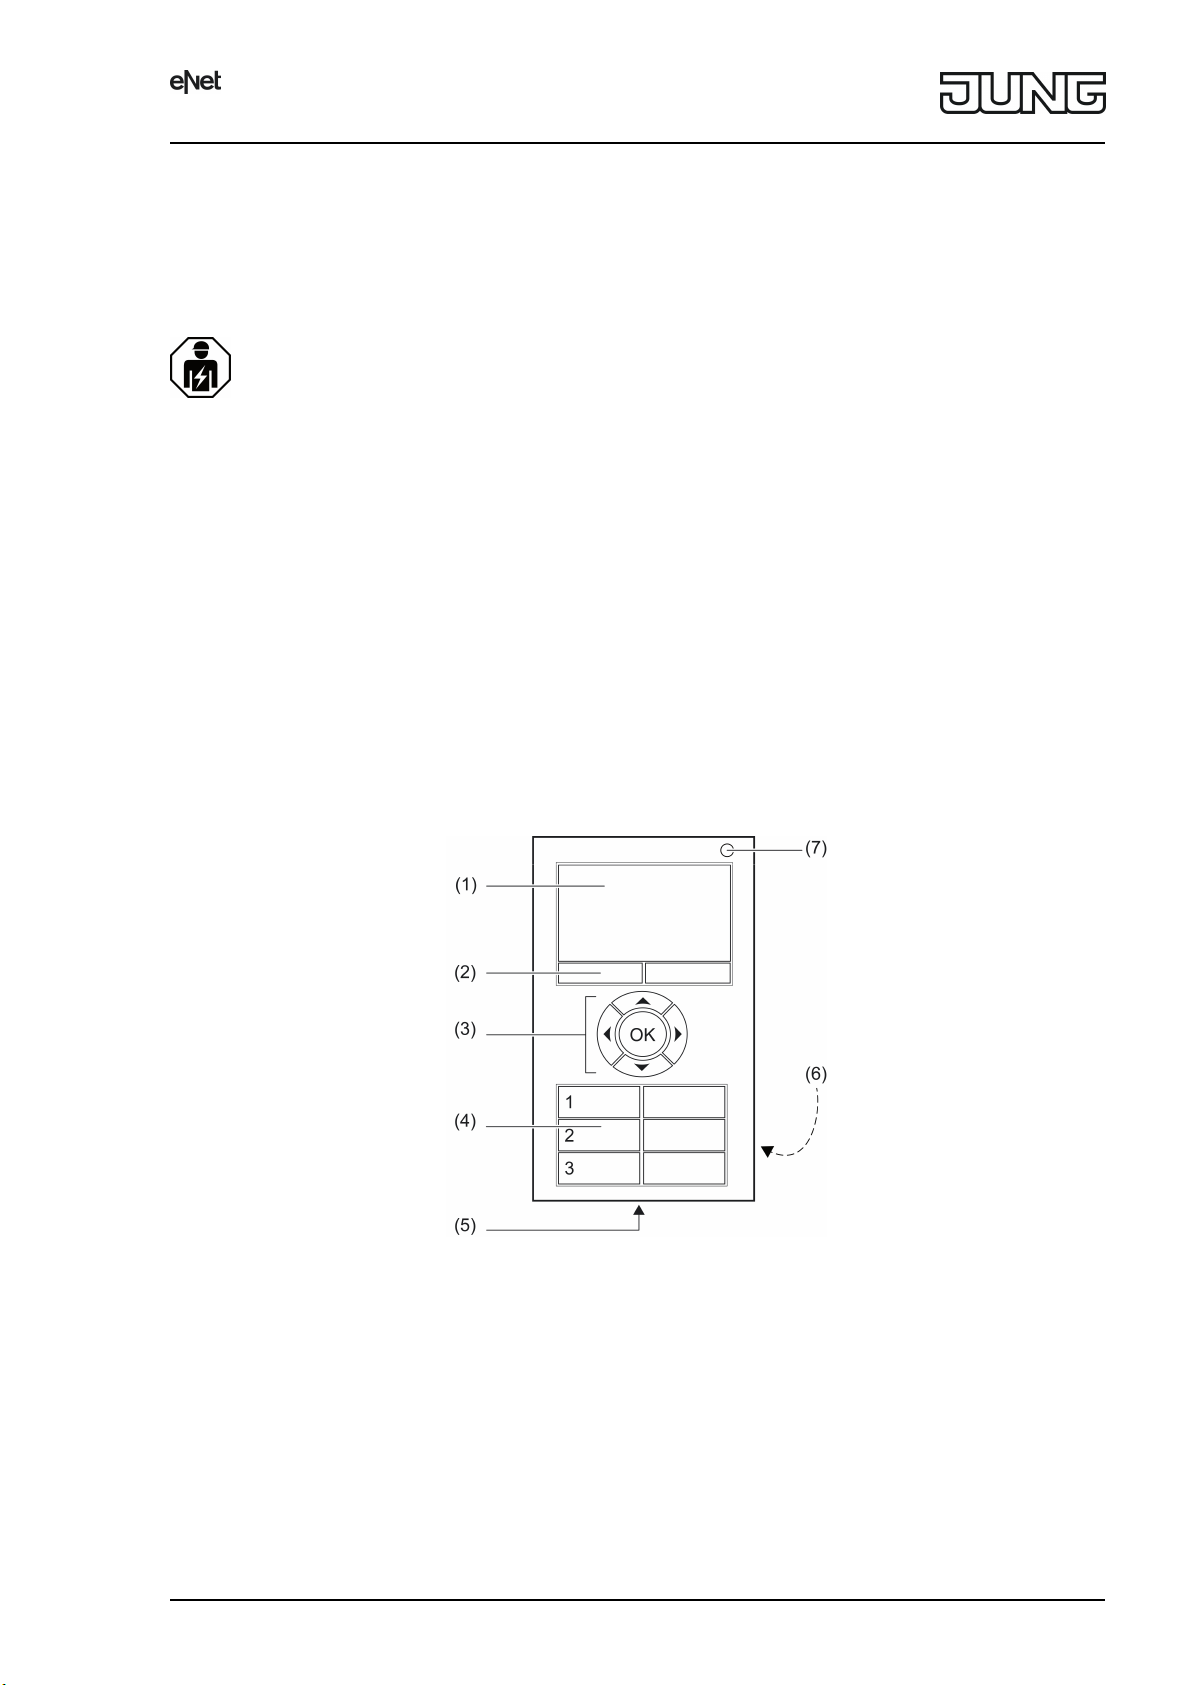
2 Device components
(1) LC display
(2) Menu buttons
(3) Navigation buttons
(4) Function keys
(5) Charging connection
(6) Battery compartment (Rear side)
(7) Status LED
Figure 1: View
82582333
J0082582333
1/18
29.03.2017
Page 2
eNet radio hand-held transmitter with display, 24-gang
3 Function
Intended use
- Hand transmitter for radio transmission of switching, dimming, blind movement and scene
commands
- Operation with radio actuators from the eNet system
Product characteristics
- LC display for user guidance
- Menu buttons with changing assignments, depending on the menu context
- Navigation buttons for orientation in the menu
- Three freely-configurable function key pairs
- Status LED to display the transmission status
- 10 lists for the compilation of favourite functions
- 16 scenes
- All On and All Off
- Lock-out protection for roller shutters or Venetian blinds
- Restraint function
- Master dimming function
- Operation with rechargeable battery (in the scope of delivery)
- Charging the battery with or without charging cradle (accessory) or USB charging device
- Charging cable included in the scope of delivery
Supplementary functions can be activated via eNet server:
- Operation locks
- Update of the device software (only with power supply connected)
i The parameter list is in the Internet in the documentation for this device.
4 Operation
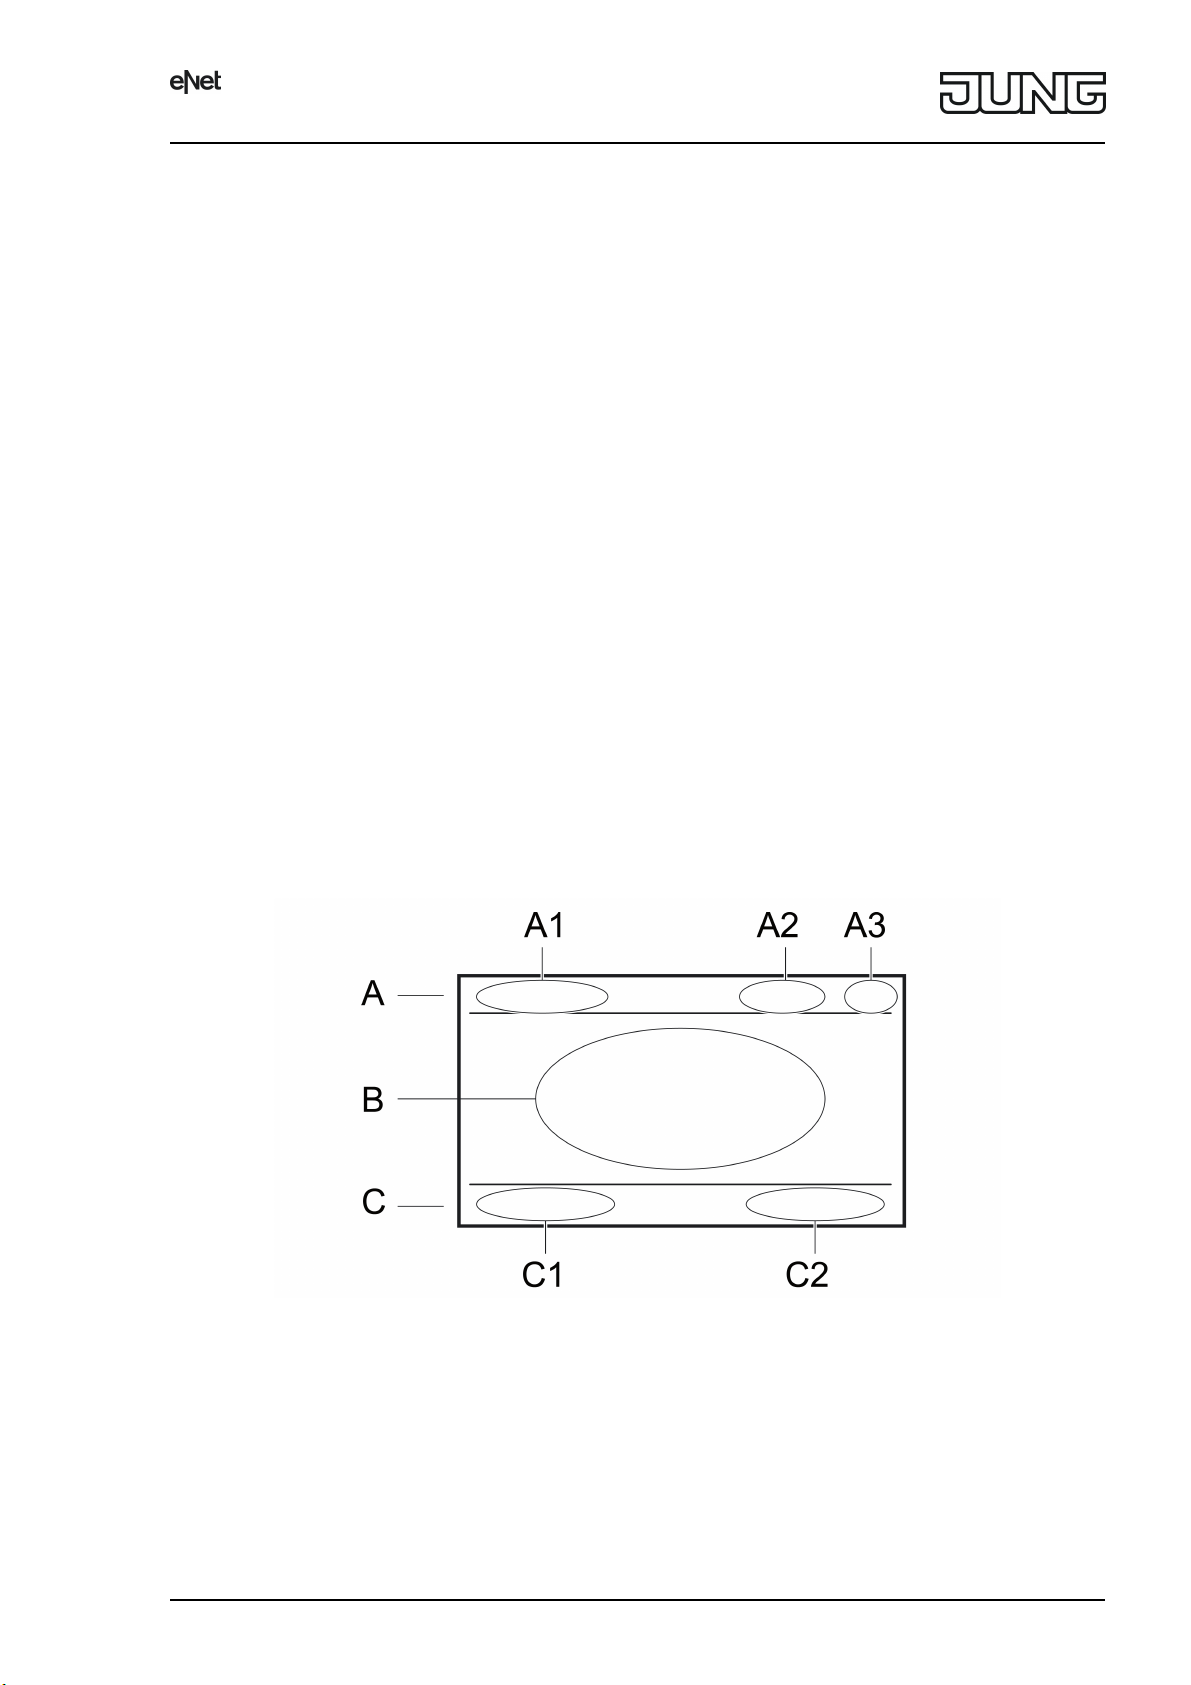
Display elements
Figure 2: Screen panes in the display
A: Title line
A1: Menu title
A2: Time display
A3: Charging display
B: Text area
C: Footer for status messages and for displaying the function of the menu buttons
C1: Function of the left menu button, context-dependent
82582333
J0082582333
2/18
29.03.2017
Page 3

eNet radio hand-held transmitter with display, 24-gang
C2: Function of the right menu button, context-dependent
The hand-held transmitter is operated using the buttons (4) or via the menu structure in the
display using the navigation buttons (3) n, o, }, ~ and OK.
4.1 First steps
i Before using the hand-held transmitter, it must be connected to the switching, dimmer and
Venetian blind actuators that are to be operated in the system. These steps are
documented in the section "Commissioning".
Caution! Only electrically skilled people may perform work on electrical systems.
Inserting the battery
Before first commissioning, the enclosed battery must be inserted in the device.
i Only use the prescribed battery type. Do not insert any other button cells.
Keep the contacts of batteries and device free of grease.
o Open the battery compartment (6) on the rear side.
o Apply the battery to the positive contact of the battery holder. Observe polarity: The
positive pole of the battery must be at the top.
o Press gently on the battery to snap it in.
o Close battery compartment.
Charging the battery
Use a device with a USB-A connection for charging, e.g. on a PC, or use a standard USB
charging device.
The enclosed battery has been inserted in the device.
o Connect the hand-held transmitter with the USB device using the enclosed USB cable.
During a charging operation, the charging display (A3) displays a progress bar. Once a
battery symbol appears here, the battery has been charged.
i The charging cradle can also be used to charge the battery (accessory).
Switching on the hand-held transmitter
o Press any button on the hand-held transmitter.
i To activate the hand-held transmitter from Standby mode, it is sufficient to move it or shake
it lightly.
Switching off the hand-held transmitter
o Open the main menu.
o Select "Programming" and press OK.
o Select "Settings" and press OK.
o Select "Turn OFF device" and press OK.
i The hand-held transmitter cannot be switched off during charging. The message "Mains
operation" appears in the footer.
4.2 Basic functions
Navigation and selection
The hand-held transmitter is operated using the function keys (4) or via the menu structure in
the display using the navigation buttons (3) and menu buttons (2):
n moves the cursor upwards.
o moves the cursor downwards.
}, ~ allow the adjustment of values.
OK selects a highlighted menu item.
Main menu
The following submenus are available in the main menu:
- "Channels": Operation of individual hand-held transmitter channels.
82582333
J0082582333
3/18
29.03.2017
Page 4

eNet radio hand-held transmitter with display, 24-gang
- "Scenes": Recalling and saving of scenes.
- "Button lock": Locks the buttons of the hand-held transmitter.
- "Program": Opens the programming menu.
The user can set the entries in the main menu and add to them using user-specific lists. Lists,
channels and scenes can be named freely (see chapter 4.5. Setting up the hand-held
transmitter).
In the main menu, the menu buttons (2) have the functions "All On" and "All Off" assigned to
them.
Programming menu
The following submenus are available in the programming menu:
- "Channels": Connect or disconnect hand-held transmitter channels and actuators; rename
hand-held transmitter channels.
- "Scenes": Integration of actuators into scenes; renaming of scenes; removal of actuators
from scenes.
- "Lists": Compilation of user-specific lists containing hand-held transmitter channels and
scenes.
- "Button assignment": Assignment of hand-held transmitter channels to the function keys
(4).
- "Settings": Opens the Settings menu.
- "Advanced startup": Opens the commissioning of the hand-held transmitter with the eNet
server.
Settings menu.
- "Home screen": Configures the main menu.
- "Display": Setting of font size, language, display, brightness and active display time.
- "Date/time": Setting of date and time; automatic summer/winter time change-over
- "Factory Settings": Resetting of the entire device to the as-delivered state.
- "Info": Information on the hardware and software version.
- "Turn OFF device": Switching the device off.
Status LED
As soon as a button is pressed or released, the status LED (7) first signals radio transmission
- LED turns red for 3 seconds
and then the actuator status/group status
- LED turns green for 3 seconds:
At least one actuator is switched on, or one Venetian blind is not in the top end position
- LED remains off:
All the actuators are switched off or the blinds are all in the upper end position
or - if there is no status message from an actuator - a transmission error.
- The LED rapidly flashes red for 5 seconds:
The status message of at least one actuator is missing
4.3 Operating actuators with rockers
The function keys (4) allow direct access to the most important functions. The user can freely
select the assignment from the saved connections.
Operating light
o Switch on: Brief press of left button.
o Switch off: Brief press of right button.
o Dim brighter: Long press of left button. The dimming process ends when the button is
released.
o Dim darker: Long press of right button. The dimming process ends when the button is
released.
Operating blind
o Move Venetian blind upwards: Long press of left button.
o Move Venetian blind downwards: Long press of right button.
82582333
J0082582333
4/18
29.03.2017
Page 5

eNet radio hand-held transmitter with display, 24-gang
o Stop or adjust Venetian blind: Short press of right or left button.
Operating push-button actuator
o Press the right or left button: The load is switched on for the duration of the button-press.
i The maximum actuation length is 60 seconds.
Recalling scenes
o Press the scene button briefly.
Actuators switch to the saved scene values.
Changing scene
o Press the scene button briefly.
Actuators switch to the saved scene value.
o Set new scene values.
o Press scene button for longer than 4 seconds.
Actuators first switch to the saved scene value and save the new scene value after
4 seconds.
Dimming a scene
The dimmer actuators in a recalled scene can be dimmed, although the brightness differences
between the individual dimmer actuators remain.
The master dimming function must be assigned to a rocker (see chapter 4.5. Setting up the
hand-held transmitter).
o Recall a scene - either using the scene menu or a function key.
o Dim brighter: Long press of the left master dimming button.
o Dim darker: Long press of the right master dimming button.
4.4 Operating the hand-held transmitter
Operating actuators with the channel menu
The "Channels" menu offers direct access to all 24 hand-held transmitter channels, irrespective
of whether or not actuators are connected.
o Open the main menu.
o Select "Channels" and press OK.
o Select the desired hand-held transmitter channel.
o Switch on: Brief press of ~ button.
o Switch off: Brief press of } button.
o Toggle: Brief press of OK button.
o Dim brighter: Long press of ~ button.
o Dim darker: Long press of } button.
o Move Venetian blind downwards: Long press of } button.
o Move Venetian blind upwards: Long press of ~ button.
o Stop Venetian blind: Short press of } or ~ button.
o Return to main menu: Press the left menu button "Back".
Operating actuators with the list menu
When set up, lists can contain selected hand-held transmitter channels or scenes and be given
sensible names according to the requirements of the operator (see chapter 4.5. Setting up the
hand-held transmitter).
o Open the main menu.
o Select the desired list in the menu and press OK.
o Select the desired hand-held transmitter channel. Operation takes place with the } and ~
buttons.
82582333
J0082582333
5/18
29.03.2017
Page 6

eNet radio hand-held transmitter with display, 24-gang
o Return to main menu: Press the left menu button "Back".
Save switch-on brightness
A switch-on brightness can be set and saved for dimmer actuators.
o Open the main menu.
o Select "Channels" and press OK.
o Select the desired hand-held transmitter channel.
o Set required switch-on brightness.
o Press the right menu button "Open".
o Select "Set Startvalue" and press OK.
The light is briefly switched off and switched on again to the switch-on brightness. Switchon brightness is saved.
o Return to main menu: Press the left menu button "Back" for approx. 1 second.
Scene menu: Recall scenes
The "Scenes" menu offers 16 scenes, irrespective of whether or not actuators are connected,
as well as the functions 'Channel lock' and 'Lock-out protection'.
o Open the main menu.
o Select "Scenes" and press OK.
o Select the desired scene and press OK.
The message "Scene called" appears in the footer.
o Return to main menu: Press the left menu button "Back".
Scene menu: Changing a scene
o Call up the scene to be changed.
o Change the active scene as desired.
o Return to the scene menu.
o Select the desired scene and press the right menu button "Open".
o Select "Store scene" and press "Save".
The message "Store scene" appears in the footer.
o Return to main menu: Press the left menu button "Back" for approx. 1 second.
Activating and removing a button lock
The button lock locks all the buttons of the hand-held transmitter against operation.
o Activating the button lock: Open the main menu, select the menu item "Button lock" and
press OK.
All the push-button functions of the hand-held transmitter are disabled.
The display indicates this state.
o Removing a button lock: Press the right menu button "Unlock" for approx. 3 seconds.
4.5 Setting up the hand-held transmitter
Creating lists
Lists allow quick access to frequently used hand-held transmitter channels or scenes. Lists can
be accessed using appropriate names in the main menu.
The hand-held transmitter is connected to all the actuators that are to be operated.
o Open the main menu.
o Select "Programming" and press OK.
o Select "Lists" and press OK.
o Select the desired list and press OK.
o Select "Assign function" and press OK.
82582333
J0082582333
6/18
29.03.2017
Page 7

eNet radio hand-held transmitter with display, 24-gang
The list with all the available hand-held transmitter channels and scenes appears in the
display.
o Select the hand-held transmitter channels and scenes, one after another. Confirm each
selection with OK.
Selected entries are indicated by >.
o Saving a list: Press the right mouse-button "Save".
The message "Store list" appears in the footer.
o Exiting a list: Press the left menu button "Back".
Renaming a list
A list name can contain a maximum of 15 characters.
o Open the main menu.
o Select "Programming" and press OK.
o Select "Lists" and press OK.
o Select the desired list and press OK.
o Select "Rename list" and press OK.
The "Edit text" window appears in the display.
o Enter the list name (see chapter "Entering texts").
o Saving an entry: Press the right mouse-button "Save".
The message "Store list" appears in the footer.
o Exiting "Edit text": Press the right menu button "Back".
Arranging a list
Users can sort the entries within a list however they wish.
Functions must be assigned before a list is sorted.
o Open the main menu.
o Select "Programming" and press OK.
o Select "Lists" and press OK.
o Select the desired list and press OK.
o Select "Arrange list" and press OK.
The list with all the assigned hand-held transmitter channels and scenes appears in the
display. If the list is empty, no functions are assigned.
o Using the n or o buttons, select a list entry. Confirm the selection with OK.
The selected entry is indicated with <>.
o Using the } or ~ buttons, move the selected entry and press OK.
The highlighting <> disappears.
o Once the list has been sorted as required, press the right menu button "Save".
The message "Store list" appears in the footer.
o Exiting a list: Press the left menu button "Back".
Connecting the function keys with the hand-held transmitter channel
The function keys (4) allow direct access to the most important functions. For individual handheld transmitter channels, buttons next to one another are combined to form a rocker.
The hand-held transmitter is connected to all the actuators that are to be operated.
o Open the main menu.
o Select "Programming" and press OK.
o Select "Button assignment" and press OK.
o Select the desired button - 1, 2 or 3 - and press OK.
o Select the desired function – channel, scene, master dimming or "no function".
o Assigning a channel: Select the desired channel and press OK.
82582333
J0082582333
7/18
29.03.2017
Page 8

eNet radio hand-held transmitter with display, 24-gang
o Assigning a scene: Select the left or right button and press OK. Select the desired scene
and press OK.
A message appears in the footer, stating that the function is being saved.
The selected entry is indicated with >.
o Exiting the selection window: Press the left menu button "Back".
Entering texts
The "Edit text" window appears when hand-held transmitter channels, scenes or lists are to be
renamed.
It contains an entry line and three selection lines in the text area. The selection lines provide the
letters A...Z, the numerals 0...9 and some special characters.
o Selecting and entering characters: In the selection lines, mark the desired characters and
press OK.
The selected character appears in the entry line.
o Switching between upper and lower-case letters: Highlight the character ğ and press OK.
o Deleting or correcting the most recently entered character: In the selection line, highlight
the character Ğ and press OK.
Selecting entries for the main menu
o Open the main menu.
o Select "Programming" and press OK.
o Select "Settings" and press OK.
o Select "Home screen" and press OK.
o Select "Select" and press OK.
o Select the desired entries and press OK.
The selected entry is indicated with >.
o Return to main menu: Press the left menu button "Back" for approx. 1 second.
The selected entries are available in the main menu.
i The "Programming" entry is always available and cannot be deactivated.
4.6 Settings
Setting the font size
o Open the main menu.
o Select "Programming" and press OK.
o Select "Settings" and press OK.
o Select "Display" and press OK.
o Select "Font size" and press OK.
o Depending on requirements, select the font size "Small" or "Big".
The text area is shown in the selected font size. The selection is indicated with >.
o Return to main menu: Press the left menu button "Back" for approx. 1 second.
Selecting a language
o Open the main menu.
o Select "Programming" and press OK.
o Select "Settings" and press OK.
o Select "Display" and press OK.
o Select "Language" and press OK.
o Select the desired language and press OK.
The text area is shown in the selected language. The selection is indicated with >.
o Return to main menu: Press the left menu button "Back" for approx. 1 second.
82582333
J0082582333
8/18
29.03.2017
Page 9

eNet radio hand-held transmitter with display, 24-gang
Selecting the display
o Open the main menu.
o Select "Programming" and press OK.
o Select "Settings" and press OK.
o Select "Display" and press OK.
o Select "Inverse display" and press OK.
The display is inverted - bright text on dark background or vice-versa. The selection is
indicated with >.
o Return to main menu: Press the left menu button "Back" for approx. 1 second.
Setting the display brightness
The display brightness can be set in 16 levels.
o Open the main menu.
o Select "Programming" and press OK.
o Select "Settings" and press OK.
o Select "Display" and press OK.
o Select "Brightness".
o Increase display brightness: Press the ~ button.
o Reduce display brightness: Press the } button.
o Return to main menu: Press the left menu button "Back" for approx. 1 second.
Set active display time
The active display time determines the time, after which the display switches to energy-saving
mode and switches off. The backlighting switches off after half of the set time.
o Open the main menu.
o Select "Programming" and press OK.
o Select "Settings" and press OK.
o Select "Display" and press OK.
o Select "Active display time".
o Increase active display time: Press the ~ button.
o Decrease active display time: Press the } button.
o Return to main menu: Press the left menu button "Back" for approx. 1 second.
82582333
J0082582333
9/18
29.03.2017
Page 10

eNet radio hand-held transmitter with display, 24-gang
5 Information for electrically skilled persons
5.1 Fitting and electrical connection
Mounting the charging cradle
Figure 3: Charging cradle for hand-held transmitter - Rear view
The optional charging cradle (accessory) gives the hand-held transmitter its permanent place.
The charging cradle can be operated when mounted on a flat surface as a table-top device or
mounted on the wall.
When mounting it on the wall, use a screw with a screw head < 8 mm, e.g. 3.0×30. Screw
spacing 60 mm.
Selecting a suitable mounting location near to a socket or on a flush-mounted USB power
supply.
o Countersink the screws into the wall to approx. 3 mm. Do not break out the mounting locks.
o Place the charging cradle onto the mounted screws and fix them by applying slight
downward pressure.
o Connect the charging cradle with the USB power supply.
5.2 Commissioning
DANGER!
Electrical shock when live parts are touched.
Electrical shocks can be fatal.
During commissioning, cover the parts carrying voltage on radio transmitters
and actuators and in their surrounding area.
Connecting the hand-held transmitter channel with the actuator
i Up to 10 radio actuators can be connected to a transmitter in a single step.
o Open the main menu.
o Select "Programming" and press OK.
o Select "Channels" and press OK.
o Select the desired hand-held transmitter channel and press OK.
o Select "Teach chanel" and press OK.
Status LED (7) flashes red. The hand-held transmitter is in programming mode for approx.
1 minute.
82582333
J0082582333
10/18
29.03.2017
Page 11

eNet radio hand-held transmitter with display, 24-gang
o Switch the actuator channels to programming mode (see actuator instructions).
The hand-held transmitter signals the number of actuator channels found.
o Press the right menu button "Teach".
The status LED lights up for approx. 5 seconds. The selected hand-held transmitter
channel is connected to the actuator. The hand-held transmitter and actuator exit the
programming mode automatically.
i The All On and All Off buttons of the hand-held transmitter are connected to the actuator
automatically as soon as the first connection to a radio transmitter takes place.
i If the status LED of the radio transmitter flashes 3 times at 1-second intervals for approx.
5 seconds, then the programming operation was not successful. The actuator is outside
radio range, not in programming mode or there are radio faults.
i If the status LED of the actuator flashes 3 times at 1-second intervals for approx. 5
seconds, then the programming operation was not successful. All the memory locations in
the actuator or radio transmitter are occupied.
i To terminate programming mode early, press the left menu button "Back".
Renaming a hand-held transmitter channel
o Open the main menu.
o Select "Programming" and press OK.
o Select "Channels" and press OK.
o Select the desired channel and press OK.
o Select "Rename channel" and press OK.
The "Edit text" window appears in the display.
o Enter a new name (see chapter "Setting up the hand-held transmitter", "Entering texts").
o Saving an entry: Press the right mouse-button "Save".
The message "Text stored" appears in the footer.
o Exiting "Edit text": Press the left menu button "Back".
Disconnecting the connection between a hand-held transmitter channel and an actuator
The connection between a hand-held transmitter channel and an individual actuator is
disconnected by repeating the connection steps:
o Open the main menu.
o Select "Programming" and press OK.
o Select "Channels" and press OK.
o Select the desired hand-held transmitter channel and press OK.
o Select "Teach chanel" and press OK.
Status LED (7) flashes red. The hand-held transmitter is in programming mode for approx.
1 minute.
o Switch the actuator channels to programming mode (see actuator instructions).
The hand-held transmitter signals the number of actuator channels found.
o Press the right menu button "Teach".
The status LED flashes quickly for approx. 5 seconds. The selected hand-held transmitter
channel is disconnected from the actuator. The hand-held transmitter and actuator exit the
programming mode automatically.
Disconnecting the connection between a hand-held transmitter channel and all the
actuator channels
o Open the main menu.
o Select "Programming" and press OK.
o Select "Channels" and press OK.
o Select the desired hand-held transmitter channel and press OK.
o Select "Reset channel" and press OK.
82582333
J0082582333
11/18
29.03.2017
Page 12

eNet radio hand-held transmitter with display, 24-gang
A security query is displayed, asking whether the operation should be continued or not.
o Cancel operation: Press the left menu button "No".
- or -
o Continue operation: Press the right menu button "Yes".
The message "Reset executed" appears in the footer. All the actuator channels connected
to the selected hand-held transmitter channel are disconnected.
Connecting a scene channel with the actuator
o Open the main menu.
o Select "Programming" and press OK.
o Select "Scenes" and press OK.
o Select the desired scene and press OK.
o Press "Teach scene" and OK.
Status LED (7) flashes red. The hand-held transmitter is in programming mode for approx.
1 minute.
o Switch the actuator channels to programming mode (see actuator instructions).
The hand-held transmitter signals the number of actuator channels found.
o Press the right menu button "Teach".
The status LED lights up for approx. 5 seconds. The selected hand-held transmitter
channel is connected to the actuator. The hand-held transmitter and actuator exit the
programming mode automatically.
i If the status LED of the radio transmitter flashes 3 times at 1-second intervals for approx.
5 seconds, then the programming operation was not successful. The actuator is outside
radio range, not in programming mode or there are radio faults.
i If the status LED of the actuator flashes 3 times at 1-second intervals for approx. 5
seconds, then the programming operation was not successful. All the memory locations in
the actuator or radio transmitter are occupied.
i To terminate programming mode early, press the left menu button "Back".
Rename scene
o Open the main menu.
o Select "Programming" and press OK.
o Select "Scenes" and press OK.
o Select the desired scene and press OK.
o Select "Rename scene" and press OK.
The "Edit text" window appears in the display.
o Enter a new name (see chapter "Setting up the hand-held transmitter", "Entering texts").
o Saving an entry: Press the right mouse-button "Save".
The message "Text stored" appears in the footer.
o Exiting "Edit text": Press the left menu button "Back".
Removing an individual actuator channel from a scene
An individual actuator is removed from a scene by repeating the connection steps:
o Open the main menu.
o Select "Programming" and press OK.
o Select "Scenes" and press OK.
o Select the desired scene and press OK.
o Press "Teach scene" and OK.
Status LED (7) flashes red. The hand-held transmitter is in programming mode for approx.
1 minute.
o Switch the actuator channels to programming mode (see actuator instructions).
82582333
J0082582333
12/18
29.03.2017
Page 13

eNet radio hand-held transmitter with display, 24-gang
The hand-held transmitter signals the number of actuator channels found.
o Press the right menu button "Teach".
The status LED lights up for approx. 3 seconds. The actuator channels are deleted from
the scene. The hand-held transmitter and actuator exit the programming mode
automatically.
Resetting a scene
All the connections of the scene channel to actuators are disconnected.
i The connections in the actuators are preserved and must be deleted separately.
o Open the main menu.
o Select "Programming" and press OK.
o Select the desired scene and press OK.
o Select "Scenes" and press OK.
o Select "Reset scene" and press OK.
A security query is displayed, asking whether the operation should be continued or not.
o Cancel operation: Press the left menu button "No".
- or -
o Continue operation: Press the right menu button "Yes".
The message "Reset executed" appears in the footer. All the actuators connected to the
selected scene are disconnected.
Setting up lock-out protection
The lock-out protection function moves the blind/shutter to the top end position for selected
Venetian blind actuators – e.g. for patio or balcony doors and locks further operation.
o Connect two scenes for activating and deactivating the lock-out protection with the desired
Venetian blind actuator (see chapter Connecting a scene channel with an actuator).
o Give the scene a suitable name (see chapter Renaming a scene).
o Open the main menu.
o Select "Scenes" and press OK.
o Select the scene for activating lock-out protection and press the right menu button "Open".
o Select "Lock-out prot. ON" and press OK.
The entry is indicated with >.
o Press the left menu button "Back".
o Select the scene for deactivating lock-out protection and press the right menu button
"Open".
o Select "Lock-out prot. OFF" and press OK.
The entry is indicated with >.
o Press the left menu button "Back".
The lock-out protection functions are indicated with ĝ.
o Exiting Scenes menu: Press the left menu button "Back".
Setting up the channel lock function
A channel lock function sets values, states or Venetian blind positions and then locks automatic
or manual operation until an enable is performed.
o Connect two scenes for activating and deactivating the channel lock with the desired
actuators (see chapter Connecting a scene channel with an actuator).
o Give the scene a suitable name (see chapter Renaming a scene).
o Set the switching dimmer and Venetian blind actuators with the desired values for the
restrained situation.
o Open the main menu.
o Select "Scenes" and press OK.
82582333
J0082582333
13/18
29.03.2017
Page 14

eNet radio hand-held transmitter with display, 24-gang
o Select the previously-created scene for activating the function and press the right menu
button "Open".
o Select "Channel lock ON" and press OK.
The entry is indicated with >.
o Select "Store scene" and press OK.
o Press the left menu button "Back".
o Select the previously-created scene for deactivating the function and press the right menu
button "Open".
o Select "Channel lock OFF" and press OK.
The entry is indicated with >.
o Press the left menu button "Back".
The channel lock functions are indicated with ĝ.
o Exiting Scenes menu: Press the left menu button "Back".
Preparing a hand-held transmitter for operation with an eNet server
The hand-held transmitter must be connected with the server for installations commissioned
with the eNet server.
o Open the main menu.
o Select "Programming" and press OK.
o Select "Advanced startup" and press OK.
"Teaching mode" is activated and the LED flashes red.
o Start reading in of devices on the eNet server.
o If the eNet server requests actuation of a button, select "Send confirmation" and press OK.
o Once programming of the hand-held transmitter by the eNet server has been completed,
select "Teaching mode" again and press the right menu button "On/Off".
The hand-held transmitter signals "End of Teaching mode" in the footer.
Resetting the hand-held transmitter to the default setting
All the connections to actuators are disconnected. The parameters are reset to the default
setting.
i The connections in the actuators are preserved and must be deleted separately.
o Open the main menu.
o Select "Programming" and press OK.
o Select "Settings" and press OK.
o Select "Default setting" and press OK.
In the text area, the message "Reset device?" appears.
o Press the right menu button "Yes".
The message "Executing reset" appears in the footer. The connections of all the hand-held
transmitter and scene channels to all the actuators are disconnected. The hand-held
transmitter returns to the main menu.
6 Appendix
Remove empty batteries immediately and dispose of in an environmentally friendly
manner. Do not throw batteries into household waste. Consult your local authorities
about environmentally friendly disposal. According to statutory provisions, the end
consumer is obligated to return used batteries.
6.1 Technical data
Rated voltage DC 3.6V
Battery type 1×Lithium LIR 2477
Dimensions L×W×H 131×67×17 mm
Ambient temperature -5 ... +45°C
82582333
J0082582333
14/18
29.03.2017
Page 15

eNet radio hand-held transmitter with display, 24-gang
Degree of protection IP 20
Radio frequency 868.0 ... 868.6MHz
Transmission capacity max. 20mW
Transmitting range in free field typ. 100m
Receiver category 2
6.2 Parameter list
i Only with eNet Server Software up to version 1.4
The device parameters can be changed with the eNet server:
Device and channels
Parameters Setting options, Basic
setting
Function Rocker/Scene, Unused
Basic setting: Rocker/Scene
Operating mode App use, lock-out protection,
forced operation
Basic setting: App use
Device settings
Parameters Setting options, Basic
setting
Name, list 1 to 10 Free text, maximum 15
characters
Basic setting: List 01 to list 10
Explanations
Rocker
The channel works as a
channel button.
Scene
The channel works as a scene
button.
Unused
The channel is not displayed
in the eNet SMART HOME
app and is disabled for use in
the commissioning interface.
Setting the type of scene used
for a scene channel.
Explanations
List designations of List 1 to
10
Font size Small, large
Basic setting: Large
Inverted display Off, On
Basic setting: On
Language German, English, Dutch,
Norwegian, Spanish, French
Basic setting: German
Display brightness 1 to 16
Basic setting: 10
Clock: Minutes 0 to 59
Basic setting: 0
Clock: Hours 0 to 23
Basic setting: 0
Date: Weekday Monday to Sunday
Basic setting: Sunday
82582333
J0082582333
15/18
Setting of the font size for
displaying characters.
Switch-over between black
font on white background and
white font on black
background.
Setting of the display
language.
Brightness setting of the
display.
Setting of the current time:
Minutes.
Setting of the current time:
Hours.
Setting of current weekday
29.03.2017
Page 16

eNet radio hand-held transmitter with display, 24-gang
Date: Day 1 to 31
Basic setting: 1
Clock: Month 1 to 12
Basic setting: 1
Date: Year 1 to 99
Basic setting: 12
Clock: Summer time
changeover
On, Off
Basic setting: On
Light run-on time 10 to 60 seconds
Basic setting: 40 seconds
Advanced device settings
Parameters Setting options, Basic
setting
Function, rocker 1 to 3 Rocker switch, scene, master
dimming, none
Basic setting: Rocker
Setting of current date: Day.
Setting of current date: Month.
Setting of current date: Year.
Clock setting for automatic
switch-over to summer and
winter time.
Time for which the display
illuminated remains switched
after the last button-press. The
setting is made in jumps of 2
seconds. A factor between 5
and 30 must be entered.
Explanations
Setting the function keys.
Setting "Rocker switch":
Adjacent buttons are
combined to form a rocker and
work as channel buttons.
Channel index, left button of
rocker 1 to 3
In the setting "Rocker switch":
17 to 40
Basic setting: 17 to 19
In the setting as scene button:
1 to 16
Basic setting: 1 to 3
Channel index, right button of
rocker 1 to 3
In the setting as scene button:
1 to 16
Basic setting: 1 to 3
Manual commissioning On, Off
Basic setting: On
Setting "Scene:" Both buttons
work as scene buttons.
Setting "Master dimming": The
dimmer actuators in a recalled
scene can be dimmed.
Setting "None": The function
keys have no function.
Connecting the function keys
with the desired channel.
Values 17 to 40 correspond to
the channels 1 to 24.
Values 1 to 16 correspond to
the scenes 1 to 16.
Connecting the function keys
with the desired channel.
Values 1 to 16 correspond to
the scenes 1 to 16.
Disables manual
commissioning for all device
channels. In the "Off" setting,
the device cannot be reset to
the factory setting.
Extended channel settings
Parameters Setting options, Basic
setting
82582333
J0082582333
16/18
Explanations
29.03.2017
Page 17

eNet radio hand-held transmitter with display, 24-gang
Manual commissioning On, Off
Basic setting: On
Blocks manual commissioning
for the device channel. In the
"Off" setting, the device
cannot be reset to the factory
setting.
Local Operation On, Off
Basic setting: On
With this device, the
parameter has no function.
6.3 Troubleshooting
After a brief button-press, the hand-held transmitter switches off.
Cause: Battery in the hand-held transmitter is almost empty.
Charge the hand-held transmitter using the USB connection.
If the problem persists: Battery is worn out. Replace it with a new battery.
Receiver does not react, status LED displays a transmission error. Status LED flashes
red quickly for 3 seconds.
Cause 1: Radio range exceeded. Structural obstacles reduce the range.
Insert a radio repeater.
Cause 2: Actuator is not ready for operation.
Check the actuator and mains voltage.
Cause 3: There are radio faults, e.g. through outside radio.
Eliminate radio interference.
i The actuator causing the transmission error can be removed from the display of
transmission errors.
To do this, open the main menu. Select "Channels" and press OK.
Select the desired hand-held transmitter channel, press OK and then "Open".
During signalling, select "Status exclusion" and press OK.
The status LED lights up red. The message "Status exclusion" appears in the footer.
The actuator is automatically taken into account again when it transmits a status message
after radio transmission.
The programming mode cancels after a few seconds.
There is an eNet server in scan mode within radio range.
Terminate scan mode on the eNet server.
After a button has been pressed, the status LED flashes red quickly for 3 seconds.
Cause: Maximum permitted transmission period (statutory Duty Cycle Limit) has almost been
reached. For the function of the transmitter to continue, the polling and display of the sum status
will be switched off. As soon as sufficient transmission time is available again, the sum status
will again be polled on button actuation.
Actuate the transmitter again after a short waiting time, normally a few seconds.
Reduce the number of actuations.
Reduce the number of actuators connected to the transmitter.
6.4 Accessories
Docking station Art. No. FMHSTF
USB charger Art. No. 521-2USB
USB power supply unit, 5 V / 500 mA
Albrecht Jung GmbH & Co. KG hereby declares that the radio system type
Art. No. FMHSD24
corresponds to the directive 2014/53/EU. You can find the full article number on the device. The
complete text of the EU Declaration of Conformity is available under the Internet address:
www.jung.de/ce
82582333
J0082582333
17/18
29.03.2017
Page 18

eNet radio hand-held transmitter with display, 24-gang
6.6 Warranty
The warranty follows about the specialty store in between the legal framework as provided for
by law.
ALBRECHT JUNG GMBH & CO. KG
Volmestraße 1
58579 Schalksmühle
GERMANY
Telefon: +49 2355 806-0
Telefax: +49 2355 806-204
kundencenter@jung.de
www.jung.de
82582333
J0082582333
18/18
29.03.2017
 Loading...