

Page 1
LB management
eNet radio centre plate
eNet radio centre plate
Art. no.: FM..1701..
Operating instructions
1 Safety instructions
Electrical devices may only be mounted and connected by electrically skilled persons.
Serious injuries, fire or property damage possible. Please read and follow manual fully.
Danger of electric shock. Always disconnect before carrying out work on the device or load. In
so doing, take all the circuit breakers into account, which support dangerous voltages to the
device and or load.
The radio communication takes place via a non-exclusively available transmission path, and is
therefore not suitable for safety-related applications, such as emergency stop and emergency
call.
These instructions are an integral part of the product, and must remain with the end customer.
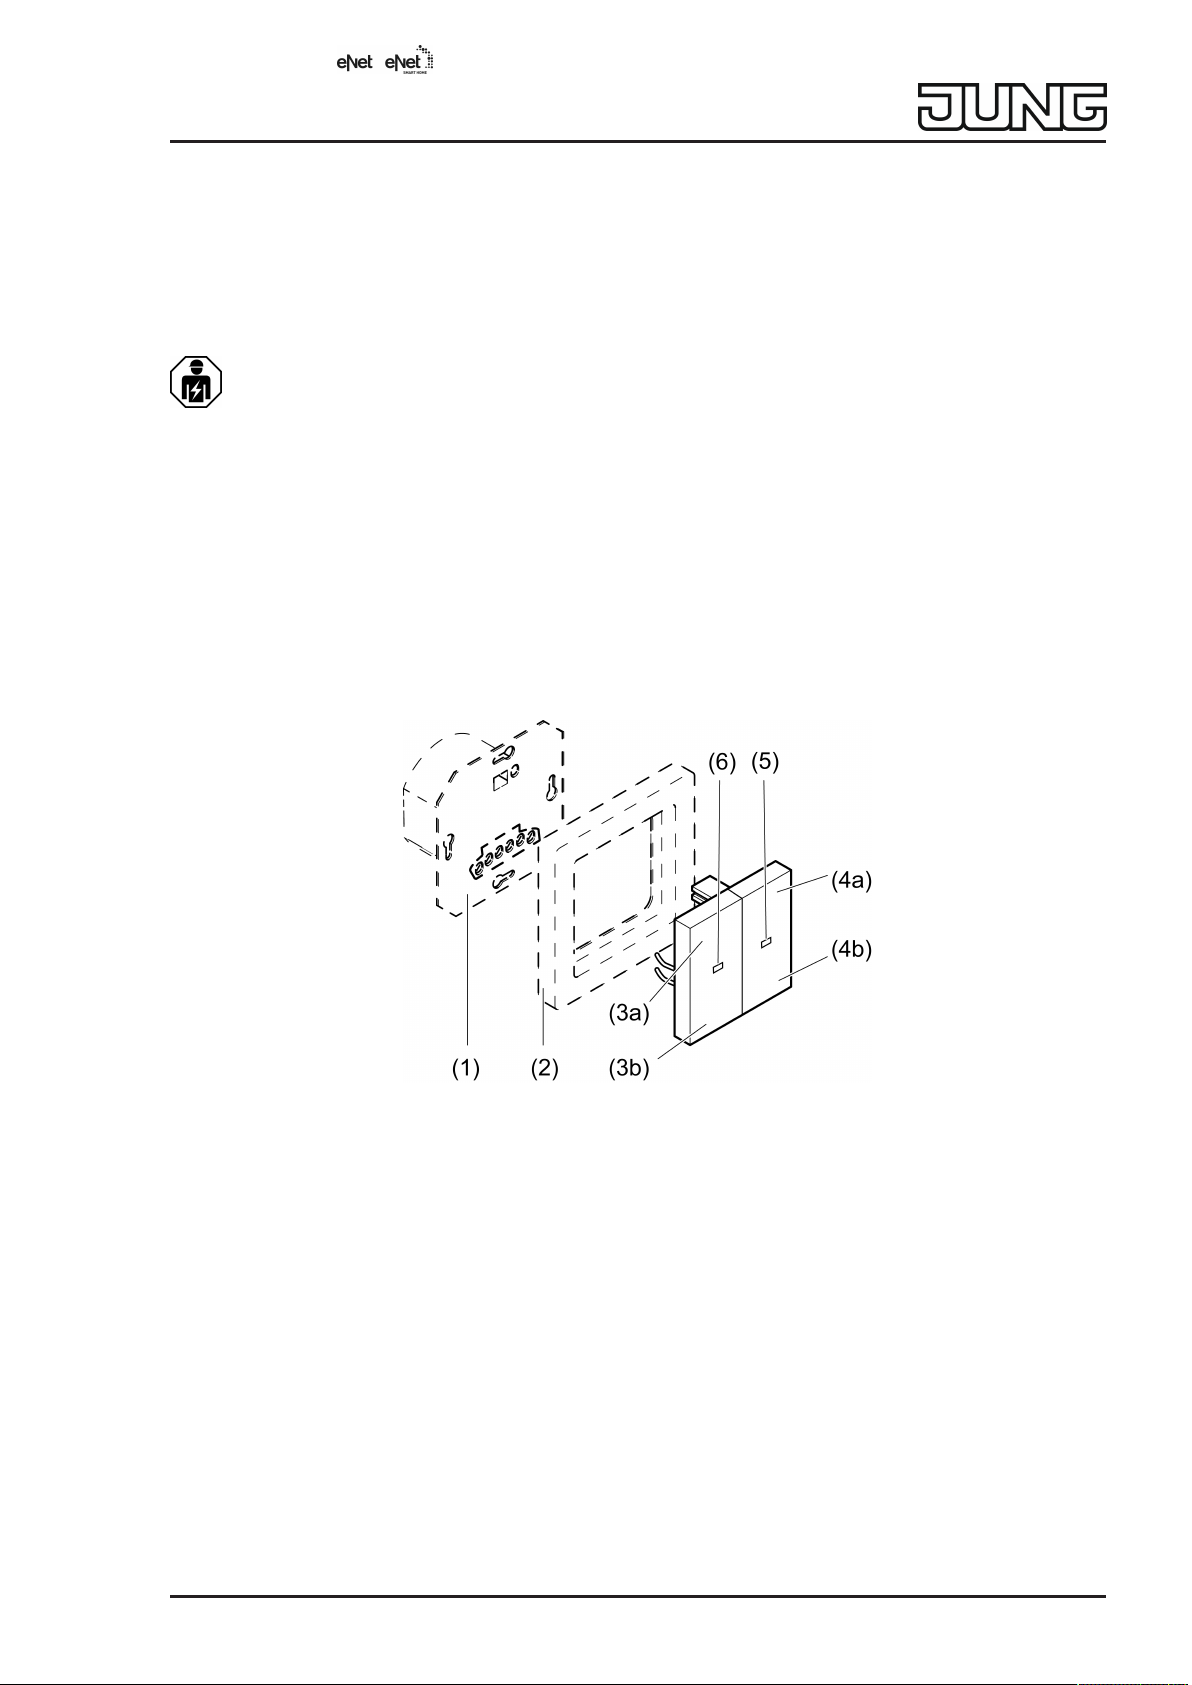
2 Device components
Figure1: Device components
(1) Insert
(2) Frame
(3a) Blind/shutter up / light on, brighter
(3b) Blind/shutter down / light off, darker
(4a) Disabling function
(4b) Memory function
(5) Function LED
Red = Disabling function active
Green = Memory function active
(6) Status LED
Green = Blind/shutter activated / light switched on
red = sending status
red flashing = error message, programming mode
or resetting to the default setting
32597903 07.08.2019
J0082597903
1 / 29
Page 2

LB management
eNet radio centre plate
3 Intended use
– Manual, radio- and time-controlled operation of e.g. Venetian blinds, shutters, awnings,
lighting or fans
– Transmitter for radio communication of switching, dimming and blind movement com-
mands
– Operation of switching, dimming or Venetian blind insert or 3-wire extension from LB man-
agement
When operating with the eNet Server, operation and signalling could vary from what is described here.
4 Product characteristics
– 2 switching times can be saved, which are repeated in a 24-hour cycle
– Disabling function
– Status feedback to radio transmitter
– Status indication with LED
– Night mode
– Evaluation of extension inputs
Functions in combination with Venetian blind insert
– Positioning of the blind/shutter via scene request
– Position for sun protection and twilight
– Running time and ventilation position of the blind/shutter can be saved
Functions in combination with light insert
– Scene operation possible
– Switch-on brightness can be saved permanently when combined with flush-mounted in-
serts for dimming
Can be set with eNet Server from version 2.2 (depending on application)
– Repeater function
– Slat change-over time/fabric-stretching time
– Change-over-time for direction change
– Running direction invertible
– Operation locks
– Deactivating extension evaluation
– Position for sun protection, twilight, lock-out protection and wind alarm
– Maximum brightness
– Minimum brightness
– Dimming speed
– Switch-on delay / switch-off delay
– Dim up/dim down ramp
– Switch-off warning
– Continuous on, Continuous off
– Hotel function
– Run-on time
– Light control
Supplementary functions with eNet Server:
– Fully encrypted radio transmission (AES-CCM)
– Update of the device software
– Reading of error memory
Behaviour after mains voltage return
– The switching times saved in memory operation have been deleted.
32597903 07.08.2019
J0082597903
2 / 29
Page 3

LB management
eNet radio centre plate
– The response after mains voltage return can be configured with the eNet server.
5 Operation of Venetian blind and shutters
Moving the blind/shutter
■ Press button (3a) or (3b) for longer than one second.
The blind/shutter moves in the desired direction to the end position or stops when the button is pressed again.
If a ventilation position has been saved, the blind stops in the ventilation position when
moving down (see Saving the ventilation position).
Adjusting the slats
■ Press the button (3a) or (3b) for less than one second.
Saving blind/shutter running time
To perform positioning movements, the blind/shutter running time has to be saved beforehand.
To save blind/shutter running time, the Venetian blind must be moved to the upper end position
and the status LED (6) switch off automatically.
■ From the top end position, press the button (3b) for longer than second.
The blind/shutter moves in the lower end position direction.
■ Press and hold down the button (3a) and (3b).
The blind/shutter remains stopped, but continues to move after 4 seconds.
■ As soon as the blind/shutter has reached the lower end position, release the buttons and
press button (3b) within the next 4 seconds.
The running time is saved. The blind/shutter moves back to the upper end position.
The change-over-time of the slats for the venetian blind and time/fabric-stretching time for
awnings can only be saved using the eNet server.
Saving the ventilation position
To save the ventilation position, the Venetian blind must be moved to the upper end position
and the status LED (6) switch off automatically.
■ From the top end position, press the button (3b) for longer than second.
The blind/shutter moves in the lower end position direction.
■ Press and hold down the button (3a) and (3b).
The blind/shutter remains stopped, but continues to move after 4 seconds.
■ As soon as the desired ventilation position has been reached, release the buttons and
press the button (3a) within the next 4 seconds.
The ventilation position is saved. The blind/shutter moves back to the upper end position.
If the ventilation position is saved again, the old value is overwritten.
6 Operation of lighting
Switch light
■ Press button (3a) or (3b) for less than 0.4 seconds.
With a dimming insert, the light switches to the brightness that was last set or a saved
brightness.
Switch light on with minimum brightness
■ Press the button (3b) for longer than 0.4 seconds.
Adjust the brightness
■ Press button (3a) or (3b) for longer than 0.4 seconds.
32597903 07.08.2019
J0082597903
3 / 29
Page 4

LB management
eNet radio centre plate
Save switch-on brightness
■ Adjust the brightness.
■ Press the buttons (3a) and (3b) for longer than 4 seconds.
Switch-on brightness is saved. For confirmation, the light is switched off briefly and
switched on again.
Delete switch-on brightness
■ Press button (3) briefly: Light switches on at the saved switch-on brightness.
■ Press the buttons (3a) and (3b) for longer than 4 seconds.
The switch-on brightness has been deleted.
Switching on takes place at the last brightness value set. For confirmation, the light is
switched off briefly and switched on again.
7 Transmitter function of the attachment
In addition to operating its own insert, the attachment also sends radio telegrams to remote
eNet actuators. In this way, a comprehensive central control system can be implemented. Irrespective of local use, the attachment can be used for switching, dimming and operating Venetian blinds of remote actuators.
Signalling of the status LED
As soon as the button (3a) or (3b) is pressed or released, the red status LED first signals radio
transmission.
– The status LED lights up red for 3 seconds.
The actuator status/group status is then displayed (see Query group status).
Polling sum status
■ Press buttons (3a) and (3b) for 1 to 4 seconds.
If there is no status message from at least one remote actuator, a transmission error is
signaled. Status LED flashes red quickly for 5 seconds.
Signalling of the group status:
– Status LED turns green for 3 seconds:
At least one actuator is switched on, or one Venetian blind is not in the top end position.
– Status LED remains off:
All the actuators are switched off or the Venetian blinds are all in the upper end position.
8 Activate functions
Saving switching times - Memory operation
■ In addition to normal operation with the button (3a) or (3b), press the button (4b) for
longer than one second.
The insert switches and the switching time is saved.
The device switches to memory operation. The function LED (5) turns continuously green.
Saved switching operations are repeated in a 24-hour cycle.
An upward and downward movement time, or on and off time, can be saved. The old
switching time will be replaced if a new one is saved.
To delete all times, press button (4b) for longer than 20 seconds until the function LED (5)
lights up green for a second time.
After programming with the eNet Server or
eNet SMART HOME app
, the switching times
saved in memory operation have been deleted.
Activating / deactivating memory operation
■ Press the button (4b) for longer than 4 seconds.
32597903 07.08.2019
J0082597903
4 / 29
Page 5
LB management
eNet radio centre plate
In memory operation, the function LED (5) turns continuously green.
It is only possible to switch to memory operation if at least one switching time has been
saved.
Activating / deactivating the disabling function
The disabling function disables extension operation and operation via radio and deactivates all
automatic functions. Manual operation using buttons (3a) and (3b) continues to be possible.
With Venetian blinds, extension operation in the "UP" direction (wind alarm) continuous to
be possible.
■ Press the button (4a) for longer than 4 seconds.
The function LED (5) is red for as long as the disabling function is active.
Activating / deactivating night mode
In night mode, the status and function LEDs are not permanently lit, but only for 5 seconds after
a button is pressed.
■ Press the buttons (4a) and (4b) for longer than 4 seconds.
Night mode is activated: The function LED turns red for 3 seconds.
Night mode is deactivated: The function LED turns green for 3 seconds.
Resetting the device to the factory setting
All connections to radio transmitters and radio actuators are disconnected and parameters are
reset to the default setting.
The connections in the radio transmitters and radio actuators are preserved and must be
deleted separately.
Load is switched off.
■ Press buttons (3a) and (3b) for longer than 20 seconds until the red status LED flashes
quickly.
■ Release buttons (3a) and (3b) and press briefly once again within 10 seconds.
The red status LED flashes more slowly for approx. 5 seconds.
The attachment is reset to the default setting.
On a Venetian blind insert, a reference run to the upper end position is performed.
9 Information for electrically skilled persons
DANGER!
Mortal danger of electric shock
Disconnect the device. Cover up live parts.
Fitting the device
Switching, dimming or Venetian blind insert or 3-wire extension are mounted and connected
properly (see instructions of the relevant inserts).
■ Fit the cover with frame on the insert.
■ Switch on mains voltage.
If the status LED (6) flashes red three times at repeated intervals, the cover was previously connected to another insert. To enable operation again, either place the cover onto
the respective insert or press buttons (3a) and (3b) for longer than 4 seconds.
When switching to another application, the device should always be reset to the default
setting and then reprogrammed.
32597903 07.08.2019
J0082597903
5 / 29
Page 6

LB management
eNet radio centre plate
10 Commissioning
DANGER!
Mortal danger of electric shock.
During commissioning, cover the parts carrying voltage on radio transmitters and actuators and in their surrounding area.
The attachment can also be commissioned with eNet Server as an alternative to the commissioning described here.
The prerequisite for scenes and positioning movements is that the moving times of the
connected blind/shutter in the attachment are saved.
Connecting attachment with radio transmitter
Load is switched off.
■ Press buttons (3a) and (3b) for longer than 4 seconds.
When operating on a switching or dimming insert, the load is switched on.
The status LED flashes after 4 seconds. The attachment is in programming mode for
approx. 1 minute.
■ Switch radio transmitter to programming mode (see radio transmitter instructions).
■ Trigger telegram on the radio transmitter.
The status LED lights up for 5 seconds.
The attachment is connected to the radio transmitter. The attachment and radio transmitter exit the programming mode automatically.
If the status LED of the attachment flashes 3 times for approx. 5 seconds, then the programming procedure was not successful. All the memory locations in the attachment or
radio transmitter are occupied.
Connecting attachment to radio actuator
Up to 10 radio actuators can be connected to a transmitter in a single step.
■ Press buttons (3a) and (3b) simultaneously for longer than 4 seconds.
The red status LED flashes. The attachment is in programming mode for
approx. 1 minute.
■ Switch radio actuator to programming mode (see radio actuator instructions).
■ Press button (3a) briefly.
The red status LED lights up for approx. 5 seconds. The attachment and actuator exit the
programming mode automatically.
If the red status LED of the attachment flashes 3 times for approx. 5 seconds, then the
programming procedure was not successful. The radio actuator is outside the radio range,
not in programming mode or there are radio faults.
If the red status LED of the radio actuator flashes 3 times for approx. 5 seconds, then the
programming procedure was not successful. All the memory locations in the attachment
or radio actuator are occupied.
Press buttons (3a) and (3b) once again simultaneously for longer than 4 seconds to terminate the programming mode prematurely.
Disconnecting connection to a radio transmitter or radio actuator
■ Carry out the same steps as when connecting (see Connecting attachment to radio trans-
mitter or Connecting attachment to radio actuator).
32597903 07.08.2019
J0082597903
6 / 29
Page 7

LB management
eNet radio centre plate
The status LED flashes quickly for 5 seconds. The attachment is disconnected from the
radio transmitter or radio actuator. The attachment and radio transmitter or radio actuator
exit the programming mode automatically.
If there several connections or scene buttons for a radio transmitter, all connections must
be disconnected individually.
All On and All Off buttons of a radio transmitter are disconnected automatically as soon as
the last connection of the corresponding output to the radio transmitter is disconnected.
Manual disconnection is not possible.
11 Technical data
Ambient temperature -5 ... +45 °C
Storage/transport temperature -20 ... +70 °C
Transmitting range in free field typ. 100 m
Radio frequency 868.0 ... 868.6 MHz
Transmission capacity max. 20 mW
Receiver category 2
12 Parameter list
The device parameters can be changed with the eNet Server.
Device and channels
Parameters Setting options
Basic setting
Sensor channel
function
Actuator channel
function
Rocker, Unused
Basic setting: Rocker
Switch insert,
Dimming insert,
Extension insert,
Venetian blind insert,
Switch insert 2-channel,
Unknown insert
Unused
"Switching" operating mode
Switching operation
Push-button operation
Flashing
Continuous on
Continuous off
Basic setting:
Switching operation
Explanations
Rocker
The channel works as a channel button.
Unused
The channel is not displayed in the
HOME app
and is disabled for use in the com-
missioning interface.
The attachment function depends on the application. For catalogue devices, the insert on which
the attachment is operated must be selected at
this point.
For devices from the device search, the existing
insert is displayed. This setting cannot be altered.
Switching operation
After switch-on, the device remains stable in the
"On" state, and stable in the "Off" state after
switch-off.
Push-button operation
The device switches "On" when the channel button of a radio transmitter is pressed, if the attachment is pressed directly or via an extension and
"Off" when the button is released. It is irrelevant
whether the "On" or "Off" button is pressed.
eNet SMART
Flashing
Switch-on starts flashing and switch-off stops
flashing. The default flash frequency is 1 Hz. This
frequency is also the maximum flash frequency.
32597903 07.08.2019
J0082597903
7 / 29
Page 8

LB management
eNet radio centre plate
Parameters Setting options
Basic setting
"Switching" function
Light (switching),
Switching, Unused
Basic setting: Light
(switching)
Explanations
The flash frequency can be changed using parameters. The parameter "Switch-off delay" is used
for the pulse time and the parameter "Switch-on
delay" for the pause time.
Continuous on
The output switches to continuously "On". All operations of radio transmitters, via an extension or
directly on the attachment are ignored.
Continuous off
The output switches to continuously "Off". All operations of radio transmitters, via an extension or
directly on the attachment are ignored.
Light (switching)
The channel is integrated for the "Lighting" central function in the
eNet SMART HOME app
.
Switching
The channel is not integrated in any central function.
Operating mode
"Dimming"
"Dimming" function
Normal operation
Continuous on
Continuous off
Basic setting:
Normal operation
Light (dimming), Unused
Basic setting: Light
(dimming)
Unused
The channel is not displayed in the
HOME app
and is disabled for use in the com-
eNet SMART
missioning interface.
Normal operation
The insert can be operated with radio transmitters, via an extension or directly on the attachment.
Continuous on
The output switches to continuously "On". All operations of radio transmitters, via an extension or
directly on the attachment are ignored.
Continuous off
The output switches to continuously "Off". All operations of radio transmitters, via an extension or
directly on the attachment are ignored.
Light (dimming)
The channel is integrated for the "Lighting" central function in the
eNet SMART HOME app
.
Unused
The channel is not displayed in the
HOME app
and is disabled for use in the com-
eNet SMART
missioning interface.
Operating mode
"Extension operation"
Normal operation
Continuous on
Continuous off
Basic setting:
Normal operation
The attachment is located on a 3-wire extension
and can operate the main device via radio transmitter or directly on the attachment.
Normal operation
Continuous on
32597903 07.08.2019
J0082597903
8 / 29
Page 9

LB management
eNet radio centre plate
Parameters Setting options
Basic setting
Function "Extension operation"
Light (dimming), light
(switching), switching,
unused
Basic setting: Light
(dimming)
Explanations
The output switches to continuously "On". All operations of radio transmitters or directly on the attachment are ignored.
Continuous off
The output switches to continuously "Off". All operations of radio transmitters or directly on the attachment are ignored.
The attachment is located on a 3-wire extension.
The function of the main device can be entered
here.
Light (dimming)
The channel is integrated for the "Lighting" central function in the
eNet SMART HOME app
.
Light (switching)
The channel is integrated for the "Lighting" central function in the
eNet SMART HOME app
.
Switching
The channel is not integrated in any central function.
"Venetian blind"
operating mode
Operating mode
"2-channel switch
insert"
Roller shutter
Venetian blind
Awning
Basic setting: Roller
shutter
Switching operation
Push-button operation
Flashing
Continuous on
Continuous off
Basic setting:
Switching operation
Unused
The channel is not displayed in the
HOME app
and is disabled for use in the com-
eNet SMART
missioning interface.
Roller shutter
A shutter is controlled.
The channel is integrated for the "Venetian blind"
central function in the
eNet SMART HOME app
.
Venetian blind
A Venetian blind is controlled.
The channel is integrated for the "Venetian blind"
central function in the
eNet SMART HOME app
.
Awning
An awning is controlled.
The channel is not integrated into the "Venetian
blind" central function in the
app
.
eNet SMART HOME
Switching operation
After switch-on, the device remains stable in the
"On" state, and stable in the "Off" state after
switch-off.
Push-button operation
The device switches "On" when the channel button of a radio transmitter is pressed, if the attachment is pressed directly or via an extension and
"Off" when the button is released. It is irrelevant
whether the "On" or "Off" button is pressed.
32597903 07.08.2019
J0082597903
9 / 29
Page 10

LB management
eNet radio centre plate
Parameters Setting options
Basic setting
Function
"2-channel switch
insert"
Light (switching) + fan
Switching + fan
Light (switching)
Switching
Unused
Basic setting:
Light (switching) + fan
Explanations
Flashing
Switch-on starts flashing and switch-off stops
flashing. The default flash frequency is 1 Hz. This
frequency is also the maximum flash frequency.
The flash frequency can be changed using parameters. The parameter "Switch-off delay" is used
for the pulse time and the parameter "Switch-on
delay" for the pause time.
Continuous on
The output switches to continuously "On". All operations of radio transmitters, via an extension or
directly on the attachment are ignored.
Continuous off
The output switches to continuously "Off". All operations of radio transmitters, via an extension or
directly on the attachment are ignored.
Light (switching) + fan
The light channel is integrated into the "Lighting"
central function in the
eNet SMART HOME app
.
The fan channel switches on and off with a delay
depending on the set parameters.
Switching + fan
The switching channel is not integrated in any
central function. The fan channel switches on and
off with a delay depending on the set parameters.
Advanced device settings
Parameters Setting options, Basic
setting
Manual commissioning
On, Off
Basic setting: On
Repeater mode On, Off
Basic setting: Off
Light (switching)
The channel is integrated for the "Lighting" central function in the
eNet SMART HOME app
. Both
channels of the switch insert switch in parallel.
Switching
The channel is not integrated in any central function. Both channels of the switch insert switch in
parallel.
Unused
The channel is not displayed in the
HOME app
and is disabled for use in the com-
eNet SMART
missioning interface.
Explanations
Disables manual commissioning for all device
channels. In the "Off" setting, the device cannot
be reset to the factory setting.
In addition to its other functions, the device can
be used as a repeater. In the "On" setting, the
device repeats all the received telegrams.
32597903 07.08.2019
J0082597903
10 / 29
Page 11

LB management
eNet radio centre plate
Parameters Setting options, Basic
setting
Allow extension
unit operation
On, Off
Basic setting: On
Extended channel settings Sensor channel
Parameters Setting options, Basic
setting
Manual commissioning
On, Off
Basic setting: On
Local Operation On, Off
Basic setting: On
Channel settings "switching"
Parameters Setting options, Basic
setting
Switch-on delay 0 s … 24 h
Basic setting: 0 s
Explanations
Allows operation via wired extensions.
Explanations
Blocks manual commissioning for the sensor
channel. In the "Off" setting, the device cannot be
reset to the factory setting.
Blocks the sensor operation of the button. Telegrams are no longer transmitted to remote actuators.
Explanations
The load switches on after a delay. Repeated
switch-on commands restart the delay time. If the
load has not yet been switched on due to the
delay when a switch-off command comes, then
the load will remain off. In Flashing operating
mode, the pause time is set using this parameter.
Switch-off delay 0 s … 24 h
Basic setting: 0 s
Run-on time 0 s … 24 h
Basic setting: 0 s
Use run-on time On, Off
Basic setting: Off
The load switches off after a delay. Repeated
switch-off commands restart the delay time. If the
load has not yet been switched off due to the
delay when a switch-on command comes, then
the load will remain on. In Flashing operating
mode, the pulse times are set using this parameter.
If a run-on time is entered and the "Use run-on
time" parameter is activated, the actuator no
longer remains permanently switched on, but
only for the duration of the run-on time entered
here or transmitted by a motion detector. The
run-on time is restarted if actuation is repeated.
A motion detector command without transmitted
run-on time (e.g. from an extension) leads to
switching on for the duration of the run-on time
entered here. If no run-on time is entered here,
the default run-on time of 2 minutes is applied.
On:
If a run-on time is configured (≠ 0 s), in addition
to motion detector commands, all switching or
dimming commands also lead to switching on for
the duration of the run-on time.
If no run-on time is configured (= 0 s), all switching or dimming commands result in permanent
switching of the load.
As soon as the attachment receives a motion detector command, the transmitted run-on time is
32597903 07.08.2019
J0082597903
11 / 29
Page 12

LB management
eNet radio centre plate
Parameters Setting options, Basic
setting
Manual switch-off
of the run-on time
On, Off
Basic setting: Off
Operating hours 0 ... 65535
Basic setting: Current
value
Extended channel settings "switching"
Explanations
automatically entered in the "Run-on time" parameter and this then also applies to all switching
and dimming commands.
Off:
Only motion detector commands lead to switching on for the duration of the transmitted or set
run-on time. The load is permanently switched for
switching and dimming commands.
Allows manual switch-off of a running run-on
time. If the parameter is switched off, then a
switch-off command will also switch the actuator
on. Only visible if a run-on time was set.
The time is counted during which the load is
switched on (relay contact closed). This parameter can be reset to "0", for example after exchanging the load. The Reset button is used to
reset the counter to "0". The device must be programmed to apply the change.
Parameters Setting options, Basic
setting
Operating mode Switching operation
Push-button operation
Flashing
Continuous on
Continuous off
Basic setting: Switching
operation
Manual commissioning
On, Off
Basic setting: On
Local Operation On, Off
Basic setting: On
Behaviour on
voltage return
On
Off
Last value
Basic setting: Off
Timer behaviour,
voltage return
Off
Restart
Basic setting: Off
Explanations
See Device and channels.
Blocks manual commissioning for the device
channel. In the "Off" setting, the device cannot be
reset to the factory setting.
Blocks the output for operation using the button.
Defines the behaviour of the output after voltage
return.
Specifies whether an active switch-on delay,
switch-off delay or run-on time remains off or restarts after voltage return. Directly connected to
the parameters "Switch-on delay", "Switch-off
delay" and "Run-on time".
Behaviour after
the end of the
disabling function
On
Off
no change
Behaviour of the output when a block is removed.
Last value
Basic setting: No
change
32597903 07.08.2019
J0082597903
12 / 29
Page 13

LB management
eNet radio centre plate
Parameters Setting options, Basic
setting
Manual saving of
the scene values
Switch-off warning
Priority, lock-out
protection
Activate lock-out
protection switch-
On, Off
Basic setting: On
On, Off
Basic setting: Off
0...4
Basic setting: 1
On, Off
Basic setting: Off
ing state
Deactivate lockout protection
On, Off
Basic setting: Off
switching state
Priority, restraint 0...4
Basic setting: 2
Explanations
Disables the saving of the current actuator state
(On/Off) as scene value in an actuator for a command via a transmitter.
If the switch-off warning is active, the light is not
switched off directly. The light briefly goes off 30,
20 and 10 seconds before permanent switch-off.
During the switch-off warning, a switch-on command activates direct switch-on. It is not possible
to terminate the time using a switch-off command.
Specifies the priority for recalling and removing a
scene of type Lock-out protection for the channel.
Defines the behaviour of the output on activating
the lock-out protection.
Defines the behaviour of the output on deactivating the lock-out protection. Only visible when the
priority for the lock-out protection is 0.
Specifies the priority for recalling and removing a
scene of type Restraint for the channel.
Activate forced
operation switching state
Deactivate forced
operation switching state
Priority, wind
alarm
Activate wind
alarm switching
state
Deactivate wind
alarm switching
state
Priority, sun protection
Activate sun protection switching
state
Deactivate sun
protection switching state
On, Off
Basic setting: On
On, Off
Basic setting: Off
0...4
Basic setting: 3
On, Off
Basic setting: Off
On, Off
Basic setting: Off
0...4
Basic setting: 0
On, Off
Basic setting: On
On, Off
Basic setting: Off
Defines the behaviour of the output on activating
the forced operation.
Defines the behaviour of the output on deactivating the forced operation. Only visible when the
priority for the forced operation is 0.
Specifies the priority for recalling and removing a
scene of type Wind alarm for the channel.
Defines the behaviour of the output on activating
the wind alarm.
Defines the behaviour of the output on deactivating the wind alarm. Only visible when the priority
for the wind alarm is 0.
Specifies the priority for recalling and removing a
scene of type Sun protection for the channel.
Defines the behaviour of the output on deactivating the sun protection. Only visible when the priority for the sun protection is 0.
Defines the behaviour of the output on deactivating the sun protection. Only visible when the priority for the sun protection is 0.
Priority, twilight 0...4
Basic setting: 0
Activate twilight
switching state
32597903 07.08.2019
J0082597903
On, Off
Basic setting: On
Specifies the priority for recalling and removing a
scene of type Twilight for the channel.
Defines the behaviour of the output on activating
the twilight function.
13 / 29
Page 14

LB management
eNet radio centre plate
Parameters Setting options, Basic
setting
Deactivate twilight switching
On, Off
Basic setting: Off
state
Invert switching
output
Minimum switching repeat time
On, Off
Basic setting: Off
100 ms ... 10 sec
Basic setting: 100 ms
Channel settings "dimming"
Parameters Setting options, Basic
setting
Switch-on brightness
1...100 %
Basic setting: 100 %
Explanations
Defines the behaviour of the output on deactivating the twilight function. Only visible when the priority for the twilight function is 0.
Inverts the switching output from NO contact
function (factory setting) to NC contact function
Limits the switching speed of the device by increasing the value, in order to protect the load,
for example. Only when the set time has elapsed
is switching possible again. The last command
during the blocking time is executed after a delay.
The switching repeat time starts after each
switching operation.
Explanations
During brief operation, the output switches on at
the set switch-on brightness. Note: If the value is
above the set maximum brightness or below the
minimum brightness, then the system will switch
to the appropriate limit value.
Minimum brightness
Maximum brightness
Dimming adjustment time
1...67 %
Basic setting: 5 %
75...100 %
Basic setting: 100 %
1…60 s
Basic setting: 4 s
Switch-on delay 0 s … 24 h
Basic setting: 0 s
Switch-off delay 0 s … 24 h
Basic setting: 0 s
Dim up ramp 0 s … 24 h
Basic setting: 0 s
Specifies the minimum settable brightness. Note:
If parameters or scene values are set to a level
lower than the minimum brightness, then the system will dim to minimum brightness.
Specifies the maximum settable brightness. Note:
If parameters or scene values are set to a level
higher than the maximum brightness, then the
system will dim to maximum brightness.
Time from minimum brightness until reaching
maximum brightness (dimming speed).
The load switches on after a delay. Repeated
switch-on commands restart the delay time. If the
load has not yet been switched on due to the
delay when a switch-off command comes, then
the load will remain off.
The load switches off after a delay. Repeated
switch-off commands restart the delay time. If the
load has not yet been switched off due to the
delay when a switch-on command comes, then
the load will remain on.
Time between switch-on and reaching switch-on
brightness. The light is switched on at minimum
brightness and then dimmed to the switch-on
brightness. Only applies to switch-on with transmitters (short operation). If scenes are recalled or
switching uses logic modules, the switch-on
brightness is approached using so-called soft
dimming (not configurable).
32597903 07.08.2019
J0082597903
14 / 29
Page 15

LB management
eNet radio centre plate
Parameters Setting options, Basic
setting
Dim down ramp 0 s … 24 h
Basic setting: 0 s
Run-on time 0 s … 24 h
Basic setting: 0 s
Use run-on time On, Off
Basic setting: Off
Explanations
Time until reaching minimum brightness. The
light is dimmed to minimum brightness and then
switched off. Only applies to switch-off with transmitters (short operation). If scenes are recalled or
switching uses logic modules, the system
switches off directly.
If a run-on time is entered and the "Use run-on
time" parameter is activated, the actuator no
longer remains permanently switched on, but
only for the duration of the run-on time entered
here or transmitted by a motion detector. The
run-on time is restarted if actuation is repeated.
A motion detector command without transmitted
run-on time (e.g. from an extension) leads to
switching on for the duration of the run-on time
entered here. If no run-on time is entered here,
the default run-on time of 2 minutes is applied.
On:
If a run-on time is configured (≠ 0 s), in addition
to motion detector commands, all switching or
dimming commands also lead to switching on for
the duration of the run-on time.
Manual switch-off
of the run-on time
Switch on to last
brightness
On, Off
Basic setting: Off
On, Off
Basic setting: Off
If no run-on time is configured (= 0 s), all switching or dimming commands result in permanent
switching of the load.
As soon as the attachment receives a motion detector command, the transmitted run-on time is
automatically entered in the "Run-on time" parameter and this then also applies to all switching
and dimming commands.
Off:
Only motion detector commands lead to switching on for the duration of the transmitted or set
run-on time. The load is permanently switched for
switching and dimming commands.
Allows manual switch-off of a running run-on
time. If the parameter is switched off, then a
switch-off command will also switch the actuator
on. Only visible if a run-on time was set.
Allows you to switch the lighting on at the same
brightness value that was used before it was last
switched off.
With the "Off" setting, the lighting is switched on
with the brightness saved in the "Switch-on
brightness" parameter.
32597903 07.08.2019
J0082597903
15 / 29
Page 16

LB management
eNet radio centre plate
Parameters Setting options, Basic
setting
Operating hours 0...65535
Basic setting: Current
value
Extended channel settings "dimming"
Parameters Setting options, Basic
setting
Operating mode Normal operation
Continuous on
Continuous off
Basic setting: Normal
Operation
Manual commissioning
On, Off
Basic setting: On
Local Operation On, Off
Basic setting: On
Behaviour on
voltage return
On
Off
Last value
Configured brightness
Basic setting: Off
Explanations
The time is counted during which the load is
switched on. This parameter can be reset to "0",
for example after exchanging the load. The Reset
button is used to reset the counter to "0". The
device must be programmed to apply the change.
Explanations
see Device and channels
Blocks manual commissioning for the device
channel. Note: In the "Off" setting, the device
cannot be reset to the factory setting.
Blocks the output for operation using the button.
Defines the behaviour of the output after voltage
return.
Brightness on
voltage return
Behaviour after
the end of the
disabling function
Manual saving of
the scene values
Switch-off warning
0...100 %
Basic setting: 100 %
On
Off
no change
Last value
Basic setting: No
change
On, Off
Basic setting: On
On, Off
Basic setting: Off
Brightness value, set by the output after voltage
return (mains voltage). The parameter "Behaviour after voltage return" must be set to "Configured brightness". Note: If the value is above
the set maximum brightness or below the minimum brightness, then the system will switch to
the appropriate limit value.
Behaviour of the output when a block is removed.
Disables the saving of the current brightness
value as scene value in an actuator for a command via a transmitter.
If the switch-off warning is active, then, during
switch-off, the system dims to minimum brightness within 30 seconds and only then switches
off. If the parameter "Dim down ramp" is configured as longer than 30 seconds, then the duration of the dim down ramp is applied. If, during
the dim down operation, another command is
given, e.g. switch on or scene recall, then the
switch-off warning stops and the command is executed. A switch-off command restarts the time
for the switch-off warning.
32597903 07.08.2019
J0082597903
16 / 29
Page 17

LB management
eNet radio centre plate
Parameters Setting options, Basic
setting
Priority, lock-out
protection
Activate lock-out
protection bright-
0...4
Basic setting: 1
0…100 %
Basic setting: 0 %
ness value
Deactivate lockout protection
0…100 %
Basic setting: 0 %
brightness value
Priority, restraint 0...4
Basic setting: 2
Activate forced
operation bright-
0…100 %
Basic setting: 100 %
ness value
Deactivate forced
operation bright-
0…100 %
Basic setting: 0 %
ness value
Priority, wind
alarm
0...4
Basic setting: 3
Explanations
Specifies the priority for recalling and removing a
scene of type Lock-out protection for the channel.
Note: 1 is the highest priority and 4 the lowest. 0
means no priority.
Defines the behaviour of the output on activating
the lock-out protection.
Defines the behaviour of the output on deactivating the lock-out protection. Only visible when the
priority for the lock-out protection is 0.
Specifies the priority for recalling and removing a
scene of type Restraint for the channel.
Defines the behaviour of the output on activating
the forced operation.
Defines the behaviour of the output on deactivating the forced operation. Only visible when the
priority for the forced operation is 0.
Specifies the priority for recalling and removing a
scene of Wind alarm type for the channel.
Activate wind
alarm brightness
0…100 %
Basic setting: 0 %
value
Deactivate wind
alarm brightness
0…100 %
Basic setting: 0 %
value
Priority, sun protection
Activate sun protection brightness
0...4
Basic setting: 0
0…100 %
Basic setting: 100 %
value
Deactivate sun
protection bright-
0…100 %
Basic setting: 0 %
ness value
Priority, twilight 0...4
Basic setting: 0
Activate twilight
brightness value
Deactivate twilight brightness
0…100 %
Basic setting: 100 %
0…100 %
Basic setting: 0 %
value
Defines the behaviour of the output on activating
the wind alarm.
Defines the behaviour of the output on deactivating the wind alarm. Only visible when the priority
for the wind alarm is 0.
Specifies the priority for recalling and removing a
scene of type Sun protection for the channel.
Defines the behaviour of the output on activating
the sun protection.
Defines the behaviour of the output on deactivating the sun protection. Only visible when the priority for the sun protection is 0.
Specifies the priority for recalling and removing a
scene of type Twilight for the channel.
Defines the behaviour of the output on activating
the twilight function.
Defines the behaviour of the output on deactivating the twilight function. Only visible when the priority for the twilight function is 0.
Basic light function
Hotel function, Off
Basic setting: Off
If the hotel function is activated, the system will
dim to "Hotel function brightness" when a switchoff command is made. Switch-off is only possible
with a forced position command. Note: If the minimum brightness is set to greater than "Hotel
32597903 07.08.2019
J0082597903
17 / 29
Page 18

LB management
eNet radio centre plate
Parameters Setting options, Basic
setting
Brightness hotel
function
0.4 ... 100 %
Basic setting: 20 %
Channel settings "3-wire extension"
Parameters Setting options, Basic
setting
Switch-on delay 0 s … 24 h
Basic setting: 0 s
Switch-off delay 0 s … 24 h
Basic setting: 0 s
Explanations
function brightness", then the system dims to the
set minimum brightness when the hotel function
is activated.
Brightness to which the light is switched when the
hotel function is activated, if switched off. The
percentage value refers to the maximum brightness.
Explanations
The load switches on after a delay. Repeated
switch-on commands restart the delay time. If the
load has not yet been switched on due to the
delay when a switch-off command comes, then
the load will remain off.
The load switches off after a delay. Repeated
switch-off commands restart the delay time. If the
load has not yet been switched off due to the
delay when a switch-on command comes, then
the load will remain on.
Extended channel settings "3-wire extension"
Parameters Setting options, Basic
setting
Operating mode Normal operation
Continuous on
Continuous off
Basic setting: Normal
Operation
Manual commissioning
On, Off
Basic setting: On
Local Operation On, Off
Basic setting: On
Channel settings "Venetian blind"
Parameters Setting options, Basic
setting
Venetian blind
ventilation posi-
0 ... 100 %
Basic setting: 0 %
tion
Slats ventilation
position
0 ... 100 %
Basic setting: 0 %
Explanations
See Device and channels.
Blocks manual commissioning for the device
channel. In the "Off" setting, the device cannot be
reset to the factory setting.
Blocks the output for operation using the button.
Explanations
Position, in which the curtain stops as a ventilation position when moving down.
Slat position set by a Venetian blind in the ventilation position.
Operating hours,Up0...65535
Basic setting: Current
value
The time is counted during which the load is
switched on (relay contact closed). This parameter can be reset to "0", for example after exchanging the load.
32597903 07.08.2019
J0082597903
18 / 29
Page 19

LB management
eNet radio centre plate
Parameters Setting options, Basic
setting
Operating hours,
Down
0...65535
Basic setting: Current
value
Extended channel settings "Venetian blind"
Parameters Setting options, Basic
setting
Operating mode Roller shutter
Venetian blind
Awning
Basic setting: Roller
shutter
Manual commissioning
On, Off
Basic setting: On
Explanations
The Reset button is used to reset the counter to
"0". The device must be programmed to apply the
change.
The time is counted during which the load is
switched on (relay contact closed). This parameter can be reset to "0", for example after exchanging the load.
The Reset button is used to reset the counter to
"0". The device must be programmed to apply the
change.
Explanations
See Device and channels.
Blocks manual commissioning for the device
channel. In the "Off" setting, the device cannot be
reset to the factory setting.
Local Operation On, Off
Basic setting: On
Running time 1 ... 600 sec
Basic setting: 120 s
Slat change-over
time/fabricstretching time
0 ms ... 10 sec
300 ms … 10 s
Basic setting: 0 ms / 300
ms
Minimum
change-over-time
Invert movement
direction
Behaviour on
voltage return
300 ms ... 10 sec
Basic setting: 1 s
On, Off
Basic setting: Off
No change
Configured value
Basic setting: No
change
Configured venetian blind position
0 ... 100 %
Basic setting: 0 %
Blocks the output for operation using the button.
Absolute time which the blind/shutter requires
from the top to the bottom end position. The entry
is essential if scene or position movements are to
occur.
Absolute time for changing-over Venetian blind
slats. The fabric stretching time can also be set
here for the Awning operating mode.
Minimum interruption time when changing directions. Increasing the minimum change-over time
will cause less wear on the motors.
Inverts the activation of the relay outputs. During
inverted operation, the relay outputs "Up" and
"Down" should be activated in reverse. This is required, for example, for controlling skylights.
Defines the behaviour of the output after voltage
return. RMD design: Bus voltage return.
If the "Configured position" value is entered for
the parameter "Behaviour after voltage return",
then the blind/shutter position set here is approached.
Configured slat
position
0 ... 100 % basic setting:
0 %
If the "Configured position" value is entered for
the parameter "Behaviour after voltage return",
then the slat position set here is approached.
32597903 07.08.2019
J0082597903
19 / 29
Page 20

LB management
eNet radio centre plate
Parameters Setting options, Basic
setting
Behaviour after
the end of the
disabling function
no change
Last value
Down
up
Basic setting: No
change
Manual saving of
the scene values
Disable wind
alarm via exten-
On, Off
Basic setting: On
On, Off
Basic setting: Off
sion
Priority, lock-out
protection
Activate lock-out
protection blind
0...4
Basic setting: 1
0 ... 100 %
Basic setting: 0 %
position
Explanations
Behaviour of the output when a block is removed.
Disables the saving of the current Venetian blind
position as scene value in an actuator for a command via a transmitter.
If the function is switched on, the UP signal no
longer has increased priority via an extension
and can be stopped via local control or radio control.
Note: In order to be able to use the wind alarm
function via the extension, this function must be
switched on.
Specifies the priority for recalling and removing a
scene of type Lock-out protection for the channel.
Defines the behaviour of the output on activating
the lock-out protection.
Activate lock-out
protection slat
0 ... 100 %
Basic setting: 0 %
position
Deactivate lockout protection
0 ... 100 %
Basic setting: 0 %
blind position
Deacitvate lockout protection slat
0 ... 100 %
Basic setting: 0 %
position
Priority, restraint 0...4
Basic setting: 2
Activate force operation blind posi-
0 ... 100 %
Basic setting: 0 %
tion
Recall forced operation slat posi-
0 ... 100 %
Basic setting: 0 %
tion
Deactivate force
operation blind
0 ... 100 %
Basic setting: 0 %
position
Defines the slat position of the output on activating the lock-out protection. Only visible when the
Venetian blind operating mode is set.
Defines the behaviour of the output on deactivating the lock-out protection. Only visible when the
priority for the lock-out protection is 0.
Defines the behaviour of the output on deactivating the lock-out protection. Only visible when the
priority for the lock-out protection is 0 and the
Venetian blind operating mode is set.
Specifies the priority for recalling and removing a
scene of type Restraint for the channel.
Defines the behaviour of the output on activating
the forced operation.
Defines the slat position of the output on activating forced operation. Only visible when the Venetian blind operating mode is set.
Defines the behaviour of the output on deactivating the forced operation. Only visible when the
priority for the forced operation is 0.
Deacitvate forced
operation slat position
0 ... 100 %
Basic setting: 0 %
Defines the slat position of the output on deactivating forced operation. Only visible when the priority for the forced operation is 0 and the Venetian blind operating mode is set.
Priority, wind
alarm
32597903 07.08.2019
J0082597903
0...4
Basic setting: 3
Specifies the priority for recalling and removing a
scene of type Wind alarm for the channel.
20 / 29
Page 21

LB management
eNet radio centre plate
Parameters Setting options, Basic
setting
Activate wind
alarm blind posi-
0 ... 100 %
Basic setting: 0 %
tion
Recall wind alarm
slat position
Deactivate wind
alarm blind posi-
0 ... 100 %
Basic setting: 0 %
0 ... 100 %
Basic setting: 0 %
tion
Deacitvate wind
alarm slat posi-
0 ... 100 %
Basic setting: 0 %
tion
Priority, sun protection
Activate sun protection blind posi-
0...4
Basic setting: 0
0 ... 100 %
Basic setting: 100 %
tion
Recall sun protection slat posi-
0 ... 100 %
Basic setting: 100 %
tion
Explanations
Defines the behaviour of the output on activating
the wind alarm.
Defines the slat position of the output on activating the wind alarm. Only visible when the Venetian blind operating mode is set.
Defines the behaviour of the output on deactivating the wind alarm. Only visible when the priority
for the wind alarm is 0.
Defines the slat position of the output on deactivating the wind alarm. Only visible when the priority for the wind alarm is 0 and the Venetian blind
operating mode is set.
Specifies the priority for recalling and removing a
scene of type Sun protection for the channel.
Defines the behaviour of the output on activating
the sun protection.
Defines the slat position of the output on activating the sun protection. Only visible when the
Venetian blind operating mode is set.
Deactivate sun
protection blind
0 ... 100 %
Basic setting: 0 %
position
Deacitvate sun
protection slat
0 ... 100 %
Basic setting: 0 %
position
Priority, twilight 0...4
Basic setting: 0
Activate twilight
blind position
Activate twilight
slat position
Deactivate twilight blind posi-
0 ... 100 %
Basic setting: 100 %
0 ... 100 %
Basic setting: 100 %
0 ... 100 %
Basic setting: 0 %
tion
Defines the behaviour of the output on deactivating the sun protection. Only visible when the priority for the sun protection is 0.
Defines the slat position of the output on deactivating the sun protection. Only visible when the
priority for the sun protection is 0 and the Venetian blind operating mode is set.
Specifies the priority for recalling and removing a
scene of type Twilight for the channel.
Defines the behaviour of the output on activating
the twilight function.
Defines the slat position of the output on activating the twilight function. Only visible when the
Venetian blind operating mode is set.
Defines the behaviour of the output on deactivating the twilight function. Only visible when the priority for the twilight function is 0.
32597903 07.08.2019
J0082597903
21 / 29
Page 22

LB management
eNet radio centre plate
Parameters Setting options, Basic
setting
Deacitvate twilight slat position
0 ... 100 %
Basic setting: 0 %
Channel settings "Switching + fan"
Parameters Setting options, Basic
setting
Switch-off delay 0 s … 24 h
Basic setting: 0 s
Run-on time 0 s … 24 h
Basic setting: 0 s
Explanations
Defines the slat position of the output on deactivating the twilight function. Only visible when the
priority for the twilight function is 0 and the Venetian blind operating mode is set.
Explanations
The load switches off after a delay. Repeated
switch-off commands restart the delay time. If the
load has not yet been switched off due to the
delay when a switch-on command comes, then
the load will remain on.
If a run-on time is entered and the "Use run-on
time" parameter is activated, the actuator no
longer remains permanently switched on, but
only for the duration of the run-on time entered
here or transmitted by a motion detector. The
run-on time is restarted if actuation is repeated.
A motion detector command without transmitted
run-on time (e.g. from an extension) leads to
switching on for the duration of the run-on time
entered here. If no run-on time is entered here,
the default run-on time of 2 minutes is applied.
Use run-on time On, Off
Basic setting: Off
Manual switch-off
of the run-on time
On, Off
Basic setting: Off
On:
If a run-on time is configured (≠ 0 s), in addition
to motion detector commands, all switching or
dimming commands also lead to switching on for
the duration of the run-on time.
If no run-on time is configured (= 0 s), all switching or dimming commands result in permanent
switching of the load.
As soon as the attachment receives a motion detector command, the transmitted run-on time is
automatically entered in the "Run-on time" parameter and this then also applies to all switching
and dimming commands.
Off:
Only motion detector commands lead to switching on for the duration of the transmitted or set
run-on time. The load is permanently switched for
switching and dimming commands.
Allows manual switch-off of a running run-on
time. If the parameter is switched off, then a
switch-off command will also switch the actuator
on. Only visible if a run-on time was set.
Switch off switchon delay,
output 2
On, Off
Basic setting: On
With 2-channel inserts, this allows you to switch
off the switch-on delay of output 2. If this is
switched off, output 2 is simultaneously switched
on with output 1.
32597903 07.08.2019
J0082597903
22 / 29
Page 23

LB management
eNet radio centre plate
Parameters Setting options, Basic
setting
Switch-on delay,
output 2
Switch-off delay,
output 2
Operating hours,
output 1
0 s … 24 h
Basic setting: 2 min
0 s … 24 h
Basic setting: 5 min
0...65535
Basic setting: Current
value
Operating hours,
output 2
0...65535
Basic setting: Current
value
Extended channel settings "Switching + fan"
Parameters Setting options, Basic
setting
Explanations
Switch-on delay for output 2 of a 2-channel insert, e.g. for fan control in sanitary facilities.
Switch-off delay for output 2 of a 2-channel insert, e.g. for fan control in sanitary facilities.
The time is counted during which the load is
switched on (relay contact closed). This parameter can be reset to "0", for example after exchanging the load. The Reset button is used to
reset the counter to "0". The device must be programmed to apply the change.
The time is counted during which the load is
switched on (relay contact closed). This parameter can be reset to "0", for example after exchanging the load. The Reset button is used to
reset the counter to "0". The device must be programmed to apply the change.
Explanations
Operating mode Switching operation
Push-button operation
Flashing
Continuous on
Continuous off
Basic setting: Switching
operation
Manual commissioning
On, Off
Basic setting: On
Local Operation On, Off
Basic setting: On
Behaviour on
voltage return
On
Off
Last value
Basic setting: Off
Timer behaviour,
voltage return
Off
Restart
Basic setting: Off
Behaviour after
the end of the
disabling function
On
Off
no change
Last value
Basic setting: No
change
See Device and channels.
Blocks manual commissioning for the device
channel. In the "Off" setting, the device cannot be
reset to the factory setting.
Blocks the output for operation using the button.
Defines the behaviour of the output after voltage
return.
Specifies whether an active switch-on delay,
switch-off delay or run-on time remains off or restarts after voltage return. Directly connected to
the parameters "Switch-on delay", "Switch-off
delay" and "Run-on time".
Behaviour of the output when a block is removed.
Manual saving of
the scene values
On, Off
Basic setting: On
Disables the saving of the current actuator state
(On/Off) as scene value in an actuator for a command via a transmitter.
32597903 07.08.2019
J0082597903
23 / 29
Page 24

LB management
eNet radio centre plate
Parameters Setting options, Basic
setting
Switch-off warning
Priority, lock-out
protection
Activate lock-out
protection switch-
On, Off
Basic setting: Off
0...4
Basic setting: 1
On, Off
Basic setting: Off
ing state
Deactivate lockout protection
On, Off
Basic setting: Off
switching state
Priority, restraint 0...4
Basic setting: 2
Activate forced
operation switch-
On, Off
Basic setting: On
ing state
Explanations
If the switch-off warning is active, the light is not
switched off directly. The light briefly goes off 30,
20 and 10 seconds before permanent switch-off.
During the switch-off warning, a switch-on command activates direct switch-on. It is not possible
to terminate the time by using a switch-off command.
Specifies the priority for recalling and removing a
scene of type Lock-out protection for the channel.
Defines the behaviour of the output on activating
the lock-out protection.
Defines the behaviour of the output on deactivating the lock-out protection. Only visible when the
priority for the lock-out protection is 0.
Specifies the priority for recalling and removing a
scene of type Restraint for the channel.
Defines the behaviour of the output on activating
the forced operation.
Deactivate forced
operation switch-
On, Off
Basic setting: Off
ing state
Priority, wind
alarm
Activate wind
alarm switching
0...4
Basic setting: 3
On, Off
Basic setting: Off
state
Deactivate wind
alarm switching
On, Off
Basic setting: Off
state
Priority, sun protection
Activate sun protection switching
0...4
Basic setting: 0
On, Off
Basic setting: On
state
Deactivate sun
protection switch-
On, Off
Basic setting: Off
ing state
Priority, twilight 0...4
Basic setting: 0
Defines the behaviour of the output on deactivating the forced operation. Only visible when the
priority for the forced operation is 0.
Specifies the priority for recalling and removing a
scene of type Wind alarm for the channel.
Defines the behaviour of the output on activating
the wind alarm.
Defines the behaviour of the output on deactivating the wind alarm. Only visible when the priority
for the wind alarm is 0.
Specifies the priority for recalling and removing a
scene of type Sun protection for the channel.
Defines the behaviour of the output on deactivating the sun protection. Only visible when the priority for the sun protection is 0.
Defines the behaviour of the output on deactivating the sun protection. Only visible when the priority for the sun protection is 0.
Specifies the priority for recalling and removing a
scene of type Twilight for the channel.
Activate twilight
switching state
Deactivate twilight switching
state
Invert switching
output
32597903 07.08.2019
J0082597903
On, Off
Basic setting: On
On, Off
Basic setting: Off
On, Off
Basic setting: Off
Defines the behaviour of the output on activating
the twilight function.
Defines the behaviour of the output on deactivating the twilight function. Only visible when the priority for the twilight function is 0.
Inverts the switching output from NO contact
function (factory setting) to NC contact function
24 / 29
Page 25

LB management
eNet radio centre plate
Parameters Setting options, Basic
setting
Minimum switching repeat time
100 ms ... 10 sec
Basic setting: 100 ms
Channel settings "2-wire switching"
Parameters Setting options, Basic
setting
Switch-on delay 0 s … 24 h
Basic setting: 0 s
Switch-off delay 0 s … 24 h
Basic setting: 0 s
Explanations
Limits the switching speed of the device by increasing the value, in order to protect the load,
for example. Only when the set time has elapsed
is switching possible again. The last command
during the blocking time is executed after a delay.
The switching repeat time starts after each
switching operation.
Explanations
The load switches on after a delay. Repeated
switch-on commands restart the delay time. If the
load has not yet been switched on due to the
delay when a switch-off command comes, then
the load will remain off.
The load switches off after a delay. Repeated
switch-off commands restart the delay time. If the
load has not yet been switched off due to the
delay when a switch-on command comes, then
the load will remain on.
Run-on time 0 s … 24 h
Basic setting: 0 s
Use run-on time On, Off
Basic setting: Off
If a run-on time is entered and the "Use run-on
time" parameter is activated, the actuator no
longer remains permanently switched on, but
only for the duration of the run-on time entered
here or transmitted by a motion detector. The
run-on time is restarted if actuation is repeated.
A motion detector command without transmitted
run-on time (e.g. from an extension) leads to
switching on for the duration of the run-on time
entered here. If no run-on time is entered here,
the default run-on time of 2 minutes is applied.
On:
If a run-on time is configured (≠ 0 s), in addition
to motion detector commands, all switching or
dimming commands also lead to switching on for
the duration of the run-on time.
If no run-on time is configured (= 0 s), all switching or dimming commands result in permanent
switching of the load.
As soon as the attachment receives a motion detector command, the transmitted run-on time is
automatically entered in the "Run-on time" parameter and this then also applies to all switching
and dimming commands.
Off:
Only motion detector commands lead to switching on for the duration of the transmitted or set
run-on time. The load is permanently switched for
switching and dimming commands.
32597903 07.08.2019
J0082597903
25 / 29
Page 26

LB management
eNet radio centre plate
Parameters Setting options, Basic
setting
Manual switch-off
of the run-on time
On, Off
Basic setting: Off
Operating hours 0...65535
Basic setting: Current
value
Extended channel settings "2-wire switching"
Operating mode Switching operation
Push-button operation
Flashing
Continuous on
Continuous off
Basic setting: Switching
operation
Manual commissioning
On, Off
Basic setting: On
Explanations
Allows manual switch-off of a running run-on
time. If the parameter is switched off, then a
switch-off command will also switch the actuator
on. Only visible if a run-on time was set.
The time is counted during which the load is
switched on (relay contact closed). This parameter can be reset to "0", for example after exchanging the load. The Reset button is used to
reset the counter to "0". The device must be programmed to apply the change.
See Device and channels.
Blocks manual commissioning for the device
channel. In the "Off" setting, the device cannot be
reset to the factory setting.
Local Operation On, Off
Basic setting: On
Behaviour on
voltage return
On
Off
Last value
Basic setting: Off
Timer behaviour,
voltage return
Off
Restart
Basic setting: Off
Behaviour after
the end of the
disabling function
On
Off
no change
Last value
Basic setting: No
change
Manual saving of
the scene values
Switch-off warning
On, Off
Basic setting: On
On, Off
Basic setting: Off
Blocks the output for operation using the button.
Defines the behaviour of the output after voltage
return.
Specifies whether an active switch-on delay,
switch-off delay or run-on time remains off or restarts after voltage return. Directly connected to
the parameters "Switch-on delay", "Switch-off
delay" and "Run-on time".
Behaviour of the output when a block is removed.
Disables the saving of the current actuator state
(On/Off) as scene value in an actuator for a command via a transmitter.
If the switch-off warning is active, the light is not
switched off directly. The light briefly goes off 30,
20 and 10 seconds before permanent switch-off.
During the switch-off warning, a switch-on command activates direct switch-on. It is not possible
to terminate the time by using a switch-off command.
Priority, lock-out
protection
32597903 07.08.2019
J0082597903
0...4
Basic setting: 1
Specifies the priority for recalling and removing a
scene of type Lock-out protection for the channel.
26 / 29
Page 27

LB management
eNet radio centre plate
Activate lock-out
protection switch-
On, Off
Basic setting: Off
ing state
Deactivate lockout protection
On, Off
Basic setting: Off
switching state
Priority, restraint 0...4
Basic setting: 2
Activate forced
operation switch-
On, Off
Basic setting: On
ing state
Deactivate forced
operation switch-
On, Off
Basic setting: Off
ing state
Priority, wind
alarm
Activate wind
alarm switching
0...4
Basic setting: 3
On, Off
Basic setting: Off
state
Deactivate wind
alarm switching
On, Off
Basic setting: Off
state
Defines the behaviour of the output on activating
the lock-out protection.
Defines the behaviour of the output on deactivating the lock-out protection. Only visible when the
priority for the lock-out protection is 0.
Specifies the priority for recalling and removing a
scene of type Restraint for the channel.
Defines the behaviour of the output on activating
the forced operation.
Defines the behaviour of the output on deactivating the forced operation. Only visible when the
priority for the forced operation is 0.
Specifies the priority for recalling and removing a
scene of type Wind alarm for the channel.
Defines the behaviour of the output on activating
the wind alarm.
Defines the behaviour of the output on deactivating the wind alarm. Only visible when the priority
for the wind alarm is 0.
Priority, sun protection
Activate sun protection switching
0...4
Basic setting: 0
On, Off
Basic setting: On
state
Deactivate sun
protection switch-
On, Off
Basic setting: Off
ing state
Priority, twilight 0...4
Basic setting: 0
Activate twilight
switching state
Deactivate twilight switching
On, Off
Basic setting: On
On, Off
Basic setting: Off
state
Invert switching
output
Minimum switching repeat time
On, Off
Basic setting: Off
100 ms ... 10 sec
Basic setting: 100 ms
Specifies the priority for recalling and removing a
scene of type Sun protection for the channel.
Defines the behaviour of the output on deactivating the sun protection. Only visible when the priority for the sun protection is 0.
Defines the behaviour of the output on deactivating the sun protection. Only visible when the priority for the sun protection is 0.
Specifies the priority for recalling and removing a
scene of type Twilight for the channel.
Defines the behaviour of the output on activating
the twilight function.
Defines the behaviour of the output on deactivating the twilight function. Only visible when the priority for the twilight function is 0.
Inverts the switching output from NO contact
function (factory setting) to NC contact function
Limits the switching speed of the device by increasing the value, in order to protect the load,
for example. Only when the set time has elapsed
is switching possible again. The last command
during the blocking time is executed after a delay.
The switching repeat time starts after each
switching operation.
32597903 07.08.2019
J0082597903
27 / 29
Page 28

LB management
eNet radio centre plate
Information window
During channel selection in the Information window, the following settings can be made or values displayed.
"Switching"
Display value Explanations
Load state The load can be switched on or off.
Restraint Display of forced position status.
Local disabling function Shows whether the disabling function has been activated on the
attachment
Operating hours Display of the operating hours since the last restart in the
Settings
window.
"Dimming"
Display value Explanations
Dim brightness value The load can be dimmed using the slider or a brightness value
entry. Only when "Function" is set to "Light (Dimming)".
Load state The load can be switched on or off.
Restraint Display of forced position status.
Local disabling function Shows whether the disabling function has been activated on the
attachment
Operating hours Display of the operating hours since the last restart in the
Settings
window.
"Venetian blind"
Display value Explanations
Position value, venetian
The position value of the Venetian blind can be changed.
blind
Position value, slat The position value of the slat can be changed.
Restraint Display of forced position status.
Lock-out protection Display of the lock-out protection status
Operating hours UP Display of the operating hours in the UP direction since the last
restart in the
Settings
window.
Operating hours DOWN Display of the operating hours in the DOWN direction since the
last restart in the
Settings
window.
"2-wire switching", "Switching + fan"
Display value Explanations
Load state The load can be switched on or off.
Restraint Display of forced position status.
Local disabling function Shows whether the disabling function has been activated on the
attachment
Operating hours Display of the operating hours since the last restart in the
Settings
window.
32597903 07.08.2019
J0082597903
28 / 29
Page 29

LB management
eNet radio centre plate
Display value Explanations
Operating hours Fan channel
Display of the operating hours since the last restart in the
window.
Settings
Only displayed if the fan channel has been configured.
13 Conformity
Albrecht Jung GmbH & Co. KG hereby declares that the radio system type art. no. FM..1701..
meets the directive 2014/53/EU. You can find the full article number on the device. The complete text of the EU Declaration of Conformity is available under the Internet address:
www.jung.de/ce
14 Warranty
The warranty is provided in accordance with statutory requirements via the specialist trade.
ALBRECHT JUNG GMBH & CO. KG
Volmestraße 1
58579 Schalksmühle
GERMANY
Telefon: +49 2355 806-0
Telefax: +49 2355 806-204
kundencenter@jung.de
www.jung.de
32597903 07.08.2019
J0082597903
29 / 29
 Loading...