

Page 1
User Guide
Manual
del usuario
Page 2
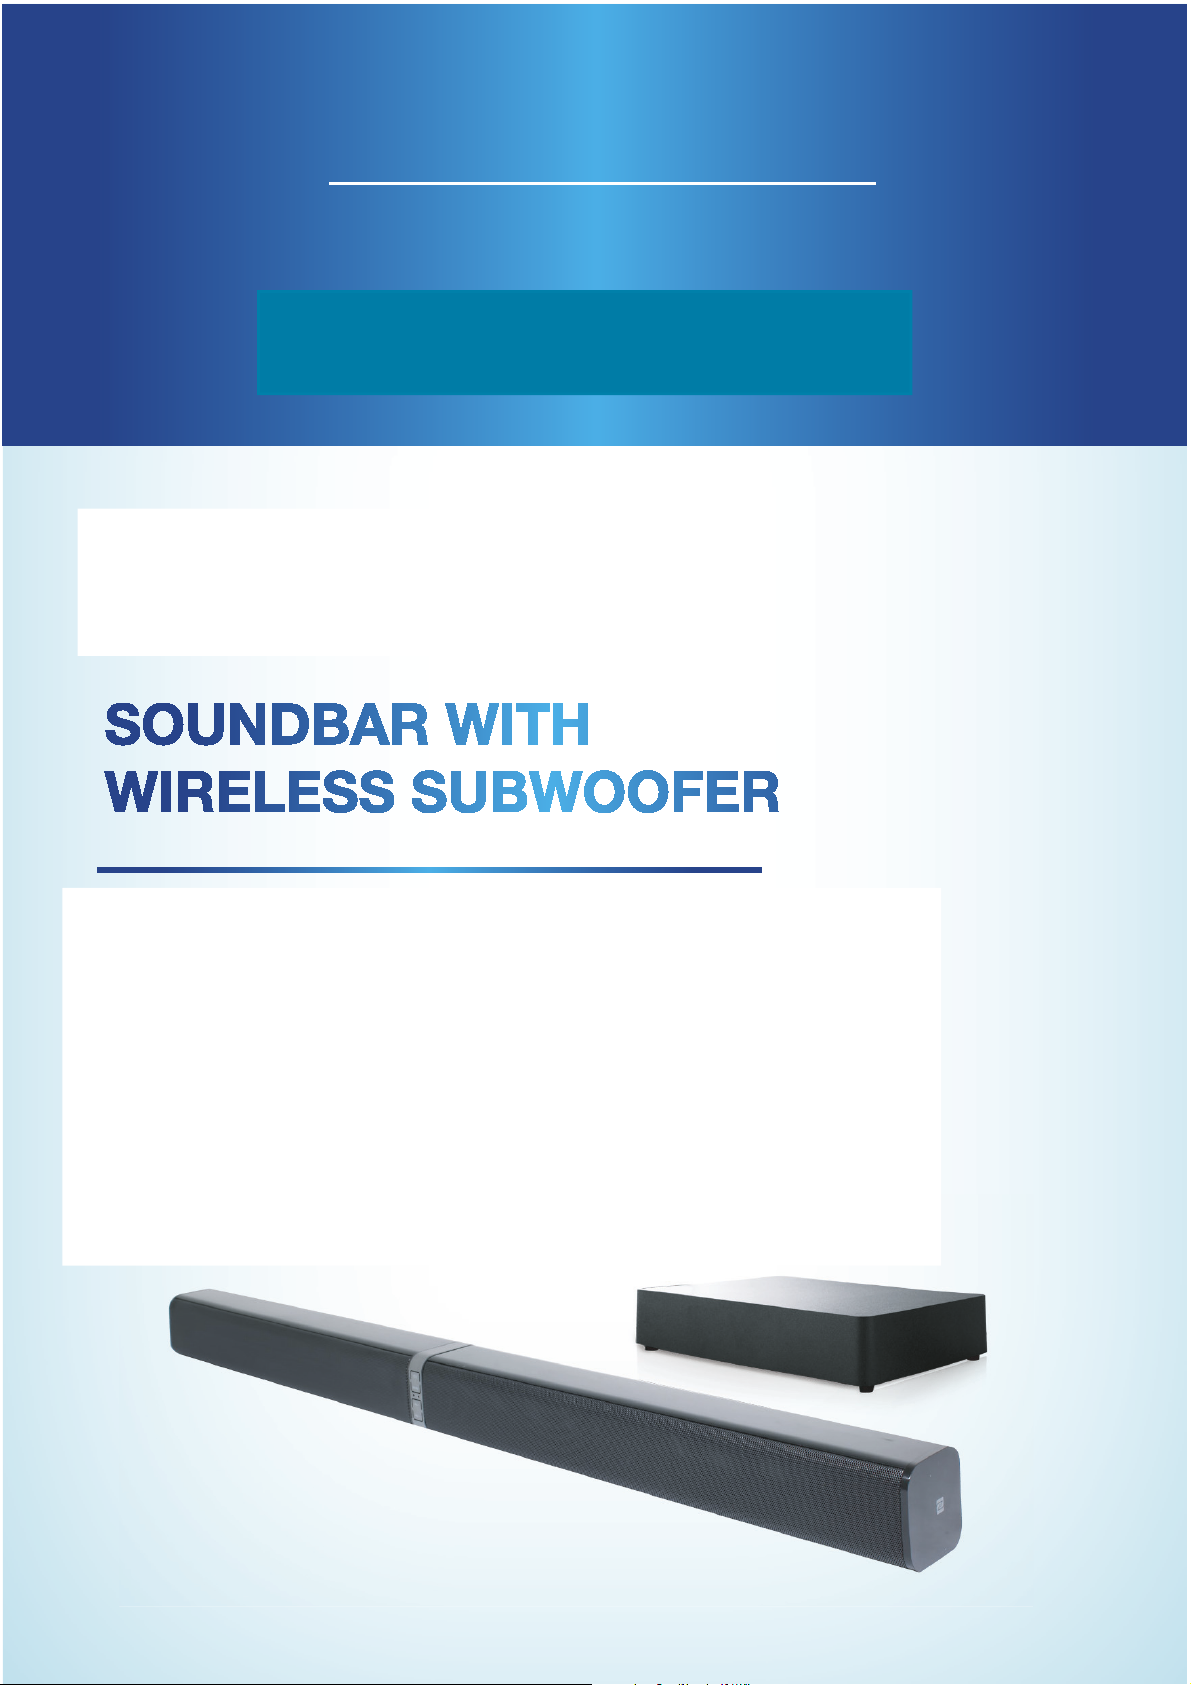
Soundbar with Wireless Subwoofer
Remote Control
Remote Control
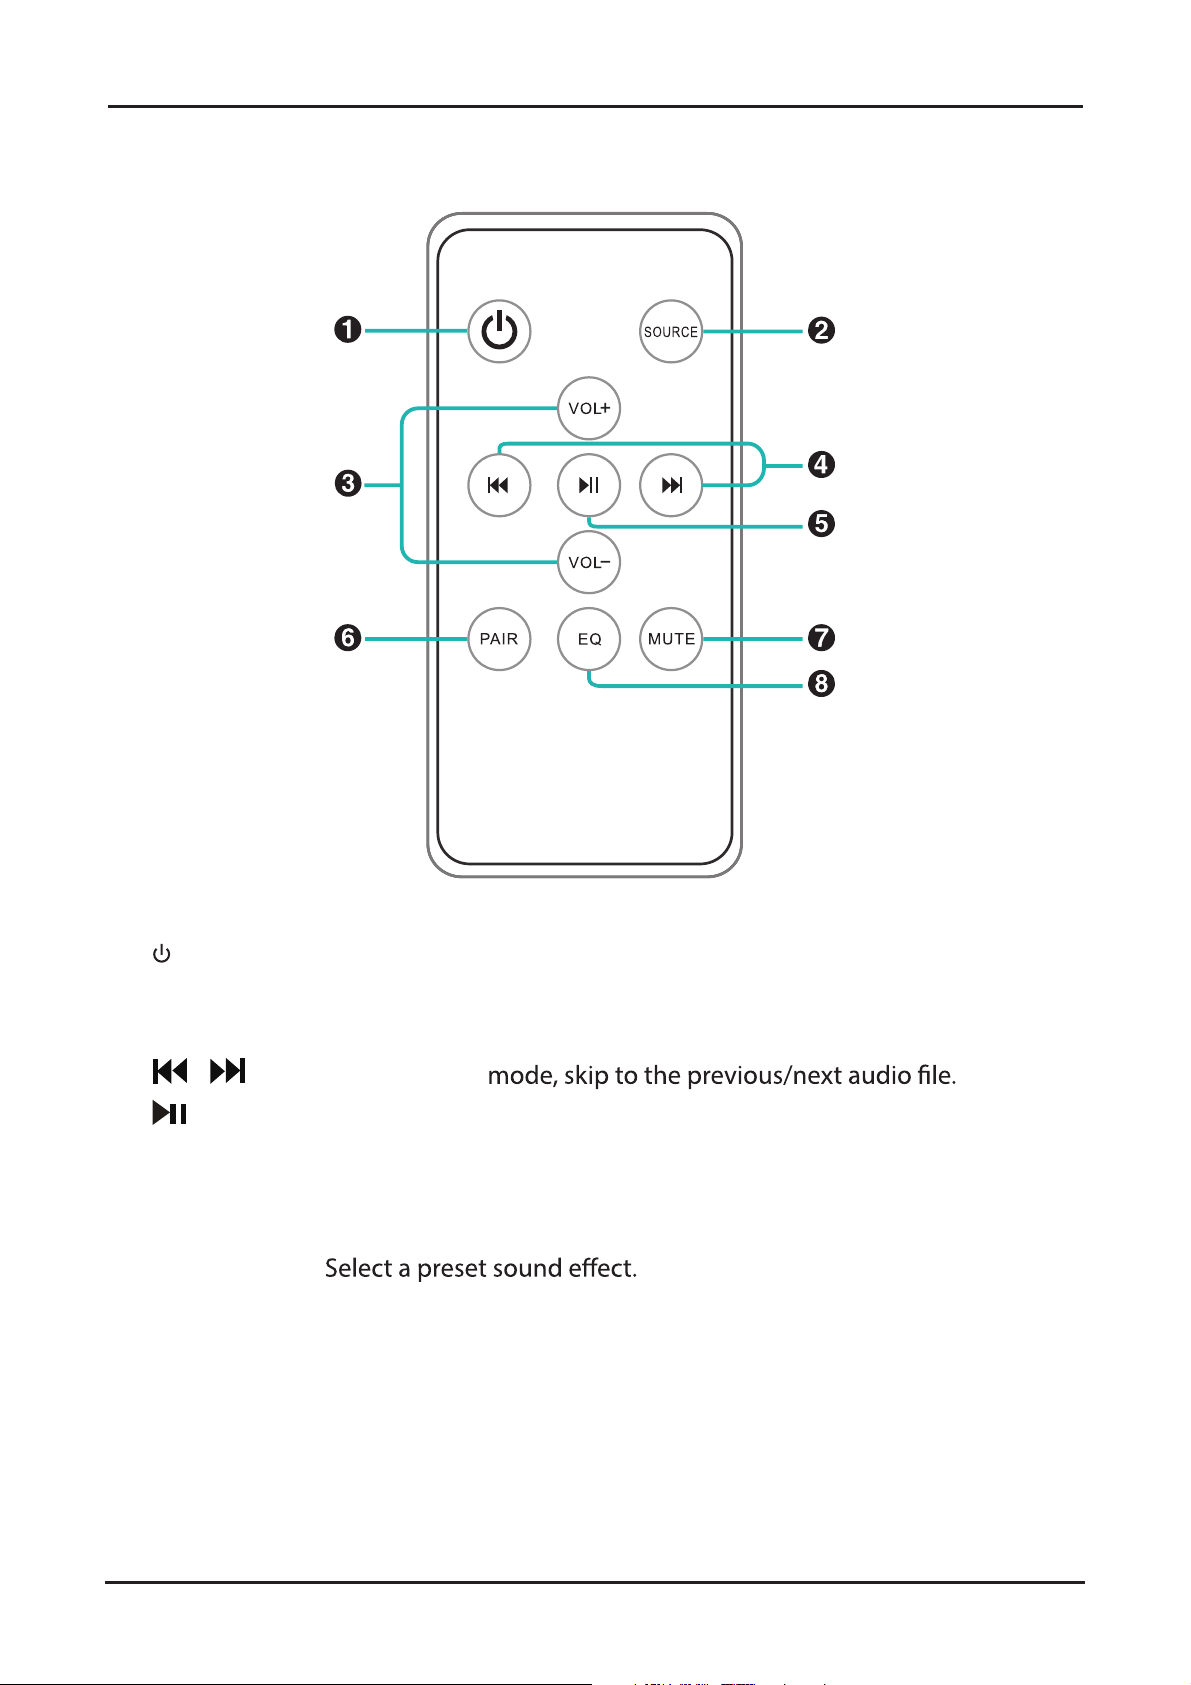
1 POWER: Switch the unit between on and standby mode.
2 SOURCE: Select the play function.
3 VOL+ / VOL-: Increase/decrease the volume level.
4 / : In Bluetooth
®
5 : In Bluetooth® mode, start or pause playback.
6 PAIR: In Bluetooth
the existing paired Bluetooth
®
mode, activate the pairing function and disconnect
®
device.
7 MUTE: Mute or resume the sound.
8 EQ:
6
866-235-5029
Page 3
Remote Control
Soundbar with Wireless Subwoofer
Remote Control (Cont.)
Remote Control Battery
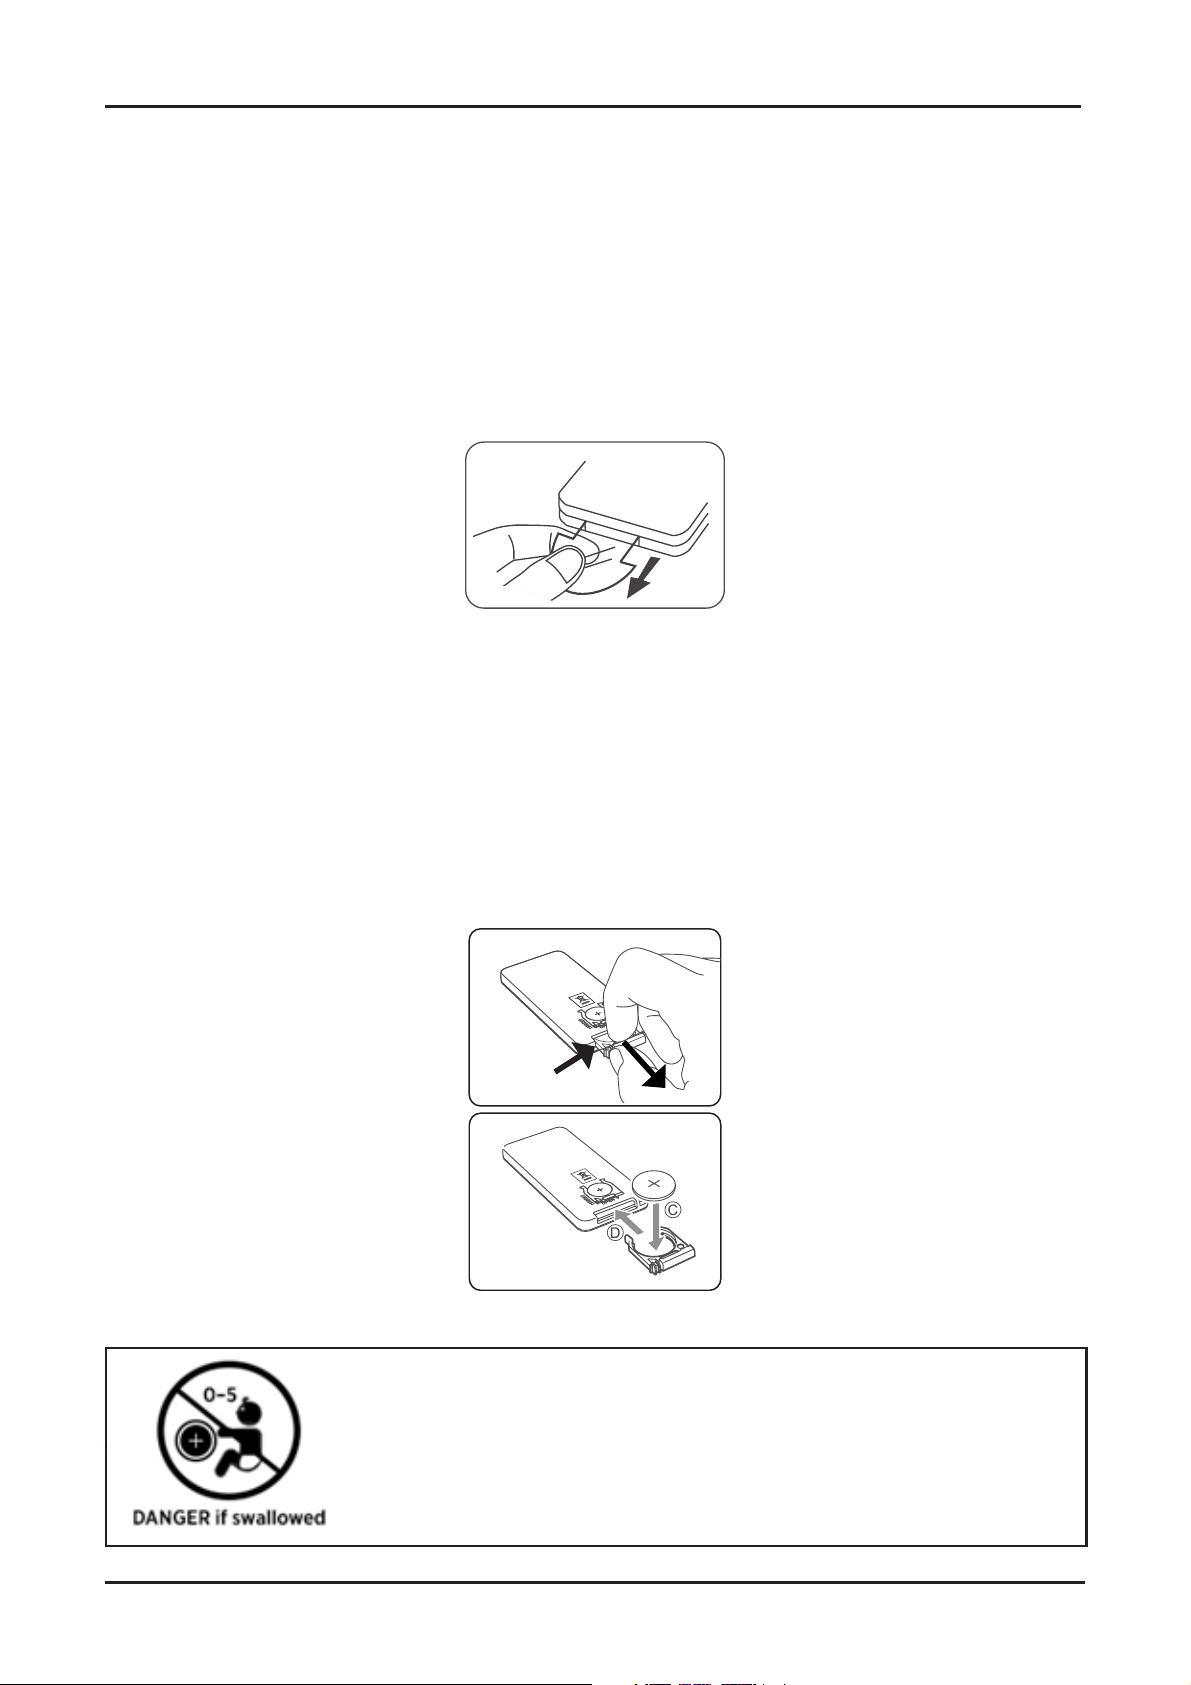
The remote control comes with a CR2025 3V button cell battery pre-installed.
First Time Use
• To activate the battery and use the remote control, pull out the plastic tab that
separates the battery from the contacts inside the compartment.
Battery Replacement
• If the remote control unit is no longer working even when it is operated near the
soundbar, you will need to replace the battery with a new battery of the same type.
• Push in the tab and pull out the battery tray. Remove the old battery.
• Insert a fresh CR2025 battery with the (+) marking facing upwards. Then push the
battery tray with the battery back into the slot.
866-235-5029
WARNING!
Keep batteries out of reach of children. Swallowing may lead to
serious injury or death in as little as 2 hours due to internal burns.
If swallowed, go straight to a hospital emergency room.
Dispose of used batteries immediately.
7
Page 4

Soundbar with Wireless Subwoofer
Remote Control
Remote Control (Cont.)
Using the Remote Control
• The remote control has a range of up to 6 metres from the soundbar. Point the
remote control directly towards the sensor at the front of the soundbar.
• Make sure no obstacles are blocking its path. The remote control will not operate if
its path is blocked.
• Handle the remote control with care. Do not drop, apply shock or step on the remote
control. Do not spill water on the unit.
• Do not use the remote control while simultaneously operating a remote control
unit of any another unit, which may result in interference.
• If the remote control is operated near other products which generate infra-red rays,
or if other remote control devices using infra-red rays are used near the unit, it may
operate incorrectly. Conversely, the other products may operate incorrectly.
• If you do not intend to use the remote control for an extended period of time
(more than a month), remove the battery to prevent possible damage from battery
leakage and corrosion.
Battery Precautions
• Do not use any other battery than the ones specied.
• Danger of explosion if battery is incorrectly replaced. Replace only with the same or
equivalent type.
• Do not carry or store batteries with other metallic objects. Doing so could cause
batteries to short-circuit, leak or explode.
• Do not expose the battery to excessive heat such as sunshine, re or the like.
• Do not attempt to short-circuit, disassemble or throw batteries into a re.
• Never recharge a battery unless it is conrmed to be a rechargeable type.
• Dispose of batteries promptly and properly, observing any local hazardous waste
regulations. Do not burn or bury them.
8
866-235-5029
Page 5
Product Overview
Product Overview
Front View Rear View
Main Unit
(right)
Soundbar with Wireless Subwoofer
DC 21V 3A
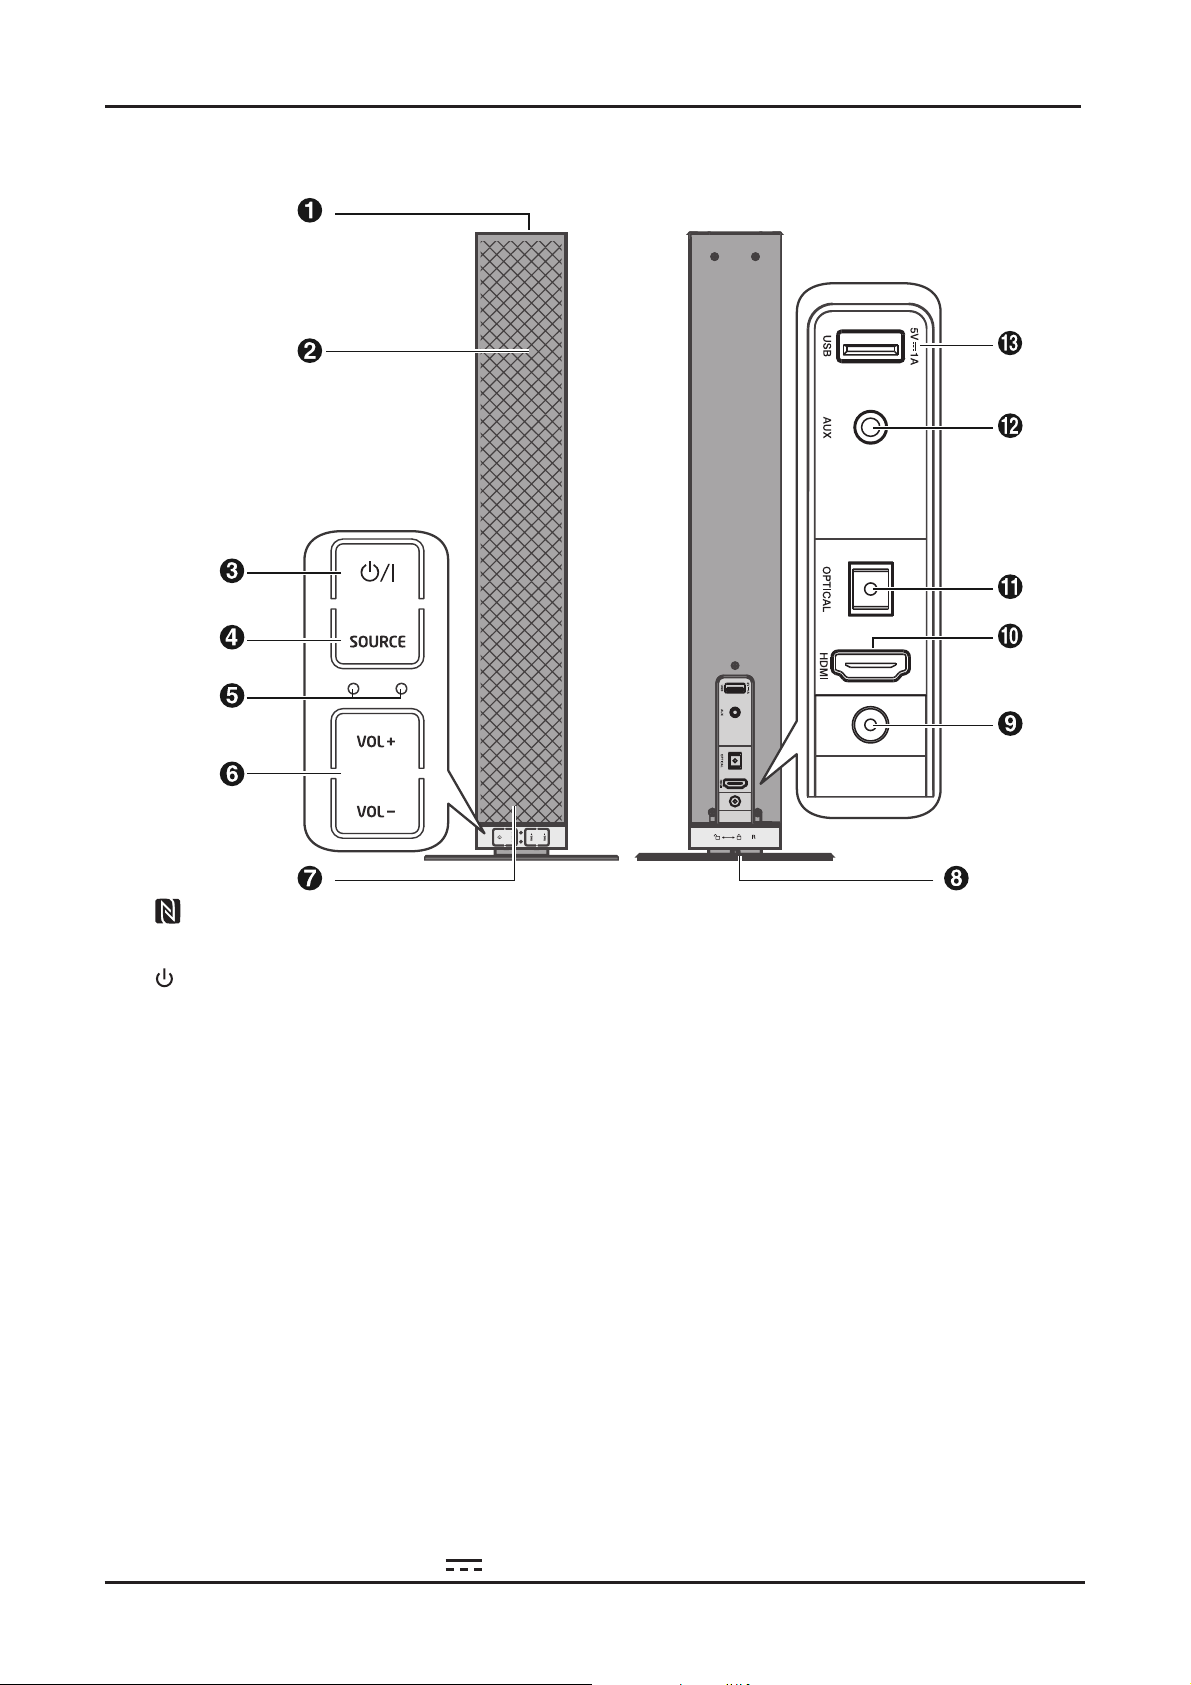
1 NFC (Near Field Communication) Sensor
2 Speakers
3
Power Switch: Press to switch the unit between on and standby mode.
4 SOURCE: Select the play function.
5 LED Indicators
• Red Indicator: In STANDBY mode.
• Green Indicator Lights Up: In AUX mode.
• Green Indicator Flashes: In HDMI ARC mode.
• Orange Indicator: In OPTICAL mode.
• Blue Indicator:
®
(Bluetooth
(Bluetooth
indicator ashing slowly: in Bluetooth® mode.)
®
indicator ashing fast: in Bluetooth® pairing mode.)
• Indicator Flashes: Adjust the volume / select a preset sound eect.
6 VOL+/VOL-: Increase/decrease the volume level.
7 Remote Control Sensor
8 Stand
9 Power Socket
10 HDMI (ARC) Socket
11 OPTICAL Socket
12 AUX Socket: Connect to an external audio device.
DC 21V 3A
13 USB Charging Port: 5V
866-235-5029
1A
9
Page 6
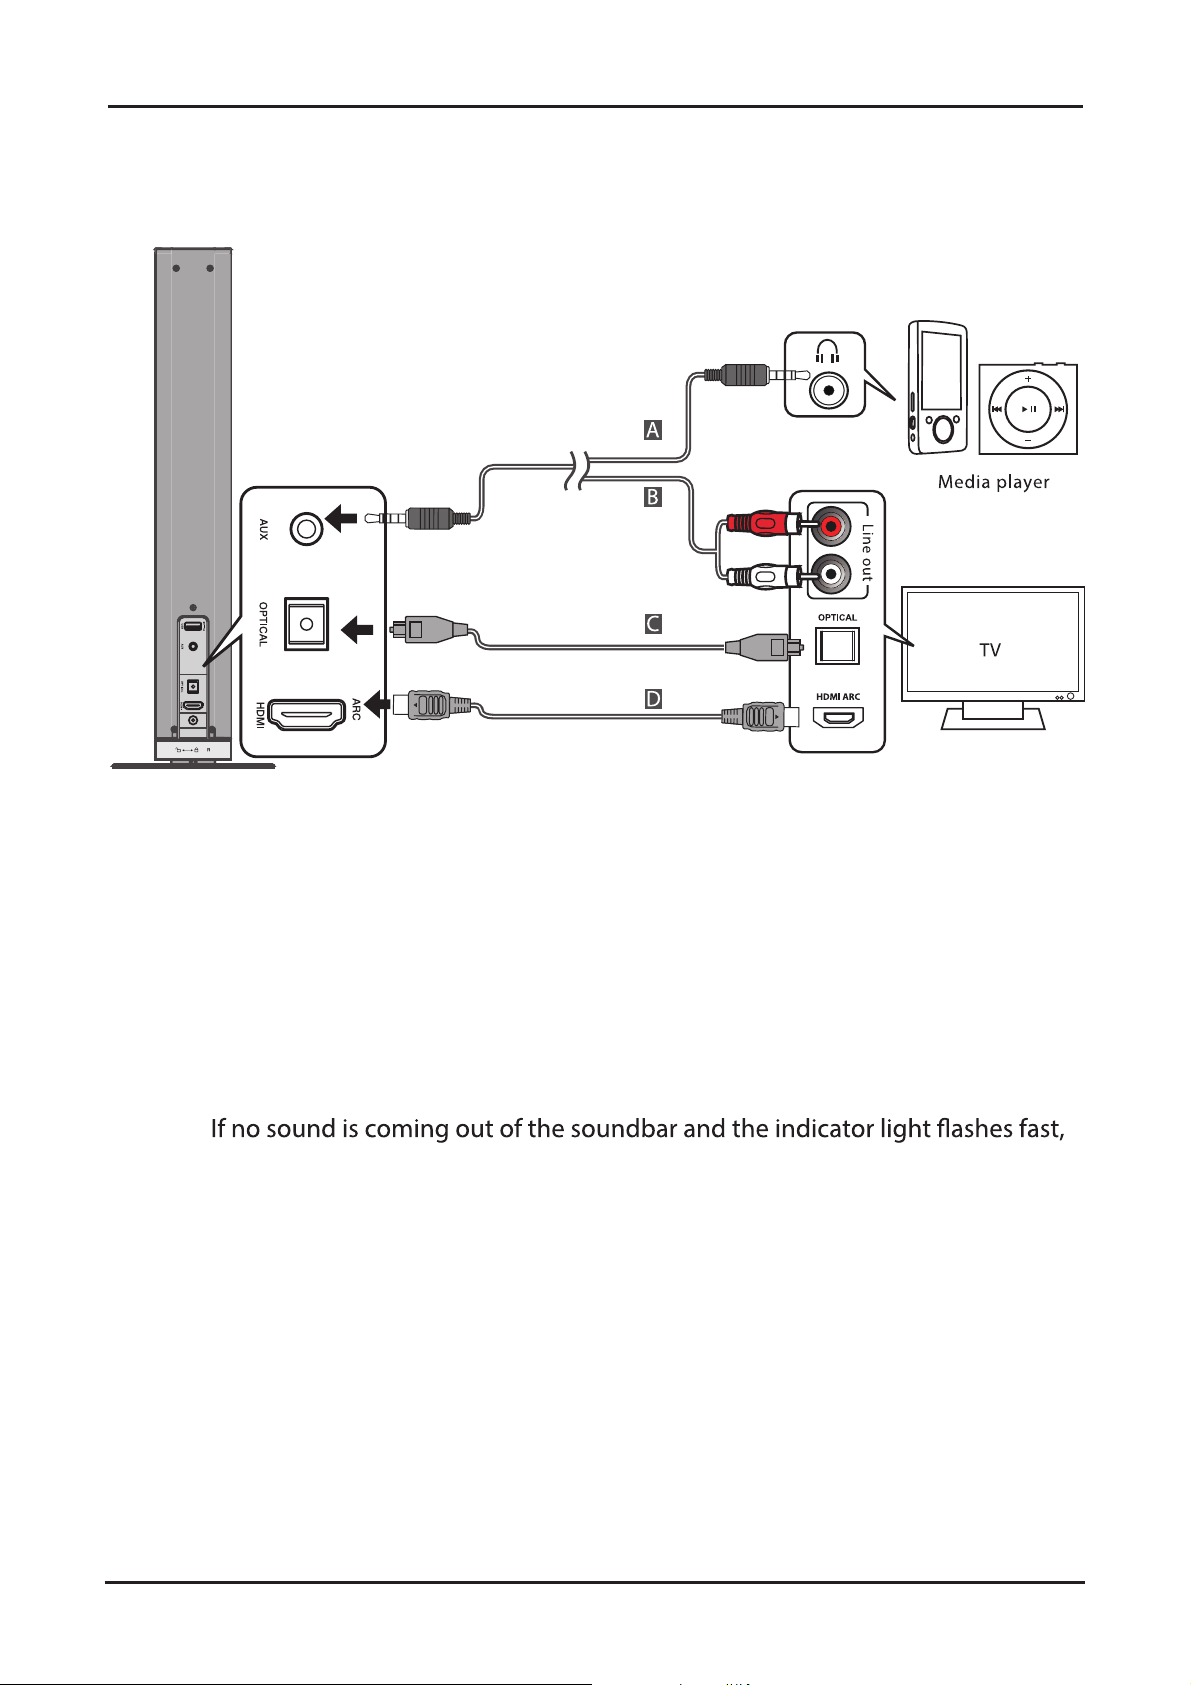
Soundbar with Wireless Subwoofer
Controls and Connections
Back Panel Connections
Controls and Connections
DC 21V 3A
AUX Socket
A Use the supplied 3.5mm to 3.5mm audio cable to connect the headphone socket of
the connected audio device, such as a media player, to the AUX socket on the unit.
B Use the supplied RCA to 3.5mm audio cable to connect the TV’s audio output
sockets to the AUX socket on the unit.
Optical Socket
C Remove the protective cap from the OPTICAL socket, then connect an OPTICAL
cable to the TV’s OPTICAL OUT socket and the OPTICAL socket on the unit.
TIP:
make sure the audio setting of your source player (e.g. DVD player, game
player, TV) is set to PCM with optical output.
HDMI (ARC) Socket
D The ARC (Audio Return Channel) function allows you to send audio input from an
ARC-compliant TV to an ARC-compliant audio device (e.g. soundbar) without the
need for an additional audio cable connection.
To enjoy the ARC function, make sure the soundbar main unit's HDMI OUT socket
is connected via HDMI cable to the HDMI (ARC) socket of your ARC-compliant TV.
Then just use your TV remote control to adjust the volume output (VOL +/– and
MUTE) of the connected audio device.
10
866-235-5029
Page 7

Control and Connections
Soundbar with Wireless Subwoofer
Controls and Connections (Cont.)
NOTE:
t Your TV must support the HDMI-CEC and ARC, and the HDMI-CEC and ARC must be
set to On.
t
details about ARC function, please refer to the TV's instruction manual.
t Make sure the HDMI cable you use can support the ARC function.
t
your TV's instruction manual for details on setting up HDMI-CEC and ARC.
Power Connection
t Before connecting the power adapter, ensure you have completed all other
connections.
t Risk of product damage! Ensure that the power supply voltage corresponds to the
voltage printed on the back or the underside of the unit.
t Connect the mains plug to the main unit and a mains socket.
DC 21V 3A
USB Charging
Connect a USB cable (not supplied) to the USB charging socket to charge your
smartphone or tablet PC.
NOTE:
t The maximum output of the USB charging port is 5V DC 1A. Please refer to your
mobile device’s manual regarding the charging power.
t This product is suitable for charging mobile devices only.
866-235-5029
11
Page 8

Soundbar with Wireless Subwoofer
Controls and Connections
Controls and Connections (Cont.)
Wireless Subwoofer
PAIR Indicator: Lights up solidly when the
pairing is successful.
Pair Button: Connect to the main unit.
Power Socket: Connect to power.
Pairing the Wireless Subwoofer With the Main Unit
Automatic pairing
The subwoofer and soundbar will automatically pair when both units are plugged into
the mains sockets and turned on. No cable is needed for connecting the two units.
t When the subwoofer is paired with the main unit, the Pair Indicator will light up.
NOTE:
- Do not press the Pair button on the rear of the subwoofer, except for manual pairing.
- If the automatic pairing fails, pair the subwoofer with the main unit manually.
Manual Pairing
1. Ensure that all the cables are well connected and the main unit is in Standby mode.
2. Press the (power icon) button on the main unit or on the remote control to switch the
main unit on and go to AUX mode.
3. Press and hold the Pair button on the rear of the subwoofer for a few seconds. The
subwoofer will enter the pairing mode and the Pair Indicator will blink quickly. At the
same time, press and hold the pair button on the remote control.
4. After the wireless connection succeeded, the Pair Indicator will light up.
5. If the Pair indicator blinks, the wireless connection has failed. Unplug the cable of the
subwoofer and then reconnect the main cable after 3 minutes. Repeat step 1 ~ 4.
NOTE:
example,interference from an electronic device) around your location. Remove these
t The subwoofer should be within 6m of the soundbar in an open area.
tIf a TV or an external device is connected, the main unit and the subwoofer will switch
on automatically when the TV or the external device is switched on.
tIf the main unit is not connected with the subwoofer and it is in On mode, the POWER
12
866-235-5029
Page 9

Installation
Soundbar with Wireless Subwoofer
Installation
This soundbar unit can be used either as a single soundbar or as 2-piece tube speakers.
Installation options include:
Option A:
Two tube speakers
installed on stands
Single soundbar mounted
horizontally with rubber feet
Option B:
Option C:
Single soundbar
wall-mounted
Stand Mounting (if using option A)
Attach one stand each to the two separate pieces and twist to secure, as illustrated
below.
866-235-5029
13
Page 10

Soundbar with Wireless Subwoofer
Installation (Cont.)
Horizontal Mounting
Align the two separate pieces and twist to secure, as illustrated below.
Installation
Rubber Feet Installation (if using option B)
You can extend the height of the unit, if required. To do so, attach the supplied rubber feet
as follows.
• Ensure the surface of the soundbar is clean prior to attaching the rubber feet.
• Turn the unit upside down.
• Remove the backing paper from the rubber feet.
• Stick the rubber feet to the bottom of the unit, as illustrated below.
14
866-235-5029
Page 11

Installation
Soundbar with Wireless Subwoofer
Installation (Cont.)
Wall Mounting (if using option C)
• Wall-mounted installation must be carried out by qualified personnel
only. Incorrect assembly can result in severe personal injury and property
damage! (If you intend to install this product yourself, you must check for installations
such as electrical wiring and plumbing, which may be hidden inside or behind the wall.)
• It is the installer’s responsibility to verify and confirm that the wall will safely
support the total load of the unit and wall brackets.
• Additional tools (not included) are required for the installation.
• Do not overtighten screws.
• Use an electronic stud nder to check the wall type before drilling and mounting.
30.19 inch
Plastic Anchor
* Only install this soundbar on a strong,
structurally sound wall.
Recommendation *
866-235-5029
15
Page 12

Soundbar with Wireless Subwoofer
Instructions
Instructions
General Operation
Standby/ON
• When you rst connect the main unit to the mains socket, the main unit will be in
Standby mode.
• Press the POWER
• Press the POWER
indicator will light up red.
• Disconnect the mains plug from the mains socket if you want to switch the unit OFF
completely.
• When there is no input signal (or weak input signal) in HDMI, AUX, Optical and
®
Bluetooth
switch to Standby mode.
mode (Stop or Pause) for more than 15 minutes, the unit will automatically
button on the unit or on the remote control to switch the unit ON.
button again to switch the unit back to Standby mode. The power
Mode Selection
Press the SOURCE button repeatedly on the unit or the button on the remote control to
®
switch between HDMI (ARC), AUX, Optical and Bluetooth
• In AUX mode: the status indicator lights up green.
• In HDMI (ARC) mode: the green status indicator ashes.
• In Optical mode: the status indicator lights up orange.
®
•In Bluetooth
mode: the status indicator lights up blue.
modes.
Volume Adjustment
• Press the VOL+ / VOL- buttons on the unit or on the remote control to adjust the
volume.
• If you wish to turn the sound o, press the MUTE button on the remote control. Press
this button again or press the VOL+ / VOL- buttons to resume normal listening.
• While adjusting the volume, the status indicator ashes quickly.
• When the volume level reaches its maximum level, if you press the VOL+ button again,
the status indicator ashes once. When the volume level reaches its minimum level, if
you press the VOL- button again, the status indicator ashes once.
Preset Sound Effect Selection
• Press the EQ button on the remote control to select between preset equalisers: Movie
(recommended for viewing movies), Music (recommended for listening to music).
• Music EQ: the status indicator will ash twice.
• Movie EQ: the status indicator will ash four times.
16
866-235-5029
Page 13

Instructions
Soundbar with Wireless Subwoofer
Instructions (Cont.)
HDMI (ARC) / AUX / Optical Operation
t Ensure that the unit is connected to a TV or audio device.
t While in ON mode, press the SOURCE button repeatedly on the unit or on the remote
control to select HDMI (ARC), AUX or Optical mode.
t Operate your audio device directly for playback features.
t Press the VOL +/– button to adjust the volume to your desired level.
Playing Bluetooth® Enabled Devices
You can listen to tracks from a media device if connected to the unit via Bluetooth
Wireless Technology.
Pairing Bluetooth®Enabled Devices
®
Bluetooth® device to this player, you need to pair your
device to this player.
1. During ON mode, press the SOURCE button repeatedly on the unit or the remote
control to select Bluetooth
®
that the system has entered pairing mode.
2. Alternatively, press the PAIR button on the remote control to be searchable. The
3. Activate your Bluetooth® enabled device and select the search mode.
“BAUHN SB-1” will appear on your Bluetooth
®
device list.
4. Select “BAUHN SB-1” in the pairing list. The blue indicator will light up solidly if
pairing succeeds.
5. To disconnect the Bluetooth
disable the function from your Bluetooth
®
function, switch to another function on the unit or
®
enabled device. The blue indicator will
Important Notes
t The operational range between this player and a Bluetooth®device is approximately
8m (without any object between the Bluetooth
obstacle between the devices can reduce the operational range.
t Before you connect a Bluetooth
®
enabled device to this unit, ensure you know the
device’s capabilities. Compatibility with all Bluetooth
t If the signal strength is weak, your Bluetooth
re-enter pairing mode automatically.
®
enabled device and the unit). Any
®
devices is not guaranteed.
®
receiver may disconnect, but it wil
866-235-5029
17
Page 14

Soundbar with Wireless Subwoofer
Instructions
Instructions (Cont.)
TIPS
• If you are prompted for a password, enter "0000".
• If there is an existing connection, press the PAIR button on the remote control to
re-activate the pairing mode, the connection will be interrupted. The
will ash slowly.
®
• If no other Bluetooth
will recover its previous connection.
• The player will also be disconnected when your device is moved beyond the
operational range.
• If you want to reconnect your device to this player, place it within the operational
range.
• If the device is moved beyond the operational range, when it is brought back, please
check if the device is still connected to the player.
device pairs with this player within two minutes, the player
blue indicator
• If the connection is lost, follow the instructions above to pair your device to the player
again.
Music Playback From Bluetooth® Enabled Devices
1. Pair and connect your Bluetooth® enabled device with the soundbar.
®
2. Play audio on your Bluetooth
3. Use the remote control to control playback.
enabled device.
Important Notes
• To stream audio via Bluetooth® Wireless Technology, the playback device should
support A2DP (Advanced Audio Distribution Prole).
• To use the playback buttons (Previous/Next, Vol+/-, Play/Pause) on the remote
control, the playback device should support AVRCP (Audio Video Remote Control
Prole).
18
866-235-5029
Page 15

Instructions
Soundbar with Wireless Subwoofer
Instructions (Cont.)
NFC (Near Field Communication) Operation
Pair your NFC enabled mobile device directly with this unit with just a single tap.
1. Activate NFC on your mobile device.
2. Tap the mobile device’s NFC antenna area on
the
3. Conrm the Bluetooth
4. To disconnect, tap the mobile device
on the
or disable NFC from your mobile device.
NOTE: This NFC function only works with mobile
icon of the unit.
®
connection.
icon of the unit to disconnect
devices that support NFC technology.
TIPS:
Some NFC enabled mobile devices cannot pair directly with the unit via NFC. In such a
case, please try either one of the solutions below:
• Please download the App “Tap-and- Pair” from Google Play Store (https://play.
Google. com) and install.
• Pair with the unit manually rst, then touch again on the NFC sensing area.
866-235-5029
19
Page 16

Soundbar with Wireless Subwoofer
Other Useful Information
Other Useful Information
Troubleshooting
To keep the warranty valid, never try to repair the system yourself. If you encounter
problems when using this unit, check the following points before requesting service.
Problem Solution
Ensure that the power cord of the apparatus is
properly connected.
No power
Ensure that there is power at the outlet.
Remote control does not work
No response from the unit
Unable to nd the soundbar in the
®
Bluetooth
device list when pairing
No connection beween the main
unit and the Subwoofer
Press the POWER
button to turn the unit on.
Reduce the distance between the remote
control and the unit.
Insert the battery with its polarities (+/-)
aligned as indicated. Please check the battery
is installed correctly (refer to page 7).
Replace the battery.
Aim the remote control directly at the sensor
on the front of the unit.
Disconnect and reconnect the power adapter,
then turn the unit on again.
Ensure you have paired the unit with your
Bluetooth
Ensure the Bluetooth
your Bluetooth
®
enabled device.
®
function is activated on
®
enabled device.
Ensure the main cables of the main unit and
the subwoofer are both connected securely to
the mains power socket.
pair the main unit with the subwoofer
manually. Please refer to "Pairing the Wireless
Subwoofer with the Main Unit" above.
20
866-235-5029
Page 17

Soundbar with Wireless Subwoofer
Other Useful Information
This device complies with Part 15 of the FCC Rules. Operation is subject to the
following two conditions: (1) this device may not cause harmful interference, and (2)
this device must accept any interference received, including interference that may
cause undesired operation.
Warning: Changes or modifications to this unit not expressly approved by the party
responsible for compliance could void the user’s authority to operate the equipment.
- NOTE: This equipment has been tested and found to comply with the limits for
a Class B digital device, pursuant to Part 15 of the FCC Rules. These limits are
designed to provide reasonable protection against harmful interference in a residential
installation. This equipment generates, uses and can radiate radio frequency energy
and, if not installed and used in accordance with the instructions, may cause harmful
interference to radio communications.
- However, there is no guarantee that interference will not occur in a particular
installation. If this equipment does cause harmful interference to radio or television
reception, which can be determined by turning the equipment off and on, the user
is encouraged to try to correct the interference by one or more of the following
measures:
- Reorient or relocate the receiving antenna.
- Increase the separation between the equipment and receiver.
- Connect the equipment into an outlet on a circuit different from that to which the
receiver is connected.
- Consult the dealer or an experienced radio/TV technician for help.
22
866-235-5029
 Loading...