

Page 1

User Guide
14ft x 17ft OvalPod
WARNING: Read these assembly instructions carefully
before attempting to assemble or use this product. Keep
this user guide in a safe place for future reference.
Page 2

IMPORTANT INFORMATION
!"#$%&'&()"$*+,-".+/0%1'.'2&"3"(+'*$&40"%05+'%0*"$-"$,,"-'60.!"
!"%789::7;<7<"=>7"?@"A7=BC!"
!"&9"C9:7BC=DEFC"9B"GEHIC"J"8=;"8=DC7"C7BH9DC"H;KDBA!"
"
WARNINGS!"
!"2;EA"G9B"<9:7CFH8"DC7!"
!"6=LH:D:"DC7B"M7H>NF"EH:HF"OPQ"R>!"
!"&9F"CDHF=SE7"G9B"8NHE<B7;"D;<7B"T?":9;FNC"J"C:=EE"I=BFCU"8N9RH;>"N=V=B<!"
!"2DF<99B"DC7"9;EA!"
!"-N7"FB=:I9EH;7"CN9DE<"S7"=CC7:SE7<"SA"=;"=<DEF"H;"=889B<=;87"MHFN"=CC7:SEA"H;CFBD8FH9;C"
=;<"8N78R7<"H;"7W7BA"H;CF=;87"S7G9B7"DC7!"
!"2;EA"9;7"DC7B!"49EEHCH9;"N=V=B<!"
!"$EM=AC"8E9C7"FN7";7F"9I7;H;>"S7G9B7"KD:IH;>!"
!"%7:9W7"G99FM7=B"S7G9B7"KD:IH;>"9;"FN7"FB=:I9EH;7!"
!"*9";9F"DC7"FN7":=F"X"KD:IH;>"S7<"MN7;"HF"HC"M7F!"
!"0:IFA"I98R7FC"=;<"N=;<C"S7G9B7"KD:IH;>!"
!"$EM=AC"KD:I"H;"FN7":H<<E7"9GG"FN7":=F"X"KD:IH;>"S7<!"
!"*9";9F"7=F"MNHECF"KD:IH;>!"
!"*9";9F"7LHF"SA"="KD:I!"
!",H:HF"FN7"FH:7"9G"89;FH;D9DC"DC=>7"Y:=R7"B7>DE=B"CF9ICZ!"
!"*9";9F"DC7"H;"CFB9;>"MH;<"89;<HFH9;C"=;<"C78DB7"FN7" FB=:I9EH;7!"
!"-N7";7F"CN9DE<"S7"8N=;>7<"7W7BA"O"A7=B!"
"
ADVISORY"
!"
This trampoline is not intended to be buried in the ground.
!"-N7"G9EE9MH;>"IB9<D8F"<H:7;CH9;"B7E=F7"F9"FNHC"OPGF"L"O[GF"2W=E"FB=:I9EH;7\"
J"
]7H>NF"GB9:">B9D;<"F9"F9I"B=HE\"^_8:"YQ!^_:Z"
J"
]7H>NF"GB9:">B9D;<"F9"F9I"9G"7;8E9CDB7\"`^O8:"Y`!^O:Z"
J"
]7H>NF"GB9:"F9I"B=HE"F9"F9I"9G"7;8E9CDB7\"O_`8:"YO!_`:Z"
!"-N7"FB=:I9EH;7":DCF"S7"IE=87<"9;"="E7W7E"CDBG=87"=F"E7=CF"`:"GB9:"=;A"CFBD8FDB7C"9B"
9SCFBD8FH9;C"CD8N"=C"G7;87U">=B=>7U"N9DC7U"9W7BN=;>H;>"SB=;8N7CU"E=D;<BA"EH;7C"9B"7E78FBH8=E"
MHB7C!"
!""
*9";9F"H;CF=EE"FN7"FB=:I9EH;7"9W7B"89;8B7F7U"=CIN=EF"9B"=;A"9FN7B"N=B<"CDBG=87";9F"=F""
"""
IB9LH:HFA"9G"9FN7B"89;GEH8FH;>"H;CF=EE=FH9;U"CD8N"=C"I=<<EH;>"X"CMH::H;>"I99ECU"CMH;>CU""
"""CEH<7C"9B"8EH:SH;>"GB=:7C!"
!"';CI78F"FB=:I9EH;7"X"7;8E9CDB7";7F"S7G9B7"7=8N"DC7!"$;A"<=:=>7<"9B"M9B;"I=BFC":DCF"S7"
B7IE=87<"S7G9B7"DCH;>"FN7"FB=:I9EH;7"!"##$"%&'#$%&'("$%&)#$*+,!"
!"'G"=;"=887CC"E=<<7B"HC"DC7<"HF"CN9DE<"S7"B7:9W7<"MN7;"FB=:I9EH;7"HC";9F"H;"DC7!"
!"6=R7"CDB7"FN7B7"=B7";9"8NHE<B7;"X"=;H:=EC"X"9SCFBD8FH9;C"D;<7B;7=FN"FN7"FB=:I9EH;7!"
!"$887CC"FN7"FB=:I9EH;7"FNB9D>N"FN7"<99B"9G"FN7"7;8E9CDB7";7F"9;EA!"6=RH;>"CDB7"A9D"C78DB7EA"
8E9C7"HF"S7G9B7"S9D;8H;>!"
!"/E7=C7"<9;aF"DC7"MN7;"HFaC"MH;<A"9B"B=H;A"=C"FNHC"8=;"8=DC7"A9D"CEHI"=;<"S789:7"H;KDB7<!"
!"*9;aF"H;F7;FH9;=EEA"B7S9D;<"9GG"FN7"7;8E9CDB7";7F"=C"FNHC"MHEE"M7=R7;"HF!"
!"2;EA"=FF=8N":=;DG=8FDB7B"=IIB9W7<"=887CC9BH7C"F9"FN7"FB=:I9EH;7"=;<"7;8E9CDB7";7F!"
!"$EM=AC"KD:I"H;"FN7":H<<E7"9G"FN7":=F"=;<"IB=8FH87"S9D;87"F78N;HbD7C"C=G7FA"MHFN"=<DEF"
CDI7BWHCH9;"=;<">DH<=;87!"
!"cD:I"MHFN9DF"CN97C!"
!"';"87BF=H;"89D;FBH7C"<DBH;>"MH;F7B"I7BH9<U"FN7"C;9M"E9=<"=;<"FN7"W7BA"E9M"F7:I7B=FDB7"
8=;"<=:=>7"FN7"FB=:I9EH;7!"'F"HC"B789::7;<7<"F9"B7:9W7"FN7"C;9M"=;<"CF9B7"FN7":=F"
=;<"FN7"7;8E9CDB7"H;<99B!"
"
"
Page 3
P"
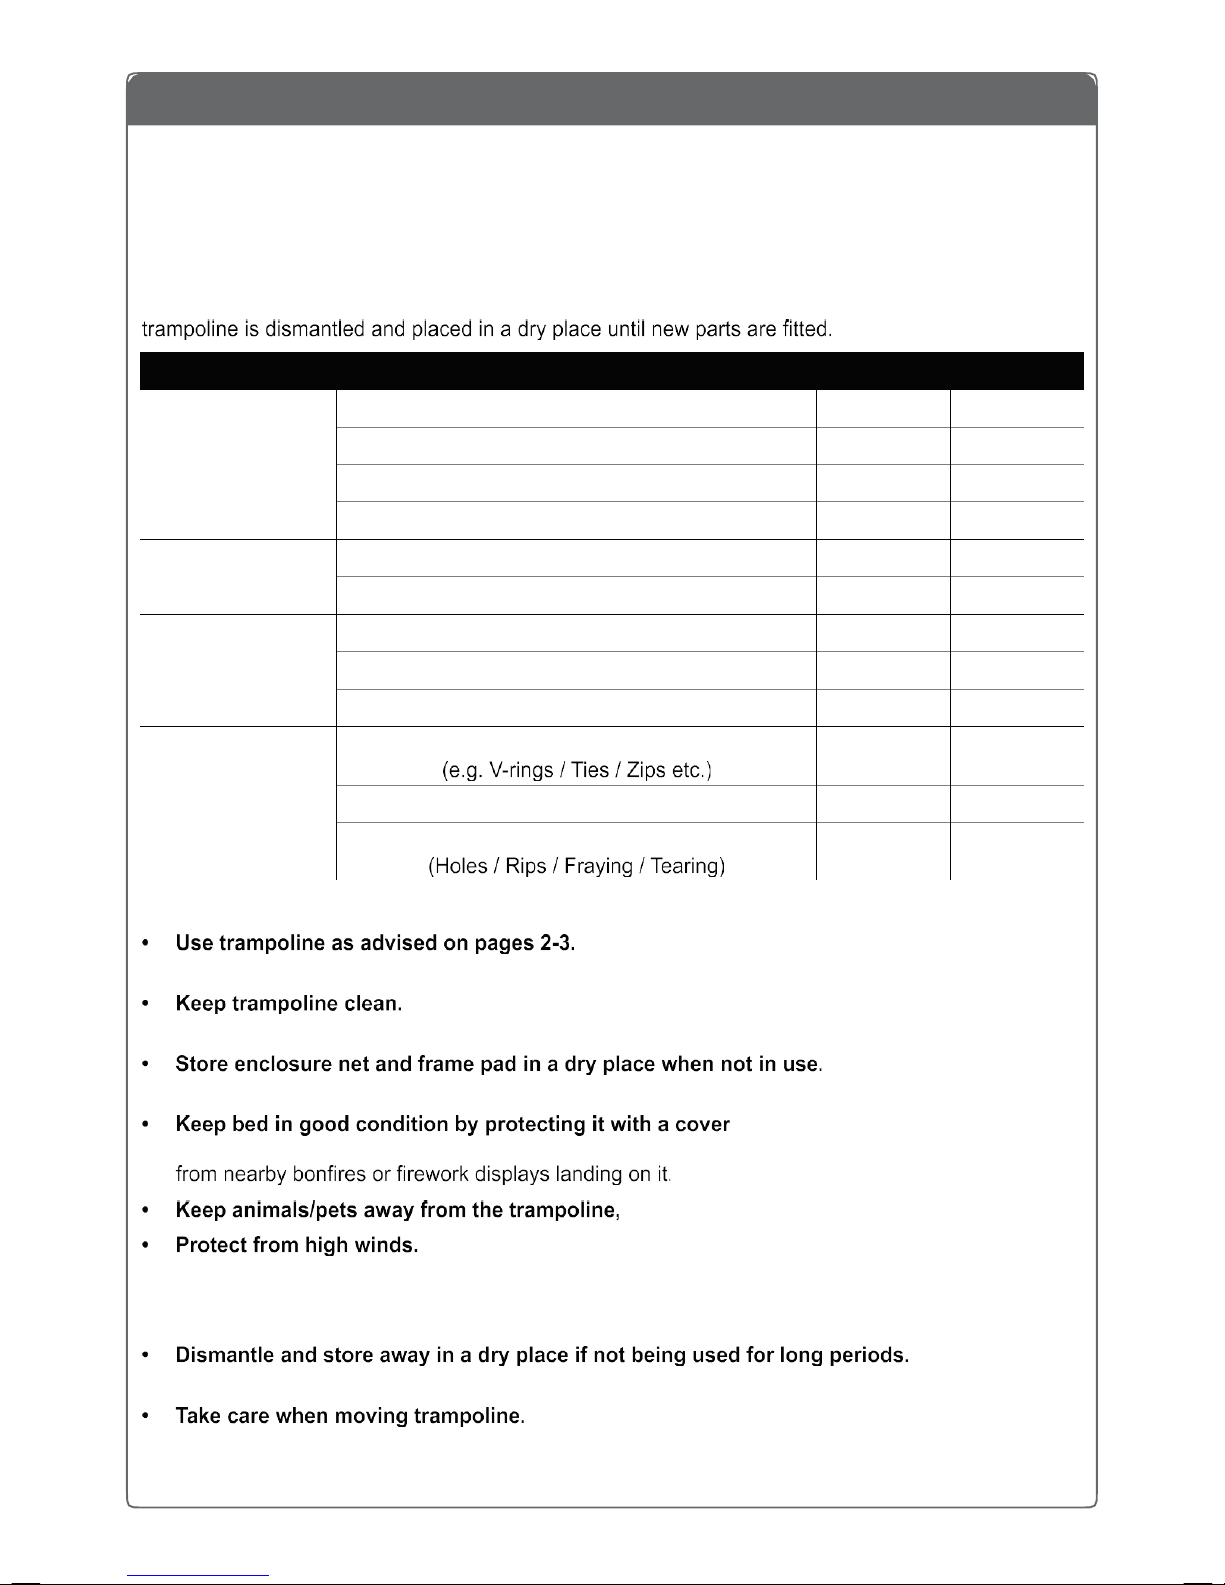
CARE & MAINTENANCE
%7>DE=B"8=B7"=;<":=H;F7;=;87"9G"A9DB"FB=:I9EH;7"HC"B7bDHB7<!"-NHC"MHEE"N7EI"IB9E9;>"HFC"EHG7"=;<"B7<D87"
FN7"I9CCHSHEHFA"9G"H;KDBA!"&7>E78FH;>"FNHC"8=;"E7=<"F9"="BHCR"G9B"DC7BC!
';CI78F"A9DB"FB=:I9EH;7"S7G9B7"7=8N"DC7"DCH;>"FN7"8N78REHCF"S7E9M"=C"=">DH<7!"-=R7"I=BFH8 DE =B"8=B7"H;"
<9H;>"FNHC"=F"FN7"C F= BF "9G"7=8N"C7=C9;"=;<"=F"B7>DE=B"H;F7BW=EC!"0;CDB7"=EE"I=BFC"=B7"H ;F =8 F"=;<"8=;;9F"
S789:7"<HCE9<>7<"<DBH;>"IE=AU"FH>NF7;"=;A"C8B 7 MC"9B";DFC"=;<"S9EFC"MN7B7"B7bDHB7<!
"
IMPORTANT:
'G"=;A"G=DEFC"=B7"G9D;<U"FN7"FB=:I9EH;7"
MUST NOT BE USED
!"#7"=<WHC7"FN=F"FN7
"
PART" CHECKLIST" OK" NOT OK"
"
"
$EE"/=BFC
"
.78DB7EA"=FF=8N7<
"
49BB78FEA" I9CHFH9;7<"
&9"CN=BI"7<>7C"9B"I9H;FC"IB7C7;F
"
&9":HCCH;>"I=BFC
"
"
.IBH;>C
"
&9"<=:=>7"!-#.($/$-'01#.,
"
&9":HCCH;>"I=BFC
"
"
dB=:7"X"0;8E9CDB7"
/9E7C
"
&9"S7;F"I=BFC
"
&9"<=:=>7
"
&9"BDCFH;>"9B"89BB9CH9;
"
"
e7<"X"0;8E9CDB7"
&7F"X"dB=:7"/=<"X"
d9=:"-DS 7C
"
&9":HCCH;>"I=BFC
"
&9"C=>>H;>
"
&9"<=:=>7
"
Looking after your trampoline:"
Excess weight and improper use of the trampoline
will damage it and cause it to break easily.
'G"=;A"I=BF"S789:7C"<HBFAU"8E7=;"MHFN"="< =:I"8E9FN"=;<"<BA"FN9B9D>NEA!"*9"
;9F"DC7"=;A"=SB=CHW7"8E7=;7BC"=C"FNHC "89DE<"<=:=>7"FN7"IB9<D8F!
"
=;<"N=BCN"M7=FN7B"8=;"C N9BF7;"HFC"EHG7!
"
/B9E9;> 7<"7LI9CDB7"F9"CD;
"
"
!&2&34&-4#$(0$-56 $7'08$05'$9#-"3(#,!
"
49::9;"<=:=>7"8=;"S7"8=DC7<"SA"M=F7B"I99EH;>U">=B<7;X9DF<99B"<7SBHC"E=;<H;>"9;"HFU"CI=BRC
"
FN7HB"8E=MC"8=;"<=:=>7"HF!
"
$"FB=:I9EH;7"8=;"=8F"EHR7"="C=HE"H;"CFB9;>"MH;<C!"'F"8=;"S7"SE9M;"9W7B"
MNH8N"8=;"8=DC7"<=:=>7"F9"FN7"GB=:7"=;<"CDBB9D;<H;>"=B7=C!"#7"B789::7;<"FN=F"HF"HC":9W7<"
F9"="CN7 EF7B7<"E98=FH9;"=;<"C78DB7<"F9"FN7">B9D;<"!(3#:;09.$13($&2 &34& -4 #$7'08$05'$9#-"3(#,U"9B"
<HC:=;FE7<"=;<"CF9B7<"=M=A!
"
d9EE9M"=CC7:SEA"
H;CFBD8FH9;C"H;"B7W7BC7"9B<7B":=RH;>"CDB7"FN7"CIBH;>C"=B7"B7:9W 7<"S7G9B7"<HC:=;FEH;>"GB=:7!
"
-9"S7"EHGF7<"SA" `"I79I E7!",HGF" CEH>NFEA"9 GG"F N 7">B9D ; <U"
R77IH;>"FN7"GB=:7"N9BHV9;F=E!"&7W7B"<B=>"F9":9W7 "HF"=C"FNHC"8=;"<HCIE=87"I=BFC!"$EM=AC"8N78R"FN=F"
I=BFC"=B7"I9CHFH9;7<"89BB78FEA"=GF7B":9WH;>!
"
Page 4
5
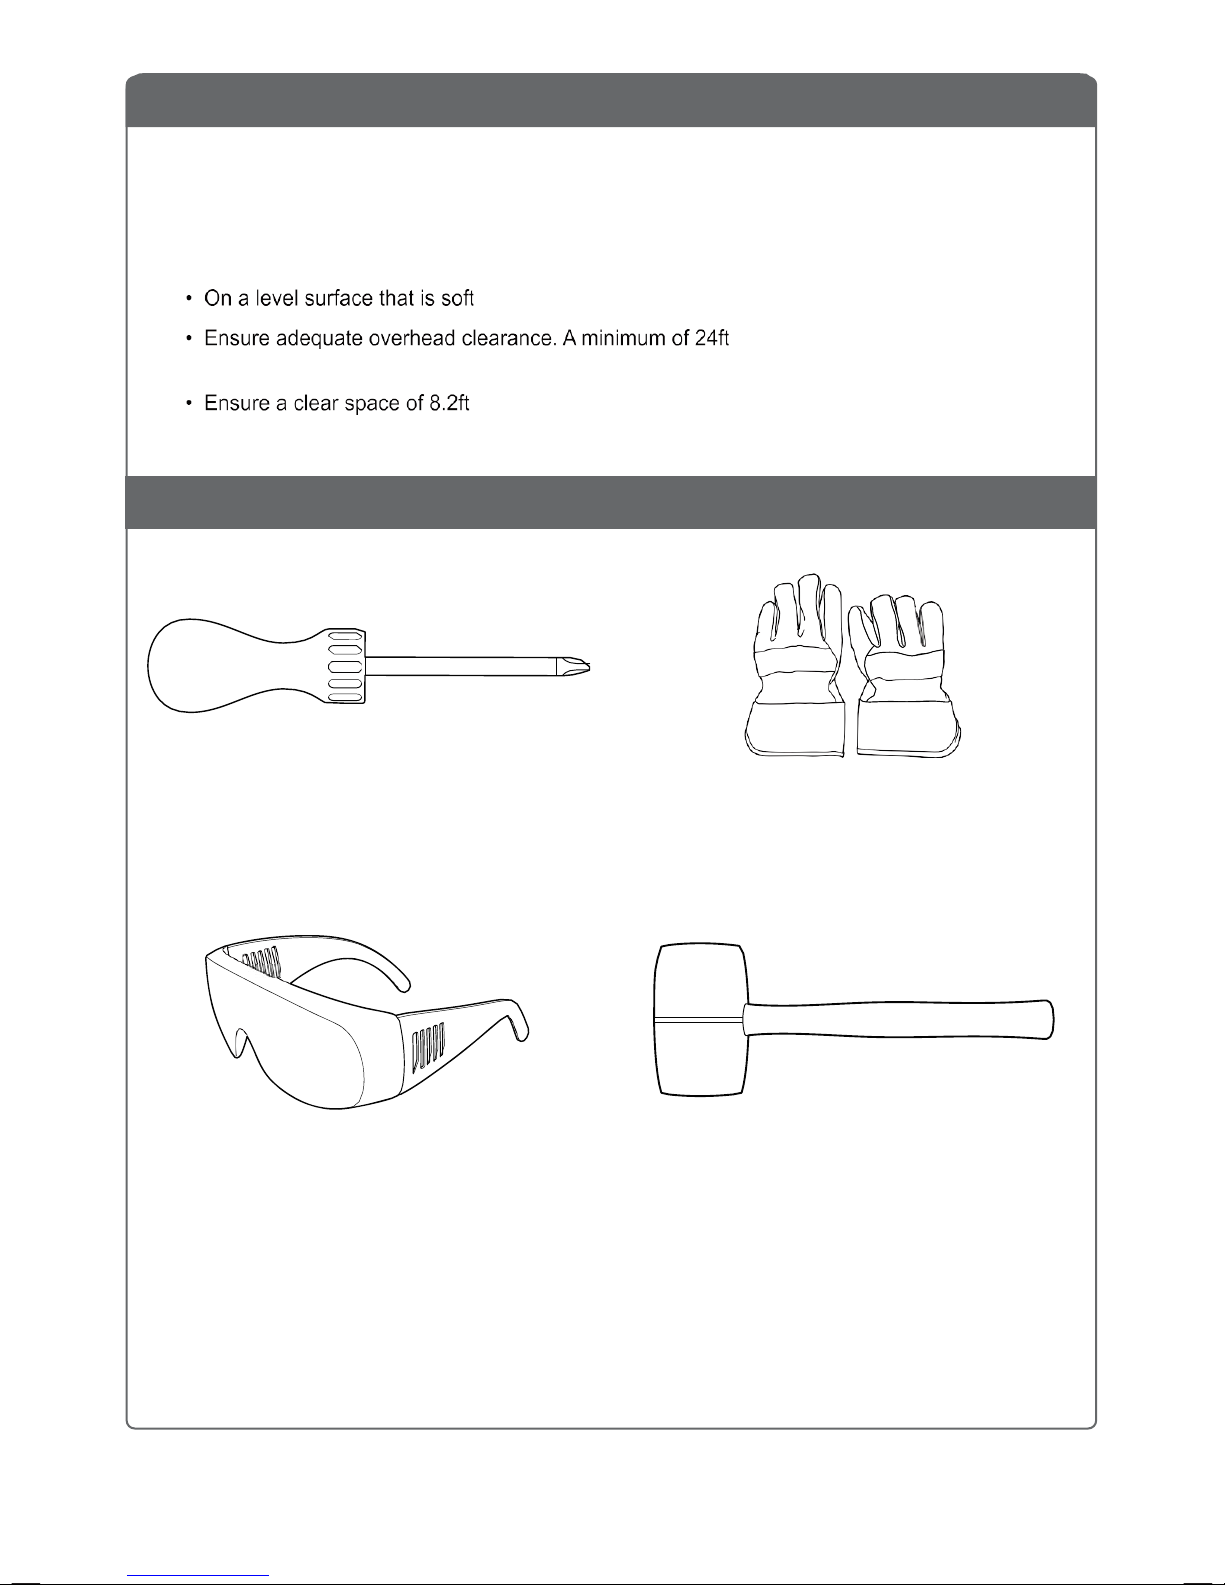
BUILDING YOUR TRAMPOLINE
1.
This is a 2 person build.
2.
Time for build is approximately 2 hours.
3.
Choose a good location:
(wood chippings, sand or grass).
(7.3m) from ground level, away from
wires, trees and other possible hazards.
(2.5m) around sides, away from walls, fences, structures, tarmac
and other hard surfaces and play areas.
WHAT YOU WILL NEED
Description: Description:
Cross-head screwdriver Gloves
Description: Description:
Safety glasses Mallet
Page 5
6
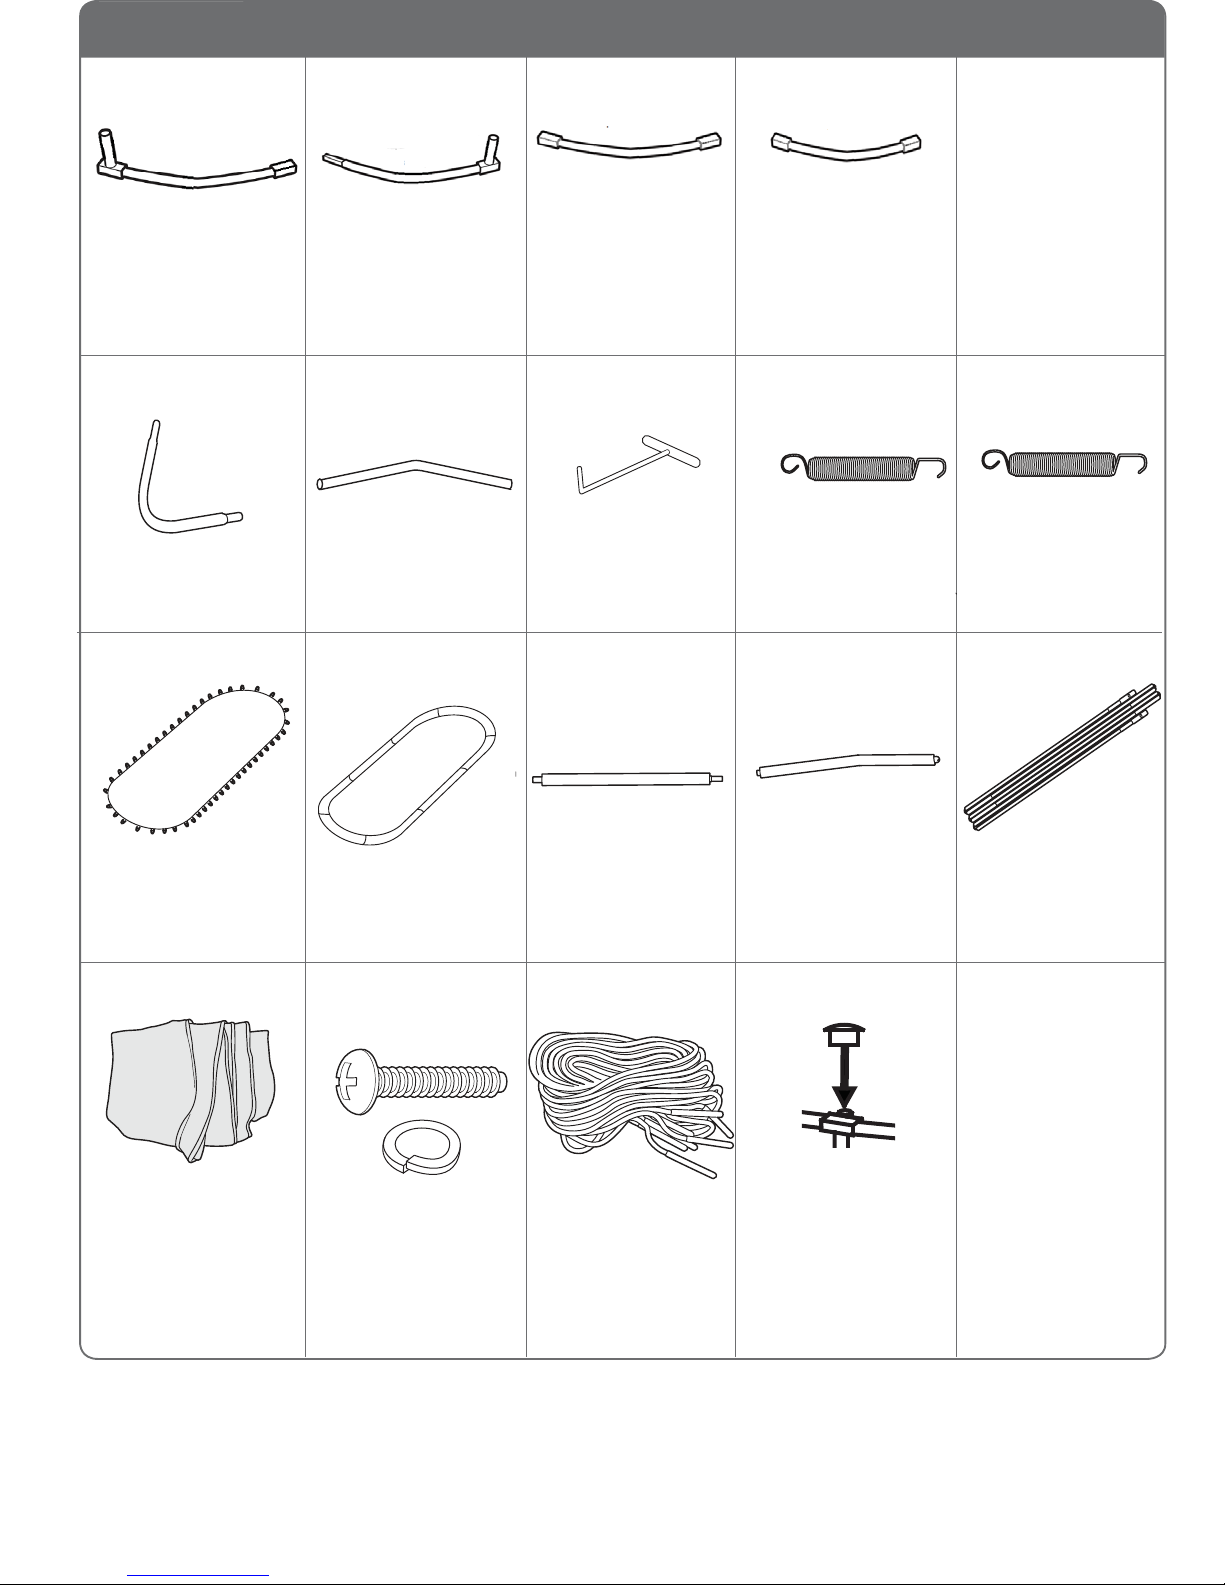
PARTS LIST
Part B
Part C
Part D
Part A
Description:
Top tube with
B marking
Quantity: 4
Description:
Top tube with
A marking
Quantity: 4
Description:
Stitched bed
Quantity: 1
Description:
Top enclosure poles
Quantity: 8
Description:
Enclosure netting
Quantity: 1
Description:
7inch Springs
Quantity: 82
Description:
Bottom enclosure
poles
Quantity: 8
Description:
Cords
Quantity: 8
Description:
Cap connector
Quantity:
8
Description:
Spring tool
Quantity: 1
Description:
Quantity: 24
Description:
L legs
Quantity: 8
Description:
V legs
Quantity: 4
Description:
Fr
ame pad
Quantity: 1
Description:
Black G4 poles
Quantity: 2
Self tapping screws
and spring washers
Description:
Top tube with
C marking
Quantity: 2
Top tube with
D marking
Description:
Quantity: 2
Description:
6.5inch Springs
Quantity: 16
Page 6
7
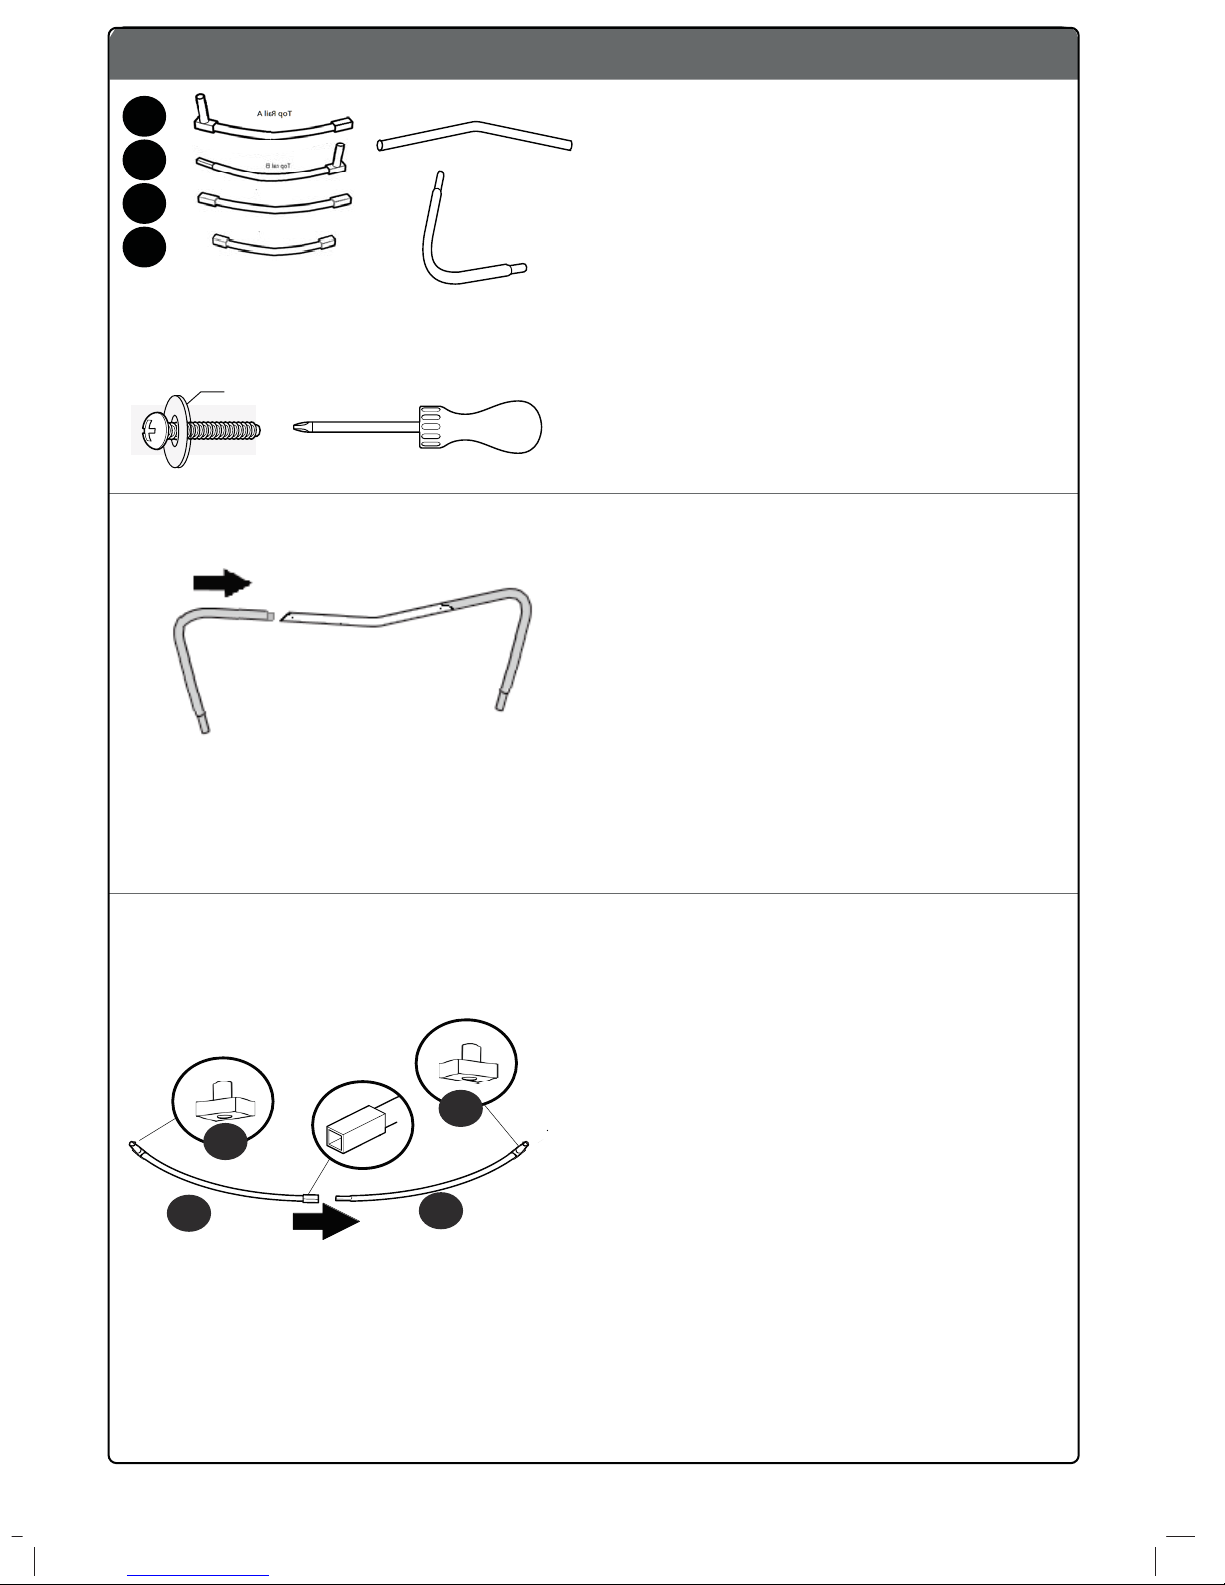
STEP 1 : ASSEMBLING THE FRAME
You will need the following parts to complete
section 1:
4 x Top tube with A marking
4 x Top tube with B marking
2 x Top tube with C marking
2 x Top tube with D marking
8 x L legs
4 x V legs
16 x Self tapping screws and washers
You will also need a cross-head screwdriver (not
supplied).
Fisrt
you will need to assemble the leg bases
of your OvalPOD. This will require 2 x L-legs
and 1 x V Leg.
Note:
Do not screw the sections together yet.
Lay out the 2 x L-legs and 1 x Centre Leg so that it
makes a ‘W’ shape. Join the three pieces so the
screw holes line up.
Rep
eat this step with the remaining pieces to
make 4 x ‘W Legs’. Leave to one side when
finished.
Layout Top Rail B, Top Rail A. You
should only be able to see 2
spring holes on each top rail.
A
A
B
B
Assemble 1 (A, B)
A
B
C
D
Self tapping screw and washer
Cross-head screwdriver
Page 7

8
You will need two people for this next step.
C
B
B
B
B
A
A
A
A
D
D
C
Insert 1 end of W-leg partially into Connector A.
Next place feet either side of POD-Connector B.
Then pull other end of W-leg into POD-Connector B.
(You will need to use force for this step)
Now push down on W-leg so inserted fully in each
POD-connector.
Repeat with other W-Legs
Now you have 4 completed segments
2 x Assembly 1 (ABC)
B
C
A
B
C
A
B
D
Turn over 1 x Assembly 1 (ABC) and 1 x
Assembly 1 (DEF)
Join by inserting C into POD-connector
D. (Make sure spring hole lines up with
gap in connector)
Repeat this step so you are left with 2
halves of Trampoline
Carefully join the 2 halves together.
For the last section, you will need
someone to stand on the opposite side
if the frame and push towards you
whilst you insert Top-rail into PODConnector.
A
Page 8

9
Locate the V-rings with coloredwebbing.
T
hese will be at 180
to each other.
Slot one of the springs onto one of the colored
webbing V-rings as shown.
Important: springs must be slotted on the right way
around.
Colored
webbing
J
Page 9

10
Continue to attach springs in the same sequence as above: in the middle of of each section, making sure the
next spring is attached on the opposite side to even out the tension.
Important: The stitcched bed is designed like elastic to be bouncy, which means that during construction it may
look like it won’t fit. Please note that it will stretch to the correct size when attaching the springs, this may take
some force.
The stitched bed is now filled and you have completed step 3.
Important: Attach the springs in
the order shown in the diagram.
This will help to distribute the
tension, making assembly easier.
Firstly, locate the 2 colored V-rings.
These V-rings are to be attacheded
at points 1 and 2 using a silver
spring.
Then attach silver springs 3 to 18
in the order shown in the diagram.
These are all silver top springs.
Important: Remember to include
the ‘under spring’ holes when
counting the V-rings on the frame
and bed.
Once all of the springs shown in
remaining top springs can be
attached, including the gold
springs.
Please attach the gold springs to
the POD-connector, as shown
below:
This diagram shows the initial order of spring attachment.
= Top spring hole: Silver,
= Bottom spring hole: Gold
C
A
A
A
A
B
B
B
B
D
D
C
Page 10

STEP 4 : FITTING THE FRAME PAD
This step will require 2 people.
Lay the frame pad
- Part K
out over the edge of
the frame with the ties facing downwards.
Align the openings in the frame pad with the
POD-connector'son the frame.
completed step 4.
WARNING:
The trampoline
MUST NOT
be used
during construction.
1O
Page 11

12
STEP 5 : FITTING THE ENCLOSURE TUBES
Top enclosure t ube
You will need the following parts to complete step 5:
Bottom enclosure tube
8 x Top enclosure tubes -Part M
8xBottomenclosuretubes
- Part L
8 x Self tapping screws and washers
- Part P
Self tapping screw and washer
You will also need a cross-head screwdriver (not
supplied).
Cross-head screwdriver
Slot the thin end of one of the bottom enclosure
tubes into the open end of one of the top
enclosure tubes.
Align the hole in the bottom enclosure tube with
the slot in the top enclosure tube.
Screw one of the self tapping screws through the
slot in the top enclosure tube and into the hole in
the bottom enclosure tube using the cross-head
screwdriver.
Page 12

1!
Slot the bottom enclosure tube into the tubes in
the POD-connector tubes visible through the slots in
the frame pad.
Assemble the remaining enclosure tubes
using the self tapping screws and the
cross-head screwdriver.
Slot the remaining enclosure tubes into the
remaining POD-connector’s on the frame.
have completed step 5.
Page 13

14
STEP 6 : FITTING THE ENCLOSURE NETTING
You will need the following parts to complete step 6:
Black G4
2xBlackG4poles
- Part N
poles
1xEnclosurenetting
- Part O
Enclosure
netting
Lay the enclosure netting out on the trampoline.
Find the sleeves that run along the top of the
enclosure netting.
Slot the thin sections on the two black G4 poles
into the metal ends so the poles become two long
sections.
Page 14

15
Slot one of the Black G4 poles through three of
the sleeves on the top of the enclosure netting.
Slot the remaining Black G4 poles through the
three other sleeves on the top of the enclosure
netting.
You will now join the two ends of the Black G4
will
poles together with the fitted pole connectors, this
require two people.
Both people hold two of the poles end sections
and walk towards each other to bend the poles
into a circle.
As soon as the poles are bent enough, insert the
connectors into the socket on the other pole (
1
Push the pin inwards
and fully insert the
(
2)
connector.
Ensure the pin is protruding through the slot in the
socket.
Page 15

16
You may need to slide the connected poles around
in the nettings sleeves until the thin black sections
are aligned with the gaps between sleeves.
Stand on the trampoline and insert one of the
exposed sections of the Black G4 pole into a
plastic grip on top of one of the enclosure tubes.
5
67
8
Attach the other exposed sections of the
Black G4 pole to the other enclosure tubes in the
order shown in the diagram.
completed step 6.
Page 16

17
STEP 7 : ATTACHING THE BOTTOM OF THE NET
You will need the following parts to complete step 7:
8xCords
- Part R
.
From the underside of the trampoline, tie the
remaining elastic straps around the springs or
through the V-Rings.
You have completed step 7 and the trampoline is
fully assembled.
Push 1 end of a cord through a hole in the bottom of
the netting.
Then tie this end to a V-ring on the bed.
Important: Keep the cord tight at all times.
Slot the other end of the cord through the next
V
-ring.
Then slot back through the net and into the next
V
-ring. Continue to do this untill you have used most
of that cord and tie end to next V-ring.
Tie another cord to same V-ring and repeat until net
is sewn in.
Page 17

USING THE TRAMPOLINE
2.5m
8.2
Before using your trampoline, check again that
there is enough clearance around it. Maintain a
clear space of 2.5 metres (8.2 feet) on all sides of
the trampoline.
Also check that the area is free from walls,
structures, fences, tarmac and other hard surfaces
and other play areas.
7.3m
24
Ensure that there is 7.3 metres (24 feet) clearance
above thetrampoline.
Also check that there area no overhanging objects
in the area above the trampoline.
1"#$%$&'#$(")*'+$%$,)&-+.
To enter the trampoline, unzip the door and climb
in.
Always close the doorway before using the
trampoline.
18
Door
zip
Page 18

 Loading...