

Page 1
7.5ft JUMP POD
WARNING
Read the assembl y, installation,
care,maintenance, anduse
instructions in thismanual prior
to assembling and using this
trampoline/enclosure. Save this
manual for future reference.
WARNING: The trampoline/enclosure is designed for users weighing 80 kg(175 lbs.)
or less.
Ladder is not supplied with trampoline.
Lifestyles (USA),LLC.
3970 Lindbrergh Drive Addison, TX 75001
USER’S MANUAL . . . . . . . . . . . . 3
Assembly, Installation, Care,
Maintenance, and Use Instructions.
www
.bazoongi.com
1-877-927-8777
Page 2

2
Page 3
QUESTIONS?
If you have questions after reading
this manual, please call our toll-free
Customer Hot Line. The trained
technicians on our Customer Hot Line
will provide immediate assistance.
Customer H
Monday–Friday, 8 a.m.–5 p.m.
ot Line: 1-877-927-8777
REPLACEMENT
PARTS
www.bazoongi.com
CONTENTS
IMPORTANT PRECAUTIONS . . . . . . . . . . . . . . . . . . . . . . . . . . . 4
WARNING LABEL PLACEMENT . . . . . . . . . . . . . . . . . . . . . . . . . . . 5
BEFORE YOU BEGIN . . . . . . . . . . . . . . . . . . . . . . . . . . . . . . .
TRAMPOLINE/ENCLOSURE SAFET Y INFORMATION . . . . . . 7
USE AND INSTRUCTIONAL MATERIAL . . . . . . . . . . . . . . . . . . 11
ASSEMBLY . . . . . . . . . . . . . . . . . . . . . . . . . . . . . . .
CARE AND MAINTENANCE . . . . . . . . . . . . . . . . . . . . . . . . . . . . 21
EXPLODED DRAWING AND PART LIST . . . . . . . . . . . .. . . . . . 22
ORDERING REPLACEMENT PARTS . . . . . . . . . . . . . . . . . . . . . . 22
. . . . . . . . . . . . . 15 .
. . . . 6
3
Page 4

1. The owner and supervisors of the trampoline
are responsible to make sure all the users are
aware of practices specified in this manual.
2. Place the trampoline on a level surface before
use.
12. Use the trampoline only with mature, knowl edgeable supervision.
13. Climb onto and off the trampoline. Do not
jump onto it or off it. Do not use the trampo line as a springboard to other objects.
3. Adequate overhead clearance is essential. A
minimum of 7.3 m (24 ft) from ground level is
recommended. Provide clearance for wires,
tree limbs, and other possible hazards.
4. Lateral clearance is essential. Place the tram poline away from walls, structures, fences, and
other play areas. Maintain a clear space on
sides of the trampoline.
5. Use the trampoline in a well lighted area. Art ificial illumination may be required for indoor or
shady areas.
6. Secure the trampoline against unauthorized
and unsupervised use. If an access ladder is
used, it should be removed when the trampol ine is not in use.
7. Inspect the trampoline and enclosure before
each use, and replace any worn, defective, or
missing parts. Make sure the netting, enclos ure tubes, and foam sleeves are correctly
positioned.
8. Remove any obstructions from beneath the
trampoline.
14. Injury may result from encountering the
frame or falling through the springs while
getting onto or off the trampoline or while
jumping. Stay in the center of the bed when
jumping. Do not use the trampoline without
the frame pad securely in place to cover the
frame. The frame pad is not designed or in tended to support the weight of the user. Do
not step or jump directly onto the frame pad.
15. The trampoline is a rebounding device that
propels the user to unaccustomed heights
and into a variety of body movements. Re bounding off the trampoline, striking the
frame or springs, or improperly landing on
the bed may cause injury.
16. Do not attempt or allow somersaults. This
can result in a broken head, neck, back, or
leg. Landing on the head or neck can cause
serious injury, paralysis, or death, even land ing on the middle of the bed.
17. Do not use the trampoline while under the
influence of alcohol or drugs. These sub stances impair reaction time, judgement,
and physical coordination.
9. The trampoline is designed for users weighing
90kg (200 lbs.) or less. The trampoline is not
recommended for use by children under 6
years of age.
10. Do not allow more than one person on the
trampoline. Use by more than one person at
the same time can result in serious unjury.
11. Misuse and abuse of the trampoline is dan gerous and can cause serious injuries.
18. Do not jump on the trampoline while holding
an object, particularly one that is sharp or
breakable.
19. Bounce only when the surface of the bed is
dry. Wind or air movement should be calm
to gentle. The trampoline must not be used
in gusty or severe winds.
20. The trampoline enclosure is to be used only
as an enclosure for a round trampoline.
Page 5
21. Do not attach anything to the
netting that is not a manufacturer
approved accessory or part of
the enclosure.
22. Wear clothing free of draw strings, hooks, loops, or anything
that could get caught in the net ting.
23. Enter and exit the trampoline
enclosure only at the door de signed for that purpose.
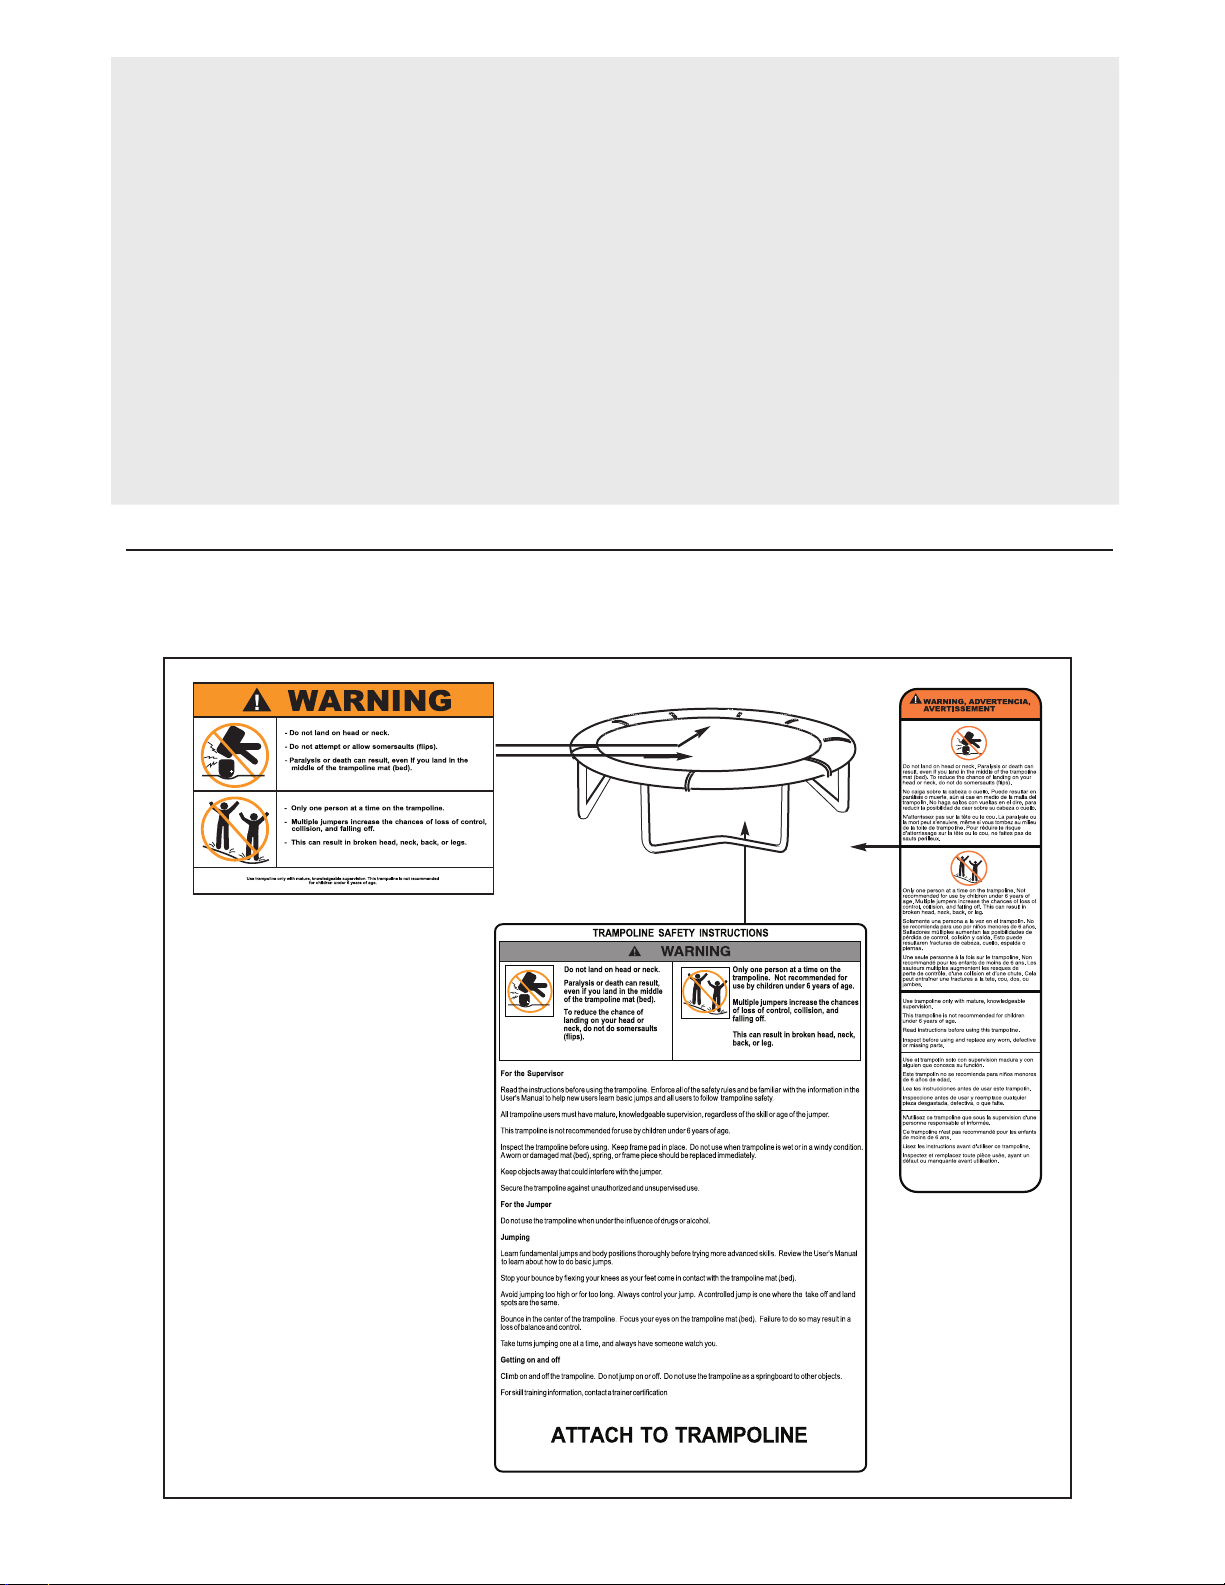
WARNING LABEL PLACEMENT
24. Do not attempt to crawl under the
netting.
25. Do not attempt to jump over the
netting.
26. Do not intentionally rebound off
the netting.
27. The trampoline frame and the enc losure are made of metal. They
are not grounded, and they will
conduct electricity. Therefore,
an electrocution hazard exists.
The labels shown on this page
have been attached to the
trampoline in the indicated
locations. The placard will be
attached by the owner (see
step 7 on page18). If one of the
labels or the placard is missing
or illegible, call our Customer
Hot Line (see page3) and order
a free replacement label or
placard. Attach the label or
placard in the location shown.
Note: The labels and the placard
are not shownactual size.
Label 1
Label 2
Avoid bouncing when tired.
Placard
(to be attached
by the owner)
For Equipment Information, Contact: Lifestyles( USA), LLC.
Customer Hot Line: 1-877-927-8777. Monday-Friday, 8 a.m.-5 p.m.
organization.
5
Made In China
Page 6
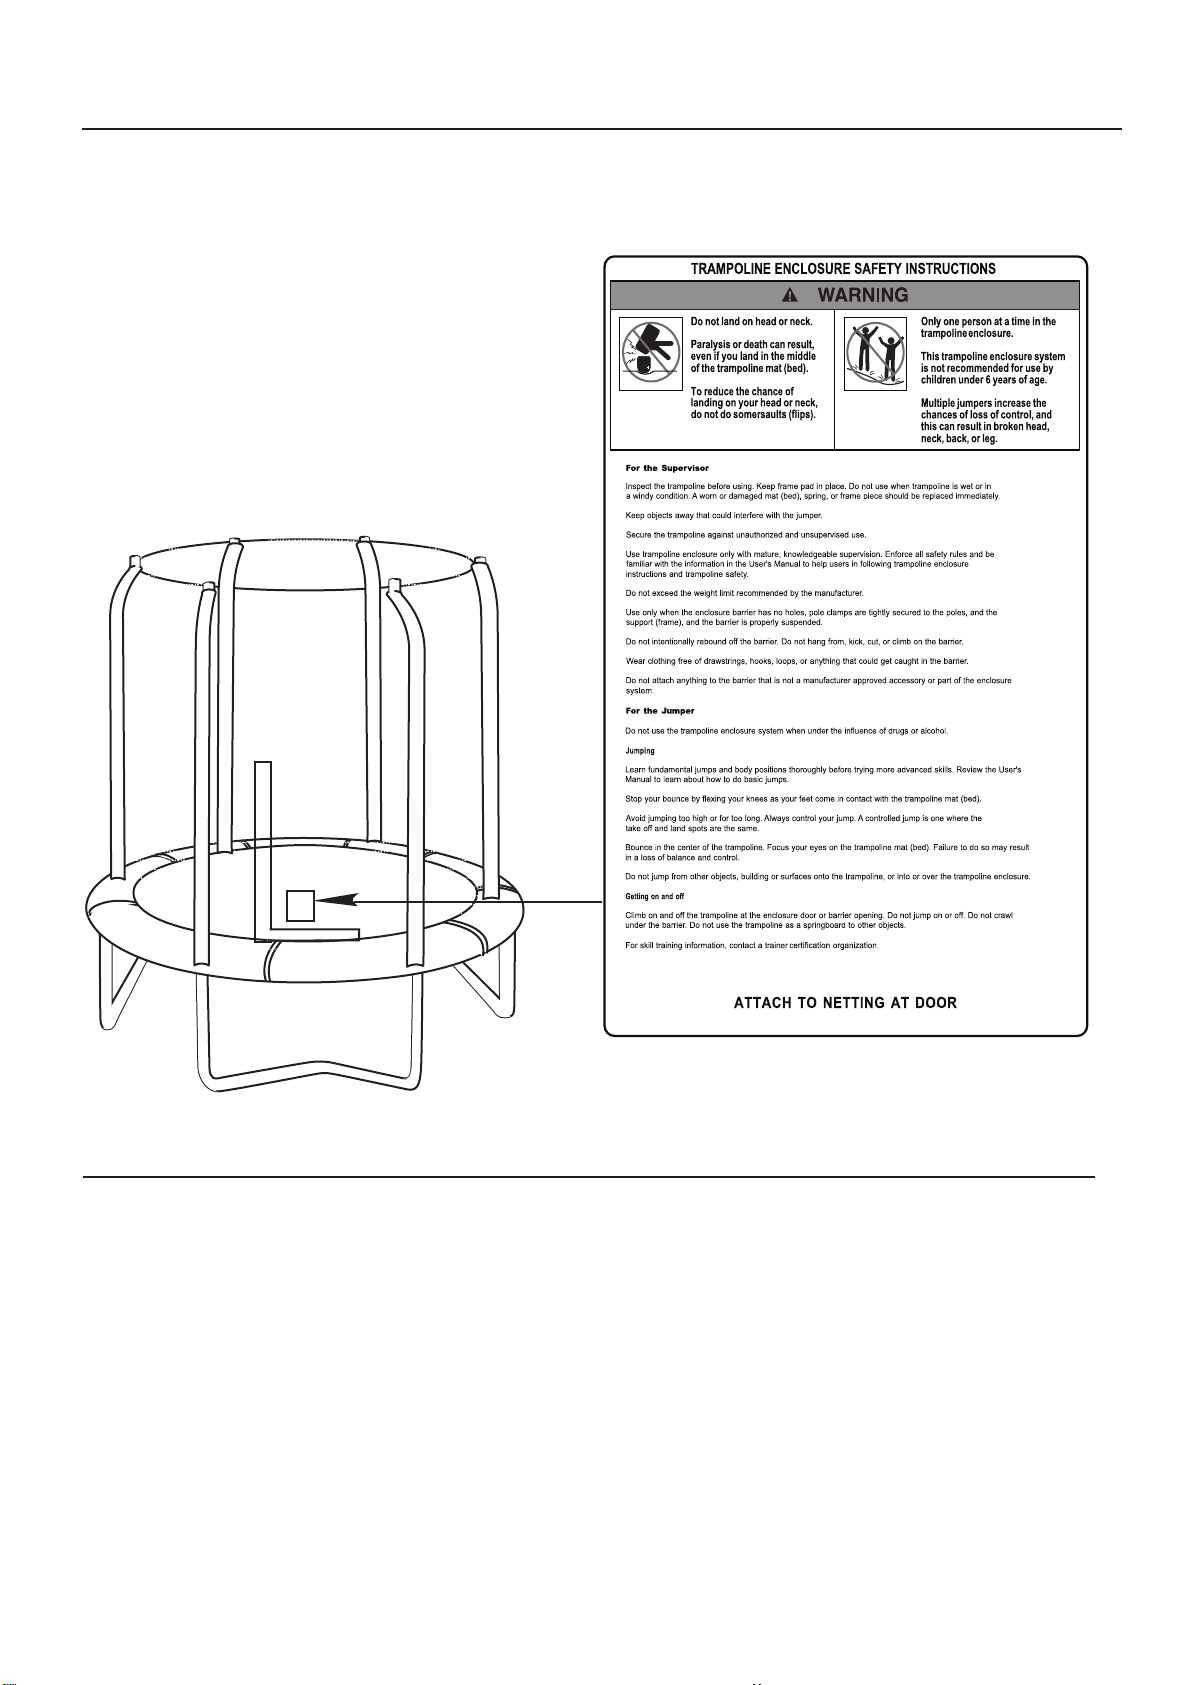
WARNINGPLACARD PLACEMENT
The placard shown at the right must be
attached to the trampoline enclosure by
the owner (see assembly step 14 on page
20). If the placard is missing or illegible,
call our Customer Hot Line toll-free at
1-877-927-8777 Monday through Frida y,
8 a.m. until 5 p.m.Central Time, to order
a free replacement placard. Note: The
placard is not shown actual size.
Avoid bouncing when tired.
BEFORE YOU BEGIN
Thank you for selecting a JumpPOD trampoline/
enclosure. JumpPODS are designed and crafted to
providem
line/enclosure c
instructions for the assembly, care, maintenance,
nd use of the trampoline/enclosure. T
a
ust be read by a
m
before any person is a
enclosure
any years of fun and fitness. This trampo-
omes equipped with warnings and
his
information
ll trampoline supervisors and users
to j
llowed
ump or use
t
he
on the trampoline.
For Equipment Information, Contact: Lifestyles (USA), LLC.
Customer Hot Line:1-877-927-8777. Monday-Friday, 8 a.m.-5 p.m.
Made In China
If you have questions after reading this manual,
please call our Customer Hot Line at 1-877-927-8777 ,
Monday - Friday, 8 a.m. until 5 p.m. Central Time
(excluding holidays). To help us assist you,
please mention the name of the product when calling.
6
Page 7

7
TRAMPOLINE SAFETY INFORMATION
In trampoline use, as in all active recreational sports,
participants can be injured. However, there are steps
that can be taken to reduce the risk of injury. In this
section, primary accident patterns are identified and
the responsibilities of supervisors and jumpers in accident prevention are described.
ACCIDENT CLASSIFICATION
Somersaults (flips): Landing on your head or neck,
even in the middle of the trampoline bed, increases
the risk of a broken back or neck, which can result in
paralysis or death. Such events can occur when a
jumper makes an error trying to perform a forward or
backward somersault (flip). Do not perform somersaults (flips) on this backyard trampoline.
Multiple Jumpers: More than one jumper on the
trampoline increases the chance of a jumper becoming injured by losing control of his or her jump.
Jumpers may collide with one another, fall off the
trampoline, fall on or through the springs, or land
incorrectly on the bed. The lightest weight jumper is
the jumper most likely to be injured.
Mounting and Dismounting: The trampoline bed is
several feet from ground level. Jumping off the trampoline to the ground or any other surface may result
in injury. Jumping onto the trampoline from a roof,
deck, or other object also represents a risk of injury.
Smaller children may need assistance getting onto or
down from the trampoline. Climb carefully onto and off
the trampoline. Do not step onto the springs or the
frame pad. Do not grasp the frame pad to pull yourself onto the trampoline.
Striking the Frame or the Springs: Injury may result
from encountering the frame or falling through the
springs while jumping or getting onto or off the trampoline. Stay in the center of the bed when jumping.
Make sure to keep the frame pad in place to cover
the frame. The frame pad is not designed nor intended to support the weight of the trampoline user. Do
not step or jump directly onto the frame pad.
Loss of Control: Jumpers who lose control of their
jump may land on the bed incorrectly, land on the
frame or springs, or fall off the trampoline. A controlled
jump is one where the landing is in the same spot as
the takeoff. Before learning a more difficult maneuver,
the preceding one should be performed consistently
under control. Attempting a maneuver beyond present
skill levels increases the chance of loss of control. To
regain control and stop your jump, bend your knees
sharply when you land.
Alcohol or Drug Use: The chance of injury increases
when a jumper has consumed alcohol or taken drugs.
These substances impair a person’s reaction time,
judgment, and physical coordination.
Encountering Objects: Use of a trampoline while
other people, pets, or objects are underneath it will
increase the chance of injury. Jumping while holding
or having an object on the trampoline, particularly one
that is sharp or breakable, will increase the chance of
injury. Placing a trampoline too close to overhead
electrical wires, tree limbs, or other obstructions can
increase the chance of injury.
Poor Maintenance of the Trampoline: Jumpers may
be injured if a trampoline is used when it is in poor
condition. A torn bed, bent frame, broken spring, or
missing frame pad, for example, should be replaced
before anyone is allowed to jump. Inspect the trampoline before each use.
Weather Conditions : A wet trampoline bed is too
slippery for safe jumping. Gusty or high winds can
cause jumpers to lose control. To reduce the chance
of injury, use the trampoline only under appropriate
weather conditions.
Access: To prevent access to the trampoline by
unsupervised smaller children, the access ladder
should always be removed and stored in a secure
location when the trampoline is not in use.
Page 8

METHODS OF ACCIDENT PREVENTION
The Supervisor’s Role in Preventing Accidents
It is the responsibility of the supervisors of trampoline
users to provide knowledgeable and mature supervision. They need to know and enforce all the rules and
warnings set forth in this manual to minimize the likelihood of accidents and injuries and to inform users of
these rules. During periods of time when supervision
is unavailable or inadequate, this may require that the
trampoline be disassembled, placed in a secure area,
or otherwise secured against unauthorized use.
Another option that may be considered is covering the
trampoline with a heavy tarp that can be secured with
locks and chains. It is the responsibility of the supervisor to make sure that the placard with TRAMPOLINE
SAFETY INSTRUCTIONS (see step 7 on page 18) is
kept posted on the trampoline and that jumpers are
informed about these instructions.
Inspect the trampoline before using it. Do not use the
trampoline without the frame pad securely in place to
cover the frame. Do not use the trampoline when it is
wet or in a windy condition. A worn or damaged bed,
s
pring, or frame piece should be replaced immediately.
Keep objects away that could interfere with the
jumper.
Secure the trampoline against unauthorized and
unsupervised use.
For the Jumper
Do not use the trampoline when under the influence
of drugs or alcohol.
Avoid bouncing when tired.
JUMPING
The Jumper’s Role in Preventing Accidents
Education on the part of the user is a must for safety.
Users must first learn a low, controlled bounce and
then learn the basic landing positions and combinations before proceeding to intermediate skills.
Jumpers must understand why they have to master
“control” before they can start thinking about other
moves. Understanding the proper progression of skills
in jumping on a trampoline must be the first lesson.
Review this manual to learn about the basic techniques for using the trampoline. Follow the rules on
the placard with TRAMPOLINE SAFETY
INSTRUCTIONS (see step 7 on page 18). For further
information or additional instructional materials, contact a certified trampoline instructor.
TRAMPOLINE SAFETY INSTRUCTIONS
For the Supervisor
Read the instructions before using the trampoline.
Enforce all of the safety rules and be familiar with the
information in this manual to help new users learn
basic jumps and all users follow trampoline safety. All
trampoline users must have mature, knowledgeable
supervision, regardless of the skill or age of the
jumper.
Learn fundamental jumps and body positions thoroughly before trying more advanced skills. Be alert to
your own limitations in the execution of trampoline
skills. Review this manual to learn how to do basic
jumps.
Stop your bounce by flexing your knees as your feet
come in contact with the trampoline bed. Learn this
skill before attempting others.
Avoid jumping too high or for too long. Always control
your jump. A controlled jump is one where the takeoff
and landing spots are the same.
Bounce in the center of the trampoline. Focus your
eyes on the frame pad. Failure to do so may result in
a loss of balance and control.
Take turns jumping, one at a time, and always have
someone watch you.
GETTING ON AND OFF
Climb onto and off the trampoline; do not jump onto it
or off it. Do not use the trampoline as a springboard to
other objects. For additional information regard-
ing skill training, contact a trainer certification organization.
This trampoline is not recommended for use by children under 6 years of age.
8
Page 9

TRAMPOLINE ENCLOSURE SAFETY INFORMATION
NEED FOR TRAMPOLINE ENCLOSURE SAFETY
A trampoline enclosure is a recreational product.
The information on this page and on page 10 identifies
important safety precautions. The precautions are not
all-inclusive, because an enclosure can be used in
ways that this manual cannot cover completely.
To prevent pinches and cuts during enclosure use, a
frame pad must be installed on the trampoline. (See
the trampoline manufacturer’s instructions.) The frame
pad must be installed before the enclosure is erected.
The frame pad reduces the chance of injury from accidental contact with the springs and frame.
USING THE ENCLOSURE SAFELY
Adult Supervision of Children
Children using a trampoline with a trampoline enclosure must be supervised by adults. Young children
must be supervised constantly. Adults must pay particular attention to:
electricity. Lights, electric heaters, extension cords,
and household electrical appliances are not permitted
in or on the trampoline or enclosure.
Hazards Associated with Entering and Exiting the
Trampoline Enclosure
A trampoline enclosure installed on a trampoline is
raised off the ground. The height of the enclosure
increases the risk of a fall when a jumper is entering
or exiting the enclosure. Young children in particular
may have di
sure. To reduce the risk of falling, help young children
to get into and out of the enclosure.
Enter and exit the trampoline enclosure only through
the door of the enclosure (the opening in the netting
walls). The trampoline bed and the netting walls of the
enclosure are separate pieces; jumpers, particularly
young children, must not exit the enclosure by going
out between the bed and the netting walls. Trying to
exit in this way poses a risk of strangulation from
being caught between the trampoline frame and the
netting walls.
fficulty getting into and out of the enclo-
• things that children bring into the enclosure.
• children’s activities inside the enclosure.
• conditions inside the enclosure while children are
using it.
• the way children get into and out of the enclosure.
Additional details of safe enclosure use are described
below.
Electrocution Hazard Associated with the Metal
Frame of the Trampoline and Enclosure
The trampoline and enclosure frames are made of
metal. They are not grounded, and they will conduct
Darkness increases the chances of a fall when a
jumper is entering or exiting the enclosure. Do not use
the trampoline unless adequate lighting is provided.
Hazards Associated with Animals and Sharp and
Breakable Objects
To avoid damage to the trampoline enclosure and the
trampoline, do not allow pets or other animals inside
of the enclosure. The claws and teeth of animals can
damage the netting. Do not jump on the trampoline
while holding or wearing a sharp or breakable object.
9
Page 10

Hazards Associated with High Winds
A trampoline with an enclosure can be moved or
blown over by high winds, potentially injuring anyone
in its path or anyone inside of the enclosure. If you
anticipate high winds, take down the enclosure netting, and stake the trampoline frame to the ground
(see page 21), or move the trampoline and enclosure
to a sheltered location.
Storing the Trampoline Enclosure Safely
Specific steps for storing the trampoline enclosure are
presented later in this manual. There are specific
safety precautions to be aware of when storing the
enclosure.
This trampoline enclosure is not recommended for
use by children under 6 years of age or by anyone
weighing more than 200 lbs (90 kg).
Use the trampoline only when the bed is clean and
dry. Inspect the trampoline and enclosure prior to
each use and replace any worn or damaged parts.
Use only when the enclosure netting has no holes,
the clamps are tightly secured to the tubes and the
frame, and the netting is properly suspended.
For the Jumper
Do not attempt to jump over the netting. Do not intentionally rebound off the netting. Do not hang from,
kick, cut, or climb on the netting.
Remove the attached tube sections as a unit, and
separate them on the ground. Avoid pinching your fingers by keeping your fingers away from pinch points
near the bracket assembly while you are removing the
tubes from the frame.
Placing the Trampoline in a Safe Place
There must be at least 24ft (7.3 m.) of clear, open
space above the trampoline bed. Do not place or
store anything underneath the trampoline.
To avoid injury, the trampoline must be kept away
from objects and possible hazards including electric
power wiring, tree limbs, and fences. Do not place the
trampoline near any other recreational devices or
structures such as a swimming pool or swing set.
The trampoline must be placed on a level surface
before use, and the area around the trampoline must
always be well lighted.
For the Supervisor
Be familiar with the information in this manual and
enforce all of the safety rules. Help new users and all
users to use the trampoline and enclosure safely.
Wear clothing that is free of drawstrings, hooks, loops
or anything that could get caught in the netting.
Do not attach anything to the netting that is not a
Bazoongi approved accessory or part of the trampoline enclosure.
How to Enter and Exit the Trampoline Enclosure
nter and exit the trampoline enclosure only through
E
the door in the netting. To enter the enclosure, first
unfasten the plastic clips on the door and unzip the
zippers. Place one knee on the frame pad and climb
head first through the door. Refasten the plastic clips
and close the zippers.
To exit the enclosure, first unzip the zippers on the
door and unfasten the plastic clips. Sit on the bed of
the trampoline and climb feet first through the door.
When you are through the door and sitting on the
frame pad, step or jump safely to the ground. Close
the zippers and refasten the plastic clips.
All trampoline users must have someone watch them,
regardless of the skill or age of the user.
Secure the trampoline against unauthorized and
unsupervised use. Keep the trampoline free of objects
that could interfere with the jumper.
10
Page 11

USE AND INSTRUCTIONAL MATERIAL
OVERVIEW OF TRAMPOLINE USE
The first periods of trampoline use should focus on
learning fundamental body positions and practicing
the eight basic bounces that are described on
pages 13 and 14 in this manual.
During this learning period, jumpers should practise
these basic techniques and
or checking the bounce, should be taught first and
stressed as a safety measure. Jumpers should brake
their jump whenever they start to lose balance or control. This is done by simply flexing the knees
sharply upon landing and absorbing the upward
thrust of the bed. This enables the jumper to stop
suddenly and avoid losing control.
In trampoline use, the takeoff point and landing
point of a good, controlled jump are in the same
spot. An exercise is considered learned only when a
jumper is able to perform it consistently. Jumpers
should never proceed to any advanced step until they
can perform all previous techniques consistently.
Allow each jumper a brief turn on the trampoline.
Extended bouncing exposes an overtired user to an
increased risk of injury. Longer turns tend to lessen
the interest of others waiting to jump. Clothing should
consist of a T-shirt and shorts. Jumpers should wear
regulation gymnastic shoes or heavy socks, or they
may jump barefoot. Street shoes or tennis shoes
perfect them. Braking,
should not be worn on the trampoline. Beginning
jumpers may wish to wear loose-fitting protective
clothes, such as a long-sleeve shirt and pants, until
correct landings are mastered. This will reduce the
chance of mat (bed) burns from improper landings on
elbows and knees. No hard-sole shoes should be
worn, as they cause excessive wear on the trampoline bed.
Mounting and dismounting properly should be a
strict rule from the beginning. Users should climb onto
the trampoline by placing their hands on the frame
and stepping or rolling up onto the frame, across the
springs, and onto the bed. Do not step directly onto
the frame pad or grasp the frame pad when mounting
or dismounting the trampoline. Users should always
place their hands on the frame while mounting or dismounting. To dismount, jumpers should walk to the
side of the bed, bend over and place one hand on the
frame, and then step from the bed to the ground. If
you have installed the optional ladder, its rungs can
be used to mount or dismount. Always face the ladder
and place your hands on the frame. Make sure your
foot has secure contact with the ladder rung when
using it.
Reckless bouncing should not be permitted. All skills
should be learned at moderate heights. Control,
rather than height, should be emphasized. Jumpers
should be forbidden to practice alone and unsupervised.
11
Page 12

INSTRUCTIONAL PROGRAM AND MODEL
LESSONS
The following lessons are examples of an instructional
program. They should follow a complete discussion
and demonstration of body mechanics between the
supervisor and the student(s). See pages 13 and 14
for descriptions of basic trampoline skills.
leg is brought forward from the standing (not
bouncing) position, and the drop to the back with
the chin held forward to the chest and the eyes forward on the frame pad. Spotting this skill is most
important. Demonstration of back drop with low
bounce and practice of both techniques.
Lesson 5
Lesson 1
1. Mounting and dismounting—Demonstration and
practice of proper techniques.
undamental bounce—Demonstration and practice.
2. F
3. Braking (checking the bounce)—Demonstration and
practice. Braking on command.
4. Hand and knee drop—Demonstration and practice,
stressing four-point landing and alignment.
Lesson 2
1. Review and practice of skills previously learned.
2. Knee drop—Half twist to the right, to the left, to the
feet, and then to the knees.
3. Seat drop—Half twist to the feet. Seat drop, knee
drop, hand and knee drop, repeat.
Lesson 3
1. Review and practice of skills previously learned,
encouraging original routines based on them.
2. Half turntable—Start from the front drop position
and push to the left or right with the hands. Turn
the head and shoulders in the same direction.
Keep the back parallel to the bed and the head up.
After completing a half turn, land in the front drop
position.
Lesson 6
1. Swivel hips—Suggested progression: seat drop,
feet, half twist, repeat; seat drop, half twist to feet,
repeat; seat drop, half twist to seat drop.
2. Half turntable.
Lesson 7
The student should now be encouraged to design and
organize routines, with emphasis on good form. The
instructor may judge or grade students and arrange
groupings for further instruction accordingly.
1. Review and practice of skills previously learned.
2. Front drop—To save time and avoid mat (bed)
burns, all students should be requested to assume
the front drop position on the floor while the instructor checks for faults. Suggested progression: from
hand and knee bounce, the body is extended for
the landing in the front drop position, and the
rebound is made to the feet.
3. Practice routine—Hand and knee drop, front drop,
feet, seat drop, half twist to feet.
Lesson 4
1. Review and practice of skills previously learned.
2. Back drop—Demonstration, emphasizing the forward thrust of the hips by arching the body as one
To stimulate interest in competition, the game of
“Trampoline Horse” can be introduced. Before the
game begins, students must count off. To start the
game, student number 1 performs a stunt. Student
number 2 then mounts the trampoline and performs
the same stunt and adds a second stunt. Student
number 3 mounts and performs stunts 1 and 2 and
adds a third stunt. Thus, the series of stunts is continuously lengthened. The first person to miss a stunt in
the series assumes the letter “H” and starts a new
series with a stunt. If a person misses again, he
assumes the letter “O.” The first person to accumulate
“H-O-R-S-E” is eliminated from the game. The last
remaining contestant is the winner.
Lesson planning from this point should be facilitated
by contacting a certified trampoline instructor.
12
Page 13
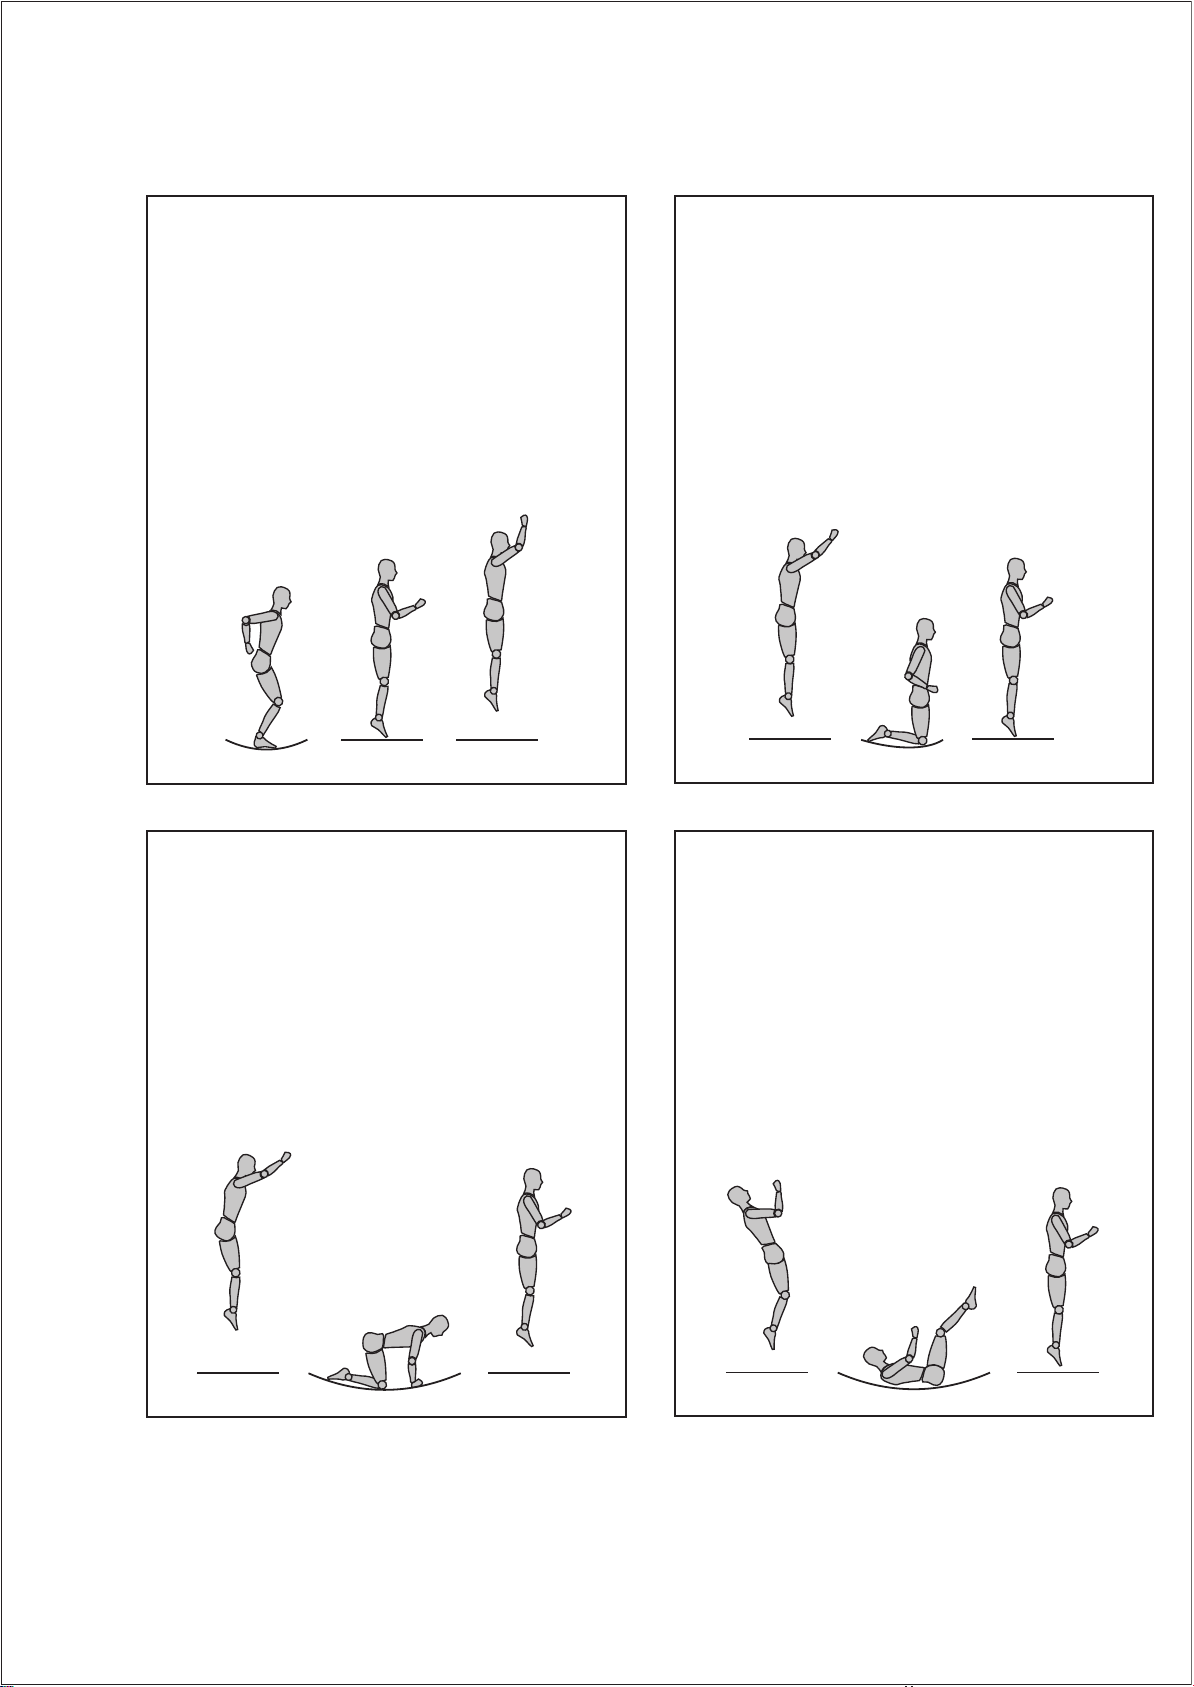
13
BASIC TRAMPOLINE SKILLS
Fundamental Bounce
1. Start from a standing position with your head
erect and your eyes on the frame pad.
2. Swing your arms forward and up in a circular
motion.
3. Bring your feet together and point your toes
downward while in the air.
4. Keep your feet about 30 cm (15 in.) apart
when landing on the bed.
Knee Drop
1. Start bouncing from a standing position,
keeping your eyes on the frame pad.
2. Land on your knees, keeping your back
straight and your body erect.
3. Come back up to an erect position.
Hand and Knee Drop
1. Start bouncing from a standing position,
keeping your eyes on the frame pad.
2. Land on the bed on your hands and knees.
3. Push with your hands and come back up to
an erect position.
Back Drop
1. Start from a low bounce and land on your
back.
2. Keep your chin forward on your chest as you
land.
3. Kick forward and up with your legs to return to
an erect position.
Page 14
ASSEMBLY
IMPORTANT ASSEMBLY INFORMATION
• No tools are required for assembly.
• Assembly requires two persons.
• Use gloves to protect your hands from pinch
points during assembly.
he assembly steps refer to parts by their descrip-
• T
tions and key numbers (see the PART LIST on
page 22). If a p
REPLACEMENT PARTS on page 22.
TRAMPOLINE PLACEMENT
1. Place the trampoline on a level surface
before use.
2. Adequate overhead clearance is essential. A
minimum of 7.3 m (24 ft.) from ground level is
1. Make sure you understand the information in
the box at the top of this page before you
begin assembling the trampoline.
art is missing, see ORDERING
recommended. Provide clearance for wires,
tree limbs, and other possible hazards.
Lateral clearance is also essential. Place the
trampoline away from walls, structures,
fences, and other play areas. Maintain a clear
space on all sides of the trampoline.
3. Use the trampoline in a well-lighted area.
Artificial illumination may be required for
indoor or shady areas.
4. Secure the trampoline against unauthorized
and unsupervised use.
5. Remove any obstructions from beneath the
trampoline.
6. The owner and supervisors of the trampoline
are responsible to make all users aware of
practices specified in this manual.
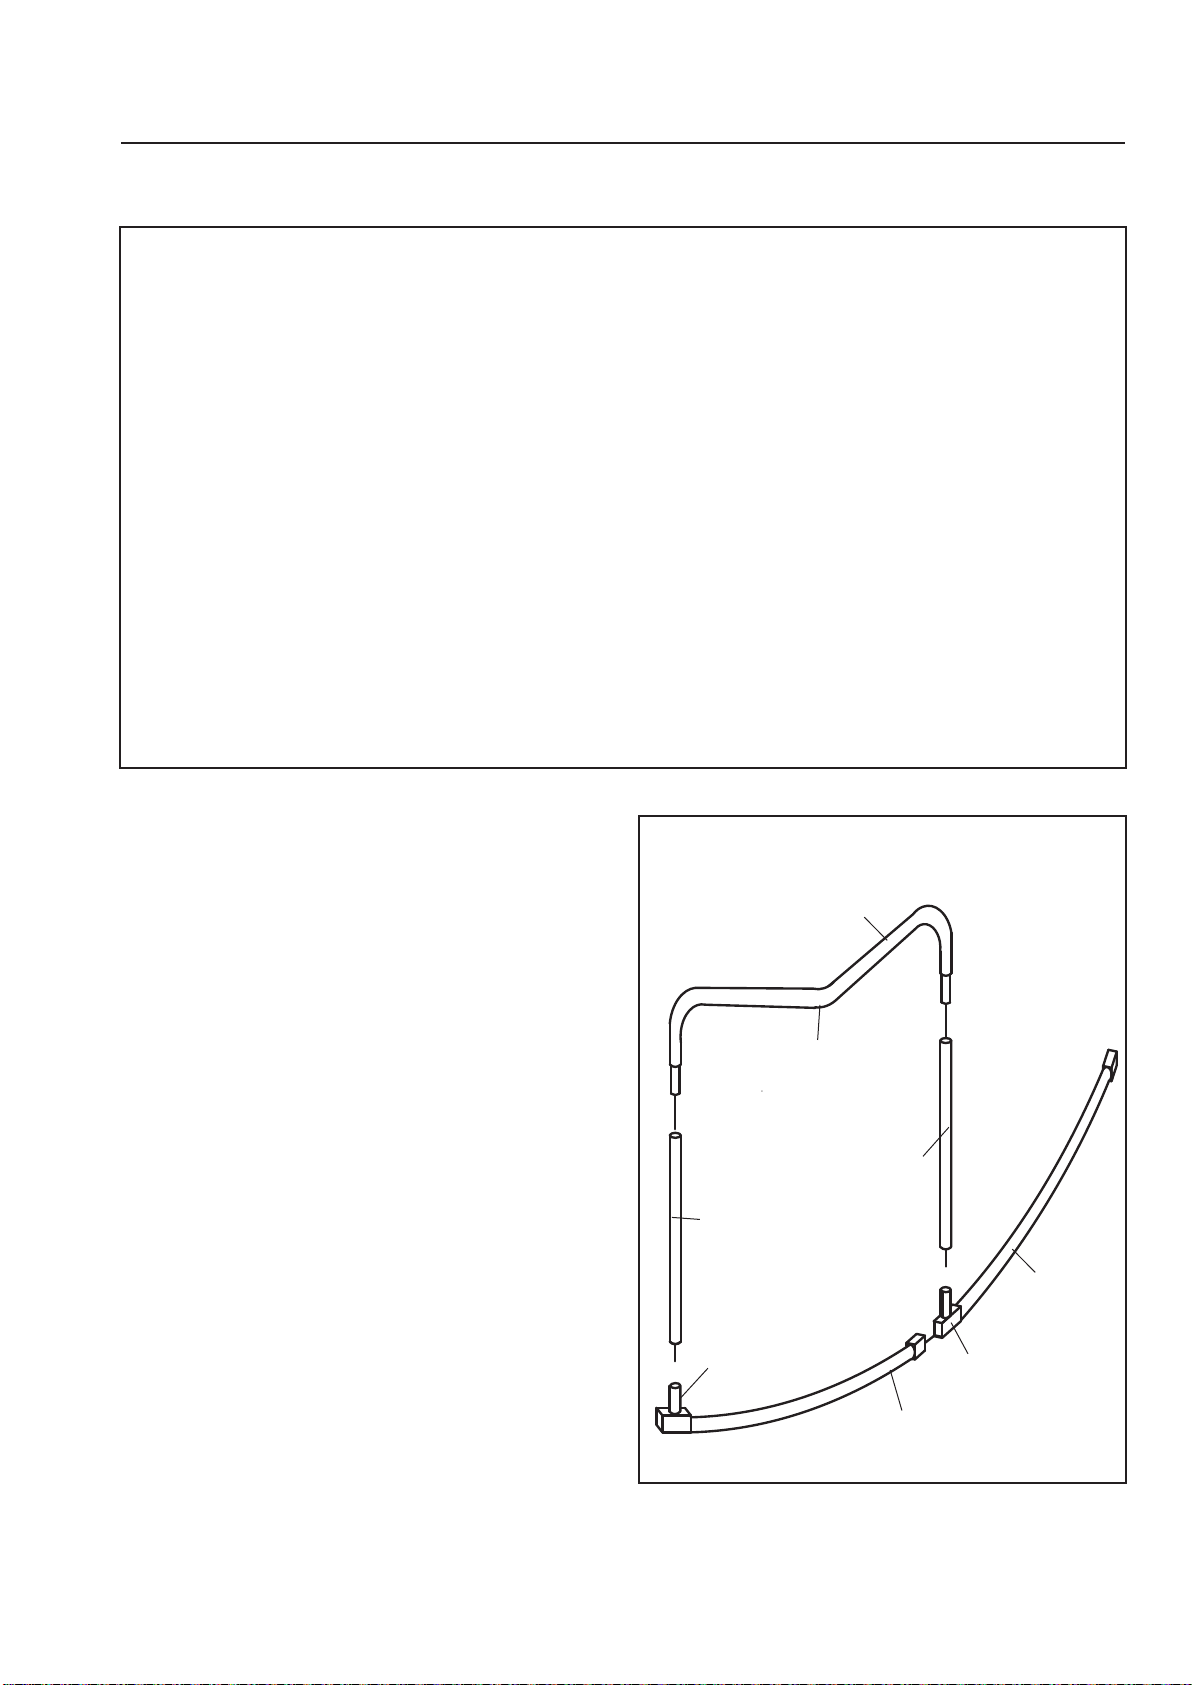
Lay two Top Tubes (1) on the ground as shown.
Make sure there is a Socket (2) on each Top
Tube. Insert the small end of one Top Tube into
the Socket on the other Top Tube.
Insert a Leg (3) into one of the Sockets (2). Insert
a Center (4) into the Leg; make sure the center of
the Base is pointing down. Slide a second Leg
onto the Base. This Leg will be next to the empty
Socket. Step on the Top Rail (1) next to the empty
Socket, lift the Leg, and insert the Leg into the
empty Socket.
You have now assembled one leg section.
Repeat this step to assemble 2 more leg
sections.
4
Center
3
3
1
2
2
1
14
Page 15
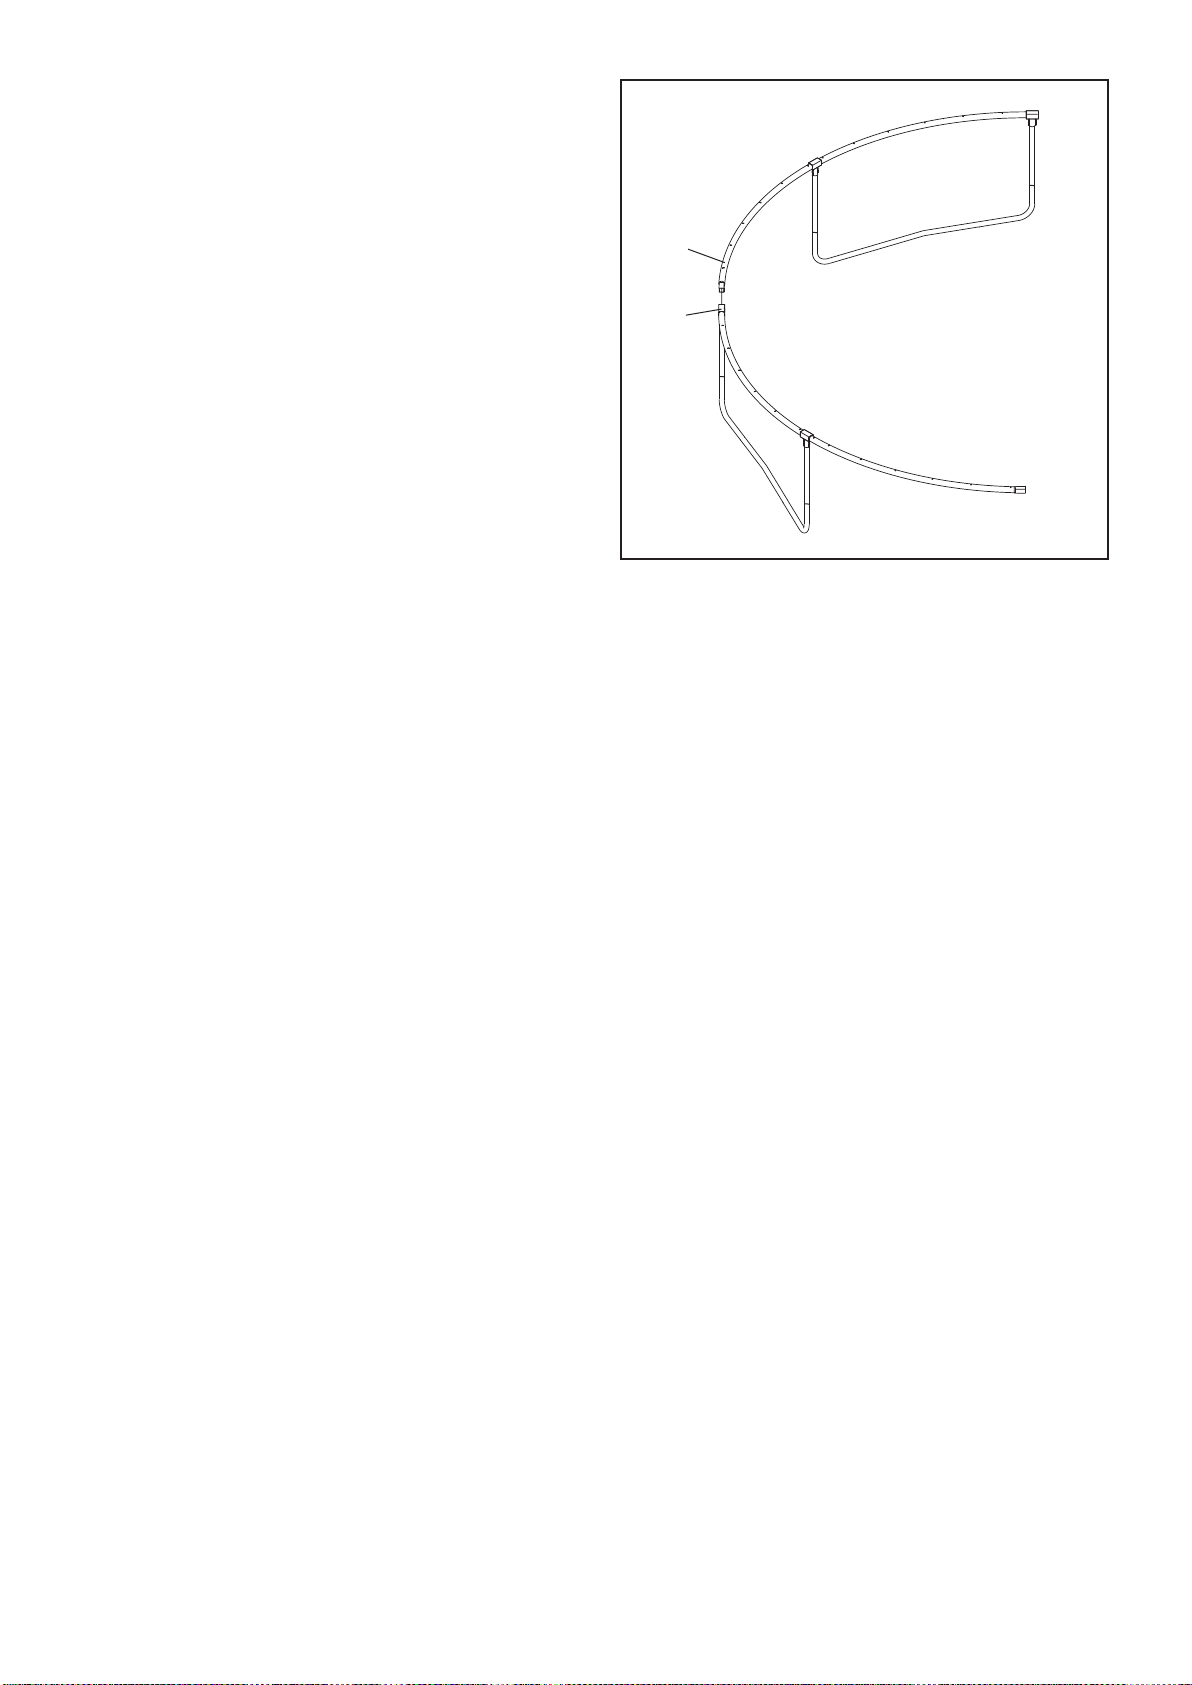
2. Note: This step requires two persons. During
this step, you will connect the three leg sections.
Hold two leg sections in the positions shown.
Insert the small end of one Top Tube (1) into the
Socket (2) on another Top Tube.
Repeat this step until all three leg sections are
connected.
NB:Connecting the last sections together
may require more effort than the other sections.
2
1
2
15
Page 16
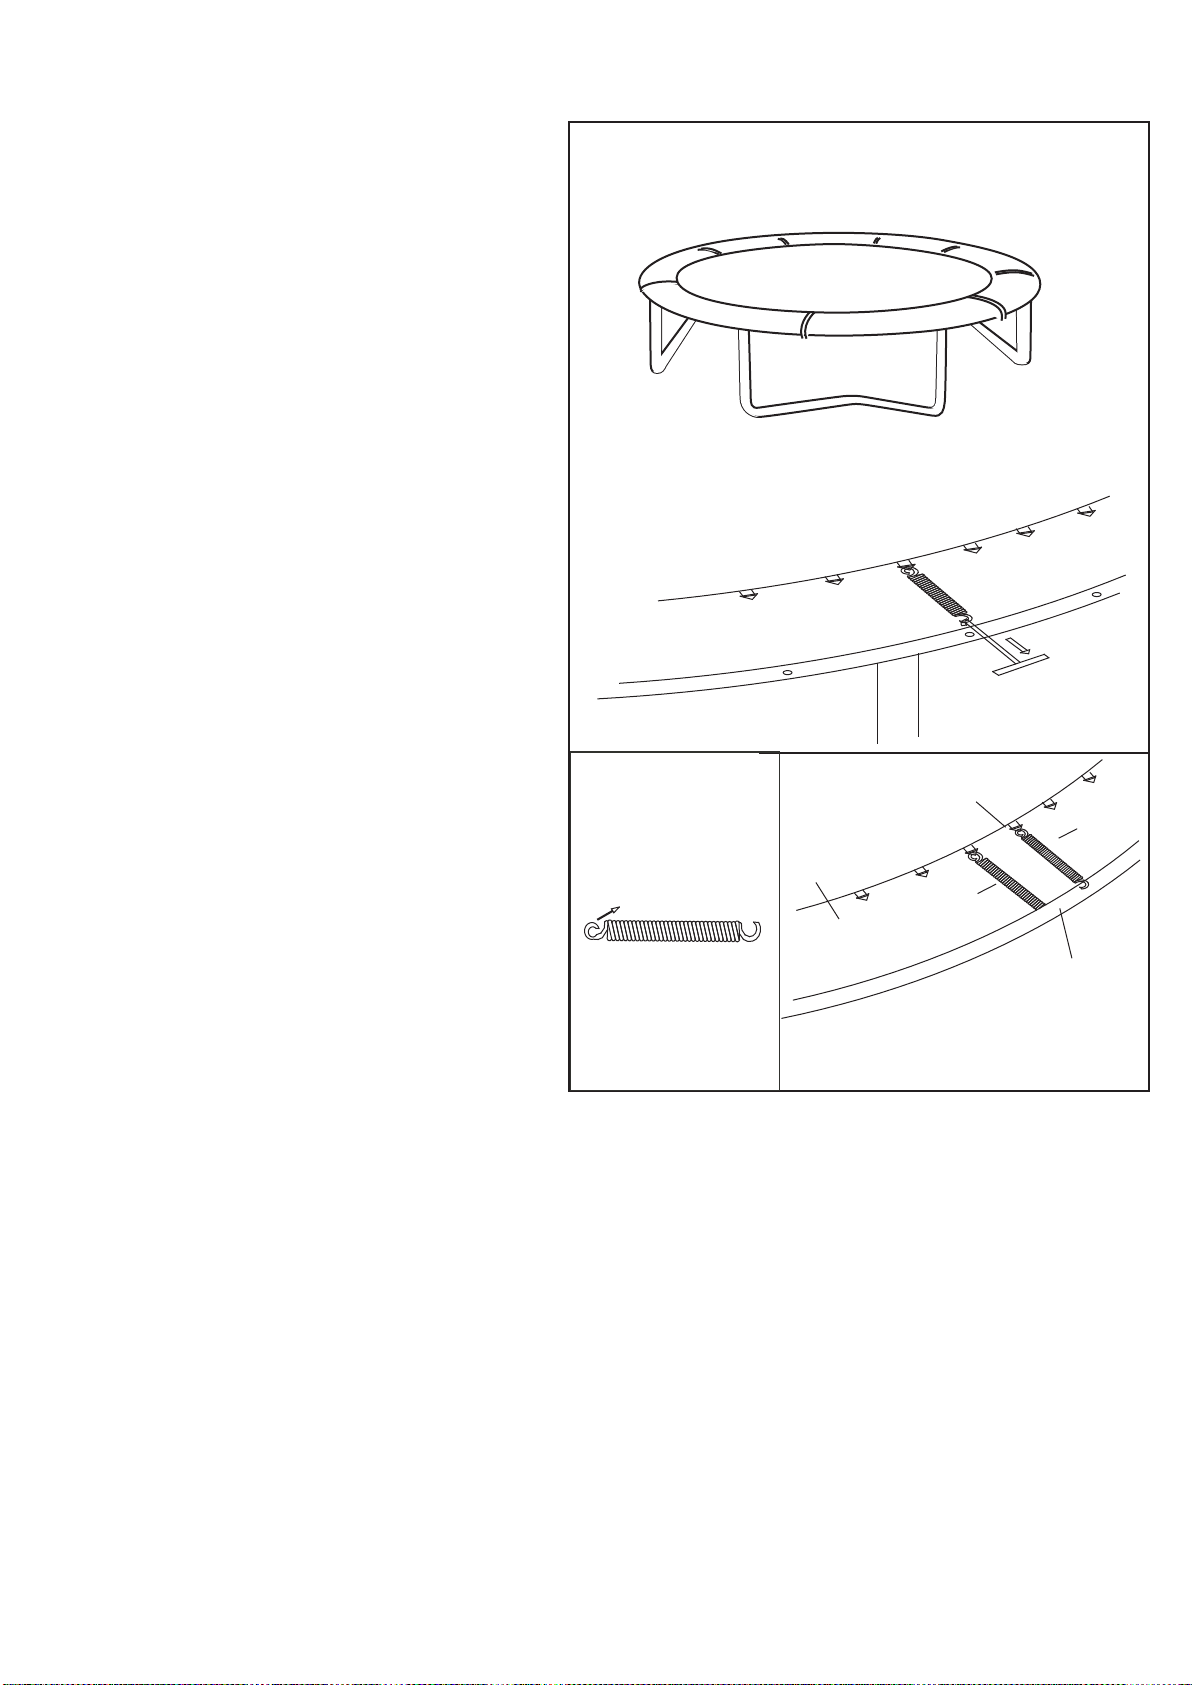
3. Lay the Bed (5) on the ground inside of the
assembled frame. Make sure that the two warning decals (not shown) are on top of the Bed.
Note: There are V-rings around the edge of the
Bed (5) and holes around the top of the frame.
During this step, you will attach the Bed to the
frame using the included Springs (7) for holes
on top of frame and Springs(7) for holes
on bottom of frame (see the inset drawing).
Hook a spring to the Bed(5) and using the spring
pulling tool(17), pull the spring from the Bed to the
hole slot in the trampoline frame with even spring
tension.
To attach each Spring, you will first hook one end
of the Spring into a V-ring with yellow webbing
location (see the inset drawing).
3
Hook a Spring
webbing location on the Bed(5) and into one of the
holes in the frame. Attach a second Spring with
yellow webbing location directly across the Bed
from the first Spring. Attach two more Springs with
location halfway between the first two Springs,
so four Springs are attached as shown.
Attach four more Springs(not shown) halfway between the first four Springs. Continue attaching
Springs halfway between the previously attached
Springs, until all the Springs are attached.
During the installations of spring, wear
gloves and protective eye wear.
into one of the V-rings with yellow
Spring (7):
Hook the V-ring
17
V-ring
7
7
5
Frame
16
Page 17
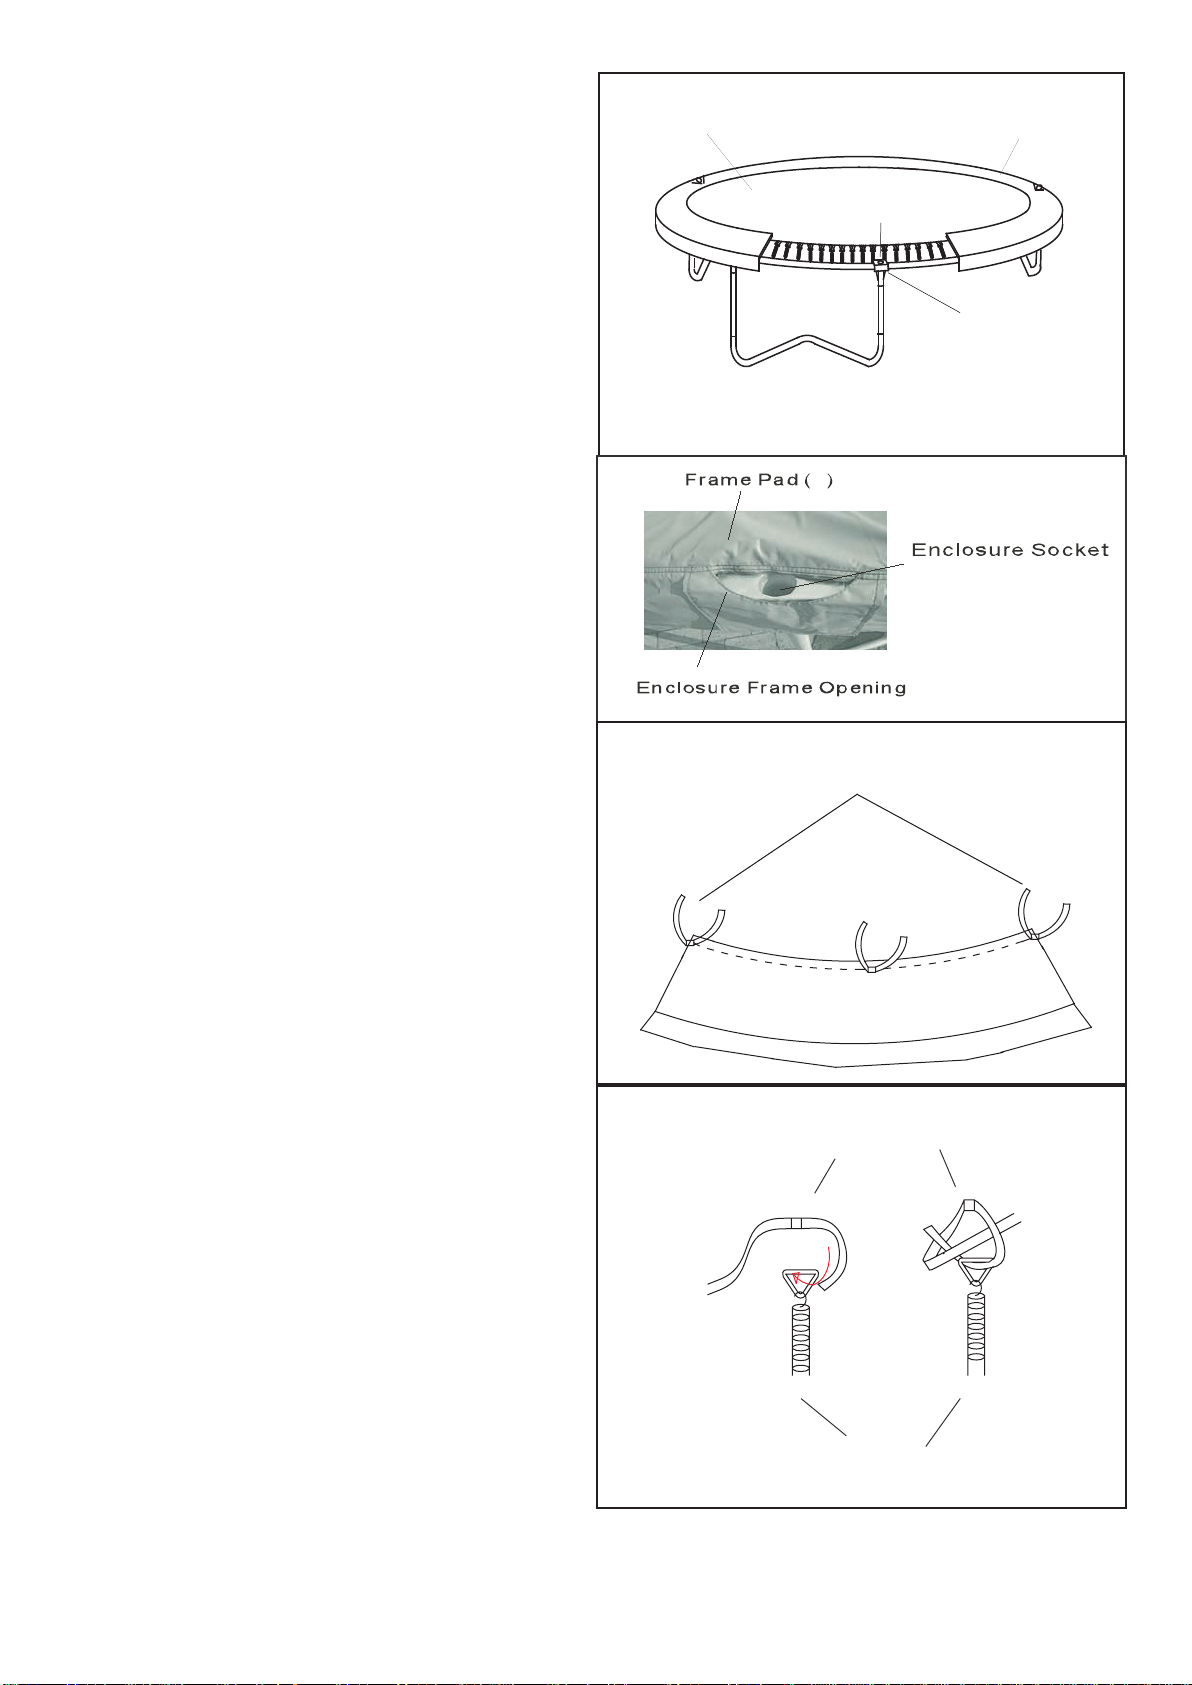
4. Lay the Frame Pad (6) on the frame. Adjust the
position of the Frame Pad so the notches are
aligned with the Legs (6) as shown. Be sure
6 Enclosure Frame Opening are t to the
Enclosure Socket position.
Do not use the trampoline without the Frame
Pad (6), which is designed to reduce the likelihood of injury to the user from coming in contact with the trampoline frame. If you do not
have a Frame Pad, contact your dealer to
obtain one. Properly install the Frame Pad
before using the trampoline.
4
5
Enclosure Frame Opening
Notches
6
6
6
Look under the trampoline and locate the
5.
straps near the edge of bed.
6. See the inset drawing.
Thread one end of Elastic Tie-Down, then tie a knot
on V-Ring.
Repeat this step with the remaining straps which at
middle position of each pad section (not shown).
5.
Elastic Tie-Down
6.
Elastic Tie-Down
V-Ring
V-Ring
17
Spring
Page 18
7. Using the included plastic tie, attach the Safety
Placard (14) to the frame near the point where
jumpers will climb onto and off the trampoline.
The trampoline is now fully assembled. Make
sure that all parts are securely attached.
Familiarize yourself and all users of the tram-
poline with the safety precautions, use and
instructional materials, and care and maintenance instructions in this manual before using
the trampoline.
7
Frame
14
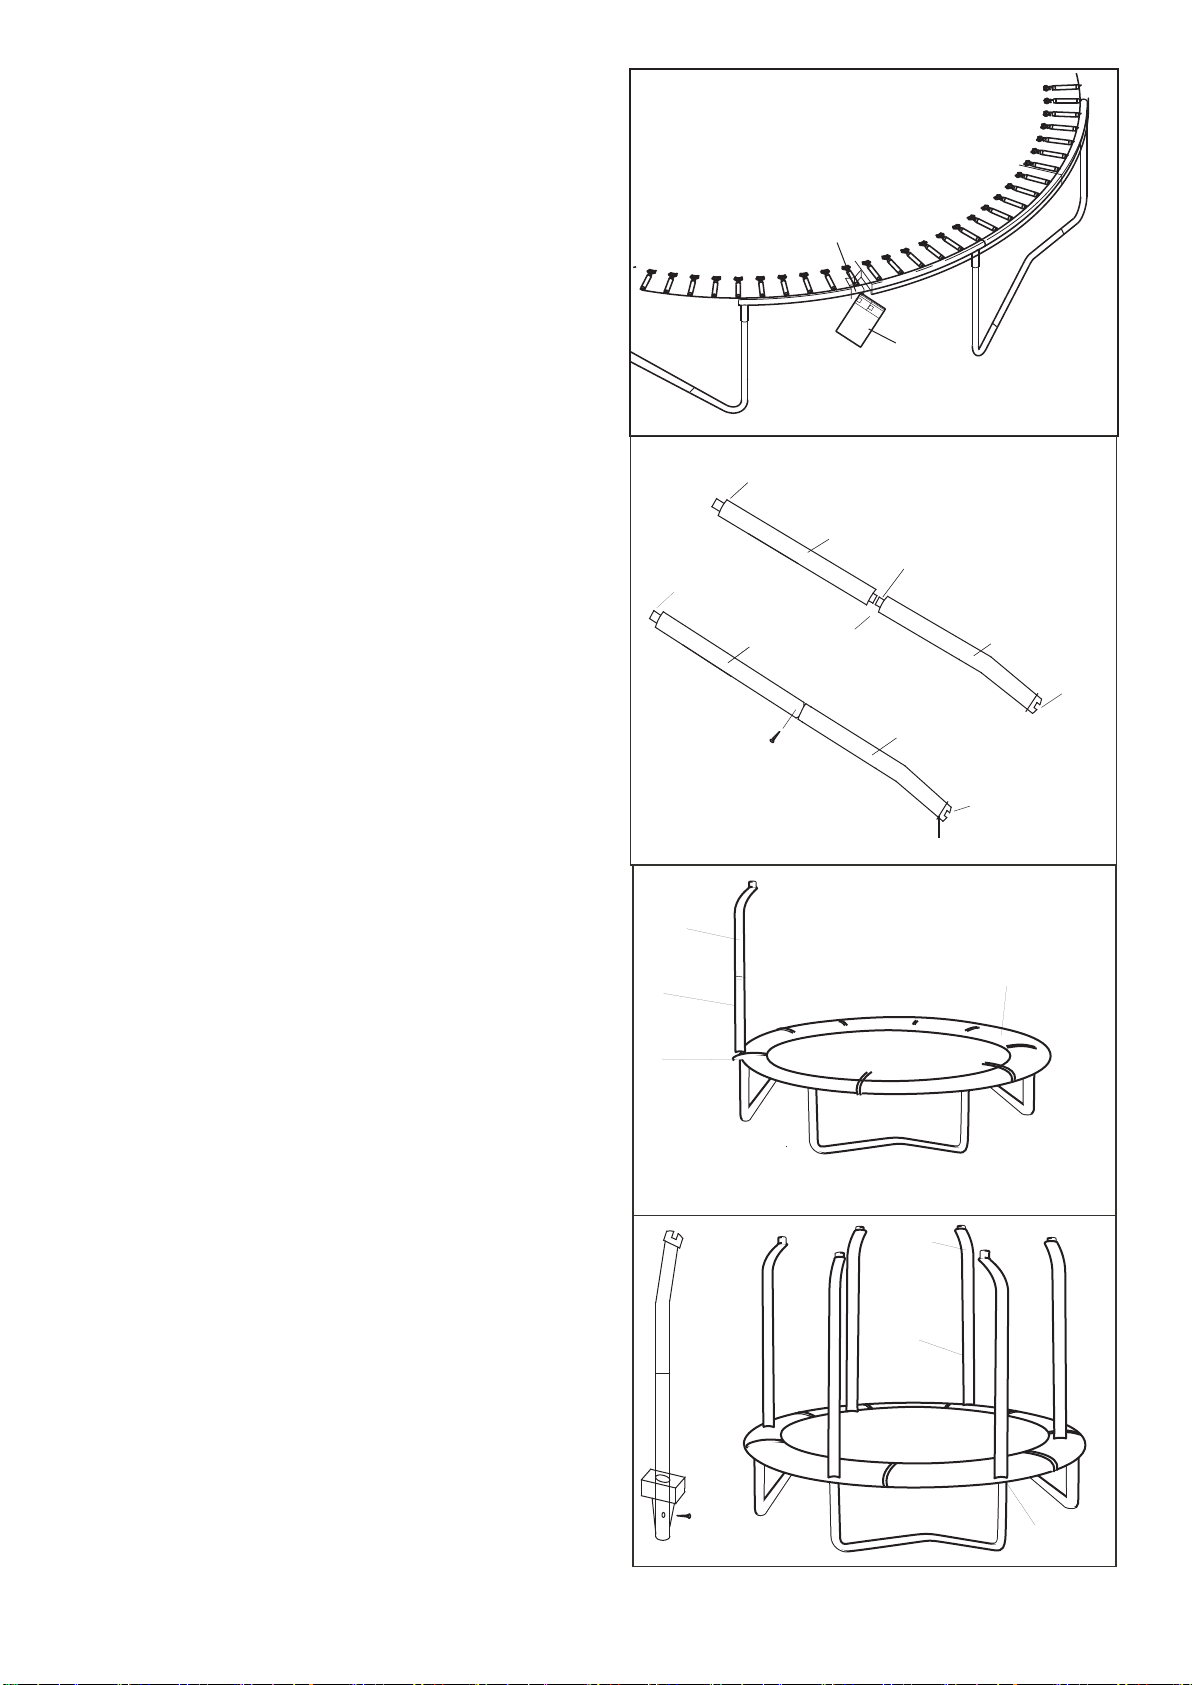
8. Lay a Straight Tube(8) and a Top Tube (9) with
Plastic Cap on the ground.
ure that the Straight Tube (8) is oriented
Make s
so the small holes are in the position shown.
Slide a Foam Sleeve (11) onto each of the tubes;
note that the ends of the Straight Tube (8) should
not be covered.
he Straight Tube (8) into the Top Tube(9).
Insert t
Tighten a Self-tapping Screw (12) into the small hole
in the Tube (8,9).
Assemble t
Tubes (9) and Foam Sleeves (11) in the same way.
9. Insert the end of Pole (8,9) into the hole of
Enclosure Socket (2).
Make sure that the straight tube (8) are oriented so
the small hole are in the position shown. Tighten a Self tapping screw (12) into the small hole in the Enclosure
Socket (2).
Attach the other three Poles (8,9) in the same way.
See inset drawing.
he remaining Straight Tubes (8), Top
8
8
8
11
Tighten Self-tapping Screw
Into Small Hole
12
9
9
8
2
11
Small Hole
5
9
11
11
Plastic Cap
(15)
Plastic Cap
(15)
9
6
Insert the Completed Pole(8,9)into
the hole of Enclosure Socket(2).
12
18
9
8
6
Page 19
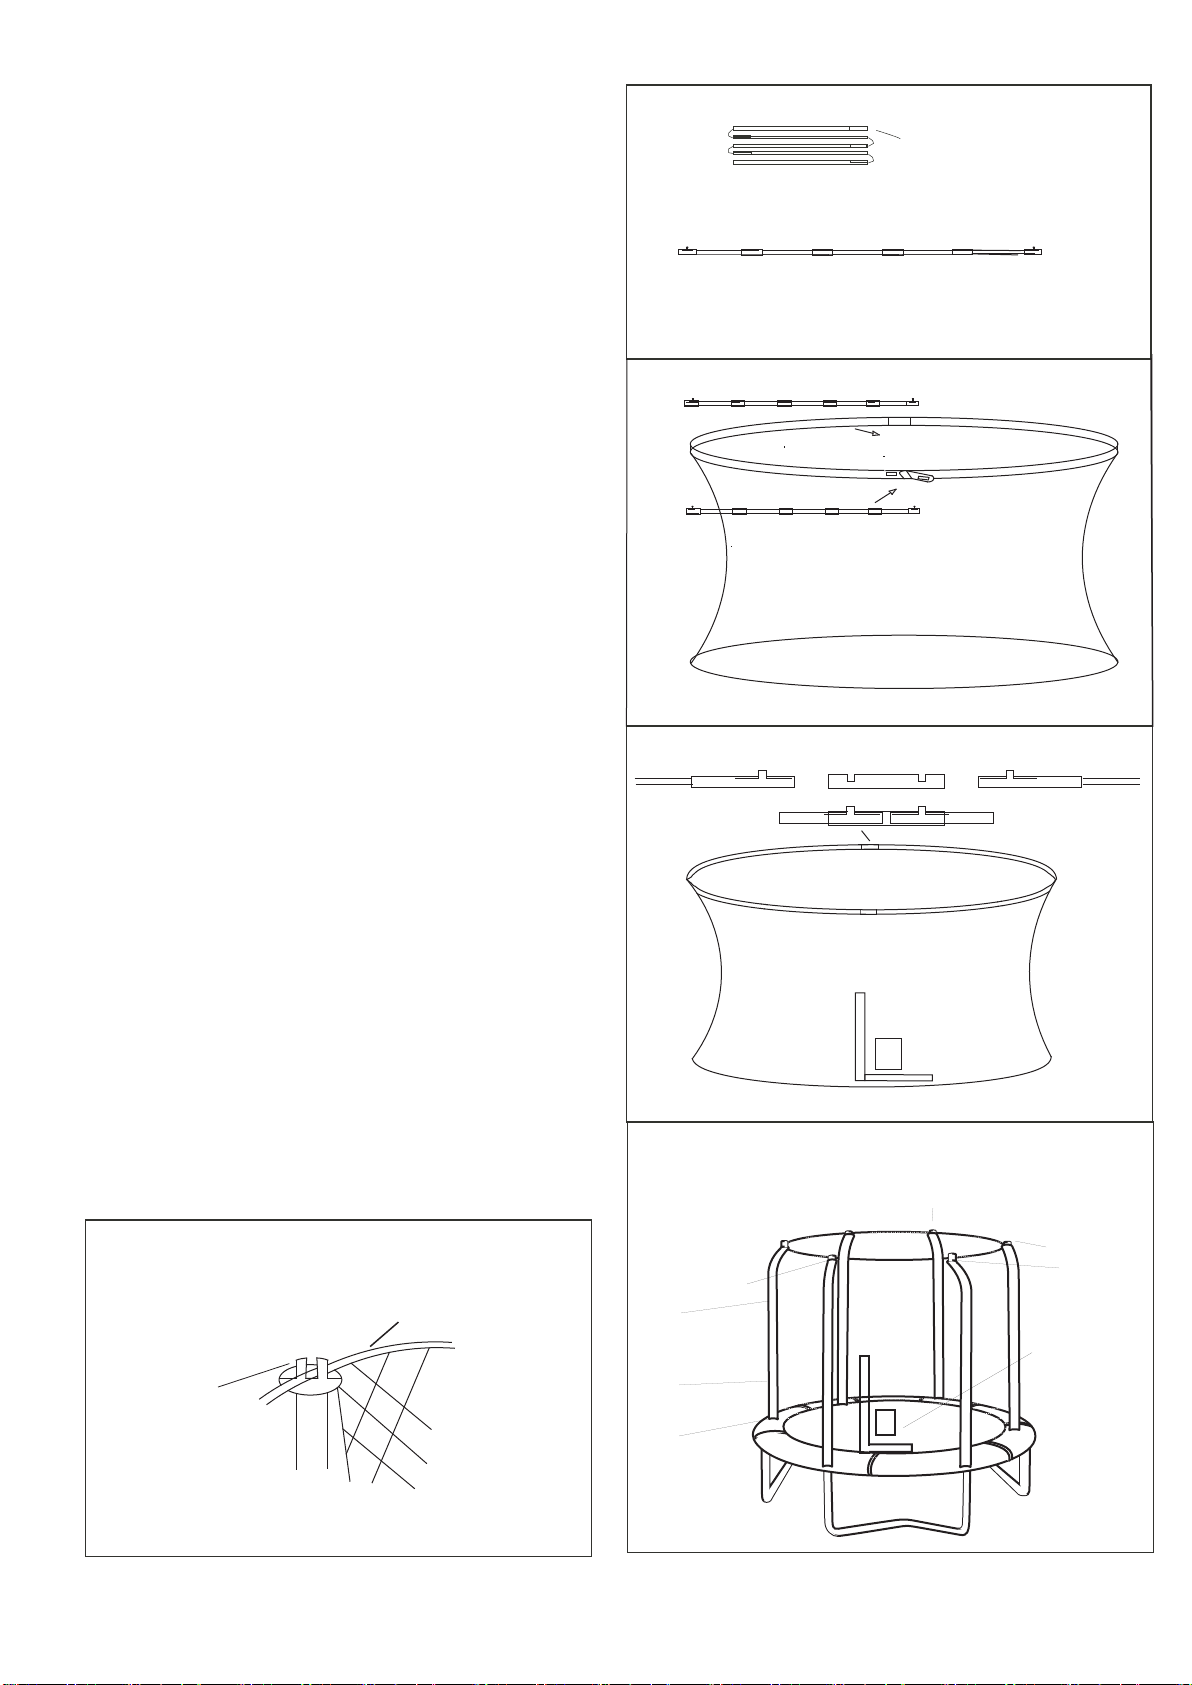
10.
Lay out Top G3 Pole (10), joint each section Connector to a
straight line as shown.
Assemble the remaining Top G3 Pole (10) in the same way.
Spread the Netting (13) on the trampoline bed, insert a Top G3
Pole (10) into the opening of Top Sleeve on the Netting (13).
Insert the other Top G3 Pole (10) into the opposite opening
of Top Sleeve on the Netting (13).
10
5 Sections Per Line
Top G3 Pole(10)
Lay out G3 Pole and Joint each section
to one straight line.
10.a
11. Joint each end of Top G3 Pole (10) by the clip of connector at
each opening. The Top Sleeve of the Netting (13) become a round
shape.
Attach the first hanging point at the upper edge of the Netting (13)
with the G3 Pole (10) to the Plastic Cap (15) of Top Pole (9).
Attach a second hanging point directly across the Netting (13)
from the first hanging point.
Attach the other two hanging point halfway between the first two
hanging points, so four hanging points are attached as shown.
11
Black G3
(11)
Opening
Netting(13)
Insert the pole into sleeve of the Netting(13)
Joint the end of each pole by Clip of Connector
Black G3
Black G3 Black G3
Top Sleeve
See insert drawing for attached of G3 Pole (10):
Attached Hanging Point:
G3 Pole(10)
(15)
Netting
19
11.a
Hanging point 6
9
8
2
Hanging point 1
Door of Netting
Netting
(13)
Plastic cap (15)
Hanging
point 2
Hanging point 3
Hanging point 4
Hanging point 5
Door of Netting
Page 20
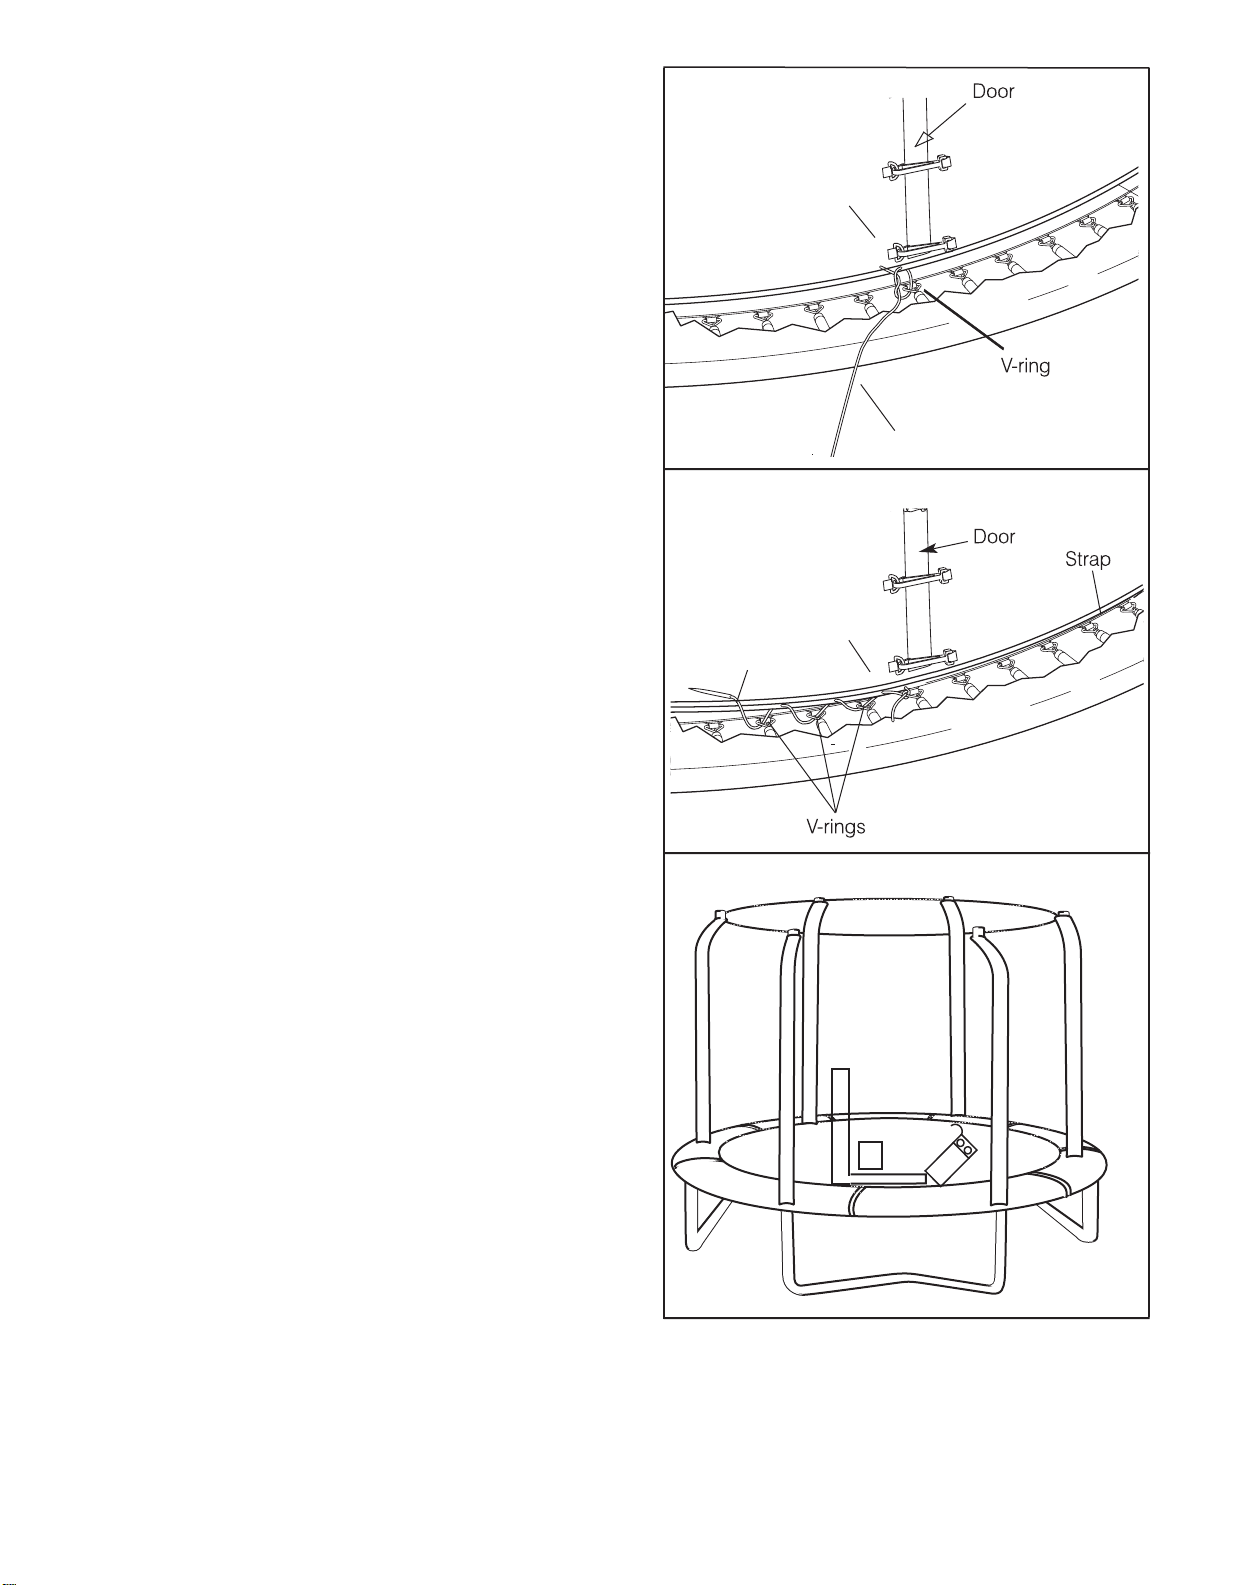
12. Note: During steps 11 and 12, you will “sew”the lower
edge of the Netting(13) to the V-rings on the bed using
the Cords(16).
Locate the V-ring closest to the door. Thread one end
of a Cord(16)through the lower edge of the Netting(13)
above the V-ring and then thread the Cord through the
V-ring. Tie the Netting to the V-ring, by making a double
knot in the Cord.
12
13
13. Thread the Cord(16) through the lower edge of the
Netting(13) halfway between the first V-ring and
the V-ring to the left, and then thread the Cord
through the V-ring to the left. Repeat this
procedure until the entire Cord is threaded through
the Netting and the V-rings as shown. Keep the
Cord taut. Tie the end of the Cord to the last V-ring
that it reaches.
Tie a second Cord(not shown)to the last V-ring
reached by the first Cord. Thread the second Cord
through the Netting(13) and the V-ring as
described above. Repeat this procedure with the
remaining Cords until the last Cord reaches the
first Cord. (Note: The last Cord may overlap the
first Cord.) Make sure that the Netting is sewn to
every V-ring on the trampoline bed; the Netting
below the door must also be sewn to the V-rings.
14. Using the included plastic tie,attach the Safety
Placard(14)to the Netting(13)near the door as
shown.
16
13
13
16
14
13
The trampoline/enclosure is now fully assembled.Make
sure that all parts are securely attached. Familiarize
yourself and all users of the trampoline/enclosure with
the safety precautions, use and instructional materials,
and care and maintenance instructions in this manual
before using.
Disassembly
To disassemble the trampoline/enclosure,follow assembly steps 1 through 13 in reverse order.
Do not attempt to disassemble any trampoline frame components before the springs and the bed
have been removed.
Use gloves to protect your hands from pinch points during disassembly.
14
20
Page 21
CARE AND MAINTENANCE
CARE
Do not allow
inside the enclosure, as claws may snag and pull
the bed material or damage the frame pad or netting.
The trampoline/enclosure is intended to be used by
one person at a time weighing 90 kg (200 lbs.) or less.
The user should be either barefoot, wearing socks, or
wearing gymnastic shoes.
Street shoes or tennis shoes should not be worn on
the trampoline. The user should remove all sharp
objects from his or her person that may cause injury or
damage to the bed. Heavy, sharp, or pointed hard
objects should not contact the bed.
Appropriate shoes should be worn inside the enclosure to reduce wear to the bed.
MAINTENANCE
Your trampoline is manufactured using quality materials and crafted to provide you and your family with
many years of enjoyment and exercise. Proper maintenance and care will help to prolong the life of the
trampoline and reduce the possibility of injury.
pets or animals on the trampoline or
trampoline/
trampoline/
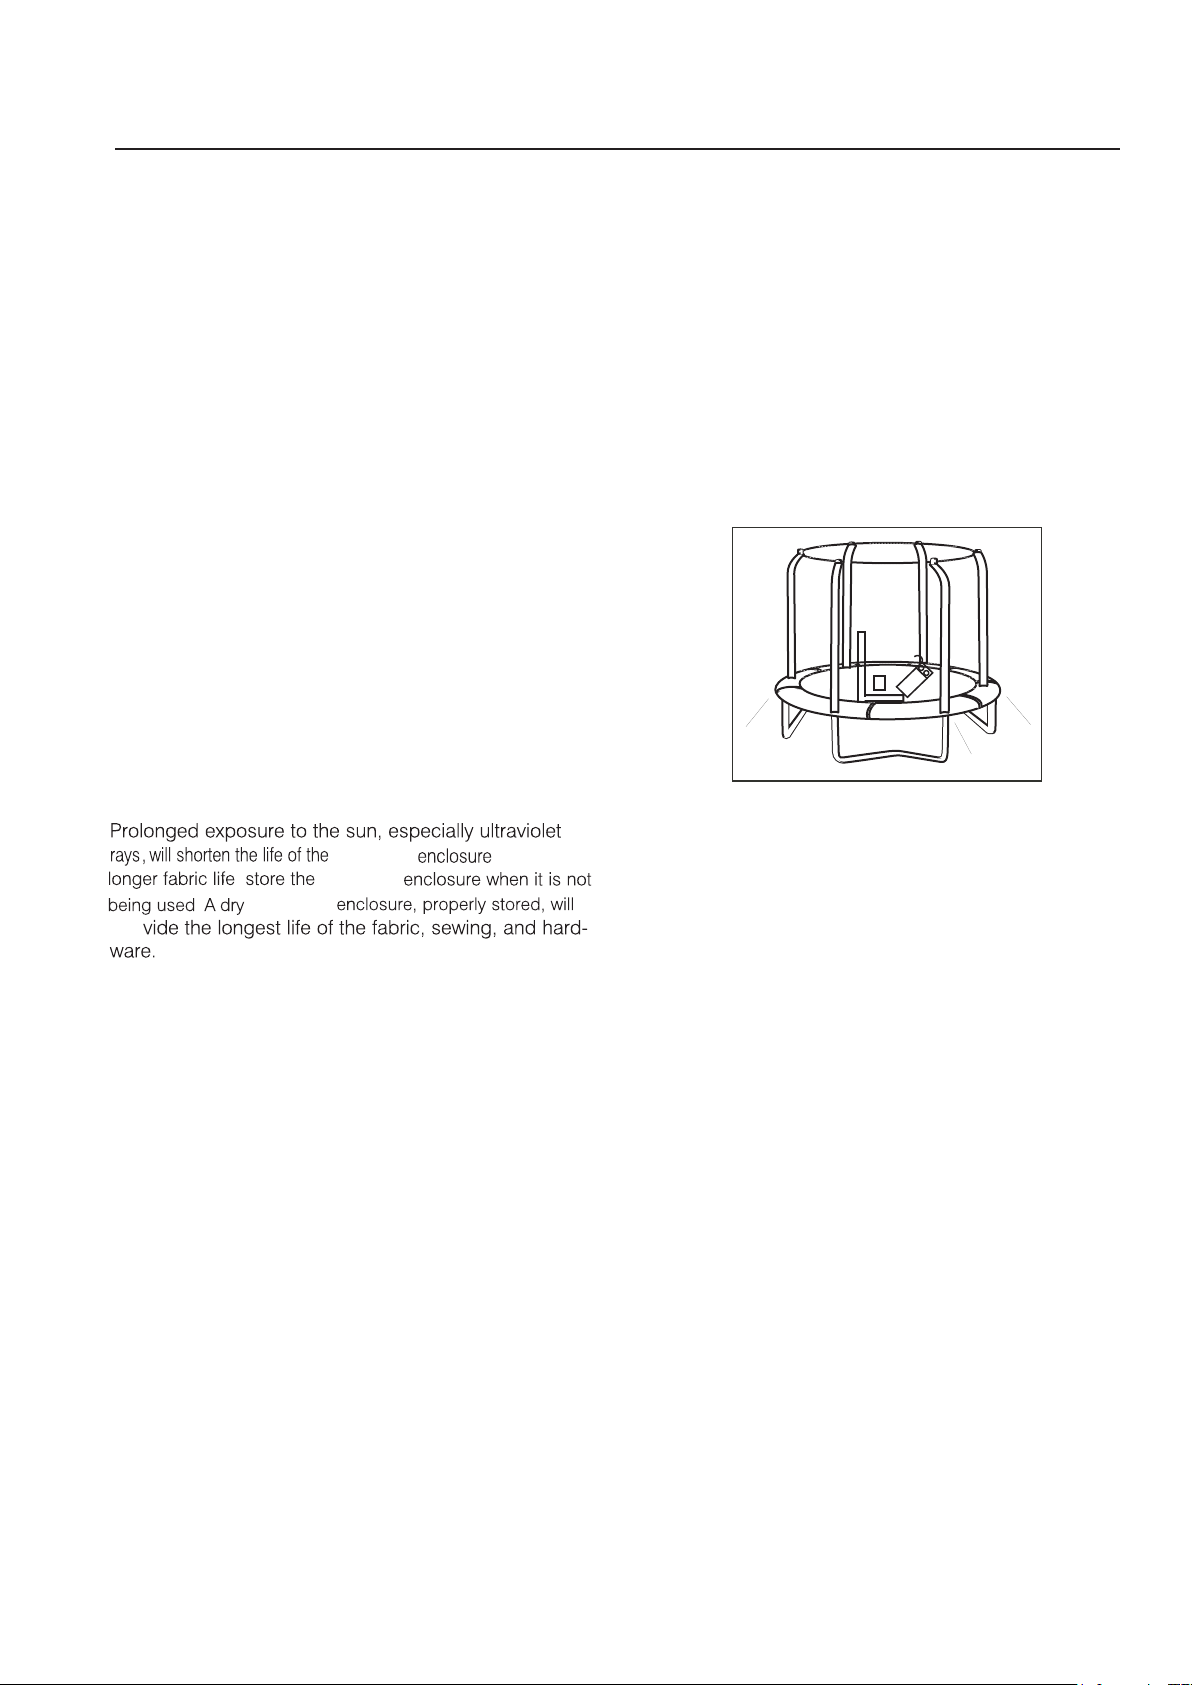
fabric.For
trampoline/
pro
Remove the enclosure from the trampoline
during harsh weather conditions or during long
periods of non-use
The following guidelines should always be observed.
Inspect the trampoline/enclosure before each use,
and replace any worn, defective, or missing parts.
The following conditions could represent potential
hazards and increase the danger of personal injury:
• a missing, improperly positioned, or insecurely
attached frame pad, netting, enclosure tubes ,
foam sleeves
• punctures, frays, tears, or holes worn in the bed,
frame pad, netting, foam sleeves.
• deterioration in the stitching or fabric of the bed,
frame pad, netting
• ruptured or missing springs
• a bent or broken frame, leg, enclosure tubes
• a sagging bed, netting
• sharp protrusions on the frame, suspension
system, enclosure tubes
REMOVING AND STORING THE TRAMPOLINE/
ENCLOSURE
Make sure that the trampoline/enclosure is dry before
removing and storing it. Use caution while removing
the tubes due to the weight of the tubes.
Once the enclosure is removed from the trampoline,
remove all items from the trampoline bed. Make sure
that the bed is clean and that it has no tears or holes.
Store the trampoline/enclosure in a safe, dry location.
SPECIAL CONSIDERATIONS
High Wind
Stake
It is possible for
be blown about by high wind. If
high winds, the trampoline/enclosure should be
moved to a sheltered location, disassembled,
or tied down to the ground with ropes and
stakes (not included). At least three ropes and three
stakes should be used. The tops of the stakes
should be at ground level so that they will not create a
tripping hazard. In addition, the tops of the stakes
should be covered, if necessary, so that users will not
be injured by falling onto the stakes. Make sure to
attach the ropes to the top of the frame;
do not simply
secure the legs or the bases to the ground, as they
can separate from the frame sockets.
Moving the Trampoline
If the trampoline/enclosure needs to be moved, it should
be moved by two persons, kept horizontal, and lifted
slightly. If necessary, the trampoline/enclosure
can be disassembled for moving.
To disassemble the trampoline/enclosure, follow the
assembly steps in reverse order (see pages 14 to 20).
Do not attempt to disassemble the frame sections,
legs, or bases before the bed and springs have been
removed.
the trampoline/enclosure
you anticipate
If any of these conditions exists, the trampoline
should be disassembled or otherwise protected
against use until the condition is remedied.
21
Page 22
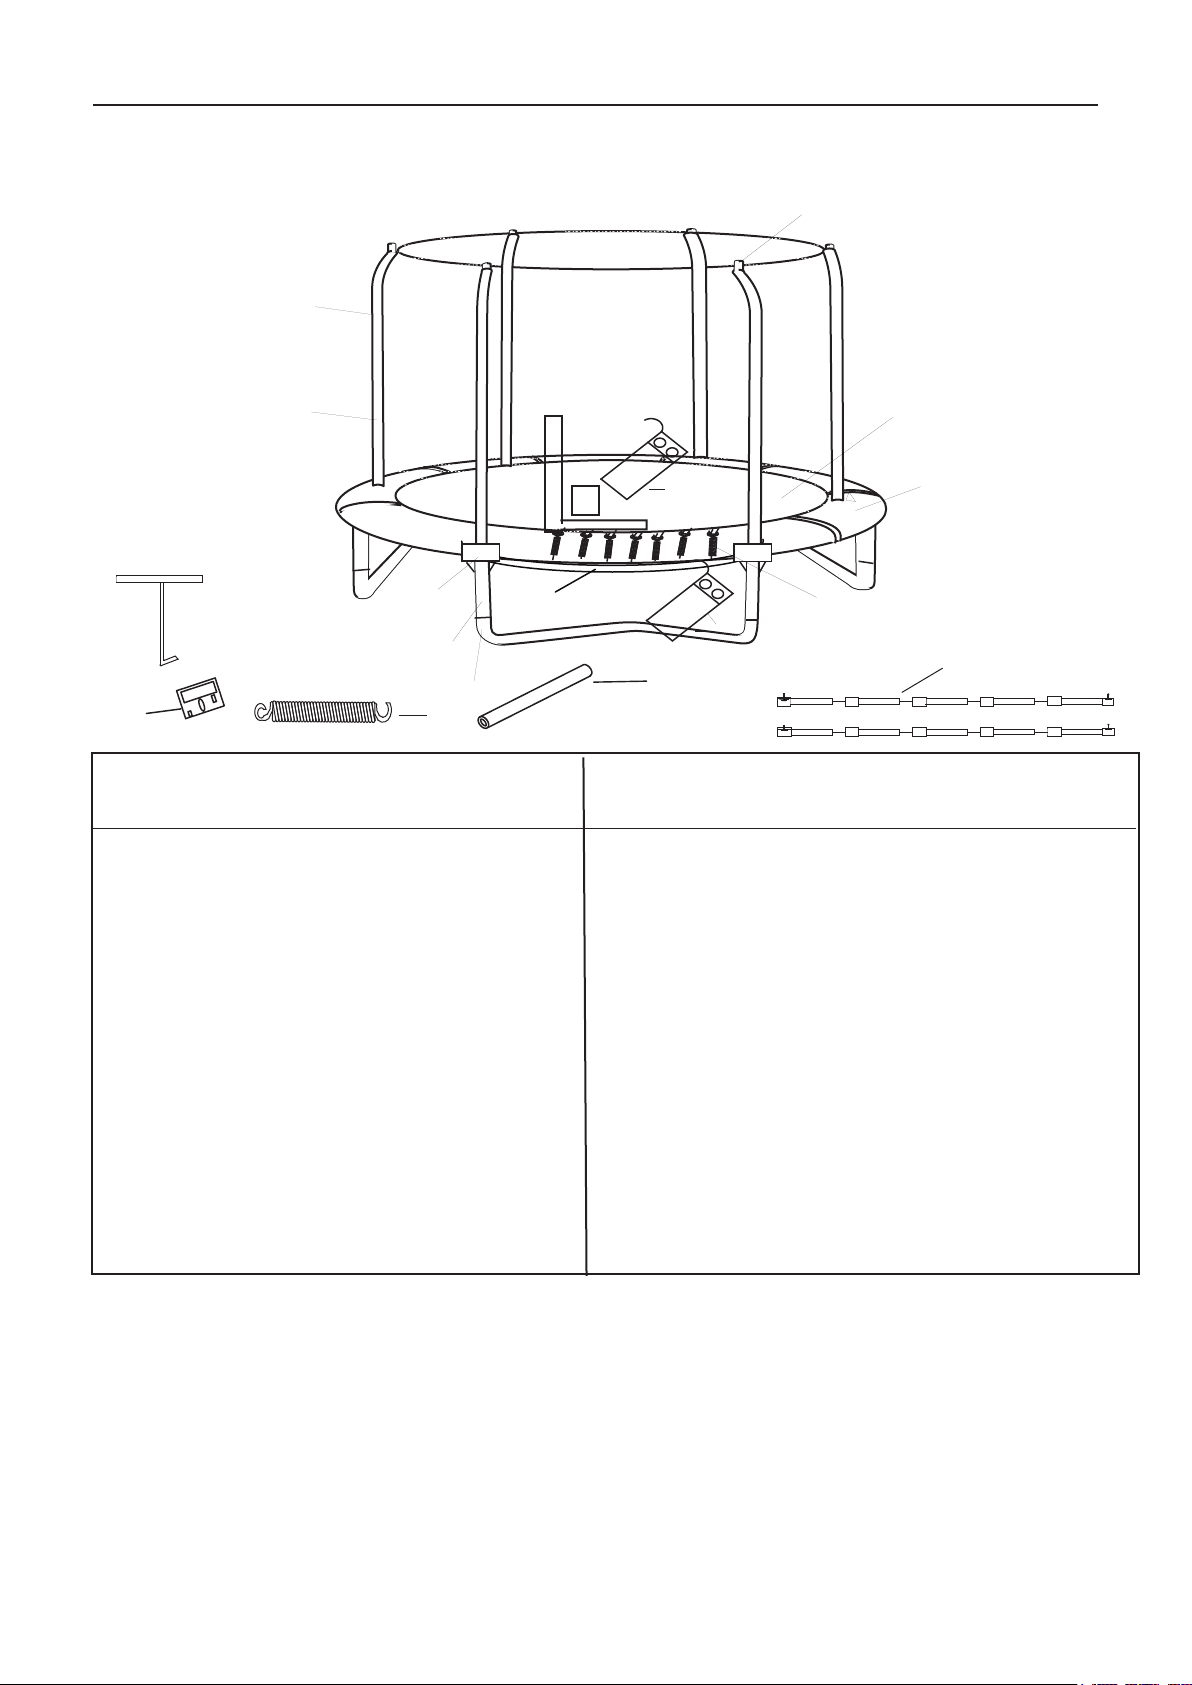
EXPLODED DRAWING AND PART LIST
15
9
13
8
2
17
3
4
14
Key
No. Qty. Description
7
1 6 Top Tube
2 6 Enclosure Socket
3 6 Leg Extension
4 3 W leg
5 1 Stitched Bed with V
6 1 Frame Pad
7 42 Set of Springs
8 6 Straight pole
9 6 T
op pole
10 2 G3 Pole
11 12 Foam Sleeve
12* 12 Self-tapping Screw
13 1 Netting with attached
hardware
-rings
14
1
11
Key
No. Qty. Description
14 1 User’s Manual and Safety
Placard (2 pcs)
15 6 Plastic Cap(This part has been
attached to the top of top pole
(9).
16* 4 Cord
17 1 Spring T
* 1 Set of ASTM Frame Labels
*This part is not illustrated.
5
6
7
14
10
ool
ORDERING REPLACEMENT PARTS
To order replacement parts, visit our Web site or call our Customer Hot Line (see page 3). To h
please provide the following information when calling:
• the MODEL of the trampoline/enclosure
• the NAME of the product
• the KEY NUMBER and DESCRIPTION of the part (see the PART LIST above)
• the quantity needed
• the desired method of shipping
22
elp us a
ssist y
ou,
 Loading...