

Page 1
USER'S MANUAL
Trampoline Enclosure System
WARNING
Read the assembly, installation,
care, maintenance, and use
instructions in this manual prior
to assembling and using this
trampoline enclosure. Save this
manual for future reference.
CONTENTS
Important Precautions . . . . . . . . . . 2
Warning Placard Placement . . . . . .3
Before You Begin . . . . . . . . . . . . . 4
Trampoline Enclosure Safety
Information . . . . . . . . . . . . . . . . . . 4
Assembly . . . . . . . . . . . . . . . . . . . 6
Care and Maintenance . . . . . . . . 10
Exploded Drawing and Part List . .11
Ordering Replacement Parts . . . .11
Limited Warranty . . . . . Back Cover
QUESTIONS?
If you have questions after reading
this manual, please call our toll-free
Customer Hot Line. The trained
technicians on our Customer Hot Line
will provideimmediate assistance.
Customer Hot Line: 1-800-322-2211
Monday–Friday, 8 a.m.–5 p.m. MST
REPLACEMENT
PARTS
www.jumpking.com
(Packet Part No. 80-00038)
Visit our Web site at
www.jumpking.com
Page 2
6
ASSEMBLY
IMPORT ANT ASSEMBLY INFORMATION
• Assembly requires a 9/16” socket and ratchet (or
a 9/16” open-end wrench) and a Philips screwdriver (not included).
•Assembly requires two adults. Keep children
away from the trampoline enclosure until it is fully
assembled.
• Use gloves to protect your hands from pinch
points during assembly.
• Make sure that the trampoline is properly assembled, with the frame pad properly attached, before
you assemble the trampoline enclosure.
• The assembly steps refer to parts by their
descriptions and key numbers (see the PART
LIST on page 11).
• Refer to the EXPLODED DRAWING AND PART
LIST on page 11 and make sure that all listed
parts are included. If a part is missing, refer to
ORDERING REPLACEMENT PARTS at the bottom of page 11.
TRAMPOLINE PLACEMENT
1. Place the trampoline and enclosure on a level
surface before use.
2. Adequate overhead clearance is essential. A
minimum of 24 feet from ground level is recommended. Provide clearance for wires, tree
limbs, and other possible hazards. Lateral
clearance is also essential. Place the trampoline and enclosure away from walls, structures, fences, and other play areas. Maintain a
clear space on all sides of the trampoline and
enclosure.
3. Use the trampoline and enclosure in a well-
lighted area. Artificial illumination may be
required for shady areas.
4. Secure the trampoline and enclosure against
unauthorized and unsupervised use.
5. Remove any obstructions from beneath the
trampoline and enclosure.
6. The trampoline enclosure is only to be used
as an enclosure for a round trampoline.
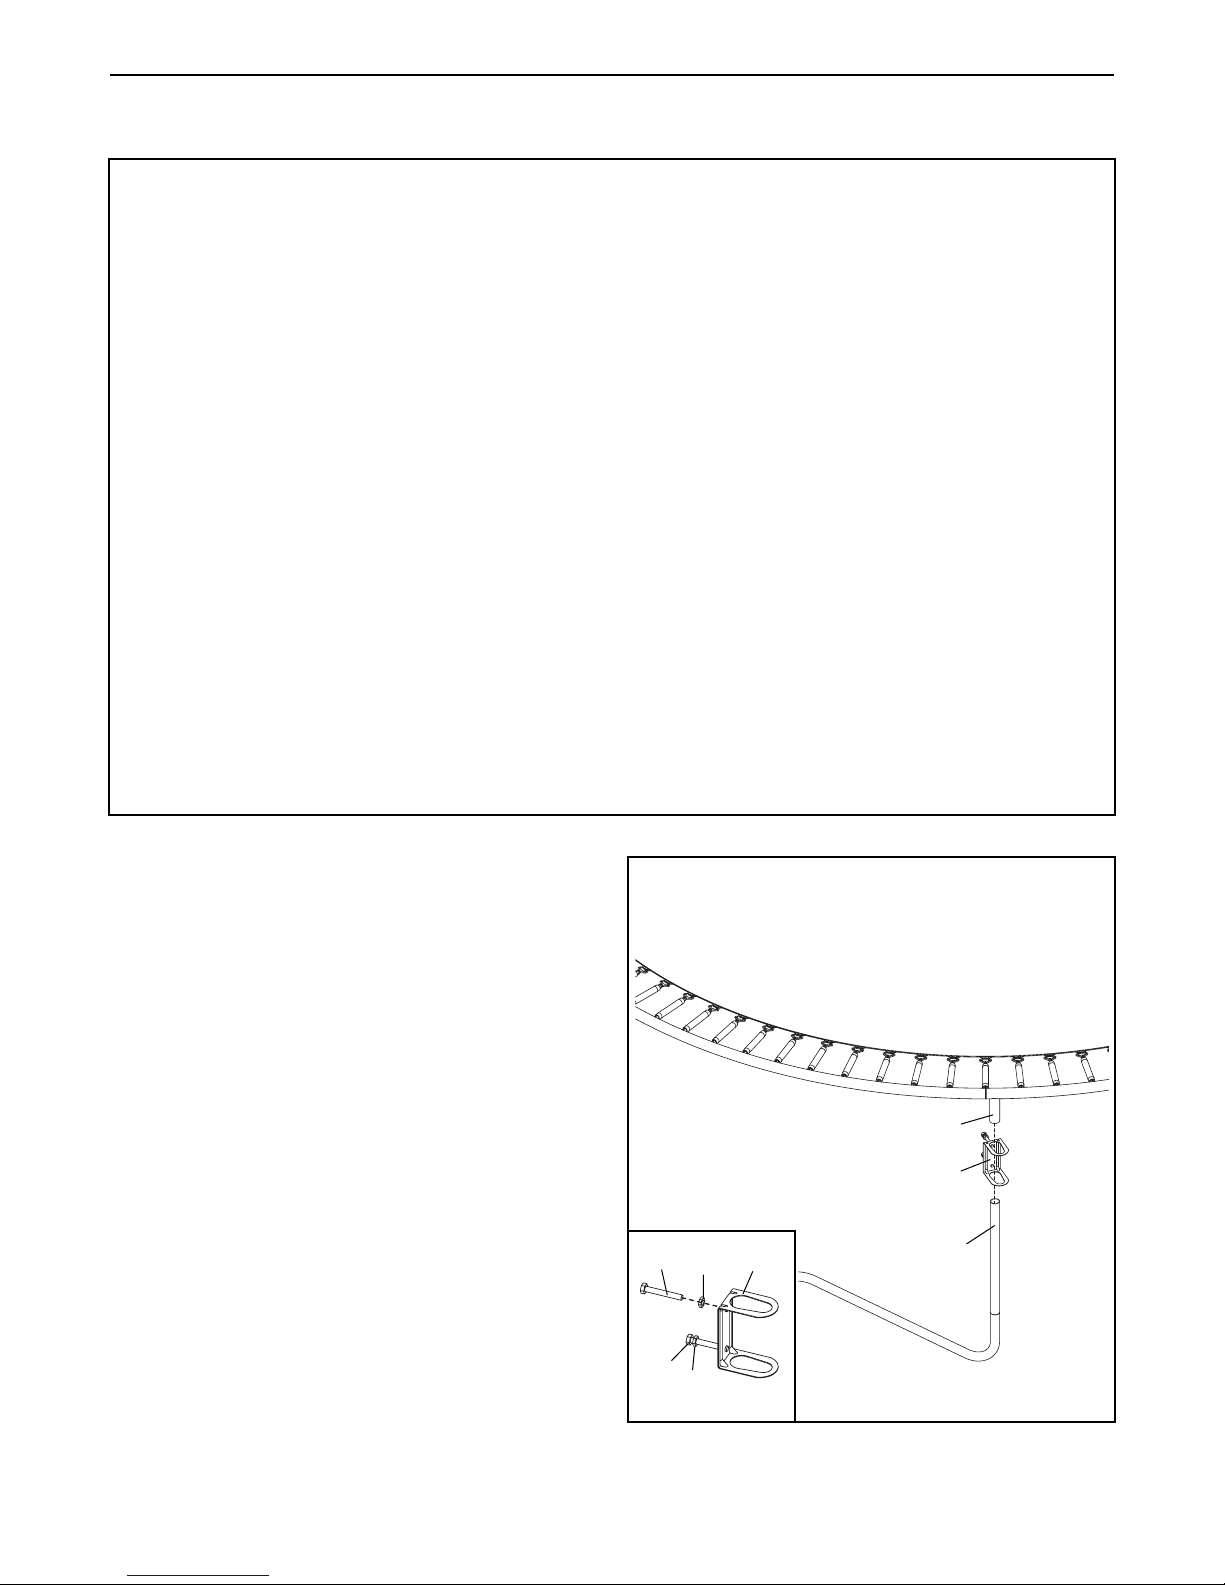
1. Make sure that you understand the informa-
tion in the box at the top of this page before
you begin assembling the trampoline enclosure.
Loosen the straps (not shown) on the underside of
the frame pad (for clarity, the frame pad is not
shown in steps 1 and 3). Do not remove the
frame pad from the trampoline.
Refer to the inset drawing. Thread a Jam Nut (1)
as far as possible onto a Clamp Screw (2). Thread
another Jam Nut onto another Clamp Screw.
Thread both Clamp Screws a few turns into one of
the Clamps (3). Repeat this step with all of the
Jam Nuts, Clamp Screws, and Clamps.
Lift one of the trampoline sockets off the leg below
it. Slide a Clamp (3) down onto the leg. Slide the
socket back onto the leg. Slide a Clamp onto
each of the legs in the same way.
3
Leg
Socket
1
1
2
2
1
3
Note: For clarity, the
frame pad is not shown.
Do not remove the frame
pad from the trampoline.
Page 3
7
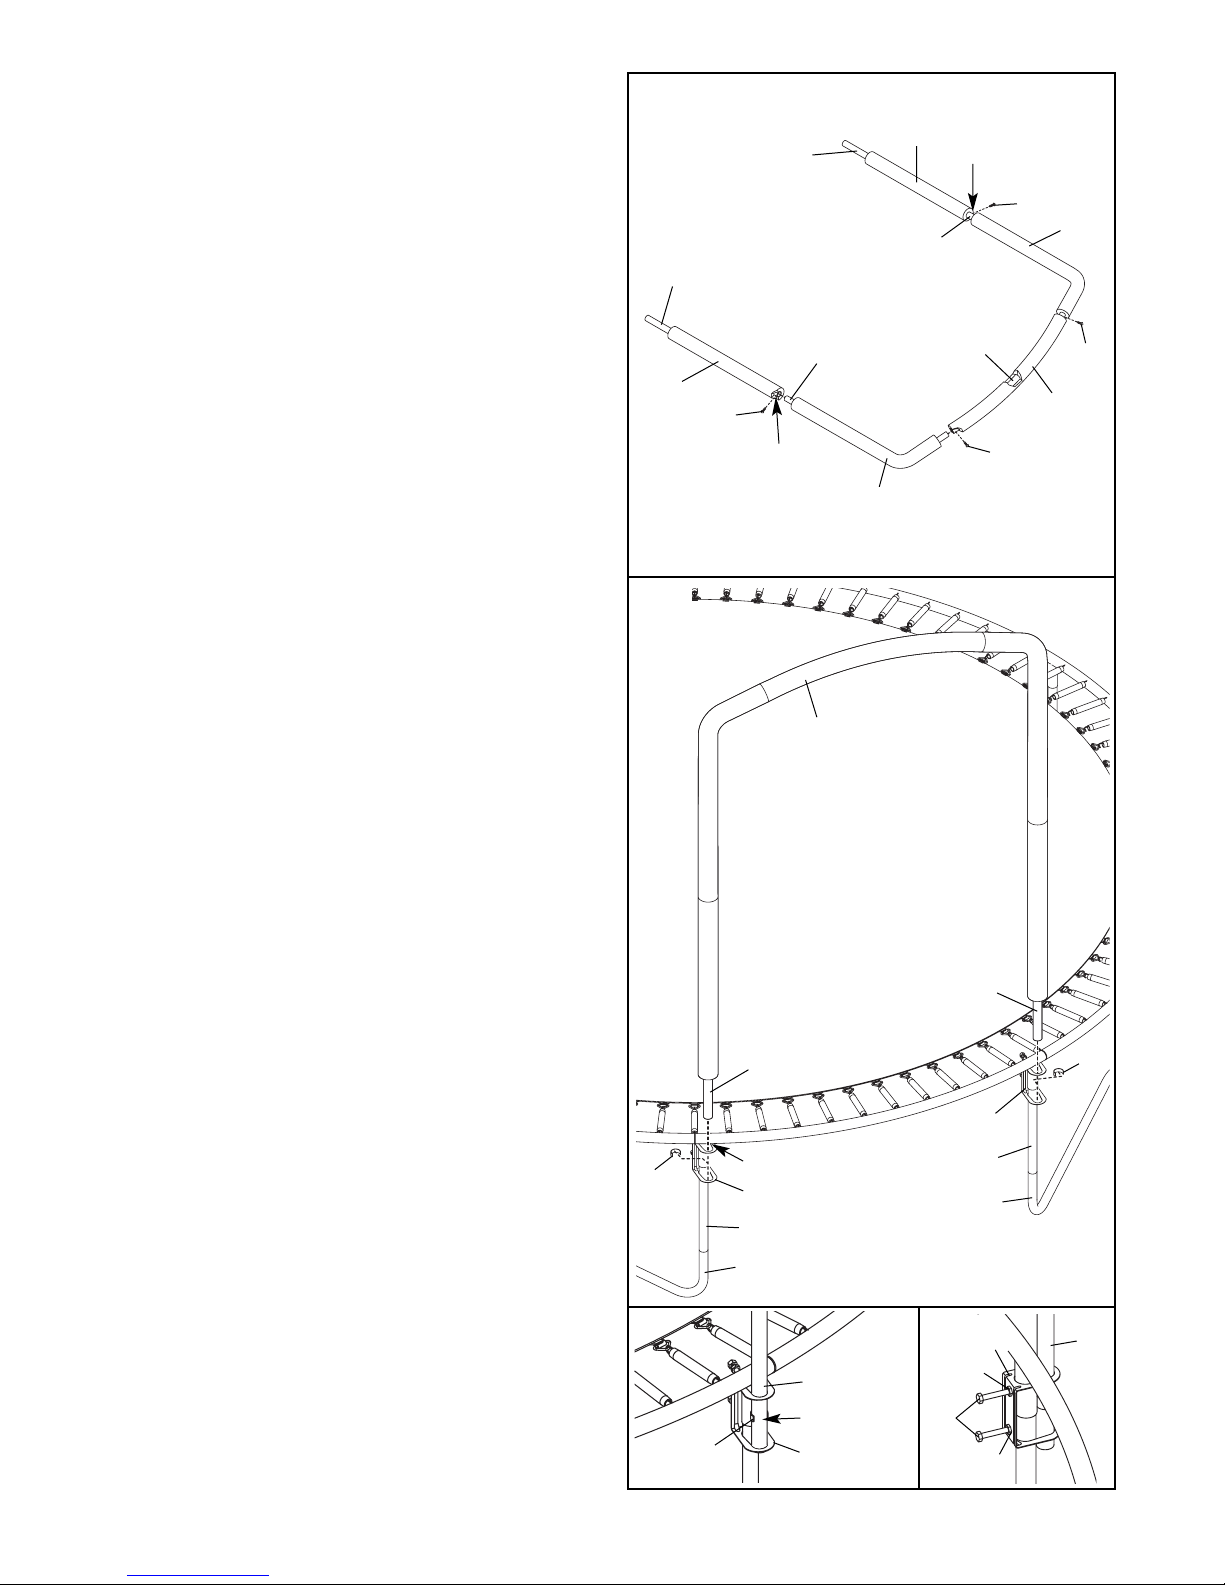
2. Lay two Straight Tubes (6), two L-tubes (7), and a
Curved Tube (8) on the ground so they form an
arch. Make sure that the Straight Tubes are oriented so the small holes are in the positions shown.
Slide a Foam Sleeve (9) onto each of the five
Tubes; note that the ends of the Straight Tubes
should not be covered.
Insert the two L-tubes (7) into the two Straight
Tubes (6). Next, insert the two L-tubes into the
Curved Tube (8).
Tighten four Self-tapping Screws (5) into the small
holes in the Straight Tubes (6) and the Curved
Tube (8). Note: The small holes may be on the
opposite side the Curved Tube.
Assemble the remaining Straight Tubes,
L-tubes, Curved Tubes, and Foam Sleeves in
the same way.
3. Locate two Clamps (3) that are next to each other
but are attached to two different bases (see the
drawing). Slide the two Clamps up until they touch
the sockets above them. Hold the Clamps in this
position.
Lift one of the arches assembled in step 2, and
insert the two Straight Tubes (6) into the tops of
the two Clamps (3) as shown. Next, slide a Black
C-clip (4) onto the lower end of each Straight
Tube. Then, insert the Straight Tubes into the bottoms of the Clamps. The lower ends of the
Straight Tubes should extend 1/4” to 1/2” below
the Clamps. Note: If the Black C-clips do not fit
between the Straight Tubes and the legs of
your trampoline, do not use the Black C-clips.
See inset drawing A. If you have attached Black
C-clips (4) to the Straight Tubes (6), turn each
Black C-clips so the opening faces away from the
trampoline. Slide the Black C-clips up until they
touch the tops of the Clamps (3).
See inset drawing B. Firmly tighten the Clamp
Screws (2) in the two Clamps (3). Then, firmly
tighten the Jam Nuts (1) against the Clamps.
Attach the other three arches in the same way
(not shown).
2
Small
Hole
Small
Hole
3
8
5
5
5
5
6
6
6
Arch
6
9
9
9
9
9
7
7
Leg
4
4
3
3
Leg
Base
Socket
Base
3
4
6
Opening
2
1
1
3
6
A
B
Page 4

8
4. Spread the Netting (10) on the trampoline bed,
with the door of the Netting below the Curved
Tube (8) where jumpers will climb onto and off the
trampoline. Next, locate one of the D-rings
attached to the upper edge of the Netting. Lift the
D-ring and hold it near an L-tube (7) as shown.
See inset drawing A. Insert one of the Straps
(11) through the D-ring on the Netting (10). Next,
thread the end of the Strap under the Foam
Sleeve (9) on the L-tube (7) and up through the
two D-rings on the opposite end of the Strap. See
inset drawing B. Thread the end of the Strap
back down through the lower D-ring on the Strap.
See inset drawing C. Pull the end of the Strap to
remove any slack. Do not fully tighten the Strap
yet.
Attach the Netting (10) to the other seven
L-tubes (7) with the other seven Straps (11).
5. Note: During steps 5 and 6, you will “sew” the
lower edge of the Netting (10) to the V-rings on
the bed using the Cords (13).
Locate the V-ring closest to the indicated side of
the door. Thread one end of a Cord (13) through
the lower edge of the Netting (10) above the Vring and then thread the Cord through the V-ring.
Tie the Netting to the V-ring by making a double
knot in the Cord. Note: If your trampoline enclosure includes a Plastic Needle (14, see the inset
drawing), insert the end of the Cord into the
Needle and use the Needle to thread the Cord
through the Netting.
6. Next, thread the Cord (13) through the lower edge
of the Netting (10) halfway between the first V-ring
and the next V-ring, and then thread the Cord
through the next V-ring. Repeat this procedure
until the entire Cord is threaded through the
Netting and the V-rings. Keep the Cord taut. Tie
the end of the Cord to the last V-ring that it reaches.
Tie a second Cord (not shown) to the last V-ring
reached by the first Cord. Thread the second Cord
through the Netting (10) and the V-rings as
described above. Repeat this procedure with the
remaining Cords, until the last Cord reaches the
strap below the door.
4
10
Door
D-ring
7
11
8
6
13
10
Door
13
10
V-ring
A
9
7
10
11
11
11
B
C
5
14
13
V-rings
Strap
Door
Page 5

9
DISASSEMBLY
To disassemble the trampoline enclosure, follow assembly steps 1 through 8 in reverse order.
7. When the last Cord (13) reaches the strap below
the door, thread the Cord over the strap, through
the nearest V-ring, over the strap again, and
through the V-ring again. Do not thread the Cord
through the lower edge of the door. Pull the
Cord tight. Next, thread the Cord over the strap,
through the next V-ring, over the strap again, and
through the next V-ring again. Repeat this procedure until the strap is tied to the V-rings. Tie the
end of the Cord to the last V-ring that it reaches.
Note: The last Cord may overlap the first Cord.
8. Tighten the eight Straps (11) attaching the Netting
(10) to the L-tubes (7) (see step 4). Tie the free
end of each Strap around the rest of the Strap to
prevent the Strap from loosening.
Tighten the straps (not shown) on the underside of
the frame pad.
Using the included plastic tie, attach the Safety
Placard (12) to the Netting (10) near the door as
shown.
The trampoline enclosure is now fully assembled. Make sure that all parts are securely
attached. Familiarize yourself and all users of
the trampoline and the enclosure with the
safety precautions, use and instructional
materials, and care and maintenance instructions in this manual before using the enclosure.
7
Strap
13
10
V-ring
8
10
12
Frame
Pad
11
7
Door
Page 6

11
116Jam Nut
21Set of 16 Clamp Bolts
38Clamp
48Black C-clip
516Self-tapping Screw
68Straight Tube
78L-tube
84Curved Tube
920Foam Sleeve
10 1 Netting with attached Hardware
11 8Strap with D-rings
12 1 User’s Manual and Safety Placard
13* 8 Cord
14* 10 Plastic Needle (your enclosure may
not need or include this part)
*These parts are not illustrated.
Specifications are subject to change without notice.
EXPLODED DRAWING AND PART LIST
ORDERING REPLACEMENT PARTS
To order replacement parts, visit our Web site at www.jumpking.com or call our toll-free Customer Hot Line at
1-800-322-2211, Monday through Friday, 8 a.m. until 5 p.m. Mountain Time (excluding holidays). To help us assist
you, please provide the following information when calling:
• the NAME of the product (FUNRING Trampoline Enclosure System)
• the KEY NUMBER and DESCRIPTION of the part (see the PART LIST above)
• the quantity needed
• the desired method of shipping
4
5
6
10
12
12
9
7
8
11
1
1
3
2
Key
No. Qty. Description
Key
No. Qty. Description
5
Page 7

Part No. 80-00039 R0403A Printed in USA © 2003 Jumpking, Inc.
Jumpking, Inc. (JUMPKING) warrants its trampoline products to be free from defects in material and workmanship under normal use and service conditions. The steel frame is warranted for two (2) years after the
date of purchase. All other parts are warranted for ninety (90) days after the date of purchase.
All warranty coverage extends only to the original retail purchaser from the date of purchase. JUMPKING’s
obligation under this Warranty is limited to replacing or repairing, at JUMPKING’s option, the product at
one of its authorized service centers. All products for which a warranty claim is made must be received by
JUMPKING at one of its authorized service centers, freight prepaid, and accompanied by sufficient proof
of purchase. All returns must be preauthorized by JUMPKING. Preauthorization may be obtained by calling JUMPKING’s Customer Hot Line at 800-322-2211. This Warranty does not extend to any product or
damage to a product caused by or attributable to freight damage, abuse, misuse, improper or abnormal
usage, or repairs not provided by a JUMPKING authorized service center, or to products used for commercial or rental purposes. No other Warranty beyond that specifically set forth above is authorized by
JUMPKING.
JUMPKING IS NOT RESPONSIBLE OR LIABLE FOR INDIRECT, SPECIAL OR CONSEQUENTIAL
DAMAGES ARISING OUT OF OR IN CONNECTION WITH THE USE OR PERFORMANCE OF THE
PRODUCT OR OTHER DAMAGES WITH RESPECT TO ANY ECONOMIC LOSS, LOSS OF PROPERTY, LOSS OF REVENUE OR PROFITS, LOSS OF ENJOYMENT OR USE, COST OF REMOVAL,
INSTALLATION OR OTHER CONSEQUENTIAL DAMAGES. SOME STATES DO NOT ALLOW THE
EXCLUSION OR LIMITATION OF INCIDENTAL OR CONSEQUENTIAL DAMAGES. ACCORDINGLY,
THE ABOVE LIMITA TION MA Y NOT APPLY TO YOU.
THE WARRANTY EXTENDED HEREUNDER IS IN LIEU OF ALL OTHER WARRANTIES AND ANY
IMPLIED WARRANTY OF MERCHANTABILITY OR FITNESS FOR A PARTICULAR PURPOSE IS LIMITED IN ITS SCOPE AND DURATION TO THE TERMS SET FORTH HEREIN. SOME STATES DO NOT
ALLOW LIMIT ATIONS ON HOW LONG AN IMPLIED WARRANTYLASTS. ACCORDINGLY, THE ABOVE
LIMITATION MAY NOT APPLYTO YOU. This warranty gives you specific legal rights. You may also have
other rights which vary from state to state. THIS WARRANTY IS VALID ONLY IN THE UNITED STATES.
Jumpking, Inc., 1371 South Town East Boulevard, Mesquite, Texas 75149
LIMITED WARRANTY
 Loading...