

SAFETY INSTRUCTIONS
IMPORTANT! PLEASE READ THESE INSTRUCTIONS CAREFULLY BEFORE USE!
IMPORTANT! READ THE ASSEMBLY INSTRUCTIONS IN THIS BOOKLET
BEFORE REMOVING THE CONTENTS OF THIS CARTON
IMPORTANT SAFETY INSTRUCTIONS
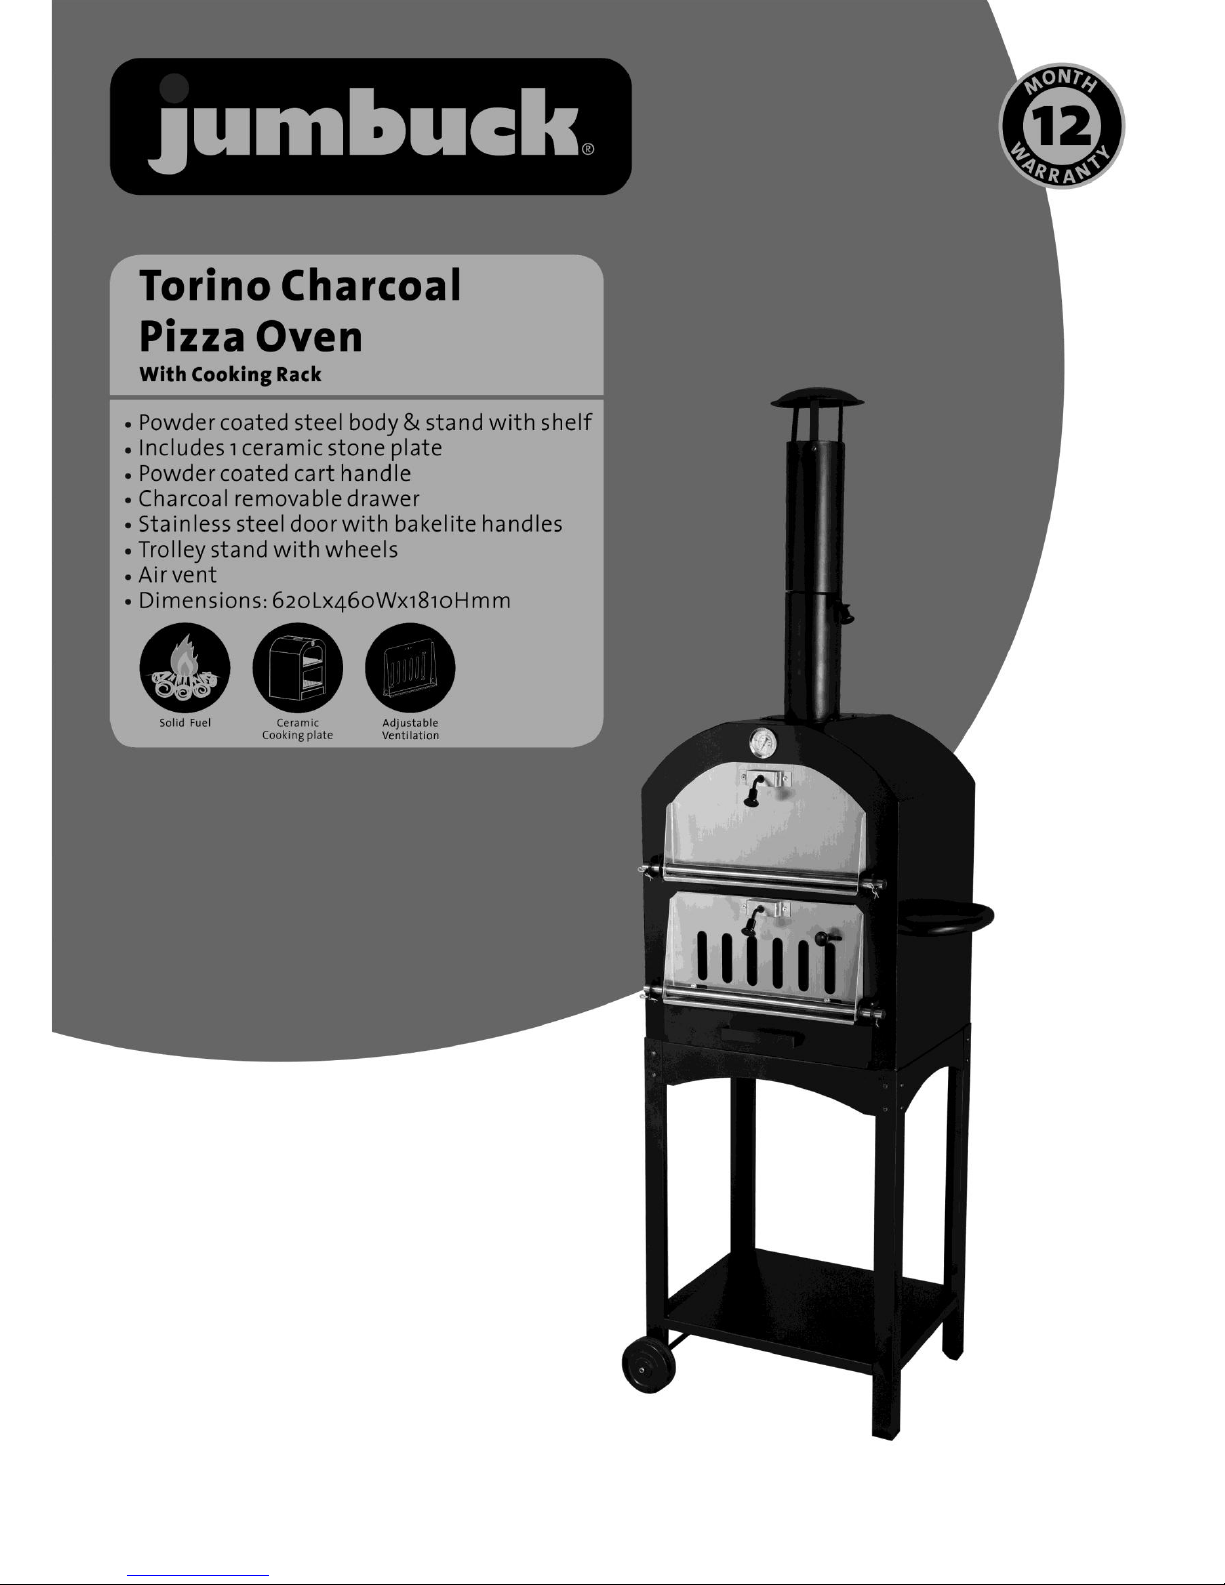
JUMBUCK TORINO CHARCOAL
PIZZA OVEN (HS-GENS-209)
FOR
OUTDOOR
USE ONLY
For outdoor use only.
Improper installation, adjustment, alteration, service or maintenance can
cause property damage, injury or death.
Read the installation, operating and maintenance instructions thoroughly
before installing or servicing this equipment.
Warning: accessible parts may be very hot. Keep young children away.
Do not move the appliance during use.
Any modification of the appliance may be dangerous and will void the
warranty.
Installer to leave instructions with the consumer and consumer to retain them
for future reference.
Please ensure all packaging and transit protection materials are removed prior
to using the oven.
This appliance must only be used in an above
ground open-air situation with natural ventilation,
without stagnant areas, where products of
combustion are rapidly dispersed by
wind and natural convection
This oven is an outdoor appliance only. Under no
circumstances should it be use indoors.
READ ALL OPERATING INSTRUCTION BEFORE
LIGHTING
Do not store chemicals or flammable materials
near this appliance.
Unsupervised children should not be near a oven
while cooking or during warm up or cool down.
People with flammable clothing such as nylon
etc. should keep well away from the oven when
it is operating.
Do not leave food unattended on the oven.
Particular care must be taken when removing
the ash tray. Hot ash can cause serious injury.
DO NOT OPERATE THIS APPLIANCE
BEFORE READING THE
INSTRUCTION BOOKLET
DO NOT PLACE ARTICLES ON OR
AGAINST THIS APPLIANCE
DO NOT STORE CHEMICALS OR
FLAMMABLE MATERIALS OR
SPRAY AEROSOLS NEAR THIS
APPLIANCE
DO NOT OPERATE THIS APPLIANCE
INDOORS
DO NOT ENCLOSE THIS APPLIANCE
DO NOT LIGHT OR OPERATE WITH THE
COVER ON (COVER NOT
INCLUDED)

OVEN OPERATING GUIDELINES
Lighting the oven
solid fuel is to be used for this product (fire
wood, charcoal etc.)
place solid fuel onto the charcoal grid and light
using fire starters
close the oven doors and let the solid fuel light
(check occasional to ensure fire is lit)
Cooking
monitor heat inside oven via temperature
gauge
recommended temperature for cooking pizza is
230 to 250 degrees Celsius
once desired temperature is reached, place
pizza (or desired food) on the ceramic cooking
plate to cook
regularly monitor temperature to ensure
pizza/food in not under or over cooked
the chimney vent and charcoal compartment
door vent can be used to control smoke and
temperature within the oven when door is
closed/sealed
Cleaning
once finish cooking, remove left over solid fuel
ashes can be removed via the charcoal drawer
always ensure oven is clean and free from oil
or grease (internally and externally) to ensure
longevity of the oven
always keep oven dry and under cover to
protect from weather and moisture
Pre-caution
always ensure hands are protected when
putting or removing food from oven
always ensure oven is cool before touching or
cleaning the internal areas
do not subject the ceramic stone plate to
sudden changes in temperature as this might
damage the ceramic stone plate
do not use flammable liquids for igniting and
re-igniting
open flames and burning embers must never
be left unattended
after use, make sure the unit is allowed to cool
before moving
Important Information
always monitor the temperature of the oven
and do not exceed 300 degrees Celsius
overheating of the oven might cause damages
to the oven
overheating of the oven might cause browning
to the stainless steel door on the oven
overheating of the oven might cause serious
burns or injuries

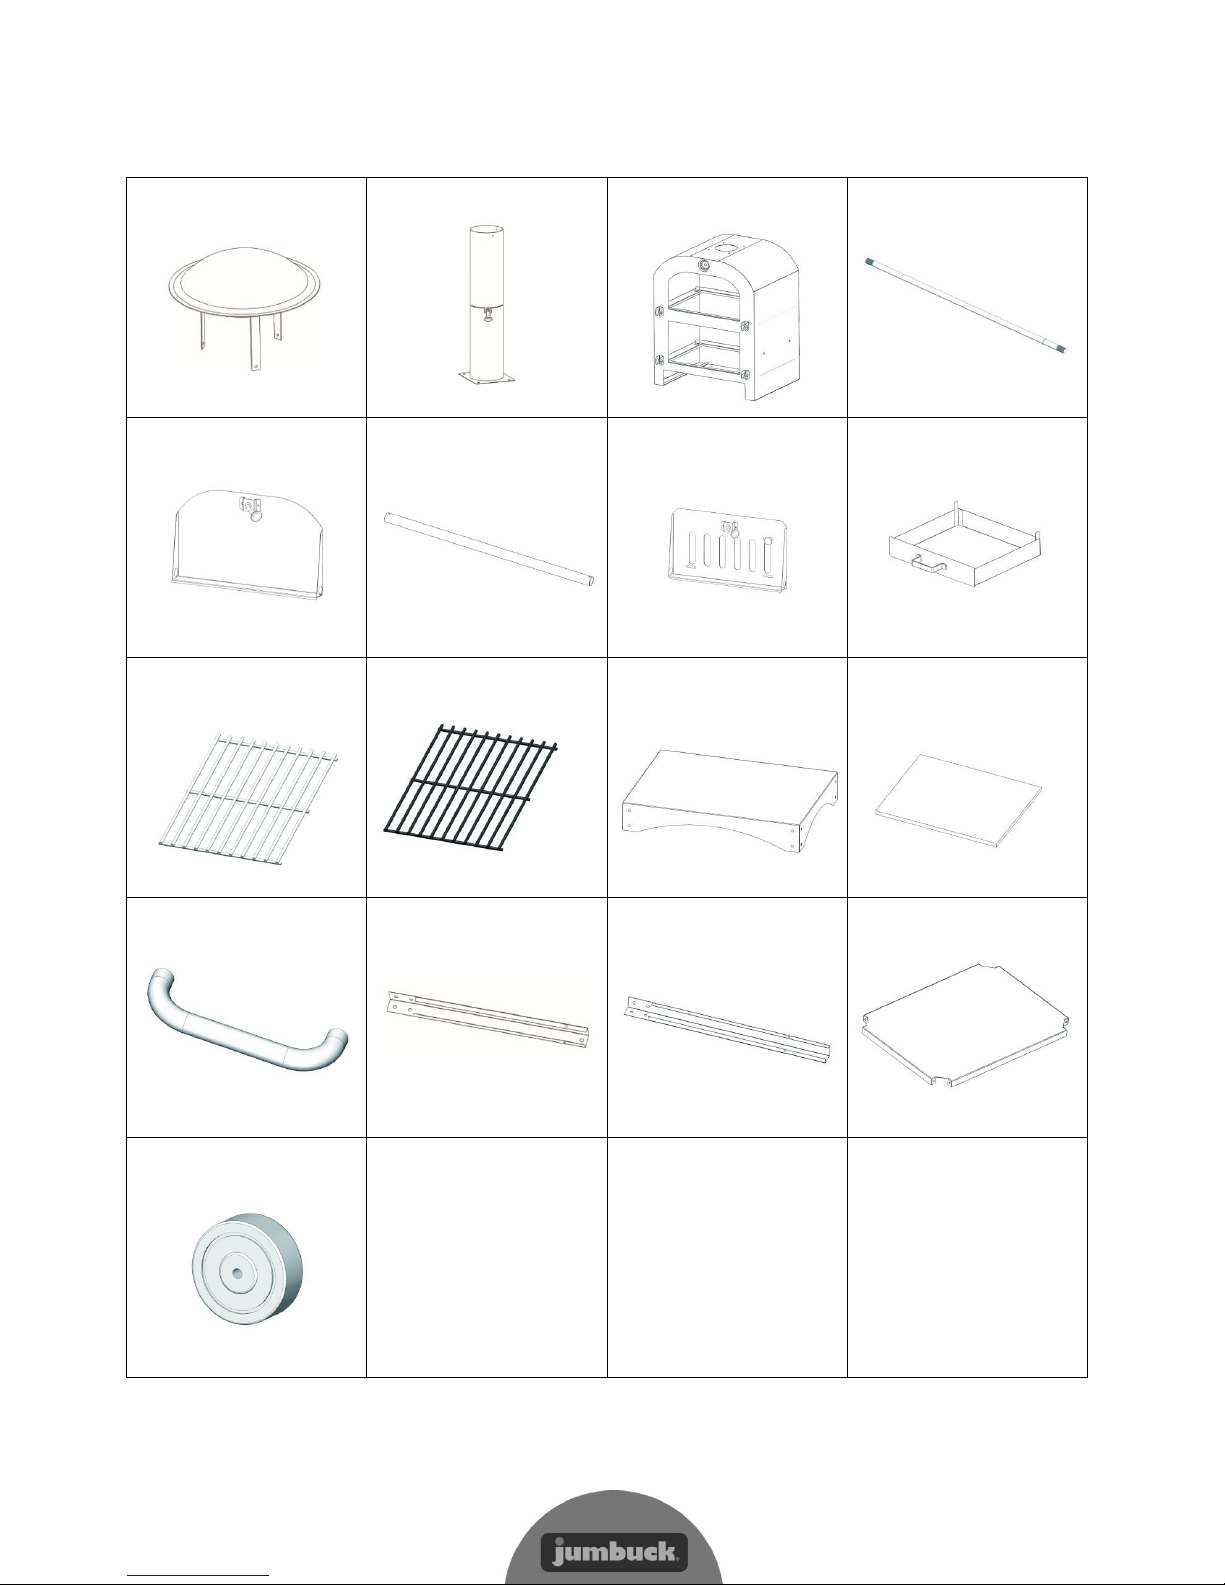
EXPLODED VIEW

PARTS CODE
Part Number
Part Name
Supplier Code
1
Chimney Cover
GENS209-01 2 Chimney
GENS209-02 3 Chimney Vent
GENS209-03
4
Oven Body
GENS209-04 5 Temperature Gauge
GENS209-05 6 Oven Door
GENS209-06
7
Door Handle Bracket
GENS209-07
8
Door Handle
GENS209-08 9 Door Axle
GENS209-09
10
Charcoal Compartment Door Vent
GENS209-10
11
Charcoal Compartment Door
GENS209-11
12
Charcoal Drawer
GENS209-12
13
Cooking Rack
GENS209-13
14
Charcoal Grid
GENS209-14
15
Bottom Panel
GENS209-15
16
Ceramic Stone Plate
GENS209-16
17
Side Handle
GENS209-14
18
Short Leg
GENS209-18
19
Long Leg
GENS209-19
20
Shelf
GENS209-20
21
Wheel
GENS209-21
22
Wheel Axle
GENS209-22
23
Chimney Vent Handle
GENS209-23
24
Door Hinges
GENS209-24
CARTON CONTENTS
1. Chimney Cover ........1pc
2. Chimney.....................1pc
3. Oven Body..................1pc
4. Wheel Axle…........…..1pc
5. Oven Door.......…...…..1pc
6. Door Axle…......…....2pcs
7. Charcoal
Compartment Door…1pc
8. Charcoal Drawer.....1pc
9. Cooking Rack.........2pcs
10. Charcoal Grid......2pcs
11. Bottom Panel.....……1pc
12. Ceramic Stone
Plate........…………………..…1pc
13. Side Handle …………1pc
14. Short Leg................2pcs
15. Long Leg.......……….2pcs
16. Shelf...........................1pc
17.Wheel ……..........2pcs

HARDWARE PACK CONTENTS
A
Bolt M6x12
2pcs
B
Bolt M5x10
35 pcs
C
Nut M5
32pcs
D
Cotter Pin
4pcs
E
Lock Nut M6
2 pcs
F
Flat washer M6
2 pcs
G
Plug Pin
4 pcs

ASSEMBLY INSTRUCTIONS
Remove all contents from packaging, and make sure all the parts are present before attempting to
assemble! Tighten all bolt connections by hand first. When the oven is fully assembled, retighten the
screws, nuts and bolts by using a wrench and screwdriver.
STEP 1
Assemble the Short Legs (Part 14) and Long Legs (Part 15) onto the Shelf (Part 16) as per illustration below.
Use Bolt B and Nut C to secure.
STEP 2
Assemble the Short Legs (Part 14) and Long Legs (Part 15) onto the Bottom Panel (Part 11) as per illustration
below. Use Bolt B and Nut C to secure.

STEP 3
Assemble the Wheels (Part 17) onto the Wheel Axle (Part 4) as per illustration below. Use Nut E to secure.
STEP 4
Assemble the Oven Body (Part 3) onto the Bottom Panel (Part 11) as per illustration below. Use Bolt B and Nut
C to secure.

STEP 5
Install the Chimney Cover (Part 1) to the Chimney (Part 2) as per illustration below. Use Bolt B to secure.
STEP 6
Install the Chimney (Part 2) onto the Oven Body (Part 3) as per illustration below. Use Bolt B and Nut C to
secure.

STEP 7
Install the Side Handle (Part 13) onto the Body as per illustration below. Use Bolt A and Flat Washer F to
secure.
STEP 8
Assemble the Oven Door (Part 5) onto the Oven Body (Part 3) by inserting the Door Axle (Part 6) as per
illustration below. Use the Cotter Pin (Part D) and Plug Pin (Part G) to secure.

STEP 9
Assemble the Charcoal Compartment Door (Part 7) onto the Oven Body (Part 3) by inserting the Door Axle
(Part 6) as per illustration below. Use the Cotter Pin (Part D) and Plug Pin (Part G) to secure.
STEP 10
Place the Charcoal Drawer (Part 8) into the Oven Body (Part 3) as per illustration below.

STEP 11
Place the Cooking Rack (Part 9) and Charcoal Grid (Part 10) into their respective compartments as per
illustration below.
STEP 12
Place the Ceramic Stone Plate (Part 12) onto the Cooking Rack (Part 9) as per illustration below.

Fully-Assembled
Your oven is now ready for use.
Please take care when lighting your oven.
Always keep children away from this oven at all times.

Thank you for purchasing one of our quality
Jumbuck Charcoal Pizza Ovens.
YOUR JUMBUCK OVEN IS COVERED AGAINST
DEFECTS FOR A PERIOD OF 12 MONTHS FOR PARTS
AND LABOUR, REPAIR OR REPLACEMENT
THIS WARRANTY EXCLUDES SURFACE RUST AND
DAMAGE CAUSE BY ABUSE OR NEGLECT
CONDITIONS OF THE WARRANTY
The appliance must be operated and maintained
in accordance with the instructions supplied in
the operating manual.
Any repair does not extend the warranty period.
Any parts other than original Jumbuck parts will
void this warranty.
WARRANTY
FOR WARRANTY CLAIMS
The warranty for Australia is given by :
Genesis Australia Corporation Pty Ltd
2/26 Industry St
Malaga
Western Australia 6090
AUSTRALIA
(08) 9248 9822
service@genesiscorp.com.au
Proof of purchase must be presented.
The warranty for New Zealand is given by :
Bunnings NZ Limited
PO Box 14436,
Panmure, Auckland, 1471
NEW ZEALAND
(09) 978 2200
marketing@bunnings.co.nz
Proof of purchase must be presented.
Any claims under this warranty must be made
within 12 months of the date of purchase of the
product.

WARRANTY
For Australian Customers
Any claim under this warranty must be made
within 12 months of the date of purchase of the
product. To make a claim under the warranty,
please contact Genesis Australia at
service@genesiscorp.com.au or return the product
(with proof of purchase) to any Bunning store.
Visit www.bunnings.com.au for store locations.
Genesis Australia bears reasonable, direct
expenses of claiming under the warranty. You may
submit details and proof to us for consideration.
The warranty covers manufacturer defects in
materials, workmanship and finish under normal
use.
This warranty is provided in addition to other
rights and remedies you may have under law: our
goods come with guarantees which cannot be
excluded under the Australian Consumer Law. You
are entitled to replacement or refund for a major
failure and to have the goods repaired or replaced
if the goods fail to be of acceptable quality and the
failure does not amount to a major failure.
The warranty excludes damage resulting from
product misuse or product neglect. The warranty
covers domestic use only and does not apply to
commercial applications.
For New Zealand Customer
Any claim under this warranty must be made
within 12 months of the date of purchase of the
product. To make a claim under the warranty, take
the product (with proof of purchase) to any
Bunnings store. Visit www.bunnings.co.nz for
store locations.
Bunnings NZ Ltd bears reasonable, direct,
expenses of claiming under the warranty. You
may submit details and proof to our store for
consideration.
The warranty covers manufacturer defects in
materials, workmanship and finish under normal
use.
This warranty is provided in addition to other
rights and remedies you may have under
law: our goods come with guarantees which
cannot be excluded under the Consumer
Guarantees Act 1993 (NZ). You are entitled to
replacement or refund for a major failure and to
compensation for other reasonably foreseeable
loss or damage. You are also entitled to have the
goods repaired or replaced if the goods fail to be of
acceptable quality and the failure does not
amount to a major failure.
Goods presented for repair may be replaced by
refurbished goods of the same type rather than
being repaired. Refurbished parts may be used to
repair the goods.
The warranty excludes damage resulting from
product misuse or product neglect. The warranty
covers domestic use only and does not apply to
commercial applications.

WARRANTY
WHAT IS NOT COVERED IN THE WARRANTY
Removal or re-installation costs. This warranty does
not cover costs for transit, nor in home service
Liability will only be accepted for loss or damage
during transit if at the time the product was being
transported by Bunnings or a Bunnings approved
contractor.
Lack of maintenance, abuse, neglect, misuse,
accidental or improper installation of this
appliances
Scratches, dents, corrosion or discoloration caused
by heat, abrasive chemicals cleaners
Corrosions or damage caused by exposure to
elements such as insects, weather, hail or grease
and fat fires
Rusting of cooking grill
Cleaning and wear and tear, service calls of this
nature are chargeable
Commercial use of this product
Unauthorized repairs or modification during
warranty period
RECORD THE FOLLOWING INFORMATION
Attached the copy of the purchase receipt here
Date of Purchase...........................................................................
Purchased From.............................................................................
Location.............................................................................................
Model Name and Number........................................................
Serial Number.................................................................................
Receipt Number.............................................................................
Note: The serial number is located either on the
outside of the packing carton or outside or inside the
appliance
FOR TECHNICAL ASSISTANCE
For Australia customers if you experience any
technical issues with your JUMBUCK OVEN, in the
first instance review the instructions manual or
contact the warranty service agent
For New Zealand customers if you experience any
technical issues with your JUMBUCK OVEN, in the
first instance review the instructions manual or
contact your local Bunnings warehouse
FOR SPARE PARTS
Call your local Bunnings warehouse and ask them
to order a part for you. You should provide the
following information:
Model of OVEN
...........................................................................................................
Year of Purchase
...........................................................................................................
Name of warranty service company
...........................................................................................................
Part that requires replacement (refer to the parts
list in the instructions manual)
...........................................................................................................
 Loading...