

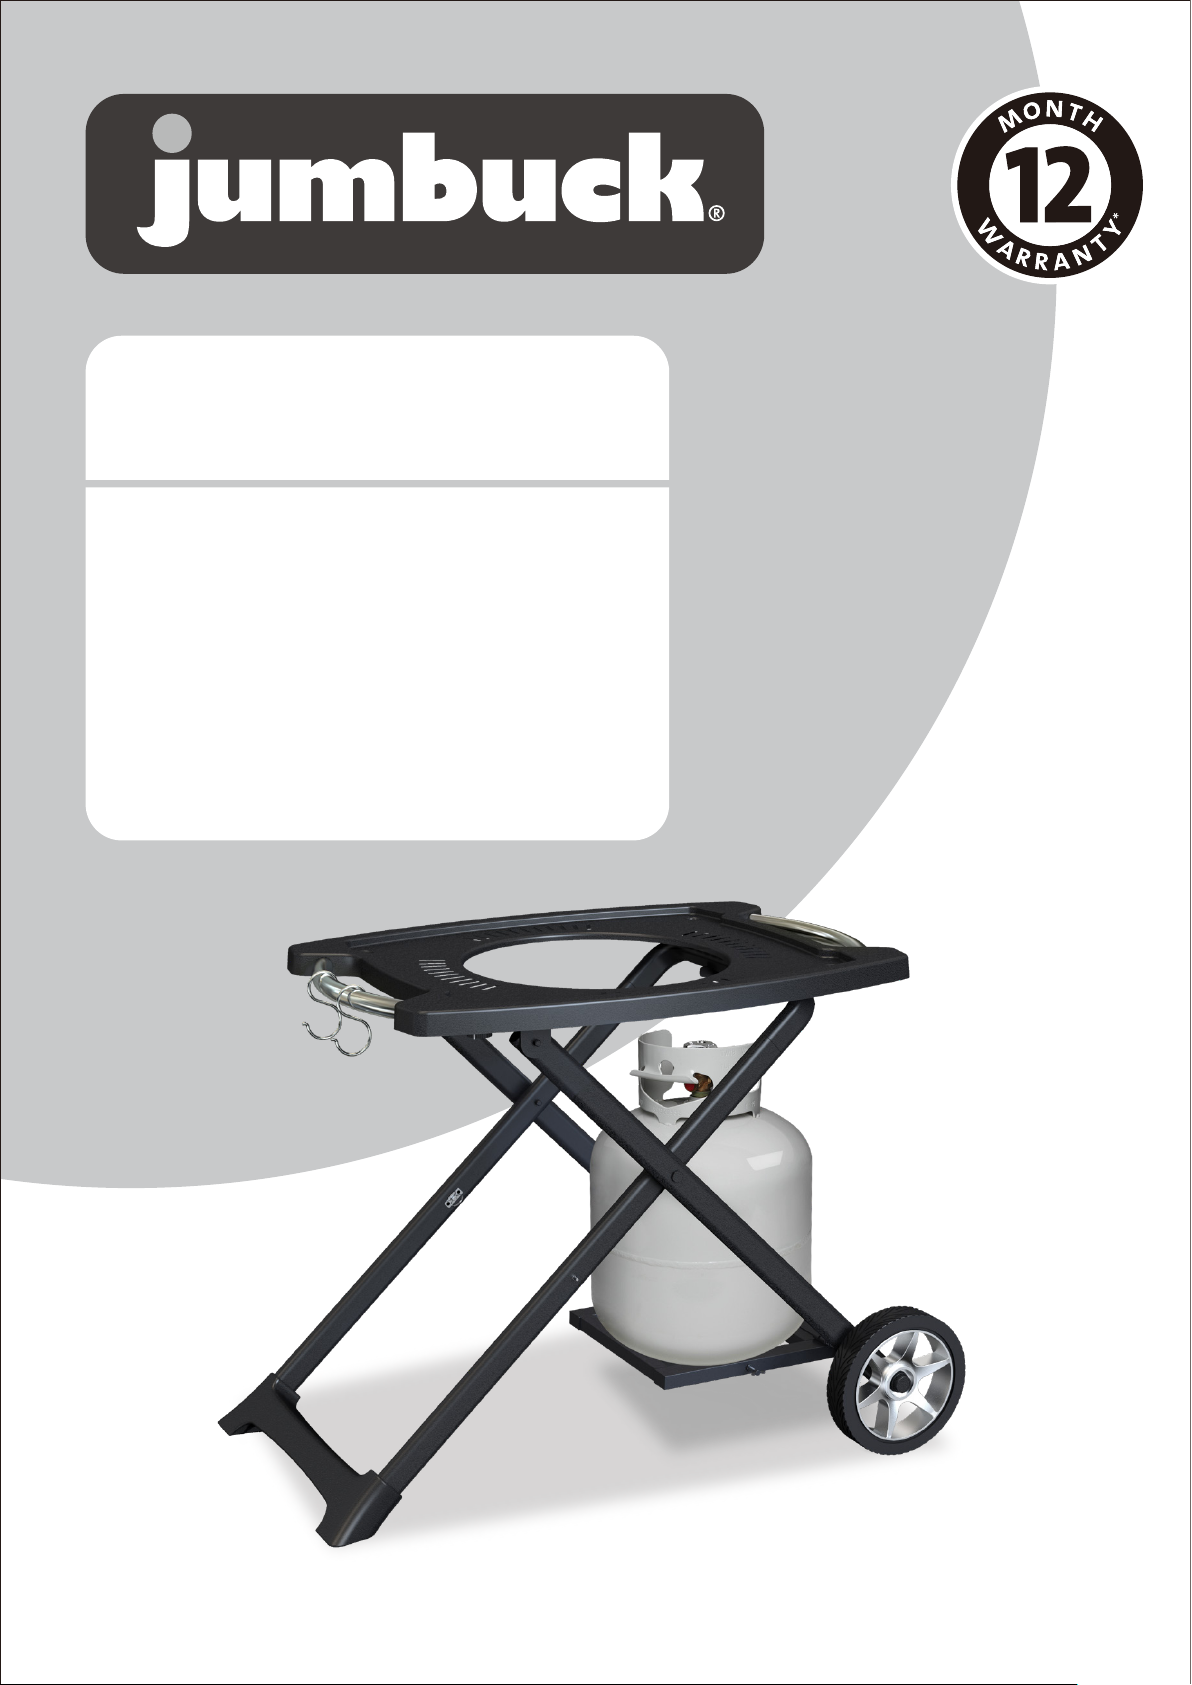
Portable Gas BBQ Trolley
Gas cylinder mounting base
Folding design
•
Solid steel construction
•
Mounting base to hold gas cylinder
•
Large 20cm diameter wheels for portability
•
BBQ tool hooks
•
BBQ mounting points
•
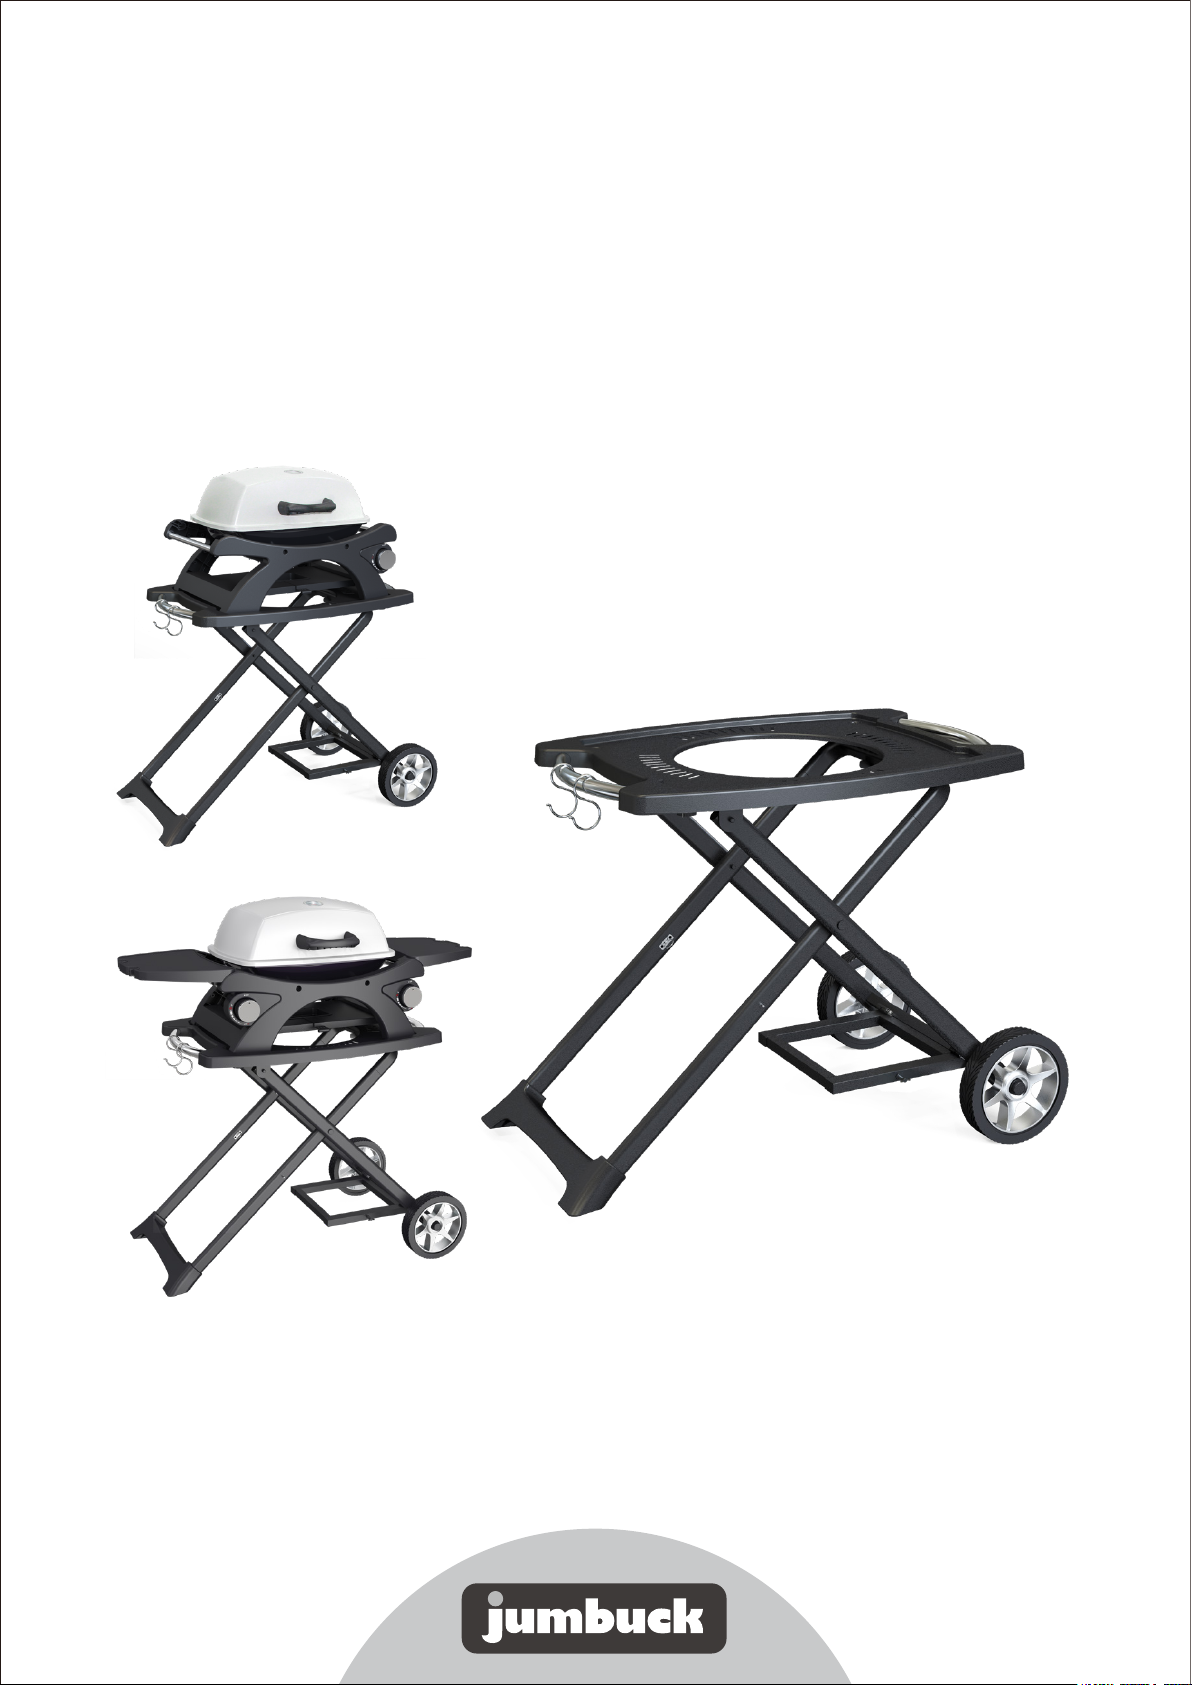
Suits Jumbuck Portable Gas BBQs (items 0173342
•
and 0173343)
Dimensions: 890L x 540W x 680Hmm
•
(cylinder not included)
Important: Please retain these instructions for future use
ASSEMBLY INSTRUCTIONS
This trolley has been approved for use with the below BBQ models only
Model no. JBPB19. Fineline. 0173342
Model no. JBPB219. Fineline. 0173343
DO NOT use this trolley if you have purchased a BBQ that is not listed above
Keep your purchase receipt, this will be required to make any claims under the 12 month warranty.
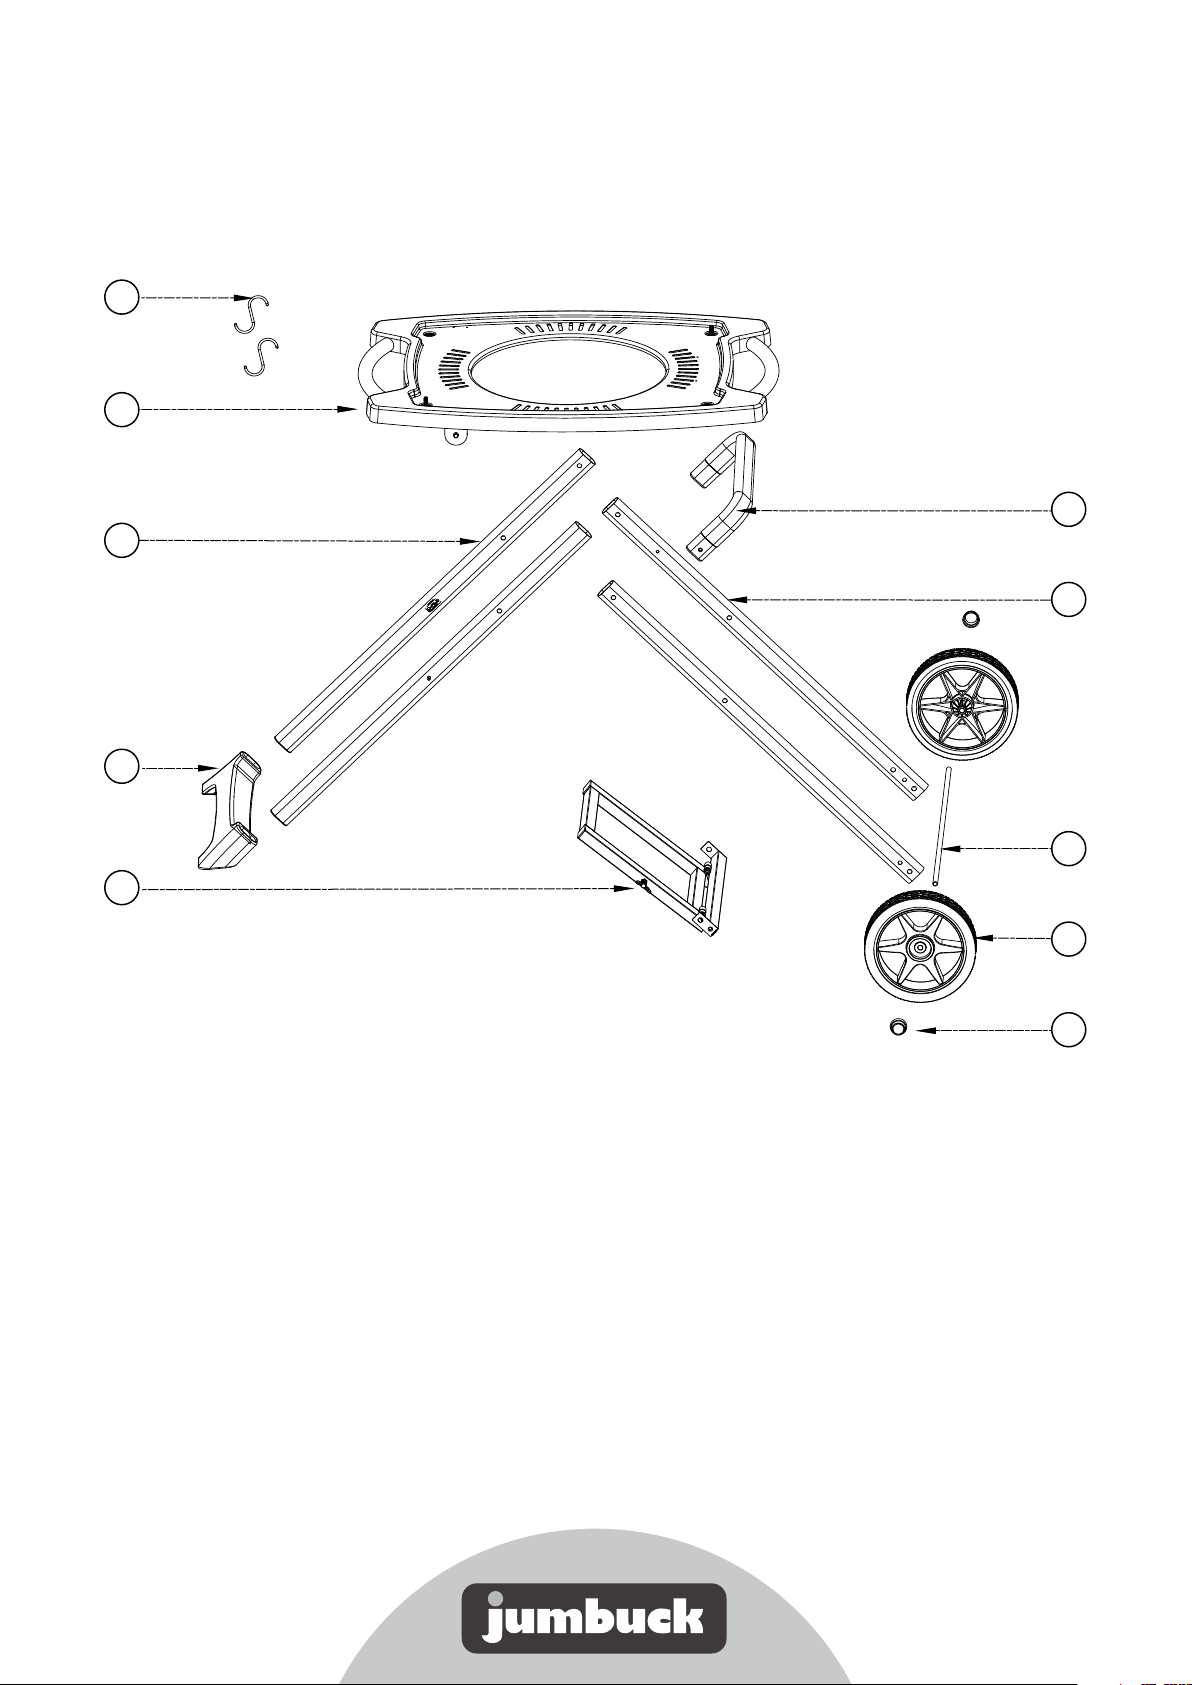
A
B
C
PARTS VIEW
J
I
D
E
H
G
F
Part
Number
CARTON CONTENTS
Part list
Description Illustration Quantity
A 2
B 1
C 2
D 1
E 1
F 2
G 2
H 1
Hook
Upper panel
Left long leg
Leg base
Gas cylinder mounting base
Wheel cover
Wheel
Wheel axle
I
J 1
Right leg
Upper leg support
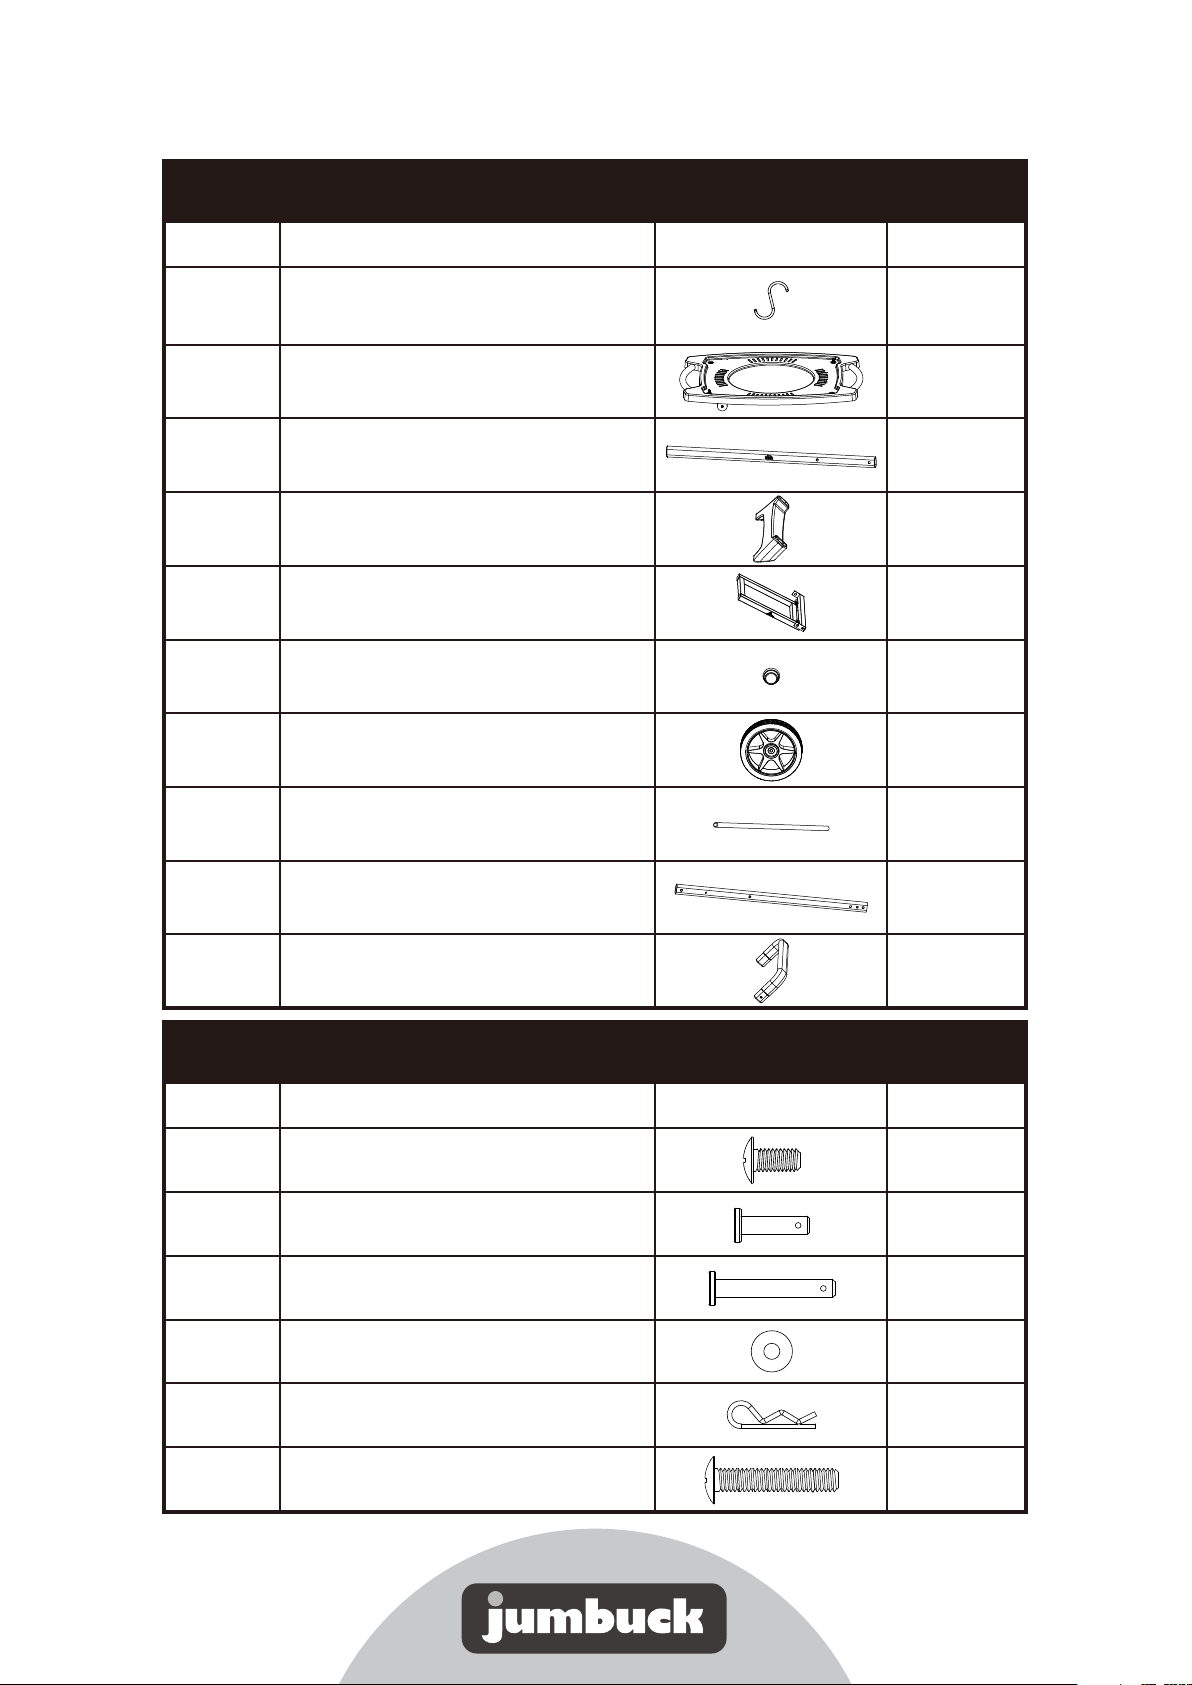
Hardware
Part
Number
AA
BB
CC
DD
EE
M6x12
Short bolt
Long bolt
Washer
R Pin
Description Illustration Quantity
2
6
2
2
2
4
FF
M6x30
2
ASSEMBLY INSTRUCTIONS
Step 1
Insert the 2 left long leg sections (C) over either side of the upper leg support (J),
ensuring the ring side of the spring pin is facing inwards. Use a phillips head
screwdriver to secure with 2 x M6x12 screws (AA).
J
AA
x2
x2
C
Step 2
Attach the gas cylinder mounting base (E) to the 2 right leg sections (I) by aligning the
mounting holes on part E with the mounting holes on parts I. Use a phillips head
screwdriver to secure with 2 x M6x12 screws (AA) through the metal nutserts on the
inside face of the legs, and 2 x M6x30 screws (FF) through the holes from the outside.
x2
E
x2
I
AA
FF
x2

ASSEMBLY INSTRUCTIONS
Step 3
Join the left leg assembly (C&J) together with the right leg assembly (I) by aligning
the middle hole on part I with the middle hole on part C as shown below. Secure
using the washer (DD) and long bolt (CC).
Insert an R pin through the hole on the end of each bolt to lock into place.
J
C
I
EE x2
The washer (DD) should be
located in between the left
and right leg section before
inserting the bolt.
DD x2 CC x2
Step 4
Insert the bottom of the leg assembly (C&J) into the leg base (D). Use a phillips head
screwdriver to secure with 2 x M6x12 screws (AA).
D
AA x2

ASSEMBLY INSTRUCTIONS
Step 5
Insert the wheel axel (H) into the hole at the end of the right leg sections (I), near
the cylinder mounting base (E). Attach a wheel (G) to either side of the axle. Ensure
wheels are secured correctly and are moving smoothly before securing with a wheel
cover (F). Use a hammer and gently tap the wheel covers to lock the wheels in place.
I
H
NOTE: Once the wheel cover is
secure, it cannot be removed.
Be sure to test that the wheels
move smoothly before securing
with the wheel cover.
x2
G
x2
F
E
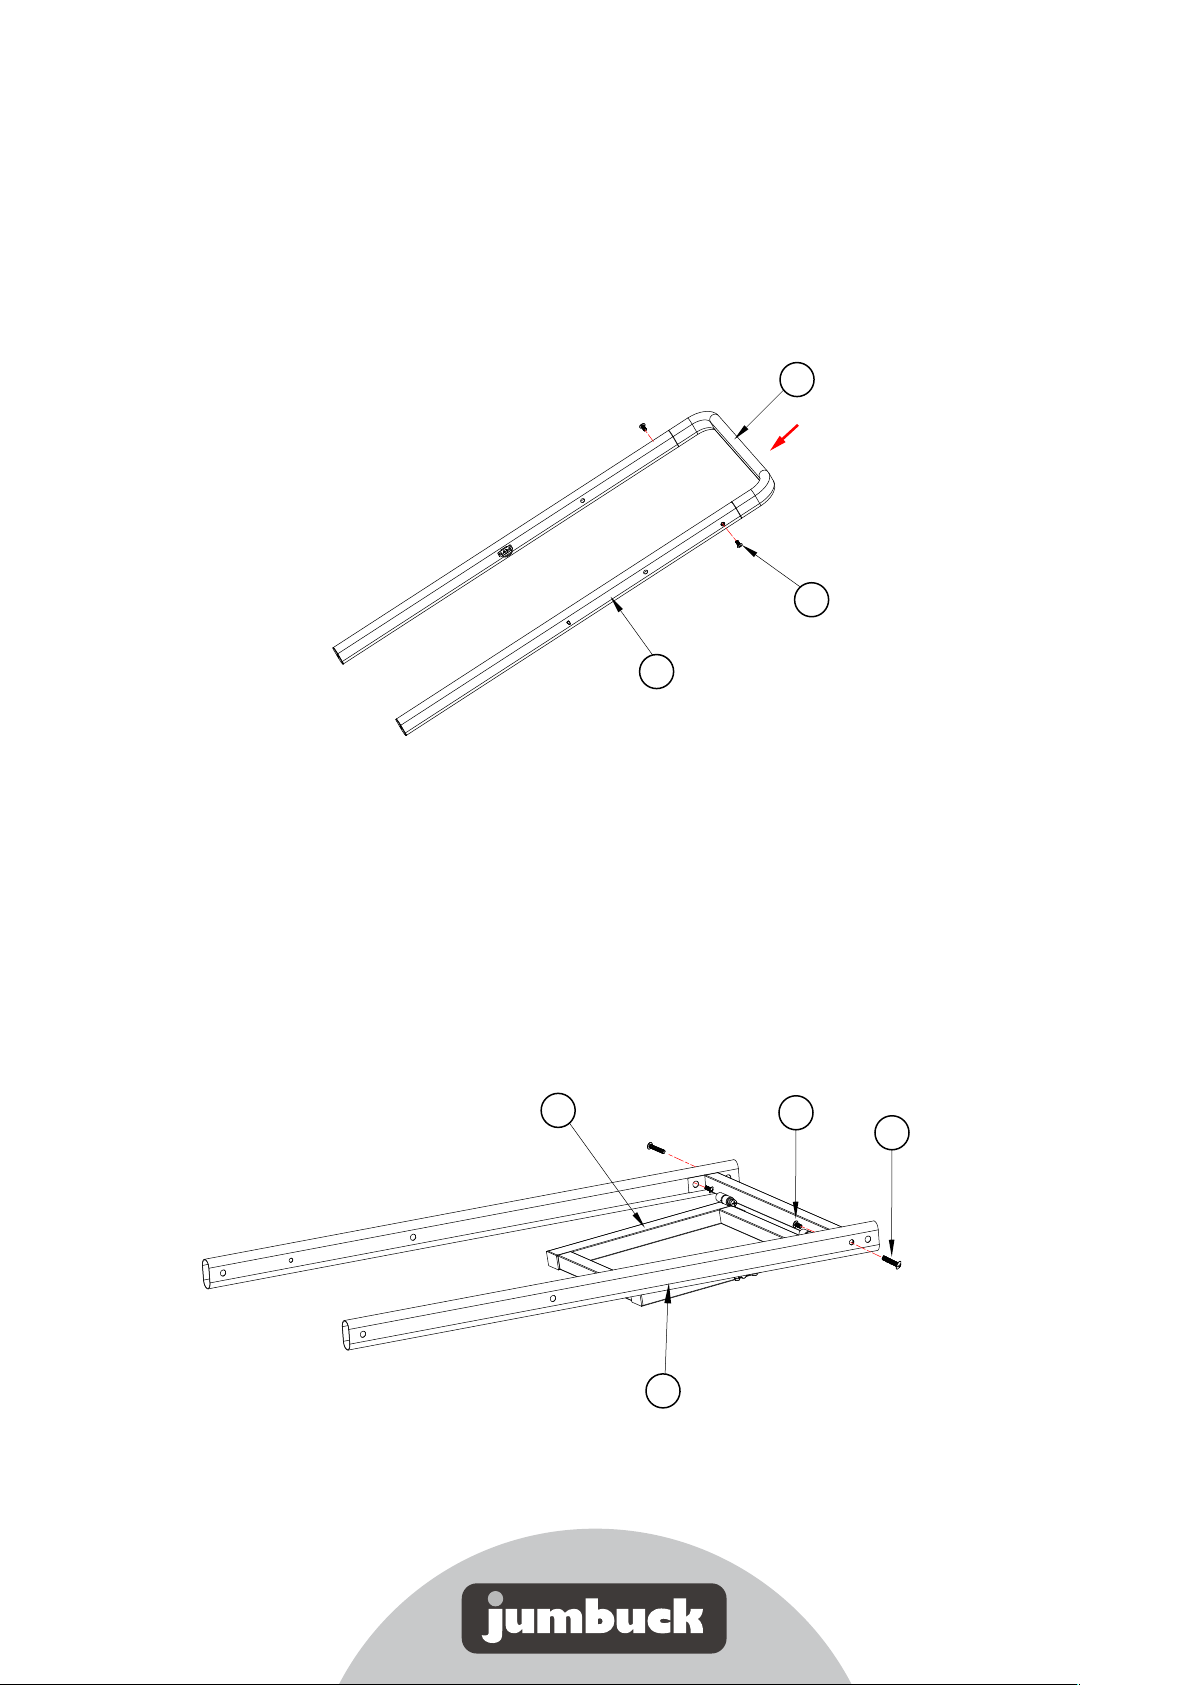
Step 6
Assemble right leg frame (I) to the upper panel (B), and lock by 2pcs short bolt (BB)
and 2pcs R pin (EE). Ensure upper panel is facing flat side down and leg frame is
positioned with the wheels and cylinder mounting base facing up.
BB x2
B
EE x2

ASSEMBLY INSTRUCTIONS
Step 7
Slowly lift up the trolley and hook the underside of the upper panel over and around
the upper leg support pole.
Step 8
Optional step. Place the hooks (A) over the left side handle as shown below to hang
your BBQ tools.
A x2

ASSEMBLY INSTRUCTIONS
Step 9
To fold down the gas cylinder mounting base (E), push the right side of the frame
over to the left and fold down.
1
2
E
To fold up the gas cylinder mounting base (E), simply lift it up as shown below.
Note: always fold up the gas cylinder mounting base before folding the trolley.

FIX THE BBQ TO THE TROLLEY
IMPORTANT:
Ensure trolley is assembled and locked into place correctly by following all assembly instructions in this manual.
Attach the BBQ to the trolley in the upright position only.
Do not fold the trolley while in use with the BBQ and always remove the BBQ
before folding the trolley.
Do not attach the hose and regulator to the gas cylinder until you have fixed the
BBQ and cylinder to the trolley securely.
Do not move the trolley while the BBQ is on and during cooking.
This trolley has been approved for use with the below BBQ models only:
Model no. JBPB
Model no. JBPB219. Fineline. 0173343
The trolley has 2 mounting points to secure the BBQs in place. Position the BBQ on
top of the trolley upper panel, aligning the 2 mounting holes with the hole in the
19. Fineline. 0173342
centre of the leg base.
Secure the BBQ using the bolts located on the underside of the trolley.

SECURE THE GAS CYLINDER TO TROLLEY
Install a 4kg or 9kg gas cylinder onto the cylinder mounting base ensuring it is
standing upright and stable.
Use the wing nut on the side of the mounting base to tighten and secure the
cylinder in place.

FOLDING INSTRUCTIONS
Note: remove BBQ and gas cylinder before folding the trolley
Step 1
To fold the trolley for storage, pull the upper panel (B) and both ends upwards while
keeping the leg base steady.
B
Step 2
Lower the trolley slowly towards the ground.

FOLDING INSTRUCTIONS
Step 3
To lock the trolley in the folded position, pull the 2 x spring pins from the rings located
on the inside of the frame and turn 90 degrees to lock.
Note: to unfold the trolley, turn the 2
pins 90 degrees and pull to release.

SPECIFICATION
BRAND NAME:
JUMBUCK
Portable Gas BBQ Trolley
Mayo Hardware
4 Secombe Place Moorebank
NSW 2170
Phone: 1300 360 211
Email: customerservice@mayohardware.com.au
JBPB19T. Fineline 0175300
Folding design
Solid steel construction
Mounting base to hold gas cylinder (cylinder not included)
Large 20cm diameter wheels for portability
Approved for use with Jumbuck portable gas BBQs.
Model JBPB19, fineline 0173342 and model JBPB219,
fineline 0173343.

WARRANTY
FOR AUSTRALIAN CUSTOMERS FOR NEW ZEALAND CUSTOMERS
Any claim under this warranty must be made within 12
months of the date of purchase of the product. To make
a claim under the warranty contact Mayo Hardware
customerservice@mayohardware.com.au, or take the
product (with proof of purchase) to any Bunnings store
(see www.bunnings.com.au for store locations)
The warranty covers manufacturer defects in materials,
workmanship and finish under normal use.
This warranty is provided in addition to other rights
and remedies you may have under law: our goods come
with guarantees which cannot be excluded under the
Australian Consumer Law. You are entitled to replacement or refund for a major failure and to have the
goods repaired or replaced if the goods fail to be of
acceptable quality and the failure does not amount to a
major failure.
The warranty excludes damage resulting from product
misuse or product neglect. The warranty covers domestic use only and does not apply to commercial applications.
Any claim under this warranty must be made within
12 months of the date of purchase of the product. To
make a claim under the warranty contact Mayo
Hardware
customerservice@mayohardware.com. au, or take
the product (with proof of purchase) to any Bunnings
store (see www.bunnings.co.nz for store locations)
The warranty covers manufacturer defects in materials, workmanship and finish under normal use.
This warranty is provided in addition to other rights
and remedies you may have under law: our goods
come with guarantees which cannot be excluded
under the Consumer Guarantees Act 1993 (NZ). You
are entitled to replacement or refund for a major
failure and to compensation for other reasonably
foreseeable loss or damage. You are also entitled to
have the goods repaired or replaced if the goods fail
to be of acceptable quality and the failure does not
amount to a major failure.
The warranty excludes damage resulting from product misuse or product neglect. The warranty covers
domestic use only and does not apply to commercial
applications.

WARRANTY
WHAT IS NOT COVERED IN THE WARRANTY
Removal or re-installation costs. This warranty does
not cover costs for transit, nor in home service.
Liability will only be accepted for loss or damage
during transit if at the time the product was being
transported by Bunnings or a Bunnings approved
contractor.
Lack of maintenance, abuse, neglect, misuse,
accidental or improper installation of this appliance.
Scratches, dents, corrosion or discolouration caused
by heat, abrasive chemicals cleaners.
Corrosions or damage caused by exposure to
elements such as weather, hail or grease from the
BBQ.
Commercial use of this product.
Unauthorised repairs or modification during
warranty period.
FOR TECHNICAL ASSISTANCE
Contact Mayo Hardware through the below details:
Phone (Aus) 1300 360 211
Phone (NZ) 09 415 6240
Email: customerservice@mayohardware.com.au
FOR SPARE PARTS
Contact your local Bunnings store or Mayo Hardware
customer service. You should provide the following
information:
Model of BBQ
.............................................................................................................
Year of Purchase
RECORD THE FOLLOWING INFORMATION
Attach the copy of the purchase receipt here
Date of Purchase .............................................................................
Purchased From................................................................................
Location ...............................................................................................
Model Name and Number ..........................................................
Serial Number....................................................................................
Receipt Number................................................................................
Note: The serial number is located either on the outside
of the packing carton or outside or inside the appliance.
.............................................................................................................
Part that requires replacement (refer to the parts list
in the instructions manuaI)
.............................................................................................................
 Loading...