

Page 1
Park Style
BACKYARD CHARCOAL GRILL
Model CBP-247
The Model CBP-247 Backyard Charcoal Grill includes:
(1) Grill Firebox -Part A
(1) 21" long Post Base Section with (1) internally threaded end -Part B
(1) 21" long Post Base Section with (1) externally threaded end -Part C
(1) 5" Locking Pin to secure the Grill to the Post Base -Part D
ASSEMBLY and INSTALLATION INSTRUCTIONS:
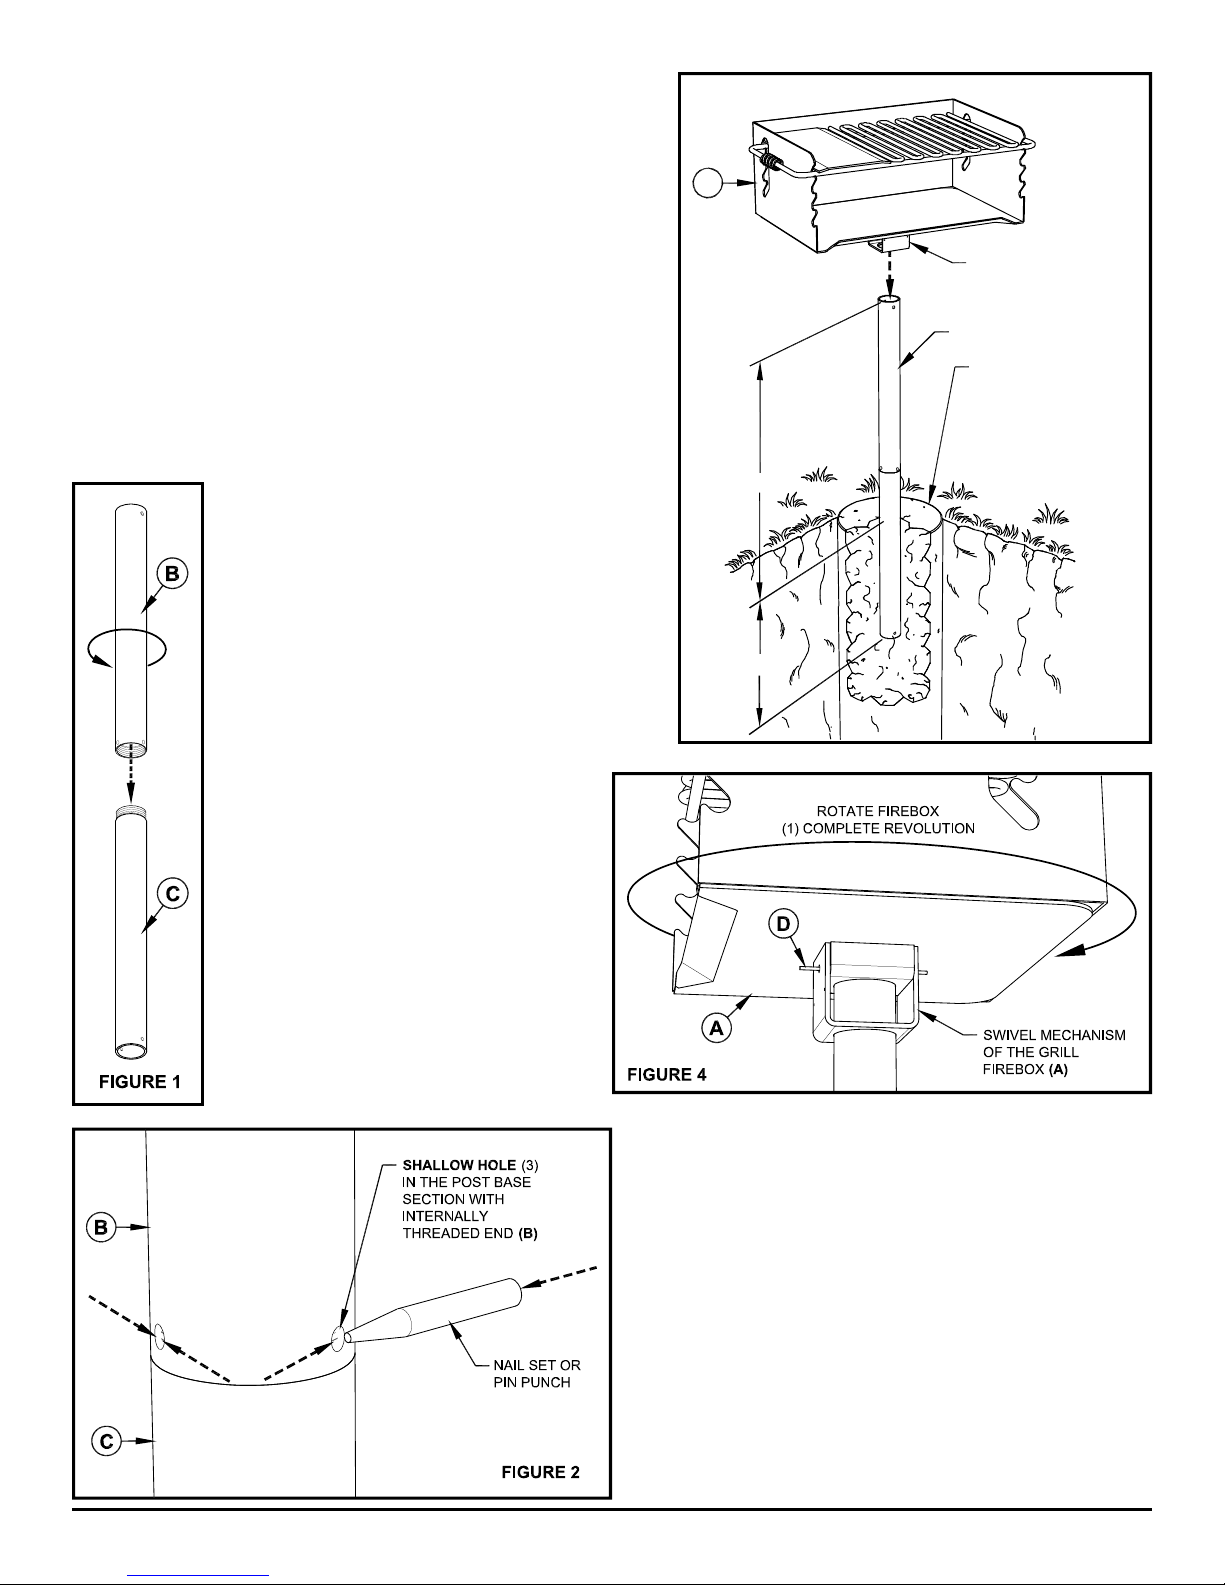
1) Remove the plastic cap from the Post Base Section with the external
threads (C). Screw the (2) threaded Post Base Sections (B & C)
together – see Figure 1.
2) For added security and theft prevention there are (3) shallow holes
around the outside perimeter of the internally threaded end of the
Part B Post Base Section of the Post Base.
These holes partially expose the threads from the
outside and are intended to allow the threads to
be deformed to prevent disassembly of the base
sections (B & C).
Using a nail set or a pin punch and a hammer, punch
into each of the (3) shallow holes in Post Section B
from two opposite angles to deform the threads
(see Fig. 2). Make sure the threads are thoroughly
deformed so the (2) Post Sections (B & C) cannot
be unscrewed.
A
26''
15-1/4''
FIGURE 3
SWIVEL MECHANISM
OF THE GRILL
FIREBOX (A)
PLUMB POST VERTICALLY
MIN 12'' DIA x 36'' DEEP
CONCRETE FOOTING
RECOMMENDED
NOTE:
LOCAL CONDITIONS
MAY REQUIRE
LARGE R FO OT I NG.
CHECK LOCAL CODES.
3) Use a post hole digger to make a hole a
minimum of 12" dia. x 36" deep. Fill the
hole with concrete – see Figure 3.
Note: Local soil conditions may require
a larger footing. Check local codes.
4) Place one end of the assembled Post Base
into the concrete with the top end 26"
above ground level and plumb it vertically
– see Figure 3. Allow the concrete to cure
before installing the Grill Firebox (A) on
the Post.
5) Install the Grill (A) on the Post by placing
the 2-3/8" dia. Holes in the Swivel
Mechanism of the Grill Firebox over the
end of the Post Base – see Figure 3.
6) To lock the Grill Fir ebox (A) on the Post Base: Line up the
Holes on the front and back of the Grill Swivel Mechanism
with the Holes at the top of the Post Base. Insert the included
5" Locking Pin (D) through the aligned holes leaving an
equal length of Pin protruding from each side of the Swivel
Mechanism – see Figure 4.
7) Rotate the Grill Firebox (A) (1) complete revolution – see
Figure 4. The Locking Pin (D) will be bent and drawn into
the Swivel Mechanism to lock the Grill onto the Post Base.
The Grill Firebox cannot be removed from the Post Base
when this step is complete.
Grill Maintenance Instructions are on Page 2.
Page 1
FORM CBP-1003 / Rev. 1-14
Page 2

GRILL MAINTENANCE:
In order to maximize the useful lifetime of your grill fi rebox and cooking grate, follow these steps:
1) Regularly clean out all charcoal and wood ash from the fi rebox bottom. Rainwater and ash accelerates the rusting process.
2) The high heat paint will last between one and two years depending on use. When there are signs of rusting, wire brush off surface
rust and spray or brush apply another coat of non-toxic high heat black enamel.
3) Do not re-coat the cooking grate as the grease from cooking meat will usually keep rust at bay and a good wire brushing after the
grate is hot also helps. If there is still rust on the grate, use aluminum foil between your food and the grate.
Local environment and climatic conditions may require more frequent maintenance.
Page 2
FORM CBP-1003 / Rev. 1-14
 Loading...