

Page 1
High Resolution
Digital Scanner
MANUAL
www.ItsJumbl.com
JUMBL is a trademark of C&A IP Holdings, LLC
©2013 All Rights Reserved
MADE IN CHINA
Distributed by C&A Marketing, Inc.
2 Bergen Turnpike, Ridgeeld Park
NJ 07660
1-866-849-3049
Page 2

Introduction
Thank you for purchasing this product. Please read this manual carefully
before use, and save the instructions for future reference. There are
many functions and details regarding the use of this scanner so we
highly recommend that you read through the manual rst so you can
optimize the use of your new device.
2
Please Read First
Be careful to keep your product dry and do not expose this to rain or
moisture to preserve the life of your product.
CAUTION: To prevent the risk of electric shock, Do not disassemble
the lm scanner.
VENTILATION: Never place the unit in a way where the ventilation vent
is blocked. Leaving your unit on a bed or a couch can lead to the
unit overheating.
HEAT: The unit should be situated away from sources of high heat such
as radiators or a stove.
SERVICING: The user should not attempt to service the device beyond
those means described in this instruction manual. All other servicing
should be referred to a qualied technician. Never attempt to open the
unit on your own.
USB CORD: If you are not using your device for a long period of time it
is recommended to unplug the USB cord from your computer.
General Tips
We strongly suggest using a clean, dry, non-alcohol cotton swab to
clean the glass surface periodically to produce a clear image. Do not
overload the USB connections on your computer. If you have too many
devices connected to your computer, there may not be enough power
for the lm scanner to operate properly.
Page 3
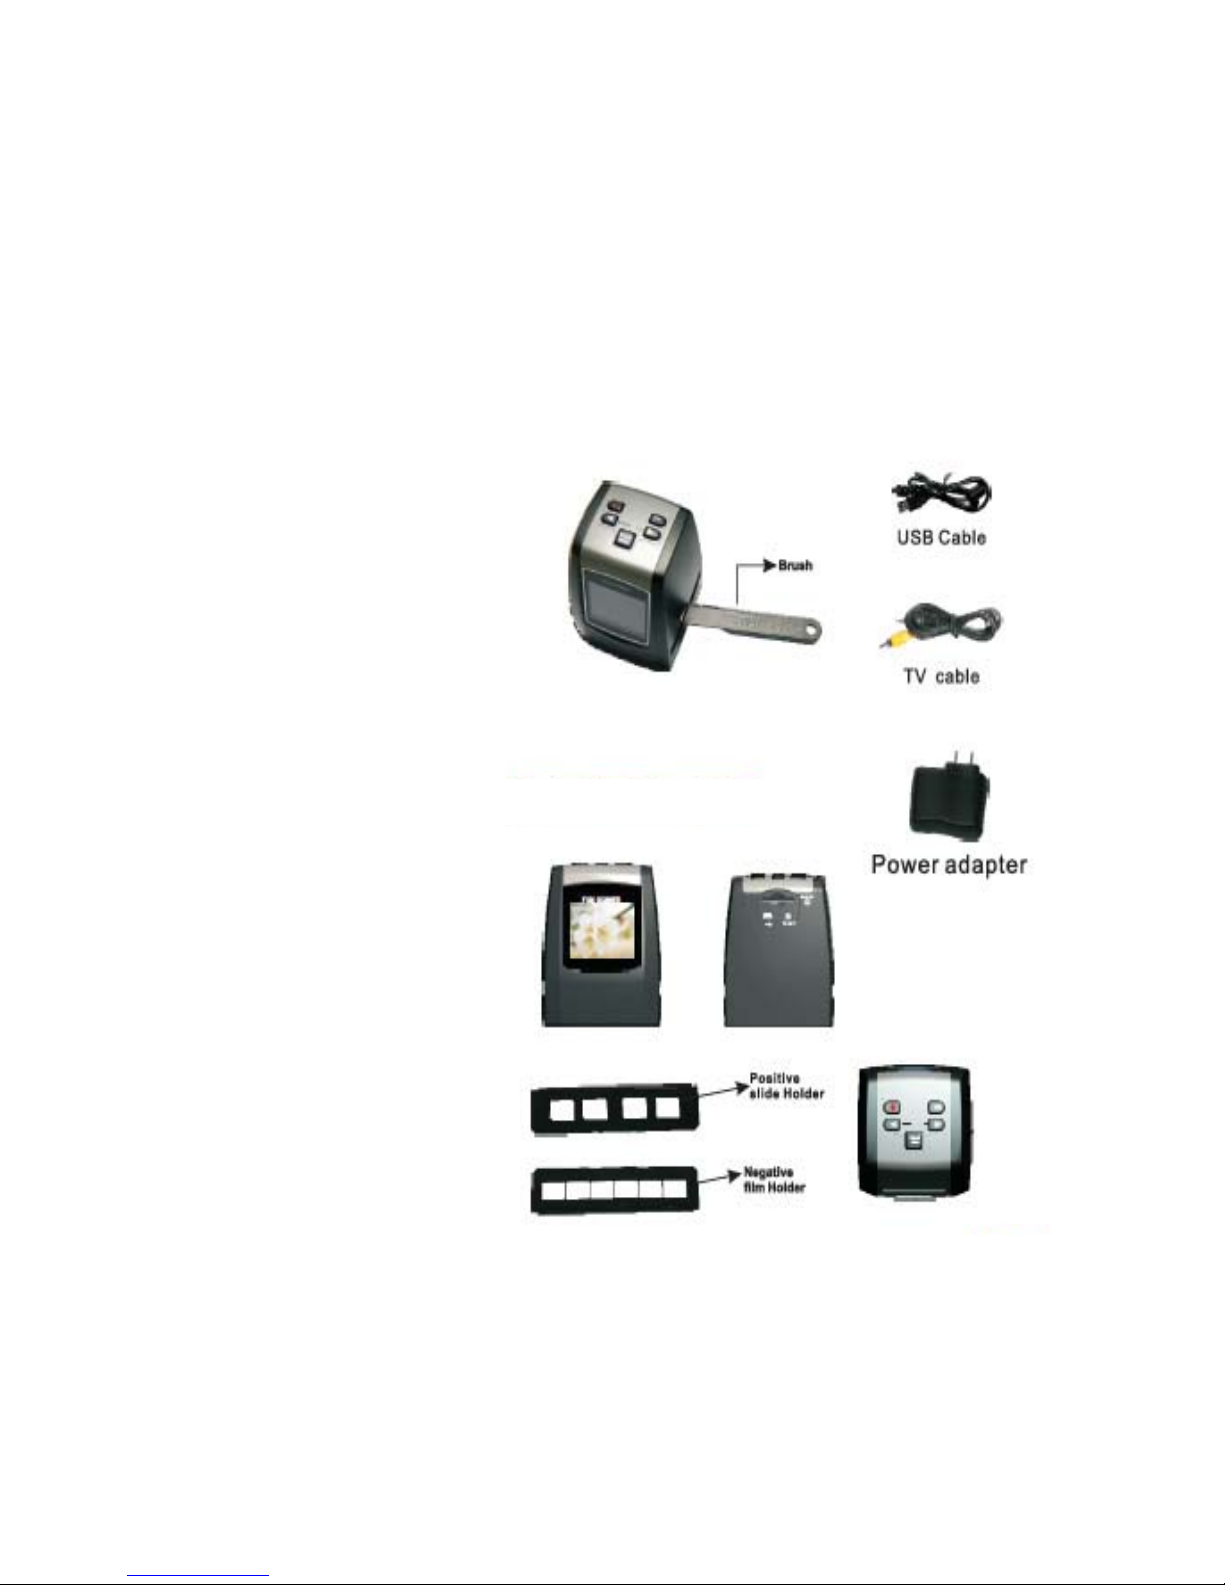
Contents - Parts Illustration
Begin by conrming that all the proper parts and pieces included with
your device. Please see the below illustration of all the parts that are
included with your device.
Please Note: Your device does NOT have an SD card included. For more
information on the use of an SD card for memory storage, please see
SD CARDS section.
The following parts are included. Please contact your retailer if your unit
has arrived missing one of these items.
Digital Scanner - 1
USB cable - 1
Negative holder - 1
(Film Strips)
Positive holder -1
(Slides)
AC / DC adapter - 1
User Manual - 1
Cleaning brush - 1
TV cable - 1
3
Page 4

QUICK START—POWER
Powering your unit:
You can power the scanner using the included USB cable in two different
ways. Firstly, connect the cable from the scanner to an available USB
port on your PC or Mac. Then plug the USB cable into the included 5-volt
adapter. The adapter should be inserted into a 120-volt wall receptacle.
Connect the other end of the cable into the USB receptacle located on
the back of the scanner. Once both ends of your cable is securely plugged
in, Press the POWER button to turn on the lm scanner.
When the device is turned on if there is no SD card inserted in the
back the screen will say no SD card. You will still be able to scan and
save images using the internal 128 MB memory.
Memory:
Your scanner has the option of saving the scanned images to the
scanner’s built in memory or on an external memory card. If you would
like your images to be stored on an external memory card, insert an
SD/MMC (Secure Digital Multi-Media Card) into the lm scanner. The
slot for your SD/MMC cards is located on the back of the unit. If an
SD/MMC card is in the slot the scanned images will automatically be
saved to the SD card.
PLEASE NOTE THAT THE SCANNER DOES NOT INCLUDE AN SD CARD.
See page SD CARDS section for more details on SD cards.
Starting up the Scanner:
After the welcome page, the Main Menu screen will display for 5
seconds. You can press the OK button to jump right to the Capture
Mode or wait for the full 5 seconds for the system to automatically
enter the Capture Mode. Capture Mode, enables you to view, scan and
save your images as displayed on the screen.
Once you enter the capture mode, there will be a capture icon indicator
on left top corner to indicate that you are in capture mode.
When the lm holder is inserted into the slot, the image always
shows the positive image according to the dened lm type. To
change the lm type see FILM TYPE SETUP section. (When power is
rst applied, the lm type defaults to (color) negative lm).
4
Page 5
LOADING NEGATIVES—POWERING THE UNIT
Please note that it is highly recommended to use the included cleaning
brush to clean the inside of the scanner. Slide the brush through the
scanner several times to clean it well. It is also very helpful to make
sure that he lms or negatives themselves are clear from any dust or
smudging or it will reect in the quality of the scanned image. Never
handle the lm with your hands. It is best to use a clean cloth when
handling the lm.
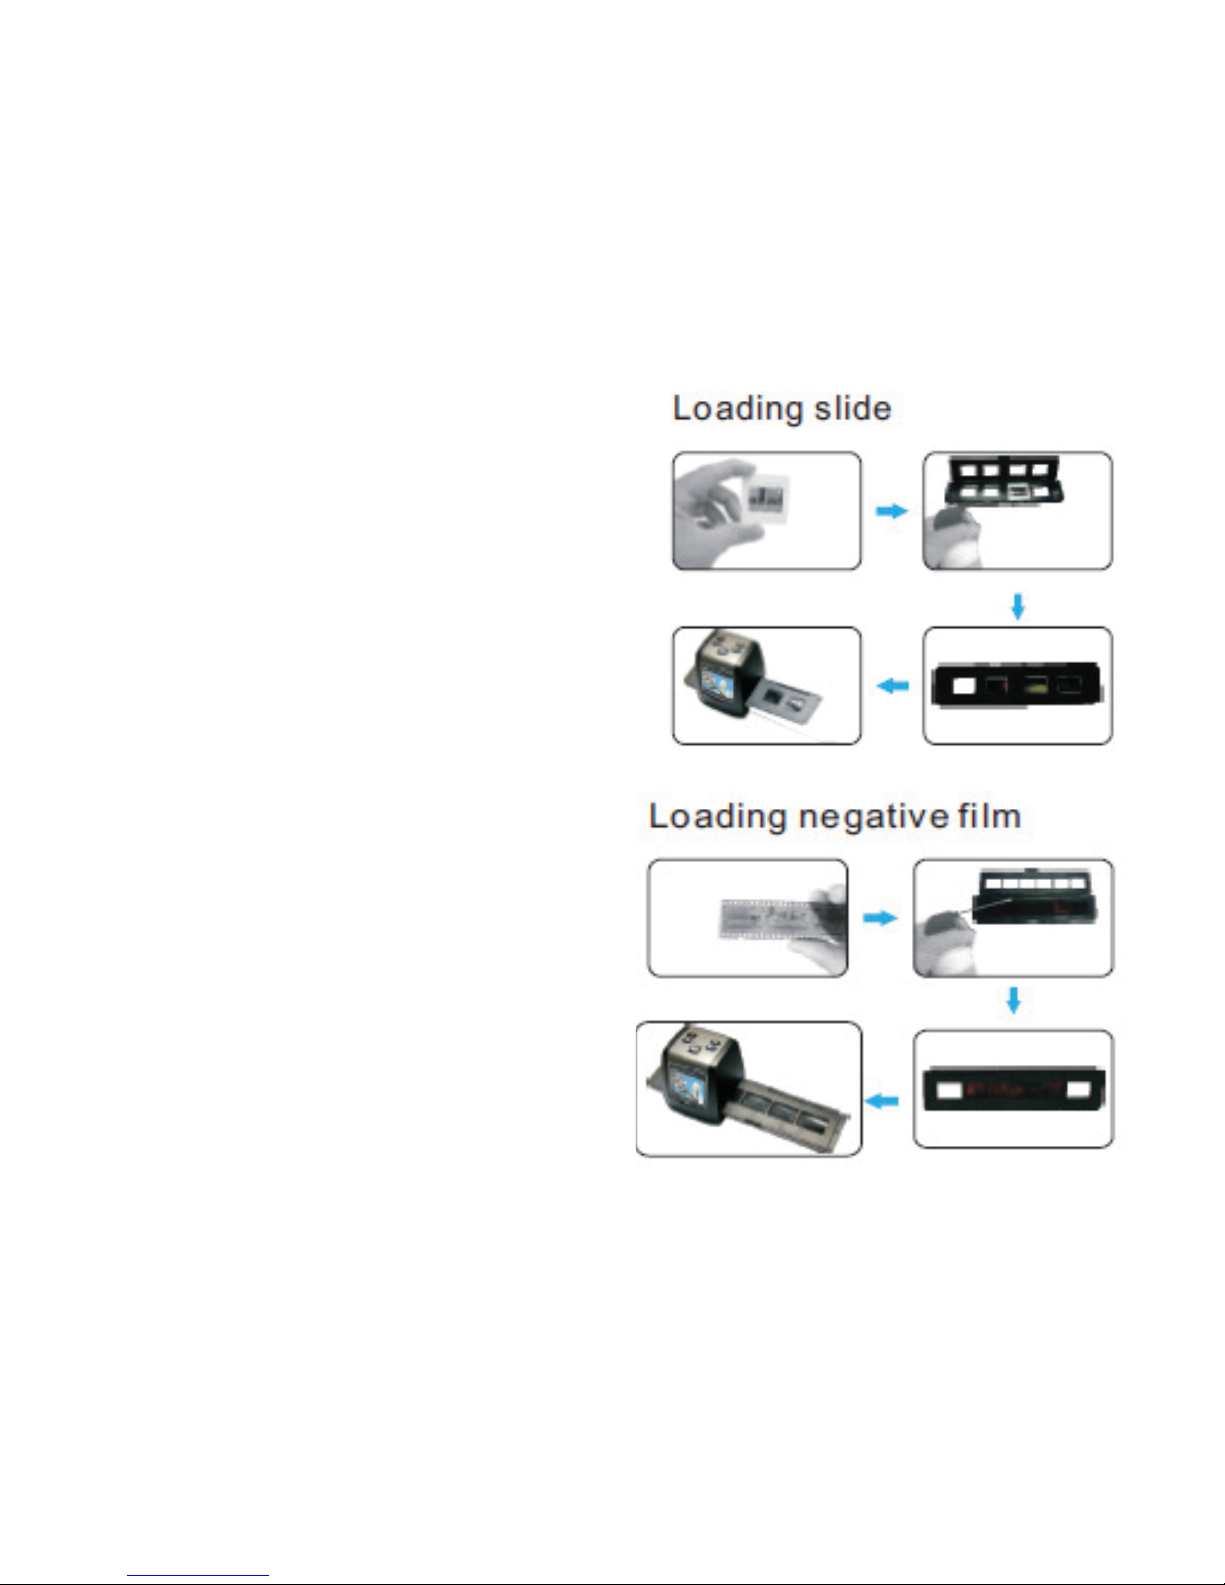
Loading Negatives:
Begin by locating your negative strip
holders. There are two holders
included. One is designed for lm
strips (marked Negatives) and one
is designed for your slides. Use the
one that best ts your needs. The
holder can be opened by pulling the
latch on the center of the holder.
The holder will then be able to be
opened ipping the top open.
See illustration.
Once your holder is open lay your
lm strip in the holder with every
frame opposite an open window
of the holder. Be sure that the
matt (dull) side of the negatives
are facing you and the negative is
right side up.
Once you have properly positioned
your lm strip in the holder, proceed
by closing the holder and securing
your lm in place. Your lm is now
ready to be scanned.
SCANNING—MEMORY
Scanning An Image:
To scan an image you will need to make sure that your scanner is in
“CAPTURE MODE”. The capture mode can be accessed from the main
menu. If you are powering on your device you will be automatically in the
main menu. Your device will skip to CAPTURE mode on its own after ve
seconds. Once in CAPTURE mode you will notice a camera icon on the
left top corner of your screen. If you like the way your image appears on
the screen then press the SCAN button. You will then be prompted to
press the save button to store your image. Press OK to save
5
Page 6
SETTINGS & EDITING BEFORE SCANNING
Film Type Setup
Your device has to be setup for the correct lm type that is being used
before beginning. You will have to choose whether you are using slides
or negatives or Black and White. To change the setting, locate the “Film
Type” option in the main menu. Press the SCAN/MENU button twice to
bring you to the main menu. Press the LEFT/RIGHT button until the Film
Type icon appears in the center of the screen with the word "Film Type"
shown below the icon. Press the OK button to access that selection.
Once you accessed that selection you can use the RIGHT/LEFT button to
select the lm type you are using. Once you have highlighted the correct
lm type press the OK button to apply your selection.
After you have selected the correct lm type your device will automatically
go back into capture mode.
Important!
Once the image is captured, press the OK button to save the image
onto the SD card or the internal memory.
Summary: While your image is displayed on the screen, press the
SCAN button to scan the image and then press the OK button to save
the image.
Memory:
Your scanner has the option of saving the scanned images to the
scanner’s built in memory or on an external memory card. If you would
like your images to be stored on an external memory card, insert an
SD/MMC (Secure Digital Multi-Media Card) into the lm scanner. The
slot for your SD/MMC cards is located on the back of the unit. If an
SD/MMC card is in the slot the scanned images will automatically be
saved to the SD card.
PLEASE NOTE THAT THE SCANNER DOES NOT INCLUDE AN SD CARD.
Memory Full:
Once the internal memory (128 MB)
or the memory card is full, a Memory
Full icon will appear an the screen if
you attempt to scan a new image. If
it is your memory card that it is full you
will want to either replace it with a
different card that has available memory
or you can ofoad some of the images to
your computer to make available space. If it is your internal memory that
is full you will want to transfer the images from your scanners memory
onto your PC. At this point, you can download the image les to a PC
or Mac by following the instructions in the EXPORTING IMAGES section.
6
Page 7
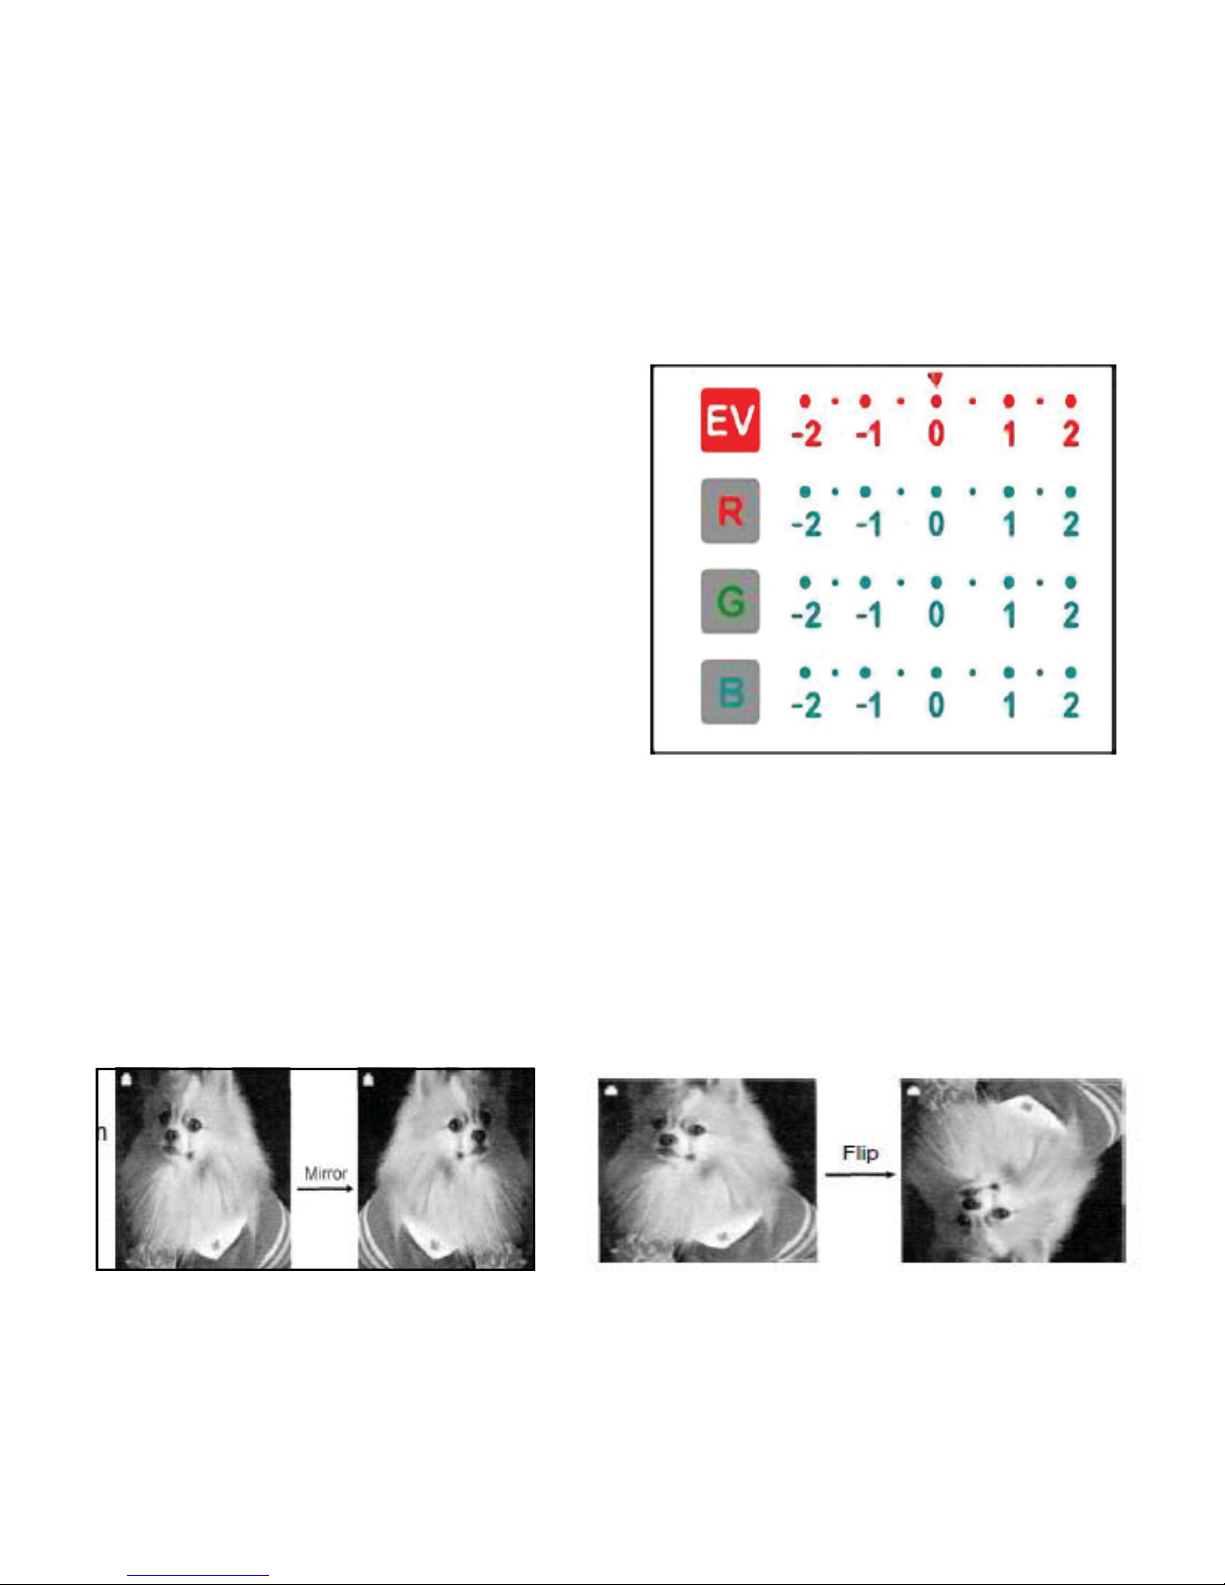
Changing the Brightness and Color:
Your scanner has the ability to adjust the color and the brightness of
the image that appears on the screen, At any time during the capture
mode you can press the OK button and the adjustment screen
will appear.
EV = Brightness
R= Red
G= Green
B= Blue.
Move the red arrow right or left to
adjust any of the settings. Once
you have made the adjustment to
that category press the OK button
to apply and move on to the next
category. Once you have adjust or
conrmed all four categories the
scanner will go back into capture
mode.
On the right top corner of the
screen there is a brightness
indicator which tells you the current
setting of the brightness.
Flipping and Mirror:
If any image requires mirroring or ipping before capture, press the
LEFT to apply the Mirror affect (see illustration below). The live view will
be adjusted accordingly (This step corrects user error when inserting the
lm). Press the LEFT button to ip the photo as in the illustration below.
These adjustments can only be done while in CAPTURE mode before the
image has been scanned, do alter the image before scanning.
Once you are happy with your image on the screen, press SCAN and
then OK to save.
7
Page 8
VIEWING STORED IMAGES—DELETING
Playback Mode:
You can view the images that were scanned and saved on either the
internal memory or on the SD card, by following the steps below. Press
the SCAN/MENU button twice to bring you to the main menu.
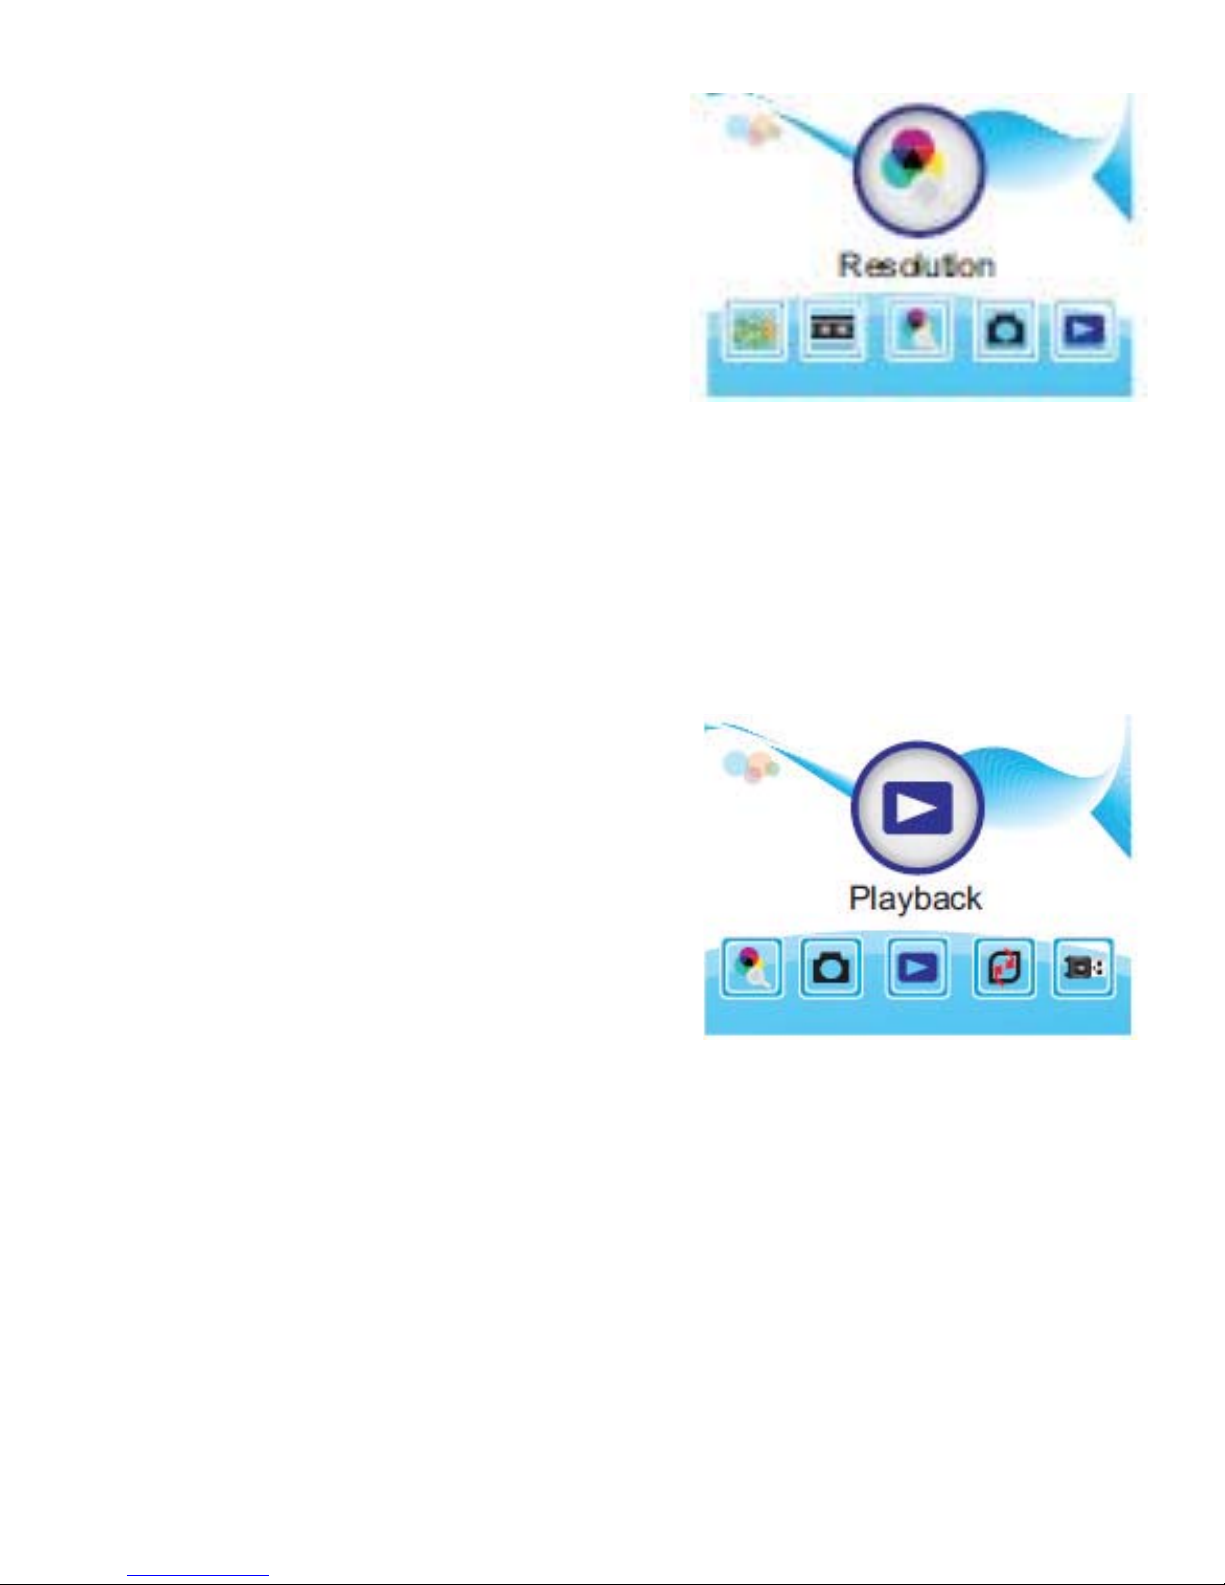
The Main Menu will appear on the
screen as shown here. Press the LEFT/
RIGHT button until the playback icon
appears in the center of the screen
with the word "Playback" shown at the
bottom of the screen. Press the OK
button to begin playing all the stored
images.
If there are no Images stored when
entering the Playback Mode, a No File
symbol will show on the screen as shown
in the illustration.
Please note: The scanner will automatically start playing the pictures
from the SD card. If you would like the scanner to play the images saved
on the internal memory then the SD card should be removed. When
there is no SD card in the slot, the scanner will play images stored in
the scanner's internal memory.
While in playback mode you can press the OK button to stop the pictures
from playing. At that point the left and the right button can be used to
skip forward or backwards to another picture.
Resolution:
The scanner has the ability to adjust
the resolution as well. To adjust the
resolution, press the SCAN/MENU
button twice. Then press the LEFT/
RIGHT button to select the Resolution
mode. Press OK to choose access that
menu. Next, use the LEFT or Right
buttons to choose between 14MP or
22MP. Lastly, press the OK button to
set the desired value you desire and
return to the Capture Mode.
NOTE: The factory default value is 14MP.
8
Page 9
Deleting a Picture:
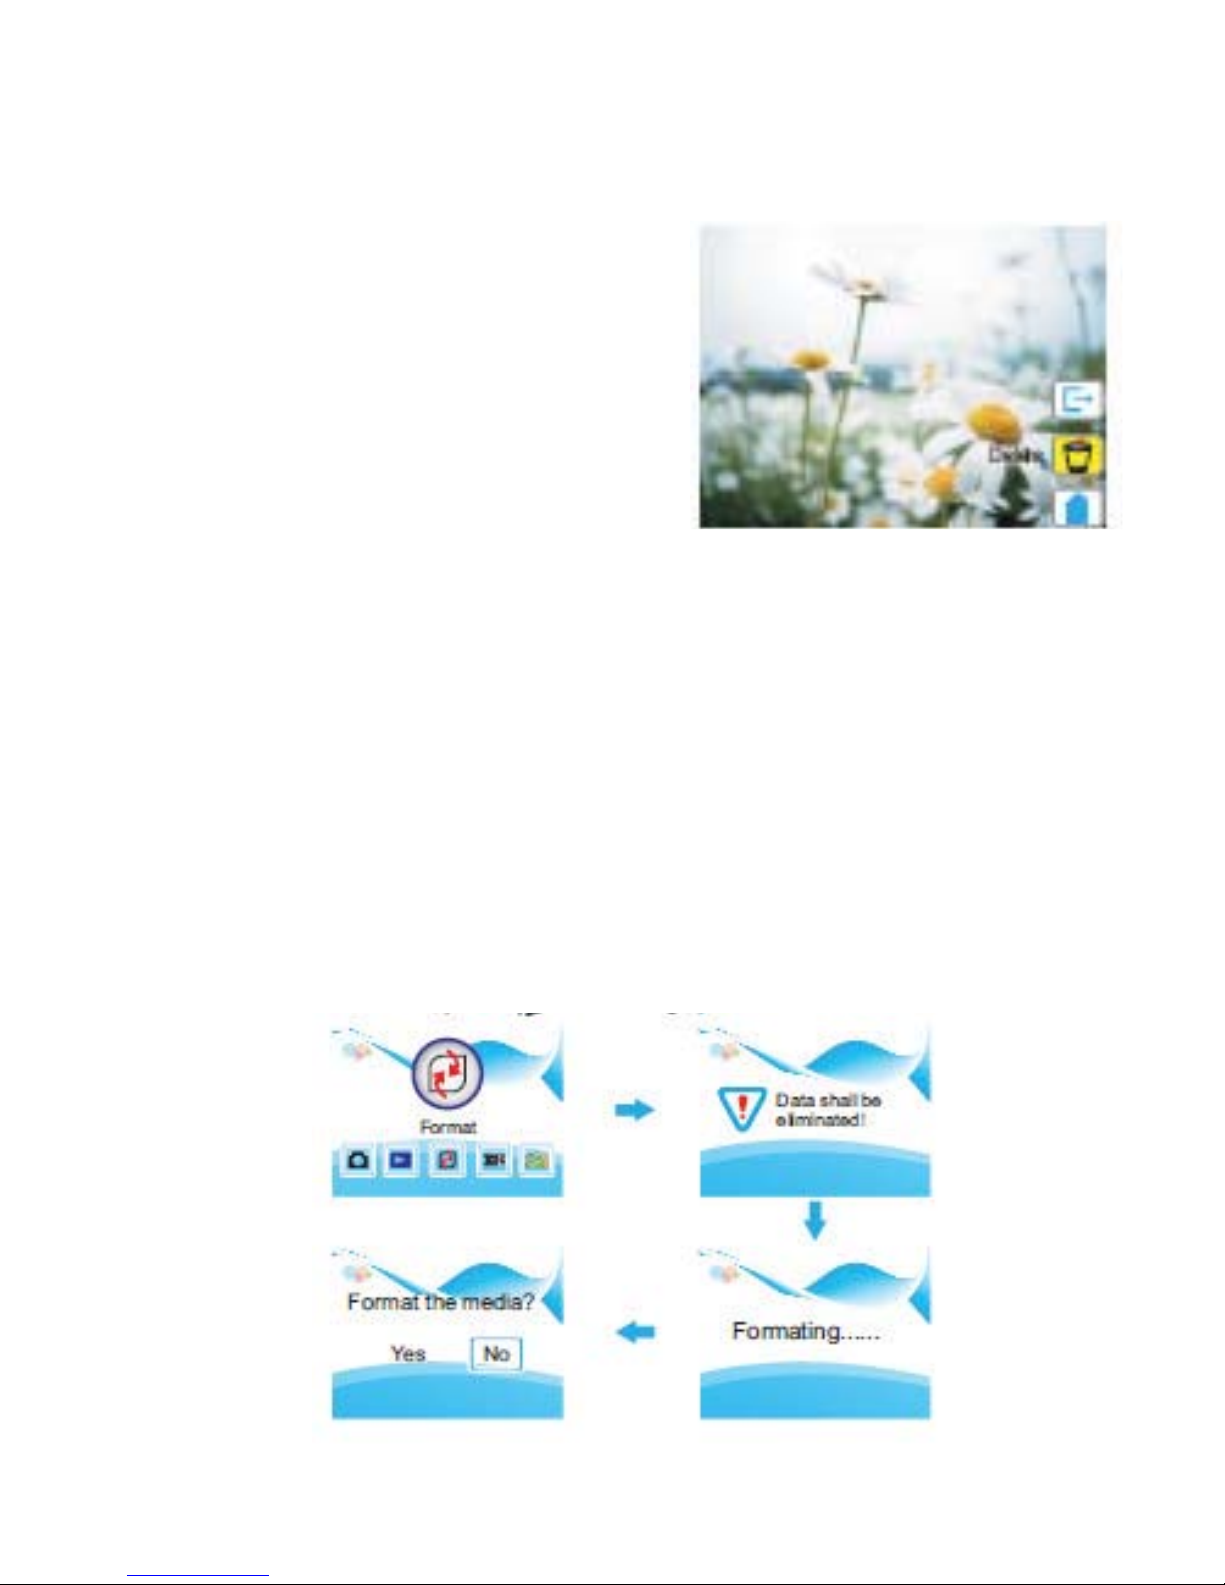
While in viewing mode you have the ability to delete a picture. You will
rst need to Press the OK button to stop the playing. Press the OK
button again and three icons will appear on the side of the screen. Use
your left/right arrow to select between the three and press OK.
The rst icon is an Exit Icon which will
bring you back to Play back mode
The second icon is the delete icon.
Highlight the icon and press OK and the
image will be deleted.
The third icon is the home icon. This icon
will bring you back to main menu.
FORMATTING—LANGUAGE
Formatting the internal memory card and SD Card:
At any time you have the ability to reformat your internal memory card
and your inserted SD Card. Re-formatting will result in the deleting of all
of your stored images. To reformat the memory, access the main menu
by pressing the SCAN/MENU twice. Once in the main menu, use the
right/left arrow to nd the Format option. When the Format icon
appears in the center of the screen press OK. Once in the Format menu
you will be asked if you want to format the media or not. Use the right/
left buttons to select yes or no. Once you have selected and highlighted
selection press OK. You will have to wait a moment while the scanner is
formatting . Once it is complete the screen will say “format is successful”.
It will then go back to the main menu on its own.
9
Page 10
Language Settings:
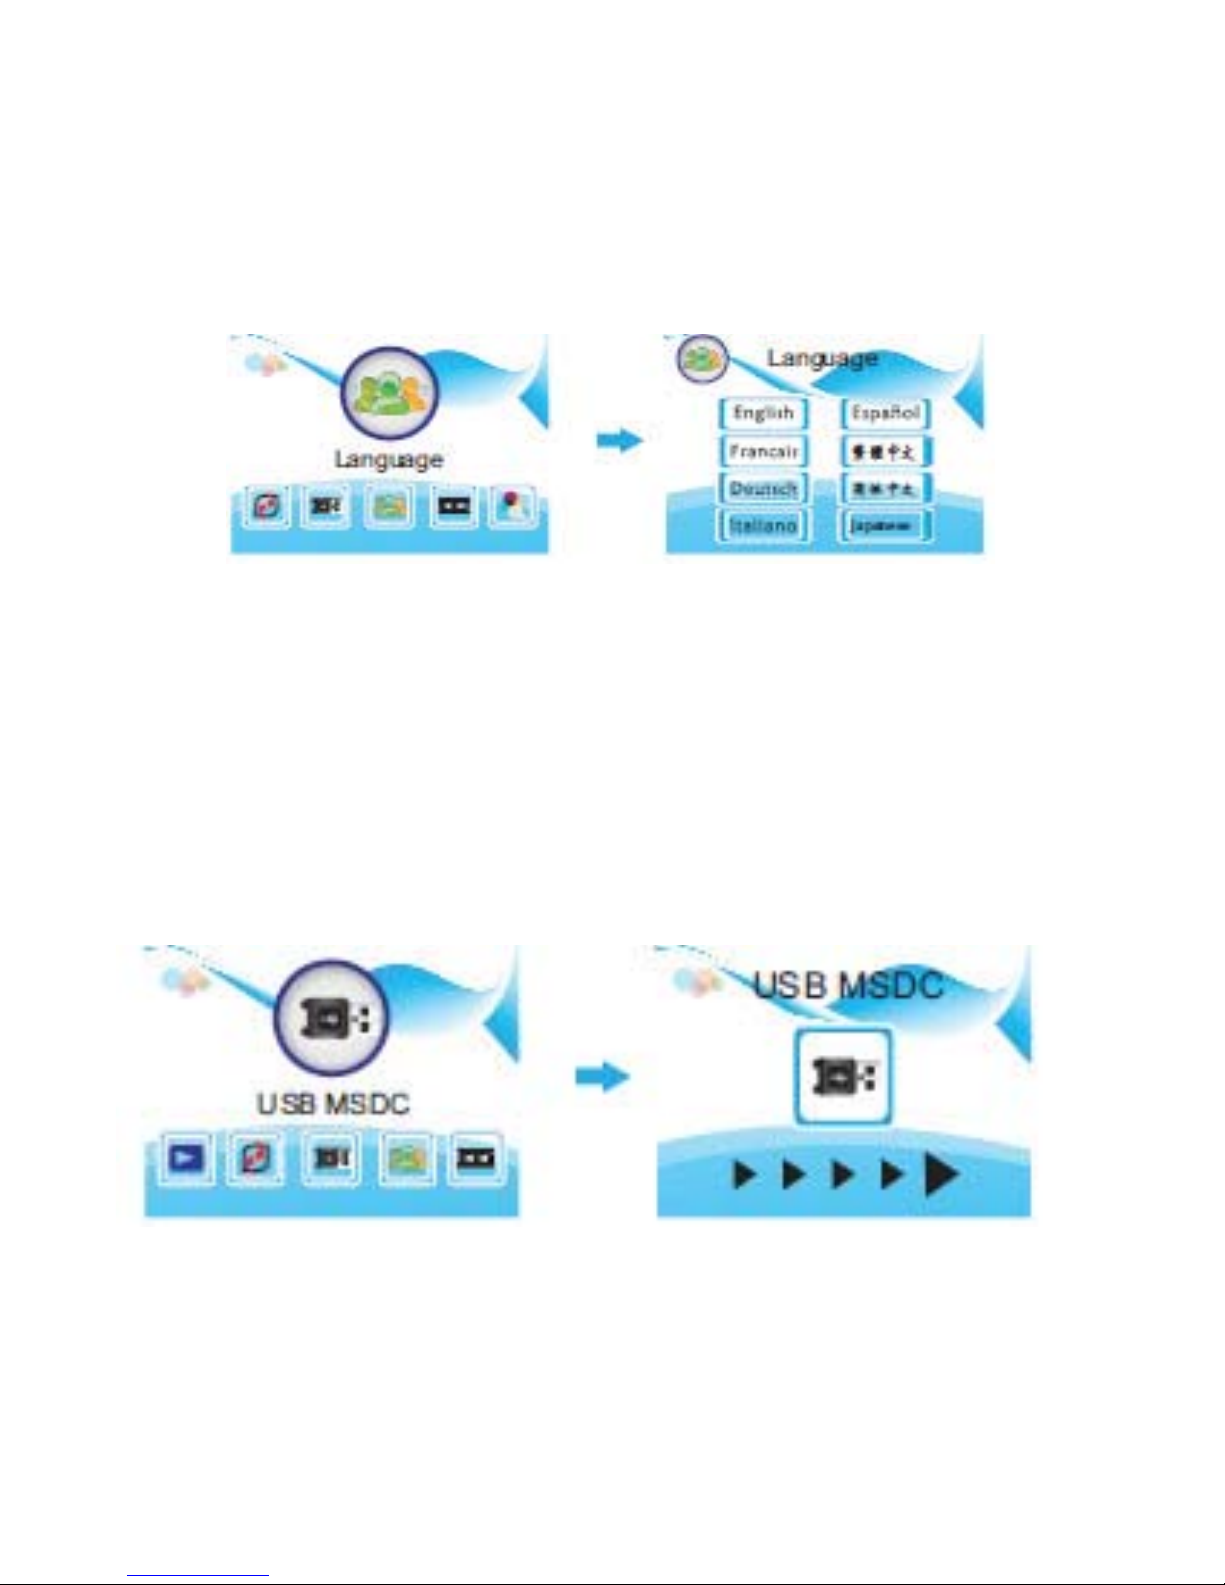
The scanner can be set to display all words in seven different languages.
To change the language, access the main menu by pressing the SCAN/
MENU twice. Once in the main menu, use the right/left arrow to nd
the language option. When the language icon appears in the center of
the screen press OK. Once in the language setting use the right/left
arrow to highlight and select the desired language. Press OK to conrm
and apply your setting.
EXPORTING IMAGES
Transferring Stored Images:
At any time you can transfer your stored images to your PC or Mac. If
your images are stored on a SD card simply remove the card and insert
it into your computer. If you would like to transfer the images that are
stored on the internal memory via a USB cable, follow the few
steps below.
Begin by connecting your scanner via the included USB cable from your
scanner to your PC or Mac. Connect the small end of the USB cable to
the USB port on the back of the scanner , and the other end of the cable
to a USB port on your PC or Mac. Be sure that both ends of the cable
are connected well into both the scanner and the computer. You will then
need to put your scanner into USB MSDC mode. To do so, access the
main menu by pressing the SCAN/MENU twice. Once in the main menu,
use the right/left arrow to nd the USB icon. When the USB icon
10
Page 11

appears in the center of the screen press OK. Once in the USB MSDC
menu you will see arrows on the bottom of your screen which means the
device is connecting to your compute. After a moment, your computer
will assign a drive letter and the lm scanner will become a mass
storage device (similar to a ash drive). You then need to access that
drive on your computer and transfer all the images to your computer.
NOTE: Images cannot be captured while in the USB mode. Images can
only be stored while in the Capture Mode.
SD CARDS
As mentioned on previously, the scanner can either save scanned images
to its internal memory or on to an SD CARD. (The Scanner does not
include an SD Card) The SD card is inserted into the slot locate on the
back of the unit. It is important to know that if your SD card has been
used already for some other use, (digital camera or les storage) it will
not be properly recognized by the scanner for the purpose of saving
scanned images. You will either have to use a new SD card or format
your existing SD card.
To format your SD card please follow the steps in the FORMATTING
section or follow the steps below.
IMPORTANT-FORMATTING YOUR SD CARD WILL ERASE ALL OF YOUR
STORED PICTURES OR FILES PERMANENTLY.
PC—Begin by inserting your SD card into the SD reader. Some
computers have it built in while some computers will require a card
reader. Access “My Computer” by either left clicking the My Computer
icon on your desktop by clicking on the start/menu button on the menu
bar and then click the computer icon. Once you are in the my computer
menu nd the correct drive that identies where the SD is inserted into.
The drive will usually say “SD card”. Right click on that drive and nd
option “format” in the drop down menu. Select and Left click format. The
format window will appear and left click the Start button on the bottom
of that window. You will then need to conrm your decision by clicking OK.
MAC—Begin by making sure that you SD card is inserted into the
computer. You may need a card reader to insert your SD card into your
card. Left click on the spotlight icon on the top right hand corner of the
screen. Type in “Disk Utility” and press OK. Find the Disk utility option
in the drop down menu and left click. The Disk utility window will open.
On the left panel, nd SD card and left click to select. On the right
screen you will be given a few options. One of the options will be erase.
Left click to select and reformat your SD card. You will be prompted to
acknowledge your decision. Left click the ERASE button to conrm. Be
careful to always “safe eject” your SD card before taking it out of
the computer.
11
Page 12

CONTACT INFORMATION
For any comments or issues, please contact us any time at
JUMBL 2 Bergen Turnpike, Ridgeeld Park, NJ 07660
or email us at [email protected]
TECHNICAL SPECIFICATIONS
Function Film Scan/ USB MSDC
Interface USB2.0
Sensor 14.0 Megapixels (4416*3312) 1/2.3” CMOS sensor
Lens F/NO.3.5,f=5.12mm, eld Angle=70°
Display Color 2.4" TFT LCD( 960*240)
Focus Range Fixed focus
Exposure Control Automatic / Manual (-2.0 EV~ +2.0EV)
White Balance Automatic
Resolution 14 Megapixels / 22 Megapixels(interpolation)
Scan Quality 3200Dpi & 4000 Dpi (interpolation)
Film Type 35mm Film, Monochrome, Slide
Picture Effects B&W, Slides, Negatives
Light Source LED Back light
File Format Picture: JPEG
TV-OUT Type NTSC/PAL
Built-in Memory YES
External Memory
Card SD card up to 32GB
Power Supply DC 5V (Adapter USB Port)
Language English / French / German / Italian / Spanish /
Japanese Portuguese/ S-Chinese / T-Chinese
Support System Windows XP/Vista/Windows7/Mac10.7.3
Product Size (L)87 X (W)86.5 X (H)102.5mm
Weight 250g
TV View:
You can also have the ability to view the images on the screen on a large
screen like a TV. Use the included TV cables and plug the single black end
into the jack located in the back of the scanner marked TV out. The other
end of the cable (red and yellow) should be plugged into your screen into the
appropriate receptacles.
12
 Loading...