

Page 1

COMPUTER SEWING MACHINE
MACHINE A COUDRE ELECTRONIQUE
MAQUINA DE COSER ELECTRONICA
HZL-E80
INSTRUCTION MANUAL
MANUEL D’INSTRUCTIONS
MANUAL DE INSTRUCCIONES
®
Page 2

“IMPORT ANT SAFEGUARDS”
“IMPORT ANT SAFETY INSTRUCTIONS”
“When using an electrical appliance, basic safety precautions should always be followed, including the following:”
“Read all instructions before using this sewing machine.”
“DANGER_____To reduce the risk of electric shock:”
1. “An appliance should never be left unattended when plugged in. Always unplug this appliance from the electric outlet
immediately after using and before cleaning.”
2. “Always unplug before relamping. Replace bulb with same type rated 15 Watts.”
“W ARNING_____To reduce the risk of burns, fire, electric shock, or injury to persons:”
1. “Do not allow to be used as a toy. Close attention is necessary when this appliance is used by or near children.”
2. “Use this appliance only for its intended use as described in this manual. Use only attachments recommended by
the manufacturer as contained in this manual.”
3. “Never operate this appliance if it has a damaged cord or plug, if it is not working properly , if it has been dropped
or damaged, or dropped into water. Return the appliance to the nearest authorized dealer or service center for
examination, repair, electrical or mechanical adjustment.”
4. “Never operate the appliance with any air openings blocked. Keep ventilation openings of the sewing machine
and foot controller free from the accumulation of lint, dust and loose cloth.”
5. “Keep fingers away from all moving parts. Special care is required around the sewing machine needle.”
6. “Always use the proper throat plate. The wrong plate can cause the needle to break.”
7. “Do not use bent needles.”
8. “Do not pull or push fabric while stitching. It may deflect the needle causing it to break.”
9. “Switch the sewing machine off ("0") when making any adjustments in the needle area, such as threading needle,
changing needle, threading bobbin, or chaning presser foot and the like.”
10. “Always unplug sewing machine from the electrical outlet when removing covers, lubricating, or when making any
other user servicing adjustments mentioned in the instruction manual.”
11. “Never drop or insert any object into any opening.”
12. “Do not use outdoors.”
13. “Do not operate where aerosol (spray) products are being used or where oxygen is being administered.”
14. “To disconnect, turn all controls to the off (“0”) position, then remove plug from outlet.”
15. “Do not unplug by pulling on cord. To unplug, grasp the plug, not the cord.”
“SA VE THESE INSTRUCTIONS”
“This sewing machine is intended for household use only .”
Be sure to disconnect the plug from the wall outlet
before replacing the sewing machine needle or
lubricating the machine.
Do not use thinner or other similar solvents to clean
the machine.
1
When not in use, be sure unplug the machine.
Do not expose the machine to direct sunlight or
humid atmosphere.
Page 3

“NOTES DE SECURITE IMPORT ANTES”
“Lorsque vous utilisez un appareil électrique, des précautions élémentaires doivent toujours être suivies, comme celles-ci.”
“Lisez attentivement ces instructions avant d’utiliser cette machine à coudre.”
“DANGER_____Pour réduire le risque d’électrocution.”
1. “Un appareil ne doit jamais être laissé sans surveillance lorsqu’il est branché. Toujours débrancher cet appareil du
secteur immédiatement après utilisation et avant de le nettoyer.”
2. “Toujours débrancher avant de changer l’ampoule. Remplacer l’ampoule par une du même type (15watts).”
“A TTENTION_____Pour les risques de brûlure, électrocutions et de blessures.”
1. “Ne pas utiliser cet appareil comme un jouet. Porter une attention particulière lorsque cet appareil est utilisé per des
enfants.”
2. “N’utiliser cet appareil que dans le cadre de ses fonctions, mentionnées dans le présent manuel. N’utiliser que lespiéces
fournies ou recommandées par le fabricant dans ce manuel.”
3. “Ne pas utiliser cet appareil si une de ses prises ou cordons est endommagé, ou s’il ne fonctionne pas correctement.
S’il est tombé, a été endommagé, tombé dans l’eau, retourner l’appareil auprès de votre revendeur le plus proche pour
un réparation, ou une vérification technique ou électrique.”
4. “Ne jamais utiliser cet appareil dans un lieu dépourvu d’aération. Maintenez une ventilation suffisante autours de la
machine et du rhéostat et éviter la poussière et les chutes de tissus aux alentours des sources d’aération de la
machine.”
5. “Eloigner vos doigts des pièces mobiles de la machine. Faites particulièrement aux mouvements de l’aiguille.”
6. “Toujours utiliser la plaque aiguille appropriée. Un plaque non appropriée peut faire casser l’aiguille.”
7. “Ne pas utiliser d’aiguilles courbes.”
8. “Ne pas tirer ou pousser le tissu lorsque vous cousez., cela pourrait abîmer, voire casser l’aiguille.”
9. “Mettre l’interrupteur de la machine en position <OFF> losrque vous manipulez l’aiguille, ou l’enfilez. De même lorsque
vous changez le pied presseur.”
10. “Débranchez toujours votre machine lorsque vous ôtez le capot, lorsque vous la nettoyez, ou pour tout autre manipulation
mentionnée dans le manuel d’instruction.”
11. “Ne jamais laisser d’objet entrer dans les ouvertures de la machine.”
12. “Ne pas utiliser à l’extérieur.”
13. “Ne pas utiliser lorsqu’un aérosol a été pulvérisé, ou lorsque de l’oxygène a été administré.”
14. “Avant de débrancher la machine, mettre l’interrupteur en position éteint <OFF>.”
15. “Ne pas débrancher en tirant sur le cordon. Pour débrancher, tenir la prise, pas le cordon.”
“RETENEZ CES INSTRUCTIONS”
“Cette machine à coudre est destinée à une utilisation domestique uniquement.”
Assurez-vous d’avoir débranchér la machine de
la prise murale avant de remplacer l’aiguille ou de
nettoyer la machine.
Ne pas utiliser de détergents ou alcool pour
nettoyer la machine.
Lorsqu’elle n’est pas utilisée, débranchez toujours
votre machine.
Ne pas exposer la machine directement au soleil
ou dans une atmosphère humide.
2
Page 4

“NORMAS DE SEGURIDAD”
Cuando utilice la máquina deberá observar todas las normas de seguridad, especialmente las que se detallan a continuación.
Antes de utilizar la máquina, lea las instrucciones.
PELIGRO____Para reducir el riesgo de descarga eléctrica.
1. Nunca deje desatendida la máquina cuando esté enchufada. Desconéctela de la red eléctrica cuando haya finalizado su
trabajo.
2. Desenchufe la máquina siempre que deba realizar cualquier manipulación con ella. Cuando cambie la bombilla, sustitúyala
por otra del mismo voltaje.
ADVERTENCIA____Para reducir el riesgo de quemaduras, fuego, descarga eléctrica o cualquier
otro daño.
1. Esta máquina no es ningún juguete. Tenga mucho cuidado cuando esté usándose por niños o cerca de ellos.
2. Use esta máquina para los fines descritos en esta guía. Utilice exclusivamente los accesorios recomendados por el fabricante.
3. No trabaje con la máquina si el cable o el enchufe están dañados, si la máquina no funciona bien o está estropeada, si
la máquina ha sufrido algún golpe, se ha caído o se ha mojado.
En todos estos casos, lleve inmediatamente la máquina al servicio técnico de su distribuidor para su reparación
4. No bloquee las aperturas de refrigeración de la máquina mientras la esté usando. Mantenga estas aperturas abiertas
y limpias de suciedad y de residuos. También mantenga en óptimas condiciones el pedal.
5. No acerque nunca los dedos a las partes móviles, sobretodo a la aguja de la máquina cuando esté enchufada.
6. Use siempre el placa agujas original, un placa agujas no adecuado puede romper la aguja.
7. No use agujas torcidas.
8. Cuando esté cosiendo, no tire de la ropa ni la empuje, sino la aguja acabará rompiéndose.
9. Desenchufe la máquina (“0”) siempre que vaya a realizar ajustes en el área de la aguja, como son el enhebrado de la
aguja y de la canilla, o el cambio del prensatelas, etc.
10. Antes de realizar los trabajos de mantenimiento descritos en esta guía, se debe desconectar la máquina de la red eléctrica.
11. No introducir ningún objeto en las aperturas de las máquinas.
12. No use la máquina al aire libre.
13. No utilice la máquina en lugares donde se han utilizado productos con gas propelente (sprays) u oxígeno.
14. Para desconectar la máquina, apague el interruptor de encendido (“0”) y desconecte el enchufe de la máquina de la
red eléctrica.
15. Desenchufe de la red tirando del enchufe y no del cable.
“SIGA EST AS INSTRUCCIONES”
Esta máquina está diseñada para su uso doméstico.
Desconecte la máquina de la red eléctrica antes
de cambiar la aguja o de lubricar la máquina.
No utilice disolventes para limpiar la máquina. No exponga la máquina directamente a la luz del
3
Cuando no esté usando la máquina, manténgala
desconectada.
sol ni tampoco la mantenga en lugares húmedos.
Page 5

CONTENTS / T ABLE DES MATIERES / ÍNDICE
CONTENTS
Important safeguards ···························································· 1
Principal parts ······································································· 5,6
Accessories ··········································································· 6
Major functions ································································ 7-10
Winding the bobbin ··························································· 11,12
Placing bobbin in the case
Threading the machine ····················································· 13,14
Automatic needle threader
Pulling up the bobbin thread
Changing the presser foot ··················································· 15
Attaching the needle ························································· 15,16
Types of feet and their application ······································ 16
How to adjust thread tension ·············································· 17
Fabric, thread and needle table ·········································· 18
How to adjust stitch length (manually) ······························ 19,20
Straight stitch ···································································· 21,22
Straight stitch on strechy fabric
Automatic lock stitch ························································· 23,24
Manual lock stitch and sewing start on heavy fabric
Zigzag stitch ·········································································· 25
TABLE DES MATIERES
Mise en garde ······································································ 2
Principaux éléments ····························································· 5,6
Accessoires ··········································································· 6
Fonctions principales ······················································· 7-10
Embobinage ······································································ 11,12
Placer la canette dans le boîtier
Enfilage ············································································· 13,14
Enfileur automatique
Remonter le fil de canette
Changement de pied presseur ············································ 15
Mise en place de l’aiguille ·················································· 15,16
Types de pieds et spplications ············································ 16
Réglage de la tension de fil ················································ 17
Tableau des tissus, fils et aiguilles ····································· 18
Réglage de la longueur du point (manuel) ························ 19,20
Point droit ·········································································· 21,22
Point droit sur tissu extensible
Point d’arrêt automatique ·················································· 23,24
Point d’arrêt manuel et départ de la couture sur les tissu épais
How to adjust stitch width (manually) ································· 26
Overcasting ··········································································· 27
Reinforced stretch stitch ······················································ 27
Automatic buttonholes ··················································· 28-30
Bartacking ········································································· 31,32
Darning stitch ········································································ 32
Quilting stitch ········································································ 33
Patch work ············································································ 33
Inserting zippers ····························································· 34-36
Lapped insertion
Centered insertion
Blind stitch ········································································· 37,38
Optional parts ································································ 39-44
Invisible zipper foot / Manual buttonhole foot
Rolled hemming foot / Even feed foot
Teflon-coated presser foot / Quilting attachment
Replacing lamp ····································································· 45
Maintenance (Cleaning) ······················································· 45
Performance checklist ························································· 46
Specification table ································································· 46
Point zig-zag ········································································· 25
Comment régler la largeur des points (manuellement) ······ 26
Surfilage ·············································································· 27
Point extensible de renfort ··················································· 27
Boutonnières automatiques ··········································· 28-30
Couture d’arrêt ····························································· 31,32
Point de reprise ···································································· 32
Point de courtepointe ························································ 33
Patchwork ·············································································· 33
Insertion de fermeture à glissière ································· 34-36
Insertion latérale
Insertion centrale
Ourlet invisible ··································································· 37,38
Pièces optionnelles ························································ 39-44
Accessoire pour quilter ························································ 45
Remplacement de l’ampoule ················································ 45
Maintenance (nettoyage) ······················································ 47
Contrôle des performances ················································· 47
ÍNDICE
Normas de seguridad ··························································· 3
Principales piezas ································································· 5,6
Accesorios ············································································· 6
Funciones principales ······················································ 7-10
Hacer canilla ······································································ 11,12
Colocar la canilla en el canillero
Enhebrar la máquina ························································· 13,14
Enhebrado automático de la aguja
Subir el hilo de la canilla
Cambio del prensatelas ······················································· 15
Colocar la aguja ································································ 15,16
Tipos de prensatelas y sus aplicaciones ··························· 16
Ajuste de la tensión del hilo ················································ 17
Ajuste de la longitud de puntada (manual) ······················· 19,20
Tabla de tejido, hilo y aguja ················································ 19
Pespunte recto ·································································· 21,22
Pespunte recto en tejido tipo punto
Puntada automática de seguridad ···································· 23,24
Puntada de seguridad manual e inicio de costura
en tejidos gruesos
Puntada zig zag ··································································· 25
Modo de ajustar la anchura de puntada (manualmente) ··· 26
Sobrehilado ··········································································· 27
Puntada de refuerzo en tejido tipo punto ··························· 27
Ojales automáticos ······················································· 28-30
Presillado ····································································· 31,32
Punto para zurcido ······························································· 32
Puntada acolchada ······························································ 33
Patch work ············································································ 33
Colocación de cremalleras ············································ 34-36
Inserción lateral
Inserción centrada
Puntada invisible ······························································· 37,38
Piezas opcionales ·························································· 39-44
Prensatelas de puntada invisible / Prensatelas de ojales manual
Prensatelas de dobladillo de caracolillo
Prensatelas para alimentar el tejido de forma uniforme
Prensatelas de teflón / Mecanismo para el acolchado
Cambiar la bombilla ······························································ 45
Mantenimiento (limpieza) ······················································ 45
Lista de problemas y soluciones ········································· 48
T abla de características ······················································· 48
4
Page 6

Principal Parts / Principaux éléments / PRINCIP ALES PIEZAS
1. Spool pin
2. Bobbin thread guide
3. Thread tension dial
4. Thread spool cap
5. Bobbin winding regulator
6. Bobbin winder
7. Face cover
8. Speed controller
9. Reverse stitch button
10. Start/Stop button
11. Auxiliary bed
1. Porte-bobine
2. Guide-fil de canette
3. Bouton de tension du fil
4. Chapeau de bobine
5. Arrêt du dévidoir de
canette
6. Dévidoir de canette
7. Capot frontal
8. Curseur de vitesse
9. Bouton de marche arrière
10. Bouton start/stop
11. Rallonge de bras
1. Pivote del portaconos
2. Guía-hilo de la canilla
3. Tensor del hilo
4. T apa de la bobina del hilo
5. Regulador del bobinador
de la canilla
6. Bobinador de la canilla
7. T apa frontal
8. Regulador de velocidad
9. Botón de costura inversa
10. Botón de marcha / paro
11. Base auxiliar
12. Drop feed lever
13. Automatic lock stitch
button
14. Stitch selection panel
15. Handwheel
16. Light / Power switch
17. Power cord receptacle
18. Speed controller
receptacle
19. Handle
20. Presser foot lever
12. Palanca de los dientes de
arrastre
13. Bouton de point d’arrêt
auto
14. Panneau de sélection du
point
15. Interrupteur de courant
16. Volant manuel
17. Prise du cordon
d’alimentation
18. Prise du rhéostat
19. Poignée
20. Levier du pied presseur
12. Griffe de transport
13. Botón de puntada
automática de seguridad
14. Panel de selección de
puntadas
15. Volante
16. Interruptor de encendido
/ Luz
17. Enchufe para el cable
18. Enchufe para el pedal
19. Asa
20. Palanca del prensatelas
15
10
11
12
1
2
3
7
8
9
4
5
6
13
14
19
20
Foot speed controller
Rhéostat
Pedal
5
16
17
18
Electric power cord
Cordon électrique
Cable eléctrico
Page 7

1. Thread Cutter
2. Needle threader
3. Buttonholing lever
4. Presser foot release
lever
5. Presser foot shank
6. Feed dog
7. Throat plate
1. Coupe-fil
2. Enfile-aiguille
3. Levier de boutonnière
4. Releveur de pied
presseur
5. Montage du pied
presseur
6. Griffes d’entraînement
7. Plaque aiguille
8. Bobbin case
9. Needle clamp
10. Needle
1 1. Presser foot
12. Hook cover release
button
13. Hook cover
14. Bobbin
8. Boîtier à canette
9. Montage du pied
10. Aiguille
1 1. Pied presseur
12. Bouton d’ouverture du
capot
13. Capot de la canette
14. Canette
1
2
3
4
5
6
7
9
10
11
12
13
1. Cortahilos
2. Enhebrador de la aguja
3. Palanca de ojales
4. Palanca que afloja el
prensatelas
5. Caña del prensatelas
6. Dientes
7. Placa aguja
Accessories
Accessoires
Accesorios
Standard presser foot (A)
Pied presseur standard (A)
Prensatelas standard (A)
Zipper foot (B)
Pied fermeture à glissière (B)
Prensatelas de cremallera (B)
8. Canillero
9. Clamp de la aguja
10. Aguja
1 1. Prensatelas
12. Botón que afloja la tapa
del garfio
13. Tapa del garfio
14. Canilla
You can keep instruction manual at hard case.
Vous pouvez ranger votre manuel d’instructions dans le capot rigide.
Le sugerimos guardar el manual de instrucciones en la maleta rígida.
Buttonhole foot (E)
Pied boutonnière (E)
Prensatelas de ojales (E)
Blindstitch presser foot (D)
Pied pour surfilage (D)
Prensatelas de puntada invisible (D)
8
Spool pin
Broche porte-bobine
Eje de carrete
14
Auxiliary Bed
Plateau de travail
Base auxiliar
Quilt guide
Guide ouateur
Guía de colcha
Bobbins (3)
Canettes (3)
Canillas (3)
Overcasting foot (C)
Pied ourlet invisible (C)
Prensatelas de sobrehilar (C)
Seam ripper
Découd-vite
Descosedor
* Standard presser foot (A) is equipped with machine.
* Le pied standard (A) est monté sur la machine.
* El prensatelas estándar (A) está incluido con la máquina.
T-shape screw-driver
Tournevis en T
Destornillador en forma de T
Needle pack HAx1 No.11 2P
No.14 1P
Paquet d’aiguilles (130-705H)
Small spool cap
Petit chapeau de bobine
Tapa para la bobina de hilo
Paquete de agujas HA x 1 Nº 1 1x2
Nº 14x1
( )
( )
6
Page 8

Major Functions / Fonctions principales / FUNCIONES PRINCIP ALES
Type of Stitch patterns and operation (Operation/indication panel)
Types de point et sélection (touches de sélection)
Tipos de puntada y funciones (panel indicativo / operativo)
Stitch length manual adjustment button
Touche de réglage manuel de la longueur du point
Botón de ajuste manual de la longitud de puntada
Zigzag width manual adjustment
button
T ouche de réglage manuel de largeur
Botón de ajuste manual de anchura
Pattern No. selection button
Left side for number of tens.
Right side for number of units.
Touche de sélection de n° de
configuration
Le côté gauche comporte 10 chiffres.
Le côté droit comporte 1 chiffre.
Botón selector de No. de patrón
El lado izquierdo es de 10 dígitos.
El lado derecho es de 1 dígito.
Pattern No. / N° de configuration
No. de Patrón
Pattern / Configuration / Patrón
Symbol of presser foot
Symbole de presseur
Símbolo de prensador
Stitch length adjusting lever
Curseur de réglage de la longueur
du point
Palanca de ajuste de la longitud
de puntada
Zigzag width adjusting lever
Levier de réglage de largeur
Palanca de ajuste de anchura
Pattern No. / Stitch length / Zigzag
width indicator
N° de configuration / Longueur des
points / Indicateur de largeur de zigzag
No. de patrón / Longitud de puntada /
Indicador de anchura de zigzag
Automatic lock stitch button
T ouche de point de programmation
du point d’arrêt
Botón de puntada automática de
seguridad
Memory key
Touche de mémorisation
Tecla de memoria
Clear key
T ouche d’ef facement
Tecla de despeje
Shift key
Touche de motion
Tecla de desplazamiento
* When turning on the machine, straight stitch “00” (left needle position) will be automatically chosen.
* Choose the pattern No. you want to sew by pushing the pattern No. selection button.
Example) When you want to choose (No.23) _
* Lorsque l’on allume la machine, le point droit “00” (aiguille à gauche) est automatiquement sélectionné.
* Choisir le n° de configuration que l’on désire exécuter à l’aide de la touche de sélection de n° de configuration.
Exemple: si vous voulez choisir (No.23) _
* Cuando encienda la máquina, por defecto, la máquina tendrá escogida la opción de pespunte recto “00” (posición izquierda
de la aguja).
* Elija el No. de patrón que usted quiera coser el patrón con el botón selector de No. de patrón.
Ejemplo) se desea escoger: (No.23) _
1. Press twice of left side (
2. Press three times of right side (
1. Appuyer deux fois sur le côté gauche de (10 chiffres).
2. Appuyer trois fois sur le côté droit de (1 chiffre).
1. Pulse dos veces del lado izquierdo (10 dígitos).
2. Pulse tres veces del lado derecho (1 dígito).
number of tens).
number of units).
7
Page 9

How to use Memory key / Clear key / Shift key
Comment régler la Touche de mémorisation / T ouche d’effacement / Touche de motion
Ajuste de las Tecla de memoria / T ecla de borrado / Tecla de desplazamiento
Memory key: Press this key when storing the selected letters or patterns
(30 to 99) in to memory . Letters and patterns can be stored in to
memory up to 40.
Touche de mémorisation: Appuyer sur cette touche pour mémoriser les
lettres ou configurations sélectionnées (30 à 99). Jusqu’à 40
lettres et configurations peuvent être mémorisées.
Tecla de memoria: Pulse esta tecla cuando almacene en la memoria las
letras o patrones (30 a 99) seleccionados. Las letras y patrones
se pueden almacenar en la memoria hasta 40.
Clear key: Letters and patterns stored in memory can be deleted from the
rear part of them. When holding pressing the button, all stored
memory can be deleted.
Touche d’effacement: Appuyer brièvement sur cette touche pour ef facer
les dernières lettres et configurations mémorisées. Appuyer
continuellement sur cette touche pour effacer tout le contenu de
la mémoire.
Tecla de borrado: Cuando usted pulse esta tecla, las letras y los patrones
almacenados en la memoria se pueden borrar desde el último
dato. Cuando se está manteniendo presionado el botón, se
puede borrar todo el contenido almacenado en la memoria.
Shift key: Press this key when you want to choose the lower patterns from
pattern Nos.30 to 78. (The lamp will light up.)
T ouche de motion : Appuyer sur cette touche pour choisir la configuration
inférieure parmi la configuration supérieure et la configuration
inférieure des numéros de configuration 30 à 78. (Le témoin s’allume.)
T ecla de desplazamiento: Pulse esta tecla cuando usted quiera elegir los
patrones inferiores de entre las dos clases de patrones superior e inferior
de No. de patrón de 30 a 78. (Se iluminara la lámpara).
This sewing machine has stitch patterns
for stretchy fabric such as knitted fabric,
jersey and so on.
Cette machine possède des
programmes spéciaux pour les matières
extensibles comme les mailles, tricots,
jerseys, etc.
La máquina tiene tipos de puntada para
diferentes tejidos como el punto, jersey,
etc.
Example) When you want to choose the lower pattern of the
pattern No. 43
Exemple) Pour choisir la configuration inférieure du numéro de
configuration 43.
Ejemplo: Cuando usted quiera elegir el patrón inferior del
patrón No. 43
Stitch patterns for stretchy fabrics
Programmes pour matières extensibles
Tipos de puntada para tejidos tipo punto
Straight stitch for elastic
Point droit pour mailles fines
Pespunte recto para tejido elástico
Stretch reinforcing stitch
Point droit triple extensible
Puntada de refuerzo para tejido tipo punto
3-step zigzag stitch
Zig-zag piqué à 3 points
Zig zag de tres pasos
Blind stitch for elastic
Ourlet invisible extensible
Puntada invisible para tejido elástico
8
Page 10

Major Functions / Fonctions principales / FUNCIONES PRINCIP ALES
Speed controller
Push speed controller plug
into lower receptacle at right
end of machine.
Rhéostat
Insérez la prise ’jack’ du
rhéostat dans son logement
à l’arrière de la machine.
Pedal
Conecte el cable del pedal en el enchufe que hay en la
parte inferior derecha de la máquina.
Power cord
Push power cord plug [1]
into upper receptacle at right
[2]
end of machine.
Plug [2] into electric outlet.
Cordon électrique
Insérez la prise du cordon
(1) dans son logement à
l’arrière de la machine.
[1]
Branchez (2) dans la prise
de courant.
Cable
Conecte el enchufe [1] en el receptáculo que hay en la
parte inferior derecha de la máquina.
Conecte el enchufe [2] a la red eléctrica.
To run the machine press
foot speed controller. The
harder you press, the faster
machine will sew. To stop
machine, remove foot from
controller.
Pour actionner la machine,
appuyez sur le rhéostat.
Puls on appuie, plus la
vitesse est élevée (en
rapport avec la position du
curseur de vitesse). On
arrête la machine en retirant
le pied.
Pise el pedal para que la máquina empiece a funcionar.
Cuanto más fuerte sea la presión que ejerce con el pie,
más rápida irá la máquina. Para parar, simplemente deberá
de dejar de pisar el pedal.
ON
OFF
(b)
(a)
Mains power and light
switch
Interrupteurs de courant
et de lumière
Interruptor de
encendido y de luz
Start/stop button
Press the button for start.
Push it again to stop sewing. Needle will stop at its
lowest position.
T ouche marche / arrêt
Pressez cette touche pour
démarrer ou pour arrêter la
machine. L’aiguille s’arrête
en position basse.
Cette touche n’est active
que le rhéostat débranché.
Botón de marcha / paro
Apriete dicho botón para
empezar a coser.
Apriételo una segunda vez
para parar la máquina. La
aguja parará en su posición
más baja.
Presser foot lever
(a) Presser foot goes up.
(b) Presser foot comes
down.
Levier du pied presseur
(a) Le pied remonte.
(b) Le pied descend.
Palanca del prensatelas
(a) Prensatelas sube
(b) Prensatelas baja
9
Page 11

Slower
Lent
Más lento
Faster
Rapide
Más rápido
Speed controller
You can adjust Maximum
sewing speed.
Curseur de vitesse
Vous pouvez régler la vitesse
maximale de couture avec ce
curseur électronique.
Regulador de velocidad
Se puede ajustar la
velocidad máxima.
Reverse stitch button
Push it manually to secure
the stitches at sewing-start
and end of seam. If you push
this button at sewing-end,
needle will stop at its highest position.
Touche de couture arrière
Utilisez cette touche pour
arrêter vos coutures au
départ et à la fin. Si vous
l’actionnez la machine
arrêtée, l’aiguille remontera
en position haute.
Botón de puntada inversa
Apriétela manualmente para atacar en el inicio y final de
costura. Si aprieta dicho botón al final de la costura, la
aguja parará en su posición más alta.
* Stitch length will be automatically set according to
the selected stitch pattern.
* Refer to page 19,20 for
stitch patterns which stitch
length can be adjusted.
* La longueur du point est
toujours prérégléé pour
chaque point.
* Référez-vous à la page
19,20 pour les points
pouvant être réglés en
longueur.
* La longitud de puntada se
ajusta automáticamente al
tipo de puntada
seleccionada.
* Consultar página 19,20
para ver los tipos de puntada
donde se puede variar la
longitud de puntada.
Adjusting lever
T ouche manuelle
Palanca de ajuste
Manual button
Curseur de réglage
Botón manual
Stitch length adjustment
In order to change stitch
length of each stitch pattern:
Push manual button (light
will be on) and move the lever to the desired position.
Touche de réglage de la
longueur du point
Afin de régler manuellement
la longueur de chaque point.
Actionnez d’abord la touche
(le voyant s’allume) puis
déplacez le curseur de
réglage vers la position
voulue.
Ajuste de la longitud de
puntada
Para cambiar la longitud de
puntada de cada tipo de
puntada: Apriete el botón
manual (el indicativo
luminoso se encenderá) y
mueva la palanca hacia la
posición que desee.
Thread tension dial
(a) To increase the needle
(a)
thread tension.
(b) T o decrease the needle
thread tension.
Bouton de tension du fil
(a) Pour augmenter la
(b)
tension du fil d’aiguille.
(b) Pour diminuer la tension.
Tensor del hilo
(a) Para aumentar la tensión
del hilo de la aguja.
(b) Para disminuir la tensión
del hilo de la aguja.
Free arm
Draw the auxiliary bed to the
left side.
Bras-libre
Retirez la tablette-rallonge
vers la gauche.
Brazo libre
Tire hacia la izquierda de la
base auxiliar.
Drop feed dog
The feed dog should be
lowered for special sewing
techniques, such as free mo-
[1]
[2]
tion embroidery .
The feed dog must be always
up for normal sewing.
Locate the feed dog lever on
the front of the free arm.
Slide the lever either to the
right (down) [1] or the left
(up) [2]. T o bring up the feed
dog, turn the handwheel
after sliding lever to the left.
Griffe d’entraînement par griffe
La griffe d’entraînement doit être placée en position basse
pour certaines techniques de couture spéciales telles que
la broderie libre. La griffe d’entraînement doit toujours être
en position haute pour la couture normale. Localiser le
levier de griffe d’entraînement à l’avant du bras libre.
Déplacer le levier vers la droite (position basse) [1] ou la
gauche [2] (position haute). Pour ramener la griffe
d’entraînement, en position haute, tourner le volant après
avoir déplacé le levier vers la gauche.
Baje el dentado de transporte
El dentado de transporte s deberá bajar de posición para
técnicas de cosidos especiales, como para bordados de
movimiento libre. Par cosido normal, el dentado de
transporte deberá estar siempre arriba. Coloque la palanca
del dentado de transporte en la parte frontal del brazo
libre. Deslice la palanca ya sea hacia la derecha (abajo)
[1] o hacia la izquierda arriba [2]. Para elevar el dentado
de transporte, gire el volante hacia la izquierda después
de deslizar la palanca.
10
Page 12

Winding Bobbin / Bobinage de la canette / HACER CANILLA
Winding a bobbin
Enfilage pour le remplissage de canette
Enhebrar para hacer canilla
Bobbin thread guide
Guide-fil de canette
Guía-hilo de la canilla
Open the hook cover.
1
Caution:
Turn off the machine before
opening the hook cover.
Ouvrez le capot.
Attention:
Débranchez la machine
auparavant.
Abra la tapa del garfio.
Precaución:
Antes de abrir la tapa del
garfio apague la máquina.
Take out the bobbin.
2
Retirez la canette vide.
Saque la canilla.
* When you turn on the power to the machine under
the bobbin winding state, the machine will peep.
*Lorsque vous allumez la machine en mode de
remplissage de canette, eile émet un bip sonore.
* Cuando encienda la máquina bajo el estado de
hacer canilla, sonará un pitido.
Bobbin winder
Dévidoir
Bobinador
Under the bobbin winding state, the display in
the display window becomes under the state
that the blink turns.
Pendant le bobinage,
l’affichage clignote sur
l’afficheur.
Cuando la bobina está
bobinando, la
Bobbin winding regulator
Arrêt de canette
Regulador del bobinador
Small spool
3
Thread spool
cap (Small)
Petite bobine
Tapa de la
bobina (pequeña)
Thread spool
cap (Large)
Grande bobine
Tapa de la
bobina (grande)
Coloque la bobina de hilo con su tapa en el pivote
del portaconos.
Escoja la tapa adecuada al diámetro de la bobina del hilo.
Petite coiffe
Bobina de hilo
Large spool
Grande coiffe
Bobina de hilo
4
Enhebrar el guía-hilo de la canilla.
Coloque el hilo manualmente alrededor del guía-hilo de
forma que se enrolle en la dirección de las agujas del reloj.
visualización en la
pantalla pasa al estado
de parpadeo.
Place the thread spool
and cap onto the spool
pin.
Select the spool cap that
matches the circumference
of the thread spool to be
used.
Placez la bobine de fil et
la coiffe sur le portebobine
Sélectionnez le type de
coiffe de taille appropriée à
la bobine.
Thread the bobbin
thread guide.
Put the thread with both
hands around the thread
guide so that it winds clockwise.
Enfilez le fil per le guide.
Insérez le fil avec les deux
mains sous le ressort du
guide pour qu’il se déroule
dans le sens d’une montre.
11
Page 13

Adjusting the bobbin thread guide
Réglage du guide-fil de canette
Ajuste del guía-hilo de la canilla
In the case where the bobbin is unevenly wound with thread
according to the type of thread, the bobbin thread guide has to
be adjusted.
Dans le cas où la canette serait mal remplie, selon le type de
fil, il convient de régler le guide.
En el caso de que la canilla esté mal bobinada, se deberá
ajustar el guía-hilo de la canilla.
•›•›
•›
•›•›
Move the bobbin thread guide up or down
to adjust so that the bobbin is evenly
wound with thread.
Déplacez le guide-fil en hauteur pour le
régler afin que le fil soit régulièrement
enroulé sur la canette.
Mueva el guía-hilo de la canilla arriba o
abajo de forma que el bobinado de la
canilla sea uniforme.
•~•~
•~
•~•~
•~•~
•~
•~•~
5
Bobbin
winder
Dévidoir
Bobinador
6
Bobbin winding
regulator
Arrêt de canette
Regulador
del
bobinador
Set the bobbin on the
bobbin winder.
Press the bobbin against the
bobbin winding regulator.
Placez la canette sur
l’axe du dévidoir.
Poussez la canette contre
l’arrêt de canette.
Coloque la canilla en el
bobinador.
Apriete la canilla contra el
regulador del bobinador.
Start winding the bobbin.
Upon completion of winding
the bobbin, press the start/
stop button again.
Embobinez la canette.
Une fois la canette remplie,
arrêtez la machine.
Empiece a hacer canilla.
Tras haber completado la
canilla, apriete otra vez el
botón de marcha / paro.
8
9
[2]
[1]
Put the bobbin in the
bobbin case.
Place the bobbin so that
thread winds counterclockwise.
Placez la canette dans
son boîtier.
Elle doit tourner dans le
sens inverse des aiguilles
d’une montre.
Coloque la canilla en el
canillero.
Coloque la canilla de forma
que el hilo salga en la
dirección contraria a las
agujas del reloj.
Thread the bobbin case.
Put the thread [1], place
thread on groove [2] and
draw the thread to rear of
machine.
Enfilez le boîtier à
canette.
Passez le fil dans la fente
(1), puis ressortez-le par la
fente (2) et place vers
l’arrière de la machine.
7
Push the bobbin back to
the left.
Cut an excess thread and
take out the bobbin.
Poussez la canette vers
la gauche.
Coupez l’excédent de fil et
retirez la canette.
Empuje la canilla hacia
atrás y hacia la izquierda.
Corte el exceso de hilo y
saque la canilla.
10
Enhebrado del canillero.
Coloque el hilo por el [1],
páselo por la ranura [2] y
llévelo hacia la parte posterior de la máquina.
Close the hook cover.
Refermez le capot.
Cierre la tapa del garfio.
12
Page 14

Threading The Machine / Enfilage de la machine / ENHEBRADO DE LA MÁQUINA
CAUTION:
ATTENTION:
PRECAUCIÓN:
1
Be sure to turn off the machine before
threading.
Assurez-vous d’avoir éteint la machine
avant l’enfilage.
Apague la máquina antes de
enhebrar la máquina.
[2]
[4]
Take-up
Levier tendeur
Tira-hilos
[3]
[7]
[8]
Raise the presser foot
lever.
Relevez le pied
presseur.
[1]
Levante el prensatelas.
* Be sure to raise the presser foot before threading the machine head.
* Le pied presseur doit toujours être relevé pour enfiler la
machine.
* Asegúrese de subir el prensatelas antes de enhebrar la
máquina.
Pass the thread around
4
[3]
[3], then pull it upward.
Passez le fil autour [3]
puis tirez-le vers le haut.
Pase el hilo alrededor
del punto [3] y tire de él
hacia arriba.
2
[2]
3
13
[2]
Thread the thread guide.
Enfilez le guide-fil.
Guía-hilos.
Draw the thread through
the groove and pull it
downward.
Passez le fil dans la
fente et tirez-le vers le
bas.
Pase el hilo por la ranura
y tire de él hacia atrás.
5
[4]
Take-up
Levier tendeur
Tira-hilos
6
Thread the thread to
take-up [4], then pull it
downward.
Enfilez le levier tendeur de
fil [4], puis redescendez.
Enhebre el tira-hilos [4]
y tire del hilo hacia
abajo.
Draw the thread behind
[5] from the right.
Glissez le fil dessous [5]
depuis la droite.
[5]
Desde la derecha, pase
el hilo por detrás del
punto [5].
Page 15

Automatic Needle Threader
Enfilage automatique de l’aiguille
Enhebrado automático del aguja
* Check to be sure that the needle is in its highest position.
* Contrôlez que l’aiguille est bien en position la plus haute.
* Asegúrese de que la aguja esté en su punto más alto.
Lower the presser foot.
1
(A)
Baje el prensatelas.
Baje el enhebrador de la aguja.
Suba la aguja. A continuación, baje el enhebrador de la
aguja y enhebre (A).
2
Hook
Crochet
garfio
Enhebrar el garfio.
Baje completamente el enhebrador de la aguja y gírelo en
la dirección de la flecha hasta que haga tope. Pase el hilo
por debajo del garfio.
3
Levante la palanca del enhebrador.
Afloje la palanca y la aguja se enhebrará.
Lower the needle threader.
Raise the needle. Then,
lower the needle threader
and thread (A).
Abaissez le pied presseur.
Abaissez l’enfile-aiguille.
Relevez l’aiguille. Puis,
decendez l’enfileur et le fil
(A).
Thread the hook.
Fully lower the needle
threader. Then, turn it in the
arrow direction until it will not
go further. Bring the thread
under the hook.
Enfilez le crochet.
Abaissez à fond l’enfileur.
Puis, tournez-le vers la flèche
au maximum possible. Placez
le fil sous le crochet.
Raise the needle threader.
Release the lever, and the
needle will be threaded.
Relevez le levier de
l’enfileur.
En relâchant le levier,
l’aiguilles sera enfilée.
Pulling Up The Bobbin Thread
Faire remonter le fil de canette
Subir el hilo de la canilla
Lightly hold the needle
1
2
3
thread with fingers.
Tenez légèrement le fil
avec les doigts.
Sostenga ligeramente el
hilo con los dedos.
T urn the handwheel
toward you.
The needle moves up and
down to draw up the bobbin
thread from the bobbin.
Tournez le volant vers
vous.
L’aiguille remontera avec le
fil inférieur.
Gire hacia usted el
volante de la máquina.
La aguja se moverá arriba
y abajo para subir el hilo de
la canilla.
Pull both the needle and
bobbin threads out by
10 cm.
Pass them under presser
foot toward back of machine.
4
Draw out thread.
Draw out thread through
needle eyelet by approximately 10 cm.
Tirez le fil.
Tirez la boucle du fil depuis
le chas d’aiguille sur 10 cm.
Pase el hilo.
Deje que sobresalga un
cabo de hilo de unos 10 cm
por detrás de la aguja.
Tirez les deux fils sur
10 cm.
Passez-les sous le pied et
vers l’arrière de la machine.
Deje que el hilo de aguja
y el de la canilla
sobresalgan 10 cm.
Páselos por debajo del
prensatelas y llévelos hacia
la parte posterior de la
máquina.
14
Page 16

Changing The Presser Foot
Changement du pied presseur
CAMBIO DEL PRENSA TELAS
Attaching The Needle
Pose de l’aiguille
COLOCACIÓN DE LA AGUJA
CAUTION:
ATTENTION:
PRECAUCIÓN:
1
2
Push
Appuyer
Empuje
3
Marker line
Ligne repère
Línea marcada
4
Make sure to disconnect the plug from the
wall outlet before changing the presser foot.
Assurez-vous d’avoir débranché la
machine avant de changer le pied.
Antes de cambiar el prensatelas,
asegúrese de desconectar la máquina
de la red eléctrica.
Raise the presser foot.
Relevez le pied
presseur.
Levante el prensatelas.
Remove the presser foot.
Press the presser foot release lever in the direction
of the arrow.
Retirez le pied.
Appuyez sur le levier
d’enclenchement de pied
pour le relâcher.
Quite el prensatelas.
Empuje la palanca del
prensatelas en la dirección
que indica la flecha.
Align the presser foot
pin with the marker line
on the throat plate.
Pin
Tige
Pivote
Alignez l’attache du pied
avec la ligne repère de
la plaque aiguille.
línea marcada en el
placa agujas.
Lower the presser foot.
Lower the presser foot lever,
and the presser foot will be
snapped in place.
Abaissez le pied presseur.
A ce moment, le pied sera
enclenché dans son
logement.
Bajar el prensatelas.
Baje la palanca del
prensatelas y éste se
encajará en su sitio.
CAUTION:
ATTENTION:
PRECAUCIÓN:
1
Quite la aguja.
(1) Gire el volante hacia usted hasta que el barra agujas
alcance su punto más alto.
(2) Afloje el tornillo del clamp de la aguja.
2
The flat part should face
away from you.
Côté plat vers l’arrière
La parte plana deber mirar
hacia el lado contrario a usted.
Colocar la aguja
(la aguja no puede insertarse a menos que esté bien
colocada).
Sostenga la aguja con su lado plano mirando hacia el lado
contrario a usted e insértela hasta que haga tope.
3
Make sure to disconnect plug from wall outlet
before inserting needle.
Assurez-vous d’avoir débranché Vis serreaiguille.
Asegúrese de desconectar el enchufe de
la red eléctrica antes de colocar la aguja.
Removing the needle.
(1) Turn the handwheel
toward you until the
needle bar reaches its
highest position.
(2) Loosen the needle clamp
Needle clamp
screw
Vis serre-aiguille
Tornillo del clamp
de la aguja
Stopper pin
Arrêt d’aiguille
Tope
Screwdriver
Tournevis
Destornillador
screw.
Retirez l’aiguille.
(1) Tournez le volant vers
vous jusqu’à ce que
l’aiguille soit en haut.
(2) Dévissez la vis du serre aiguille.
Attaching the needle.
(The needle cannot be inserted unless it is correctly positioned.)
Hold the needle with its flat
part facing away from you,
and insert it fully until it
touches the stopper pin.
Placez l’aiguille.
(L’aiguille ne peut pas être
insérée à l’envers).
Soutenez l’aiguille avec le
côté plat vers l’arrière et
insérez-la à fond jusqu’à
l’arrêt d’aiguille.
Securely tighten the needle
clamp screw, using the
screwdriver furnished with
the machine.
Revissez fermement la vis
du serre- aiguille avec le
tournevis fourni.
Fije el tornillo de la aguja
utilizando el destornillador
que viene con la máquina.
15
Page 17

Needle to be purchased
Aiguilles à utiliser
Agujas
When purchasing spare needles, specify
HAx1 (130/705H) for household sewing
machine or HAx1SP (needle for knits).
Lorsque vous rachetez des aiguilles,
spécifiez le type 130/705H (standard) pour
machine à coudre ou HAx1SP (pour jerseys).
Las agujas que necesita son del sistema
Hax1 (130/705h) para uso doméstico o
HAx1SP (aguja para punto)
Needle size
Taille de l’aiguille
Tamaño de la aguja
The larger the number,
the thicker the needle.
Plus le tissu est épais,
plus la taille d’aiguille
est grosse.
Cuanto más alto sea el
número, más gruesa
será la aguja.
Checking the needle
Vérification de l’aiguille
Compruebe que la aguja
Parallel
Parallèle
Paralelo
Flat plate
Pièce plate
Parte plana
Flat part of needle
Côté plat de l’aiguille
Pare plana de la aguja
* Check the needle for its
straightness occasionally. Any
bent needle would cause stitch
skipping, thread breakage or
damage to materials.
* Vérifiez la bonne qualité de
l’aiguille régulièrement. Toute
aiguille épointée ou tordue peut
endommager votre tissu et
causer des défauts de couture
importants.
* Compruebe que la aguja no
esté torcida, ya que las agujas
dobladas puede ocasionar saltos
de puntada, rotura de hilo o daño
a los tejidos.
Types of Feet and Their Application / T ypes de pieds et leurs applications
TIPOS DE PRENSA TELAS Y SUS APLICACIONES
Stitch pattern
Programme
Tipo de costura
Standard presser foot (A)
Pied presseur standard (A)
Prensatelas standard (A)
Typical applications
Applications types
Aplicaciones
Straight stitch
Point droit
Pespunte recto
Zigzag stitch
Point zigzag
Puntada zig zag
Straight stitch for elastic
Point droit pour jerseys
Pespunte recto para
elástico
Stretch reinforcing stitch
Point triple
Puntada de seguridad
en tejido tipo punto
Overcasting 3-step zigzag stitch
Zig-zag piqué 3 points
Puntada de sobrehilar de zig
zag de tres pasos
Quilt stitch
MATELASSURE
ACOLCHADO
Patchwork, etc.
Patchwork, etc.
Patchwork
Applique
Applications
Apliques
Alphabet / Points-lettres / Alfabeto
Pattern stitch
Assemblage
Montaje
Scallop stitch
Feston
Puntada escalope
Zipper foot (B)
Pied fermeture glissière (B)
Prensatelas de cremallera (B)
Overcasting foot (C)
Pied surfilage (C)
Prensatelas de sobrehilar (C)
Blindstitch presser foot (D)
Pied ourlet invisible (D)
Prensatelas de
puntada invisible (D)
Buttonhole foot (E)
Pied boutonnière (E)
Prensatelas de ojales (E)
Darning stitch
Point de reprise
Punto para zurcir
Setting zipper
Insertion glissières
Colocación de cremalleras
Overcasting (Overlocking)
Surfilage (overlock)
Sobrehilado (overlock)
Blindstitch
Point invisible
Puntada invisible
Blindstitch for elastic fabric
Point invisible (pour tissu stretch)
Puntada invisible para tejido tipo punto
Buttonholing
Boutonnière
Ojales
Bartack
Points déxtrémité renforcent
Presillas
16
Page 18

How T o Adjust Thread Tension
Comment régler la tension du fil
AJUSTE DE LAS TENSIONES DEL HILO
* Adjust the thread tension as described below when special type of fabric is used or
the thread tension has changed from the adequate setting.
* Les réglages de tension ci-dessous sont utiles lorsque l’on coud une matière
spéciale ou que les réglages initiaux ont été changés.
* Cuando se utilice un tejido especial o cuando sea necesario ajustar la tensión del
hilo siga las instrucciones que se describen a continuación.
Upper thread (Needle thread)
Fil supérieur (fil d’aiguille)
Hilo superior (hilo de la aguja)
Normally, well-tensed seam is obtained
when the needle thread and bobbin
thread interlace with each other at the
middle of the fabric thickness.
Normalement, une bonne tension est
obtenue quand les deux fils s’entrecroisent
au centre de l’épaisseur du tissu (d’où la
nécessité de toujours faire vos essais sur
deux épaisseurs de tissu).
Tenemos una tensión correcta cuando
el hilo de la aguja y el hilo de la canilla
se entrelazan en el mitad del tejido.
The upper thread tension is too low.
La tension supérieure est trop faible
La tensión del hilo superior es muy baja.
Upper thread (Needle thread)
Fil supérieur (fil d’aiguille)
Hilo superior (hilo de la aguja)
Middle of fabric thickness
Milieu des tissus
Mitad del tejido
The upper thread tension is too high.
La tension supérieure est trop forte
La tensión del hilo superior es muy alta.
Fabric (right side)
Tissu (dessus)
Derecho del tejido
Fabric (wrong side)
Tissu (dessous)
Revés del tejido
Bobbin thread
Fil de canette
Hilo de la canilla
Upper thread (Needle thread)
Fil supérieur (fil d’aiguille)
Hilo superior (hilo de la aguja)
17
Bobbin thread
Fil de canette
Hilo de la canilla
To increase upper
thread tension.
Pour augmenter la tension
supérieure.
Para aumentar la tensión del
hilo superior.
Bobbin thread
Fil de canette
Hilo de la canilla
To decrease upper
thread tension.
Pour diminuer la tension
supérieure.
Para disminuir la tensión del
hilo superior.
Page 19

Fabric, Thread And Needle T able
Fabric
Thread Needles
HA x 1
(130/705H)
Light-weight
Medium-weight
Heavy-weight
* The knitting needles (HAx1sp) effectively prevent from stitch skipping, and ideal for sewing stretchy fabrics.
Lawn # 80~100 (No.9)
Georgette
Tricot
Wool and synthetic fiber cloth
Light-weight jersey
General wool and synthetic cloth
Jersey
Coating
Silk
Synthetic thread/
Fine thread
Synthetic
Silk
Synthetic
Cotton
Synthetic
Silk
Synthetic
Cotton
Synthetic
Silk
Synthetic
Silk
# 90, 100
# 80
# 60~100
# 50~80
# 50~60
# 50
# 50~60
# 30~50
# 30~50
# 50
# 50~60
# 50
Knitting needle No.11# 60~100
No.1 1~14General cotton and synthetic cloth
Knitting needle No.11
No.1 1~14
No.14~16Denim
Knitting needle No.11
No.1 1~14
Tissus, Fils et Aiguilles
No.11
No.11
Tissu
Tissu fin
Tissu moyen
Tissu épais
* Les aiguilles jersey (HAx1sp) évitent de sauter le point et sont idéales pour les tissus stretch.
Iin # 80~100 (No.9)
Crépe
Tricot
Laine et vêtements en fibre
synthétique
Jerseys fins
Laine et synthétiques
Jersey
Côtes
Fil Aiguilles
Fil coton
Fil synthétique /
Fil fin
Synthétique
Soie
Synthétique
Coton
Synthétique
Soie
Synthétique
Coton
Synthétique
Soie
Synthétique
Soie
# 90, 100
# 80
# 60~100
# 50~80
# 50~60
# 50
# 50~60
# 30~50
# 30~50
# 50
# 50~60
# 50
HA x 1
(130/705H)
No.1 1
Aiguille jersey No.1 1# 60~100
No.1 1
No.11~14Coton
Aiguille jersey No.1 1
No.11~14
No.14~16Jean
Aiguille jersey No.11
No.11~14
18
Page 20

T abla de Tejidos, Hilo y Agujas
T ejido
Hilo
Agujas
HA x 1
(130/705H)
Fino
Medio
Grueso
* Las agujas para punto (HAx1sp) evitan los saltos de puntada y son ideales para coser tejidos como el punto.
Lino
Crespón
Malla tricot
Lana y fibra sintética
Algodón y fibra sintética
Punto fino
Lana y fibra sintética
Tejano
Punto
Abrigo
Hilo de algodón
Hilo sintético /
Hilo fino
Sintético
Seda
Sintético
Algodón
Sintético
Seda
Sintético
Algodón
Sintético
Seda
Sintético
Seda
# 80~100
# 90, 100
# 60~100
# 80
# 60~100
# 50~80
# 50~60
# 50
# 50~60
# 30~50
# 30~50
# 50
# 50~60
# 50
(No.9)
No.1 1
Agujas para punto No.1 1
No.1 1
No.1 1~14
Agujas para punto No.1 1
No.1 1~14
No.14~16
Agujas para punto No.1 1
No.1 1~14
How T o Adjust Stitch Length (manually)
Comment régler manuellement la longueur du point
AJUSTE MANUAL DE LA LONGITUD DE PUNT ADA
Stitch length manual override indicator lamp
Indicateur de modification manuelle de longueur de point
Indicador luminoso de longitud de puntada manual
Manual button
T ouche manuelle
Botón manual
Adjusting lever
Curseur de réglage
Palanca de ajuste
* When machine is turned on again or a pattern is re-selected,
the stitch length will be automatically set to a preset one.
* To adjust the stitch length to a desired one, press the manual
button (the lamp will light up) and the actual stitch length will be
shown on LED display . (To cancel the manual adjustment mode,
select a pattern or press the manual button again.)
*Lorsque la machine est rallumée ou qu’un autre point a été
sélectionné, la longueur de point a automatiquement été préréglée.
*Pour régler la longueur des points, appuyer sur la touche
manuelle (le témoin s’allume). La longueur des points réelle est
alors indiquée sur l’afficheur. (Pour annuler le réglage manuel,
sélectionnez un point ou rappuyez sur la touche).
* Cuando la máquina se enciende o se vuelve a seleccionar un
tipo de costura, la longitud de la puntada se ajusta
automáticamente a aquella longitud preestablecida.
* Para ajustar la longitud de puntada a la longitud deseada, pulse
el botón manual (se ilumina la lámpara) y la longitud actual de
puntada se muestra en el LED visualizador. Para salir del modo
manual, seleccione un tipo de costura o apriete otra vez el botón
manual.
19
Page 21

Stitch pattern
Programme
Tipo de puntada
Automatic (mm)
Automatique (mm)
Automático (mm)
Manual (mm)
Manuel (mm)
Manual (mm)
Stitch pattern
Programme
Tipo de puntada
Automatic (mm)
Automatique (mm)
Automático (mm)
Manual (mm)
Manuel (mm)
Manual (mm)
2.0
1.6
~2.4
2.4
0 ~ 4
0.7
0.2
~1.0
2.6 0.8
1.2
~2.6
0.4
~4.0
1.2
~4.0
1.2
~2.6
- - 2.6
0.4
~4.0
- -
1.22.4 2.0 1.82.0 2.0 2.6
- ~2.6
1.2
0~4
1.2 ~ 2.6
0.4
~4.0
1.0
0.4 0.5 0.6
0.2
~2.0
0.2 ~ 1.0
0.0 ~ 1.0
Examples of automatically/manually determined straight stitch lengths
Exemples de longueur de point automatique/manuelle
Ejemplos de longitudes de pespunte recto determinadas automáticamente/manualmente
Automatic / Automatique / Automático
For automatically-determined stitch length:
The best-suited stitch length for selected pattern is automatically established regardless of the position of the adjusting lever.
Pour une longueur de point automatiquement sélectionnée:
La longueur de point idéale est automatiquement établie quelque soit la position du
curseur.
Para una longitud de puntada determinada automáticamente :
La máquina establece la longitud de puntada más adecuada para llevar a cabo el
tipo de puntada seleccionada, independientemente de la posición del regulador.
1.4
1.0
~1.8
0.5
Manual / Manuelle / Manual
* The machine will peep when the adjusting lever is moved. Set the adjusting lever at a desired position.
* Even in the case where the stitch length is manually adjusted, the indicator lamp will flash on and off when the
automatically-determined stitch length position is reached.
* La machine émet un bip sonore quand le curseur est bougé. Réglez- le sur la position requise.
* Lorsqu’on modifie la longueur du point, la diode s’allume et clignote quand le curseur rejoint la position de réglage initiale.
* La máquina pitará cuando se mueve el botón del regulador. Coloque dicho botón en la posición que desee.
* Incluso en el caso de una longitud de puntada ajustada manualmente, el indicador luminoso se encenderá cuando se
alcance la posición de longitud de puntada determinada automáticamente.
When the manual button is pressed and adjusting
lever is moved to the right beyond the point at which
the indicator lamp flashes on and off:
Quand le bouton manuel est actionné et curseur
déplacé vers la droite depuis le réglage initial, le
point est allongé.
Se aprieta el botón manual y se mueve el botón del
regulador hacia la derecha más allá del punto en el
cual el indicador luminoso se enciende y se apaga.
When the adjusting lever is moved to the left beyond
the point at which the indicator lamp flashes on and
off.
Quand le le bouton manuel est actionné et curseur
déplacé vers la gauche depuis le réglage initial, le point
est raccourci.
Se aprieta el botón manual y se mueve el botón del
regulador hacia la izquierda más allá del punto en el
cual el indicador luminoso se enciende y se apaga.
20
Page 22

Straight Stitch / Point droit / PESPUNTE RECTO
The straight stitch is the basic stitch.
Le point droit est le point de base.
El pespunte recto es el tipo de puntada más básica.
CAUTION:
Turn off the machine before changing
the presser foot.
1
2
Left needle
position
Aiguille à
gauche
Posición
izquierda de
la aguja
3
Standard presser
foot (A)
Pied standard (A)
Prensatelas
estándar (A)
Center needle
position
Aiguille au
centre
Posición
central de la
aguja
Make sure that the
presser foot is correct.
Vérifiez d’utiliser le bon
pied presseur.
Asegúrese de que el
prensatelas sea el
correcto.
Select a stitch pattern.
Sélectionnez le
programme.
Seleccione el tipo de
puntada.
Set the fabric and lower
the presser foot.
Place the fabric under the
presser foot so the needle
will enter the sewing start
point of the fabric. Pull both
the needle and bobbin
threads to the rear of the
machine and lower the
presser foot.
ATTENTION:
Atención:
4
5
6
Eteignez la machine avant changer le
pied presseur.
Apague la máquina antes de cambiar el
prensatelas.
Begin sewing.
Commencez à coudre.
Empiece a coser.
Lightly hold the fabric
with your hands.
Be careful not to apply excessive pulling force to the
fabric while sewing.
Guidez légèrement le
tissu avec vos mains.
Faites attention de ne pas
tirer ou retenir le tissu
pendant la couture.
Sostenga ligeramente el
tejido con sus manos.
Evite tirar o empujar del
tejido mientras esté
cosiendo.
Adjust the sewing
speed.
Ajustez la vitesse.
Ajuste la velocidad de
costura.
Placez le tissu et abaissez le pied.
Mettez le tissu ou le pied afin que l’aiguille pénètre au point
de départ voulu. Tirez les deux fils vers l’arrière et abaissez
le pied presseur.
Coloque el tejido y baje el prensatelas.
Coloque el tejido bajo el prensatelas de forma que la aguja
empiece a coser allí donde desee. Tire de los hilos de la
canilla y de la aguja hacia atrás de la máquina y baje el
prensatelas.
21
7
Stop sewing.
Arrêtez de coudre.
Pare de coser.
Page 23

8
Lift the presser foot and
take out the fabric.
Wait until the needle totally
stops. Push the reverse
stitch button to raise the
needle and then raise the
presser foot lever.
10
Knot the threads on the
wrong side of the fabric.
Pull out the remaining
threads on the wrong side
of the fabric, knot the
threads and cut them at the
edge of the knot.
9
[A]
Relevez le pied et retirez
le tissu.
Attendez que l’aiguille soit
bien arrêtée. Appuyez sur la
touche couture arrière pour
remonter l’aiguille puis
relevez le pied.
Levante el prensatelas y
saque el tejido.
Espere hasta que la aguja
esté totalmente parada.
Empuje el botón de puntada
inversa para subir la aguja
y a continuación, suba la
palanca del prensatelas.
Trim the threads.
Pull out the needle and bobbin threads by approximately 10 cm and cut them
with the “thread cutter”
mounted on the face plate
cover.
[A] =Thread cutter
Coupez les fils.
Tirez les deux fils sur env.
10cm et coupez-les avec
coupe-fils situé sur l’avant
du capot frontal.
[A] = coupe-fils
Corte de los hilos.
Deje que sobresalgan unos
cabos de hilos de unos 10 cm
y córtelos con el “cortahilos”
que está montado en la tapa
frontal.
[A] = cortahilos
Nouez les fils à l’envers
du tissu.
Retirez les fils restant à
l’envers du tissu, nouez-les
et coupez-les au bord du
nœud.
Anude los hilos por el
revés del tejido.
Tire de los hilos por el revés
del tejido, anúdelos y
córtelos.
Straight stitch for elastic fabric
Finished seams are elastic. This stitch system can be used for producing straight
stitches on elastic fabrics such as knits and
jersey .
Point droit pour tissus élastiques.
Les coutures sont extensibles. Ce point
produit des points droits très souples sur
les jerseys fins et les mailles.
Pespunte recto en tejido elástico
Los finales de las costuras son elásticos.
Este sistema de puntada puede usarse
para coser pespunte recto en tejidos
elásticos como el punto o el jersey .
22
Page 24

Automatic lock stitch
Points d’arrêt programmables
Puntada de seguridad automática
To prevent stitches from coming apart:
Select a pattern to be sewn, then press button.
Then, the indicator lamp will light up and the machine will
perform lock stitch by three stitches both at the beginning
and end of sewing.
Permet d’éviter que les coutures ne se défassent au départ
et à la fin. Sélectionnez le programme de couture voulu, puis
pressez la touche .
La diode lumineuse s’allume et la machine effectuera trois
points d’arrêt à la fois au départ et à la fin du programme de
couture.
Seleccione el tipo de costura a coser y apriete el
botón
El indicador luminoso se encenderá y la máquina coserá
puntadas de seguridad dando tres puntadas al inicio y tres
puntadas al final de la costura.
To cancel the automatic back tacking, follow one of the three
different procedures described below:
Pour annuler cette fonction, suivez une des trois procédures
proposées ci-dessous:
Para anular el atacado final automático, siga cualquiera de
los tres procedimientos que se describen a continuación:
(1) Press button again.
(2) Select another pattern.
(3) Turn on the power to the machine once again.
(1) Pressez à nouveau la touche
(2) Sélectionnez un autre programme.
(3) Rallumez de nouveau la machine.
(1) Apriete otra vez el botón
(2) Seleccione otro tipo de costura.
(3) Encienda otra vez la máquina.
Example:
Straight stitch
Exemple:
Point droit
Ejemplo:
Pespunte recto
1
Sélectionnez d’abord le programme à coudre.
Pressez la touche .
La machine effectue trois points d’arrêt puis démarre la
couture à l’endroit initial.
Seleccione primero el tipo de costura que va a coser.
Apriete el botón .
La máquina dará tres puntadas de seguridad y
automáticamente empezará a coser desde el inicio de la
costura.
2
Utilisez la touche “couture arrière”.
Pressez la touche “couture arrière” à l’endroit voulu et la
machine effectue trois points d’ arrêt puis stoppe à l’endroit
déterminé (avec l’aiguille en position haute).
* La machine fera aussi trois points d’arrêt en pressant la
touche “arrière” aprés celle “stop”.
Apriete el botón de costura inversa.
Apriete el botón de costura inversa allí donde lo desee y
la máquina dará tres puntadas de seguidas y parará en la
posición preestablecida. (La máquina parará con la aguja
arriba).
* Tras haber apretado el botón de paro, apretando el botón
de costura inversa, la máquina dará tres puntadas de
seguridad.
[1]
Fabric
Tissu
Tejido
Select first stitch pattern
to be sewn.
Press button.
The machine produces
three times lock stitches and
automatically starts sewing
from the starting position.
Press the reverse stitch
button.
Press the reverse stitch button at the predetermined position, and the machine will
perform three lock stitches
and stop at the predetermined position. (The machine will stop with its needle
up.)
* The machine will perform
three lock stitches by pressing the reverse stitch button
after pressing the stop button.
[2]
23
Page 25

Lock stitch (Reverse stitch)
Couture arrière
Puntada de seguridad (Puntada inversa)
Use this function to produce lock stitches of more than three
stitches.
Beginning of sewing heavy-weight fabric
Démarrer la couture sur des matières
épaisses
Inicio de costura en tejidos gruesos
Utilisez cette fonction pour faire plus de trois points en couture
arrière.
Utilice esta función para obtener más de tres puntadas de
seguridad.
* The machine will perform reverse
stitching as long as the reverse stitch
button is held pressed.
* The machine performs reverse stitching
at low speed.
* La machine coud en arrière tant que la
touche est pressée.
* La machine ne coud en arrière qu’à
vitesse électroniquement réduite.
* La máquina coserá puntadas inversas
mientras se tenga apretado el botón de
puntada inversa.
* La máquina coserá puntadas inversas
a baja velocidad.
Press the reverse stitch
1
Apriete el botón de costura inversa.
La máquina coserá puntadas inversas mientras se tenga
apretado el botón de puntada inversa.
button.
The machine performs reverse stitching as long as
the reverse stitch button is
held pressed.
Pressez la touche
“arrière”.
La machine effectue la
couture en arrière tant que
la touche est pressée.
Sew the seam.
[1]
Fabric
Tissu
Tejido
[2]
[3]
1
T o start sewing from the multi-layer material edge, use the button mounted on the
presser foot to make the presser foot parallel to the fabric, thereby ensuring smooth
sewing.
Pour démarrer vorte couture sur les bords
des épaisseurs, vous pouvez utiliser le
bouton situé sur le pied presseur pour
l’aligner en parallèle avec le tissu,
assurant ainsi une couture facilitée.
Para coser un tejido con más de una
capa, utilice el botón que lleva el
prensatelas de forma que éste quede
paralelo al tejido y sea más sencillo coser.
Pressing the button
(spring) that is mounted
on the presser foot into
the groove in the presser
foot holder, lower the
presser foot.
Appuyez sur le bouton
(ressort) qui est monté
sur le pied dans la fente
du support de pied,
abaissez le pied presseur.
Apriete el botón (muelle)
que lleva el prensatelas
dentro de la ranura en el
soporte del prensatelas
y baje el prensatelas.
2
3
Effectuez votre couture.
Cosa la costura.
Press the reverse stitch
button.
(The machine will stop with
its needle up.)
Pressez la touche
“arrière”.
(La machine s’arrête avec
l’aiguille en haut).
Apriete el botón de
costura inversa.
(La máquina parará con la
aguja arriba.)
24
Page 26

Zigzag Stitch / Point zig zag / PUNT ADA ZIG ZAG
1
2
Stitch width
Rapport de largeur
Anchura de longitud
Standard presser
foot (A)
Pied standard (A)
Prensatelas
estándar (A)
7.0
Make sure that the
presser foot is correct.
Vérifiez d’avoir le bon
pied presseur.
Asegúrese de que el
prensatelas es el
correcto.
Select the zigzag stitch
pattern.
(Automatic)
Zigzag width: 7.0 mm
Stitch length: 2.0 mm
Sélectionnez le point
zig-zag.
(Automatique)
Largeur du point: 7.0 mm
Réglage de longueur: 2.0 mm
CAUTION: Make sure to turn off the machine
ATTENTION:
PRECAUCIÓN:Asegúrese de apagar la máquina an-
Automatic lock stitch
Point d’arrêt automatique
Puntada de seguridad automática
Select a stitch pattern to be sewn and press the
button.
Place the fabric at the sewing- start position and start
the machine.
Sélectionnez le programme voulu puis pressez la
touche .
Placez le tissu à la position initiale et cousez.
Seleccione el tipo de costura deseado y apriete el
botón .
Coloque el tejido en el lugar donde desea empezar a
coser y cosa.
before changing the presser foot.
Assurez-vous d’éteindre la machine
avant de changer le pied presseur.
tes de cambiar el prensatelas.
Stitch length
Longueur du point
Longitud de puntada
2.0
25
Seleccione el tipo de
costura zig zag.
(Automática)
Anchura punto: 7.0 mm
Longitud punto: 2.0 mm
The machine sews three lock stitches first, and continuously sews the fabric in the normal direction.
When the predetermined seam end is reached, press the
reverse stitch button. Then, the machine will perform lock
stitches by three stitches, stop at the predetermined position.
La machine coud trois points d’arrêt sur place, puis
continue le programme de couture normal.
Lorsque vous avez atteint l’extrémité de vorte travail,
pressez de nouveau la touche. La machine fera encore
trois points d’arrêt sur place et stoppe à la position voulue.
La máquina coserá tres puntadas de seguridad en el inicio
y a continuación coserá hacia delante.
Cuando se alcance el fin de costura preestablecido, apriete
el botón de costura inversa. La máquina coserá tres
puntadas de seguridad y parará en el punto final
preestablecido.
Page 27

How T o Adjust Stitch Width (manually)
Comment régler la largeur des points (manuellement)
Modo de ajustar la anchura de puntada (manualmente)
Stitch width manual override indicator lamp
Témoin de correction manuelle de largeur des points
Lámpara indicadora de solapamiento manual de
anchura de puntada
Manual button
T ouche manuelle
Botón manual
Adjusting lever
Curseur de réglage
Palanca de ajuste
Stitch width vs. stitch length
Rapport de Largeur/longueur du point
Anchura de longitud / Longitud de puntada
Stitch width (mm)
Rapport de Largeur (mm)
Anchura de longitud (mm)
2.0
0.5 ~ 4
Stitch length (mm)
longueur du point (mm)
Longitud de puntada (mm)
Automatic
Automatique
Automático
Manual
Manuel
Manual
* T o adjust the stitch width, press the manual button (the lamp will light up)
and move the adjusting lever to left or right. The actual stitch width will
be shown on LED display .
* T o cancel the manual adjustment mode, select a pattern or press the
manual button again.
* Pour régler la largeur des points, appuyer sur la touche manuelle (le
témoin s’allume) et déplacer le bouton de réglage à gauche ou à droite.
La largeur des points réelle est alors indiquée sur l’afficheur .
* Pour désactiver le mode de réglage manuel, sélectionner une
configuration ou appuyer à nouveau sur la touche manuelle.
* Para ajustar la anchura de puntada, pulse el botón manual (se ilumina la
lámpara) y mueva la perilla de ajuste hacia la izquierda o hacia la derecha.
La anchura actual de puntada se visualiza en el LED visualizador.
* Para cancelar l modalidad de ajuste manual, seleccione un patrón o
pulse otra ve el botón manual.
2.0
~
2.0 2.0
~~~
0.5 ~ 4 0.5 ~ 4 0.5 ~ 4
Stitch patterns which are possible to adjust stitch width
Configurations de points dont la largeur des points peut être réglée
Patrones de puntada que se pueden ajustar a anchura de puntada
Stitch pattern
Programme
Tipo de puntada
Automatic (mm)
Automatique (mm)
Automático (mm)
Manual (mm)
Manuel (mm)
Manual (mm)
Stitch pattern
Programme
Tipo de puntada
Automatic (mm)
Automatique (mm)
Automático (mm)
Manual (mm)
Manuel (mm)
Manual (mm)
6.3
3.3
~6.3
7.0
2.0
~4.5
2.5
~7.0
2.5 ~ 7.0
7.0 7.03.0 6.3 4.0
3.3
3.0
~6.3
~5.5
3.5
5.0
~7.0
5.0
3.0
~7.0
3.0 ~ 5.0
4.0 ~ 7.0 2.5 ~ 7.0
7.0
7.0
5.0 ~ 7.0 3.0 ~ 5.0
5.0
26
Page 28

Overcasting
Surfilarge
SOBREHILADO
Reinforcing stretch (elastic) stitch
Point triple élastique
PUNT ADA DE REFUERZO ELÁSTICA
This stitch style is used to prevent the cut edge of fabric from
fraying.
Ce point est utilisé pour éviter que les bords ne s’effilochent
par frottement.
Este tipo de costura se utiliza para evitar que el tejido se
deshilache.
CAUTION: Make sure to turn off the machine
ATTENTION:
PRECAUCIÓN: Asegúrese de apagar la máquina
1
2
Cuando se utiliza el prensatelas de sobrehilar.
Cosa con el borde del tejido apretado contra la guía.
before changing the presser foot.
Assurez-vous d’éteindre la machine
avant de changer le pied presseur.
antes de cambiar el prensatelas.
Change the presser foot
with the one that matches
the pattern to be sewn.
For or patterns, be
sure to use the standard
presser foot (A).
Standard
presser foot (A)
Pied standard (A)
Prensatelas
estándar (A)
Overcasting
foot (C)
Pied surfilage (C)
Prensatelas para
sobrehilar (C)
Guide
Guide
Guía
Vérifiez que le pied soit
adapté à ce programme.
Pour les programmes
ou vérifiez d’utiliser
le pied standard (A).
Cambie el prensatelas
por aquel adecuado al
tipo de costura que se
vaya a hacer.
Para los tipos de costura
ó se utilizará el
prensatelas estándar (A).
When the overcasting
foot is used.
Perform sewing with the fabric edge pressed towards
the guide.
Lorsque vous utilisez le
pied surfilage.
Positionnez le bord du tissu
contre le guide du pied.
The reinforcing stretch stitch helps reinforce seams when used
for sewing of elastic fabric or the force-exerted part of fabric
that is likely to fray.
Le point triple élastique aide à renforcer les coutures pour les
matières extensibles ou demandant un renfort dans le sens
d’élongation.
La puntada de refuerzo refuerza las costuras en los tejidos
elásticos o en los que tienen tendencia a deshacerse.
CAUTION:
ATTENTION:
PRECAUCIÓN: Asegúrese de apagar la máquina
1
2
* Example of use
* Exemple d’utilisation
* Ejemplo:
Sleeve attaching
Montage des manches
Unión de mangas
Side
Côté
Lateral
Make sure to turn off the machine
before changing the presser foot.
Assurez-vous d’éteindre la machine
avant de changer le pied presseur.
antes de cambiar el prensatelas.
Standard presser
foot (A)
Pied standard (A)
Prensatelas
estándar (A)
Back body
Dos
Parte trasera
Reinforcing stitch
Points renforcés
Puntada de refuerzo
Change the presser
foot with the
appropriate one.
Vérifiez que le pied soit
adapté à ce programme.
Cambie el prensatelas
por el adecuado.
Select the pattern.
Sélectionnez le
programme.
Seleccione el tipo de
costura.
Pocket sewing is frequently
sewn with reinforcing stretch
stitches.
Couture de poche renforcée
avec ces points.
Cosido de bolsillos
Attaching handles to bags
Montage des poignées de sac
Cosido de asas a bolsos
Patch pocket
Application de la poche
Bolsilo
27
Page 29
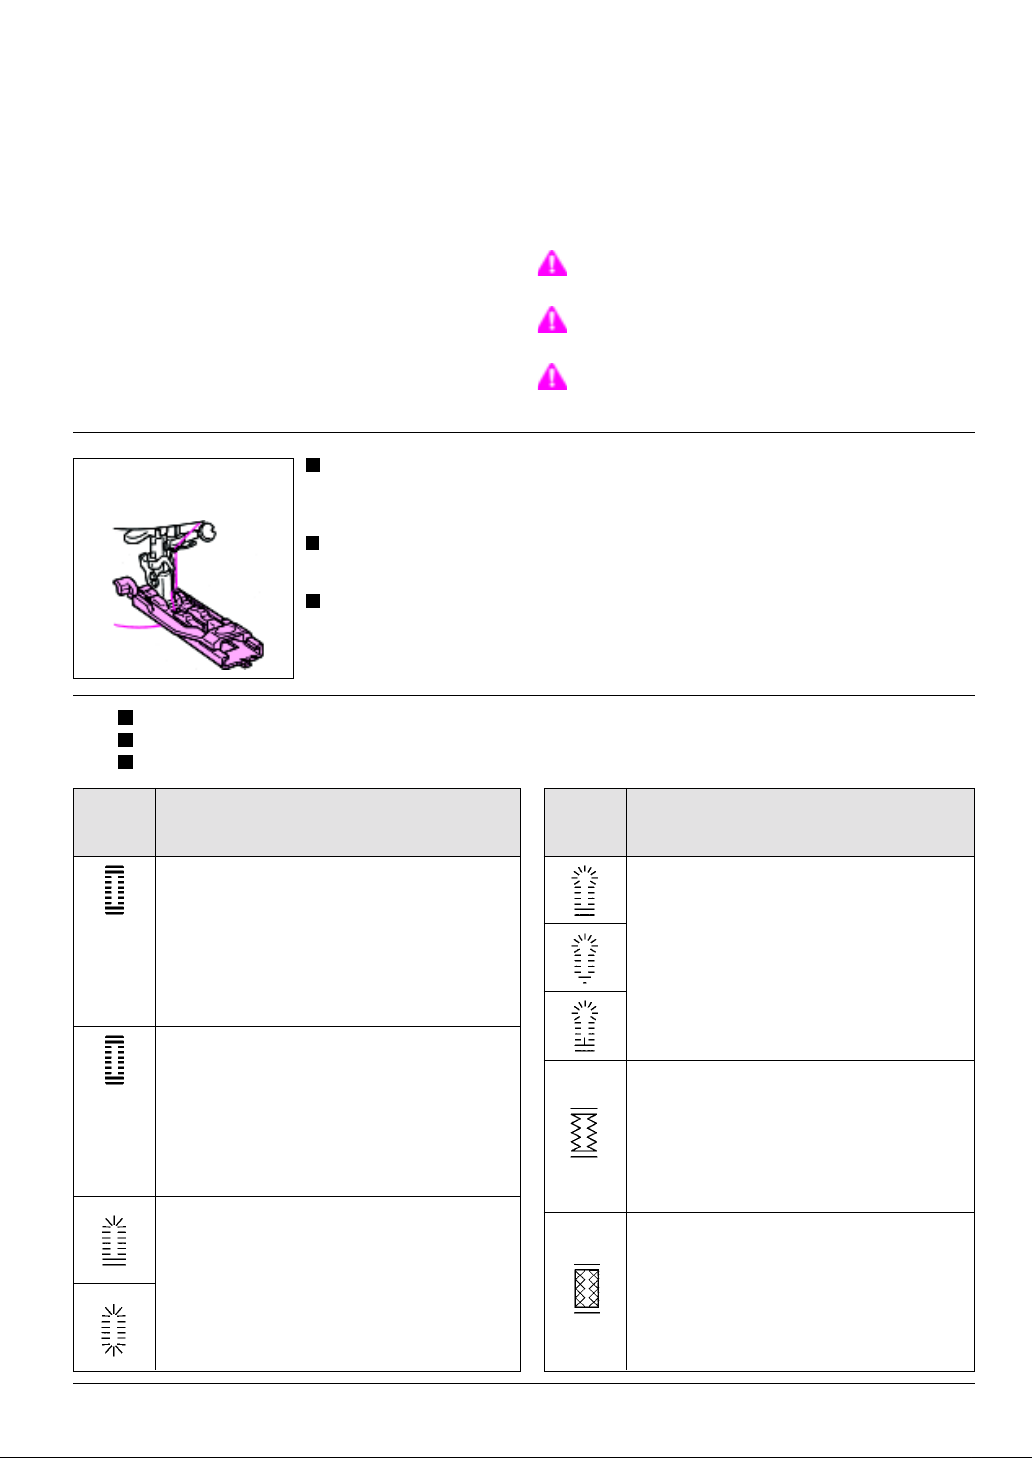
Automatic buttonholes
Boutonnières automatiques en 1 temps
OJALES AUTOMÁTICOS
Select a pattern according to type of fabric and size of button
to be used.
Sélectionner une configuration en fonction du type de tissu et
de la taille des boutons à utiliser.
Seleccione el tipo de costura adecuado al tipo de tejido y al
tamaño del botón que se vaya a utilizar.
Buttonhole foot (E)
Pied boutonnière (E)
1
Prensatelas de ojales (E)
Install buttonhole foot (E).
Pass the needle thread through under the presser foot, and then draw the thread to
the side of the presser foot.
Placez le pied boutonnière (E).
Placez le fil d’aiguille sous le pied à travers celui-ci, et dégagez le fil vers le côté du pied.
Instale el prensatelas de ojales (E).
Pase el hilo de la aguja por debajo del prensatelas y llévelo hacia un lado.
Select a buttonhole that matches your purpose.
2
Sélectionnez le programme voulu.
Seleccione el ojal más indicado para lo que desea hacer.
Pattern
Programme
Tipo
Typical application
Application type
Aplicación
CAUTION:
ATTENTION:
PRECAUCIÓN:
Pattern
Programme
Tipo
Make sure to turn off the machine before changing the presser foot.
Vérifiez d’éteindre la machine avant de
changer le pied presseur.
Asegúrese de apagar la máquina
antes de cambiar el prensatelas.
Typical application
Application type
Aplicación
Stitch width
Rapport de
Largeur
Anchura de
longitud
3.0 ~ 4.0
Stitch width
Rapport de
Largeur
Anchura de
longitud
5.0 ~ 7.0
For sewing small buttonholes in shirts, blouses,
children’s clothing, etc.
Petites boutonnières pour chemises, vêtements
d’enfants, etc.
Para coser ojales pequeños en camisas, blusas,
ropa de niños, etc.
For sewing small buttonholes on light to medium
weight fabric.
Pour la couture de boutonnières moyennes dans
des tissus légers ou moyens.
Para coser ojales medianos en tejidos de peso ligoto
a medianos.
For sewing large buttonholes on medium to heavy
weight fabric.
Pour la couture de grandes boutonnières dans du
tissu moyen ou lourd.
Para coser botones qrandes en tejidos de peso
medio a pesados.
For sewing large buttonholes in thick or heavy
weight fabrics.
Pour la couture de grandes boutonnières dans
du tissu épais ou lourd.
Para coser botones qrandes en tejidos qruesos
de peso pesado.
For knit fabrics such as double knit.
Pour des tissus tricotés comme le tricot double.
Para tejidos de punto tales como los de punto
doble.
For stretch fabrics such as cotton jersey.
Pour des tissus élastiques comme le jersey.
Para tejidos elásticos tales como los jerseys
dealqodón.
28
Page 30

Sliding part
3
After placing a button on the
buttonhole foot, press the sliding part to determine the buttonhole length.
Après avoir placé un bouton sur
le pied, refermez la glissière
pour déterminer la longueur de
la boutonnière.
Tras haber colocado un botón
en el prensatelas, ajuste la pieza
corredera para determinar la
longitud del ojal.
Partie glissière
Pieza corredera
Lower the buttonhole foot
once to place a button on
it.
The buttonhole length is automatically determined only by
placing a button on the buttonhole foot. (If a button cannot fit
in the buttonhole foot, the buttonhole length will be “buttonhole diameter + button thickness.”)
Abaissez le pied après
avoir placé un bouton
dessus.
La longueur de la boutonnière
sera automatiquement
déterminée par la taille du
bouton adapté à celle-ci. (Si un
bouton ne peut pas être placé
dans le pied, la longueur de la
boutonnière sera “diamètre du
bouton + épaisseur du bouton”.)
Lower the buttonhole foot
at the marked position.
6
Lower the buttonhole foot so
that the marked position is at
the center of needle entry hole
in the foot.
Abaissez le pied
boutonnière à la
position marquée.
Marked position
Position marquée
Posición marcada
Abaissez le pied boutonnière
afin que la position marquée
soit un centre du point de
pénétration de l’aiguille dans
le pied boutonnière.
Baje el prensatelas de ojales a la posición marcada.
Baje el prensatelas de ojales de forma que la posición marcada
quede en el centro del agujero del prensatelas por donde entra
la aguja.
Baje el prensatelas de ojales para colocar el botón.
La longitud del ojal se establece automáticamente con solo colocar
el botón dentro del prensatelas de ojales. (Si hay algún botón que
no quepa en el prensatelas de ojales, la longitud del ojal será el
diámetro del ojal + el grosor del botón”).
Remove the button.
Once the buttonhole length is
4
determined, remove the button from the buttonhole foot.
Retirez le bouton.
Une fois la longueur de la
boutonnière définie, retirez le
bouton du pied.
Quite el botón.
Una vez determinada la
longitud del ojal, quite el botón
del prensatelas.
Mark the buttonhole
positions.
5
Mark
Marque
Marca
Draw marker lines on the fabric at the buttonhole positions
with an assistant marker.
Marquez les positions
de la boutonnière.
Marquez les lignes de repère
sur le tissu avec un marqueur
textile.
Lower the buttonholing
7
lever.
Lower the lever until it will go
no further.
* If you start the sewing machine without lower the lever,
the machine will blip.
Abaissez le levier de
Buttonholing lever
Levier de boutonnière
Palanca del soporte
del prensatelas de ojales.
boutonnière.
Abaissez le levier au maximum.
* Si vous commencez à coudre
sans abaisser le levier, la
machine émet un bip sonore
d’avertissement.
Baje la palanca del soporte del prensatelas de
ojales.
Baje la palanca hasta el máximo.
* Si se empieza a coser sin haber bajado la palanca al máximo,
la máquina pitará.
Begin sewing.
8
Commencez à coudre.
Empiece a coser.
29
Marque la posición del
ojal.
Marque con una línea el ojal
en el tejido.
Page 31

Sewing sequence
Cycle de couture
9
Secuencia de costura
1 2 3 4 5 6
The machine will automatically stop sewing after producing back tack stitches.
The machine will stop with its needle up.
La machine s’arrête automatiquement après avoir effectué les points d’arrêt.
Elle stoppe l’aiguille en haut.
La máquina parará automáticamente de coser tras hacer las atacados finales.
La máquina parará con la aguja arriba.
After the completion of sewing, trim the threads.
* From the second buttonhole and beyond, lower the buttonhole foot at the next marker line
on the fabric for sewing buttonholes.
Après avoir fini le cycle, coupez les fils.
* Depuis la seconde boutonnière et plus, abaissez le pied sur la marque suivante sur le tissu.
Tras completar toda la costura, corte los hilos.
* Desde el segundo ojal en adelante, para coser los ojales baje el prensatelas en cada marca
de ojal que haya marcada en el tejido.
Open the buttonhole using a seam ripper.
10
Stopper pin
Epingle d’arrêt
Alfiler que hace
de tope
It is recommended to use a straight pin to prevent from excessive cutting of buttonhole.
Ouvrez la boutonnière avec le découd-vite.
Il est recommandé d’utiliser une épingle droite pour éviter de coupe les extrémités de la
boutonnière en l’ouvrant.
Abrir el ojal utilizando un descosedor.
Se recomienda utilizar un alfiler para evitar cortar en exceso.
Adjusting the stitch length / Réglez la longueur du point / Ajuste de la longitud de puntada
*T o sew buttonholes on heavy-weight
materials such as denim with thick
thread, set the stitch length larger than
the automatically-determined one.
*Pour coudre les boutonnières sur les
tissus épais comme le jeans ou avec
un gros fil, réglez la longueur du point
plus longue que celle d’origine.
*Para coser ojales en tejidos gruesos
como el tejano y con hilo grueso, ajuste
la longitud de puntada a una mayor a la
que viene establecida automáticamente.
To decrease stitch length:
Pour diminuer la longueur du point:
Para disminuir la longitud de
puntada:
[2]
[1]
To increase stitch length:
Pour augmenter la longueur du point:
Para aumentar la longitud de
puntada:
[2]
[1]
30
Page 32

Bartacking / Couture d’arrêt / Presillado
Bartacking is used to reinforce part of seam that is likely to
ravel.
La couture d’arrêt permet de renforcer une partie de la couture
susceptible de s’effilocher.
El presellado se usa para reforzar la parte de la costura que
es susceptible de destejerse.
Install buttonhole foot (E).
1
Buttonhole foot (E)
Pied boutonnière (E)
Prensatelas de ojales (E)
2
Pass the needle thread
through under the presser
foot, and then draw the thread
to the side of the presser foot.
Placez le pied
boutonnière (E).
Placez le fil d’aiguille sous le
pied à travers celui-ci, et
dégagez le fil vers le côté du
pied.
Instale el prensatelas de
ojales (E).
Pase el hilo de la aguja por
debajo del prensatelas y
llévelo hacia un lado.
Select the pattern.
Sélectionnez le
programme.
Seleccione el tipo de
costura.
CAUTION:
ATTENTION:
PRECAUCIÓN: Asegúrese de apagar la máquina
4
Make sure to turn off the machine
before changing the presser foot.
Assurez-vous d’éteindre la machine
avant de changer le pied presseur.
antes de cambiar el prensatelas.
Press the reverse stitch
button at predetermined
position [A].
Once the needle returns to
the start position, the machine automatically starts
zigzag stitching.
Appuyez sur le bouton
de marche arrières à la
position déterminée à
l’avance.
Une fois que l’aiguille revient
en position de départ, la
[A]
machine commencs
automatiquement la couture
en points zigzag.
Presione el boton de
punto reversible en la
posición predeterminada
[A].
Una vez que la aquja vuelve
a su posicion de comienzo
la maquina empieza a coser
en zigzag automaticamente.
3
Buttonholing lever
Levier de boutonnière
Palanca del soporte
del prensatelas de ojales.
31
Start machine with
buttonholing lever raised.
Commencez à coudre.
Remarque: le levier de
boutonnière resta en
place.
Empiece a coser.
Nota: la palanca del ojal
permanece en su reserva.
5
Upon completion of
stitching [B], press the
reverse stitching button
to stop the machine.
Les points terminés,
appuyez sur le bouton
de marche arrière pour
arrótar la machine.
Al termino de la costura
[B], presionar el botón
de punto reversible para
parar la máquina.
[B]
Page 33

Darning stitch / Point de reprise /
Punto para zurcido
To continuously sew bartacks of the same length two or
more times, follow the procedure described below:
Pour coudre des points d’extrémité de longueur identiques
2 fois ou plus, suivez la pracédure décrite ci-dessous:
Para coser continuamente presillas de la misma lonquitud,
dos o màs veces, siga el proceso descrito màs abajo:
Start
Marche
Comienzo
Automatically U-turn
Retours automatiques
en U
Retorno automatico-V
* T o change the sewing length stored in memory, reselect the
pattern number and follow steps 1 through 5.
* Pour modifier la longueur de couture stookée en mémoire,
sélectionnez de nouveau le numéro du motif et parcourez les
étapes de 1 à 5.
* Para combiar la lonqitud del punto almacenada, vuelua a
seleccionar el número de diseño y siqa los pasos 1 a 5.
Automatically returns
Retours automatiques
Retosno automatico
Press the reverse stitching
button to stop the machine.
Appuyez sur le bouton de
marche arrière pour arrèter la
machine.
Presione el boton de punto
reversible para parar la máquina.
CAUTION:
ATTENTION:
PRECAUCIÓN: Asegúrese de apagar la máquina
Buttonhole foot (E)
Pied boutonnière (E)
1
Prensatelas de ojales (E)
Instale el prensatelas de ojales (E).
Pase el hilo de la aguja por debajo del prensatelas y llévelo hacia
un lado.
2
3
Sliding part
Partie glissière
Pieza corredera
Make sure to turn off the machine
before changing the presser foot.
Assurez-vous d’éteindre la machine
avant de changer le pied presseur.
antes de cambiar el prensatelas.
Install buttonhole foot (E).
Pass the needle thread through
under the presser foot, and then
draw the thread to the side of
the presser foot.
Placez le pied boutonnière
(E).
Placez le fil d’aiguille sous le
pied à travers celui-ci, et
dégagez le fil vers le côté du
pied.
Select the pattern.
Sélectionnez le
programme.
Seleccione el tipo de
costura.
Set the darning stitch
length.
Push the slide to set the length.
Réglez la longueur du point
de reprise.
Coloque la tonqitud del
punto de zurcido.
Empuje el cusor para colocar la
lonqitud.
* Application examples
* Exemples d’application
* Ejemplo de aplicaciones
Trousers and skirts
Pantalons et jupes
Pantalones y faldas
Bags
Sacs
Bolsos
Pockets
Poches
Bolsillos
Lower the buttonholing
4
5
Emplece a coser.
La máquina parará automáticamente cuando se haya cosido un
diseño completamente.
lever.
Abaissez le levier
boutnnière.
Baje la palanca de ojàles 9.
Empiece a coser.
Bigin sewing.
The machine will stop
automatically when the sewing
of one pattern is complete.
Commencez à coudre.
La machine s’arrête
automatiquement lorsque la
couture d’un motif est terminée.
32
Page 34

Quilting stitch / Point de courtepointe
Puntada acolchada
Patch Work / Patchwork
P ATCHWORK
The works of quilting and patch work can be finished as though
they were hand-sewn by using inconspicuous bobbin thread.
Les travaux de courtepointe et de patchwork peuvent avoir
une finition “cousu main” en utilisant un fil de canette discret.
Los trabajos de acolchado y de colocar retazos se pueden
acabar como si fueran hechos a mano usando hilo de bobina
indiscernible.
CAUTION:
ATTENTION:
PRECAUCIÓN: Asegúrese de apagar la máquina
1
Make sure to turn off the machine
before changing the presser foot.
Assurez-vous d’éteindre la machine
avant de changer le pied presseur.
antes de cambiar el prensatelas.
Standard presser
foot (A)
Pied standard (A)
Prensatelas
estándar (A)
Change the presser foot
with the appropriate
one.
Vérifiez que le pied soit
adapté à ce programme.
Cambie el prensatelas
por el adecuado.
CAUTION:
ATTENTION:
PRECAUCIÓN:
1 cm
1
Runstitch
Surpiqûre
Costura
Fabric (wrong side)
Tissu (dessous)
Tejido (del revés)
Standard presser
2
foot (A)
Pied standard (A)
Prensatelas
estándar (A)
Make sure to turn off the machine before changing the presser foot.
Assurez-vous d’éteindre la machine
avant le changer le pied presseur.
Asegúrese de apagar la máquina
antes de cambiar el prensatelas.
Runstitch the fabric.
Runstitch two pieces of
fabric.
Seam
allowance
T olérance
de couture
Margen de
la costura
Surpiquez le tissu.
Surpiquez les deux
morceaux de tissu.
Cosa el tejido.
Cosa dos piezas de tejido.
Make sure that the
presser foot is correct.
Vérifiez que le pied
presseur es le bon.
Asegúrese de colocar el
prensatelas adecuado.
2
3
33
Select the pattern.
Sélectionnez le
programme.
Seleccione el tipo de
costura.
Lower the presser foot
lifting lever and start
sewing.
Abaisser le levier relèvepresseur et commencer
la couture.
Baje la palanca
elevadora del prensatela
y comience el cosido.
Select stitch pattern.
3
Overlapping patch
Patch recouvert
Unión sobrepuesta
Fabric
(right side)
Tissu
(dessus)
Tejido
(del derecho)
* Sew patterns so that they extend over both pieces of fabric.
* Cousez les points afin qu’ils s’étendent au-delà des deux
morceaux de tissu.
* Cosa de forma que las puntadas caigan en las dos piezas
de ropa.
Sélectionnez le
programme.
Seleccione el tipo de
puntada.
Open patch
Patch ouvert
Unión abierta
Fabric
(right side)
Tissu
(dessus)
Tejido
(del derecho)
Page 35

Inserting Zippers / Fermetures à glissière / COLOCACIÓN DE CREMALLERAS
Zippers are set in two different ways such as by inserting
in side seam of the garment and by centering in opening.
Les fermetures à gllissière sont placées de deux
façons différents : recouverte sur le côté du vêtement
ou centrée à l’ouverture.
Existen dos formas de colocar las cremalleras: la que
queda cosida como recubierta por el tejido y otra que
queda centrada.
CAUTION:
Make sure to turn off the machine before
changing the presser foot.
1
Left needle position
Aiguille en position gauche
Posición izquierda de la aguja
Seam...Stitch length [Auto]
Couture…Longueur de point [Auto]
2
Costura...Longitud de puntada [Automático]
Machine-baste...Stitch length [4]
Fabric
(wrong side)
Tissu (dessous)
Tejido (revés)
Bâti…Longueur de point [4]
Hilván...Longitud de
puntada [4]
Reverse stitches
(1 cm)
Points d’arrêt (1cm)
Puntadas inversas (1 cm)
ATTENTION:
PRECAUCIÓN:
Assurez-vous d’éteindre la machine avant
de changer le pied presseur.
Asegúrese de apagar la máquina antes
de cambiar el prensatelas.
Select stitch pattern.
If the center needle position is selected, the needle will come in contact
with the zipper foot. T o avoid this, be sure to select the left needle position.
Sélectionnez le programme.
Si l’aiguille est en position centrale, elle touchera le pied presseur. Pour
l’éviter, sélectionnez l’aiguille à gauche.
Seleccione el tipo de costura.
Si selecciona la posición central de la aguja, ésta entrará en contacto con
el prensatelas de cremallera. Para evitarlo, asegúrese de seleccionar la
posición izquierda de la aguja.
Insert zippers using the standard presser foot (A).
Place the fabrics face-to-face. Check the runstitching length and the length
of zipper to be inserted. Baste the zipper on the fabrics.
* Machine-baste...Zipper opening length + 1 cm
Une fermeture est recouverte lorsque un bord tissu la recouvre et la
cache, ne laissant apparaitre que le point droit.
* Bàti à la machine…Longueur de la fermeture +1cm
Colocación de cremalleras usando el prensatelas estándar (A).
Coloque el tejido encarado. Compruebe la longitud de puntada y la longitud
de la cremallera que se debe coser. Hilvane la cremallera al tejido.
* Hilván...Longitud de la apertura de la cremallera + 1 cm
3
Zipper foot (B)
Pied fermeture éclair (B)
Prensatelas cremallera (B)
(Left)
(Gauche)
(Izquierda)
(Right)
(Dessus)
(Derecha)
Attach the zipper foot (B) to the machine.
T o sew the left part of the zipper , place the zipper under the right portion of
the zipper foot. To sew the right part of the zipper, place the zipper under
the left portion of the foot.
Si la fermeture est à gauche de l’aiguille, la partie gauche du pied ira sur le
zip. Si la fermeture est à droite de l’aiguille, la partie droite du pied ira sur
le zip.
Coloque el prensatelas de cremallera (B).
Para coser la parte izquierda de la cremallera, coloque la cremallera bajo
la parte derecha del prensatelas. Para coser la parte derecha de la
cremallera, coloque ésta bajo la parte izquierda del prensatelas.
34
Page 36

lapped insertion / Fermetures recouvertes / Inserción recubierta
Open the seam allowance.
1
Fabric
(wrong side)
Tissu
(dessous)
Tejido (revés)
3mm
2
Attach the right side
Attachez le côté gauche
Coloque el lado derecho
Teeth
Dents
Dientes
Slider
Glisseur
Carro
Zipper
opening size
Mesure
d’ouverture de
la fermeture
Tamaño de la
apertura de la
cremallera
Neatly open the seam allowance. Adjust the back seam allowance so that
it projects 3 mm from the seam. Press with an iron to make a crease. Fit
the crease at the edge of teeth.
Recouvertes: Les fermetures sont insérées dans la couture du
vètement.
Le bord des dents suit la couture.
Coudre la fermeture du bas vers le haut au bord de la partie à rabattre.
Margen de apertura de la costura.
Debe existir un margen limpio. Establezca el margen de la costura trasera
de forma que quede a 3 mm de la costura. Aplique una plancha para crear
la doblez. Ajuste el dobladillo al extremo de los dientes.
Sew the zipper tape on the seam allowance from bottom to top.
Fitting the edge of the zipper foot at the edge of the zipper teeth, sew the
zipper tape on the seam allowance. At the slider part of the zipper, stop
the machine at a position about 5 cm before the slider, move the slide to
the far side of the presser foot, then sew the zipper until its top end is
reached.
Fabric
(wrong side)
Tissu (dessous)
Tejido (revés)
Stitch length [Auto]
Longueur de point [Auto]
Longitud de puntada [automática]
3
Attach the left side
Attachez le côté gauche
Coloque el lado izquierdo
Opening end
(reverse stitch)
Extrémité d’ouverture
(point arrière)
Final abierto (puntada
inversa)
Stitch length [Auto]
Longueur de point [Auto]
Longitud de puntada [Automática]
Slider
Glisseur
Carro
Machine-baste
Bâti machine
Hilván
Plaquer le tissu à rabattre au bout de la fermeture.
Coudre la fermeture du bas vers le hant comme indiqué en suivant le
bord.
Cosa la cremallera en el margen de la costura de arriba a abajo.
Haga coincidir el extremo del prensatelas con el extremo de los dientes
de la cremallera y cosa la cremallera en el margen de la costura. Pare la
máquina cuando esté a unos 5 cm del carro de la cremallera, a
continuación, mueva dicho carro hacia la parte más alejada del prensatelas
y siga cosiendo la cremallera hasta que llegue a su extremo más superior.
Put the top cloth over the zipper. Baste the zipper and set it on
the fabric.
Move the slider to the top of zipper. Put the top cloth over the zipper and
perform basting. Stitch the zipper, as illustrated, with reverse stitches produced at the opening end. At the slider section, undo the basting stitch
seam, lower the slider and sew the remaining part.
Epinglez ou bâtissez la fermeture au vêtement depuis le dessous
à travers la bande de la fermeture, la bande à rabattre et le dessus
du vêtement.
Dégager le dessus du vêtement. Cousez à travers le bout le plus bas de
la fermeture jusqu’à la taille. Utiliser les points de bàti comme guide.
Décousez le bàti.
Coloque el tejido por encima de la cremallera. Hilvane la
cremallera y colóquela en el tejido.
Mueva el carro hacia la parte superior de la cremallera. Coloque el tejido
superior por encima de la cremallera y hilvánela. Cosa la cremallera, tal y
como se indica en el dibujo, con puntadas inversas en los finales abiertos.
En la parte del carro, deshaga el hilván, baje el carro y cosa la parte que
quede.
35
Page 37

Centered Insertion / Fermetures centrées / CoIocación centrada
Seamline
Couture
1
Línea de la costura
T eeth
Dents
Dientes
Fabric (wrong side)
Tissu (dessous)
Tejido (del revés)
Slider
Glisseur
Carro
Baste
Bâti
Hilván
Zipper (wrong side)
Fermeture (dessous)
Cremallera
(del revés)
Fabric (wrong side)
Tissu (dessous)
Tejido (del revés)
2
Attach the right side
Attachez le côté gauche
Coloque la parte derecha
Opening end
(reverse stitch)
Extrémité d’ouverture
(point arrière)
Apertura final
(puntada inversa)
Stitch length [Auto]
Longueur de point [Auto]
Longitud de puntada [Automática]
Fabric (right side)
Tissu (dessus)
Tejido (del derecho)
Baste
Bâti machine
Hilván
Baste zipper and garment body.
Open the seam allowance. Fitting the teeth of zipper at the end of the
seam line, perform basting.
Centrées: La fermeture est centrée dans l’ouverture et convient
pour presque tous les tissus.
Bâtissez à la machine l’ouverture de la fermeture à l’endroit à la ligne de
couture et maintenez ouvert la partie à coudre.
Hilvane la cremallera a la prenda.
Margen de apertura de la costura. Haga coincidir los dientes de la
cremallera con el final de la línea de costura y hilvánela.
Sew the left part of the zipper on the seam allowance from bottom
of opening to top.
Bâtissez à travers la bande de la fermeture. Cousez le tissu de
l’extérieur.
Tournez la partie gauche du vêtement vers le haut et cousez à travers la
fermeture en cousant toules les épaisseurs.
Cosa la parte izquierda de la cremallera al margen de la costura
de arriba a abajo.
3
Attach the left side
Attachez le côté gauche
Coloque la parte izquierda
Fabric (right side)
Tissu (dessus)
Tejido (del derecho)
Stitch length [Auto]
Longueur de point [Auto]
Longitud de puntada [Automática]
Sew the right part of zipper.
After the completion of sewing, undo the basting stitch seam.
Cousez dessus à travers toutes les épaisseurs.
Décousez les coutures de bâti.
Cosa la parte derecha de la cremallera.
Tras haber acabado de coser , quite el hilván.
36
Page 38

Blindstitch / Point invisible / PUNT ADA INVISIBLE
Blindstitching provides a durable way to finish a hem and is
presented as an instantly selectable pattern as a convenience.
It needs practice, so a test sewing is suggested.
L’ourlet invisible procure une finition durable pour les ourlets et
est facilité par son programme instantanément sélectionné.
Il nécessite un peu de pratique, aussi faîtes quelques essais
auparavant.
Con la puntada invisible se puede obtener un acabado duradero
de los dobladillos. Es un tipo de costura que se puede seleccionar.
Para obtener unos resultados óptimos, se necesita práctica, es
por ello, que se recomienda hacer pruebas hasta conseguir lo
que se desea.
CAUTION:
ATTENTION:
PRECAUCIÓN:
Make sure to turn off the machine
before changing the presser foot.
Assurez-vous d’éteindre la
machine avant de changer le pied
presseur.
Asegúrese de apagar la
máquina antes de cambiar el
prensatelas.
1. Fold the fabric and then baste it.
1. Pliez le tissu et bâtissez-le.
1
1. Doble el tejido e hilvánelo.
0.5~0.6 cm
Basting
Fabric (wrong side)
Tissu (dessous)
Tejido (del revés)
2. Fold the fabric at the basting stitch seam.
2. Repliez le tissu et bâtissez-le.
2. Doble el tejido e hilvane la costura.
Fabric (wrong side)
Tissu (dessous)
Tejido (del revés)
3.
Fabric (wrong side)
Tissu (dessous)
Tejido (del revés)
Bâti
Dobladillo acabado
Finished hem
Ourlet fini
Hilván
Overcast the fabric, and fold the edge.
Refer to page 27 for overcasting.
Surfilez le tissu et pliez le bord.
Référez vous à la page 27 pour le surfilage.
3
4
Fabric
(wrong side)
Tissu
(dessous)
Tejido
(del revés)
For elastic
fabric
Pour tissu
extensible
Para tejido
elástico
Guide
Guide
Guía
Select the blindhem
stitch pattern.
Sélectionnez le
programme approprié.
Seleccione el tipo de
costura de puntada
invisible.
Position the folded edge
against the guide.
Place the folded edge
against the presser foot
guide, and sew the fabric.
Positionnez le bord plié
le long du guide.
Placez le bord contre le
guide et cousez.
Coloque el dobladillo
contra la guía.
Coloque el dobladillo contra
la guía del prensatelas y
cosa.
Sobrehíle el tejido y haga el dobladillo.
Consultar las instrucciones referentes al sobrehilado.
Change the presser
2
foot.
Changez le pied
presseur.
Cambie el prensatelas.
Blindstitch presser foot (D)
Pied ourlet invisible (D)
Prensatelas de puntada
invisible (D)
37
5
Fabric
(wrong side)
Tissu
(dessous)
T ejido
(del revés)
Finished hem
Ourlet fini
Dobladillo acabado
Fabric
(right side)
Tissu
(dessus)
T ejido
(del derecho)
Turn the fabric over.
After sewing the seam, turn
the fabric over.
Retournez le tissu.
Après la couture, retournez
le tissu.
Gire el tejido.
Tras haber hecho la
costura, dé la vuelta al
tejido.
Page 39

How to adjust the guide of the blindstitch presser foot
Comment régler le guide du pied ourlet invisible
Ajuste de la guía del prensatelas de puntada invisible.
If the stitches fail to reach the folded edge:
Si les points n’atteignent pas lebord du pli:
Si las puntadas no se dan en el extremo del dobladillo:
Guide
Guide
Guía
Turn the screw toward you, and the guide will shift to the right.
Tournez la vis vers vous et le guide glisse vers la droite.
Gire el tornillo hacia usted y la guía se moverá hacia la
derecha.
If the stitches reach too far beyond the folded edge:
Si les points sont trop à l’intérieur du bord plié:
Si las puntadas se dan demasiado lejos del extremo del dobladillo:
Guide
Guide
Guía
Turn the screw away from you, and the guide will shift to the left.
T ournez la vis vers l’arrière et le guide glisse vers la gauche.
Gire el tornillo hacia el lado contrario a usted y la guía se moverá
hacia la izquierda.
38
Page 40

Optional parts / Accessoires optionnels / PIEZAS OPCIONALES
Invisible zipper foot
Pied fermeture invisible
Prensatelas de puntada invisible
1
Basting
Bâti
Hilvanar
Fabric (wrong side)
Tissu (envers)
Tejido (del revés)
Runstitch
Surpiqûre
Pespunte
a: Opening size
a: Taille d’ouverture
a: Tamaño apertura
Pattern to be used
Programme requis
Tipo de costura a utilizar
CAUTION:
ATTENTION:
PRECAUCIÓN:
d’ouverture / Apertura final
Opening end / Extrémité
a
b
2.5 cm
Reverse stitch (1 cm)
Couture arrière (1cm)
Puntada inversa (1 cm)
b: Zipper size
b: Taille du zip
b: Tamaño cremallera
Since a seam does not appear on the right side of fabric, opening
can be finished with fabric edges neatly butted.
A fin qu’aucune couture apparaisse sur le devant du tissu,
l’ouverture doit être finie avec les bords du tissu rentrés à l’intérieur.
Como la costura no aparece en el lado derecho, la apertura puede
acabarse con los extremos del tejido remetidos.
Make sure to turn off the machine before changing the presser foot.
Assurez-vous d’éteindre la machine avant de changer le pied presseur.
Asegúrese de apagar la máquina antes de cambiar el prensatelas.
Check the zipper opening size. Install the standard presser
foot (A).
Place two pieces of fabric face to face. Baste the fabric from the edge
of fabric to the opening end. At the opening end, change the stitch
length to [2.0] and sew reverse stitches by 1 cm and sew until the
predetermined position is reached. Neatly open the seam allowance.
Vérifiez la taille de l’ouverture du zip. Installez le pied standard
(A).
Placez les deux morceaux de tissu face à face. Bâtissez depuis le
bord du tissu jusqu’à l’extrémité de l’ouverture. Arrivé à celle-ci, réglez
la longueur du point à (2) et cousez en arrière sur 1 cm et cousez
jusqu’à la position prédéterminée. Ouvrez sur la tolérance de couture.
Comprobar el tamaño de la cremallera. Instalación del
prensatelas (A).
Coloque dos piezas de tejido encaradas. Hilvane el tejido desde su
extremo hasta su apertura final. En dicha apertura, cambie la longitud
de puntada a 2.0 y cosa con puntadas inversas durante 1 cm. A
continuación, siga cosiendo hasta que alcance la posición que desea.
Respete el margen de apertura de la costura.
2
Basting
Bâti
Hilvanar
Fabric (wrong side)
Tissu (envers)
Tejido (del revés)
Cardboard
Carton renfort
Cartón
39
Basting (only zipper tape and
seam allowance)
Bâti (bande du zip et
tolérance seulement)
Hilvanar (solo la cremallera
y el margen de la costura)
Invisible zipper
(wrong side)
Fermeture invisible
(envers)
Cremallera invisible
(del revés)
Put the invisible zipper on the fabric so that its center meets the seam
line. Place a cardboard between the seam allowance and front fabric.
Manually baste both sides of seam allowances and zipper tapes.
Upon completion of basting, remove the cardboard.
Mettez la fermeture invisible sur le tissu afin que son centre rencontre
la ligne de couture. Placez du carton de renfort entre la bande de
tolérance et le dessus du tissu.
Bâtissez manuellement chacun des côtés de la bande de tolérance et
celle du zip. Une fois terminé, retirez le renfort.
Coloque la cremallera invisible en el tejido de forma que el centro
coincida con la línea de costura. Coloque un cartón entre el margen
de la costura y el delantero del tejido.
Hilvane manualmente los dos lados de los márgenes de costura de la
cremallera. Tras acabar de hilvanar , quite el cartón.
Page 41

3
Undo the basting stitch seam to the bottom of opening as shown
in the sketch given in step 1. Then, open the zipper.
Depuis le point de bâti du fond de l’ouverture, suivez les étapes.
1. puis, ouvrez la fermeture.
Quite el hilván de abajo a arriba tal y como explica el punto 1. A
continuación, abra al cremallera.
4
5
Invisible zipper foot
Pied fermeture invisible
Prensatelas de
Tape
cremallera invisible
Bande
Cinta de la
cremallera
Seam
Couture
Costura
Invisible zipper foot
Pied fermeture
invisible
Prensatelas de
cremallera
invisible
Teeth
Dents
Dientes
Teeth
Dents
Dientes
Seam
Couture
Costura
Fabric
Tissu
Tejido
Tape
Bande
Cinta de la
cremallera
Fabric
Tissu
Tejido
Aligning the teeth of either zipper tape with the groove on the zipper foot, sew the zipper at the very edge of the teeth from the end
of opening while raising the teeth with fingers.
Alignez les dents avec la bande de la fermeture avec la fente
contre le pied, cousez au plus près des dents.
Alinee los dientes de la cremallera con el hendidura del prensatelas
de cremallera. Cosa la cremallera lo máximo al borde de los dientes
de la misma, desde el final de la apertura mientras sube los dientes
con los dedos.
Sew the remaining zipper tape on the other side of seam allowance in the same procedure. (The lower portion of zipper tape
located below the bottom of the opening will remain loose without
sewn on the seam allowance.)
Cousez en maintenant la bande de la fermeture de l’autre côté de
la tolérance de couture, de la même manière que le fond de
l’ouverture restera lâche sans couture sur la tolérance de couture).
Cosa el otro lado de la cremallera en el otro margen de la costura
siguiendo el mismo procedimiento. (La parte inferior de la
cremallera que queda por debajo de la apertura inferior quedará
suelta sin coserse a la costura).
6
Slider
Glissière
Carro
T ake out the slider and pull it out to appear on the right side of the
fabric.
Sortez la glissière et tirez-la sur l’endroit du tissu.
Saque el carro de forma que aparezca en el derecho del tejido.
40
Page 42

Manual buttonhole foot
Pied boutonnière manuelle
Prensatelas de ojales manual
Pattern to be used
Programme
Tipo de costura a utilizar
CAUTION: Make sure to turn off the machine before changing the presser foot.
ATTENTION: Veillez à éteindre la machine avant le changer le pied presseur.
PRECAUCIÓN: Asegúrese de apagar la máquina antes de cambiar el prensatelas.
Mark fabric to indicate but-
1
Mark
Marque
Marca
Marque el tejido para indicar el lugar que ocupará el ojal.
Baje el prensatelas de ojales de forma que la marca quede
en el centro del agujero del prensatelas por donde pasa la
aguja.
Buttonholing lever
Levier boutonnière
2
Soporte del prensatelas
de ojales
3
End of mark
Marque de fin
Final de la marca
tonhole placement. Lower
buttonhole foot so that mark
is at center of needle entry
hole in foot.
Marquez le tissu à
l’emplacement requis.
Abaissez le pied afin de la
marque soit alignée avec le
centre du trou d’entrée de
l’aiguille dans le pied.
Lower buttonholing lever.
Abaissez le levier
boutonnière.
Baje la palanca del soporte
del prensatelas de ojales.
When needle reaches end
of marker line, slightly press
buttonholing lever towards
rear of machine.
Quand l’aiguille arrive à la
fin de la marque, appuyez
franchement sur le levier
boutonnière en direction de
l’arrière de la machine.
Cuando la aguja alcance el
final de la línea marcada,
empuje suavemente hacia
atrás la palanca del soporte
del prensatelas.
Use this foot for buttonholing heavy-weight placket or collar band.
Utilisez ce pied pour des boutonnières sur des issus épais et
spongieux.
Utilice este prensatelas para hacer los ojales en los rellenos de
cuellos o puños.
When needle reaches be-
4
Mark
Marque
Marca
5
End of mark
Marque de fin
Final de la marca
ginning of mark, slightly pull
lever towards front of machine.
* Machine starts straight
stitching on right-hand parallel section of buttonhole.
Quand l’aiguille arrive à la
fin de la marque appuyez
franchement sur le levier
boutonnière vers l’arrière.
* La machine commence
une point zigzag sur la
droite de la boutonnière.
Cuando la aguja llegue al
inicio de la marca, empuje
suavemente hacia delante
la palanca.
* La máquina coserá
pespunte recto en el lado
derecho del ojal.
When needle reaches end
of mark, slightly press buttonhole lever towards rear
of machine.
* Machine starts zigzag
stitching on right-hand parallel section of buttonhole.
Quand l’aiguille arrive au
début de la marque tirez
franchement le levier
boutonnière vers vous.
* La machine commence
par une couture à droite de
la boutonnière.
Cuando la aguja alcance el
final de la marca, apriete
suavemente la palanca del
soporte de ojales hacia
atrás.
* La máquina coserá zig zag
en el lado derecho del ojal.
41
Page 43

Rolled hemming foot
Pied ourlet roulé
Prensatelas de dobladillo de caracolillo
Pattern to be used
Programme
Tipo de costura a utilizar
Fabric edge is hemmed while rolling it under.
Used for finishing bottom of shirts and blouses and edges of
frills and handkerchiefs.
Le bord du tissu est ainsi roulé en dessous.
Permet de finir les bas de robes chemisiers et les bord des
mouchoirs légers.
When needle reaches be-
6
Stop the machine.
Arrêt de la machine.
Paro de la máquina.
1. Take care not to allow fabric to come in contact with
buttonholing lever. If buttonholing lever is pressed by
mistake, operation mode will be changed to bartacking.
2. If sewing machine does not operate as described above,
stop machine and re-press stitch selection button. It will
start buttonholing from the beginning.
ATTENTION:
1. Faîtes attention que le tissu ne gêne pas course du
ginning of mark, slightly pull
lever towards front of machine and sewing machine
will start bartacking,perform
fastening stitching and stop.
Quand l’aiguille arrive au
début de la marque tirez
franchement le levier
boutonnière vers vous et la
machine coud la bride puis
les points d’arret et s’arrête.
Cuando la aguja alcance el
inicio de la marca, apriete
suavemente hacia delante
la palanca. La máquina
empezará a atacar y parará.
Caution
levier boutonnière. Si celui-ci est appuyé par erreur,
le cycle des points sera modifié.
2. Si la machine n’effectue pas le travail comme décrit
ci-avant, arrêtez la machine et re-sélectionnez le
programme. La fonction boutonnière automatique sera
reprise depuis le début.
1. Asegúrese de que el tejido no entre en contacto con la
palanca del soporte. Si se apretase por error dicha
palanca, la máquina empezaría a hacer atacados.
2. Si la máquina no funciona tal y como se ha descrito,
pare y apriete de nuevo el botón de selección de tipo
de costura. La máquina empezará a hacer ojales desde
el inicio.
Precaución
Se hace el dobladillo mientras se va enrollando.
Este tipo de dobladillo se utiliza a menudo en camisas y blusas.
CAUTION:
ATTENTION:
PRECAUCIÓN:
1
10cm
Fabric
Tissu
Tejido
2
Sosteniendo los cabos de hilo de la aguja y de la canilla,
gire manualmente el volante 3 ó 4 vueltas para guiar el
tejido hacia el prensatelas.
Make sure to turn off the machine before changing the presser foot.
Veillez à éteindre la machine avant de
changer le pied presseur.
Asegúrese de apagar la máquina
antes de cambiar el prensatelas.
Cut away a corner of fabric
in order to make work easier.
Insert fabric into spiral
groove in hemmer foot until
Groove
Fente
Ranura
0.5cm
0.8cm
needle position is reached.
Coupez un coin du tissu
afin de pouvoir travailler
facilement.
Insérez le tissu dans la
spirale formée par le pied
jusqu’à l’aiguille.
Para facilitar el trabajo, corte
la esquina del tejido.
Coloque el tejido en la
ranura en forma de espiral
del prensatelas hasta que
se alcance la posición de
agua.
Drawing ends of needle and
bobbin threads, turn
handwheel 3 or 4 turns by
hand to guide fabric to hemmer foot.
En maintenant les bouts des
fils d’aiguille et de canette,
tournez manuellement le
volant 3 ou 4 tours pour
guider le tissu dans le pied.
Cousez.
42
Page 44

Even feed foot
Pied double entraînement
Prensatelas para alimentar el tejido de forma uniforme
Pattern to be used
Programme
Tipo de costura a utilizar
This even feed foot is generally used for fabrics (such as knits, jersey, vinyl cloth, artificial leather and leather) that are dif ficult
to be fed by sewing machine. It ensures smooth feed of fabric while preventing fabric slippage to achieve neatly finished
seams.
Ce pied est généralement employé pour les matières (comme les tricots, jersey, vinyl, cuir artificiel et cuir) qui sont dif ficiles à
entraîner sous le pied normal. Il assure un entraînement progressif et souple qui évite les fronces ou les défauts de point.
Este prensatelas se utiliza para tejidos, como punto, jersey, vinilo, piel artificial y piel auténtica, que son difíciles de alimentar.
Este prensatelas garantiza una alimentación uniforme y un acabado óptimo de las costuras.
CAUTION:
ATTENTION:
PRECAUCIÓN:
1
Presser bar
Barre du pied
Barra del
prensatelas
Presser foot clamp screw
Vis de support
Tornillo del prensatelas
2
Presser foot
clamp screw
Vis du support
Tornillo del
prensatelas
Actuating lever
Levier en mouvement
Palanca
Make sure to turn off the machine before changing the presser foot.
Veillez à éteindre la machine avant de changer le pied presseur .
Asegúrese de apagar la máquina antes de cambiar el prensatelas.
Remove presser foot holder.
Lift presser bar, remove presser foot clamp screw and presser foot holder.
Retirez le support du pied.
Relevez la barre du pied, retirez le pied et sa vis de support pour retirer celui-ci.
Quite el soporte del prensatelas.
Suba la barra del prensatelas, quite el tornillo y saque el soporte.
Attach even feed foot to machine.
Put forked section of actuating lever around needle clamp, attach to presser bar and
securely tighten presser foot clamp screw.
Mettez le pied double entraînement sur la machine.
Mettez la partie fourchue du levier en mouvement du pied sur la vis du serre- aiguille,
mettez le pied en place et vissez fortement la vis du support.
Coloque el prensatelas para la alimentación uniforme del tejido.
Coloque la horquilla de la palanca alrededor del clamp de la aguja, coloque la barra
del prensatelas y apriete el tornillo.
43
Needle clamp screw
Vis serre-aiguille
Tornillo de la aguja
* Sewing speed should be set at low to medium.
* La vitesse de couture doit être comprise entre lent et moyen.
* La velocidad debe ajustarse de forma que esté entre la mínima y la media.
Page 45

T eflon-coated presser foot
Semelle téflon
Prensatelas de teflón
CAUTION:
ATTENTION:
PRECAUCIÓN:
Make sure to turn off the machine before changing the presser foot.
Veillez à éteindre la machine avant de
changer le pied presseur.
Asegúrese de apagar la máquina
antes de cambiar el prensatelas.
Quilting attachment
Ensemble pour quilting
Mecanismo para acolchar
Pattern to be used
Programme
Tipo de costura a utilizar
Two piles of fabric are stitched together with batting placed
between them to produce quilt with your original design.
Deux surfaces de tissu sont cousues ensemble avec un bâti
placé entre elles pour produire un quilt avec votre dessin
original.
Consiste en coser dos capas de tejido con relleno en medio.
CAUTION:
ATTENTION:
PRECAUCIÓN:
Make sure to turn off the machine before changing the presser foot.
Veillez à éteindre la machine avant de
changer le pied presseur.
Asegúrese de apagar la máquina
antes de cambiar el prensatelas.
Teflon coating provides
smooth surface.
Teflon presser foot is suitable for hard-to-feed fabrics
(jersey, vinyl cloth or
leather).
La semelle téflon permet un
entraînement régulier sur
les surfaces glissantes
(cuir, latex, vinyl ou jersey).
Elle s’utilise comme le pied
standard.
Este prensatelas tiene una
superficie más suave.
Es muy recomendable para
tejidos que son difíciles de
alimentar (jersey, vinilo o
piel).
1
Presser bar
Barre du pied
Barra del
prensatelas
Presser foot clamp screw
Vis de support
Tornillo del prensatelas
2
3
Remove presser foot
holder.
Lift presser bar, remove
presser foot clamp screw
and presser foot holder.
Retirez la vis du support.
Releves la barre du pied,
retirez le puis la vis du
support et celui-ci.
Quite el soporte del
prensatelas.
Suba la barra del prensatelas,
quite el tornillo y saque el
soporte.
Set the drop-feed knob
to “NOT FEED”.
Placer le bouton
d’entraînement par griffe
sur “NOT FEED”.
Fije la perilla de bajada
de transporte a “NOT
FEED”.
Install the quilting foot.
Installez le pied quilting.
Instale el prensatelas
para acolchar.
44
Page 46

Replacing lamp (How T o Remove Face
Cover)
Comment remplacer l’ampoule
CAMBIO DE LA BOMBILLA (CÓMO
QUIT AR LA T AP A FRONT AL)
CAUTION:
Be sure to disconnect the plug from the wall outlet before replacing light bulb.
Contact the dealer in your area for the correct light
bulb replacement.
Light bulb is hot after usage of the machine.
ATTENTION:
Avant de remplacer l’ampoule de lampe, débrancher
la fiche de la prise murale.
Contactez vorte revendeur le plus proche pour un
remplacement adapté.
L’ampoule de lampe est chaude après l’utilisation de
la machine.
PRECAUCIÓN:
Antes de cambiar la bombilla, asegúrese de
desconectar la máquina de la red eléctrica.
Contacte con su distribuidor para saber que tipo de
bombilla es la adecuada.
Tenga en cuenta, que la bombilla, tras haber estado
en funcionamiento, estará caliente.
Rear of sewing machine
Dos de la machine à
1
coudre
Parte trasera de la
máquina
2
Lamp bulb
Ampoule de lampe
Bombilla
Setscrew
Vis
Tornillo
Loosen setscrew located on
rear face of machine. Slide
cover straight in a lateral direction until it comes off.
Utilisez le tournevis, ôtez la
vis de maintien du capot et
retirezle.
Afloje el tornillo que está en
la parte posterior de la
máquina. Corra la tapa
hasta que salga.
Turn lamp bulb to remove it.
Install a new lamp bulb in
place.
Pour retirer l’ampoule de
lampe, la tourner. Poser une
ampoule de lampe neuve.
Para sacar la bombilla,
gírela. Coloque una nueva.
Maintenance (cleaning)
Nettoyage de la machine
MANTENIMIENTO (LIMPIEZA)
CAUTION:
ATTENTION:
PRECAUCIÓN:
1
2
3
4
Be sure to disconnect the plug from wall outlet before cleaning and lubricating machine.
Assurez vous débrancher la prise du
secteur avant de nettoyer la machine.
Asegúrese de desconectar la máquina
de la red eléctrica antes de limpiar o
lubricar la máquina.
Remove throat plate.
Remove first needle and
presser foot.
Then, detach throat plate.
Retirez les peluches et la
poussière.
Quite el placa agujas.
Quite primero la aguja y el
prensatelas. A continuación,
quite el placa agujas.
Remove the bobbin case
holder.
Retirez la capsule.
Quite el soporte del
canillero.
Clean to remove lint and
dust.
Clean the area between feed dog
teeth and slots in throat plate, using brush or the like.
Nettoyez la partie entre les
griffes et le crochet.
Limpie de polvo y de restos
de suciedad.
Utilizando un cepillo, limpie el
área que hay entre los dientes y
en la ranuras del placa agujas.
Re-install bobbin case
holder.
[A]: Fitting projection of bobbin
case holder with part marked with
arrow, drop holder in place.
* Power consumption of lamp bulb is 15 W.
* Purchase correct lamp bulb from JUKI distributor in your area
from which you have bought your machine.
* La puissance de l’ampoule est de 15 watts.
* Se procurer l’ampoule de lampe correcte auprès du distributeur
JUKI local chez qui la machine a été achetée.
* El consumo de la bombilla es de 15 W.
* Asegúrese de comprar la bombilla adecuada contactando con
su distribuidor.
45
Après avoir nettoyé la
machine, remettre la
capsule et la plaque
[A]
Vuelva a instalar el soporte del canillero.
[A]: Haga coincidir la punta del soporte del canillero con la parte
marcada con la flecha. Encaje el soporte en su sitio.
aiguille.
[A]: Mettre le support de boîte à
canette en place en faisant
correspondre sa saillie avec la
partie marquée par la flèche.
Page 47

Performance Checklist
If sewing difficulties occur, make sure the instructions are correctly followed.
If a problem still exists, the reminders below may help solve it.
Problem Cause (Reason) Action to be taken
Machine fails to
feed fabric.
Needle breaks.
Thread breaks.
Bobbin thread
breaks.
Skipped stitches.
Puckering occurs.
Thread tangles on
wrong side of fabric.
Loud noise, heavy
to turn the handwheel.
Sewing machine will
not sew when start
button is pressed.
Needle cannot be
threaded.
* Machine runs idle.
* Stitch length is set at left position of manual
mode.
* Drop feed is engaged.
* Needle is bent. Needle is not correctly
installed.
* Presser foot does not match pattern
selected.
* Relation among needle, thread and fabric
is not appropriate.
* Machine head is incorrectly threaded.
* Thread is caught in a part that is not to be
threaded.
* Needle thread tension is too high.
* Needle is bent.
* Needle is not installed correctly .
* Needle is bent.
* Machine head is not correctly threaded.
* Thread tension is too high.
* Needle and thread do not match fabric.
* Machine head is not correctly threaded. * Re-thread machine head correctly.
* Lint or dust has accumulated in hook. * Clean up hook.
* Bobbin winder is set in bobbin winding
position.
* Controller is connected to machine.
* Needle is not raised to its highest
position.
* Needle is not installed by fully inserting
into needle clamp.
* Sewing machine is rotated by mistake with
needle threading lever lowered (during
needle threading).
* Return bobbin winder to the left.
* Set stitch length at auto mode or right position
of manual mode.
* Disengage drop feed.
* Change needle with a new one and install it
correctly.
* Use presser foot that matches the pattern
selected.
* Use needle and thread that match fabric.
* Re-thread machine head correctly.
* Check spool pin and thread guide for thread
tangling.
* Adjust thread tension adequately.
* Replace needle with a new one.
* Correctly attach needle.
* Replace needle with a new one.
* Re-thread machine head correctly.
* Adjust thread tension adequately.
* Use needle and thread that correctly match
fabric.
* Return bobbin winder to the left.
* Start machine with controller or remove
connector from machine.
* Turn handwheel to raise needle to its highest
position.
* Correctly install needle.
* Turn handwheel slightly away from you (in
direction opposite to normal direction of
rotation in which handwheel turns to perform
sewing).
Page
1 1,12
19,20
10
15
16
18
13,14
-
17
15
15
15
13,14
17
18
13,14
45
1 1,12
9,10
11,12
15
-
Specification table
Item Specification
Dimensions 410 (W) x 300 (H) x 180 (D) mm
Dimensions when attached
with case
Weight
Rated voltage/ Power con-
sumption
Power consumption of lamp
440 (W) x 305 (H) x 215 (D) mm
7.3kg (when attached with case: 8.4kg)
120V / 1.0A 60Hz (USA and Canada only)
220-230V / 100W 50 / 60Hz
120V / 15W (USA and Canada only)
240V / 15W
46
Page 48

Problèmes éventuels et remèdes simples
Si vous recontrez des difficultés,vérifiez d’abord que vous avez bien suivi les instructions.
L’expérience démontre que la plupart des problèmes sont dus à des détails d’utilisation.
Sinon, essayez de résoudre vorte problème à l’aide du tableau ci-dessous.
En cas de persistance, ramenez la machine auprès de votre vendeur spécialisé.
Probléme Cause A faire
La machine
n’entraîne pas le
tissu.
Casse d’aiguilles.
Cassa de fils.
Le fil de canette
casse.
Points manqués.
Fronçes
Boucles audessous du tissu.
Machine dure et
bruyante.
La machine ne coud
pas quand on
actionne la touche
Start.
* La machine tourne dans le vide.
* La longueur du point est réglée en position
gauche du mode manuel.
* Abaisse-griffes engagé.
* L’aiguille est tordue. Elle n’est pas
correctement mise.
* Le pied presseur n’est pas adapté au
programme sélectionné.
* La relation aiguille/fil/tissu est inappropriée.
* La machine est mal enfilée.
* Le fil est entré dans un endroit non prévu.
* La tension supérieure est trop forte.
* L’aiguille est épointée.
* L’aiguille est mal mise.
* L’aiguille est épointée.
* La machine est mal enfilée.
* La tension du fil est trop forte.
* L’aiguille ou le fil ne correspond pas au
tissu.
* La machine est mal enfilée. * Refaire l’enfilage.
* Poussière et débris accumulés dans le
crochet.
* Le dévidoir de canette est en position
remplissage.
* Le rhéostat est branché.
* Remettre le dévidoir de canette à gauche.
* Sélectionnez la longueur du point en mode
auto ou en position droite du mode manuel.
* Déengager l’abaisse-griffes.
* Changer l’aiguille avec une nouvelle et
l’installer correctement.
* Mettre un pied presseur adapté.
* Utiliser une aiguille et un fil appropriés.
* Renfiler la machine correctement.
* Vérifier depuis le porte-bobine et les guide fils.
* Régler correctement la tension.
* Remplacer l’aiguille.
* Remettre correctement l’aiguille.
* Remplacer l’aiguille.
* Refaire l’enfilage.
* Réduire la tension.
* Utiliser une aiguille ou un fil adéquat.
* Nettoyer le crochet.
* Remettre le dévidoir à gauche.
* Démarrer la machine avec le rhéostat ou le
débrancher.
Page
1 1,12
19,20
10
15
16
18
13,14
-
17
15
15
15
13,14
17
18
13,14
45
1 1,12
9,10
L’aiguille ne peut
être enfilée.
* L’aiguille n’est pas relevée à fond.
* L’aiguille est pas bien insérée dans le
serre-aiguille.
* La machine est actionnée par erreur avec
l’enfileur abaissé.
T ableau de caractéristiques
Sujet Caractéristique
Dimensions 410 (L) x 300 (H) x 180 (P)
Dimensions avec la mallette
Poids
Courant absorbé/
consommation
Courant absorbé ampoule
440 (L) x 305 (H) x 215 (P)
7.3 kg (avec mallette : 8.4 kg)
120V / 1.0A 60Hz (USA et Canada)
220-230V / 100W 50 / 60Hz
120V / 15W (USA et Canada)
240V / 15W
47
* Tourner manuellement le volant pour la
remonter.
* Installer correctement l’aiguille.
* Tourner le volant à l’envers (vers l’arrière).
1 1,12
15
-
Page 49

T ABLA DE PROBLEMAS
Si tiene problemas con el funcionamiento de la máquina compruebe que ha seguido las instrucciones detalladas
en este manual. Si tiene algún problema, consulte esta tabla para intentar solucionarlo.
PROBLEMA CAUSA (RAZÓN) SOLUCIÓN
La máquina no
alimenta bien el
tejido.
Se rompen las
agujas.
El hilo se rompe.
El hilo de la canilla
se rompe.
Se producen saltos
de puntadas.
El tejido se ondula.
El hilo se enreda en
el revés del tejido.
La máquina hace un
ruido raro y cuesta
girar el volante.
* La máquina no funciona bien
* La longitud de la puntada está establecida
en la posición izquierda del modo manual.
* Los dientes están abajo.
* La aguja está doblada o no está bien
instalada.
* El prensatelas no es el adecuado para el
tipo de costura seleccionada.
* La relación entre la aguja, el hilo y el tejido
no es correcta.
* La máquina está mal enhebrada.
* El hilo se ha enganchado.
* La tensión del hilo es demasiado alta.
* La aguja está doblada.
* La aguja no está bien instalada.
* La aguja está torcida.
* La máquina no está bien enhebrada.
* La tensión del hilo es muy alta.
* El hilo y la aguja no son los adecuados
para el tejido.
* La máquina no está bien enhebrada. * Vuelva a enhebrar la máquina.
* Se ha acumulado suciedad en el garfio. * Limpie el garfio.
* Gira el bobinador a la izquierda.
* Establezca la longitud en el modo automático
o en la posición derecha del modo manual.
* Subir los dientes.
* Cambie la aguja por una nueva y/o instálela
correctamente.
* Utilice el prensatelas adecuado al tipo de
costura.
* Utilice la aguja y el hilo correcto para el tejido.
* Vuelva a enhebrar la máquina.
* Compruebe el pivote del portaconos y el guía
hilos.
* Ajuste la tensión del hilo.
* Cambie la aguja.
* Instale bien la aguja.
* Cambie la aguja.
* Vuelva a enhebrar la máquina.
* Ajuste la tensión del hilo.
* Utilice la aguja y el hilo adecuados al tejido.
PAG.
1 1,12
19,20
10
15
16
19
13,14
-
17
15
15
15
13,14
17
19
13,14
45
Al apretar el botón
de inicio, la
máquina no cose.
La aguja no se
puede enhebrar.
* El bobinador está colocado en la posición
para bobinar.
* El pedal está conectado a la máquina.
* La aguja no está en su posición más alta.
* La aguja no está encajada del todo.
* La máquina se ha puesto en marcha por
error con la palanca de enhebrar bajada
(durante el enhebrado de la aguja.)
Características Técnicas
Dimensiones
Dimensiones con caja
Peso
Voltaje y consumo eléctrico
Consumo eléctrico de la
bombilla
410 x 300 x 180 mm
440 x 305 x 215 mm
7,3 kg (con maleta 8,4 Kg)
120V / 1,0A 60Hz (Estados Unidos de América y Canadá)
220-230V / 100W 50 / 60Hz
120V / 15W (Estados Unidos de América y Canadá)
240V / 15W
* Empuje el bobinador a la izquierda.
* Cosa con el pedal o desconéctelo de la
máquina.
* Gire el volante para que la aguja alcance su
punto más alto.
* Instale bien la aguja.
* Gire suavemente el volante en la dirección
contraria a usted (en la dirección contraria a
la dirección de giro del funcionamiento normal
de la máquina).
Características
1 1,12
9,10
11,12
15
-
48
Page 50

®
JUKI CORPORA TION
8-2-1, KOKURYO-CHO,
CHOFU-SHI, TOKYO 182-8655, JAP AN
PHONE : 03(3480)5034
FAX : 03(3480)5037
Copyright © 2002 JUKI CORPORATION.
All rights reserved throughout the world.
000902•iT•jAJE800S0B0A
 Loading...