

Page 1

Young Rider
Child Safety Car Seat
(Group II+III / 15~36 kg)
EN DE IT FR ES RO BG HU PL
User Manual
Page 2
EN
Page 2
DE
IT
FR
1
2
3
ES
RO
BG
HU
4
PL
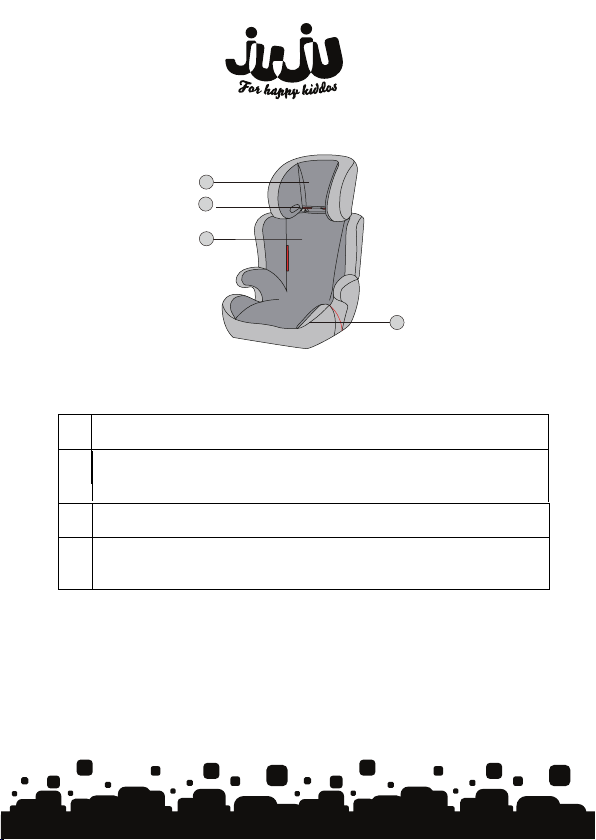
Headrest, Kopfstütze, Poggiatesta, Têtière, Reposacabezas, Tetiera,
1
подглавник, Fejtámasz, Zagłówek,
2
Diagonal Belt Guide, Schräger Gurt, Cintura diagonale, Ceinture diagonale,
Cinturón diagonal, Centura diagonala, Диагонален колан, Átló biztonsági öv,
Prowadnica części ukośnej pasa bezpieczeństwa
Backrest, Rückenlehne, Schienale, Dossier, Respaldo, Spatar, облегалка,
3
Háttámasz, Oparcie
Seat cushion, Sitzkissen, Copertina seggiolino, Housse du siège, Husa silla,
4
Husa scaun, тапицерия на столчето, üléshúzat, Siedzisko
Page 3
1
Page 3
4
2
3
5
6
Page 4
EN
Page 4
INSTRUCTIONS FOR USE
This is a “Universal” child restraint. It is approved to Regulation No.44/04 for general
use in vehicles and it will fit most, but not all, car seats.
A correct fit is likely if the vehicle manufacturer has declared in the vehicle handbook
that the vehicle is capable of accepting a “Universal” child restraint for this group.
This child restraint has been declared “Universal” under more stringent conditions
than those which applied to earlier designs which do not carry this notice.
If in doubt, consult either the child restraint manufacturer or the retailer.
Only suitable if the approved vehicles are fitted with 3-point static, 3 point
retractor safety-belts, approved to UN/ECE Regulation No. 16 or other equivalent
Please read through these instructions carefully
the first time. You risk endangering your child’s life if you use the product incorrectly.
standards.
before using the child car seat for
1.Applicability
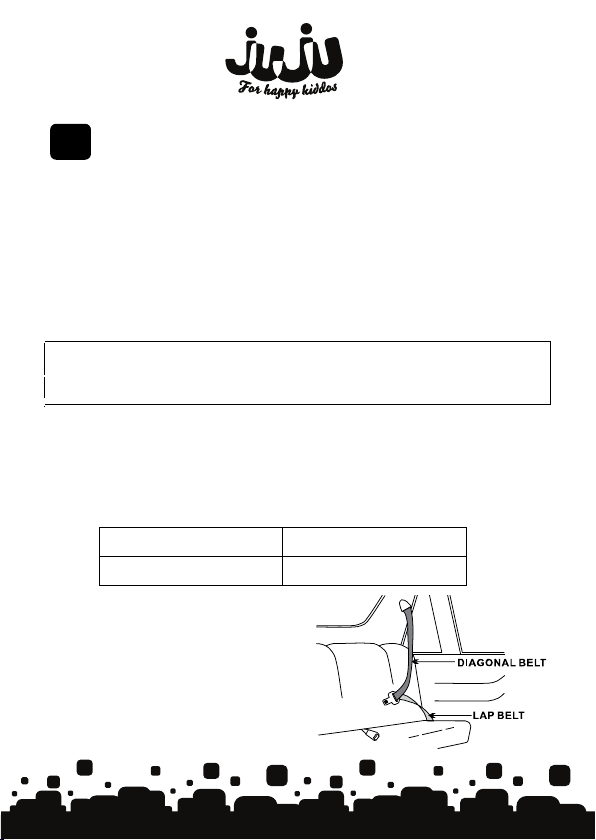
The child car seat is suitable for weight categories II to III, which means children
with a body weight between 15kg and 36kg (approx. 3 years to children of 11 years).
Mass Group II
Mass Group III
15kg-25kg
22kg-36kg
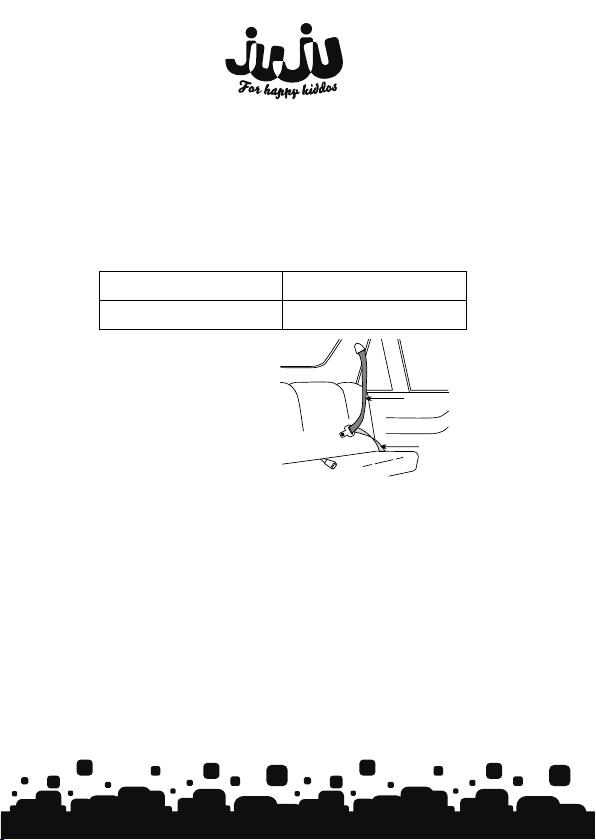
Only suitable if the vehicle
fitted with 3—point static, 3point retractor safety belts,
approved to UN/ECE Regulation
No.16 or other equivalent
standards.
is
Page 5

2. Safety instructions
Page 5
Please invest a few minutes in your child’s safety to read these instructions,
Many injuries, which are easily avoidable, are caused by carelessness and
incorrect use.
The
instructions
1.
built—in restraints.
This child seat can only be installed forward facing using a three-point vehicle
2.
belt.
Do not use this child seat at home. It is not designed for home use and should
3.
only be used in your car.
4. Before each journey check
5. Do not change the child car seat in any way.
6. Do not leave your child unattended in the seat at any time.
In the event of an emergency it is important that the child can be released
7.
quickly. This means
must be taught never to play with the buckle.
Protect the child restrain
8.
temperature will hurt your child.
Ensure that all parts are locked in place correctly and no
9.
adjustable seats or doors.
Luggage or other
10.
be properly secured.
The child car seat
11.
The sea
12.
recommended by the manufacturer.
Periodically
13.
points, stitching and adjusting devices.
Do not continue to use the
14.
have loosened after an accident.
The back rest of the
15.
vehicle seat. If necessary, adjust the head rest ofthe vehicle seat.
can
retained on the child seat for its life period in the case of
be
whether the child car seat is installed firmly.
that the buckle is not fully tamper proof and so your child
t system against direct sun light otherwise the high
t penned in the
objects liable to cause injuries in the event of a collision shall
must not be used without the cover.
t cover should not be replaced with any other than the one
inspect the harness, pay particular attention to attachment
child car seat if parts have become damaged or
child car seat system has to rest flat against the back ofthe
Page 6

When you drive without a child in the child restraint system,
Page 6
16.
always secure
Not to use any load bearing contact points other than those described
17.
instructions and marked in the child car seat.
We recommend using the baby car seat on the back seat of
18.
the system with the adult belt.
in the
cars.
3. Parts and interior equipment – Page 2
4. Height adjustment of headrest
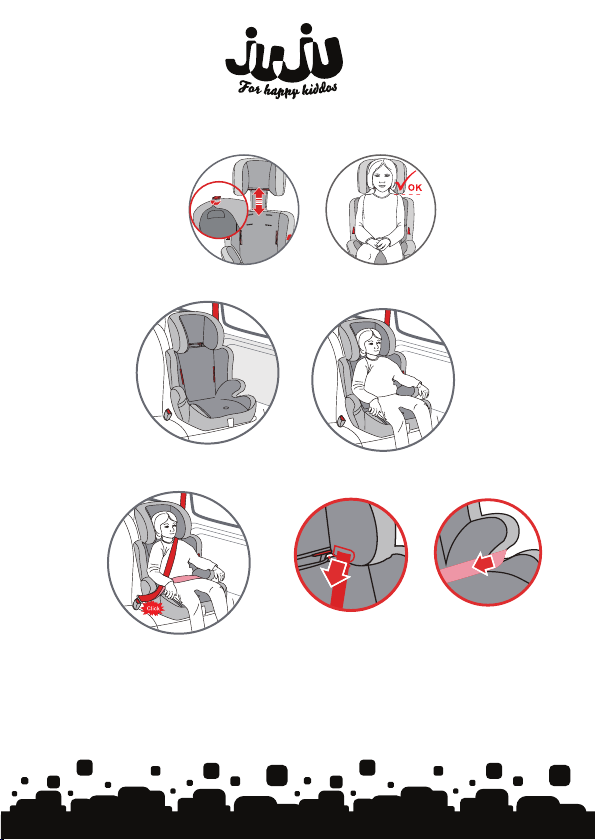
Regularly check whether the headrest is optimally to your child.
The height ofthe headrest is set optimally to the size of your child, when their head
rests comfortably in the middle ofthe head rest.
•
ln order to set the height, turn the seat to the back. Press down the height adjuster
ofthe head rest. Now the head rest can be pushed upwards or downwards(fig.1).
Loosen the height adjuster. the head rest is locked correctly. After
•
adjust, check that the head res
Securing the child car seat with vehicle's belt
5.
The vehicle’s 3—point belt system may
age groups II and lll(15kg-36kg).
Step 1: Place the child safety seat on the vehicle’s seat ensuring it is firmly pressed
against the car seat backrest(Fig. 2).
Step 2: Place your child in the child car seat (Fig. 3).
Step 3: Pull out the 3-point vehicle belt and place the lap belt on the opposite side of
the buckle under the arm rest.(make sure that the diagonal belts and the lap belt on
the buckle side are under the armrest) The lap strap should be worn low down, so that
the pelvis is firmly engaged and the straps should not be twisted.
And allow it to the buckle in place. You will hear "click”(Fig. 4).
Step 4: Place the diagonal belt goes through the Head belt guide on the side ofthe
headrest. Make sure that the belt is not twisted.
Tightenthe adult belts in the direction as picture shows(Fig. 4) and the diagonal
shoulder belt in the direction of the automatic roll-up as possible(Fig.5.).
t is locked correctly.
only be used to buckle up children of the
Page 7
The satisfactory position of the adult safety-belt relative to the child car seat is as
Page 7
the Fig 6. You can contact the child car seat manufacturer if in doubt about this
point.
6. Care instructions
6.1. Removing / replacing the cover
Press the backrest so far back so that it rests flat on the floor.
Now you can remove the backrest.
Now the seat cushion cover can be pulled forward and removed.
To replace the cover proceed in the reverse order to removing the cover.
6.2. Cleaning the cover
Use only neutral dete rgent and warm water to wash.
Do not wash by machine, Spin-dry or tumbledry are not recommended.
7. Procedure after an accident
The child car seat must be replaced when
an accident.
DE
it has been subject to violent stresses in
BENUTZUNGSANWEISUNGEN
Das ist ein universaler Autositz, genehmigt gemäß den Regelungen der ECE R44.04
für allgemeine Anwendung in Autos. Eine richtige Anpassun g ist möglich, wenn der
Hersteller des Fahrzeuges in das technische Buch des Autos erklärt hat, dass das
Auto mit einem universalen Sitz für diese Altersgruppe ausgestattet werden kann.
Dieser Autositz wurde an universal eingestuft, unter mehreren strengen
Bedingungen aus die anderen aus seiner Klasse, die von dieser Bemerkung nicht
begleitet werden. Wenn Sie Fragen haben, bitte wenden Sie sich an dem Hersteller
oder Verkäufer des Sitzes.
Page 8
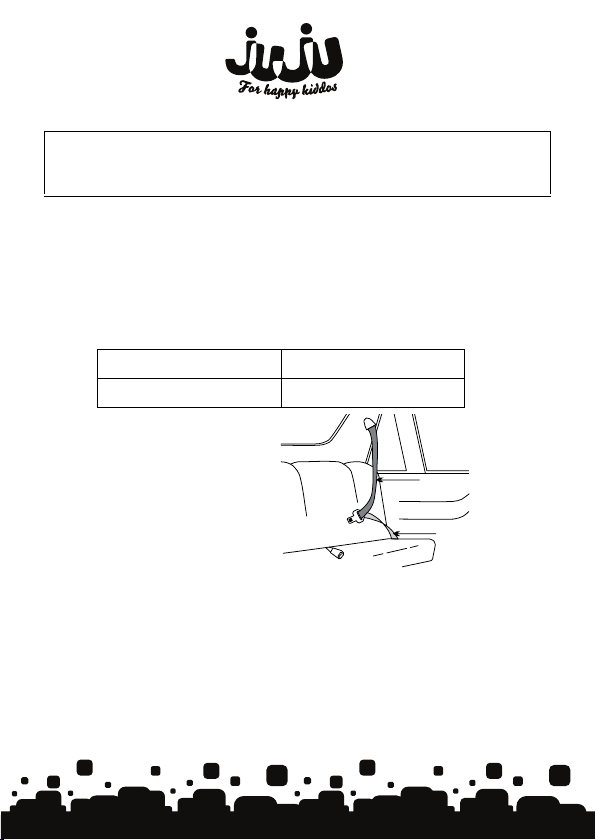
Die Sitzerhöhung ist nur geeignet, wenn das Fahrzeug mit einem festen Gurt in 3
Page 8
Befestigungspunkte oder einem einziehbaren Gurt in 3 Punkte ausgestattet ist,
genehmigt von UN/ECE Gesetz nr. 16 oder andere gleichwertige Standards
Bitte lesen Sie diese Anweisungen aufmerksam durch, bevor Sie den Autositz für das
erste Mal benutzen. Sie
Produkt falsch benutzen.
können das Leben Ihres Kindes gefährden, wenn Sie dieses
1. Anwendbarkeit
Der Autositz ist für die Gewichtsklassem II bis III (Gruppen II-III) geeignet, was
bedeutet, dass die Kinder mit einem Gewicht zwischen 15 und 36 kg (ungef.
Zwischen 3 und 11 Jahre).
Gewichtsgruppe II 15kg-25kg
Gewichtsgruppe III 22kg-36kg
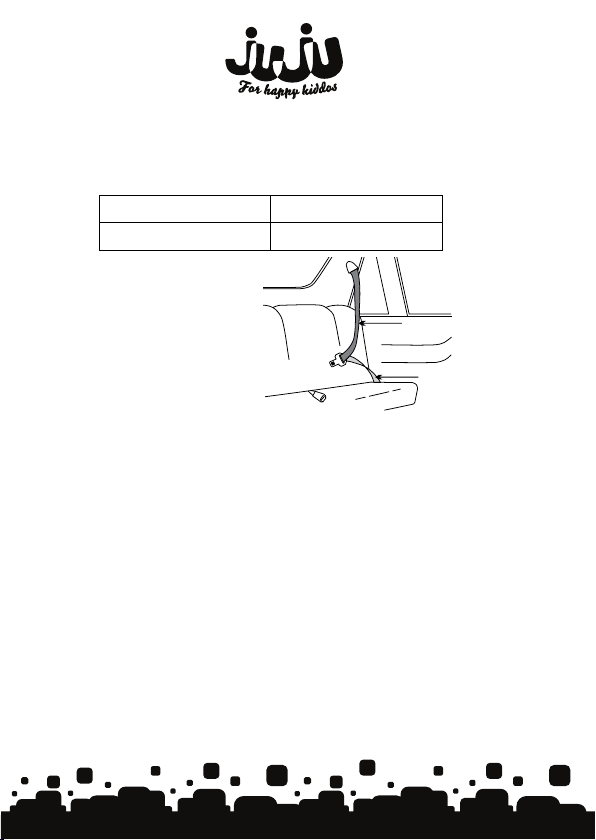
Ist nur geeignet, wenn das
Fahrzeug mit einem festen Gurt in
3 Befestigungspunkte oder einem
einziehbaren Gurt in
ausgestattet ist, genehmigt von
UN/ECE Gesetz nr. 16 oder andere
gleichwertige Standards
3 Punkte
diagonal gürtel
median gürtel
2. Anweisungen für Sicherheit
Bitte nehmen Sie sich einige Minuten Zeit für die Sicherheit Ihres Kindes und
lesen Sie diese Anweisungen durch. Viele Unfälle, die leicht vorgebeugt
werden können, werden von der falschen Benutzung des Kindersitzes
verursacht.
Die Anweisungen müssen während der ganzen Daue
1.
Kindersitzes aufbewahrt werden.
r der Benutzung des
Page 9

Dieser Kindersitz
Page 9
2.
Sicherheitsgurtes mit Befestigung und drei Punkte.
Benutzen Sie diesen Sitz nicht zuhause, weil er für die Benutzung im Auto
3.
vorgesehen ist.
Vor jeder Fahrt prüfen Sie, ob der Sitz richtig eingebaut ist.
4.
Verändern Sie den Sitz
5.
6.
Niemals das Kind unbeaufsichtigt in den Sitz lassen.
Im Notfall ist es wichtig, das Kind rasch zu entfernen. Das bedeutet, dass der Gurt
7.
nicht verriegelt sondern nur geschlossen ist und das Kind muss verstehen, nicht
damit zu spielen.
Schützen Sie den Sitz vor direktem Sonnenlicht, andernfalls können hoche
8.
Temperaturen das Kind verle
Stellen Sie sicher, dass alle Teile richtig geschlossen und nicht nur befestigt
9.
sind.
Gepäck oder andere Gegenstände, die das Kind verletzen könnten, müssen
10.
strengstens befestigt sein.
11.
Der Kindersitz muss ohne Überzug benutzt werden.
Der Überzug soll nur mit anderen Überzüge ersetzt werden, die vom
12.
Hersteller empfohlen
Prüfen Sie das Geschirr regelmäßig, vor allem seien Sie besonders aufmerksam
13.
auf die Verbindungspunkte und Nähte und die Regelvorrichtungen.
Benutzen Sie
14.
lose sind.
Die Kopfstütze des Sitzes muss gerade au
15.
liegen. Wenn notwendig, regeln Sie die Kopflehne des Autositzes.
Falls Sie ohne Kind fahren, wird der Sitz nur mit dem Sicherheitsgurt befestigt.
16.
nutzen Sie
Be
17.
Anweisungen beschrieben und auf dem
18.
Wir empfehlen die Be
wird nur in die Fahrtrichtung eingebaut, anhand des
in keiner Weise.
tzen.
sind.
diesen Sitz nicht mehr, wenn Teile nach einem Unfall beschädigt oder
Rücklehne des Fahrzeugsitzes
f die
kein anderes zusätzliches Gewicht, als das, das in den
nutzung des Sitzes
Sitz markiert ist.
auf den Rücksitz des Fahrzeuges.
3.
Innere Teile und Ausstattungen - Sei
te 2
Page 10

4. Anpassung der Höhe der Kopfstütze
Page 10
Prüfen Sie regelmäßig, ob die Kopfstütze für Ihr Kind passt.
Die Höhe der Kopfstütze liegt richtig, wenn der Kopf des Kindes komfortable in der
Mitte der Stütze lie gt.
Um die Höhe einzustellen, drehen Sie den Sitz mit dem Rücken um. Drücken
•
Sie die Regeltaste für die Höhe der Kopfstütze. Jetzt können Sie die Kopfstütze
ziehen oder drücken (siehe Bild 1).
•
Lassen Sie die Taste los und die Kopfstütze ist richtig verriegelt.
Nach der Anpassung, prüfen Sie, ob die Kopfstütze richtigt verriegelt ist.
5. Befestigung des Kindersitzes mit dem Sicherheitsgurt
es Fahrzeuges
d
Der Sicherheitsgurt mit Befestigung in drei Punkte wird nur für die Sicherung der
Kinder aus den Gruppen II und III (15 kg - 36 kg) benutzt.
Schritt 1. Legen Sie den Kindersitz auf den Rücksitz des fahrzeuges und stellen Sie
sicher, dass er auf die Rücklehne des Fahrzeugsitzes richtig liegt (Bild 2).
Schritt 2: Setzen
Schritt 3: Ziehen Sie den Gurt des Fahrzeuges mit drei Befestigungspunkte und
legen Sie
Befestigungsschnalle unter der Armlehne. (Stellen Sie sicher, dass die queren Gurte
und der mittlere Gurt auf die Seite der Befestigungsschnalle unter der Armlehne
liegen). Jeder mittlere Gurt wird so unten wie möglich eingebaut und wird in dem
Bereich des Beckens sehr fest angezogen, und der Gurt muss nicht verdreht sein
und danach befestigen Sie sie in die Schnalle, bis Sie einen Klick hören (Bild 4).
Schritt 4: Führen Sie den queren Gurt durch den Schlitz für den Gurt bei der
Kopfstütze. Stellen Sie sicher,
mittleren Gurt in
Schultergurt in die Faltrichtung, gemäß Bild 5.
Die befriedigende Lage der des Fahrzeuggurtes im Verhältnis zu dem Kindersitz ist
die aus Bild 6 Sie können sich an den Hersteller des Kindersitzes wenden, wenn Sie
Fragen über diesen Punkt haben.
Sie das Kind in den Kindersitz (
den mittleren Gurt in die entgegengesetzte Richtung der
dass der Gurt nicht verdreht ist, ziehen Sie den
die in Bild 4 angegebene Richtung fest und den
Bild 3).
Page 11
6. Anweisungen für die Pflege
Page 11
6.1. Beseitigung/Ersatz des Überzuges
Drücken Sie die
vollständig erreicht wird.
Jetzt können Sie die Rücklehne entfernen
Jetzt kann der Überzug
Für den Ersatz des Überzuges, verfahren Sie in die umgekehrte Reihenfolge
der Beseitigung des Überzuges.
6.2. Reinigung des Überzuges
Benutzen
Sie nur neutrale Reinigungsmittel und Warmwasser.
Waschen Sie den Überzug nicht in die Waschmaschine und trocknen Sie ihn nicht in
die Schleudertrocknermaschine.
Rücklehne so biel wie möglich, sodass die horizontale Lage
des Sitzes gezogen und entfernt werden.
7. Verfahren im Falle von Unfällen
Der Kindersitz muss nach einem heftigen Unfall ersetzt werden.
I T
I
STRUZIONI D’USO
Questo prodotto è un seggiolino auto universale, approvato in base alla legge ECE
R44/04 per l’uso generale nei veicoli. La corretta corrispondenza è possibile se il
fabbricante ha stipulato nel libro dell’auto che il veicolo è in grado di accettare un
seggiolino auto universale per questo gruppo d i età. Questo seggiolino auto è stato
classificato come universale, secondo delle condizioni più rigorose di quelle
applicate ai prodotti della sua classe che non sono accompagnati da questo avviso.
In caso di dubbio, consultare il produttore del seggiolino auto o il venditore.
E 'adatto solo se il veicolo è dotato di cintura di sicurezza fissa a 3 punti o retrattile
sempre a 3 punti, approvata dall’UN/ECE la legge numero 16 o altri standard
equivalenti.
Page 12
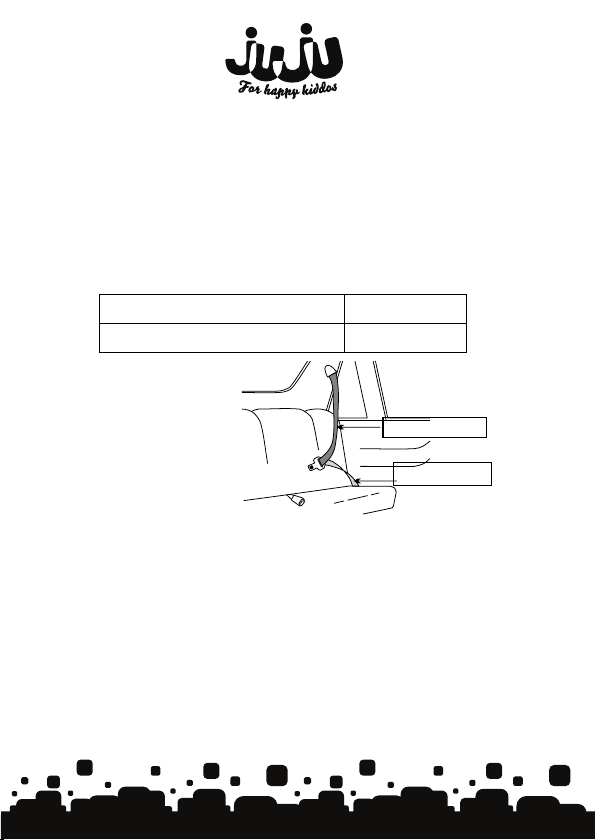
Si prega di leggere queste attentamente istruzioni prima di utilizzare il seggiolino
Page 12
auto. Se questo prodotto non è utilizzato correttamente, rischiate di mettere in
pericolo la vita del vostro bambino.
1. Applicabilità
Il seggiolino auto è adatto per le categorie di peso da II a III (gruppi II-III),
rappresentate da bambini di peso compreso tra 15 kg e 36 kg (da circa 3 anni a 11
anni).
Peso gruppo II 15kg-25kg
Peso gruppo III 22kg-36kg
Adatto solo se l’auto è
dotato di
sicurezza fissa a 3 punti o
retrattile sempre a 3
punti, approvata dall’UN/
ECE la legge numero 16
o altri standard
equivalenti.
cintura di
Cintura diagonale
Cintura mediana
2. Istruzioni di sicurezza
Si prega di prendere qualche minuto per la sicurezza del vostro bambino e di
leggere queste istruzioni. Molti incidenti facilmente evitabili sono causati
dall’uso incorretto del seggi olino.
Le istruzioni
1.
seggiolino auto.
Questo seggiolino sarà installato solo rivolto in avanti, usando la cintura di
2.
sicurezza a tre punti dell’auto.
Non usare questo seggiolino auto a casa, è fabbricato appositamente per
3.
essere
devono essere custodite durante tutto il periodo di uso del
utilizzato in auto.
Page 13

4.
Page 13
Verificare prima di ogni viaggio che il seggiolino auto sia installato
5. Non modificare il seggiolino auto in nessun modo.
6. Non lasciare il bambino nel seggiolino auto
7.
In caso di emergenza, è importante rilasciare immediatamente il bambino. Ciò
significa che
essere insegnato a non giocare con essa.
Proteggere il seggiolino auto dalla luce
8.
temperatura elevata può danneggiare il bambino.
9. Assicurarsi che tutte le parti sono chiuse correttamente e
I bagagli o altri oggetti che possono causare lesioni devono essere assicurati
10.
rigorosamente.
11. Il seggiolino auto non deve
La copertura non deve essere sostituita con un'altra che non sia raccomandata dal
12.
produttore.
Verificare periodicamente la cintura a bretelle e prestare particolare attenzione ai
13.
punti di attacco, di solito alle cuciture ed ai dispositivi di regolazione.
Non usare più il seggiolino au
14.
allentate dopo un incidente stradale.
Il poggiatesta del seggiolino auto
15.
posteriore dell’auto. Se
Se si viaggia senza il bambino, il seggiolino auto sarà assicurato solo con la
16.
cintura di sicurezza dell’auto.
Non usare peso supplementare, altro da quello indicato nelle istruzioni e
17.
segnato sul seggiolino auto.
Si raccomanda di utilizzare il seggiolino auto sulla panchin
18.
dell’auto.
3.
Parti
la cintura non sia bloccata ma solo chiusa e il bambino dovrebbe
essere utilizzato senza la copertura.
alcune
to se
necessario, regolare il poggiatesta dell’auto.
deve rimanere stretto sulla panchina
e attrezzature interne - Pagina 2
supervisione.
senza
solare diretta, altrimenti la
parti sono state danneggiate o
bene.
non solo attaccate.
a posteriore
4. Regolazione dell’altezza del poggiatesta
Controllare regolarmente che il poggiatesta sia adeguato al vostro bambino.
Page 14

L’altezza del poggiatesta è
Page 14
confortevole nel mezzo del poggiatesta.
Per regolare l’altezza, girare il seggiolino nel senso opposto. Premere il
•
pulsante di regolazione dell’altezza. Adesso potete tirare o spingere il
poggiatesta (vedere la foto 1).
•
Rilasciare il pulsante e il poggiatesta sarà bloccato correttamente.
Dopo la regolazione, controllare che il poggiatesta sia bloccato
correttamente.
al livello ottimale quando la testa del bambino si trova
5. Assicurare il seggiolino auto con la cintura dell’auto
La cintura a tre punti dell’auto si usa solo per assicurare i bambini dai gruppi di
II e III (15 kg-36kg).
Passo 1. Mettere il seggiolino sulla panchina posteriore dell’auto e
sia posizionato bene (figura 2).
Passo 2: Mettere il bambino nel seggiolino auto (figura 3).
Passo 3: Tirare la cintura a tre punti dell’auto e mettere la cintura mediana nella
parte opposta della fibbia di attacco, sotto il bracciolo. (assicurarsi che la cintura
diagonale e la cintura mediana dal lato della fibbia di attacco siano
sotto il bracciolo). Qualsiasi cintura mediana si fissa al più basso possibile e si stringe
fortemente nella zona del bacino, controllando che la cintura non sia attorcigliata,
quindi si fissa nella fibbia fino a quando si sente un click (figura 4).
Passo 4: Passare la cintura diagonale attraverso la fessura del poggiatesta.
Assicurarsi che la cintura non sia attorcigliata, stringere la cintura mediana nella
direzione indicata nella figura 4 e la cintura di spalla nella direzione di piegatura,
come indicato nella figura 5.
La posizione soddisfacente della cintura di sicurezza rispetto al seggiolino auto è
conforme alla figura 6. Se avete delle domande riguardo questo punto, rivolgersi al
produttore del seggiolino auto.
6. Istruzioni di manutenzione
6.1. Rimozione/sostituzione della copertura
Spingere lo schienale cosi tanto da arrivare in posizione orizzontale totale
assicurarsi che
età
Page 15
Adesso potete rimuovere lo schienale
Page 15
Adesso la copertura del seggiolino può essere ritirata e rimossa.
Per sostituire la copertura, invertire la procedura di rimozione della copertura.
6.2. Pulizia della copertura
Utilizzare solo detergenti neutri e acqua calda.
Non lavare la copertura nella lavatrice. Asciugarla mediante centrifugazione non è
raccomandato.
7. P
rocedure da seguire dopo un incidente stradale
Il seggiolino auto deve essere sostituito dopo essere stato coinvolto in un incidente
stradale violento.
FR
MODE D’EMPLOI
Ceci est un siège d’auto universel, approuvé selon la réglementation ECE R44/04
pour l’utilisation générale dans les véhicules. Une adéquation correcte est possible
si le constructeur de l’automobile a déclaré dans le manuel du véhicule qu’il peut
accepter un siège d’auto universel pour ce groupe d’âge. Ce siège d’auto a été classé
comme universel, sous des conditions plus strictes que d’autres dans sa catégorie,
qui ne sont pas accompagnés de cette note. En cas de doute, consultez le
producteur du siège d’auto ou le vendeur.
Il n’est utilisable que si le véhicule est équipé d’une ceinture fixe à 3 points ou
rétractable en 3 points, approuvée selon le Règlement CEE/ONU no. 16 ou d’autres
Veuillez lire attentivement ce mode d’emploi avant la première utilisation du siège
d'auto. Vous risquez la vie de votre enfant si vous n’utilisez pas correctement ce
produit.
normes équivalentes.
Page 16
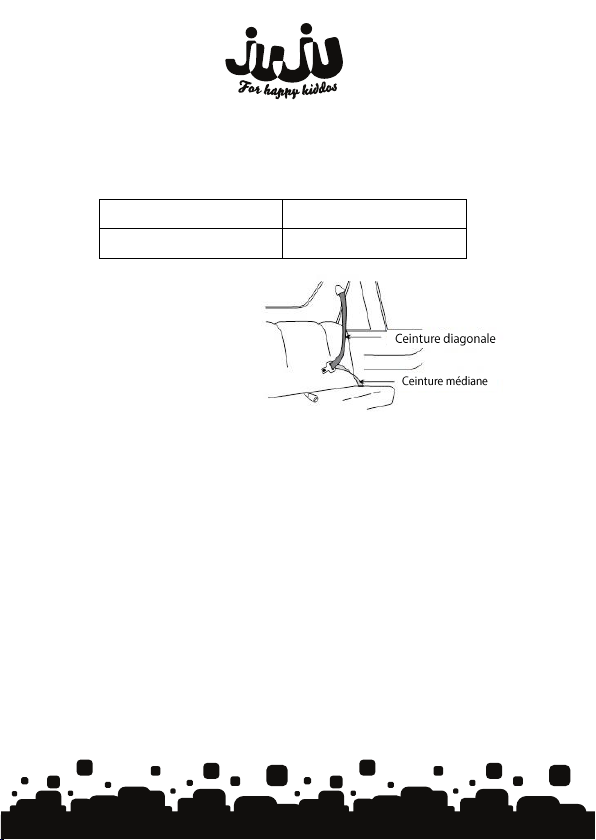
1. Applicabilité
Page 16
Le siège d’auto est adapté aux classes de poids de II à III (Groupes II-III), c’est-àdire aux enfants pesant entre 15 kg et 36 kg (environ de 3 ans à 11 ans).
Poids groupe II 15 Kg à 25 kg
Poids groupe III 22 Kg à 36 kg
Il n’est utilisable que si le
véhicule est équipé d’une
ceinture à 3 points et
rétractable en
approuvée selon le
Règlement CEE/ONU no.
16 ou d’autres normes
équivalentes.
3 points,
2. Consignes de sécurité
Veuillez prendre quelques minutes pour la sécurité de votre enfant et lire ces
consignes. De nombreux accidents pouvant être évités facilement sont causés
par une mauvaise utilisation du siège d’auto.
Les
consignes doivent être gardées tout au long de l’utilisation du siège
1.
d’auto.
Ce siège d’
2.
la voiture à trois points.
N’utilisez pas ce siège d’auto à la maison, c’est un produit spécifiquement
3.
conçu pour l’utilisation dans la voiture.
Vérifiez avant chaque voyage que le siège d
4.
5. Ne changez le siège d’auto d’aucune façon.
6. Ne laissez jamais votre enfant sans surveillance dans le siège d’auto.
En cas d’u
7.
que la ceinture n’est pas verrouillée mais seulement fermée, et l’enfant doit être
appris à ne pas jouer avec elle.
auto ne sera installé que tourné vers l’avant en utilisant la ceinture de
’auto est correctement installé.
rgence il est important de libérer immédiatement l'enfant. Cela signifie
Page 17

Protégez le siège d’auto
Page 17
8.
température peut blesser l’enfant.
Assurez-vous que toutes les parties sont fermées correctement et non
9.
seulement fixées.
Les bagages ou d’autres objets qui peuvent causer des blessures doivent être
10.
strictement sécurisés.
11. Le siège d’auto ne doit pas être utilisé sans sa housse.
La housse ne doit être remplacée que
12.
fabricant.
Vérifiez périodiquement le harnais et faites principalement attention aux points
13.
de connexion, habituellement aux coutures et aux dispositifs de réglage.
Ne continuez pas d’utiliser le siège d’auto si des pièces sont endommagées
14.
desserrées après un accident.
L’appui-tête du siège d’auto doit rester droit sur l’arrière de
15.
voiture. Si nécessaire, réglez l’appui-tête de la voiture.
Si vous voyagez sans enfant, le siège d’auto sera sécurisé
16.
ceinture de sécurité.
N’utilisez pas de poids supplémentaire autre que comme décrit dans
17.
consignes et marqué sur le siège d’auto.
Nous vous recommandons
18.
la voiture
de la lumière directe du soleil, autrement la haute
par une autre recommandée par le
la banquette de la
uniquement
d’utiliser le siège d’auto sur la banquette arrière de
avec
3. Pièces et équipements intérieurs - Page 2
4.
Réglage en hauteur de l’appuie-tête
Vérifiez régulièrement si l’appuie-tête est adapté à votre enfant.
a hauteur de l’appuie-tête est au niveau optimal lorsque la tête de l’enfant reste
L
confortablement au milieu de l’appuie-tête.
Pour régler la hauteur, retournez le siège avec l’arrière. Appuyez sur le bouton
•
réglage de la hauteur de l’appuie-tête. Maintenant, vous pouvez tirer ou pousser
l'appuie-tête (voir photo 1).
ou
la
les
de
Page 18

Page 18
Relâchez le bouton et l’appuie-tête est correctement verrouillé. Après le réglage,
•
vérifiez que l’appui-tête est correctement verrouillé.
5. Sécuriser le siège d’auto à l’aide de la ceinture de la
voiture
La ceinture de la voiture à trois points n’est utilisée que pour sécuriser les enfants
des groupes d’âge II et III (15 kg à 36 kg).
Étape 1 : Placez le siège
est bien placé sur le dossier de la banquette (Figure 2).
Étape 2 : Mettez l’enfant dans le siège d’auto (Figure
Étape 3 : Tirez la ceinture de la voiture à trois points et placez la ceinture médiane
dans la partie opposée à la boucle sous l’accoudoir. (assu
diagonales et la ceinture médiane du côté de la boucle sont sous l’accoudoir). La
ceinture médiane est fixée aussi bas que possible possible et serrée très bien au
niveau du bassin ; la ceinture ne doit pas être tordue ; faites passer dans la boucle
jusqu’à ce que vous entendiez un déclic (Figure 4).
Étape 4 : Faites passer la ceinture diagonale par la fente de la ceinture de l’appui-
tête. Assurez-vous que la ceinture n’est pas tordue, serrez la ceinture médiane dans
la direction indiquée à la Figure 4, et la ceinture d’épaule dans la direction de pliage
comme représenté à la Figure 5.
La position satisfaisante de la ceinture de voiture pour le siège d’auto pour enfants
est comme illustré la Figure 6. Vous pouvez contacter le fabricant du siège d’auto si
vous avez des questions à ce sujet.
d’auto
sur l
a banque
tte de
la voiture et assurez-vous qu’il
3).
rez-vous que les ceintures
6. Consignes d’entretien
6.1. Enlèvement/remplacement de la housse
Appuyez sur le dossier jusqu’à ce qu’il arrive dans la position horizontale
Maintenant, vous pouvez enlever le dossier
Maintenant, la housse du siège peut être tirée et enlevée.
Pour remplacer la housse, procédez dans l’ordre inverse à la procédure
d’enlèvement de la housse.
Page 19
6.2. Nettoyage de la housse
Page 19
Utilisez uniquement de
Ne lavez pas la housse à la machine à laver et le séchage par centrifugation n’est pas
recommandé.
s détergents neutres et de l’eau chaude.
7. Procédures à suivre après un accident
Le siège d’auto pour enfants doit être remplacé après un accident de voi ture violent.
ES
INSTRUCCIONES DE USO
Esto es una silla de coche universal, homologada según la normativa ECE R44- 04
para uso general en vehículos. El ajuste correcto es posible si el fabricante del
automóvil ha mencionado, en la documentación del vehículo, que éste puede
acomodar una silla de coche universal para este grupo de edad. Esta silla de coche
ha sido clasificada de universal de acuerdo con varias condiciones más estrictas que
las demás aplicables a su clase, que no van acompañadas de esta nota. En caso de
duda, por favor consulte con el fabricante de la silla de coche o con el vendedor.
Esta silla de coche se puede utilizar sólo si el vehículo está previsto de un cinturón
fijo de 3 puntos y de un cinturón retráctil de 3 puntos, aprobado por la normativa
Por favor, lea atentamente estas instrucciones antes del primer uso de
coche. Si utiliza este producto de forma incorrecta, puede arriesgar la vida de su niño.
UN/ECE no. 16 u otras normas equivalentes
la silla de
1. Aplicabilidad
La silla de coche es adecuada para las categorías de peso II - III (Grupos II-III), es
decir para niños que pesan entre los 15 y los 36 kg (aproximadamente 3 a- 11 años).
Peso grupo II 15 kg - 25 kg
Peso grupo III 22 kg - 36 kg
Page 20
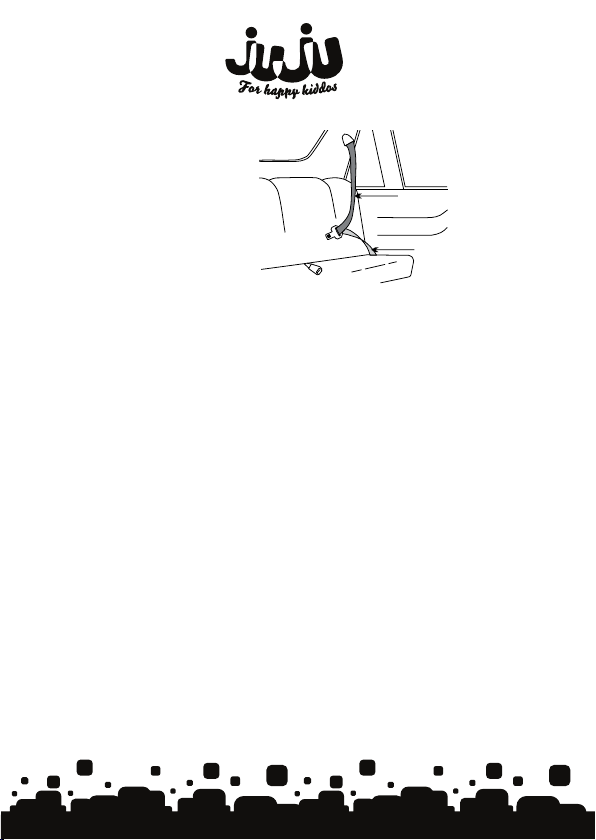
Esta silla de coche se puede
Page 20
utilizar sólo si el vehículo
está previsto de un cinturón
fijo de 3 puntos y de un
cinturón retráctil de 3
puntos, aprobado por la
normativa UN/ECE no. 16 u
otras normas equivalentes.
cinturón diagonal
cinturón mediano
2. Instrucciones de seguridad
Por favor, lea detenidamente estas instrucciones, para la seguridad de su niño.
Hay muchos accidentes que se pueden evitar fácilmente que son causados por
el uso inadecuado de la silla de coche.
Las instrucciones deben guardarse durante el uso
1.
Esta silla de coche sólo se debe instalar orientada hacia adelante, en la dirección
2.
de marcha, utilizando el cinturón de seguridad de 3 puntos de su coche.
No utilice esta silla de coche en su hogar, ya que se trata de un producto
3.
destinado al uso en el coche.
Antes de cada viaje, compruebe que l
4.
correctamente.
5. No intente hacer modificaciones de la silla de coche.
6. ¡Nunca deje a su niño sin atender en la silla de coche!
En caso de emergencia, es importante poder liberar al niño rápidamente. Esto
7.
significa que el cinturón no está bloqueado, sino sólo cerrado, y debe enseñar al
niño que no debe jugar con el cinturón.
Proteja la silla de coche de la luz solar directa, ya que las altas temperaturas
8.
pueden hacer daño al
9. Asegúrese de que todas las piezas están cerradas correctamente.
Cualquier equipaje u otros objetos que puedan
10.
accidente deben estar bien sujetados.
11. La silla de coche no se debe utilizar sin su funda.
niño.
de la silla de coche.
a silla de coche se ha instalado
causar lesiones en caso de un
Page 21

La funda no debe sustituirse por cualquier otra funda, excepto las
Page 21
12.
recomendadas po
Periódicamente compruebe el arnés, prestando especial atención a los
13.
puntos de conexión, a las costuras y a los dispositivos de ajuste.
No vuelva a utilizar la silla de coche para niños si sus partes componentes
14.
están dañadas o debilitadas después de un accidente.
El reposacabezas debe quedarse en posición recta, apoyada
15.
asiento del coche. Si hace falta, ajustar el reposacabezas del asiento del coche.
Si viaja sin su niño, la silla de coche para niños sólo debe sujetarse con el
16.
cinturón de
No utilice en caso de pesos mayores a los indicados en las instrucciones y
17.
marcados en el alzador.
Se recomienda utilizar la silla de coche para niños en el asiento de atrás del
18.
coche
r el fabricante.
en el respaldo del
seguridad.
3. PIEZAS Y EQUIPOS INTERIORES - Página 2
4. Ajuste de la altura del reposacabezas
Compruebe e intervalos regulares si el reposacabezas es apropiado para su niño. La
altura del reposacabezas es óptima cuando la cabeza del niño se encuentra en el
medio del reposacabezas, en una posición cómoda.
Para ajustar la altura, oriente la silla hacia atrás. Pulse el botón de ajuste de la
•
altura del reposacabezas. Ahora puede tirar o empujar
imagen 1).
Suelte el botón y el reposacabezas estará bloqueado en la posición
•
correcta.
Después del aj
correctamente.
Fijación de la silla de coche utilizando el cinturón de
5.
uste, compruebe que el reposacabezas esté bloqueado
el reposacabezas (véase la
seguridad
El cinturón de seguridad de tres puntos del coche sólo se utiliza para sujetar a
perteneciendo a los grupos de edad II y III (15 kg - 36 kg).
niños
Page 22

Page 22
Paso 1: Coloque la silla de coche en el asiento del coche y asegúrese de que está
bien posicionada en el asiento trasero del coche (figura 2).
Paso 2: Coloque al niño en la silla de coche (Figura 3).
Paso 3: Tire del cinturón de tres puntos del coche y coloque el cinturón mediano en
la parte opuesta a la hebilla de sujeción por debajo del reposabrazos. (Asegúrese de
que el cinturón y la hebilla del cinturón del lado de la hebilla de sujeción están
colocados por debajo del reposabrazos). Cualquier cinturón mediano debe fijarse lo
más bajo posible y apretarse muy bien en la zona del pelvis y el cinturón no debe
estar retorcido; introdúzcalo en la hebilla hasta que oiga el clic específico (Figura 4).
Paso 4: Introduzca el cinturón diagonal por la ranura del reposacabezas. Asegúrese
de que el cinturón no está retorcido, apriete el cinturón mediano en la dirección
indicada en la Figura 4 y la correa para los hombros en la dirección de plegado
indicada en la Figura 5.
La posición correcta del cinturón de seguridad del coche para la silla de coche para
niños se indica en la Figura 6. Si tiene dudas acerca de este punto, por favor
póngase en contacto con el fabricante de la silla de coche.
6. Instrucciones de mantenimiento
6.1. Quitar/sustituir la funda
Presione el respaldo hasta que se quede en posición horizontal
Ahora puede retirar el respaldo
Ahora la funda de la silla de coche se puede quitar.
Para reemplazar la funda, siga las instrucciones par
inverso.
6.2. Limpiado de la funda
Utilice sólo detergentes neutros y agua caliente.
comendamos la
No re
a funda en la lavadora y secarla por centrifugación.
var l
a quitar la funda en orden
7. Procedimientos que se deben seguir después de un
accidente
La silla de coche para niños debe ser reemplazarse después de estar involucrada en
un accidente de coche grave.
Page 23
RO
Page 23
INSTRUCTIUNI DE UTILIZARE
Acesta este un scaun auto universal, este aprobat conform reglementarii ECE R44/04
pentru uz general in autovehicule. O potrivire corecta este posibila daca fabricantul
autovehiculului a declarat in cartea masinii ca vehiculul este capabil sa accepte un
scaun auto universal pentru aceasta grupa de varsta. Acest scaun auto a fost
clasificat ca fiind unul universal, sub mai multe conditii riguroase decat celelalte din
clasa lui, care nu sunt insotite de acesasta nota. Daca aveti nelamuriri consultati
producatorul scaunului auto sau vanzatorul.
Este potivit doar daca autovehiculul are in dotare centura fixa in 3 puncte sau
retractabila tot in 3 puncte, aprobata de UN/ECE legea numarul 16 sau alte
Va rugam sa cititi aceste instructiuni cu atentie inainte de prima folosire a scaunului
auto. Riscati sa puneti in pericol viata copilului dumneavoastra dac a folositi incorect
acest produs.
standarde echivalente.
1. Aplicabilitate
Scaunul auto este potrivit pentru categoriile de greutate de la II la III ( grupele II-III),
ceea ce inseamna copii cu greutatea cuprinsa intre 5 kg si 36 kg (aproximativ de la
3 ani la 11 ani).
Greutate grupa II 15kg-25kg
Greutate grupa III 22kg-36kg
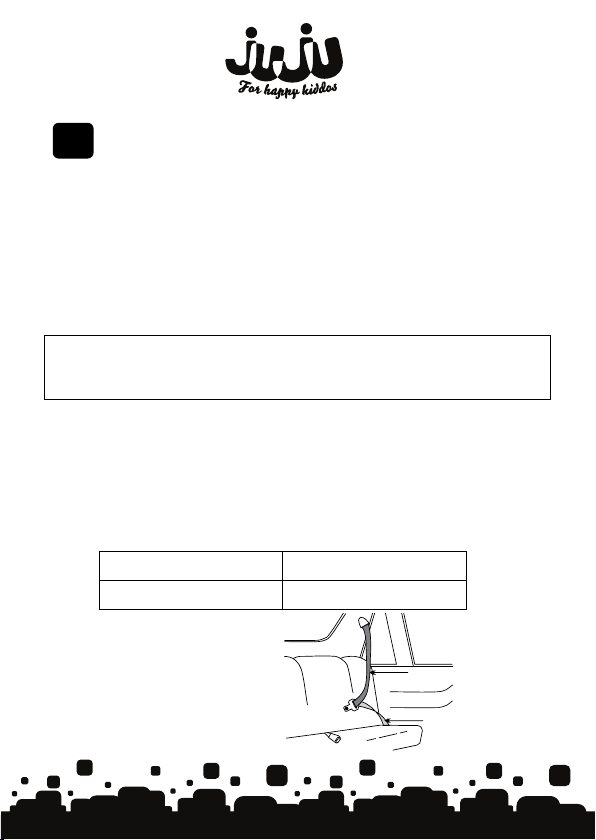
Potivit doar daca autovehiculul
are in dotare cen
puncte si retractabila tot
puncte, aprobata de UN/ECE
legea numarul 16 sau alte
standarde echivalente.
tura fixa in 3
in 3
Centura diagonala
Centura mediana
Page 24

2. Instructiuni pentru siguranta
Page 24
Va rugam acordati cateva minute pentru siguranta copilului dumneavoastra si
cititi aceste instructiuni. Multe accidente care pot fi evitate usor sunt cauzate
de folosirea incorecta a scaunului auto.
Instructiunile trebuiesc pastrate pe toata pe
1.
Acest scaun au
2.
masinii cu prindere in trei puncte.
Nu folositi acest scun auto acasa, este produs special pentru folosirea in
3.
masina.
Inainte de fiecare drum verificati daca scaunul auto este bine instalat.
4.
5.
Nu schimbati scaunul au
Nu lasati copilul nesupravegheat in sc
6.
In cazul u
7.
inseamna
nu se joace cu ea.
Pro
8.
poate rani copilul.
9.
Asigurati-va ca toate partile sunt inchise corect si nu sunt doar prinse.
10.
Bagajele sau alte obiecte ce pot cauza ranirea, t
11.
Scaunul auto nu trebuie folosit fara husa.
12.
Hus
Per
13.
imbinare, de regula cusaturilor si dispozitivelor de ajustare.
Nu mai continuati sa folositi scaunul auto daca unele parti s-au deteriorat sau
14.
sunt slabite dupa un accident.
Tetiera scunului auto trebuie sa stea dreapta pe s
15.
Daca este necesar ajustati tetiera masinii.
In cazul in care calatoriti fara copil scaunul au
16.
masinii.
Nu folositi greutate suplime
17.
marcata pe scaunul auto.
Recomandam folosirea scaunului auto pe bancheta din spate a masinii
18.
nei urgente este importanta eliberarea imediata a copilului. Asta
c
a centura nu este blocata si doar inchisa, iar copilul trebuie invatat sa
tejati scaunul
a nu trebuie inlocuita cu o alta decat cu cele recomandate de producator.
iodic verificati hamul in special acordati atentie sporita punctelor de
instalat doar cu fata la sensul de mers folosind centura
to va fi
to i
ici un fel.
n n
uto de lumina directa a soarelui, altfel temperatura ridicata
a
ntara alta decat cea descrisa in instructiuni si
rioada folosirii scaunului auto.
aunul auto.
rebuiesc asigurate cu strictete.
patele banchetei masinii.
to se va asigura numai cu centura
Page 25

3. Partile si echipamentele interioare – Pagina 2
Page 25
4. Ajustarea inaltimii tetierei
Verificati in mod regulat dac
Inaltimea tetierei este la nivelul optim atunci cand capul copilului sta confortabil pe
mijlocul tetierei.
Pentru a ajusta inaltimea intoarceti scaunul cu spatele. Apasati pe butonul de
•
ajustare a inaltimii tetierei. Acum puteti trage sau apasa pe tetiera (vedeti poza 1).
Dati drumul la buton, iar tetiera este blocata in mod corect.
•
Dupa ajustare verificati daca tetiera este blocata corect.
a tetiera este potivita pentru copilul dumneavoastra.
5. Asigurarea scaunului auto cu centura masinii
Centura cu prindere in trei puncte a masinii se foloseste numai pentru a asigura copii
din grupele de varsta II si III (15 kg-36kg).
Pasul 1. Puneti scaunul auto pe bancheta masinii si asigurati-va ca este bine
pozitionat pe spatarul banchetei ( figura 2).
Pasul 2: Puneti copilul in scaunul auto ( figura 3).
Pasul 3: Trageti centura masinii cu prindere in trei puncte si plasati centura mediana
in partea opusa cataramei de prindere pe sub cotiera. (asigurati-va ca centurile
diagonale si centura mediana de pe partea cataramei de prindere se afla sub
cotiera). Orice centura mediana se fixeaza cat de jos cu putinta si stransa foarte bine
in zona bazinului, iar centura nu trebuie sa fie rasucita, apoi prindeti in catarama
pana veti auzi click ( figura 4).
Pasul 4: Treceti centura diagonala prin fanta pentru centura de la tetiera.
Asigurati-va ca centura nu este rasucita, strangeti centura mediana in directia
indicata de figura 4, iar centura de umar in directia de pliere asa cum este indicata in
figura 5.
Pozitia satisfacatoare a centurii masinii fata de scaunul auto pentru copil este
conform figurii 6. Puteti contacta producatorul scaunului auto daca aveti
nelamuriri cu privire la acest punct.
Page 26
6. Instructiuni privind ingrijirea
Page 26
6.1. Inlaturarea/ inlocuirea husei
Apasati spatarul atat de mult, incat sa aiba pozitia orizontala tot
Acum puteti inlatura spatarul.
Acum husa scaunului poate fi trasa si indepartata.
Pentru inlocuirea husei, procedati in ordinea inversa procedurii de indepartare a
husei.
6.2 Curatarea husei
Folositi numai detergenti neutri si apa calda.
Nu spalati husa la masina de spalat, iar uscarea prin centrifugare nu este
recomandata.
ala.
7. Proceduri de urmat dupa accident
Scaunul auto pentru copii trebuie inlocuit dupa ce a fost implicat intr-un accident
auto violent.
BG
ИНСТРУКЦИИ ЗА УПОТРЕБА
Това е универсално столче за ко ла, одоб рено съгласно регламент ECE R44.04 за
обща употреба в автомобил. Правилно съчетаване е възможно, ако
производителят на автомобила е декларирал в Наръчника за използване на
превозното средство, че в превозното средство могат да се поставя
универсално столче за кола за тази възрастова група. Това автомобилно сто лче
е класифицирано като универсално при по-строги условия в сравнение с
прилаганите в предишни конструкции, на които няма тази бележка. Ако имате
съмнения, консултирайте се с производителя на детското столче за кола или с
продавача.
Подходящо е само, ако автомобилът е оборудван с 3-точков предпазен колан
или прибиращо устройство, също 3-точково, одобрени от правило № 16 на
ИКЕ при ООН или други еквивалентни стандарти
Page 27
Моля, прочетете внимателно тези инструкции преди да използвате детското
Page 27
столче за кола за първи път. Рискувате да застрашите живота на детето си, ако
използвате неправилно този продукт.
1.Приложимост
Детското столче за кола е подходящо за категориите тегло от II до III
(групи II-III), които означава, че деца с тегло между 9 кг и 36 кг (приблизително
от 3 години до 11 години).
Тегло група II 15 кг -25 кг
Тегло група III 22 кг-36 кг
Подходящо е само, ако
превозните средства имат 3
точкови предпазни колани,
одобрени от ИКЕ / ООН Закон
16 или еквивалентни на него
стандарти.
-
диагонален колан
подвижен колан
2. Инструкции за безопасност
Моля, отделете няколко минути за сигурността на детето ви и прочетете
тези инструкции. Много инциденти, които могат да бъдат лесно
избегнати, се причиняват от неправилното използване на столчето за
кола.
Инструкциите трябва да се съхраняват за целия период на използване на
1.
столчето за кола.
Това столче за кола трябва да се монтира само с лице към посоката на
2.
движение, като се използва 3-точковия колан на превозното средство.
Не използвайте това столче вкъщи. То е специално за използване в
3.
автомобил.
4. Преди всяко пътуване проверявайте дали столчето е добре монтирано.
Page 28

Page 28
5.
Не модифицирайте столчето за кола по никакъв начин.
Не оставяйте детето в столчето без наблюдение.
6.
При спешен случай е важно незабавното освобождаване на детето. Това
7.
означава, че коланът
научава да си играе с него.
Пазете столчето от пряката слънчева
8.
температура може да нарани детето.
Уверете се, че всички части са правилно закопчани, а не само захванати.
9.
Багажите, които могат да причинят нараняване, трябва да бъдат обезпечени
10.
стриктно.
Столчето не трябва да се използва без тапицерия.
11.
Тапицерията не трябва да се заменя с друга, различна от препоръчаната от
12.
производителя
Проверявайте периодично ремъка, особено внимание е нужно на точките на
13.
съединяване, обикновено на шевовете и устройствата за регулиране.
Не продължавайте да използвате столчето, ако някои части са повредени или
14.
са разхлабени след инцидент.
Подглавникът на столчето трябва да стои изправен на задната седалка на
15.
автомобила. Ако е необходимо регулирайте подглавника на автомобила.
Ако пътувате без дете, столчето се обезопасява само с колана на автомобила.
16.
Не използвайте допълнителен товар, различен от този, описан в
17.
инструкциите и отбелязан на столчето.
Препоръчваме използването на столчето на задната седалка на автомобила.
18.
3.
Части и вътрешно оборудв
не е заключен, а само закопчан, а детето не трябва да се
светлина, в противен случай високата
ане - Страница 2
4. Регулиране височината на подглавника
Проверявайте редовно дали подглавникът е подходящ за детето ви.
Височината на подглавника е на оптимално ниво когато главата на детето стои
удобно по средата на подглавника.
Page 29

Page 29
За да регулирате височината, обърнете стола с гърба. Натиснете бутона за
•
регулиране височината на подглавника.
Сега можете да издърпате или натиснете подглавника (виж изображение 1).
Натиснете бутона, а подглавникът е заключен правилно. След регулирането,
•
проверете дали подглавникът е заключен правилно.
5.
Обезопасяване на столчето с колана на автомобила
3-точковият колан на автомобила се използва само за обезопасяване на деца
от възрастови групи II и III ( 15 кг-36кг).
Стъпка 1. Поставете столчето на задната седалка на автомобила и се уверете,
че е добре позиционирано върху облегалката на седалката (фигура 2).
Стъпка 2. Сложете детето в столчето ( фигура 3).
Стъпка3. Издърпайте 3-точкови колан на автомобила и поставете средния
колан от страната, противоположна на катарамата за захващане под
подлакътника. ( уверете се, че диагоналните колани и средният колан от
на катарамата за захващане са под подлакътника). Всеки среден колан
страната
се фиксира възможно най-ниско и и добре стегнат в областта на таза, а коланът
не трябва да бъде усукан, после захванете в катарамата докато чуете щракване
(фигура 4).
Стъпка 4. Прекарайте диагоналния колан през процепа за колана от
подглавника. Уверете се, че коланът не е усукан, затегнете средния колан в
посоката, указана на фигура 4, а раменният колан в посоката на плъзгане, както
е показано на фигура 5.
Задоволителната позиция на колана на автомобила по отношение на детското
столче е съгласно фигура 6. Можете да се свържете с производителя на
столчето, ако имате неясноти относно тази точка.
6. Инструкции относно полагането на грижи
6.1. Махане/ смяна на тапицерията
Натиснете облегалката толкова много, че изцяло да заеме хоризонтална
позиция
Page 30
Page 30
Сега можете да извадите облегалката
Сега тапицерията на столчето може да се издърпа и отстрани.
За смяна на тапицерията, процедирайте в обратен ред на процедурата по
махане на тапицерията.
6.2 Почистване на тапицерията
Използвайте само неутрални препарати и топла вода.
Не перете тапицерията в перална машина, а сушенето в центрофуга не е
препоръчително.
7. Процедури след инцидент
Детското столче за кола трябва да се замени след като е участвало в жесток
инцидент.
HU
HASZNÁLATI UTASÍTÁS
Ez egy univerzális autósülés, ECE R44.04 szabvány szerint jóváhagyva általános
használatra alkalmas gépkocsikban. Egy helyes beállítást akkor lehet elvégezni ha a
gépkocsi gyártó a gépkocsi műszaki könyvében leírta hogy a gépkocsiba be lehet
szerelni egy univerzális autósülést ennek a korcsoportnak megfelelően. Ez az
autóülés univerzálisnak van minősítve több szigorú feltétel szerint összehasonlítva
ennek a csoportnak megfelelő más autósüléssel, melyek nem tartalmazzák ezt a
megjegyzést. Abban az esetben ha kérdések felmerülének az autósülés gyártójával
vagy az eladóval kell felvenni a kapcsolatot.
Akkor megfelelő ha a gépkocsi rendelkezi k 3 pontos fix biztonsági övvel vagy 3
pontos behúzható biztonsági övvel, melyet az UN/ECE jóváhagyott a 16-os számú
Kérjük olvassa el figyelmesen a használati utasításokat mielőtt a baba autósülést
először használná. Ha helytelenül használja jelen terméket gyermekének életét
kockáztatja.
törvény szerint vagy más hasonló szabvány szerint.
Page 31
1. Alkalmazás
Page 31
Az autósülés alkalmas az II-III sullyú kategóriának (II-III csoport) ami azt jelenti hogy a
gyerek súlya 15 kg és 36 kg közt lehet. (körül belül 3 évig és 11 évig).
II-es csoport súlya
III-as csoport súlya
Csak abban az esetben
megfelelő ha a gépkocsinak 3
pontos biztonsági öve van
melyet 16-os számú UN-ECE
törvény jóváhagyott vagy más
egyértelmű szabvány.
15kg-25kg
22kg-36kg
átlós biztonsági öv
középső biztonsági öv
2. Biztonsági utasítások
Kérjük szenteljen egy pár percet gyereke biztonságának és olvassa el jelen
használati utasításokat. Az autósülés helytelen használatához kapcsolódó
legtöbb balesetet könnyen meg lehet előzni.
1.
A használati utasításokat tárolni kell az autóülés használata alatt.
Jelen autóülést csak a menetiránnyal szembe szabad beszerelni a gépkocsi 3
2.
pontos kapcsolású biztonsági övét használva.
3.
Ne használja otthon jelen autóülést, csak gépkocsiban használható.
Minden útra indulás előtt vizsgálja meg hogy az autóülés helyesen legyen
4.
felszerelve.
Ne módosítsa az au
5.
6.
Ne hagyja a gyereket felügyelet nélkül az autóülésben.
Sűrgös esetben fontos a gyerek azonnali kiszabadítása. Ez azt jelenti hogy a
7.
biztonsági öv ne legyen blokkolva csak becsukva, és a gyereket meg kell
hogy nem szabad játszani vele.
Védje az autóülést a direct napfénytől, a magas hőmérséklet megégetheti a
8.
gyereket.
tóülést semmi féle képpen.
tanítani
Page 32

Page 32
Figyeljen arra hogy minden rész jól össze legyen kapcsolva ne csak
9.
összefogva.
A gépkocsiban található tárgyakat szorosan kell rögzíteni, a szabadon hagyott
10.
tárgyak, baleset esetében testi sérülést okozhatnak.
11.
Ne használja az autóülést a védőhuzat nélkül.
Az autóülés védőhuzatát ne heyettesítse más huzattal melyet a gyártó nem
12.
hagyott jová
Idönként vizsgálja meg a hámot különösen figyeljen a kapcsolási pontokra, a
13.
varrásokra és a beállítási berendezésekre.
Abban az esetben ha az autóülés balesetet szenvedett vagy megrongálódott ezt
14.
cserélni.
ki kell
Az autóülés fejtámasza egyenesek kell álljon a gépkocsi ülésének hátán. Ha
15.
szükséges állítsa be.
Abban az esetben ha a babaülésben nincs benne a gyerek utazás
16.
gépkocsi bizonsági övével kell rögzíteni.
Ne helyezzen az ülésben nagyobb súlyt a megengedettnél, ami a haszálati
17.
utasításban és az ülésen fel van tüntetve.
Azt ajánljuk hogy az autóülést a gépkocsi hátsó ülésén használja.
18.
Részei és belső felszerelései - 2-Oldal
3.
közben ezt a
4. A fejtámasz magasságának beállítása
Vizsgálja meg rendszeresen hogy a fejtámasz megfelelő legyen gyermeke számára. A
fejtámasz magassága akkor helyes ha a gyerek feje kényelmesen elhelyezkedik a
fejtámasz közepén.
A magasság beállításának céljából fordítsa meg az au
fejtámasz magasságának beállítási gombját. Most felhúzhatja vagy lenyomhatja a
fejtámaszt ( lásd a képet 1).
Engedje el a gombot, így a fejtámasz helyesen van rögzítve. A beállítás után
vizsgálja meg hogy a fejtámasz helyesen legyen rögzítve.
tóülést háttal. Nyomja meg a
Page 33

5. Az autóülés biztosítása a gépkocsi biztonsági övével
Page 33
A gépkocsi három ponto
tartozó gyerekek biztosítására használhatja (15 kg-36kg).
1. lépés Helyezze az autóülést a gépkocsi hátsó ülésére és figyeljen
helyesen van az ülés háttámaszára helyezve ( 2-es kép).
2. lépés Helyezze a gyereket az autóülésbe (3-es kép).
3.lépés. Húzza meg a gépkocsi 3 pontban rögzíthető biztonsági övét és helyezze el
a középső övet a kartámasz alatt található csatt ellentétes irányában. ( figyeljen arra
hogy az átlós övek és a csatt részén található középső öv a kartámasz alatt legyen).
Minden középső övet minnél lejjebb kell elhelyezni és jól megszorítva a medence
körül. Az öv nem szabad el legyen csavarodva. Nyomja meg a csattot amíg egyet
kattan ( 4-as kép).
4. lépés. Húzza át a középső övet a fejtámasz öv lyukén keresztül.
Figyeljen arra hogy az öv ne legyen elcsavarodva, szorítsa meg a középső övet a 4-
as képen mutatott irányba és a vállövet a hajlási irányba ahogyan a 5-es kép
mutatja.
A gépkocsi övének csattjának megfelelő helyzete az autóülésre nézve a 6-os képne
van bemutatva. Abban az esetben ha kérdései lennének azzel a pontal
kapcsolatosan kérjük vegye fel a kapcsolatot az ülés gyártójával.
s rögzítésű biztonsági övét csak a II és III-as csoportban
arra hogy ez
6. Karbantartási utasítások
6.1. A húzat eltávolítása/helyettesítése
Nyomja meg a háttámaszt amíg ez teljesen vízszintes helyzetbe kerül.
Most eltávolíthatja a háttámaszt
Most az ülés huzatát le lehet húzni és eltávolítani.
Ahhoz hogy a húzatot helyettesítse a húzat eltávolításának fordított műveleteit kell
elvégezni.
6.2 A húzat tisztítása
Csak semleges mosó
Ne mossa a húzatot mosógépben és ne szárítsa centrifugálással.
szert kell használni és meleg vizet tisztításkor.
7. Hogyan járjunk el baleset után
A gyerek autóülést ki kell cserélni súlyos autóbaleset után.
Page 34
Page 34
PL
Instrukcja użytkownika
Niniejszy produkt to "uniwersalny" fotelik dziecięcy z homologacją ECE 44.04,
przeznaczony do ogó
nie wszystkich) siedzeń samochodowych. Prawidłowe zamocowanie fotelika
możliwe jest
informacja o tym, że pojazd ten jest przystosowany do instalacji "uniwersalnych"
fotelików dziecięcych danych kategorii wagowych i wiekowych.
Niniejszy fotelik zaliczony został do grupy urządzeń "uniwersalnych", na podstawie
spełniania bardziej restrykcyjnych wymogów niż te, które stosowane były odnośnie
do wcześniejszych projektów, nieopatrzonych tą informacją.
W przypadku pojawienia się jakichkolwiek wątpliwości, należy skonsultować się z
producentem lub sprzedawcą urządzenia.
Fotelik przeznaczony jest do instalacji wyłącznie w pojazdach wyposażonych w 3-
punktowe pasy bezpieczeństwa (statyczne lub bezwładnościowe), spełniające
warunki Regulaminu nr 16 EKG / ONZ lub inne równoważne normy.
Przed pierwszym użyciem fotelika prosimy o uważne przeczytanie niniejszej
instrukcji użytkowania. Nieprawidłowe używanie produktu może stanowić
zagrożenie życia dziecka.
lnego użytku w pojazdach i pasujący do większości (jednak
wtedy, gdy w inst
rukcji obsługi danego pojazdu zamieszczona jest
1. Zastosowanie
Niniejszy fotelik przeznaczony jest dla kategorii (grup) wagowych II-III, co oznacza,
że mogą z niego korzystać dzieci o wadze od 15 do 36 kg (w wieku od około 3 lat
do 11 la).
II grupa wagowa
III grupa wagowa 22kg-36 kg
15kg-25kg
Page 35
Page 35
Fotelik przeznaczony jest do
instalacji wyłącznie w pojazdach
wyposażonych w 3-punktowe
pasy bezpiecze
lub bezwładnoś
spełniające warunki
nr 16 EKG / ONZ lub inne
równoważne normy.
Instrukcje dotyczące bezpieczeństwa
2.
W trosce o bezpieczeństwo dziecka, prosimy o poświęcenie kilku minut na
przeczytanie poniższych instrukcji. Wiele łatwych do uniknięcia urazów
spowodowanych jest nieostrożnością oraz niewłaściwym użytkowaniem
produktu.
W przypadku fotelików wbudowanych instrukcje te mogą być umieszczone na
1.
produkcie w okresie jego użytkowania.
Niniejszy fotelik może być zainstalowany wyłącznie przodem do kierunku jazdy i
2.
zamocowany za pomocą 3-punktowego pasa samochodowego.
Nie używać w domu. Produkt nie jest przeznaczony do zastosowań domowych.
3.
Należy używać go wyłącznie w samochodzie.
Przed każdą podróżą należy upewnić się, że fotelik jest prawidłowo i pewnie
4.
zamocowany.
Nie należy w żaden sposób modyfikować niniejszego produktu.
5.
Nie należy nigdy pozostawiać dziecka w foteliku bez opieki.
6.
W nagłych wypadkach bardzo ważne jest, by dziecko mogło być szybko wyjęte z
7.
fotelika. Oznacza to, że klamra ni
też należy instruować dziecko, aby nigdy się nią nie bawiło.
Należy bezwzględnie unikać sytuacji, w których fotelik jest wystawiony na
8.
działanie bezpośrednich promieni słonecznych. W przeciwnym razie może się on
nagrzać do wysokich temperatur i w konsekwencji doprowadzić do poparzeń
dziecka.
ństwa (statyczne
ciowe),
Regulaminu
e jest całkowicie odporna na manipulacje, dlatego
Page 36

Page 36
Należy upewnić się, że wszystkie części fotelika są prawidłowo zamocowane do
9.
stałych, niepodlegających regulacjom elementów samochodu.
Należy zadbać o to, by bagaż oraz inne przedmioty mogące spowodować
10.
obrażenia ciała w przypadku kolizji pojazdu, były odpowiednio zabezpieczone.
Fotelik samochodowy nie może być używany bez tapicerki.
11.
W przypadku konieczności jej wymiany, oryginalna tapicerka może być zastąpiona
12.
wyłącznie odpo
Należy okreso
13.
a
punkty mocowań, szwy oraz elementy regulacyjne.
n
Nie należy kontynuować użytkowania fotelika, jeśli na skutek wypadku
14.
którekolwiek z
Oparcie fotelika musi przylegać płasko do oparcia siedzenia pojazdu. Jeśli to
15.
konieczne, należy poprawić ustawienie zagłówka fotela pojazdu.
Podczas jazdy, fotelik powinien być pewnie przymocowany do siedzenia pojazdu
16.
za pomocą pasa samochodowego, nawet wówczas, gdy nie znajduje się w nim
dziecko.
Nie należy używać innych nośnych punktów styczności niż te, które są opisane w
17.
instrukcji obsługi oraz oznaczone na produkcie.
18. Zaleca się instalację fotelika na tylnych siedzeniach samochodów.
wiednikiem rekomendowanym przez producenta.
pasy
wo sprawdzać
jego części są uszkodzone lub poluzowane.
zpieczeństw
be
a zwracając sz
czegól
ną uwagę
3. Schemat i opis poszczególnych części produktu-Strona2
4. Regulacja wysokości zagłówka
Należy regularnie sprawdzać, czy wysokość zagłówka jest optymalna dla Twojego
dziecka.
Sytuacja ta ma miejsce, gdy główka dziecka spoczywa wygodnie w środkowej części
zagłówka.
Aby ustawić wysokość zagłówka należy wykonać następujące kroki:
Odwróć fotelik tak, by uzyskać dostęp do jego tylnej części.
•
Wciśnij przycisk regulatora wysokości zagłówka. Teraz można wysunąć lub wsunąć
zagłówek (patrz o
brazek 1).
Page 37

Page 37
Zwolnij przycisk regulatora wysokości zagłówka. Zagłówek jest teraz poprawnie
•
zablokowany. Po każdej zmianie wysokości zagłówka należy upewnić się, że
został on prawidłowo zablokowany.
5. Mocowanie fotelika przy użyciu pasa samochodowego
3-punktowy samochodowy pas bezpieczeństwa wykorzystywany jest z fotelikiem
samodzielnie wyłącznie w przypadku dzieci z grup wagowych II i III (15 - 36kg).
Krok 1: Umieść fotelik na siedzeniu pojazdu w tak
oparcia fotela samochodowego (Rys. 2).
Krok 2: Umieść dziecko w foteliku (Rys. 3)
Krok 3: Zapnij 3-punktowy pas samochodowy w taki sposób, aby zapinka znalazła
się w klamrze samochodowej po drugiej stronie fotelika.
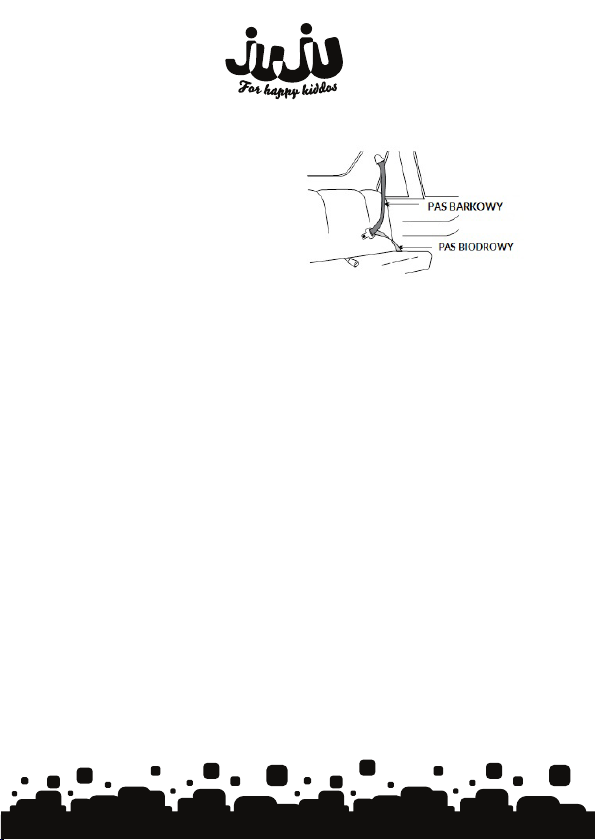
Poprowadź pas biodrowy tak, by przechodził pod obydwoma podłokietnikami.
Zwróć uwagę na to, by nie był on skręcony i przebiegał dostatecznie nisko, tak, aby
przytrzymywana była miednica.
Po umieszczeniu zapinki w klamrze usłyszysz charakterystyczne "kliknięcie". (Rys. 4).
Krok 4: Poprowadź pas barkowy przez prowadnicę zlokalizowaną z boku zagłówka.
ię, że nie jest on skręcony. Naciągnij pas barkowy w kierunku wskazanym
Upewnij s
na rysunku numer 4 (w kierunku automatycznego zwijania) tak mocno, jak to
możliwe (Rys. 5).
Rysunek 6 przedstawia prawidłową pozycję klamry p
względem fotelika.
W przypadku jakichkolwiek wątpliwości, co do sposobu mocowania fotelika, należy
skontaktować się z jego producentem.
6. Informacje odnośnie konserwacji
6.1. Zdejmowanie / zakładanie elementów tapicerki
Przechyl oparcie do tyłu tak, by spoczywało płasko na podłodze.
W tej pozycji możliwy jest demontaż oparcia.
Po wykonaniu powyższych kroków można (ciągnąc je d
fotelika.
i sposób, by ściśle przylegał do
asa samochodowego
o przodu) wysunąć obicie
Page 38

Page 38
Aby na powrót założyć elementy tapicerki fotelika, wykonaj powyższe kroki w
odwrotnej kolejności.
6.2. Czyszczenie tapicerki
Do czyszczenia elementów tapicerki należy używać wyłącznie neutralnych
detergentów oraz ciepłej wody.
Nie należy prać ich w pralce, odwirowywać ani suszyć w suszarce.
7. Zastosowanie po wypadku
Podczas wypadku fotelik może ulec uszkodzeniu, d
bezzwłocznie wymienić na nowy egzemplarz.
latego też należy go
Page 39

Manufacturer: Dot Com Investment SRL
Address: 2A Jiului Street, Bucharest, ROMANIA 013219
Designed in: EU
Made in: P.R.C.
Email: [email protected]
Web: www.jujubaby.eu
 Loading...