

Judge JEA49 Instruction Manual
Mini Chopper
Mini Chopper
Mini Chopper
Mini Chopper
Instruction Manual
Model No. JEA49
PLEASE READ THIS INSTRUCTION MANUAL CAREFULLY BEFORE USE
AND KEEP FOR LATER REFERENCE.
UNPACK YOUR MINI CHOPPER CAREFULLY (CUTTER BLADES ARE SHARP!)
AND REMOVE TEMPORARY PACKING PIECES, LABELS AND STICKERS.
The Mini Chopper should not be run continuously for more than 15 seconds, •
after which there should be a 60-second delay before it is operated again. It is
recommended that you pause and check the chopped food regularly to avoid
over processing. Often, running for 15 seconds is sufcient; it is unlikely that a
total chopping time of more than 60 seconds will be necessary.
Do not connect the Plug
•
8
into your socket with wet hands.
Unplug the unit whenever it is not in use.
•
Never leave the unit unattended when it is operating.•
The Mains Lead •
8
should be positioned so as not to cause an obstruction or
to overhang the edge of the surface, where it could accidentally snagged or
pulled by children.
Ensure that the Mains Lead
•
8
is not near any hot surface.
Pull the Plug (do not pull Mains Lead)
•
8
to disconnect from mains socket.
Always keep the unit out of the reach of children.
•
The Mini Chopper should only be used as instructed: there is potential for •
injury from misuse.
Care must be taken when handling the sharp Cutting Blades Assembly
•
3
,
emptying the Bowl
2
and during cleaning.
Do not use ngers to scrape food away from the Cutting Blades Assembly
•
3
.
A plastic spatula may be used.
An interlock system is incorporated to prevent operation when the Lid
•
1
is removed. Nevertheless, it is good practice to ensure the machine is
disconnected from the mains electricity supply when performing any activity
within the Bowl
2
. PLEASE OBSERVE THIS .
Never mount the Cutting Blades Assembly
•
3
onto the Drive Shaft 5 without
the bowl
2
attached.
Ensure the Cutting Blades Assembly
•
3
has come to a complete stop before
removing the lid from the bowl.
The Bowl
•
2
and Lid 1 must be securely locked in position before operating
the machine: do not attempt to defeat the safety interlock mechanisms.
Always disconnect the electricity supply before removing the Bowl
•
2
from
the stand, or approaching any part that moves in use.
Do not switch on or attempt to operate the appliance if it appears to be faulty
•
in any way - contact Judge customer services at the address given in the
warranty section.
Never attempt to make any repair to the Mini Chopper yourself - contact
•
Judge customer services at the address given in the warranty section.
Do not immerse the Motor Body
•
4
in water.
Please keep your puchase receipt.
•
Specication
Name Model No. Rated Voltage Rated Frequency Rated Power
Judge Mini Chopper JEA49 220 - 240v 50Hz 250W
Judge 2 Year Domestic Electrical Guarantee
The Judge Guarantee covers the product to be free of defects in
materials and workmanship for a period of TWO YEARS from the
date of original retail purchase. During this period, JUDGE will, at
their option, repair or replace defective parts of the product, or
replace the product, providing the Use Care and Safety Advice have
been followed.
The Guarantee does not cover damage, defect or failure caused
by or resulting from accidents, external damage, alteration,
modication, abuse, misuse or misapplication.
The Guarantee does not cover any damage caused by taking the
appliance apart yourself, or attempting to repair the appliance
yourself.
THE PRODUCT IS INTENDED FOR DOMESTIC USE ONLY.
Please keep your Purchase Receipt and contact us directly if you
encounter any problems with your product.
HORWOOD SHALL NOT BE LIABLE FOR INCIDENTAL OR
CONSEQUENTIAL DAMAGES RESULTING FROM THE USE OF
THIS PRODUCT (INCLUDING COLOUR FADING, SCRATCHES OR
ACCUMULATED DIRT) WITHOUT FOLLOWING THE USE, CARE &
SAFETY INSTRUCTIONS.
Note: Due to the introduction of improvements from time to time, the right
is reserved to supply products which dier slightly from those illustrated and
described in this publication.
Errors and Omissions Excepted.
JUDGE CUSTOMER SERVICES, HORWOOD, AVONMOUTH WAY,
BRISTOL, BS11 9HX, GREAT BRITAIN
customerservice@horwood.co.uk
www.judgecookware.co.uk
Tel: 0117 940 0000
CORRECT DISPOSAL OF THIS PRODUCT
This marking indicates that this product should not be disposed with other household
wastes throughout the EU. To prevent possible harm to the environment or human health
from uncontrolled waste disposal, recycle it responsibly to promote the sustainable reuse
of material resources. To return your used device, please use the return and collection
systems or contact the retailer where the product was purchased. They can take this
product for environmental safe recycling.
FOR DOMESTIC USE ONLY

Mini Chopper
Mini Chopper
Mini Chopper
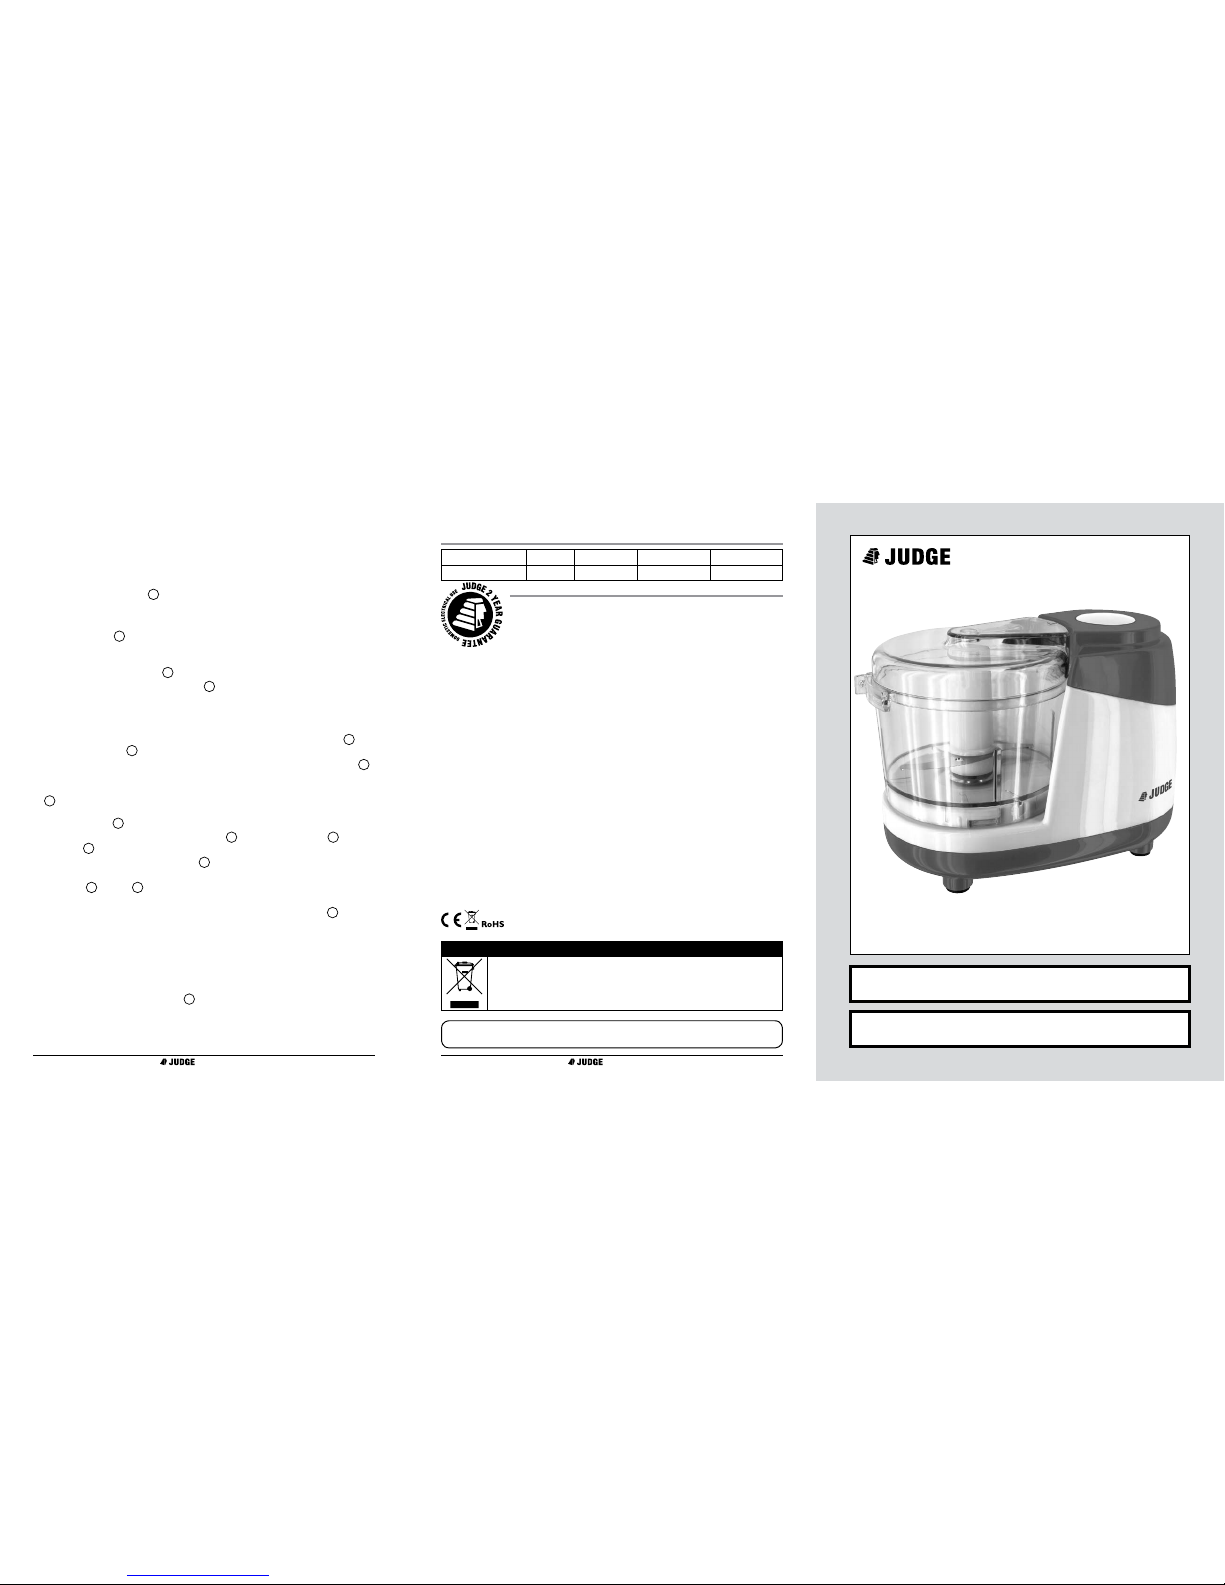
Identifying the parts
(with Part Numbers for customer replaceable items)
Lid 1.
(JEA49LD)
Bowl
2.
(JEA49BL)
Cutting blades
3.
assembly
(JEA49CB)
Motor body
4.
Drive shaft5.
ON/OFF (pulse) button6.
Top moulding7.
Mains lead and plug8.
How to use
Food to be chopped should be precut into pieces of approximately •
12mm / ½” . To achieve an even chop, these pieces should be similar in size.
See “Preparing foods”.
Place food in the Bowl
•
2
and lock the Lid 1 into position. A maximum of
200ml of food can be processed at one time, as indicated by the tops of the
vertical bars on the side of the Bowl
2
. Larger quantities of food would
require separate batches to be processed. Stabilise the Mini Chopper by
placing one hand on top of the Lid
1
.
Insert the Mains Plug
•
7
into a mains socket and switch on at the socket. The
ON/OFF Button
6
will illuminate to conrm that power is applied.
Even chopping
Press and release the ON/OFF Button •
6
two or three times, allowing the
food pieces to drop to the bottom of the Bowl
2
between bursts.
Using this technique you can get an even chop without over-processing the
•
food - inspect the food by looking through the Bowl 2 as you go.
For a coarse chop, pulse just a few times.
Fine chopping
For ne chopping, or making purées, press and hold the ON/OFF Button •
6
to
run the machine continuously for up to 20 seconds, followed by a 60-second
wait time. Do not operate empty or allow to “labour”.
Continue to repeat this until the required consistency is achieved.
•
If any pieces of food should stick to the inside of the Bowl •
2
and not be
chopped effectively it might be necessary to remove the Lid
1
and scrape
down the sides with a plastic spatula.
An interlock system is incorporated to prevent operation when the Lid
•
1
is removed. Nevertheless, it is good practice to ensure the machine is
disconnected from the mains electricity supply when performing any activity
within the Bowl. PLEASE OBSERVE THIS GOOD PRACTICE. DO NOT PUT
YOUR FINGERS INTO THE BOWL
2
.
Removing processed food
Before removing food from the Bowl •
2
, wait until the Cutting Blades
Assembly
3
has stopped spinning, and remove the lid 1 by turning anti-
clockwise.
DO NOT TRY TO REMOVE THE BOWL
•
2
AND LID 1 AS ONE UNIT, AS
THIS COULD DAMAGE THE APPLIANCE.
Be sure to remove the Cutting Blades Assembly
•
3
before emptying the Bowl
2
.
Unlock the Bowl
•
2
from the Motor Body 4 by turning anti-clockwise and
lifting straight up. Empty chopped food from the Bowl ; if necessary, use a
plastic spatula.
Before rst use
Remove any labels and/or swingtickets.1.
Follow the instructions for “Cleaning”.2.
How to assemble
Ensure that the machine is disconnected from the electricity supply before
assembly.
Fit the Bowl
3.
2
over the Drive Shaft
5
, rotate until the two lugs in the bowl
base slot into the cutouts in the Motor Body
4
, then lock positively in
position by turning clockwise. (This safety interlock ensures the Mini Chopper
will not work if the bowl is not locked into position correctly).
Locate the Cutting Blades Assembly
4.
3
over the
Drive Shaft
5
and Bowl 2 and turn using the
stem until it positively locates (the assembly drops
so that the lower blade is close to the bowl oor -
approximately 5mm).
Place the Lid
5.
1
on the top of the Bowl 2 so that
the arrow on the lid aligns with the left of the Top
Moulding
7
. Rotate the lid clockwise until the
arrow on the lid aligns with the centre of the top
moulding, so that the vertical lug on the side of the
lid positively engages into the slot in the Motor
Body
4
. (This safety interlock ensures the Mini
Chopper will not work if the bowl is not locked into
position correctly).
The Mini Chopper should be sited on a dry, level and stable surface, away
•
from direct heat. The Mains Lead 8 should be positioned so as not to cause
an obstruction or to overhang the edge of the surface.
1
3
2
4
5
8
6
Preparing foods
In all cases, food should be cut into pieces of approximately
12mm / ½”, after any special preparation as follows, and processed in amounts
of up to 200ml. If any food is too hard to cut with a knife, do not attempt
to process it in the Mini Chopper as the Cutting Blades Assembly
3
may be
damaged.
Fruit, vegetables
• - peel and core where applicable. Remove fruit stones and
seeds.
Meat, poultry and sh
• - these should be cold but not frozen. Pulse or run
the mini-chopper until the desired consistency is reached. Stop and check
frequently to avoid over-processing.
Bread, crackers, biscuits
• - break into 12mm / ½” pieces and process
continuously until chopped as preferred.
Liquids
• - the Mini Chopper is not suitable for processing liquids or food with a
high liquid content.
Tips
Occasionally, a piece of food may become jammed between the Cutting •
Blades Assembly 3 and the bowl 2 . Disconnect from the electricity supply.
Remove the Lid
1
. Remove the Bowl 2, lift out the Cutting Blades Assembly
3
to free the jam. Empty the food, remount the Bowl
2
onto the Motor Body
4
, t the Cutting Blades Assembly 3, rell with food and re-t the Lid 1.
Reconnect to the electricity supply and continue processing.
The maximum temperature of food that can be processed is 80°C, but it is
•
better to process foods at a lower temperature if possible.
Cleaning
Thoroughly wash the bowl 2, lid 1 and cutting blades assembly 3 before
use with liquid detergent and warm water, rinse and dry. Wipe the motor body
4
with a cloth dampened slightly with liquid detergent and warm water.
Reassemble the Mini Chopper and store with lid
1
ajar. Store blades 3
protected in a safe place to prevent accidents.
Removeable parts may be washed in the top shelf of a dishwasher.
•
DO NOT IMMERSE THE MOTOR BODY •
4
IN WATER.
Cautions
This appliance is not intended for use by persons (including children) with •
reduced physical, sensory or mental capabilities or lack of experience or
knowledge, unless they have been given supervision or instruction concerning
use of the appliance by a person responsible for their safety.
Before use, check that your mains power supply corresponds to the voltage
•
shown in this manual.
This appliance is not intended to be operated by means of an external timer or
•
a separate remote-control system.
7
 Loading...