

Judge JEA43 Instruction Manual & Recipe Booklet
Digital
Bread
Maker
Model No: JEA43
Instruction
Manual &
Recipe Book
Please read this
instruction manual
carefully before
use and save for
later reference.
Version 003 2018
UNPACK YOUR DIGITAL BREAD MAKER CAREFULLY AND REMOVE
PACKING PIECES, LABELS AND STICKERS BEFORE USE.

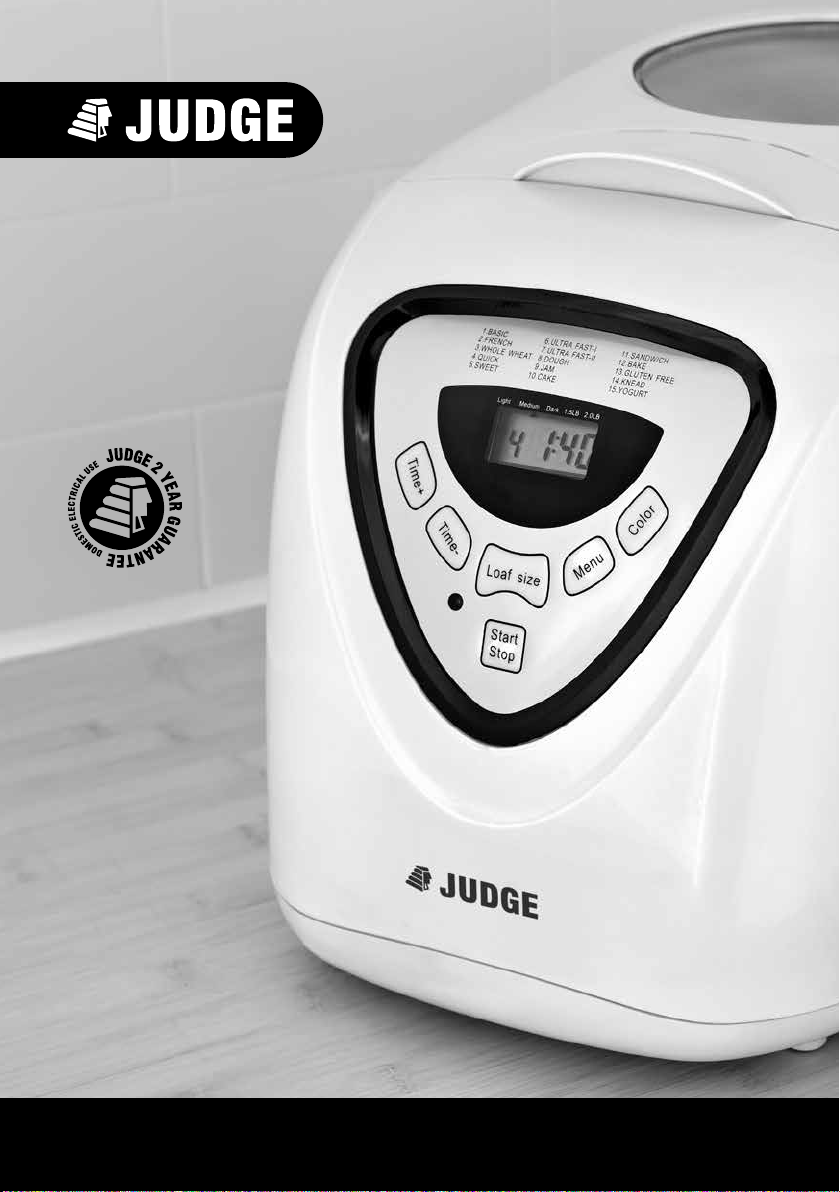
Identifying the parts of your Judge Digital Bread Maker
(with Part Numbers for customer replaceable items)
Bread Maker Body
Lid
Bread Pan (JEA43BP)
Kneading Blade (JEA43KB)
Measuring Cup (JEA43MC)
Measuring Spoon (JEA43MS)
Hook (JEA43HK)
Power Cable and Plug
Controls & Indicators Panel (see below)
Time + (Increase) Button
Time - (Decrease) Button
Programme Running Indicator
Start/Stop Button
Menu Button
Colour Button
Loaf Size Button
Selected Programme
Time Left
Selected Loaf Colour
Selected Loaf Weight
1.BASIC
2.FRENCH
3.WHOLE WNEAT
4.QUICK
5.SWEET
Light Medium Dark 1.5LB 2.0LB
Time+
Time-
Digital Bread Maker
6.ULTRA FAST-I
7.ULTRA FAST-II
8.DOUGH
9.JAM
10.CAKE
Loaf size
Start
Stop
11.SANDWICH
12.BAKE
13.GLUTEN FREE
14.KNEAD
15.YOGURT
Menu
Colour

Functions
The functions provided by the Controls and Indicators above are as follows.
Please familiarise yourself with these before operating the Bread Maker.
At Power-On
When the Bread Maker is plugged in
and switched on at the mains, a single
long “beep” will sound, the Selected
Programme
and the Time Left
as 3:00, in the format h:mm, with
the colon “:” displayed steadily. The
Selected Loaf Colour
are each indicated by a small
triangle and are initially displayed
as Medium and 2lb, respectively.
Programme Select
There are 15 different numbered
programmes available, listed at the
top of the Controls & Indicators panel
; these are described in more detail
under “Programmes”. The selected
programme number (1 to 15) is
shown in the digital display
Pressing the Menu Button
the programme number with each press,
until Programme 15 is reached, after
which it will cycle to Programme 1.
Loaf Colour
Baking programmes allow three
alternative loaf colours to be selected,
Light, Medium or Dark, defaulting to
Medium. The Selected Loaf Colour
is indicated by a small triangle and
selected using the Loaf Colour Button
, which cycles through the three options.
Loaf Size/Weight
Baking programmes allow two
alternative loaf sizes to be selected,
1.5lb or 2.0lb (approximately 0.7kg
or 0.9kg), defaulting to 2.0lb. The
Selected Loaf Weight
by a small triangle and selected
using the Loaf Size Button
alternates between 1.5lb and 2.0lb.
will be displayed as ‘1’
will be displayed
and Weight
.
increases
is indicated
, which
Starting and Stopping the Programme
When the required programme (with any
adjustment - see Programme Time) has been
selected, pressing the Start/Stop Button
will start the programme. The Program
Running Indicator
Time Left
the “:” flashing. All buttons except Stop/
Start are disabled during this period.
The programme can be stopped at any time
by pressing the Start/Stop Button
holding for 3 seconds. A single long “beep”
will sound and the display will return to its
Power-on status (see “At Power-on”).
Programme Time Delay
It is possible to delay the start of many of the
programmes, for example if you want a loaf
to be freshly baked for the following morning.
Pressing the Time+ Button
increase the overall time by delaying the start
in increments of 10 minutes; pressing the TimeButton
either button causes the time to adjust rapidly
in increments of 10 minutes. The total Time
Left
maximum extended programme time is 13 hours.
For example, if you wish your bread to be ready
for 07:00 am the following day and it is now
08:30 pm (20:30) today, you need your bread to
finish baking in 10 hours and 30 minutes. After
adding your ingredients, you can select your
required programme and the total programme
time will be displayed as Time Left
3:50 for Programme 1. Use the Time+
TimeLeft
is pressed, the Time Left
it reaches 3:50, then the baking programme will
begin and run for 3 hours and 50 minutes.
DO NOT USE THE PROGRAMME TIME DELAY
WITH EASILY PERISHABLE INGREDIENTS, SUCH
AS EGGS, FRESH MILK, FRUIT OR ONIONS.
display will count down, with
reduces this delay. Holding down
(delay + baking time) is displayed; the
Buttons to adjust the displayed Time
to 10:30. Once the Start/Stop Button
will illuminate and the
and
repeatedly will
, for example
and
will count down until
Digital Bread Maker

Keep Warm
After baking bread, but not other programmes, the Bread Maker will automatically keep
the bread warm for up to 60 minutes, or until the Start/Stop Button
Power Interruptions
The Bread Maker has a memory feature, to allow it to continue after an
interruption to the mains power during a programme. If the power is restored
within 15 minutes, the Bread Maker will resume the programme automatically.
Otherwise, the programme will have to be reselected and restarted, with fresh
ingredients unless the interrupted programme is still in the kneading phase.
Programmes
The following programmes are available. Some buttons have no effect, or
have a different function in certain programmes, as shown in the table.
Programme Description Time± Loaf Size Colour
1
Basic
2
French
3
Whole Wheat
4
Quick
5 Sweet Knead, rise and bake sweet (crisp) bread 2lb/1.5lb L/M/D
6
Ultra Fast I
7
Ultra Fast II
8
Dough
9 Jam For boiling jams and marmalades
10
Cake
11
Sandwich
12
Bake
13
Gluten Free
14 Knead Knead only, no rise or bake
15
Yogurt
N/R Function available but not recommended L/M/D Light/Medium/Dark
Knead, rise and bake normal bread. You may
also add ingredients for flavouring
Knead, rise and bake with a longer rise time,
for crisper crust and lighter texture
Knead, rise and bake with a longer preheat
time to allow the grain to soak up water and
expand
Knead, rise and bake with baking soda or
baking powder - smaller with dense texture
Knead, rise and bake in shortest time. Usually
loaf is smaller and rougher than using Quick
As Ultra Fast - I, but for larger loaf 2lb L/M/D
Knead and rise but no bake, to allow the
dough to be removed and shaped, e.g. for
rolls, pizza, steamed bread
Knead, rise and bake cake mixture with
baking soda or baking powder
Knead, rise and bake light texture bread with
a thinner crust
Bake, no knead or rise. Can be used to extend
baking time
Knead, rise and bake using gluten-free
ingredients
Making yogurt from milk and starter.
Maintains ingredients at correct temperature
Function available Function unavailable
is pressed.
2lb/1.5lb L/M/D
2lb/1.5lb L/M/D
N/R 2lb/1.5lb L/M/D
1.5lb L/M/D
1.5lb L/M/D
2lb/1.5lb
2lb/1.5lb L/M/D
8h/6h
Digital Bread Maker
Before First Use
Remove any labels and/or swing tickets.
In order to remove any residue
from the manufacturing process
before use, proceed as follows:
1. Follow the “Cleaning” instructions. Ensure
the parts are completely dry.
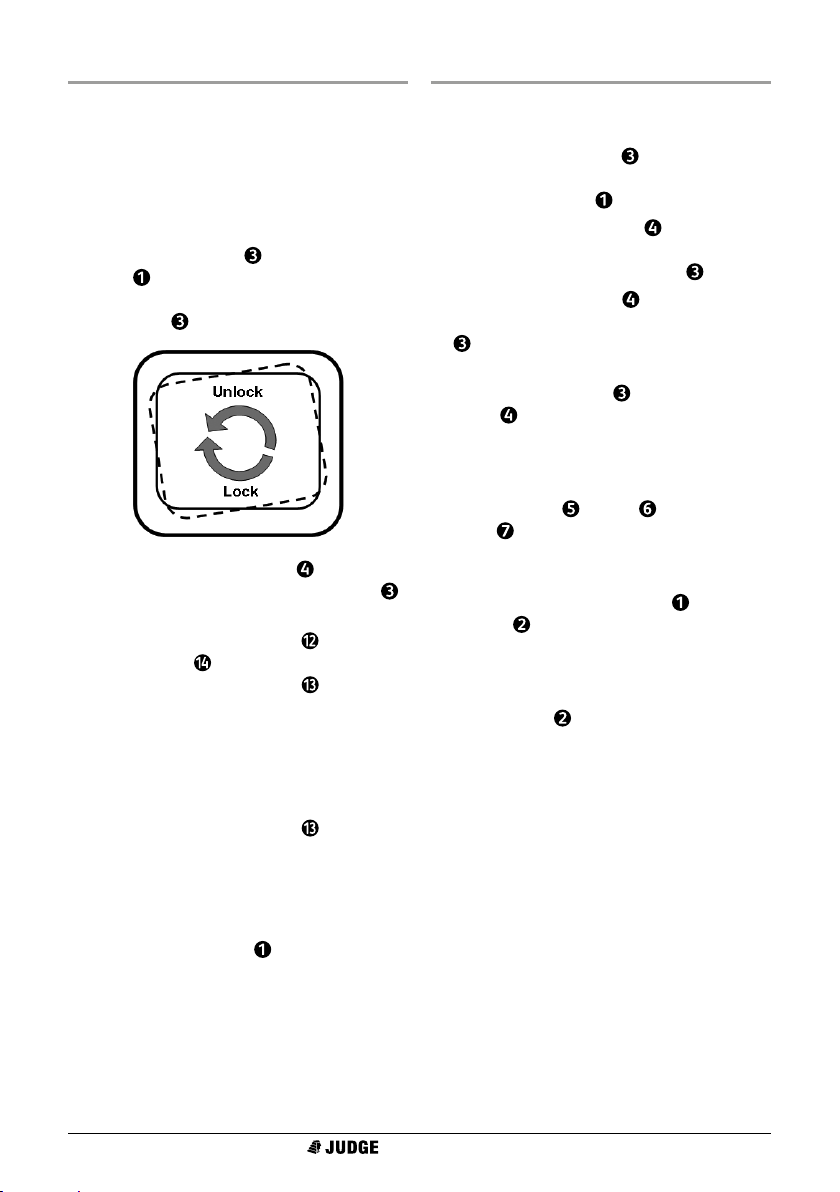
2. Place the Bread Pan in the Bread Maker
Body
at an angle (see diagram) and
adjust until it drops home. Rotate the
Bread Pan
clockwise to lock into place.
3. Locate the Kneading Blade on the
spindle in the centre of the Bread Pan
and push down until it is seated.
4. Select the Bake Programme using the
Menu Button
using the Start/Stop Button
. Start the programme
.
• It is normal for smoke and a
hot smell to be emitted during
this process; manufacturing
residues are being removed.
5. After 10 minutes, stop the programme
using the Start/Stop Button
machine to cool for 20 minutes.
. Allow the
6. Repeat steps 1 to 3 above to clean and
re-assemble the Bread Maker.
• DO NOT IMMERSE ANY PART OF THE
BREAD MAKER BODY
IN WATER
Cleaning
Disconnect the Bread Maker from the
power and allow to cool before cleaning.
1. Rotate the Bread Pan counterclockwise
to unlock (see diagram). Lift out of the
Bread Maker Body
.
2. Hold the Kneading Blade firmly and
pull upwards to remove it from the spindle
in the centre of the Bread Pan
• If the Kneading Blade is difficult
to remove, fill the Bread Pan
with hot water and allow to
soak for about 30 minutes.
3. Wash the Bread Pan and Kneading
Blade
washing-up liquid. Do not use any harsh
or abrasive cleaning materials. Both these
items are dishwasher safe.
4. Wash the Cup , Spoon and
Hook
washing-up liquid. Do not use any harsh
or abrasive cleaning materials.
5. Wipe the Bread Maker Body
and Lid
with warm water and detergent. Do not
use any abrasive cleaning materials.
6. Dry all parts thoroughly before storing,
when the Lid
in warm water and detergent or
in warm water and detergent or
with a cloth, slightly dampened
should be left closed.
.
Digital Bread Maker

Operating Instructions
Please familiarise yourself with the “Functions” provided by the
Controls and Indicators before operating the Bread Maker.
1. Place the Bread Pan in the Bread
Maker Body
and adjust until it drops home. Rotate the
Bread Pan
at an angle (see diagram)
clockwise to lock into place.
2. Locate the Kneading Blade on the
spindle in the centre of the Bread Pan
and push down until it is seated.
3. Measure and add the ingredients to
the Bread Pan
your recipe book or the instructions
on a ready bread mix, but subject to
the guidance and limits given under
“Ingredients”. Close the Lid
in accordance with
gently.
4. Insert the Plug into a mains socket.
5. Select the desired programme
using the Menu Button
.
6. Select the required crust colour,
using the Colour Button
available in all programmes).
(not
7. Select the appropriate loaf size,
using the Loaf Size Button
available in all programmes).
(not
or stop the programme before
completion, press and hold the Start/
Stop Button
until a long “beep” sounds.
12. Rotate the Bread Pan
counterclockwise to unlock (see diagram).
Lift out of the Bread Maker Body
• THE BREAD PAN AND BREAD WILL BE
VERY HOT. ALWAYS HANDLE WITH CARE
AND USE OVEN MITTS OR GLOVES.
13. Use a non-metallic spatula to
gently loosen the bread from the
sides of the Bread Pan
14. Turn the Bread Pan upside down onto
a rack or clean cooking surface and gently
shake until the bread falls out. Allow
to cool for 20 minutes before slicing.
15. If the Kneading Blade is stuck in the
bread, use the Hook
16. Disconnect the Bread Maker
from the mains power.
8. If required, set the start delay, using
the Time+
(not available in all programmes).
and Time- Buttons
9. Start the programme, using
the Start/Stop Button
.
10. During the programme, if the Bread
Maker pauses and sounds 10 short
“beeps”, you may add additional
ingredients, such as fruit.
11. When the programme is completed,
the Bread Maker will pause and sound
10 short “beeps”, followed by one long
“beep”. It will keep the bread warm
for a further 60 minutes if left.
• To halt the Keep Warm function,
for about 3 seconds
.
.
to remove it.
Digital Bread Maker

Ingredients
This section introduces the main ingredients used in baking bread
and making yogurt and how to measure them. Exact instructions
will be found in your recipe book or the ingredient packet.
Measuring Ingredients
The quantity of ingredients you use is very
important to achieving good results. To assist
in this, both a Measuring Cup
graduated in liquid ounces, millilitres and
fractions of a cup,
and a Measuring Spoon
teaspoon and tablespoon measure.
Water, other liquids and larger quantities
of dry ingredients such as flour should
be measured using the Measuring Cup
; ensure you are viewing the cup
horizontally. Wash the cup thoroughly
between ingredients other than water.
Smaller quantities should be measured using
the Measuring Spoon
Ensure that measured dry powder
ingredients are level with the rim of
the spoon, for example with a knife
blade. Store such ingredients in cool
and dry conditions, loosely packed.
THE MAXIMUM QUANTITY OF FLOUR
IS 4 CUPS. THE MAXIMUM QUANTITY
OF YEAST IS 3 TEASPOONS.
Adding Ingredients
It is important to add ingredients in
the correct sequence, as applicable:
Usually, water or other liquid should be
added first, then eggs, followed by sugar,
salt and flour, then yeast or baking powder
as the last ingredient. An exception to
this is heavy dough with high rye or
wholemeal content, in which case it is
advisable to add yeast, then other dry
ingredients first, then liquid ingredients.
This will give better results from kneading.
Do not allow yeast to come into contact
with liquid or salt whilst adding ingredients.
This requires that some flour is kept dry to
.
, which is
, which has a
allow yeast to be added. To add yeast, first
make a small indentation in a dry area of
flour, then add the yeast to the indentation.
Additional fruit ingredients, such a
raisins, should not be included with
the original ingredients, as they can
lose flavour during mixing. During the
following programmes, a series of 10
short “beeps” will sound to indicate that
additional ingredients can be added:
• Basic
• French
• Whole Wheat
• Sweet
• Sandwich.
Flour
Flour is the most important
ingredient in bread making.
Bread flour (also called “strong flour”) has
a high protein content which results in a
high gluten production during kneading.
It has good elasticity, should rise well
and maintain the bread size after rising,
to give a larger loaf with good texture.
Wholemeal flour (also called “whole
wheat flour”) is made by grinding the
entire wheat kernel, so is heavier and
contains more nutrients. Bread made from
wholemeal flour will tend to be smaller
and heavier in texture, so some recipes call
for a proportion of bread flour as well.
Plain flour should not normally be used for
making bread, except in the Quick Bread
and Ultra Fast programmes, or for cakes,
mixed with baking soda or baking powder.
Flour made from other grains, such
as corn or oatmeal does not produce
gluten but can be added to enhance the
flavour and produce a rougher texture.
Digital Bread Maker

Cake Powder
Cake powder is made by grinding soft
wheat or low protein wheat and is
specifically intended for making cakes.
Sugar
Sugar provides food for the yeast, as
well as adding sweetness to the taste,
creating a finer and softer texture and
giving colour to the crust. Certain recipes
may call for sugars other than white
granulated or caster, such as brown sugar.
Yeast
Yeast is a living organism which is
nourished by the sugars in the mixture,
causing it to ferment and create carbon
dioxide gas, which makes the bread rise
and gives it its open texture. You can use
active dry yeast or instant yeast, with 1 ½
teaspoons of active dry yeast equivalent
to 1 teaspoon of instant yeast. Observe
the storage instructions on the packet.
If the yeast is inactive or dead, the
bread will not rise properly. You can
test if the yeast is living as follows:
1. Half fill a cup with warm water (45° to
50°)
2. Dissolve 1 teaspoon of white sugar in the
water, then sprinkle 2 teaspoons of yeast
over the water; do not stir.
3. Place the cup in a warm place for
about 10 minutes.
4. The yeast should produce froth, up
to the top of the cup. If it does not, this
indicates that it is dead and should not
be used.
Salt
Salt can be used to enhance the flavour
of the bread. It also strengthens the
structure of the gluten and makes it more
stretchable. However, it also inhibits the
action of the yeast and therefore rising,
so it is important not to use too much.
Eggs
Adding lightly beaten eggs can improve
bread texture, add nourishment and
make the loaf larger. This can also help
increase the storage life of the bread.
Fats
Fats (such as butter, margarine or oils) can be
added to make bread softer, add flavour and
help increase the storage life of the bread.
Baking Powder and Soda
Baking powder or soda is used in the
Quick Bread and Ultra Fast programmes,
as well as for cakes. When combined with
liquid and heated, it produces gas from a
chemical reaction, to make the mixture rise.
Bread Mix
A wide variety of ready mixed Bread
Mixes are available with all the
necessary ingredients and requiring
only the addition of water. Follow
the instructions on the packet.
Water and Other Liquids
Water is an essential ingredient in making
bread. For most types of bread, the initial
water temperature should be between
20° and 25°; however, for an Ultra Fast
programme, the initial water temperature
should be between 48° and 50°, as measured
by a cooking thermometer. Water may be
replaced by fresh milk, or water mixed with
2% milk powder, which may enhance the
bread flavour and improve crust colour.
Some recipes may call for juice (e.g. apple,
orange or lemon) to enhance the flavour.
Yoghurt is made from milk, with
a starter - see “Baking Tips”.
Digital Bread Maker
 Loading...