

www.jts-germany.de
9
TG-10R /1
Bestellnummer 25.3070
TG-10T/1
Bestellnummer 25.3080
Tour-Guide-System 863 – 865 MHz
DEUTSCH
Diese Anleitung richtet sich an Benutzer ohne besondere Fachkenntnisse.
Bitte lesen Sie die Anleitung vor dem
Betrieb gründlich durch und heben Sie
sie und die beiliegende Frequenzliste
für ein späteres Nachlesen auf.
1 Verwendungsmöglichkeiten
Der Sender TG-10T/1 bildet in Verbindung mit einem
oder mehreren Empfänger/n TG-10R /1 ein mobiles
Funksystem zur Sprachübertragung, geeignet z. B. für
Gruppenführungen oder mehrsprachige Vorträge. Für
die Funkübertragung stehen 16 Kanäle im Frequenzbereich 863 – 865 MHz zur Verfügung, von denen bis
zu 3 Kanäle gleichzeitig genutzt werden können, ohne
sich gegenseitig zu stören. Die Übertragungsreichweite
hängt von den örtlichen Gegebenheiten ab und kann
bis zu 60 m betragen.
1.1 Konformität und Zulassung
Hiermit erklärt MONACOR INTERNATIONAL, dass der
Sender TG-10T/1 und der Empfänger TG-10R /1 der
Richtlinie 2014 / 53 / EU entsprechen. Die EU-Konformitätserklärungen können bei MONACOR INTERNATIONAL angefordert werden. Das Funksystem ist für
den Betrieb in den EU- und EFTA-Staaten allgemein
zugelassen und anmelde- und gebührenfrei.
2 Wichtige Hinweise für den Gebrauch
Das Gerät entspricht allen relevanten Richtlinien der EU
und trägt deshalb das -Zeichen.
Setzen Sie das Gerät nur im Innenbereich ein und
•
schützen Sie es vor Feuchtigkeit und Hitze (zulässiger
Einsatztemperaturbereich 0 – 40 °C.
Verwenden Sie für die Reinigung nur ein trockenes,
•
weiches Tuch, niemals Wasser oder Chemikalien.
Wird das Gerät zweckentfremdet, falsch bedient oder
•
nicht fachgerecht repariert, kann keine Haftung für daraus resultierende Sach- oder Personenschäden und
keine Garantie für das Gerät übernommen werden.
Soll das Gerät endgültig aus dem Betrieb
genommen werden, übergeben Sie es zur
umwelt gerechten Entsorgung einem örtlichen Recyclingbetrieb.
3 Stromversorgung
Der Sender/Empfänger wird über einen Lithium-IonenAkku mit Strom versorgt. Vor der ersten Inbetriebnahme
den Akku voll aufladen. Zur Aufladung sind von JTS folgende Ladegeräte erhältlich:
– Ladestation TG-10CH2 zum Aufladen der Akkus von
bis zu 2 Geräten gleichzeitig
– Transportkoffer TG-10CH18 zum Aufladen der Akkus
von bis zu 18 Geräten gleichzeitig
– rollbarer Transportkoffer TG-10CH36 zum Aufladen
der Akkus von bis zu 36 Geräten gleichzeitig
Das Gerät nicht mit entladenem Akku lagern und bei
längerem Nichtgebrauch alle drei Monate nachladen.
Einen defekten Akku nur durch eine Fachkraft auswechseln lassen, da das Gerät dazu geöffnet werden muss.
Defekte Akkus gehören nicht in den Hausmüll, sondern müssen als Sondermüll entsorgt werden.
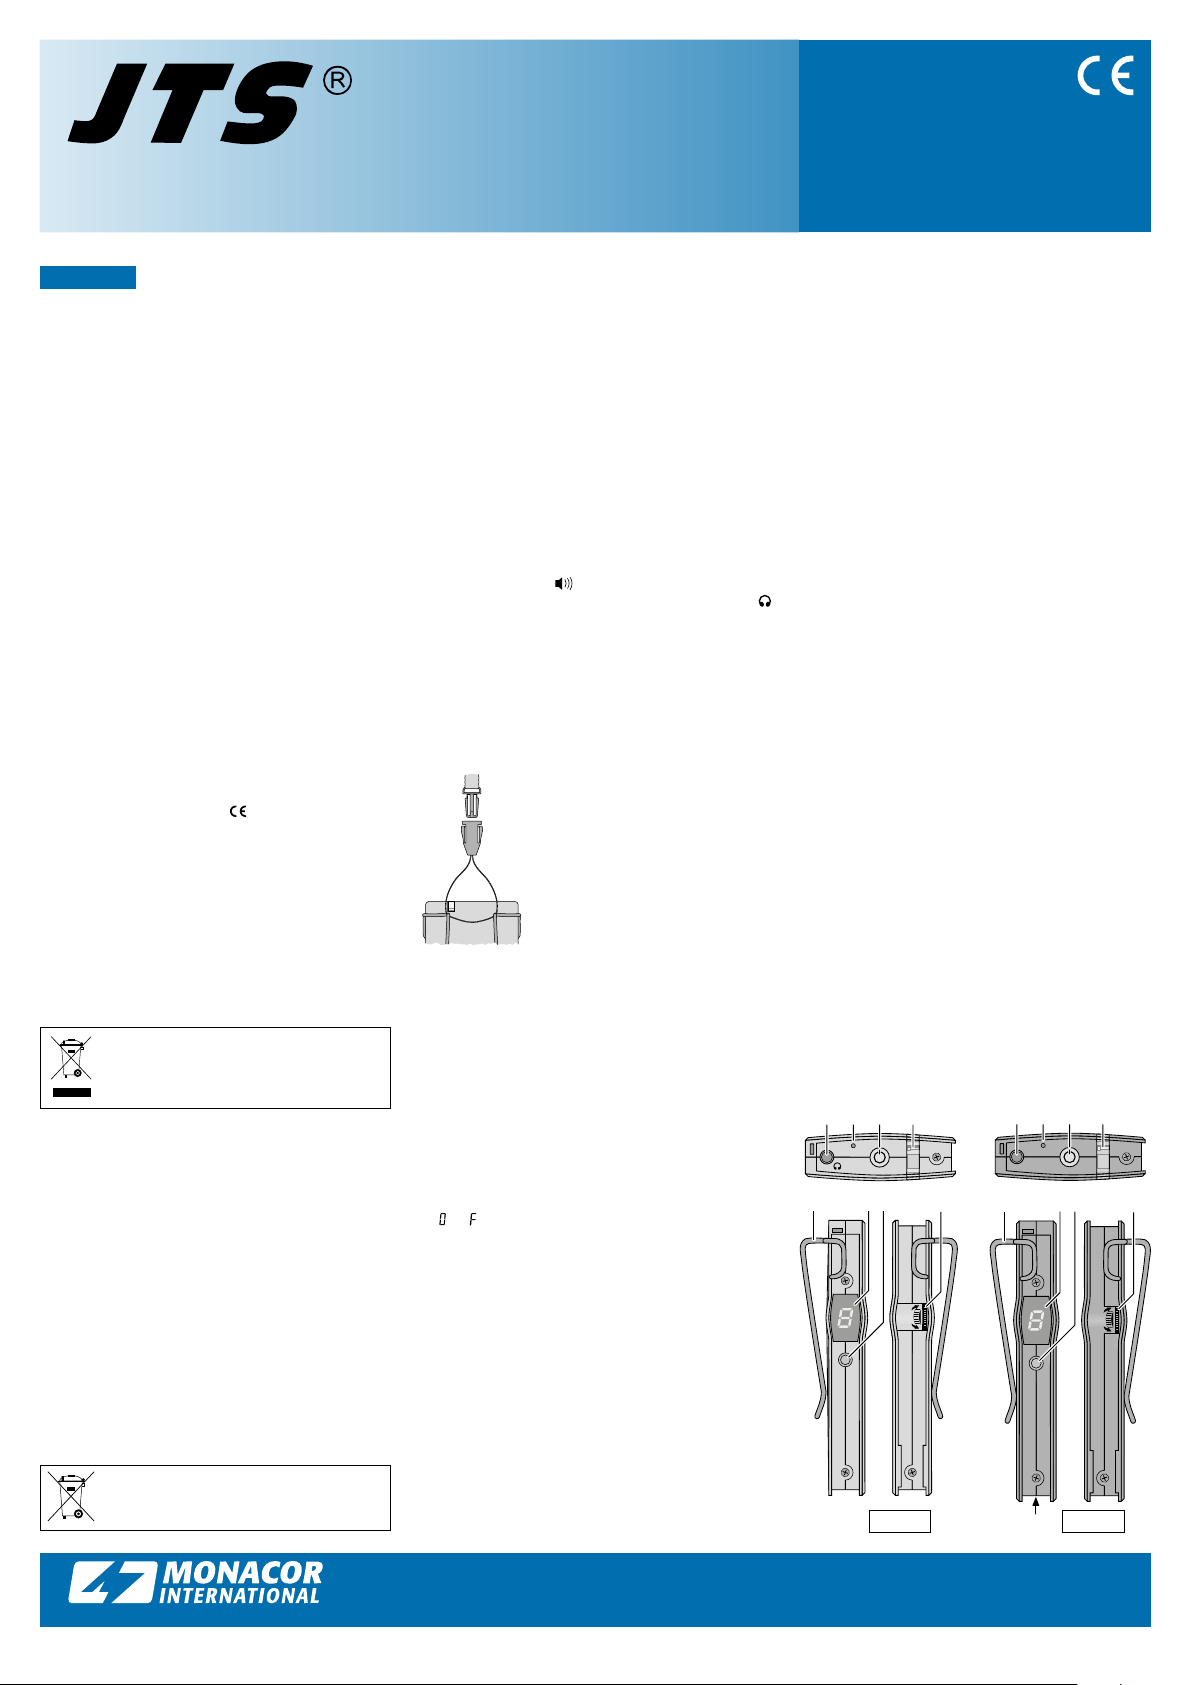
4 Mikrofon an den Sender anschließen
Soll statt des internen Mikrofons (9) das Ohrbügelmikrofon verwendet werden, dieses an die Buchse
MIC INPUT (1) anschließen. Damit ist das interne Mikrofon abgeschaltet. Bei Bedarf einen Poppschutz über
die Mikrofonkapsel ziehen. Den Ohrbügel auf das linke
Ohr setzen, so dass die Ohrläppchenstütze von hinten
gegen das Ohrläppchen drückt. Mit der Klemme kann
das Mikrofonkabel an der Kleidung fixiert werden.
5 Ohrhörer an den Empfänger anschließen
Um den Ohrhörer abzupolstern, kann er mit dem
Schaumstoffüberzug umwickelt werden: Den Ohrhörer, mit der bedruckten Seite nach hinten, in die unbedruckte Tasche des Überzugs stecken, den Überzug
um den Hörer legen und die zweite Tasche über ihn
stülpen. Die Bedruckung kennzeichnet dann die
Schallaustrittsseite. Den Ohrhörer an die Buchse (1)
anschließen und an der Ohrmuschel anbringen.
Soll der Ton an ein Hörgerät übertragen werden,
kann statt des Ohrhörers die Induktionsschlinge NL-90
(als Zubehör von MONACOR erhältlich) angeschlossen
werden. Sie wird um den Hals gelegt und überträgt
den Ton über ein Magnetfeld an Hörgeräte mit einer
„Telefonspule“.
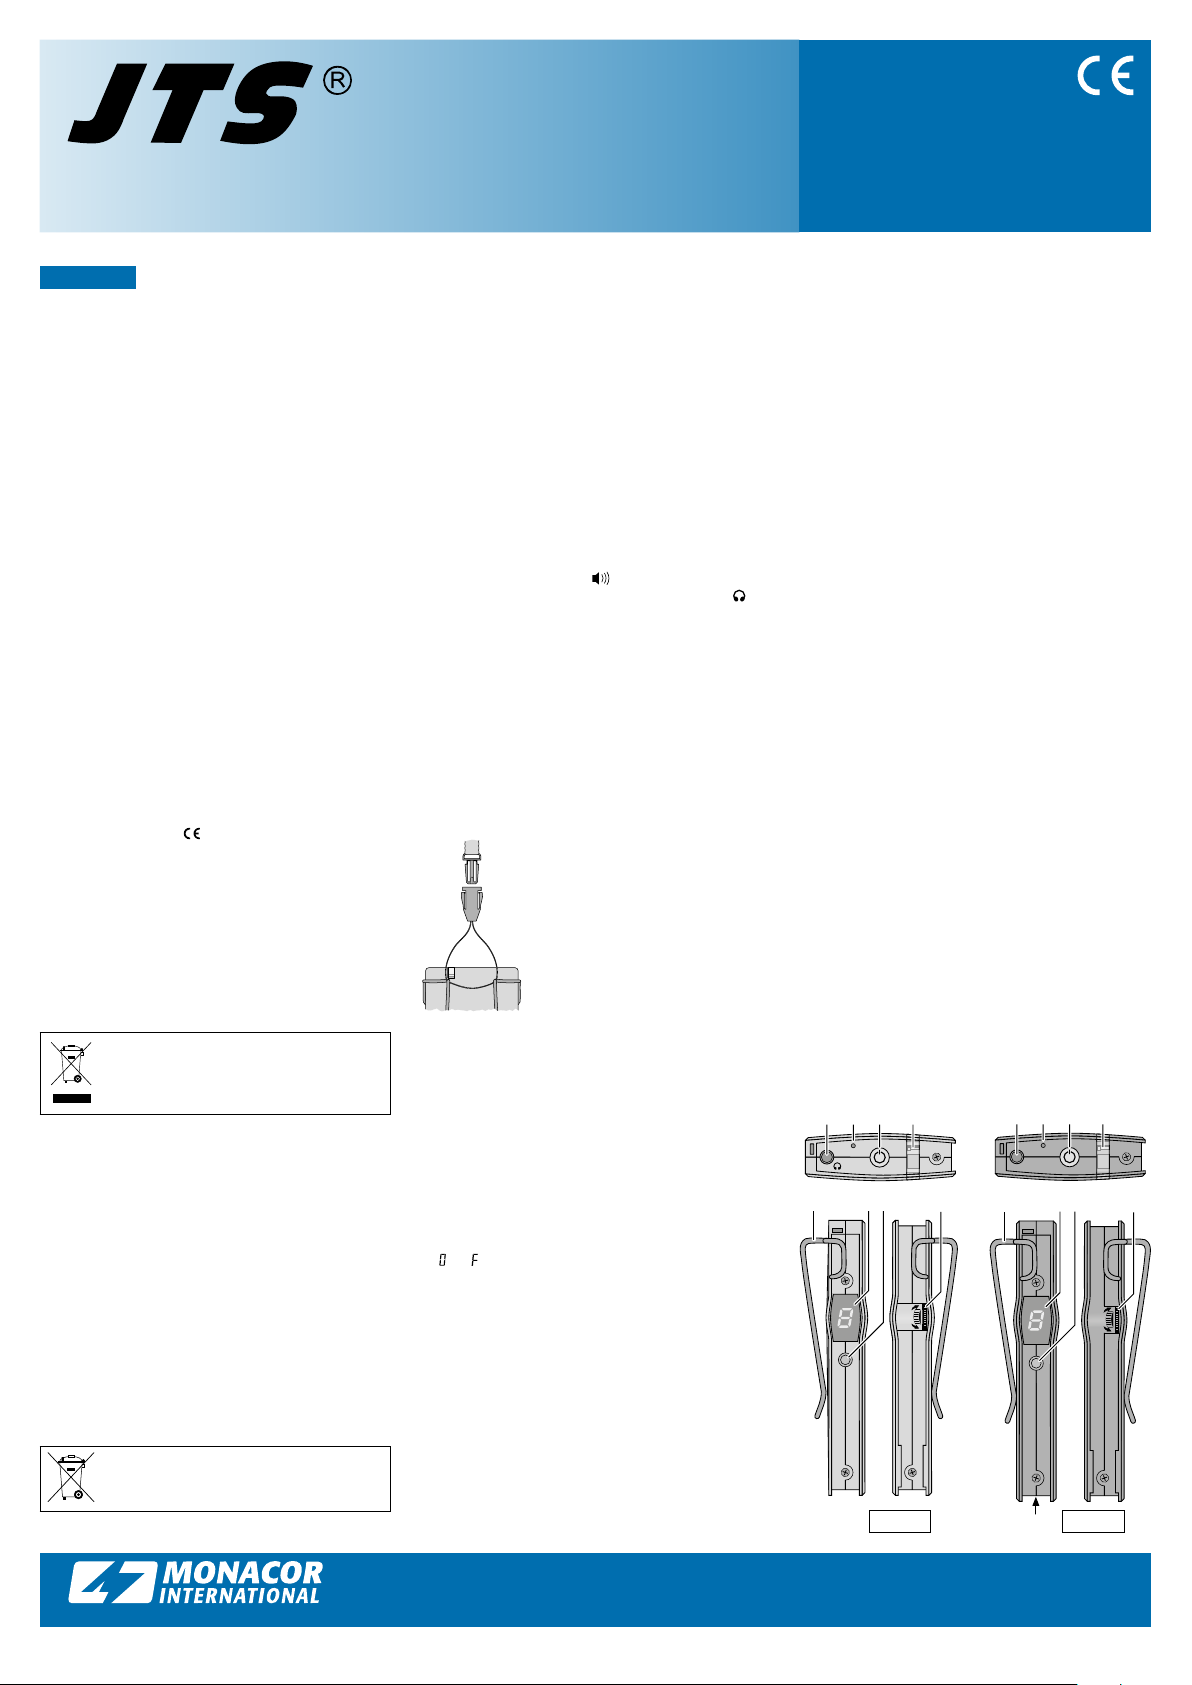
6 Gerät am Körper tragen
Der Sender/Empfänger lässt sich über seinen Bügel (5)
an der Kleidung festklemmen (z. B. am Gürtel, an der
Hosentasche) oder über das Halsband tragen:
Die Befestigungsschlaufe des Bands
über den Bügel ziehen, durch Verschieben des Druckknopfes am
Band die gewünschte Bandlänge
einstellen und das Band um den
Hals hängen. Durch Entriegeln der
Schnappvorrichtung (
lässt sich das Gerät leicht wieder
abnehmen und gegen ein anderes
austauschen.
Abb. links)
☞
7 Inbetriebnahme
1) Zum Einschalten der Geräte des Systems die Taste
POWER (3) drücken. Die Betriebsanzeige (4) leuchtet grün. Leuchtet sie rot, ist der Akku fast leer und
sollte möglichst schnell wieder aufgeladen werden.
Nach jeder Tastenbetätigung zeigt das Display (6)
für ca. 9 Sekunden den eingestellten Übertragungskanal an, dann erlischt die Anzeige. Durch kurzes
Drücken einer Taste am Gerät lässt sich das Display
wieder für ca. 9 Sekunden aktivieren.
2)
Den Übertragungskanal aus den verfügbaren Kanälen
bis auswählen. Der Sender und der /die Empfänger eines Systems müssen auf den gleichen Kanal
eingestellt werden.
Zum Einstellen des Kanals die Taste CHANNEL
(7) so lange gedrückt halten, bis im Display ein
Punkt neben der Kanalanzeige blinkt. Dann die Taste
CHANNEL so oft drücken, bis der gewünschte Kanal
angezeigt wird. Der gewählte Kanal ist gespeichert,
wenn ca. 6 Sekunden nach der letzten Betätigung
der Taste CHANNEL der Punkt im Display erlischt.
3) Am Sender in das interne Mikrofon (9) oder in das
angeschlossene Ohrbügelmikrofon sprechen. Mit
dem Regler (8) am Sender die Lautstärke für das
gesendete Tonsignal einstellen und am Empfänger
die Wiedergabelautstärke. Vorsicht: Stellen Sie die
Lautstärke nie sehr hoch ein. Hohe Lautstärken können auf Dauer das Gehör schädigen!
4)
Ist der Empfang schlecht oder gestört, überprüfen ob:
– auf einem anderen Kanal die Übertragung besser ist.
– der Abstand zwischen Sender und Empfänger zu
groß ist.
– sich Hindernisse in der Übertragungsstrecke be-
finden, die das Funksignal abschirmen können.
Es lassen sich maximal 3 Systeme TG-10./1, die auf
unterschiedlichen Kanälen senden, störungsfrei parallel betreiben. Bei Parallelbetrieb mehrerer Systeme
auf ausreichend räumlichen Abstand zwischen den
einzelnen Systemen achten.
5)
Zum Zurücksetzen eines Geräts bei Funktionsstörungen kann mit einem dünnen Gegenstand, z. B.
Metallstift, die Taste RESET (2) betätigt werden. Das
Gerät schaltet sich dann aus und kann erneut in Betrieb genommen werden.
6)
Zum Ausschalten der Geräte die Taste POWER so
lange gedrückt halten, bis die Betriebsanzeige erlischt.
8 Technische Daten
Funkfrequenzbereich: � � � � � 863 – 865 MHz (Kanalbelegung
Audiofrequenzbereich:
Sendeleistung: � � � � � � � � � � � < 10 mW
intern� Sendermikrofon: � � � Elektret-Mikrofon
Zubehör
Sender � � � � � � � � � � � � � � � Elektret-Ohrbügelmikrofon (Kugel-
Empfänger: � � � � � � � � � � � dynamischer Mono-Ohrhörer mit
Stromversorgung:
Akku-Betriebszeit: � � � � � � � � bis zu 14 h (lautstärkeabhängig)
Maße, Gewicht: � � � � � � � � � � 54 × 99 × 17 mm, 80 g
Änderungen vorbehalten.
5 6 7 8
� � � � � � � � Lithium-Ionen-Akku 3,7 V/ 1300 mAh
4321
RESET
POWER
CHANNEL
TG-10R /1 TG-10T/1
beiliegende Frequenzliste)
☞
� � � � 40 Hz–18 kHz
(Nierencharakteristik)
charakteristik) mit Kabelklemme und
2×Poppschutz, Halstrageband
Polster, Halstrageband
RESET
MIC INPUT
POWER
5 6 7 8
CHANNEL
4321
Vertrieb von JTS-Produkten – Distrubution of JTS products
®
MONACOR INTERNATIONAL GmbH & Co. KG, Zum Falsch 36, 28307 Bremen, Germany
Copyright© by MONACOR INTERNATIONAL. All rights reserved. A-1227.99.03.11.2016
www.jts-germany.de
9
TG-10R /1
Order number 25.3070
TG-10T/1
Order number 25.3080
Tour Guide System 863 – 865 MHz
ENGLISH
These instructions are intended for
users without any specific technical
knowledge. Please read these instructions carefully prior to operation and
keep them and the attached frequency list for later reference.
1 Applications
In combination with a receiver or several receivers of
the type TG-10R /1, the transmitter TG-10T/1 creates
a mobile wireless system for speech transmission, e. g.
for guided tours or multilingual lectures. For wire les s
transmission, 16 channels are available in the frequency range of 863 – 865 MHz. Up to three of these
channels may be used at the same time without mutual
interference. The transmission range depends on local
conditions and may reach 60 m as a maximum.
1.1 Conformity and approval
Herewith, MONACOR INTERNATIONAL declare that the
transmitter TG-10T /1 and the receiver TG- 10R /1 comply with the directive 2014 / 53 / EU. The EU declarations
of conformity are available on request from MONACOR
INTERNATIONAL. The wireless transmission system is
generally approved for operation in EU and EFTA countries; it is licence-free and requires no registration.
2 Important Notes
This unit corresponds to all relevant directives of the EU
and is therefore marked with
The unit is suitable for indoor use only. Protect it
•
against humidity and heat (admissible ambient temperature range 0 – 40 °C).
For cleaning only use a dry, soft cloth; never use water
•
or chemicals.
No guarantee claims for the unit and no liability for
•
any resulting personal damage or material damage
will be accepted if the unit is used for other pur poses
than originally intended, if it is not correctly operated,
or if it is not repaired in an expert way.
If the unit is to be put out of operation definitively, take it to a local recycling plant for
a disposal which will not be harmful to the
environment.
.
3 Power Supply
The transmitter / receiver is supplied with power via a
lithium-ion rechargeable battery: Prior to initial operation, fully recharge the battery. The following chargers
are available from JTS:
– charging station TG-10CH2 to recharge the batteries
of up to 2 units at the same time
– transport case TG-10CH18 to recharge the batteries
of up to 18 units at the same time
– transport case with castors TG-10CH36 to recharge
the batteries of up to 36 units at the same time
Do not put the unit in storage with a discharged battery.
If the unit is not used for a longer period, recharge the
battery every three months.
As the unit must be opened for replacing the battery,
a defective battery must always be replaced by skilled
personnel.
Defective rechargeable batteries must not be
placed in the household waste; always take
them to a special waste disposal.
4 Connecting the Microphone to the Transmitter
When using the earband microphone instead of the
internal microphone (9), connect the earband microphone to the jack MIC INPUT (1). Thus, the internal
microphone will be deactivated. If required, cover the
microphone cartridge with the pop shield provided.
Put the earband on your left ear so that the earlobe
support will press against your earlobe from the rear.
A clip is provided to attach the microphone cable to
your clothes.
5 Connecting the Earphone to the Receiver
As a padding for the earphone, wrap the foam cover
around it: Put the earphone with its printed side to the
rear into the unprinted pocket of the cover, wrap the
cover around the earphone and slip the second pocket
over it. The printing will mark the side where the
sound is emitted. Connect the earphone to the jack
(1) and attach the earphone to your ear.
For transmitting the sound to a hearing aid, connect
the induction loop NL-90 (available as an accessory
from MONACOR) instead of the earphone. Put the loop
around your neck. Via a magnetic field, it will transmit
the sound to hearing aids with a “telephone coil”.
6 Wearing the Unit
To wear the transmitter / receiver,
attach the clip (5) to your clothes
(e. g. belt or trouser pocket) or use
the neckband: Pull the loop of the
band over the clip, slide the pushbutton to the desired length of the
band and put the band around your
neck. By unlocking the snap connec-
figure on the left), the unit
tion (
☞
is easily removed and exchanged
against another one.
7 Operation
1)
To switch on the units of the system, press the button
POWER (3). The POWER LED (4) will show green.
If it shows red, the battery is almost discharged and
should be recharged as soon as possible.
Whenever a button is pressed, the display (6) will
indicate the transmission channel adjusted for approx.
9seconds, then the channel number will disappear.
To reactivate the display for approx. 9 seconds, shortly
press a button on the unit.
2)
Select a transmission channel from the channels
to available. Always set the transmitter and the
receiver / receivers of a system to the same channel.
To set the channel, keep the button CHANNEL
(7) pressed until a dot starts flashing on the display
next to the channel number. Then press the button
CHANNEL repeatedly until the desired channel is
indicated. When the dot on the display disappears
approx. 6 seconds after the last actuation of the
button CHANNEL, the channel selected has been
memorized.
3) Speak into the internal microphone (9) of the transmitter or into the earband microphone connected.
With the control (8), adjust the volume of the audio
signal transmitted on the transmitter and the reproduction volume on the receiver. Caution: Never
adjust a very high volume. Permanent high volumes
may damage your hearing!
4) If the reception is poor or disturbed, check
– if the reception can be improved by using a different
transmission channel.
– if the transmitter and the receiver are too far apart.
– if there are obstacles in the transmission path which
may shield the radio signal.
Up to three systems TG-10./1 transmitting on dif-
ferent channels may be operated in parallel without
interference. When several systems are operated
in parallel, make sure to keep a sufficient distance
between the individual systems.
5)
To reset a unit in case of malfunction, press the button
RESET (2) by means of a thin object, e. g. a metal
pin. The unit will be switched off and may be set into
operation again.
6)
To switch off the units, keep the button POWER
pressed until the POWER LED is extinguished.
8 Specifications
Radio frequency range: � � � � 863 – 865 MHz (channel assignment
Audio frequency range:
Transmitting power: � � � � � � < 10 mW
Internal microphone
of transmitter: � � � � � � � � � � � electret microphone (cardioid)
Accessories
Transmitter: � � � � � � � � � � � electret earband microphone
Receiver: � � � � � � � � � � � � � dynamic mono earphone with
Power supply:
Operating time of battery: � up to 14 hours
Dimensions, weight:
Subject to technical modification.
5 6 7 8
� � � � � � � � � � � lithium-ion battery 3�7 V/ 1300 mAh
� � � � � � 54 × 99 × 17 mm, 80 g
4321
RESET
POWER
CHANNEL
TG-10R /1 TG-10T/1
frequency list attached)
☞
� � � 40 Hz–18 kHz
(omnidirectional) with cable clip and
2 × pop shield, neckband
padding, neckband
(depending on volume)
RESET
MIC INPUT
POWER
5 6 7 8
CHANNEL
4321
Vertrieb von JTS-Produkten – Distrubution of JTS products
®
MONACOR INTERNATIONAL GmbH & Co. KG, Zum Falsch 36, 28307 Bremen, Germany
Copyright© by MONACOR INTERNATIONAL. All rights reserved. A-1227.99.03.11.2016

www.jts-germany.de
9
TG-10R /1
Référence numérique 25.3070
TG-10T/1
Référence numérique 25.3080
Système Tour Guide 863 – 865 MHz
FRANÇAIS
Cette notice s‘adresse aux utilisateurs
sans connaissances techniques particulières. Veuillez lire la notice avec
attention avant le fonctionnement et
conservez-la, ainsi que la liste de fréquences jointe, pour pouvoir vous y
reporter ultérieurement.
1 Possibilités d’utilisation
Combiné à un ou plusieurs récepteurs TG-10R /1,
l’émetteur TG-10T/1 forme un système sans fil mobile pour la transmission de paroles, par exemple pour
des visites guidées ou des discours en plusieurs langues. Pour la transmission sans fil, 16 canaux dans la
plage de fréquences 863 – 865 MHz sont disponibles,
parmi lesquels 3 peuvent être utilisés simultanément
au plus sans se gêner réciproquement. La portée de
trans mission dépend de la configuration des lieux d’utilisation et peut aller jusqu’à 60 m.
1.1 Conformité et autorisation
Par la présente, MONACOR INTERNATIONAL déclare
que l‘émetteur TG-10T/1 et le récepteur TG-10R /1 se
trouvent en conformité avec la directive 2014 / 53 / UE.
Les déclarations UE peuvent être demandées auprès de
MONACOR INTERNATIONAL. Le système sans fil est autorisé pour un fonctionnement dans les pays de l‘Union
européenne et de l‘A.E.L.E. sans déclaration ni taxe.
2 Conseils importants d’utilisation
L’appareil répond à toutes les directives nécessaires de
l’Union européenne et porte donc le symbole .
L’appareil n’est conçu que pour une utilisation en
•
intérieur. Protégez-le de l’humidité et de la chaleur
(température ambiante admissible 0 – 40 °C).
Pour le nettoyage, utilisez un chiffon sec et doux, en
•
aucun cas de produits chimiques ou d’eau.
Nous déclinons toute responsabilité en cas de dom-
•
mages corporels ou matériels résultants si l’appareil
est utilisé dans un but autre que celui pour lequel
il a été conçu, s’il n’est pas correctement utilisé ou
réparé par une personne habilitée ; en outre, la
garantie deviendrait caduque.
Lorsque l’appareil est définitivement retiré du service,
vous devez le déposer dans une usine de recyclage
de proximité pour contribuer à son élimination non
polluante�
CARTONS ET EMBALLAGE
PAPIER À TRIER
3 Alimentation
L’émetteur / récepteur est alimenté par un accumulateur
Lithium-ion. Avant la première utilisation, l’accumulateur doit être chargé complètement. Pour le charger, les
chargeurs JTS suivants sont disponibles :
– station de charge TG-10CH2 pour charger les accus
de deux appareils au plus simultanément
– coffret de transport TG-10CH18 pour charger les
accus de 18 appareils au plus simultanément
–
coffret de transport sur roulettes TG-10CH36 pour charger les accus de 36 appareils au plus simul ta nément.
N’entreposez pas l’appareil avec un accumulateur déchargé, en cas de non utilisation prolongée, il convient
de le recharger tous les trois mois.
Tout accumulateur défectueux doit être remplacé par
un technicien, car l’appareil doit être ouvert.
Ne jetez pas les accumulateurs défectueux dans la
poubelle domestique, déposez-les dans un container
spécifique�
4 Relier le microphone à l’émetteur
Si vous souhaitez utiliser le microphone oreillette à la
place du microphone interne (9), reliez-le à la prise
MIC INPUT (1). Le microphone interne est alors
déconnecté. Si besoin, placez une bonnette anti-pop
sur la capsule micro. Placez l’étrier de l’oreillette sur
l’oreille gauche de telle sorte que le support de lobe
appuie par l’arrière contre le lobe. Vous pouvez fixer le
cordon micro au vêtement avec la pince.
5 Relier l’écouteur au récepteur
Pour capitonner l’écouteur, on peut le recouvrir avec la
housse en mousse : mettez l’écouteur, face imprimée
vers l’arrière, dans l’enveloppe non repérée, positionnez
la housse autour de l’écouteur et mettez par dessus la
seconde enveloppe. Le repère
de sortie du son. Reliez l’écouteur à la prise (1) et
mettez-le sur le pavillon de l’oreille.
Si le son doit être transmis à un appareil auditif, on
peut relier la boucle à induction NL-90 (disponible en
accessoire MONACOR) à la place de l’écouteur. Elle se
place autour du cou et transmet le son via un champ
magnétique aux appareils auditifs avec une “ bobine
téléphonique”.
représente le côté
6 Positionnement de l’appareil sur le corps
L’émetteur/ récepteur peut se fixer sur un vêtement via
son étrier (5) (par exemple à la ceinture, sur une poche
de pantalon) ou être porté autour du cou :
tirez la boucle de fixation de la
courroie via l’étrier ; en déplaçant
le bouton sur la bandoulière, réglez
la longueur voulue puis passez la
bandoulière autour du cou. En déverrouillant le système de fixation,
schéma gauche), vous pouvez
(
☞
retirez facilement l’appareil et le
remplacer par un autre.
7 Fonctionnement
1) Pour allumer les appareils du système, appuyez sur
la touche POWER (3). Le témoin de fonctionnement
(4) brille en vert. S’il brille en rouge, l’accumulateur
est presque vide, il convient de le recharger le plus
rapidement possible.
Après chaque activation de touche, l’affichage
(6) indique pendant 9 secondes environ le canal
de transmission réglé puis l’indication disparaît. Par
une brève pression sur une touche, on peut réactiver
l’affichage pendant 9 secondes environ.
2)
Sélectionnez le canal de transmission parmi les
canaux disponibles à . L’émetteur et le récepteur
(les récepteurs) du système doivent être réglés sur
le même canal.
touche CHANNEL (7) enfoncée jusqu’à ce que, sur
l’affichage, un point à côté de l’indication de canal
clignote. Ensuite appuyez sur la touche CHANNEL
jusqu’à ce que le canal voulu soit affiché. Le canal
sélectionné est mémorisé si 6 secondes environ après
la dernière activation de la touche CHANNEL, le point
sur l’affichage disparaît.
3) Sur l’émetteur, parlez dans le microphone interne (9)
ou dans le micro oreillette relié. Avec le réglage (8),
Pour régler le canal, maintenez la
vous pouvez régler le volume sur l’émetteur pour le
signal audio émis et sur le récepteur vous pouvez
régler le volume de restitution. Attention : Ne réglez
jamais le volume de manière très élevée. Un volume
trop élevé peut, à long terme, générer des troubles
de l’audition !
4)
Si la réception est mauvaise ou perturbée, vérifiez si :
– la transmission est meilleure sur un autre canal.
– la distance entre l’émetteur et le récepteur est
trop grande.
– des obstacles se trouvent entre les appareils pou-
vant perturber le signal radio.
On peut faire fonctionner en parallèle et sans interférences 3 systèmes TG-10. /1 au plus, émettant sur
des canaux différents. En fonctionnement parallèle
de plusieurs systèmes, faites attention à conserver
une distance suffisante entre chacun des systèmes.
5) Pour réinitialiser un appareil en cas de dysfonctionnements, activez la touche RESET (2) avec un objet
fin, par exemple une goupille métallique. L’appareil
s’éteint et peut être remis en fonction.
6) Pour éteindre, maintenez la touche POWER enfoncée, jusqu’à ce que le témoin de fonctionnement
s’éteigne.
8 Caractéristiques techniques
Plage de fréquence radio : � � 863 – 865 M Hz
Bande passante audio :
Puissance d’émission : � � � � � < 10 mW
Micro émetteur interne : � � � � micro électret (cardioïde)
Accessoires
Emetteur : � � � � � � � � � � � � � micro électret oreillette (om ni-
Récepteur : � � � � � � � � � � � � � écouteur mono dynamique avec
Alimentation : � � � � � � � � � � � � accu Lithium-ion, 3,7 V/ 1300 mAh
Durée fonctionnement accu : jusqu’à 14 h (selon le volume)
Dimensions, poids : � � � � � � � 54 × 99 × 17 mm, 80 g
Tout droit de modification réservé.
RESET
POWER
5 6 7 8
CHANNEL
TG-10R /1 TG-10T/1
(configuration des canaux
jointe des fréquences)
� � � � 40 Hz–18 kHz
direc tionnel) avec pince câble et
2bonnettes anti-pop, tour de cou
capitonnage, tour de cou
4321
MIC INPUT
5 6 7 8
RESET
CHANNEL
POWER
☞
4321
liste
Vertrieb von JTS-Produkten – Distrubution of JTS products
®
MONACOR INTERNATIONAL GmbH & Co. KG, Zum Falsch 36, 28307 Bremen, Germany
Copyright© by MONACOR INTERNATIONAL. All rights reserved. A-1227.99.03.11.2016

www.jts-germany.de
9
TG-10R /1
Référence numérique 25.3070
TG-10T/1
Référence numérique 25.3080
Sistema de Visitas Guiadas 863 – 865 MHz
ESPAÑOL
Estas instrucciones van dirigidas a
usuarios sin ningún conocimiento técnico específico. Lea atentamente estas
instrucciones antes de utilizar los aparatos y guárdelas junto con la lista de
frecuencias para usos posteriores.
1 Aplicaciones
En combinación con un receptor o con varios receptores del tipo TG-10R /1, el emisor TG-10T/1 crea un
sistema inalámbrico móvil para transmisiones de habla,
p. ej. para visitas guiadas o lecturas multilingües. Para
la transmisión inalámbrica hay 16 canales disponibles
en la gama de frecuencias 863 – 865 MHz. Se pueden
utilizar hasta tres de estos canales al mismo tiempo
sin interferencias entre sí. La distancia de transmisión
depende de las condiciones de la zona y puede alcanzar los 60 m.
1.1 Conformidad y aprobación
Por la presente, MONACOR INTERNATIONAL declara
que el emisor TG-10T/1 y el receptor TG-10R /1 cumplen con la directiva 2014 / 53 / UE. Las declaraciones
de conformidad UE están disponibles bajo petición en
MONACOR INTERNATIONAL. El sistema inalámbrico
está aprobado para el funcionamiento en la UE y en
los países de la AELC; no requiere ninguna licencia
ni registro.
2 Notas Importantes
Este aparato cumple con todas las directivas relevantes
de la UE y por lo tanto está marcado con el símbolo
El aparato está adecuado sólo para utilizarlo en inte-
•
riores. Protéjalo de la humedad y del calor (temperatura ambiente admisible: 0 – 40 °C).
Utilice sólo un paño suave y seco para la limpieza; no
•
utilice nunca ni agua ni productos químicos.
No podrá reclamarse garantía o responsabilidad al-
•
guna por cualquier daño personal o material resultante si el aparato se utiliza para otros fines diferentes
a los originalmente concebidos, si no se utiliza adecuadamente o no se repara por expertos.
Si va a poner el aparato fuera de servicio definitivamente, llévelo a la planta de reciclaje de la zona para
que su eliminación no sea perjudicial para el medio
ambiente�
3 Alimentación
El emisor / receptor se entrega con alimentación mediante una batería Li-Ion recargable: Recargue completamente la batería antes de la primera utilización. Están
disponibles los siguientes cargadores de JTS:
– Estación de carga TG-10CH2 para cargar las baterías
de hasta 2 aparatos al mismo tiempo
– Maleta de transporte TG-10CH18 para cargar las
baterías de hasta 18 aparatos al mismo tiempo
– Maleta de transporte TG-10CH36 para cargar las
baterías de hasta 36 aparatos al mismo tiempo
No guarde el aparato con una batería descargada. Si
no se va a utilizar el aparato durante un largo periodo,
recargue la batería cada tres meses.
Puesto que tiene que abrirse el aparato para cambiar la
batería, sólo el personal cualificado puede cambiar una
batería defectuosa.
Las baterías defectuosas no se deben depo sitar en el
contenedor habitual; hágalo siempre en un contenedor de recogida especial�
4 Conexión del Micrófono al Emisor
Cuando utilice el micrófono de oreja en lugar del
micrófono interno (9), conecte el micrófono de oreja a
la toma MIC INPUT (1). De este modo, se desactivará
el micrófono interno. Si es necesario, cubra la cápsula
del micrófono con la espuma provista. Póngase el micrófono de oreja en su oreja izquierda de modo que
el soporte de lóbulo apriete su lóbulo desde detrás. Se
entrega una pinza para sujetar el cable del micrófono
con su ropa.
5 Conexión del Auricular al Receptor
Como almohadilla para el auricular, envuélvalo con la
espuma: Ponga el auricular con su cara impresa detrás
en el bolsillo sin impresión de la funda, envuelva el
auricular con la funda y páselo por el segundo bolsillo.
La impresión marcará la cara por la que se emite el
sonido. Conecte el auricular a la toma (1) y acople
el auricular a su oreja.
Para transmitir el sonido a un audífono, conecte
el bucle magnético NL-90 (disponible como accesorio
de MONACOR) en el lugar del auricular. Ponga el lazo
alrededor de su cuello. Mediante un campo magnético,
emitirá el sonido a los audífonos con un “cable telefónico”.
6 Colocar el Aparato
Para ponerse el emisor / receptor,
ponga la pinza (5) en su ropa (p. ej.
.
en el cinturón o en el bolsillo del
pantalón) o utilice la diadema: Tire
del lazo de la cinta por la pinza,
deslice el pulsador de la cinta para
ajustar su longitud y pase la cinta
por su cuello. Abriendo el cierre
figura de la izquierda), el apa-
(
☞
rato se puede quitar fácilmente e
intercambiar por otro.
7 Funcionamiento
1)
Para conectar los aparatos del sistema, pulse el botón
POWER (3). El LED POWER (4) se ilumina en verde.
Si se ilumina en rojo, significa que la batería está
casi descargada y tendría que recargarse tan pronto
como sea posible.
Cuando se pulsa un botón, en el visualizador se
indica (6) el canal de transmisión ajustado durante
unos 9 segundos, luego desaparece el número del
canal. Para reactivar el visualizador unos 9segundos,
pulse brevemente un botón del aparato.
2) Seleccione un canal de transmisión de los canales
a disponibles. Coloque siempre el emisor y el
o los receptores de un sistema en el mismo canal.
Para ajustar un canal, mantenga pulsado el botón
CHANNEL (7) hasta que empiece a parpadear un
punto en el visualizador junto al número del canal.
Luego pulse el botón CHANNEL repetidamente hasta
que se indique el canal que desee. Cuando desaparezca el punto del visualizador unos 6 segundos
después de pulsar el botón CHANNEL por última vez,
se habrá seleccionado el canal.
3) Hable por el micrófono interno (9) del emisor o por
el micrófono de oreja conectado. Con el control (8),
ajuste el volumen de la señal de audio transmitida
en el emisor y el volumen de reproducción en el
receptor. Precaución: No ajuste nunca un volumen
muy elevado. ¡Los volúmenes altos permanentes
pueden dañar su oído!
4)
Si la recepción es pobre o interrumpida, compruebe:
– Si la recepción puede mejorarse utilizando un canal
de transmisión diferente.
– Si el emisor y el receptor están demasiado lejos
entre sí.
– Si hay obstáculos en la línea de transmisión que
puedan bloquear la señal de radio.
Pueden funcionar hasta tres sistemas TG-10. /1
transmitiendo por canales diferentes paralelamente
sin interferencias. Cuando se utilizan varios sistemas
en paralelo, asegúrese que hay suficiente distancia
entre los sistemas.
5) Para reiniciar un aparato en caso de avería, pulse el
botón RESET (2) mediante un objeto fino, p. ej. un
clip. Se desconectará el aparato y se podrá poner de
nuevo en funcionamiento.
6) Para desconectar los aparatos, mantenga pulsado el
botón POWER hasta que se apague el LED POWER.
8 Especificaciones
Rango de frecuencia de radio: � 863 – 865 MHz
Rango de frecuencia de audio:
Potencia de transmisión:� � � � � � < 10 mW
Micrófono interno del emisor: � Micrófono electret (cardioide)
Accesorios
Emisor: � � � � � � � � � � � � � � � � � � Micrófono de oreja electret
Receptor: � � � � � � � � � � � � � � � � Auricular dinámico mono con
Alimentación:
Tiempo de func� de la batería: � Hasta 14 horas
Dimensiones, peso:
Sujeto a modificaciones técnicas.
5 6 7 8
� � � � � � � � � � � � � � Batería Li-Ion 3,7 V/ 1300 mAh
� � � � � � � � � 54 × 99 × 17 mm, 80 g
4321
RESET
POWER
CHANNEL
TG-10R /1 TG-10T/1
(Asignación de canal
frecuencias adjuntada)
� 40 Hz – 18 kHz
(omnidireccional) con pinza y
2espumas, cinta de cuello
espuma, cinta de cuello
(dependiendo del volumen)
RESET
MIC INPUT
5 6 7 8
CHANNEL
POWER
☞
lista de
4321
Vertrieb von JTS-Produkten – Distrubution of JTS products
®
MONACOR INTERNATIONAL GmbH & Co. KG, Zum Falsch 36, 28307 Bremen, Germany
Copyright© by MONACOR INTERNATIONAL. All rights reserved. A-1227.99.03.11.2016
 Loading...