

Page 1

MANUAL DE USUARIO
FRANÇAIS
DEUTSCH
ITALIANO
ENGLISH
ESPAÑOL
USER MANUAL
MANUEL D´UTILISATEUR
BENUTZERHANDBUCH
MANUALE DELL'UTENTE
JTG JT300
(JT280 – JT250)
2012
Page 2

Page 3

ESPAÑOL
JTG JT300
(JT280 – JT250)
2012
Page 4

Page 5
3
ESPAÑOL
Bienvenido a JTG!
Gracias por confiar en nuestra marca
y adquirir esta motocicleta de, por y
para Trial.
Como usuario de JTG, podrá
disfrutar de un producto que aporta
innovación en aquello que es justa y
estrictamente necesario, sin rodeos,
incorporando sobre todo los sellos
de calidad, prestigio y exclusividad.
Diseñada por profesionales ligados al
mundo del off-road para ofrecer una
conducción cómoda y eficaz, no
descuida su espíritu competitivo,
que le hará sentir las prestaciones de
una marca ganadora al alcance de la
mano.
JOTAGAS S.L. 2012
Page 6
4
¡ATENCIÓN! Este símbolo hace referencia a aspectos que, de ser ignorados, pueden conllevar algún tipo de daño a su
motocicleta. Si estas advertencias no son tenidas en cuenta pueden provocar la anulación de la garantía del vehículo.
¡PRECAUCIÓN! Este símbolo hace referencia a aspectos que, de ser ignorados, pueden conllevar algún tipo de peligro
físico para el usuario.
JTG LE ADVIERTE:
Antes de poner en marcha su motocicleta, lea íntegramente este manual de usuario donde se detallan todas las instrucciones
que contribuyen al correcto manejo de la misma y a su propia seguridad, permitiendo a su vez un mantenimiento y conservación
óptimos desde el primer día.
Preste atención especial a las notas marcadas específicamente con estos símbolos:
Además de las notas de advertencias específicas, quedan detallados a su vez en este manual otro tipo de consejos para una
mejor utilización de su motocicleta, así como un mejor ajuste y control de las características importantes del vehículo.
JTG se reserva el derecho a la realización de modificaciones en el presente manual.
Page 7

5
ESPAÑOL
JTG LE RECOMIENDA:
Ante cualquier duda en cuanto a posibles ajustes de su motocicleta, seguir las indicaciones del manual y/o
acudir a un concesionario autorizado de JTG.
Lea atentamente la información del manual de usuario para familiarizarse con las características de su
vehículo antes de proceder a una conducción en condiciones de máxima potencia.
Se aconseja un período de rodaje de al menos 8-10 horas para una óptima puesta a punto del motor, sin
conducir a altas velocidades y sin llegar a acelerar al máximo. Dentro de este período de rodaje, la primera
hora de marcha conviene hacerla moderadamente.
El combustible es un líquido fácilmente inflamable. Tenga precaución al repostar y apague siempre el motor
previamente.
Antes de exigir condiciones extremas al motor es importante dejarlo llegar a una temperatura óptima de
servicio, así como al arrancar o en condiciones ambientales de bajas temperaturas.
Esta motocicleta utiliza aceite sintético de dos tiempos mezclado al 1% con combustible de 98 octanos, no
use otro tipo de lubricación sin consultar previamente a un mecánico autorizado de JTG.
Esta motocicleta está diseñada para una sola persona, no está permitido el transporte de un segundo
pasajero.
Para una larga vida de servicio, procure mantener la motocicleta en el estado de mantenimiento
recomendado en este manual.
Este vehículo está diseñado para una conducción segura, siempre y cuando el piloto vaya equipado con las
correspondientes medidas de seguridad (casco, protecciones, etc.). Tenga precaución y pilote de manera
sensata.
Page 8
6
ÍNDICE
Descripción de elementos 7
Ficha técnica 9
Información del vehículo 11
Arranque y parada del motor 12
Estárter 12
Cambio de marchas 13
Grifo gasolina 13
Depósito de combustible 14
Neumáticos 15
Frenos 16
Bloqueo de la dirección 17
Caballete 17
Manillar y cuadro de mandos 18
Regulación de manetas y manillar 19
Control del nivel de aceite 19
Filtro de aire 20
Bujía 21
Sistema de refrigeración 22
Carburador 23
Ajuste del ralentí 24
Caja de láminas 25
Cadena de transmisión 25
Suspensión 26
Basculante 27
Conservación de la motocicleta 28
Velocímetro 29
Pares de apriete 33
Almacenaje 34
Operaciones de mantenimiento 35
Homologación 39
Posibles averías y preguntas frecuentes 40
Page 9
7
ESPAÑOL
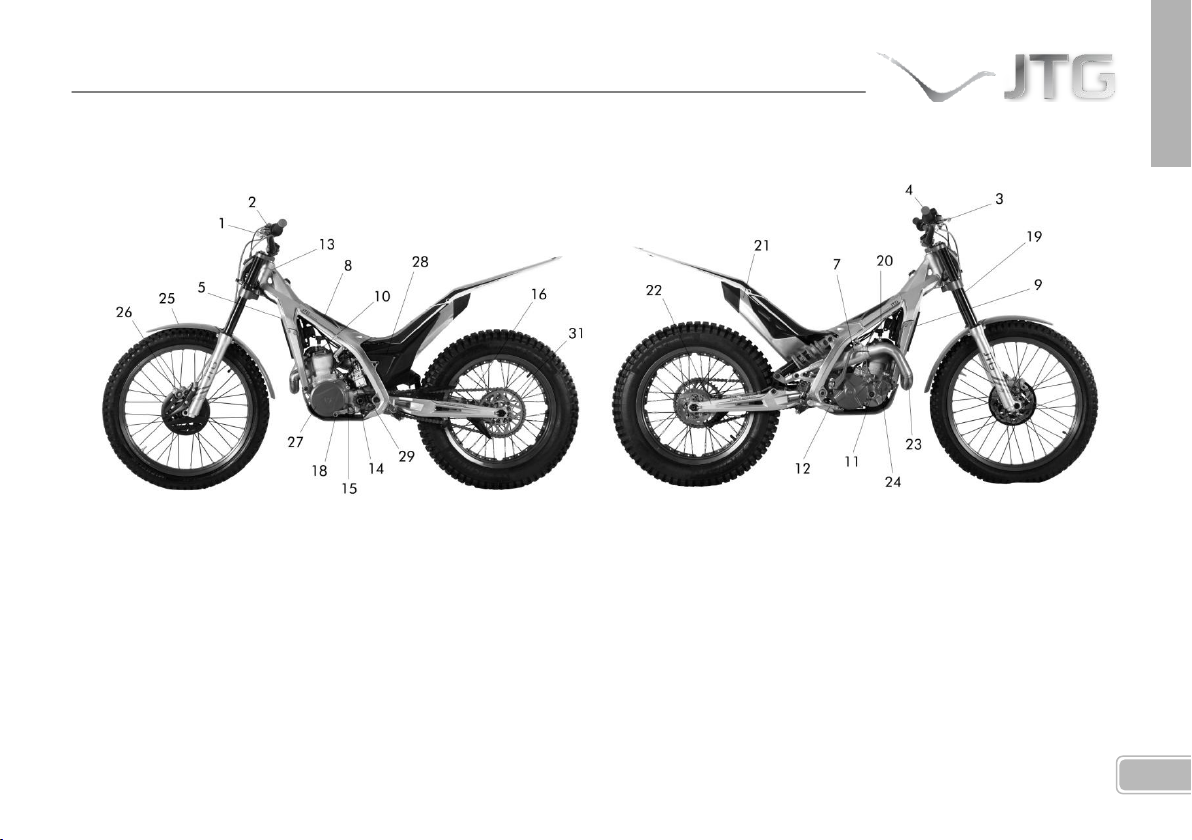
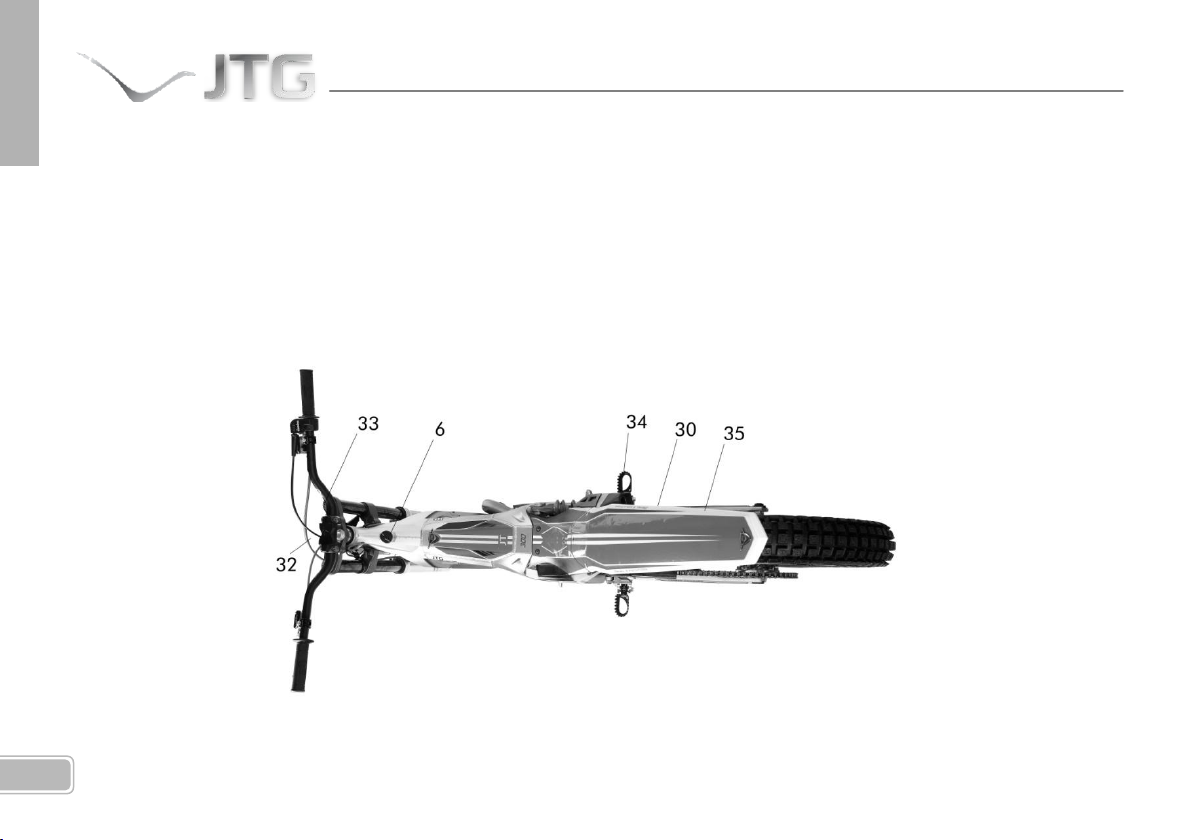
DESCRIPCIÓN DE ELEMENTOS
1- Maneta del embrague
2- Botones de los indicadores de
dirección, claxon y paro
3- Maneta del freno
4- Acelerador
5- Tapón del radiador
6- Tapón del depósito de
gasolina
7- Pedal de arranque
8- Depósito de gasolina
9- Radiador
10- Tornillo drenaje radiador
11- Mirilla nivel aceite cárter
12- Pedal freno trasero
13- Desvaporizador
14- Grifo de la gasolina
15- Caja de láminas
16- Cadena de transmisión
Page 10
8
18- Pedal del cambio
19- Horquilla delantera
20- Bujía
21- Silencioso
22- Basculante
23- Escape
24- Bomba agua
25- Guardabarros delantero
26- Pinza de freno delantera
27- Tapa encendido
28- Tapa filtro aire
29- Carburador
30- Caballete
31- Corona
32- Velocímetro
33- Regulación suspensión
delantera
34- Estribos
35- Guardabarros trasero
Page 11

9
ESPAÑOL
FICHA TÉCNICA
CHASIS
Tipo: Doble viga con sistema de suspensión lateral y depósito de combustible integrado
NEUMÁTICOS
Delantero: 2.75 x 21" - 44 (160kg) L
Trasero: 4.00 x 18" - 52 (200kg) - L
SUSPENSIÓN
Delantera: Horquilla telescópica TECH Hidráulica regulable COM-EX Ø39mm (recorrido 175mm)
Trasera: Sistema progresivo V3 con monoamortiguador multirregulable OLLE (recorrido 175mm)
FRENOS
Delantero: De disco, Ø185mm, con pinza de 4 pistones
Trasero: De disco, Ø150mm, con pinza de 2 pistones
MOTOR
Tipo: Dos tiempos, monocilíndrico, admisión por láminas directamente al cárter, refrigeración líquida.
Cilindrada: 301.58cc
Diámetro del pistón: 80mm
Carrera: 60mm
Carburador: DELLORTO PHBL26
Sistema de lubricación: Mezcla al 1% (1:100)
Sistema de encendido: Digital CDI HIDRIA
Bujía: NGK BPMR6A
Generador: 12V / 110W
TRANSMISIÓN
Page 12
10
Tipo: 5 velocidades con embrague de mando hidráulico.
Transmisión secundaria: Por cadena.
Relaciones de cambio:
1ª 3.000 (33/11)
2ª 2.571 (36/14)
3ª 2.187 (35/16)
4ª 1.444 (26/18)
5ª 0.889 (24/27)
Reducción primaria 2.778 (75/27)
Reducción final 4 (40/10)
Relación total (5ª marcha): 9.879
Aceite de transmisión: 400cc, tipo GEAR TRANS 0W75
DIMENSIONES
Altura total: 1160mm
Anchura total: 833mm
Altura asiento: 650mm
Distancia entre ejes: 1180mm
Capacidad del depósito: 2.7 litros
Peso en vacio: 64 kg
Page 13
11
ESPAÑOL
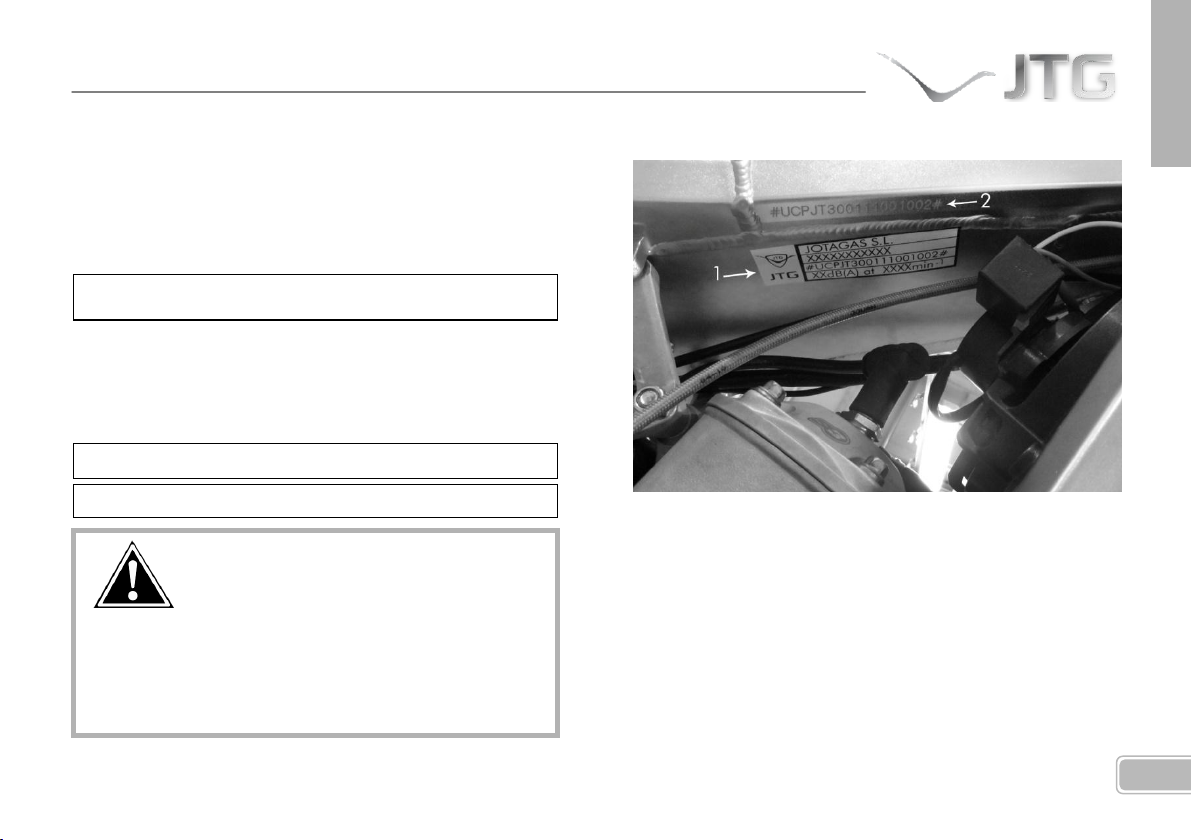
Es recomendable conservar anotado el número de
serie y la información de identificación de su
motocicleta para agilizar trámites en caso de robo o
suministro de recambios.
INFORMACIÓN DEL VEHÍCULO
PLACA DEL FABRICANTE (Bajo el depósito)
Esta placa contiene información de la homologación de su
vehículo, anótela para un fácil reconocimiento de su
motocicleta en situaciones en que sea necesario.
NÚMERO DE SERIE Y CÓDIGO DE LAS LLAVES
Estos números son los que identifican su motocicleta y el
bloqueo de dirección, consérvelos anotados en su manual
(P.ej. para pedir copia de las llaves en caso de pérdida).
1- PLACA DEL FABRICANTE
2- NÚMERO DE CHASIS
3- CÓDIGO IDENTIFICATIVO DE LAS LLAVES
(Se encuentra junto a las llaves)
Page 14
12
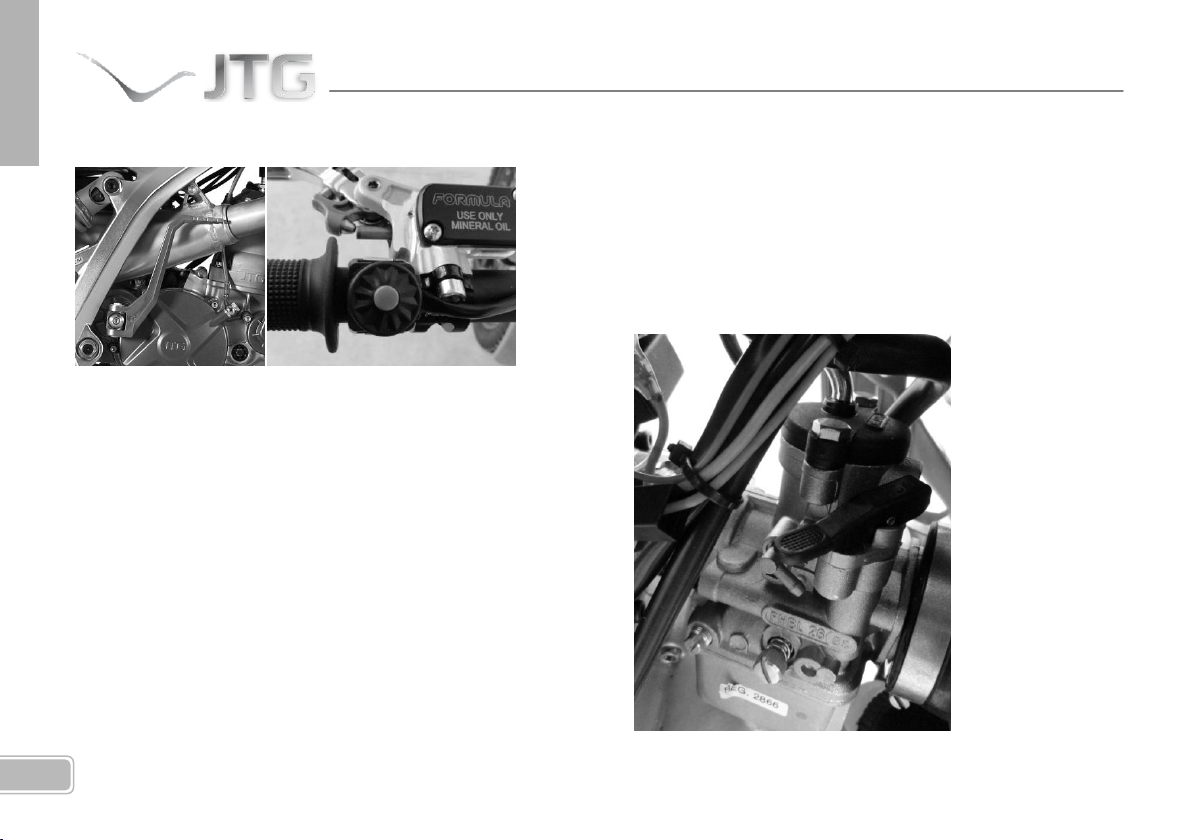
ARRANQUE Y PARADA DEL MOTOR
Para arrancar la moto, primero debe asegurarse de que el
grifo de la gasolina está en posición de uso habitual y la
transmisión en punto muerto, o en su defecto mantener
accionada la maneta del embrague.
Una vez hecho esto, accione el pedal de arranque, situado
en el lado derecho de la moto. Al arrancar en un ambiente
frío, accione a la vez el estárter.
Para parar el motor, coloque la transmisión en posición de
punto muerto y apriete el botón de paro de motor del
manillar.
ESTÁRTER
Utilice el estárter cuando el motor esté frío para favorecer
el arranque sin maltratar el motor. Este dispositivo, usado
convenientemente, prevendrá del desgaste y los daños
mecánicos por arranques a temperaturas adversas. Para
accionarlo debe usar una palanca negra situada en el
carburador.
Page 15
13
ESPAÑOL
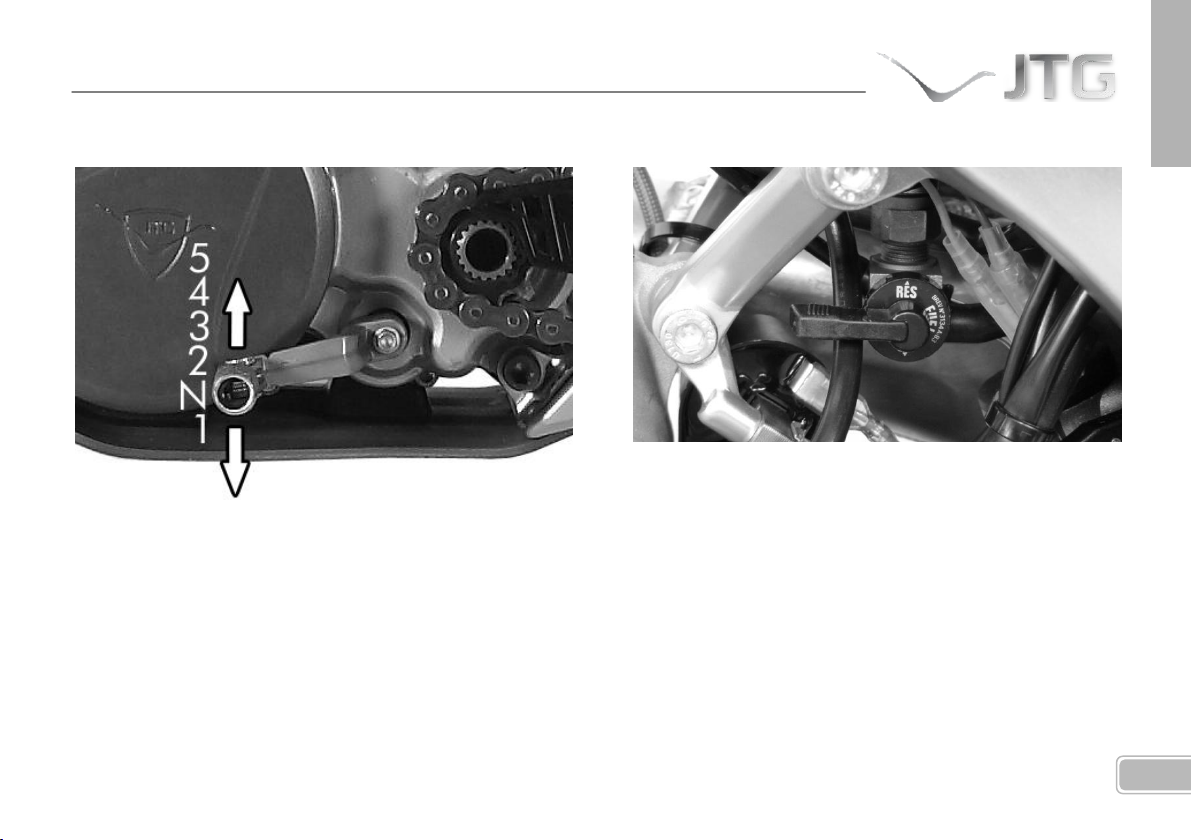
CAMBIO DE MARCHAS
El cambio de marchas se controla mediante una palanca a
modo de pedal en el lado izquierdo del vehículo, con la
secuencia marcada en el diagrama. Debe accionar
simultáneamente el embrague con la maneta izquierda
para cambiar de marcha. El cambio es secuencial, es decir,
para cambiar de 2ª a 4ª marcha debe pasar antes por 3ª.
GRIFO DE GASOLINA
El grifo de la gasolina está situado bajo el depósito.
Para dejar pasar la gasolina el grifo debe estar colocado en
la posición que marca ON. En reserva debe colocarse en la
posición RES y para cerrar el grifo debe dejarse en la
posición intermedia entre las dos.
Page 16
14
Importante. No mezcle aceite vegetal y mineral. Siga los
niveles y proporciones marcados para una correcta
combustión en el interior de su motor. Para conseguir
una buena mezcla, vierta primero en un recipiente el
aceite y parte de la gasolina, agite y después añada el
resto de la gasolina, evitando hacerlo a bajas
temperaturas pues se dificulta la operación.
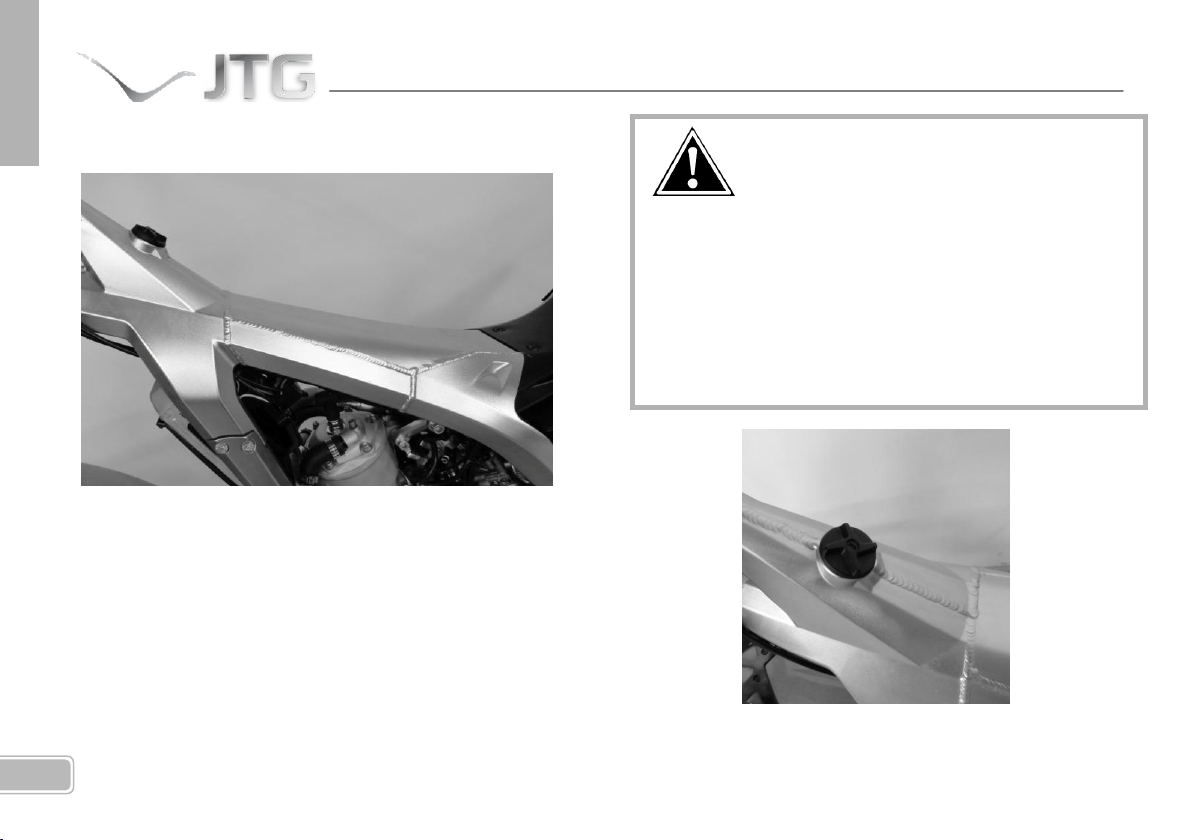
DEPÓSITO DE COMBUSTIBLE
El depósito de esta motocicleta está integrado en el propio
chasis, concretamente en la parte superior. Su capacidad es
de 2.7 litros y debe llenarse con una mezcla de gasolina sin
plomo y aceite, de proporciones marcadas en la hoja de
datos técnicos. El tapón del depósito se sitúa en la parte
superior del depósito.
Octanaje mínimo de la gasolina: 98 octanos
Page 17
15
ESPAÑOL
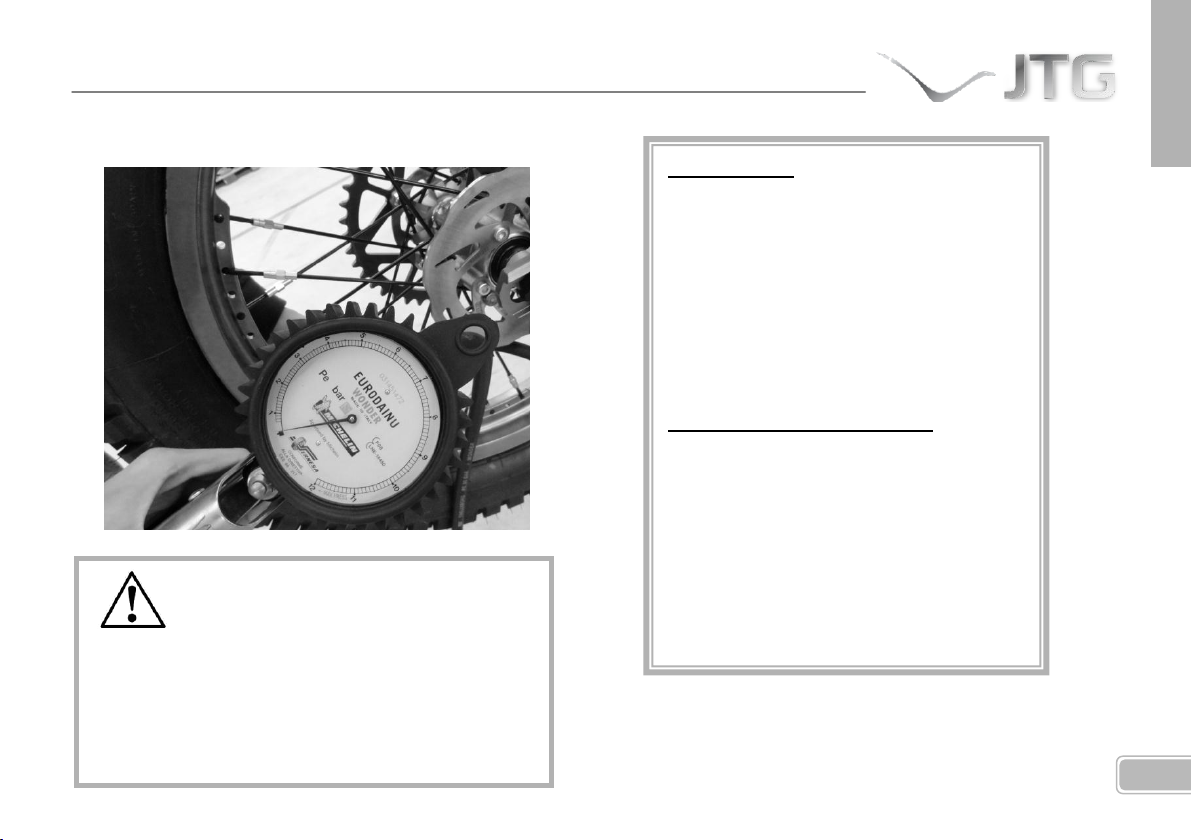
NEUMÁTICOS
Un correcto estado de los neumáticos contribuye en
gran medida a su seguridad y garantiza una mejor
conducción. Manténgalos con la presión adecuada
en cada momento y controle su desgaste. La presión
debe comprobarse con el neumático en frío.
NEUMÁTICOS
Rueda delantera:
2,75x21" TRIAL
Rueda trasera:
4,00x18" TRIAL
PRESIONES RECOMENDADAS
Rueda delantera:
0,45bar (0,42bar en competición)
Rueda trasera:
0,35bar (0,3bar en competición)
En terrenos con poca adherencia puede reducir la presión
ligeramente para aumentar el agarre y viceversa.
Page 18
16
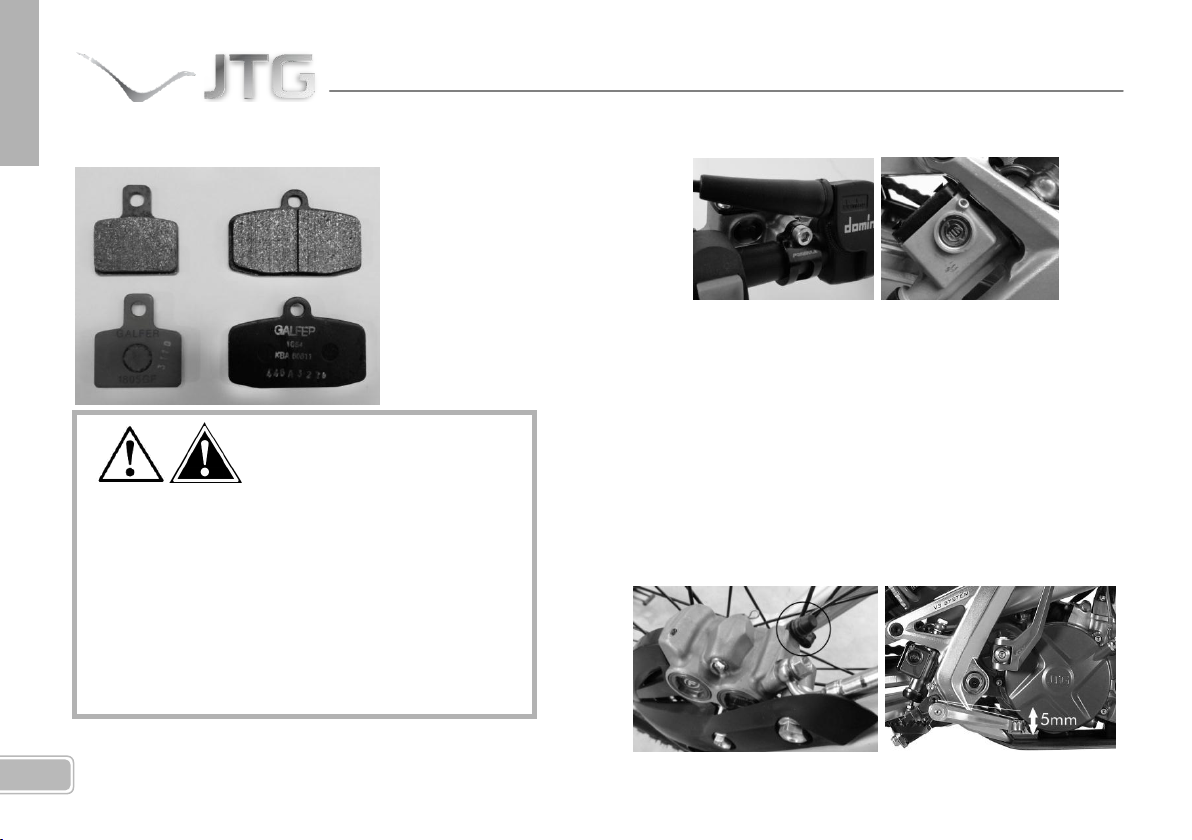
FRENOS
Se debe revisar periódicamente el estado de las
pastillas de freno delanteras y traseras y el nivel
del líquido de frenos. Por su seguridad, y por una
conducción precisa y eficaz, no pilote la
motocicleta con pastillas desgastadas o con el
líquido de frenos por debajo del nivel mínimo. Si
el pedal de freno tiene un tacto esponjoso, quizá
tenga aire en el circuito, púrguelo por seguridad.
Puede ver el nivel del líquido de frenos en la mirilla situada
en la bomba delantera y en el depósito de la bomba
trasera. El nivel debe llegar a la mitad, rellene ambos
depósitos si fuera necesario. Use líquidos D.O.T.4.
Además, dispone de purgadores en ambos circuitos para
eliminar los restos de aire presentes en el interior tras
cualquier manipulación.
El pedal de freno debe tener algo de juego libre inicial.
Page 19
17
ESPAÑOL
BLOQUEO DE LA DIRECCIÓN
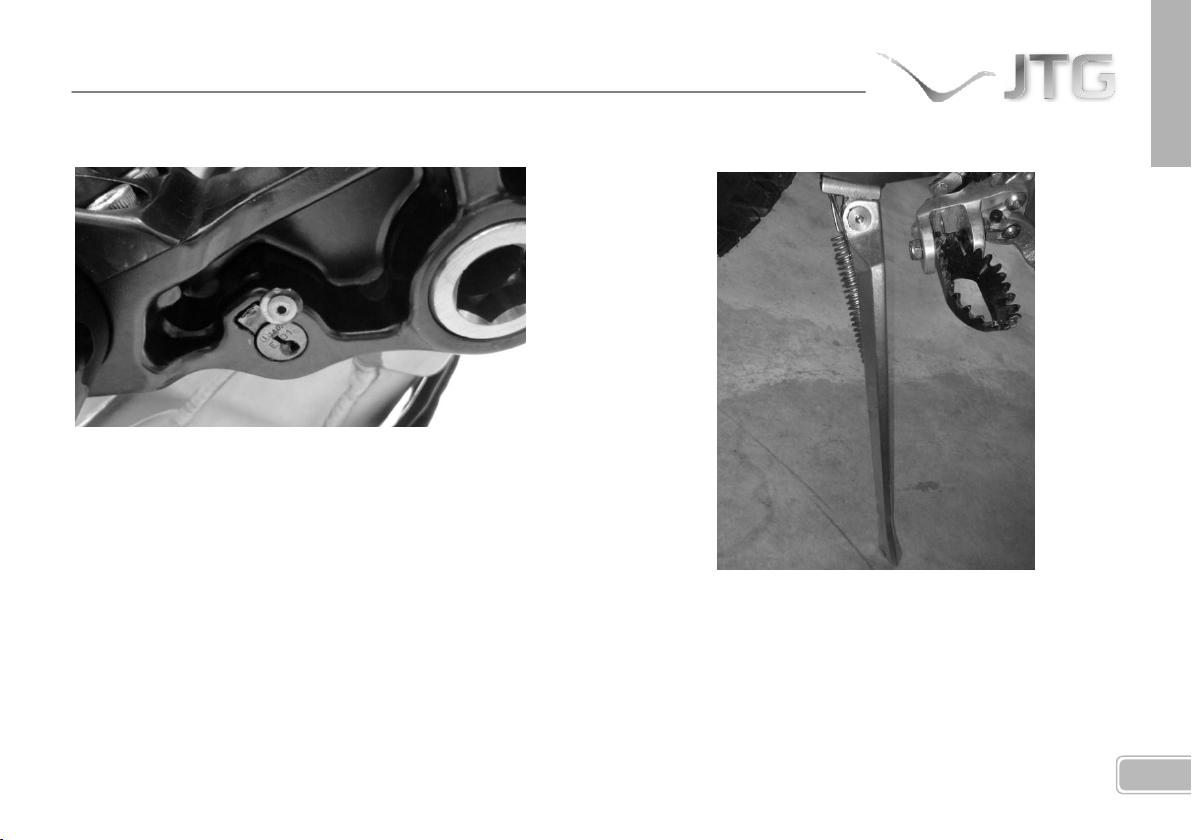
El bloqueo de la dirección está situado bajo la tija inferior
de la horquilla delantera.
Para activar dicho bloqueo, inserte la llave, gire el manillar
hacia el lado derecho hasta el tope y presione mientras
gira la llave en sentido anti horario.
Para desbloquearlo, inserte la llave y gírela en sentido
horario.
CABALLETE
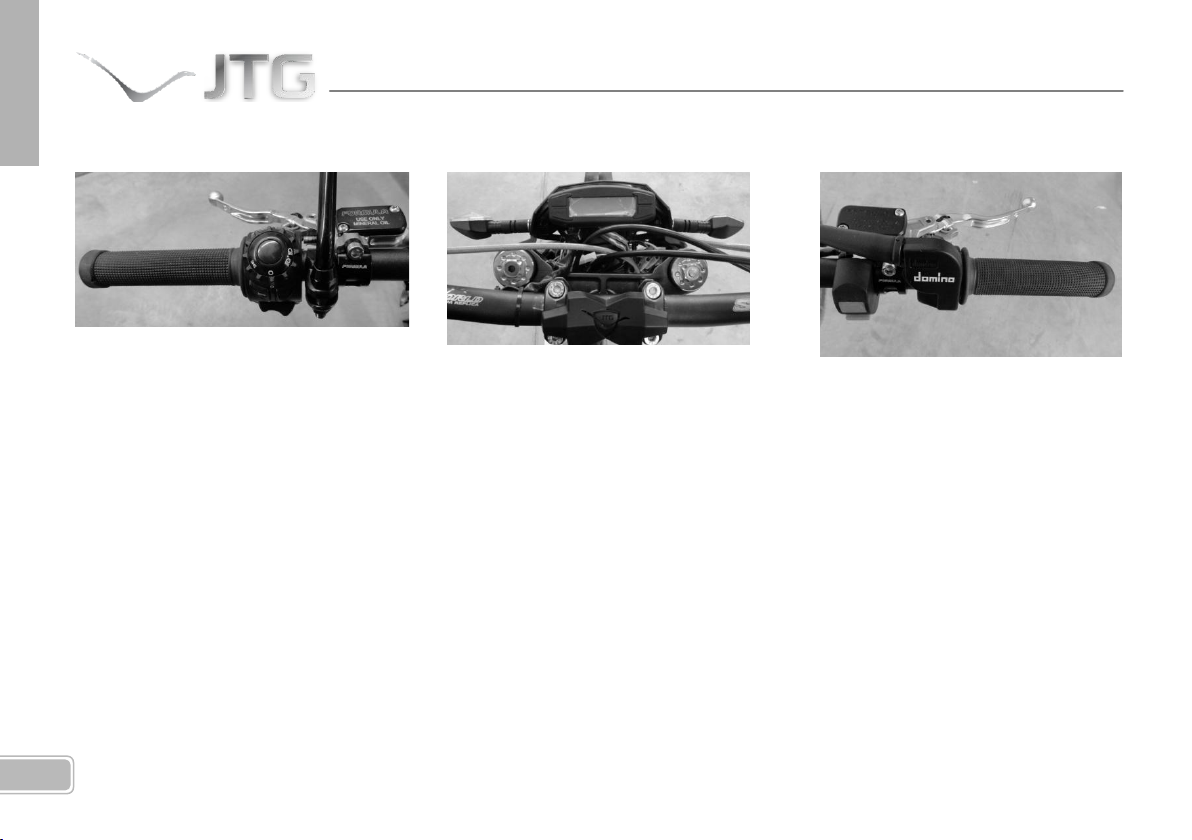
En el lado derecho del vehículo podrá encontrar el
caballete, anclado al chasis mediante un muelle. Despliegue
la pata hasta su máxima extensión para apoyar la moto en
el suelo cuando estacione. Nunca conduzca con el
caballete desplegado.
Page 20
18
MANILLAR Y CUADRO DE MANDOS
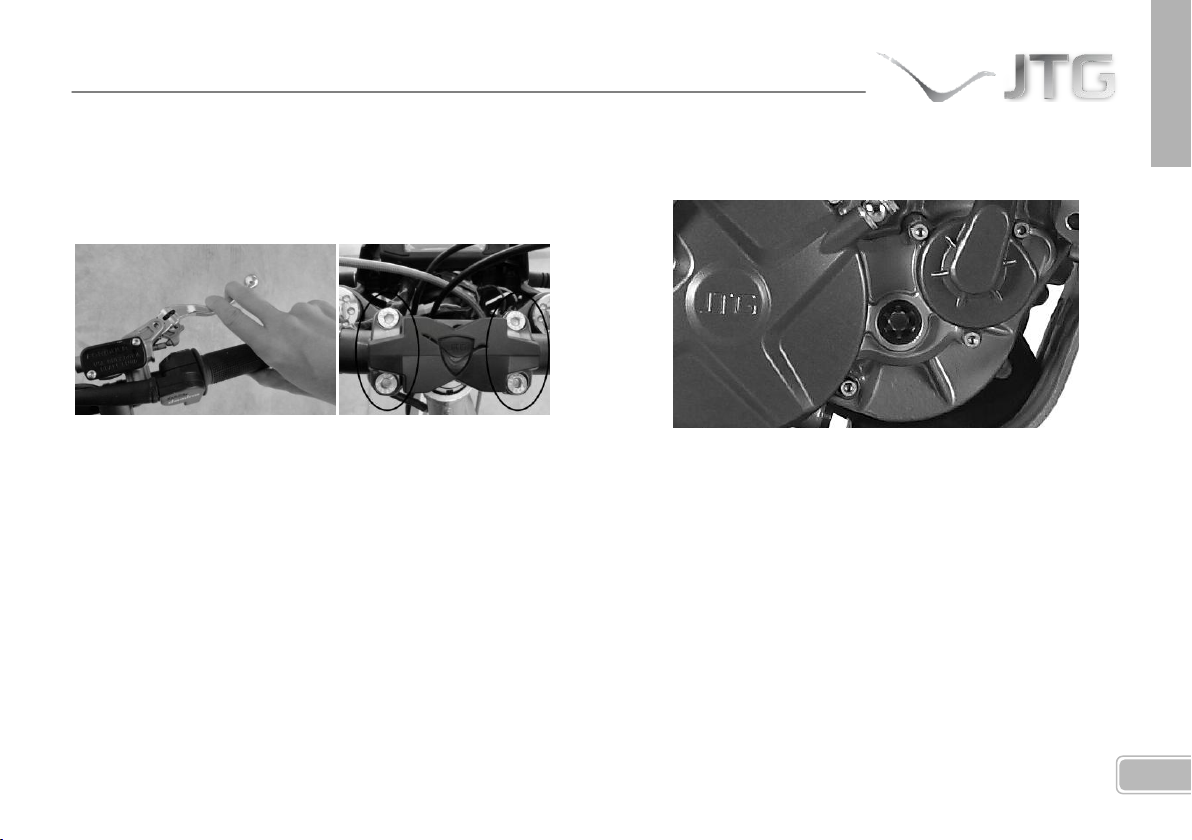
En el lado izquierdo del manillar se
encuentran:
- Maneta de embrague.
- Claxon.
- Botón de paro motor.
- Botón de luz de cruce,
carretera e indicadores de
dirección.
En el centro del manillar se
encuentra el cuadro de mandos.
(Más información e instrucciones de
uso en apartados posteriores de este
manual)
En el lado derecho del manillar
puede encontrar:
- Maneta de freno
- Mando del acelerador
Page 21
19
ESPAÑOL
REGULACIÓN DE LAS MANETAS Y EL
MANILLAR
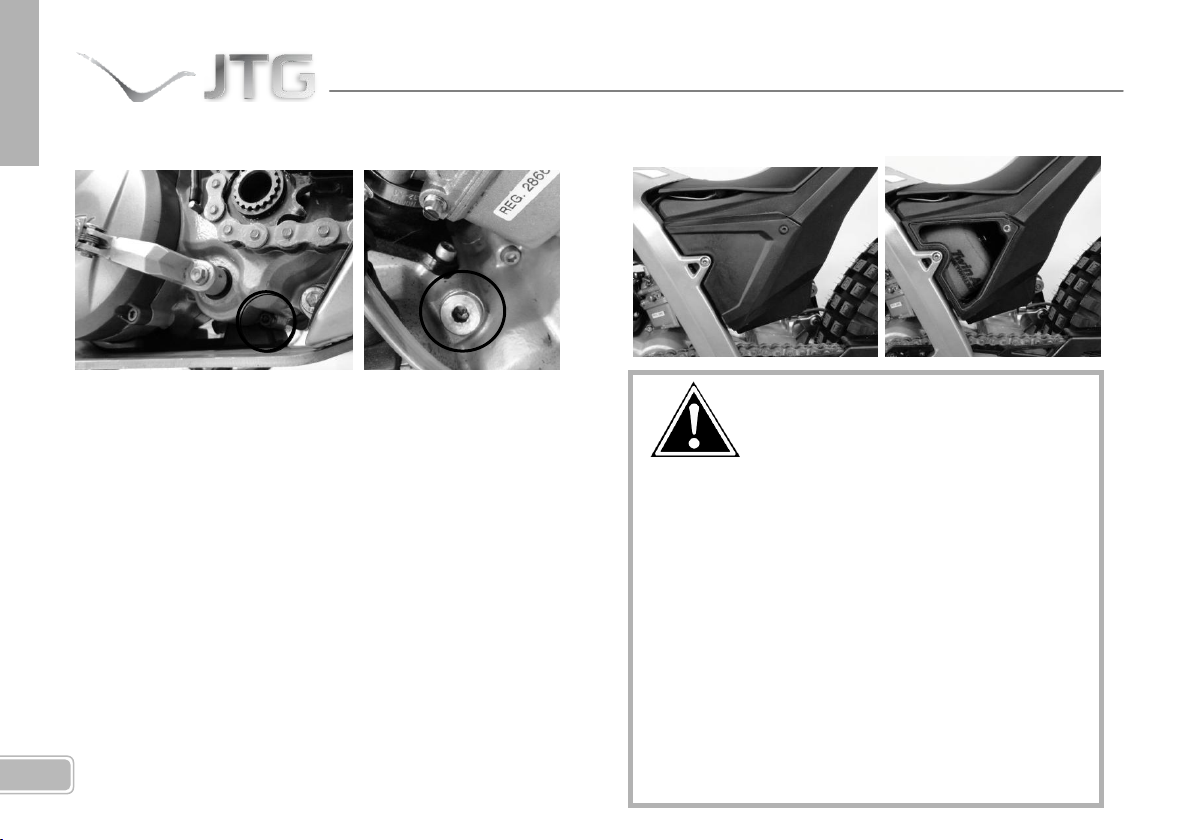
Ambas manetas deben mantener un juego libre inicial en
su recorrido de 3mm como máximo. Es importante que ese
juego exista, no inutilizarlo. Para regularlo, use las tuercas
de ajuste que se sitúan al comienzo de las manetas.
Para adaptar el manillar a cada tipo de conducción distinto,
puede inclinarlo más o menos aflojando las bridas que lo
sujetan a la horquilla. Una vez regulado a su gusto, apriete
los tornillos de nuevo, empezando por los más cercanos al
asiento y siguiendo por los más cercanos al velocímetro.
CONTROL DEL NIVEL DE ACEITE
El motor tiene una capacidad de 400cc de aceite de
transmisión. Intente mantener el nivel del mismo entre los
valores máximo y mínimo para un correcto funcionamiento
del motor.
No mezcle distintos tipos de aceites, llenar usando aceite
del mismo tipo cada vez. Se recomienda usar aceites del
tipo 0W75 GEAR TRANS
Page 22
20
La limpieza del filtro, una vez extraído, se debe
realizar en primer lugar con un desengrasante
específico, posteriormente limpieza con agua y
detergente, dejar secar el filtro, para
posteriormente humedecerlo con aceite especial
para filtros. Se recomienda comprobar
periódicamente el estado del filtro de aire, para
evitar mal funcionamiento debido a impurezas en
admisión. Asegúrese de limpiarlo en una zona
ventilada, sin chispas cercanas y no use gasolina
para la limpieza, pues podría provocar una
explosión.
Cambio de aceite
FILTRO DE AIRE
Fig(a):Tapón vaciado aceite Fig(b):Tapón llenado aceite
Existe un tapón en la parte inferior del cárter para el
vaciado del aceite Fig(a) y otro en la parte superior para el
llenado Fig(b). Para cambiar el aceite, partiendo de motor
frío, arranque la moto y déjela funcionar al ralentí 5
minutos. Esto permitirá un calentamiento adecuado del
aceite para su cambio.
Después ponga la moto en posición de marcha con un
recipiente debajo y quite el tapón de vaciado. Deje caer
todo el aceite y limpie el tapón de posibles virutas
metálicas. Una vez limpio, colóquelo de nuevo y rellene el
motor por el orificio de entrada de la parte superior, hasta
alcanzar el nivel deseado en la mirilla.
Page 23
21
ESPAÑOL
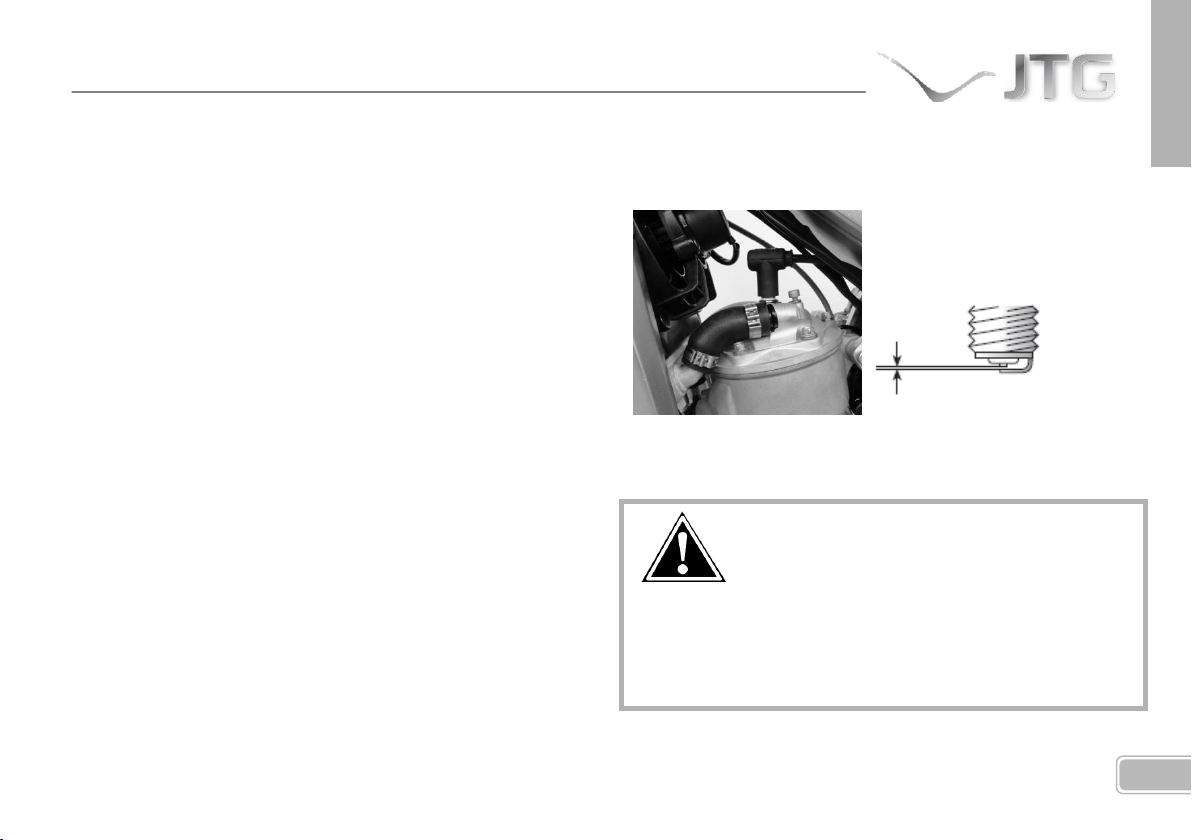
Para un correcto mantenimiento del motor, es
conveniente limpiar con aire a presión el electrodo de la
bujía, asegurando además que el espacio que deja con la
misma es de aproximadamente 0,6 - 0,7mm.
La ubicación de una compuerta en el lado izquierdo de la
moto permite un fácil acceso al filtro de aire.
Tenga cuidado con la espuma del filtro al
desmontarlo, puede dañarse fácilmente.
Acceda al filtro a través de la compuerta y desmonte
la sujeción del mismo.
Extraiga la jaula soporte con cuidado de no dañar la
espuma.
Utilice un recipiente para limpiarlo y un trapo limpio
que no se deshilache para secarlo.
Una vez limpio, puede humedecerlo ligeramente
empleando aceite especial para filtros, antes de
colocarlo de nuevo en su alojamiento.
BUJÍA
La bujía que viene instalada de fábrica es la definida en la
hoja de características. Debe apretarse a 11Nm.
Page 24
22
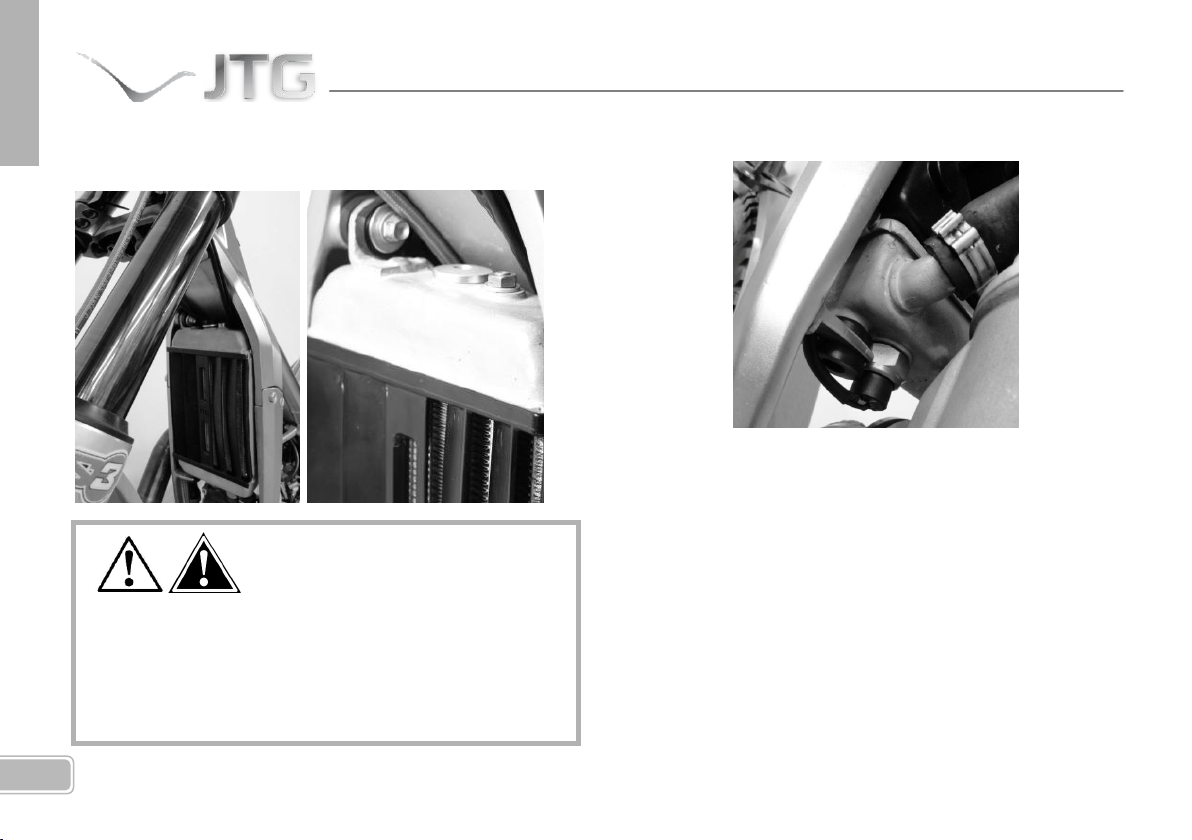
No olvide que el radiador puede estar a altas
temperaturas cuando lo manipule, tenga precaución y
espere a que se enfríe una vez parado el motor.
Utilice siempre fluido refrigerante (-30°C) para motores
de aleación ligera al llenar el radiador.
SISTEMA DE REFRIGERACIÓN
Es conveniente comprobar periódicamente que los tubos
de entrada y salida al radiador no tengan golpes, grietas o
fugas que dificulten el funcionamiento del sistema de
refrigeración, así como el estado de las aletas metálicas del
radiador.
Para un correcto mantenimiento del motor, debe
asegurarse de que el nivel del líquido refrigerante es el
adecuado. Para ello, puede rellenar (preferentemente con
el líquido recomendado) el depósito del radiador a través
de un orificio situado en la parte superior.
Page 25
23
ESPAÑOL
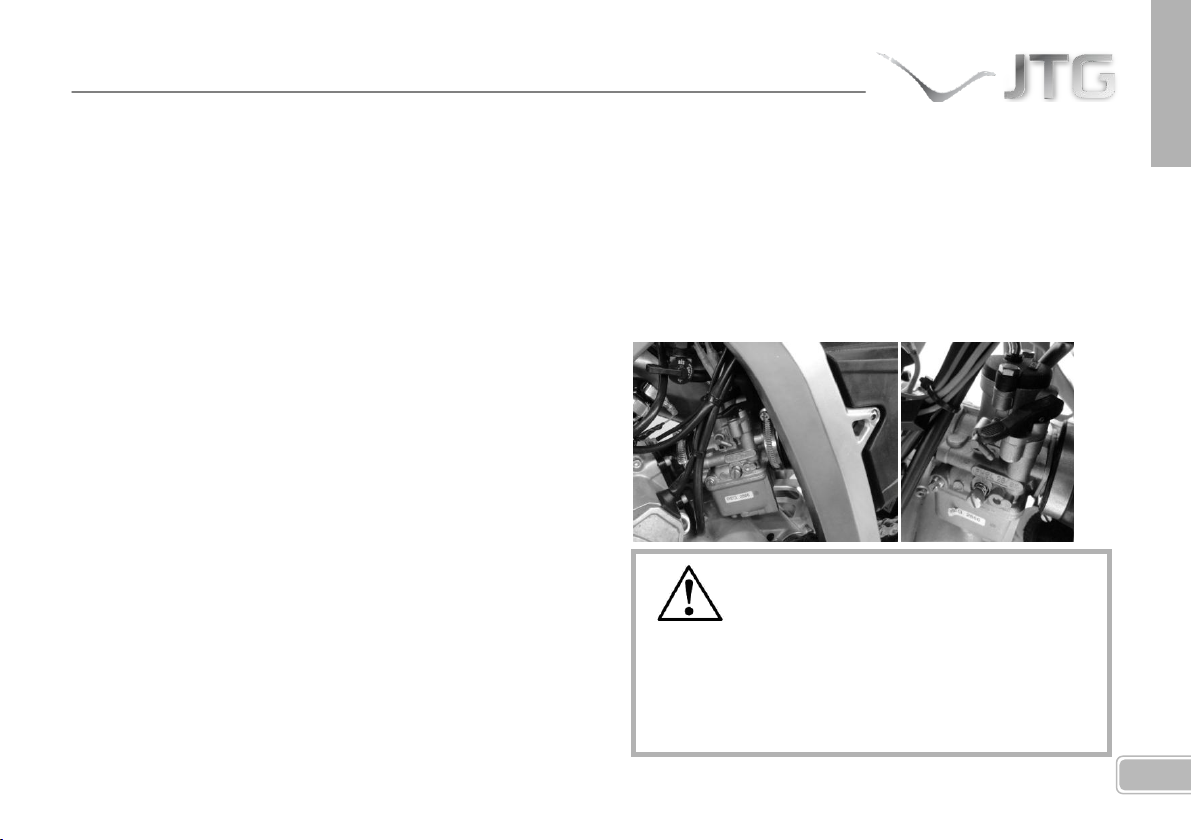
Para proceder, y siempre con el motor frio y la moto en
Al manipular el carburador y piezas adyacentes
pueden quedar restos de combustible que
previamente deben ser drenados. Dicho combustible
es fácilmente inflamable y tóxico, tenga precaución.
Al manipular el carburador y piezas adyacentes
pueden quedar restos de combustible que
previamente deben ser drenados. Dicho combustible
es fácilmente inflamable y tóxico, tenga precaución.
posición de marcha, primero abra parcialmente el tapón
girando en sentido anti horario y deje salir los posibles
vapores existentes. Después, abra completamente el tapón
y rellene de líquido (si es necesario) hasta justo debajo de la
goma del mismo.
El líquido refrigerante que viene de fábrica es una mezcla
de tipo permanente de etileno glicol, diluida en agua
destilada al 50% y con aditivos anticorrosivos.
Con el tiempo es recomendable sustituir el líquido por uno
nuevo y purgar el sistema. Preste atención a posibles
tonalidades distintas de la habitual del refrigerante:
manchas blancas (piezas de aluminio corroídas), manchas
marrones (piezas de acero corroídas), y sea respetuoso con
el medio ambiente, no vierta este tipo de sustancias en
lugares no preparados para tal fin.
En la parte inferior del radiador podrá encontrar un
termocontacto, cuya función es controlar la temperatura
del líquido en el circuito de refrigeración. Es conveniente
que este dispositivo se encuentre en perfecto estado, para
evitar posibles daños a su motor.
CARBURADOR
Es conveniente una revisión del carburador cada cierto
tiempo, lavándolo y limpiándolo con aire a presión para
mejorar su rendimiento.
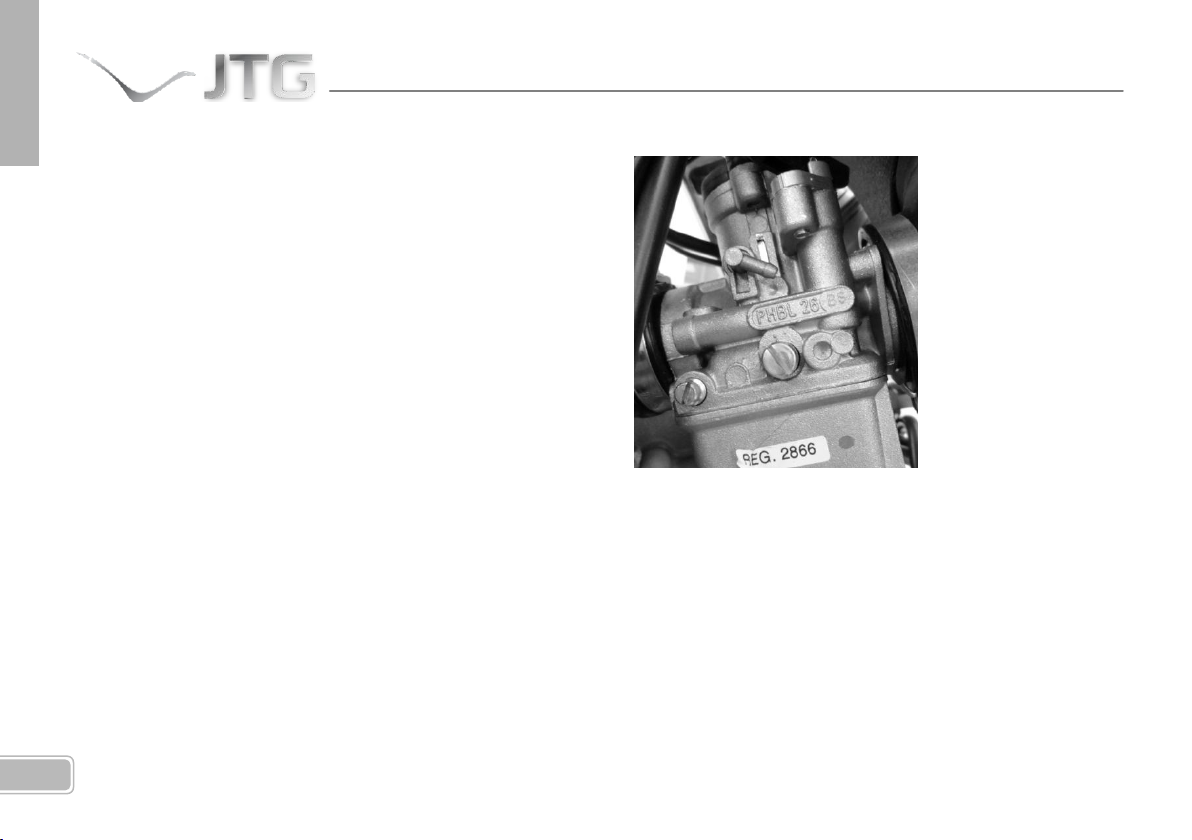
Observe la altura del flotador que marca el nivel de la
gasolina en la cuba y regule el carburador para que
permanezca a 17mm dentro de los márgenes indicados.
Page 26
24
Carburación de la mezcla
Una mezcla óptima de gasolina y aire le permitirá sacar el
máximo rendimiento a su motor. Para ello, debe afinar las
cantidades de gasolina y aire que entran por el carburador.
Una buena manera de averiguar la calidad de la mezcla que
está entrando a su motor es inspeccionar la bujía. Si la bujía
presenta un color marrón claro, la mezcla es buena; si por
el contrario presenta un color negro (exceso de gasolina), o
blanco (exceso de aire), la mezcla que llega a su motor no
es la correcta.
AJUSTE DEL RALENTÍ
Para controlar la cantidad de gasolina que llega al motor
puede modificar la posición del surtidor principal, el cual
lleva graduada una escala en donde los números mayores
indican mayor paso de gasolina. También puede controlar
la mezcla con el tornillo del aire, atornillándolo para
enriquecerla y viceversa.
Para ajustar el ralentí dispone de dos tornillos situados en
el carburador: el tornillo del aire y el del ralentí, que le
permitirán variar su punto de funcionamiento si fuera
necesario.
Page 27
25
ESPAÑOL
CAJA DE LÁMINAS
CADENA DE TRANSMISIÓN
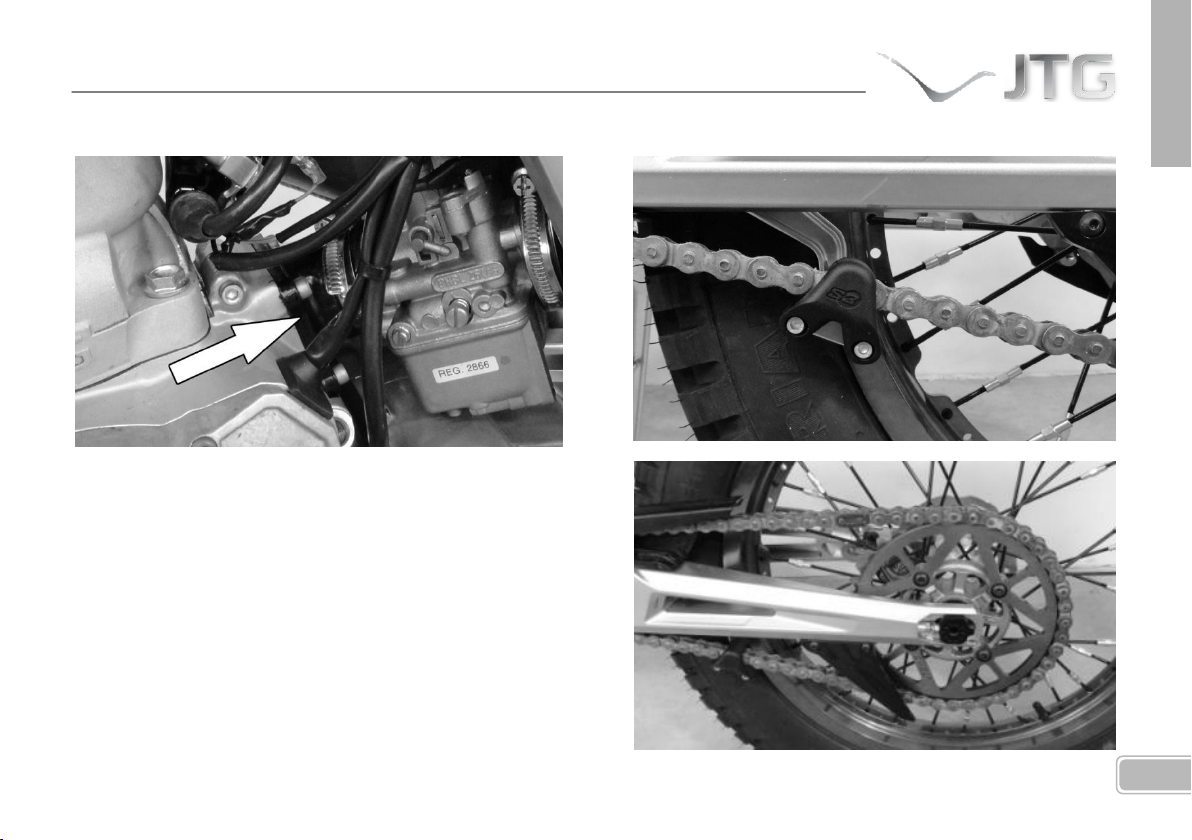
La admisión se realiza a través de una caja de láminas, cuyo
estado de conservación influye en gran medida sobre el
rendimiento de su motor. Cada vez que desmonte el
carburador para su limpieza asegúrese de que las láminas
no presentan desgaste, y si fuera así, cambie la caja por una
nueva.
Page 28
26
Tenga cuidado con este tipo de ajuste. Un eje de
rueda trasera mal alineado o con la tuerca poco
apretada puede provocar un accidente.
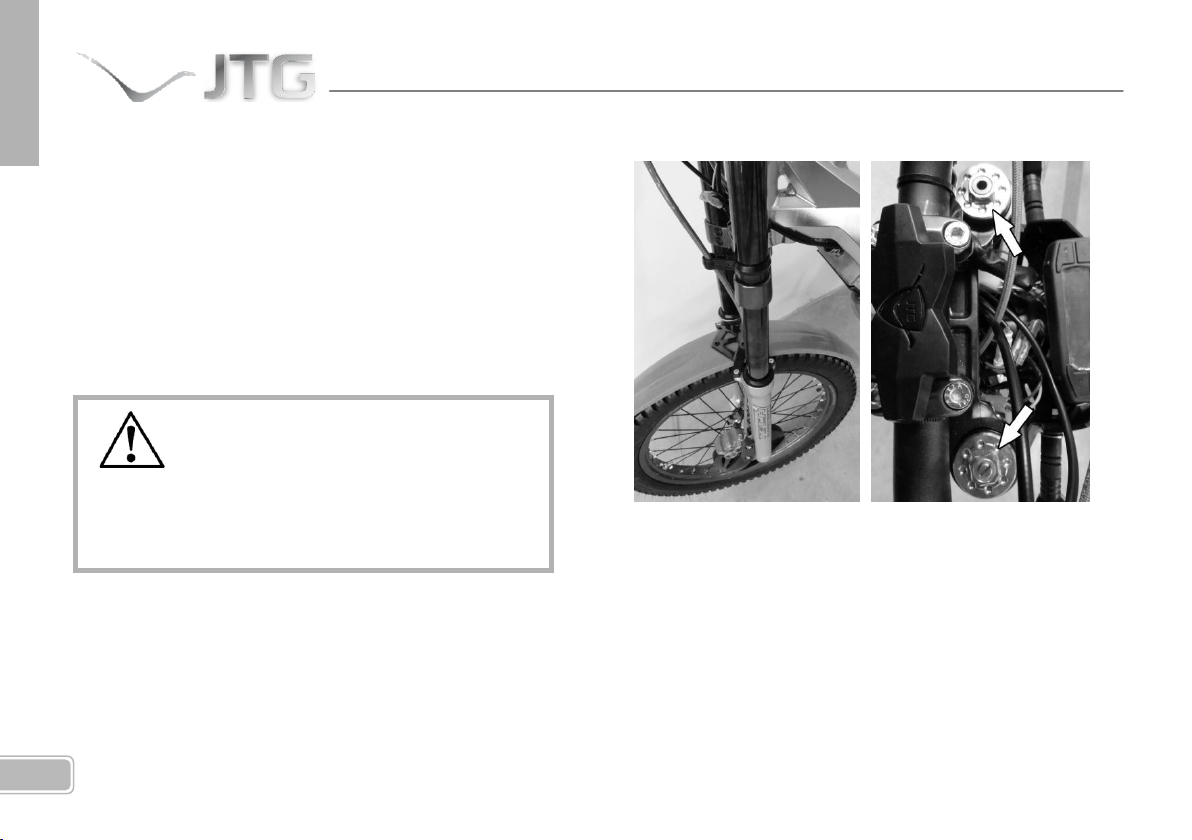
El tensado de la cadena debe permitir un juego de
aproximadamente 10-15mm en la zona expuesta entre el
basculante y el tensor.
Para proceder al tensado, afloje primero la tuerca del eje
trasero y a continuación regule la tensión de la cadena con
los tornillos de ajuste del tensor de la misma que se alojan
en el basculante. Una vez ajustado, apriete de nuevo la
tuerca del eje trasero prestando atención a la alineación del
mismo, para que no quede torcido.
Mantenga engrasada la cadena para un rodaje óptimo,
usando aceite preferentemente viscoso, de mayor
duración.
SUSPENSIÓN
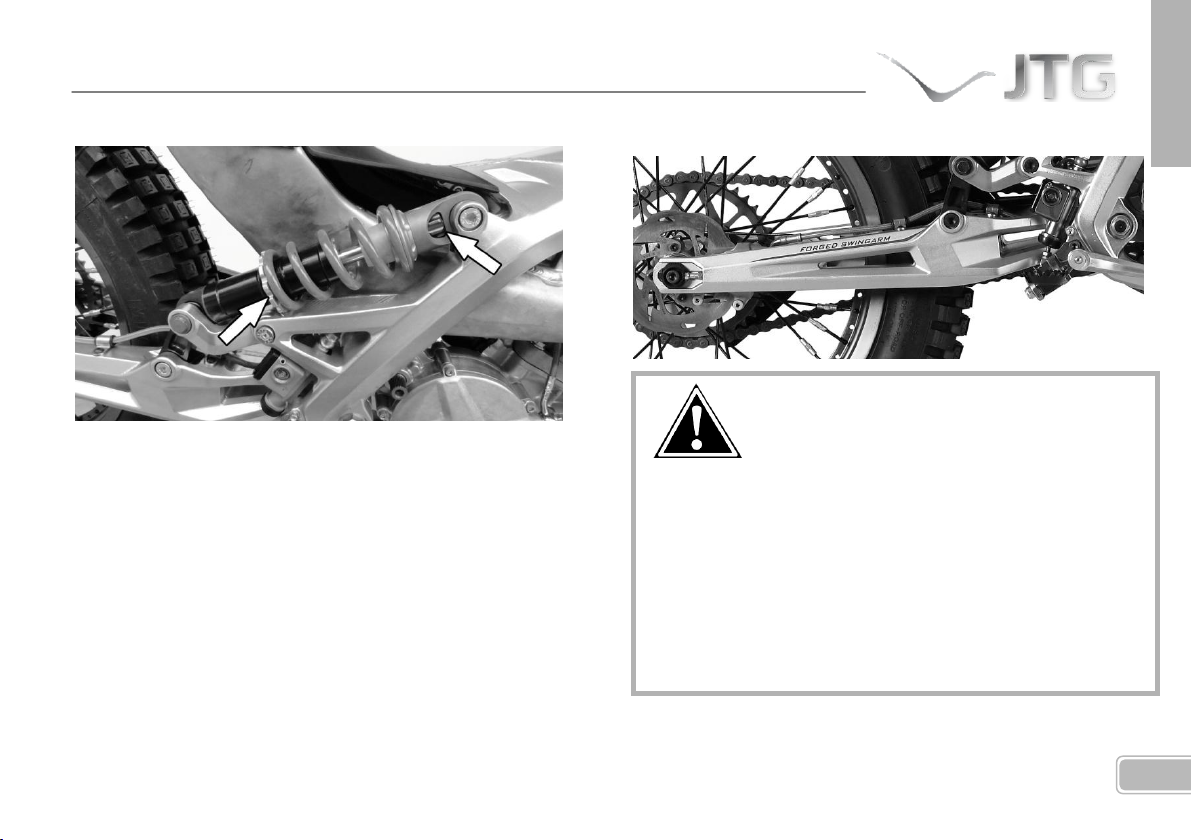
La regulación de la horquilla delantera viene determinada
por unos tornillos que se encuentran en la parte superior.
Girando el tornillo del tubo izquierdo de la horquilla se
regula la compresión y girando el tornillo del tubo derecho
se regula la extensión de la misma. Elija el ajuste óptimo
según su preferencia, siempre teniendo en cuenta que los
cilindros izquierdo y derecho de la horquilla deben estar
regulados al mismo nivel y perfectamente alineados.
Page 29
27
ESPAÑOL
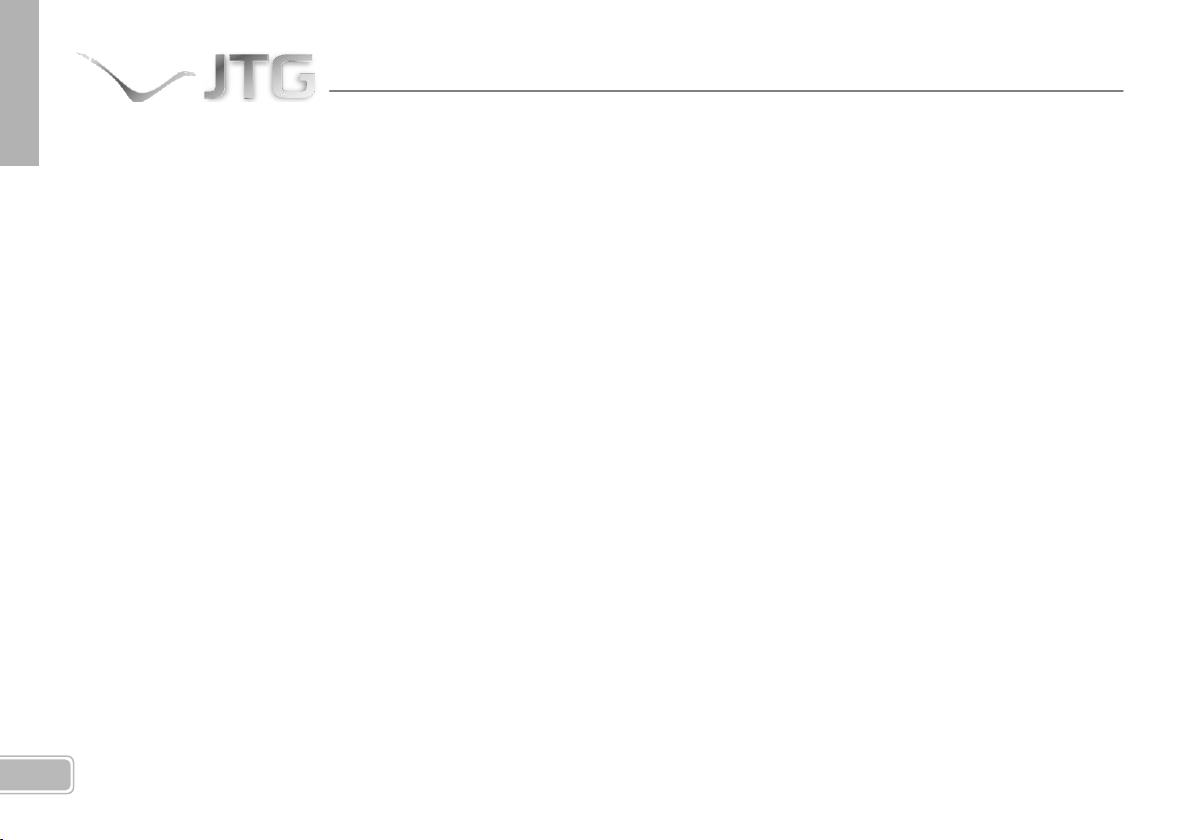
Una buena conservación del sistema de suspensión trasero
y del basculante exige su desmontaje periódicamente para
realizar la limpieza, revisión y engrase de sus cojinetes y
rodamientos internos, así como el ajuste y engrase de la
cadena de transmisión. Asegúrese de que todas las piezas
están en perfecto estado y cambie las piezas desgastadas
por unas nuevas si es necesario.
Se puede regular la precarga del muelle mediante el giro de
una tuerca almenada en la base del amortiguador. De la
misma manera, es posible regular el freno hidráulico del
amortiguador con un tornillo situado en la parte superior.
Este tornillo debe estar en el punto medio de su recorrido
para una regulación normal.
BASCULANTE
Page 30
28
CONSERVACIÓN DE LA MOTOCICLETA
Cuanto mayor sea el cuidado que reciba su vehículo, mayor
será su vida útil y mejor su funcionamiento. Preste atención
a los elementos que se destacan a continuación en cuanto a
mantenerlos limpios y correctamente engrasados, para una
óptima conservación de su motocicleta:
ARTICULACIONES DE MANETAS
PEDAL DEL FRENO TRASERO
PALANCA DE CAMBIO
ESTRIBERAS Y PATA DE CABRA
PALANCA DE ARRANQUE
MANDO DEL GAS
COLUMNA DE LA DIRECCIÓN
CADENA DE TRANSMISIÓN Y ARTICULACIONES DEL
BASCULANTE
TENSOR DE CADENA
Page 31
29
ESPAÑOL
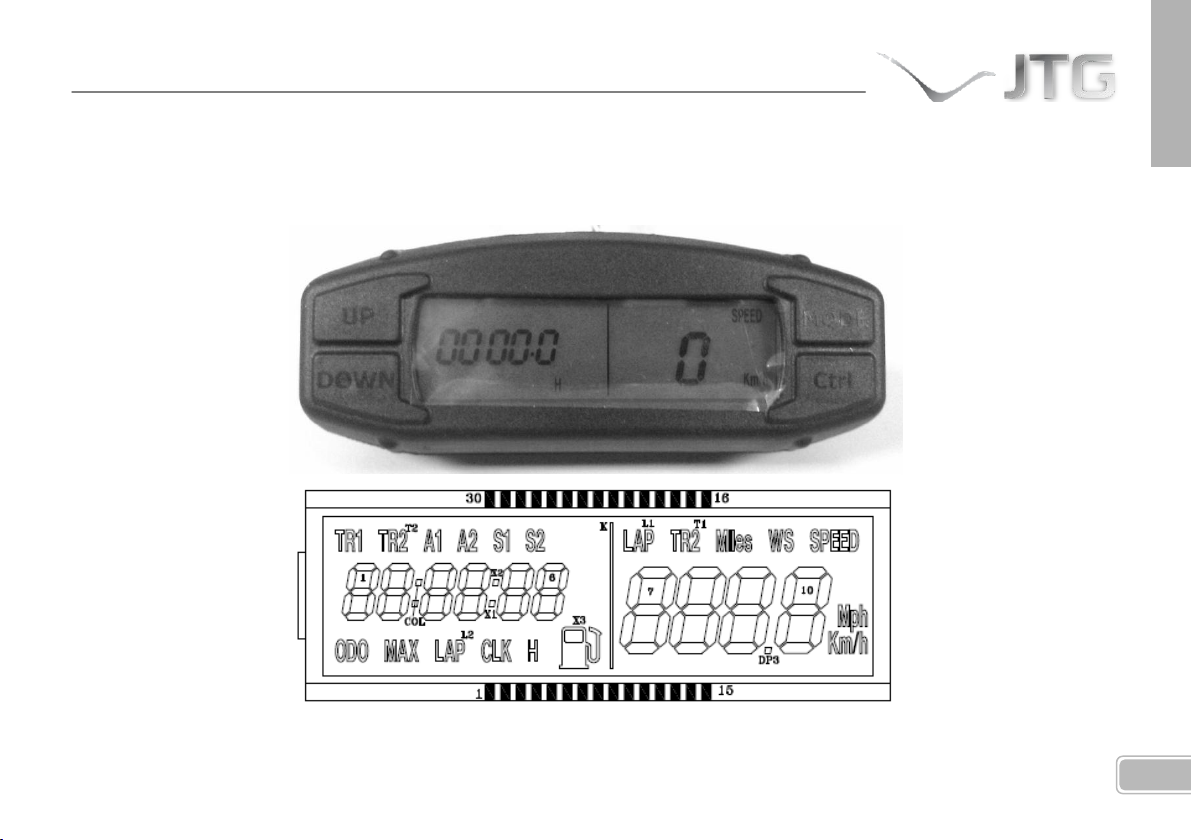
VELOCÍMETRO
A continuación se pasan a detallar las características más importantes del tablero de mandos e indicador de velocidad
incorporado en el vehículo:
Page 32
30
Velocidad Máx
Sobreestimación
Resolución
Actualización
Impulsos/revolución
300 Km/h (186 Mph)
4% constante
1 Km/h (1 Mph)
Cada 500ms
1
El sistema está dimensionado según estas características:
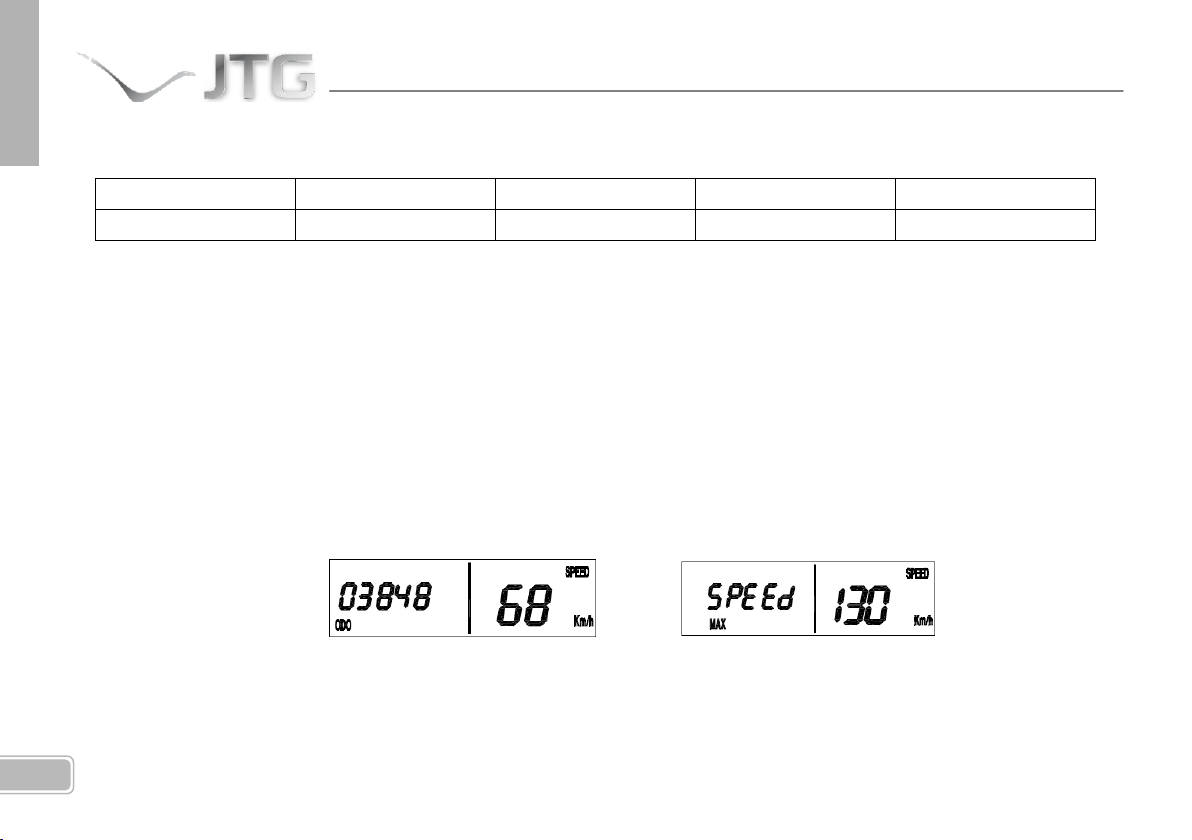
Las funciones básicas (que son siempre visibles y no se pueden deseleccionar desde el menu de setup) del indicador son:
- La velocidad actual (SPEED)
- La distancia total recorrida (ODO)
- El tiempo total de marcha del vehículo (H)
Función SPEED
Esta información está siempre visible, independientemente del estado de reposo o movimiento del vehículo. La
configuración por defecto indica Km/h como unidad de medida.
Si la velocidad del vehículo es superior a 110 km/h por más de 20 segundos consecutivos, en la pantalla parpadea la
imagen de la derecha. Esta señal se mantiene hasta que la velocidad del vehículo desciende por debajo de 110 km/h
por lo menos durante 10 segundos consecutivos.
Page 33
31
ESPAÑOL
Función ODO
Esta información sólo se puede ver pulsando el botón
MODE, sin importar el estado de reposo o
movimiento del vehículo. La configuración
predeterminada indica Kms como unidad de medida y
se almacenan de forma permanente en memoria a
cada km recorrido.
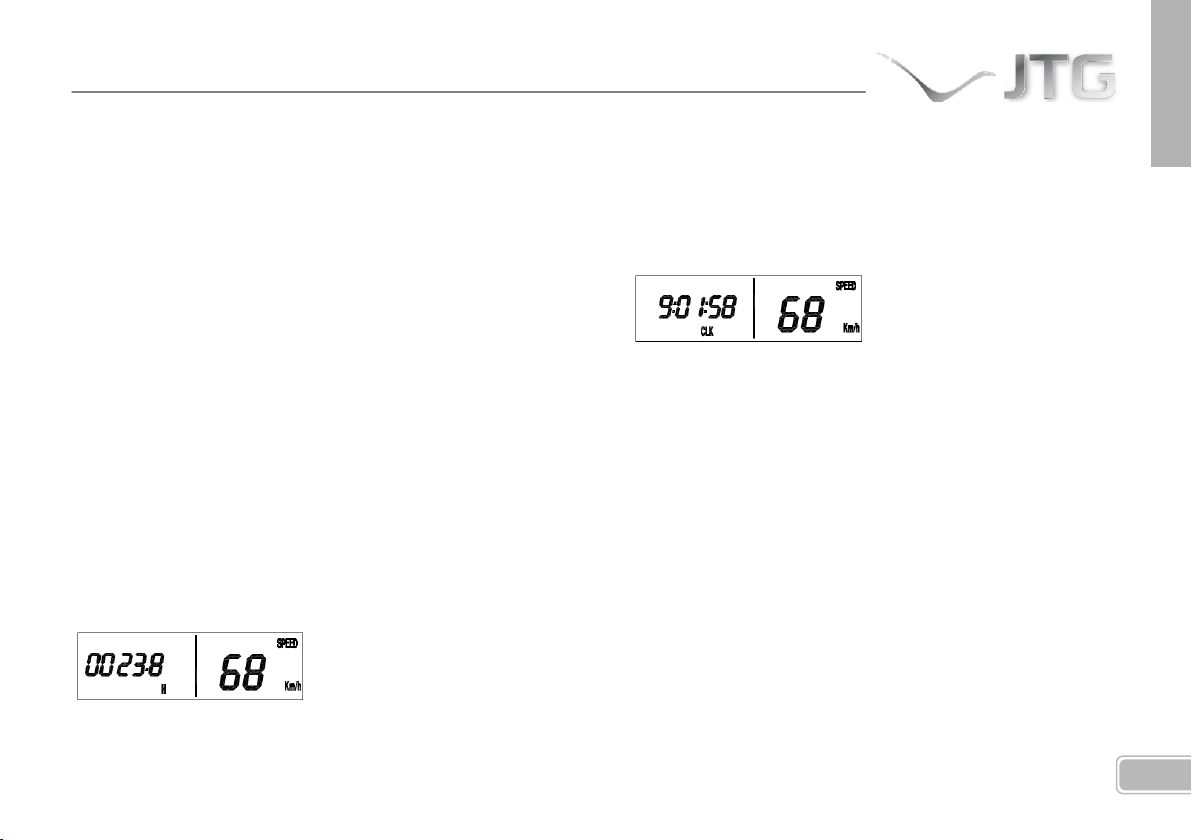
Función Reloj (CLK)
Esta función indica la hora actual en el formato
"hh:mm:ss". El reloj se mantiene activo incluso
cuando el sistema activa el modo de bajo consumo
(Sleep Mode).
Función H
Esta función indica las horas de funcionamiento del
vehículo y se puede ver pulsando el botón MODE, sin
importar el estado de reposo o movimiento del
vehículo. El contador asociado con esta función sólo
se activa cuando el vehículo está en movimiento, al
recibir el primer impulso del sensor de velocidad, y se
inhibe 3s después de haber recibido el último impulso
del mismo.
El ajuste de la hora se puede hacer solamente a
vehículo parado, accionando el botón MODE varias
veces hasta que aparezca la pantalla de la imagen
detallada en el párrafo anterior. Una vez en la pantalla
del modo CLK, presionando unos segundos el botón
MODE, comenzarán a parpadear los dígitos activos (en
este orden: horas, minutos, segundos y modalidad de
representación), que se podrán modificar con los
botones UP y DOWN, y seleccionar con el botón
MODE. En el modo de configuración de la hora, si
pasan 20 segundos sin apretar ningún botón o el
vehículo se pone en movimiento, el sistema volverá a
Page 34
32
su modo operativo estándar, guardando la
configuración seleccionada.
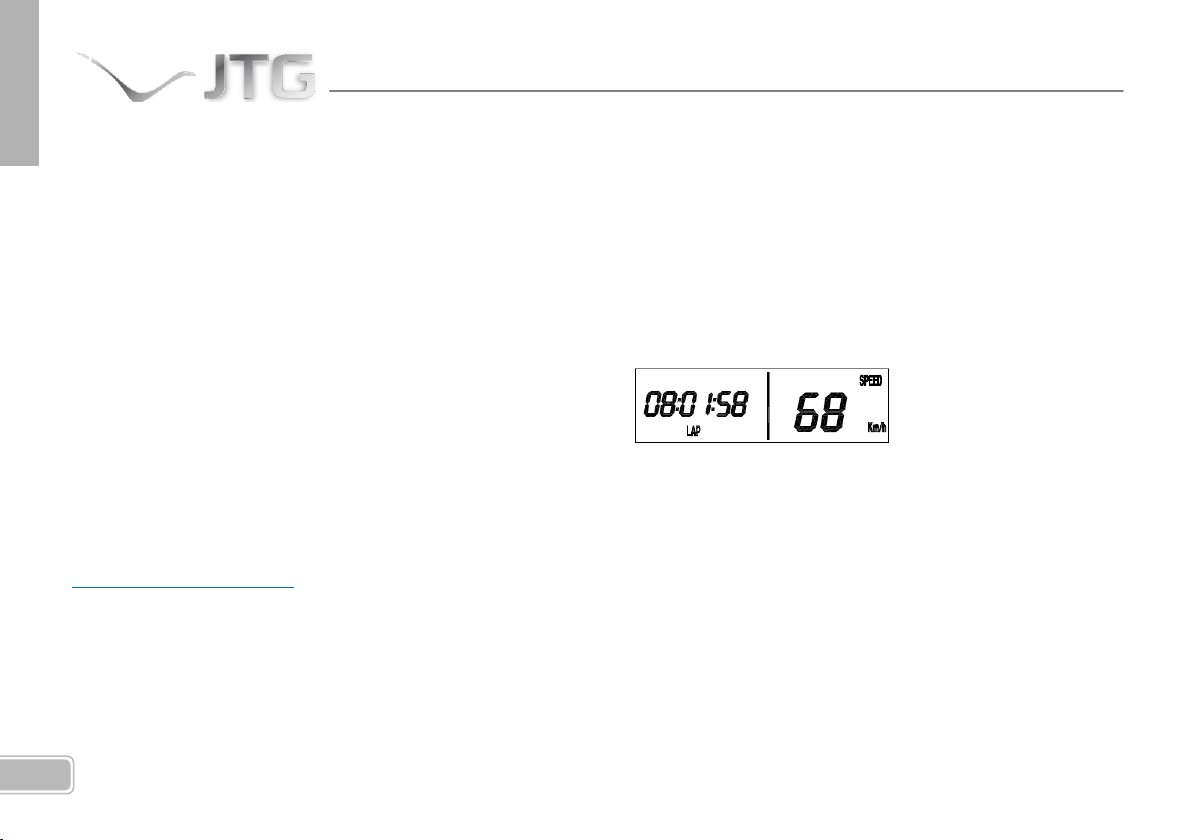
Función Cronómetro Manual (LAP)
Esta función permite activar y desactivar
manualmente un cronómetro, tanto si el vehículo está
Funciones Trip, Velocidad Media y Cronómetro
Automático (TR1, A1 y S1)
Estas funciónes indican la distancia parcial recorrida,
velocidad media y el tiempo de uso del viaje actual del
vehículo. Se activan automáticamente y vienen
parado como si está en movimiento. Para activar el
cronómetro, pulse el botón UP dentro de la pantalla
mostrada a continuación, y para desactivarlo pulse de
nuevo el botón UP. Para borrar el tiempo medido,
pulse el botón DOWN.
representadas en la pantalla por los indicadores TR1,
A1 y S1 respectivamente, mostrando por defecto la
distancia recorrida en kms, la velocidad en kms/h y el
tiempo en horas, minutos y segundos.
Para mayor información sobre el resto de funciones del sistema, visite la página:
http://www.jotagas.com
Page 35
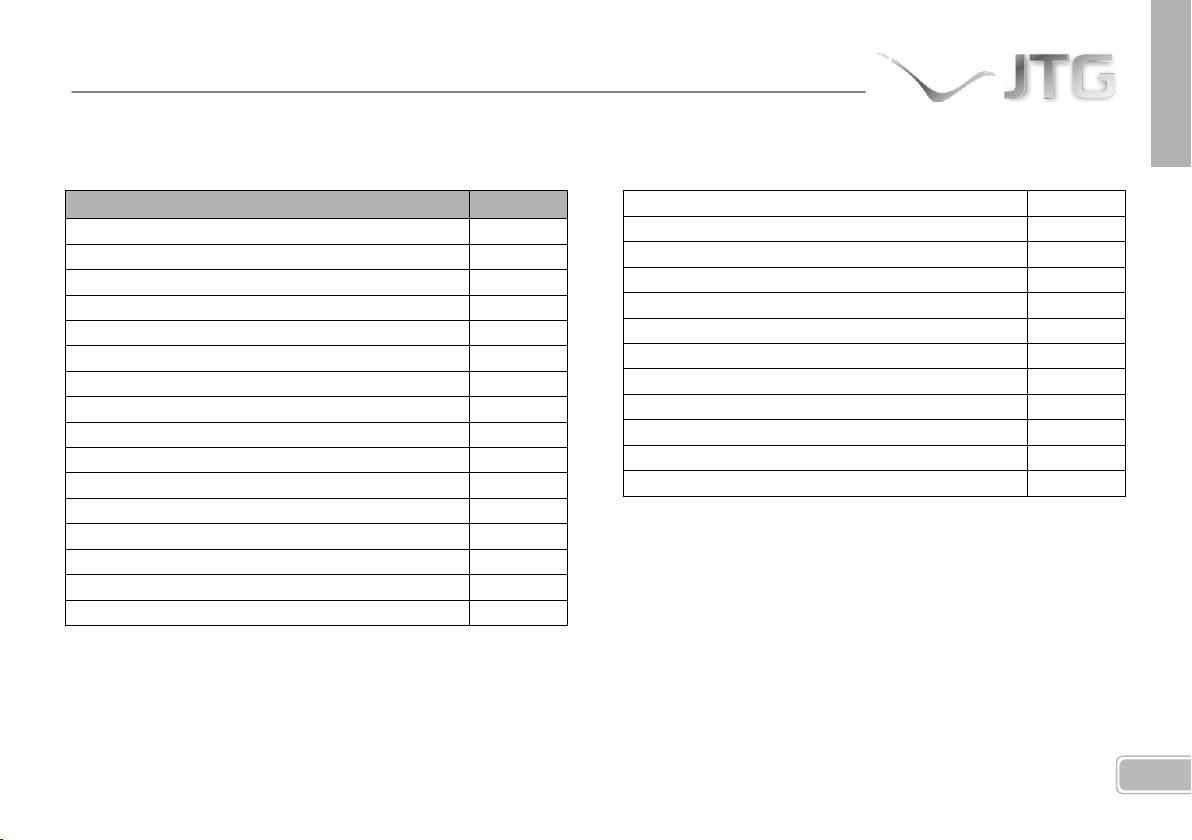
33
ESPAÑOL
UNIÓN
Nm
Basculante-Chasis
40-50
Fijación superior amortiguador
40-50
Fijación inferior amortiguador
40-50
Eje rueda delantera
40-50
Bieletas
40-50
Manillar
25-30
Puente aleta delantera
7-10
Silencioso
10-15
Eje rueda trasera
40-50
Fijación pinza del freno delantero
25-30
Fijación curva del escape
10-15
Fijación del motor
30-35
Fijación bomba freno trasero
7-10
Bujía
11
Fijación del encendido
7-8
Fijación del embrague
20-25
Fijación de espárragos del cilindro
25
Fijación de las láminas
7-8
Fijación muelle embrague
3-4
Fijación cárteres
7-8
Fijación tapa bomba de agua
7-8
Fijación tapa del embrague
7-8
Fijación del volante
40
Tapa de encendido
7-8
Tapón vaciado cárter
12
Tornillo del pedal de arranque
12-13
Tornillo del pedal de cambio
7-8
Tornillos de culata
12-13
PARES DE APRIETE
Page 36
34
ALMACENAJE
En determinadas ocasiones le puede resultar necesario mantener la moto parada durante largos períodos de tiempo, si es así es
conveniente que realice las siguientes operaciones antes de su almacenaje:
Limpieza integral del vehículo.
Engrasar y/o lubricar debidamente los componentes que así lo requieran.
Vaciar el depósito de gasolina. (Tenga precaución con el combustible, es fácilmente inflamable y tóxico)
Vaciar el cárter retirando el aceite de transmisión usado y rellenarlo con aceite nuevo (si partía de motor parado, se
recomienda arrancar la moto previamente y dejar funcionar el motor unos minutos para calentar el aceite y favorecer
su drenaje).
Cubrir el escape con una bolsa de plástico, protegiéndolo de la intemperie.
Si hay partes metálicas no pintadas susceptibles de sufrir oxidación, cubrirlas con una capa de aceite.
Evitar que las ruedas toquen el suelo, separándolas de él con algún elemento como cartón o similares.
Proteger la motocicleta en la medida de lo posible del polvo y la suciedad mediante su cubrimiento con plásticos o lona.
En el momento de volver a ponerla en marcha, previamente deberá:
Retirar los plásticos protectores colocados.
Comprobar el estado de lubricación y engrase de los componentes que lo requieran.
Revisar el estado de la bujía.
Ajustar la presión de los neumáticos a la recomendada.
Llenar el depósito de gasolina.
Page 37
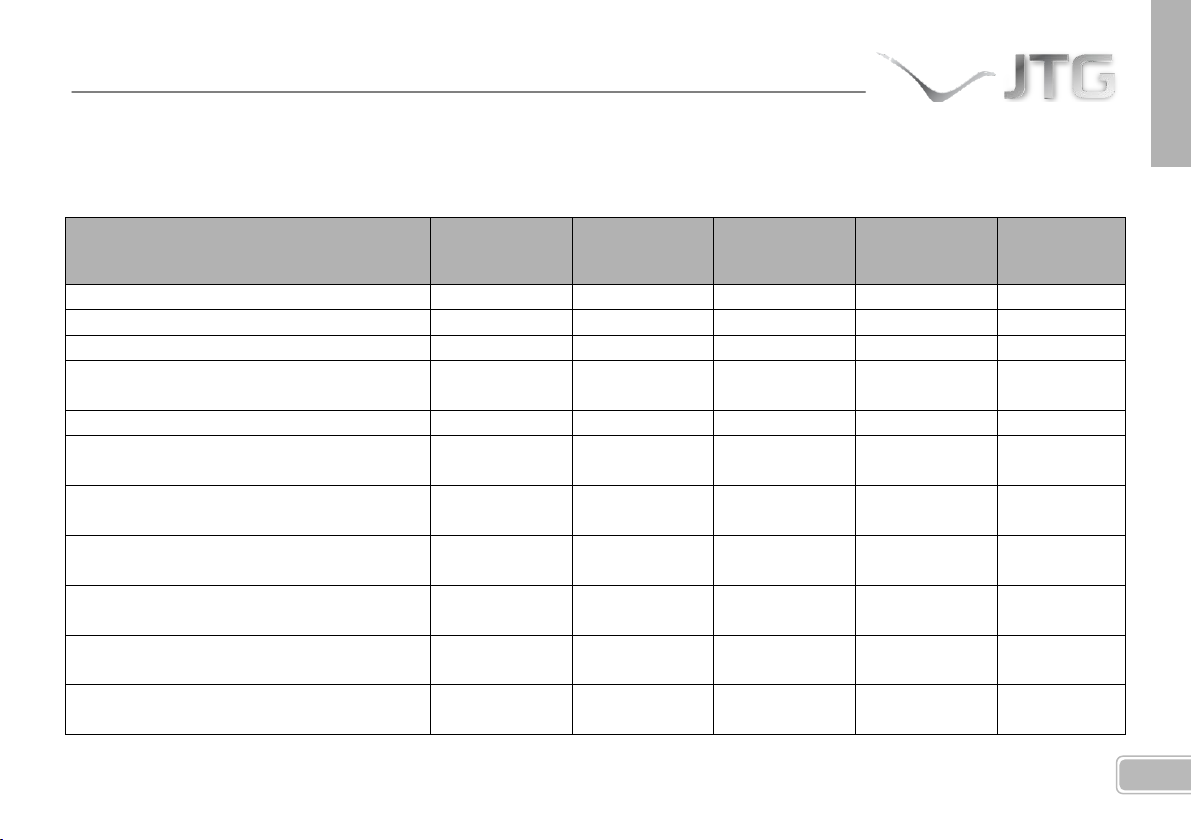
35
ESPAÑOL
OPERACIONES DE MANTENIMIENTO
COMPONENTE
VERIFICAR
AJUSTAR
SUSTITUIR
LIMPIAR
ENGRASAR
Amortiguador trasero
Anualmente
Cada 2 años
Aceite de suspensión horquilla delantera
60h
Aceite de transmisión
30h 60h
Reglaje de frenos
En cada uso
Cuando sea
necesario
Bujía
30h
60h
15h
Basculante y bieletas
En cada uso
Si estuvieran
dañados
En cada uso
Tras cada
lavado
Cadena de transmisión
En cada uso
Cuando sea
necesario
Si estuviera
dañada
En cada uso
Tras cada
lavado
Cable y puño del acelerador
En cada uso
Cuando sea
necesario
Si estuvieran
dañados
Cuando sea
necesario
Tras cada
lavado
Caja de láminas
30h
Si estuviera
dañada
En cada uso
Carburador
Cuando sea
necesario
Si estuviera
dañado
En cada uso
Chasis
Si estuviera
dañado
En cada uso
(NOTA: Tenga en cuenta que una motocicleta limpia facilita la inspección de fallos y defectos de desgaste en cada revisión)
Page 38
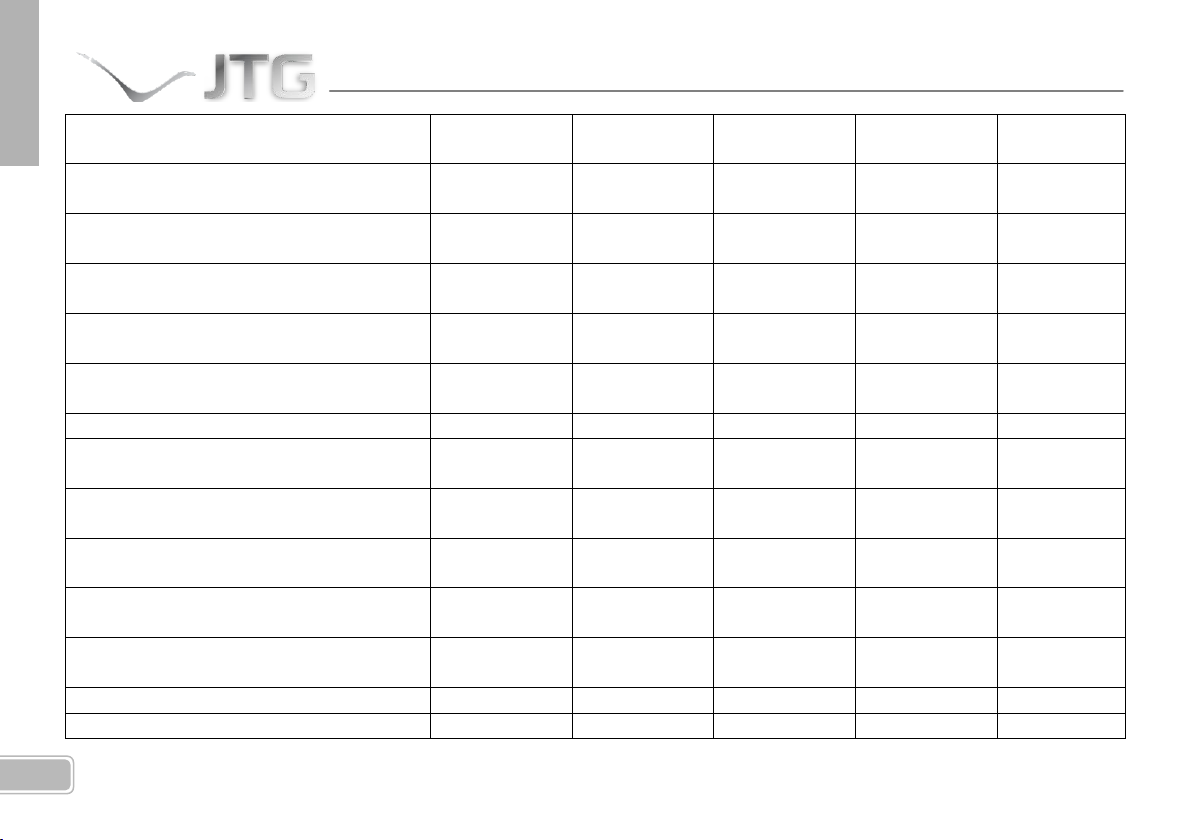
36
Chiclé del carburador
Cuando sea
necesario
Si estuviera
dañado
Cojinete de dirección
Si estuviera
dañado
Cojinete de pistón
Si estuviera
dañado
Cojinete de rueda
Si estuviera
dañado
Cojinetes del motor
Si estuvieran
dañados
Corona trasera
30h
Primeras 5h
Si estuviera
dañada
Tras cada
lavado
Culata y cilindro
60h
Anualmente
Frenos
En cada uso
Cuando sea
necesario
Si estuvieran
dañados
Discos de freno
En cada uso
Primeras 5h
Si estuvieran
dañados
Cada dos usos
Discos de embrague
Si estuvieran
dañados
Embrague
Si estuviera
dañado
Paso de rueda-silenciador
En cada uso
Si hay alguna
caída
Escape
500h
Fibra del silenciador
100h
Page 39

37
ESPAÑOL
Filtro de aire
En cada uso
Si estuviera
dañado
En cada uso
Tras cada
lavado
Juego dirección
En cada uso
Cuando sea
necesario
Latiguillo freno
Cuando sea
necesario
Cada 2 años
Tras cada
lavado
Líquido refrigerante
Cuando sea
necesario
Anualmente
Lubricación general
En cada uso
En cada uso
Tras cada
lavado
Llanta delantera y trasera
Si estuvieran
dañadas
En cada uso
Neumáticos
En cada uso
Si estuvieran
dañados
En cada uso
Nivel líquido de freno
Cuando sea
necesario
Patín guía cadena
Si estuviera
dañado
Pedal arranque y pedal cambio
Si estuvieran
dañados
Tras cada
lavado
Pistón bomba freno y guardapolvo
Si estuvieran
dañados
Pistón freno y guardapolvo
Si estuvieran
dañados
Pistón y aro pistón
60h
Anualmente
Page 40
38
Radios delanteros y traseros
5h
Si estuvieran
dañados
En cada uso
Sistema gasolina
En cada uso
Si estuviera
dañado
Suspensión delantera
Cuando sea
necesario
Si estuviera
dañada
Tórica escape
Si estuviera
dañada
Tornillos, tuercas y sujecciones
Cuando sea
necesario
Si estuvieran
dañados
Tubo gasolina
En cada uso
Cuando sea
necesario
Si estuviera
dañado
Tubo radiador y conexiones
En cada uso
Cuando sea
necesario
Si estuvieran
dañados
Adhesivos protector chasis
Si estuvieran
dañados
Protector carter
Si estuviera
dañado
Page 41

39
ESPAÑOL
HOMOLOGACIÓN
Todos los componentes incluidos en el montaje de este vehículo cumplen las normas legales establecidas en materia de
homologación, incluyendo las marcas respectivas de identificación en las piezas que así lo requieren.
Preste atención a los componentes obligatorios para circular por la vía pública y que debe tener su motocicleta para pasar la
Inspección Técnica de Vehículos:
- Portamatrículas
- Indicador de velocidad
- Sistemas de alumbrado y catadióptricos
- Indicadores de dirección
- Claxon
- Retrovisores
- Bloqueo de dirección
- Placa de identificación del fabricante
- Restrictor del filtro de aire
- Sistema de escape catalizado
- Silencioso
- Chiclés de carburación
- Caballete
NOTA IMPORTANTE: Junto con el vehículo se suministra un KIT RACING de componentes adicionales. Debe tener en cuenta
que las modificaciones que aplica este kit NO quedan cubiertas por la homologación del vehículo.
Page 42
40
POSIBLES SÍNTOMAS DE AVERÍAS Y PREGUNTAS FRECUENTES
AVERÍA
POSIBLES CAUSAS
MEDIDAS A TOMAR
El motor no funciona
- Bujía sucia.
- Motor ahogado.
- Combustible mal mezclado.
-
- Limpiar y secar la bujía o cambiarla.
- Abra el mando del gas al máximo y
accione el pedal de arranque 5 a 10
veces. Arrancar luego el motor.
- Comprobar obstrucciones en
conductos del depósito de gasolina y
del filtro del aire.
La moto arranca bien y luego se para
- Alimentación de aire incorrecta,
motor ahogado.
- No hay suficiente gasolina.
- Cerrar el estárter, verificar conductos
de alimentación.
- Llenar el depósito.
Calentamiento excesivo del motor
- Nivel bajo del líquido refrigerante.
- Radiador sucio u obstruido.
- Añadir líquido refrigerante,
comprobar posibles fugas.
- Limpiar las láminas del radiador.
Funcionamiento inestable del motor
- Problemas en la bujía y/o capuchón
antiparasitario de la misma.
- Rótor del encendido averiado.
- Agua en el combustible.
- Comprobar estado de ambos.
- Cambiar el rotor.
- Vaciar el depósito y llenar con
(NOTA IMPORTANTE: Se recomienda acudir a un taller autorizado para realizar todo tipo de ajustes internos de
motor o de piezas que no sean las habituales de desgaste. Tenga en cuenta que la manipulación indebida de la moto
puede ser peligroso para usted y/o conllevar posibles cancelaciones de la garantía.)
Page 43

41
ESPAÑOL
combustible nuevo.
Ruidos raros en el motor
- Problemas en el encendido.
- Motor sobrecalentado.
- Acudir a un taller especializado.
- Parar el motor y comprobar el estado
del sistema de refrigeración y escape.
Falta de respuesta en el motor
- Problemas en admisión.
- Problemas en sistema de escape.
- Surtidores del carburador sucios.
- Rodamientos de cigüeñal dañados.
- Falta de contacto en el embrague.
- Limpiar el sistema de admisión de
carburante y filtro de aire.
- Comprobar fugas en el sistema y
limpiar o sustituir la fibra del silencioso.
- Desmontar el carburador y limpiarlos.
- Cambiar los rodamientos.
- Verificar el ajuste del mismo. Acudir a
un taller especializado.
Humo blanco en la salida del escape
- Entra agua en el cilindro.
- Cable del acelerador mal ajustado.
- Cambiar la junta tórica de la culata.
- Verificar ajuste del acelerador.
Humo marrón en la salida del escape
- Entra poco aire en la mezcla.
- Surtidores principal demasiado alto.
- Limpiar o cambiar el filtro de aire.
- Verificar Surtidor principal.
Explosiones en el escape
- Presencia de carbonilla en la cámara
de combustión.
- Combustible inapropiado.
- Bujía en malas condiciones o errónea.
- Juntas del sistema de escape
deteriorado.
- Limpiar la cámara de combustión.
- Vaciar el depósito y llenarlo con
combustible correcto.
- Cambiar la bujía por una adecuada.
- Verificar el estado de las juntas y, si es
necesario, cambiarlas por unas nuevas.
Mal contacto en el embrague
- No hay juego en la maneta de
embrague.
- Acudir a un taller especializado.
Page 44

42
- Embrague desgastado.
- Muelles del embrague rotos o débiles.
- Acudir a un taller especializado.
- Acudir a un taller especializado.
Mal engrane de las marchas
- Problemas en horquillas, ruedas o
sistemas adicionales del cambio.
- Acudir a un taller especializado.
Ruidos extraños en la moto
- Cadena desgastada o mal ajustada
- Dientes corona trasera desgastados.
- Falta de lubricación en la cadena.
- Rueda trasera mal alineada.
- Falta de aceite en la horquilla
delantera.
- Problemas en el muelle de la horquilla
delantera.
- Disco freno gastado.
- Pastillas de freno cristalizadas o
descolocadas.
- Ajustar la cadena o cambiarla.
- Cambiar la corona trasera.
- Aplicar lubricante apropiado para
cadenas.
- Acudir a un taller especializado.
- Añadir aceite específico para
horquillas hasta nivel adecuado.
- Sustituir el muelle de la horquilla
delantera.
- Sustituir disco freno.
- Recolocar las pastillas o cambiarlas.
Inestabilidad en la conducción
- Tuerca del eje de dirección muy
apretada.
- Rodamientos del eje de dirección
dañados o desgastados.
- Eje de la dirección doblado.
- Aflojar un poco la tuerca del eje de
dirección.
- Sustituir los rodamientos.
- Acudir a un taller especializado.
Suspensión demasiado dura
- Horquilla con exceso de aceite.
- Horquilla con aceite demasiado
viscoso.
- Horquilla torcida o doblada.
- Purgar el aceite sobrante hasta el
nivel adecuado.
- Sustituir el aceite por uno nuevo con
la viscosidad deseada.
- Acudir a un taller especializado.
Page 45

43
ESPAÑOL
- Demasiada presión de neumáticos.
- Amortiguador trasero mal ajustado.
- Ajustar la presión de los neumáticos.
- Ajustar el amortiguador trasero.
Suspensión demasiado blanda
- Nivel de aceite bajo en la horquilla.
- Horquilla con aceite poco viscoso.
- Amortiguador trasero mal ajustado.
- Añadir aceite específico hasta nivel
adecuado.
- Sustituirlo por un aceite de
viscosidad adecuada.
- Ajustar el amortiguador trasero.
Vibración en el manillar
- Neumático desgastado, basculante o
sus rodamientos desgastados.
- Llanta descentrada.
- Rueda mal alineada.
- Ejes de dirección, soportes de manillar
o tuercas de fijación con holguras.
- Acudir a un taller especializado.
- Acudir a un taller especializado.
- Acudir a un taller especializado.
- Apretar tuercas y fijaciones siguiendo
los pares indicados.
Mal funcionamiento de los frenos
- Pastillas desgastadas
- Discos desgastados.
- Pérdidas de fluido de frenos.
- Líquido de frenos en mal estado.
- Pistón de la bomba deteriorado.
- Sistema mal ajustado.
- Cambiar pastillas
-Cambiar discos.
- Verificar circuitos. Sustituir piezas con
fugas y reponer líquido hasta el nivel
adecuado.
- Purgar el circuito de fluido de frenos y
reponer con uno nuevo adecuado.
- Sustituir el pistón de la bomba.
- Ajustar frenos.
Se funden las bombillas
- Problemas con el regulador de
tensión.
- Comprobar las conexiones, verificar el
regulador de tensión y los fusibles.
Page 46

Page 47

ENGLISH
JTG JT300
(JT280 – JT250)
2012
Page 48

Page 49
3
ENGLISH
Welcome to JTG!
Thank you for the confidence you
have shown in our brand by
purchasing this motorcycle designed
for Trial.
As a JTG user, you will enjoy a
product that offers innovation
where strictly necessary, without
excesses, incorporating
characteristics such as quality,
prestige and exclusivity.
Designed by off-road professionals
to offer comfortable and effective
service without forgetting a
competitive spirit, that will enable
you to experience the performance
of a winner, ready at your disposal.
JOTAGAS S.L. 2012
Page 50
4
ATTENTION! This symbol refers to aspects which if ignored could cause damage to your motorcycle. Non-observance of
these warnings could render the guarantee void.
PRECAUTION! This symbol refers to aspects which if ignored could result in physical danger to the user.
JTG ADVISES YOU:
Please read this user manual carefully before using your motorcycle. In it you will find all the instructions necessary for correct
operation of the machine as well as for your own safety, enabling you to attain optimum maintenance and service life from the
very first day.
Please pay special attention to notes bearing these symbols:
In addition to the specific warning notes, this manual also contains other tips for better use of your motorcycle as well as better
adjustment and control of important features of the vehicle.
JTG reserves the right to modify this manual.
Page 51

5
ENGLISH
JTG RECOMMENDS:
In case of any doubt as to possible adjustments of your motorcycle, please follow the instructions contained
in this manual and/or contact an authorised JTG dealer.
Please read the information contained in this user manual and familiarise yourself with the features of your
vehicle before driving it at maximum power.
It is recommended to establish an initial running-in period of at least 8-10 hours for the engine to bed in,
during this period do not drive at high speed or full throttle. The first hours of use should be at moderate
speed only.
Fuel is highly inflammable. Take care when refuelling and always stop the engine first.
Before running the engine at high speed, it is important to have reached an optimum operating
temperature, especially when starting up the motorcycle or in low temperature conditions.
This motorcycle uses synthetic two-stroke oil mixed with 98-octane fuel in a 1% proportion. Do not use any
other type of lubrication without first consulting with an authorised JTG mechanic.
This motorcycle is designed to carry only one person; it is not permitted to carry a passenger.
For the longest possible service life, keep the motorcycle maintained according to the recommendations in
this manual.
This vehicle has been designed for safe riding, as long as the rider is equipped with the necessary safety gear
(Helmet, body protection, etc.). Take care and ride in a sensible manner.
Page 52
6
TABLE OF CONTENTS
Description of parts 7
Technical datasheet 9
Vehicle information 11
Starting and stopping the engine 12
The choke 12
Gear change 13
Fuel tap 13
Fuel tank 14
Tyres 15
Brakes 16
Steering lock 17
Side stand 17
Handlebar and instrument panel 18
Adjusting levers and the handlebar 19
Checking the oil level 19
Air filter 20
Sparkplug 21
Cooling system 22
Carburettor 23
Adjusting the tick over 24
Reed valve box 25
Transmission chain 25
Suspension 26
Swing arm 27
Maintaining the motorcycle 28
Speedometer 29
Torque values 33
Storage 34
Maintenance operations 35
Homologation 39
Troubleshooting 40
Page 53
7
ENGLISH
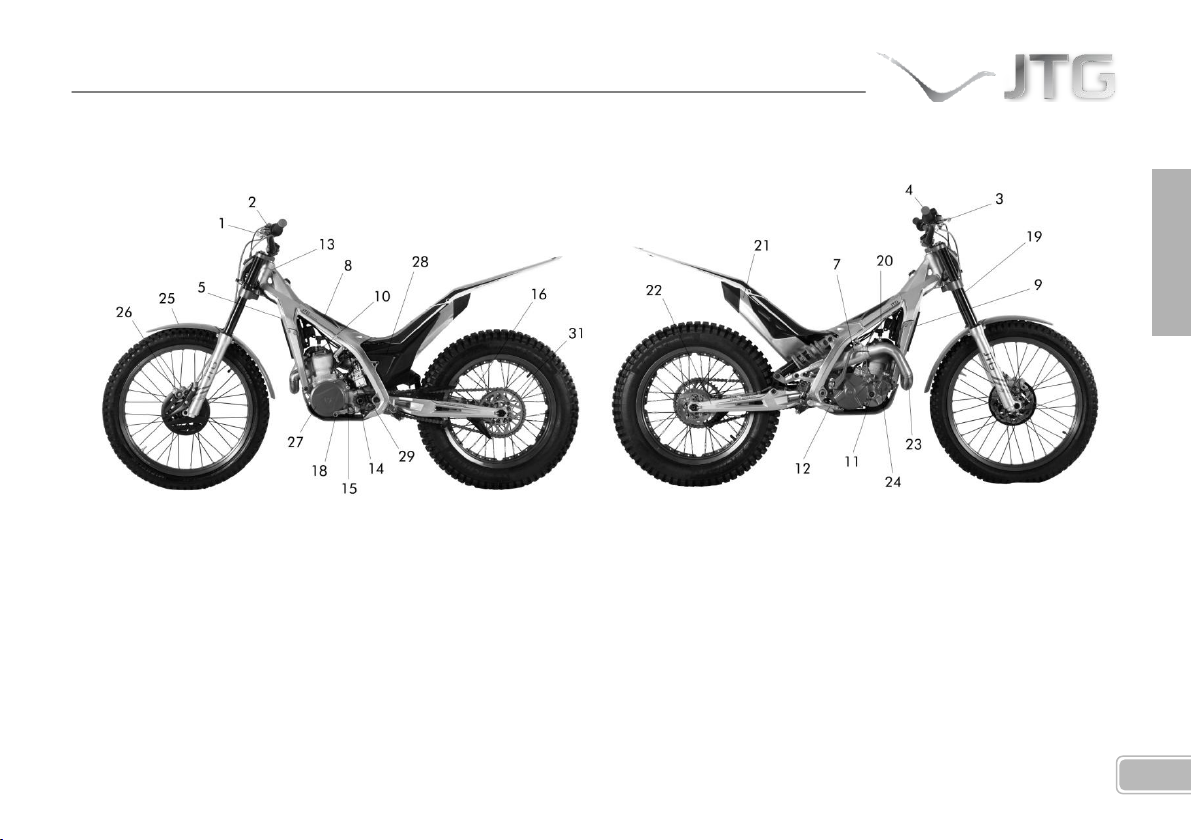
DESCRIPTION OF PARTS
1- Clutch lever
2- Indicator, horn and stop
buttons
3- Brake lever
4- Accelerator
5- Radiator cap
6- Fuel tank cap
7- Starting pedal
8- Fuel tank
9- Radiator
10- Radiator drainage bolt
11- Sump oil level peep hole
12- Rear brake pedal
13- Engine breather
14- Fuel tap
15- Reed valve
16- Transmission chain
18- Gear change pedal
Page 54
8
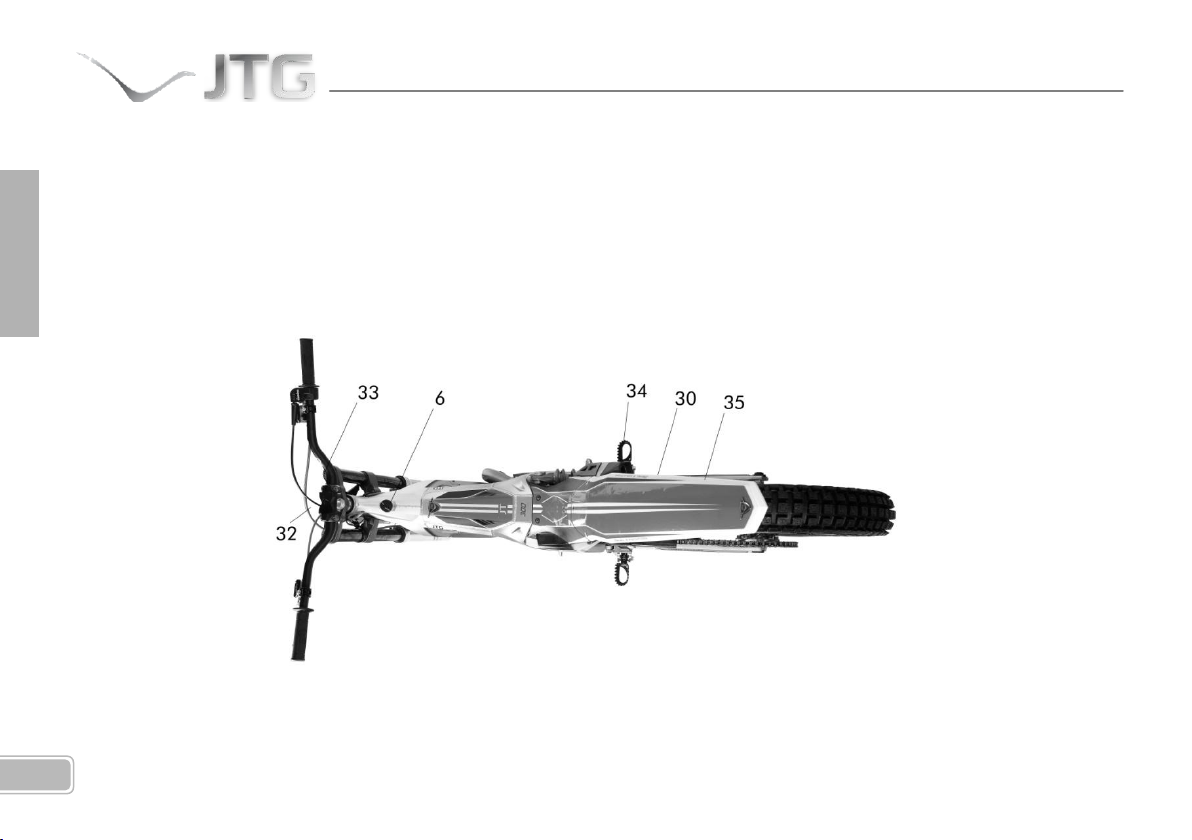
19- Front fork
20- Spark plug
21- Silencer
22- Swing arm
23- Exhaust pipe
24- Water pump
25- Front mudguard
26- Front brake caliper
27- Ignition cover
28- Air filter cover
29- Carburettor
30- Centre stand
31- Rear sprocket
32- Speedometer
33- Front suspension adjustment
34- Footrests
35- Rear mudguard
Page 55

9
ENGLISH
TECHNICAL DATASHEET
CHASSIS
Type: Double beam with lateral suspension system and built-in fuel tank
TYRES
Front: 2.75 x 21" - 44 (160 kg) L
Rear: 4.00 x 18" - 52 (200 kg) - L
SUSPENSION
Front: TECH Hydraulic telescopic fork COM-EX Ø39 mm (175 mm travel)
Rear: V3 progressive system with OLLE mono adjustable shock absorber (175mm travel)
BRAKES
Front: Disc, Ø185 mm, 4-piston caliper
Rear: Disc, Ø150 mm, 2-piston caliper
ENGINE
Type: Two-stroke, single cylinder, reed valve admission directly to the engine block, liquid cooled.
Cubic capacity: 301.58 cc
Piston diameter: 80 mm
Stroke: 60 mm
Carburettor: DELLORTO PHBL26
Lubrication system: 1% mixture (1:100)
Ignition: Digital CDI HIDRIA
Spark plug: NGK BPMR6A
Generator: 12V / 110W
TRANSMISSION
Page 56
10
Type: 5-speed with hydraulically operated clutch.
Secondary transmission: Chain.
Gear ratios:
1st 3.000 (33/11)
2nd 2.571 (36/14)
3rd 2.187 (35/16)
4th 1.444 (26/18)
5th 0.889 (24/27)
Primary reduction 2.778 (75/27)
Final reduction 4 (40/10)
Total ratio (5
th
gear): 9.879
Transmission oil: 400 cc, type GEAR TRANS 0W75
DIMENSIONS
Overall height: 1160 mm
Overall width: 833 mm
Seat height: 650 mm
Wheelbase: 1180 mm
Fuel capacity: 2.7 litres
Dry weight: 64 kg
Page 57
11
ENGLISH
We recommend you take note of the serial number
and identification data of your motorcycle for use in
case of theft or to order spare parts.
VEHICLE INFORMATION
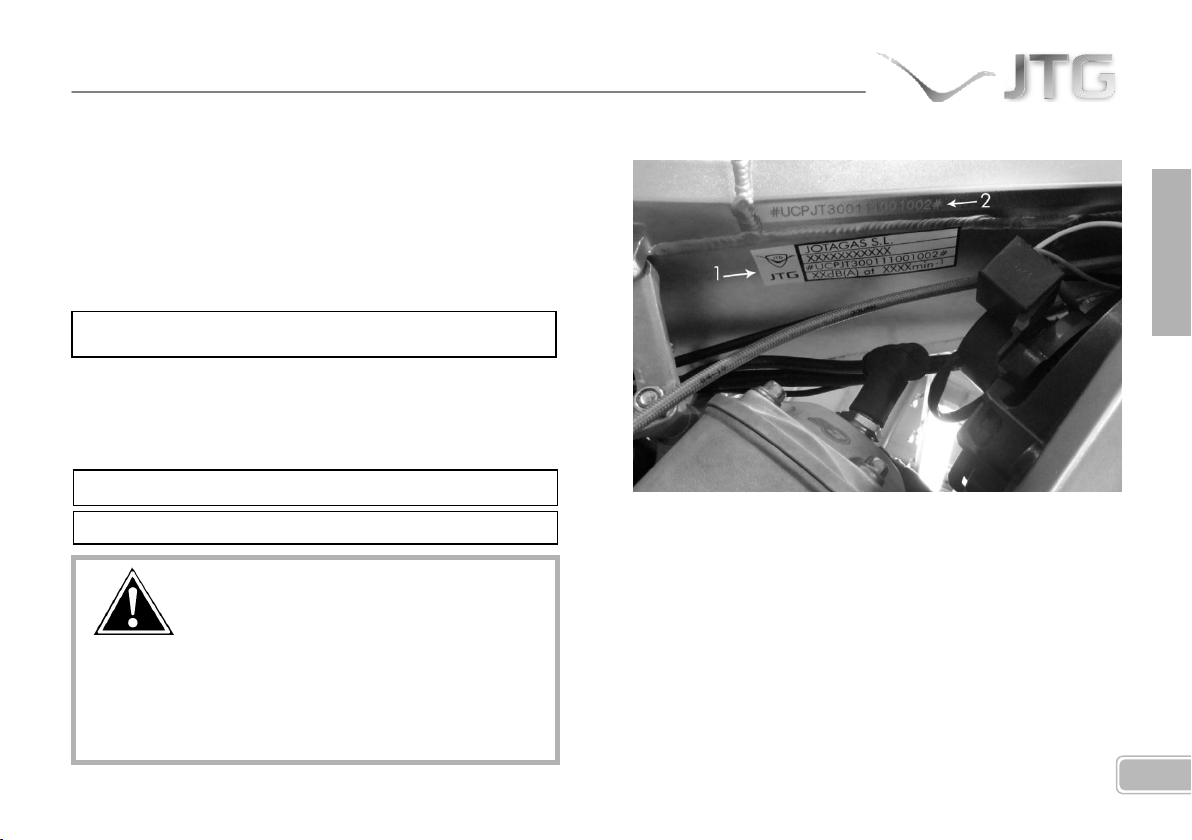
MANUFACTURER’S IDENTIFICATION PLATE (Under
the fuel tank)
This plate contains information regarding vehicle
certification, take note of this for easy identification of your
vehicle, when needed.
SERIAL NUMBER AND KEY CODE
These numbers identify your motorcycle and the steering
lock, take note of them in this manual (e.g. for ordering
new keys if you lose them).
1- MANUFACTURER’S IDENTIFICATION PLATE
2- CHASSIS NUMBER
3- KEY CODE
(Supplied with the keys)
Page 58
12
STARTING AND STOPPING THE ENGINE
To start the motorcycle, first make sure that the fuel tap is
open and that the gearbox is in neutral or if not, that the
clutch lever is pulled in.
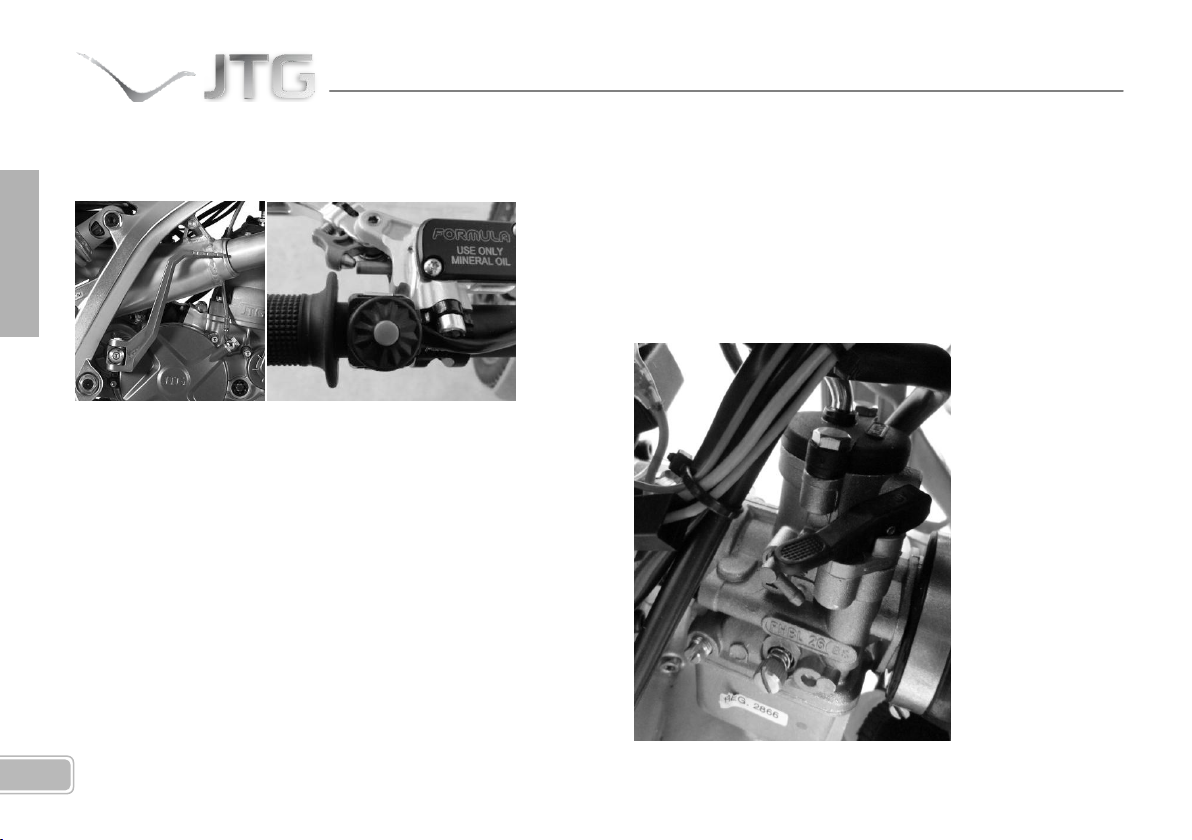
Then push the starting pedal, located on the right-hand side
of the motorcycle. It will also be necessary to use the choke
when starting from cold.
To stop the engine, select neutral and press the stop button
on the handlebar.
THE CHOKE
Use the choke when the engine is cold to start without
causing damage to the engine. This device, when used
properly, will avoid excessive wear and mechanical damage
when starting in cold temperature. To activate it, lift the
black lever on the carburettor.
Page 59
13
ENGLISH
GEAR CHANGE
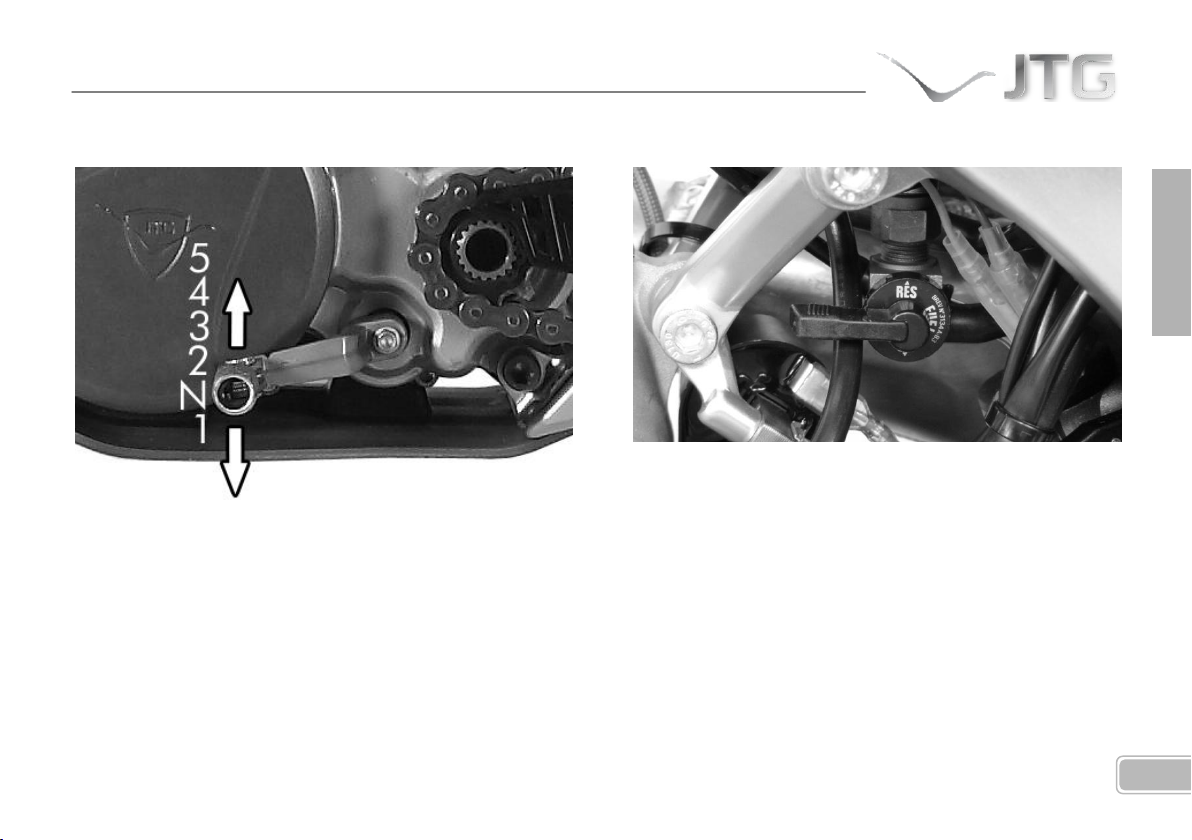
The gear change is controlled by a pedal on the left-hand
side of the vehicle, the sequence is as indicated in the
illustration. At the same time as you change gears you
must disengage the clutch by pulling in the clutch lever on
the left-hand side of the handlebar. The gearbox is
sequential, i.e., to change from 2nd to 4th gear you must
first go through 3rd gear.
FUEL TAP
The fuel tap is under the fuel tank.
For the fuel to flow, the tap must be in the ON position. For
reserve, select the RES position and to shut of the flow,
leave the tap lever in an intermediate position between ON
and RES.
Page 60
14
Important. Do not mix vegetable and mineral oil. Respect
the specified levels and proportions for correct
combustion. For a homogeneous mix, first pour the oil
into a container and add some petrol, shake and then
add the mixture to the rest of the petrol. Avoid mixing at
low temperature, as this will make the operation more
difficult.
FUEL TANK
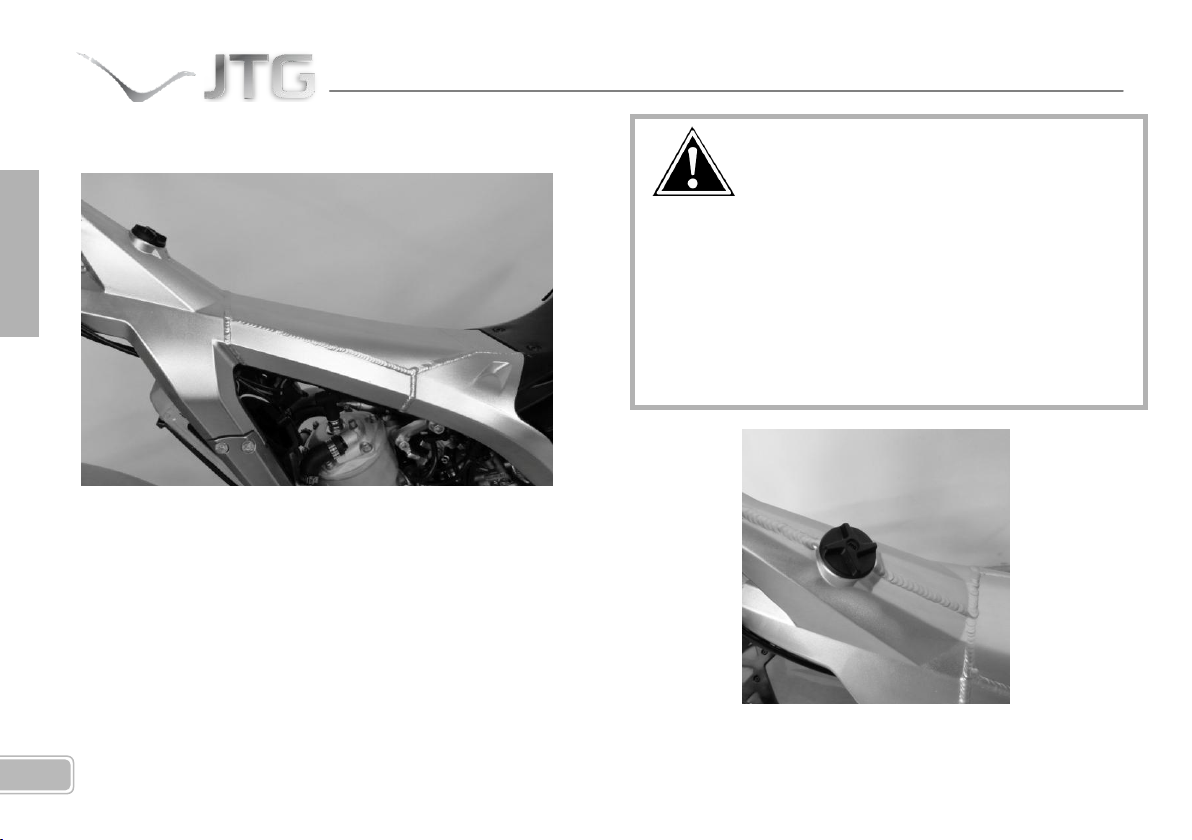
This motorcycle’s fuel tank is built into the chassis, more
specifically the upper part of the chassis. It holds 2.7 litres
of fuel which should be lead free petrol with two-stroke oil
in the proportions specified on the technical datasheet. The
tank cap is at the top of the tank.
Petrol minimum octane rating: 98 octanes
Page 61
15
ENGLISH
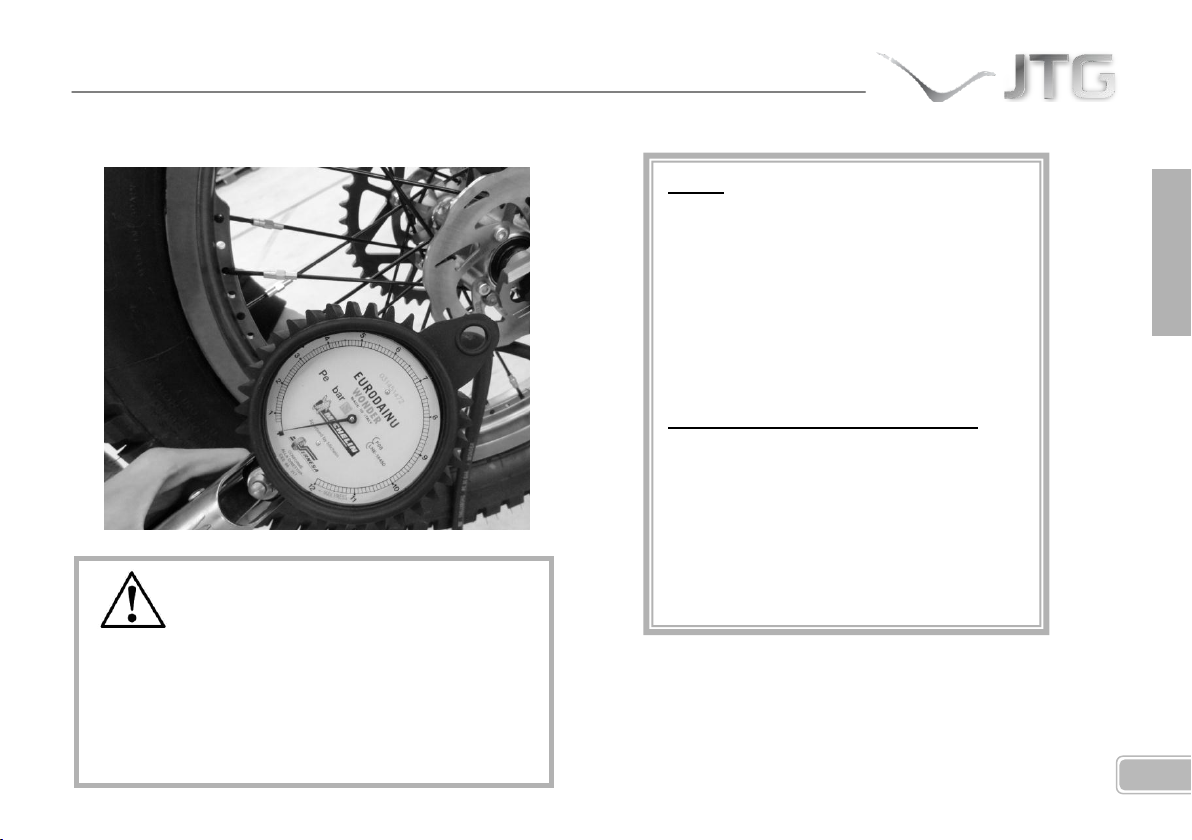
TYRES
Tyres in good state will significantly contribute to
your safety and will guarantee better driving
behaviour. Make sure the pressures are correct at all
times and check for wear. Pressure should be
measured when the tyre is cold.
TYRES
Front wheel:
2.75 x 21" TRIAL
Rear wheel:
4.00 x 18" TRIAL
RECOMMENDED TYRE PRESSURES
Front wheel:
0.45 bar (0.42 bar for competition)
Rear wheel:
0.35 bar (0.3 bar for competition)
When riding on low adherence terrain, you can reduce the
pressure slightly in order to favour adhesion and viceversa.
Page 62
16
BRAKES
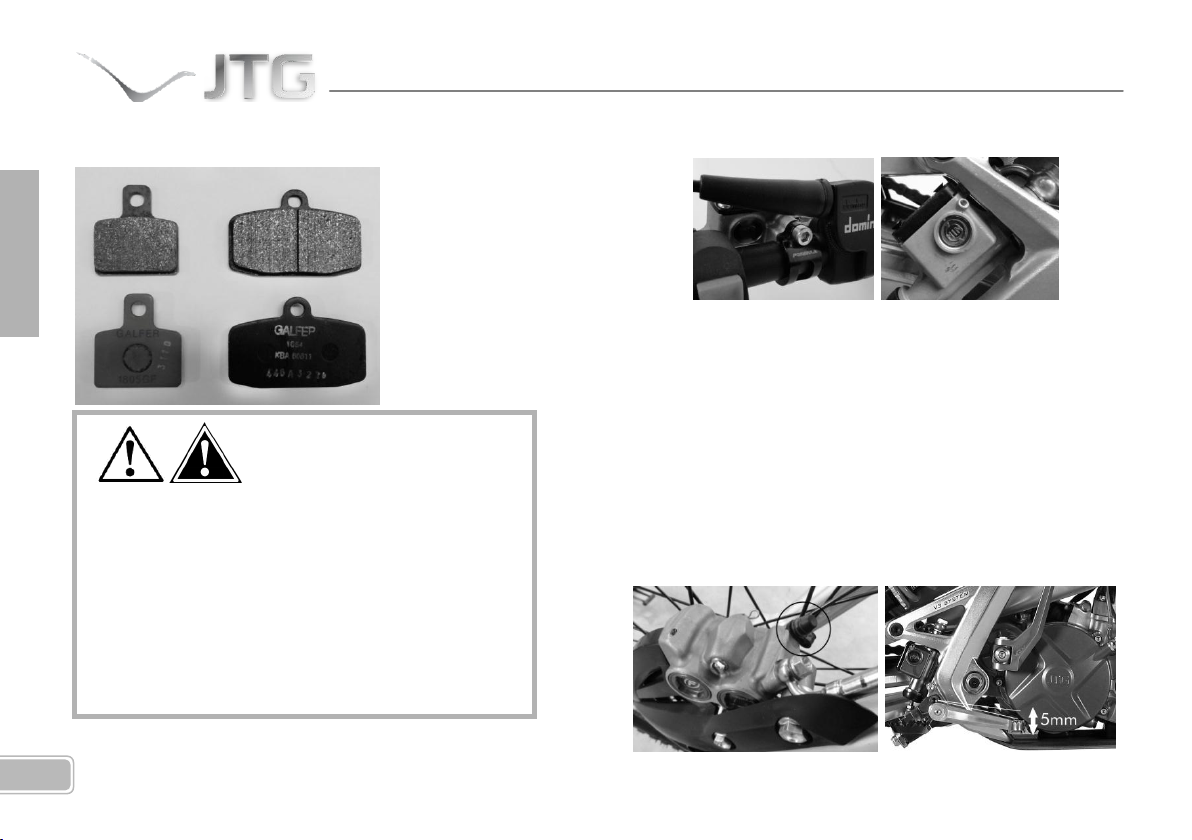
You should regularly check the state of the front
and rear brake pads as well as the brake fluid level.
For your safety as well as precise and effective
riding, do not use the motorcycle with excessively
worn brake pads or brake fluid below the
minimum level. If the brake pedal has a spongy
feel, there may be air in the hydraulic system and
it will need to be bled.
The brake fluid level can be checked through the peephole
on the front master cylinder and the fluid reservoir of the
rear master cylinder. The level must reach the middle, fill
both reservoirs if necessary. Use D.O.T. 4 brake fluid.
There are bleed nipples on both circuits in order to
eliminate air bubbles that could have entered the system
after any work has been carried out.
The brake pedal must have some free play.
Page 63
17
ENGLISH
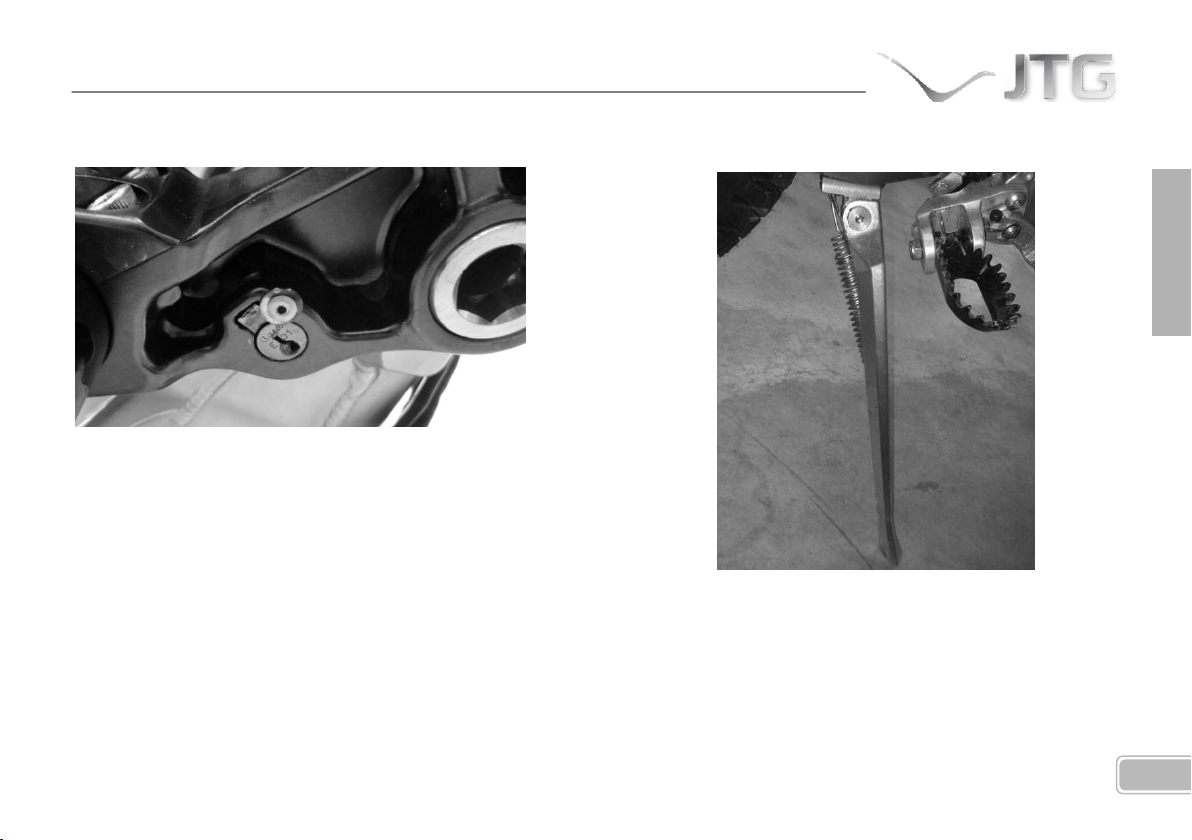
STEERING LOCK
The steering lock is located under the lower front fork triple
clamp.
To lock the steering, insert the key and turn the
handlebars right as far as they will go, then press and turn
the key anti-clockwise.
To unlock, insert the key and turn clockwise.
SIDE STAND
The side stand is on the right of the motorcycle, secured to
the chassis with a spring. Move the side stand out as far as
it will go in order to rest the motorcycle on it when
stationary. Never drive with the side stand unfolded.
Page 64
18
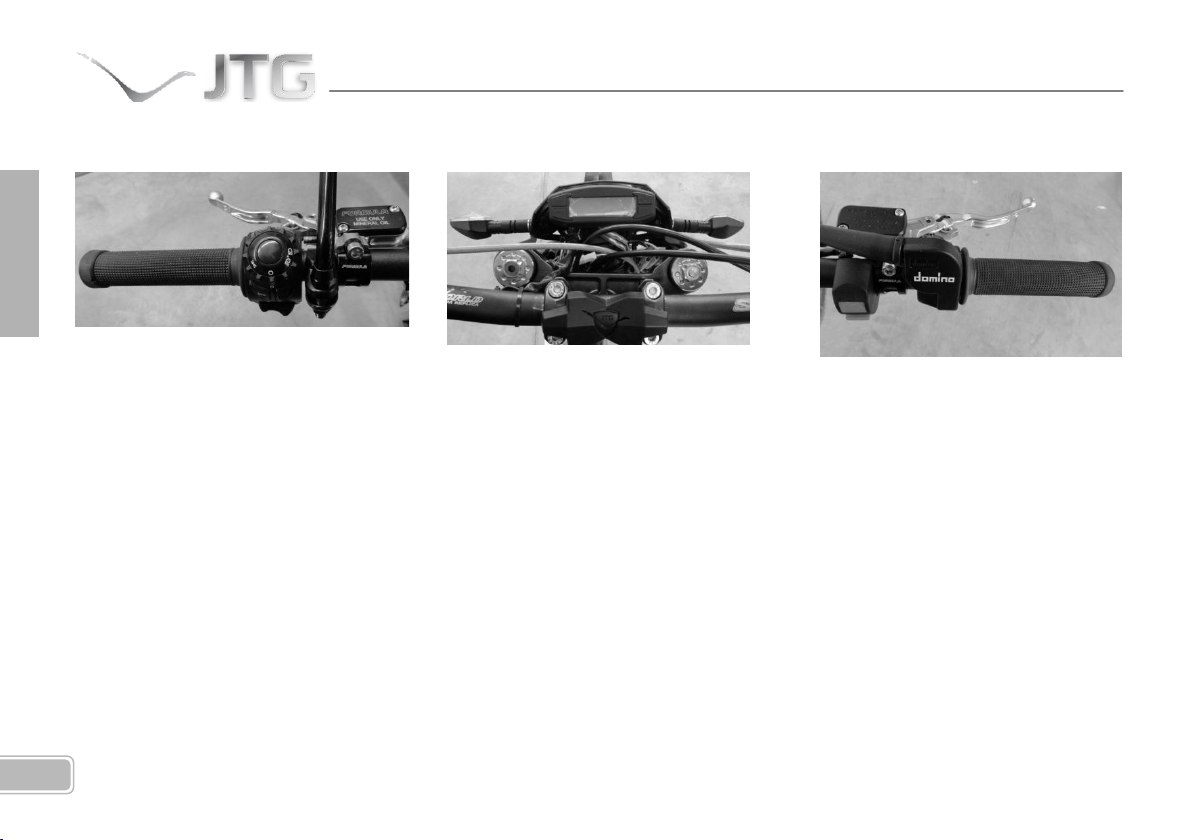
HANDLEBAR AND INSTRUMENT PANEL
The left-hand side of the handlebar
contains:
- Clutch lever.
- Horn.
- Engine stop button.
- Main/dip beam switch, and
indicator switch.
The instrument panel is in the centre
of the handlebar. (More information
and instructions for use provided
later in the manual)
The right-hand side of the handlebar
contains:
- Brake lever
- Throttle
Page 65
19
ENGLISH
ADJUSTING LEVERS AND THE HANDLEBAR
CHECKING THE OIL LEVEL
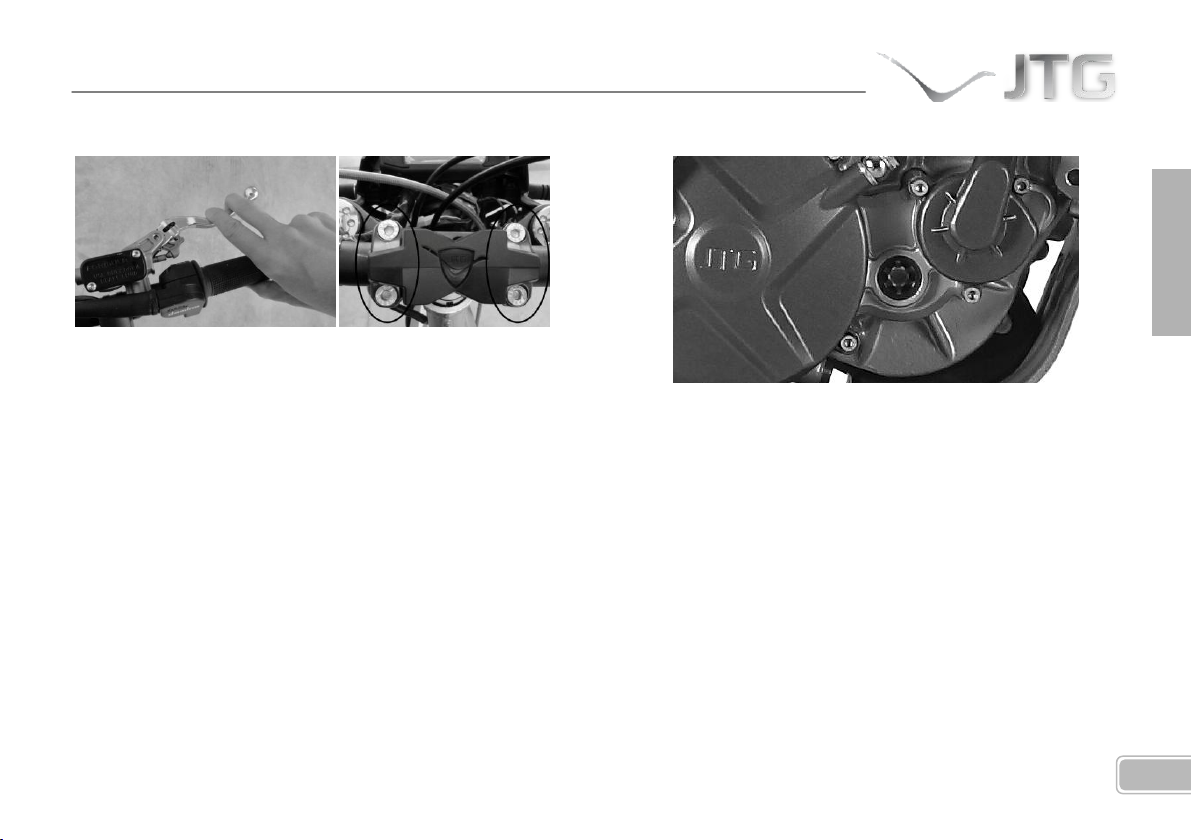
Both levers must have a free play of 3 mm at the most.
This play must be present, do not eliminate it. To adjust,
use the adjustment nuts located on the levers.
To adapt the handlebar to different types of riding, you can
tilt it more or less by loosening the clamps that secure it to
the fork. When adjusted as desired, tighten the bolts again,
starting with the bolts closest to the seat and continuing
with those closest to the speedometer.
The engine holds 400 cc of transmission oil. Try to keep the
level between maximum and minimum levels for correct
operation of the engine.
Do not mix oils of different types, always top up with the
same oil. We recommend 0W 75 GEAR TRANS type oil.
Page 66
20
After removing the filter, it can be cleaned using a
specific degreaser, then washed with water and
detergent, let the filter dry and then coat it with
special air filter oil. It is recommended to check the
state of the air filter regularly, to avoid problems
due to particles in the admission. Make sure you
clean it in a ventilated place, without sparks nearby
and do not use petrol for cleaning, as this could
cause an explosion.
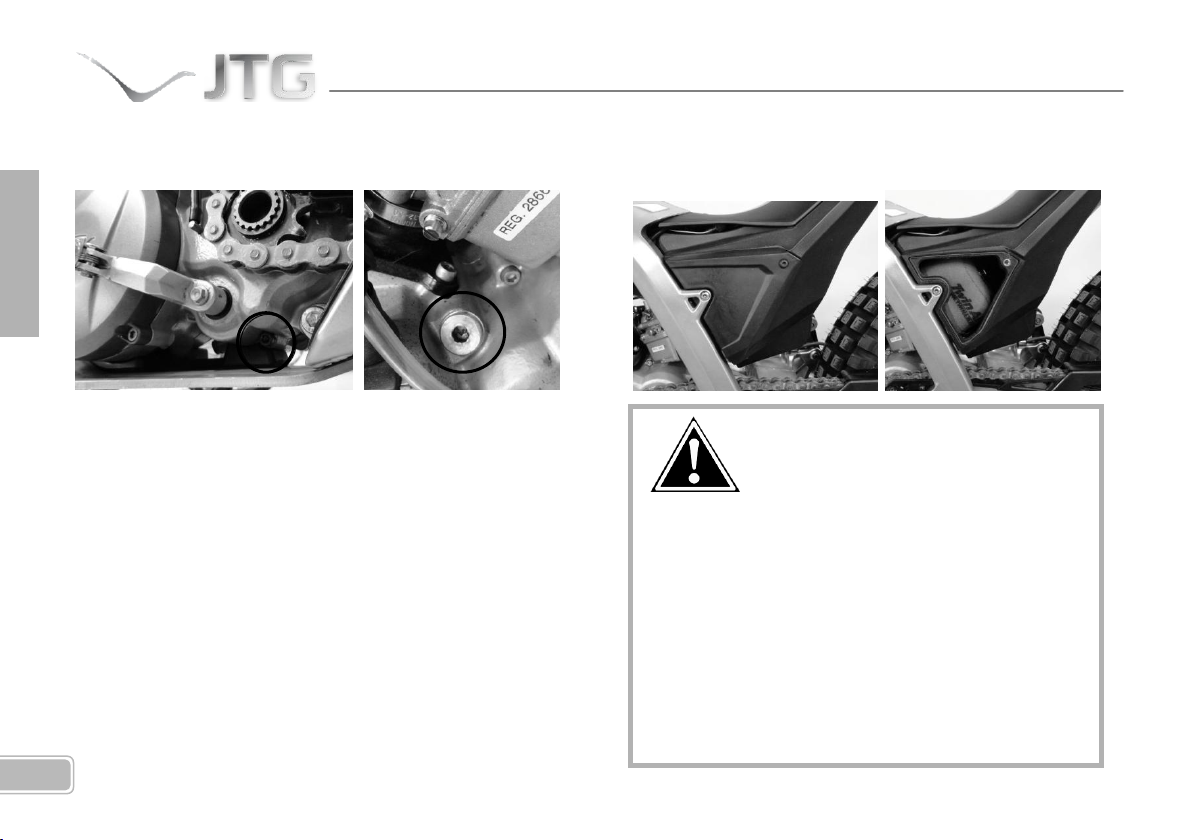
Oil change
Fig(a): Oil emptying plug Fig(b). Oil filling plug
There is a plug at the bottom of the sump for emptying the
oil Fig(a) and another plug at the top for filling Fig(b).
To change the oil, start up the cold engine and let it tick
over for 5 minutes. This will heat the oil enough for
changing.
Then place a tray under the engine and remove the oil plug.
Let all the oil drain out and clean the plug removing any
possible metal filings. When it is clean refit and fill with new
oil through the upper filling plug orifice, until it reaches the
correct level in the peep hole.
AIR FILTER
Page 67
21
ENGLISH
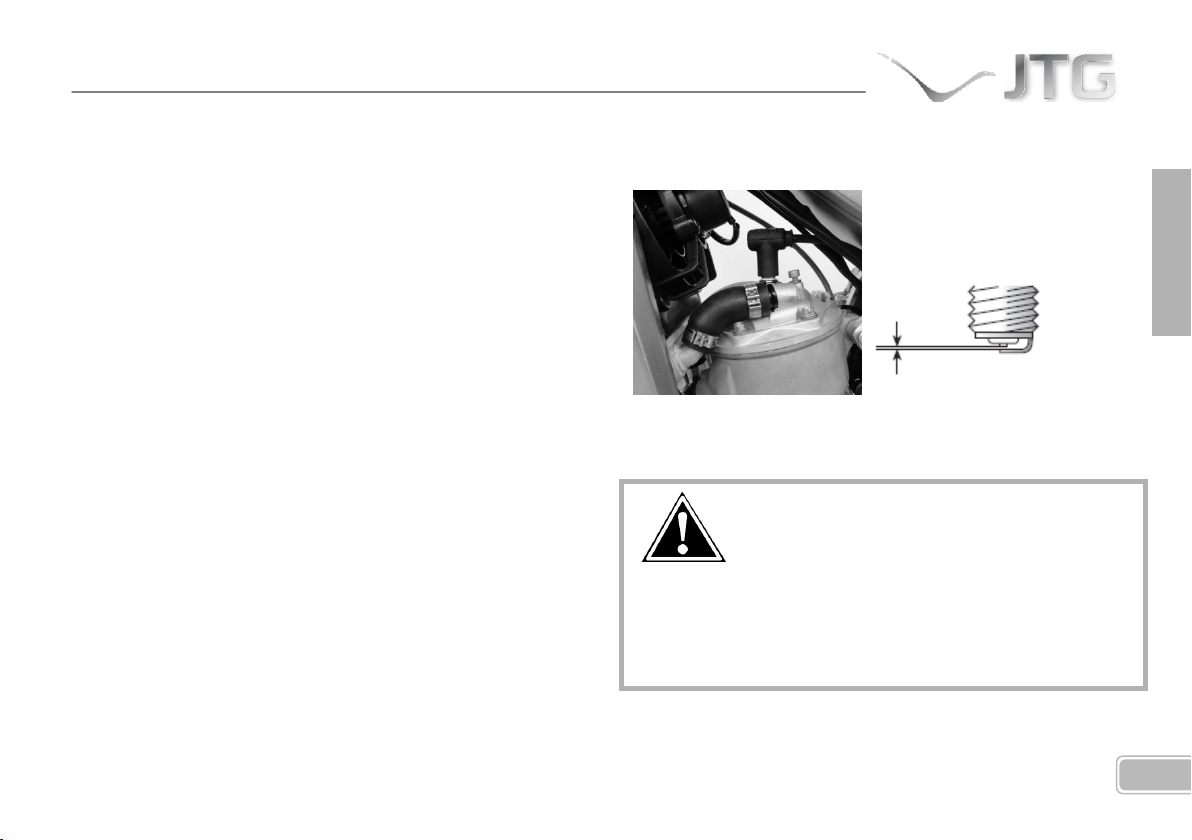
For correct maintenance of the engine, it is recommended
to clean the spark plug electrode with compressed air,
ensuring that the gap is approximately 0.6 – 0.7 mm.
The location of hatch on the left-hand side of the
motorcycle offers easy access to the air filter.
Take care with the filter foam when dismantling, as it
is easily damaged.
Access the air filter through the hatch and dismantle
its securing elements.
Remove the support cage with care, so as not to
damage the foam.
Clean it in a container and dry with a lint-free cloth.
When it is clean, it can be slightly lubricated with
special oil for air filters before replacing in its housing.
SPARK PLUG
The spark plug fitted in the factory is as defined in the
specifications datasheet. Tighten to 11 Nm.
Page 68
22
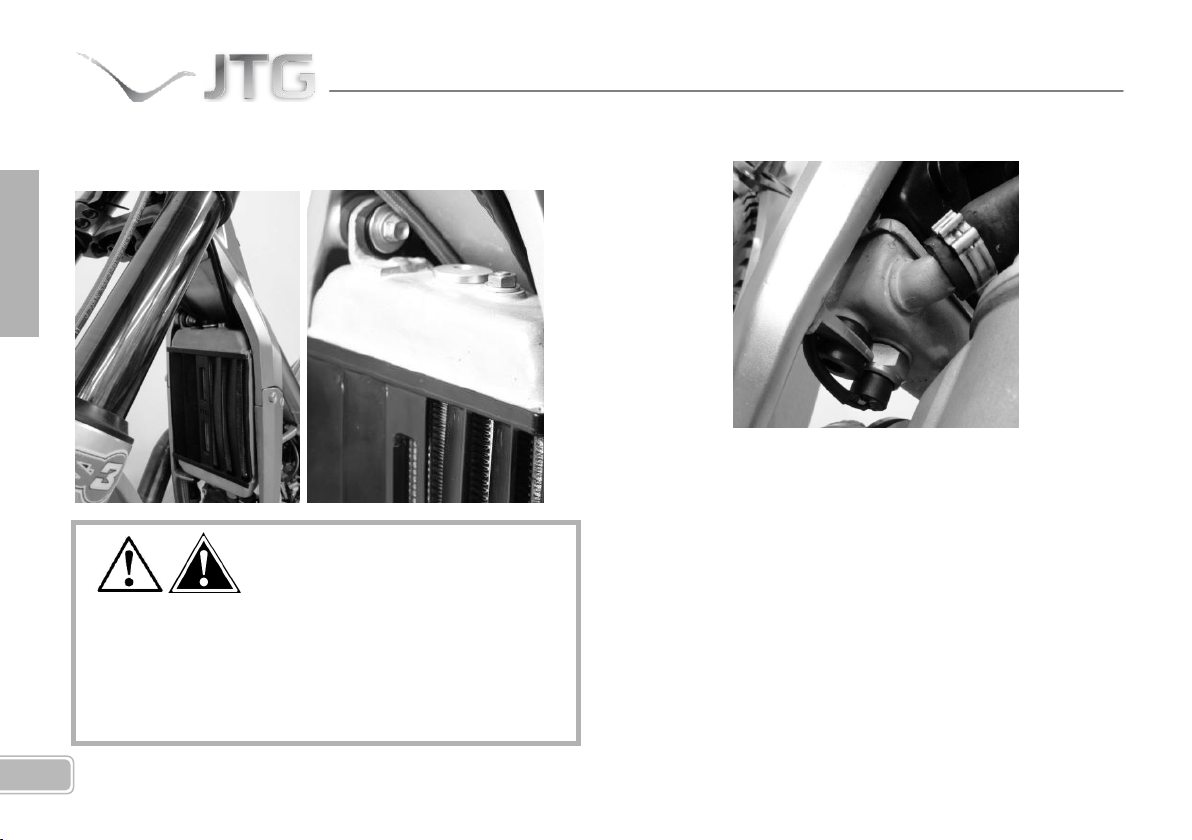
Do not forget that the radiator can get very hot, when
manipulating, take care and let it cool down after
switching off the engine.
Always use coolant (-30°C) for alloy engines when
topping up the radiator.
COOLING SYSTEM
Regularly check the radiator inlet and outlet tubes for
impacts, cracks or leaks that could compromise the cooling.
Also check the radiator alloy fins.
For correct operation of the engine, make sure the level of
the coolant is correct. You can top up the radiator tank
(preferably with the recommended coolant) through the
cap at the top.
Do this with the engine cold and the motorcycle upright,
first open the cap partially by turning anti-clockwise and let
Page 69
23
ENGLISH
any steam escape. Then open the cap completely and top
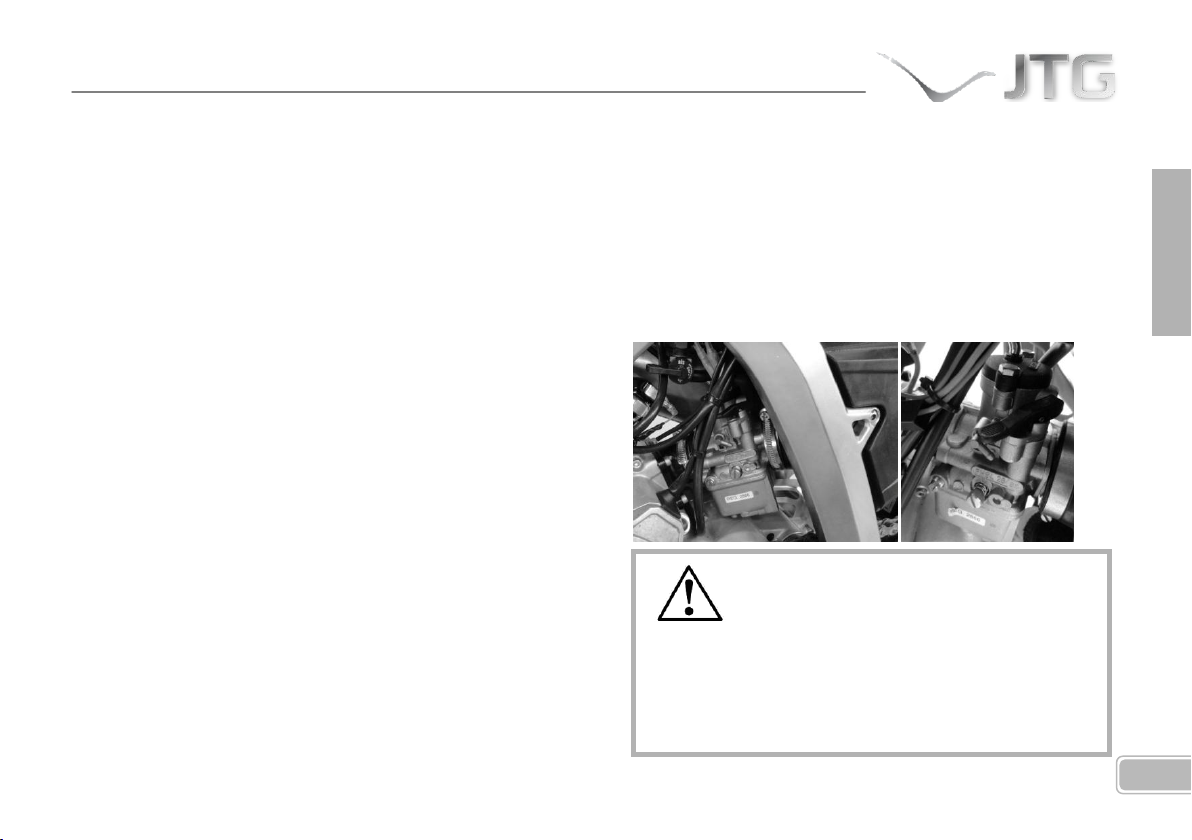
Al manipular el carburador y piezas adyacentes
pueden quedar restos de combustible que
previamente deben ser drenados. Dicho combustible
es fácilmente inflamable y tóxico, tenga precaución.
When manipulating the carburettor and adjacent
parts there may be traces of fuel that must first be
drained. This fuel is inflammable and toxic, take
care.
up the fluid (if necessary) until it is just below the rubber.
The coolant supplied in the factory is a permanent mix of
ethylene glycol, diluted in distilled water at 50%
concentration and with anticorrosion additives.
It is recommended to change the fluid after some time in
use and bleed the system. Pay attention to any abnormal
colour of the fluid: white particles (corroded aluminium),
brown particles (corroded steel parts), and be respectful
with the environment, do not pour the fluid into
inadequate places.
There is a thermal switch at the bottom of the radiator; its
job is to control the temperature of the liquid in the cooling
circuit. This device should be in correct working order in
order to avoid possible damage to the engine.
CARBURETTOR
The carburettor should be checked after a certain time,
cleaning it and drying with compressed air so as to improve
its performance.
Check the height of the float that maintains the level of
petrol in the carburettor and adjust it so it remains at
17mm within the specified margins.
Page 70
24
Air-fuel mixture
An optimum petrol-air mixture will enable you to obtain the
maximum performance from your engine. For this purpose,
the amount of air and fuel entering the carburettor must be
adjusted. A good way discover the quality of the mixture is
to inspect the spark plug. If the spark plug has a light brown
colour, the mixture is correct; if it is black there is an excess
of fuel, and if it is white there is an excess of air, in both
cases the mixture entering the engine is incorrect.
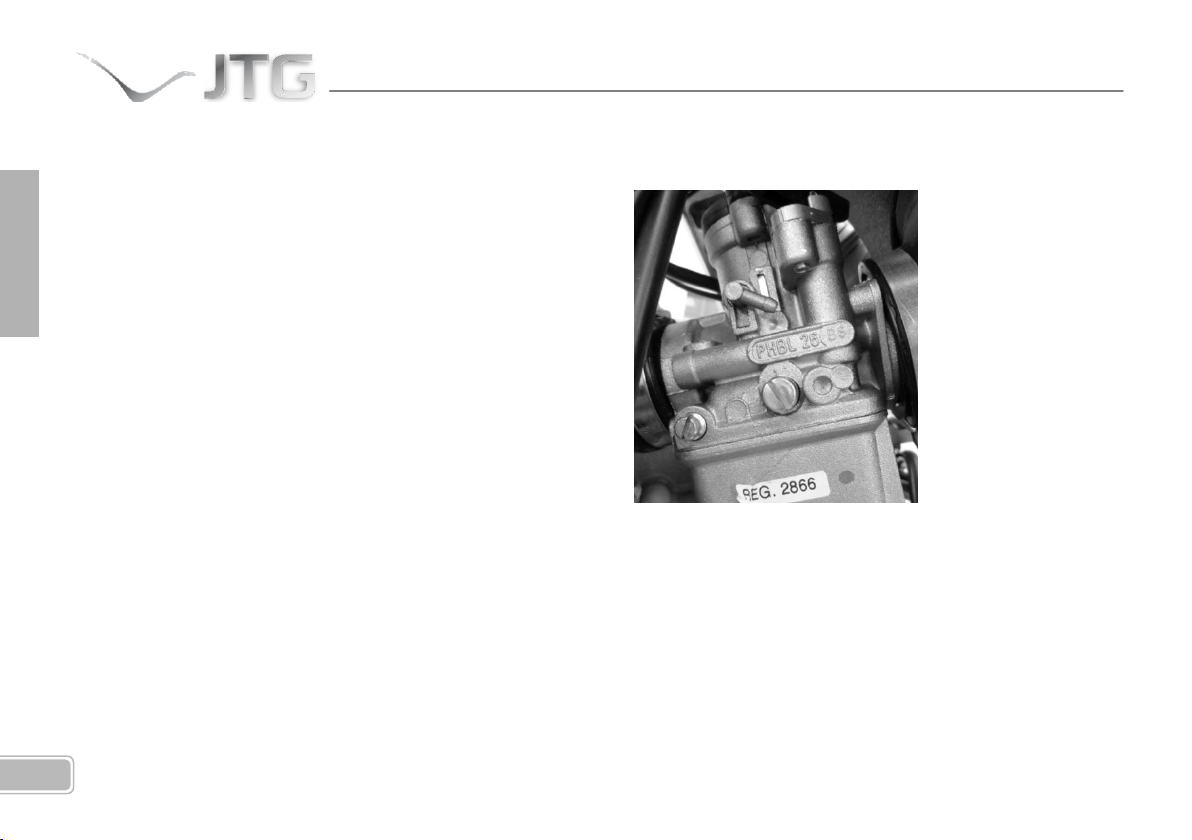
To adjust the amount of petrol reaching the engine, you
can modify the position of the main jet, which has a scale
where the larger numbers indicate greater passage of
petrol. You can also control the mixture with the air
adjustment screw. Screwing in to enrich the mixture and
vice-versa.
ADJUSTING THE TICK OVER
There are two screws on the carburettor that can be used
to adjust the tick over: The air adjustment screw and the
tick over screw, that will enable you to change the speed of
operation if necessary.
Page 71
25
ENGLISH
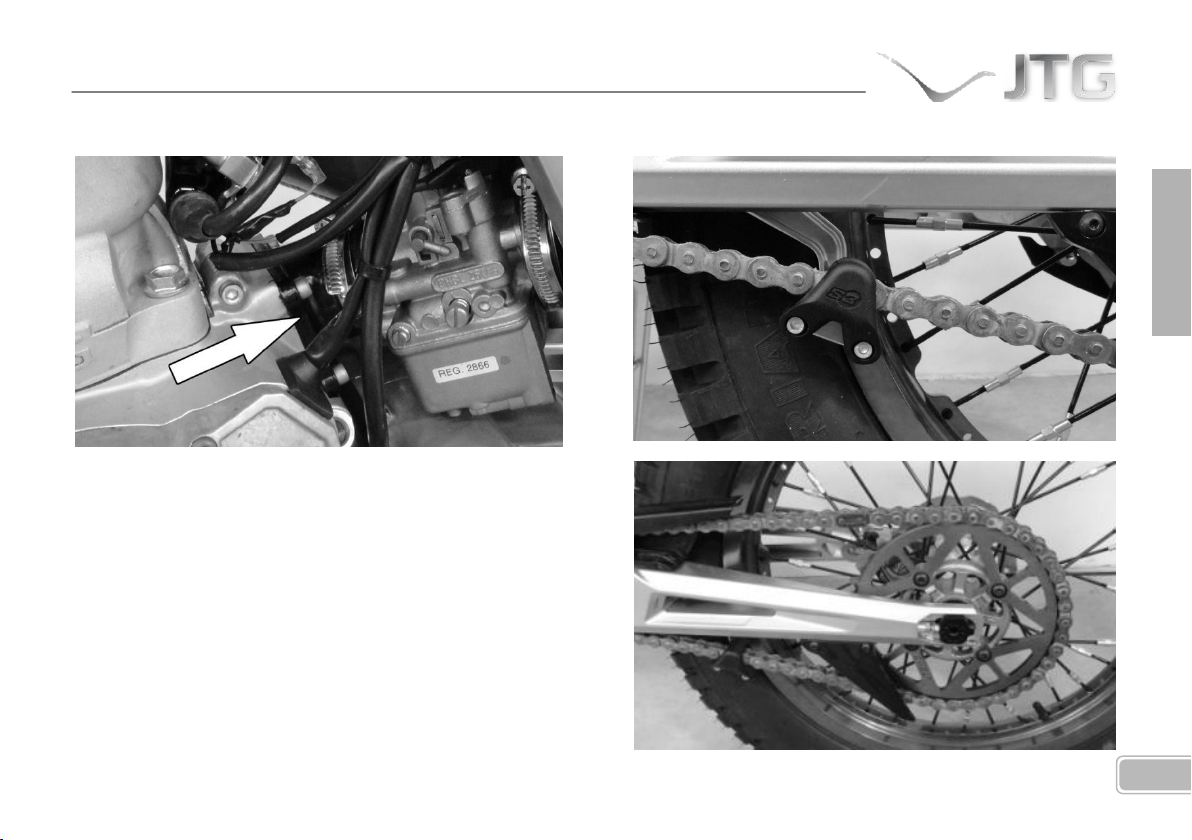
REED VALVE BOX
TRANSMISSION CHAIN
Admission is through a reed valve, the state of which has a
significant influence on the performance of the engine.
Whenever the carburettor is removed for cleaning, make
sure the reed valves are not worn and if so, replace the box
with a new one.
Page 72
26
Take care with this adjustment. A misaligned rear
wheel axle or with the nut loose could cause an
accident.
Correct tension of the chain should allow a play of
approximately 10-15 mm in the area between the frame
and the tensioner.
To tension the chain, first loosen the rear wheel axle nut
and then adjust the chain using the tensioner adjustment
bolts, which are in the swing arm. When adjusted, retighten
the rear axle nut, paying special attention to the alignment
of the chain, ensuring that it is not twisted.
Keep the chain lubricated for optimum service life,
preferably using viscous oil, for longer life.
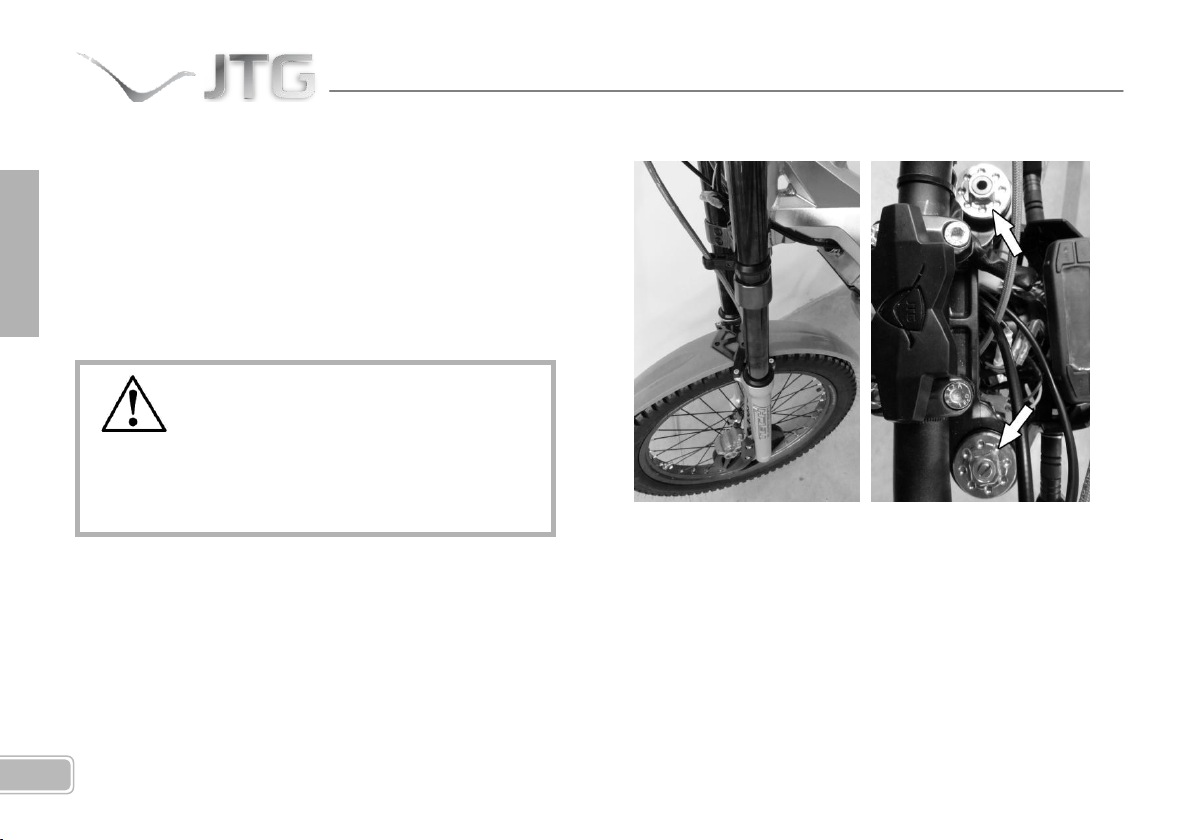
SUSPENSION
The front fork can be adjusted with the bolts at the top of
the fork. Turning the bolt on the left-hand fork tube you
can adjust the compression and it you turn the bolt on the
right-hand tube you adjust the extension. Choose the best
option according to your needs, always bearing in mind that
the left and right-hand cylinders must be adjusted to the
same level and perfectly aligned.
Page 73
27
ENGLISH
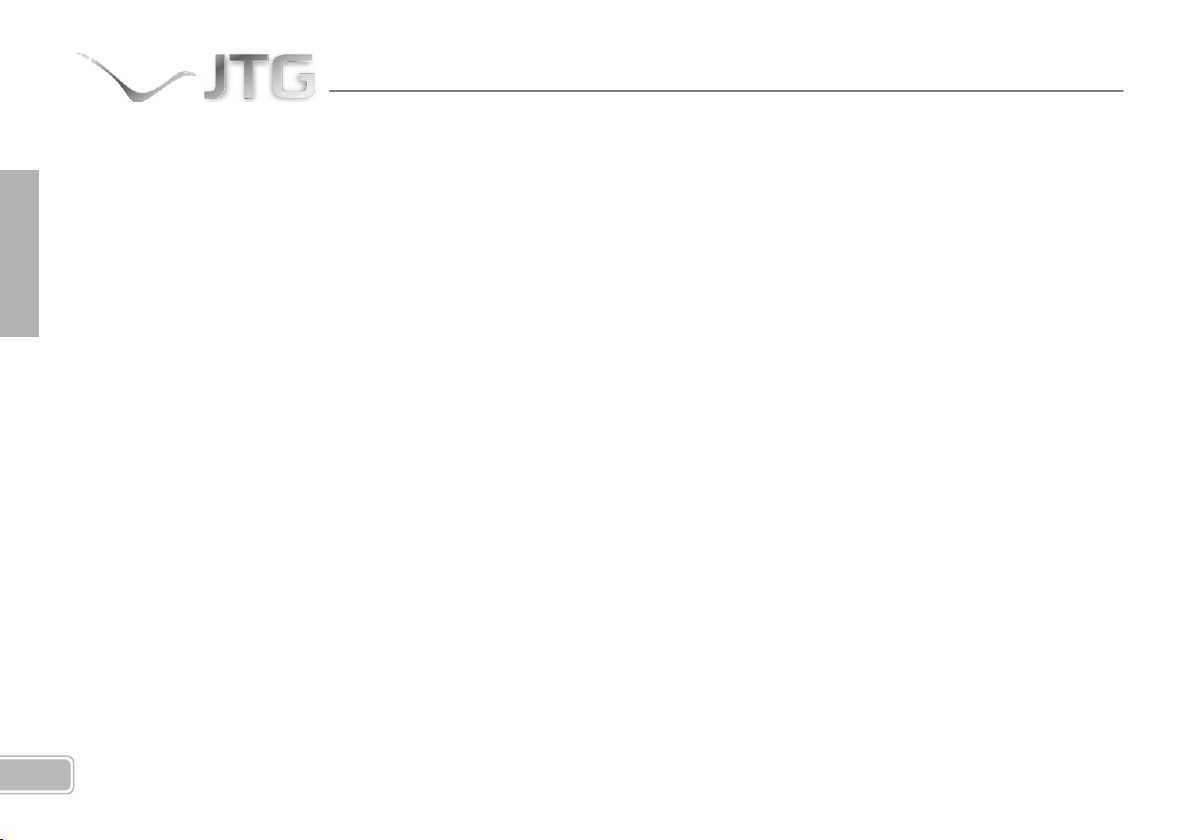
For correct maintenance of the rear suspension system
and swing arm, it must be regularly dismantled for
cleaning, checking and lubricating the internal bearings, as
well as adjustment and lubrication of the chain. Make sure
that all the parts are in perfect state and replace any worn
components if necessary.
SWING ARM
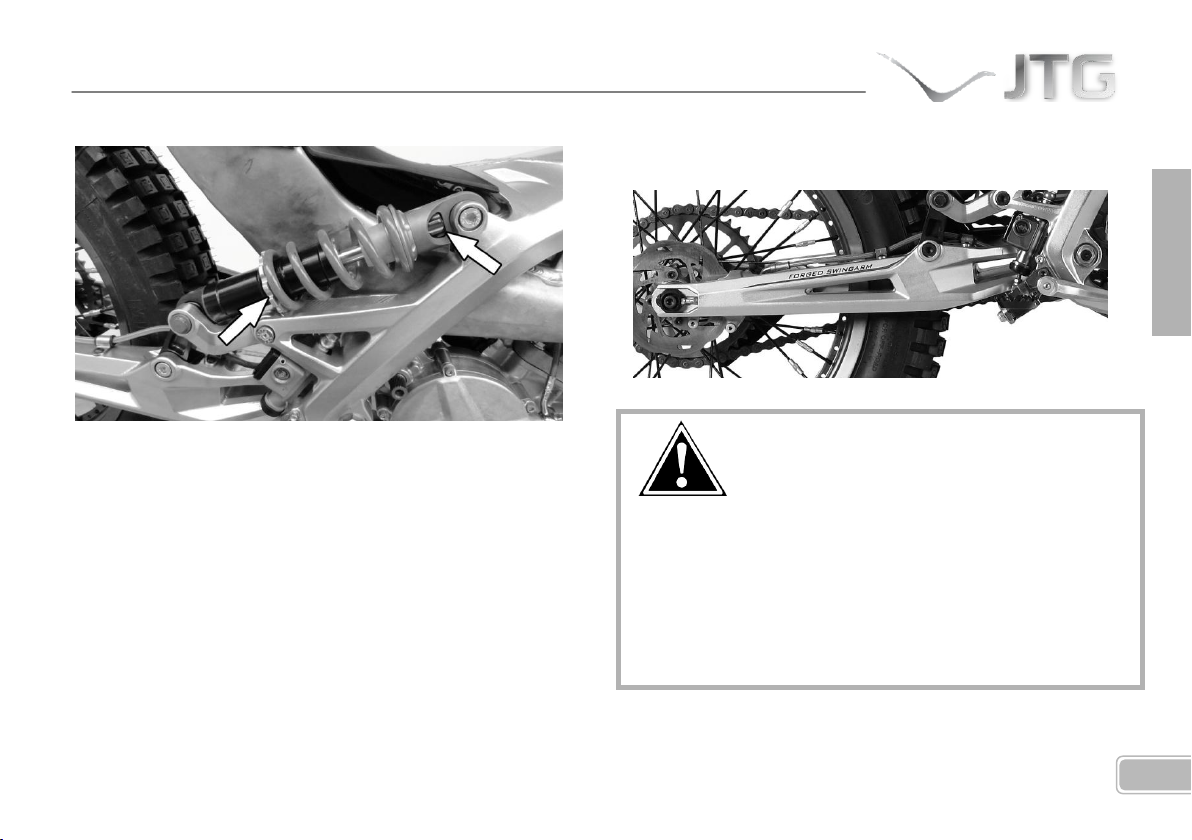
The preload of the spring can be adjusted by turning the
castellated nut at the base of the shock absorber. It is also
possible to adjust the hydraulic brake of the shock absorber
with a bolt at the top. This bolt must be in the middle of its
travel in normal adjustment.
Page 74
28
MAINTAINING THE MOTORCYCLE
The greater the care given to the motorcycle, the longer its
service life will be and the better it will perform. Check all
the elements listed below and keep them clean and
lubricated for optimum service:
LEVER ARTICULATIONS
REAR BRAKE PEDAL
GEAR LEVER
FOOTRESTS AND SIDE STAND
STARTER PEDAL
THROTTLE
STEERING COLUMN
TRANSMISSION CHAIN AND SWING ARM ARTICULATIONS
CHAIN TENSIONER
Page 75
29
ENGLISH
SPEEDOMETER
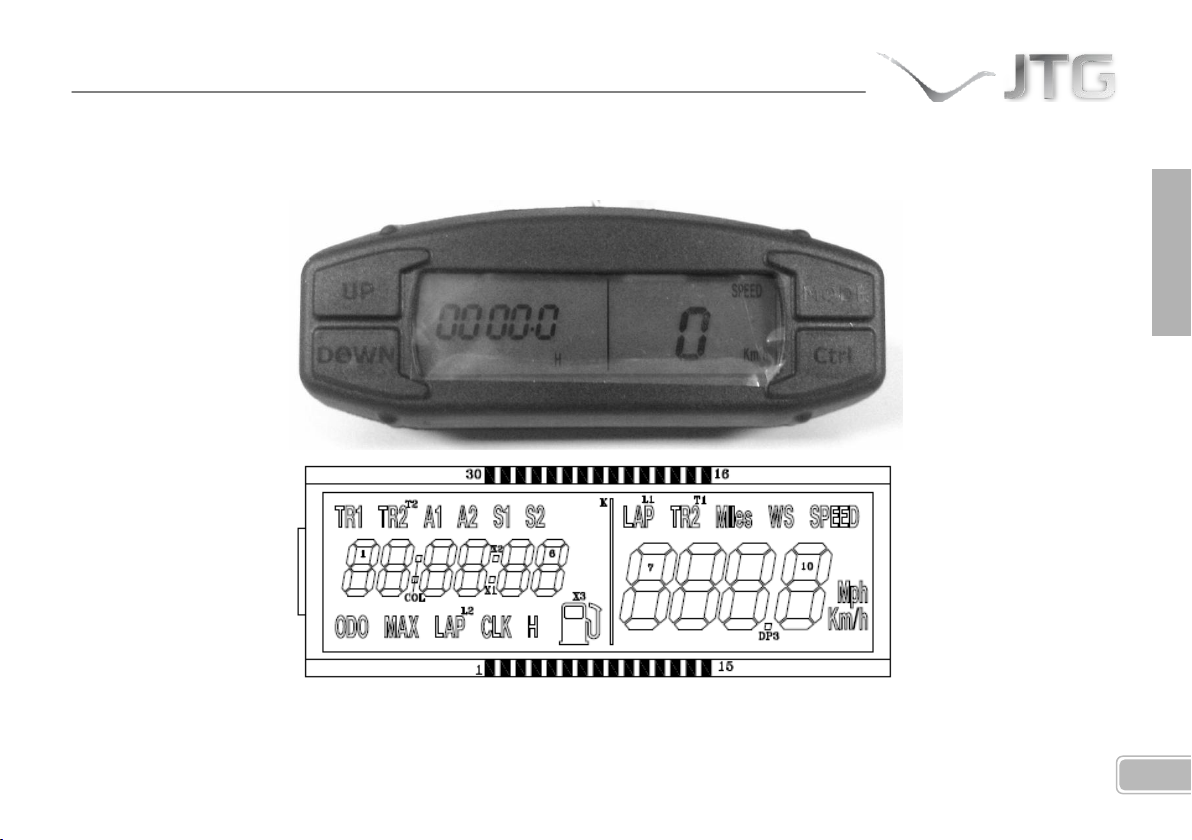
These are the most important features of the control panel and speedometer fitted to your motorcycle:
Page 76
30
Max. speed
Overestimation
Resolution
Updated
Impulses/revolution
300 Km/h (186 Mph)
4% constant
1 Km/h (1 Mph)
Every 500ms
1
These are its features:
The basic functions (Always visible and cannot be deselected from the setup menu) of the panel are:
- Current speed (SPEED)
- Total distance covered (ODO)
- Total time of vehicle operation (H)
SPEED function
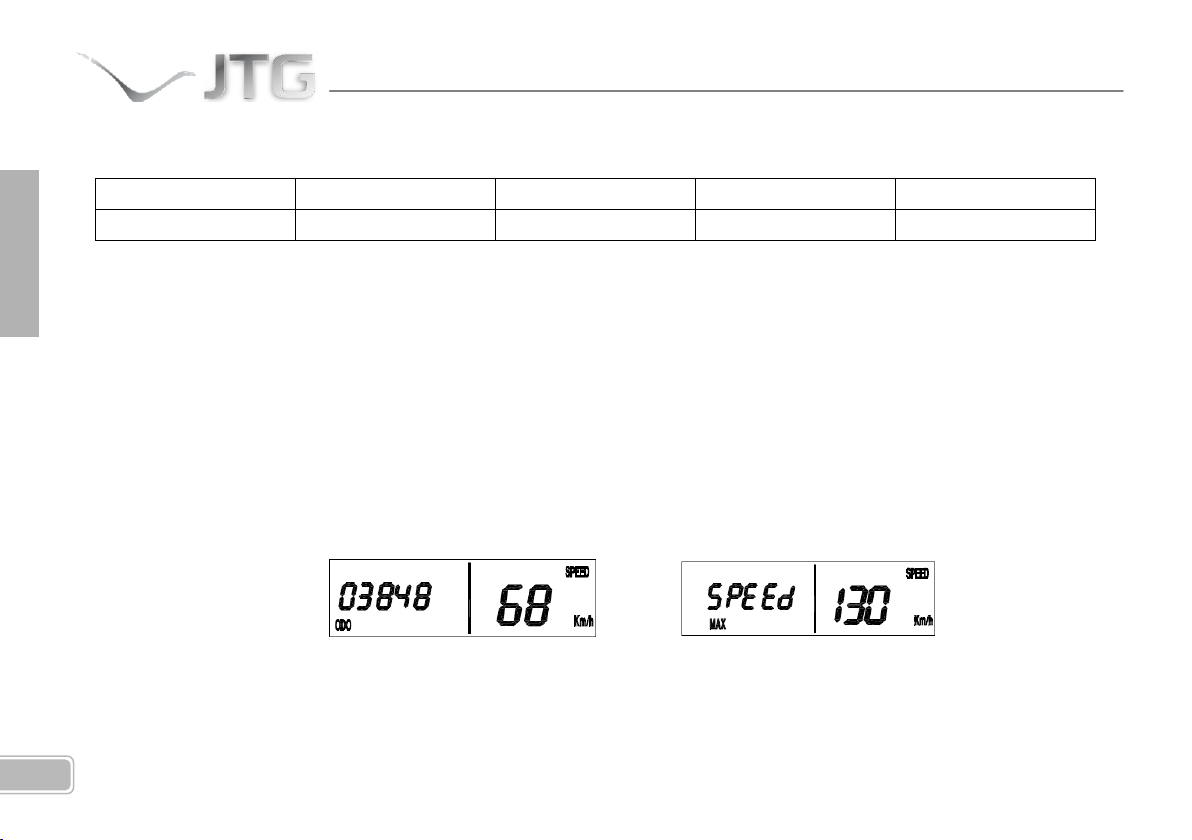
This information is always visible, regardless of the status of the vehicle (stationary or in movement). The default
configuration indicates Km/h.
If the speed of the vehicle exceeds 110 km/h for more than 20 consecutive seconds, the status on the right-hand
illustration will be displayed flashing. This signal will continue until the speed of the vehicle drops below 110 km/h
for at least 10 consecutive seconds.
Page 77
31
ENGLISH
ODO function
This information can only be seen by pushing the
MODE button, regardless of whether the vehicle is
stationary or in movement. The predetermined
configuration indicates Km and each Km is
permanently stored in the in the memory.
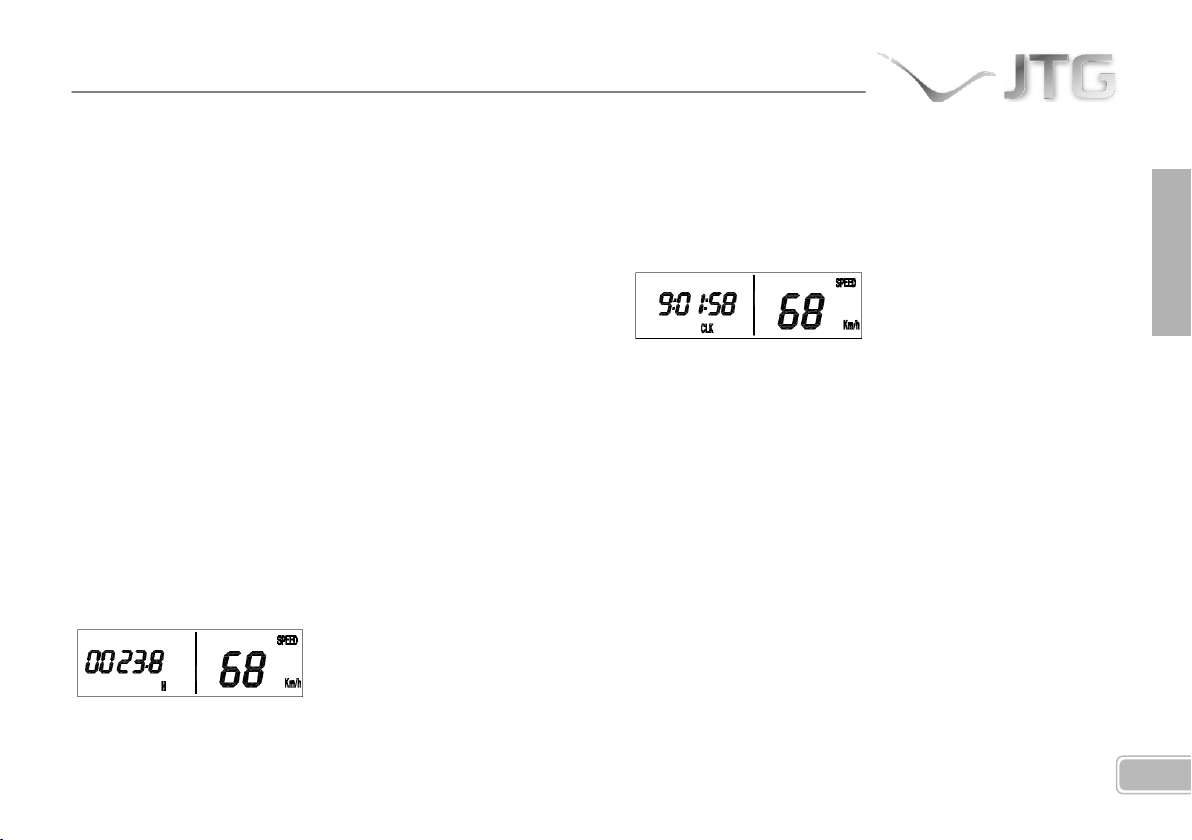
Clock function (CLK)
This function indicates the current time in "hh:mm:ss"
format. The clock remains active even when Sleep
Mode is activated.
H function
This function indicates the hours the vehicle has been
in operation and can be seen by pressing the MODE,
button, regardless of whether the vehicle is stationary
or in movement. The counter associated with this
function only works when the vehicle is in movement,
on receiving the first impulse from the speed sensor,
and it stops 3s after receiving the last impulse from
the sensor.
The time can only be set when the vehicle is
stationary, pressing the MODE button several times
until the display screen is as illustrated above. When
the CLK mode is displayed, pressing the MODE button
for a few seconds, the active digits will begin to flash
(In this order: hours, minutes, seconds and in display
mode), which can be modified with the UP and DOWN
buttons, and select with the MODE button. In time
configuration mode, if 20 seconds pass without
pressing any button or if the vehicle begins to move,
the system will return to standard operational mode,
saving the modified configuration.
Page 78
32
Trip, Average speed and Automatic Chronometer
functions (TR1, A1 and S1)
These functions indicate the partial distance covered,
average time and the time the vehicle has been on the
current trip. They are activated automatically and are
displayed on the screen with the indicators TR1, A1
and S1 respectively, displaying the distance covered in
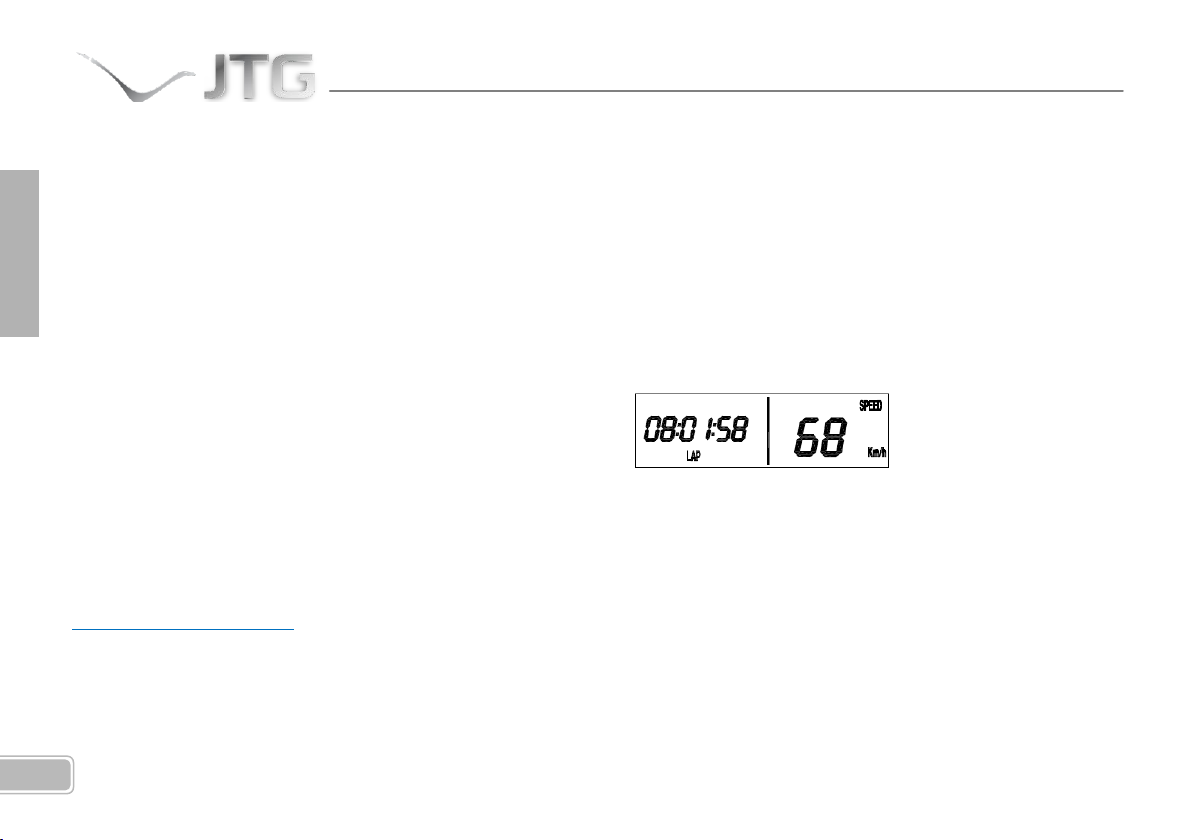
Manual Stopwatch function(LAP)
This function enables you to activate or deactivate a
stopwatch manually, either if the vehicle is stationary
or in movement. To activate the stopwatch, press the
UP button on the screen displayed below, and to
deactivate, press the UP button again. To delete the
average time, press the DOWN button.
km, speed in km/h and time in hours, minutes and
seconds by default.
For more information on the rest of functions of the system, go to:
http://www.jotagas.com
Page 79
33
ENGLISH
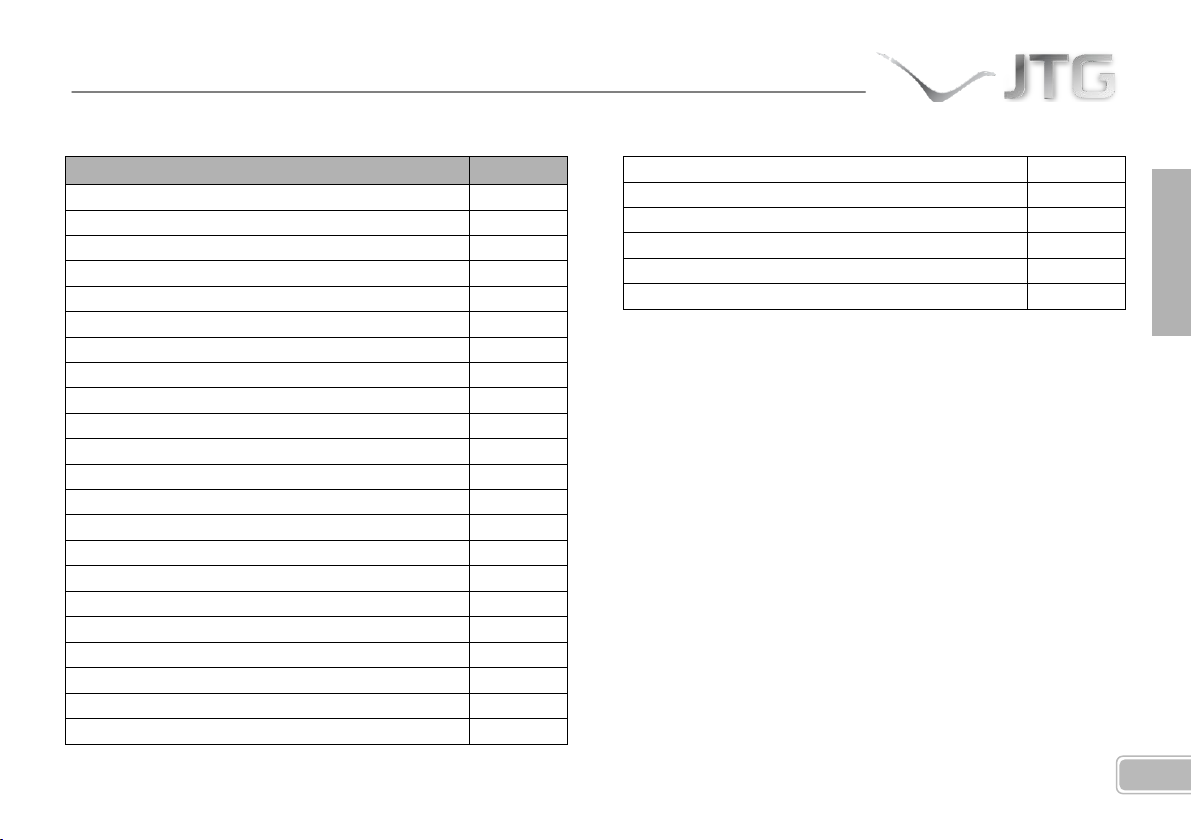
TORQUE VALUES
ELEMENTS FASTENED
Nm
Swinging arm-Chassis
40-50
Upper shock absorber fastener
40-50
Lower shock absorber fastener
40-50
Front wheel axle
40-50
Connecting rods
40-50
Handlebar
25-30
Front mudguard bridge
7-10
Silencer
10-15
Rear wheel axle
40-50
Front brake caliper fasteners
25-30
Exhaust pipe fasteners
10-15
Engine fasteners
30-35
Rear brake master cylinder fasteners
7-10
Spark plug
11
Ignition fasteners
7-8
Clutch fasteners
20-25
Cylinder stud fasteners
25
Reed valve fasteners
7-8
Clutch spring fasteners
3-4
Sump fasteners
7-8
Water pump cover fastener
7-8
Clutch cover fasteners
7-8
Flywheel fasteners
40
Ignition cover
7-8
Sump drain plug
12
Starter pedal bolt
12-13
Gear change pedal bolt
7-8
Cylinder head nuts
12-13
Page 80
34
STORAGE
If it is necessary to store the motorcycle for a long period of time, the following operations are recommended before storage:
Clean the whole vehicle.
Lubricate or grease the components that need it.
Empty the fuel tank. (Take care with the fuel, which is inflammable and toxic)
Empty the sump, removing the old transmission oil and refilling with new oil (If the engine is cold, it is recommended to
start up and leave running for a few minutes to warm up the oil and favour draining).
Cover the exhaust with a plastic bag, protecting it form the elements.
Any unpainted metal parts that could get rusty should be coated with oil.
Avoid the tyres touching the ground by placing a piece of cardboard or similar material under them.
Protect the motorcycle as much as possible form dust and dirt by covering it with a plastic or canvas sheet.
When putting the motorcycle back into service, first:
Remove the plastic protection used.
Check the oil and lubrication of components.
Check the spark plug.
Adjust type pressure to the recommended value.
Fill the petrol tank.
Page 81
35
ENGLISH
MAINTENANCE OPERATIONS
COMPONENT
CHECK
ADJUST
REPLACE
CLEAN
LUBRICATE
Rear shock absorber
Annually
Every 2 years
Front fork suspension oil
60h
Transmission oil
30h 60h
Brake adjustment
Every time it is
used
Whenever
necessary
Spark plug
30h
60h
15h
Swinging arm and connecting rods
Every time it is
used
If damaged
Every time it is
used
Whenever it
is cleaned
Transmission chain
Every time it is
used
Whenever
necessary
If damaged
Every time it is
used
Whenever it
is cleaned
Throttle cable and twist grip
Every time it is
used
Whenever
necessary
If damaged
Whenever
necessary
Whenever it
is cleaned
Reed valve box
30h
If damaged
Every time it is
used
Carburettor
Whenever
necessary
If damaged
Every time it is
used
Chassis
If damaged
Every time it is
used
(NOTE: Bear in mind that a clean motorcycle will facilitate inspection and detection of faults and wear)
Page 82
36
Carburettor jet
Whenever
necessary
If damaged
Steering bearing
If damaged
Piston bearing
If damaged
Wheel bearing
If damaged
Engine bearings
If damaged
Rear sprocket
30h
First 5h
If damaged
Every time it
is cleaned
Cylinder head and cylinder
60h
Annually
Brakes
Every time
used
Whenever
necessary
If damaged
Brake discs
Every time
used
First 5h
If damaged
Every two
uses Clutch plates
If damaged
Clutch
If damaged
Wheel-silencer clearance
Every time
used
In case of a
fall
Escape
500h
Silencer fibre
100h
Air filter
Every time
used
If damaged
Every time
used
Every time it
is cleaned
Steering play
Every time
used
Whenever
necessary
Brake hoses
Whenever
necessary
Every 2 years
Every time it
is cleaned
Page 83

37
ENGLISH
Coolant
Whenever
necessary
Annually
General lubrication
Every time
used
Every time
used
Every time it
is cleaned
Front and rear wheel
If damaged
Every time
used
Tyres
Every time
used
If damaged
Every time
used
Brake fluid level
Whenever
necessary
Chain guide slipper
If damaged
Starter pedal and gear change pedal
If damaged
Every time it
is cleaned
Brake master cylinder piston and dust
cover
If damaged
Brake piston and dust cover
If damaged
Piston and rings
60h
Annually
Front and rear wheels
5h
If damaged
Every time
used
Fuel system
Every time
used
If damaged
Front suspension
Whenever
necessary
If damaged
Exhaust seal
If damaged
Nuts, bolts and other fasteners
Whenever
If damaged
Page 84
38
necessary
Petrol tube
Every time
used
Whenever
necessary
If damaged
Radiator tube and joints
Every time
used
Whenever
necessary
If damaged
Chassis protective adhesive elements
If damaged
Sump protector
If damaged
Page 85

39
ENGLISH
HOMOLOGATION
All the components fitted in this vehicle comply with legal homologation requirements, including the identification marks on
part that require them.
Pay attention to the component that are compulsory for using the motorcycle on public roads and must be present on the
vehicle in order to pass the Vehicle Technical Inspection Test:
- Registration plate holder
- Speedometer
- Lighting system and reflectors
- Indicators
- Horn
- Rear view mirrors
- Steering lock
- Manufacturer’s identification plate
- Air filter restrictor
- Exhaust system with catalyser
- Silencer
- Carburettor jets
- Side stand
IMPORTANT NOTE: The vehicle is also supplied with a RACING KIT containing additional components. Bear in mind that the
modifications provided by this kit are NOT covered by the vehicle homologation.
Page 86
40
TROUBLESHOOTING
PROBLEM
POSSIBLE CAUSES
ACTIONS
The engine will not start
- Dirty spark plug.
- Engine flooded.
- Fuel badly mixed.
-
- Clean and dry the spark plug or
change it.
- Open the throttle fully and kick the
starter pedal 5 to 10 times and then
start the engine.
- Check for obstruction in the petrol
tank tubes and air filter.
The motorcycle starts well and then
stops
- Incorrect air supply, engine flooded.
- Insufficient petrol.
- Close the choke, check the fuel pipes.
- Fill the fuel tank.
Engine excessively hot
- Low level of coolant.
- Radiator dirty or obstructed.
- Add coolant, check for possible leaks.
- Clean the radiator fins.
Engine runs erratically
- Problems with the spark plug and/or
plug cap.
- Fault in the ignition rotor.
- Water in the fuel.
- Check the state of both.
- Change the rotor.
- Empty the tank and refill with new
petrol.
(IMPORTANT NOTE: For all internal adjustments or replacement of parts that are not normal wearing components it
is recommended to take the motorcycle to an authorised workshop. Bear in mind that unskilled manipulation of the
motorcycle can be dangerous for you and/or possibly render the guarantee void.)
Page 87

41
ENGLISH
Engine makes strange noises
- Ignition problems.
- Overheated engine.
- Take motorcycle to an authorised
workshop.
- Stop the engine and check the state of
the cooling and exhaust systems.
Engine lacks power
- Admission problems.
- Exhaust system problems.
- Carburettor jets dirty.
- Damaged crankshaft bearings.
- Clutch slipping.
- Clean the fuel admission system and
air filter.
- Check for leaks in the system and
clean or replace the silencer fibre.
- Remove the carburettor and clean
them.
- Replace the bearings.
- Check its adjustments. Take bike to a
specialised workshop.
Exhaust gives off white smoke
- Water in the cylinder.
- Accelerator cable incorrectly adjusted.
- Change the cylinder head O-ring.
- Check accelerator adjustment.
Exhaust gives off brown smoke
- Lack of air in the mixture.
- Main jet too high.
- Clean or change the air filter.
- Check the main jet.
Explosions in the exhaust
- Carbon deposits in the combustion
chamber.
- Incorrect type of fuel.
- Spark plug in bad condition or wrong
type.
- Exhaust system gaskets damaged.
- Clean the combustion chamber.
- Empty fuel tank and refill with correct
type of fuel.
- Replace spark plug with correct type.
- Check state of gaskets and replace if
necessary .
Clutch not working correctly
- No play in the clutch lever.
- Take bike to a specialised workshop.
Page 88

42
- Clutch worn.
- Clutch springs broken or weak.
- Take bike to a specialised workshop.
- Take bike to a specialised workshop.
Gears engage badly
- Problems in forks, gears or additional
gearbox systems.
- Take bike to a specialised workshop.
Abnormal noises
- Worn or badly adjusted chain
- Rear sprocket teeth worn.
- Chain needs lubrication.
- Badly aligned rear wheel.
- Lack of oil in the front fork.
- Problems with the front fork springs.
- Worn brake disc.
- Brake pads glazed or badly fitted.
- Adjust or change chain.
- Change rear sprocket.
- Apply appropriate chain lubricant.
- Take bike to a specialised workshop.
- Add fork oil to the specified level.
- Replace front fork spring.
- Replace brake disc.
- Refit pads or replace.
Unstable ride
- Steering shaft nut too tight.
- Steering bearings worn or damaged.
- Bent steering shaft.
- Loosen the steering nut a little.
- Replace bearings.
- Take bike to a specialised workshop.
Suspension too hard
- Too much oil in fork.
- Oil in fork too dense.
- Twisted or bent fork.
- Excessive tyre pressure.
- Rear shock absorber badly adjusted.
- Remove excess oil.
- Replace oil with correct density.
- Take bike to a specialised workshop.
- Adjust tyre pressure.
- Adjust rear shock absorber.
Suspension too soft
- Low oil level in fork.
- Add the right oil to the specified level.
Page 89

43
ENGLISH
- Oil with excessively low density.
- Rear shock absorber badly adjusted.
- Replace oil with correct density.
- Adjust rear shock absorber.
Handlebar vibration
- Worn tyre, swinging arm or bearings
worn.
- Rim out of true.
- Badly aligned wheel.
- Steering shafts, handlebar supports or
fasteners with play.
- Take bike to a specialised workshop.
- Take bike to a specialised workshop.
- Take bike to a specialised workshop.
- Tighten nuts and fasteners to
specified torque.
Brakes working badly
- Pads worn
- Discs worn.
- Loss of brake fluid.
- Brake fluid in bad state.
- Master cylinder piston worn.
- System badly adjusted.
- Change pads
-Change discs.
- Check circuits. Replace leaking parts
and top up fluid to the correct level.
- Remove brake fluid circuit and replace
with fresh fluid of the right type.
- Replace master cylinder piston.
- Adjust brakes.
Fusing bulbs
- Voltage regulator problems.
- Check connections. Check voltage
regulator and fuses.
Page 90

Page 91

FRANÇAIS
JTG JT300
(JT280 – JT250)
2012
Page 92

Page 93
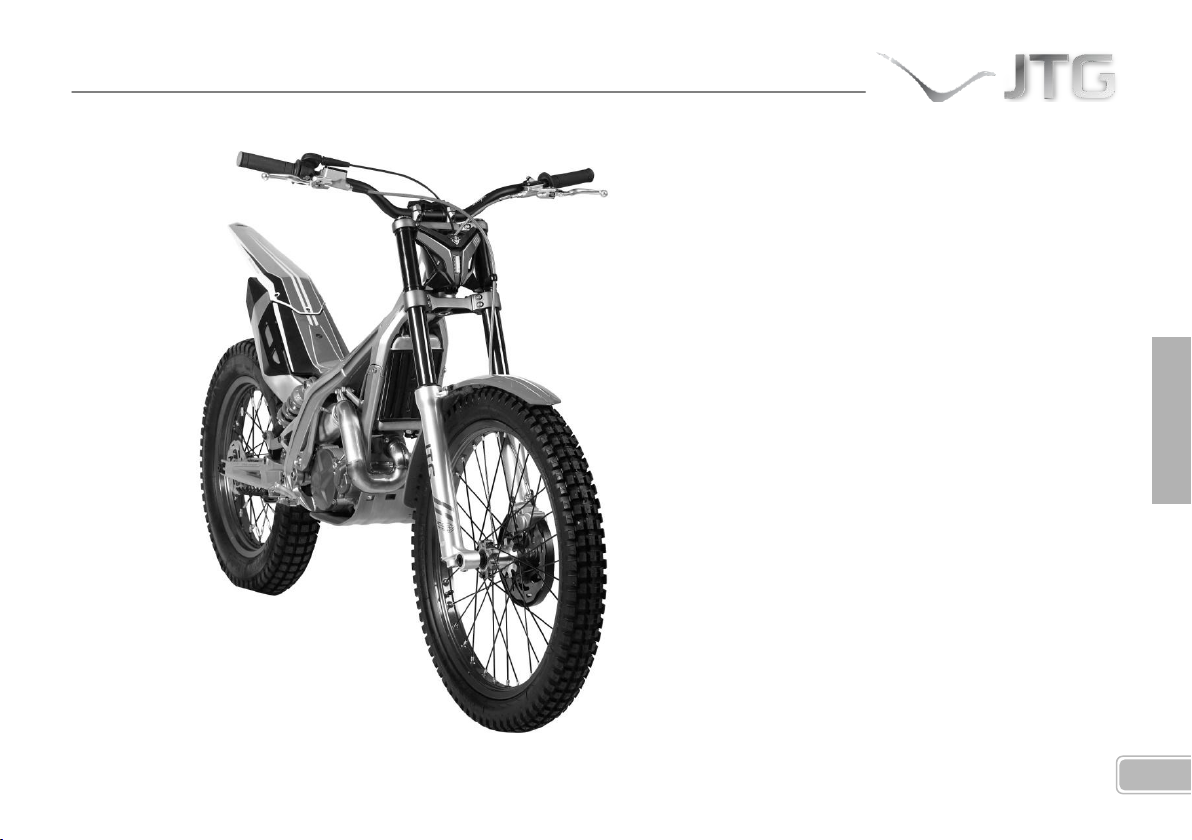
3
FRANÇAIS
Bienvenue chez JTG!
Nous vous remercions de la
confiance accordée à notre marque
et de l’achat de cette moto de Trial.
En tant qu’utilisateur de JTG, vous
pourrez profiter d’un produit qui
offre l’innovation strictement
nécessaire, sans superflu et qui,
surtout, porte les labels de qualité,
de prestige et d’exclusivité.
Conçue pour offrir une conduite
confortable et efficace par des
professionnels rattachés au monde
de l’off-road, l’esprit de compétition
n’est donc pas négligé ; elle vous
permettra de sentir les prestations
d’une marque gagnante, à portée
de main.
JOTAGAS S.L. 2012
Page 94
4
ATTENTION! Ce symbole fait référence aux aspects qui peuvent engendrer, s’ils sont ignorés, un dommage à la
motocyclette. Ne pas tenir compte de ces avertissements pourrait entraîner l’annulation de la garantie du véhicule.
PRÉCAUTION! Ce symbole fait référence à des aspects qui peuvent provoquer, s’ils sont ignorés, un danger physique
pour l’usager.
JTG AVERTIT:
Avant de mettre la motocyclette en marche, prière de lire entièrement ce manuel de l’utilisateur qui présente dans le détail
toutes les consignes contribuant à l’utiliser correctement et à veiller à son entretien, sa maintenance et conservation optimums
dès le premier jour, ainsi qu’à la sécurité de l’usager.
Porter une attention particulière aux notes marquées de ces symboles, en particulier:
Hormis les avertissements spécifiques, ce manuel apporte également des conseils pour une meilleure utilisation de la
motocyclette et le réglage et contrôle des caractéristiques les plus importantes du véhicule.
JTG se réserve le droit d’apporter des modifications au présent manuel.
Page 95

5
FRANÇAIS
JTG RECOMMANDATIONS:
En présence de doute concernant les éventuels réglages de la motocyclette, suivre les indications du manuel
et/ou s’adressez à un concessionnaire JTG.
Lire attentivement l’information donnée dans ce manuel de l’usager afin de se familiariser avec les
caractéristiques de ce véhicule avant de le conduire dans des conditions de puissance optimales.
Un rodage d’au moins 8-10 heures est conseillé pour une mise au point optimale du moteur. Le véhicule ne
sera pas conduit à de grandes vitesses et il n’y aura pas d’épisodes d’accélération au maximum. Durant cette
période de rodage, la première heure de marche sera effectuée avec modération.
Le carburant est un liquide facilement inflammable. Pour faire le plein, prendre des précautions et
commencer toujours par arrêter le moteur.
Avant d’exiger des conditions extrêmes du moteur, il est important de le laisser atteindre une température
adéquate, de même qu’au démarrage ou dans des conditions environnementales de basses températures.
Cette motocyclette utilise de l’huile de mélange deux temps 100 pour 100 synthèse à 1% avec du carburant
de 98 octanes, ne pas utiliser d’autre type de lubrifiant sans consulter auparavant un mécanicien agréé de
JTG.
Cette motocyclette est homologuée pour une seule personne, le transport d’un second passager n’est pas
autorisé.
Pour une longue vie de service, la motocyclette doit être entretenue et maintenue dans les conditions
recommandées dans ce manuel et JTG conseille de vous rapprocher le plus souvent possible de son réseau.
Ce véhicule est conçu pour une conduite sûre, à condition que le pilote soit équipé des mesures de sécurité
pertinentes (casque, protections, etc.). Faire preuve de prudence et de bon sens, durant la conduite.
Page 96
6
TABLE DES MATIÈRES
Description des éléments 7
Fiche technique 9
Information sur le véhicule 11
Démarrage et arrêt du moteur 12
Starter 12
Changement de vitesses 13
Robinet d’essence 13
Réservoir d’essence 14
Pneumatiques 15
Freins 16
Verrouillage de la direction 17
Béquille 17
Guidon et tableau de bord 18
Réglage des manettes et du guidon 19
Contrôle du niveau d’huile 19
Filtre à air 20
Bougie 21
Système de refroidissement 22
Carburateur 23
Réglage du ralenti 24
Boîte à clapets- Lamelles 25
Chaîne de transmission 25
Suspension 26
Bras oscillant 27
Conservation de la motocyclette 28
Indicateur de vitesse 29
Couples de serrage 33
Stockage 34
Interventions de maintenance 35
Homologation 39
Éventuelles pannes et questions fréquentes 40
Page 97
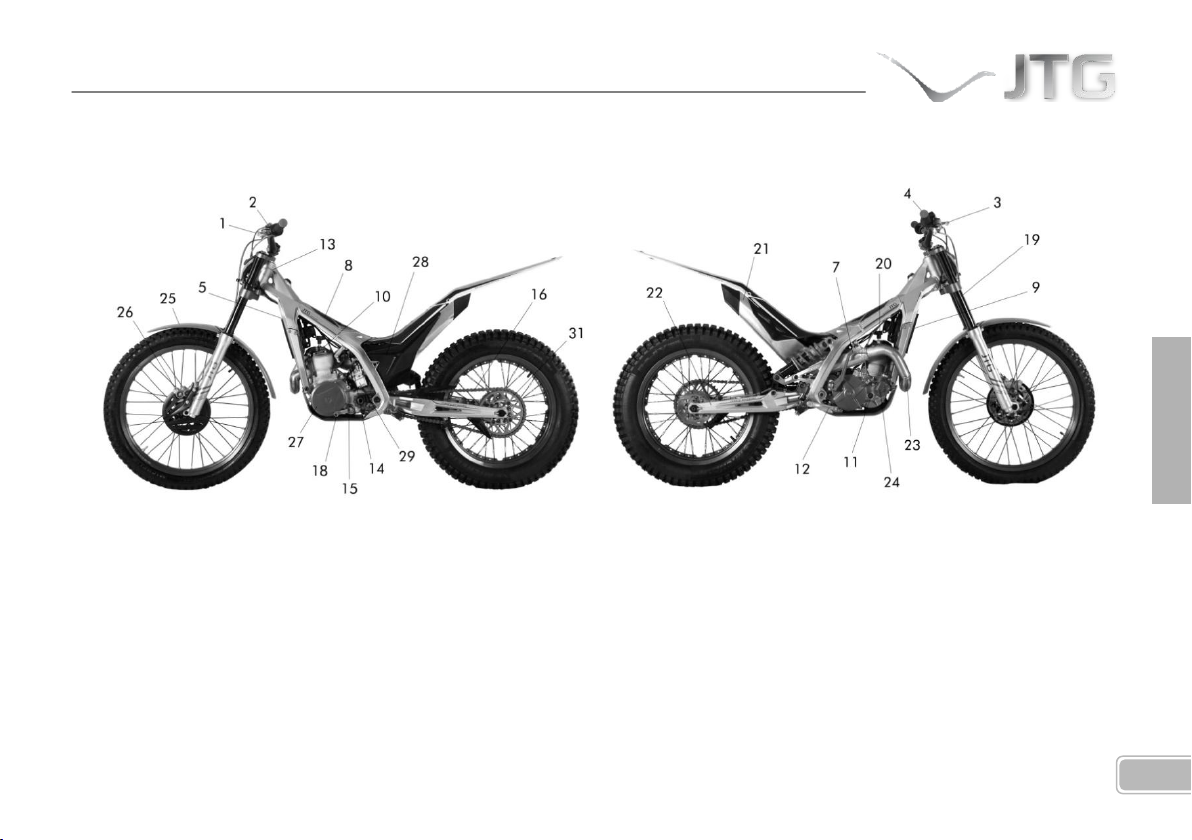
7
FRANÇAIS
DESCRIPTION DES ÉLÉMENTS
1- Levier d’embrayage
2- Boutons d’ indicateurs de
direction, klaxon et arrêt
3- Levier de frein
4- Accélérateur
5- Bouchon du radiateur
6- Bouchon du réservoir
d’essence
7- Kick starter de démarrage
8- Réservoir d’essence
9- Radiateur
10- Vis de vidange radiateur
11- Regard niveau d’huile carter
12- Pédale de frein arrière
13- Mise à l’air
14- Robinet d’essence
15- Boîte à clapets - Lamelles
16- Chaîne de transmission
Page 98
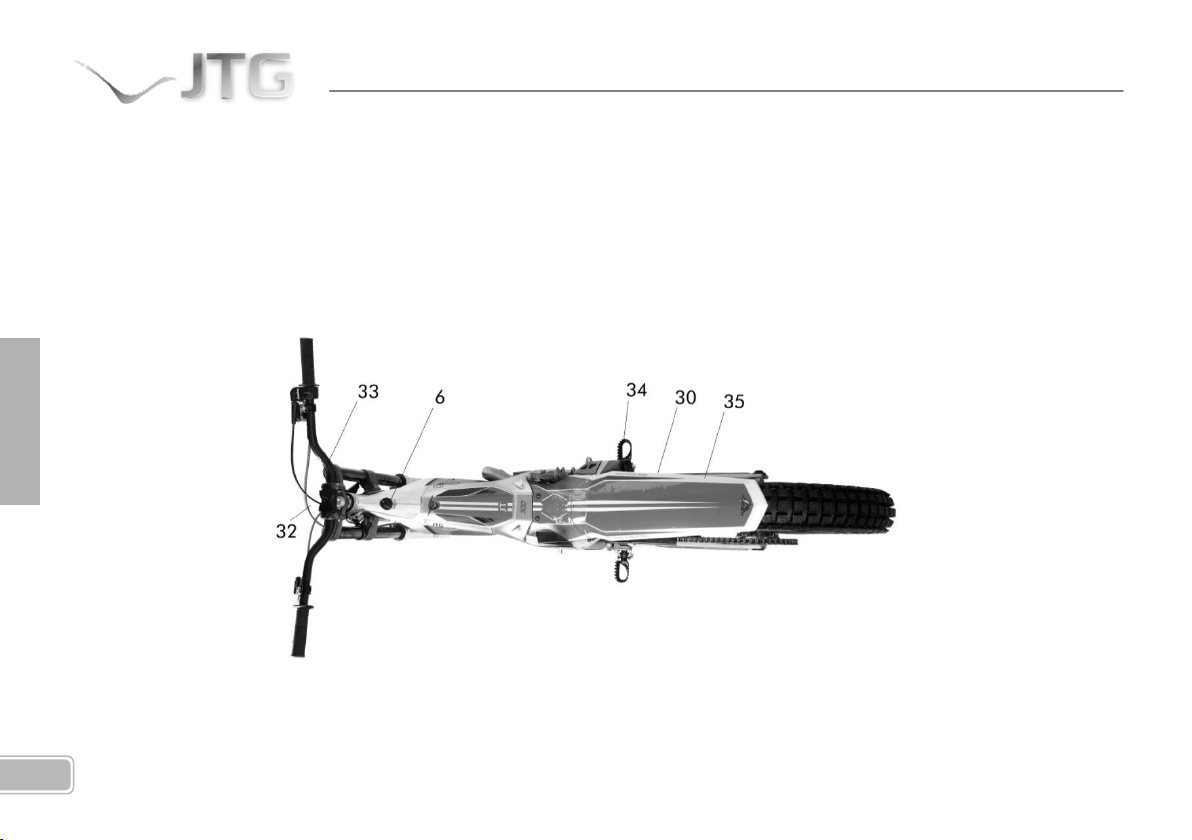
8
18- Sélecteur de vitesses
19- Fourche avant
20- Bougie
21- Silencieux
22- Bras oscillant
23- Échappement
24- Pompe à eau
25- Garde-boue avant
26- Étrier de frein avant
27- Carter d’allumage
28- boite de filtre air
29- Carburateur
30- Béquille
31- Couronne
32- Indicateur de vitesse
33- Réglage suspension avant
34- Repose-pieds
35- Garde-boue arrière
Page 99
9
FRANÇAIS
FICHE TECHNIQUE
CADRE
Type: Double berceau avec suspension latérale et réservoir de carburant intégré
PNEUMATIQUES
Avant: 2.75 x 21" - 44 (160kg) L
Arrière: 4.00 x 18" - 52 (200kg) - L
SUSPENSION
Avant: Fourche télescopique TECH Hydraulique réglable COM-EX Ø39mm (débattement 175mm)
Arrière: Système progressif V3 avec mono-amortisseur multi-réglable OLLE (débattement 175mm)
FREINS
Avant: à disque, Ø185mm, avec étrier à 4 pistons
Arrière: à disque, Ø150mm, avec étrier à 2 pistons
MOTEUR
Type: Deux temps, monocylindre, admission par clapets directement au carter, réfrigération liquide.
Cylindrée: 301.58cc
Diamètre du piston: 80mm
Course: 60mm
Carburateur: DELLORTO PHBL26
Système de lubrification: Mélange à 1% (1:100)
Système d’allumage: Numérique CDI HIDRIA
Bougie: NGK BPMR6A
Générateur: 12V / 110W
TRANSMISSION
Page 100
10
Type: 5 vitesses à embrayage à commande hydraulique.
Transmission secondaire: Par chaîne.
Rapports de changement:
1ª 3.000 (33/11)
2ª 2.571 (36/14)
3ª 2.187 (35/16)
4ª 1.444 (26/18)
5ª 0.889 (24/27)
Réduction primaire 2.778 (75/27)
Réduction finale 4 (40/10)
Rapport total (5ª marche): 9.879
Huile de transmission: 400cc, type GEAR TRANS 0W75
DIMENSIONS
Hauteur totale: 1160mm
Largeur totale: 833mm
Hauteur siège: 650mm
Empattement: 1180mm
Capacité du réservoir: 2.7 litres
Poids à vide: 64 kg
 Loading...