

Page 1

Digital Wireless Surveillance System
User’s Guide
1
Page 2

Contents
What’s Included............................................................... 3
What Guardian Can Do For You..................................... 4
Using This Manual..............................................................................4
Getting Started ................................................................ 5
Getting to Know the Receiver........................................................5
5
Getting to Know the Camera .........................................................5
What the lights mean.................................................................5
Setting Up the Equipment..............................................................6
Power Up the Receiver ..............................................................6
Mount the Camera Stand .........................................................6
Attach the camera.......................................................................7
Setting Up Your System...................................................................8
Verify Receiver and Cameras are Paired.....................................8
Camera Setup ..............................................................................8
System Setup ................................................................................8
Recording setup...........................................................................8
Guardian Software Operation Overview....................... 9
What the icons mean .............................................................. 10
Guardian System Screen Descriptions......................... 12
Guardian Settings Screen............................................................. 12
Camera Setup Screen.............................................................. 14
Recorder Setup Screen........................................................... 17
Network Setup Screen............................................................ 19
Alarm Setup Screen ................................................................. 22
System Setup Screen............................................................... 25
Save to SD ................................................................................... 29
System Upgrade ....................................................................... 30
Default.......................................................................................... 30
Quick Tips........................................................................................... 31
Other Stu ......................................................................................... 31
Using Your System ........................................................ 32
Playing Back Recorded Video ..................................................... 32
Adding New Cameras.................................................................... 32
Some things to know about pairing cameras:............... 33
Pair Camera................................................................................. 33
Managing Your Files....................................................................... 34
Setting your recordings to delete ...................................... 34
Maintaining Your System ............................................. 35
Solving Problems........................................................... 36
LEGALITIES..................................................................... 38
ʇ Genuine Uniden software will NEVER install Spyware, Adware, or other malicious les along with the
program, nor does it ever attempt to contact any web sites.
ʇ This software does not incorporate any Hardware Locking or other intrusive licensing schemes.
ʇ This software is distributed AS-IS and oers no warranty whatsoever. You install this software at your own
risk. Uniden assumes no responsibility or liability for any negative eects of the software’s use, mis-use,
installation, uninstallation, etc.
ʇ Copyright 2011. All rights allowed by law are hereby reserved.
Page 3
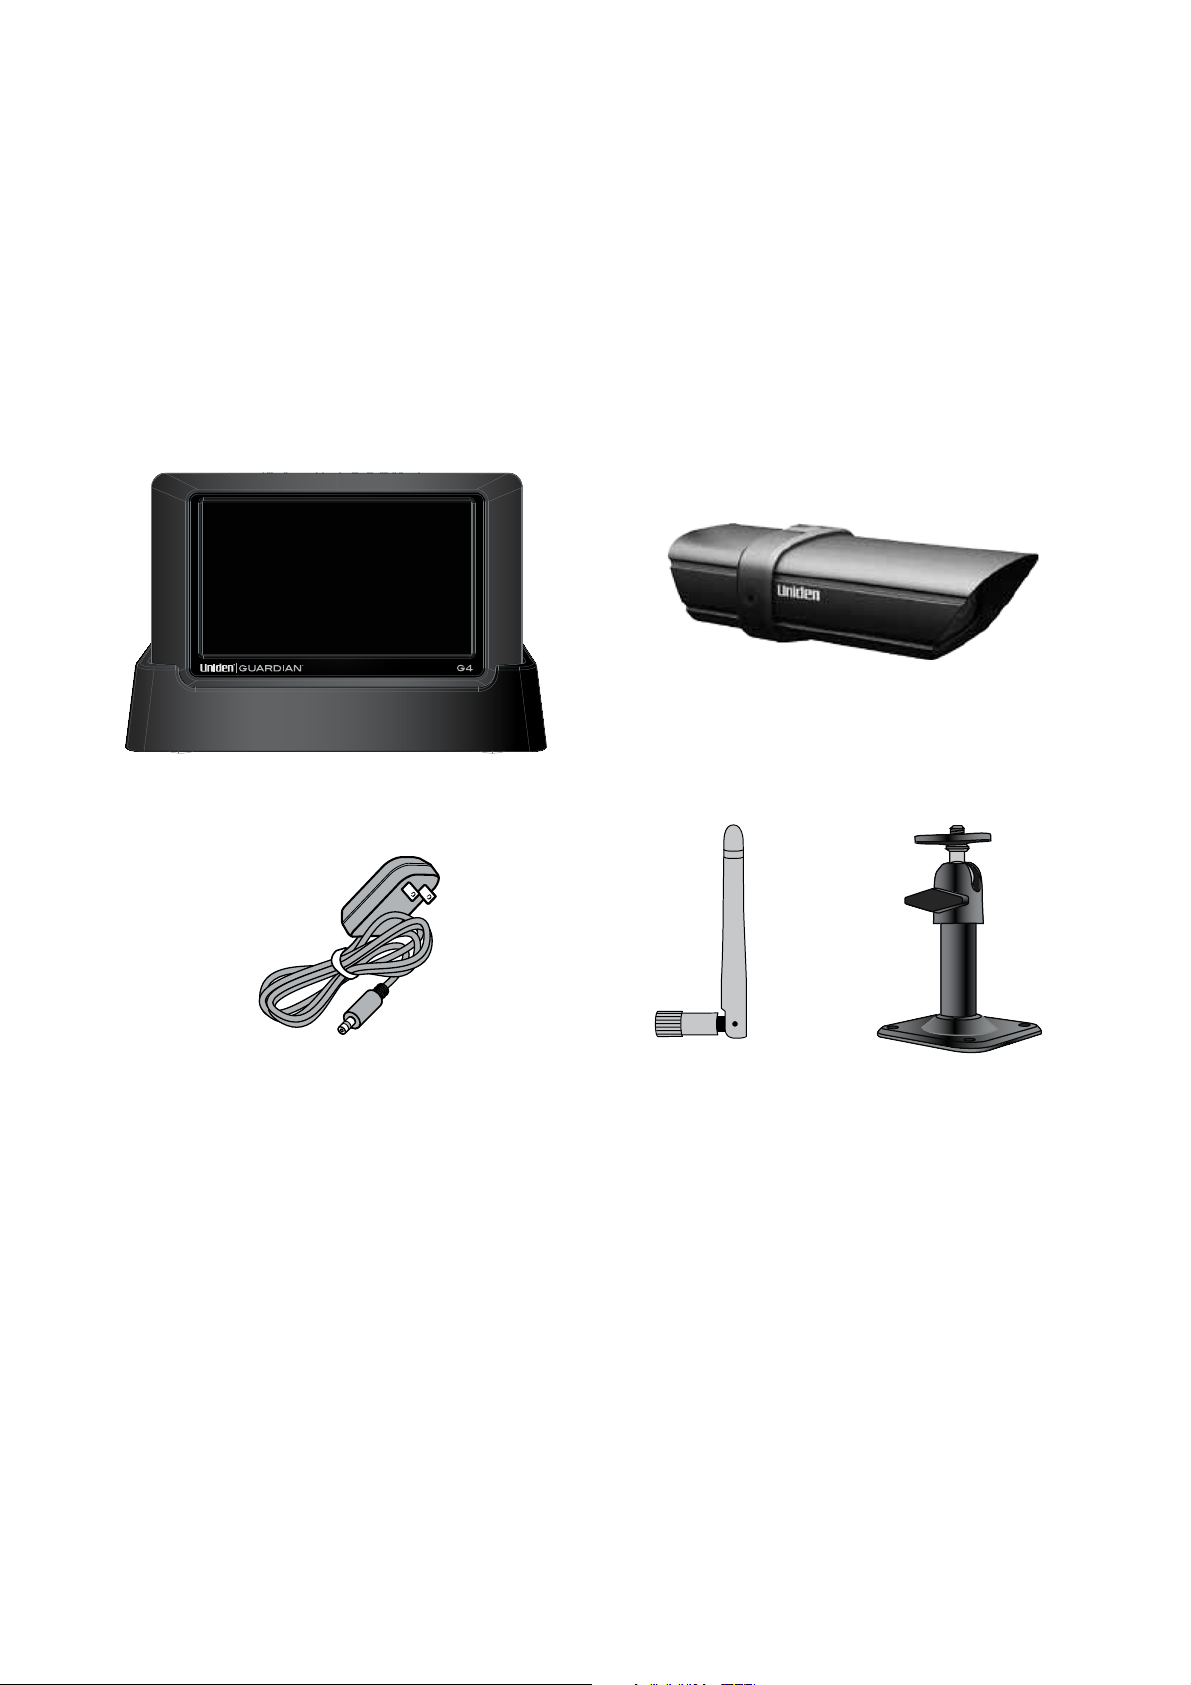
You should have the following items:
G7 Receiver and Base GC45 Camera (2)
What’s Included
AC Adapter (3) Antenna (2) Stand (2)
If any items are missing or damaged, contact our Customer Care Line immediately.
Never use damaged products!
3
Page 4

Using This Manual
This manual is set up in six main sections:
ʇ Getting Started. This section describes your hardware and how to physically set it up. You will
find
ʇ Operations Overview. This section lists basic operations in an abbreviated format. It references
screen details in the third section.
ʇ Screen Descriptions. Here you will find detailed descriptions of each screen and how it is used.
ʇ PC Access. This section tells you how to hook up your surveillance system to your PC and access
it from a separate location
ʇ Maintenance
ʇ Troubleshooting
Use the ___ section for an overview of setup procedures. When you are familiar with the screen
setup, you can refer to this section
4
Page 5
Getting Started
Getting to Know the Receiver and Cameras
Power
On/O
SD slot
AC Power
Connection
Receiver
(back/side)
Receiver
Power Dock
Pull-Out
Stand
Stand
Front view Back view
Power status
Link status
Light sensor
Data Cable
Connection
AC Power
Connection
Antenna
connector
Power
pigtail
Link button
What the lights mean
Light State What it means
Power
status
On The camera is on.
Off The camera is off.
5
Page 6

Flashing The camera is in pairing mode.
Link
status
Orange The camera is connected to the receiver.
Off The camera is in standby.
Setting Up the Equipment
Set Up the Receiver
1. If you are using the receiver as a stand-alone unit, flip out the stand on the back of the receiver
and connect an AC adapter to the power input on the side of the receiver.
If you are using the receiver in the base, insert the receiver into the base and connect an AC
adapter to the input on the back of the base.
2. Connect the other end of the adapter to a 120 volt AC (standard indoor) power outlet.
3. Press the
4. The receiver displays the Uniden
POWER
button on the top of the receiver for 2 seconds to power it up.
Welcome
screen for a few seconds and then transitions to the
LIVE view.
The screen remains dark until the cameras are powered up.
Mount the Camera Stand
You can mount the camera with the stand on the bottom (on a wall or table-top) or on the top (on
the ceiling). When you are positioning the camera, you might want to bring the receiver along; it’s
much easier to get the camera into the right position when you have the display handy.
1. Hold the base of the camera stand where you want to mount it and mark the location of the
screw holes.
2. Use the included screws and anchors to attach the base to the wall or ceiling.
3. Before attaching the camera, tug gently on the stand to make sure it is securely in place.
6
Page 7
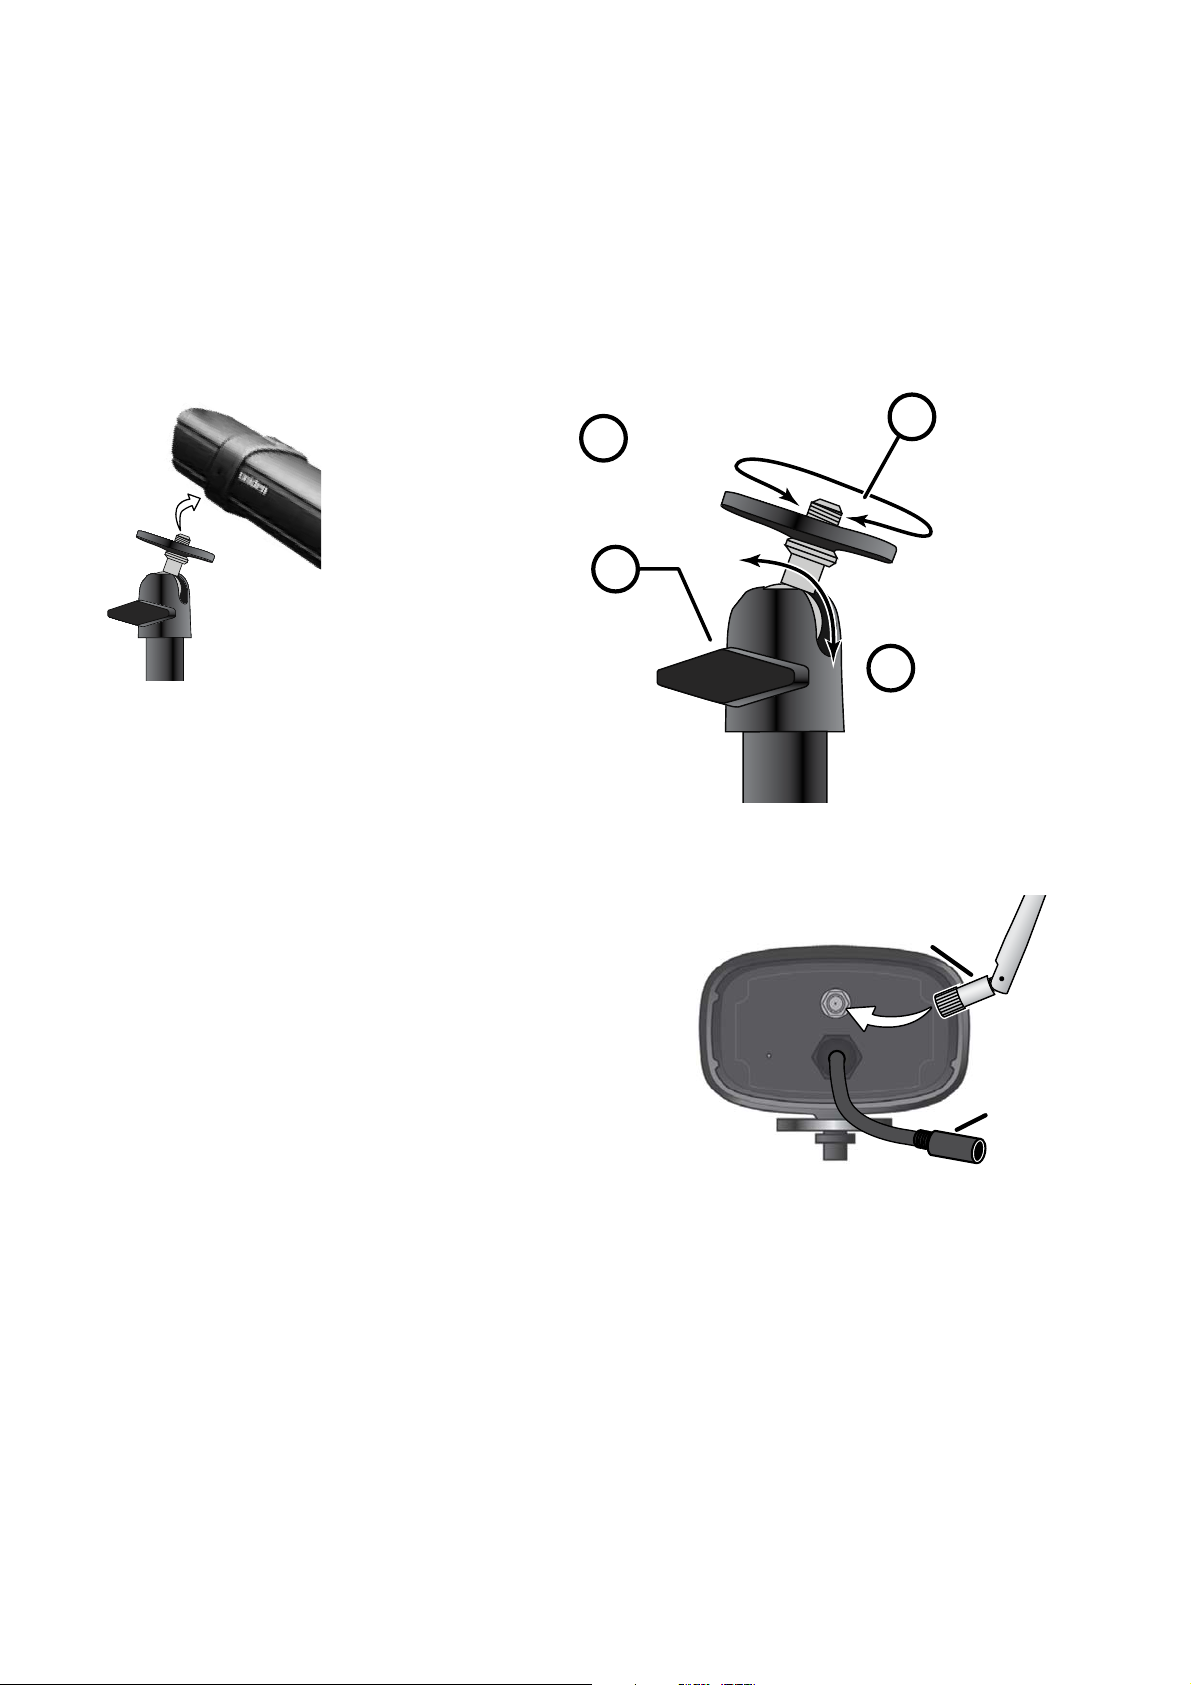
Attach the camera
Attach the camera
1. For each camera,
attach the camera
bracket to the
Tighten the brace against
2
the camera to
secure it
in place.
1
to the mounting
screw and turn it
to the desired
direction.
mounting screw.
You can attach the
stand to the top or
the bottom of the
camera as needed.
Tighten it a few
turns, then turn the camera to face the
direction you want.
3
Loosen the
wingnut to
unlock the
mounting
post.
Adjust the post to
4
the correct angle,
then tighten the
wingnut to lock the
post into place.
2. Tighten the camera brace up against the
camera to secure it into place.
3. Unlock the mounting post by turning the wingnut to the left a few turns.
4. Set the mounting post to the correct angle, then tighten the wingnut until the post is locked
into place.
5. Attach the antenna to the rear of the camera.
Antenna
6. Connect one end of an AC adapter to the camera’s
power pigtail and plug the other end into a 120 volt
AC (standard indoor) power outlet. (If necessary,
connect the extension cord to the camera’s pigtail
and connect the AC adapter to the extension cord.)
7. Make sure the
Power status
light turns on. If it doesn’t,
try reconnecting the AC adapter, and make sure the
power outlet isn’t controlled by a wall switch.
Power
(Link button
not shown)
7
Page 8

Setting Up Your System
You can now set your cameras and system to your preferred settings. .
Camera Settings
ʇ Brightness (page ___)
ʇ Motion Detection (page ___)
ʇ Schedule Recordings (page ___)
ʇ Alarms (page ___)
System Settings
ʇ Power Saving (page ___)
ʇ Screen Auto Lock (page ___)
ʇ Time (page ___)
ʇ Language (default language is English; see page ___)
Recording Settings
ʇ Motion Detection (page ___)
ʇ Schedule Recordings (page ___)
8
Page 9
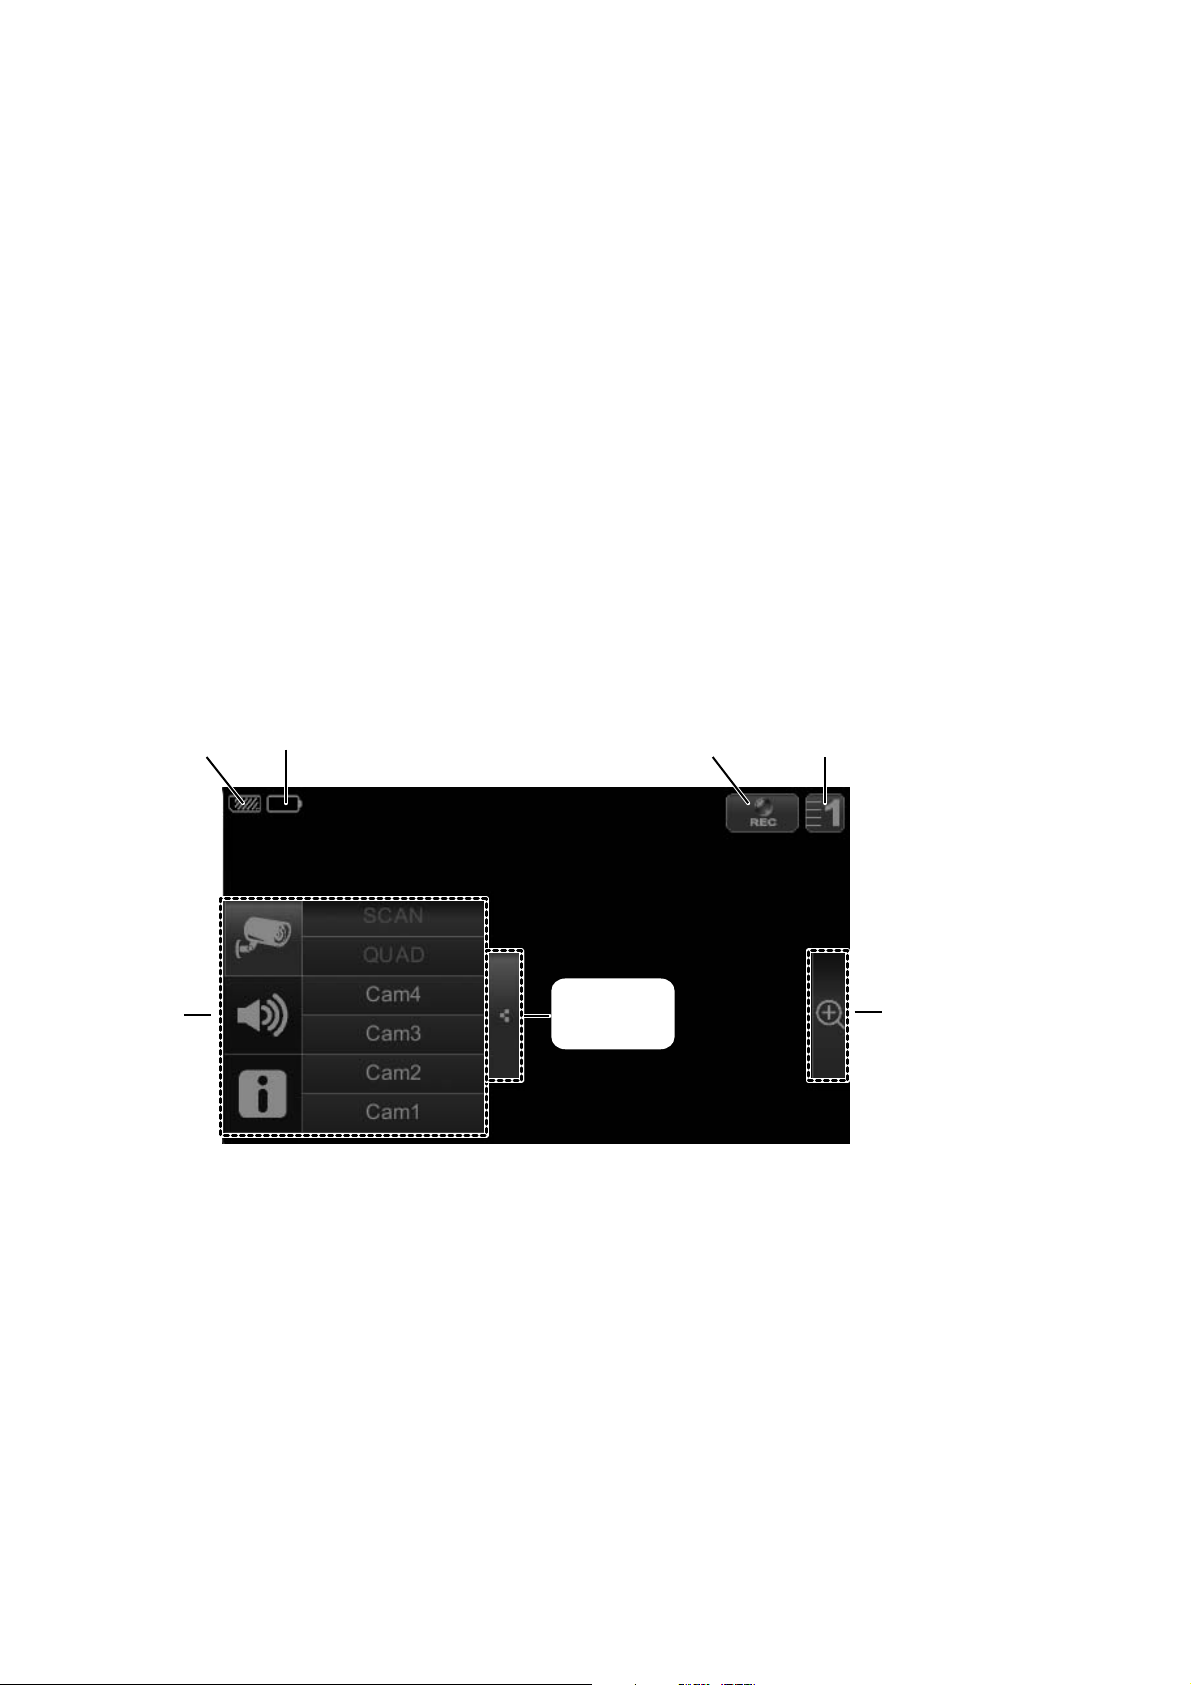
Guardian Software Operation Overview
Your receiver’s Guardian software operates through a series of screens that let you choose groups
of operations. For example, when you tap on the camera icon in the Pop-up menus, you can set
how you want the main viewing screen - called the Live screen - to display images from the paired
cameras. You can scan between cameras, show all cameras on a single screen, or only display a
specific camera.
The Live screen lets you view the camera transmissions. It also lets you set up your screen display
and make adjustments to it. Icons on the screen itself let you monitor power and camera status.
Live Screen
SD card
status
Pop up
menus
Battery
status
Pop up
menu tab
Record
status
Camera
number
Zoom
9
Page 10
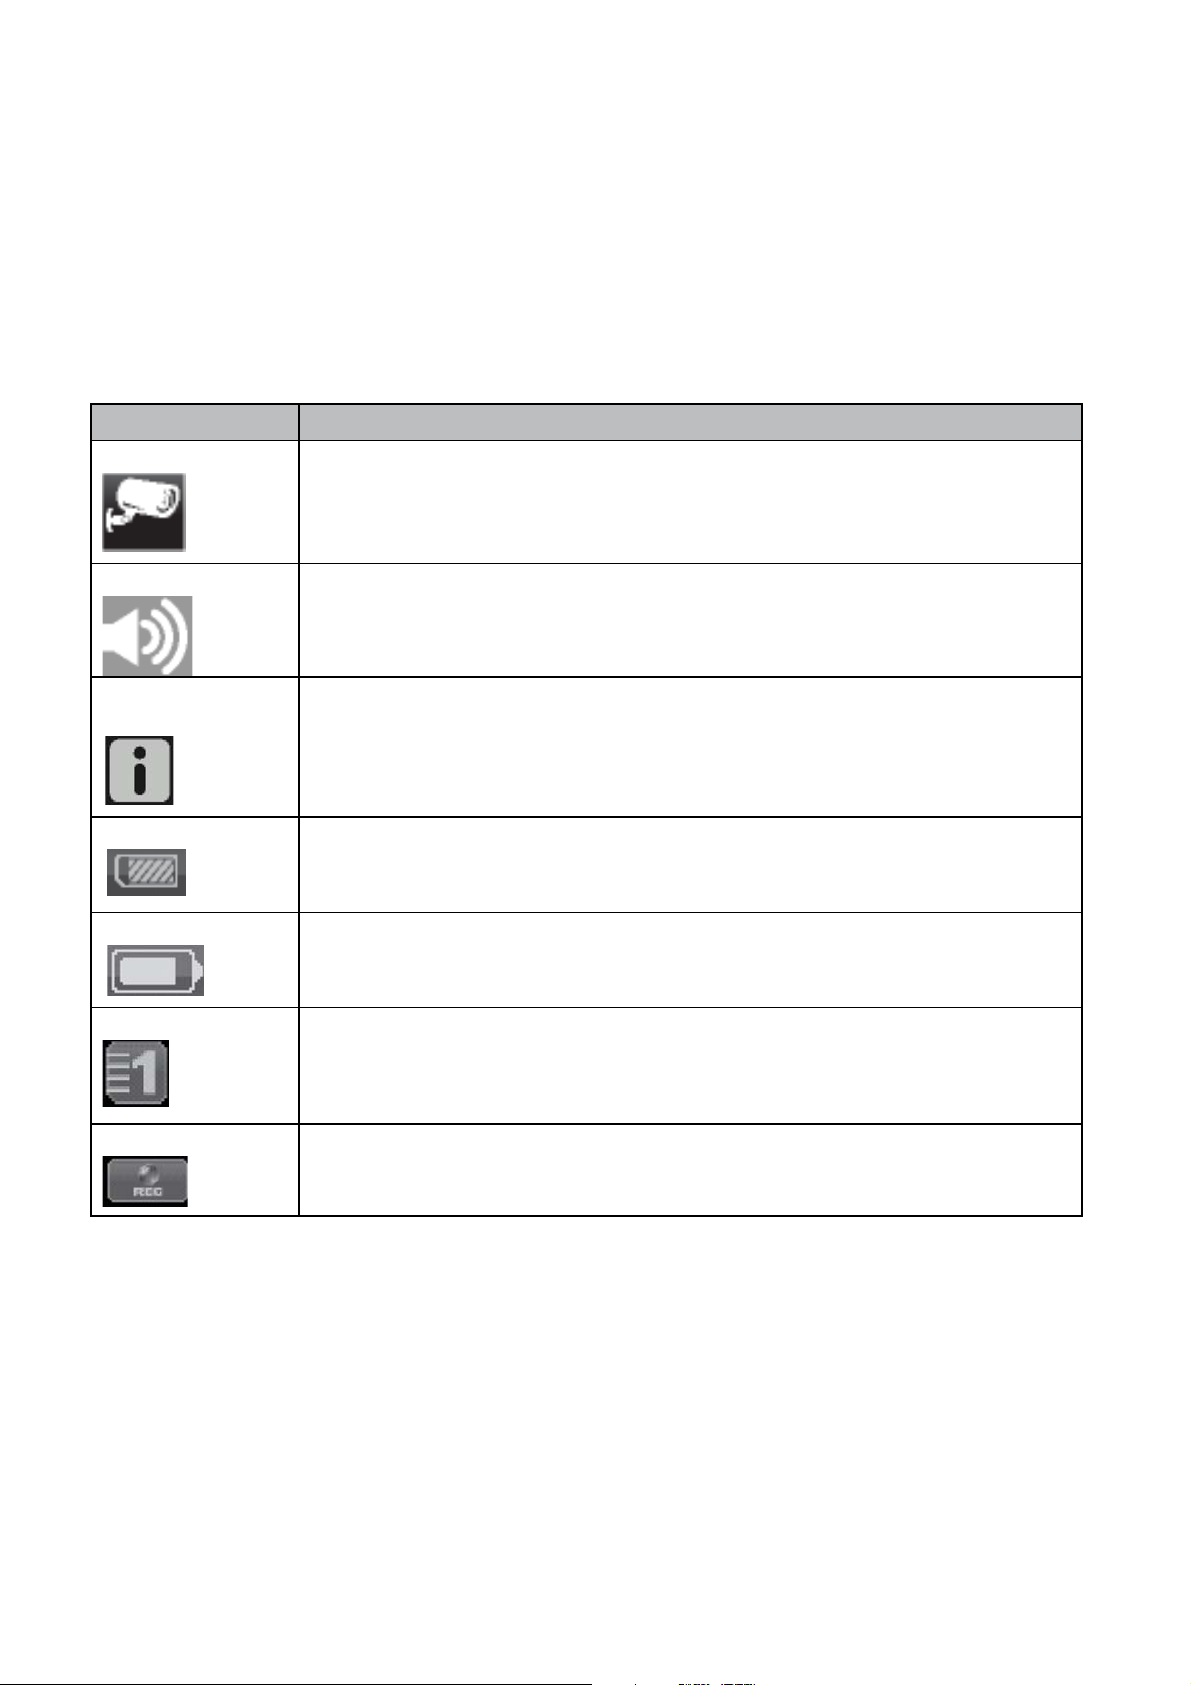
What the icons mean
Icon What it does
CAMERA MODE
VOLUME
GUARDIAN SYSTEM
SETTINGS
SD CAPACITY
BATTERY CAPACITY
Select how you want the Main screen to display camera input:
- Scan between cameras (
- Quad view (all paired cameras display)
- Single camera selection (1 camera displays)
Adjust the volume level for notification tones and alerts.
Access the Guardian Software Operation screens or view recorded events.
Indicates memory capacity remaining.
Displays battery capacity. This graphic shows battery at nearly full.
in 5 second intervals up to 20 seconds?)
CAMERA NUMBER
RECORD STATUS
10
Displays the camera’s receive strength through the status lines to the left of
the number.
Starts or stops recording for that camera
- Steady on - Not recording
- Flashing - Recording
Page 11
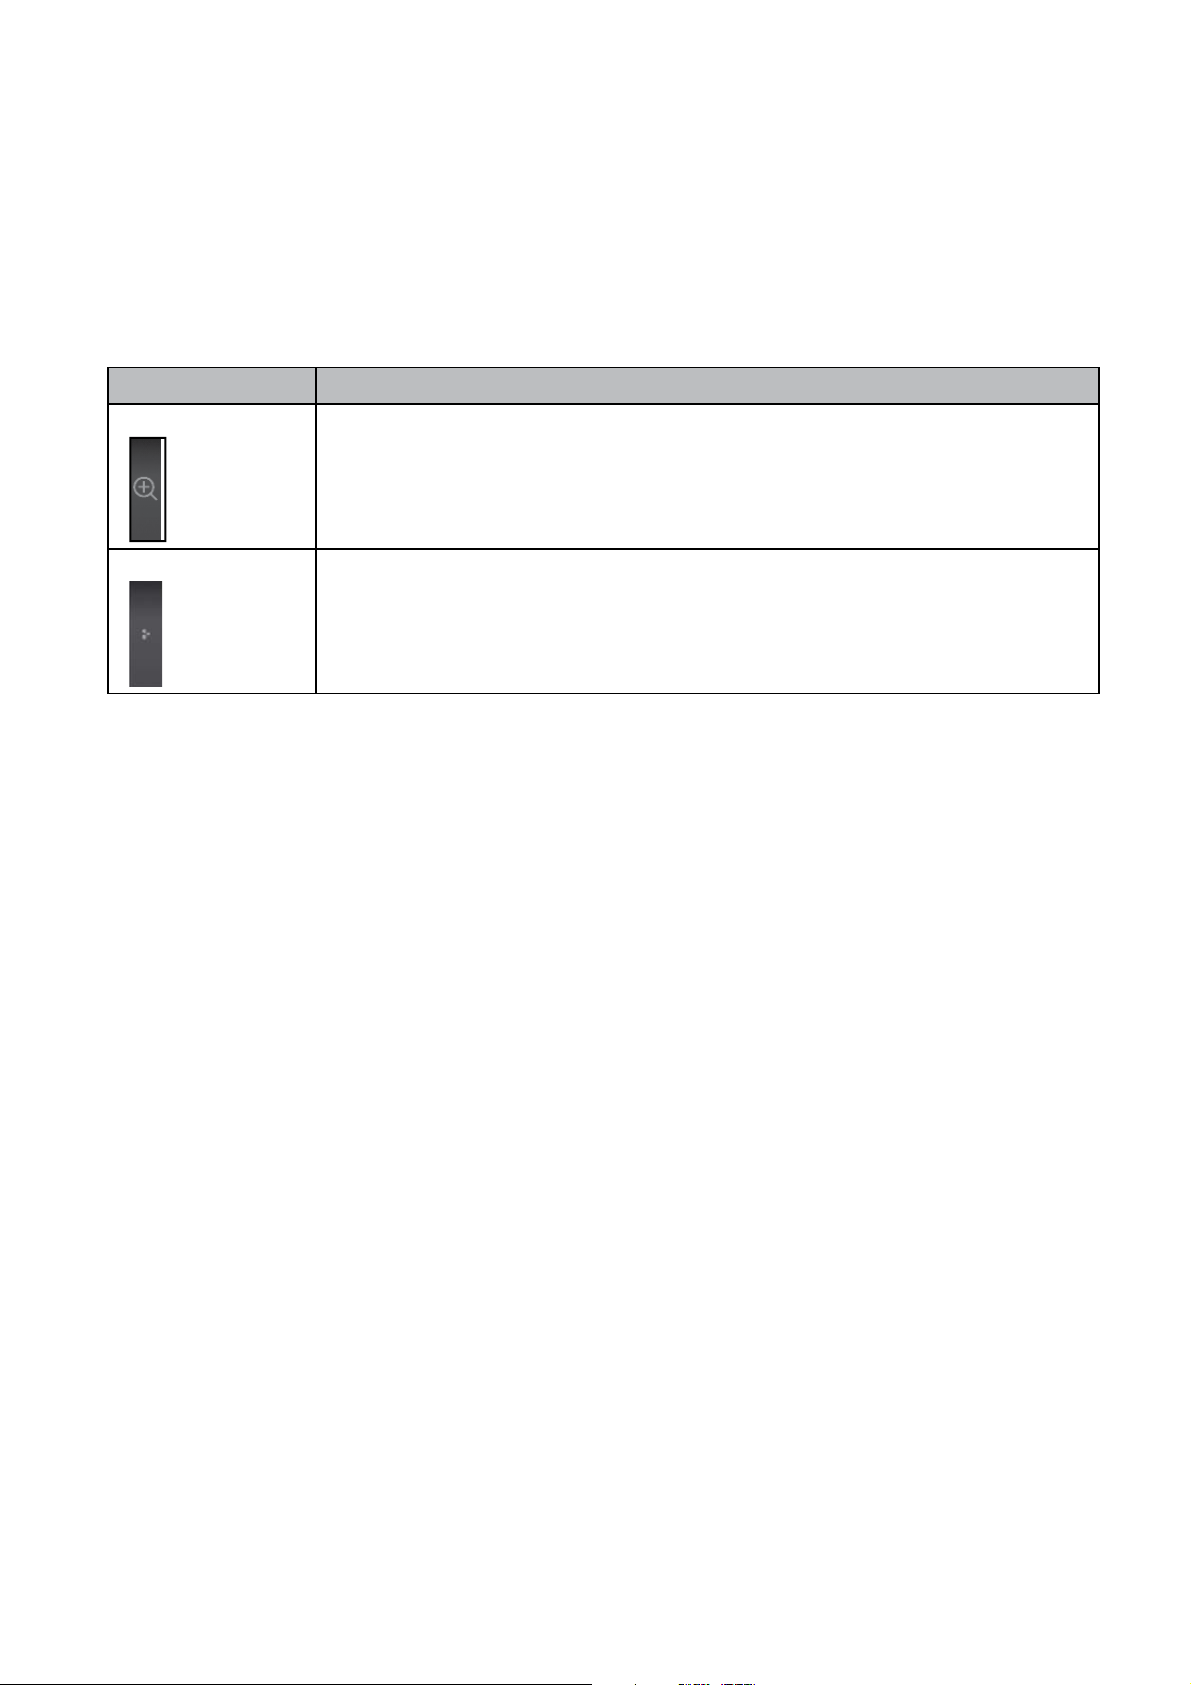
Icon What it does
ZOOM
- Zooms into a specific area of the image. Tap a second time to return to
normal screen.
POP UP MENU TAB
Opens and closes the pop up menu display.
11
Page 12
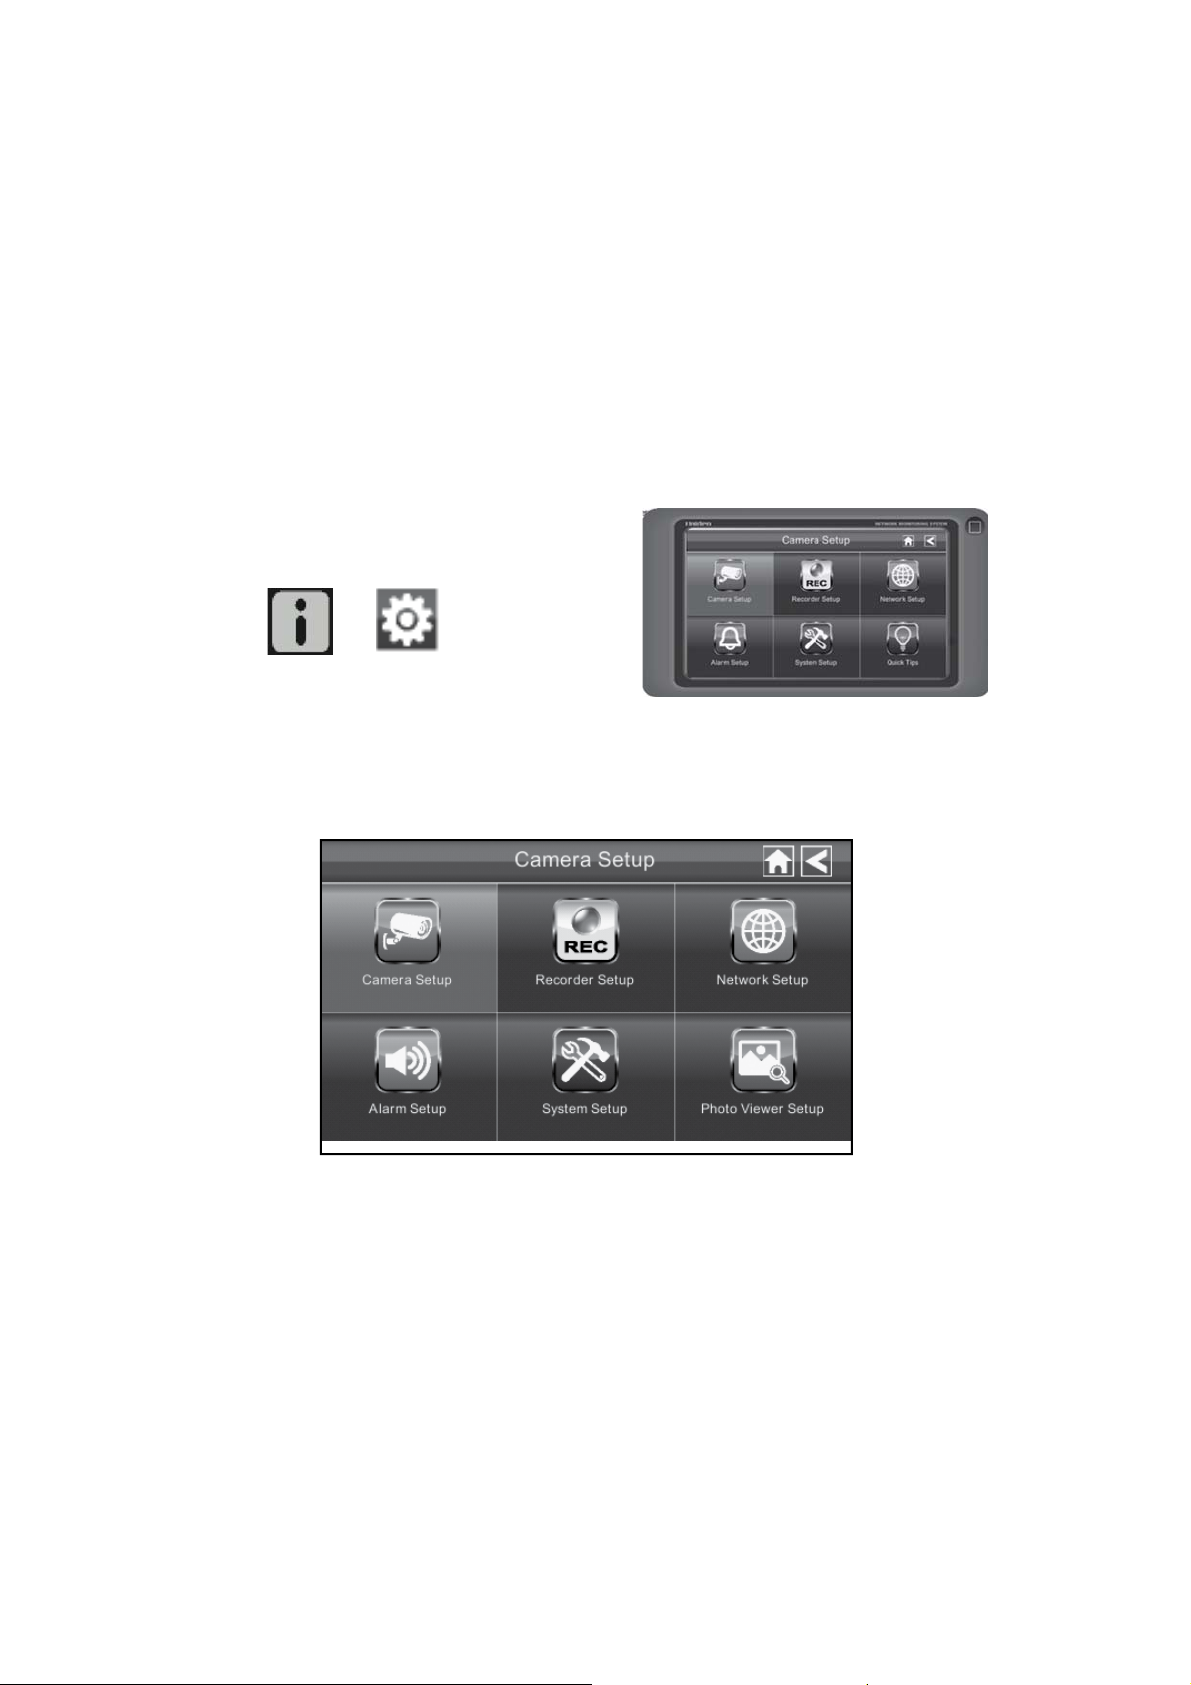
Guardian Screen Descriptions
Guardian Settings Screen
From the pop-up menu, tap the
following icons as they appear
on the screens:
Î
This screen should display:
12
The Guardian Settings screen highlights the Camera Setup option as the default.
Page 13

Main Screen Sub Screens What it Does
Camera Setup Pairing Enables the cameras and the monitor to com-
municate with each other
Camera on Makes the cameras visible to the monitor
Brightness Brightens or darkens the display
Recorder Setup Motion Detection Records when something moves in front of the
camera. Continues recording for _________.
Schedule Record Set up a schedule for pre-determined recording
times and lengths
Network Setup Internet Setup Select the type of internet connection to be
used
Security Code Set a security code for remote access
Network Information Displays information about your network
Alarm Setup Period Set a length of time for the alarm to sound
Volume Set the alarm volume
Melody Select a melody to play for the alarm
System Setup Power Saving
Screen Auto Lock Locks the screen from further activity until the
screen is unlocked.
Time Set the time in 12-hour increments
Format Storage Erase SD card and copy current data
System Upgrade Download system upgrades from the network.
Default Lists the original system defaults
Quick Tips NA Provides a list of 10 common questions.
13
Page 14

Camera Setup Screen
Pairing
Your cameras are paired to the receiver at the factory. When you add a camera, you have to pair it
to the receiver (that is, you have “introduce” the camera and receiver so they can communicate).
Some things to know about pairing cameras:
ʇ If a camera is already assigned to the selected channel, the receiver overwrites that camera link
with the new one.
ʇ Only pair one camera at a time! The receiver links to the first camera it detects. If two or more
cameras are in pairing mode, you can’t control which camera the receiver will detect first.
ʇ If you have trouble pairing a new camera, refer to the manual that came with the camera or the
receivers.
14
Page 15

From the pop-up menus, tap
the following icons as they
appear on the screens:
This screen should display:
ÎÎ
Î
1. Tap the camera image you want to pair. A processing icon displays.
2. Press and release the Pairing button on that camera’s power cord. A check mark appears on the
receiver for that camera when pairing completes.
Camera On
When you add cameras to your system, turn them on before you pair them.
From the pop-up menu, tap the
This screen should display:
following icons as they appear
on the screens:
ÎÎ
Î
1. Tap the camera you want to add.
2. A check mark replaces the X under the camera. The camera can now be paired.
15
Page 16

Brightness
From the pop-up menu, tap the
This screen should display:
following icons as they appear
on the screens:
ÎÎ
Tap the camera whose brightness level you want to change. The default brightness is 0, and the
range is from -2 through 2.
Recorder Setup Screen
Î
16
Page 17

Motion Detection
From the pop-up menus, tap
the following icons as they
appear on the screens:
ÎÎ
1. You can set the motion detection level to Off, Normal, of High. Tap on the camera to cycle
through these choices. Default = Low.
2. The screen returns to the Motion Detection screen after __________ seconds or when you press
the Back icon.
How many seconds before it times out and returns to the Motion Detection screen?
Schedule Record
You can schedule up to 5 recording sessions per camera in a single day. You are limited to the size
of the SD card for how long a total recording time you have.
Î
This screen should display:
From the pop-up menus, tap
the following icons as they
appear on the screens:
ÎÎ
This Schedule Record screen displays:
Î
17
Page 18

1. Tap the camera number you want to record (1 - 4).
2. Set the recording start time. Tap the hour and number boxes separately and use the UP and
DOWN arrows to scroll through the times.
3. Tap the AM/PM block to toggle between them.
4. Tap on the blank DATE box. The Schedule Record Calendar screen displays.
5. Tap on the date you want the recording. The previous screen displays.
6. Set up the recording and then tap Save. You can select another recording session to schedule,
return the previous screen, or return to the LIVE screen.
To Clear a Scheduled Recording
1. Access the Schedule Record screen.
2. Tap on the scheduled recording you want to clear (1-5). The screen displays the settings for that
schedule.
3. Tap CLEAR. The screen resets to the default values for that recording slot.
18
Page 19

Network Setup Screen
The Network Setup screen allows you to select your internet type and set a security code. You can
also display system default configuration.
From the pop-up menu, tap the
The Network Setup screen displays:
following icons as they appear
on the screens:
ÎÎ
Internet Setup
1. Tap Internet Setup icon to display the Internet Setup screen.
19
Page 20

2. Tap on your selection and fill in the fields requested. Tap OK.
Selection Fields
Static IM - IP Address
- Subnet Mask
- Default Gateway
- DNS Server
DHCP None
PPPOE - User Name
- Password
3. Tap OK on the system reboot screen. The Network Setup screen displays.
Security Code
1. Tap Security Code icon to display the Security Code screen.
2. If you have not entered a security code, you can enter it here. If you have previously entered a
security code, your current security code displays. Tap on the Change Code field. A keyboard
screen displays.
20
Page 21

3. Enter your security code. You can switch the keyboard from alphabetical characters to numbers/
symbols and back by tapping the field to the left of the space bar. Tap Return. The Security Code
screen displays again.
4. Repeat your security code to confirm it. Tap Return again.
5. Tap OK on the system reboot screen. The Network Setup screen displays.
Network Information Screen
1. Tap the Network Information icon to display the Network Information screen.
2. Tap the BACK arrow to return to the previous screen.
Alarm Setup Screen
From the Alarm Setup screen, you can:
ʇ Set the length of time the siren sounds
ʇ Change the alarm volume
ʇ Select a melody for the siren
What’s the difference between an alarm and a siren?
21
Page 22

Period Screen
This selection allows you to select the length of time the siren will sound.
1. Tap Period. The Set Siren Duration screen displays.
2. Tap the duration you want the siren to last (2, 10, or 30 seconds) or tap None to turn sirens off.
3. Tap the BACK arrow to return to the previous screen.
22
Page 23

Volume
1. Tap Volume. The Set Siren Volume screen displays.
2. Tap + or - to increase or decrease the siren volume.
3. Tap the BACK arrow to return to the previous screen.
Melody
This selection allows you to select a melody for the siren.
How do you hear samples of the melody?
1. Tap Melody. The Change Siren Melody screen displays.
23
Page 24

2. A check mark appears on the melody you tap.
3. Tap the BACK arrow to return to the previous screen.
System Setup Screen
Power Saving
When you turn on Power Saving mode, the monitor goes into sleep mode after it is idle for 30
seconds. Press Power once to reactive the monitor. The default is OFF.
1. Tap Power Saving. The Activate Power Saving mode screen displays.
24
Page 25

2. A check mark appears on your selection.
3. Tap the BACK arrow to return to the previous screen.
Screen Auto Lock
When you turn on Auto Lock mode, the monitor ???????. .
What is auto lock again? And why doesn’t the following screen say Screen Auto Lock? It’s too
wordy.
1. Tap Screen Auto Lock. The Activate Touch Screen Operation screen displays.
25
Page 26

2. Tap your selection; a check mark displays.
3. Tap the BACK arrow to return to the previous screen.
Time
The Time screen lets you set up clock alarms, set the time, and set a timer.
From the pop-up menu, tap the
following icons as they appear
on the screens:
The following screen displays:
Clock Alarm
1. Tap
ÎÎ
Î
to display the Clock Alarm screen.
2. Tap on an alarm button.
26
Page 27

3. Tap on the hour block. The UP/DOWN arrows move to the hour block. Set the hour.
If there is a clock alarm already set for that alarm button, it will reset to 08:00 AM.
4. Tap on the minute block. The UP/DOWN arrows move to the minute block. Set the minute.
5. Tap on AM/PM to toggle between the two.
6. Tap SAVE when you are finished.
Time Setting
This screen contains fields to set the Month, Day, Year, Hour, Minute, and AM/PM.
1. Tap
to display the Time Setting screen.
2. Tap on each field to set it. The UP/DOWN arrows shift to that field. Use UP/DOWN to set the
field.
3. Tap on the AM/PM block to switch between the two.
4. Tap SAVE when you are finished.
27
Page 28

Timer
1. Tap
to display the Time Setting screen.
2. Tap on each field to set it. The UP/DOWN arrows shift to that field. Use UP/DOWN to set the
field.
3. Tap START to begin the timer. When the timer reaches 00:00, an alarm beeps until you tap OK.
Format Storage
From the pop-up menu, tap the
following icons as they appear
on the screens:
The Reformat Storage screen displays:
Save to SD
To be done
28
ÎÎ
Î
Page 29

System Upgrade
From the pop-up menu, tap the
This screen should display:
following icons as they appear
on the screens:
ÎÎ
Î
Default
Changing the Language
English is the default language. When you change languages, all system settings default to the
original factory settings. You will have to reenter any specialized setting you have made.
From the pop up menus, tap
This screen should display:
the following icons as they
appear on the screens:
ÎÎ
Î
1. Tap a language to reboot to that language. The Restore Default Settings screen displays:
2. Tap OK to continue with the language reset. If you do not want to continue, tap CANCEL and
return to theprecious page. The system will reboot in about 5 seconds.
29
Page 30

Quick Tips
Other Stu
Recording Live Video
Tap
recording.
Changing How the Screen Displays
If you are in Quad view, tap on one camera image. The screen displays that camera in Full Screen
view.
If you are in Full Screen view, tap on the screen to change back to Quad view.
once on the LIVE screen. The icon flashes while the camera records. Tap it again to stop
30
Page 31

Using Your System
Playing Back Recorded Video
From the pop-up menus, tap
The Record List screen displays.
the following icons as they
appear on the screens:
ÎÎ
1. Tap on the highlighted day containing the recording you want to view. The Record List screen
displays that day’s recordings listed in a folder.
If you tap on a day that is not highlighted, a folder displays with no recordings listed.
2. Tap on the recording you want to view. It displays on the screen.
3. Tap on any area of the screen that does not have control icons to bring up the playback
progress bar. Tap that area again to close it.
What happens when the recording ends? Does it go back to the listing of recordings? The Record
List screen?
Adding New Cameras
Your receiver supports a total of four active cameras at a time.
When you add a camera, you have to pair it to the receiver (that is, you have “introduce” the camera
and receiver so they can communicate).
31
Page 32

Some things to know about pairing cameras:
ʇ If a camera is already assigned to the selected channel, the receiver overwrites that camera link
with the new one.
ʇ Only pair one camera at a time! The receiver links to the first camera it detects. If two or more
cameras are in pairing mode, you can't control which camera the receiver will detect first.
ʇ If you have trouble pairing a new camera, refer to the manual that came with the camera or the
receivers.
Pair Camera
1. Tap the camera image you want to pair. A processing icon displays.
2. Press and release the Pairing button on that camera’s power cord. A check mark appears on the
receiver for that camera when pairing completes.
3. If you have any trouble, consult the following table:
If... Try...
- making sure the camera is plugged in
the camera’s signal status
icon shows no bars
and the red LED is on.
- making sure the camera is paired to the
correct channel
- re-pairing the camera and receiver
32
the camera’s signal status
icon shows one or two bars
or the video quality is poor
the camera won’t pair with
the receiver
See page ____ for tips on improving video
quality.
- making sure the camera is plugged in
and the red LED is on.
- pressing and releasing the pairing button
quickly. Do not press and hold the pairing
button.
Page 33

Managing Your Files
How do you connect the monitor to the computer? What are the things you can do with it? I have
NOTHING AT ALL on this.
Setting your recordings to delete
Does the system automatically delete recordings after a set time period? Can you set the time
frame for deletion? How DO you delete Recordings?
33
Page 34

How to clean the receiver
How to clean the cameras
Maintaining Your System
34
Page 35

Solving Problems
If you have any trouble with your system, try these simple steps. If you are still having a problem
with your camera, check the manual that came with your camera. If you still have a question, call
our Customer Care Line listed on the front cover.
If… Try..
The motion sensor won’t
respond to movement.
The motion sensor goes off
when there’s nothing there.
I can’t play my video clips
in another program
The image on my monitor
is frozen.
The software keeps
shutting down.
I schedule a recording,
save the schedule, and the
recording does not happen
at the scheduled time.
The camera’s signal status
icon shows no bars
The camera’s signal status
icon shows one or two bars
or the video quality is poor
- Increasing the sensitivity of the motion sensor (see page 20).
- Checking the settings on the Record screen (see page 18).
- Decreasing the sensitivity of the motion sensor (see page 20).
- You may not have the necessary video codec (XVID) installed. The
codec is available on the installation CD as
you can visit the official Xvid website at http://www.xvid.org.
- Seeing if your computer went into power saving or standby mode.
- Seeing if some other program is using all of your system resources.
- The software isn’t registered or the registration key may have been
corrupted. Re-register the software (see page 5).
- making sure the camera is plugged in and the red LED is on.
- making sure the camera is paired to the correct channel
- re-pairing the camera and receiver
See page ____ for tips on improving video quality.
video decoder.exe
, or
35
Page 36

If… Try..
The camera won’t pair with
the receiver
When I power up my
receiver and cameras for
the first time, they seem
to be on but there is no
picture on the screen
I have my regular LIVE
screen but there are no
icons.
- making sure the camera is plugged in and the red LED is on.
- pressing and releasing the pairing button quickly. Do not press and
hold the pairing button.
- tapping the Power button on top of the receiver. Screen lock may be
on and tapping the Power button will unlock the screen.
- tapping the Power button on top of the receiver. Screen lock may be
on and tapping the Power button will unlock the screen.
36
Page 37

LEGALITIES
37
Page 38

38
Page 39

FCC NOTE:
This equipment has been tested and found to comply with the limits for a Class B digital device,
pursuant to Part 15 of the FCC Rules. These limits are designed to provide reasonable protection
against harmful interference in a residential installation. This equipment generates, uses and can
radiate radio frequency energy and, if not installed and used in accordance with the instructions,
may cause harmful interference to radio communications. However, there is no guarantee that
interference will not occur in a particular installation. If this equipment does cause harmful interference
to radio or television reception, which can be determined by turning the equipment o and on, the user
is encouraged to try to correct the interference by one or more of the following measures:
-- Reorient or relocate the receiving antenna
-- Increase the separation between the equipment and receiver.
-- Connect the equipment into an outlet on a circuit dierent from that to which the receiver is connected.
-- Consult the dealer or an experienced radio/TV technician for help.
This device complies with Part 15 of the FCC Rules. Operation is subject to the following two
conditions: (1) this device may not cause harmful interference, and (2) this device must accept any
interference received, including interference that may cause undesired operation.
The manufacturer is not responsible for any radio or TV interference caused by unauthorized
modications to this equipment. Such modications could void the user's authority to operate
the equipm
ent.
IC NOTE:
This device complies with Industry Canada licence-exempt RSS standard(s). Operation is subject
to the following two conditions: (1) this device may not cause interference, and (2) this device must
accept any interference, including interference that may cause undesired operation of the device.
Under Industry Canada regulations, this radio transmitter may only operate using an antenna of
a type and maximum (or lesser) gain approved for the transmitter by Industry Canada. To reduce
potential radio interference to other users, the antenna type and its gain should be so chosen that
the equivalent isotropically radiated power (e.i.r.p.) is not more than that necessary for successful
communication.
39
 Loading...