

Page 1
PRC50 Pulser-Receiver Card
Operator Manual
VERSION 1.1.1
Copyright 2006. All Rights Reserved
000003100007
Page 2

PRC50 Pulser-Receiver Card
Table of Contents
PRC50 PULSER-RECEIVER CARD
TABLE OF CONTENTS........................................................................................................................ 2
SAFETY AND TECHNICAL SUPPORT INFORMATION ...................................................................... 4
Safety .........................................................................................................................................................................4
Technical Support ....................................................................................................................................................4
WARRANTY AGREEMENT.................................................................................................................. 5
Instrument Limited Warranty................................................................................................................................5
Software Limited Warranty....................................................................................................................................5
Application Disclaimer.............................................................................................................................................5
GENERAL DESCRIPTION.................................................................................................................... 6
Description................................................................................................................................................................6
PRC50 System Blocks and Their Functions...........................................................................................................7
JSR Control Panel...................................................................................................................................................8
Control Logic and PCI Interface ............................................................................................................................8
High Voltage Power Supply...................................................................................................................................8
Pulser/ Energy/Damping ........................................................................................................................................8
Receiver Amplifier.................................................................................................................................................8
Low Pass Filters .....................................................................................................................................................8
High Pass Filters.....................................................................................................................................................8
................................................................................................ 1
PRC50 RECEIVER BLOCK DIAGRAM ................................................................................................ 9
INDICATORS AND CONNECTORS.................................................................................................... 10
Output Connector.................................................................................................................................................10
Through Connector...............................................................................................................................................10
T/R Connector......................................................................................................................................................10
Trig/Sync Connector ............................................................................................................................................11
Pulse Indicator (Pulse)..........................................................................................................................................11
INSTRUMENT SETUP ........................................................................................................................ 12
System Components...............................................................................................................................................12
Host Computer Requirements...............................................................................................................................12
Ventilation...............................................................................................................................................................12
Page 2
JSR Ultrasonics, A Division of Imaginant
Page 3

PRC50 Pulser-Receiver Card
PRC50 Installation.................................................................................................................................................12
To install the PRC50:...........................................................................................................................................12
Installing the JSR Control Panel software and PRC50 card.................................................................................12
Additional Instructions for Windows XP Users...................................................................................................13
OPERATION....................................................................................................................................... 14
T/R Mode Operation..............................................................................................................................................14
Through Transmission Mode Operation..............................................................................................................15
Simultaneous T/R and Through (Both) Mode Operation...................................................................................16
Operating the PRC50.............................................................................................................................................17
JSR CONTROL PANEL...................................................................................................................... 18
PROGRAM CONTROL OF THE PRC50............................................................................................. 19
PRC50 Program Control Overview......................................................................................................................19
Programmers Reference Manual..........................................................................................................................19
Properties Reference Manual ...............................................................................................................................19
PRC50 DEFAULT VALUES................................................................................................................ 20
PRC50 SIGNAL AND CONTROL CABLES........................................................................................ 21
CBL-150 Transducer Cable..................................................................................................................................21
CBL-400 Trigger/Output Cable ...........................................................................................................................21
APPENDIX A
PRC50 SPECIFICATIONS.................................................................................................................. 22
Pulser.......................................................................................................................................................................22
Receiver...................................................................................................................................................................23
PC or Compatible Control Computer..................................................................................................................23
Environmental Operating Conditions..................................................................................................................23
Miscellaneous..........................................................................................................................................................23
............................................................................................................................. 22
Page 3
JSR Ultrasonics, A Division of Imaginant
Page 4

PRC50 Pulser-Receiver Card
Safety and Technical Support Information
Safety
There are no user serviceable parts in the PRC50. PRC50 units should be
returned to the manufacturer for any repair.
If the PRC50 is not used as prescribed by the manufacturer, the overall safety
may be impaired.
Disconnect electric power from the PC before installation or removal of the card.
SHOCK HAZARD – Do not touch the circuitry of the PCI card while the unit is
running.
Technical Support
The answers to most questions regarding the use of the equipment are contained in this manual. Please use this as
your first source of information. If you cannot find an answer in this manual, please contact technical support at
Imaginant.
Imaginant Inc.
3800 Monroe Ave.
Pittsford, NY 14534
Voice: +1 585 264 0480
Fax: +1 585 264 9642
E-mail: techsupport@jsrultrasonics.com or techsupport@imaginant.com
Please have the following information available before contacting Technical Support:
Model number (i.e.: PRC50) and Serial Number (i.e.: MB0101)
Specific nature of the problem
Technical support is available Monday through Friday from 8:00AM to 5:00PM EST.
Page 4
JSR Ultrasonics, A Division of Imaginant
Page 5

PRC50 Pulser-Receiver Card
Warranty Agreement
Instrument Limited Warranty
Imaginant Inc. warrants that its instruments will be free from defects in materials and workmanship for a
period of one (1) year from the date of purchase. Imaginant will, at its option, repair or replace any of its
products that prove to be defective during the warranty period without charge for parts and labor.
To obtain service under this warranty, the Customer must obtain a Return Material Authorization (RMA)
number from Imaginant before shipping the product to Imaginant with the shipping charges prepaid. The
Customer is responsible for packaging the product, preferably in the original packaging materials.
This warranty does not apply to any defect, failure, or damage caused by improper usage, handling, care,
or tampering. Neither will this warranty apply to any equipment damaged from attempts by personnel
other than Imaginant to repair or modify the product.
Imaginant disclaims any warranty, either express or implied, as to the applicability or fitness of its
hardware or software for a particular purpose or application. Imaginant will not be liable for any indirect,
incidental, or consequential damages related to the use of its’ products irrespective of whether Imaginant
received any advance notice of the possibility of such damages.
Software Limited Warranty
Imaginant Inc. warrants for a period of 120 days from the date of delivery, that its instrument software will
perform under normal usage and without unauthorized modification substantially in accordance with the
specifications published in the documentation and those set forth in Imaginant advertising material; that,
under normal use, the media upon which this program is recorded is not defective; and that the user
documentation is substantially complete and contains the information Imaginant deems necessary for
using its software.
Imaginant disclaims any warranty, either express or implied, as to the applicability or fitness of its
software for a particular purpose or application. Imaginant will not be liable for any indirect, incidental, or
consequential damages related to the use of its products irrespective of whether Imaginant received any
advance notice of the possibility of such damages.
Application Disclaimer
This product is not intended or designed for use in medical or other devices or systems where
malfunction of this product can reasonably be expected to result in personal injury. Imaginant customers
using or selling this product for use in such applications do so at their own risk and agree to fully
indemnify Imaginant against any damages resulting from such improper use or sale.
Page 5
JSR Ultrasonics, A Division of Imaginant
Page 6

PRC50 Pulser-Receiver Card
Description
The PRC50 Pulser-Receiver Card is a versatile single-channel ultrasonic pulser-receiver on a half-length
PCI card for use in a host computer. All card functions and configurations are under the control of the
host computer. A Windows-based turnkey control software program is provided to enable you to control
the PRC50. Alternatively, programming information supplied in this manual and in the included Software
Developers Kit (SDK) and Programmer’s Manual allows you to develop custom software programs for
controlling the PRC50.
In a typical application, the PRC50 produces a high voltage electrical excitation pulse, which is available
on the card’s T/R connector. Seven discrete pulse energy levels and a variable power supply are
available for adjusting the strength of this excitation pulse to the transducer. An ultrasonic transducer is
connected to the T/R connector via a length of 50Ω coaxial cable, and the transducer converts energy
from the electrical excitation pulse into an ultrasonic pulse that is propagated into a test material or
medium. Eight discrete damping levels in the PRC50 allow the transducer response to be fine-tuned.
With the PCR50 configured for Transmit/Receive mode of operation, any acoustic echoes reflected from
interfaces or from defects within the test material are converted by the transducer into an electrical signal
to be processed by the PRC50 receiver. This electrical signal passes through a user-adjustable gain
stage and the amplified signal then passes through adjustable high and low pass filters. After filtering, the
processed signal is available at the Output connector. The use of a second receiving transducer enables
the detection of ultrasonic pulses that propagate through the test material or medium. This second
transducer is connected to the PRC50 receiver using the THROUGH connector on the card, and the
received signal is processed as it is for transmit/receive mode operation.
The wide-bandwidth low-noise PRC50 receiver has inputs for T/R (Transmit/Receive) and Through
transducer signals. The receiver can amplify either input signal while maintaining excellent isolation from
the other signal. In addition, the PRC50 receiver can independently amplify both input signals, and output
the sum of the amplified signals. Following amplification, the receiver output signal passes through
selectable High-Pass and Low-Pass filters. The output signal is then provided on the PRC50 Output
connector.
The PRC50 is ideal for use in PC-based ultrasonic testing and inspection systems, and its small size and
low power consumption enable systems to be implemented using portable computers. Power to operate
the card is drawn from the host PC. The PRC50 can be combined with A/D Boards or other signal
detection and processing instrumentation, which gives system integrators the flexibility to optimize system
cost and performance. Connections are easily made between the PRC50 and other hardware using 50W
coaxial cables. The four interface connectors on the PRC50 are SMA female coaxial connectors. The
PRC50 Pulser synchronizes easily to other system hardware by producing or accepting trigger pulses on
the PRC50 Trig/Sync connector.
The full-featured PRC50 is an excellent choice for PC-based ultrasonic system applications including flaw
detection, quality assurance, material characterization, transducer testing, and time of flight
measurements.
General Description
Page 6
JSR Ultrasonics, A Division of Imaginant
Page 7
PRC50 Pulser-Receiver Card
Theory of Operation
PRC50 System Blocks and Their Functions
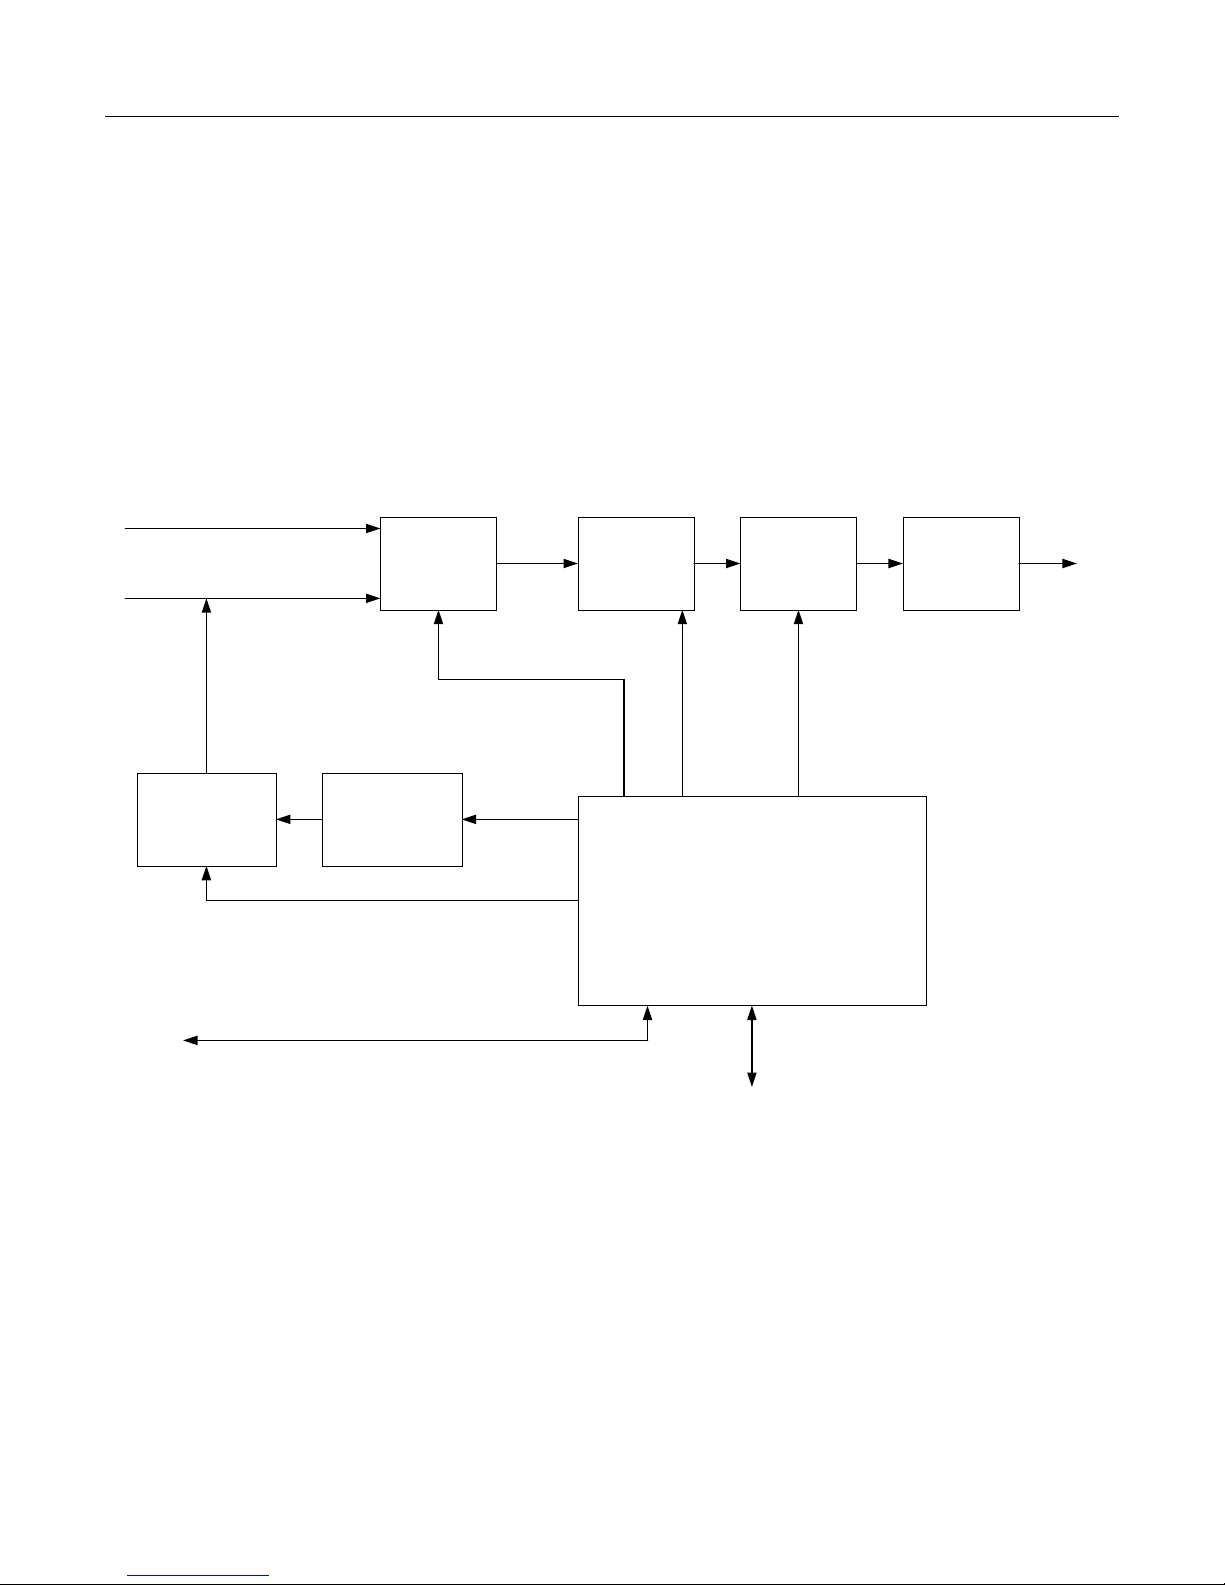
The PRC50 Pulser-Receiver Card is composed of the functional blocks shown in the figure below. These
are the Control Logic and PCI interface, High Voltage Power supply, Pulser, Receiver Amplifier,
Receiver Low Pass Filters, and Receiver High Pass Filters. JSR Instrument Control Panel software
resides in the host computer and controls the instrument via the PCI interface.
PRC50 System Block Diagram
Through
T/R
Receiver
Amplifier
Low Pass
Filters
High Pass
Filters
Output
Receiver Out
Pulser
(Energy & Damping )
Trig/Sync
High Voltage
Power Supply
Control Logic
PCI Bus
Copyright Imaginant 2006
Page 7
JSR Ultrasonics, A Division of Imaginant
Page 8

PRC50 Pulser-Receiver Card
JSR Control Panel
This software enables a user to remotely control the PRC50 from a host computer. In addition to
the JSR Control Panel program provided with the PRC50, SDK information is provided in this
manual for users that wish to develop custom instrument control programs.
Control Logic and PCI Interface
The interface and control logic enables the control of the PRC50 from software running on the
host computer. Communication is via the PCI bus within the host computer.
High Voltage Power Supply
The high voltage supply provides power to the pulser. The PRC50 pulser produces constant pulse
amplitude regardless of the pulse repetition rate or other instrument parameters within the
specified range of PRC50 operation. The JSR Control Panel software and SDK software provide
“power limit status” indications that warn the user when the PRC50 Pulser may be operating
outside of the normal range of operation.
Pulser/ Energy/Damping
The pulser generates a transducer excitation pulse upon receipt of a trigger event from a selected
source. The Pulser Energy, Voltage and Damping controls control pulser parameters such as
pulse duration, energy and peak amplitude. There are seven energy and eight damping
impedance values provided by the PRC50. The Voltage Control is adjustable in 1V steps from
100 to 475 Volts.
Receiver Amplifier
Controls the amplification of signals presented to the PRC50 receiver. The receiver gain can be
varied from -14 dB to +60 dB. The PRC50 Receiver has an input impedance of 128Ω.
Low Pass Filters
This filter is available for reducing the bandwidth of the PRC50 receiver. High frequency
bandwidth limiting can be used to improve the signal to noise ratio for applications that do not
require the full receiver bandwidth. Four user selectable low pass filter values are available.
High Pass Filters
This filter is available for eliminating undesirable low frequency energy from the PRC50 receiver
signal. High pass filtering can be used as a means of providing faster receiver recovery from
strong signals such as the excitation pulse or strong interface echoes. Four user selectable high
pass filter values are available.
Page 8
JSR Ultrasonics, A Division of Imaginant
Page 9

PRC50 Pulser-Receiver Card
PRC50 Receiver Block Diagram
Pulser and
Damping
Circuit
T/R
T/R VGA
128 Ohms
Output
Through
128 Ohms
T/R Gain
Control
Through
VGA
Through Gain
Control
T/R
Enable
Through
Enable
Sum
Low
+
Pass
Filter
High
Pass
FIlter
Buffer
The PRC50 allows independent gain control of the T/R and Through receiver signal paths. Setting the
JSR Control Panel software to “T/R” mode enables the T/R signal path and allows the user to perform
Transmit/Receive measurements. Selecting “Through” mode enables the Through signal path and allows
the user to perform Through measurements. Selecting “Both” mode enables both the T/R and Through
signal paths so that simultaneous Transmit/Receive and Through measurements can be made.
Page 9
JSR Ultrasonics, A Division of Imaginant
Page 10

PRC50 Pulser-Receiver Card
Indicators and Connectors
In this section, the PRC50 Pulser-Receiver card indicators and connectors are described. The diagram below
shows the positions of the connectors on the PRC50 end bracket.
PRC50 End Bracket Indicator and Connectors
Output Connector
The PRC50 receiver output signal is present on this SMA connector. The PRC50 can provide an output
signal of up to ± 1V into a 50Ω load. This output signal should be terminated with a 50Ω load to prevent
reflections in any coaxial cable connected to this connector.
Through Connector
A receiving transducer is connected to this SMA connector during Through and Both mode operation.
T/R Connector
The transmit/receive transducer is connected to this SMA connector during T/R mode operation. A
transmitting transducer is connected to this connector during Through mode operation.
Page 10
JSR Ultrasonics, A Division of Imaginant
Page 11

PRC50 Pulser-Receiver Card
Trig/Sync Connector
This connector provides a positive polarity sync pulse signal that can be used to trigger an oscilloscope or
other signal monitoring/recording instrument when the PRC50 internal oscillator is used to trigger the
pulser. In this mode, the signal line should be terminated with a 50Ω load.
If the PRC50 pulser is set to external trigger mode, then the Trig/Sync connector is used for receiving a
3V to 5V external trigger pulse. Software controls select whether the Pulser will trigger on the rising
edge or falling edge of the trigger pulse.
When triggering the PRC50 pulser from an external source or under software control, it is important to
ensure that the average pulse repetition frequency does not exceed the 5 kHz maximum PRF rate.
Pulse Indicator (Pulse)
This red LED illuminates whenever the pulser is firing. This indicator may be cycled to create a blinking
indicator. The Pulse Indicator is located on the PRC50 card below the Trig/Sync connector.
Page 11
JSR Ultrasonics, A Division of Imaginant
Page 12

PRC50 Pulser-Receiver Card
Instrument Setup
System Components
The following items should be present in your shipment:
•
PRC50 Pulser-Receiver Card
•
CD containing JSR Instrument Control Panel software, PRC50 Instruction Manual and the JSR
Common API Software Development Kit.
•
Quick Start Guide
Host Computer Requirements
A Personal Computer or compatible computer running Windows 2000 or XP with an available PCI slot is
required as Host for the PRC50.
Ventilation
To maintain adequate instrument cooling, the host computer should allow convection driven airflow or
should possess a cooling fan.
PRC50 Installation
Do not install the PRC50 card until the JSR Instrument Control Panel software is installed. Note that
Administrator privileges are required to install this software. It is recommended that only qualified
personnel install the PRC50 card into the host computer.
To install the PRC50:
You will need the following:
•
PC running Windows 2000 or Windows XP with an available PCI slot.
•
Philips (Cross-point) Screwdriver suitable for the screws in your PC case.
Installing the JSR Control Panel software and PRC50 card
1. Close all open Windows 2000 or Windows XP applications.
2. Insert the JSR Control Panel software CD and follow the on-screen instructions.
a. In the event that the setup program does not run automatically, the program can be run
from Windows Explorer by browsing the CD-ROM contents and double-clicking the file
‘JSR Control Panel Installer_3.1.10.EXE, or from the Start menu by selecting Start>Run->Browse and then browse the CD-ROM contents, selecting the file ‘JSR Control
Panel Installer_3.1.10.EXE.
3. Remove the JSR Control Panel software CD.
4. Disconnect the PC’s power and remove the PC case cover.
Page 12
JSR Ultrasonics, A Division of Imaginant
Page 13

PRC50 Pulser-Receiver Card
‘Next’ to continue on.
5. Important: To avoid electrostatic damage, wear a grounding strap or ground yourself by touching
the computer’s framework before you install any components or touch any parts inside the
computer.
6. With the PC case cover removed, locate an empty PCI slot on the motherboard.
7. Remove the ‘blank’ slot cover from the back of the case by removing the screw that holds the
cover in place.
8. Align the PRC50 with the slot and gently push the card into the connector on the computer
motherboard.
9. Once the PRC50 is seated firmly in place, replace and tighten the fixing screw.
10. Check to make sure no other PCI boards have been loosened during PRC50 installation, and that
no other boards are in contact with the PRC50 card.
11. Replace the PC case cover.
12. Reconnect power and restart the PC.
Additional Instructions for Windows XP Users
After restarting the PC with the PRC50 installed, it is possible that ‘Found New Hardware Wizard’ setup
screens may appear similar to those shown below.
Click “Finish” to complete the “Found New Hardware Wizard” application.
If the screen shown at left appears click on the ‘No,
not this time’ button and then click ‘Next’ to
continue forward.
If the screen below appears, click on the ‘Install the
Software automatically’ button and then click
At this point, the PRC50 installation is
complete.
Page 13
JSR Ultrasonics, A Division of Imaginant
Page 14

PRC50 Pulser-Receiver Card
T/R Mode Operation
In the T/R mode of operation, a single transducer is used for both pulse transmission and echo receiving.
Ultrasonic energy is echoed back from the test object and changes in time between echoes are taken as
indications of variations in material continuity.
To configure the PRC50 for T/R operation, the transmit/receive transducer is connected to the SMA
connector labeled T/R, typically via a 50Ω coaxial cable.
The PRC50 T/R mode configuration is shown in the following figure.
Operation
T/R Mode Operation
Page 14
JSR Ultrasonics, A Division of Imaginant
Page 15

PRC50 Pulser-Receiver Card
Through Transmission Mode Operation
For Through transmission mode operation, separate transmitting and receiving transducers are employed.
The transmitting transducer is connected to the PRC50 T/R SMA connector and the receiving transducer
is connected to the THROUGH SMA connector.
The PRC50 Through transmission mode configuration is shown below.
Through Transmission Mode Operation
Page 15
JSR Ultrasonics, A Division of Imaginant
Page 16

PRC50 Pulser-Receiver Card
Simultaneous T/R and Through (Both) Mode Operation
For simultaneous T/R and Through (Both) mode operation, both transmitting and receiving transducers
are employed.
The transmitting transducer is connected to the PRC50 T/R SMA connector and the receiving transducer
is connected to the THROUGH SMA connector.
The PRC50 ‘Both’ mode configuration is shown below.
‘Both’ Mode Operation
Page 16
JSR Ultrasonics, A Division of Imaginant
Page 17

PRC50 Pulser-Receiver Card
Operating the PRC50
The following steps describe an operating session with the PRC50.
1. Using 50Ω SMA to Microdot cables, connect a transducer to the PRC50 T/R connector, or
connect two transducers to the PRC50 Through and T/R connectors.
2. Using a 50Ω SMA to BNC cable, connect the PRC50 card SMA connector labeled ‘Output’ to an
oscilloscope or waveform digitizing instrument. The oscilloscope or digitizer should have a 50Ω
input impedance. If the instrument has a high input impedance value, a shunt 50Ω terminator
should be used at the input of the instrument.
3. Double click on the JSR Control Panel icon to launch the software. Once launched, it will appear
as shown below.
4. Set the Receiver Signal Select to “T/R”, “Through” or “Both” as desired.
5. Set the Pulser Enable to “Enabled”.
6. Set the Trigger Source to ‘Internal’ or ‘External’ as applicable.
• Set the Trigger Source to Internal if the PRC50 pulser is to be triggered by the PRF timing
source. In addition, connect the PRC50 Trig/Sync connector to the external trigger input of
the monitoring oscilloscope or waveform digitizer using a 50Ω SMA to BNC cable.
• Set the Trigger Source to ‘External’ if the PRC50 pulser is to be triggered from an external
source such as a waveform digitizer. The PRC50 Trig/sync connector and the external trigger
input of the oscilloscope or digitizer should be connected to the source of the external trigger
signal with one instrument set to high impedance and the other having a 50Ω input
impedance. For convenience, the PRC50 Trig/Sync connector terminating impedance is
selectable between 50Ω and 10kΩ. The instruments should be connected in the following
sequence using 50Ω coaxial cable: Trigger Signal source High Input Impedance
Instrument 50Ω Input Impedance Instrument.
7. The red LED located below the Trig/Sync connector will illuminate to indicate that the pulser is
firing.
8. Adjust the Gain control to obtain a signal level no greater than ± 1 Volts
into 50Ω at the Output
p-p
connector.
9. Adjust the High-Pass and Low-Pass Filter cutoff frequencies as desired.
Note: When you exit the JSR Control Panel application, the PRC50 will continue operating. If you do not
wish the PRC50 to continue functioning, go to the Enable drop down menu and click ‘Disabled’ before
exiting the JSR Control Panel.
Page 17
JSR Ultrasonics, A Division of Imaginant
Page 18

PRC50 Pulser-Receiver Card
Please refer to the JSR Control Panel Operator Manual as found on the software CD that is
included with the PRC50.
This Windows-based control program should be installed on a PC running either the Windows 2000 or
the Windows XP operating systems.
The JSR Control Panel offers an easy-to-use interface to the PRC50 Pulser-Receiver Card.
The following Receiver related adjustments could be made using the JSR Control Panel:
1. Selection T/R, Through or “Both” receiver modes
2. Independent T/R and Through Signal Path Gains
3. Selection of four (4) Low Pass Filter values
4. Selection of four (4) High Pass Filter values
The following Pulser adjustments can be made using the JSR Control Panel:
1. Pulser Enable / Disable
2. Pulser Trigger Source select
3. PRF (Pulse Repetition Frequency value
4. Pulser Voltage
5. Energy Control
6. Damping
7. Pulse Indicator
8. Ext. Trigger Input Impedance (Rin)
9. External Trigger Edge, Rising or Falling
JSR Control Panel
Page 18
JSR Ultrasonics, A Division of Imaginant
Page 19

PRC50 Pulser-Receiver Card
Program Control of the PRC50
This section describes the PRC50 communications interface and the various commands used to configure and
control the instrument.
PRC50 Program Control Overview
Communication between the control computer and PRC50 is via the PCI interface.
For users who wish to create a Windows application to control the PRC50 a Software Developers Kit is
included with the PRC50. Application software will use C or C++ calls to a provided DLL that will
function with several JSR products. The DLL can also simulate a PRC50 to allow application
development without requiring the PRC50 card to be installed in the host computer.
There are two reference manuals found on the CD included with the PRC50. These manuals, described
below, are included with the JSR Common API Library Software Development Kit.
Programmers Reference Manual
This manual is intended as a reference for persons designing and writing a Windows Application
that interfaces with the JSR Common API Library in order to control one or more JSR PulserReceiver instruments, such as the PRC50.
Properties Reference Manual
This document is a list of Property ID’s in the JSR Common API Library (JSR Library). It
describes values, settings, data types, and other relevant info, and provides notes on their usage.
This document is designed to be a reference to the Properties only; it is not a complete overview
of the JSR Library.
The JSR Common API Library is based on the ‘Objects with Properties’ interface model, which
is explained in detail in Programmers Reference Manual.
For further programming details, please refer to these manuals.
Page 19
JSR Ultrasonics, A Division of Imaginant
Page 20

PRC50 Pulser-Receiver Card
Upon power-up the very first time the PRC50 defaults to the following values:
PRC50 Attribute Default
Receiver Bandwidth 50 MHz
Low Pass Filter 50 MHz
High Pass Filter 0.3 MHz
Receiver Mode T/R
Trigger Enable Disabled
Trigger Source Internal
Energy Control 330 pf
Pulse Indicator Activity
External Trigger Rin
It is important to note that the JSR Control Panel application always saves your most recent settings.
When the PRC50 is restarted all of your saved control values except for Trigger Enable will be restored.
Trigger Enable will always initialize to “Disabled”.
PRC50 Default Values
T/R Gain -14dB
Through Gain -14dB
PRF 100 Hz
Voltage 200V
Damping
Trigger Edge Rising
50Ω
50Ω
Page 20
JSR Ultrasonics, A Division of Imaginant
Page 21

PRC50 Pulser-Receiver Card
PRC50 Signal and Control Cables
In order to ensure solid connections and to minimize noise pickup, it is recommended that high quality coaxial
cables and connectors be used.
To connect the PRC50 card to a transducer (via T/R) or to multiple transducers (via T/R and THROUGH) the
following cable is recommended:
CBL-150 Transducer Cable
This cable is 1.22 meters (4’) long and is manufactured using RG174/U Coaxial Cable with an
SMA Coax connector on one end and a Microdot Coaxial connector on the opposing end.
SMA Connector Microdot Connector
To connect the PRC50 card to an oscilloscope or waveform digitizer (OUTPUT and/or TRIG/SYNC) or Signal
Generator (TRIG/SYNC) the following cable is recommended:
CBL-400 Trigger/Output Cable
This cable is 1.22 meters (4’) long and is manufactured using RG174/U Coaxial Cable with a
BNC Coax connector on one end and an SMA Coax connector on the opposing end.
BNC Connector SMA Connector
The CBL-150 and CBL-400 cables can be ordered directly by contacting JSR Ultrasonics at
sales@jsrultrasonics.com or by calling +1 585 264-0480. Contact JSR for quotes on special lengths or
customized cables.
Page 21
JSR Ultrasonics, A Division of Imaginant
Page 22

PRC50 Pulser-Receiver Card
Appendix A
PRC50 Specifications
Pulser
Pulse Type Negative spike pulse on T/R Connector
Pulser Supply Voltage Adjustable 100V to 475V
Initial Transition 6ns typical (10-90% Fall Time).
Pulse Amplitude -180V into 50Ω typical. Amplitude varies with Energy and Damping control settings,
and load impedance.
Pulse Duration 25 – 150ns FWHM typical with 50Ω external load. Pulse duration varies with the
Energy and Damping control settings.
Damping Eight discrete damping values; 28, 31, 36, 42, 50, 63, 85 and 128Ω.
Internal Triggering 100 Hz – 5 kHz trigger rate.
Synchronization pulse appears on Trig/Sync Connector.
Sync Pulse +5Vmax into 50Ω load, 20ns max risetime, 200ns width typical. Rising
edge of sync pulse is synchronous with the initial pulse transition on T/R connector.
External Triggering 0 Hz – 5 kHz trigger rate.
Trigger Pulse applied to Trig/Sync Connector
Trig/Sync input impedance is selectable as either 50Ω or 10kΩ
Triggering may be selected to occur on either the rising or falling edge of the trigger
pulse.
Page 22
JSR Ultrasonics, A Division of Imaginant
Page 23

PRC50 Pulser-Receiver Card
Receiver
Gain -14 to +60 dB noninverting.
Input Modes T/R, Through or ‘Both’ Receiver Modes.
Through Trans. 60 dB typical between Through and T/R receiver paths at 10 MHz.
Isolation
Input Impedance Through Input Connector: 128Ω
T/R Input Connector: Impedance varies with Damping Value.
Bandwidth 0.3 MHz to 50 MHz minimum (-3 dB).
High Pass Filter 0.3, 1.0, 5.0 or 12.5 MHz.
Low Pass Filter 7.5, 15, 25 or 50 MHz.
Noise Typically 145µV
input referred (measured at 60 dB gain, 50 MHz –3 dB BW)
p-p
Output Impedance 50Ω
Output Voltage Swing ± 1V into 50Ω load
PC or Compatible Control Computer
Interface PCI bus.
Software Turnkey software for Windows 2000 and Windows XP.
Software Developers Kit provided.
Environmental Operating Conditions
Temperature 0 to 45oC
Humidity 0 to 80% RH non-condensing
Miscellaneous
Power 7.5 W maximum.
Dimensions 3.875" High by 6.875" Wide, (98.4 x 174.6mm) not including SMA and PCI edge
connectors.
Weight 0.63 lbs (0.29 Kg)
Notes: Specifications are typical, at 25oC
Page 23
JSR Ultrasonics, A Division of Imaginant
 Loading...