

Installation Instructions
Page 1 of 4Bourne
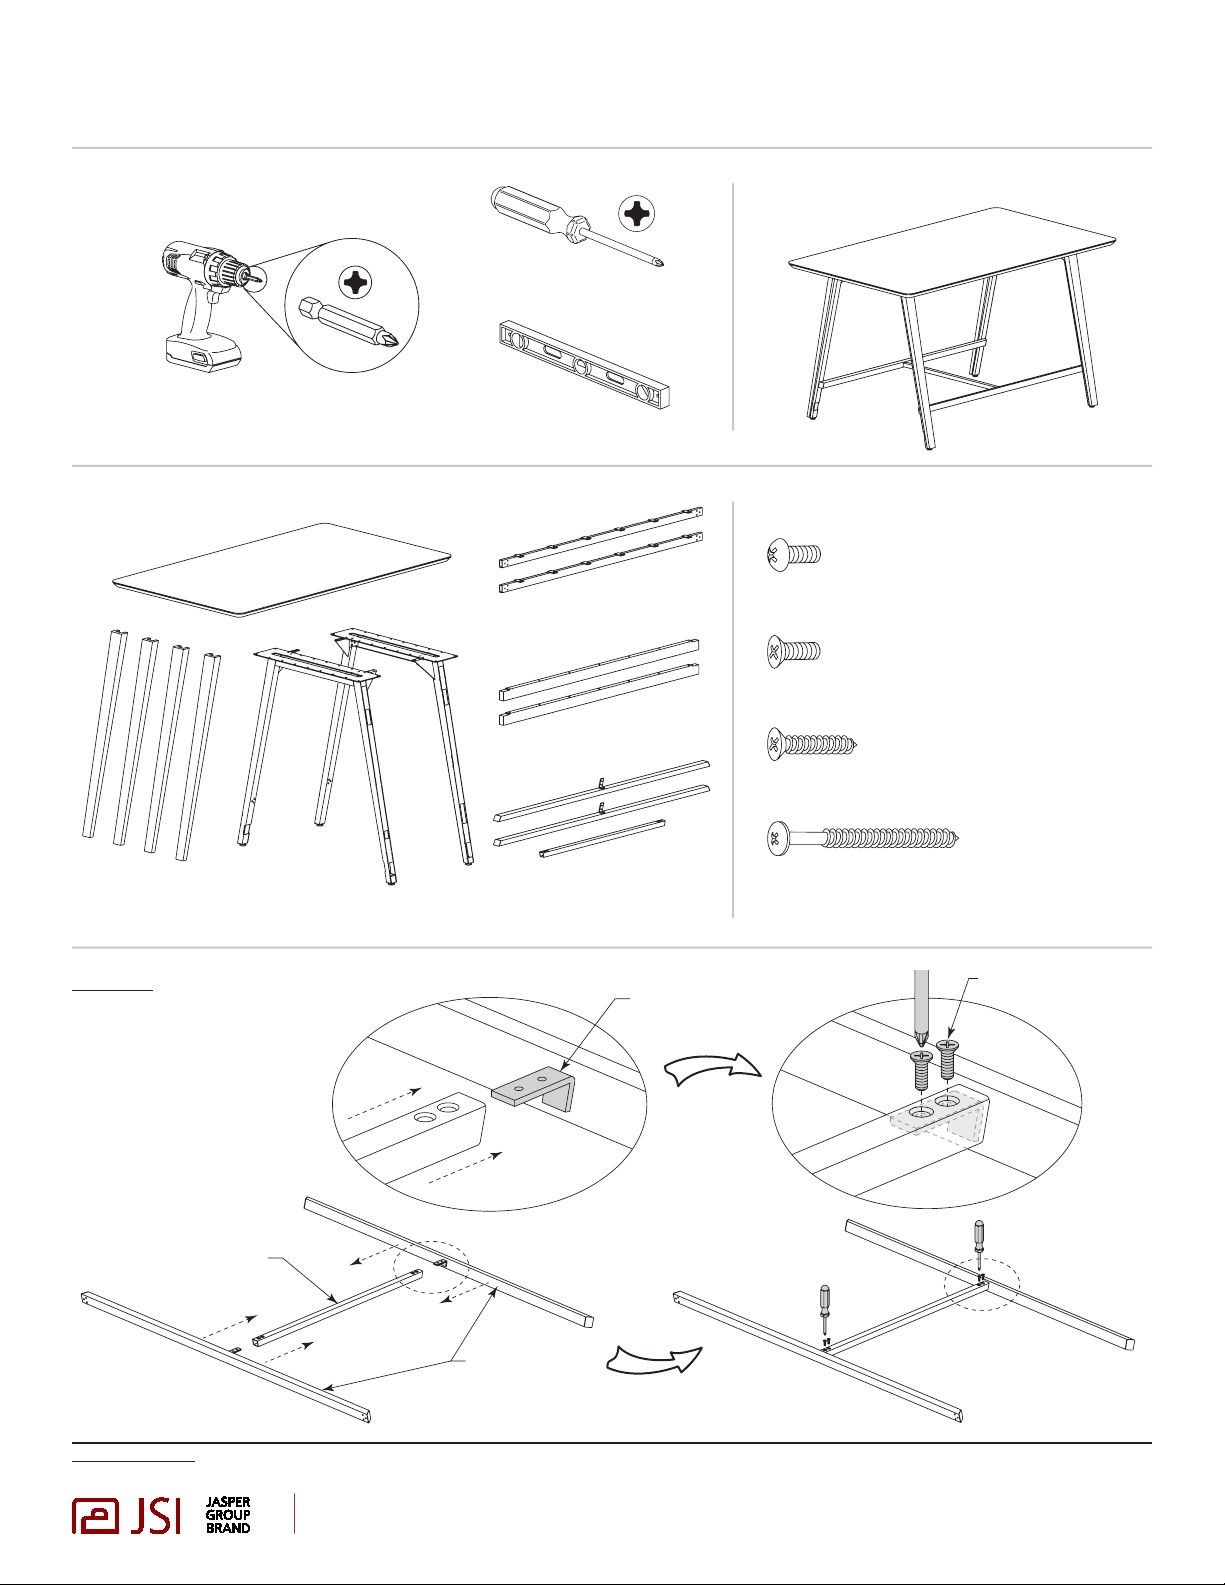
Recommended Tools
Screw Gun
#3 Phillips Head Bit
Package Contents
Top
#3 Phillips Screw Driver
Level
Metal Rails
(Qty. 2)
Wood Rails
(Qty. 2)
Metal Table Assembly
Hardware Used
1
”
1/4-20 x
1/4-20 x
/
2
Pan Head Bolts
1
”
/
2
Flat Head Bolts
Metal Legs
Wood Leg Caps
(Qty. 2)
(Qty. 4)
Step 1
Assemble H-Frame
• Insert Cross Bar into Side
Rail brackets.
• Fasten together using
1/4-20 x
1
/
”
2
flat head bolts.
Cross Bar
H-Frame Rails
& Cross Bar
(Qty. 3)
Side Rail Bracket
#10 x 1” Flat Head Screws
1
”
#10 x 2
/
4
Truss Head Screws
1/4-20 x
1
/
”
2
Bolts
H-Frame
Foot Rails
Notice To Installers: Failure to comply with installation instructions will compromise the safety, durability and performance of this product, which may risk injury to the user of this
product and/or diminish the product life cycle. Jasper Group assumes no liability in these instances.
jsifurniture.com
800.457.4511
812.482.3204 O
812.482.1548 F
225 Clay Street / PO Box 231
Jasper, Indiana 47546
Form No. INST-BU004
5/1/16

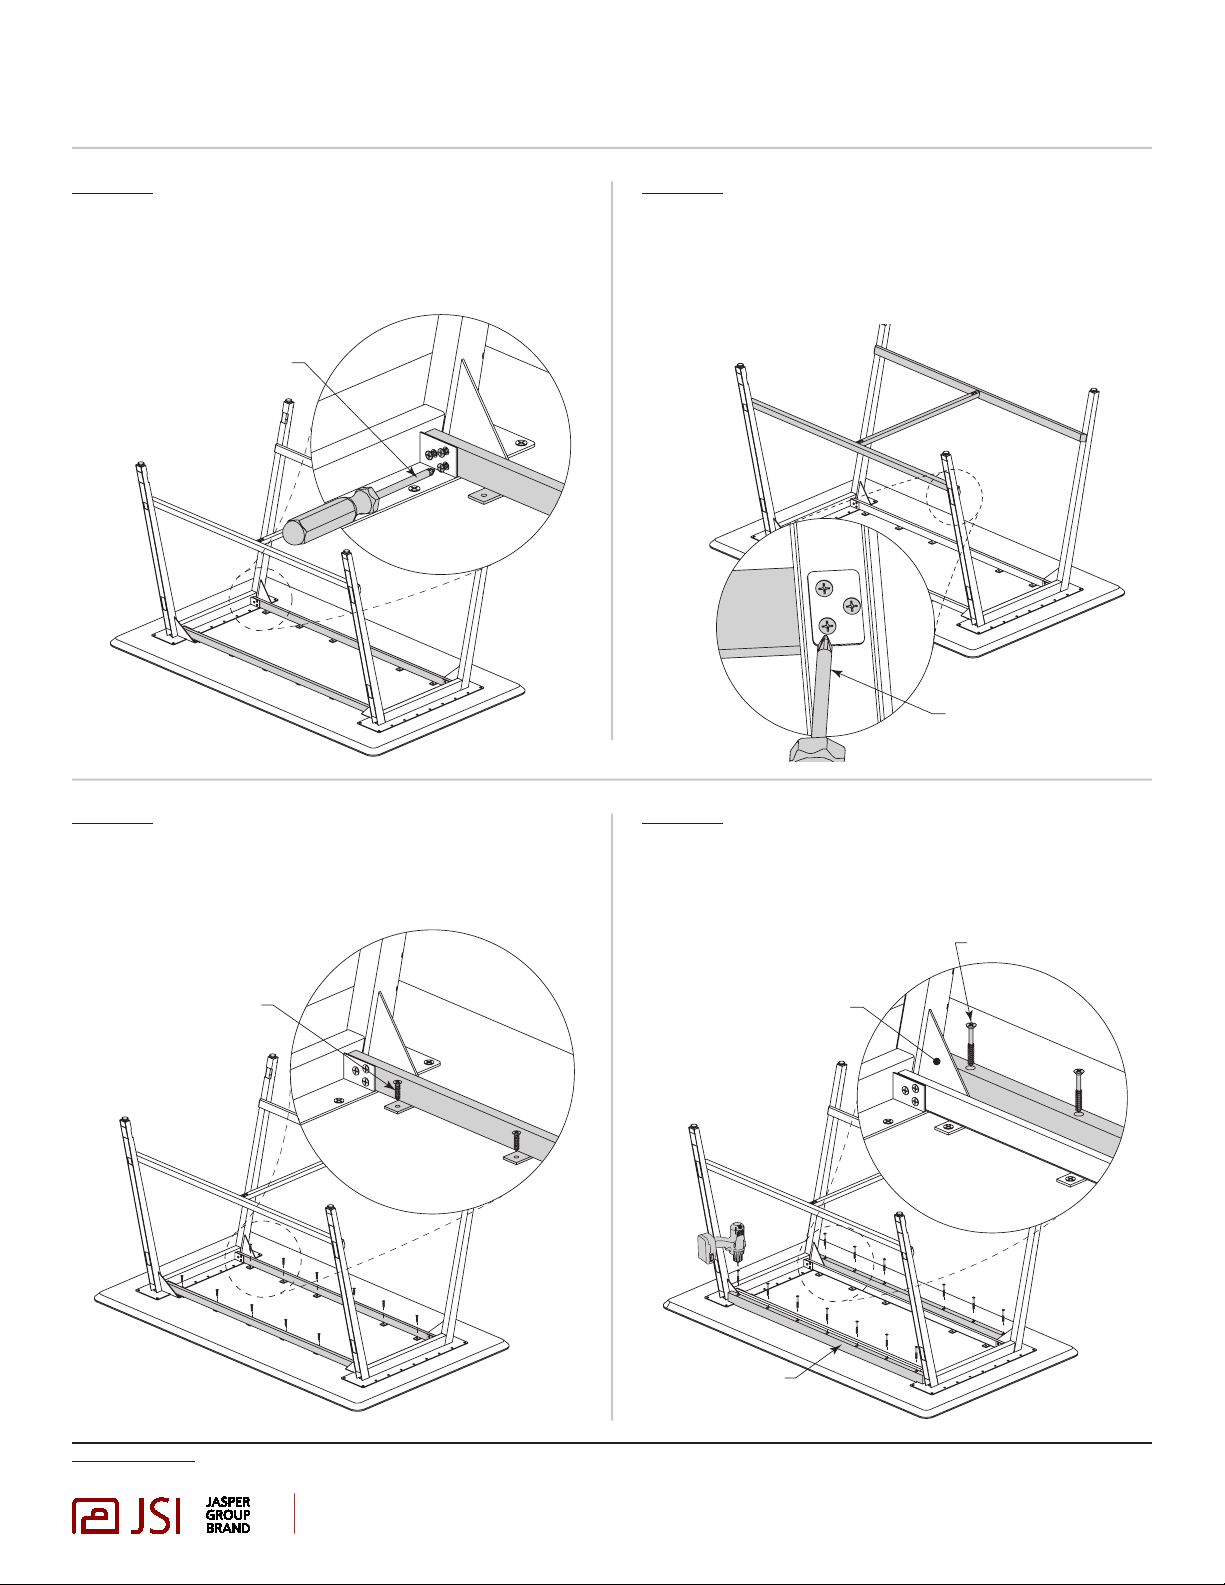
Step 2
Position Legs in Place on Top
• Flip top upside down and lay on a flat
smooth surface.
• Position Legs on the Top. Align holes
in leg plates to pre-bored holes in Top
as shown.
Metal Legs
Installation Instructions
Metal Table Assembly
Step 3
Attach Metal Rails to Legs
• Fasten all four Metal Rails to Legs
using 1/4-20 x
• Leave screws loose, DO NOT
tighten at this point.
1/4-20 x
1
/
2
1
/
”
flat head
”
2
flat head bolts.
Page 2 of 4Bourne
(continued)
Step 4
Attached H-Frame to Legs
• Fasten Metal Rails to Legs using
1/4-20 x
• Leave screws loose, DO NOT
tighten at this point.
1
/
”
2
pan head bolts.
H-Frame
Metal Rails
Step 5
Fasten Legs to Top
• Align holes in leg plates to pre-bored
holes in Top.
• Fasten all four Legs to Top using
#10 x 1” flat head screws.
”
#10 x1
flat head
1
/
1/4-20 x
Notice To Installers: Failure to comply with installation instructions will compromise the safety, durability and performance of this product, which may risk injury to the user of this
product and/or diminish the product life cycle. Jasper Group assumes no liability in these instances.
jsifurniture.com
800.457.4511
”
2
pan head
812.482.3204 O
812.482.1548 F
225 Clay Street / PO Box 231
Jasper, Indiana 47546
Form No. INST-BU004
5/1/16
Installation Instructions
Page 3 of 4Bourne
Step 6
Tighten Metal Rail
Fasteners to Legs
• After Legs have been securely fastened to
Top, return back to Metal Rail screws and
tighten firmly.
Tighten Screws
Step 7
Metal Table Assembly
Tighten H-Frame
Fasteners to Legs
• After Legs have been securely fastened
to Top, return back to H-Frame screws
and tighten firmly.
Tighten Screws
(continued)
Step 8
Fasten Metal Rails to Top
• Locate all the tabs on Metal Rails
and fasten to Top using #10 x 1
flat head screws.
”
#10 x 1
flat head
”
Step 9
Fasten Wood Rails to Top
• Place Wood Rails against Metal Truss,
centered right to left, and secure to Top
using #10 x 2
Wood Rail centered
between legs. Use wood
leg caps as spacer.
1
”
/
4
truss head screws.
Metal Truss
#10 x 2
1
/
”
4
truss head
Notice To Installers: Failure to comply with installation instructions will compromise the safety, durability and performance of this product, which may risk injury to the user of this
product and/or diminish the product life cycle. Jasper Group assumes no liability in these instances.
jsifurniture.com
800.457.4511
812.482.3204 O
812.482.1548 F
225 Clay Street / PO Box 231
Jasper, Indiana 47546
Form No. INST-BU004
5/1/16

Installation Instructions
Page 4 of 4Bourne
Step 10
Attach Wood Leg Caps
• Carefully flip table upright.
• Attach wood leg caps to metal legs by
engaging clip in cap into metal leg. Slide
cap fully upward, then press bottom of cap
firmly for hook & loop to engage.
Metal Table Assembly
(continued)
Clip fully engaged
in metal leg.
Slide clip upward
into metal leg.
Step 11
Level Table
• Level table front-to-back and
side-to-side by rotating
adjustable glides.
Hook & Loop
Side View
Press firmly
on bottom of
cap to engage
hook & loop
Notice To Installers: Failure to comply with installation instructions will compromise the safety, durability and performance of this product, which may risk injury to the user of this
product and/or diminish the product life cycle. Jasper Group assumes no liability in these instances.
jsifurniture.com
800.457.4511
812.482.3204 O
812.482.1548 F
225 Clay Street / PO Box 231
Jasper, Indiana 47546
Form No. INST-BU004
5/1/16
 Loading...