

Page 1
MotorLite Quick Programming Guide FS 10. 08. 05 MotorLite Quick Programming Guide FS 10. 08. 05
Programming Beeps
Acknowledgement of Programming Steps
BEEP x 1 & BEEP x 2
Dot move setting
BEEP x 1 & BEEP x 3
The third limit position setting
BEEP x 1 & BEEP x 4
Delete limit
BEEP x 1 & BEEP x 4
Setting UP & DOWN limits
BEEP x 1 & BEEP x 6
Pairing motor to remote
BEEP x 1 & BEEP x 7
Add Emitter
BEEP x 1 & BEEP x 7
Delete emitter
BEEP x 7
Low Battery Signal. To be added in 2016 to new motors
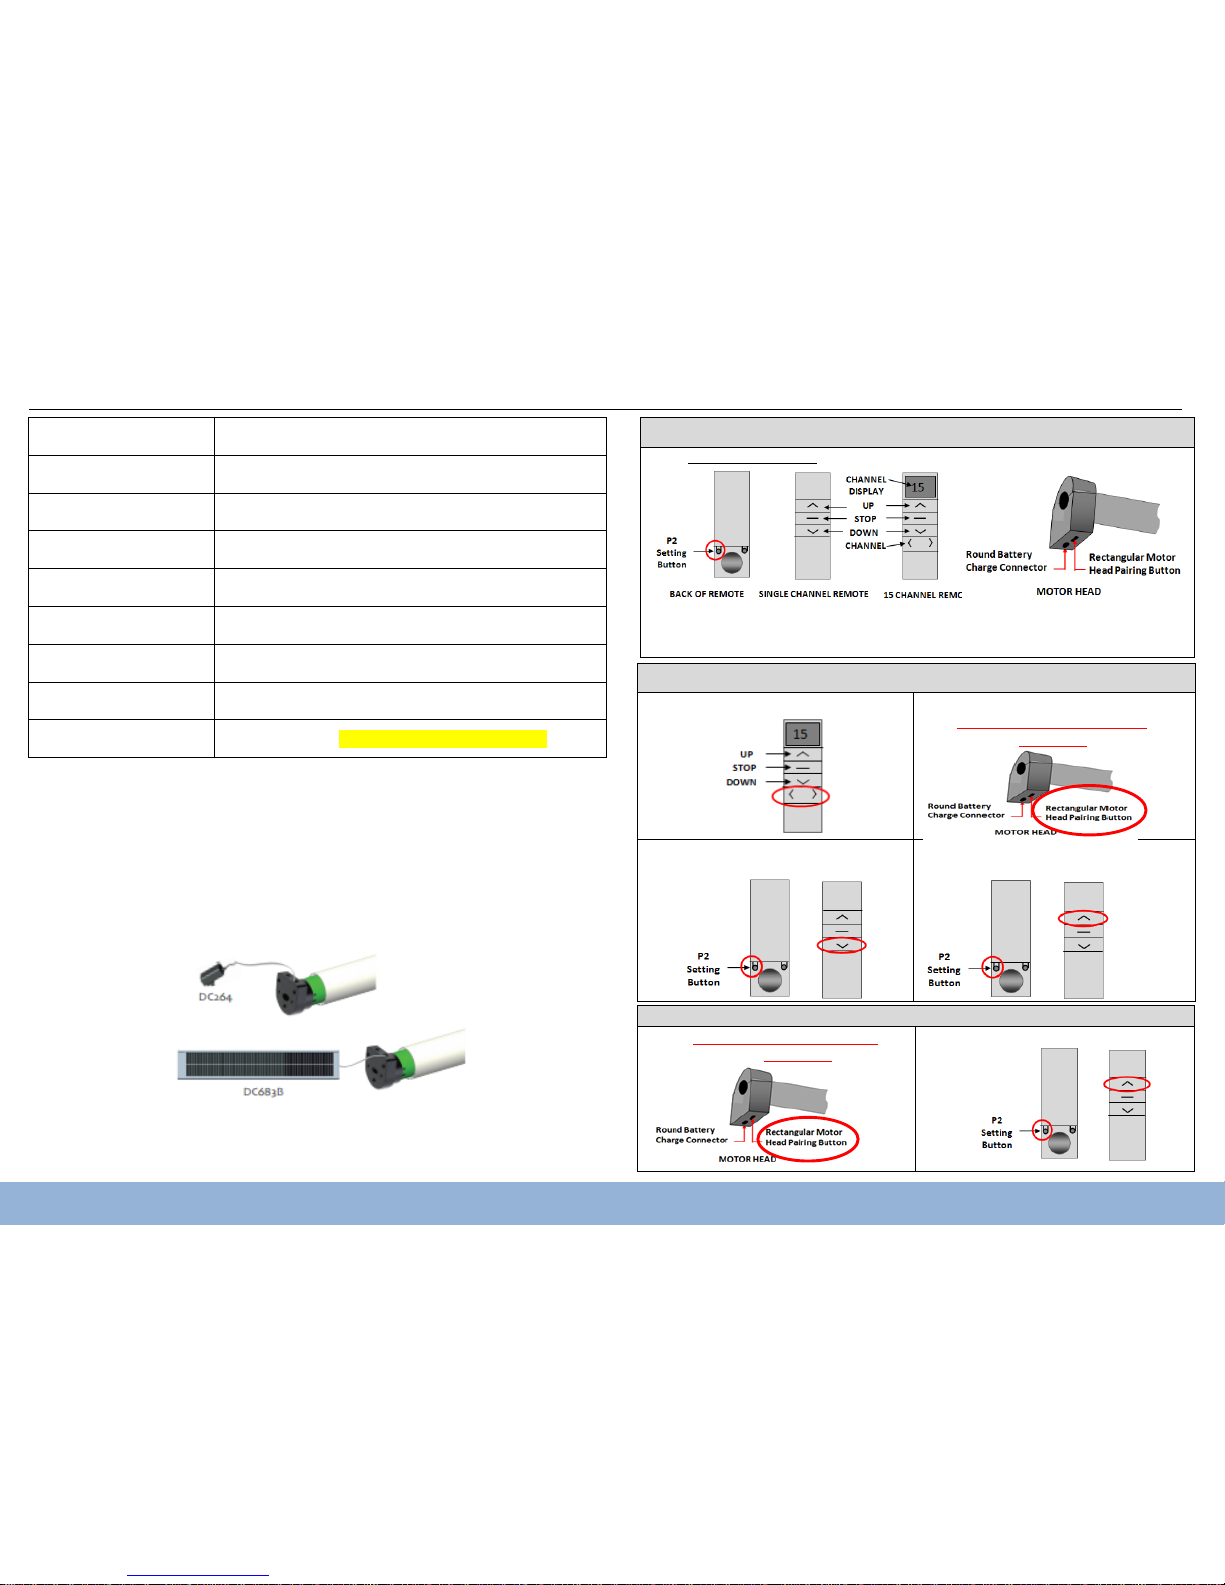
Battery Recharge Options
The motor has a built-in battery. The battery can be recharged using the following options;
1. Model DC264, 240/12 volts plug in power supply charger. The charger light changes
from red to green indicating when the battery is fully charged
2. Model DC683B solar panel. When using a solar panel ensure the solar panel is
directed towards the sun & is installed inside in a water free environment to protect
from the weather.
OVERVIEW OF REMOTE BUTTONS & MOTOR BATTERY CHARGE CONNECTOR
Log on www.jpm-speed.com & click video to view online programming guides
Remove cover on the back of the remote to access the P2 programming button
NOTE: Maximum 5 second time interval between each programming step otherwise
the motor will drop out of programming mode and loose any steps
STEP 1 - PAIRING MOTOR TO REMOTE
1. SELECT REMOTE CHANNEL
2. ACTIVATE MOTOR PAIRING
Press pairing button (bent paper clip) for ~
3 seconds, until motor jogs & BEEP x 1
3. CLOCKWISE MOTOR ROTATION
Press P2 x 2 then press DOWN x 1
4. ANTI CLOCKWISE MOTOR ROTATION
Press P2 x 2 then press UP x 1
STEP 2 – CHANGE MOTOR ROTATION CLOCKWISE TO ANTI CLOCKWISE (Select channel)
1) Press pairing button (bent paper clip) for
~ 3 seconds, until motor jogs & BEEP x 1
2) Press P2 x 2 then press UP x 1
Page 2
MotorLite Quick Programming Guide FS 10. 08. 05 MotorLite Quick Programming Guide FS 10. 08. 05
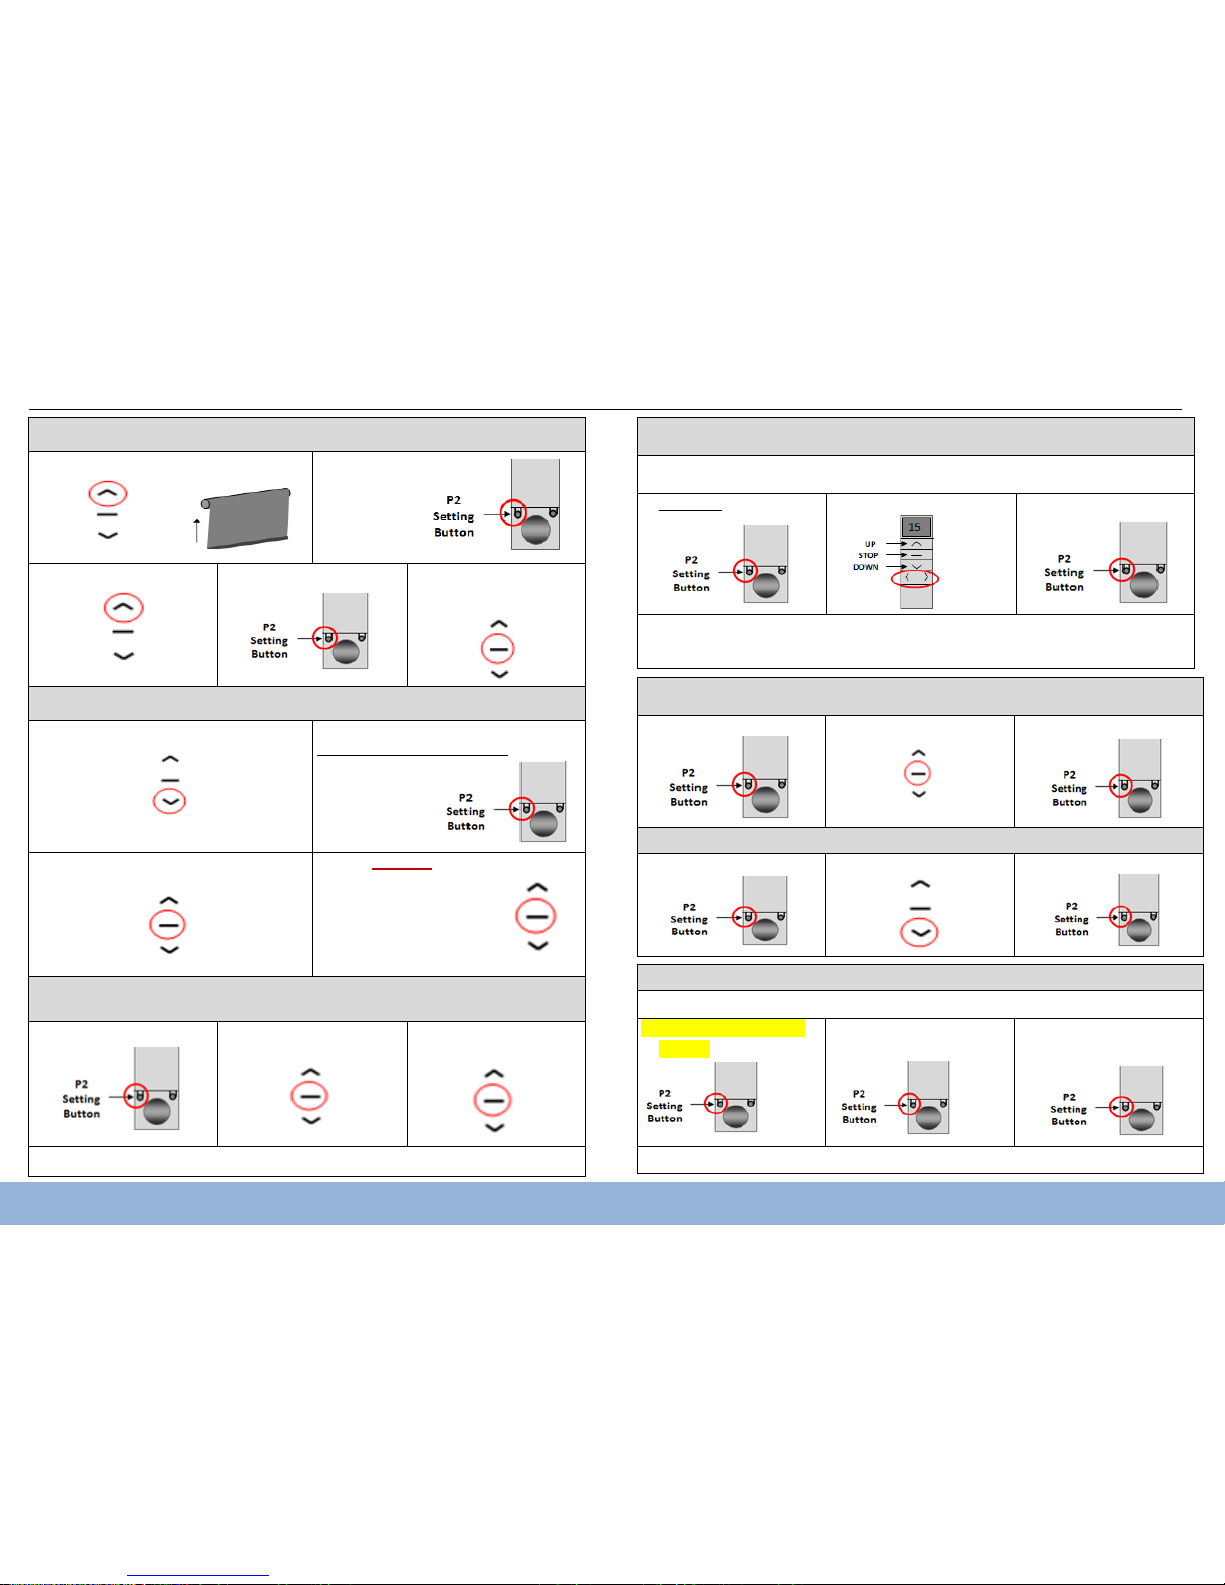
STEP 3 - SETTING TOP LIMIT (Select channel on Multi Channel Remote)
1) Press UP. Raise blind to top position
2) Press P2 x 1
3) Press UP x 1
4) Press P2 x 1. BEEP x 1
5) Press STOP x 5.
Motor will jog to confirm
STEP 4 - SETTING BOTTOM LIMIT
1. Press DOWN x 1
2. Press P2 x 1.
Blind will auto micro step down
3. Press STOP when position reached
3) Press STOP x 5 to memorize.
Motor will JOG to confirm
STEP 5 - SETTING INTERMEDIATE LIMIT (Optional after UP & DOWN limits set)
Lower blind to desired intermediate position
1) Press P2 x 1
2) Press STOP x 1.
BEEP x 1 after > 1 second
3) Press STOP x 1.
BEEP x 3 after >1 second
To operate the intermediate setting press the STOP button for ~ 3 sec
STEP 6 - PROGRAMMING SELECTED MOTOR GROUPS
On a 15 channel remote ALL motors will automatically group on to channel 0
1. PAIR REMOTE & SET LIMITS FOR EACH MOTOR ON SEPARATE CHANNELS
2. THEN COPY SETTINGS TO A GROUP CONTROL CHANNEL AS FOLLOWS:
1) Select ch 1 & press P2 x 2
2) Select group channel
3) Press. P2 x 1
Repeat copy function steps 1, 2 & 3 to group required number of motors
Blinds may be grouped on any spare channel. Up to 20 blinds may be
grouped/channel
STEP 7 - DELETING CHANNEL PAIRING & LIMITS (Restore motor factory settings)
Select channel on Multi Channel Remote
1. Press P2 x 1. BEEP x 1
1) Press STOP x 1
2) Press. P2 x 1. BEEP x 4
STEP 8 - DELETING LIMITS ONLY - Select channel on Multi Channel Remote to be deleted
1. Press P2 x 1. BEEP x 1
2) Press DOWN x 1
3) Press P2 x 1. BEEP x 1
STEP 9 - PROGRAMMING A SECOND REMOTE (if required)
Only program second remote after the first remote has been fully programmed
1. Press. P2 x 1, on the first
remote. BEEP x 1
2. Press. P2 x 1, on the first
remote again. BEEP x 1
3. Access the 2nd remote
Press. P2 x 1. BEEP x 7
Your second remote transmitter is now programmed & ready for use
 Loading...