

Page 1
GUARANTEE
Register for 24 Month Warranty on-line at http://www.jpltele.com/product-registration.
Your JPL product has been carefully manufactured and 100% tested using high quality assured
components. It is guaranteed against faulty workmanship and materials for a period of 24 months
from the date of purchase. In the unlikely event that a failure should occur, please contact the JPL
dealer from which you purchased this product or visit www.jpltele.com and follow our product
returns procedure. You will be given a RMA number and instructions on how to return your headset.
Further help can be found on-line at www.jpltele.com on our FAQs page.
Note: Removing the factory-applied warranty label on the back of the control unit will void the
warranty. Specically exempt from warranty are limited-life consumable components subject to
normal wear and tear, such as microphone windscreens, ear cushions and other accessories. Your
statutory rights under common law are in no way aected by this guarantee. The warranty does
not cover cosmetic damage or damage due to misuse, abuse, negligence, acts of nature, accident,
disassembling or modication of, or to any part of, the product. The warranty does not cover damage
due to improper operation, maintenance or installation, or attempted repair by anyone other than
Consequential and incidental damages, including without limitation, loss of property and those
arising from breach of any express or implied warranty, are not the responsibility of JPL Telecom and
In accordance with its policy of progressive product design, JPL Telecom reserves the right to
(NB. For product returns, please follow instructions and returns department address provided on our website.
JPL Telecom. Any unauthorised repairs will void this warranty.
LIMITED WARRANTY
to the extent permitted by law, are excluded.
change product specications without prior notice.
* Repair or replacement is at the discretion of the manufacturer.
REGISTERED ADDRESS
Unit 1, Church Close Business Park, Church Close, Todber, Sturminster Newton,
Buon 46-604, Col. Nueva Anzures, Delg. Miguel Hidalgo C.P. 11590
Returned products received at the registered addresses are likely to be returned to sender).
UK Oice: JPL Telecom Limited
Dorset, DT10 1JH England
USA Oice: JPL Telecom LLC
445 W Merritt Ave, Merritt Island, FL 32953, USA
Mexico Oice: JPL Telecom Mexico
Registered in England No. 5250754
www.jpltele.com
18/268-v6
JPL-Element-X500
User Guide
Page 2
Features:
• User changeable headband from single ear to dual ear
• Universal patented base with slot-in cartridge drawer to accept
Bluetooth or USB modules (Optional accessories - sold separately)
• DECT wireless technology level A
• Surround Shield™ noise cancelling microphone
• Sound Shield™ hearing protection
• Max 100m (300) coverage
• Max 30 users in 50 square meters
• 6 hours talk time (stand by ~ 140 hours)
• Quick recharge time (60 to 90 mins)
• Volume contol on headset
• Boom arm adjustable through 270°
• In use / busy light indicator on speaker housing
• 50mm smooth protein leather ear cushion
• Headset weight 65g/80g
• Compatible with MS-Lync
• Patented design
• Full range of EHS cords available
• 24 Month repair or replacement warranty
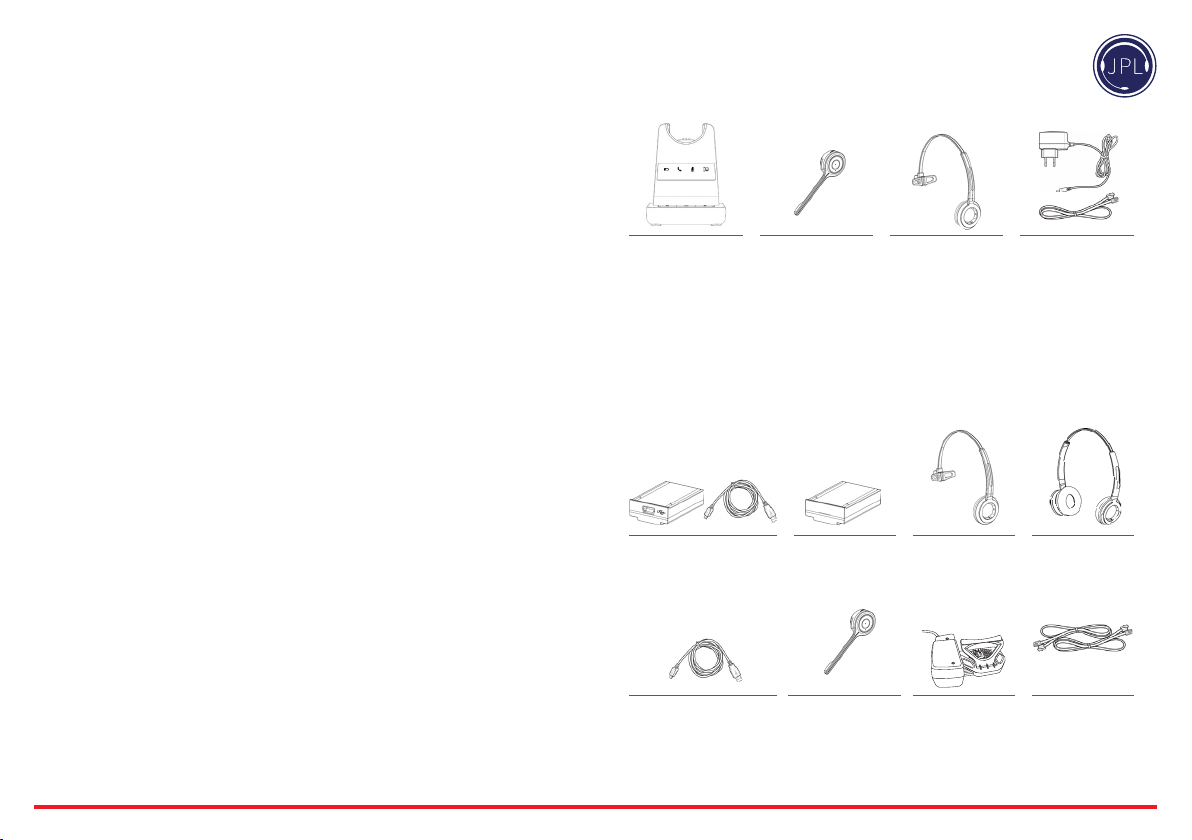
What’s included
Base Unit
Microphone
Boom Arm
Optional Accessories
USB 2.0 Module and
USB Cable Type-A to Mini-B
Bluetooth
Module
Monaural
Headband
Monaural
Headband
Switch Mode Power
Supply with Multi
Country Adapters &
Telephone Cord
Binaural
Headband
USB Cable Type-A to
Micro USB for optional
headset charging method
Microphone
Boom Arm
Type of lead varies
depending on phone model.
Please refer to EHS Guide
www.jpltele.com/ehs-cables
JPL-DECT Lier Electronic Hook
Switch (EHS)
Page 3
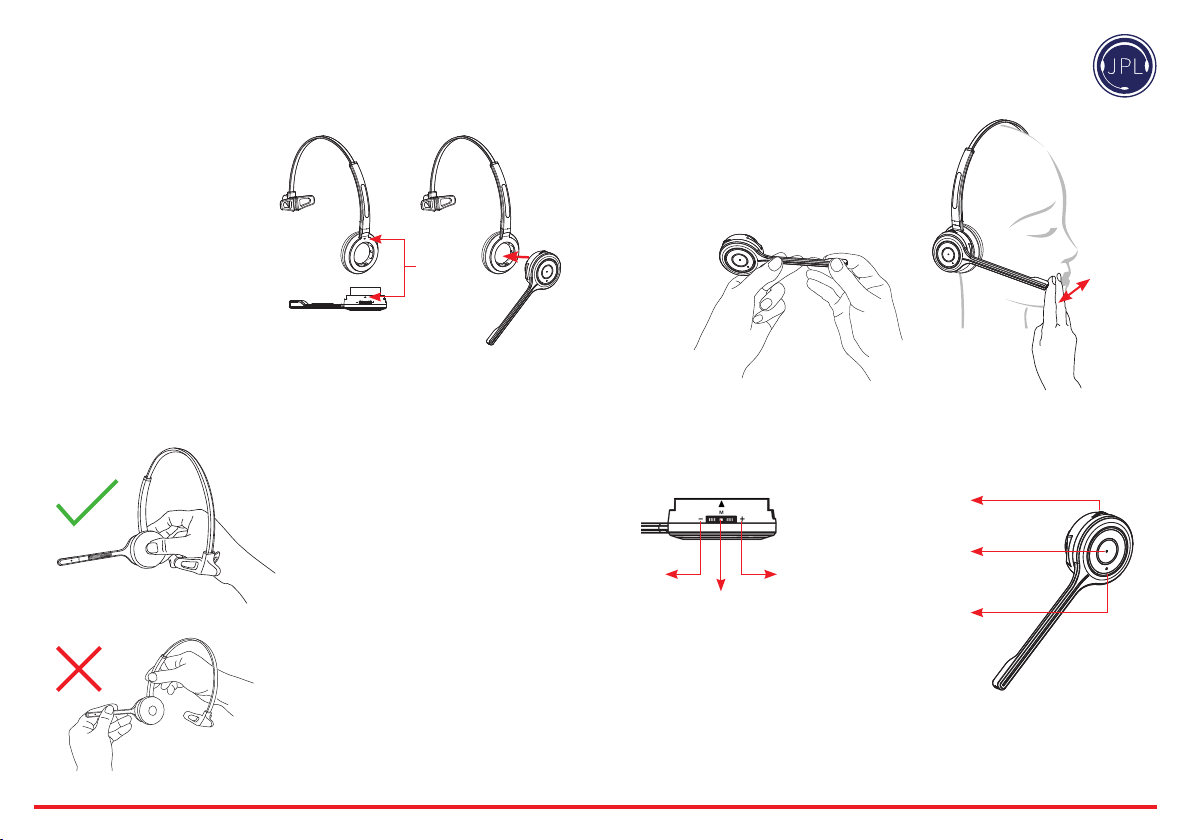
Attaching the headband
To attach the microphone boom
arm to the headband, align the
triangle shape on the microphone
boom arm with the triangle shape
on the headband and push to
click into place. The microphone
boom arm will then rotate to your
required position.
Detaching the headband
Align
Positioning the Microphone
The microphone boom arm is exible, so you can
gently bend the boom and position it to suit the
curve of your face.
The ideal position for the microphone is at the corner
of the mouth approximately 30mm (2 nger width)
away from the mouth.
30mm
To detach the microphone boom arm from the
headband, gently push the microphone speaker from
inside the ear cushion. This will pop the microphone
boom away from the headband.
DO NOT pull on the microphone boom
to remove it from the headband.
Microphone Boom Volume Control
Mute /
Speaker Volume
Hook On/O
Down Up
Mute
To change the speaker volume: roll the volume
switch towards the ‘plus’ sign to increase the
volume and roll the switch towards the ‘minus’
sign to reduce the volume and press the switch to
activate the microphone mute mode.
Answer / End
a call
In-use / busy
indicator
Page 4
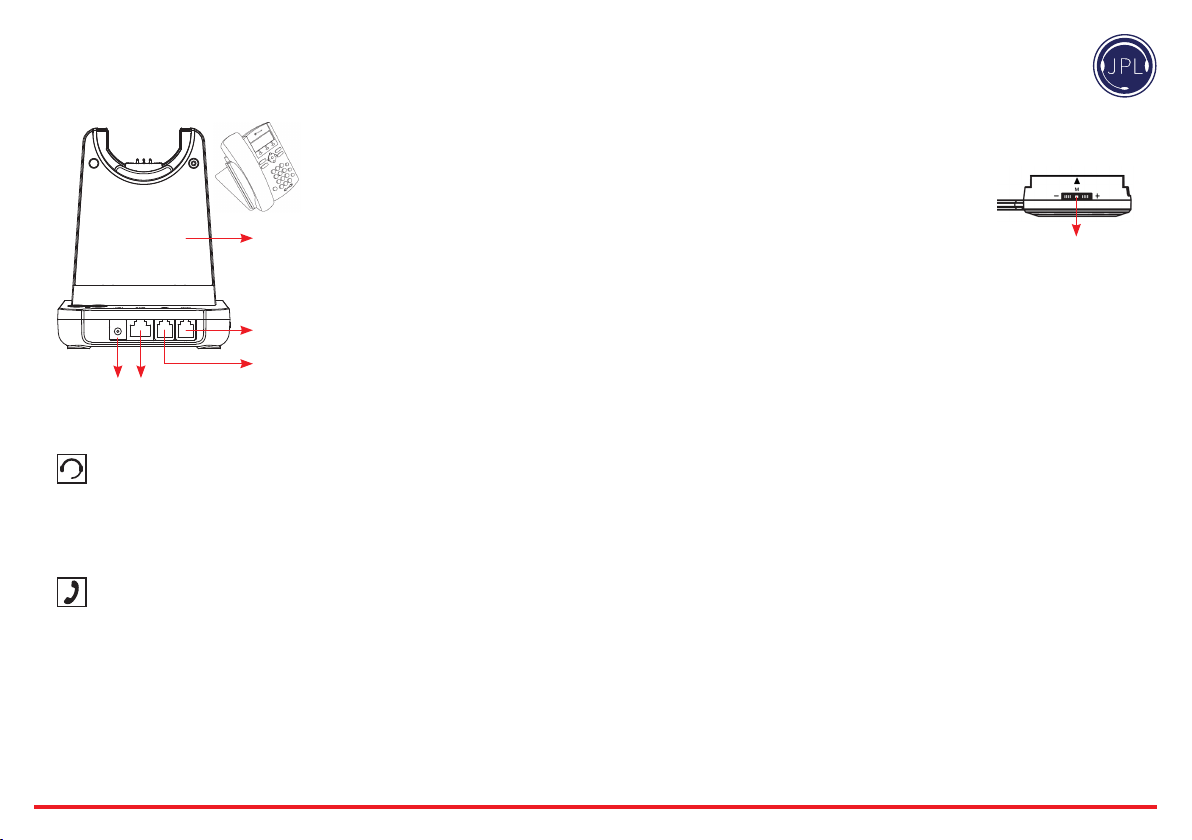
Setting up the Base Unit
Base Unit
Handset Port
Telephone Port
DC Jack AUX Port
Desk Phone with Headset Port
• Plug the supplied telephone cord into the TEL port of the base unit
• Connect the telephone cord to the HEADSET port of the desk phone
Desk Phone without Headset Port
• On the desk phone, unplug the handset cable from the phone
• Plug the handset cable into the
HANDSET port on the base unit
• Plug the telephone cord into the TEL port on the base unit and plug the other end of the
telephone cord into the HANDSET port on the desk phone
Operating Instructions
Pairing a headset to the base unit:
1) Make sure there is no power to the base unit
2) Take the headset o the base unit
3) Hold the ‘mute button’ for 2-3 seconds until the blue indicator
light on the headset starts to ash (Indicating Pairing Mode)
4) Place the headset back on the base unit
5) Plug in the power cord to the base unit
6) Wait up to a minute and you should be able to hear an audible beep signifying the headset is
connected to the base unit
7) Test by taking the headset o the base unit, which should enable the headset to be ‘o hook’
(Green phone light activated) and make a test call.
Pairing a second headset to a base station:
1) One headset should already be paired to this base unit, if so it needs to be turned o
2) To turn the headset o, rstly take it o the base unit and press the call accept/reject button to
deactivate the green phone light on the base unit
3) Hold the call accept/reject button for 3 seconds, you should hear a short beep and then a longer
beep signifying the rst headset is o
4) Follow the steps in ‘Pairing a headset to a base unit’ above to connect the second headset
5) Once the second headset is connected turn the rst headset back on with a short press to the call
accept/reject button
6) Test the headsets by calling the phone system connected to the base unit and each headset should ring.
Please note pairing two headsets to one base unit allows each headset to answer the incoming call,
(a maximum of ve headsets can be paired to one base unit) however, only the person (the rst to
answer the call) will be able to hear and interact with the caller.
Mute
Page 5
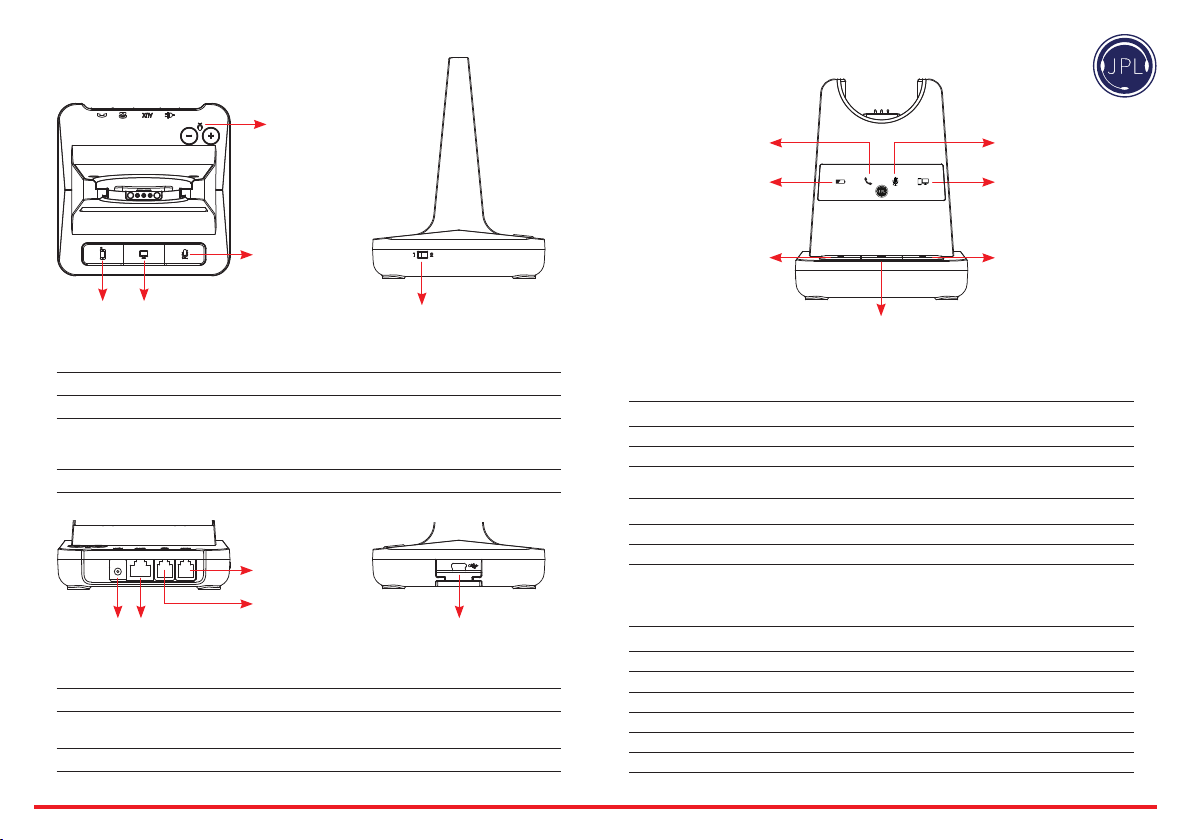
Microphone
Volume
Base UnitBase Unit
Telephone
Indicator
Battery Charge
Indicator
Microphone Mute
Indicator
PC/Bluetooth
Indicator
Microphone
Mute Button
Bluetooth
Pairing Button
Bluetooth Button This function works when the Bluetooth module is inserted
PC/TEL Selection This function works when the USB cartridge is inserted
Microphone Mute Button Press to mute the call
Microphone Volume Your headset has automatic audio conguration, (this can take a few
Compatibility Switch Select ‘1’ or ‘2’ until a dial tone is heard via the telephone connection
DC Jack Connect Power Adapter to DC Jack
AUX port Connection for Handset Lier or EHS Adapter (optional extra)
Telephone Port Connect telephone cord to the headset port or handset port of a
Handset Port Plug Handset cord from the phone to Handset port
PC/TEL
Selection
DC Jack AUX Port
Compatibility
Switch
minutes to settle) however, if required, you can adjust the volume
level for the speakers and microphone to suit
Handset Port
Telephone Port
Mini ‘B’ USB/Bluetooth
Module Drawer
telephone / base unit
Bluetooth
Button
PC/TEL Selection
Microphone
Mute Button
Visual Indicator
Charging Status LED Status
Charging Battery Indicator: ‘Flashing’ 1 sec-ON, 1 sec-OFF
Fully Charged Battery Indicator: ‘ON’
Low Battery Battery Indicator: ‘Flashing’ 0.5 sec-ON, 0.5 sec-OFF
Event LED Status
Press Microphone Mute Mute Indicator: ‘ON’
Press PC/TEL Selection PC/TEL Indicator - TEL: ‘OFF’ PC: ‘ON’
Hook O Selected Mode Indicator: ‘ON’
Audio Indicator
Event Sound Eect
Speaker / Microphone Volume Beep Sound ‘UP’ - High Tone, ‘DOWN’ - Low Tone
Max/Min Speaker Volume Double beep
Max/Min Microphone Volume Double Beep
Microphone Mute/Unmute Beep / Double Beep
Mute Reminder Beep (every 3 seconds)
Hook O / On Double Beep (High Tone / Low Tone)
Low Battery Continuous beep in headset when battery is low
Page 6
Trouble Shooting
1. Cannot hear a dial tone.
• Check the PC/TEL button. TEL Mute: PC/TEL indicator – ‘OFF’
• Please check the cable connection between base unit and phone.
• Check that the power adapter is plugged in and has power
• Please check the compatibility switch. Adjust compatibility switch until you can hear the dial tone.
2. Microphone volume (TX) is low / dead.
• Make sure that the microphone (TX) mute function is deactivated.
• Check the position of the boom arm and make sure that the microphone is placed as close as
possible to your mouth (approx. 2 ngers distance).
• Adjust the microphone (TX) volume on the bottom of base unit.
3. Buzzing sound on the headset
• Telephone may not be fully immune to the radio transmission between your headset and base
unit. To overcome this problem, move the base unit to at least 30 cm/12” away from the phone.
4. Headset echoes
• Adjust the telephone’s volume. If necessary, adjust your microphone volume on the headset to a
lower setting.
5. EHS doesn’t work with the telephone
• Make sure the telephone is compatible with the wireless headset. Refer to the EHS guide.
6. Headset was working, but it has stopped.
• Headset may need pairing to the base unit again. Refer to the ‘Operating Instructions’
• Headset battery may be dead. Return the headset to the cradle on the base unit for charging.
Additional Accessories
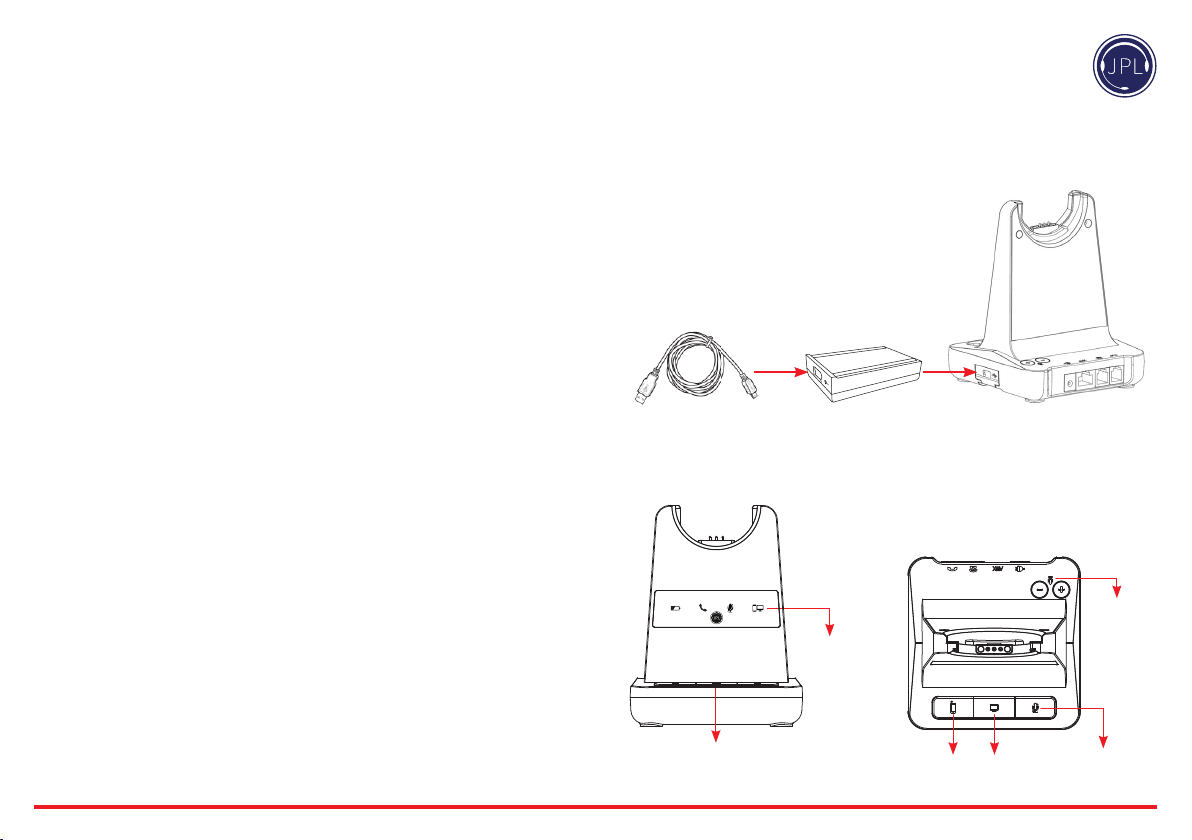
X500 Cartridge Module for
USB Connection
• Sophone interoperability through USB/computer with 3CX, Avaya One-X,
Cisco Jabber, Counter Path and Skype with assistance from the JPL Gateway.
• JPL Gateway soware must be installed and running for remote call control
functions to work with supported sophones. www.jpltele.com/gateway
• Before inserting your USB cartridge, make sure that the base unit
is powered-o.
USB Cable Type-A to Mini-B
• Aer inserting the cartridge, connect the power and then connect the USB cable.
• To make a USB call, press the “PC/TEL’ button.
• When you press the “PC/TEL” button, the “PC/TEL” LED will ash on and o.
PC/Bluetooth
Indicator
Microphone
Volume
PC/TEL
Selection
Bluetooth
Pairing Button
PC/TEL
Selection
Microphone
Mute Button
Page 7
Additional Accessories
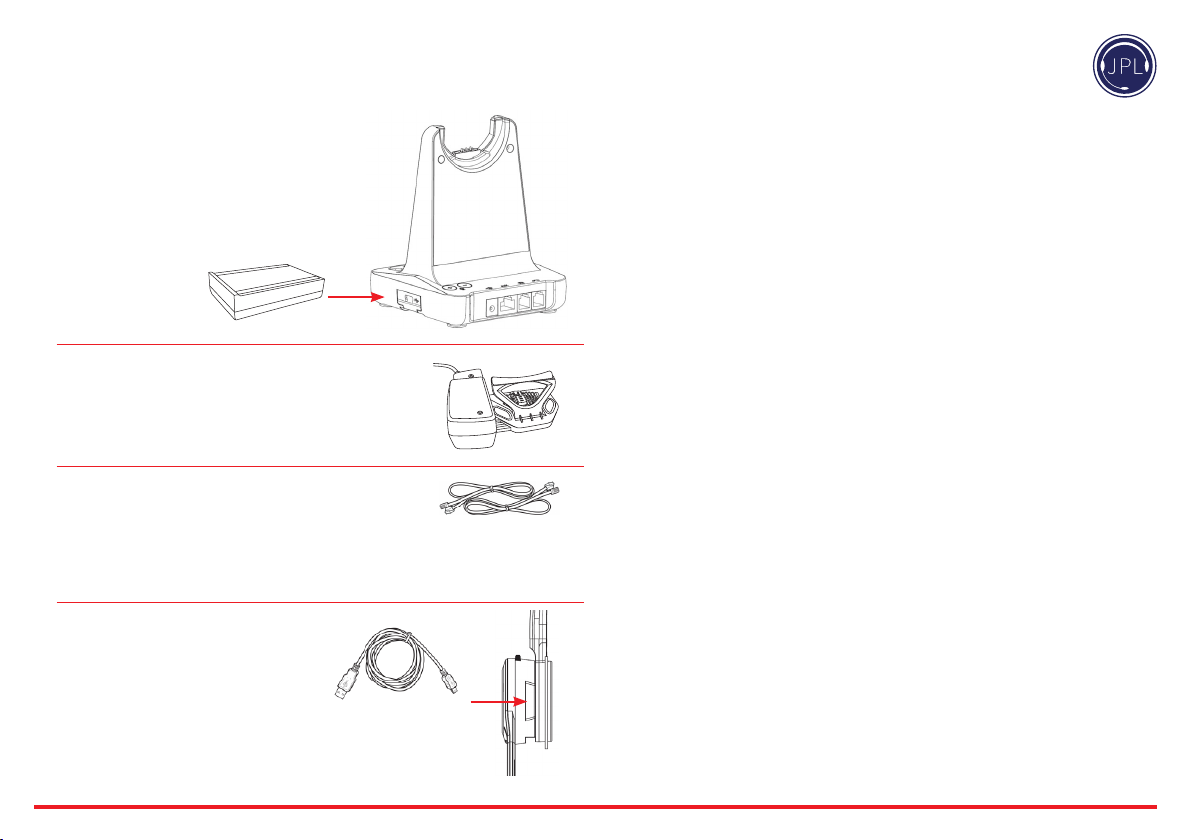
X500 Cartridge Module for
Bluetooth Connection
• Bluetooth allows the DECT headset to connect wirelessly to
Bluetooth enabled smartphones.
• This headset allows wireless conversations from any desk phone,
sophone and mobile.
• Before inserting your Bluetooth cartridge, make sure that the base
unit is powered-o.
JPL-DECT Lier
• The JPL-DECT Lier remotely lis the desk phone handset
to make or answer a call.
www.jpltele.com/accessories
(Refer to the JPL-DECT Lier installation guide).
Electronic Hook Switch (EHS) Adapter
• EHS Adapter enables an incoming call to be answered
or ended by using the On/O button on the Headset.
www.jpltele.com/ehs-cables Refer to the EHS Compatibility Table to see which adapter you need for your
desk phone. (Refer to the EHS Adapter installation guide to see how to install your EHS cable).
USB Cable Type-A to Micro USB
• Optional method for charging the headset.
Connect the micro USB jack to the micro USB port
located on the side of the headset
Type of lead varies
depending on phone
 Loading...