

Page 1
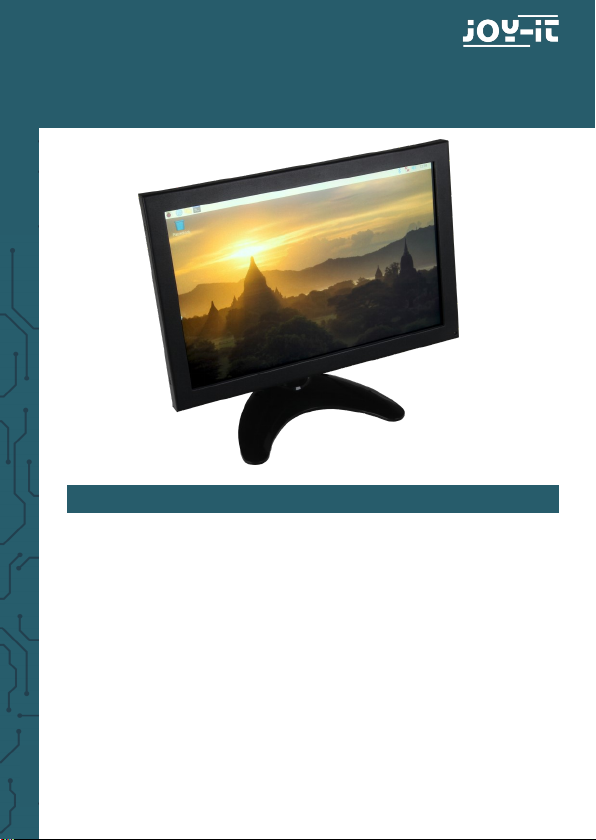
RB-LCD10-2
10,1"-Touchscreen Display Manual
1. GENERAL INFORMATION
Dear customer,
thank you very much for choosing our product. In following, we will introduce you to what to observe while
starting up and using this product.
Should you encounter any unexpected problems during use, please do not hesitate to contact us.
Page 2
2. ASSEMBLY OF DISPLAY
2.1 Assembly of the Display
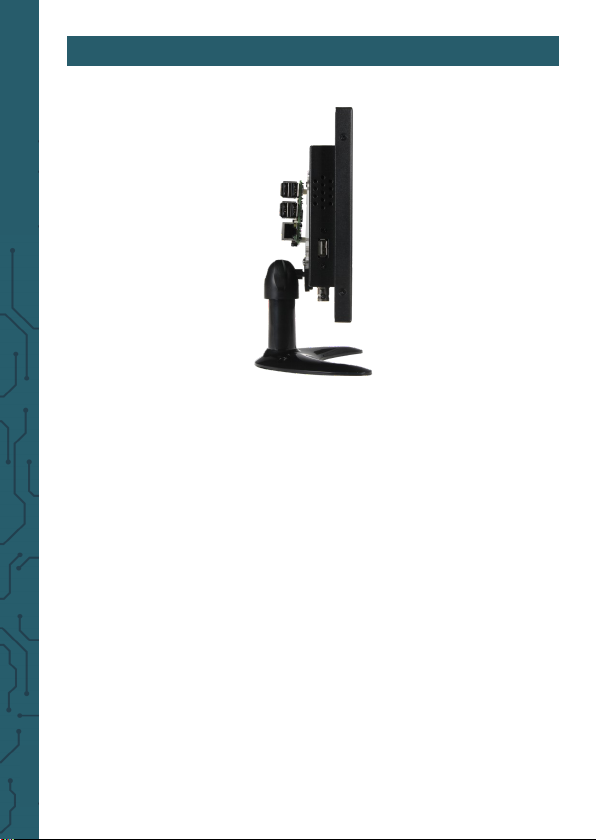
Take out the display, the foot and the socket neck from
the package. Insert the metallic rectangle of the socket
neck into the matching conduction on the display case
(near the USB imprint).
Fixate the socket neck by tightening the round washer,
which is located directly in front of the metallic rectangle.
Now insert the socket neck into the foot and tighten it
with the provided screws.
Page 3

2.2 Assembly of a Raspberry Pi
If you wish to operate the display with a Raspberry Pi ,
you can use the mounting platform provided for this
purpose. Remove the provided mounting platform and
attach your Raspberry Pi onto it.
Aer you have fixated your Raspberry Pi, place the
mounting plate on the back of the display and mount it
to it (screw holes 9 - Vesa).
The display is now completely assembled and should
correspond to the following picture.
Page 4
2.3 Connection to a device
First, plug the power supply into the display. Then, connect the display with the device, which should be used,
using the HDMI cable.
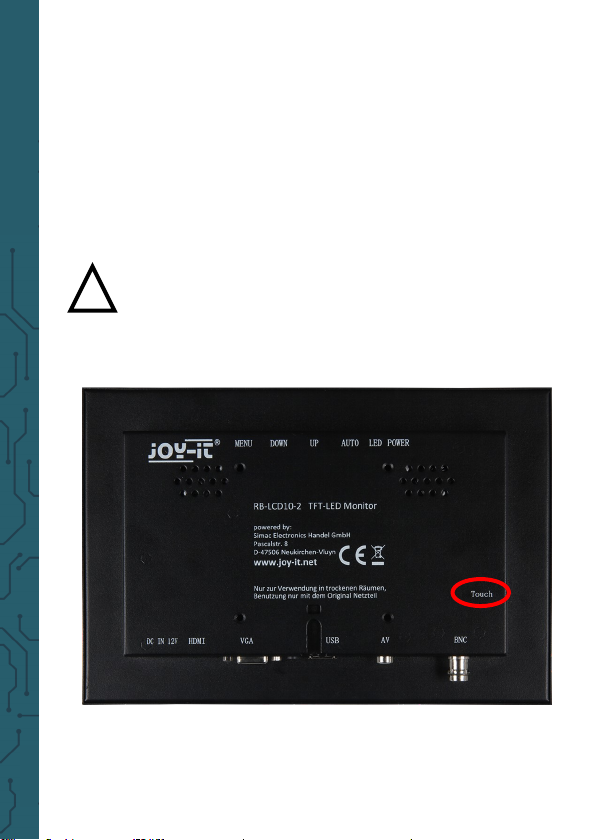
To use the Touch functions as well, the display must also
be connected with the device to be used with the provided USB cable.
Caution! Do not confuse the USB ports! You
!
have to use the port with the imprint "touch" on
the display to be able to use the touch functions.
Page 5
3. USAGE OF THE DISPLAY
3.1 Installation of soware
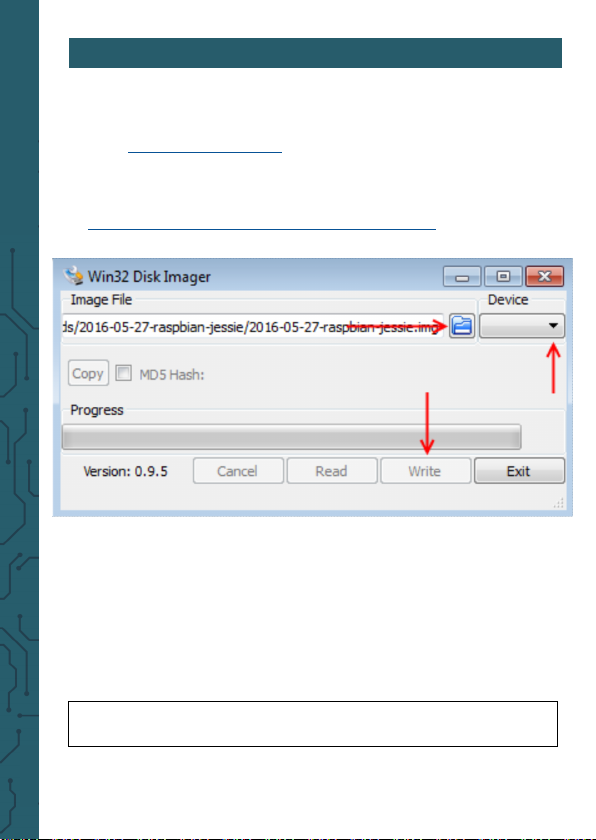
Install the LCD image on your SD card with the help of
the „Win32 Disk Imager“-program, which you can find
as preinstalled Raspbian system for your Raspberry Pi
as download by the following link:
hps://joy-it.net/de/products/RB-LCD10-2
1. Choose Image
3. Write SD card with
image
3.2 Manual Installation & Calibration (experienced
user)
-Usage with a Raspberry Pi 4:
For the usage with a Raspberry Pi 4, a setting in „/boot/
config.txt“ must be edited. For this, please enter the
following command:
sudo nano /boot/config.txt
2. Choose
Device
Page 6
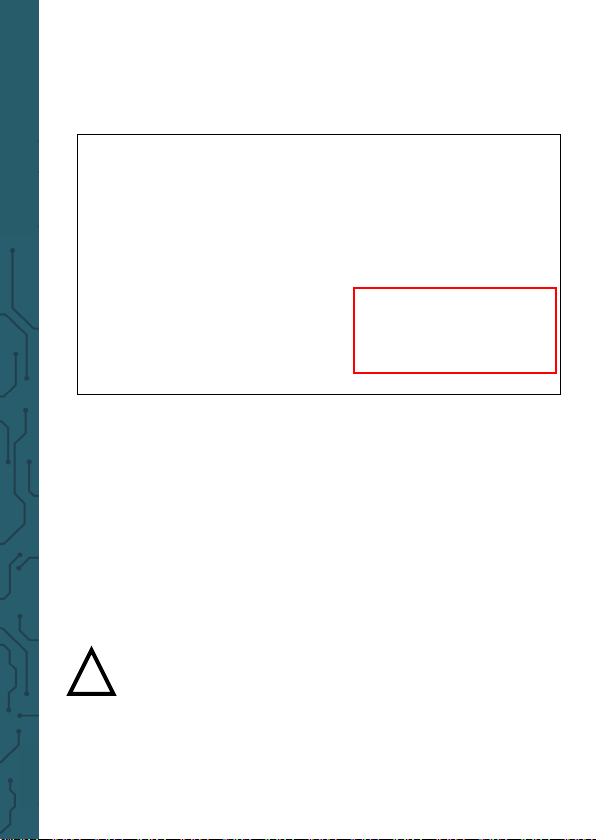
Below the Point [pi4], you have to comment out the
following command: dtoverlay=vc4-fkms-v3d.
This should look like the following:
[pi4]
# Enable DRM VC4 V3D driver on top of the
dispmanx display stack
#
#dtoverlay=vc4-fkms-v3d
max_framebuffers=2
If you do not want to use our prepared Image or integrate the display into an existing system, you can also
install the display manually, of course.
First, connect the both devices with the provided HDMI
cable. Connect both the display and the Raspberry Pi
with the matching power supplies.
Caution! When starting the display for the first
time, the Raspberry Pi has to be started AFTER
!
the Display! Otherwise, the transmission of picture data will not function.
<- This setting has to
be commented out
with #
Page 7
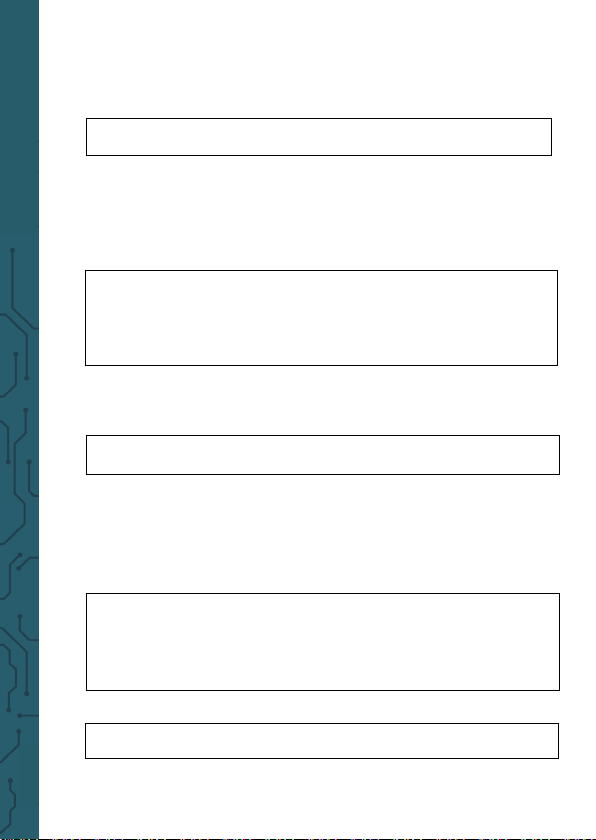
In order to display the image correctly when the display
is started with the Raspberry Pi, the „config.txt“-file has
to be edited first. Open it with the following command:
sudo nano /boot/config.txt
Now enter the following lines at the end of the file.
Aerwards, you can save the file using the key combination CTRL+O and exit the file with the combination
CTRL+X.
hdmi_force_hotplug=1
hdmi_group=2
hdmi_mode=27
Now install the Touchscreen driver with the following
command:
sudo apt-get install xserver-xorg-input-evdev
To ensure, that the installed drivers are always initialised aer the existing drivers, please copy the configuration file with the following command (please write
the command in one line !):
sudo cp /usr/share/X11/xorg.conf.d/10evdev.conf /usr/share/X11/xorg.conf.d/45evdev.conf
Next, the driver must be embedded in the following file:
sudo nano /usr/share/X11/xorg.conf.d/40-libinput.conf
Page 8
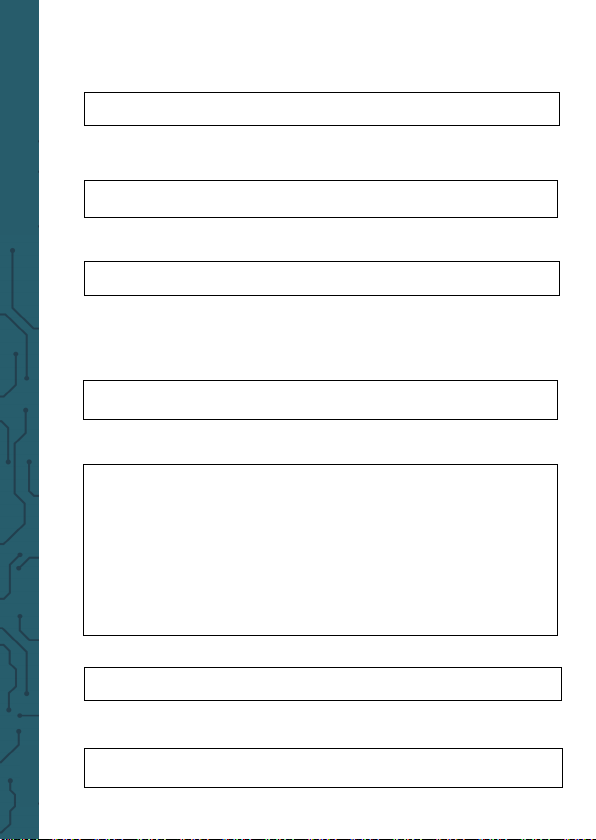
In this file must be changed in the penultimate line of
the driver from "libinput" to "evdev":
Driver "evdev"
Next, the calibration tool can be installed and started
with the following command:
sudo apt-get install xinput-calibrator
Then restart your Raspberry Pi:
sudo reboot
Before your can start the calibration tool, you have to
create the file for the calibration settings (please write
the command in one line !):
sudo nano /usr/share/X11/xorg.conf.d/99-calibration.conf
Now enter the following settings in this file:
Section "InputClass"
Identifier "calibration"
MatchProduct "eGalax Inc. USB TouchController"
Option "Calibration" "4094 -35 4026 10"
Option "SwapAxes" "1"
EndSection
Restart your Raspberry Pi then:
sudo reboot
Now you can start the calibration tool with the following command (please write the command in one line !):
xinput_calibrator --device "eGalax Inc. USB TouchController"
Page 9
The display will now show four consecuting points
that you will have to press. Aer that, four calibration
values will be outputted to you, which you must enter
in the previously created file „99-calibration.conf“.
For this, please enter the following command (in one
line):
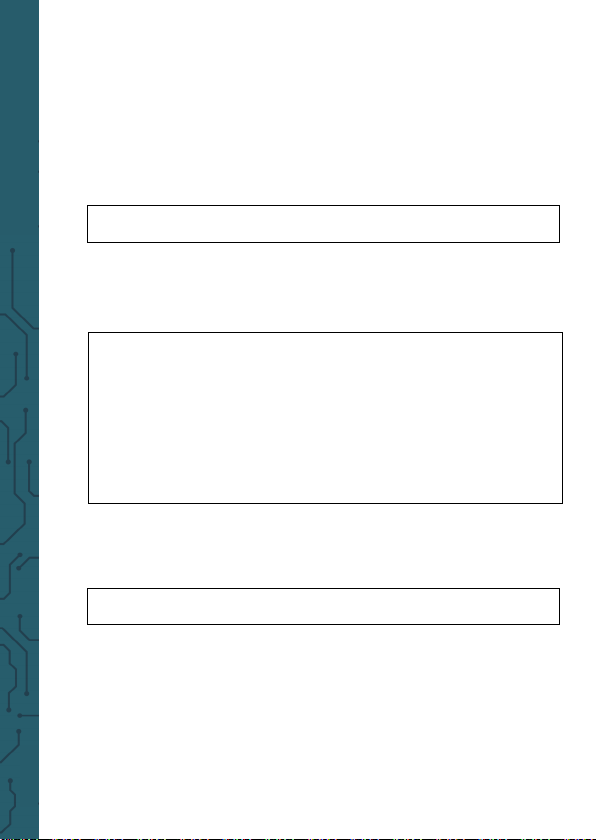
sudo nano /usr/share/X11/xorg.conf.d/99-calibration.conf
Enter the following content here and amend the four
values of the "calibration" option with those, which
have been outputted to you in the previous step:
Section "InputClass"
Identifier "calibration"
MatchProduct "eGalax Inc. USB TouchController"
Option "Calibration" "4094 -35 4026 10"
Option "SwapAxes" "1"
EndSection
Finally, you have to restart the Raspberry Pi for the last
time:
sudo reboot
Now the Touch function is ready to use.
Page 10
3.3 Usage with a desktop PC
Connect the display with the provided power supply.
Then, connect your computer with the display, using
an HDMI– or VGA-cable, depending on your preference.
You can further connect your computer with the Touch
interface using the USB cable, if the operation via
Touchscreen is desired.
This requires an additional driver installation though.
Attention! On some systems, it may happen
that the the lastest drivers are not fully func-
!
tional. In this case, better results can be
The drivers for the Touch function can be found on this
website.
In order to ensure the touch function of the display
even when using several screens, the multiple moni-
tor function must be activated in the eGalax Touch
program.
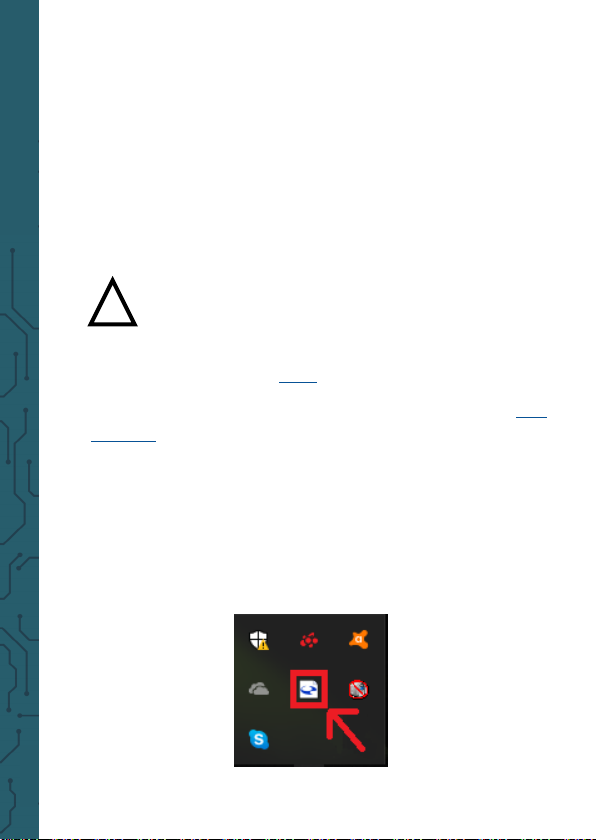
For this, please first open the program:
achieved with older drivers. You can download
an older driver here.
Page 11
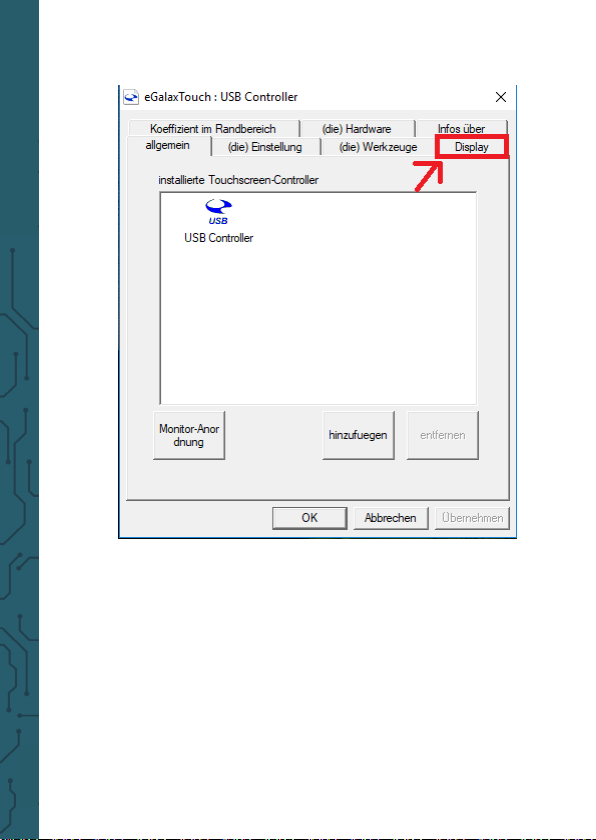
Aerwards, choose the tab "Display" :
Page 12
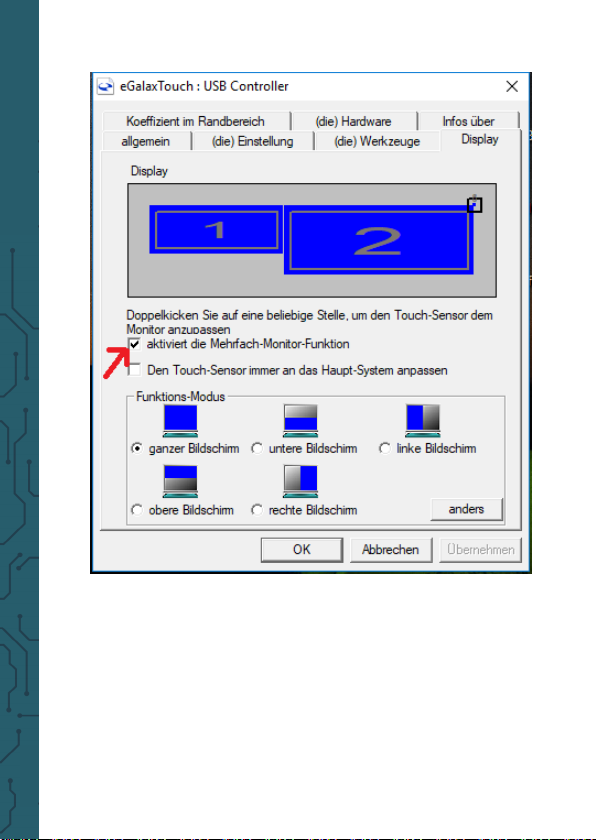
Now activate the multiple monitor function:
Aer activation, you will be prompter to perform another calibration. If this does not take place automatically,
please proceed as follows:
Page 13
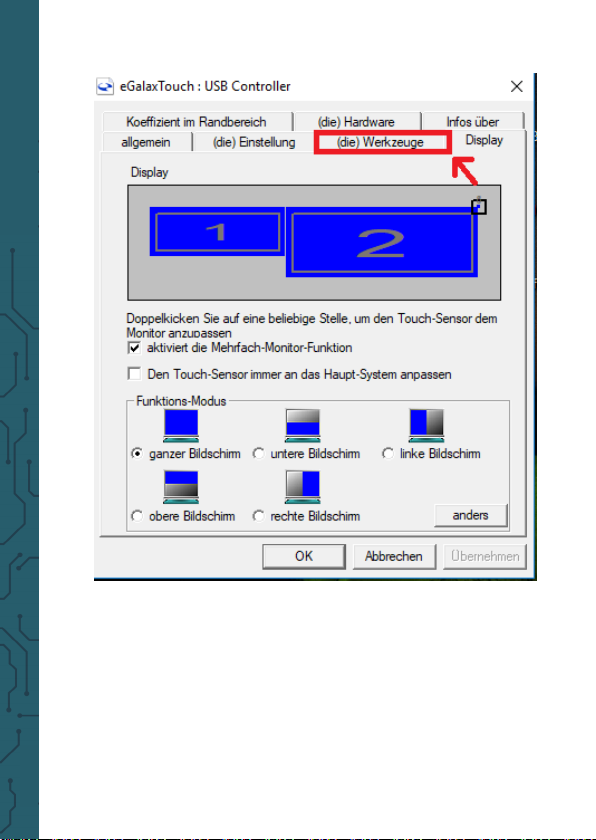
Select the Tab "Tools" :
Page 14
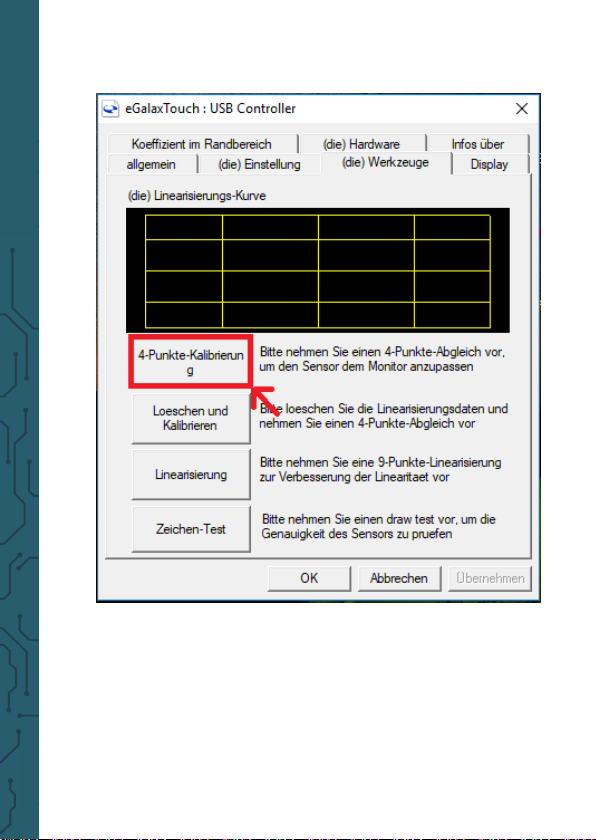
Now please click on 4-Point-Calibration, to perform a
new calibration:
If there is a problem arising with the detection of the
USB- touch screen drivers, the eGalax Touch driver
must be uninstalled and reinstalled.
During the installation, make sure that you have the
USB cable connected with the computer and the Touch
interface of the display.
Then you have finished the set-up.
Page 15
4. ADDITIONAL INFORMATION
Our Information and Take-back Obligations
according to the German Electronic Law
(ElektroG)
Symbol on Electric and Electronic Devices:
This crossed-out dustbin means, that electric and
electronic devices do not belong into household waste.
You have to return the used device to a registration place.
Before handing over, you must remove the waste
(rechargeable) batteries which are not enclosed by the
device.
Return Options:
As end user, you can hand over the used device (which
essentially serves for the same function as the new one
bought with us) free of charge for disposal at purchase of
the new device. Small devices which do not have outer
dimensions bigger than 25 cm, can be handed over for
disposal in normal household quantities independently of
purchasing a new device.
Option of return at our company site during our opening hours:
Simac E. H. GmbH, Pascalstr. 8, D-47506 Neukirchen-Vluyn
Option of return nearby:
We will send you a parcel stamp with which you can send
us your old device free of charge. For using this, please
contact us via e-mail at [email protected] or via telephone at 02845 93 60 -23.
Information on packaging:
Please pack your old device safe for transport. If you do
not have suitable packaging material or you do not want
to use your own material, please contact us and we will
send you an appropriate package.
Page 16

5. SUPPORT
We support you aer purchase, of course. Should you
have any outstanding questions or problems, please
contact us via e-mail, telephone and ticket-supportsystem.
E-mail: [email protected]
Ticket-System: http://support.joy-it.net
Telephone: +49 (0)2845 98469 – 66 (10 - 17 o'clock)
For further information, please visit our website:
www.joy-it.net
Veröentlicht: 04.11.2019
Simac Electronics Handel GmbH
Pascalstr. 8 47506 Neukirchen-Vluyn
www.joy-it.net
 Loading...