

Page 1

for/pour/para
XBOXTM360
for/pour/para
XBOXTM360
for/pour/para
XBOXTM360
User Guide
Guide de l’utilisateur
9200 DIGITAL
™
LCD MONITOR
Page 2
Welcome
Thank you for purchasing the 9200 Digital LCD Monitor™ for the Xbox
360™ console. Before using this product please familiarize yourself
thoroughly with this user guide so you understand the setup procedure
and functions of the product.
2 ENGISH
Note: Read the Xbox 360™ console instruction manual for important
safety information and health warnings. Please retain all documents for
future reference.
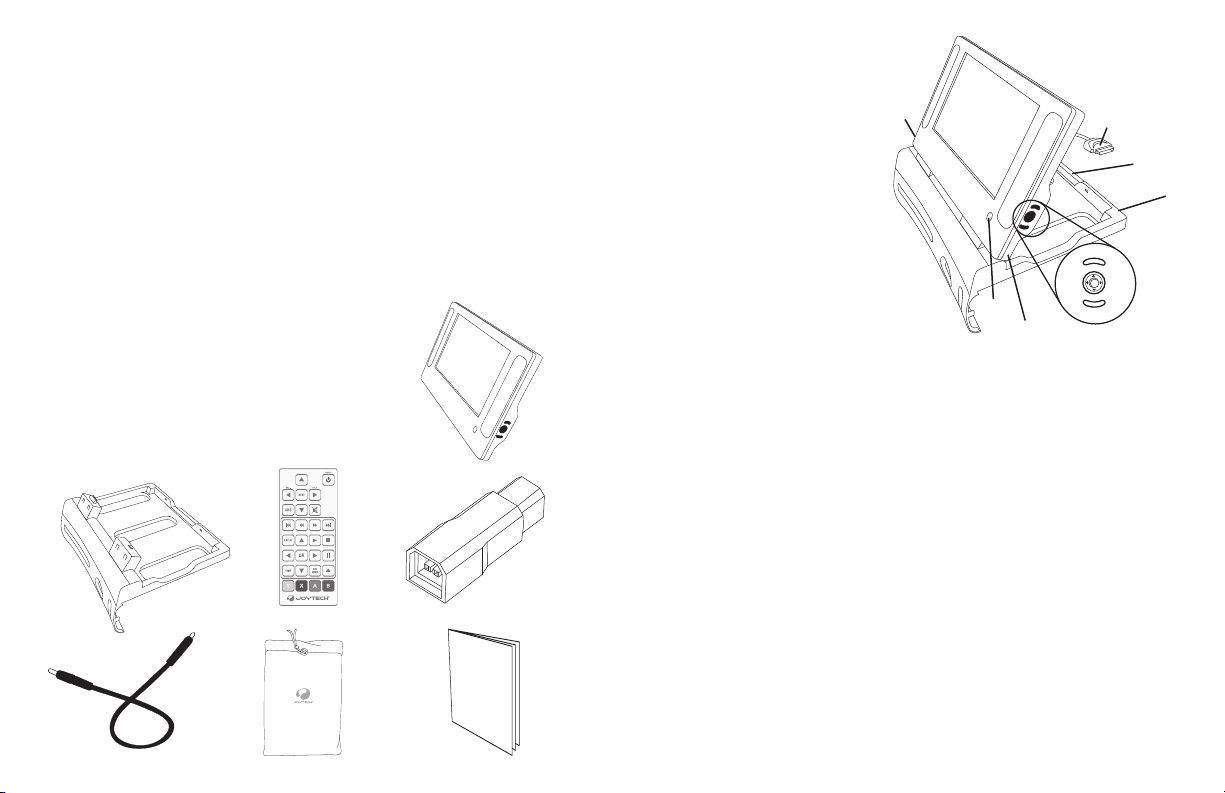
Package Contents
Check you have the following items:
1) 9200 Digital LCD Monitor™
2) Monitor Mount for Xbox 360™
3) Remote Control
4) Power Adapter
5) Power Adapter Link-Cable
6) Protective Bag
7) User Guide
2
5
3
6
1
4
7
Part Names
1) AV Connector
2) Monitor Mount Lock
3) DC IN 12V Connector
4) (ON / Standby) Button
and LED indicator
5) Direction Button
6) Menu Button
7) Earphone Output
8) IR Receiver
7
1
2
3
4
Setup Procedure
1) Switch off the Xbox 360™ console
and remove the AC power cord from
the wall outlet
2) Disconnect all cables and accessories from the Xbox 360™ console
and remove the Xbox 360™ Faceplate.
3) Place the Xbox 360™ console on a stable and flat surface.
Note: Ensure the Monitor is not attached to the Monitor Mount
during this stage of the setup.
Slide the Monitor Mount backwards while guiding the Faceplate so it
attaches to the Xbox 360™ console. Rotate the Monitor Mount Lock so
it closes and clicks into position on the rear of the Xbox 360™.
4) Rotate the bosses on the Monitor Mount so they are in the vertical
position. Hold the Monitor and align the connections to the bosses on
the Monitor Base. Press down firmly so the Release Buttons on the rear
of the Monitor click. The Monitor is now locked on the Monitor Base.
8
7
5
6
Page 3
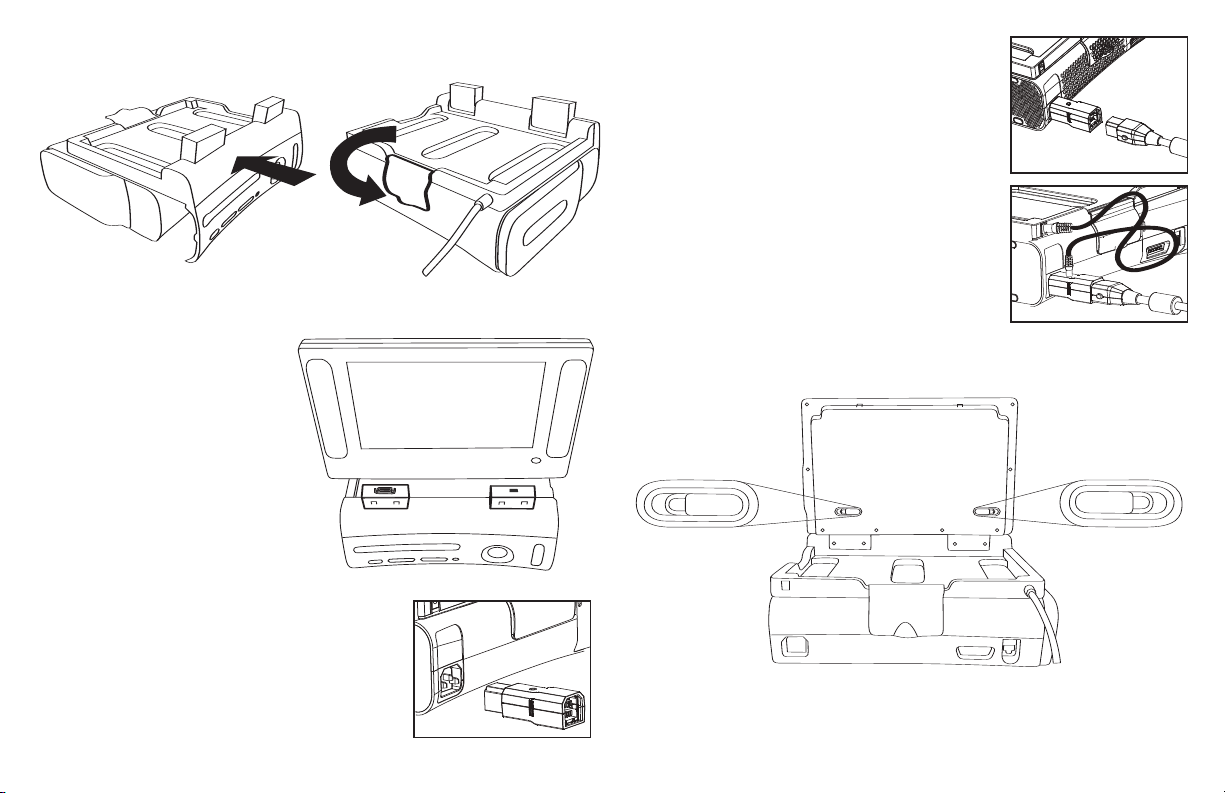
8) Connect the Power Adapter Link-Cable
between the Power Adapter and the DC IN 12V
connector on the Monitor Mount.
9) Press the ON / Standby button on the Xbox
360™ console and then the Monitor.
3 ENGLISH
Note: Attempting to attach
the Monitor to the Monitor
Base at an angle could
cause damage. Always make
sure the Monitor is connected straight and locked firmly
in position before use.
5) Connect the Monitor AV
Connector to the AV port on the
rear of the Xbox 360™ console.
6) Fully insert the Power Adapter supplied with
the Monitor into the Xbox 360™ console.
7) Fully insert the Microsoft Xbox 360™ power
supply cord into the Power Adapter.
Removing the Monitor from the
Monitor Base
1) Make sure the Monitor and Xbox 360™ console are switched off. Slide both of the Release
Buttons on the rear of the Monitor.
Note: Always make sure the Monitor is removed from the
Monitor Base in a linear motion. Twisting the Monitor could
cause damage.
2) While holding the Release Buttons, carefully lift the Monitor to remove
it from the Monitor Base.
Page 4

Monitor Settings
1
2
3
4
5
6
7
8
9
10
12
13
14
15
16
17
18
19
20
11
Set the volume using the left and right arrows on the Direction Button.
Adjust picture and sound settings by pressing the Menu Button to
display the OSD and then use the Direction Button to navigate up and
down. Adjust a highlighted setting using the left and right arrows on the
4 ENGISH
Direction Button.
Press the Menu Button again to close the OSD and save settings. The
OSD will turn off automatically and save settings if no buttons are
pressed for 10 seconds.
10. OPEN/ CLOSE – Opens or closes the Xbox 360™ disc tray.
11. ACTION BUTTONS (A,B,X,Y) – Selects commands on the Xbox 360™ Dashboard.
12. Monitor OSD navigation
13 MENU – Displays the Monitor on screen display
14. SRS – Toggles SRS® audio enhancement on and off
15. SCAN - Fast reverse playback
16. PREVIOUS – Skips back top the beginning of the current or previous chapter.
17. DISPLAY – Accesses the Xbox 360™ onscreen menu for Subtitles, Camera Angle,Audio
Channel Select and Zoom
18. OK - Enters the item selected on the DVD disc menu or the on-screen control panel
of the Xbox 360™.
19. Xbox 360™ Dashboard navigation controls
20. GUIDE – XBOX Guide Button displays the dashboard
Remote Control
The Remote Control can access the
Monitor OSD to adjust picture and sound
settings. It can also control some movie
and music playback features of the
Xbox 360™ console.
1. POWER – Used to switch Monitor between ON
and standby mode.
2. LEFT/RIGHT - When the OSD is not displayed
the Left/Right will adjust volume
3. MUTE – Mutes the speakers in the Monitor
4. SCAN - Fast forward playback
5. NEXT – Skips to the beginning of the next track.
6. PLAY – Begins playback of movie or audio
media on Xbox 360™
7. STOP - Stops playback
8. PAUSE – Pauses and resumes media playback.
9. DVD MENU – Displays the disc menu of the DVD
video disc. The menu contents will vary depending
on the disc.
SRS® Audio Technology
The Digital LCD Monitor™ features SRS® Audio Technology. SRS®
improves the audio dynamics of the stereo speakers and earphones.
Toggle SRS® on and off to hear the change in audio effect.
Monitor Display
The 9200 Digital LCD Monitor™ features RGB color definition for a
bright vibrant image suitable for both games and movies. The Monitor
supports Standard Definition (SD) video signals from the Xbox™ 360
console and is not designed for use with High Definition (HD) signals.
Page 5
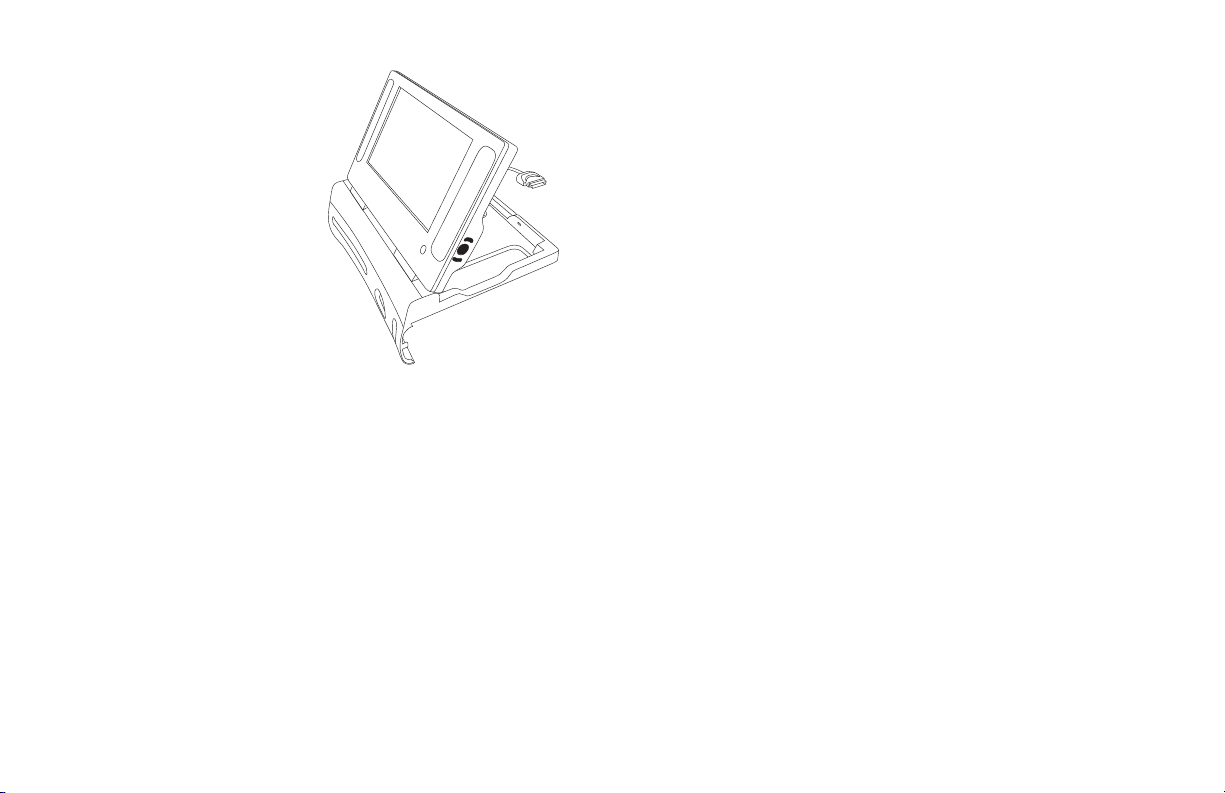
Prevent the Monitor and Xbox 360™ Console
from Overheating
Do not block any ventilation openings on
the Monitor or Console. Do not place
the Monitor and Console on a bed,
sofa, or other soft surface that may
5 ENGISH
block ventilation openings.
Do not operate the Monitor,
Console or both products while the
Monitor is attached to the Monitor
Base and is folded flat in the storage
position. When the Monitor or Console is
used the Monitor must be opened in a
near-vertical position so it does not block the
ventilation openings in the top of the Console.
Remote Control (Battery Replacement)
The Remote Control is powered by two LR1130 batteries (supplied).
To replace the batteries use a small cross head screwdriver to open the
panel on the underside of the Remote Control and insert new batteries
observing the correct polarity.
Troubleshooting
Should your Monitor develop a problem, please check the troubleshooting points below:
Check the Power Adapter Link-Cable is fitted securely.
Check that the Xbox 360™ console is switched on.
Ensure that the Monitor AV Connector is correctly fitted into
the AV port of the Xbox 360™.
Adjust the brightness and contrast settings of the Monitor.
• No Sound
Adjust the volume control and check the audio is not muted
Check there are no earphones connected to the Monitor.
• Monitor Remote Control does not work.
There is an object in the line of sight between
the Remote Control and the IR Receiver.
The distance between the Remote Control and
the IR Receiver is too far.
Check that the batteries are inserted correctly.
Replace old batteries with new ones.
• No picture
Check the power is switched on to the Xbox 360™ Power Supply.
Check the Power Adapter is correctly fitted between the Xbox 360™
console and the Power Cord.
Page 6

Warranty
When you purchase from JOYTECH, you purchase quality. JOYTECH
offers a one (1) year replacement warranty on this product. JOYTECH
warrants to the original consumer purchaser that this product is free
ENGISH
from defects in either material or workmanship. If a defect covered by
this warranty occurs, JOYTECH, at its option, will repair or replace the
product at no charge. JOYTECH products are tested to withstand normal wear and tear, but are not indestructible and can be damaged if
misused. The JOYTECH warranty does not cover normal wear and tear
or abusive use. This warranty does not apply to products used for any
industrial, professional or commercial purpose. This warranty does not
apply to products that have been damaged by abuse, misuse, modification or tampering or by any other cause not relating to either materials or
workmanship. If a replacement is necessary and your product is no
longer available, a comparable product may be substituted at JOYTECH
sole discretion.
This product is warranted as new, however it may contain factory refurbished components.
For technical support please consult the JOYTECH website at
www.joytech.net/support
LCD Panel Warranty Statement
The JOYTECH 12 month limited warranty reserves an allowance for
missing or faulty pixels. Due to the millions of transistors (pixels) used in
the manufacturing process of LCD TFT Monitors; it is possible to sometimes have a non-performing transistor (bright or dark pixels).
Manufacturers of LCD TFT Monitors expect this defect to occur to a limited extent. Therefore, there is no warranty for any dead pixels unless or
until the display has 5 or more dead pixels.
Battery Care
Incorrect use of batteries can result in battery leakage or explosion.
When using batteries, be sure to follow these instructions:
• Make sure that the plus and minus terminals of the batteries are
inserted in the correct directions.
• Do not mix old and new or different types of batteries.
• Do not attempt to recharge non-rechargeable type batteries.
• Remove the batteries when the product will not be used for an
extended period of time.
• If the battery has leaked, be sure to carefully remove all residue before
inserting new batteries.
CAUTION
• Do not remove this product when the console power is ON.
• Avoid placing this product near extreme temperatures or humidity.
• Do not submerse or allow this product to come into contact with
water. Use in dry locations only.
• An adult should supervise young children when using this product.
• Use of any attachment or accessory with this product not recommended or sold by JOYTECH may result in risk of fire, electrical shock
or injury to persons or product.
• Do not clean any parts with alcohol, cleaning solutions containing
alcohol or strong abrasives. Use a soft cloth and a little water.
• Tampering with this product will invalidate your JOYTECH warranty.
IMPORTANT HEALTH WARNINGS
Photosensitive Seizure Warning
A very small percentage of people may experience a seizure when
exposed to certain visual images, including flashing lights or patterns
that may appear in video games. Even people who have no history of
seizures or epilepsy may have an undiagnosed condition that can
Page 7

cause these “photosensitive epileptic seizures” while watching video
games. These seizures may have a variety of symptoms, including
lightheadedness, altered vision, eye or face twitching, jerking or shaking
of arms or legs, disorientation, confusion, or momentary loss of awareness. Seizures may also cause loss of consciousness or convulsions
that can lead to injury from falling down or striking nearby objects.
Immediately stop playing and consult a doctor if you experience
any of these symptoms.
Parents should watch for or ask their children about the above symptoms - children and teenagers are more likely than adults to experience
these seizures.
Taking the following precautions may reduce the risk of photosensitive
epileptic seizures:
• Sit further away from the screen
• Use a smaller TV screen
• Play in a well-lit room
• Do not play when you are drowsy or fatigued
If you or any of your relatives have a history of seizures or epilepsy, consult a doctor before playing.
We also advise you to take regular breaks of 15 minutes every hour.
Design and specifications are subject to change without notice.
Dispose of this product or products contained in this pack in accordance with local and national disposal regulations.
Page 8

Not suitable for children under 3 years of age. Specifications and external appearance are subject to change without prior notice. JOYTECH is a trademark
of Take-Two Interactive Software, Inc. Microsoft, Xbox, Xbox Live, Xbox 360 and the Xbox logos are either registered trademarks or trademarks of Microsoft
Corporation in the U.S. and/or other countries.
Ne convenient pas a un enfant de moins de 3 ans. Les caractéristiques et l'apparence extérieures sont susceptibles de changer sans notification préalable.
JOYTECH est une marque commerciale de Take-Two Interactive Software, Inc. Microsoft, Xbox, Xbox Live, Xbox 360 et les logos Xbox sont des marques
commerciales ou deposees de Microsoft Corporation aux etats-unis et/ou dans d'autres pays.
 Loading...