

Page 1
3
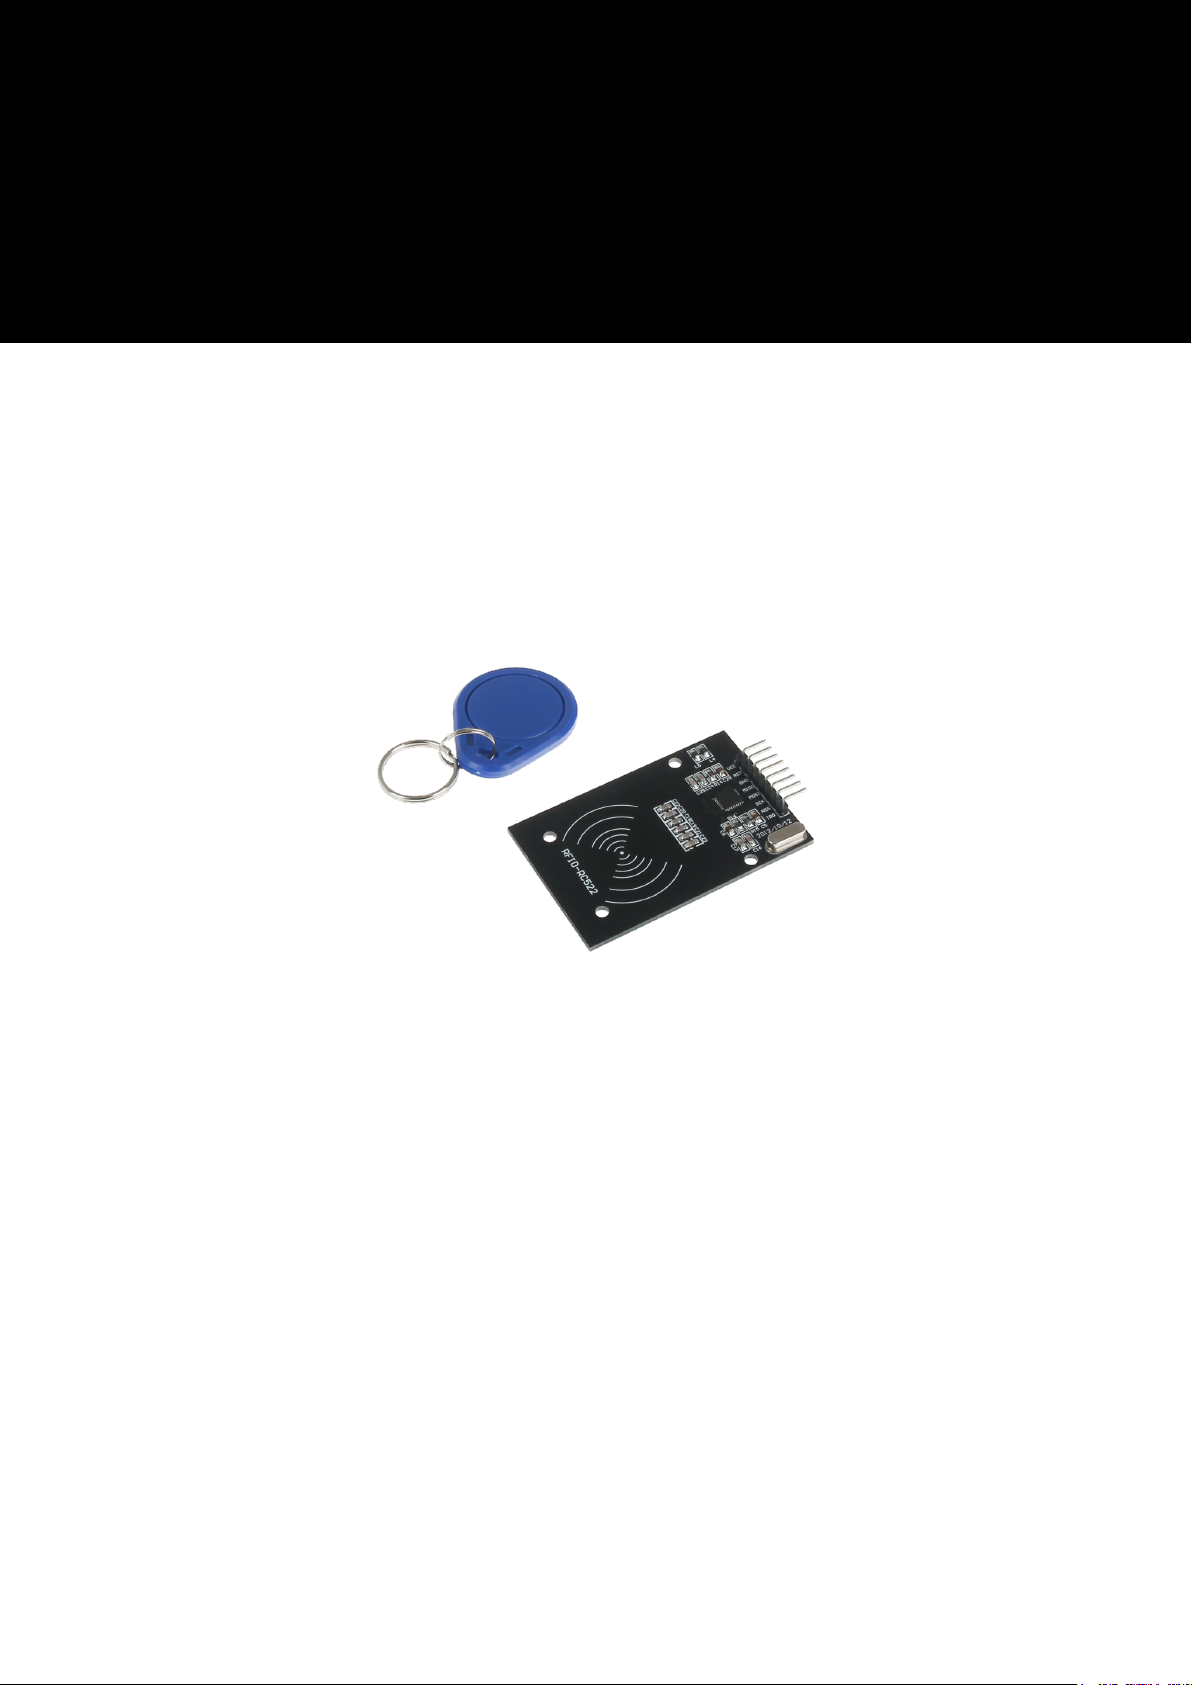
RFID Module
based on NXP MFRC-522
Page 2

TABLE OF CONTENTS
1. Overview
2. Pin-Assignment
3. Using with an Arduino
3.1 Connecng the module
3.2 Installing the module
3.3 Example applicaon
RFID Module
4. Using with a Raspberry Pi
4.1 Connecng the module
4.2 Seng up the system
4.3 Installing the module
4.4. Example applicaon
5. Informaon- and take-back obligaons
6. Support
Publ ished: 08 .07.2019 Copyright by Joy-IT 2
Page 3
RFID Module
1. OVER VIEW
Dear customer,
Thank you very much for choosing our product.
In the following we will show you what has to be observed during commissioning and use. Should you
encounter any unexpected problems during use, please feel free to contact us.
Frequecy 13,56 MHz
Communicaon SPI
RFID Protokoll Mifare
Power Supply DC 3,3V
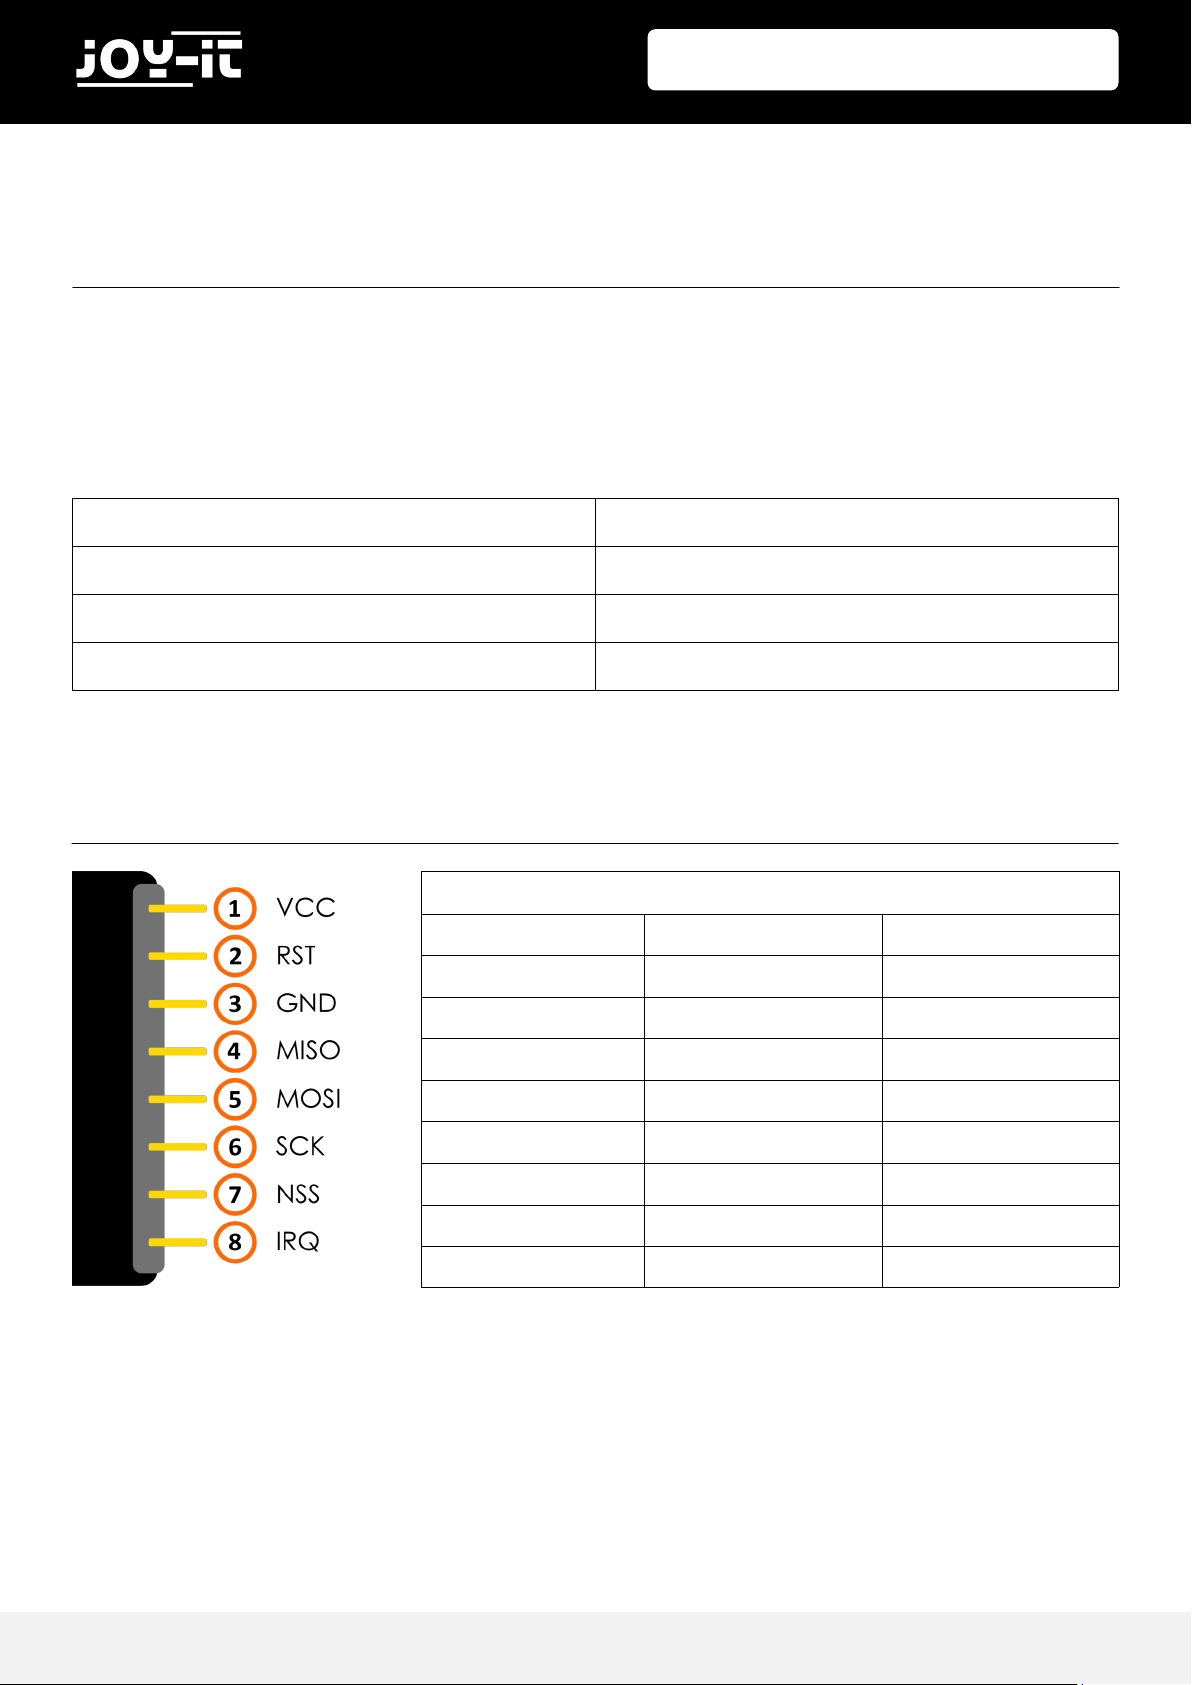
2. PIN-A SSIGNMENT
Assignment
RFID Module Arduino Raspberry Pi
VCC 3,3V 1 (3,3V)
RST 9 22 (BCM 25)
GND GND 6 (GND)
MISO 12 21 (BCM 9)
MOSI 11 19 (BCM 10)
SCK 13 23 (BCM 11)
NSS 10 24 (BCM 8)
IRQ / /
Publ ished: 08 .07.2019 Copyright by Joy-IT 3
Page 4
RFID Module
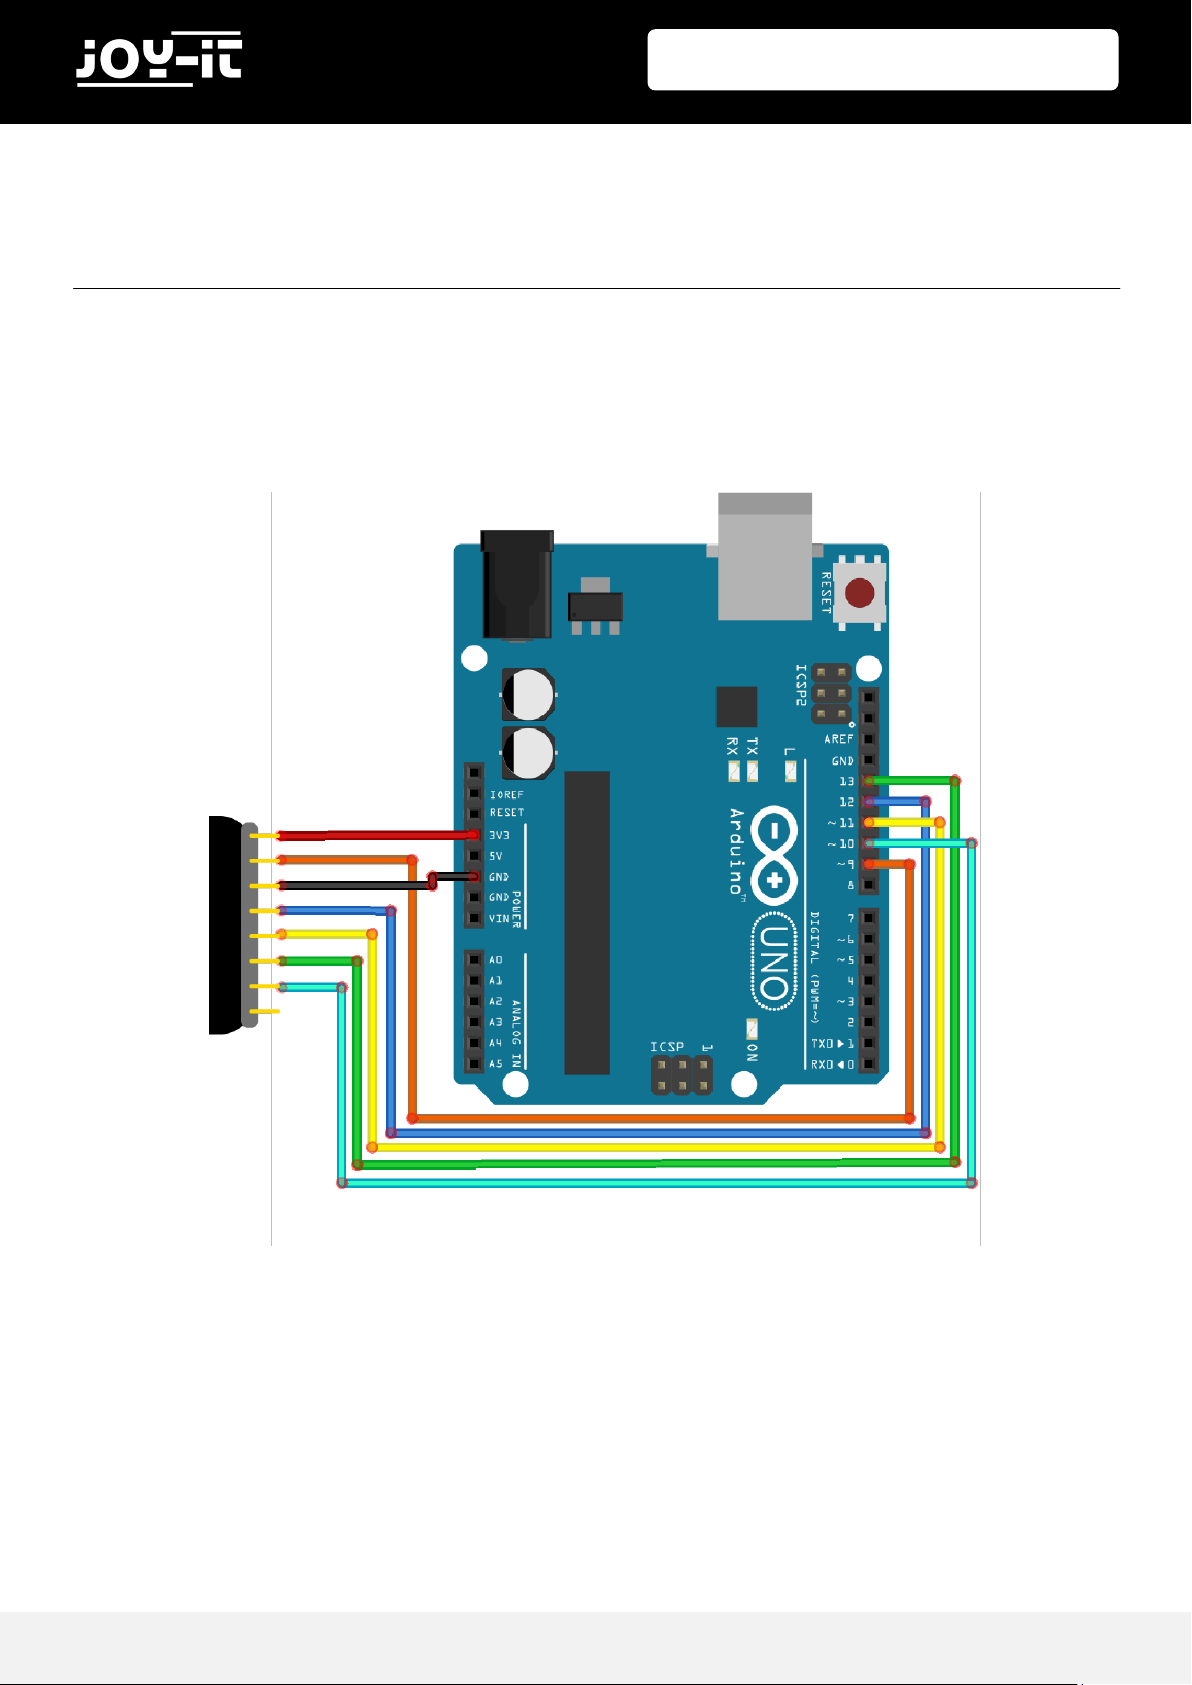
3. USI NG WI TH AN A R DUI NO
3.1 CONNECTING THE MODULE
Connect the RFID module to the pins of your Arduino as shown in the following picture and in the table in
Chapter 2.
Publ ished: 08 .07.2019 Copyright by Joy-IT 4
Page 5

RFID Module
3.2 INSTALLING THE MODULE
In order to use the module with your Arduino, it is rst necessary to install the MFRC522 library from the
Arduino library manager.
In the window that opens, enter the term "MFRC522" in the search eld and install the library.
Publ ished: 08 .07.2019 Copyright by Joy-IT 5
Page 6

RFID Module
3.3 EXAMPLE APPLICATION
Aer you have successfully installed the library, your module is ready for use.
You can use the following code example and transfer it to your Arduino to start up and test the module.
#include <SPI.h>
#include <MFRC522.h>
#define RST_PIN 9
#define SS_PIN 10
MFRC522 mfrc522(SS_PIN, RST_PIN);
void setup() {
//Initialisierung des RFID-Moduls
Serial.begin(9600);
while (!Serial);
SPI.begin();
mfrc522.PCD_Init();
mfrc522.PCD_DumpVersionToSerial(); //Details des Lesegerätes ausge-
ben
Serial.println(F("Scan PICC to see UID, type, and data blocks..."));
}
void loop() {
//Suche nach neuen Karten
if ( ! mfrc522.PICC_IsNewCardPresent()) {
return;
}
if ( ! mfrc522.PICC_ReadCardSerial()) {
return;
}
//Informationsabruf des RFID-Gerätes
mfrc522.PICC_DumpToSerial(&(mfrc522.uid));
}
Publ ished: 08 .07.2019 Copyright by Joy-IT 6
Page 7

RFID Module
4. USI NG WI TH A RA S PBERRY PI
4.1 CONNECTING THE MODULE
Connect the RFID module to the pins of your Raspberry Pis as shown in the following gure and in the
table in Chapter 2.
Publ ished: 08 .07.2019 Copyright by Joy-IT 7
Page 8

RFID Module
4.2 SETTING UP THE SYSTEM
If you are already using a current Raspbian system on your Raspberry, you can skip this step and proceed
immediately to step 3.
First download the latest version of the Raspbian operang system here. With the help of a suitable
program (e.g. „Win32 Disk Imager“) you can install the downloaded image le on a micro-SD card.
Once the process is complete, you can insert the micro-SD card into your Raspberry Pi and start it.
Publ ished: 08 .07.2019 Copyright by Joy-IT 8
Page 9

RFID Module
4.3 INSTALLING THE MODULE
Before you can use the module, it is necessary to install addional libraries.
Open a terminal window on your Raspberry Pi and enter the following commands:
sudo apt-get install python-pip python-dev build-essential
sudo pip install RPi.GPIO
Now open the cong.txt le with the following command:
sudo nano /boot/config.txt
Add the following lines to the end of the le:
dtparam=spi=on
Save the le with the key combinaon CTRL+O, conrm with Enter and exit the editor with the
combinaon CTRL+X.
Restart your Raspberry Pi:
sudo reboot
Now that the preparaons have been completed, the actual library can be installed:
sudo apt-get install git python-def --yes
git clone https://github.com/lthiery/SPI-Py.git
cd SPI-Py
sudo python setup.py install
cd ..
git clone https://github.com/pimylifeup/MFRC522-python.git && cd MFRC522-python
Publ ished: 08 .07.2019 Copyright by Joy-IT 9
Page 10
Now the scripts for wring and reading the data have to be wrien.
Enter the following command to create the script for reading:
sudo nano Read.py
Enter the following script in this le:
#!/usr/bin/env python
import RPi.GPIO as GPIO
import sys sys.path.append('/home/pi/MFRC522-python')
from mfrc522 import SimpleMFRC522
reader = SimpleMFRC522()
print("Now place tag next to the scanner to write")
try:
id, text = reader.read()
print(id)
print(text)
finally:
GPIO.cleanup()
RFID Module
Now enter the following command to create the script for wring:
sudo nano Write.py
Enter the following script in this le:
#!/usr/bin/env python
import RPi.GPIO as GPIO
import sys
sys.path.append('/home/pi/MFRC522-python')
from mfrc522 import SimpleMFRC522
reader = SimpleMFRC522()
try:
while True:
text = raw_input('Your Text: ')
print("Now place tag next to the scanner to write")
id, text = reader.write(text)
print("recorded")
print(id)
print(text)
break
finally:
GPIO.cleanup()
Publ ished: 08 .07.2019 Copyright by Joy-IT 10
Page 11

RFID Module
4.4 EXAMPLE APPLICATIONS
The library now installed already contains sample applicaons for reading and wring.
You can start the applicaon for reading with the following command:
sudo python Read.py
Run the le to write a clip or a card with the following command:
sudo python Write.py
Publ ished: 08 .07.2019 Copyright by Joy-IT 11
Page 12

RFID Module
5. INFOR MATION- A N D TAKE-BACK OBLIGATIONS
Symbol on electrical and electronic equipment
This crossed-out dustbin means that electrical and electronic appliances do not belong in the household
waste. You must return the old appliances to a collecon point. Before handing over waste baeries and
accumulators that are not enclosed by waste equipment must be separated from it.
Return opons
As an end user, when you purchase a new device, you can return your old device (which essenally fulls
the same funcon as the new one purchased from us) free of charge for disposal. Small appliances with
no external dimensions greater than 25 cm can be disposed of in normal household quanes
independently of the purchase of a new appliance.
Possibility of return at our company locaon during opening hours
Simac GmbH, Pascalstr. 8, D-47506 Neukirchen-Vluyn
Possibility of return near you
We will send you a parcel stamp with which you can return the device to us free of charge. Please contact
us by e-mail at Service@joy-it.net or by telephone.
Informaon on packaging
If you do not have suitable packaging material or do not wish to use your own, please contact us and we
will send you suitable packaging.
Publ ished: 08 .07.2019 Copyright by Joy-IT 12
Page 13

RFID Module
6. SUPP ORT
We are also there for you aer the purchase. If you sll have quesons or problems, we are also available
by e-mail, telephone and cket support system.
E-Mail: service@joy-it.net
Ticket-System: hp://support.joy-it.net
Phone: +49 (0)2845 98469 – 66 (9:30 - 17:00 Uhr)
For further informaon please visit our website:
www.joy-it.net
Publ ished: 08 .07.2019 Copyright by Joy-IT 13
 Loading...