

Page 1
www.joy-it.net
Pascalstr. 8 47506 Neukirchen-Vluyn
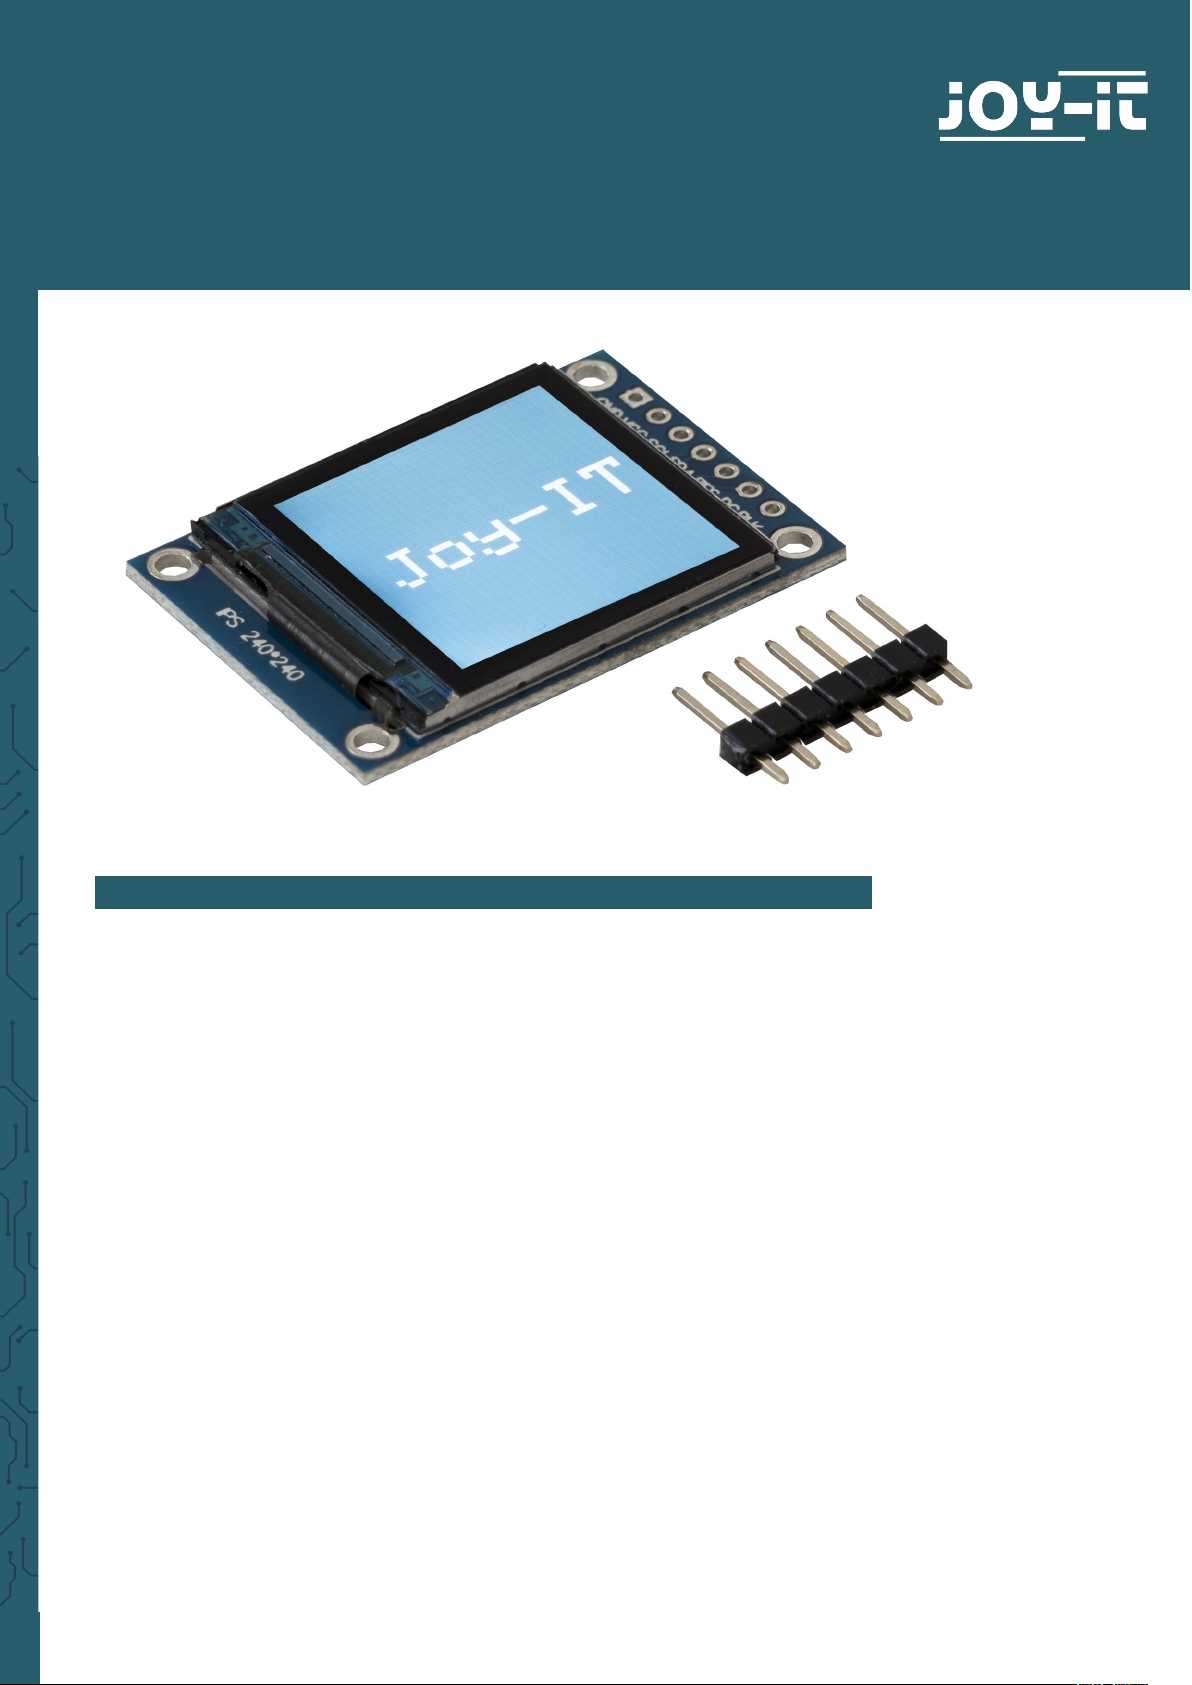
1,3 " HD-IPS-TFT-LCD DISPLAY
SBC-LCD01
1. GENERAL INFORMATION
Dear customer,
thank you for choosing our product. In the following, we will show you
how to use this device.
Should you encounter any unexpected problems during use, please do
not hesitate to contact us.
Note that before you can use the display, you must solder the pin
header!
Page 2
www.joy-it.net
Pascalstr. 8 47506 Neukirchen-Vluyn
2. USAGE WITH THE NODEMCU
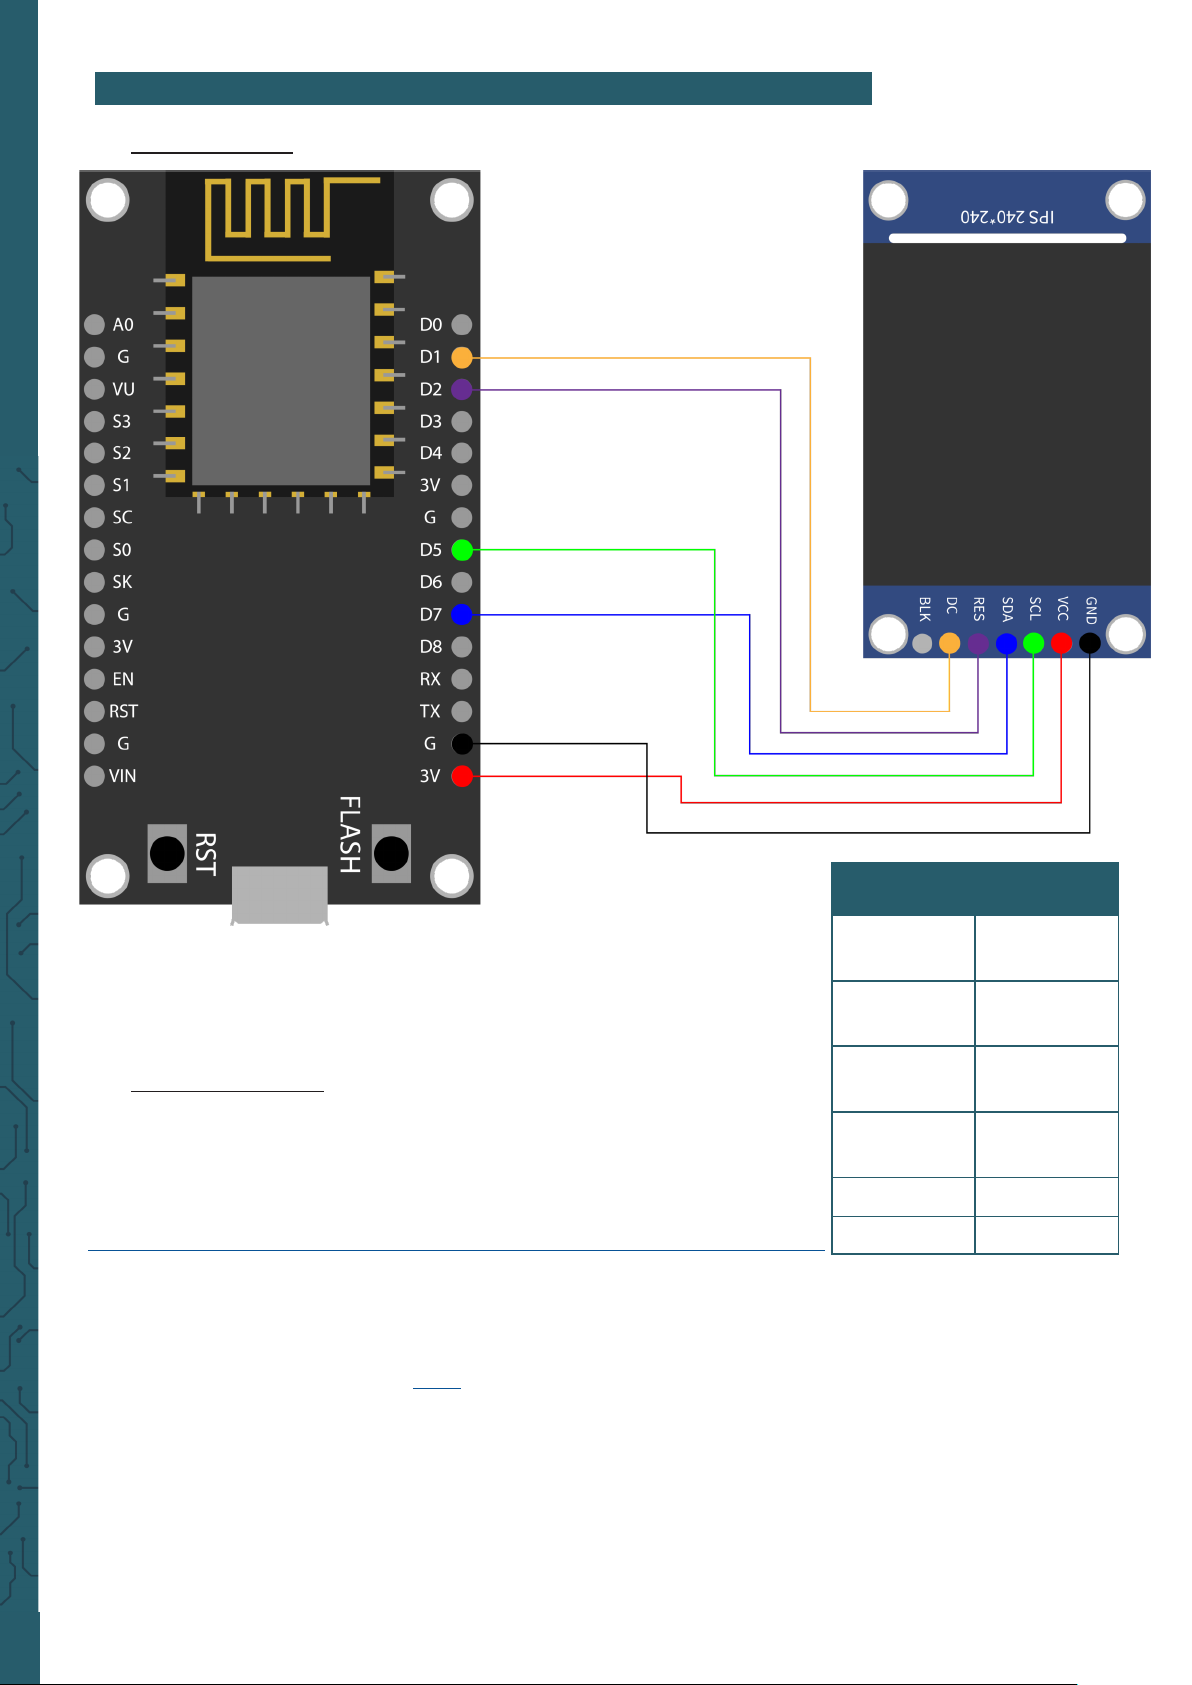
1. Connection
2. Code example
The SBC-LCD01 has a logic level of 3.3V, making a NodeMCU recommended for this application. To use a NodeMCU with the Arduino IDE,
you must first add the board. To do this click on
File
→
Preferences
. There you add the following link
Additional board
administrator URLs
.
Now you can download the library in the Arduino IDE. There you go to the
library manager, which you can find under
Sketch → Include library …
→
Manage libraries …
. There you install Adafruit ST7735 and ST7789
Library and the Adafruit GFX Library using the search bar. Now you can
download a sample code here, where an image is displayed on the
screen.
Make sure that you select the NodeMCU as board also under
Tools
, as
well as the correct port.
Please note, if you want to upload the code, you have to keep the
flash button pressed!
NodeMCU LCD
D1
(GPIO 5)
DC
D2
(GPIO 4)
RES
D5
(SCLK)
SCL
D7
(MOSI)
SDA
G GND
3V VCC
http://arduino.esp8266.com/stable/package_esp8266com_index.json
Page 3

www.joy-it.net
Pascalstr. 8 47506 Neukirchen-Vluyn
#include <Adafruit_GFX.h>
#include <Adafruit_ST7789.h>
#include <SPI.h>
#define CS -1 // Declaration of Chip Select
#define DC 5 // Declaration of Data / Command Pin
#define RST 4 // Declaration of RESET Pin
// Initialize display
Adafruit_ST7789 lcd = Adafruit_ST7789(CS, DC, RST);
void setup(void) {
lcd.init(240, 240, SPI_MODE2);
lcd.setRotation(1);
delay(500);
// fill Display with a colour and a String
lcd.fillScreen(0x22ED);
lcd.setCursor(20, 100);
lcd.setTextColor(ST77XX_WHITE);
lcd.setTextSize(6);
lcd.print("Joy-IT");
}
void loop() {
// empty
}
Page 4

www.joy-it.net
Pascalstr. 8 47506 Neukirchen-Vluyn
3. USAGE WITH THE RASPBERRY PI
1. Connection
Raspberry Pi LCD
Pin 22
(GPIO 25)
DC
Pin 13
(GPIO 27)
RES
Pin 23
(SCLK)
SCL
Pin 19
(MOSI)
SDA
GND GND
3, 3 V VCC
Pin 12
(GPIO 18)
BLK
2. Code example with SPI
We oer you two sample codes for the Raspberry Pi. One is a control via
SPI and the other one via a frame buer. In this part the operation via SPI
is explained.
First enter the following command to enable SPI on your Raspberry Pi.
sudo raspi-config
Page 5

www.joy-it.net
Pascalstr. 8 47506 Neukirchen-Vluyn
There you activate SPI under
5 Interfacing Options → P4 SPI
. Then run
the following command to restart the Raspberry Pi to put the changes
into eect.
sudo reboot
For this code example we use the library RPI ST7789, which was published under the MIT Lizenz. To do this, insert the following commands one
aer the other to successfully install the library.
sudo apt-get update
sudo apt-get install python3-rpi.gpio python3-spidev python3-pip python3-pil
python3-numpy
git clone https://github.com/rusconi/Rpi-ST7789.git
cd Rpi-ST7789
sudo python3 setup.py install
Now you have successfully downloaded the library. You can download
the sample code here or use the following command to download it directly to your Raspberry Pi.
wget https://joy-it.net/files/files/Produkte/SBC-LCD01/SBC-LCD01-Python.zip
You must download this file to have the image file on your Raspberry Pi.
Now you can execute the following commands to project the image file
on your LCD.
unzip SBC-LCD01-Python
cd SBC-LCD01-Python
sudo python3 image.py Joy-IT-240x240.png
In the following you will additionally find our code:
import sys
from PIL import Image
import ST7789 as ST7789
# Save image from argument
picRAW = sys.argv[1]
# Declare display
lcd = ST7789.ST7789( port= 0,
cs = ST7789.BG_SPI_CS_FRONT,
dc = 25, rst = 27, backlight = 18,
mode = 3, spi_speed_hz = 8000000)
lcd.begin()
# Open image
pic = Image.open(picRAW)
# Fit image to screen
pic = pic.resize((lcd.width, lcd.height))
# Show image on display
lcd.display(pic)
Page 6

www.joy-it.net
Pascalstr. 8 47506 Neukirchen-Vluyn
3. Use with a Framebuer
We explain here how to set up the framebuer fbcp-ili9341 to use it with
this LCD screen. This library was published under the MIT-Lizenz.
You must first deactivate SPI, if you have activated it earlier. Therefore,
go back to the configuration of the Raspberry Pi.
sudo raspi-config
There you deactivate SPI under
5 Interfacing Options → P4 SPI
. Now
you have to edit the
config.txt
and comment out a command. You open
the
config.txt
with :
sudo nano /boot/config.txt
There you remove the hash at hdmi_force_hotplug=1. You can save with
CTRL + O and leave the editor with CTRL + X. Now you must restart the
Raspberry Pi with the following command.
sudo reboot
Now you can install fbcp-ili9341 by executing the following commands
one aer the other:
sudo apt-get install cmake
cd ~
git clone clone https://github.com/juj/fbcp-ili9341.git
cd fbcp-ili3941
mkdir build
You must edit the
display.h
before continuing with the setup. Therefore,
open the
display.h
with the following command:
sudo nano display.h
There you exchange line 83 #define DISPLAY_SPI_DRIVE_SETTINGS (0) with
#define DISPLAY_SPI_DRIVE_SETTINGS (1 | BCM2835_SPI0_CS_CPOL | BCM2835_SPI0_CS_CPHA)
#ifndef DISPLAY_SPI_DRIVE_SETTINGS
#define DISPLAY_SPI_DRIVE_SETTINGS (1 | BCM2835_SPI0_CS_CPOL | BCM2835_SPI0_CS_CPHA)
#endif
You save again with CTRL + O and leave the editor with CTRL + X. You can
now continue with the setup by executing the following commands one
aer the other.
cd build
cmake -DST7789VW=ON -DGPIO_TFT_DATA_CONTROL=25 -DGPIO_TFT_RESET_PIN=27 -
DGPIO_TFT_BACKLIGHT=18 -DSPI_BUS_CLOCK_DIVISOR=8 -DBACKLIGHT_CONTROL=ON ..
make -j
sudo ./fbcp-ili9341
Now you will see your desktop on your 1.3" display.
Page 7

www.joy-it.net
Pascalstr. 8 47506 Neukirchen-Vluyn
PR
4. FURTHER INFORMATION
Our information and redemption obligation according to
the Electrical and Electronic Equipment Act
(ElektroG)
Symbol on electrial and electronic products :
This crossed-out bin means that electrical and electronic products do not
belong into the household waste. You must hand over your old appliance
to a registration oice. Before you can hand over the old appliance, you
must remove used batteries and accumulators which are not enclosed by
the device.
Return options :
As the end user, you can hand over with the purchase of a new device your old appliance (which has essentially the same functions as the new
one) free of charge for disposal. Small devices which do not have outer
dimensions greater than 25 cm can be submitted independently of the
purchase of a new product in normal household quantities.
Possibility of restitution at our company location during our opening
hours:
Simac GmbH, Pascalstr. 8, D-47506 Neukirchen-Vluyn
Possibility of restitution nearby :
We send you a parcel stamp with which you can send us your old appliance free of charge. For this possibility, you must contact us via e-mail at
service@joy-it.net or via telephone.
Information about packaging:
Please package your old appliance safe during transport. Should you not
have a suitable packaging material or you do not want to use your own
material, you can contact us and we will send you an appropriate packa-
ge.
5. SUPPORT
If any questions remain open or problems arise aer your purchase, we
are available by email, telephone and ticket support system to answer
these.
E-Mail: service@joy-it.net
Ticket-System: http://support.joy-it.net
Telephone: +49 (0)2845 98469 – 66 (10 - 17 o‘clock)
For more information visit our website:
www.joy-it.net
Published: 29.09.2020
www.joy-it.net
SIMAC Electronics GmbH
Pascalstr. 8, 47506 Neukirchen-Vluyn
 Loading...