

Page 1
3
Joy-Pi
Page 2

Publ ished: 20 .02.2019 Copyright by Joy-IT 2
Joy-Pi
1. Overview
2. Details
3. Changing modules and using the GPIOs
4. Using Python and Linux
5. Lessons
5.1 Lesson 1: Using the buzzer for warning sounds
5.2 Lesson 2: Controlling the buzzer with key inputs
5.3 Lesson 3: How a relay works and how to control it
5.4 Lesson 4: Sending a vibraon signal
5.5 Lesson 5: Detecng noises with the sound sensor
5.6 Lesson 6: Detecng brightness with the light sensor
5.7 Lesson 7: Detecng the temperature and the humidity
5.8 Lesson 8: Detecng movements
5.9 Lesson 9: Measuring distances with the ultrasonic sensor
5.10 Lesson 10: Controlling the LCD display
5.11 Lesson 11: Reading and wring RFID cards
5.12 Lesson 12: Using stepper motors
5.13 Lesson 13: Controlling servo motors
5.14 Lesson 14: Controlling the 8x8 LED matrix
5.15 Lesson 15: Controlling the 7-Segment display
5.16 Lesson 16: Recognizing touches
5.17 Lesson 17: Detecng lts with the lt sensor
5.18 Lesson 18: Using the buon matrix
5.19 Lesson19: Controlling and using the IR sensor
5.20 Lesson 20: Own circuits with the breadboard
5.21 Lesson 21: Photographing with the Raspberry Pi camera
6. Informaon and take-back obligaons
7. Copyright informaons
8. Support
TABLE OF CONTENTS
Page 3
Publ ished: 20 .02.2019 Copyright by Joy-IT 3
Joy-Pi
Dear customer,
Thank you very much for choosing our product. In the following we will show you what has to be observed
during commissioning and use. Should you encounter any unexpected problems during use, please feel
free to contact us.
The following lessons are designed so that, regardless of how much prior knowledge you already have,
you can complete all lessons without any problems. For the dierent lessons you have to download
sample les and run them on the Joy-Pi. How to do this can also be found in this manual.
But these tutorials are only the beginning.
We look forward to seeing what you will do with our Joy-Pi.
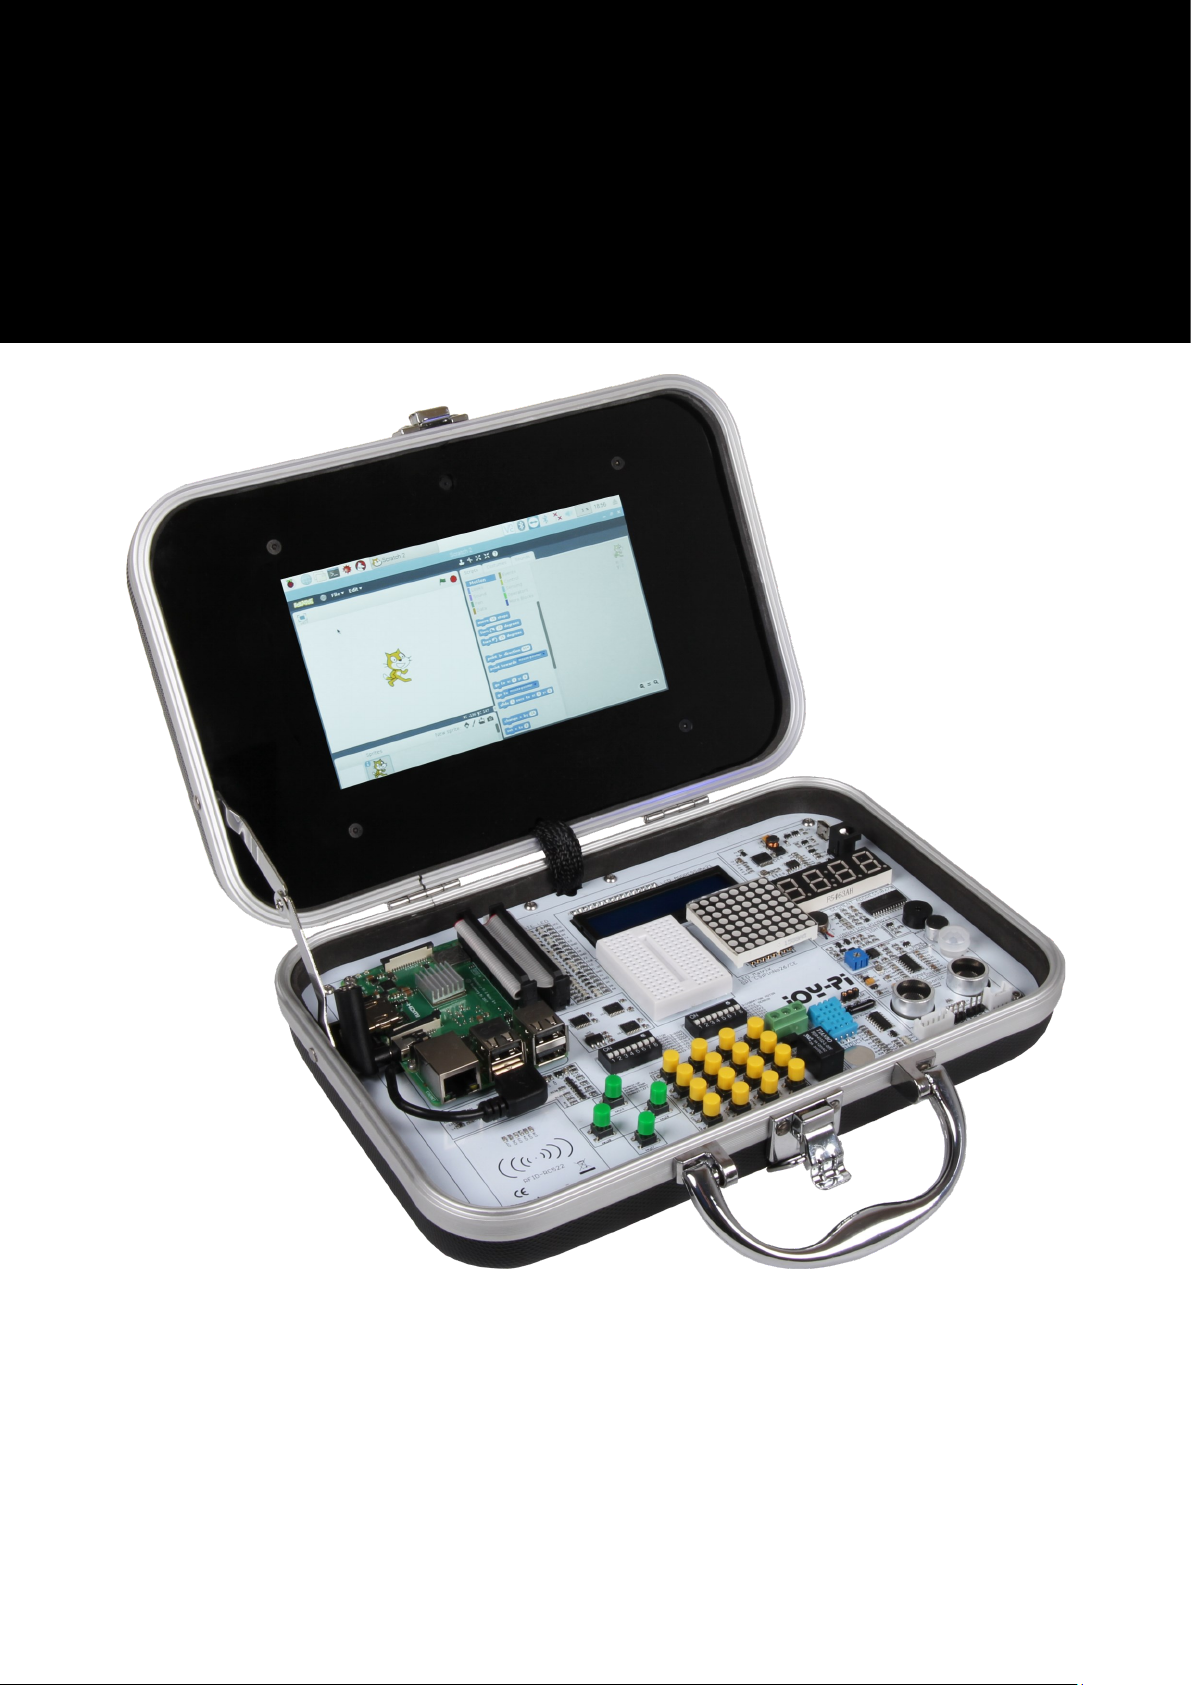
1. OVERVIEW
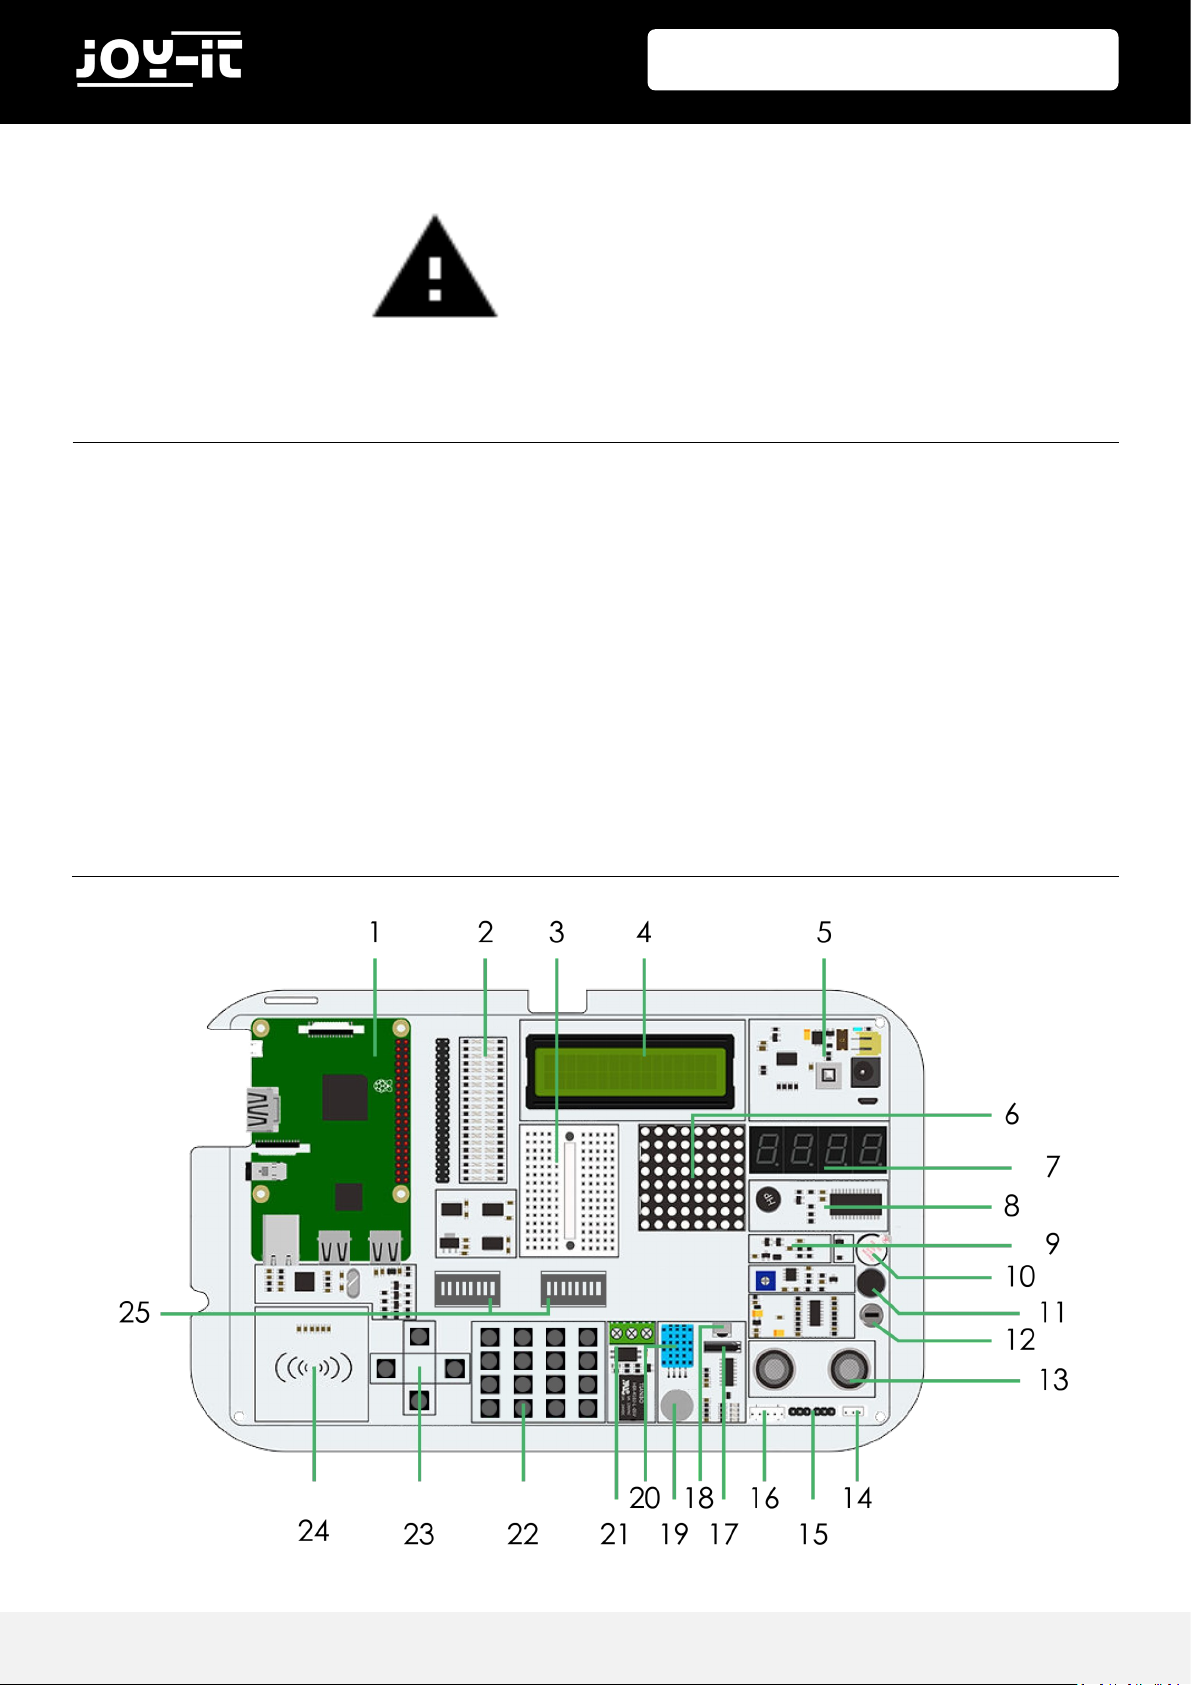
2. DETAILS
The login data is:
Username: pi
Password: 12345
Page 4

Publ ished: 20 .02.2019 Copyright by Joy-IT 4
Joy-Pi
1 Raspberry Pi
2 GPIO LED Display
3 Breadboard - for creang custom curciuts with external modules
4 16x2 LCD Module (MCP23008)
5 Power supply
6 8x8 LED Matrix (MAX7219)
7 7 Segment LED display (HT16K33)
8 Vibraon module
9 Light sensor - to measure the light intensity (BH1750)
10 Buzzer - to generate alarm tones
11 Sound sensor
12 Moon sensor (LH1778)
13 Ultrasonic sensor - Used for distance measurement
14 / 15 Servo interfaces - for connecng servo motors
16 Stepper motor interface
17 Tilt sensor (SW-200D)
18 Infrared sensor
19 Touch sensor
20 DHT11 Sensor - for measuring humidity and temperature
21 Relay - for opening and closing electronic circuits
22 Key matrix
23 Independent keys
24 RFID module - for reading and wring data via RFID/NFC (MFRC522)
25 Switch - for switching between sensors and modules
Page 5
Publ ished: 20 .02.2019 Copyright by Joy-IT 5
Joy-Pi
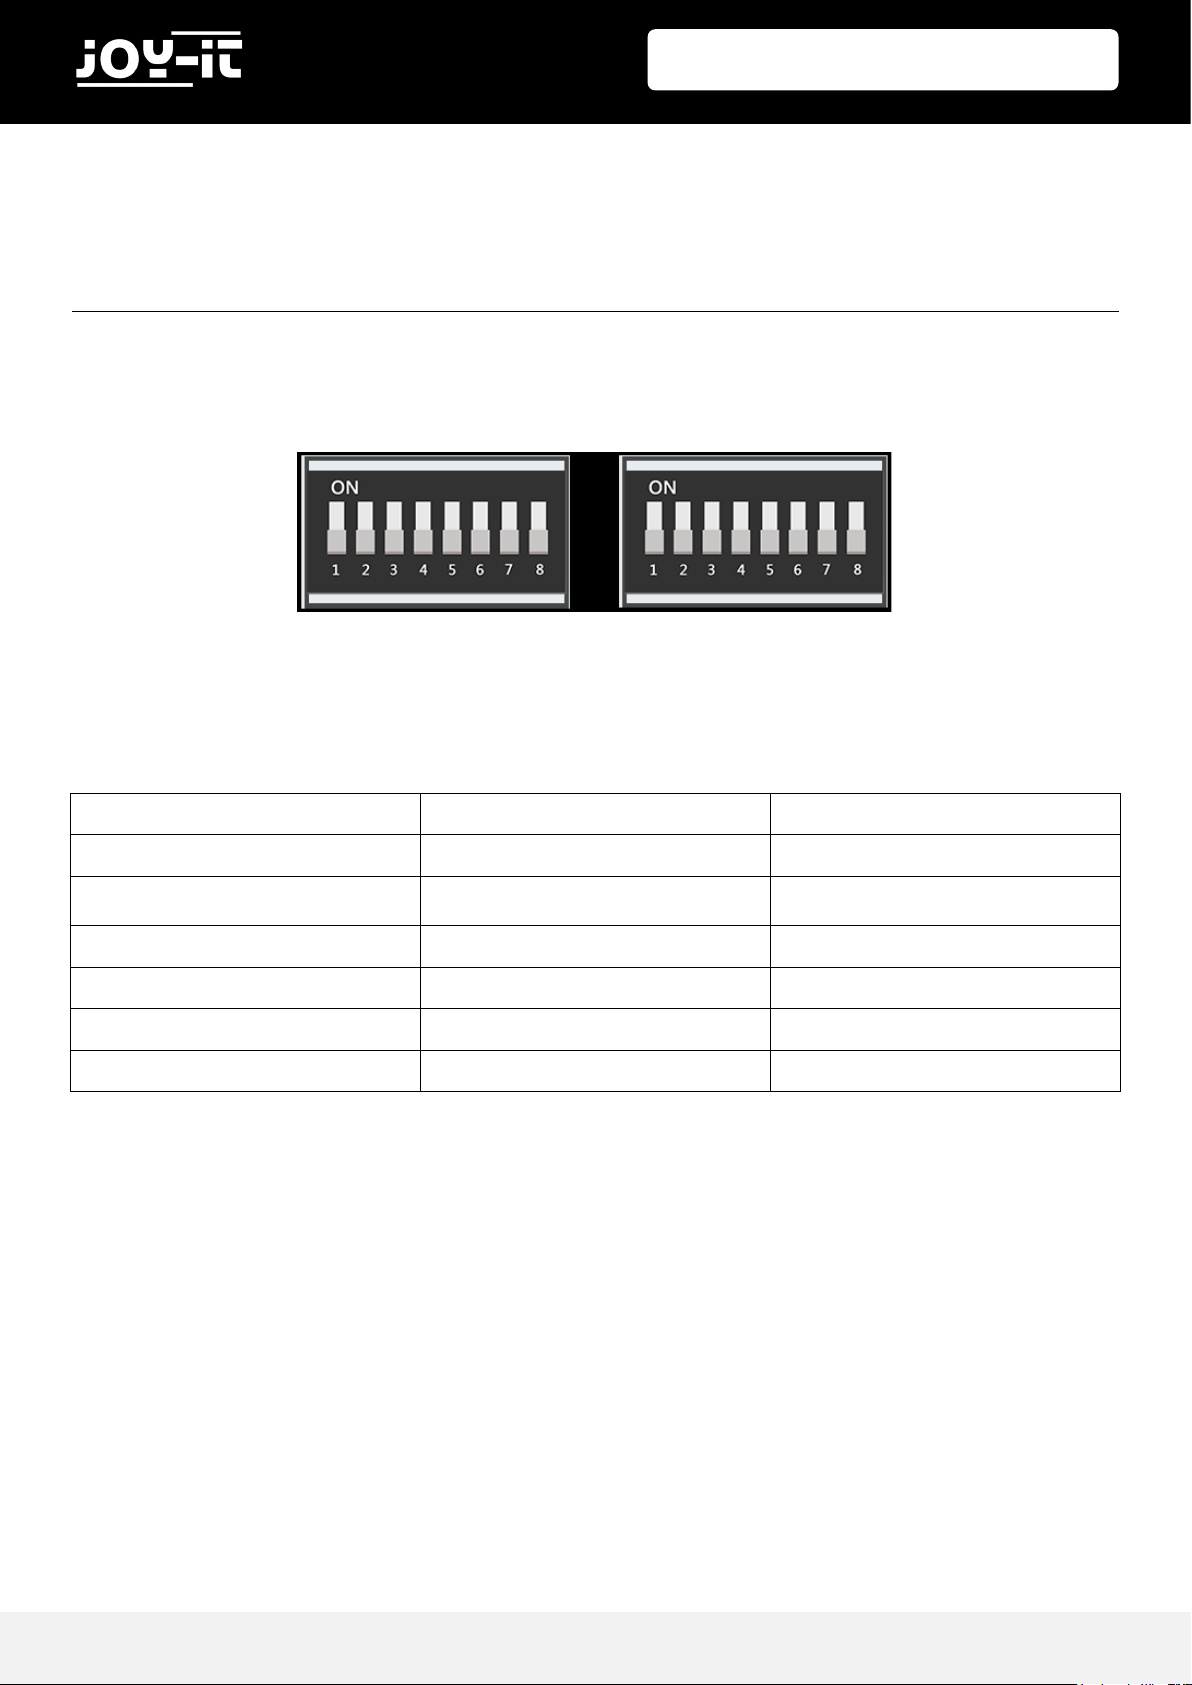
CHANGING MODULES
The Joy-Pi board contains 2 switching units. Each unit contains 8 switches. The switches make it possible
to switch between the use of sensors and modules. Since the Raspberry Pi has only a limited number of
GPIO pins, we need the switches to be able to use more sensors.
3. CHANGING MODULES AND USING THE GPIOS
Sensors / Modules Switching Unit Switches
Key array Le 1 - 8
Buon matrix Le 1 - 8
Vibraon module Right 1
Tilt sensor Right 2
Stepper motor Right 3, 4, 5, 6
Servomotor Right 7, 8
Page 6
Publ ished: 20 .02.2019 Copyright by Joy-IT 6
Joy-Pi
USING THE GPIOS
In the following we will explain in more detail what GPIO's are, how they work and how they are
controlled.
GPIO stands for: "General-purpose input / output" (universal input / output).
GPIO pins have no specic purpose. They can be congured as either input or output and have a general
purpose. This depends on what you want to achieve.
Input pin example: Buon
If the Buon is pressed, the Signal will transfered through the input pin to the RaspberryPi
Output pin example: Buzzer
Send a signal through the output pin to control the buzzer.
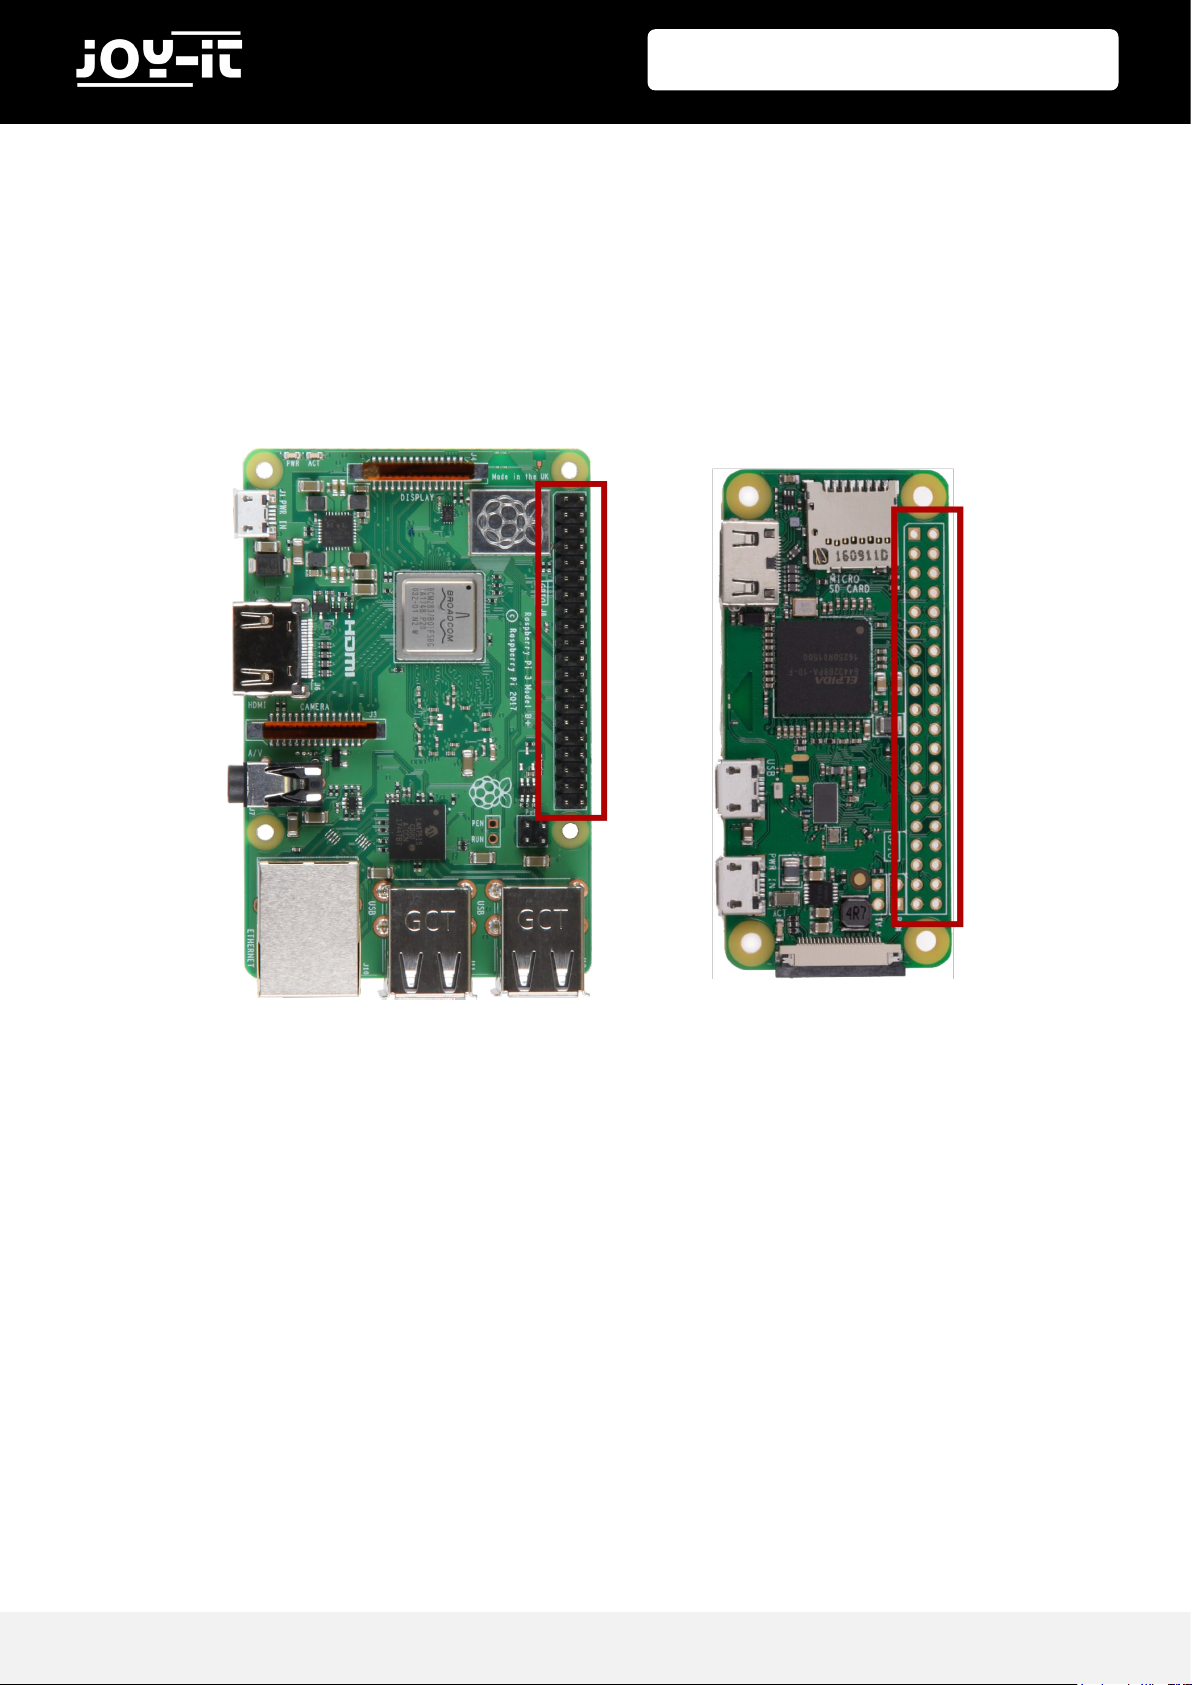
The GPIO pins are located on the right side of the Raspberry Pi board if you start from the Joy-Pi
perspecve.
Page 7

Publ ished: 20 .02.2019 Copyright by Joy-IT 7
Joy-Pi
There are 2 possible Raspberry Pi GPIO schemes: GPIO-BOARD and GPIO-BCM
The GPIO-BOARD opon indicates that you are referring to the pins by the pin number. This means that
the pin numbers listed below will be used.
The GPIO.BCM opon means that you refer to the pins of the "Broadcom SOC Channel". These are the
numbers aer "GPIO" .
1 3.3V DC
3 GPIO 2 (SDA1, I2C)
5 GPIO 3 (SCL1, I2C)
7 GPIO 4
9 Ground
11 GPIO 17
13 GPIO 27
15 GPIO 22
17 3.3V
19 GPIO 10 (SPI, MOSI)
21 GPIO 9 (SPI, MISO)
23 GPIO 11 (SPI, CLK)
25 Ground
27 ID_SD (I2C, EEPROM)
29 GPIO 5
31 GPIO 6
33 GPIO 13
35 GPIO 19
37 GPIO 26
39 Ground
2 5V DC
4 5V DC
6 Ground
8 GPIO 14 (TXD0)
10 GPIO 15 (RXD0)
12 GPIO 18
14 Ground
16 GPIO 23
18 GPIO 24
20 Ground
22 GPIO 25
24 GPIO 8 (SPI)
26 GPIO 7 (SPI)
28 ID_SC
30 Ground
32 GPIO 12
34 Ground
36 GPIO 16
38 GPIO 20
40 GPIO 21
GPIO-Board
Number:
GPIO-Board
Number:
Page 8

Publ ished: 20 .02.2019 Copyright by Joy-IT 8
Joy-Pi
GPIO-Board
Number:
Used sensors and modules:
1 3.3V
2 5.0V
3 I2C, SDA1 (Licht Sensor, LCD Display, 7 Segment Display)
4 5.0V
5 I2C, SCL1 (Light Sensor, LCD Display, 7 Segment Display)
6 Ground
7 DHT11 Sensor
8 TXD0
9 Ground
10 RXD0
11 Touch Sensor
12 Buzzer
13 Buon matrix (ROW1), Vibraon motor
14 Ground
15 Buon matrix (ROW2), Tilt sensor
16 Moon sensor
17 3.3V
18 Sonic sensor
19 SPI
20 Ground
21 SPI
22 Servo2, Buon matrix (COL1), Le Buon
23 SPI
24 RFID Modul
25 Ground
26 LED-MATRIX
27 ID_SD (I2C, EEPROM(Electrically Erasable Programmable Read-only Memory))
28 ID_SC
29 Stepper Motor (STEP1), Buon matrix (ROW3)
30 Ground
31 Stepper Motor (STEP2), Buon matrix (ROW4)
32 Ultrasonic sensor (Echo)
33 Stepper Motor (STEP3), Buonmatrix (COL4), Down Buon
34 Ground
35 Stepper Motor (STEP4), Buonmatrix (COL3), Right Buon
36 Ultrasonic sensor (TRIG)
37 Servo1, Buon matrix (COL2), Up Buon
38 Infrared sensor
39 Ground
40 Relais
ASSIGNMENT OF THE GPIO PINS ACCORDING TO GPIO.BOARD SCHEME
Page 9

Publ ished: 20 .02.2019 Copyright by Joy-IT 9
Joy-Pi
In our examples we use Python language to control the GPIO pins. In Python there is a library called
"RPi.GPIO". This is a library that helps to control the pins programmacally with Python.
Take a look at the following example and the comments in the code to beer understand how it works.
The rst step will be to import the library by typing the command "RPi.GPIO as GPIO", then the "me"
library comes with the command "import me".
Then we set the GPIO mode to GPIO.BOARD. We declare the input pin as pin number 11 for our example
and the output pin as pin 12 (the input is the touch sensor and the output is the buzzer). We send a signal
to the output pin, wait 1 second and then turn it o. Then, to conrm the input, we go through a loop
unl the GPIO.input input signal is received. We print "Input Given" to make sure that the click was
conrmed, clean up the GPIO with GPIO.cleanup () and nish the script.
To learn more about the purpose and use of GPIO, we recommend that you read the ocial
documentaon on the topic of GPIO pins wrien by the Raspberry Pi foundaon.
hps://www.raspberrypi.org/documentaon/usage/gpio/
import RPi.GPIO as GPIO
import time #import lybraries
import signal
TOUCH = 11 #Declaring variables
BUZZER = 12 #and connecting pins
def setup_gpio(): #Definition of in and outputs
GPIO.setmode(GPIO.BOARD)
GPIO.setup(TOUCH, GPIO.IN, pull_up_down=GPIO.PUD_UP)
GPIO.setup(BUZZER, GPIO.OUT)
def do_smt(channel): #class for buzzer output and
print("Touch detected") #detected touch
GPIO.output(BUZZER, GPIO.HIGH) #Signal output
time.sleep (1) #Wait 1 second
GPIO.output(BUZZER, GPIO.LOW) #Stop signal Output
def main():
setup_gpio()
try: #Checking if touch is detected
GPIO.add_event_detect(TOUCH, GPIO.FALLING, callback=do_smt, bouncetime=200)
signal.pause()
except KeyboardInterrupt: #CTRL+C is closing the script
pass
finally:
GPIO.cleanup()
if __name__ == '__main__':
main()
Page 10
Publ ished: 20 .02.2019 Copyright by Joy-IT 10
Joy-Pi
GETTING THE PREINSTALLED OPERATING SYSTEM
For the First Step you have to Download the image le with the Joy-Pi operang system.
You can nd the le on our website at hps://joy-pi.net/downloads/.
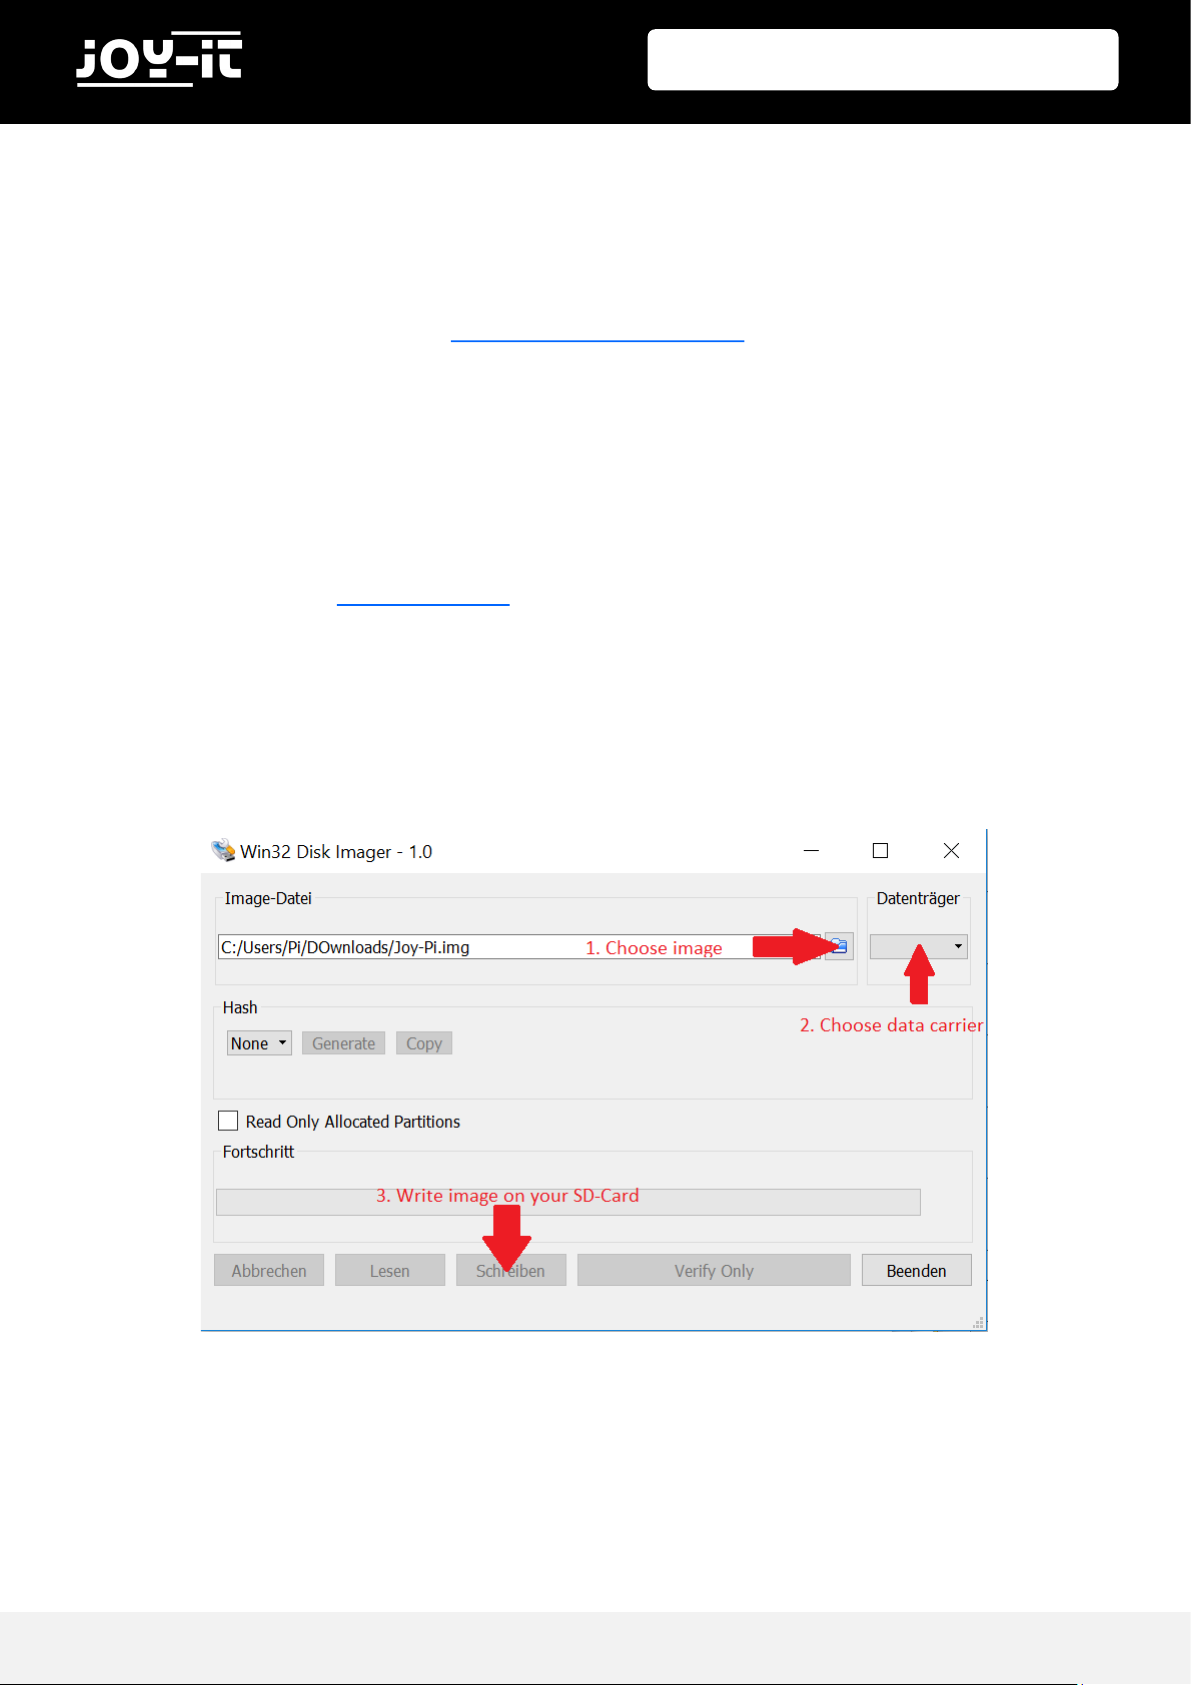
1. Load the .Zip le onto your computer and unzip it to any folder you like. You should receive a .ISO
le
2. Connect a MicroSD card to your computer with the aached MicroSD card reader.
3. Now format the MicroSD card with the program „SD Formaer“
4. Start the Program „Win32DiskImager“ and choose the unziped .Iso le, then click on the „Write“
buon to copy the image onto your MicroSD card.
5. Now the MicroSD card is ready for use, you can put it in your Raspberry Pi now.
Page 11
Publ ished: 20 .02.2019 Copyright by Joy-IT 11
Joy-Pi
This step is oponal, but makes it easier to execute scripts without having to create them individually.
The scripts used in this guide can be downloaded directly from a package. Simply follow the instrucons
below:
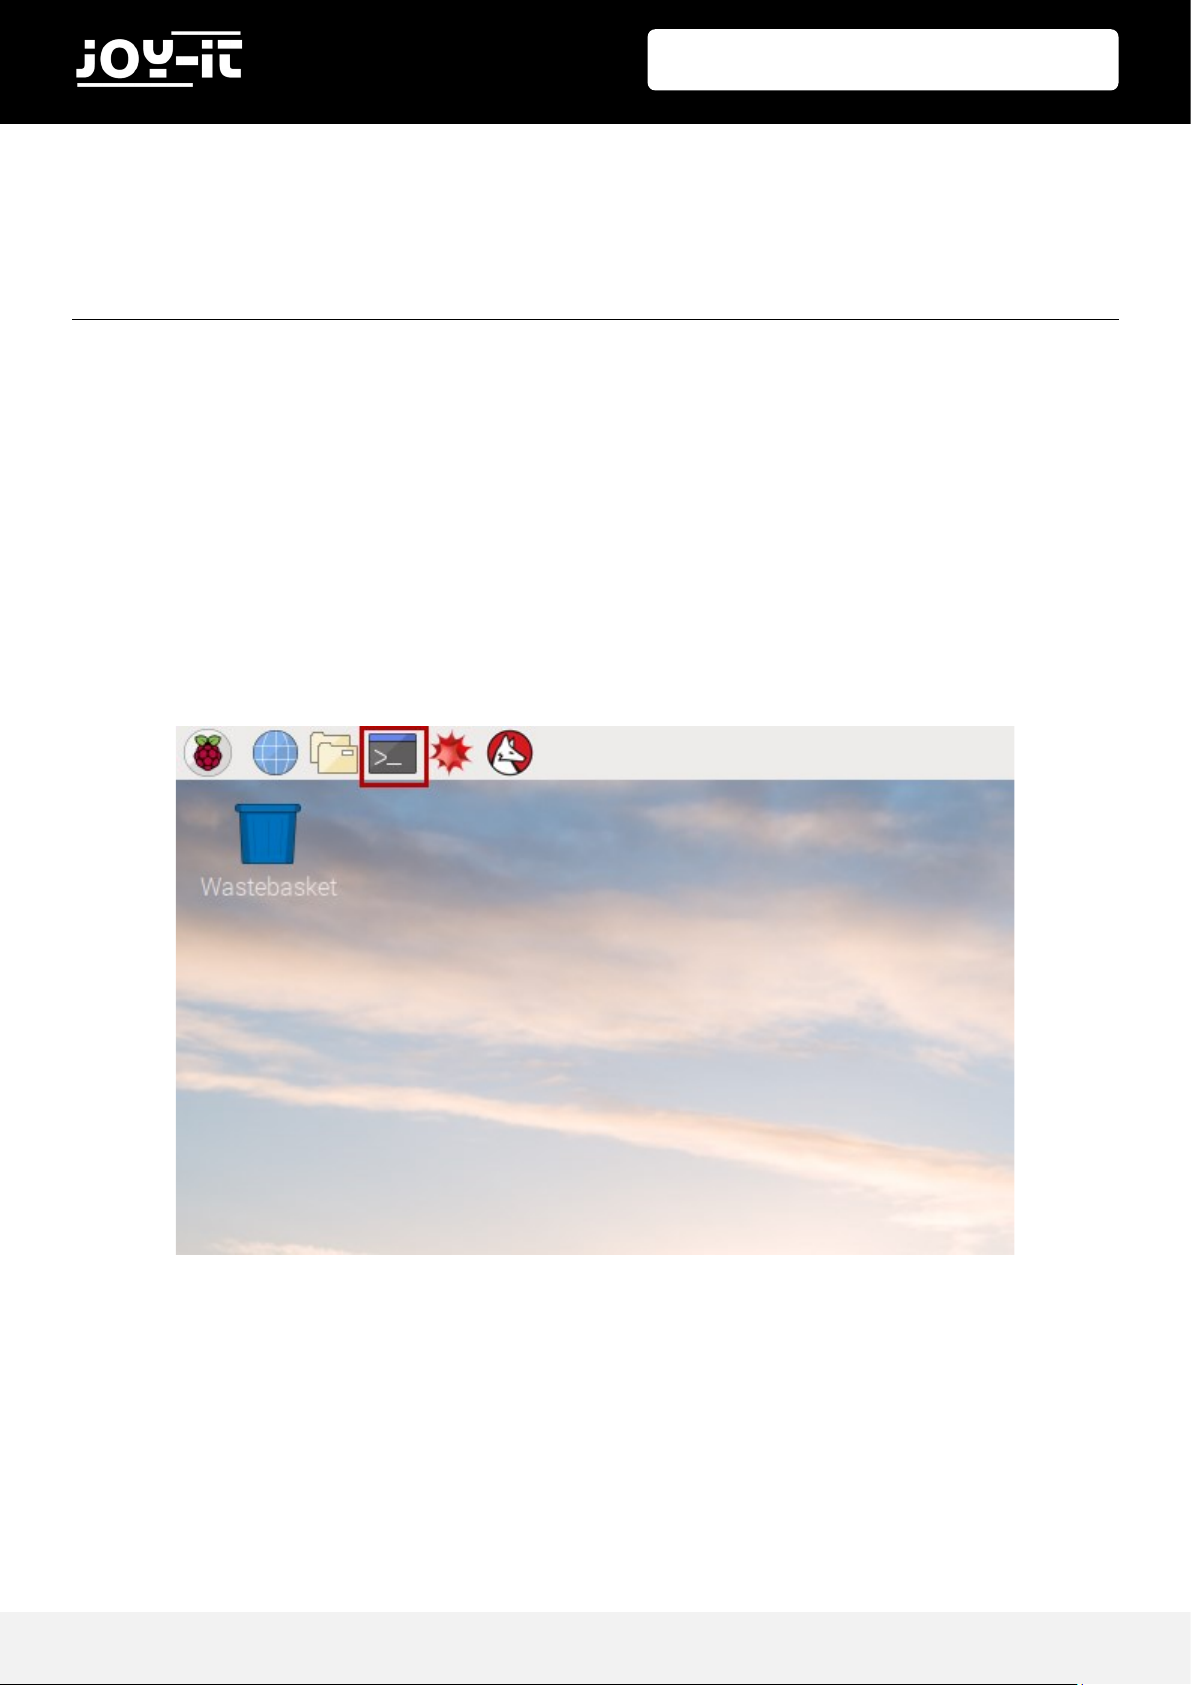
1. Open the "Terminal". We use this to run most of our Python scripts and download extensions and
scripts.
4. USE OF PYTHON AND LINUX
Page 12
Publ ished: 20 .02.2019 Copyright by Joy-IT 12
Joy-Pi
2. Aer successfully opening the terminal, we need to download the script archive to the desktop with
the following commands:
3. Press "Enter" on your keyboard. Now all you have to do is unpack the archive:
4. Press "Enter" and wait unl the process is completed.
5. With the command "cd" we change to the correct directory so that we can use the scripts that are in it:
cd Desktop/
wget http://anleitung.joy-it.net/wp-content/uploads/2019/01/Joy-Pi.zip
unzip JoyPi.zip
cd Joy-Pi
Attention! Every time you restart your terminal, you have to repeat the steps of
changing the directory.
Page 13

Publ ished: 20 .02.2019 Copyright by Joy-IT 13
Joy-Pi
EXECUTING PYTHON SCRIPTS
Aer we successfully downloaded our script, we would like to execute it. Open the terminal again and
follow the instrucons below to run the script:
Write the command "sudo python <script name>" to execute a Python script.
For example:
The sudo command gives us root permissions (admin permissions), which are later required by the GPIO
library. We write "python" to tell the system that we want to execute the command with Python. At the
end, we write the script name as we put it on the desktop. Make sure to always be in the right folder
when you execute the command.
sudo python buzzer.py
Page 14

Publ ished: 20 .02.2019 Copyright by Joy-IT 14
Joy-Pi
5.1 LESSON 1: USING THE BUZZER FOR WARNING SOUNDS
In the previous explanaon, we learned how to use the GPIO pin both as output and input. To test this
now, we go ahead with a real example and apply our knowledge from the previous lesson. The module we
will use is the "Buzzer".
We will use the GPIO output to send a signal to the buzzer and close the circuit to generate a loud buzz.
Then we will send another signal to turn it o.
The buzzer is located on the right side of the Joy-Pi-Board and is easily recognized by the loud noise that it
will make when acvated. When you use your Raspberry Pi for the rst me, the buzzer may have a
protecve scker on it. Make sure this scker has been removed before using the Buzzer.
Just like in the previous example, we have prepared a special script with detailed comments that will
explain how the whole buzzer process works, and how we can control the buzzer with the GPIOs.
First we import the RPi.GPIO library and the me library. Then we congure the buzzer. At pin 12 we set
the GPIO mode to GPIO BOARD and the pin as OUTPUT.
We output a signal for 0.5 seconds and then turn it o.
5. LESSONS
Page 15

Publ ished: 20 .02.2019 Copyright by Joy-IT 15
Joy-Pi
Buzzer code example:
Execute the following commands and try it yourself:
#!/usr/bin/python
# -*- coding: utf-8 -*-
import RPi.GPIO as GPIO #import librarys
import time
buzzer_pin = 12 #define buzzer pin
GPIO.setmode(GPIO.BOARD)
GPIO.setup(buzzer_pin, GPIO.OUT)
# Make buzzer sound
GPIO.output(buzzer_pin, GPIO.HIGH)
#wait 0.5 seconds
time.sleep(0.5)
# Stop buzzer sound
GPIO.output(buzzer_pin, GPIO.LOW)
GPIO.cleanup()
sudo python buzzer.py
cd /home/pi/Desktop/Joy-Pi/
Page 16
Publ ished: 20 .02.2019 Copyright by Joy-IT 16
Joy-Pi
5.2 LESSON 2: CONTROLLING THE BUZZER WITH KEY INPUTS
Aer successfully demonstrang how to turn the buzzer on and o, it's me to make things a lile more
excing. In this lesson, we'll combine a buon with the buzzer so that the buzzer is only turned on by
pressing the buon.
This me we will use 2 GPIO setups. One will be the GPIO.INPUT, which takes the buon as an input,
another will be the GPIO.OUTPUT, which sends a signal to the buzzer to output a sound.
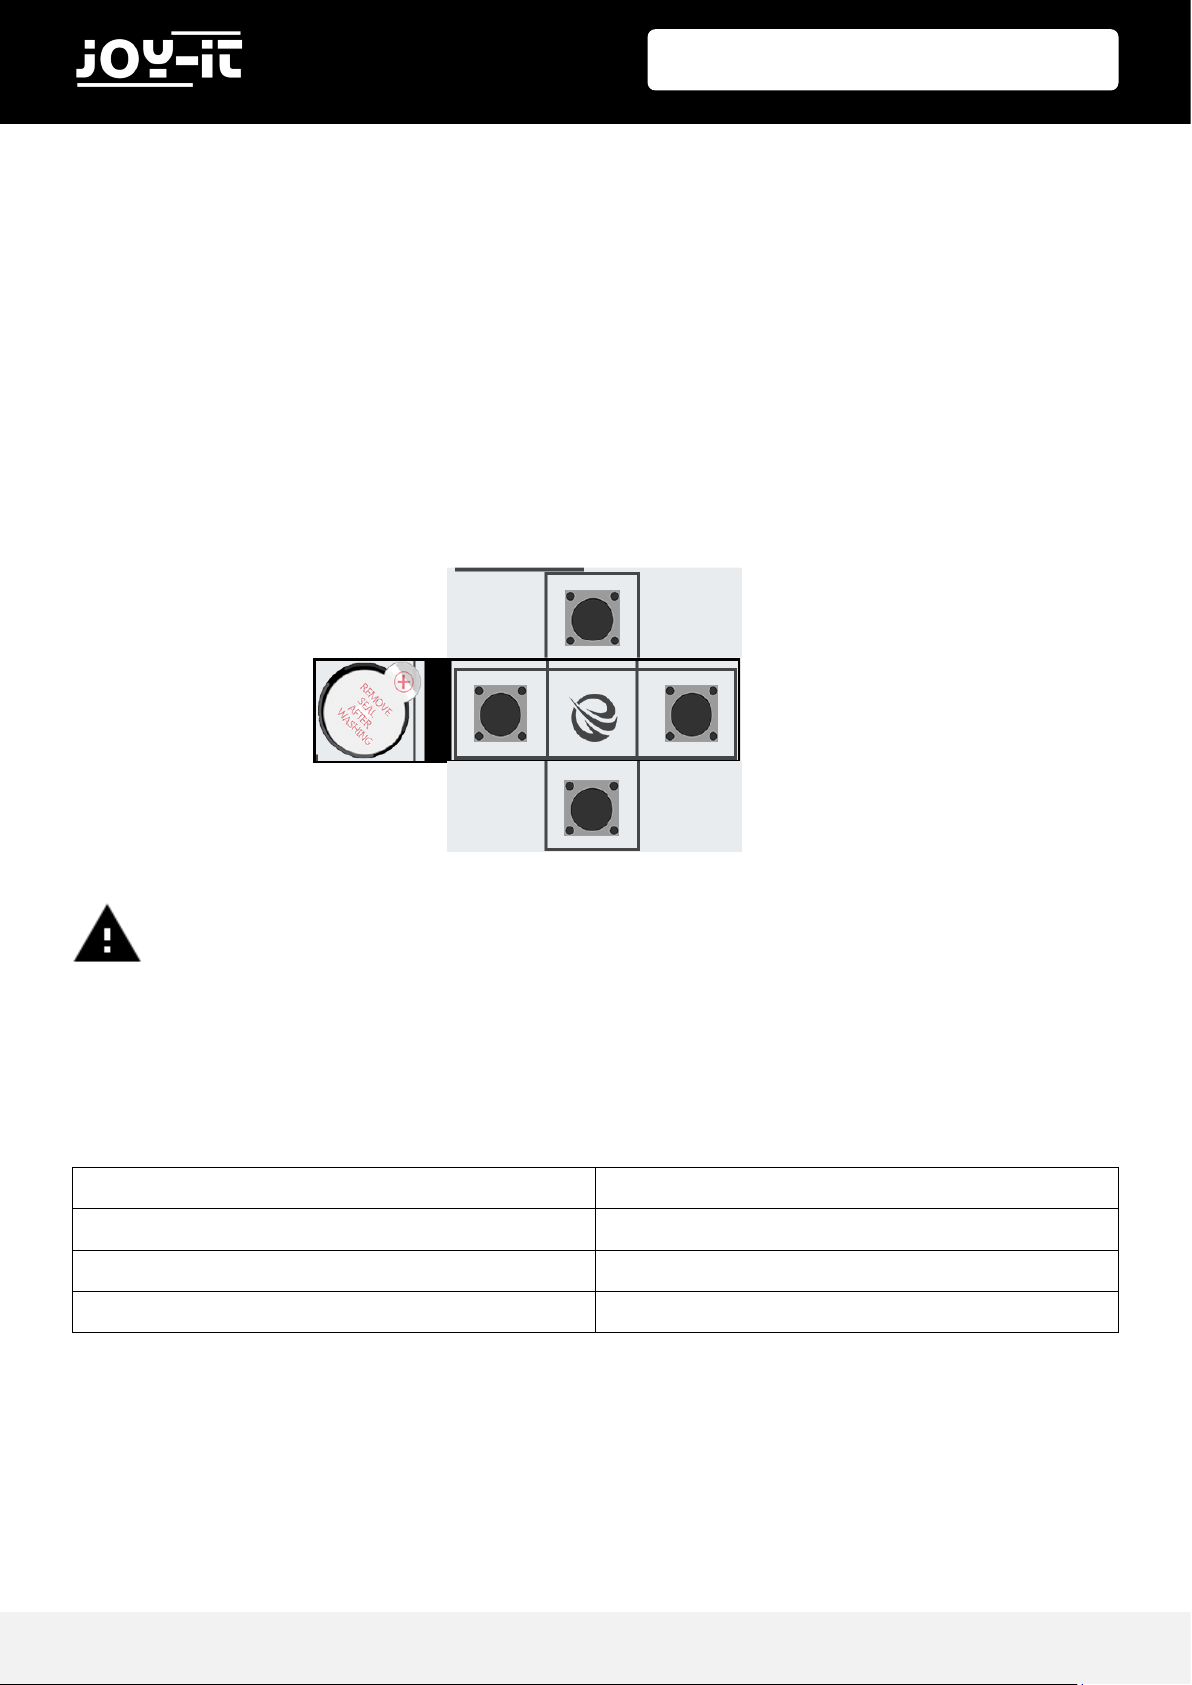
In our example we use the upper of the 4 keys on the lower le side. Theorecally, however, any of the 4
keys can be used. If you sll want to use another key, you have to change the pin assignment accordingly.
Attention! For this example you have to switch between the modules. Turn switch
number 5, 6, 7 and 8 on the left switching unit ON. All the other switches should
be turned OFF.
GPIO37 Upper buon
GPIO27 Lower buon
GPIO22 Le buon
GPIO35 Right buon
Page 17

Publ ished: 20 .02.2019 Copyright by Joy-IT 17
Joy-Pi
For this part of our tutorial we need to use 2 GPIO sengs. One input and one output. The GPIO input is
used to determine when a key was pressed and the GPIO output is used to acvate the buzzer when that
key is pressed.
As you can see in the example below, we have dened 2 pins called buzzer_pin and buon_pin. The
program runs unl CTRL + C is pressed.
When you press the key on your Joy-Pi, the buzzer does a sound! Release the key and the Buzzer stops.
Example code:
Execute the following commands and try it yourself:
#!/usr/bin/python
# -*- coding: utf-8 -*-
import RPi.GPIO as GPIO
import time
# configure both button and buzzer pins
button_pin = 37
buzzer_pin = 12
# set board mode to GPIO.BOARD
GPIO.setmode(GPIO.BOARD)
# setup button pin as input and buzzer pin as output
GPIO.setup(button_pin, GPIO.IN, pull_up_down=GPIO.PUD_UP)
GPIO.setup(buzzer_pin, GPIO.OUT)
try:
while True:
# check if button pressed
if(GPIO.input(button_pin) == 0):
# set buzzer on
GPIO.output(buzzer_pin, GPIO.HIGH)
else:
# it's not pressed, set button off
GPIO.output(buzzer_pin, GPIO.LOW)
except KeyboardInterrupt:
GPIO.cleanup()
sudo python button_buzzer.py
cd /home/pi/Desktop/Joy-Pi/
Page 18
Publ ished: 20 .02.2019 Copyright by Joy-IT 18
Joy-Pi
5.3 LESSON 3: HOW A RELAY WORKS AND HOW TO CONTROL IT
Now that we know everything we need to know about the buzzer, it's me for the next lesson. Now we'll
learn how to use the relay, what the funcon of the relay is and how to control it.
Relays are used to control a circuit by a separate low power signal, or when several circuits need to be
controlled by one signal. If you connect you wires to „NC“ and „COM“ and you send a GPIO.HIGH signal
the relay will close and deacvate your custom circuit. If you stop the signal the relay will open and will
acvate your custom circuit.
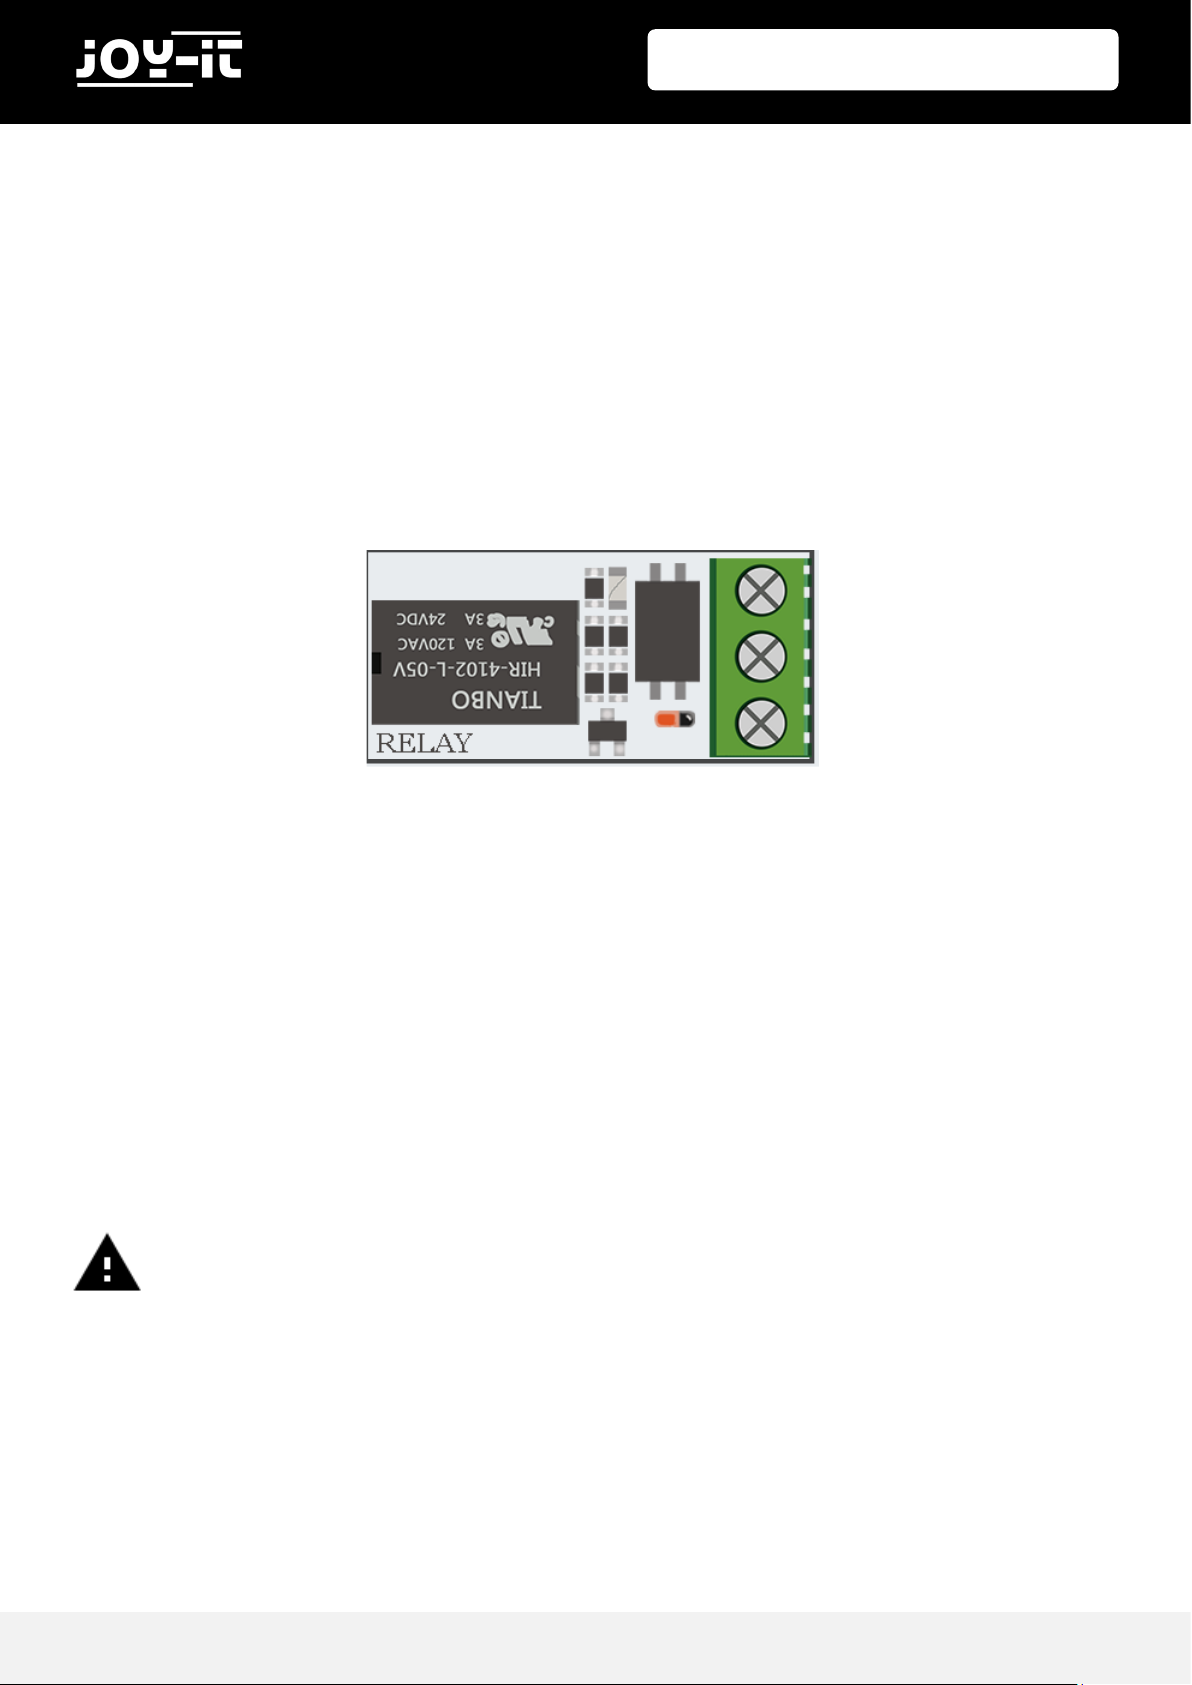
The relay is located in the middle, lower part of the board, next to the key matrix. It has 3 inputs of which
we will use 2 in this example.
„NC“ means „normally closed“, „NO“means „normally open“ and „COM“ means „commom“.
Common in this case means common ground.
When the common circuit is de-energised (GPIO.LOW) the „NC“ circuit is closed.
When the common circuit gets energized (GPIO.HIGH) the relay will close the circuit for „NO“.
When using „NO“ and „COM“ everything is reversed.
When „COM“ is o (GPIO.LOW) the relay circuit is open.
When „COM“ is on (GPIO.High) the relay circuit is closed.
Attention! It is very important not to try to connect high voltage devices to the
relay (e.g. table lamp, coffee machine etc.). This could result in electric shock and
serious injury.
Page 19

Publ ished: 20 .02.2019 Copyright by Joy-IT 19
Joy-Pi
Now that we have understood what a relay is and how it works, we take a look at the code:
Execute the following commands and try it for yourself:
#!/usr/bin/python
# -*- coding: utf-8 -*-
import RPi.GPIO as GPIO
import time
# define relay pin
relay_pin = 40
# set GPIO mode as GPIO.BOARD
GPIO.setmode(GPIO.BOARD)
# setup relay pin as OUTPUT
GPIO.setup(relay_pin, GPIO.OUT)
# Open Relay
GPIO.output(relay_pin, GPIO.LOW)
# Wait half a second
time.sleep(0.5)
# Close Relay
GPIO.output(relay_pin, GPIO.HIGH)
GPIO.cleanup()
sudo python relay.py
cd /home/pi/Desktop/Joy-Pi/
Page 20

Publ ished: 20 .02.2019 Copyright by Joy-IT 20
Joy-Pi
5.4 LESSON 4: SENDING A VIBRATION SIGNAL
Have you ever wondered how your phone vibrates when someone calls you or when you receive a message? We built exactly the same module into our Joy-Pi and now we will learn how to use it.
The vibraon module is located on the right side of the LED matrix and below the segment LED. When it is
on, it is dicult to tell where the vibraon is coming from because it feels like the whole Joy-Pi board is
vibrang.
The vibraon module uses a GPIO.OUTPUT-signal just like the Buzzer and other modules previously used.
When sending an output signal the module will start vibrang.
When you stop the signal with GPIO.LOW the vibraon will stop.
You can adjust the vibraon length with dierent me.sleep() intervals.
For this example you have to switch between the modules. Set switch number 1 of the righthand switching unit to ON. All the other switches should be turned OFF.
Page 21

Publ ished: 20 .02.2019 Copyright by Joy-IT 21
Joy-Pi
Execute the following commands and try it yourself:
#!/usr/bin/python
# -*- coding: utf-8 -*-
import RPi.GPIO as GPIO
import time
# define vibration pin
vibration_pin = 13
# Set board mode to GPIO.BOARD
GPIO.setmode(GPIO.BOARD)
# Setup vibration pin to OUTPUT
GPIO.setup(vibration_pin, GPIO.OUT)
# turn on vibration
GPIO.output(vibration_pin, GPIO.HIGH)
# wait 4 seconds
time.sleep(4)
# turn off vibration
GPIO.output(vibration_pin, GPIO.LOW)
# cleanup GPIO
GPIO.cleanup()
sudo python vibration.py
cd /home/pi/Desktop/Joy-Pi/
Page 22
Publ ished: 20 .02.2019 Copyright by Joy-IT 22
Joy-Pi
5.5 LESSON 5: DETECTING NOISES WITH THE SOUND SENSOR
In this lesson, we will learn how to use the sound sensor to make inputs, detect loud noises and react
accordingly. So you can build your own alarm system that detects loud noises or turn on an LED by
clapping!
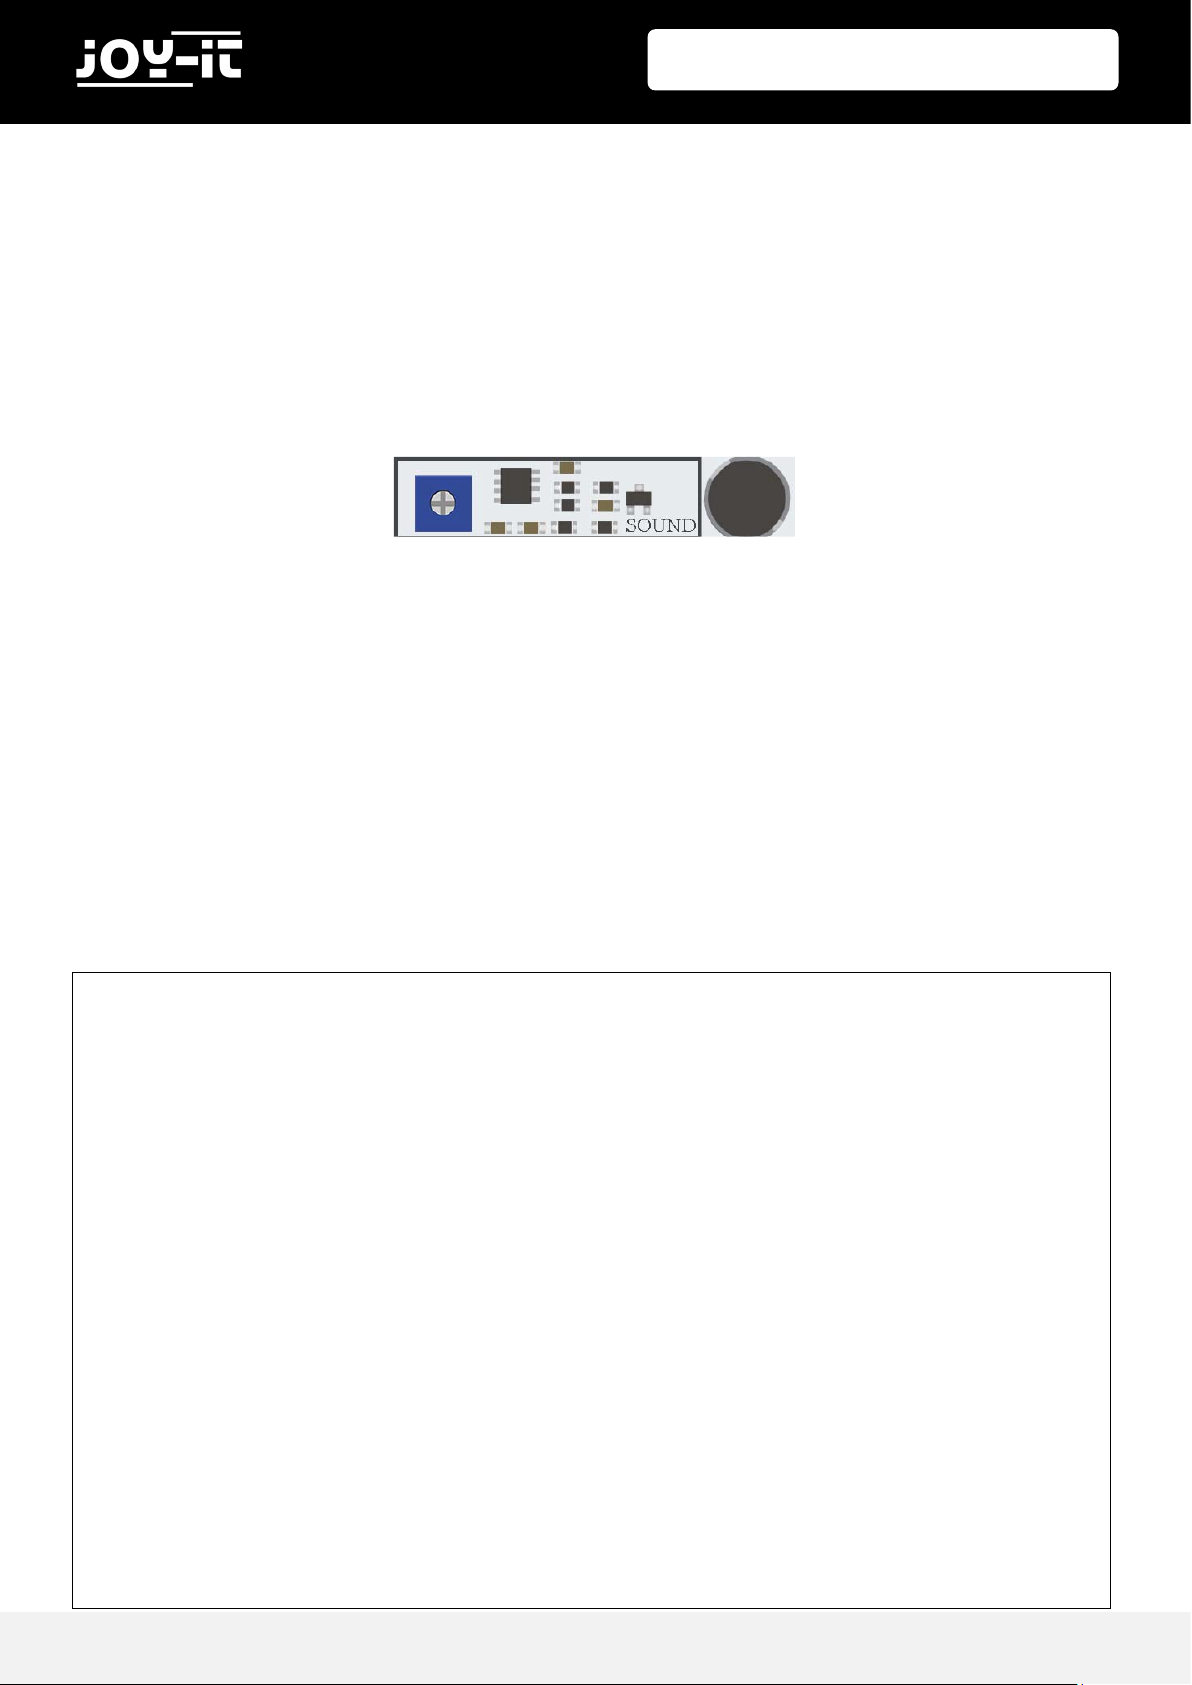
The sound sensor consists of two parts: a blue potenometer, which regulates the sensivity, and the
sensor itself, which detects the input of sounds. The sound sensor can be easily recognized by the blue
potenometer and the sensor itself is located on the right under the buzzer.
With the help of the potenometer we can regulate the sensivity of the sensor. For our script to work,
we must rst learn how to control the sensivity. To adjust the sensivity you have to turn the small
screw on the potenometer with a screwdriver to the le or right. The best way to test the sensivity is to
run the script. Clap your hands and see if the device is receiving a signal. If no signal is received this means
that the sensivity of the sensor is not set high enough. This can be easily corrected by turning the
potenometer.
#!/usr/bin/python
# -*- coding: utf-8 -*-
import RPi.GPIO as GPIO
import time
# define sound pin
sound_pin = 18
# set GPIO mode to GPIO.BOARD
GPIO.setmode(GPIO.BOARD)
# setup pin as INPUT
GPIO.setup(sound_pin, GPIO.IN, pull_up_down=GPIO.PUD_UP)
try:
while True:
# check if sound detected or not
if(GPIO.input(sound_pin)==GPIO.LOW):
print('Sound Detected')
time.sleep(0.1)
except KeyboardInterrupt:
# CTRL+C detected, cleaning and quitting the script
GPIO.cleanup()
Page 23
Publ ished: 20 .02.2019 Copyright by Joy-IT 23
Joy-Pi
Execute the following commands and try it yourself:
First we dene our pin, GPIO18. Then we set a while loop to run this script permanently. We check if we
have received an input from the sound sensor indicang that loud noises have been detected and then we
print "Sound Detected".
If Ctrl + C is pressed, the program is quit.
5.6 LESSON 6: DETECTING BRIGHTNESS WITH THE LIGHT SENSOR
The light sensor is one of our favorites. It is extremely useful in many projects and situaons, e.g. with
lamps that switch on automacally as soon as it gets dark. With the light sensor we can see how bright the
module surface is.
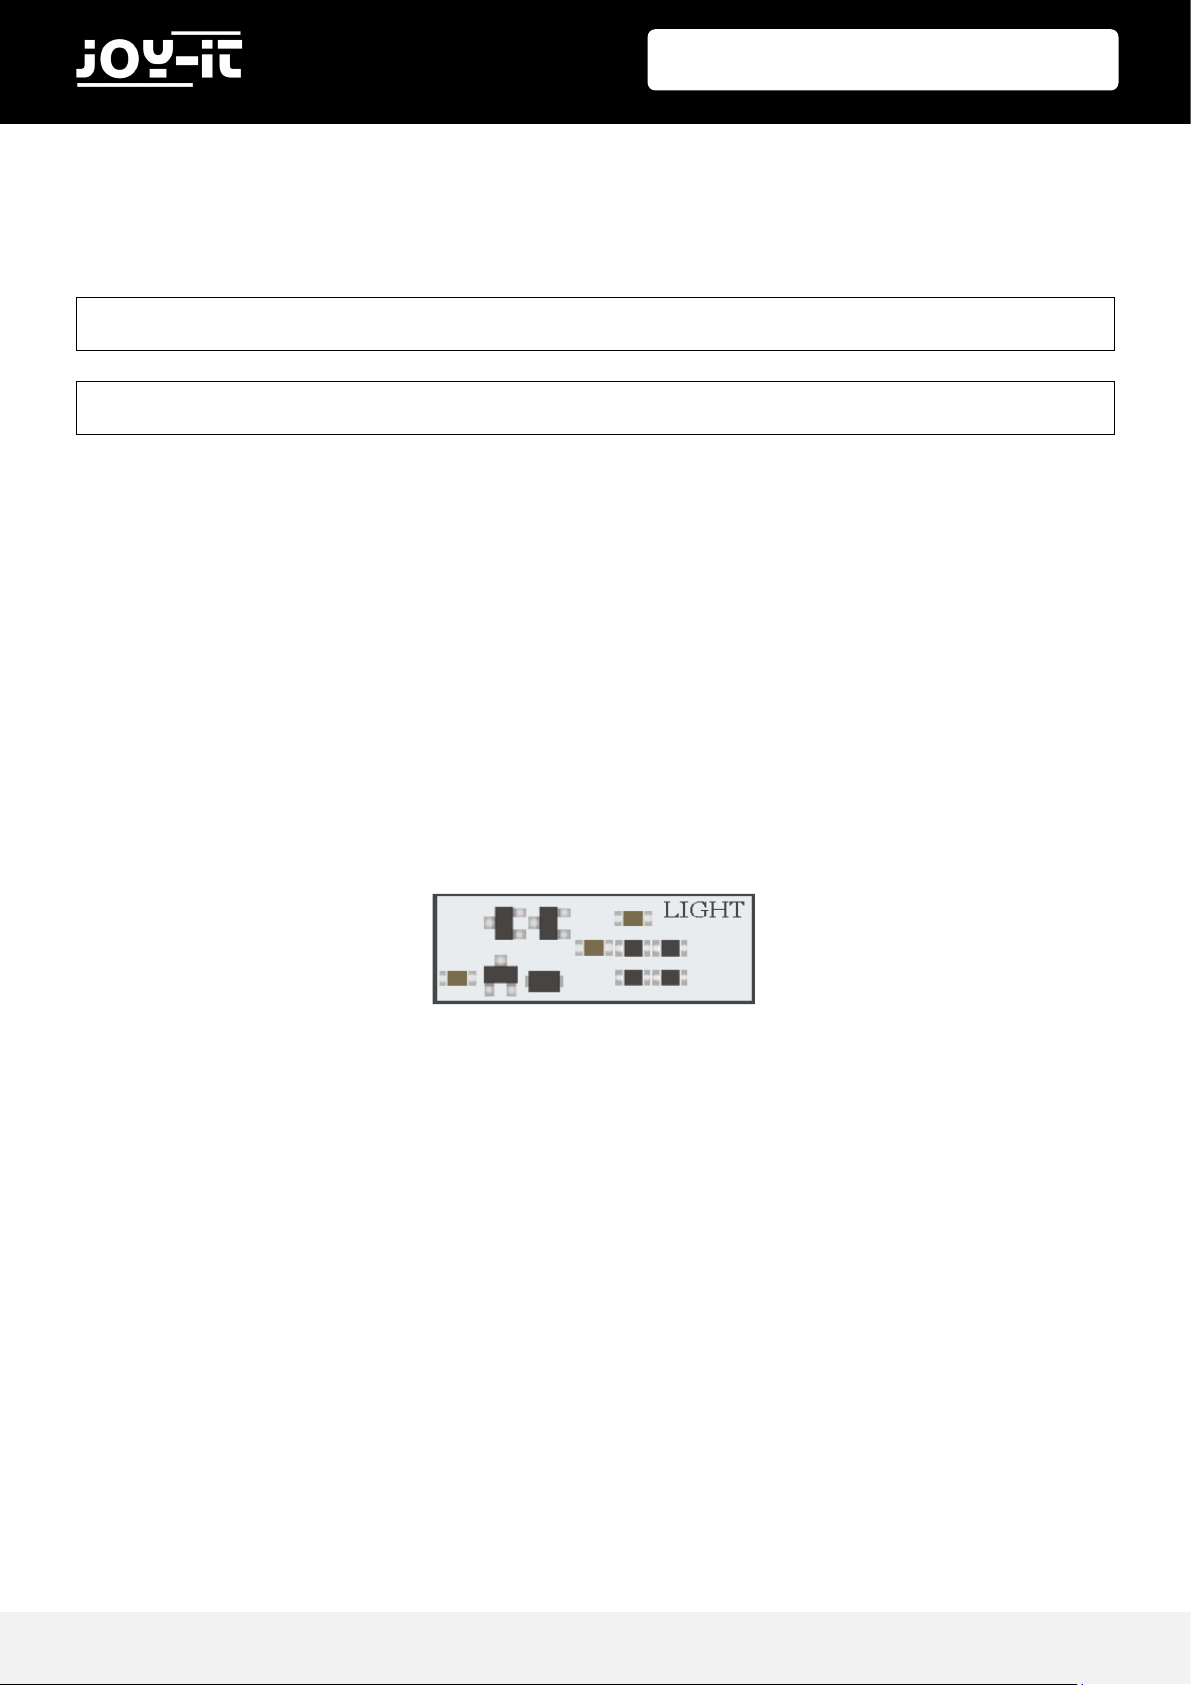
The light sensor is dicult to detect because it consists of very small parts. The sensor is to the le of the
buzzer. If you cover it with your nger, the output of the light sensor should be close to zero, as no light
can reach it.
sudo python sound.py
cd /home/pi/Desktop/Joy-Pi/
Page 24

Publ ished: 20 .02.2019 Copyright by Joy-IT 24
Joy-Pi
It's me to test it in real me and see how it works. However, the light sensor is a lile dierent from
other sensors because it works with I2C and not with the normal GPIOs as we learned in the lessons before.
In this script we use a funcon to communicate with the sensor, this way we can get the brightness.
The higher the number, the higher is the surrounding.
#!/usr/bin/python
# -*- coding: utf-8 -*-
# Author: Matt Hawkins
# Author's Git: https://bitbucket.org/MattHawkinsUK/
# Author's website: https://www.raspberrypi-spy.co.uk
import RPi.GPIO as GPIO
import smbus
import time
# Find the right revision for bus driver
if(GPIO.RPI_REVISION == 1):
bus = smbus.SMBus(0)
else:
bus = smbus.SMBus(1)
class LightSensor():
def __init__(self):
# Define some constants from the datasheet
self.DEVICE = 0x5c # Default device I2C address
self.POWER_DOWN = 0x00 # No active state
self.POWER_ON = 0x01 # Power on
self.RESET = 0x07 # Reset data register value
# Start measurement at 4lx resolution. Time typically 16ms.
self.CONTINUOUS_LOW_RES_MODE = 0x13
# Start measurement at 1lx resolution. Time typically 120ms
self.CONTINUOUS_HIGH_RES_MODE_1 = 0x10
# Start measurement at 0.5lx resolution. Time typically 120ms
self.CONTINUOUS_HIGH_RES_MODE_2 = 0x11
# Start measurement at 1lx resolution. Time typically 120ms
# Device is automatically set to Power Down after measurement.
self.ONE_TIME_HIGH_RES_MODE_1 = 0x20
# Start measurement at 0.5lx resolution. Time typically 120ms
# Device is automatically set to Power Down after measurement.
self.ONE_TIME_HIGH_RES_MODE_2 = 0x21
Page 25

Publ ished: 20 .02.2019 Copyright by Joy-IT 25
Joy-Pi
# Start measurement at 1lx resolution. Time typically 120ms
# Device is automatically set to Power Down after measurement.
self.ONE_TIME_LOW_RES_MODE = 0x23
def convertToNumber(self, data):
# Simple function to convert 2 bytes of data
# into a decimal number
return ((data[1] + (256 * data[0])) / 1.2)
def readLight(self):
data = bus.read_i2c_block_data
(self.DEVICE,self.ONE_TIME_HIGH_RES_MODE_1)
return self.convertToNumber(data)
def main():
sensor = LightSensor()
try:
while True:
print "Light Level : " + str(sensor.readLight()) + " lx"
time.sleep(0.5)
except KeyboardInterrupt:
pass
if __name__ == "__main__":
main()
sudo python light_sensor.py
cd /home/pi/Desktop/Joy-Pi/
Execute the following commands and try it yourself:
Page 26

Publ ished: 20 .02.2019 Copyright by Joy-IT 26
Joy-Pi
5.7 LESSON 7: DETECTING THE TEMPERATURE AND THE HUMIDITY
The DHT11 is a very interesng sensor, because it has not only one funcon, but two! It contains both a
humidity sensor and a temperature sensor, both of which are very accurate. Ideal for any weather staon
project, or if you want to check the temperature and humidity in the room!
The DHT11 sensor is very easy to recognize. A small blue sensor with many small holes. It is located to the
right of the relay and above the touch sensor. Working with the DHT11 sensor is very easy, thanks to the
Adafruit_DHT library. The library is used to output temperature and humidity as values without having to
perform complicated mathemacal calculaons.
#!/usr/bin/python
# Copyright (c) 2014 Adafruit Industries
# Author: Tony DiCola
import sys
import Adafruit_DHT
# set type of the sensor
sensor = 11
# set pin number
pin = 4
# Try to grab a sensor reading. Use the read_retry method which will retry up
# to 15 times to get a sensor reading (waiting 2 seconds between each retry).
humidity, temperature = Adafruit_DHT.read_retry(sensor, pin)
# Un-comment the line below to convert the temperature to Fahrenheit.
# temperature = temperature * 9/5.0 + 32
# Note that sometimes you won't get a reading and
# the results will be null (because Linux can't
# guarantee the timing of calls to read the sensor).
# If this happens try again!
if humidity is not None and temperature is not None:
print('Temp={0:0.1f}* Humidity={1:0.1f}%'.format(temperature, humidity))
else:
print('Failed to get reading. Try again!')
sys.exit(1)
Page 27

Publ ished: 20 .02.2019 Copyright by Joy-IT 27
Joy-Pi
Execute the following commands and try it yourself:
5.8 LESSON 8: DETECTING MOVEMENTS
The moon sensor is one of the most useful and frequently used sensors. It can be used, for example, to
build an alarm system. When the sensor detects a movement, it can send a signal to the buzzer, which
then sounds a loud alarm.
The moon sensor is located directly under the sound sensor and is covered by a small, transparent cap.
The cap helps the sensor to detect more movements by refracng the infrared light of the environment.
The sensivity of the moon sensor, like that of the sound sensor, is controlled with a potenometer. This
is located below the potenometer of the sound sensor, but is much smaller. By using a screwdriver, you
can set the distances, over which the moon sensor should react.
sudo python dht11.py
cd /home/pi/Desktop/Joy-Pi/
Page 28

Publ ished: 20 .02.2019 Copyright by Joy-IT 28
Joy-Pi
The moon sensor is controlled by the GPIO pins. When moon is detected, the moon sensor will send a
signal. This will stop for some me and then stop again unl the sensor detects the next movement.
Execute the following commands and try it yourself:
#!/usr/bin/python
# -*- coding: utf-8 -*-
import RPi.GPIO as GPIO
import time
# define motion pin
motion_pin = 16
# set GPIO as GPIO.BOARD
GPIO.setmode(GPIO.BOARD)
# set pin mode as INPUT
GPIO.setup(motion_pin, GPIO.IN)
try:
while True:
if(GPIO.input(motion_pin) == 0):
print "Nothing moves ..."
elif(GPIO.input(motion_pin) == 1):
print "Motion detected!"
time.sleep(0.1)
except KeyboardInterrupt:
GPIO.cleanup()
sudo python motion.py
cd /home/pi/Desktop/Joy-Pi/
Page 29

Publ ished: 20 .02.2019 Copyright by Joy-IT 29
Joy-Pi
5.9 LESSON 9: MEASURING DISTANCES WITH THE ULTRASONIC SENSOR
Now we will learn how to use the ultrasonic sensor to measure distances and display them on the Joy-Pi
screen. By the way, cars use the same method to measure distances.
The ultrasonic sensor is located at the boom right of the Joy-Pi board, directly above the stepper motor
and servo interfaces. It is easily recognizable by the two large circles. We will move our hands over the
distance sensor to measure the distance between our hands and the Joy-Pi.
The distance sensor works with GPIO INPUT, but it is slightly dierent from what we used in our previous
lessons. The sensor needs a certain interval to be able to detect the distance in an accurate way. It sends
an ultrasonic signal and with a built-in sensor it receives the echo reected by an obstacle. From the me
dierence between sending the signal and receiving the echo, the distance is calculated.
Page 30

Publ ished: 20 .02.2019 Copyright by Joy-IT 30
Joy-Pi
Execute the following commands and try it yourself:
#!/usr/bin/python
# -*- coding: utf-8 -*-
# Author : www.modmypi.com
# Link: https://www.modmypi.com/blog/hc-sr04-ultrasonic-range-sensor-on-theraspberry-pi
import RPi.GPIO as GPIO
import time
GPIO.setmode(GPIO.BOARD)
TRIG = 36
ECHO = 32 #Declare variables
print "Distance Measurement In Progress" #Console output
GPIO.setup(TRIG,GPIO.OUT) #Using TRIG as output
GPIO.setup(ECHO,GPIO.IN) #Using ECHO as Input
GPIO.output(TRIG, False)
print "Waiting For Sensor To Settle" #Console output
time.sleep(2) #Wait 2 seconds
GPIO.output(TRIG, True) #Start sending a signal
time.sleep(0.00001) #Wait for 0.00001 seconds
GPIO.output(TRIG, False) #Stop sending a Signal
while GPIO.input(ECHO)==0:
pulse_start = time.time()
while GPIO.input(ECHO)==1:
pulse_end = time.time()
pulse_duration = pulse_end - pulse_start #measurement for distance
distance = pulse_duration * 17150 #Calculation for distance
distance = round(distance, 2) #rounded to 2 decimal places
print "Distance:",distance,"cm" #Output distance in console
GPIO.cleanup()
sudo python distance.py
cd /home/pi/Desktop/Joy-Pi/
Page 31
Publ ished: 20 .02.2019 Copyright by Joy-IT 31
Joy-Pi
5.10 LESSON 10: CONTROLLING THE LCD DISPLAY
With the Joy-Pi you can display the LCD data that you collect with your sensors and update it in real me
depending on the changes that the modules go through. For example, in conjuncon with the temperature sensor - always display the current temperature and humidity on the LCD.
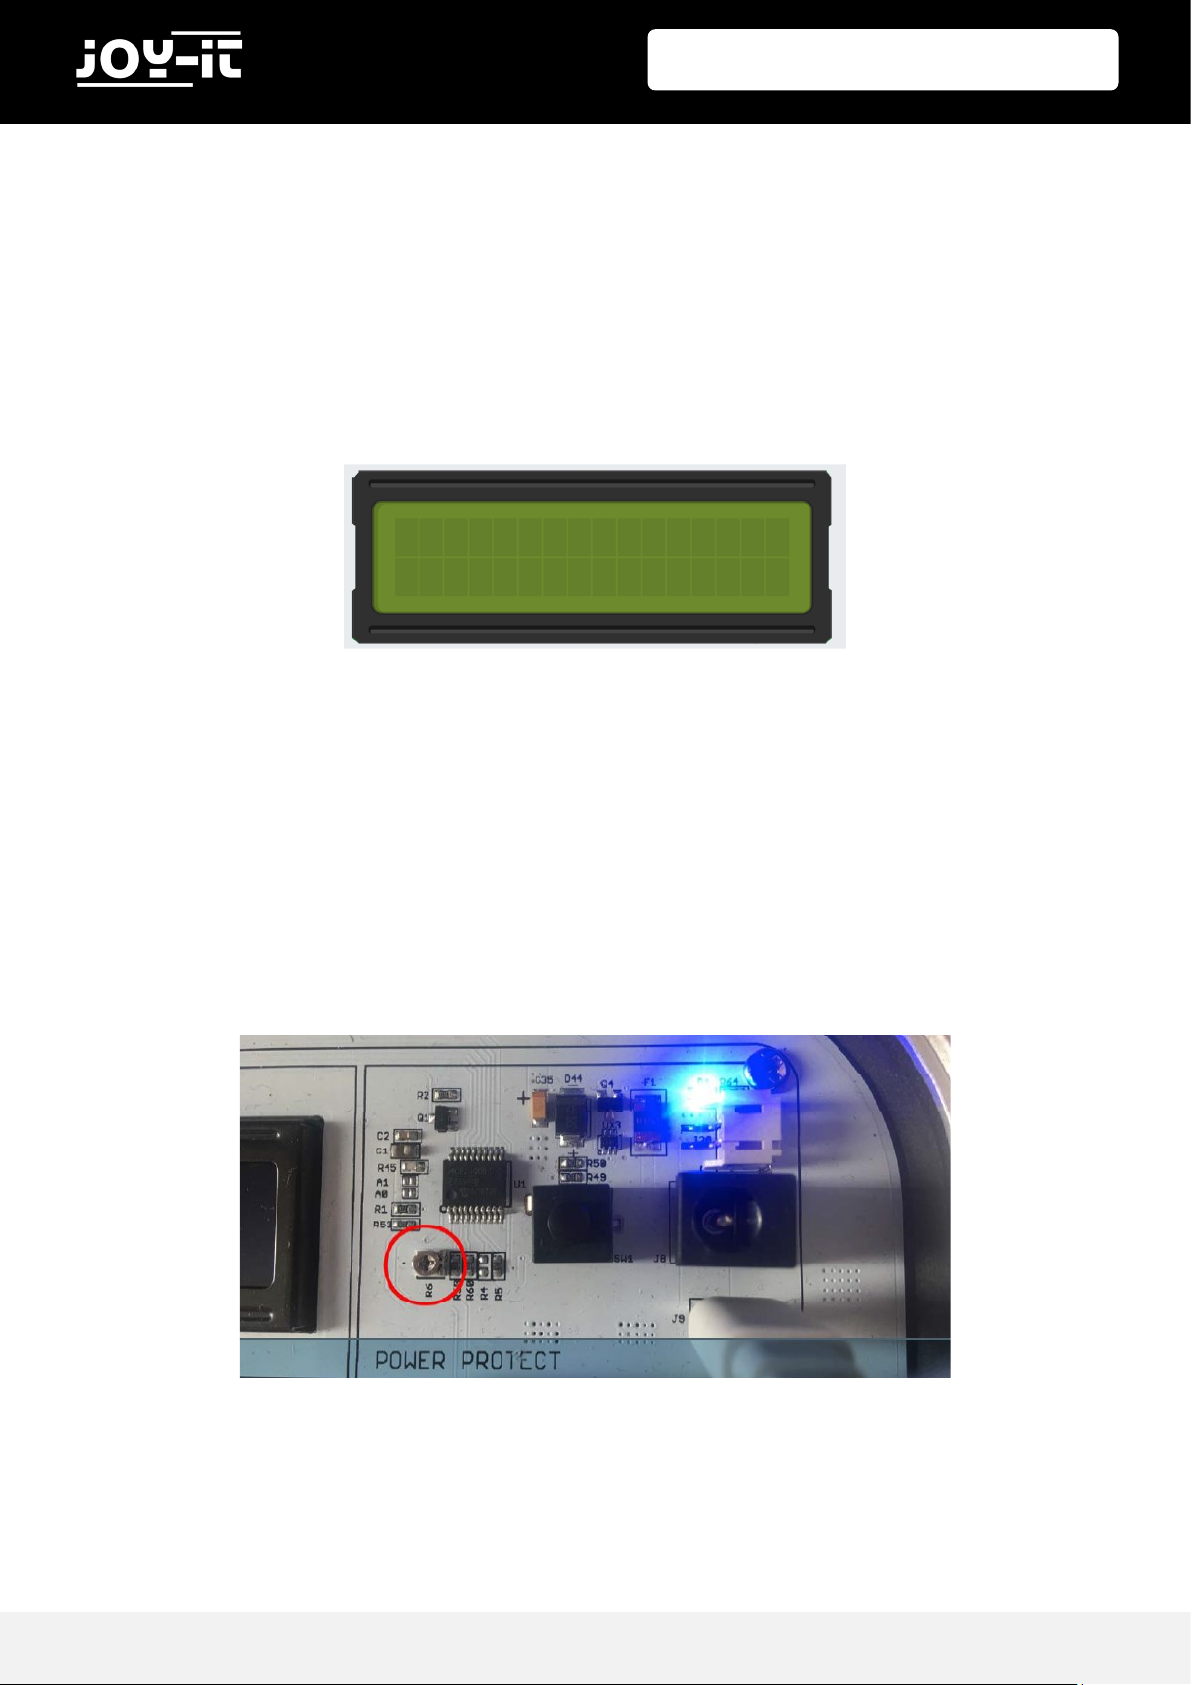
The LCD screen takes up a large part of the Joy-Pi board - it is located at the top center of the Joy-Pi, to
the right of the GPIO LED display. As soon as the demo script and the examples are executed, the display
turns on. Thanks to the integrated backlight you can read data on the display even in complete darkness.
Like the sound and moon sensors, the LCD also has an associated potenometer. With this potenometer you can adjust the brightness of the backlight of the display. If you turn it counterclockwise the
brightnes gets higher and if you turn it clockwise it will get lowered.
Rotate the potenometer counterclockwise to increase the contrast, rotate it clockwise to decrease the
contrast.
Page 32

Publ ished: 20 .02.2019 Copyright by Joy-IT 32
Joy-Pi
The LCD and some other sensors do not work with GPIO technology. Therefore we use "I2C". We use the
address 21 for the LCD by establishing a connecon to this I2C address. So we can send commands such
as wring text, switching on the backlight of the LCD, acvang the cursor, etc.
We use the Adafruit_CharLCDBackpack library to control the display.
#!/usr/bin/python
# -*- coding: utf-8 -*-
# Example using a character LCD backpack.
import time
import Adafruit_CharLCD as LCD
# Define LCD column and row size for 16x2 LCD.
lcd_columns = 16
lcd_rows = 2
# Initialize the LCD using the pins
lcd = LCD.Adafruit_CharLCDBackpack(address=0x21)
try:
# Turn backlight on
lcd.set_backlight(0)
# Print a two line message
lcd.message('Hello\nworld!')
# Wait 5 seconds
time.sleep(5.0)
# Demo showing the cursor.
lcd.clear()
lcd.show_cursor(True)
lcd.message('Show cursor')
time.sleep(5.0)
# Demo showing the blinking cursor.
lcd.clear()
lcd.blink(True)
lcd.message('Blink cursor')
time.sleep(5.0)
# Stop blinking and showing cursor.
lcd.show_cursor(False)
lcd.blink(False)
# Demo scrolling message right/left.
lcd.clear()
Page 33

Publ ished: 20 .02.2019 Copyright by Joy-IT 33
Joy-Pi
sudo python lcd.py
cd /home/pi/Desktop/Joy-Pi/
To control the LCD we use the Adafruit_CharLCDBackpack library.
Execute the following commands and try it yourself:
message = 'Scroll'
lcd.message(message)
for i in range(lcd_columns-len(message)):
time.sleep(0.5)
lcd.move_right()
for i in range(lcd_columns-len(message)):
time.sleep(0.5)
lcd.move_left()
# Demo turning backlight off and on.
lcd.clear()
lcd.message('Flash backlight\nin 5 seconds...')
time.sleep(5.0)
# Turn backlight off.
lcd.set_backlight(1)
time.sleep(2.0)
# Change message.
lcd.clear()
lcd.message('Goodbye!')
# Turn backlight on.
lcd.set_backlight(0)
# Turn backlight off.
time.sleep(2.0)
lcd.clear()
lcd.set_backlight(1)
except KeyboardInterrupt:
# Turn the screen off
lcd.clear()
lcd.set_backlight(1)
Page 34

Publ ished: 20 .02.2019 Copyright by Joy-IT 34
Joy-Pi
5.11 LESSON 11: READING AND WRITING RFID CARDS
In this lesson you will learn how to control the RFID module. The RFID module is a very interesng and
useful module. It is used worldwide in a variety of soluons such as: Intelligent door locks, employee IDs,
business cards and even dog collars.
The RFID module is located directly under the Raspberry Pi and looks like a small Wi symbol. This symbol
means wireless connecvity. To use it, we need to take the chip, or card, that comes with the Joy-Pi and
hold it over the Joy-Pi RFID chip area. It must be close enough for our script to be recognized. 2-4cm
should be close enough. Just try it out!
To use the RFID RC522 Shield we need the SPI Bus. We have to modify the cong le otherwise the
kernel couldn‘t start, to get acces to the cong le we use the following command:
The following lines have to be aached to the end of the le:
We save the le with CTRL+O and then pressing Enter, aer saving the le we can close the editor with
CTRL+X. Finally we have to acvate SPI so we use the following command to modify the sengs:
Now we go to „Interfacing opons“ then acvate „SPI“ and click on „OK“ we restart the Raspberry pi and
the conguraon part for the RFID module is done.
sudo nano /boot/cong.txt
device_tree_param=spi=on
dtoverlay=spi-bcm2708
sudo raspi-cong
Page 35

Publ ished: 20 .02.2019 Copyright by Joy-IT 35
Joy-Pi
To navigate to the folder for the RFID scripts you have to use the following command:
If you want to write on the chip or card you can use the following command:
You can change the data that is geng wrien on the RFID chip or card by changing the program code:
To modify the data you have to change the number sequence in the square brackets, but the numbers
cannot be below 0 or above 255.
If you want to read the number sequence you have to use the following command:
Now you can put the chip or the card on the RFID-reader and it will show you something like this:
The number sequence next to sector 8 is the one we saved on the chip or card now.
cd /home/pi/Desktop/Joy-Pi/MFRC522-python
sudo python Write.py
sudo python Read.py
Page 36

Publ ished: 20 .02.2019 Copyright by Joy-IT 36
Joy-Pi
#!/usr/bin/env python
# -*- coding: utf8 -*-
import RPi.GPIO as GPIO
import MFRC522
import signal
continue_reading = True
# Capture SIGINT for cleanup when the script is aborted
def end_read(signal,frame):
global continue_reading
print "Ctrl+C captured, ending read."
continue_reading = False
GPIO.cleanup()
# Hook the SIGINT
signal.signal(signal.SIGINT, end_read)
# Create an object of the class MFRC522
MIFAREReader = MFRC522.MFRC522()
# Welcome message
print "Welcome to the MFRC522 data read example"
print "Press Ctrl-C to stop."
# This loop keeps checking for chips.
# If one is near it will get the UID and authenticate
while continue_reading:
# Scan for cards
(status,TagType) = MIFAREReader.MFRC522_Request(MIFAREReader.PICC_REQIDL)
# If a card is found
if status == MIFAREReader.MI_OK:
print "Card detected"
# Get the UID of the card
(status,uid) = MIFAREReader.MFRC522_Anticoll()
# If we have the UID, continue
if status == MIFAREReader.MI_OK:
# Print UID
print "Card read UID: %s,%s,%s,%s" % (uid[0], uid[1], uid[2], uid[3])
# This is the default key for authentication
key = [0xFF,0xFF,0xFF,0xFF,0xFF,0xFF]
# Select the scanned tag
MIFAREReader.MFRC522_SelectTag(uid)
# Authenticate
status = MIFAREReader.MFRC522_Auth(MIFAREReader.PICC_AUTHENT1A, 8, key, uid)
# Check if authenticated
if status == MIFAREReader.MI_OK:
MIFAREReader.MFRC522_Read(8)
MIFAREReader.MFRC522_StopCrypto1()
else:
print "Authentication error"
Example code RFID-Read:
Page 37

Publ ished: 20 .02.2019 Copyright by Joy-IT 37
Joy-Pi
#!/usr/bin/env python
# -*- coding: utf8 -*-
import RPi.GPIO as GPIO
import MFRC522
import signal
continue_reading = True
# Capture SIGINT for cleanup when the script is aborted
def end_read(signal,frame):
global continue_reading
print "Ctrl+C captured, ending read."
continue_reading = False
GPIO.cleanup()
# Hook the SIGINT
signal.signal(signal.SIGINT, end_read)
# Create an object of the class MFRC522
MIFAREReader = MFRC522.MFRC522()
# This loop keeps checking for chips. If one is near it will get the UID and authenticate
while continue_reading:
# Scan for cards
(status,TagType) = MIFAREReader.MFRC522_Request(MIFAREReader.PICC_REQIDL)
# If a card is found
if status == MIFAREReader.MI_OK:
print "Card detected"
# Get the UID of the card
(status,uid) = MIFAREReader.MFRC522_Anticoll()
# If we have the UID, continue
if status == MIFAREReader.MI_OK:
# Print UID
print "Card read UID: %s,%s,%s,%s" % (uid[0], uid[1], uid[2], uid[3])
# This is the default key for authentication
key = [0xFF,0xFF,0xFF,0xFF,0xFF,0xFF]
# Select the scanned tag
MIFAREReader.MFRC522_SelectTag(uid)
Example code RFID-Write:
Page 38

Publ ished: 20 .02.2019 Copyright by Joy-IT 38
Joy-Pi
# Authenticate
status = MIFAREReader.MFRC522_Auth(MIFAREReader.PICC_AUTHENT1A, 8, key, uid)
print "\n"
# Check if authenticated
if status == MIFAREReader.MI_OK:
# Variable for the data to write
data = [99, 11, 55, 66, 44, 111, 222, 210, 125, 153, 136, 199, 144, 177, 166, 188]
# Fill the data with 0xFF
for x in range(0,16):
data.append(0xFF)
print "Sector 8 looked like this:"
# Read block 8
MIFAREReader.MFRC522_Read(8)
print "\n"
print "Sector 8 will now be filled with 0xFF:"
# Write the data
MIFAREReader.MFRC522_Write(8, data)
print "\n"
print "It now looks like this:"
# Check to see if it was written
MIFAREReader.MFRC522_Read(8)
print "\n"
# Stop
MIFAREReader.MFRC522_StopCrypto1()
# Make sure to stop reading for cards
continue_reading = False
else:
print "Authentication error"
Connuaon RFID-Write code:
Page 39
Publ ished: 20 .02.2019 Copyright by Joy-IT 39
Joy-Pi
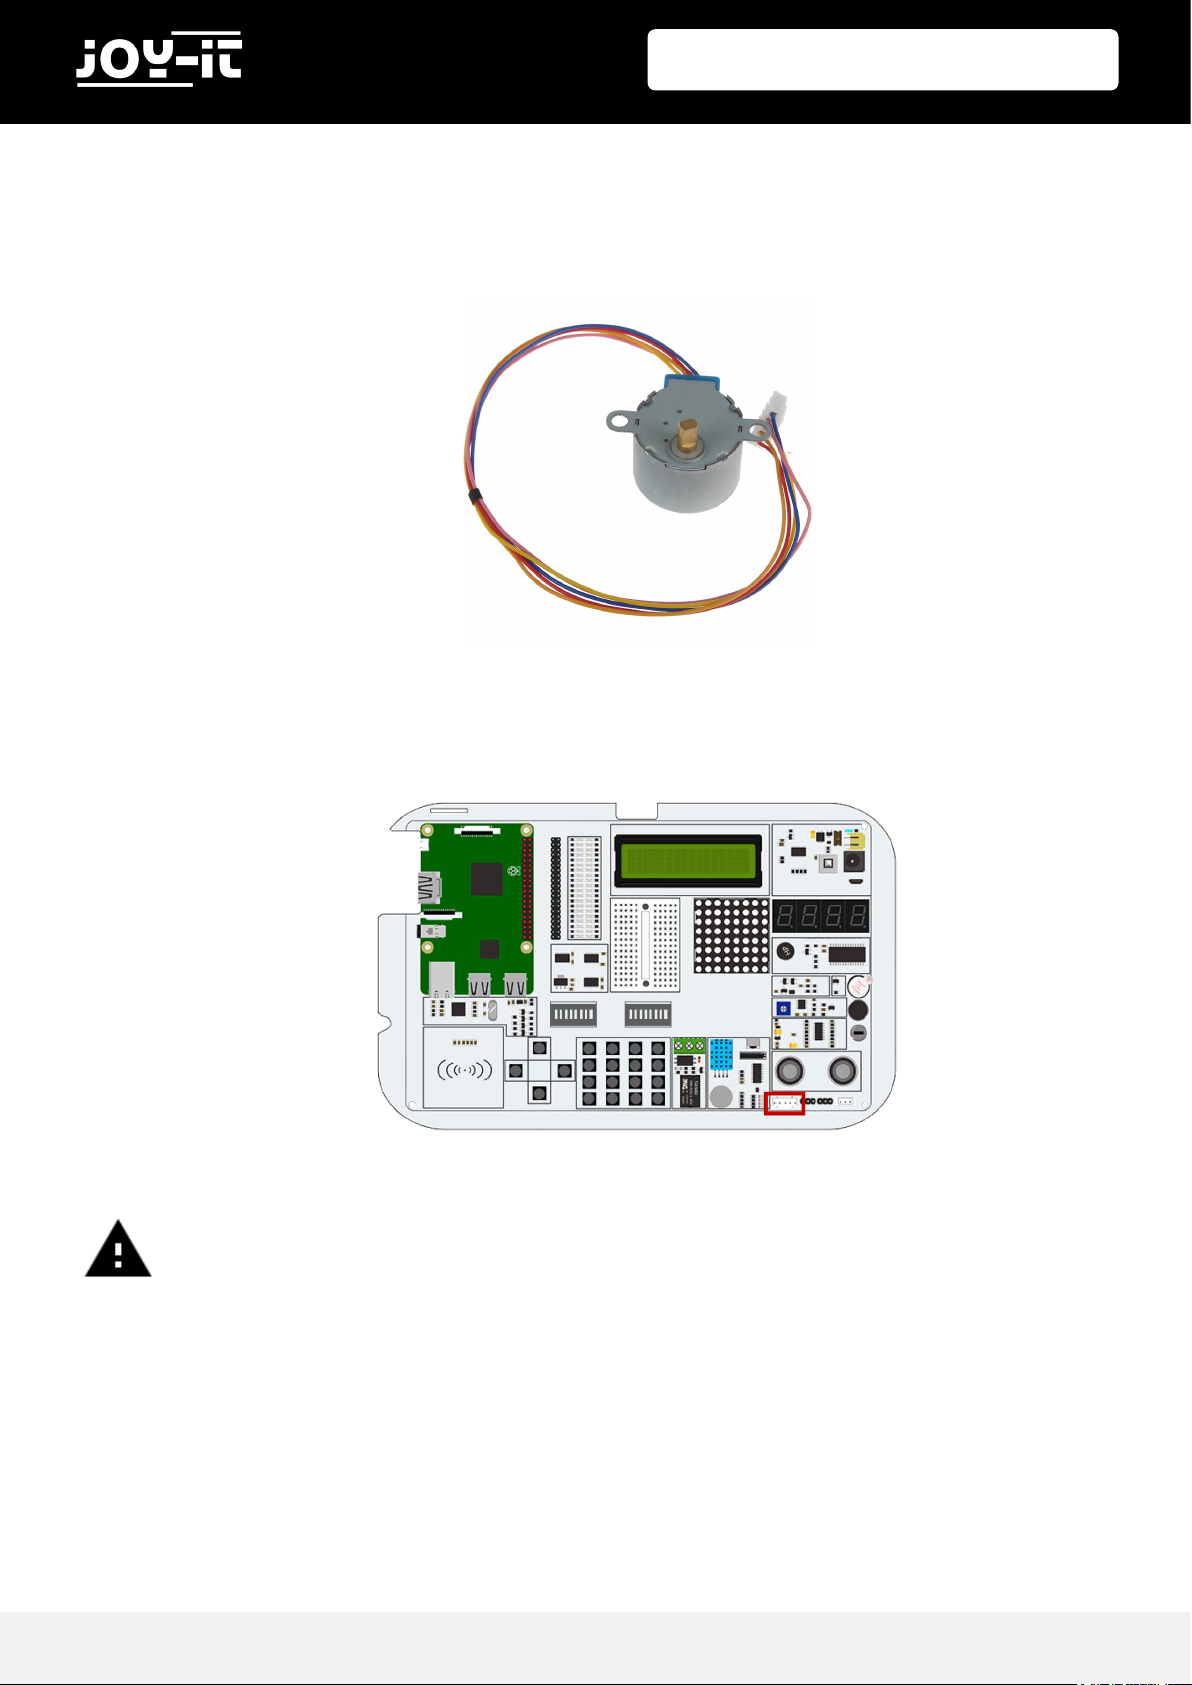
5.12 LESSON 12: USING STEPPER MOTORS
The stepper motor is an independent module that you will have to connect to the board. We need to take
the stepper motor that came with the kit and connect it to our Joy-Pi.
Simply connect the stepper motor to the following connector on the Joy-Pi board:
The module may heat up during use. This is due to technical reasons and is not unusual.
The stepper motor is connected to 4 GPIO pins, which are switched on quickly one aer the other. This
causes the stepper motor to "push" forward and take one step. Any number of steps can be executed
with the turnSteps funcon. The turnDegrees funcon rotates the motor by a certain angle.
You can nd the Example code on the next page.
For this example you have to switch between the modules. Set switch numbers 3, 4, 5 and 6 on
the right-hand switching unit to ON. All the other switches should be turned OFF.
Page 40

Publ ished: 20 .02.2019 Copyright by Joy-IT 40
Joy-Pi
Example code stepper motor:
#!/usr/bin/python
# -*- coding: utf-8 -*-
# Author : Original author ludwigschuster
# Original Author Github: https://github.com/ludwigschuster/RasPi-GPIOStepmotor
import time
import RPi.GPIO as GPIO
import math
class Stepmotor:
def __init__(self):
# set GPIO mode
GPIO.setmode(GPIO.BOARD)
# These are the pins which will be used on the Raspberry Pi
self.pin_A = 29
self.pin_B = 31
self.pin_C = 33
self.pin_D = 35
self.interval = 0.010
# Declare pins as output
GPIO.setup(self.pin_A,GPIO.OUT)
GPIO.setup(self.pin_B,GPIO.OUT)
GPIO.setup(self.pin_C,GPIO.OUT)
GPIO.setup(self.pin_D,GPIO.OUT)
GPIO.output(self.pin_A, False)
GPIO.output(self.pin_B, False)
GPIO.output(self.pin_C, False)
GPIO.output(self.pin_D, False)
def Step1(self):
GPIO.output(self.pin_D, True)
time.sleep(self.interval)
GPIO.output(self.pin_D, False)
def Step2(self):
GPIO.output(self.pin_D, True)
GPIO.output(self.pin_C, True)
time.sleep(self.interval)
GPIO.output(self.pin_D, False)
GPIO.output(self.pin_C, False)
def Step3(self):
GPIO.output(self.pin_C, True)
time.sleep(self.interval)
GPIO.output(self.pin_C, False)
def Step4(self):
GPIO.output(self.pin_B, True)
GPIO.output(self.pin_C, True)
Page 41

Publ ished: 20 .02.2019 Copyright by Joy-IT 41
Joy-Pi
time.sleep(self.interval)
GPIO.output(self.pin_B, False)
GPIO.output(self.pin_C, False)
def Step5(self):
GPIO.output(self.pin_B, True)
time.sleep(self.interval)
GPIO.output(self.pin_B, False)
def Step6(self):
GPIO.output(self.pin_A, True)
GPIO.output(self.pin_B, True)
time.sleep(self.interval)
GPIO.output(self.pin_A, False)
GPIO.output(self.pin_B, False)
def Step7(self):
GPIO.output(self.pin_A, True)
time.sleep(self.interval)
GPIO.output(self.pin_A, False)
def Step8(self):
GPIO.output(self.pin_D, True)
GPIO.output(self.pin_A, True)
time.sleep(self.interval)
GPIO.output(self.pin_D, False)
GPIO.output(self.pin_A, False)
def turn(self,count):
for i in range (int(count)):
self.Step1()
self.Step2()
self.Step3()
self.Step4()
self.Step5()
self.Step6()
self.Step7()
self.Step8()
def close(self):
# cleanup the GPIO pin use
GPIO.cleanup()
def turnSteps(self, count):
# Turn n steps
# (supply with number of steps to turn)
for i in range (count):
self.turn(1)
Page 42

Publ ished: 20 .02.2019 Copyright by Joy-IT 42
Joy-Pi
Führen Sie die folgenden Befehle aus und versuchen Sie es selbst:
def turnDegrees(self, count):
# Turn n degrees (small values can lead to inaccuracy)
# (supply with degrees to turn)
self.turn(round(count*512/360,0))
def turnDistance(self, dist, rad):
# Turn for translation of wheels or coil (inaccuracies involved
# e.g. due to thickness of rope)
# (supply with distance to move and radius in same metric)
self.turn(round(512*dist/(2*math.pi*rad),0))
def main():
print("moving started")
motor = Stepmotor()
print("One Step")
motor.turnSteps(1)
time.sleep(0.5)
print("20 Steps")
motor.turnSteps(20)
time.sleep(0.5)
print("quarter turn")
motor.turnDegrees(90)
print("moving stopped")
motor.close()
if __name__ == "__main__":
main()
sudo python stepmotor.py
cd /home/pi/Desktop/Joy-Pi/
Page 43

Publ ished: 20 .02.2019 Copyright by Joy-IT 43
Joy-Pi
5.13 LESSON 13: CONTROLLING SERVO MOTORS
With the help of the servo motor, devices can be mechanically controlled and parts can be moved. For
example, intelligent waste bins, a box with an intelligent opening and closing door and many other interesng projects can be created.
The Joy-Pi has two servo interfaces, both of which can be used to control servo motors. In this tutorial we
will use interface number two, which is marked as "Servo2". Of course you can also use the other servo
interface, but you have to adapt the script to the correct GPIO's for this.
The servomotor needs three pins: posive, negave, and the data pin. The posive pin is the red cable,
the negave pin is the black cable (also called ground) and the data cable is yellow.
For this example you have to switch between the modules. Set switches number 7 and 8 on the
right-hand switching unit to ON. All the other switches should be turned OFF.
Page 44

Publ ished: 20 .02.2019 Copyright by Joy-IT 44
Joy-Pi
Let's take a look at our example code to understand it beer:
The servo uses the GPIO.board pin number 22. Each me the script will set the direcon of the servo motor to rotate. We can use posive degrees to rotate le and negave degrees to rotate right. Just change
the degrees and see how the rotaon of the motor changes.
Cable Pin
Red Middle pin of Servo2
Black Right pin of Servo2
Colored Le pin of Servo2
#!/usr/bin/python
# -*- coding: utf-8 -*-
# Author : Original author WindVoiceVox
# Original Author Github: https://github.com/WindVoiceVox/Raspi_SG90
import RPi.GPIO as GPIO
import time
import sys #Import librarys
class sg90:
def __init__( self, pin, direction ):
GPIO.setmode( GPIO.BOARD ) #set pinlayout to GPIO.BOARD
GPIO.setup( pin, GPIO.OUT ) #declare output
self.pin = int( pin )
self.direction = int( direction )
self.servo = GPIO.PWM( self.pin, 50 )
self.servo.start(0.0)
def cleanup( self ):
self.servo.ChangeDutyCycle(self._henkan(0))
time.sleep(0.3)
self.servo.stop() # stop servomotor
GPIO.cleanup() #Clean GPIOs for other uses
def currentdirection( self ):
return self.direction
def _henkan( self, value ):
return 0.05 * value + 7.0
Page 45

Publ ished: 20 .02.2019 Copyright by Joy-IT 45
Joy-Pi
Execute the following commands and try it yourself:
def setdirection( self, direction, speed ):
for d in range( self.direction, direction, int(speed) ):
self.servo.ChangeDutyCycle( self._henkan( d ) )
self.direction = d
time.sleep(0.1)
self.servo.ChangeDutyCycle( self._henkan( direction ) )
self.direction = direction
def main():
servo_pin = 22 #give servo_pin GPIO.BOARD pin 22
s = sg90(servo_pin,0)
try:
while True:
print "Turn left ..." #console output
s.setdirection( 100, 10 )
time.sleep(0.5) #wait 0.5 seconds
print "Turn right ..."
s.setdirection( -100, -10 )
time.sleep(0.5) #wait 0.5 seconds
except KeyboardInterrupt:
s.cleanup()
if __name__ == "__main__":
main()
sudo python servo.py
cd /home/pi/Desktop/Joy-Pi/
Page 46

Publ ished: 20 .02.2019 Copyright by Joy-IT 46
Joy-Pi
5.14 LESSON 14: CONTROLLING THE 8X8 LED-MATRIX
The LED matrix plays an important role in many ashing LED projects. Even if you don't see it at rst
glance, the LED matrix can do much more than just blink red. It can be used to display informaon, text,
emojis and even Chinese characters. Perfect for displaying informaon in fun and unique ways and maybe
even a game like Snake or a countdown mer!
The LED matrix module is a large square module located on the le side of the segment LED and just be-
low the LCD. It can easily be recognized by the small white dots that are the LEDs. Do not be fooled by the
small size of the LEDs. This LED matrix can light up a dark place with ease!
In this example, we display a short text. In the script, we create a string with a message and use the
show_message() funcon to display the message on the matrix display.
We can control properes, such as delays, that make the message faster or slower. For example,
scroll_delay 0 will be quite fast, while a delay of 0.1 will make the
message ow slows down a bit. The Matrix LED, unlike other modules, uses an SPI interface from which it
can be controlled. Try several examples and change the code to see what happens.
#!/usr/bin/env python
# -*- coding: utf-8 -*-
# Copyright (c) 2017-18 Richard Hull and contributors
# License: https://github.com/rm-hull/luma.led_matrix/blob/master/LICENSE.rst
# Github link: https://github.com/rm-hull/luma.led_matrix/
# Import all the modules
import re
import time
from luma.led_matrix.device import max7219
from luma.core.interface.serial import spi, noop
from luma.core.render import canvas
from luma.core.virtual import viewport
from luma.core.legacy import text, show_message
from luma.core.legacy.font import proportional, CP437_FONT, TINY_FONT, SIN-
CLAIR_FONT, LCD_FONT
Page 47

Publ ished: 20 .02.2019 Copyright by Joy-IT 47
Joy-Pi
Execute the following commands and try it yourself:
def main(cascaded, block_orientation, rotate):
# create matrix device
serial = spi(port=0, device=1, gpio=noop())
device = max7219(serial, cascaded=cascaded or 1,
block_orientation=block_orientation, rotate=rotate or 0)
# debugging purpose
print("[-] Matrix initialized")
# print hello world on the matrix display
msg = "HELLO WORLD"
# debugging purpose
print("[-] Printing: %s" % msg)
show_message(device, msg, fill="white", font=proportional(CP437_FONT),
scroll_delay=0.1)
if __name__ == "__main__":
# cascaded = Number of cascaded MAX7219 LED matrices, default=1
# block_orientation = choices 0, 90, -90, Corrects block orientation when
wired vertically, default=0
# rotate = choices 0, 1, 2, 3, Rotate display 0=0°, 1=90°, 2=180°, 3=270°,
default=0
try:
main(cascaded=1, block_orientation=90
, rotate=0)
except KeyboardInterrupt:
pass
sudo python matrix_demo.py
cd /home/pi/Desktop/Joy-Pi/
Page 48

Publ ished: 20 .02.2019 Copyright by Joy-IT 48
Joy-Pi
5.15 LESSON 15: CONTROLLING THE 7-SEGMENT DISPLAY
The segment LED is a very useful display when it comes to numbers and data. It can show us the me,
count how many mes we have done certain things. The segment display is also used in many industrial
soluons, such as elevators.
The segment display is located directly above the vibraon sensor and next to the LED matrix. When it is
o, 4 eights are visible. As soon as you have acvated the segment display module the dark colour becomes a shiny, bright red.
In our example we demonstrate a clock. We will use the me and date modules to get the Raspberry Pi
system me, which we display using the segment.write_display() funcon. The set_digit() funcon, in
combinaon with the numbers 0,1,2 and 3, sets the posion on the display where the number should be
shown.
Since the current system me is retrieved in this example, it is necessary to congure the Raspberry Pi to
the correct me zone rst. Open a terminal window and enter the following command:
A window opens in which you can select your current me zone. Aer you have selected the correct me
zone, conrm with the OK buon and press Enter again to conrm.
sudo dpkg-reconfigure tzdata
Page 49

Publ ished: 20 .02.2019 Copyright by Joy-IT 49
Joy-Pi
Execute the following commands and try it yourself:
#!/usr/bin/python
import time
import datetime
from Adafruit_LED_Backpack import SevenSegment
# ===========================================================================
# Clock Example
# ===========================================================================
segment = SevenSegment.SevenSegment(address=0x70)
# Initialize the display. Must be called once before using the display.
segment.begin()
print "Press CTRL+C to exit"
# Continually update the time on a 4 char, 7-segment display
try:
while(True):
now = datetime.datetime.now()
hour = now.hour
minute = now.minute
second = now.second
segment.clear()
# Set hours
segment.set_digit(0, int(hour / 10)) # Tens
segment.set_digit(1, hour % 10) # Ones
# Set minutes
segment.set_digit(2, int(minute / 10)) # Tens
segment.set_digit(3, minute % 10) # Ones
# Toggle colon
segment.set_colon(second % 2) # Toggle colon at 1Hz
# Write the display buffer to the hardware. This must be called to
# update the actual display LEDs.
segment.write_display()
# Wait a second.
time.sleep(1)
except KeyboardInterrupt:
segment.clear()
segment.write_display()
sudo python segment.py
cd /home/pi/Desktop/Joy-Pi/
Page 50

Publ ished: 20 .02.2019 Copyright by Joy-IT 50
Joy-Pi
5.16 LESSON 16: RECOGNIZE TOUCHES
The touch sensor is very useful when it comes to key funcons. Many products on the market use touch
instead of pressing a buon, such as smartphones and tablets.
The touch sensor is located directly below the DHT11 sensor and to the right of the relay.
The easily accessible posioning on the Joy-Pi allows easy operaon.
The touch sensor works like any other key module. The only dierence is that it only needs to be touched
instead of pressed. By touching the touch sensor, the module closes a circuit because the computer
detects that the sensor has been touched. The touch sensor uses GPIO Board Pin 11.
from RPi import GPIO
import signal
TOUCH = 11
def setup_gpio():
GPIO.setmode(GPIO.BOARD)
GPIO.setup(TOUCH, GPIO.IN, pull_up_down=GPIO.PUD_UP)
def do_smt(channel):
print("Touch wurde erkannt")
def main():
setup_gpio()
try:
GPIO.add_event_detect(TOUCH, GPIO.FALLING, callback=do_smt, bounceti-
me=200)
signal.pause()
except KeyboardInterrupt:
pass
finally:
GPIO.cleanup()
if __name__ == '__main__':
main()
sudo python touch.py
cd /home/pi/Desktop/Joy-Pi/
Page 51

Publ ished: 20 .02.2019 Copyright by Joy-IT 51
Joy-Pi
5.17 LESSON 17: DETECTING TILTS WITH THE TILT SENSOR
The lt sensor allows us to detect an inclinaon to the right or le. It is used in robocs and other indust-
ries to ensure that things are held straight. It's a small, elongated, black sensor that lies between the
DHT11 sensor and the ultrasonic sensor and can easily be detected by the sound it makes when you lt
the board a lile.
You could easily think that something inside the Joy-Pi-Board is damaged when you hear this noise, but
this noise is completely normal. When the lt sensor is lted to the le, the circuit is acvated and a GPIO
HIGH signal is sent. If the lt sensor is lted to the right, the circuit is deacvated and a GPIO LOW signal
is sent.
For this example you have to switch between the modules. Set switch number 2 of the righthand switching unit to ON. All the other switches should be turned OFF.
#!/usr/bin/python
# -*- coding: utf-8 -*-
import time
import RPi.GPIO as GPIO
# define tilt pin
tilt_pin = 15
# set GPIO mode to GPIO.BOARD
GPIO.setmode(GPIO.BOARD)
# set pin as input
GPIO.setup(tilt_pin, GPIO.IN)
try:
while True:
# positive is tilt to left negative is tilt to right
if GPIO.input(tilt_pin):
print "[-] Left Tilt"
else:
print "[-] Right Tilt"
time.sleep(1)
except KeyboardInterrupt:
# CTRL+C detected, cleaning and quitting the script
GPIO.cleanup()
Page 52

Publ ished: 20 .02.2019 Copyright by Joy-IT 52
Joy-Pi
Execute the following commands and try it yourself:
5.18 LESSON18: USING THE BUTTON MATRIX
The buon matrix is a module with 16 independent buons that can be used for many projects such as a
keyboard or a memory game. The great possibilies of the keys allow you to do almost anything.
The buon matrix is located at the boom center of the Joy-Pi board, to the right of the relay. It is easily
recognizable by the 16 individual buons. The excellent posioning on the board allows easy operaon of
the keys while sll providing a good overview of all other sensors.
The buon matrix consists of four columns and rows. We congure the matrix rows and columns with
their GPIO pins and inialize the BuonMatrix() object as a buon variable. Then we can press any
buon of the matrix and see which one has been pressed.
In our example, aer recognizing a keystroke, we acvate the funcon
acvateBuon(), which displays the number of the pressed buon. You can of course edit this module to
do anything you can imagine.
The example code is on the next 2 sites.
sudo python tilt.py
cd /home/pi/Desktop/Joy-Pi/
For this example you have to switch between the modules. Set ALL switches of the le switching
unit to ON. All the other switches should be turned OFF.
Columns (COL):
1 2 3 4
Rows (ROW):
1
2
3 4
Page 53

Publ ished: 20 .02.2019 Copyright by Joy-IT 53
Joy-Pi
#!/usr/bin/python
# -*- coding: utf-8 -*-
# Author : original author stenobot
# Original Author Github: https://github.com/stenobot/SoundMatrixPi
import RPi.GPIO as GPIO
import time
class ButtonMatrix():
def __init__(self):
GPIO.setmode(GPIO.BOARD)
# matrix button ids
self.buttonIDs = [[4,3,2,1],[8,7,6,5],[12,11,10,9],[16,15,14,13]]
# gpio inputs for rows
self.rowPins = [13,15,29,31]
# gpio outputs for columns
self.columnPins = [33,35,37,22]
# define four inputs with pull up resistor
for i in range(len(self.rowPins)):
GPIO.setup(self.rowPins[i], GPIO.IN, pull_up_down = GPIO.PUD_UP)
# define four outputs and set to high
for j in range(len(self.columnPins)):
GPIO.setup(self.columnPins[j], GPIO.OUT)
GPIO.output(self.columnPins[j], 1)
def activateButton(self, rowPin, colPin):
# get the button index
btnIndex = self.buttonIDs[rowPin][colPin] - 1
print("button " + str(btnIndex + 1) + " pressed")
# prevent button presses too close together
time.sleep(.3)
def buttonHeldDown(self,pin):
if(GPIO.input(self.rowPins[pin]) == 0):
return True
return False
def main():
# initial the button matrix
buttons = ButtonMatrix()
try:
Page 54

Publ ished: 20 .02.2019 Copyright by Joy-IT 54
Joy-Pi
Execute the following commands and try it yourself:
while(True):
for j in range(len(buttons.columnPins)):
# set each output pin to low
GPIO.output(buttons.columnPins[j],0)
for i in range(len(buttons.rowPins)):
if GPIO.input(buttons.rowPins[i]) == 0:
# button pressed, activate it
buttons.activateButton(i,j)
# do nothing while button is being held down
while(buttons.buttonHeldDown(i)):
pass
# return each output pin to high
GPIO.output(buttons.columnPins[j],1)
except KeyboardInterrupt:
GPIO.cleanup()
if __name__ == "__main__":
main()
sudo python button_matrix.py
cd /home/pi/Desktop/Joy-Pi/
Page 55
Publ ished: 20 .02.2019 Copyright by Joy-IT 55
Joy-Pi
5.19 LESSON 19: CONTROLLING AND USING THE IR-SENSOR
In this lesson, we will learn how to use the infrared receiver and how to receive IR codes from a remote
control. The use of this method is extremely useful because we can use dierent dene acons for dierent buons. With a remote control we can switch on dierent LEDs or control the servo motor each me
the buon is pressed.
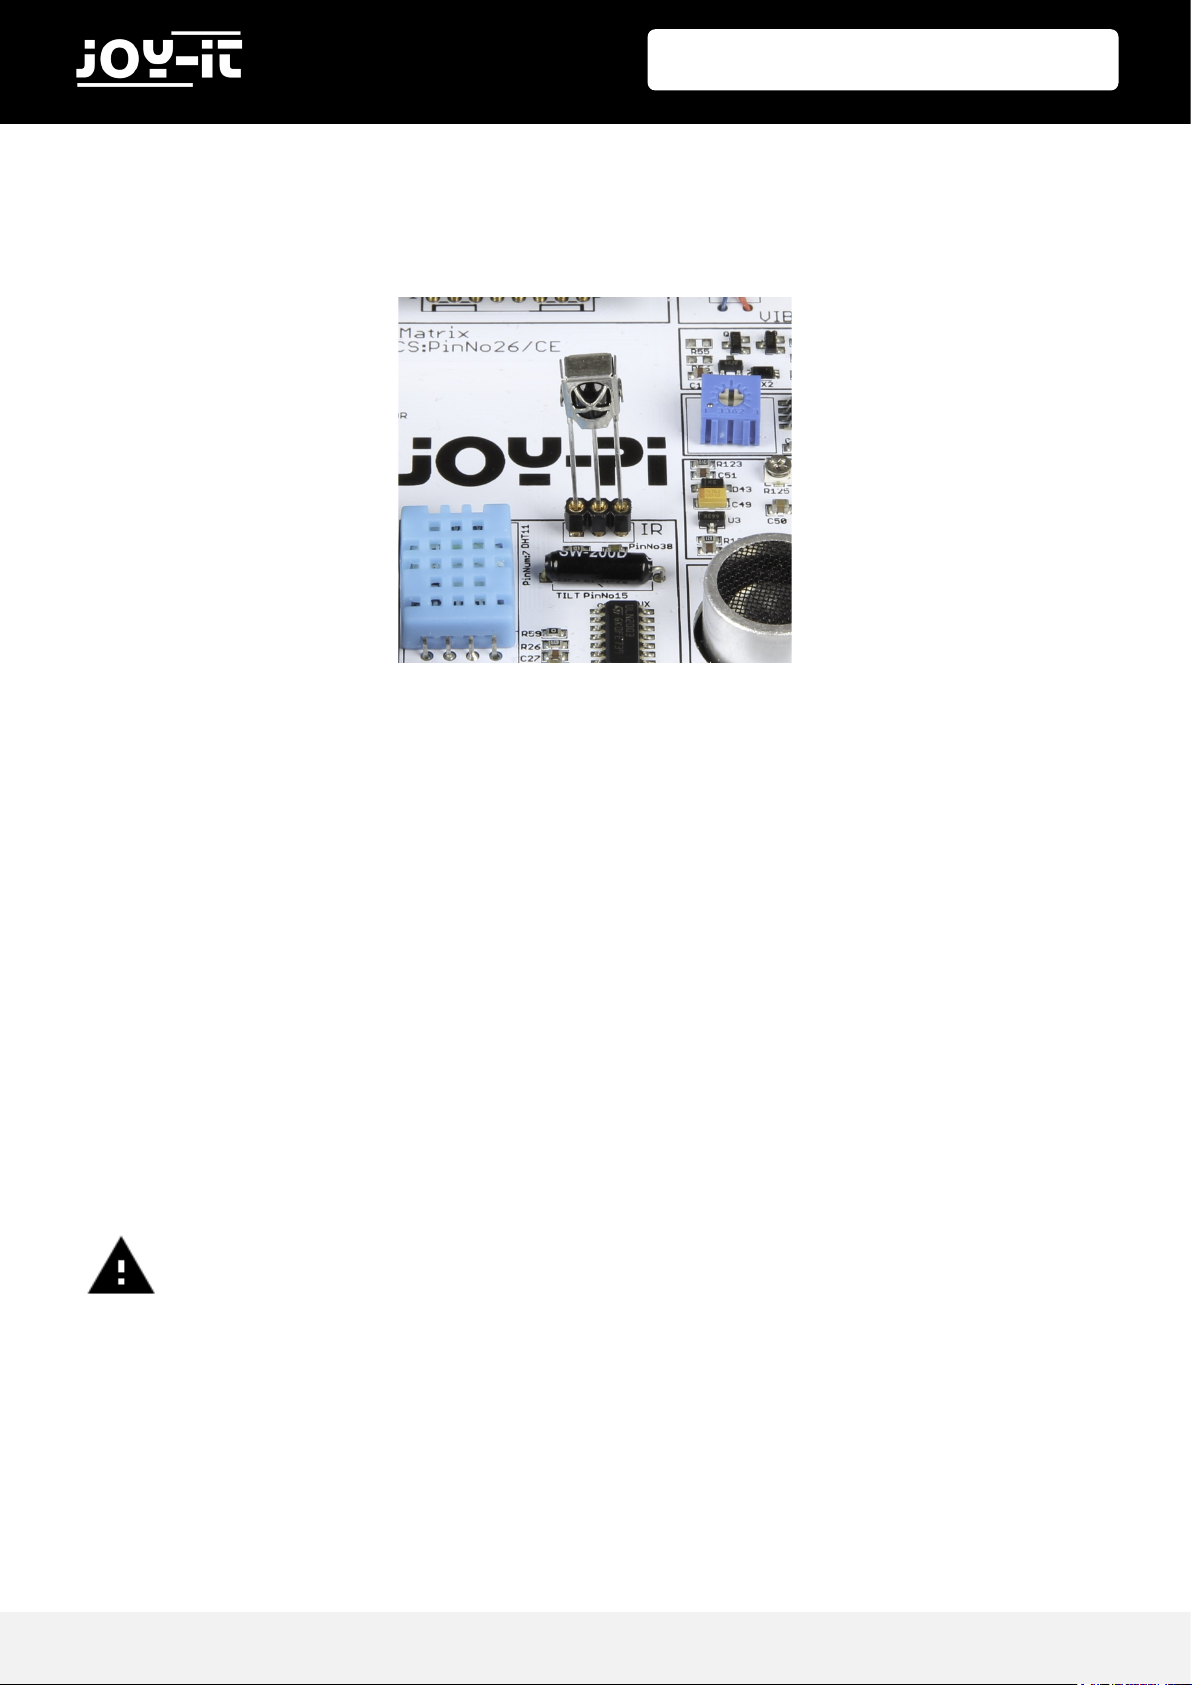
The IR sensor will be delivered with the Joy-Pi but is not pre-installed.
You have to plug it in the slot as shown in the picture above.
The IR sensor is located to the right of the DHT11 sensor and above the lt sensor. It looks like a small LED
with 3 pins. We also need the IR remote control, which is included in the Joy-Pi-Kit.
The IR receiver uses a library called LIRC and Python-LIRC to receive and understand the codes we send
with the IR remote control. The Out variable contains the key we pressed. Using if queries, we can check
whether certain keys have been pressed. This informaon allows us to execute the appropriate commands.
The example code is on the next site.
Important!!! Remove the IR-sensor before you close the Joy-Pi case
Page 56

Publ ished: 20 .02.2019 Copyright by Joy-IT 56
Joy-Pi
Execute the following commands and try it yourself:
#!/usr/bin/env python
# -*- coding: utf-8 -*-
import socket, signal
import lirc, time, sys
import RPi.GPIO as GPIO
from array import array
GPIO.setmode(11)
GPIO.setup(17, 0)
GPIO.setup(18, 0)
PORT = 42001
HOST = "localhost"
Socket = socket.socket(socket.AF_INET, socket.SOCK_STREAM)
Lirc = lirc.init("keys")
#lirc.set_blocking(False, Lirc) # Un-Comment to stop nextcode() from
# waiting for a signal ( will return empty array when no key is pressed )
def handler(signal, frame):
Socket.close()
GPIO.cleanup()
exit(0)
signal.signal(signal.SIGTSTP, handler)
def sendCmd(cmd):
n = len(cmd)
a = array('c')
a.append(chr((n >> 24) & 0xFF))
a.append(chr((n >> 16) & 0xFF))
a.append(chr((n >> 8) & 0xFF))
a.append(chr(n & 0xFF))
Socket.send(a.tostring() + cmd)
while True:
Out = lirc.nextcode()
print Out[0]
sudo python IR.py
cd /home/pi/Desktop/Joy-Pi/
Page 57

Publ ished: 20 .02.2019 Copyright by Joy-IT 57
Joy-Pi
5.20 LESSON 20: OWN CIRCUITS WITH THE BREADBOARD
The breadboard is an extremely useful part of the Joy-Pi that allows us to create our own circuits and
funcons. Now that we've learned how to use all the sensors, it's me to create our own. In this lesson
you will create your rst custom circuit using a ashing LED example. The breadboard is located in the
middle of the Joy Pi board. It is a small, white, board with many small holes.
We will create a custom circuit with the funcon to make an LED blink. To do this, we need to use GPIO as
output and GND, as we already did in earlier lessons. We will connect the servo interface (SERVO1 interface) to GPIO 37.
You can use this picture as a guide to create your circuit on the plug-in board.
Remember that pin number 37 is on the GPIO port and GND is on the GND port of the SERVO1 interface.
For this example you have to switch between the modules because the servo pins are used. Set
the switches 7 and 8 of the right switching unit to ON. All the other switches should be
turned OFF.
Page 58

Publ ished: 20 .02.2019 Copyright by Joy-IT 58
Joy-Pi
We must use a resistor and connect it to the negave side of the LED (the negave side of the LED is the
one with the shorter leg). We will connect the other side of the resistor directly to the GND pin on the
SERVO1 interface using the cable. Connect the posive side of the LED to the GPIO37 pin of the SERVO1
interface.
Aer you build the circuit ist me to write the code that will controll the LED.
The plan is to send GPIO.HIGH to the GPIO37 Pin then wait 0.2 seconds and
cut the signal with GPIO.LOW. This will be looped and the LED will start blinking.
You can stop the programm by clicking CTRL+C.
The example code is on the next side.
Important: The resistor, the LED and the cables are not included.
Page 59

Publ ished: 20 .02.2019 Copyright by Joy-IT 59
Joy-Pi
Execute the following commands and try it yourself:
#!/usr/bin/python
# -*- coding: utf-8 -*-
import time
import RPi.GPIO as GPIO
# define LED pin
led_pin = 37
# set GPIO mode to GPIO.BOARD
GPIO.setmode(GPIO.BOARD)
# set pin as input
GPIO.setup(led_pin, GPIO.OUT)
try:
while True:
# turn on LED
GPIO.output(led_pin, GPIO.HIGH)
# Wait half a second
time.sleep(0.2)
# turn off LED
GPIO.output(led_pin, GPIO.LOW)
# Wait half a second
time.sleep(0.2)
except KeyboardInterrupt:
# CTRL+C detected, cleaning and quitting the script
GPIO.cleanup()
sudo python blinking_led.py
cd /home/pi/Desktop/Joy-Pi/
Page 60

Publ ished: 20 .02.2019 Copyright by Joy-IT 60
Joy-Pi
5.21 LESSON 21: PHOTOGRAPHING WITH THE RASPBERRY PI CAMERA
The Raspberry Pi camera is extremely useful and can be used for a variety of projects. For example for
security cameras, face recognion and much more. In the following lesson we will introduce you to the
basics of using the Raspberry Pi camera. This will teach you how to take a picture.
The camera is located centrally above the Joy-Pi's screen and is connected directly to the Raspberry Pi
with a USB cable.
First, install the fswebcam package:
(you dont have to install it if you use our ready to use image)
Enter the command fswebcam followed by a lename and a picture will be taken using the webcam, and
saved to the lename specied:
Our webcam has a resoluon of 1280x1024 so to specify the resoluon we want we will use the –r ag:
If we want to remove the mestamp we have to use the --no-banner ag:
sudo apt-get install fswebcam
fswebcam image.jpg
fswebcam -r 1280x1024 image2.jpg
fswebcam -r 1280x1024 --no-banner image3.jpg
Page 61

Publ ished: 20 .02.2019 Copyright by Joy-IT 61
Joy-Pi
To capture a video we use the following command:
You can change the resoluon if you want to.
Aer capturing you can navigate to the save folder with the „cd“ command and play the video with the
following command:
The video will play in fullscreen if you want to close the video press CTRL+C.
mpeg -f v4l2 -r 25 -s 780x480 -i /dev/video0 example.avi
omxplayer example.mp4
Page 62

Publ ished: 20 .02.2019 Copyright by Joy-IT 62
Joy-Pi
Symbol on electrical and electronic equipment
This crossed-out dustbin means that electrical and electronic equipment does not belong in the
household waste. You must return the old appliances to a collecon point. Before handing over waste
baeries and accumulators that are not enclosed by waste equipment must be separated from it.
Return opons
As an end user, you can return your old appliance (which essenally fulls the same funcon as the new
appliance purchased from us) free of charge for disposal when you purchase a new appliance. Small
appliances with no external dimensions greater than 25 cm can be disposed of in normal household
quanes independently of the purchase of a new appliance.
Possibility of return at our company locaon during opening hours
Simac GmbH, Pascalstr. 8, D-47506 Neukirchen-Vluyn
Possibility of return in your area
We will send you a parcel stamp with which you can return the device to us free of charge. Please contact
us by e-mail at Service@joy-it.net or by telephone.
Informaon on packaging
If you do not have suitable packaging material or do not wish to use your own, please contact us and we
will send you suitable packaging.
6. INFORMATION AND TAKE-BACK OBLIGATIONS
Page 63

Publ ished: 20 .02.2019 Copyright by Joy-IT 63
Joy-Pi
This product contains soware wich are available under the terms of an open content licence of the type GNU
General Public License, Version 2 (GPL) or X11 License (also named MIT). The complete licence texts will you see on
the following sites. You can nd more detailed informaons at hp://www.gnu.org/licenses/old-licenses/gpl-2.0
and hps://www.gnu.org/licenses/license-list.html.
As this is free soware, there is no warranty, as far as permied by law. Details hierzu nden Sie in der GNU
General Public License und der X11 License. Please note that the warranty for the hardware of course is not
aected and exists in full
Furthermore we will provide the source code in machine-readable form, calculated only the manufacturing cost of
the medium. The request schould be sent to service@joy-it.net.
Weitere Fragen beantworten wir Ihnen gerne unter service@joy-it.net.
GNU GENERAL PUBLIC LICENSE
Version 2, June 1991
Copyright (C) 1989, 1991 Free Soware Foundaon, Inc.
51 Franklin Street, Fih Floor, Boston, MA 02110-1301, USA
Everyone is permied to copy and distribute verbam copies
of this license document, but changing it is not allowed.
Preamble
The licenses for most soware are designed to take away your freedom to share and change it. By contrast, the GNU General Public License is intended to
guarantee your freedom to share and change free soware--to make sure the soware is free for all its users. This General Public License applies to most of
the Free Soware Foundaon's soware and to any other program whose authors commit to using it. (Some other Free Soware Foundaon soware is
covered by the GNU Lesser General Public License instead.) You can apply it to your programs, too.
When we speak of free soware, we are referring to freedom, not price. Our General Public Licenses are designed to make sure that you have the freedom to
distribute copies of free soware (and charge for this service if you wish), that you receive source code or can get it if you want it, that you can change the
soware or use pieces of it in new free programs; and that you know you can do these things.
To protect your rights, we need to make restricons that forbid anyone to deny you these rights or to ask you to surrender the rights. These restricons
translate to certain responsibilies for you if you distribute copies of the soware, or if you modify it.
For example, if you distribute copies of such a program, whether gras or for a fee, you must give the recipients all the rights that you have. You must make
sure that they, too, receive or can get the source code. And you must show them these terms so they know their rights.
We protect your rights with two steps: (1) copyright the soware, and (2) oer you this license which gives you legal permission to copy, distribute and/or
modify the soware.
7. Copyright informaons
Page 64

Publ ished: 20 .02.2019 Copyright by Joy-IT 64
Joy-Pi
Also, for each author's protecon and ours, we want to make certain that everyone understands that there is no warranty for this free soware. If the
soware is modied by someone else and passed on, we want its recipients to know that what they have is not the original, so that any problems introduced
by others will not reect on the original authors' reputaons.
Finally, any free program is threatened constantly by soware patents. We wish to avoid the danger that redistributors of a free program will individually
obtain patent licenses, in eect making the program proprietary. To prevent this, we have made it clear that any patent must be licensed for everyone's free
use or not licensed at all.
The precise terms and condions for copying, distribuon and modicaon follow.
TERMS AND CONDITIONS FOR COPYING, DISTRIBUTION AND MODIFICATION
0. This License applies to any program or other work which contains a noce placed by the copyright holder saying it may be distributed under the terms of
this General Public License. The "Program", below, refers to any such program or work, and a "work based on the Program" means either the Program or any
derivave work under copyright law: that is to say, a work containing the Program or a poron of it, either verbam or with modicaons and/or translated
into another language. (Hereinaer, translaon is included without limitaon in the term "modicaon".) Each licensee is addressed as "you".
Acvies other than copying, distribuon and modicaon are not covered by this License; they are outside its scope. The act of running the Program is not
restricted, and the output from the Program is covered only if its contents constute a work based on the Program (independent of having been made by
running the Program). Whether that is true depends on what the Program does.
1. You may copy and distribute verbam copies of the Program's source code as you receive it, in any medium, provided that you conspicuously and
appropriately publish on each copy an appropriate copyright noce and disclaimer of warranty; keep intact all the noces that refer to this License and to the
absence of any warranty; and give any other recipients of the Program a copy of this License along with the Program.
You may charge a fee for the physical act of transferring a copy, and you may at your opon oer warranty protecon in exchange for a fee.
2. You may modify your copy or copies of the Program or any poron of it, thus forming a work based on the Program, and copy and distribute such
modicaons or work under the terms of Secon 1 above, provided that you also meet all of these condions:
a) You must cause the modied les to carry prominent noces stang that you changed the les and the date of any change.
b) You must cause any work that you distribute or publish, that in whole or in part contains or is derived from the Program or any part
thereof, to be licensed as a whole at no charge to all third pares under the terms of this License.
c) If the modied program normally reads commands interacvely when run, you must cause it, when started running for such interacve
use in the most ordinary way, to print or display an announcement including an appropriate copyright noce and a noce that there is no
warranty (or else, saying that you provide a warranty) and that users may redistribute the program under these condions, and telling the
user how to view a copy of this License. (Excepon: if the Program itself is interacve but does not normally print such an announcement,
your work based on the Program is not required to print an announcement.)
These requirements apply to the modied work as a whole. If idenable secons of that work are not derived from the Program, and can be reasonably
considered independent and separate works in themselves, then this License, and its terms, do not apply to those secons when you distribute them as
separate works. But when you distribute the same secons as part of a whole which is a work based on the Program, the distribuon of the whole must be on
the terms of this License, whose permissions for other licensees extend to the enre whole, and thus to each and every part regardless of who wrote it.
7. Copyright informaons
Page 65

Publ ished: 20 .02.2019 Copyright by Joy-IT 65
Joy-Pi
Thus, it is not the intent of this secon to claim rights or contest your rights to work wrien enrely by you; rather, the intent is to exercise the right to control
the distribuon of derivave or collecve works based on the Program.
In addion, mere aggregaon of another work not based on the Program with the Program (or with a work based on the Program) on a volume of a storage or
distribuon medium does not bring the other work under the scope of this License.
3. You may copy and distribute the Program (or a work based on it, under Secon 2) in object code or executable form under the terms of Secons 1 and 2
above provided that you also do one of the following:
a) Accompany it with the complete corresponding machine-readable source code, which must be distributed under the terms of Secons 1
and 2 above on a medium customarily used for soware interchange; or,
b) Accompany it with a wrien oer, valid for at least three years, to give any third party, for a charge no more than your cost of physically
performing source distribuon, a complete machine-readable copy of the corresponding source code, to be distributed under the terms of
Secons 1 and 2 above on a medium customarily used for soware interchange; or,
c) Accompany it with the informaon you received as to the oer to distribute corresponding source code. (This alternave is allowed only
for noncommercial distribuon and only if you received the program in object code or executable form with such an oer, in accord with
Subsecon b above.)
The source code for a work means the preferred form of the work for making modicaons to it. For an executable work, complete source code means all the
source code for all modules it contains, plus any associated interface denion les, plus the scripts used to control compilaon and installaon of the
executable. However, as a special excepon, the source code distributed need not include anything that is normally distributed (in either source or binary
form) with the major components (compiler, kernel, and so on) of the operang system on which the executable runs, unless that component itself
accompanies the executable.
If distribuon of executable or object code is made by oering access to copy from a designated place, then oering equivalent access to copy the source code
from the same place counts as distribuon of the source code, even though third pares are not compelled to copy the source along with the object code.
4. You may not copy, modify, sublicense, or distribute the Program except as expressly provided under this License. Any aempt otherwise to copy, modify,
sublicense or distribute the Program is void, and will automacally terminate your rights under this License. However, pares who have received copies, or
rights, from you under this License will not have their licenses terminated so long as such pares remain in full compliance.
5. You are not required to accept this License, since you have not signed it. However, nothing else grants you permission to modify or distribute the Program or
its derivave works. These acons are prohibited by law if you do not accept this License. Therefore, by modifying or distribung the Program (or any work
based on the Program), you indicate your acceptance of this License to do so, and all its terms and condions for copying, distribung or modifying the
Program or works based on it.
6. Each me you redistribute the Program (or any work based on the Program), the recipient automacally receives a license from the original licensor to copy,
distribute or modify the Program subject to these terms and condions. You may not impose any further restricons on the recipients' exercise of the rights
granted herein. You are not responsible for enforcing compliance by third pares to this License.
7. If, as a consequence of a court judgment or allegaon of patent infringement or for any other reason (not limited to patent issues), condions are imposed
on you (whether by court order, agreement or otherwise) that contradict the condions of this License, they do not excuse you from the condions of this
License. If you cannot distribute so as to sasfy simultaneously your obligaons under this License and any other pernent obligaons, then as a consequence
you may not distribute the Program at all. For example, if a patent license would not permit royalty-free redistribuon of the Program by all those who receive
7. Copyright informaons
Page 66

Publ ished: 20 .02.2019 Copyright by Joy-IT 66
Joy-Pi
copies directly or indirectly through you, then the only way you could sasfy both it and this License would be to refrain enrely from distribuon of the
Program. If any poron of this secon is held invalid or unenforceable under any parcular circumstance, the balance of the secon is intended to apply and
the secon as a whole is intended to apply in other circumstances.
It is not the purpose of this secon to induce you to infringe any patents or other property right claims or to contest validity of any such claims; this secon has
the sole purpose of protecng the integrity of the free soware distribuon system, which is implemented by public license pracces. Many people have made
generous contribuons to the wide range of soware distributed through that system in reliance on consistent applicaon of that system; it is up to the
author/donor to decide if he or she is willing to distribute soware through any other system and a licensee cannot impose that choice.
This secon is intended to make thoroughly clear what is believed to be a consequence of the rest of this License.
8. If the distribuon and/or use of the Program is restricted in certain countries either by patents or by copyrighted interfaces, the original copyright holder
who places the Program under this License may add an explicit geographical distribuon limitaon excluding those countries, so that distribuon is permied
only in or among countries not thus excluded. In such case, this License incorporates the limitaon as if wrien in the body of this License.
9. The Free Soware Foundaon may publish revised and/or new versions of the General Public License from me to me. Such new versions will be similar in
spirit to the present version, but may dier in detail to address new problems or concerns.
Each version is given a disnguishing version number. If the Program species a version number of this License which applies to it and "any later version", you
have the opon of following the terms and condions either of that version or of any later version published by the Free Soware Foundaon. If the Program
does not specify a version number of this License, you may choose any version ever published by the Free Soware Foundaon.
10. If you wish to incorporate parts of the Program into other free programs whose distribuon condions are dierent, write to the author to ask for
permission. For soware which is copyrighted by the Free Soware Foundaon, write to the Free Soware Foundaon; we somemes make excepons for
this. Our decision will be guided by the two goals of preserving the free status of all derivaves of our free soware and of promong the sharing and reuse of
soware generally.
NO WARRANTY
11. BECAUSE THE PROGRAM IS LICENSED FREE OF CHARGE, THERE IS NO WARRANTY FOR THE PROGRAM, TO THE EXTENT PERMITTED BY APPLICABLE LAW.
EXCEPT WHEN OTHERWISE STATED IN WRITING THE COPYRIGHT HOLDERS AND/OR OTHER PARTIES PROVIDE THE PROGRAM "AS IS" WITHOUT WARRANTY OF
ANY KIND, EITHER EXPRESSED OR IMPLIED, INCLUDING, BUT NOT LIMITED TO, THE IMPLIED WARRANTIES OF MERCHANTABILITY AND FITNESS FOR A
PARTICULAR PURPOSE. THE ENTIRE RISK AS TO THE QUALITY AND PERFORMANCE OF THE PROGRAM IS WITH YOU. SHOULD THE PROGRAM PROVE DEFECTIVE,
YOU ASSUME THE COST OF ALL NECESSARY SERVICING, REPAIR OR CORRECTION.
12. IN NO EVENT UNLESS REQUIRED BY APPLICABLE LAW OR AGREED TO IN WRITING WILL ANY COPYRIGHT HOLDER, OR ANY OTHER PARTY WHO MAY
MODIFY AND/OR REDISTRIBUTE THE PROGRAM AS PERMITTED ABOVE, BE LIABLE TO YOU FOR DAMAGES, INCLUDING ANY GENERAL, SPECIAL, INCIDENTAL OR
CONSEQUENTIAL DAMAGES ARISING OUT OF THE USE OR INABILITY TO USE THE PROGRAM (INCLUDING BUT NOT LIMITED TO LOSS OF DATA OR DATA BEING
RENDERED INACCURATE OR LOSSES SUSTAINED BY YOU OR THIRD PARTIES OR A FAILURE OF THE PROGRAM TO OPERATE WITH ANY OTHER PROGRAMS),
EVEN IF SUCH HOLDER OR OTHER PARTY HAS BEEN ADVISED OF THE POSSIBILITY OF SUCH DAMAGES.
7. Copyright informaons
Page 67

Publ ished: 20 .02.2019 Copyright by Joy-IT 67
Joy-Pi
END OF TERMS AND CONDITIONS
How to Apply These Terms to Your New Programs
If you develop a new program, and you want it to be of the greatest possible use to the public, the best way to achieve this is to make it free soware which
everyone can redistribute and change under these terms.
To do so, aach the following noces to the program. It is safest to aach them to the start of each source le to most eecvely convey the exclusion of
warranty; and each le should have at least the "copyright" line and a pointer to where the full noce is found.
one line to give the program's name and an idea of what it does. Copyright (C) yyyy name of author
This program is free soware; you can redistribute it and/or modify it under the terms of the GNU General Public License as published by the Free Soware
Foundaon; either version 2 of the License, or (at your opon) any later version.
This program is distributed in the hope that it will be useful, but WITHOUT ANY WARRANTY; without even the implied warranty of MERCHANTABILITY or
FITNESS FOR A PARTICULAR PURPOSE. See the GNU General Public License for more details.
You should have received a copy of the GNU General Public License along with this program; if not, write to the Free Soware Foundaon, Inc., 51 Franklin
Street, Fih Floor, Boston, MA 02110-1301, USA.
Also add informaon on how to contact you by electronic and paper mail.
If the program is interacve, make it output a short noce like this when it starts in an interacve mode:
Gnomovision version 69, Copyright (C) year name of author Gnomovision comes with ABSOLUTELY NO WARRANTY; for details type `show w'. This is free
soware, and you are welcome to redistribute it under certain condions; type `show c' for details.
The hypothecal commands `show w' and `show c' should show the appropriate parts of the General Public License. Of course, the commands you use may be
called something other than `show w' and `show c'; they could even be mouse-clicks or menu items--whatever suits your program.
You should also get your employer (if you work as a programmer) or your school, if any, to sign a "copyright disclaimer" for the program, if necessary. Here is a
sample; alter the names:
Yoyodyne, Inc., hereby disclaims all copyright interest in the program `Gnomovision'(which makes passes at compilers) wrien by James Hacker.
signature of Ty Coon, 1 April 1989
Ty Coon, President of Vice
7. Copyright informaons
Page 68

Publ ished: 20 .02.2019 Copyright by Joy-IT 68
Joy-Pi
GNU GENERAL PUBLIC LICENSE
Version 3, 29 June 2007
Copyright © 2007 Free Software Foundation, Inc. <https://fsf.org/>
Everyone is permitted to copy and distribute verbatim copies of this license document, but changing it is not allowed.
Preamble
The GNU General Public License is a free, copyleft license for software and other kinds of works.
The licenses for most software and other practical works are designed to take away your freedom to share and change the works. By contrast, the GNU General
Public License is intended to guarantee your freedom to share and change all versions of a program--to make sure it remains free software for all its users. We,
the Free Software Foundation, use the GNU General Public License for most of our software; it applies also to any other work released this way by its authors.
You can apply it to your programs, too.
When we speak of free software, we are referring to freedom, not price. Our General Public Licenses are designed to make sure that you have the freedom to
distribute copies of free software (and charge for them if you wish), that you receive source code or can get it if you want it, that you can change the software or
use pieces of it in new free programs, and that you know you can do these things.
To protect your rights, we need to prevent others from denying you these rights or asking you to surrender the rights. Therefore, you have certain responsibilities
if you distribute copies of the software, or if you modify it: responsibilities to respect the freedom of others.
For example, if you distribute copies of such a program, whether gratis or for a fee, you must pass on to the recipients the same freedoms that you received. You
must make sure that they, too, receive or can get the source code. And you must show them these terms so they know their rights.
Developers that use the GNU GPL protect your rights with two steps: (1) assert copyright on the software, and (2) offer you this License giving you legal
permission to copy, distribute and/or modify it.
For the developers' and authors' protection, the GPL clearly explains that there is no warranty for this free software. For both users' and authors' sake, the GPL
requires that modified versions be marked as changed, so that their problems will not be attributed erroneously to authors of previous versions.
Some devices are designed to deny users access to install or run modified versions of the software inside them, although the manufacturer can do so. This is
fundamentally incompatible with the aim of protecting users' freedom to change the software. The systematic pattern of such abuse occurs in the area of products
for individuals to use, which is precisely where it is most unacceptable. Therefore, we have designed this version of the GPL to prohibit the practice for those
products. If such problems arise substantially in other domains, we stand ready to extend this provision to those domains in future versions of the GPL, as needed
to protect the freedom of users.
Finally, every program is threatened constantly by software patents. States should not allow patents to restrict development and use of software on general-
purpose computers, but in those that do, we wish to avoid the special danger that patents applied to a free program could make it effectively proprietary. To
prevent this, the GPL assures that patents cannot be used to render the program non-free.
The precise terms and conditions for copying, distribution and modification follow.
7. Copyright informaons
Page 69

Publ ished: 20 .02.2019 Copyright by Joy-IT 69
Joy-Pi
TERMS AND CONDITIONS
0. Definitions.
“This License” refers to version 3 of the GNU General Public License.
“Copyright” also means copyright-like laws that apply to other kinds of works, such as semiconductor masks.
“The Program” refers to any copyrightable work licensed under this License. Each licensee is addressed as “you”. “Licensees” and “recipients” may be
individuals or organizations.
To “modify” a work means to copy from or adapt all or part of the work in a fashion requiring copyright permission, other than the making of an exact copy. The
resulting work is called a “modified version” of the earlier work or a work “based on” the earlier work.
A “covered work” means either the unmodified Program or a work based on the Program.
To “propagate” a work means to do anything with it that, without permission, would make you directly or secondarily liable for infringement under applicable
copyright law, except executing it on a computer or modifying a private copy. Propagation includes copying, distribution (with or without modification), making
available to the public, and in some countries other activities as well.
To “convey” a work means any kind of propagation that enables other parties to make or receive copies. Mere interaction with a user through a computer
network, with no transfer of a copy, is not conveying.
An interactive user interface displays “Appropriate Legal Notices” to the extent that it includes a convenient and prominently visible feature that (1) displays an
appropriate copyright notice, and (2) tells the user that there is no warranty for the work (except to the extent that warranties are provided), that licensees may
convey the work under this License, and how to view a copy of this License. If the interface presents a list of user commands or options, such as a menu, a
prominent item in the list meets this criterion.
1. Source Code.
The “source code” for a work means the preferred form of the work for making modifications to it. “Object code” means any non-source form of a work. A
“Standard Interface” means an interface that either is an official standard defined by a recognized standards body, or, in the case of interfaces specified for a
particular programming language, one that is widely used among developers working in that language.
The “System Libraries” of an executable work include anything, other than the work as a whole, that (a) is included in the normal form of packaging a Major
Component, but which is not part of that Major Component, and (b) serves only to enable use of the work with that Major Component, or to implement a
Standard Interface for which an implementation is available to the public in source code form. A “Major Component”, in this context, means a major essential
component (kernel, window system, and so on) of the specific operating system (if any) on which the executable work runs, or a compiler used to produce the
work, or an object code interpreter used to run it.
The “Corresponding Source” for a work in object code form means all the source code needed to generate, install, and (for an executable work) run the object
code and to modify the work, including scripts to control those activities. However, it does not include the work's System Libraries, or general-purpose tools or
generally available free programs which are used unmodified in performing those activities but which are not part of the work. For example, Corresponding
Source includes interface definition files associated with source files for the work, and the source code for shared libraries and dynamically linked subprograms
that the work is specifically designed to require, such as by intimate data communication or control flow between those subprograms and other parts of the work.
The Corresponding Source need not include anything that users can regenerate automatically from other parts of the Corresponding Source.
The Corresponding Source for a work in source code form is that same work.
7. Copyright informations
Page 70

Publ ished: 20 .02.2019 Copyright by Joy-IT 70
Joy-Pi
2. Basic Permissions.
All rights granted under this License are granted for the term of copyright on the Program, and are irrevocable provided the stated condions are met. This
License explicitly arms your unlimited permission to run the unmodied Program. The output from running a covered work is covered by this License only if
the output, given its content, constutes a covered work. This License acknowledges your rights of fair use or other equivalent, as provided by copyright law.
You may make, run and propagate covered works that you do not convey, without condions so long as your license otherwise remains in force. You may
convey covered works to others for the sole purpose of having them make modicaons exclusively for you, or provide you with facilies for running those
works, provided that you comply with the terms of this License in conveying all material for which you do not control copyright. Those thus making or running
the covered works for you must do so exclusively on your behalf, under your direcon and control, on terms that prohibit them from making any copies of
your copyrighted material outside their relaonship with you.
Conveying under any other circumstances is permied solely under the condions stated below. Sublicensing is not allowed; secon 10 makes it unnecessary.
3. Protecng Users' Legal Rights From An-Circumvenon Law.
No covered work shall be deemed part of an eecve technological measure under any applicable law fullling obligaons under arcle 11 of the WIPO
copyright treaty adopted on 20 December 1996, or similar laws prohibing or restricng circumvenon of such measures.
When you convey a covered work, you waive any legal power to forbid circumvenon of technological measures to the extent such circumvenon is eected
by exercising rights under this License with respect to the covered work, and you disclaim any intenon to limit operaon or modicaon of the work as a
means of enforcing, against the work's users, your or third pares' legal rights to forbid circumvenon of technological measures.
4. Conveying Verbam Copies.
You may convey verbam copies of the Program's source code as you receive it, in any medium, provided that you conspicuously and appropriately publish on
each copy an appropriate copyright noce; keep intact all noces stang that this License and any non-permissive terms added in accord with secon 7 apply
to the code; keep intact all noces of the absence of any warranty; and give all recipients a copy of this License along with the Program.
You may charge any price or no price for each copy that you convey, and you may oer support or warranty protecon for a fee.
5. Conveying Modied Source Versions.
You may convey a work based on the Program, or the modicaons to produce it from the Program, in the form of source code under the terms of secon 4,
provided that you also meet all of these condions:
a) The work must carry prominent noces stang that you modied it, and giving a relevant date.
b) The work must carry prominent noces stang that it is released under this License and any condions added under secon 7. This requirement
modies the requirement in secon 4 to “keep intact all noces”.
c) You must license the enre work, as a whole, under this License to anyone who comes into possession of a copy. This License will therefore apply,
along with any applicable secon 7 addional terms, to the whole of the work, and all its parts, regardless of how they are packaged. This License
gives no permission to license the work in any other way, but it does not invalidate such permission if you have separately received it.
d) If the work has interacve user interfaces, each must display Appropriate Legal Noces; however, if the Program has interacve interfaces that
do not display Appropriate Legal Noces, your work need not make them do so.
A compilaon of a covered work with other separate and independent works, which are not by their nature extensions of the covered work, and which are not
combined with it such as to form a larger program, in or on a volume of a storage or distribuon medium, is called an “aggregate” if the compilaon and its
resulng copyright are not used to limit the access or legal rights of the compilaon's users beyond what the individual works permit. Inclusion of a covered
work in an aggregate does not cause this License to apply to the other parts of the aggregate.
6. Conveying Non-Source Forms.
You may convey a covered work in object code form under the terms of secons 4 and 5, provided that you also convey the machine-readable Corresponding
Source under the terms of this License, in one of these ways:
a) Convey the object code in, or embodied in, a physical product (including a physical distribuon medium), accompanied by the Corresponding
Source xed on a durable physical medium customarily used for soware interchange.
b) Convey the object code in, or embodied in, a physical product (including a physical distribuon medium), accompanied by a wrien oer, valid
for at least three years and valid for as long as you oer spare parts or customer support for that product model, to give anyone who possesses the
object code either (1) a copy of the Corresponding Source for all the soware in the product that is covered by this License, on a durable physical
medium customarily used for soware interchange, for a price no more than your reasonable cost of physically performing this conveying of source,
or (2) access to copy the Corresponding Source from a network server at no charge.
c) Convey individual copies of the object code with a copy of the wrien oer to provide the Corresponding Source. This alternave is allowed only
occasionally and noncommercially, and only if you received the object code with such an oer, in accord with subsecon 6b.
d) Convey the object code by oering access from a designated place (gras or for a charge), and oer equivalent access to the Corresponding
Source in the same way through the same place at no further charge. You need not require recipients to copy the Corresponding Source along with
the object code. If the place to copy the object code is a network server, the Corresponding Source may be on a dierent server (operated by you or
a third party) that supports equivalent copying facilies, provided you maintain clear direcons next to the object code saying where to nd the
Corresponding Source. Regardless of what server hosts the Corresponding Source, you remain obligated to ensure that it is available for as long as
needed to sasfy these requirements.
e) Convey the object code using peer-to-peer transmission, provided you inform other peers where the object code and Corresponding Source of
the work are being oered to the general public at no charge under subsecon 6d.
7. Copyright informaons
Page 71

Publ ished: 20 .02.2019 Copyright by Joy-IT 71
Joy-Pi
A separable poron of the object code, whose source code is excluded from the Corresponding Source as a System Library, need not be included in conveying
the object code work.
A “User Product” is either (1) a “consumer product”, which means any tangible personal property which is normally used for personal, family, or household
purposes, or (2) anything designed or sold for incorporaon into a dwelling. In determining whether a product is a consumer product, doubul cases shall be
resolved in favor of coverage. For a parcular product received by a parcular user, “normally used” refers to a typical or common use of that class of product,
regardless of the status of the parcular user or of the way in which the parcular user actually uses, or expects or is expected to use, the product. A product is
a consumer product regardless of whether the product has substanal commercial, industrial or non-consumer uses, unless such uses represent the only
signicant mode of use of the product.
“Installaon Informaon” for a User Product means any methods, procedures, authorizaon keys, or other informaon required to install and execute
modied versions of a covered work in that User Product from a modied version of its Corresponding Source. The informaon must suce to ensure that the
connued funconing of the modied object code is in no case prevented or interfered with solely because modicaon has been made.
If you convey an object code work under this secon in, or with, or specically for use in, a User Product, and the conveying occurs as part of a transacon in
which the right of possession and use of the User Product is transferred to the recipient in perpetuity or for a xed term (regardless of how the transacon is
characterized), the Corresponding Source conveyed under this secon must be accompanied by the Installaon Informaon. But this requirement does not
apply if neither you nor any third party retains the ability to install modied object code on the User Product (for example, the work has been installed in
ROM).
The requirement to provide Installaon Informaon does not include a requirement to connue to provide support service, warranty, or updates for a work
that has been modied or installed by the recipient, or for the User Product in which it has been modied or installed. Access to a network may be denied
when the modicaon itself materially and adversely aects the operaon of the network or violates the rules and protocols for communicaon across the
network.
Corresponding Source conveyed, and Installaon Informaon provided, in accord with this secon must be in a format that is publicly documented (and with
an implementaon available to the public in source code form), and must require no special password or key for unpacking, reading or copying.
7. Addional Terms.
“Addional permissions” are terms that supplement the terms of this License by making excepons from one or more of its condions. Addional permissions
that are applicable to the enre Program shall be treated as though they were included in this License, to the extent that they are valid under applicable law. If
addional permissions apply only to part of the Program, that part may be used separately under those permissions, but the enre Program remains governed
by this License without regard to the addional permissions.
When you convey a copy of a covered work, you may at your opon remove any addional permissions from that copy, or from any part of it. (Addional
permissions may be wrien to require their own removal in certain cases when you modify the work.) You may place addional permissions on material,
added by you to a covered work, for which you have or can give appropriate copyright permission.
7. Copyright informaons
Page 72

Publ ished: 20 .02.2019 Copyright by Joy-IT 72
Joy-Pi
Notwithstanding any other provision of this License, for material you add to a covered work, you may (if authorized by the copyright holders of that material)
supplement the terms of this License with terms:
a) Disclaiming warranty or liming liability dierently from the terms of secons 15 and 16 of this License; or
b) Requiring preservaon of specied reasonable legal noces or author aribuons in that material or in the Appropriate Legal Noces displayed
by works containing it; or
c) Prohibing misrepresentaon of the origin of that material, or requiring that modied versions of such material be marked in reasonable ways as
dierent from the original version; or
d) Liming the use for publicity purposes of names of licensors or authors of the material; or
e) Declining to grant rights under trademark law for use of some trade names, trademarks, or service marks; or
f) Requiring indemnicaon of licensors and authors of that material by anyone who conveys the material (or modied versions of it) with
contractual assumpons of liability to the recipient, for any liability that these contractual assumpons directly impose on those licensors and
authors.
All other non-permissive addional terms are considered “further restricons” within the meaning of secon 10. If the Program as you received it, or any part
of it, contains a noce stang that it is governed by this License along with a term that is a further restricon, you may remove that term. If a license document
contains a further restricon but permits relicensing or conveying under this License, you may add to a covered work material governed by the terms of that
license document, provided that the further restricon does not survive such relicensing or conveying.
If you add terms to a covered work in accord with this secon, you must place, in the relevant source les, a statement of the addional terms that apply to
those les, or a noce indicang where to nd the applicable terms.
Addional terms, permissive or non-permissive, may be stated in the form of a separately wrien license, or stated as excepons; the above requirements
apply either way.
8. Terminaon.
You may not propagate or modify a covered work except as expressly provided under this License. Any aempt otherwise to propagate or modify it is void, and
will automacally terminate your rights under this License (including any patent licenses granted under the third paragraph of secon 11).
However, if you cease all violaon of this License, then your license from a parcular copyright holder is reinstated (a) provisionally, unless and unl the
copyright holder explicitly and nally terminates your license, and (b) permanently, if the copyright holder fails to nofy you of the violaon by some
reasonable means prior to 60 days aer the cessaon.
Moreover, your license from a parcular copyright holder is reinstated permanently if the copyright holder noes you of the violaon by some reasonable
means, this is the rst me you have received noce of violaon of this License (for any work) from that copyright holder, and you cure the violaon prior to
30 days aer your receipt of the noce.
Terminaon of your rights under this secon does not terminate the licenses of pares who have received copies or rights from you under this License. If your
rights have been terminated and not permanently reinstated, you do not qualify to receive new licenses for the same material under secon 10.
9. Acceptance Not Required for Having Copies.
You are not required to accept this License in order to receive or run a copy of the Program. Ancillary propagaon of a covered work occurring solely as a
consequence of using peer-to-peer transmission to receive a copy likewise does not require acceptance. However, nothing other than this License grants you
permission to propagate or modify any covered work. These acons infringe copyright if you do not accept this License. Therefore, by modifying or propagang
a covered work, you indicate your acceptance of this License to do so.
7. Copyright informaons
Page 73

Publ ished: 20 .02.2019 Copyright by Joy-IT 73
Joy-Pi
10. Automac Licensing of Downstream Recipients.
Each me you convey a covered work, the recipient automacally receives a license from the original licensors, to run, modify and propagate that work,
subject to this License. You are not responsible for enforcing compliance by third pares with this License.
An “enty transacon” is a transacon transferring control of an organizaon, or substanally all assets of one, or subdividing an organizaon, or merging
organizaons. If propagaon of a covered work results from an enty transacon, each party to that transacon who receives a copy of the work also receives
whatever licenses to the work the party's predecessor in interest had or could give under the previous paragraph, plus a right to possession of the
Corresponding Source of the work from the predecessor in interest, if the predecessor has it or can get it with reasonable eorts.
You may not impose any further restricons on the exercise of the rights granted or armed under this License. For example, you may not impose a license
fee, royalty, or other charge for exercise of rights granted under this License, and you may not iniate ligaon (including a cross-claim or counterclaim in a
lawsuit) alleging that any patent claim is infringed by making, using, selling, oering for sale, or imporng the Program or any poron of it.
11. Patents.
A “contributor” is a copyright holder who authorizes use under this License of the Program or a work on which the Program is based. The work thus licensed is
called the contributor's “contributor version”.
A contributor's “essenal patent claims” are all patent claims owned or controlled by the contributor, whether already acquired or hereaer acquired, that
would be infringed by some manner, permied by this License, of making, using, or selling its contributor version, but do not include claims that would be
infringed only as a consequence of further modicaon of the contributor version. For purposes of this denion, “control” includes the right to grant patent
sublicenses in a manner consistent with the requirements of this License.
Each contributor grants you a non-exclusive, worldwide, royalty-free patent license under the contributor's essenal patent claims, to make, use, sell, oer for
sale, import and otherwise run, modify and propagate the contents of its contributor version.
In the following three paragraphs, a “patent license” is any express agreement or commitment, however denominated, not to enforce a patent (such as an
express permission to pracce a patent or covenant not to sue for patent infringement). To “grant” such a patent license to a party means to make such an
agreement or commitment not to enforce a patent against the party.
If you convey a covered work, knowingly relying on a patent license, and the Corresponding Source of the work is not available for anyone to copy, free of
charge and under the terms of this License, through a publicly available network server or other readily accessible means, then you must either (1) cause the
Corresponding Source to be so available, or (2) arrange to deprive yourself of the benet of the patent license for this parcular work, or (3) arrange, in a
manner consistent with the requirements of this License, to extend the patent license to downstream recipients. “Knowingly relying” means you have actual
knowledge that, but for the patent license, your conveying the covered work in a country, or your recipient's use of the covered work in a country, would
infringe one or more idenable patents in that country that you have reason to believe are valid.
If, pursuant to or in connecon with a single transacon or arrangement, you convey, or propagate by procuring conveyance of, a covered work, and grant a
patent license to some of the pares receiving the covered work authorizing them to use, propagate, modify or convey a specic copy of the covered work,
then the patent license you grant is automacally extended to all recipients of the covered work and works based on it.
A patent license is “discriminatory” if it does not include within the scope of its coverage, prohibits the exercise of, or is condioned on the non-exercise of one
or more of the rights that are specically granted under this License. You may not convey a covered work if you are a party to an arrangement with a third
party that is in the business of distribung soware, under which you make payment to the third party based on the extent of your acvity of conveying the
work, and under which the third party grants, to any of the pares who would receive the covered work from you, a discriminatory patent license (a) in
connecon with copies of the covered work conveyed by you (or copies made from those copies), or (b) primarily for and in connecon with specic products
or compilaons that contain the covered work, unless you entered into that arrangement, or that patent license was granted, prior to 28 March 2007.
Nothing in this License shall be construed as excluding or liming any implied license or other defenses to infringement that may otherwise be available to you
under applicable patent law.
12. No Surrender of Others' Freedom.
If condions are imposed on you (whether by court order, agreement or otherwise) that contradict the condions of this License, they do not excuse you from
the condions of this License. If you cannot convey a covered work so as to sasfy simultaneously your obligaons under this License and any other pernent
obligaons, then as a consequence you may not convey it at all. For example, if you agree to terms that obligate you to collect a royalty for further conveying
from those to whom you convey the Program, the only way you could sasfy both those terms and this License would be to refrain enrely from conveying the
Program.
13. Use with the GNU Aero General Public License.
Notwithstanding any other provision of this License, you have permission to link or combine any covered work with a work licensed under version 3 of the
GNU Aero General Public License into a single combined work, and to convey the resulng work. The terms of this License will connue to apply to the part
which is the covered work, but the special requirements of the GNU Aero General Public License, secon 13, concerning interacon through a network will
apply to the combinaon as such.
14. Revised Versions of this License.
The Free Soware Foundaon may publish revised and/or new versions of the GNU General Public License from me to me. Such new versions will be similar
in spirit to the present version, but may dier in detail to address new problems or concerns.
Each version is given a disnguishing version number. If the Program species that a certain numbered version of the GNU General Public License “or any later
version” applies to it, you have the opon of following the terms and condions either of that numbered version or of any later version published by the Free
Soware Foundaon. If the Program does not specify a version number of the GNU General Public License, you may choose any version ever published by the
Free Soware Foundaon.
If the Program species that a proxy can decide which future versions of the GNU General Public License can be used, that proxy's public statement of
acceptance of a version permanently authorizes you to choose that version for the Program.
Later license versions may give you addional or dierent permissions. However, no addional obligaons are imposed on any author or copyright holder as a
result of your choosing to follow a later version.
7. Copyright informaons
Page 74

Publ ished: 20 .02.2019 Copyright by Joy-IT 74
Joy-Pi
15. Disclaimer of Warranty.
THERE IS NO WARRANTY FOR THE PROGRAM, TO THE EXTENT PERMITTED BY APPLICABLE LAW. EXCEPT WHEN OTHERWISE STATED IN WRITING THE
COPYRIGHT HOLDERS AND/OR OTHER PARTIES PROVIDE THE PROGRAM “AS IS” WITHOUT WARRANTY OF ANY KIND, EITHER EXPRESSED OR IMPLIED,
INCLUDING, BUT NOT LIMITED TO, THE IMPLIED WARRANTIES OF MERCHANTABILITY AND FITNESS FOR A PARTICULAR PURPOSE. THE ENTIRE RISK AS TO THE
QUALITY AND PERFORMANCE OF THE PROGRAM IS WITH YOU. SHOULD THE PROGRAM PROVE DEFECTIVE, YOU ASSUME THE COST OF ALL NECESSARY
SERVICING, REPAIR OR CORRECTION.
16. Limitaon of Liability.
IN NO EVENT UNLESS REQUIRED BY APPLICABLE LAW OR AGREED TO IN WRITING WILL ANY COPYRIGHT HOLDER, OR ANY OTHER PARTY WHO MODIFIES AND/
OR CONVEYS THE PROGRAM AS PERMITTED ABOVE, BE LIABLE TO YOU FOR DAMAGES, INCLUDING ANY GENERAL, SPECIAL, INCIDENTAL OR CONSEQUENTIAL
DAMAGES ARISING OUT OF THE USE OR INABILITY TO USE THE PROGRAM (INCLUDING BUT NOT LIMITED TO LOSS OF DATA OR DATA BEING RENDERED
INACCURATE OR LOSSES SUSTAINED BY YOU OR THIRD PARTIES OR A FAILURE OF THE PROGRAM TO OPERATE WITH ANY OTHER PROGRAMS), EVEN IF SUCH
HOLDER OR OTHER PARTY HAS BEEN ADVISED OF THE POSSIBILITY OF SUCH DAMAGES.
17. Interpretaon of Secons 15 and 16.
If the disclaimer of warranty and limitaon of liability provided above cannot be given local legal eect according to their terms, reviewing courts shall apply
local law that most closely approximates an absolute waiver of all civil liability in connecon with the Program, unless a warranty or assumpon of liability
accompanies a copy of the Program in return for a fee.
END OF TERMS AND CONDITIONS
How to Apply These Terms to Your New Programs
If you develop a new program, and you want it to be of the greatest possible use to the public, the best way to achieve this is to make it free soware which
everyone can redistribute and change under these terms.
To do so, aach the following noces to the program. It is safest to aach them to the start of each source le to most eecvely state the exclusion of
warranty; and each le should have at least the “copyright” line and a pointer to where the full noce is found.
<one line to give the program's name and a brief idea of what it does.>
Copyright (C) <year> <name of author>
This program is free soware: you can redistribute it and/or modify
it under the terms of the GNU General Public License as published by
the Free Soware Foundaon, either version 3 of the License, or
(at your opon) any later version.
This program is distributed in the hope that it will be useful,
but WITHOUT ANY WARRANTY; without even the implied warranty of
MERCHANTABILITY or FITNESS FOR A PARTICULAR PURPOSE. See the
GNU General Public License for more details.
You should have received a copy of the GNU General Public License
along with this program. If not, see <hps://www.gnu.org/licenses/>.
Also add informaon on how to contact you by electronic and paper mail.
If the program does terminal interacon, make it output a short noce like this when it starts in an interacve mode:
<program> Copyright (C) <year> <name of author>
This program comes with ABSOLUTELY NO WARRANTY; for details type `show w'.
This is free soware, and you are welcome to redistribute it
under certain condions; type `show c' for details.
The hypothecal commands `show w' and `show c' should show the appropriate parts of the General Public License. Of course, your program's commands
might be dierent; for a GUI interface, you would use an “about box”.
You should also get your employer (if you work as a programmer) or school, if any, to sign a “copyright disclaimer” for the program, if necessary. For more
informaon on this, and how to apply and follow the GNU GPL, see <hps://www.gnu.org/licenses/>.
The GNU General Public License does not permit incorporang your program into proprietary programs. If your program is a subroune library, you may
consider it more useful to permit linking proprietary applicaons with the library. If this is what you want to do, use the GNU Lesser General Public License
instead of this License. But rst, please read <hps://www.gnu.org/licenses/why-not-lgpl.html>.
7. Copyright informaons
Page 75

Publ ished: 20 .02.2019 Copyright by Joy-IT 75
Joy-Pi
Compile and install from the repository
First download the library source code from the GitHub releases page, unzipping the archive, and execute:
Python 2:
cd Adafruit_Python_DHT
Python 3:
cd Adafruit_Python_DHT
You may also git clone the repository if you want to test an unreleased version:
git clone hps://github.com/adafruit/Adafruit_Python_DHT.git
See example of usage in the examples folder.
Adafruit invests me and resources providing this open source code, please support Adafruit and open-source hardware by purchasing products from Adafruit!
Wrien by Tony DiCola for Adafruit Industries.
MIT license, all text above must be included in any redistribuon
This library has been deprecated! We are leaving this up for historical and research purposes but archiving the repository.
We are now only supporng the use of our CircuitPython libraries for use with Python.
Check out this guide for info on using character LCDs with the CircuitPython library: hps://learn.adafruit.com/character-lcds/python-circuitpython
Adafruit_Python_CharLCD
Python library for accessing Adafruit character LCDs from a Raspberry Pi or BeagleBone Black.
Designed specically to work with the Adafruit character LCDs ----> hps://learn.adafruit.com/character-lcds/overview
For all plaorms (Raspberry Pi and Beaglebone Black) make sure you have the following dependencies:
sudo apt-get update
For a Raspberry Pi make sure you have the RPi.GPIO library by execung:
sudo pip install RPi.GPIO
For a BeagleBone Black make sure you have the Adafruit_BBIO library by execung:
sudo pip install Adafruit_BBIO
Install the library by downloading with the download link on the right, unzipping the archive, navigang inside the library's directory and execung:
sudo python setup.py install
See example of usage in the examples folder.
Adafruit invests me and resources providing this open source code, please support Adafruit and open-source hardware by purchasing products from Adafruit!
Wrien by Tony DiCola for Adafruit Industries.
MIT license, all text above must be included in any redistribuon
Usage
Author
DEPRECATED LIBRARY. Adafruit Python CharLCD
7. Copyright informaons
Page 76

Publ ished: 20 .02.2019 Copyright by Joy-IT 76
Joy-Pi
We also support you aer your purchase. If there are any quesons le or if you encounter any problems,
please feel free to contact us by mail, phone or by our cket-system on our website.
E-Mail: service@joy-it.net
Ticket-System: hp://support.joy-it.net
Telefon: +49 (0)2845 98469 – 66 (11- 18 Uhr)
For further informaon please visit our website:
www.joy-it.net
7. SUPPORT
 Loading...