

Page 1
3
3
RPi - Explorer700
Ausgabe 07.12.2016 Copyright by Joy-IT 1
Page 2

3
Contents
1. Connecons
2. Introducon
3. Connecng the expansion board and the RPI
4. LED sample programs - Changing the LED status
5. Key sample programs
6. PCF8574 sample programs - I/O expansion demos
7. BMP180 sample programs - Barometer Demos
8. DS3231 sample programs - High precision RTC Demos
9. DS18B20 sample programs - Temperature sensor Demos
10. IRM sample programs - Infrared reecve sensor
11. UART sample programs - Transming the serial data received
12. OLED sample programs
13. Libraries Installaon for RPi
13.1 Install WiringPi Library
13.2 Install C Library bcm2835
13.3 Install Python Library
13.4 Conguring the interfaces
14. Code example download
15. Support
RPi - Explorer 700
Ausgabe 07.12.2016 Copyright by Joy-IT 2
Page 3
3
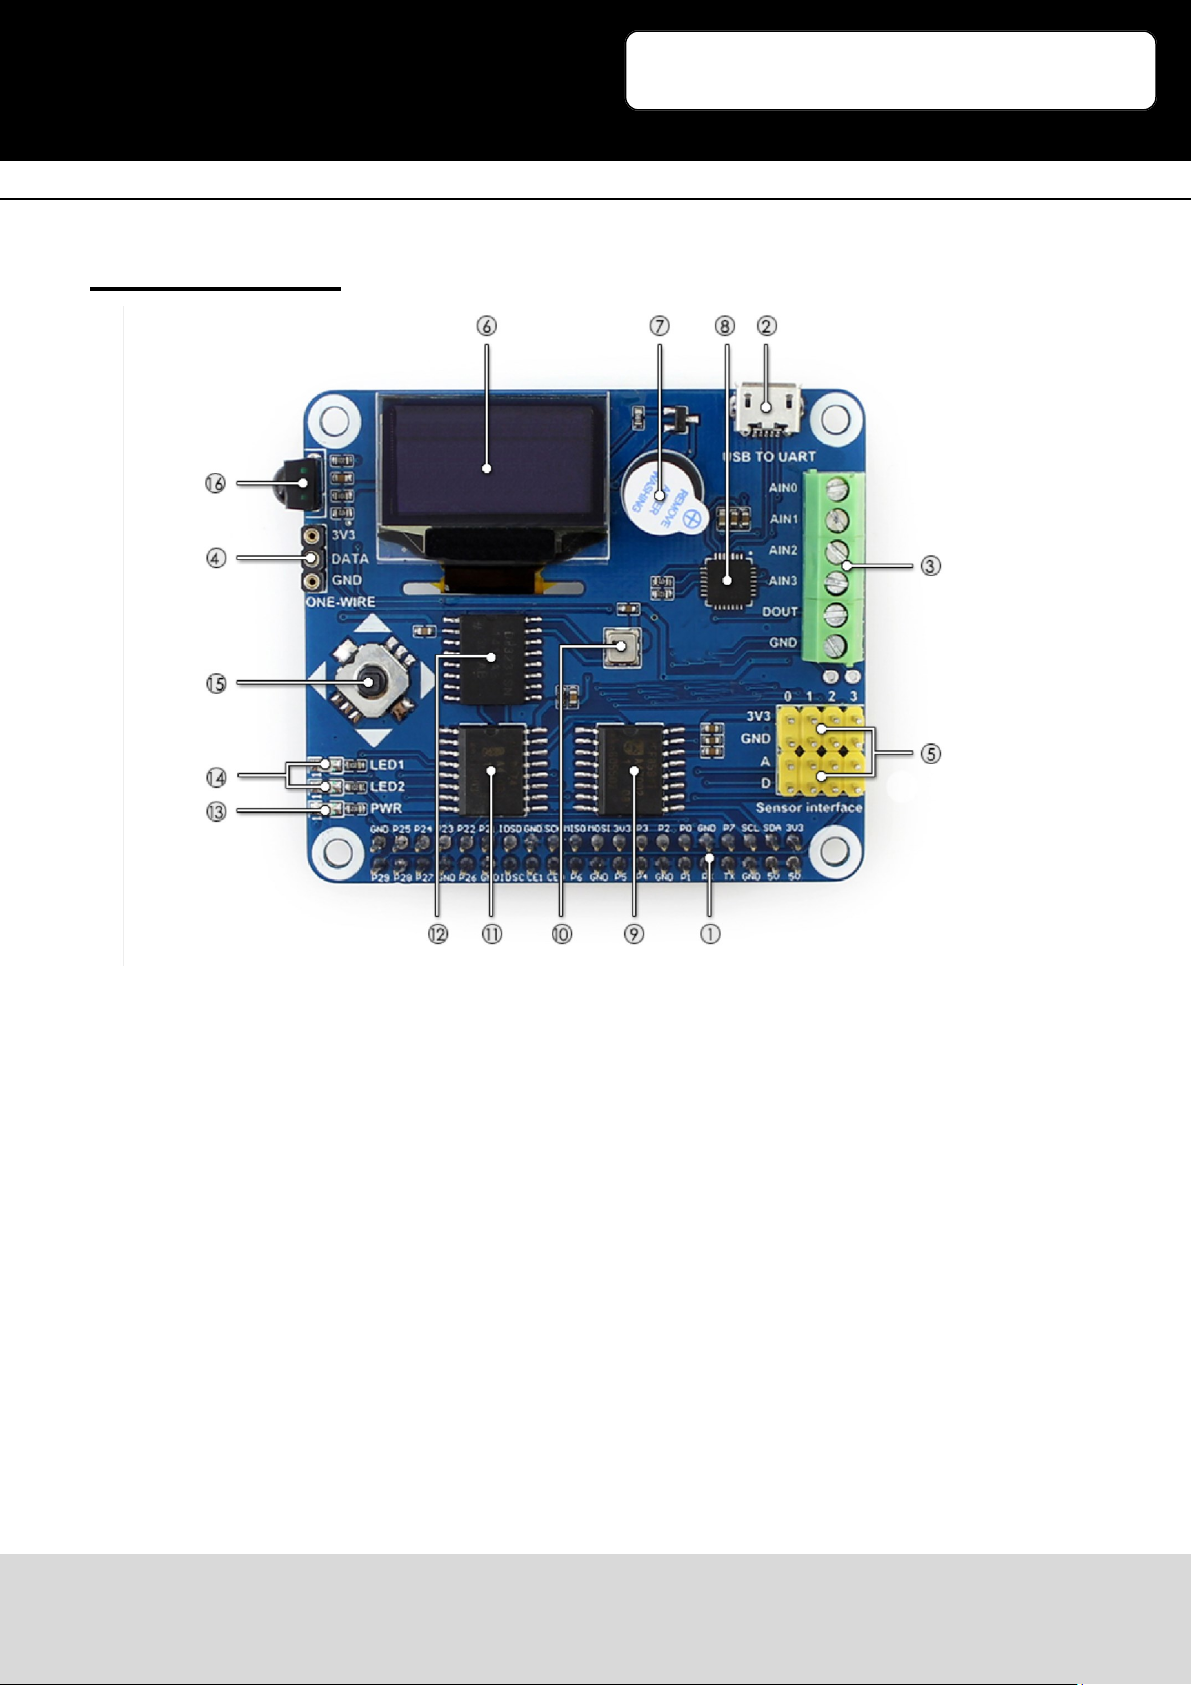
1. Connections
RPi - Explorer700
1. Raspberry Pi GPIO interface: to connect with Raspberry Pi
2. USB to UART: control the Pi with serial terminal
3. AD/DA IO interface: screw terminal
4. 1-WIRE interface: to connect 1-WIRE devices like DS18B20
5. Sensor interface: to connect various sensors
6. 0.96 inch OLED: SSD1306 driver, 128x64 resoluon, SPI interface
7. Buzzer
8. CP2102: USB to UART converter
9. PCF8591: 8 bit AD/DA converter I2C interface
10. BMP180: pressure sensor, I2C interface
11. PCF8574: I/O expension chip, I2C interface
12. DS3231: Real-Time-Clock chip, I2C interface
13. Power indicator
14. User LED
15. Joysck
16. LFN0038K IR receiver
Ausgabe 07.12.2016 Copyright by Joy-IT 3
Page 4
3
RPi - Explorer700
2. Introducon
Raspberry Pi Expansion Board, Miscellaneous Components, All-in-One
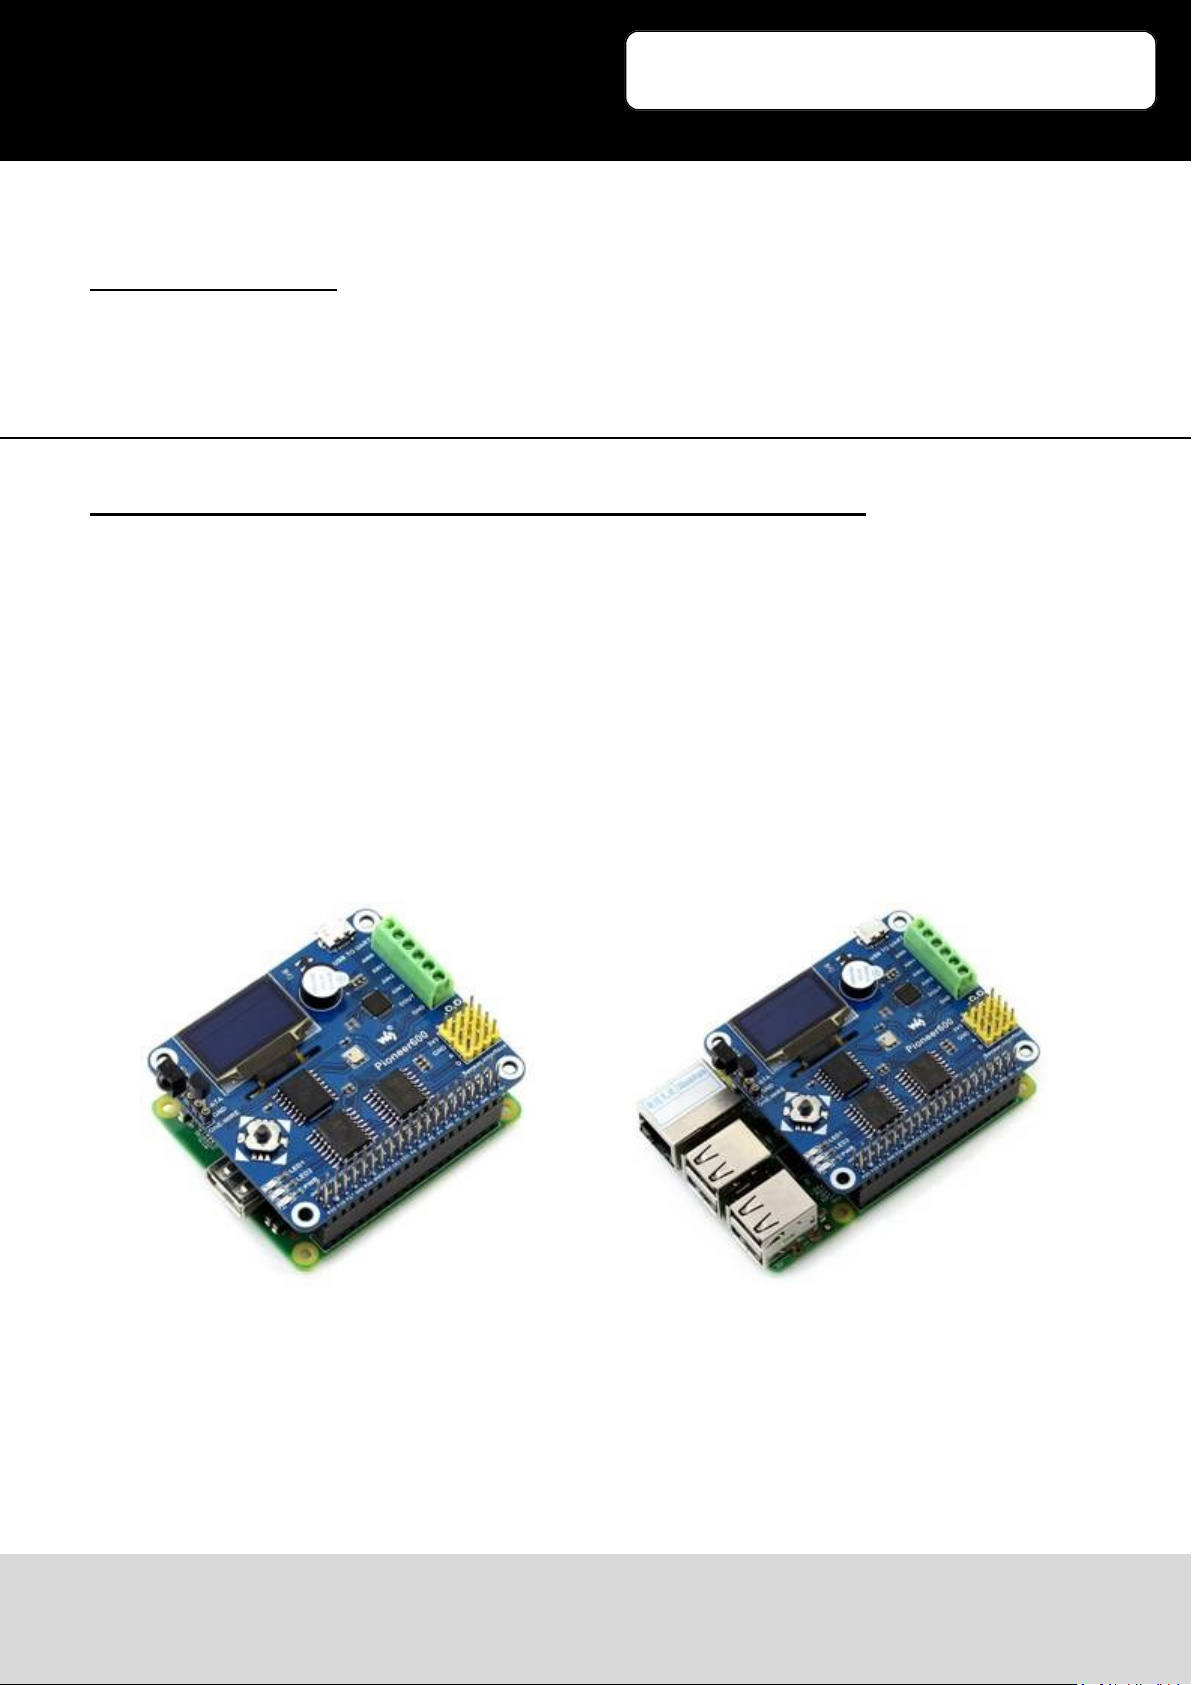
3. Connecng the expansion board and the RPI
The Explorer700 expansion board supports the Raspberry Pi A+ / B+ / 2 / 3 Model B. Before running
the sample programs, please make sure the Explorer700 is connected to the RPi and the RPi is
powered up by the USB power supply. Without the RPi main board, the sample programs cannot be
used on the expansion board.
Connected to Raspberry Pi Model A+:
Ausgabe 07.12.2016 Copyright by Joy-IT 4
Connected to Raspberry Pi B+/2/
3 Model B
Page 5
3
RPi - Explorer700
4. LED sample programs - Changing the LED status
bcm2835 program:
Open the Linux terminal and enter to the corresponding path and run the following commands:
The command for compiling the program:
pi@raspberrypi ~/Explorer700/LED/bcm2835 $ make
The command for execung the program:
pi@raspberrypi ~/Explorer700/LED/bcm2835 $ sudo ./led
Expected result: The LED1 is blinking.
Press the keys Ctrl+C to end the program.
wiringPi program:
Enter the Linux terminal, and run the following commands:
The command for compiling the program:
pi@raspberrypi ~/Explorer700/LED/wiringPi $
The command for execung the program:
pi@raspberrypi ~/Explorer700/LED/wiringPi $ sudo ./led
Expected result: The LED1 is blinking.
Press the keys Ctrl+C to end the program.
Enter the Linux terminal, and run the following commands:
The command for compiling the program:
pi@raspberrypi ~/Explorer700/LED/wiringPi $
The command for execung the program:
pi@raspberrypi ~/Explorer700/LED/wiringPi $ sudo ./pwm
Expected result: The brightness of the LED1 is changing gradually.
Press the keys Ctrl+C to end the program.
Ausgabe 07.12.2016 Copyright by Joy-IT 5
Page 6
3
sysfs program:
Enter the Linux terminal, and run the following commands:
The command for compiling the program:
pi@raspberrypi ~/Explorer700/LED/fs $ make
The command for execung the program:
pi@raspberrypi ~/Explorer700/LED/fs $ sudo ./led
Expected result: The LED1 blinks 10 mes and then the program will automacally quit.
Press the keys Ctrl+C to end the program.
python program:
Enter the Linux terminal, and run the following commands:
The command for execung the program:
pi@raspberrypi ~/Explorer700/LED/python $ sudo python led.py
Expected result: The LED1 is blinking.
Press the keys Ctrl+C to end the program.
Enter the Linux terminal, and run the following commands:
The command for execung the program:
pi@raspberrypi ~/Explorer700/LED/python $ sudo python pwm.py
Expected result: The brightness of the LED1 is changing gradually.
Press the keys Ctrl+C to end the program.
RPi - Explorer700
Ausgabe 07.12.2016 Copyright by Joy-IT 6
Page 7
3
RPi - Explorer700
5. Key sample programs
bcm2835 program:
Enter the Linux terminal, and run the following commands:
The command for compiling the program:
pi@raspberrypi ~/Explorer700/KEY/bcm2835 $ make
The command for execung the program:
pi@raspberrypi ~/Explorer700/KEY/bcm2835 $ sudo ./key
Expected result:
Press the center key of the joysck, and the terminal will display the following informaon:
Key Test Program!!!!
KEY PRESS
KEY PRESS
KEY PRESS
Press the keys Ctrl+C to end the program.
wiringPi program:
Enter the Linux terminal, and run the following commands:
The command for compiling the program:
pi@raspberrypi ~/Explorer700/KEY/wiringPi $
The command for execung the program:
pi@raspberrypi ~/Explorer700/KEY/wiringPi $ sudo ./key
Ausgabe 07.12.2016 Copyright by Joy-IT 7
Page 8
3
Expected result:
Press the center key of the joysck, and the terminal will display the following informaon:
Key Test Program!!!
KEY PRESS
KEY PRESS
KEY PRESS
Press the keys Ctrl+C to end the program.
python program:
Enter the Linux terminal, and run the following commands:
The command for execung the program:
pi@raspberrypi ~/Explorer700/KEY/python $ sudo ./key.py
Expected result:
Press the center key of the joysck, and the terminal will display the following informaon:
Key Test Program
KEY PRESS
KEY PRESS
KEY PRESS
Press the keys Ctrl+C to end the program.
RPi - Explorer700
Ausgabe 07.12.2016 Copyright by Joy-IT 8
Page 9

3
RPi - Explorer700
6. PCF8574 sample programs - I/O expansion demos
bcm2835 program:
Enter the Linux terminal, and run the following commands:
The command for compiling the program:
pi@raspberrypi ~/Explorer700/PCF8574/bcm2835 $ make
The command for execung the program:
pi@raspberrypi ~/Explorer700/PCF8574/bcm2835 $ sudo ./led
Expected result: The LED2 is blinking.
Press the keys Ctrl+C to end the program.
Enter the Linux terminal, and run the following commands:
The command for compiling the program:
pi@raspberrypi ~/Explorer700/PCF8574/bcm2835 $ make5
The command for execung the program:
pi@raspberrypi ~/Explorer700/PCF8574/bcm2835 $ sudo ./pcf8574
Expected result: Press the direcon keys, then the LED2 will light up, the buzzer will sound, and the
terminal will display the following informaon:
PCF8574 Test Program !!!
up
le
down
right
Press the keys Ctrl+C to end the program.
Ausgabe 07.12.2016 Copyright by Joy-IT 9
Page 10

3
python program:
Enter the Linux terminal, and run the following commands:
The command for execung the program:
pi@raspberrypi ~/Explorer700/PCF8574/python $ sudo python led.py
Expected result: The LED2 is blinking.
Press the keys Ctrl+C to end the program.
Enter the Linux terminal, and run the following commands:
The command for execung the program:
pi@raspberrypi ~/Explorer700/PCF8574/python $ sudo python pcf8574.py
Expected result: Press the direcon keys, then the LED2 will light up, the buzzer will sound, and the
terminal will display the following informaon:
PCF8574 Test Program !!!
up
le
down
right
Press the keys Ctrl+C to end the program.
RPi - Explorer700
Ausgabe 07.12.2016 Copyright by Joy-IT 10
Page 11

3
fs program:
Enter the Linux terminal, and run the following commands:
The command for compiling the program:
pi@raspberrypi ~/Explorer700/PCF8574/fs $ make
The command for execung the program:
pi@raspberrypi ~/Explorer700/PCF8574/fs $ sudo ./led
Expected result: The LED2 is blinking.
Press the keys Ctrl+C to end the program.
wiringPi program:
Enter the Linux terminal, and run the following commands:
The command for compiling the program:
pi@raspberrypi ~/Explorer700/PCF8574/wiringPi $ make
The command for execung the program:
pi@raspberrypi ~/Explorer700/PCF8574/wiringPi $ sudo ./led
Expected result: The LED2 is blinking.
Press the keys Ctrl+C to end the program.
Enter the Linux terminal, and run the following commands:
The command for compiling the program:
pi@raspberrypi ~/Explorer700/PCF8574/wiringPi $ make
The command for execung the program:
pi@raspberrypi ~/Explorer700/PCF8574/wiringPi $ sudo ./LED
Expected result: The LED2 is blinking.
Press the keys Ctrl+C to end the program.
RPi - Explorer700
Ausgabe 07.12.2016 Copyright by Joy-IT 11
Page 12

3
RPi - Explorer700
7. BMP180 sample programs- Barometer Demos
bcm2835 program:
Enter the Linux terminal, and run the following commands:
The command for compiling the program:
pi@raspberrypi ~/Explorer700/BMP180/bcm2835 $ make
The command for execung the program:
pi@raspberrypi ~/Explorer700/BMP180/bcm2835 $ sudo ./BMP180
Expected result: The terminal will display the following informaon:
BMP180 Test Program ...
Temperature: 34.20 C
Pressure: 1005.12 Pa
Altude: 67.66 m
Press the keys Ctrl+C to end the program.
wiringPi program:
Enter the Linux terminal, and run the following commands:
The command for compiling the program:
pi@raspberrypi ~/Explorer700/BMP180/wiringPi $ make
The command for execung the program:
pi@raspberrypi ~/Explorer700/BMP180/wiringPi $ sudo ./BMP180
Expected result: The terminal will display the following informaon:
BMP180 Test Program ...
Temperature: 34.20 C
Pressure: 1005.12 Pa
Altude: 67.66 m
Press the keys Ctrl+C to end the program.
Ausgabe 07.12.2016 Copyright by Joy-IT 12
Page 13

3
python program:
Enter the Linux terminal, and run the following commands to execute the program:
pi@raspberrypi ~/Explorer700/BMP180/python $ sudo python BMP180_example.py
Expected result: The terminal will display the following informaon:
Temperature: 34.20 C
Pressure: 1005.12 Pa
Altude: 67.66 m
Press the keys Ctrl+C to end the program.
RPi - Explorer700
8. DS3231 sample programs - High precision RTC Demos
bcm2835 program:
Enter the Linux terminal, and run the following commands:
The command for compiling the program:
pi@raspberrypi ~/Explorer700/DS3231/bcm2835 $ make
The command for execung the program:
pi@raspberrypi ~/Explorer700/DS3231/bcm2835 $ sudo ./ds3231
Expected result: The terminal will display the following informaon:
start..........
2015/08/12 18:00:00 Wed
2015/08/12 18:00:01 Wed
2015/08/12 18:00:02 Wed
2015/08/12 18:00:03 Wed
Press the keys Ctrl+C to end the program.
Ausgabe 07.12.2016 Copyright by Joy-IT 13
Page 14

3
wiringPi program:
Enter the Linux terminal, and run the following commands:
The command for compiling the program:
pi@raspberrypi ~/Explorer700/DS3231/wiringPi $ make
The command for execung the program:
pi@raspberrypi ~/Explorer700/DS3231/wiringPi $ sudo ./ds3231
Expected result: The terminal will display the following informaon:
start..........
2015/08/12 18:00:00 Wed
2015/08/12 18:00:01 Wed
2015/08/12 18:00:02 Wed
2015/08/12 18:00:03 Wed
Press the keys Ctrl+C to end the program.
python program:
Enter the Linux terminal, and run the following commands to execute the program:
pi@raspberrypi ~/Explorer700/DS3231/python $ sudo python ds3231.py
Expected result: The terminal will display the following informaon:
2015/08/12 18:00:00 Wed
2015/08/12 18:00:01 Wed
2015/08/12 18:00:02 Wed
2015/08/12 18:00:03 Wed
2015/08/12 18:00:04 Wed
Press the keys Ctrl+C to end the program.
RPi - Explorer700
Ausgabe 07.12.2016 Copyright by Joy-IT 14
Page 15

3
RPi - Explorer700
9. DS18B20 sample programs - Temperature sensor Demos
(Notes: To use the DS18B20 program, you should add a line dtoverlay=w1-gpio-pullup to the end of
the Raspberry Pi boot le /boot/cong.txt, and restart the RPi to make it take eect. For more
detailed informaon, please refer to the relave Raspberry Pi documents.)
sysfs program:
Enter the Linux terminal, and run the following commands to execute the program:
pi@raspberrypi ~/Explorer700/DS18B20/fs $ sudo ./ds18b20
Expected result: The terminal will display the following informaon:
rom: 28-00000674869d
temp: 30.437 °C
temp: 30.375 °C
Press the keys Ctrl+C to end the program.
python program:
Enter the Linux terminal, and run the following commands to execute the program:
pi@raspberrypi ~/Explorer700/DS18B20/python $ sudo python ds18b20.py
Expected result: The terminal will display the following informaon:
rom: 28-00000674869d
C=29.687 F=85.437
C=29.687 F=85.437
C=29.687 F=85.437
Press the keys Ctrl+C to end the program.
Ausgabe 07.12.2016 Copyright by Joy-IT 15
Page 16

3
RPi - Explorer700
10. IRM sample programs - Infrared reecve sensor
bcm2835 program:
Enter the Linux terminal, and run the following commands:
The command for compiling the program:
pi@raspberrypi ~/Explorer700/IRM/bcm2835 $ make
The command for execung the program:
pi@raspberrypi ~/Explorer700/IRM/bcm2835 $ sudo ./irm
Expected result: Press the keys on the infrared remote controller, and the terminal will display the
relave value of the pressed key.
irm test start:
Get the key: 0x0c
Get the key: 0x18
Get the key: 0x5e
Press the keys Ctrl+C to end the program.
wiringPi program:
Enter the Linux terminal, and run the following commands:
The command for compiling the program:
pi@raspberrypi ~/Explorer700/IRM/wiringPi $ make
The command for execung the program:
pi@raspberrypi ~/Explorer700/IRM/wiringPi $ sudo ./
Expected result: Press the keys on the infrared remote controller, and the terminal will display the
relave value of the pressed key.
irm test start:
Get the key: 0x0c
Get the key: 0x18
Get the key: 0x5e
Press the keys Ctrl+C to end the program.
Ausgabe 07.12.2016 Copyright by Joy-IT 16
Page 17

3
python program:
Enter the Linux terminal, and run the following commands to execute the program:
pi@raspberrypi ~/Explorer700/IRM/python $ sudo python irm.py
Expected result: Press the keys on the infrared remote controller, and the terminal will display the
relave value of the pressed key.
IRM Test Start ...
Get the key: 0x0c
Get the key: 0x18
Get the key: 0x5e
Press the keys Ctrl+C to end the program.
RPi - Explorer700
Ausgabe 07.12.2016 Copyright by Joy-IT 17
Page 18

3
RPi - Explorer700
11. UART sample programs - Transming the serial data received
Noces: The serial port of RPi is set to terminal debugging mode by default. However, in order to run
this sample program, you should disable the terminal debugging funcon, which means you cannot
debug the RPi via the serial port communicaon any more. In this case, you should employ other
methods to debug the RPi before running this program. For example, you can connect an external
HDMI displayer to the RPi or use SSH.
wiringPi program:
Enter the Linux terminal, and run the following commands:
The command for compiling the program:
pi@raspberrypi ~/Explorer700/UART/wiringPi $ make
The command for execung the program:
pi@raspberrypi ~/Explorer700/UART/wiringPi $ sudo ./
Expected result: Connect the expansion board to the PC via the USB TO UART interface, and congure
the serial communicaon soware on the PC (Here, you can use the soware PuTTY to monitor the
serial port), selecng the right serial port number and seng the Baud rate to 115200. Then, you can
use your PC to send data to the RPi via the serial communicaon. Aer the data is received by the RPi,
it will be echoed to the serial monitor on the PC.
python program:
Enter the Linux terminal, and run the following commands to execute the program:
pi@raspberrypi ~/Explorer700/UART/python $ sudo python uart.py
Expected result: It is the same as in the above case.
Ausgabe 07.12.2016 Copyright by Joy-IT 18
Page 19

3
RPi - Explorer700
12. OLED sample programs
bcm2835 program:
Enter the Linux terminal, and run the following commands:
The command for compiling the program:
pi@raspberrypi ~/Explorer700/OLED/bcm2835 $
The command for execung the program:
pi@raspberrypi ~/Explorer700/OLED/bcm2835 $ sudo ./main
Expected result: The OLED shows the LOGO of Waveshare for 2 seconds, and then it will switch to
display the current system me.
Press the keys Ctrl+C to end the program.
wiringPi program:
Enter the Linux terminal, and run the following commands:
The command for compiling the program:
pi@raspberrypi ~/Explorer700/OLED/wiringPi $
The command for execung the program:
pi@raspberrypi ~/Explorer700/OLED/wiringPi $ sudo ./main
Expected result: The OLED shows the LOGO of Waveshare for 2 seconds, and then it will switch to
display the current system me.
Press the keys Ctrl+C to end the program.
Ausgabe 07.12.2016 Copyright by Joy-IT 19
Page 20

3
python program:
When using this python program to control the OLED, you need to install another library pythonimaging. To install the python-imaging library, you should connect the RPi to the network, and use the
line below:
sudo apt-get python-imaging
Expected result: Entering the following commands under the Terminal to execute the program, you
will get dierent displayed informaon.
pi@raspberrypi ~/Explorer700/OLED/python $ sudo python oled.py
pi@raspberrypi ~/Explorer700/OLED/python $ sudo python dispchar.py
pi@raspberrypi ~/Explorer700/OLED/python $ sudo python image.py
pi@raspberrypi ~/Explorer700/OLED/python $ sudo python animate.py
pi@raspberrypi ~/Explorer700/OLED/python $ sudo python waveshare.py
For more detailed informaon, please refer to the relave Raspberry Pi documents.
RPi - Explorer700
Ausgabe 07.12.2016 Copyright by Joy-IT 20
Page 21

3
RPi - Explorer700
13. Libraries Installaon for RPi
In order to use the API examples we provide, related libraries are required, which should be
installed manually.
bcm2835 libraries
wiringPi libraries
13.1 Install WiringPi Library
Click to download the wiringPi libraries, or you can also obtain the latest version from the WiringPi
website:
hps://projects.drogon.net/raspberry-pi/wiringpi/download-and-install/
Copy the installaon package into your own system via a USB ash drive, enter the WiringPi folder,
then do this to install:
chmod 777 build
./build
Run the following command to check the installaon:
gpio –v
13.2 Install C Library bcm2835
Click to download the bcm2835-1.50 libraries. You can also obtain the latest version from the
bcm2835 website: hp://www.airspayce.com/mikem/bcm2835/
Copy the installaon package into your own system, enter the bcm2835 libraries folder, then do this
to install:
./congure
make
sudo make check
sudo make install
Ausgabe 07.12.2016 Copyright by Joy-IT 21
Page 22

3
RPi - Explorer700
13.3 Install Python Library
Python Libraries for Raspbian (contain RPi.GPIO and spidev installaon packages. See: hps://
pypi.python.org/pypi/RPi.GPIO hps://pypi.python.org/pypi/spidev ) get it by apt-get commands.
Please take a note, your Raspberry Pi should be connected to the network when using the command
apt-get to install the library. Before the installaon, you can run the following command to update
your soware list.
sudo apt-get update
1. Run the following command to install the package python-dev
sudo apt-get install python-dev
2. Installing the RPi.GPIO package (GPIO interface funcons). Copy the installaon package
RPi.GPIO to your RPi board, and unzip it. Enter the unzipped le under the terminal, and run
the following command to install the library:
sudo python setup.py install
3. Run the following command to install the library smbus (I2C interface funcons)
sudo apt-get install python-smbus
4. Run the following command to install the library serial, which contains UART interface
funcons
sudo apt-get install python-serial
5. Installing the library spidev (SPI funcons). Copy the installaon package spidev to your RPi
board, and unzip it. Enter the unzip le under the terminal, and run the following command to
install the library:
sudo python setup.py install
Ausgabe 07.12.2016 Copyright by Joy-IT 22
Page 23

3
RPi - Explorer700
13.4 Conguring the interfaces
(Before running the API codes we provided, you should start up the corresponding core drivers of the
interfaces. In the ready-to-use system image le, both I2C and SPI are set to Enable by default, but the
serial port is sll in the terminal debugging funcon mode.)
1. Enable the I2C funcon. Run the following command to congure your Raspberry Pi board:
sudo raspi-cong
Select Advanced Opons -> I2C -> yes, to start up the I2C core driver. Then you also need to
modify the conguraon le. Run the following command to open the conguraon le:
sudo nano /etc/modules
Add the following two lines to the conguraon le
i2c-bcm2708
i2c-dev
Press the keys Ctrl+X to exit, and input Y to save the sengs. Then, reboot the module to make
the sengs take eect.
2. Enable the serial funcon. The serial port of RPi is set to serial terminal debugging funcon
mode by default. If you want the serial port services as a common IO, you should modify the
sengs on the RPi. When the terminal debugging funcon is disabled, you cannot access RPi
board via the serial port any more. If you want to control the RPi, you may need to enable the
debugging funcon of the serial port again.
Select Advanced Opons -> Serial. Select the opon no can disable the serial debugging funcon. And
then, the serial port can be used for serial communicaon. And select the opon yes can enable the
serial debugging funcon. You should reboot the module to make the sengs take eect.
Note: the serial port on Raspberry Pi 3 Model B is unusable, because Pin 14 and Pin 15 is connected
to the on-board Bluetooth model.
Select Advanced Opons -> I2C -> yes, to start up I2C core driver.
sudo raspi-cong
1.Start up the spi funcon, run the following command:
sudo raspi-cong
Ausgabe 07.12.2016 Copyright by Joy-IT 23
Page 24

3
RPi - Explorer700
14. Code example download
Code examples
15. Support
If you have any quesons , or problems please contact us via e-mail, phone or support system.
E-Mail: service@joy-it.net
Support-System: hp://support.joy-it.net
Phone: +49 (0)2845 98469 – 66 (11 AM - 6 PM)
Please visit our website for more informaon:
www.joy-it.net
Ausgabe 07.12.2016 Copyright by Joy-IT 24
 Loading...