

Page 1

www.joy-it.net
Pascalstr. 8 47506 Neukirchen-Vluyn
TEMPERATURE AND AIR PRESSURE SENSOR
SEN-KY052
1. GENERAL INFORMATION
Dear customer,
Thank you very much for choosing our product. In the following we will
show you what has to be observed during commissioning and use.
Should you encounter any unexpected problems during use, please feel
free to contact us.
Page 2

www.joy-it.net
Pascalstr. 8 47506 Neukirchen-Vluyn
2. USAGE WITH THE RASPBERRY PI
2.1 Installation
First you need to install git and pip on your Raspberry Pi, this works with
the following commands:
sudo apt-get install git
Now you can download and install the required librarys for the sensor as
follows:
sudo pip3 install adafruit-circuitpython-bmp280
sudo apt-get install python3-pip
sudo pip3 install adafruit-circuitpython-lis3dh
2.1.1 Installation SPI
To use the sensor with SPI, you must first activate the SPI interface.
To do this, enter the following command:
sudo raspi-config
Now navigate to 3 Interfacing Options -> P4 SPI and enable the SPI in-
terface.
Now you need to reboot your Raspberry Pi with the command:
sudo reboot
Now open the configuration of the Raspberry Pi and activate I2C as
follows:
sudo raspi-config
sudo apt-get install -y python-smbus
sudo apt-get install -y i2c-tools
Now enter the following commands for installing the I2C interface:
2.1.2 Installation I2C
Now navigate to 3 Interface Options -> P5 I2C and enable the I2C inter-
face.
Page 3

www.joy-it.net
Pascalstr. 8 47506 Neukirchen-Vluyn
Raspberry Pi KY052
3.3 V
(Pin 1, Pin 17)
VCC, SDO, CSB
GND (Pin 6) GND
SCL (Pin 5) SCL
SDA (Pin 3) SDA
2.2.1 Wiring I2C
2.2.2 Wiring SPI
Raspberry Pi KY052
3.3 V
(Pin 1, Pin 17)
VCC
GND (Pin 6) GND
SCLK (Pin 23) SCL
MOSI (Pin 19) SDA
Pin 29 CSB
MISO (Pin 21) SDO
2.3 Programming example
In the following programme example, the temperature, the air pressure
and the calculated altitude are shown.
In order for the altitude to be calculated correctly, the following line in
the programme example must be adjusted:
Replace the 1013.25 with the QNH pressure in hPa (the pressure at sea
level) at your location. Weather services can give you information on this.
sensor.sea_level_pressure = 1013.25
Page 4

www.joy-it.net
Pascalstr. 8 47506 Neukirchen-Vluyn
2.3.1 I2C example
Now test your BMP280 with the following sample code.
First create a file with:
sudo nano bmp280.py
An empty window will now open in which you can enter the following
example code.
import board
import busio
import adafruit_bmp280
# i2c initialisation
i2c = busio.I2C(board.SCL, board.SDA)
sensor = adafruit_bmp280.Adafruit_BMP280_I2C(i2c)
# Replace the 1013.25 with the QNH pressure in hPa (the pressure at sea level)
# at your location. Weather services can give you information on this.
sensor.sea_level_pressure = 1013.25
# output sensor data
print("\nTemperature: %0.1f *C" % sensor.temperature)
print("Air pressure: %0.1f hPa" % sensor.pressure)
print("Altitude: %0.2f m" % sensor.altitude)
Save the source code with the key combination CTRL + O and confirm
with Enter. Exit the editor with CTRL + X.
You execute the programme example with the following command:
sudo python3 bmp280.py
import board
import busio
import adafruit_bmp280
import digitalio
#spi initialisation
spi = board.SPI()
bmp_cs = digitalio.DigitalInOut(board.D5)
sensor = adafruit_bmp280.Adafruit_BMP280_SPI(spi, bmp_cs)
# Replace the 1013.25 with the QNH pressure in hPa (the pressure at sea level)
# at your location. Weather services can give you information on this.
sensor.sea_level_pressure = 1013.25
# output sensor data
print("\nTemperature: %0.1f *C" % sensor.temperature)
print("Air pressure: %0.1f hPa" % sensor.pressure)
print("Altitude: %0.2f m" % sensor.altitude)
2.3.1 SPI example
Page 5
www.joy-it.net
Pascalstr. 8 47506 Neukirchen-Vluyn
3. USAGE WITH THE ARDUINO
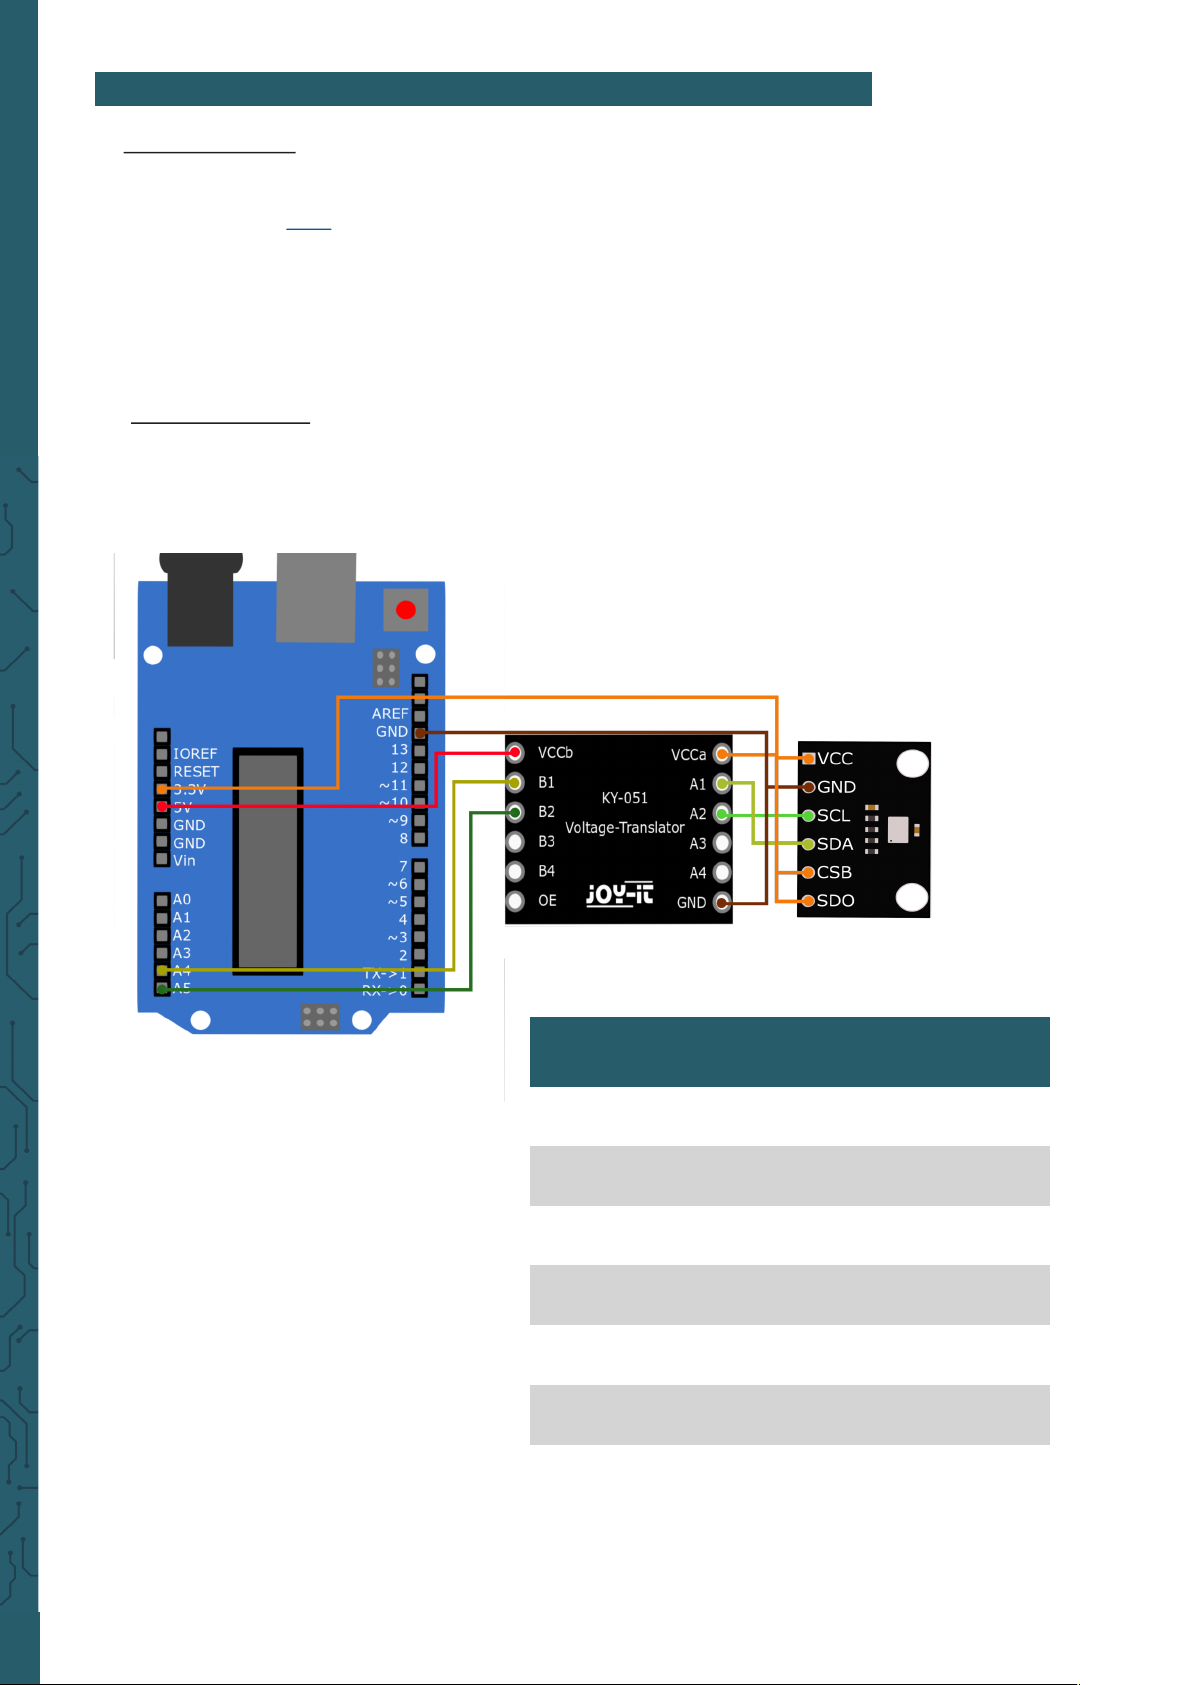
3.2.1 Wiring I2C
Since the sensor operates with a logic level of 3.3 V and the Arduino UNO
with 5 V, you need a logic level converter to use it. In this example, the
COM-KY051VT from Joy-IT is used.
Arduino KY052
Logic level
converter
3.3 V VCC, SDO, CSB VCCa
GND GND GND
- SDA A1
- SCL A2
A4 - B1
A5 - B2
5 V - VCCb
3.1 Installation
In order to use the sensor with the Arduino, you must first download the
required library here. Unzip the folder and save it in your Libraries folder.
This is usually located under Documents → Arduino → Libraries.
Page 6
www.joy-it.net
Pascalstr. 8 47506 Neukirchen-Vluyn
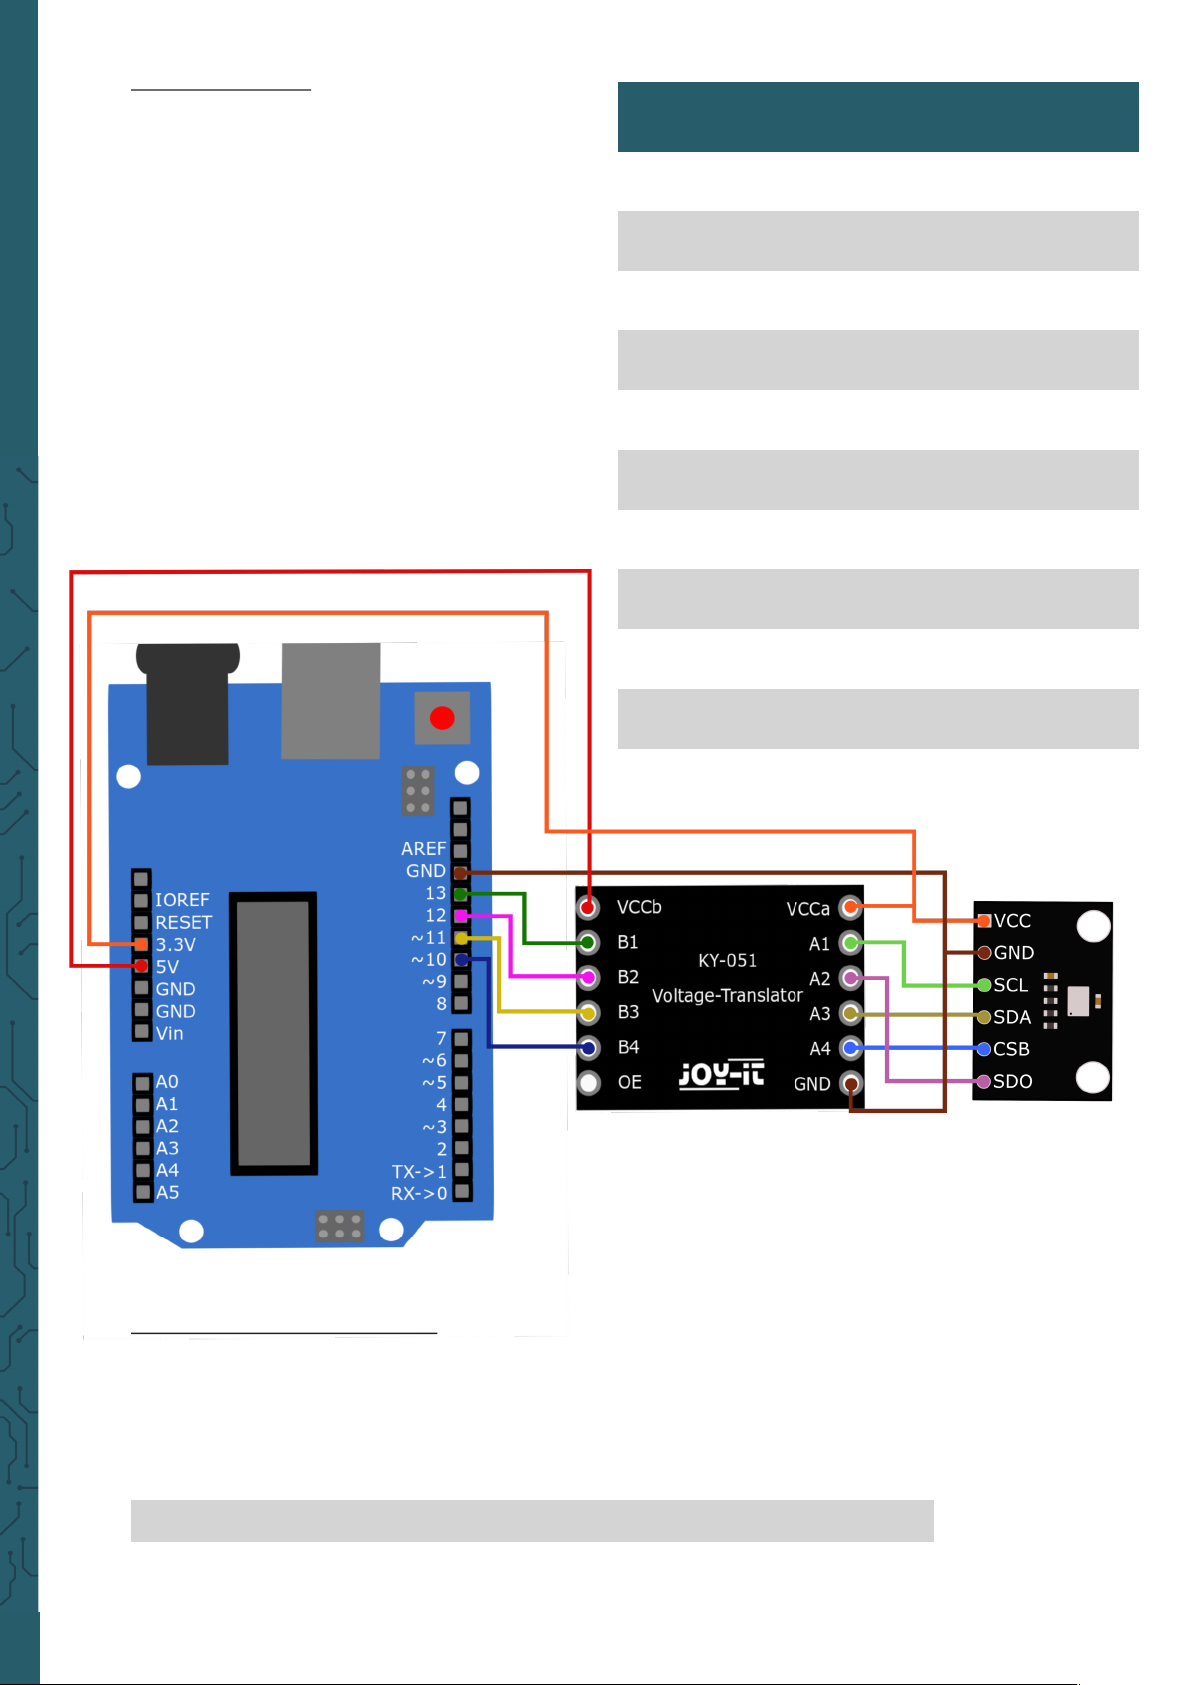
3.2.2 Wiring SPI
Since the sensor operates with a logic
level of 3.3 V and the Arduino UNO with 5
V, you need a logic level converter to use
it. In this example, the COM-KY051VT
from Joy-IT is used.
3.3 Programming example
In the following programme example, the temperature, the air pressure
and the calculated altitude are regularly displayed in the serial console.
In order for the altitude to be calculated correctly, the following line in
the programme example must be adjusted:
Replace the 1013.25 with the QNH pressure in hPa (the pressure at sea
level) at your location. Weather services can give you information on this.
#define localQNH 1013.25
Arduino KY052
Logic level
converter
3.3 V VCC, SDO, CSB VCCa
GND GND GND
- SCL A1
- SDO A2
- SDA A3
- CSB A4
13 - B1
12 - B2
11 - B3
10 - B4
5 V - VCCb
Page 7

www.joy-it.net
Pascalstr. 8 47506 Neukirchen-Vluyn
/***************************************************************************
This is a library for the BMP280 humidity, temperature & pressure sensor
Designed specifically to work with the Adafruit BMEP280 Breakout
----> http://www.adafruit.com/products/2651
These sensors use I2C or SPI to communicate, 2 or 4 pins are required
to interface.
Adafruit invests time and resources providing this open source code,
please support Adafruit andopen-source hardware by purchasing products
from Adafruit!
Written by Limor Fried & Kevin Townsend for Adafruit Industries.
BSD license, all text above must be included in any redistribution
***************************************************************************/
#include <Wire.h>
#include <Adafruit_BMP280.h>
#define localQNH 1013.25
Adafruit_BMP280 bmp; // I2C
void setup() {
Serial.begin(9600);
Serial.println(F("BMP280 test"));
if (!bmp.begin()) {
Serial.println(F("Could not find a valid BMP280 sensor, check wiring!"));
while (1);
}
}
void loop() {
Serial.print(F("Temperature = "));
Serial.print(bmp.readTemperature());
Serial.println(" *C");
Serial.print(F("Pressure = "));
Serial.print(bmp.readPressure());
Serial.println(" Pa");
Serial.print(F("Approx altitude = "));
Serial.print(bmp.readAltitude(localQNH));
Serial.println(" m");
Serial.println();
delay(2000);
}
3.3.1 I2C example
Page 8

www.joy-it.net
Pascalstr. 8 47506 Neukirchen-Vluyn
/***************************************************************************
This is a library for the BMP280 humidity, temperature & pressure sensor
Designed specifically to work with the Adafruit BMEP280 Breakout
----> http://www.adafruit.com/products/2651
These sensors use I2C or SPI to communicate, 2 or 4 pins are required
to interface.
Adafruit invests time and resources providing this open source code,
please support Adafruit andopen-source hardware by purchasing products
from Adafruit!
Written by Limor Fried & Kevin Townsend for Adafruit Industries.
BSD license, all text above must be included in any redistribution
***************************************************************************/
#include <Wire.h>
#include <SPI.h>
#include <Adafruit_BMP280.h>
#define BMP_SCK 13
#define BMP_MISO 12
#define BMP_MOSI 11
#define BMP_CS 10
Adafruit_BMP280 bmp(BMP_CS, BMP_MOSI, BMP_MISO, BMP_SCK);
void setup() {
Serial.begin(9600);
Serial.println(F("BMP280 test"));
if (!bmp.begin()) {
Serial.println(F("Could not find a valid BMP280 sensor, check wiring!"));
while (1);
}
}
void loop() {
Serial.print(F("Temperature = "));
Serial.print(bmp.readTemperature());
Serial.println(" *C");
Serial.print(F("Pressure = "));
Serial.print(bmp.readPressure());
Serial.println(" Pa");
Serial.print(F("Approx altitude = "));
Serial.print(bmp.readAltitude(1013.25)); // this should be adjusted to y-
our local forcase
Serial.println(" m");
Serial.println();
delay(2000);
}
3.3.2 SPI example
Page 9

www.joy-it.net
Pascalstr. 8 47506 Neukirchen-Vluyn
PR
Published: 13.10.2021
www.joy-it.net
SIMAC Electronics GmbH
Pascalstr. 8, 47506 Neukirchen-Vluyn
4. OTHER INFORMATION
Our Information and Take-back Obligations according to the
Electrical and Electronic Equipment Act (ElektroG)
Symbol on Electrial and Electronic Products:
This crossed-out bin means that electrical and electronic products do not
belong into the household waste. You must hand over your old appliance to
a registration place. Before you can hand over the old appliance, you must
remove used batteries and replacement batteries which are not enclosed by
the device.
Return Options:
As the end user, you can hand over your old appliance (which has
essentially the same functions as the new one bought with us) free of charge
for disposal with the purchase of a new device.
Small devices, which do not have outer dimensions bigger than 25 cm can be
handed in for disposal independently of the
purchase of a new product in normal household quantities.
1. Possibility of return at our company location during our opening
hours
SIMAC Electronics GmbH, Pascalstr. 8, D-47506 Neukirchen-Vluyn
2. Possibility of return nearby
We will send you a parcel stamp with which you can send us your old
appliance free of charge. For this possibility, please contact us via email at
[email protected] or via telephone.
Information about Package:
Please package your old appliance safe for transport. Should you not
have suitable packaging material or you do not want to use your own
material, you can contact us and we will send you an appropriate
package.
5. SUPPORT
If any questions remained open or problems may arise aer your
purchase, we are available by email, telephone and ticket
support system to answer these.
Email: [email protected]
Ticket-system: http://support.joy-it.net
Telephone: +49 (0)2845 98469 – 66 (10 - 17 o'clock)
For further information visit our website:
www.joy-it.net
 Loading...