

Page 1
3
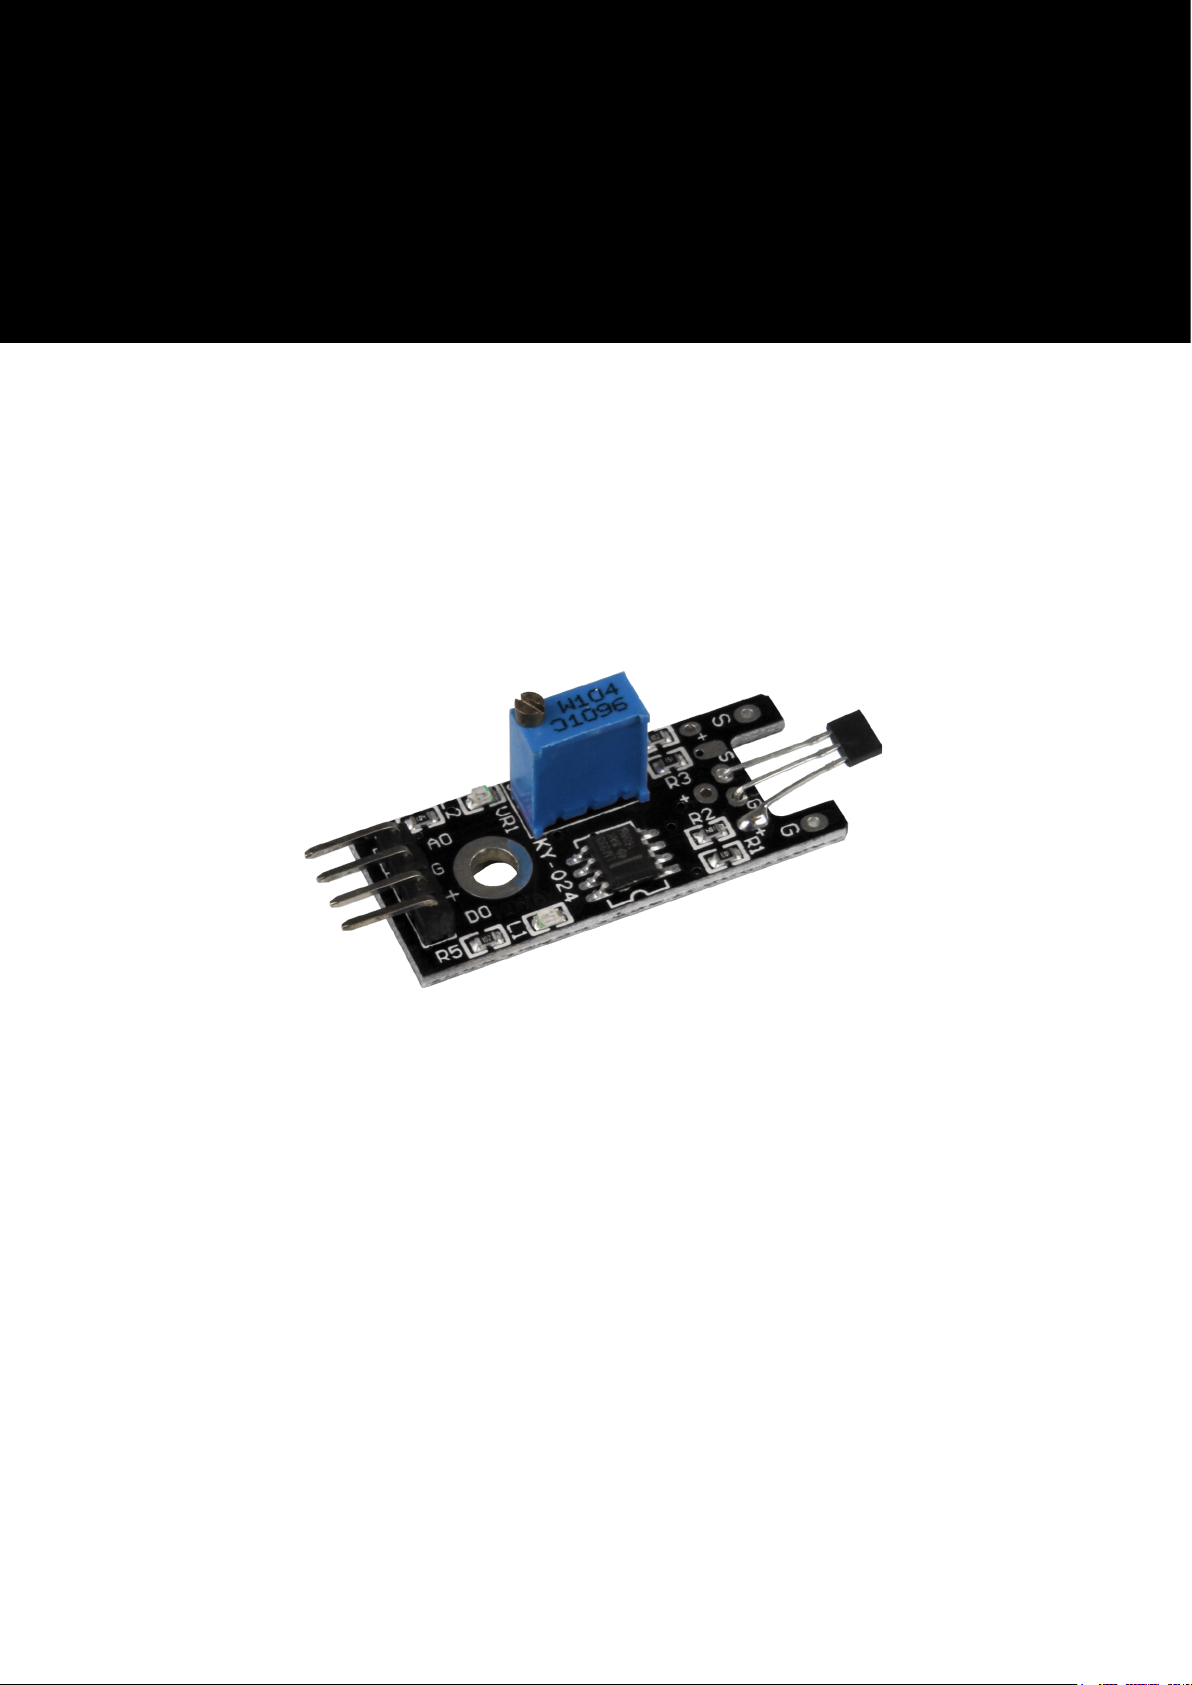
Linear Magnetic Hall Sensor
KY-024
Page 2

Veröffentlich t : 15.11.2 0 18 Copyright by Joy-IT 2
Linear Magnetic Hall Sensor
1. Overview
2. Pin-Assignment
3. Code example Arduino
4. Code example Raspberry Pi
5. Informaon and take-back obligaons
6. Support
TABLE OF CONTENTS
Page 3

Veröffentlich t : 15.11.2 0 18 Copyright by Joy-IT 3
Linear Magnetic Hall Sensor
Dear customer,
Thank you very much for choosing our product.
In the following we will show you what has to be observed during commissioning and use. Should you
encounter any unexpected problems during use, please feel free to contact us.
1. OVERVIEW
Chipset A3141
OP-Amplier LM393
Digital Output
If a magnec eld is detected, a signal is given out
here.
Analog Output Direct measured value of the sensor unit
LED1 Indicates that the sensor is powered.
LED2 Indicates that a magnec eld has been detected.
2. PIN-ASSIGNMENT
Pin Assignment Arduino
Digital Signal Pin 3
+V Pin 5V
GND Pin GND
Analog Signal Pin 0
Page 4

Veröffentlich t : 15.11.2 0 18 Copyright by Joy-IT 4
Linear Magnetic Hall Sensor
In contrast to the Arduino, the Raspberry Pi has no analog inputs and no ADC (analog digital converter) is
integrated in the chip of the Raspberry Pis. This limits the Raspberry Pi if you want to use sensors that do
not output digital values, but should be a connuous, variable value (example: potenometer -> other
posion = dierent voltage value).
To avoid this problem, there is our KY-053 module, with 16 bit accurate ADC, which you can use on the
Raspberry to expand it by 4 analog inputs. This is connected via I2C to the Raspberry Pi, takes over the
analog measurement and passes the value digitally to the Raspberry Pi.
Therefore we recommend to connect the KY-053 module with the ADC in between for analog sensors.
Pin Assignment Raspberry Pi
Digital Signal GPIO24 [Pin 18]
+V 3,3V [Pin 1]
GND Ground [Pin 6]
Analog Signal
Analog 0
(ADS1115 - KY053)
Pin Assignment ADS1115
VDD 3,3V [Pin 1]
GND Ground [Pin 9]
SCL GPIO03 / SCL [Pin 5]
SDA GPIO02 / SDA [Pin 3]
A0 Analog Signal (Sensor)
Page 5
Veröffentlich t : 15.11.2 0 18 Copyright by Joy-IT 5
Linear Magnetic Hall Sensor
The program reads the current voltage value that can be measured at the analog output and outputs it to
the serial interface.
In addion, the state of the digital pin is also indicated in the console. This indicates whether the value has
fallen below the limit or not.
3. CODE EXAMPLE ARDUINO
// Deklaration und Initialisierung der Eingang-Pins
int Analog_Eingang = A0; // X-Achse-Signal
int Digital_Eingang = 3; // Knopf
void setup ()
{
pinMode (Analog_Eingang, INPUT);
pinMode (Digital_Eingang, INPUT);
Serial.begin (9600); // Serielle Ausgabe mit 9600 bps
}
// Das Programm liest die aktuellen Werte der Eingang-Pins
// und gibt diese auf der seriellen Ausgabe aus
void loop ()
{
float Analog;
int Digital;
//Aktuelle Werte werden ausgelesen, auf den Spannungswert konvertiert...
Analog = analogRead (Analog_Eingang) * (5.0 / 1023.0);
Digital = digitalRead (Digital_Eingang);
//... und an dieser Stelle ausgegeben
Serial.print ("Analoger Spannungswert:"); Serial.print (Analog, 4); Seri-
al.print ("V, ");
Serial.print ("Grenzwert:");
if(Digital==1)
{
Serial.println (" erreicht");
}
else
{
Serial.println (" noch nicht erreicht");
}
Serial.println ("-----------------------------------------------------------
-----");
delay (200);
}
Page 6
Veröffentlich t : 15.11.2 0 18 Copyright by Joy-IT 6
Linear Magnetic Hall Sensor
The program uses the corresponding Adafruit Python ADS1x15 library from Adafruit to control the
ADS1115. These were published under the following link under the MIT OpenSource Licence. This has to
be installed rst.
Open a terminal window on your Raspberry Pi and enter the following commands:
Use the following command to download the latest version of the Adafruit_DHT Library:
Now install the library:
You can download the code example here. Alternavely you can copy the following excerpts.
Then start the example with the following command:
4. CODE EXAMPLE RASPBERRY PI
sudo apt-get install git build-essential python-dev
git clone https://github.com/adafruit/Adafruit_Python_ADS1x15.git
cd Adafruit_Python_ADS1x15
sudo python setup.py install
sudo python Adafruit_ADS1x15.py
Page 7

Veröffentlich t : 15.11.2 0 18 Copyright by Joy-IT 7
Linear Magnetic Hall Sensor
#
#!/usr/bin/python
# coding=utf-8
##############################################################################
###############################
### Copyright by Joy-IT
### Published under Creative Commons Attribution-NonCommercial-ShareAlike 3.0
Unported License
### Commercial use only after permission is requested and granted
###
### Analog Sensor + ADS1115 ADC - Raspberry Pi Python Code Example
###
##############################################################################
###############################
# Dieser Code nutzt die ADS1115 und die I2C Python Library fuer den Raspberry
Pi
# Diese ist unter folgendem Link unter der BSD Lizenz veroeffentlicht
# [https://github.com/adafruit/Adafruit-Raspberry-Pi-Python-Code]
from Adafruit_ADS1x15 import ADS1x15
from time import sleep
# Weitere benoetigte Module werden importiert und eingerichtet
import time, signal, sys, os
import RPi.GPIO as GPIO
GPIO.setmode(GPIO.BCM)
GPIO.setwarnings(False)
# Benutzte Variablen werden initialisiert
delayTime = 0.2
# Adresszuweisung ADS1x15 ADC
ADS1015 = 0x00 # 12-bit ADC
ADS1115 = 0x01 # 16-bit
# Verstaerkung (Gain) wird ausgewaehlt
gain = 4096 # +/- 4.096V
# gain = 2048 # +/- 2.048V
# gain = 1024 # +/- 1.024V
# gain = 512 # +/- 0.512V
# gain = 256 # +/- 0.256V
Page 8
Veröffentlich t : 15.11.2 0 18 Copyright by Joy-IT 8
Linear Magnetic Hall Sensor
# Abtasterate des ADC (SampleRate) wird ausgewaehlt
# sps = 8 # 8 Samples pro Sekunde
# sps = 16 # 16 Samples pro Sekunde
# sps = 32 # 32 Samples pro Sekunde
sps = 64 # 64 Samples pro Sekunde
# sps = 128 # 128 Samples pro Sekunde
# sps = 250 # 250 Samples pro Sekunde
# sps = 475 # 475 Samples pro Sekunde
# sps = 860 # 860 Samples pro Sekunde
# ADC-Channel (1-4) wird ausgewaehlt
adc_channel = 0 # Channel 0
# adc_channel = 1 # Channel 1
# adc_channel = 2 # Channel 2
# adc_channel = 3 # Channel 3
# Hier wird der ADC initialisiert - beim KY-053 verwendeten ADC handelt es
sich um einen ADS1115 Chipsatz
adc = ADS1x15(ic=ADS1115)
# Hier waehlt man den Eingangs-Pin des digitalen Signals aus
Digital_PIN = 24
GPIO.setup(Digital_PIN, GPIO.IN, pull_up_down = GPIO.PUD_OFF)
##############################################################################
###############################
# ########
# Hauptprogrammschleife
# ########
# Das Programm liest die aktuellen Werte der Eingang-Pins
# und gibt diese in der Konsole aus
try:
while True:
#Aktuelle Werte werden aufgenommen
analog = adc.readADCSingleEnded(adc_channel, gain, sps)
# Ausgabe auf die Konsole
if GPIO.input(Digital_PIN) == False:
print "Analoger Spannungswert:", analog,"mV,
","Grenzwert: noch nicht erreicht"
else:
print "Analoger Spannungswert:", analog, "mV, ",
"Grenzwert: erreicht"
print "---------------------------------------"
Page 9

Veröffentlich t : 15.11.2 0 18 Copyright by Joy-IT 9
Linear Magnetic Hall Sensor
# Reset + Delay
button_pressed = False
time.sleep(delayTime)
except KeyboardInterrupt:
GPIO.cleanup()
Page 10

Veröffentlich t : 15.11.2 0 18 Copyright by Joy-IT 10
Linear Magnetic Hall Sensor
Symbol on electrical and electronic equipment
This crossed-out dustbin means that electrical and electronic appliances do not belong in the household
waste. You must return the old appliances to a collecon point. Before handing over waste baeries and
accumulators that are not enclosed by waste equipment must be separated from it.
Return opons
As an end user, when you purchase a new device, you can return your old device (which essenally fulls
the same funcon as the new one purchased from us) free of charge for disposal. Small appliances with
no external dimensions greater than 25 cm can be disposed of in normal household quanes
independently of the purchase of a new appliance.
Possibility of return at our company locaon during opening hours
Simac GmbH, Pascalstr. 8, D-47506 Neukirchen-Vluyn
Possibility of return near you
We will send you a parcel stamp with which you can return the device to us free of charge. Please contact
us by e-mail at [email protected] or by telephone.
Informaon on packaging
If you do not have suitable packaging material or do not wish to use your own, please contact us and we
will send you suitable packaging.
5. INFORMATION AND TAKE-BACK OBLIGATIONS
Page 11

Veröffentlich t : 15.11.2 0 18 Copyright by Joy-IT 11
Linear Magnetic Hall Sensor
We are also there for you aer the purchase. If you sll have quesons or problems, we are also available
by e-mail, telephone and cket support system.
E-Mail: [email protected]
Ticket-System: hp://support.joy-it.net
Phone: +49 (0)2845 98469 – 66 (9:30 - 17:00 o‘clock)
For further informaon please visit our website:
www.joy-it.net
6. SUPPORT
 Loading...