


Portable O3 Ozone Tester/Detector
BX80
Operating instruction manual

Content
1. General……………………………………………………3
2. Technical performance and parameters………………3
3. Operating instruction……………………………………4
4. Adjusting and calibrating………………………………11
5. Daily use and maintenance …………………………14
6. Storage and quality assurance………………………14
7. Complete set……………………………………………15
Notice
Please read through this manual carefully before
operating the instrument!
1. General
BX80 O3 Ozone tester is a portable O3 gas detector/alarm that can be used to test
the ozone level in air or gas. The tester comprises circuit board, annunciator, LCD,
electrochemistry sensor. The sensor changes the ozone concentration into electricity
signal and displays on the LCD. If you set a threshold, the tester will make alarm signal to
remind you when the ozone concentration reach the threshold.
BX80 has a very clear and large LCD with audible and visible alarm, and can detect
accurate ozone level and send alarm to the operator in time for prevention even in very
inimical work environment.
2. Technical performance and parameters
Features
• Smart, portable and firm
• Audible and visible alarm
• Large screen digital and character display, instantaneous value, peak value
and mean value available
• Self-checking for displaying, battery, sensor, audible and visible alarm at
startup
• Regular light flashing and audible indication
• Distinct audible alarm
• Low maintenance cost
Main technical indexes
Gas for detect
Range
Precision
Least count
Response time
Ozone (O3)
0-5-20ppm
<±5% (F.S)
0.01/0.1ppm
≤ 60 sec
Detection mode: Gaseous diffusion
Battery: Lithium ion rechargeable battery, 3.7V
Battery working period: About 200 hours
Sensor work principle: Electrochemistry mode
Sensor service life: 2 years
Display: Large screen LCD
Alarm: Audible and visible alarm
Direct readings: instantaneous value, peak value, battery voltage, TWA, STEL
Ex-mark: Ex ibdIICT4
Protection degree: IP45
Work temperature: -10~50℃
Work humidity: 5~90% RH
Size: 126mm (L) x 66mm (W) x 32mm (H)
Weight: 220g (with charger)
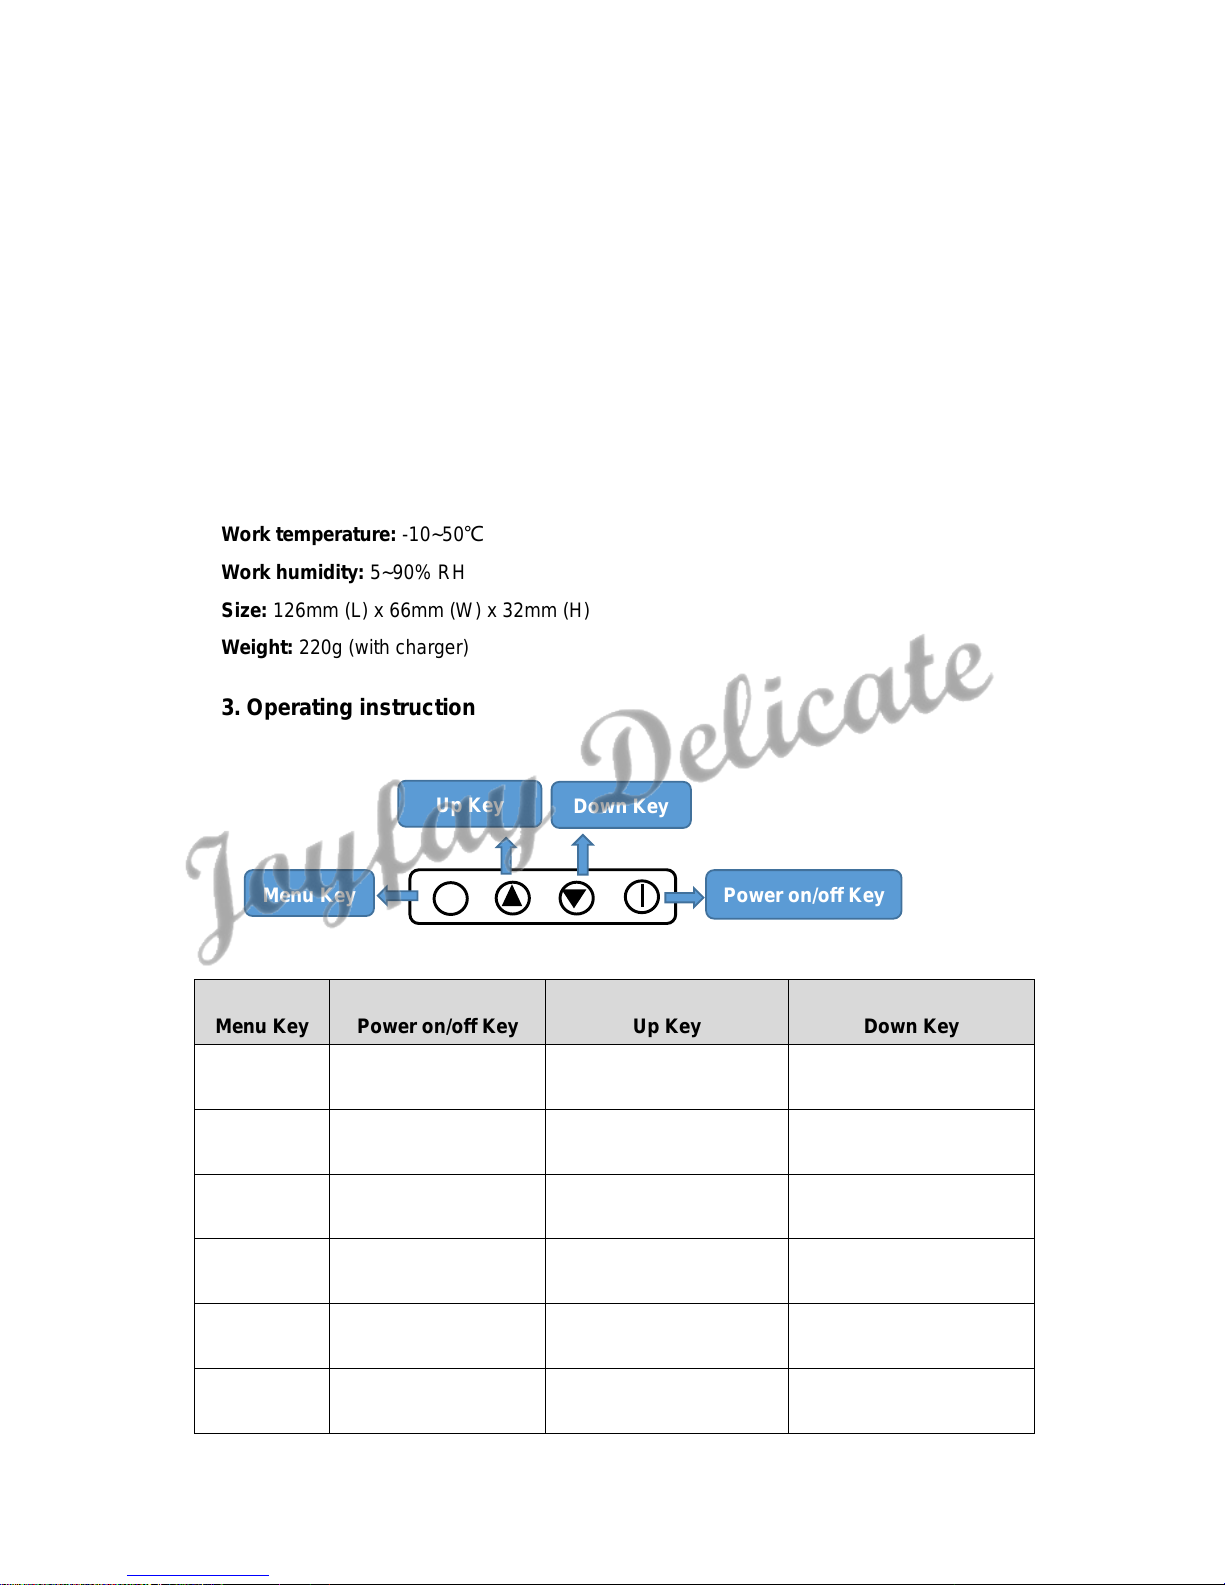
3. Operating instruction
Menu Key Power on/off Key Up Key Down Key
Enter Menu Switch-on Selecting menu Selecting menu
Exit Switch-off Value up Value down
Selfcheck Activate The Background
Activate the background
Zero Point Calibrating
Sensitivity Setting
Affirm Setting
Menu Key
Up Key
Down Key
Power on/off Key
Switching on
Press “ ” key and the detector will be switched on after two beeps.
Switching off
At measuring status, press and hold “ ” key down, the detector will be switched off
after 5 seconds’ countdown; if the holding time for pressing “ ” key is not long enough, the
detector will be brought back to the measuring status.
Low power
Audible and visible alarm for undervoltage will be activated if the battery voltage is
lower than the pre-set value. And the battery should be recharged at such situation. At
undervoltage alarm, the screen will also display a detection failure symbol besides the
audible and visible alarm, and meanwhile the symbol for detection pass will flicker
together with the symbol for battery undervoltage. When the power is exhausted, the
symbol for detection failure will flicker together with the symbol for battery
undervoltage, and the screen will display an indication of “battery off”, and then the
detector will be switched off automatically.
After an undervoltage alarm, the detector should be switched off and recharged for
4~6 hours around.
3.1 Functional description of the operating keys
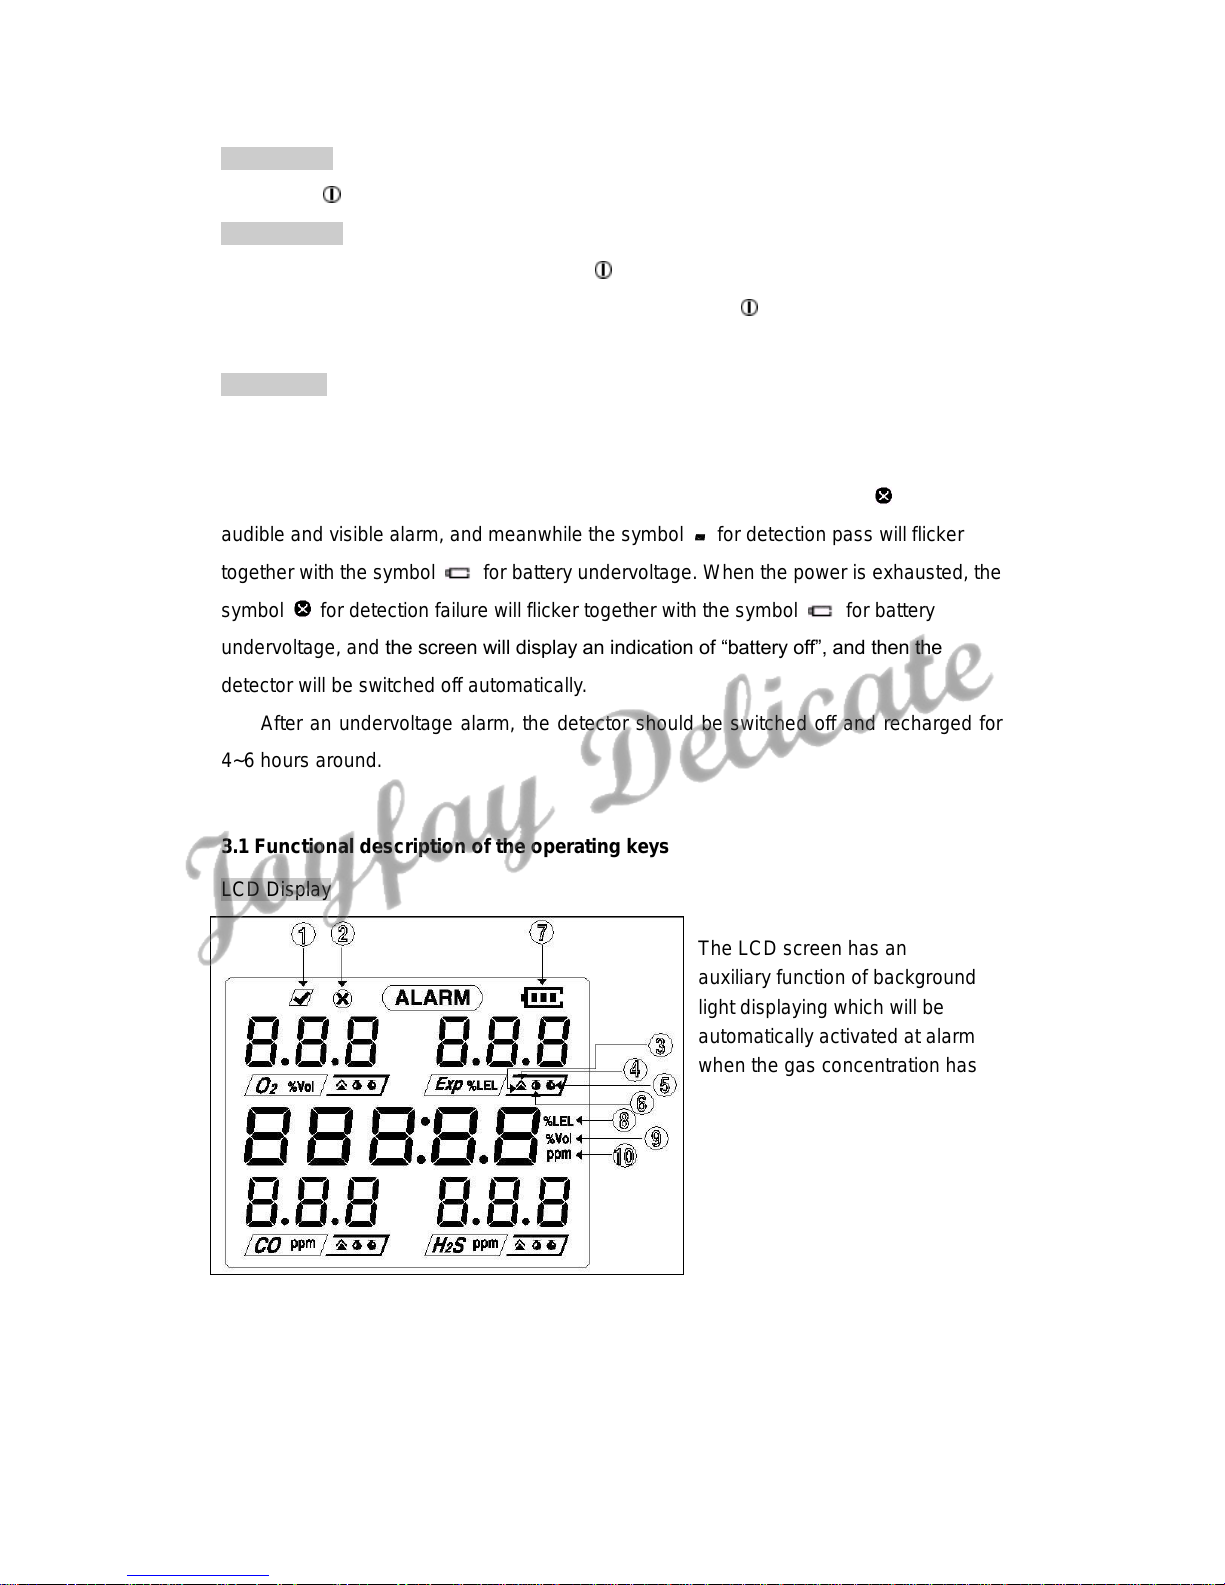
LCD Display
The LCD screen has an
auxiliary function of background
light displaying which will be
automatically activated at alarm
when the gas concentration has
exceeded the alarm point; at
normal detecting in an
environment with weak light, it
can be activated by pressing UP
Key or DOWN Key once.
1. Detection pass 2. Detection failure 3. Grade I Alarm
4. Grade II Alarm 5. STEL Value 6 .TWA Alarm
7 Battery 8. %LEL (unit) 9. %Vol (unit)
10. PPM (unit)

3.2 Self-checking
Press “ ” key and with two beeps the screen will display the following information:
1. Displaying all the digital and character indications; checking audible and visible alarm;
Checking the battery, electric circuit and the sensor(s)
2. Displaying the version of software and detection range
3. Displaying Grade I alarm point (combustible gas, noxious gas, and high concentration
O2 alarm) and Grade II alarm point (combustible gas, noxious gas, and low concentration
O2 alarm); Displaying STEL and TWA alarm points (only for noxious gas)
Software Version
Detection Range
Grade I Alarm Point
Grade II Alarm Point
TWA Alarm Point
STEL Alarm Point

4. The result of self-checking will be displayed as follows:
In addition, the detector will check the battery, electric circuit and the sensor(s) regularly.
!Notice: at failure of self-checking, a re-selfcheck should be taken, if it fails again, please
contact us or the local agent for service
3.3 Measuring mode
A measuring mode of "Gas diffusion” or “Gas absorption" can be applied to the detector
which can be fixed to the waist belt or handled for use during normal operation. Once
switched on, the detector will start measuring continuously, and generally the surrounding
air can enter into the sensor through diffusion which will bring the target gas directly into
the sensor, and then the sensor will response to the concentration of the gas and output a
measuring result. The detection principle of diffusion mode applies the above way to
detecting the concentration of the surrounding gas with an advantage of swift response
time. If it is required to take a remote detection for the gas at the sample position, gas
absorption mode should be applied to measuring, and the detector should be equipped
with a calibrating case and an optional air pump, but at such situation, the direction for gas
sampling should be in accordance with the arrowhead. The gas kind and concentration will
be separately displayed on a same screen.
3.3.1 Gas alarm
The detector has two instantaneous gas alarm grades, in which Grade II alarm point
(high concentration alarm for combustible gas and noxious gas, low concentration alarm
for O2) should be more urgently treated than Grade I alarm point (low concentration alarm
Selfcheck Pass
Selfcheck Failure
Normal Display
for combustible gas and noxious gas, high concentration alarm for O2) in general, and it is
the same important for too high or too low concentration of O2. For noxious gases, it also
has a 15 minutes' STEL alarm point of mean exposure concentration and an 8 hours TWA
alarm point of mean exposure concentration. The user can carry out settings for Grade I
alarm point, Grade II alarm point, STEL alarm point and TWA alarm point.
Note: STEL stands for Short Time Exposure Limit and TWA for Time-Weighted
Average.
Notice: The setting value for Grade I alarm point should not exceed the setting value
for Grade II alarm point, or the detector will work only with Grade I alarm function if the two
setting values are the same.
At any alarm, the indication symbol will display and flicker together with
the corresponded alarm symbol (Grade I, high concentration), (Grade II, low
concentration), (STEL) and (TWA) will indicates as per the gas type and alarm
grade.
If the concentration of the gas detected is beyond the measuring range, the full range
value will flicker at alarm.
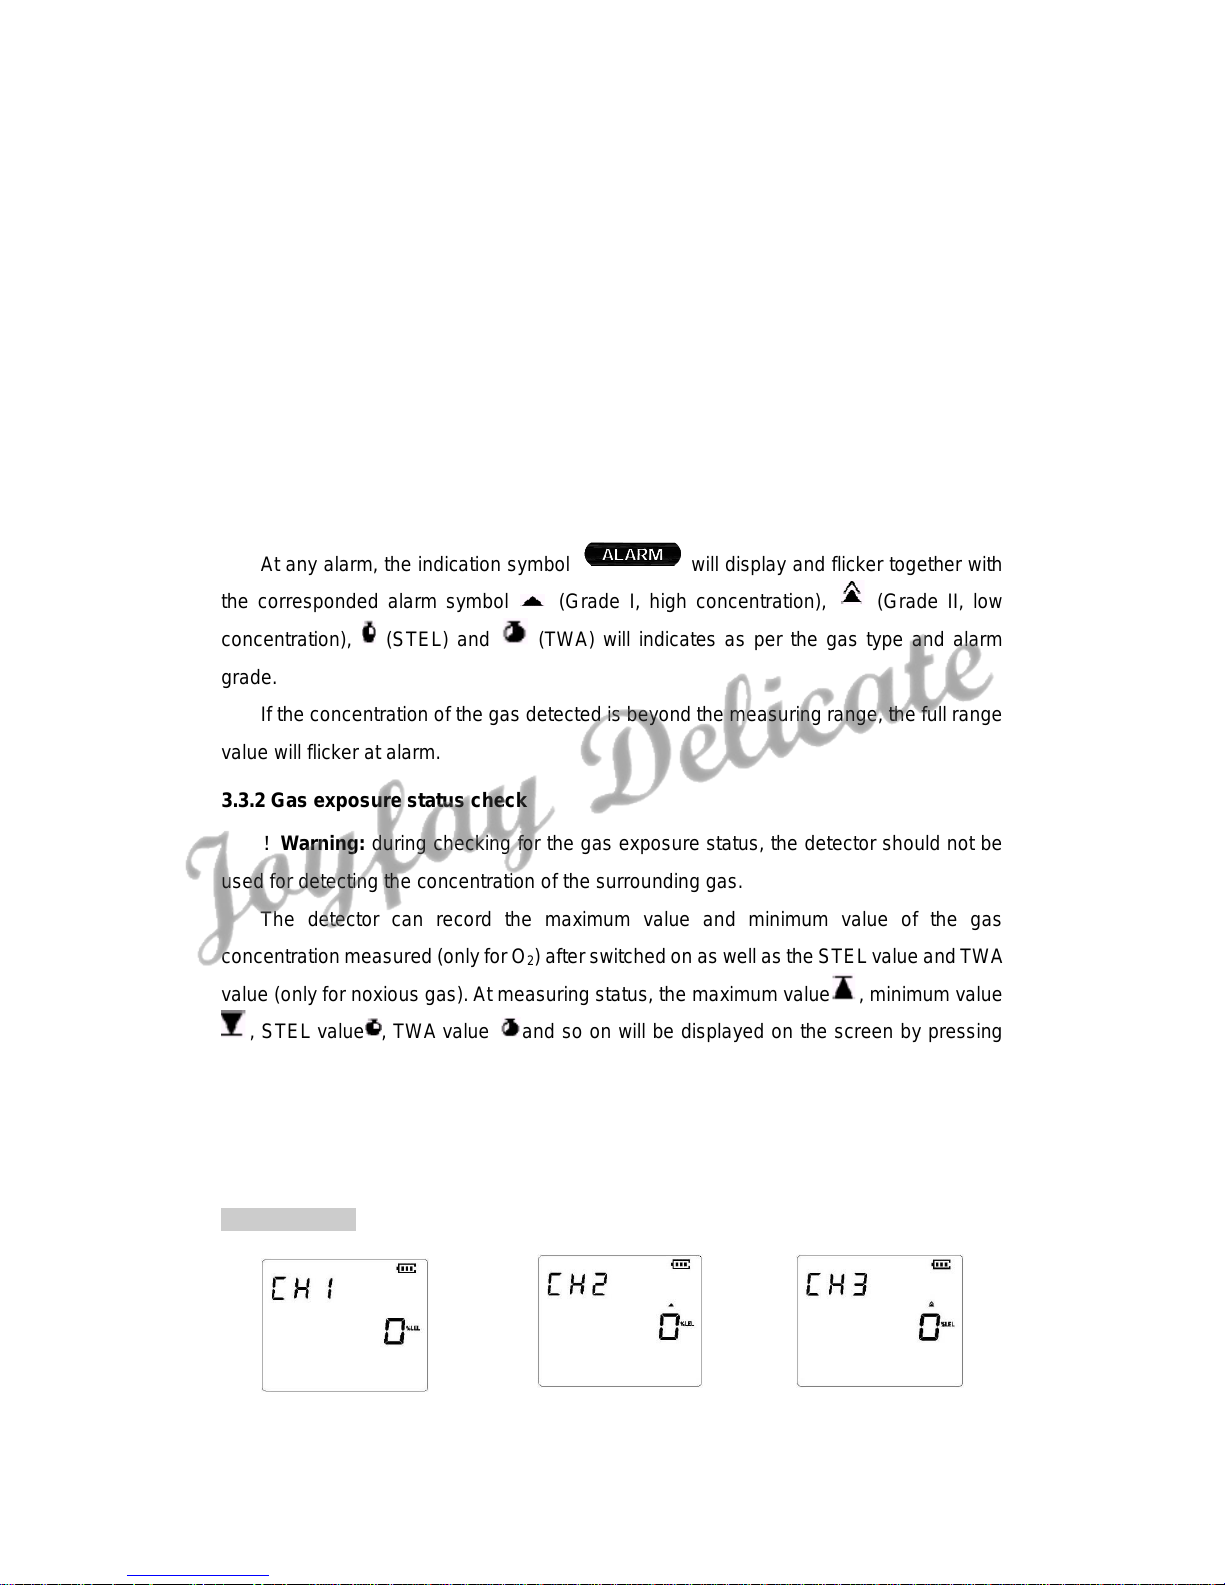
3.3.2 Gas exposure status check
!Warning: during checking for the gas exposure status, the detector should not be
used for detecting the concentration of the surrounding gas.
The detector can record the maximum value and minimum value of the gas
concentration measured (only for O2) after switched on as well as the STEL value and TWA
value (only for noxious gas). At measuring status, the maximum value , minimum value
, STEL value , TWA value and so on will be displayed on the screen by pressing
UP Key or DOWN Key. They will be displayed in sequence by pressing UP Key (in forward)
or DOWN Key (in reverse).
If no key is pressed down within 10 seconds, the detector will be brought back to the
normal measuring mode.
Screen display:
Current Value
Minimum Value
Maximum Value

3.3.3 Audible and visible indication
Audible and visible indication in every 5 minutes' intervals can be set to the detector
for indicating normal work status. The user can activate or close this function, or only use
visible signal or both indicating type for option (refer to Setting mode). The default setting
for audible and visible indication of the detector at leaving factory is both closed.
3.4 Setting mode
Notice: the detector cannot be used for measuring at setting mode.
At setting mode, the operator can carry out the following settings:
·Audible and visible indicating mode
·V ibration alarm indicating mode
·Mode conversion for alarm or non-alarm
·Setting value for Grade I alarm point
·Setting value for Grade II alarm point
·Setting value for STEL alarm point
·Setting value for TWA alarm point
3.4.1 Enter into setting mode
At normal measuring mode, press menu key for about 3 seconds, the detector
will be brought into the setting mode with audible indication.
3.4.2 Modify the detector settings
The menu structure at setting mode is shown as Table 1.
At setting mode, the setting time can be selected by pressing "▲" or "▼" and affirmed
by " ". And then the parameter of the selected item can be modified.
The parameter can be increased by pressing "▲" or decreased by "▼". And affirmed
by pressing " ".
Once a modification is finished, the new parameter will be saved in the detector.
TWA Value
STEL Value

Table 1
Setting type
Display (e.g.)
Instruction
Audible and
Visible Indication
Select by pressing "▲" or "▼"; "NO" means
the detector is in measuring function and will
not have Audible and Visible Indication at
exceeding; "YES" means the detector works
with measuring and Audible and Visible
Indication; the modification can be affirmed by
" " or unchanged if not pressing " ".
Vibration Alarm
Indication
Select by pressing "▲" or "▼"; "NO" means
the detector is in measuring function and will
not have Vibration Alarm Indication
at exceeding; "YES" means the detector
works with measuring and Vibration Alarm
Indication; the modification can be affirmed
by " " or unchanged if not pressing " ".
Alarm Mode
Select by pressing "▲" or "▼"; "NO" means
the detector is in measuring function and will
not alarm at exceeding; "On" means the
detector works with measuring and alarm
functions; the modification can be affirmed by
" " or unchanged if not pressing " ".
Grade I alarm
Increase the value by pressing "▲" or
decrease by "▼", the modification can be
affirmed by " " or unchanged if not pressing
" ".
Grade II alarm
Increase the value by pressing "▲" or
decrease by "▼", the modification can be
affirmed by " " or unchanged if not
pressing " ".
TWA alarm
Increase the value by pressing "▲" or
decrease by "▼", the modification can be
affirmed by "
" or unchanged if not pressing
" ".
STEL alarm
Increase the value by pressing "▲" or
decrease by "▼", the modification can be
affirmed by " " or unchanged if not pressing
" ".
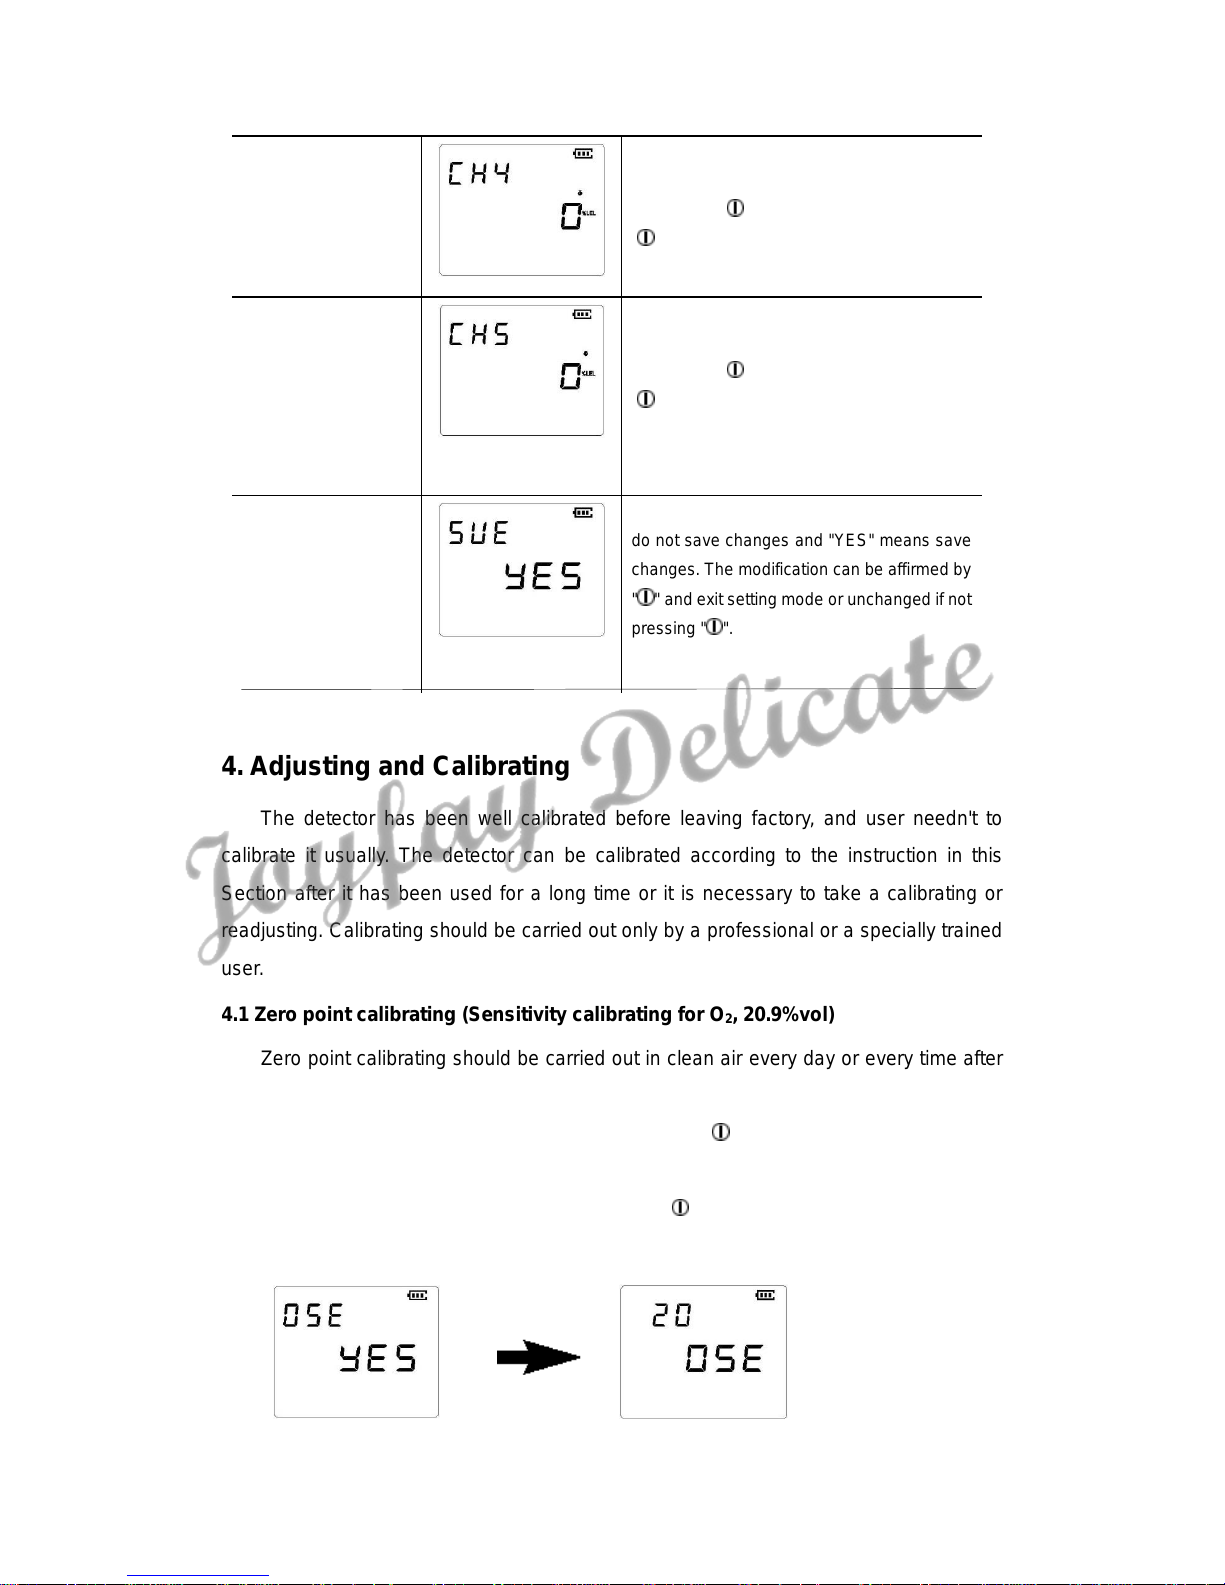
Save Indication
Select by pressing "▲" or "▼"; "NO" means
do not save changes and "YES" means save
changes. The modification can be affirmed by
"
" and exit setting mode or unchanged if not
pressing " ".
4. Adjusting and Calibrating
The detector has been well calibrated before leaving factory, and user needn't to
calibrate it usually. The detector can be calibrated according to the instruction in this
Section after it has been used for a long time or it is necessary to take a calibrating or
readjusting. Calibrating should be carried out only by a professional or a specially trained
user.
4.1 Zero point calibrating (Sensitivity calibrating for O2, 20.9%vol)
Zero point calibrating should be carried out in clean air every day or every time after
an alarm.
At normal measuring status, press and hold down " " and "▼" for about 5 seconds,
the detector will be brought into zero point calibrating with an audible indication; pressing
"▲" or "▼" to select "YES" or "NO" and affirm by " ", the screen will display "CAL" and
flickering zero point calibrating symbol, and start a 20 seconds' countdown.

·After zero point calibrating for all the sensors are succeeded, the symbol for detection
pass will be displayed.
·If the zero point calibrating for one or more sensors is failed, the symbol for detection
pass will also be displayed but with an "Err" indication for a failed channel.
Notice: If there is any sensor failed, carry out the zero point calibrating again in clean air;
if it still fails, please contact us or the local agent for service.
4.2 Zero point calibrating (Sensitivity calibrating for O2, 0.0%vol)
For noxious gas sensors, the sensitivity calibrating should be carried out every 6
months. The user should apply a standard gas to sensor calibrating, and the detector will
identify automatically.
At sensitivity calibrating, the operator should apply the following calibrating tools:
·S tandard gas cylinder(s) with known concentration
Gas type
Standard gas concentration recommended
Combustible Gas
CH4 60%LEL
·Flow meter (300mL/min recommended) and pressure relief valve
·Connecting pipe between the pressure relief valve and the calibrating case
Zero Point Calibration
Dectection Failed

·Zero point calibrating and sensor channel On/Off setting should be finished before
sensitivity calibrating.
4.3 Standard gas setting
Information on standard gas setting will be displayed.
·At normal measuring status, press and hold down " " and "▲" for about 3 seconds, the
detector will be brought into sensitivity calibrating mode with audible indication.
·The user can adjust the gas type for calibrating by UP Key or DOWN Key, and affirm by "
". Then it will have a 20 seconds countdown
The Detector will automatically calculate the mean gas concentration value detected before within
20 seconds.
If gas is not detected, the tester will automatically show system error, press " " key to return
normal measuring status.

If the current value is to be modified, press " " to affirm. The value can be adjusted by UP
Key or DOWN Key and affirmed by " ".
If the sensitivity calibrating is succeeded, the symbol " " for detection pass will be
displayed.
5. Daily use and maintenance
5.1 This manual of instruction should be carefully read through before operating the
detector.
5.2 This detector should be used or maintained by a well-trained person or a
professional.
5.3 This detector should be used strictly as per the rules specified by our company.
5.4 Any maintenance or replace of any part should be carried out by a specially and
well trained person with original spare parts from our company.
5.5 Replace or recharge of battery should be carried out in a safe environment.
5.6 The detector should be well prevented against dropping down or excessive
vibration.
5.7 If the detector appears with any irregular display and some intermittent sound, it
means that the battery is under voltage and the detector can be recovered to
normal status after the battery is recharged.
5.8 The detector is forbidden to be used in a high concentration and corrosive gas
environment for a long period, or the sensor will lose sensitivity or be damaged at
serious conditions.
Calibration Succeeded
6. Storage and quality assurance
6.1 For BX80 O3 Ozone Detector/alarm, our company will take responsibility for a 12
months' guarantee for repair from the day when the user obtains the detector.
6.2 The user should obey the operating rules at all times, and any damage to the
detector upon any improper use or use under any improper environment will be
beyond the guarantee scope.
6.3 Our company will take no responsibility for the reliability of the detector if the user
has carried out any repair or replace of any part beyond the operating rules.
6.4 The detector should be protected in a damp-proof bag if it is transported or stored
on ship or in a very damp environment.
7. Complete set
7.1 BX80 O3 Ozone Detector/alarm 1 set
7.2 Device Charger 1 set
7.3 Operating instruction manual 1 book
7.4 Product certificate 1 sheet
7.5 Repair guarantee card 1 card
 Loading...