

Page 1

ST-28
§ Multi-Player §
User’s Manual
1
Page 2
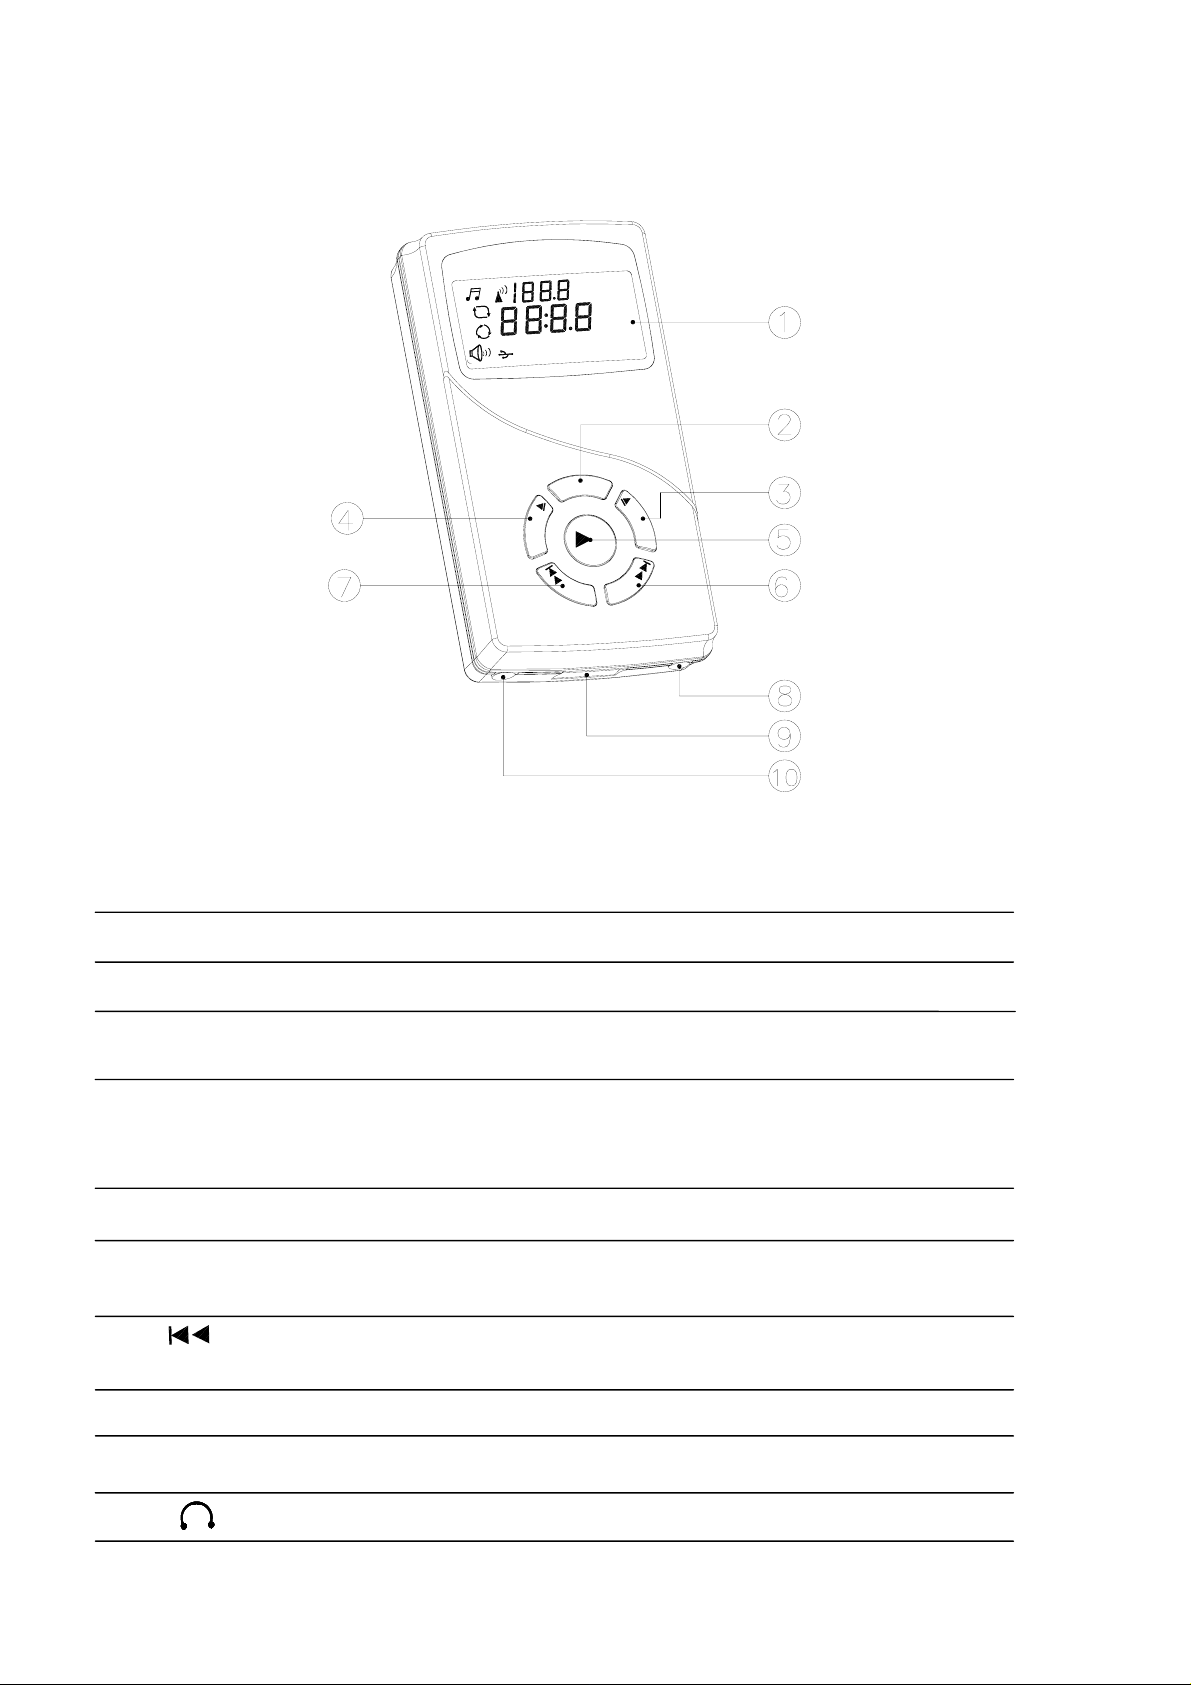
◆ Multi-Player Controls
Multi-Player
(
(
(
L
L
A
T 1
RP
T
Select/Lower
Vol/Prev.
C
E
L
E
S
V
Z
MH
l
ma
r
No
LCD
Menu
N
U
E
M
S
E
L
E
C
T
=
+
L
O
O
L
V
-
Select/Upper
Play/Stop
Vol/Next
Power Socket
USB Socket
Earphone
◆ Key Instructions
Item Symbol Title Description
1 LCD Display the functions
2 MENU Menu 1.Play mode 2.Frequency setup
3 SELECT
4
5
SELECT Select/Upper Adjust the Upper frequency/
Play /Stop Start/stop a song over
6 VOL+
Select/Lower Adjust the lower frequency/
Performance mode
Performance mode
Vol/Next Skip to next song/ Change the volume lower
to press simultaneously for seconds
7
8
9
10
VOL- Vol/Prev.
Skip to previous song/ Change the volume
louder to press simultaneously f
Power socket For external power-supply
USB socket USB docking
Earphone For earphone use
or seconds
2
Page 3
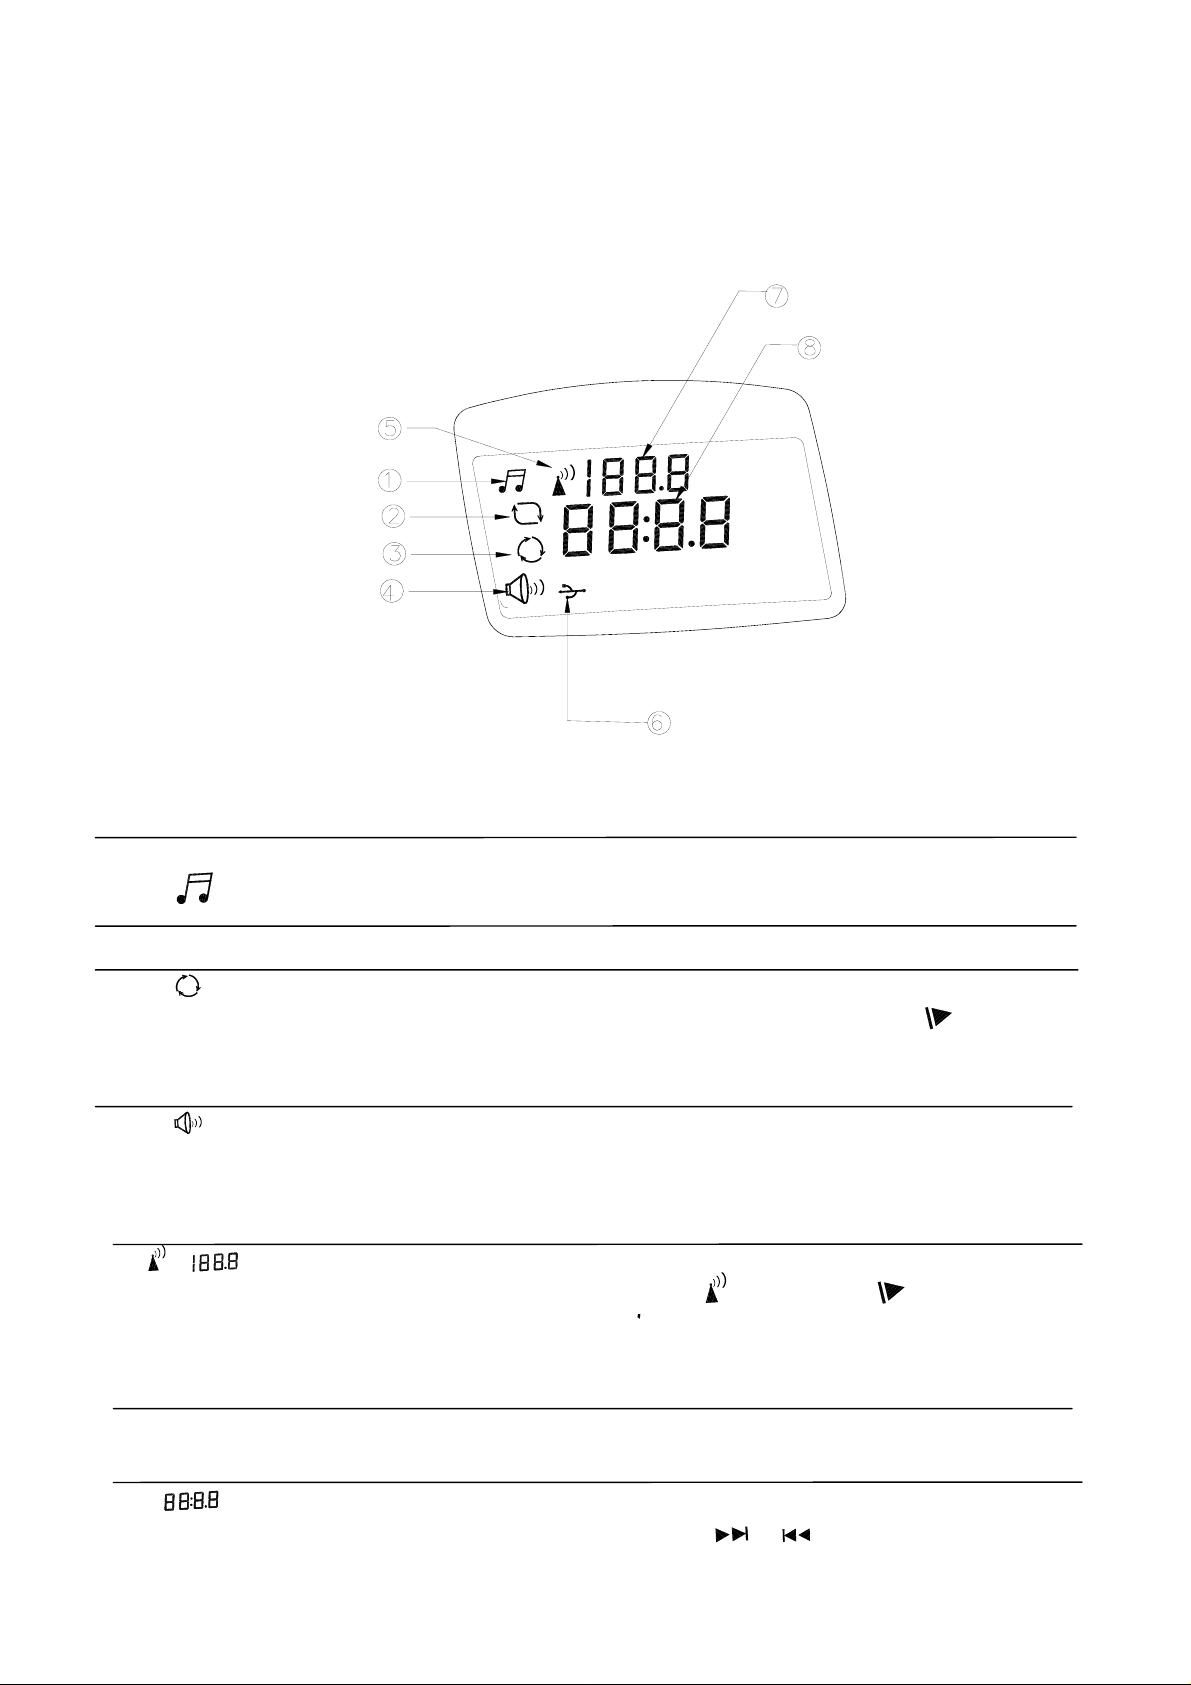
◆ LCD Illustration
(
(
Frequency Setup
Ready
Playing
Frequency
Title and Volume
(
(
(
MHZ
Play Mode
RPT 1 ALL
Norma
l
Volume
USB Linked
◆ The description of Symbol on LCD
Item Symbol Title Description
1 Sound Ready The music is standby
2
3
Playing y
Play mode select s MENU button when the Select the play mode→Pres
Pla ing the music
” appears, then press SELECT SELECT
“
button to select the items.
4
Volume setting The symbol appears when setup volume. After the
Play Mode:1.RPT1 2.RPT ALL
symbol disappears,
then press the VOL+
volume level.
(
(
/ Frequency setting W hen setup the frequency, press MENU button twice and
5
then the symbol
SELECT
frequency w e saved, after several seconds , then the
button to adjust the frequency., The last
ill b
frequency will show the last one
or
or VOL- to adjust the
(
(
appears. Press SELECT/
e . used in use next tim
6
7
USB Storage The symbol appears ,since The USB storage has
been to link with mu -pla r.
lti ye
Playing time/Vol./Item This symbol shows the playing time/volume level/item
→ Press the VOL+
or
VOL- to select the item.
3
Page 4
◆ Accessories
1. Description
Item Title Suitable Features
01 Desktop DC 100~240V Pleasing design and used easily on the
5V/1A desk
16V/24V Used in the car and plug-in cigar li02 Cradle Holder ghter
03 Power Bank AC100~240V Portable and can be Charged when DC
5V/1A idle, suitable for home and in
04 Desktop Speaker AC100~120V As speaker. Putting the Multi Player in
DC 12V/1A the desktop speaker for use easily and
r
perfo m the sound out.
car
2.
Wire Accessories
Item Title Suitable Features
A Travel Charger AC100V~240V High voltage charging effectively.
B Earphone Portable and easy for personal use
C Saver Charger 13.5V High voltage charger. Plug into the
cigar lighter to supply the po
Multi player or charge the power
bank.
USB Cable Link the PC with Desktop to
D
transmit or store the data to/from
the USB storage device.
wer to
3.Specification:
1、Output FM Range:88.1MHz~107.9MHz
2、Frequency Adjustment:0.2 MH
z/per step
3、Smart/Auto power saving design
4、High quality fidelity, full stereo sound
、Big LCD with back light lamp
5
、Compatible:USB storage device、HDD Enclosure、Card reader
6
4
Page 5
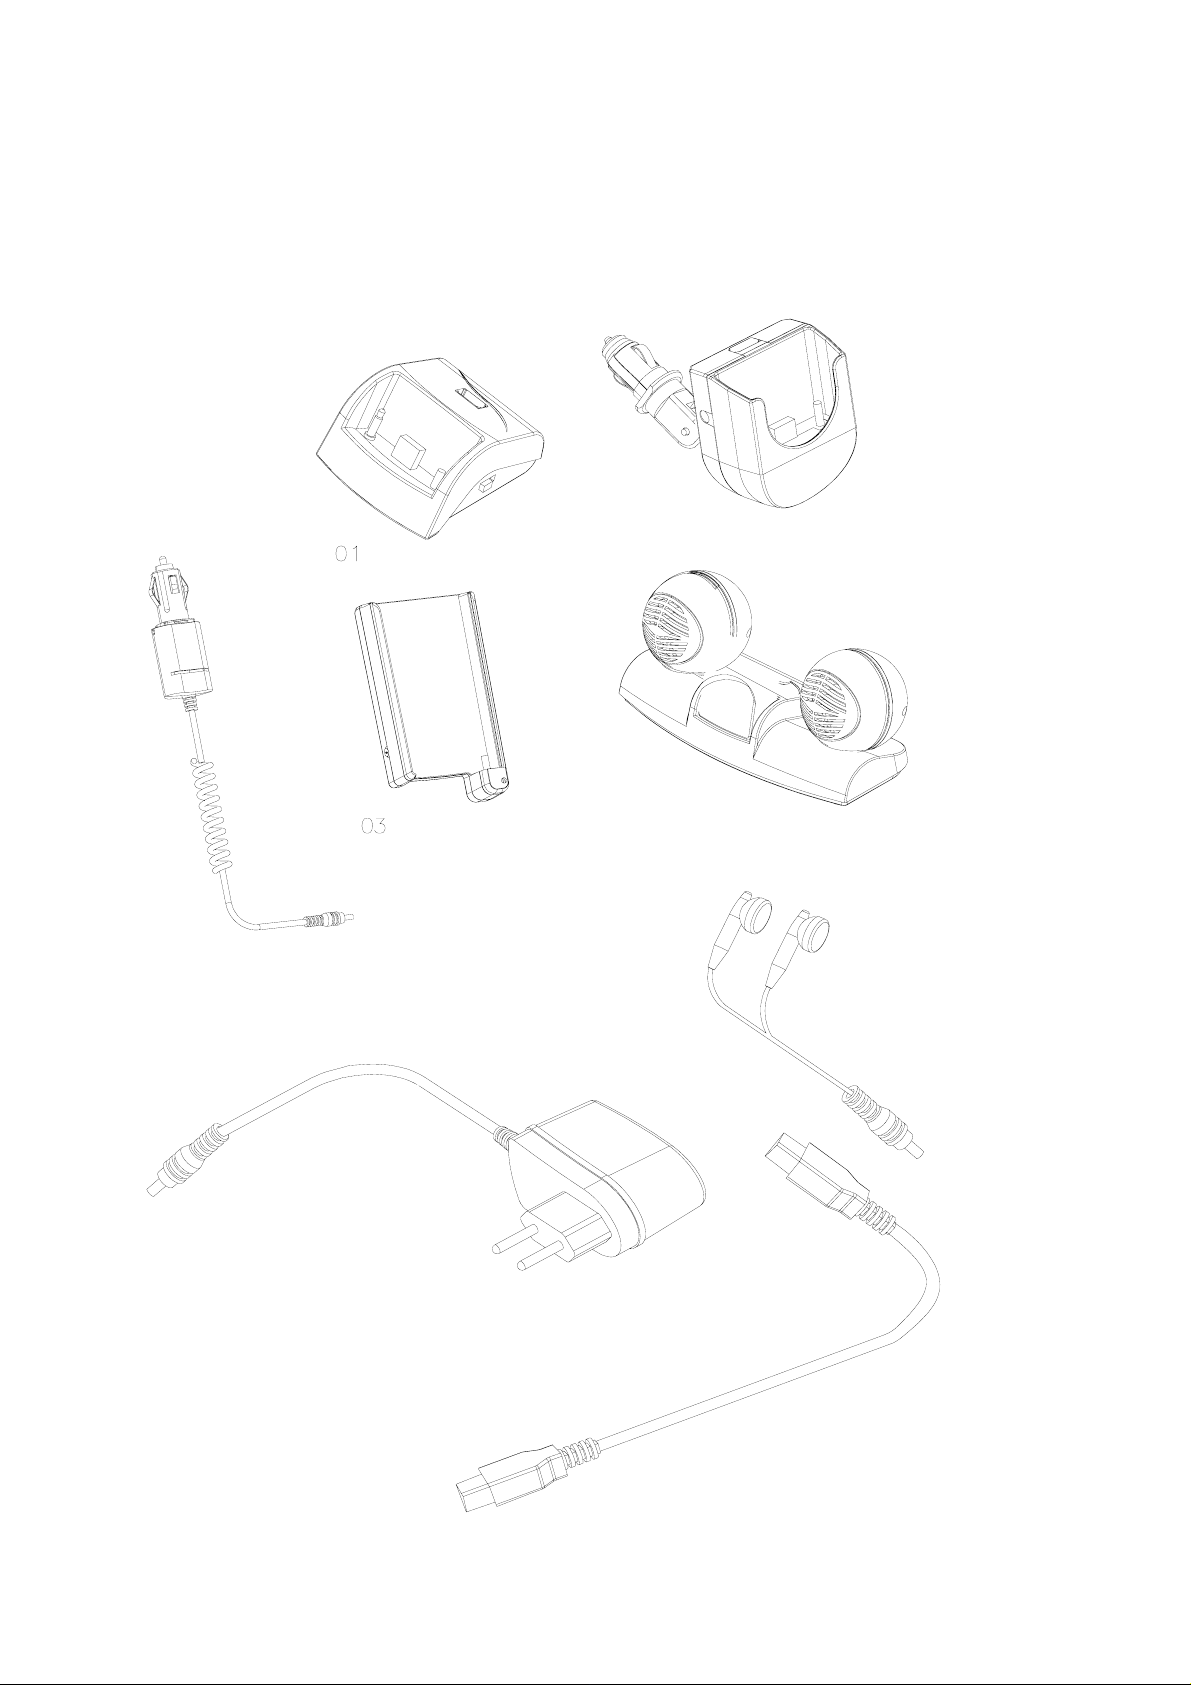
◆ Accessories Illustrations
C Saver Charger
Desktop
Power Bank
02 Cradle Holder
04 Desktop Speaker
B Earphone
A Travel Charger
D USB Cable
5
Page 6
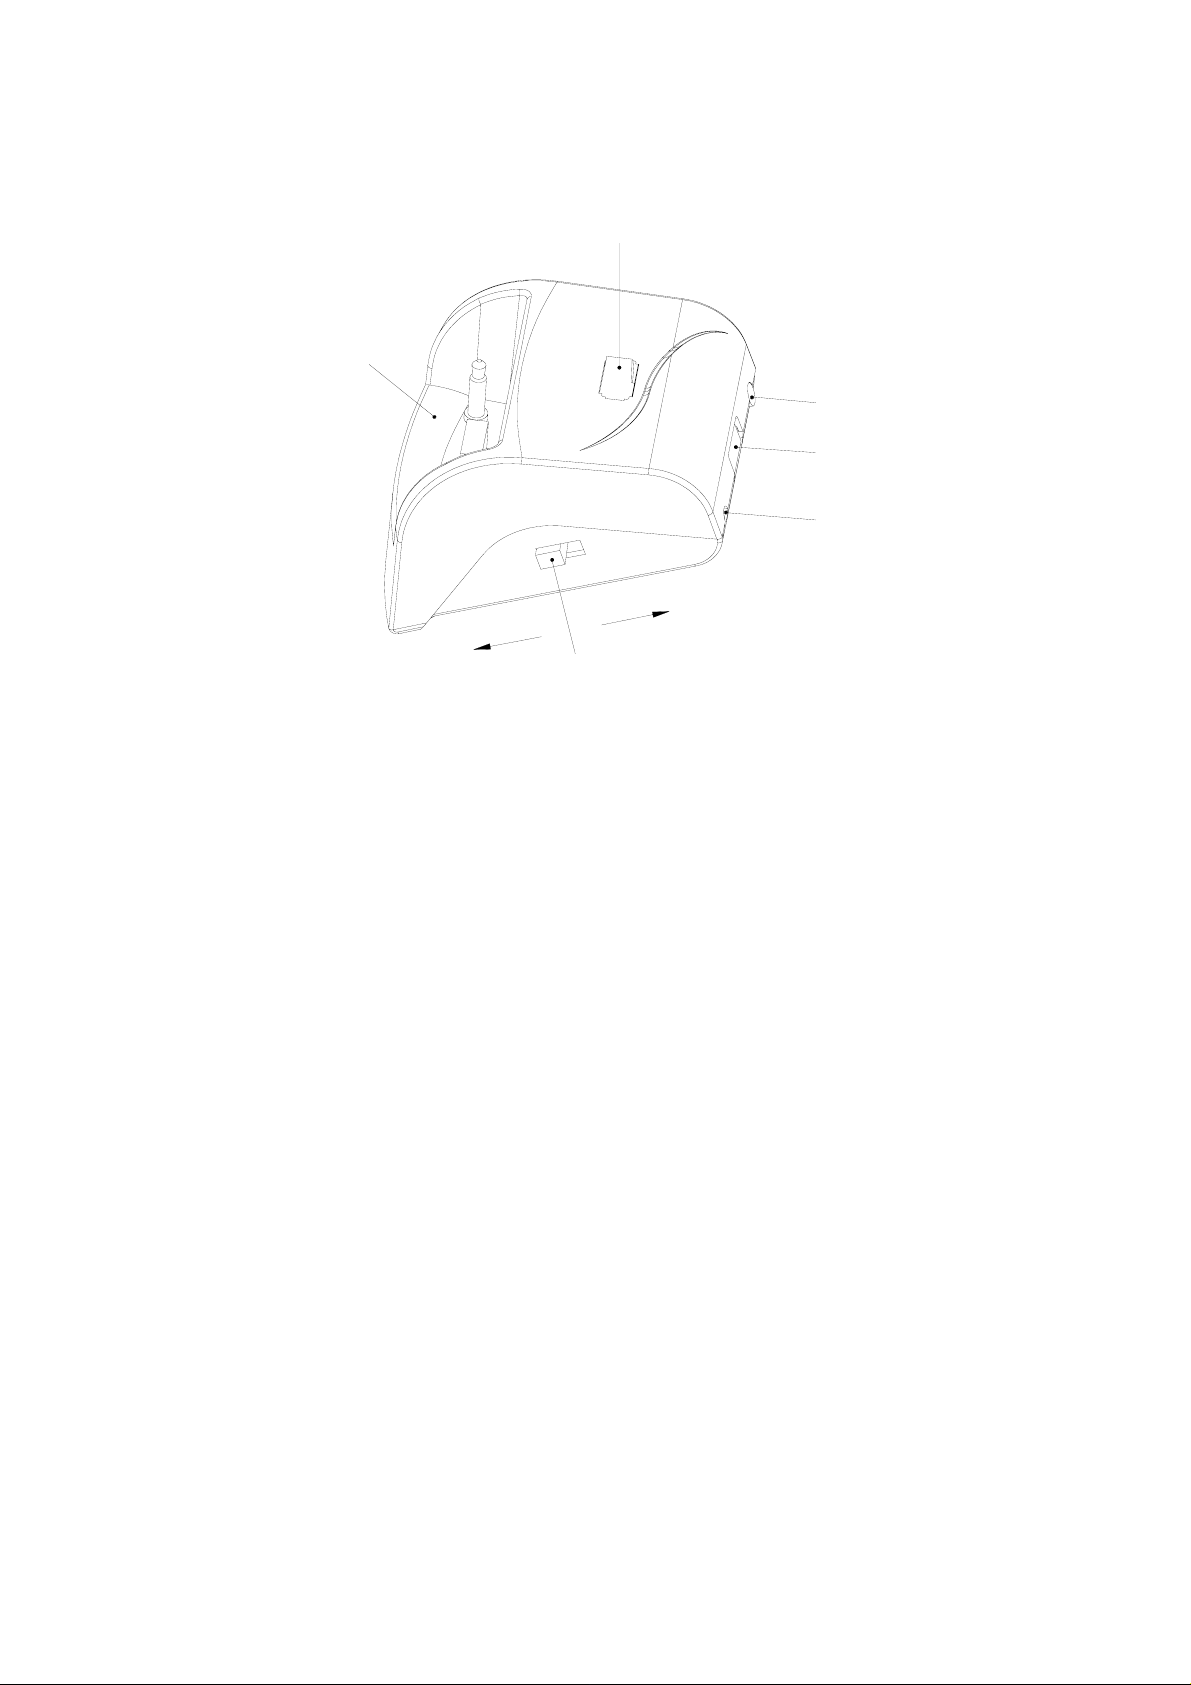
01 Desktop】
【
Multi Player Slit
Play
USB Storage Slit
/LINK
PC
Switch
Earphone Port
USB Socket
Power Socket
Suitable Voltage/Current:
ravel Charger:AC 100~240 DC 5V/1A
T
Usage of Multi Player + Des
1 With FM Stereo Figure 1.、 ( )
2 With Earphone Figure 2. 、 ( )
3、With External Speaker(Figure 3.
、Linked with PC to Storage device(Figure 4.)
4
ktop + Accessories:
)
6
Page 7

Multi Player and FM stereo Installation (Figure 1.)
K
IN
L
/
PC
y
a
Pl
Assembling Method:
1、Plug in the AC Adaptor4 to a wall plug; plug in the DC Jack to power socket of
the Desktop.
2、Install the Multi-Player2 to the Multi Player Slit1.
3、Install the USB Flash Memory Stick3 to the USB slit.
4、Change the Switch beside the desktop to “Play” side.
Operation Method:
1. Set the FM Radio Frequency of home stereo to none-used Radio Frequency
(such as 88.1)
(
(
2. Press the MENU button of the 2Multi-Player twice and find out the
symbol for radio frequency setting,
3. When the symbol flash, press
SELECT / SELECT button to set up the
same radio channel with Stereo Radio Frequency. (When the Stereo become
totally mute, the connecting completed)
4. Press
Play/Stop button to transmit the music to the Stereo.
(
5. Adjust the required volume by adjust the VOL+
/ VOL- button. Or,
adjust the volume of the car stereo.
Caution:
1、Ensure the switch in the “Player” side, or Multi player will not work。
7
Page 8

Multi Player and Earphone Installation (Figure 2.)
PC/LINK
Play
Assembling Method:
1、Plug in the AC Adaptor4 to a wall plug; plug in the DC Jack to power socket of
the Desktop.
2、Install the Multi-Player2 to the Multi Player Slit1.
3、Install the USB Flash Memory Stick3 to the USB slit.
4、Install the earphone jack into the earphone socket5 in the back of desktop.
5、Change the Switch beside the desktop to “Play” side.
Operation Method:
1. Set the FM Radio Frequency of home stereo to none-used Radio Frequency
(such as 88.1)
(
(
(
2. Press the MENU button of the 2Multi-Player twice and find out the
symbol for radio frequency setting,
3. When the symbol flash, press
SELECT / SELECT button to set up the
same radio channel with Stereo Radio Frequency. (When the Stereo become
totally mute, the connecting completed)
4. Press
Play/Stop button to transmit the music to the Stereo.
5. Adjust the required volume by adjust the VOL+
/ VOL- button. Or,
adjust the volume of the car stereo.
Caution:
1、Ensure the switch in the “Player” side, or Multi player will not work。
8
Page 9

Multi Player and External Speaker Installations (Figure 3.)
K
IN
PC/L
ay
pl
Assembling Method:
1、Plug in the AC Adaptor4 to a wall plug; plug in the DC Jack to power socket of
the Desktop.
2、Install the Multi-Player2 to the Multi Player Slit1.
3、Install the USB Flash Memory Stick3 to the USB slit.
4、Install the external speaker jack into the earphone socket5 in the back of desktop.
5、Change the Switch beside the desktop to “Play” side.
Operation Method:
1. Set the FM Radio Frequency of home stereo to none-used Radio Frequency
(such as 88.1)
(
(
(
2. Press the MENU button of the 2Multi-Player twice and find out the
symbol for radio frequency setting,
3. When the symbol flash, press
SELECT / SELECT button to set up the
same radio channel with Stereo Radio Frequency. (When the Stereo become
totally mute, the connecting completed)
4. Press
5. Adjust the required volume by adjust the VOL+
Play/Stop button to transmit the music to the external speaker.
/ VOL- button. Or,
adjust the volume of the car stereo.
Caution:
1、Ensure the switch in the “Player” side, or Multi player will not work。
9
Page 10

Multi Player Links with PC installations (Figure 4.)
/LINK
PC
y
a
pl
Assembling Method:
1、Plug in the USB cable in USB port of PC and then plug in the other side into the
USB port in back of the Multi Player.
2、Ensure the 2Multi Player is plugged well in Multi Player Slit1。
3、Put the 3USB storage device in the USB slit and no need to have external power
supplied.
Operation Method:
1、Change the switch beside the desktop to “PC/LINK” side, then can transmit the
data into the USB storage 3from PC.
Caution:
1. Ensure the all plugs and accessories installed to correct position.
2. Ensure the switch in the “PC/LINK” side.
3. Only compatible with USB power supplied from PC 。
10
Page 11

【02Cradle Holder】
Multi Player and Car FM Stereo Installation (Figure 5.)
Car FM Stereo
Current:
Vehicle 16V~24V
Multi-Player + Cradle Holder Assembling Instruction:
1
、Tune with Car FM Stereo and earphone (Figure 5)
Assembling Method:
2、 Insert the power plug2 into the cradle holder1 (twist gently clockwise.)
3、 Insert the installed power plug2 and cradle holder1 into vehicle cigarette
lighter adapter outlet. Adjust to required angle by releasing the bolt on the
power plug2, and then re-fasten the bolt again.
4、 Install the Multi-Player2 to the Cradle Holder socket1.
5、 Install the USB Flash Memory Stick3 to the USB socket.
6、 Install the earphone jack into the earphone socket5. (Depends on user’s
options)
Operation Method:
1. Set the FM Radio Frequency of the car stereo to none-used Radio Frequency
(such as 88.1)
(
(
(
2. Press the MENU button of the 2Multi-Player twice and find out the
for radio frequency setting,
3. When the symbol flash, press
SELECT / SELECT button to set up the
same radio channel with Stereo Radio Frequency. (When the Stereo become
symbol
totally mute, the connecting completed)
4. Press
Play/Stop button to transmit the music to the Stereo.
5. Adjust the required volume by adjust the VOL+
adjust the volume of the car stereo.
Caution:
1、Ensure the all plugs and accessories installed to correct position.
/ VOL- button. Or,
11
Page 12

【03 POWER BANK】
Socket
LED
er
Multi Player Slit
CURRENT:
AC 100~240 DC 5V/1A
Multi-Player + Cradle Holder Assembling Instruction:
1、Tune with Home FM Stereo Radio Frequency (Figure 6)
2、Tune with Mobile FM Stereo (Figure 7)
12
Page 13

Multi Player and Ho m e FM stereo Installation (Figure 6.)
Assembling Method:
A. Use the Travel Charger
1、Plug in the AC Adaptor4 to a wall plug, plug in the DC Jack to power socket of
the Power bank1.
2、Install the Multi-Player2 to the Power Bank socket1.
3、Install the USB Flash Memory Stick3 to the USB socket.
4、Install the earphone jack into the earphone socket5.
B. Use without chargers
1、Install the Multi-Player2 to the Power Bank socket1.
2、Install the USB Flash Memory Stick3 to the USB socket.
3、Install the earphone jack into the earphone socket5.
Operation Method:
1、 Set the FM Radio Frequency of the home stereo to none-used Radio Frequency
(such as 88.1)
(
(
2、 Press the MENU button of the 2Multi-Player twice and find out the
for radio frequency setting,
3、
When the symbol flash, press
SELECT / SELECT button to set up the same
radio channel with Stereo Radio Frequency. (When the Stereo become totally
(
symbol
mute, the connecting completed)
4、
Press Play/Stop button to transmit the music to the Stereo.
5、 Adjust the required volume by adjust the VOL+ / VOL- button. Or,
adjust the volume of the stereo.
Caution:
1、Ensure the all plugs and accessories installed to correct position.
2
、User can carry the Power Bank and move freely. It is not necessary to connect
the Power Bank with its power supply all the time. Connect the power supply
when it’s out of power.
13
Page 14

Multi Player and Power Bank, Car FM stereo Installatio ns (Figure 7.)
Assembling Method:
Car stereo
A. Use the Saver Charger
(Only used when it’s out of power)
1、 Plug in the Saver Charger4 to the car cigarette liter; plug in the DC Jack to
power socket of the Power bank1.
2、Install the Multi-Player2 to the Power Bank socket1.
3、Install the USB Flash Memory Stick3 to the USB socket.
4、Install the earphone jack into the earphone socket5 (depends on user’s opinions).
B. Use without chargers
1、Install the Multi-Player2 to the Power Bank socket1.
2、Install the USB Flash Memory Stick3 to the USB socket.
3、Install the earphone jack into the earphone socket5.
Operation Method:
1. Set the FM Radio Frequency of the car stereo to none-used Radio Frequency
(such as 88.1)
(
(
(
2. Press the MENU button of the 2Multi-Player twice and find out the
for radio frequency setting,
3. When the symbol flash, press
SELECT / SELECT button to set up the same
radio channel with Stereo Radio Frequency. (When the Stereo become totally
symbol
mute, the connecting completed)
4. Press
5. Adjust the required volume by adjust the VOL+
Play/Stop button to transmit the music to the Stereo.
/ VOL- button. Or,
adjust the volume of the stereo.
Caution:
1、Use the saver charger when the Power Bank is out of power.
2、Ensure the all plugs and accessories installed to correct position.
14
Page 15

04 Desktop Speaker
【
Power Socket
USB Storage Slit
Earphone Port
】
Speaker
Multi Player Slit
Current:
AC 100~120V DC 12V/1A(Different county use different AC Adaptor)
Multi-Player+Desktop Speaker Assembling Instruction
1、Tune the Desktop Speaker with a FM Stereo Radio Frequency(Figure 8)
2、Tune the Desktop Speaker with external Speakers(Figure 9)
3、Use Desktop Speaker only(Figure 10)
15
Page 16

Multi Player , Desktop Speaker and FM stereo Installations (Figure 8.)
Assembling Method:
1、 Plug in the AC Adaptor4 to a wall plug; plug in the DC Jack to power socket
of the Desktop Speaker1.
2、 Install the Multi-Player2 to the Desktop Speaker socket1.
3、 Install the USB Flash Memory Stick3 to the USB socket.
Operation Method:
1. Set the FM Radio Frequency of the home stereo to none-used Radio
Frequency(such as 88.1)
(
(
(
2. Press the MENU button of the 2Multi-Player twice and find out the
symbol for radio frequency setting,
3. When the symbol flash, press
SELECT / SELECT button to set up the
same radio channel with Stereo Radio Frequency. (When the Stereo become
totally mute, the connecting completed)
4. Press
5. Adjust the required volume by adjust the VOL+
Play/Stop button to transmit the music to the Stereo.
/ VOL- button. Or,
adjust the volume of the stereo.
Caution:
Ensure the all plugs and accessories installed to correct position.
16
Page 17

Multi Player, Desktop Speaker and External speaker Installations (Figure 9.)
Assembling Method:
1、 Plug in the AC Adaptor4 to a wall plug; plug in the DC Jack to power socket
of the Desktop Speaker1.
2、 Install the Multi-Player2 to the Power Bank socket1.
3、 Install the USB Flash Memory Stick3 to the USB socket.
4、 Install the audio cable of the external speakers into the earphone socket.
Operation Method:
1. Set the FM Radio Frequency of the home stereo to none-used Radio
Frequency(such as 88.1)
(
(
(
2. Press the MENU button of the 2Multi-Player twice and find out the
symbol for radio frequency setting,
3. When the symbol flash, press
SELECT / SELECT button to set up the
same radio channel with Stereo Radio Frequency. (When the Stereo become
totally mute, the connecting completed)
4. Press
Play/Stop button to transmit the music to the Stereo.
5. Adjust the required volume by adjust the VOL+
/ VOL- button. Or,
adjust the volume of the stereo.
Caution:
1、Ensure the all plugs and accessories installed to correct position.
17
Page 18

Multi Player and Desktop Speaker Installations (Figure 10.)
Assembling Method:
1、 Plug in the AC Adaptor4 to a wall plug; plug in the DC Jack to power socket
of the Desktop Speaker1.
2、 Install the Multi-Player2 to the Desktop Speaker socket1.
3、 Install the USB Flash Memory Stick3 to the USB socket.
Operation Method:
1. Press Play/Stop button to transmit the music to the Desktop Speaker.
2. Adjust the required volume by adjust the VOL+
/ VOL- button.
Caution:
1、Ensure the all plugs and accessories installed to correct position.
18
Page 19

Troubleshooting
1. Make sure the plug has exactly plug-in
2. IF the cradle have no power please check whether the fuse on power wire is
broken, if yes, renew one by 2A/250V required
3. Have check the unit body exactly plug-in
4. Check the screen display and active normal
If none of the above phenomena .please call your dealer for help
Maintenance and Notice
1. Keep the product off direct sunlight or heat environment .and keep it away
from kids.
2. keep product dry ,and don’t use or stock under wet/dirty/high or low
temperature environment.
3. Don’t disassemble without professional electrical technician.
4. Don’t random throw , rap or shake product.
Don’t use irritant chemical; corrosive cleaner to clear the product
19
Page 20

FEDERAL COMMUNICATIONS COMMISSION
INTERFERENCE STATEMENT
This equipment has been tested and found to comply with the limits for a Class B digital
device, pursuant to Part 15 of the FCC Rules. These limits are designed to provide
reasonable protection against harmful interference in a residential installation. This
equipment generates, uses and can radiate radio frequency energy and, if not installed
and used in accordance with the instructions, may cause harmful interference to radio
communications. However, there is no guarantee that interference will not occur in a
particular installation. If this equipment does cause harmful interference to radio or
television reception, which can be determined by turning the equipment off and on, the
user is encouraged to try to correct the interference by one or more of the following
measures:
•
Reorient or relocate the receiving antenna.
•
Increase the separation between the equipment and receiver.
•
Connect the equipment into an outlet on a circuit different from that to which the
receiver is connected.
•
Consult the dealer or an experienced radio/TV technician for help.
FCC ID. QPRST28
CAUTION:
To assure continued FCC compliance:
(1) The user must use shielded USB cable and bonded a ferrite core when connecting
to USB port of PC, and use un-shielded line of earphone with a ferrite core and
travel charger which contain an un-detachable un-shielded dc output cable with a
ferrite core, and the ac adapter must use an un-detachable un-shielded dc output
cable with a ferrite core when connecting to power socket of desktop speaker.
If you use other cables, it may cause interference with radio and television reception.
(2) Any changes or modifications not expressly approved by the grantee of this device
could void the user's authority to operate the equipment.
FCC Label Compliance Statement:
This device complies with Part 15 of the FCC Rules. Operation is subject to the following
two conditions: (1) This device may not cause harmful interference, and (2) This device
must accept any interference received, including interference that may cause undesired
operation.
 Loading...