

Page 1
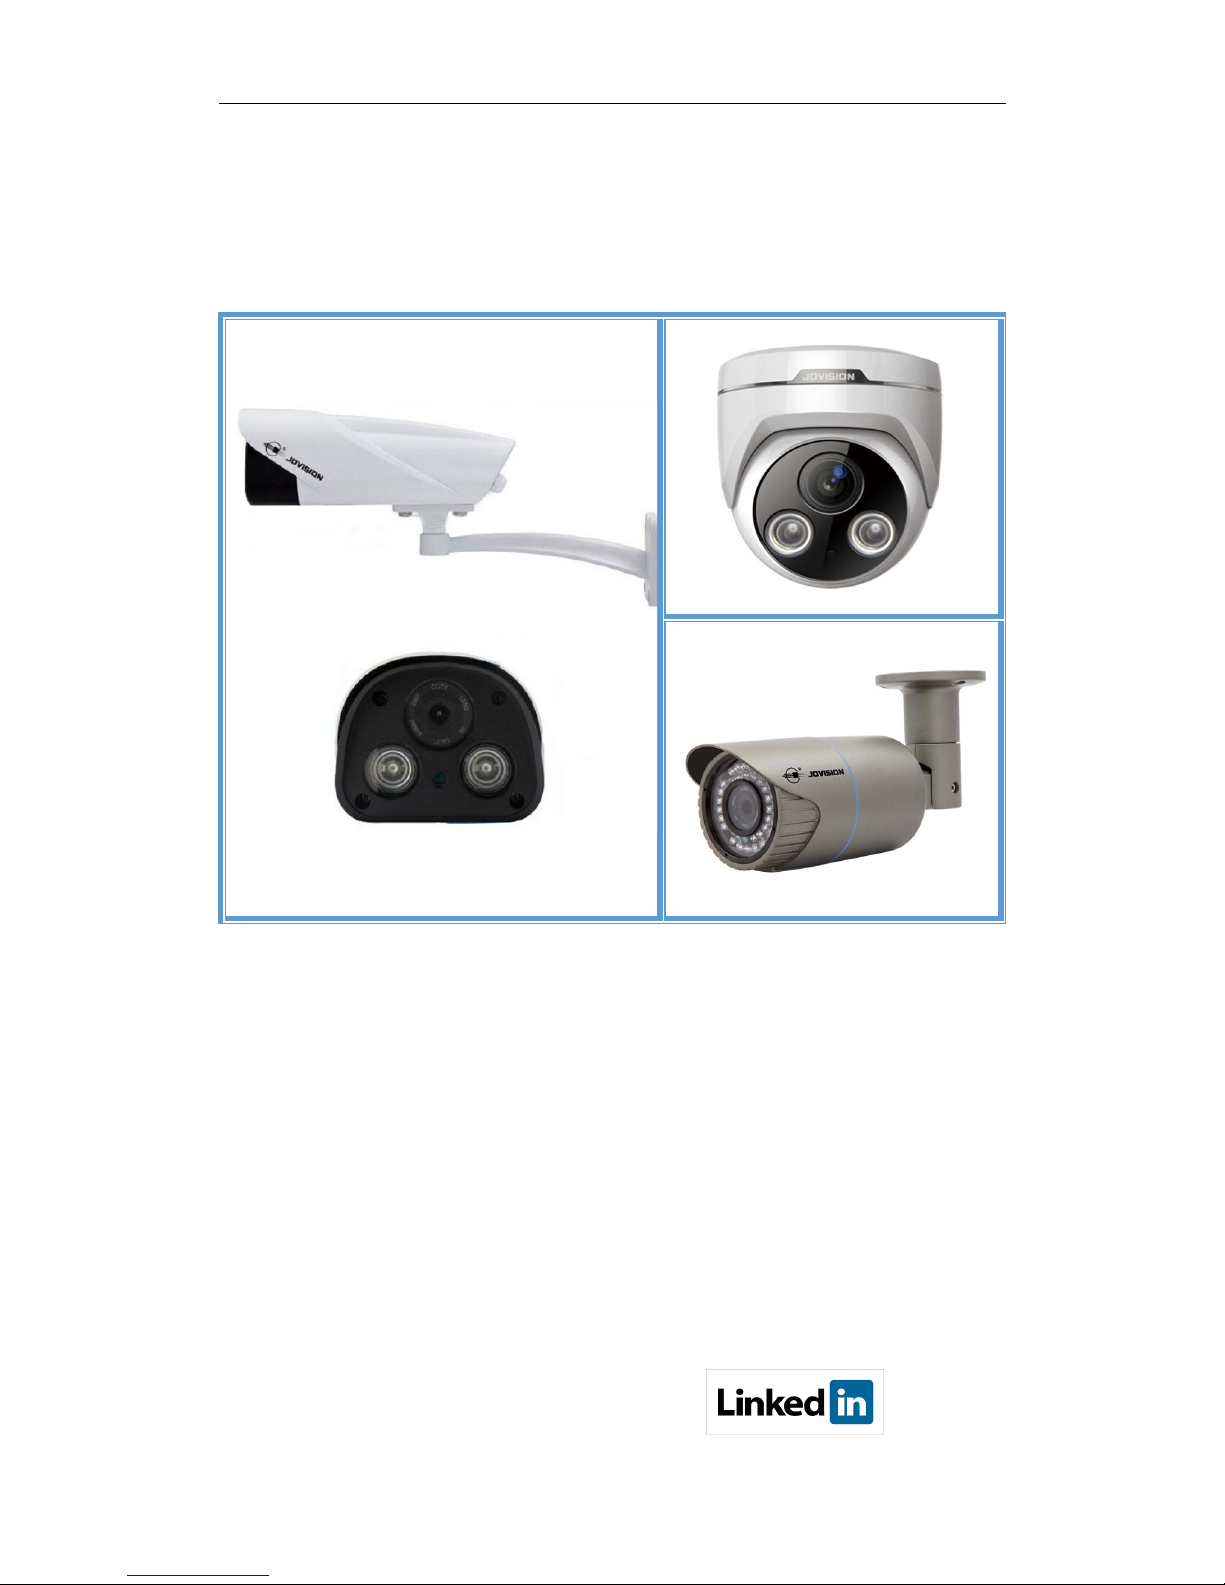
Jovision Network Camera Quick Start Guide
JOVISION
NETWORK CAMERA
QUICK START GUIDE
Copyright© Jovision Technology Co., Ltd.
All rights reserved.
http://www.jovision.london
Email:[email protected]
Page 2
Jovision Network Camera Quick Start Guide
1
Statement
Thank you for choosing Jovision, this user manual is intended for users of network IP Camera. It
includes instructions on how to use the product. The software embodied in the product is governed
by the user license agreement covering that product.
About this Manual
This Manual is subject to domestic and international copyright protection.
Jovision Technology Co., Ltd. (“Jovision”) reserves all rights to this manual. This manual cannot be
reproduced, changed, translated, or distributed, partially or wholly, by any means, without the
prior written permission of Jovision.
Privacy Notice
Surveillance laws vary by jurisdiction. Check all relevant laws in your jurisdiction before using this
product for surveillance purposes to ensure that your use of this product conforms.
Support
Should you have any questions, please do not hesitate to contact your local dealer.
CHANGE THE DEFAULT PASSWORD
Default Network Camera Account :
Username: abc Password: 123
The default password (123) for the abc account is for first-time
log-in purposes only. You should change this default password
to better protect against security risks, such as the
unauthorized access by others to the product that may prevent
the product from functioning properly and/or lead to other
undesirable consequences.
For your privacy, we strongly recommend changing the password to something of your
own choosing (using a minimum of 8 characters, including upper case letters, lower
case letters, numbers, and special characters) in order to increase the security of your
product.
Proper configuration of all passwords and other security settings is the responsibility of
the installer and/or end-user.
Page 3

Jovision Network Camera Quick Start Guide
2
Contents
Statement .......................................................................................................................................... 1
Appearance and Interface ................................................................................................................. 3
1.1 Box Type .............................................................................................................................. 3
1.2 Dome Type .......................................................................................................................... 3
Installation......................................................................................................................................... 4
2.1 Box Camera Mounting ......................................................................................................... 4
2.2 Dome Camera Ceiling Mounting ......................................................................................... 5
Access Network Camera over LAN .................................................................................................... 6
3.1 Network Connection ........................................................................................................... 6
3.2 Access the camera ............................................................................................................... 6
JNVR .................................................................................................................................. 6
IE Browser ......................................................................................................................... 8
Access Network Camera over WAN .................................................................................................. 9
4.1 Network Connection ........................................................................................................... 9
4.2 Access the camera ............................................................................................................... 9
CloudSEE ........................................................................................................................... 9
CloudSEE APP .................................................................................................................. 11
Account and Password .................................................................................................................... 12
5.1 Change Password .............................................................................................................. 12
Safety Instruction ............................................................................................................................ 13
6.1 Warnings ........................................................................................................................... 13
6.2 Cautions ............................................................................................................................ 13
Appendix ......................................................................................................................................... 14
I Packing List and Qualification Card .................................................................................... 14
Page 4
Jovision Network Camera Quick Start Guide
3
1
Appearance and Interface
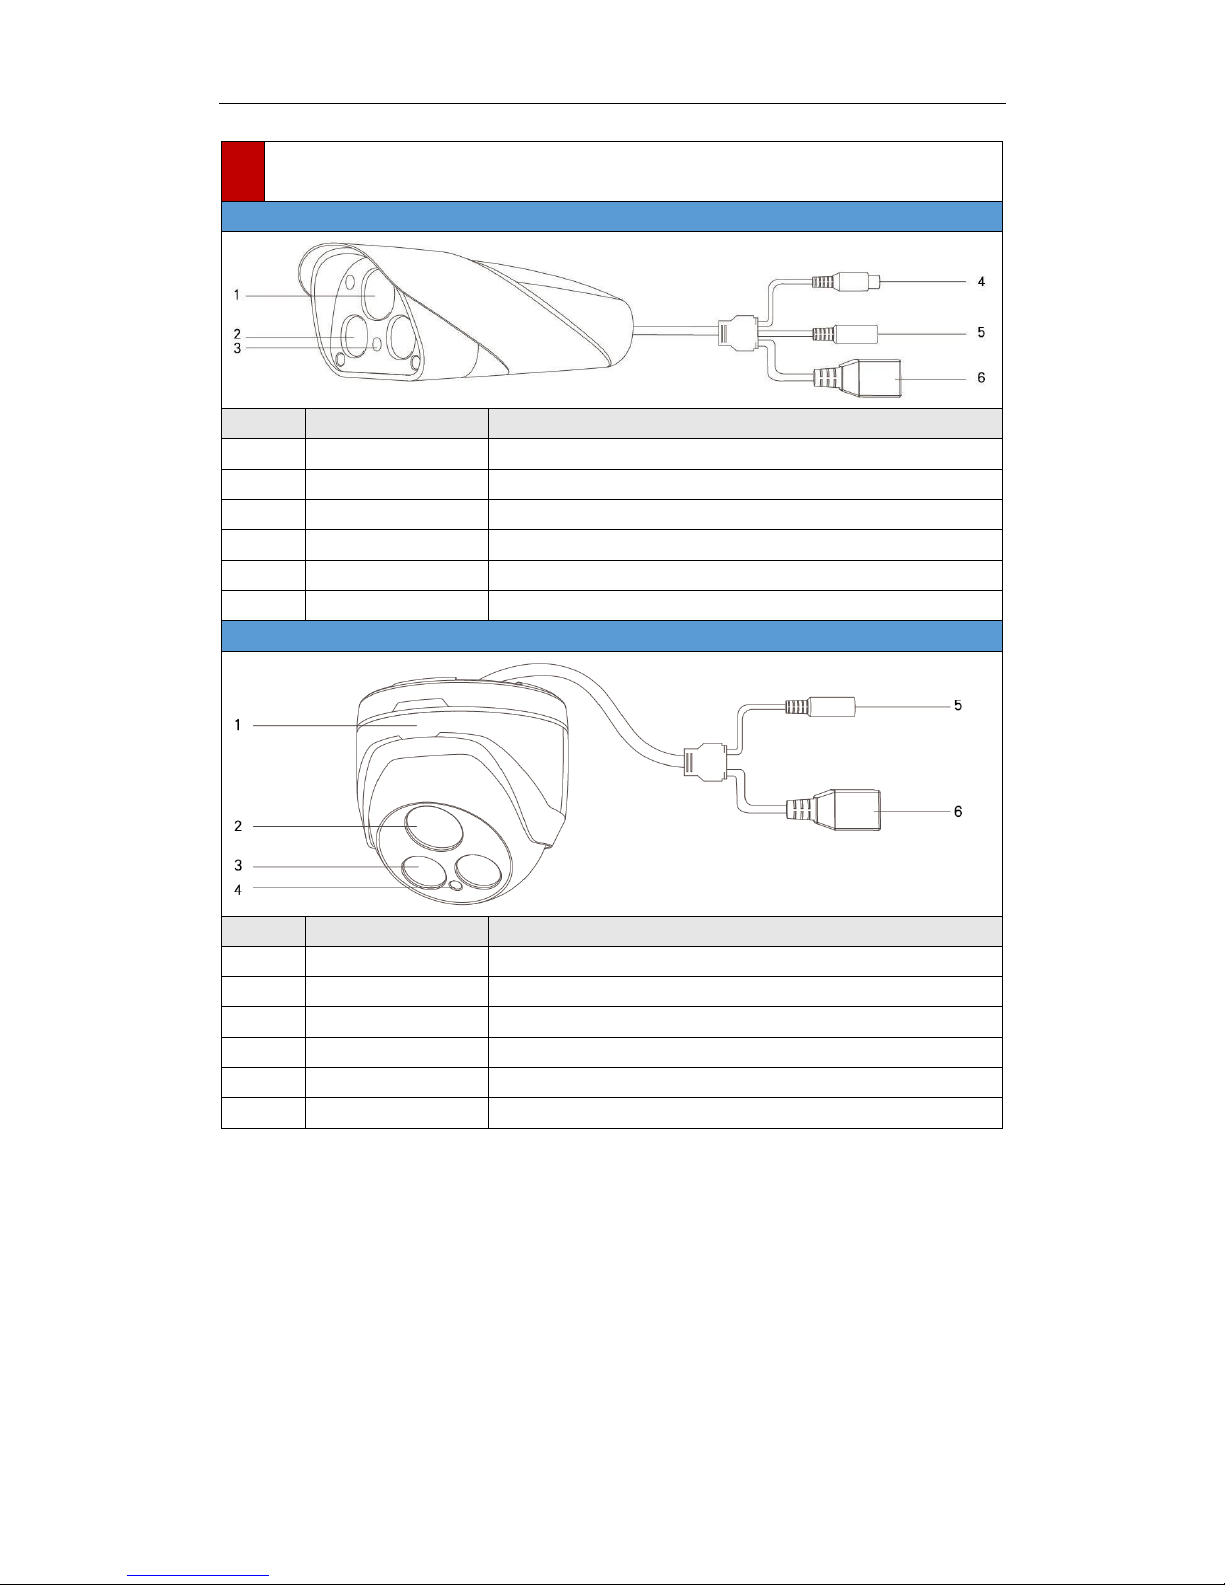
1.1 Box Type
No.
Name
Description
1
Lens
Optical imaging element
2
IR LED
IR light to realize night mode monitor
3
Photo-resistance
Light-controlled variable resistor, control IR cut filter switch
4
Audio-input
Connect audio input device
5
Power
DC 12V
6
Network Interface
Ethernet
1.2 Dome Type
No.
Name
Function Description
1
Cover
Device Protection
2
Lens
Optical Imaging Element
3
IR LED
IR light to realize night mode monitor
4
Photo-resistance
Light-controlled variable resistor, control IR cut filter switch
5
Power
DC 12V
6
Network Interface
Ethernet/ POE
Page 5
Jovision Network Camera Quick Start Guide
4
2
Installation
2.1 Box Camera Mounting
Before you start:
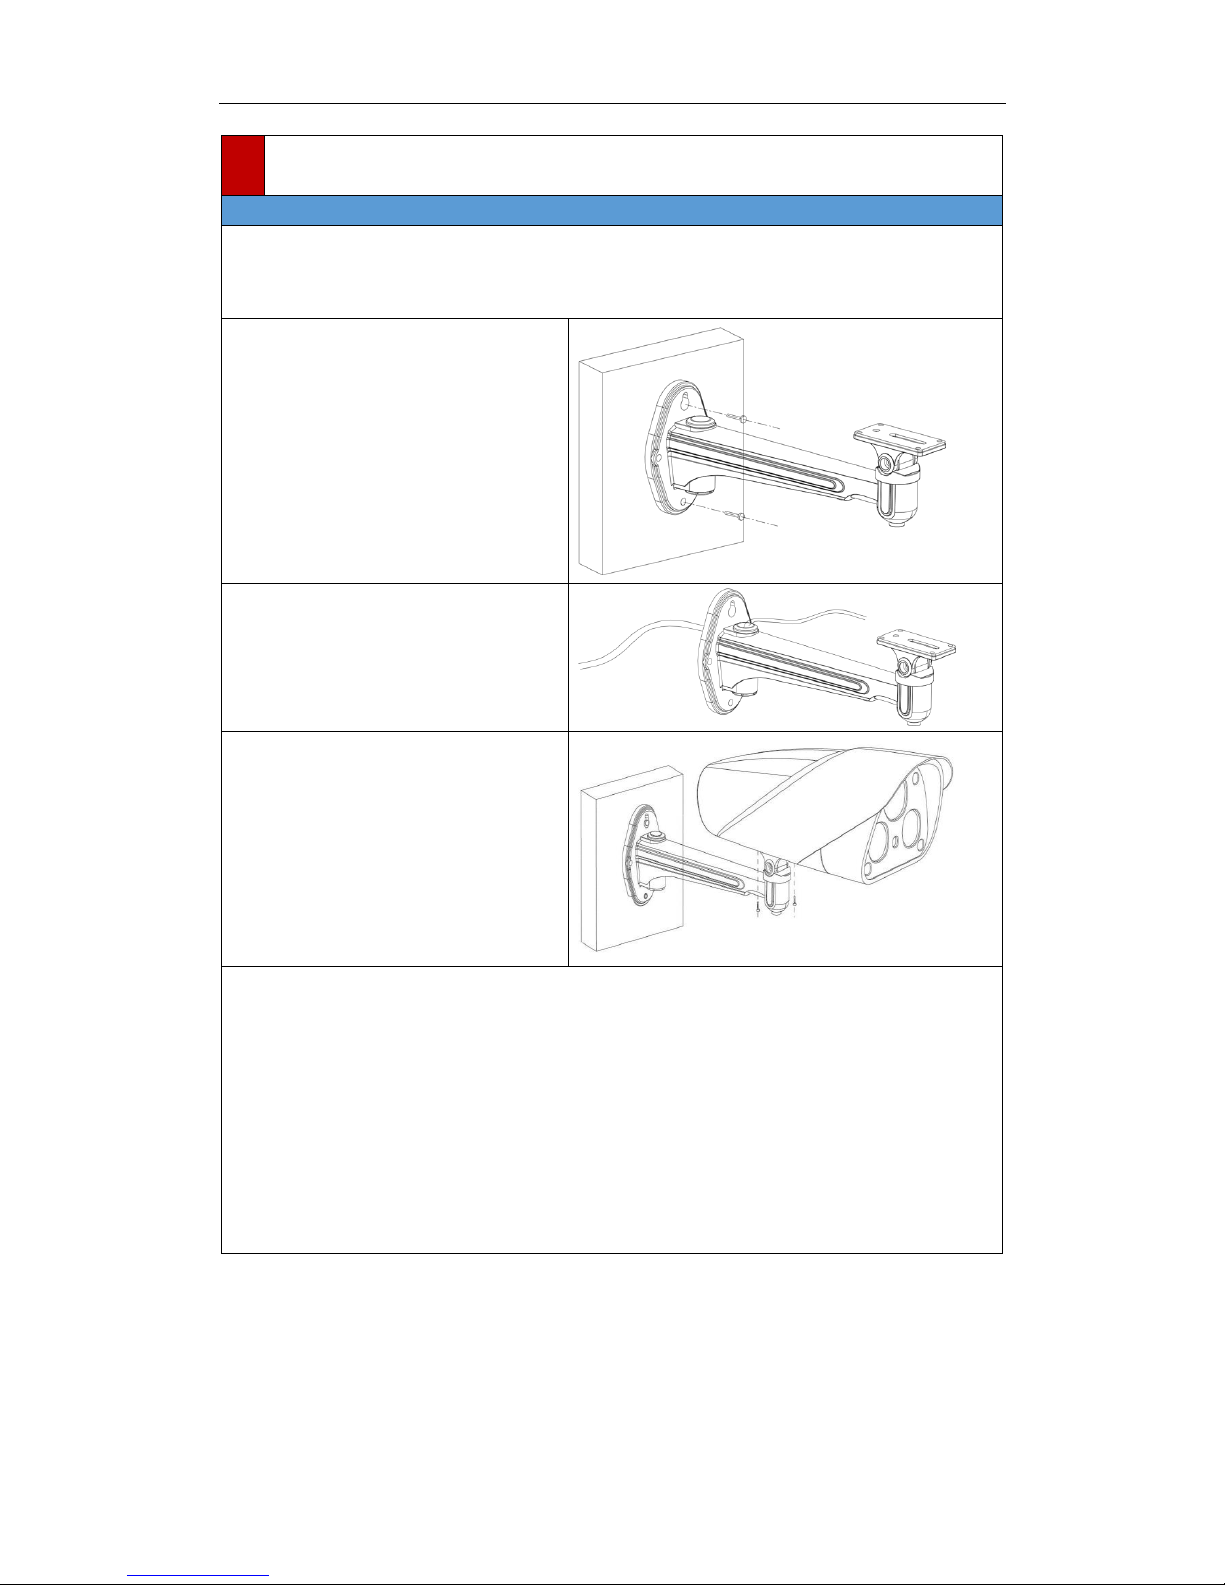
These box cameras can be installed to wall or ceiling. Wall mounting is taken as an example in
this section; if you adopt ceiling mounting, you can also take below procedure as a reference.
Steps:
1. Attach the wall mount (not provided)
to the wall and tighten the screws to fix
it.
2. Route the cables for the camera.
3. Fix the camera on the installed
bracket, installation is complete, as
shown on the right.
Notes:
The wall mount should be longer than 1/2 of the camera length.
For cement ceiling mounting, you need to use the expansion screw to fix the bracket. The
mounting hole of the expansion pipe on the wall should align with the mounting hole on
the bracket.
For wooden ceiling mounting, you can just use the self-tapping screw to fix the bracket.
The ceiling must be strong enough to withstand more than 3 times the weight of the
camera and the bracket.
Page 6
Jovision Network Camera Quick Start Guide
5
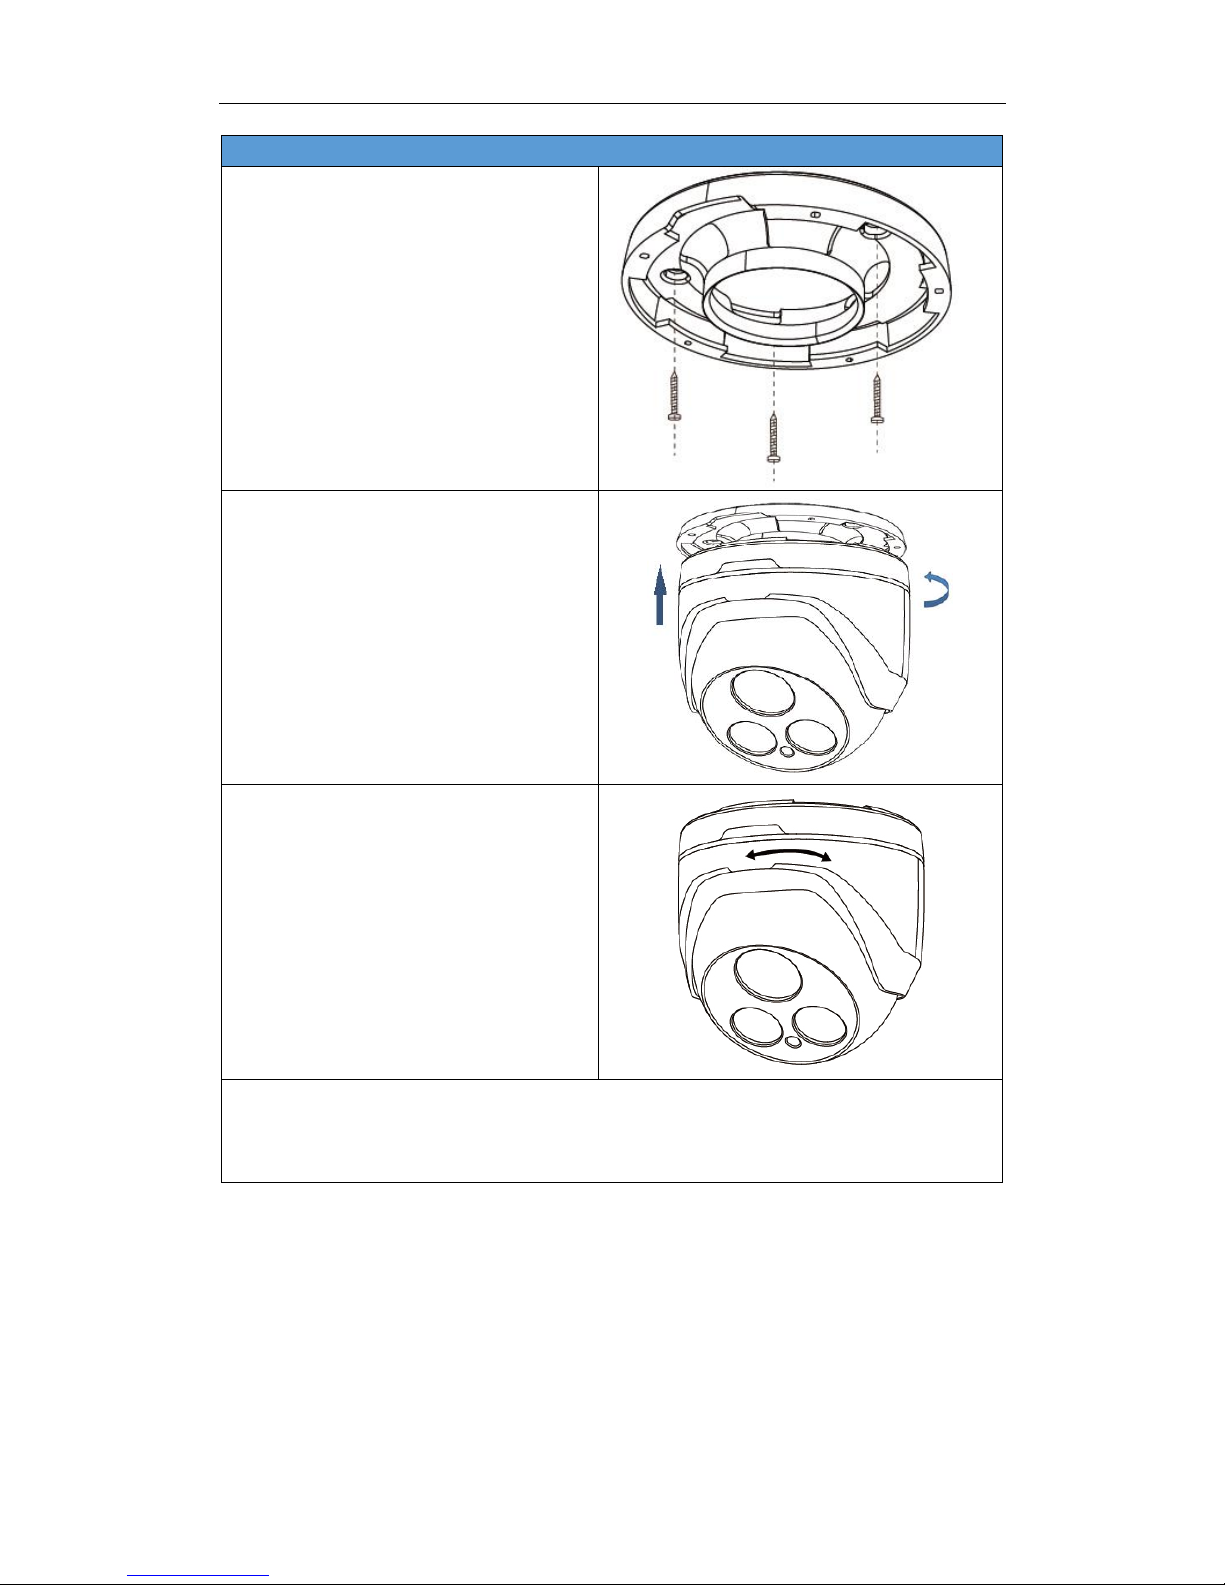
2.2 Dome Camera Ceiling Mounting
Steps:
1. Use the screws to fix the mounting base
to the ceiling.
2. Rotate the back box counterclockwise to
secure it to the mounting base, use the lock
screw to secure the dome camera.
3. Lens angle adjustment: compare video
image on the display, adjust camera
horizontal and vertical direction by spinning
the ball, till you find the perfect angle of
areas that need to be monitored, the
installation is complete.
Notes:
Please make sure that the ceiling can support more than 50(N) Newton gravities if the camera
is fixed to the ceiling.
Page 7
Jovision Network Camera Quick Start Guide
6
3
Access Network Camera over LAN
3.1 Network Connection
OR
Switch
Computer
Network Camera
OR
NVR
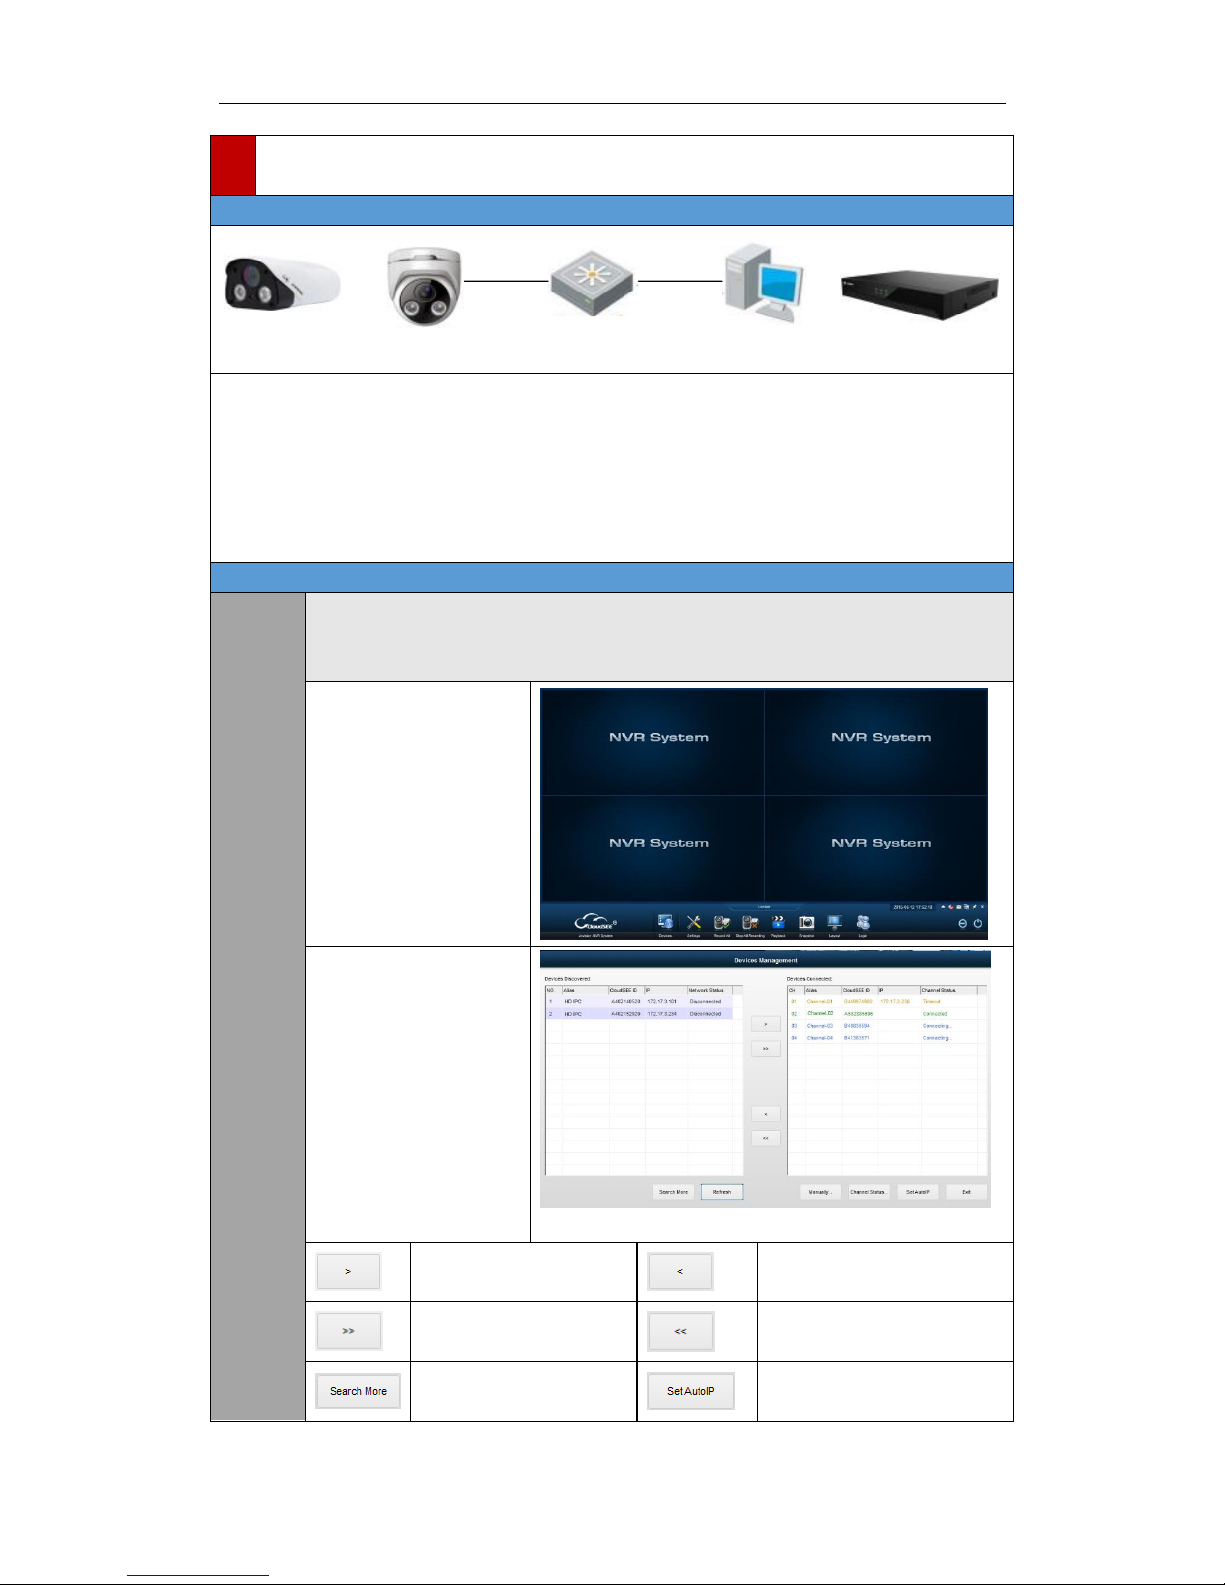
To view and configure the camera via a LAN, you need to connect the network camera in the
same subnet with your computer, as shown above, and install the CloudSEE or JNVR software to
search and access the network camera.
Note:
If you have a NVR in your LAN, you can connect the camera on NVR, please refer to NVR user’s
manual for detailed information.
3.2 Access the camera
JNVR
JNVR is a software tool which can access and manage network camera in a LAN.
Note:
JNVR Default Username : abc Password: 123
Install and run JNVR, the
main view is as shown on
the right.
JNVR will search and
connect network camera
automatically if there is
no device added.
Click Devices at the
bottom, the Devices
Management dialog box
appears. Device
information including
device name, CloudSEE
ID, IP address, Channel
status are listed.
Add selected Device
Delete All Added Device
Add All Detected Devices
Delete All Added Device
Research Device
Set IP for Camera
Automatically
Page 8
Jovision Network Camera Quick Start Guide
7
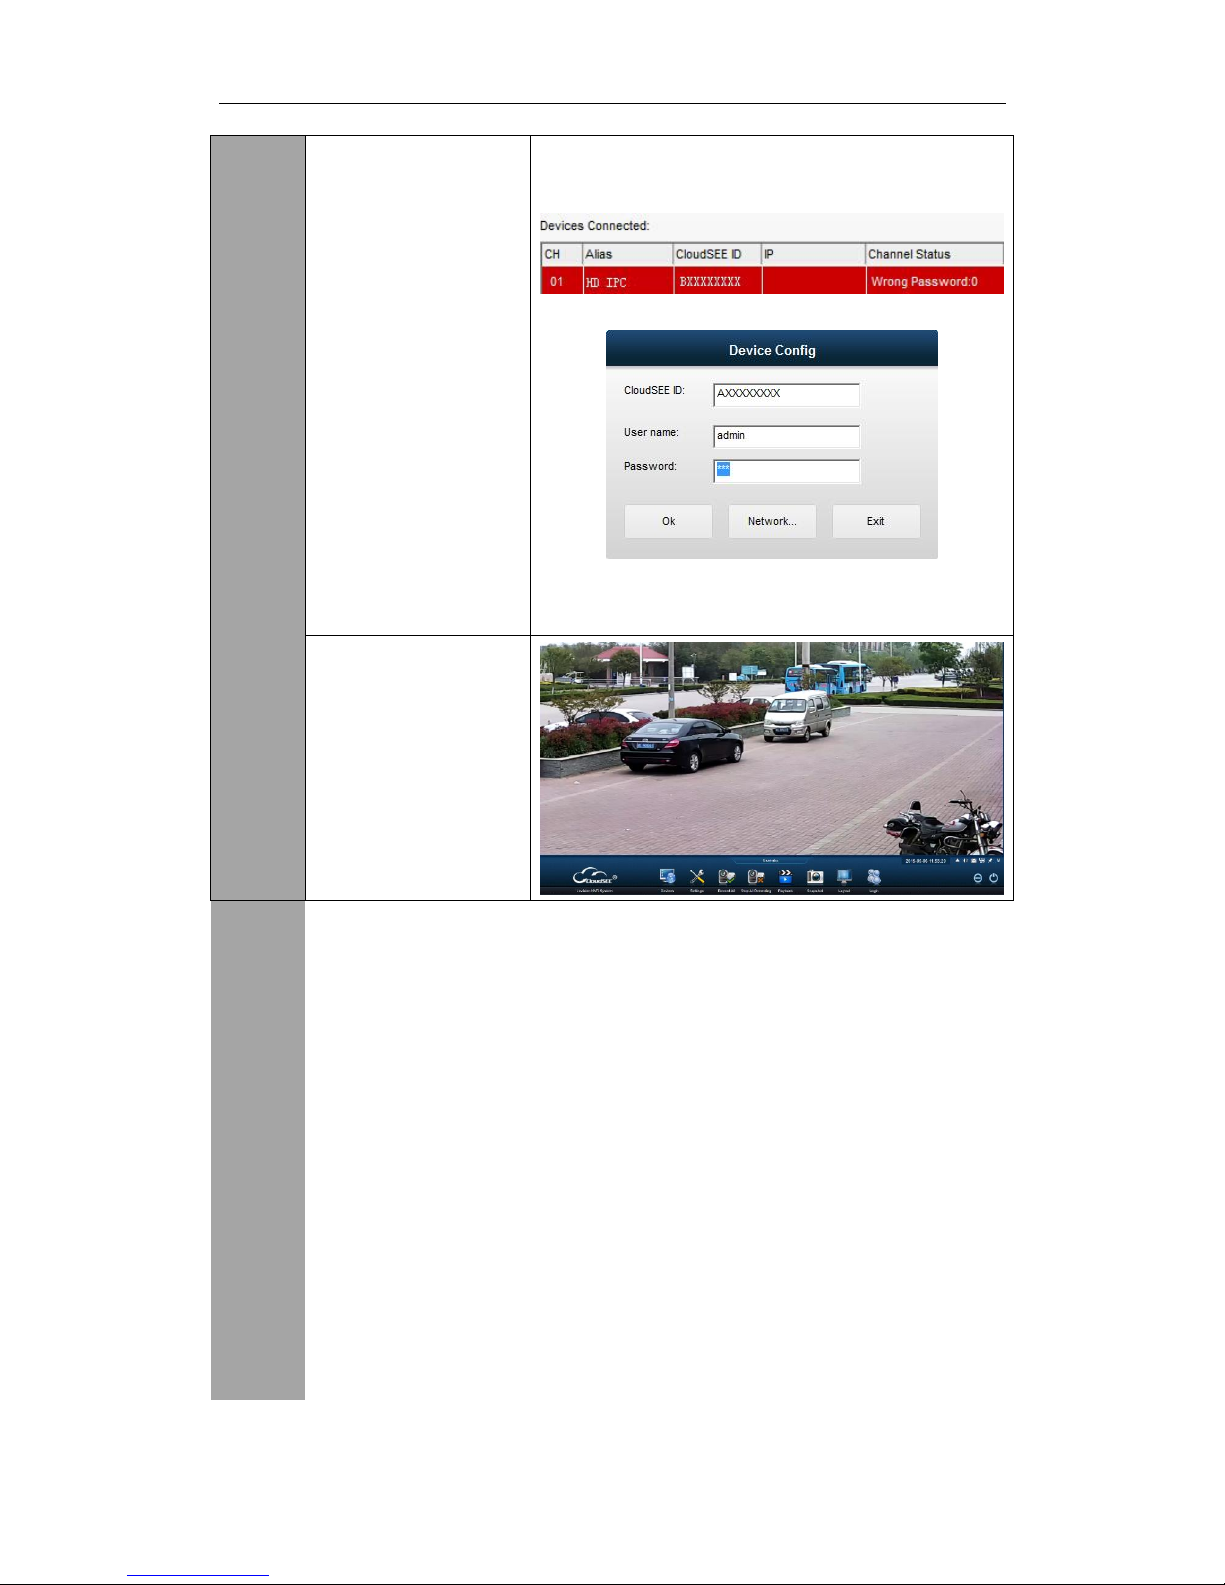
Note:
JNVR will automatically
connect the added
device with default
network camera account
(Username: abc
Password: 123), if you
have changed the
password, the device
cannot be connect and
show “Wrong Password”
in Channel Status.
Double click the device
name, and input correct
username and password,
click OK, the camera will
connect automatically.
The live view of the
camera added will
display In the live view
window.
Page 9
Jovision Network Camera Quick Start Guide
8
IE
Browser
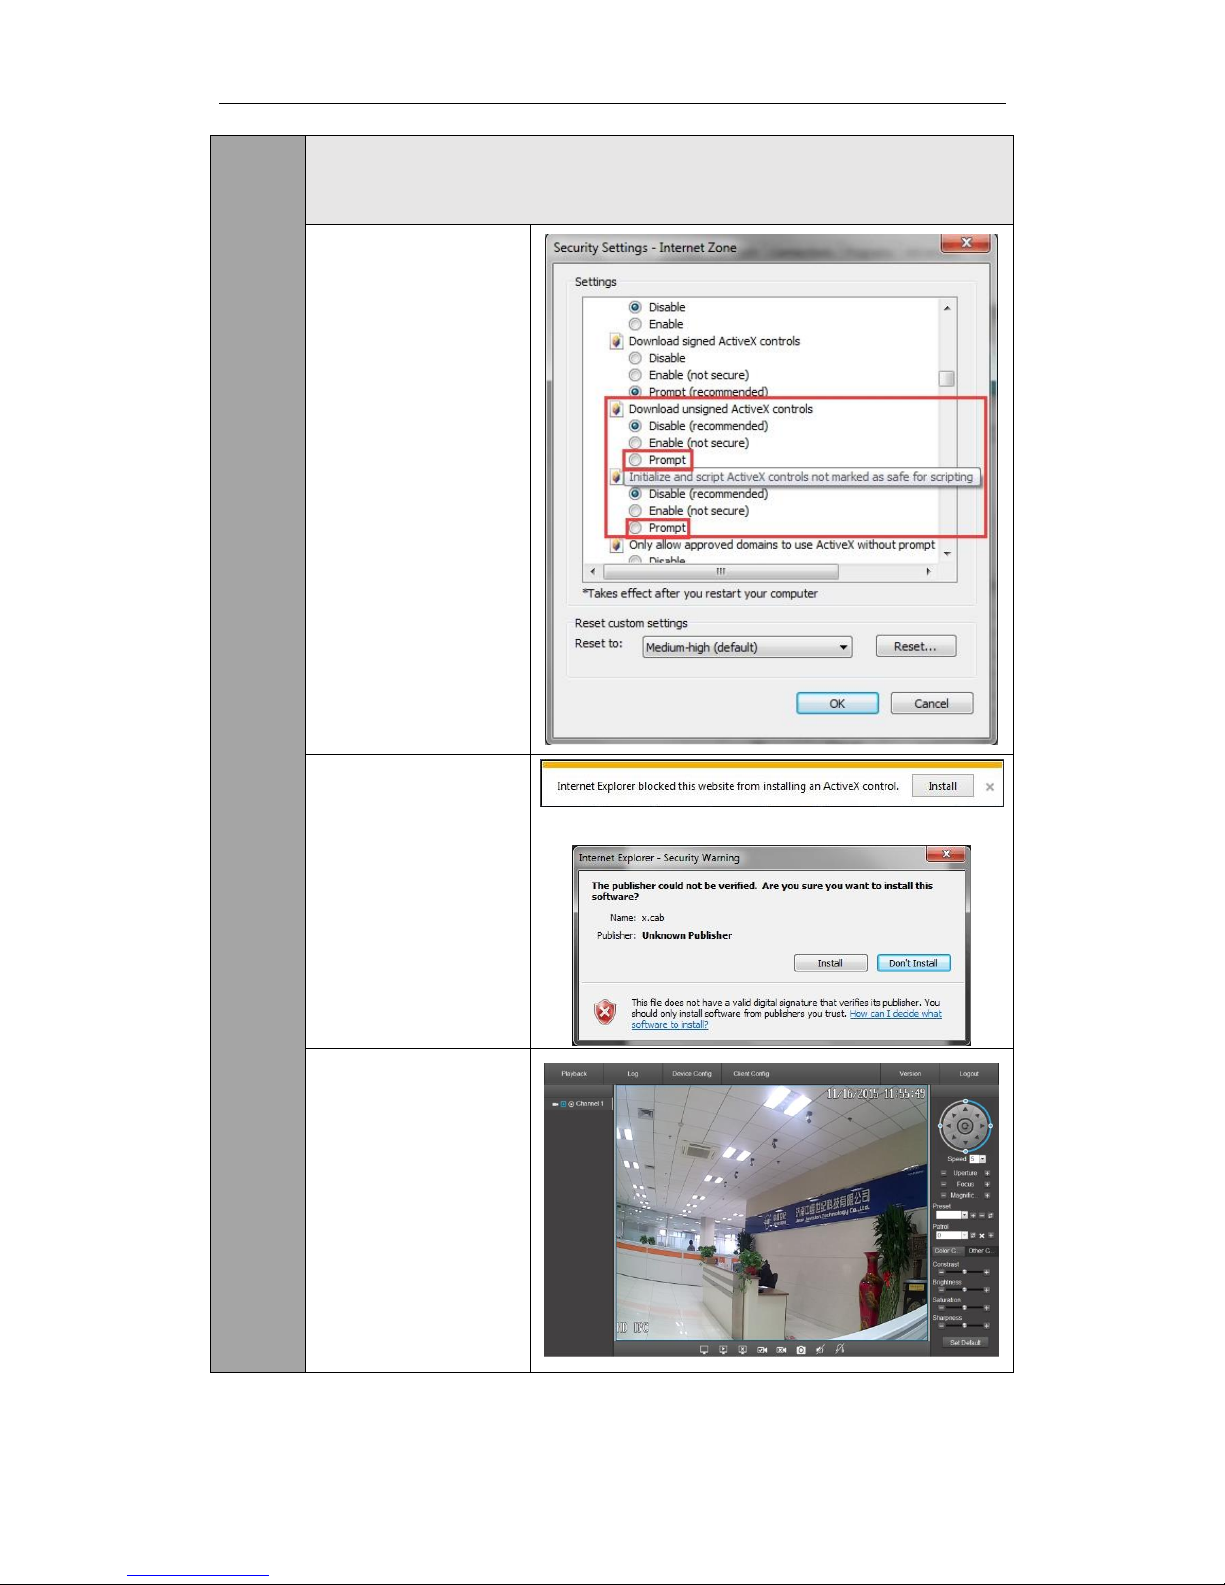
You can access the IPC in LAN by visiting the camera IP in browser.
Camera Address: http://<camera IP>
But you need to configure Internet options first to allow the ActiveX control to install.
1. Open IE, Internet
options--Security-Custom level, in Security
Settings-Internet Zone
page, set "Download
unsigned ActiveX
controls" and" Initialize
and script ActiveX
controls not marked as
safe for scripting “as
"Prompt”. Save the
setting and restart IE
browser.
2. Enter and visit camera
IP in IE, IE will prompt
that "Internet Explorer
blocked this website
from installing an ActiveX
control" in IE information
bar, click Install. Then a
security warning dialog
box to confirm the
installation, click Install.
3. Refresh the page,
enter the username and
password of the camera
and click "GO!", then you
can access the camera in
IE.
Page 10
Jovision Network Camera Quick Start Guide
9
4
Access Network Camera over WAN
4.1 Network Connection
OR
Router
Computer
Network Camera
This section explains how to connect the network camera through Internet. You need to connect
the network camera to Internet and install CloudSEE software to access the network camera.
Each device of our company has a CloudSEE ID, all the network cameras connected to Internet,
which means CloudSEE ID is online, can be accessed with CloudSEE ID.
4.2 Access the camera
CloudSEE
CloudSEE can access and manage all kinds of CloudSEE product via WAN
Note:
JNVR Default Username : abc Password: 123
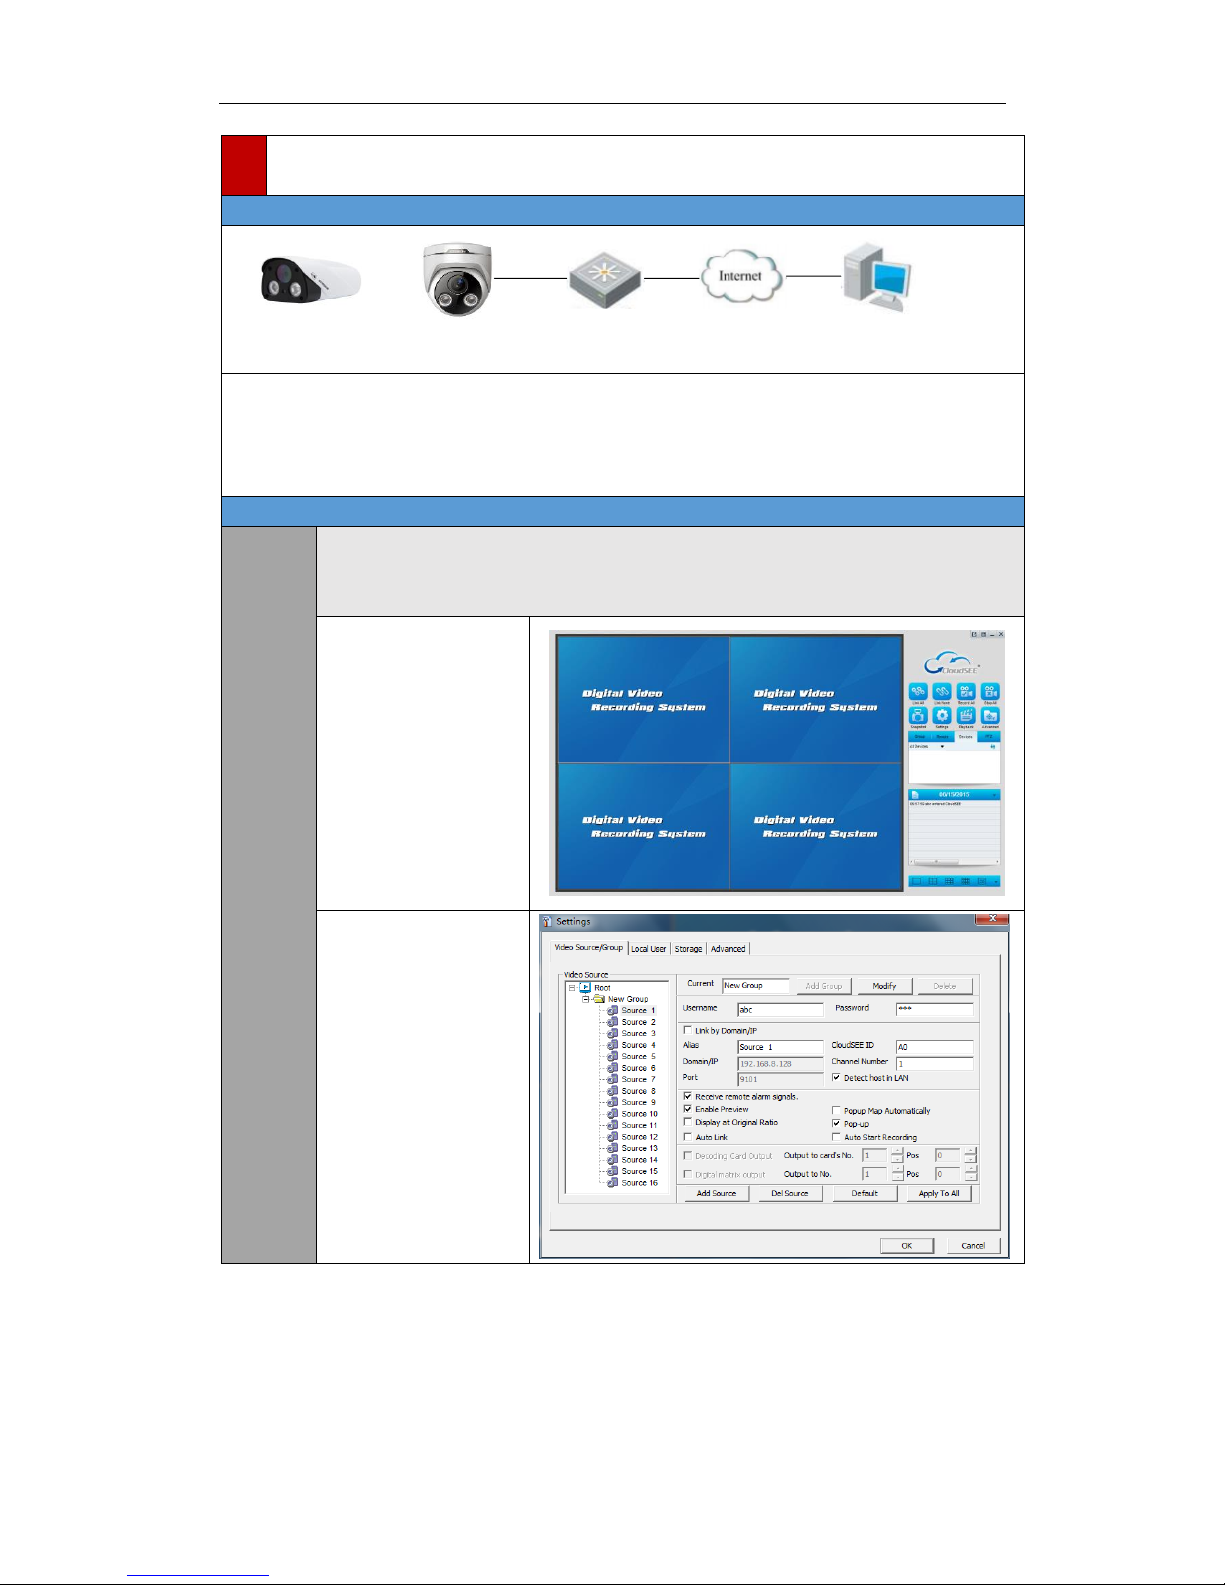
Install and run
CloudSEE, the main
view is as shown on the
right.
Click “Settings” on the
right function panel ,
the Settings dialog box
appears, you can add
new source or edit a
source, and input
Username, Password,
CloudSEE ID, Channel
Number(1 for main
stream, 2 for substream), then click OK.
Page 11
Jovision Network Camera Quick Start Guide
10
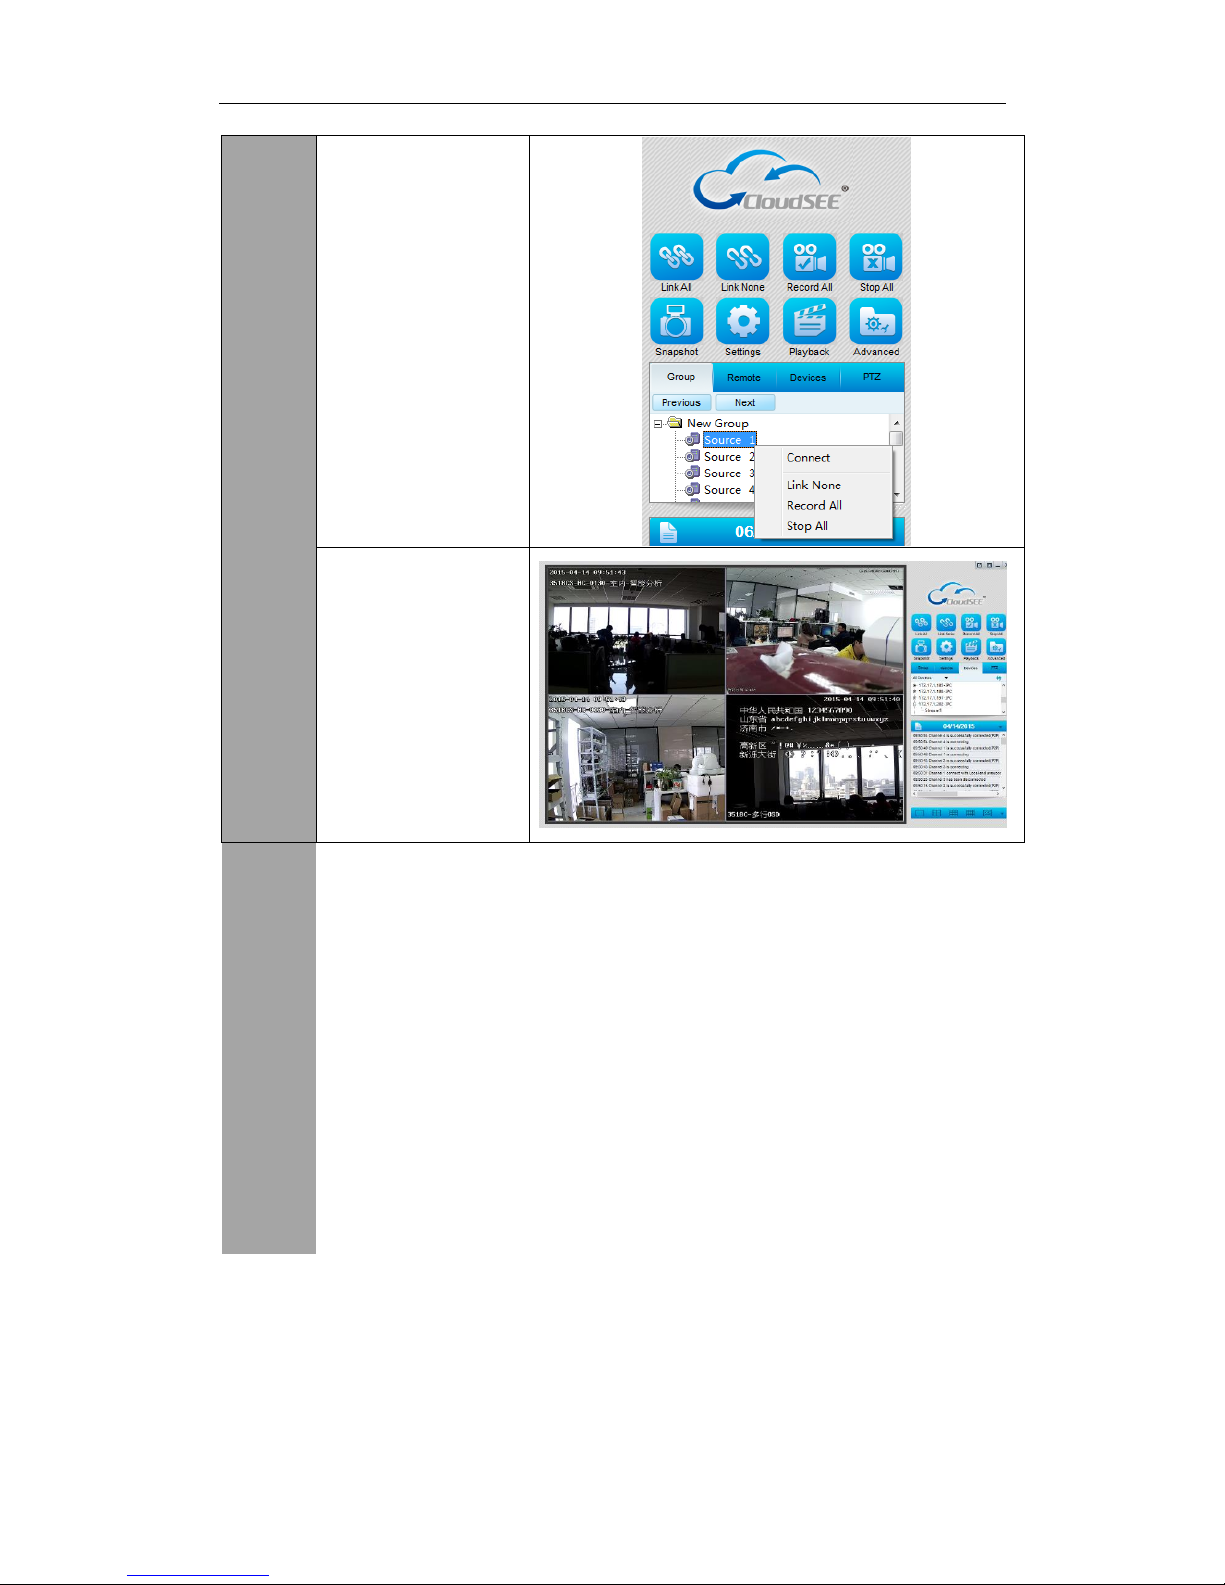
Click “Group”, and
select the device just
added, right click and
select Connect (or
double click the source)
The live view of the
camera added will
display In the live view
window.
Also you can adjust the settings of any dvr, nvr or ip camera remotely this can be done by clicking
the right button on the mouse and clicking remote settings in the menu. When in the menu you
can adjust settings such as time, date, time zone, device name, setup user accounts, update the
device by web or file update, check event logs, setup motion detection, alarm parameters, image
adjust, audio adjust, bit rate, frame rate, resolution, network settings, ptz functions, IVA
intelligent analysis function for 1.3mp ip cameras and nvr(setup trip wires and place boxes
around objects).
Page 12
Jovision Network Camera Quick Start Guide
11
CloudSEE
APP
(iOS,
Android)
CloudSEE App, makes it possible to watch camera live view on smart phone, supports
all CloudSEE products, including DVR, NVR, network camera, USB DVR and DVR cards.
Note:
l The steps apply to both iOS and Android.
l You need to register a CloudSEE account before using CloudSEE service which is
free. Although you can use “Visitor Login”, but we strongly recommend
that register your own account for better experience. With CloudSEE service
account, devices list will automatically, upload and store in the cloud, and
when you login to CloudSEE with your account on other smart phones, you
can gain access to all these devices without adding them again.
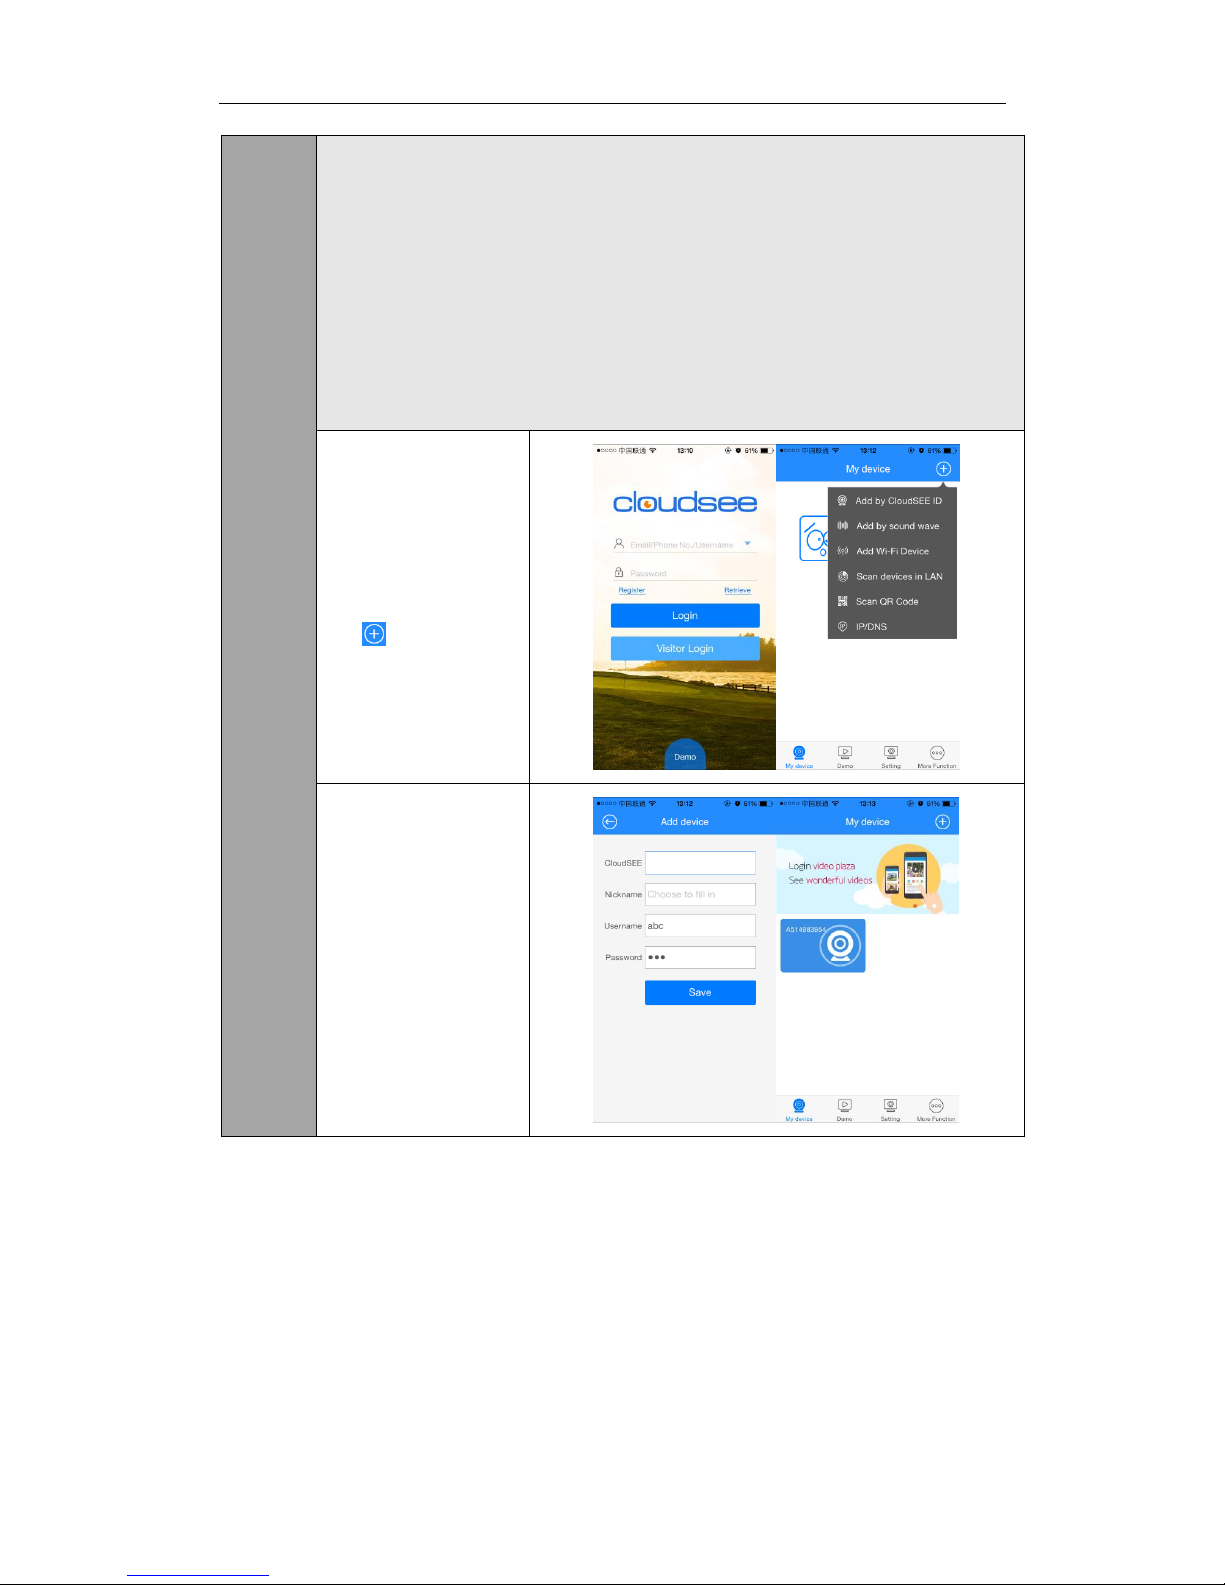
Run CloudSEE app on
smart phone, login with
your CloudSEE account,
tap , select “Add
by CloudSEE ID”
Input CloudSEE ID,
Username, Password of
the network camera,
and save, the camera
will appears in My
Device page
Page 13
Jovision Network Camera Quick Start Guide
12
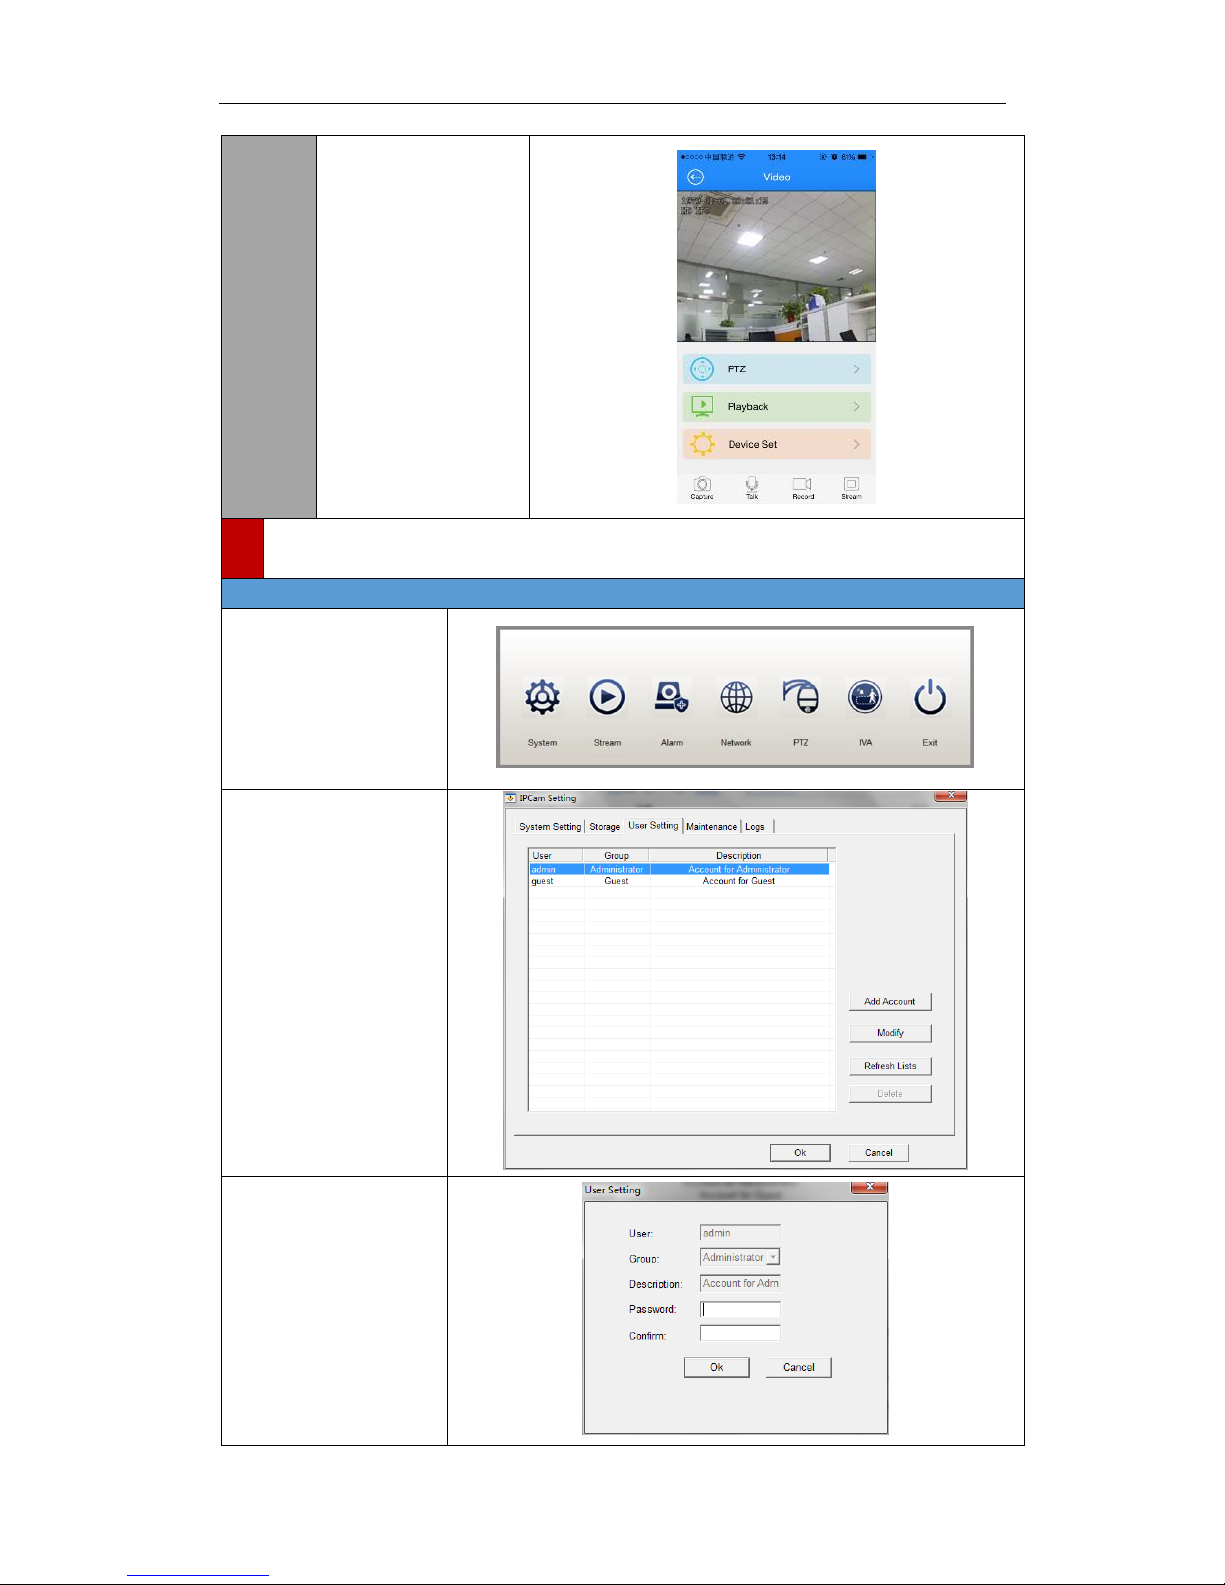
Tap the device, live
video of the camera will
display.
5
Account and Password
5.1 Change Password
Connect the camera in
client software, right
click on the live video,
click “Remote setting”,
and the dialog box
appears. Click “System”.
Click “User Setting” tab,
select user “admin” and
click “Modify”
Input new password
twice to confirm, click
OK, then the password
has been changed. You
can also click “Add
Account” to create a
new account.
Page 14
Jovision Network Camera Quick Start Guide
13
6
Safety Instruction
6.1 Warnings
Please adopt the power adapter which can meet the safety extra low voltage (SELV) standard.
If the product does not work properly, please contact your dealer or the nearest service
center. Never attempt to disassemble the camera yourself. (We shall not assume any
responsibility for problems caused by unauthorized repair or maintenance.)
To reduce the risk of fire or electrical shock, do not expose this product to rain or moisture.
This installation should be made by a qualified service person and should conform to all the
local codes.
Please install blackouts equipment into the power supply circuit for convenient supply
interruption.
6.2 Cautions
Make sure the power supply voltage is proper before using the camera.
Do not drop the camera or subject it to physical shock.
Do not touch sensor modules with fingers. If cleaning is necessary, use a clean cloth with a bit
of ethanol and wipe it gently. If the camera will not be used for an extended period of time,
put on the lens cap to protect the sensor from dirt.
Do not aim the camera lens at the strong light such as sun or incandescent lamp. The strong
light can cause fatal damage to the camera.
The sensor may be burned out by a laser beam, so when any laser equipment is being used,
make sure that the surface of the sensor not be exposed to it.
Do not place the camera in extremely hot, cold temperatures (the operating temperature
should be between -30°C to 60°C), dusty or damp environment, and do not expose it to high
electromagnetic radiation.
To avoid heat accumulation, good ventilation is required.
Keep the camera away from water and any liquid.
While shipping, the camera should be packed in its original packing.
Page 15
Jovision Network Camera Quick Start Guide
14
 Loading...