

Page 1
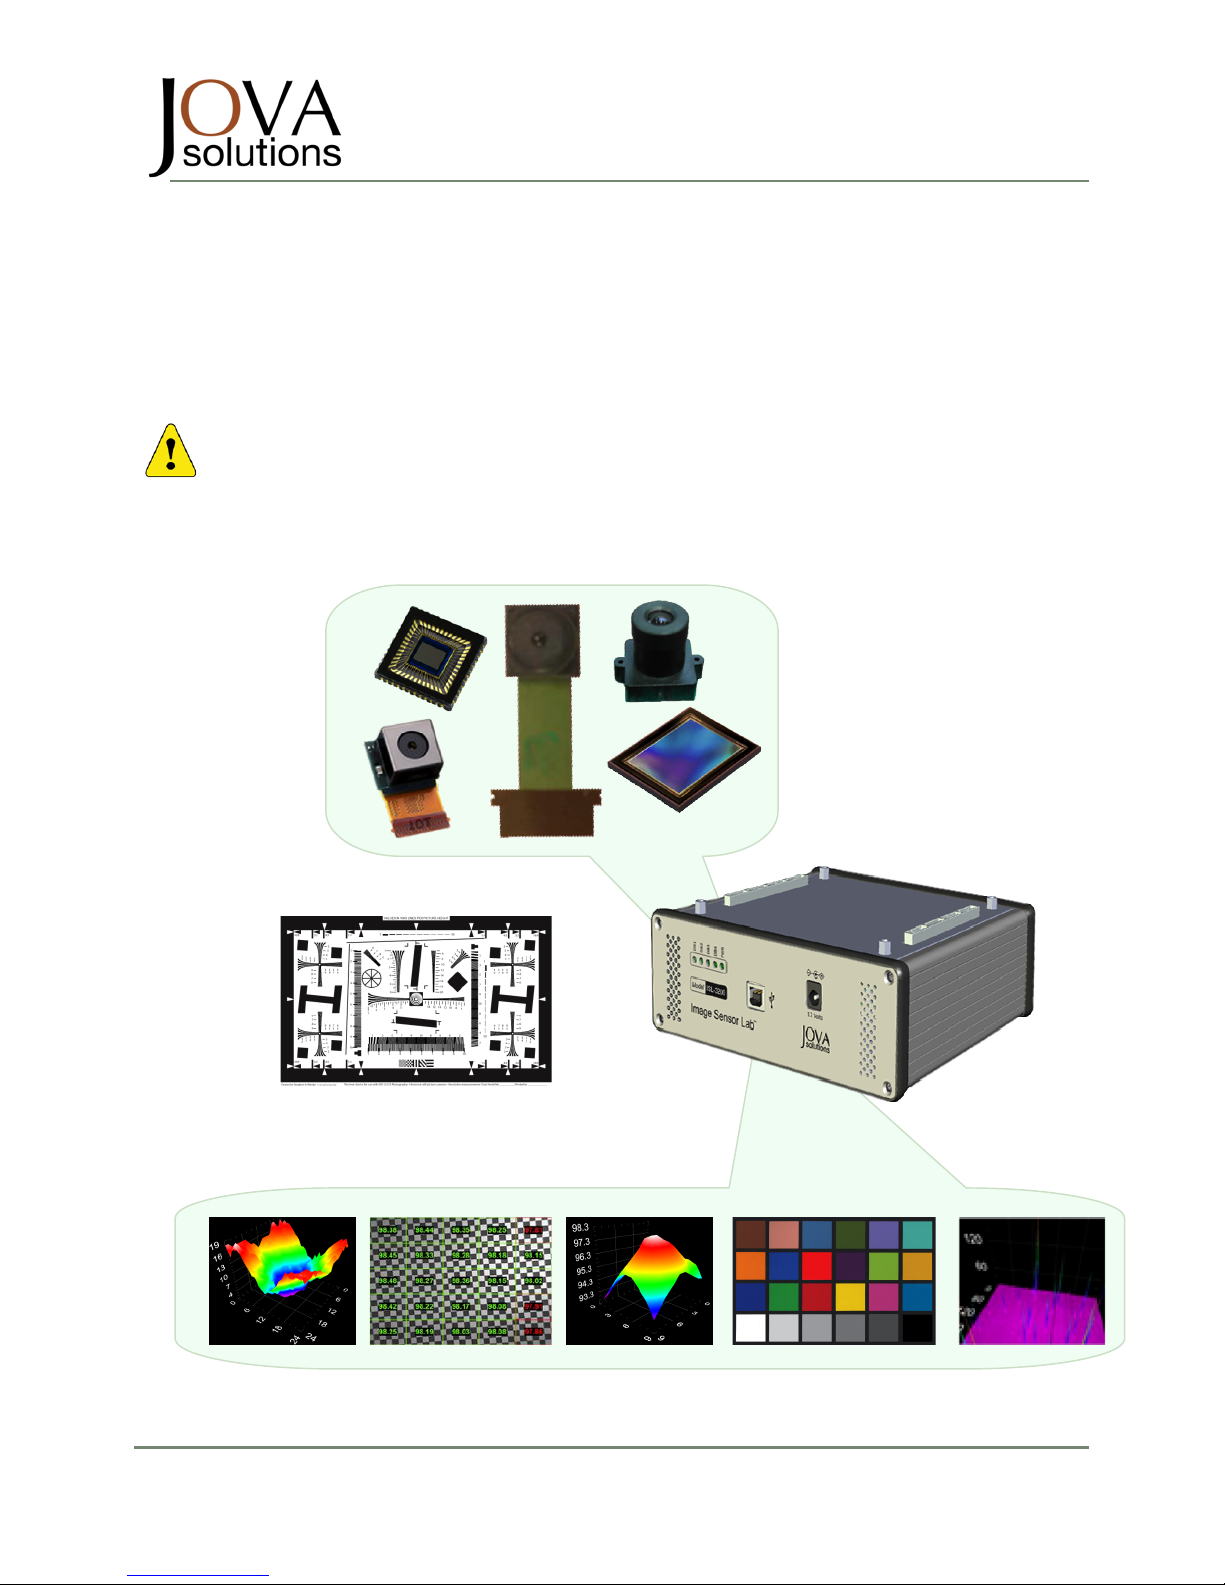
ISL-3200
TM
Quick Start Guide
ISL-3200TM Quick Start Guide Document Number 210-0008-02 Page 1 of 22
2009 Jova Solutions, All Rights Reserved (415) 348-1400
www.jovasolutions.com fax (415) 348-1414
ISL-3200TM Digital Imaging Sensor Interface
and Test Solution
Read This First!
NOTE: DO NOT CONNECT THE ISL INSTRUMENTATION HARDWARE TO THE
HOST COMPUTER UNTIL THE DRIVER SOFTWARE INSTALLATION IS COMPLETE!
Page 2

ISL-3200
TM
DIGITAL IMAGING SENSOR INTERFACE
Quick Start Guide
ISL-3200TM Quick Start Guide Document Number 210-0008-02 Page 2 of 22
1. INTRODUCTION ......................................................................................................................................... 3
2. CONTACT INFORMATION ........................................................................................................................ 3
3. PROPRIETARY INFORMATION ............................................................................................................... 3
3.1 SOFTWARE LICENSE.................................................................................................................................... 3
3.2 REFERENCE DOCUMENTS ........................................................................................................................... 3
4. WHAT YOU’LL FIND IN THE QUICK STEP GUIDE ............................................................................... 5
5. INSTALL ISL APPLICATION SOFTWARE.............................................................................................. 6
5.1 INSERT THE ISL INSTALLATION CD INTO THE CD DRIVE OF THE HOST COMPUTER. ..................................... 6
5.2 RUN THE ISL INSTALLER ............................................................................................................................. 6
5.3 ACCEPTING NATIONAL INSTRUMENTS’ (NI) LICENSE AGREEMENT............................................................... 7
5.4 REVIEW THE NI COMPONENTS TO BE INSTALLED......................................................................................... 8
5.5 MONITOR INSTALLATION PROGRESS ........................................................................................................... 9
5.6 ACTIVATE AND REGISTER NI VISION.......................................................................................................... 10
6. INSTALL THE USB DRIVER ................................................................................................................... 13
7. INSTALL THE ISL USB HARDWARE .................................................................................................... 15
8. STANDARD INSTALLATION OF EXTERNAL PCI EXPRESS (PCIE) OPTIONAL INTERFACE .... 18
8.1 ALTERNATE PCIE DRIVER INSTALLATION................................................................................................... 18
8.2 PCIE DRIVER RE-INSTALLATION................................................................................................................ 22
Page 3
ISL-3200
TM
DIGITAL IMAGING SENSOR INTERFACE
Quick Start Guide
ISL-3200TM Quick Start Guide Document Number 210-0008-02 Page 3 of 22
1. INTRODUCTION
ISL™ is a cost-effective combination of sensor interface and test electronics and application software
that provides complete communications, image capture, and characterization testing, of a variety of
image sensors.
The ISL software application offers scripting and plug-in functionality, allowing enhanced graphical user
interfaces to specific image sensor models as well as customized image processing analysis and
characterization testing routines.
The ISL software application is pre-configured with a library of testing and characterization routines,
as well as many of the processing tools that are typically needed for thorough evaluation and testing
of image sensors.
2. CONTACT INFORMATION
The primary contact for information regarding sales, support, and technical information is:
Jova Solutions
965 Mission Street Suite 600
San Francisco, CA 94103
Toll free: (866) 755-1400
415-348-1400
415-348-1414 fax
[email protected]
http://www.jovasolutions.com
3. PROPRIETARY INFORMATION
This document contains information deemed proprietary. Information contained herein may be
protected under patents, copyright, or by other lawful means. Use or reproduction of this document is
restricted under the terms of the license.
3.1 SOFTWARE LICENSE
The product described within this document contains licensed software that is protected under
copyright law. You may not reverse engineer, decompile, disassemble, modify, translate, make any
attempt to copy or discover the source code of the software, or create derivate works from the
software.
Software © 2009, WireWorks West Inc. dba Jova Solutions, All Rights Reserved
3.2 REFERENCE DOCUMENTS
Here are the ISL documents that you may find useful:
Description
Doc. No
Company/Author
Rev. Date
ISL-3200 Product Specification
210-0004-xx
Jova Solutions
07/14/2009
ISL-3200 Basic User Manual
210-0001-xx
Jova Solutions
07/14/2009
ISL-3200 Advanced Analysis Guide
210-0002-xx
Jova Solutions
07/14/2009
ISL-3200 Quick Start Guide
210-0008-xx
Jova Solutions
07/14/2009
ISL-3200 Test and Automation Suite Guide
210-0003-xx
Jova Solutions
07/14/2009
ISL-3200 DLL.API Reference
210-0006-xx
Jova Solutions
07/14/2009
Page 4

ISL-3200
TM
DIGITAL IMAGING SENSOR INTERFACE
Quick Start Guide
ISL-3200TM Quick Start Guide Document Number 210-0008-02 Page 4 of 22
Page 5

ISL-3200
TM
DIGITAL IMAGING SENSOR INTERFACE
Quick Start Guide
ISL-3200TM Quick Start Guide Document Number 210-0008-02 Page 5 of 22
4. WHAT YOU’LL FIND IN THE QUICK STEP GUIDE
This guide describes the quickest way for you to install and begin using your ISL-3200.
Here are the steps that you will follow:
Caution on connecting the ISL-3200
1. Install ISL application software
2. Install and register the USB Driver
3. Install the ISL USB Hardware
4. Activate the PCIe Drivers
5. Install the ISL USB Hardware
Page 6
ISL-3200
TM
DIGITAL IMAGING SENSOR INTERFACE
Quick Start Guide
ISL-3200TM Quick Start Guide Document Number 210-0008-02 Page 6 of 22
Read this first!
NOTE: DO NOT CONNECT THE ISL HARDWARE TO THE HOST COMPUTER UNTIL AFTER
INSTALLATION IS COMPLETE!
It is important that these steps be accurately followed BEFORE connecting the ISL hardware to the host
computer PCIe interface
5. INSTALL ISL APPLICATION SOFTWARE
Descriptive ppg will include Appl sw , install and activate the NI vision…, and the USB driver
5.1 INSERT THE ISL INSTALLATION CD INTO THE CD DRIVE OF THE HOST COMPUTER.
5.2 RUN THE ISL INSTALLER
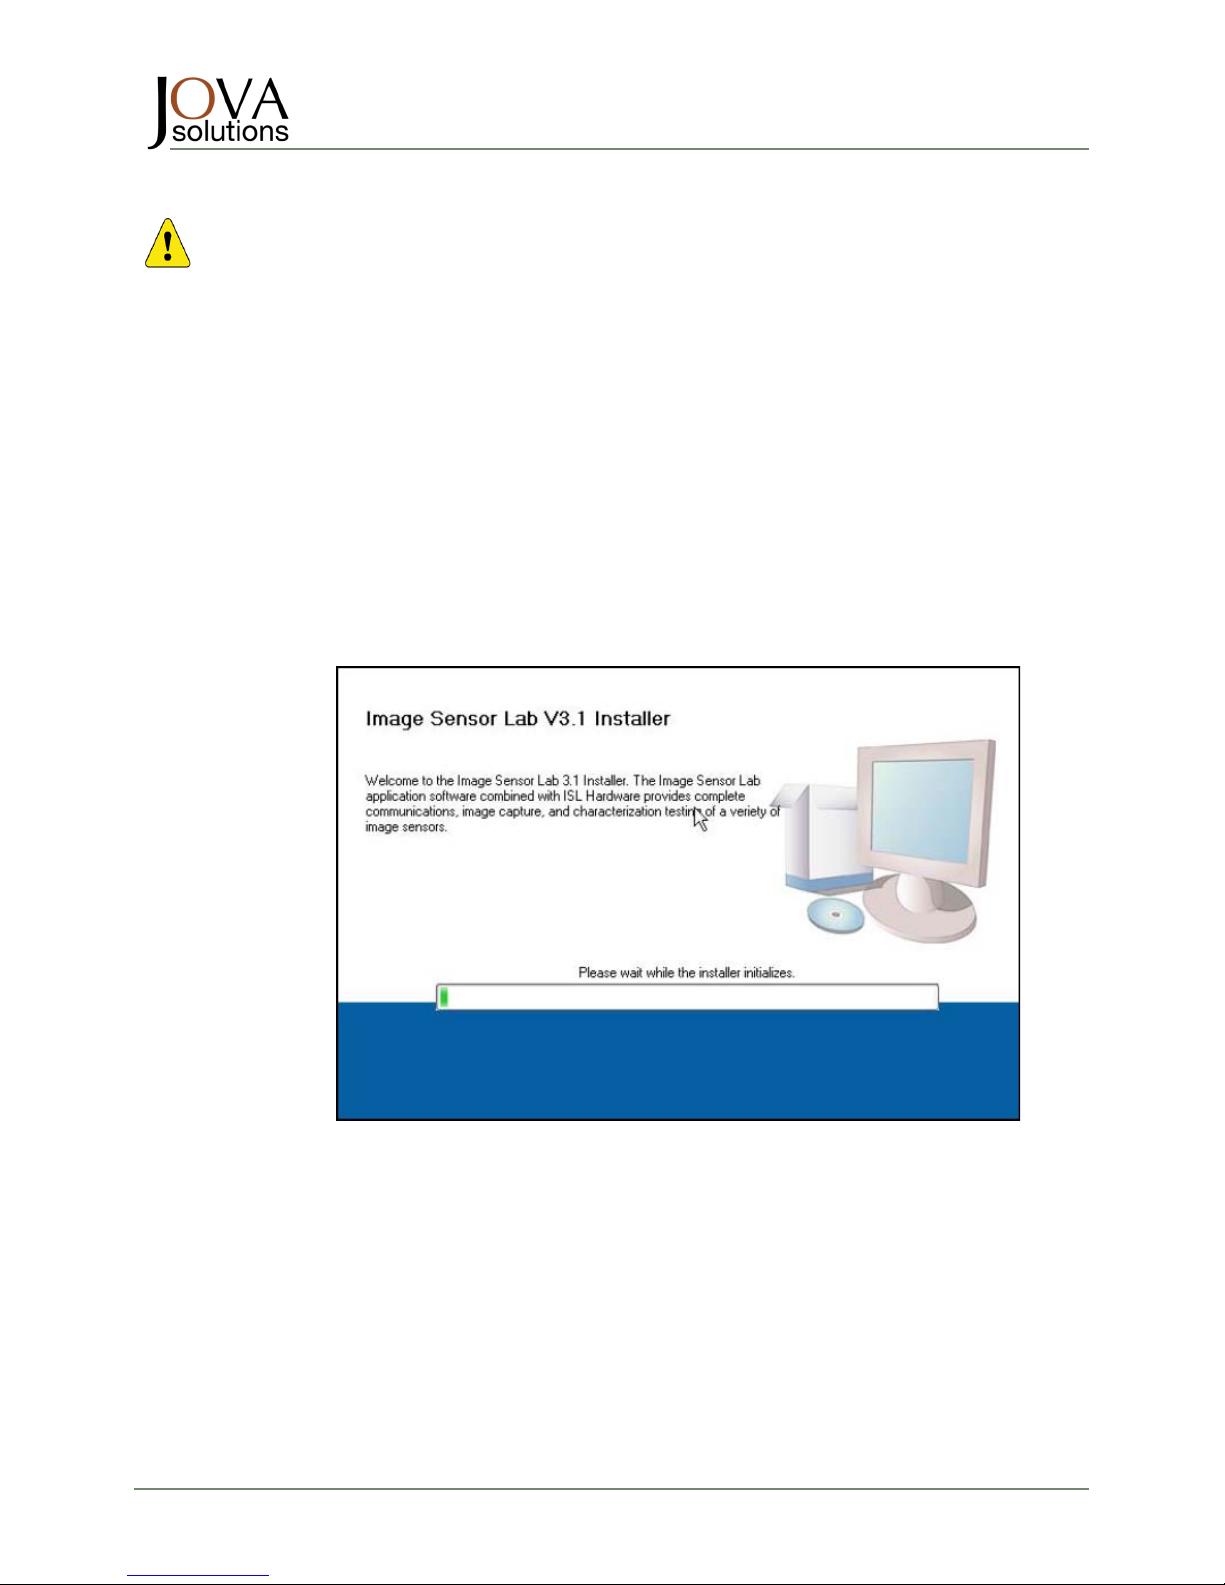
Run the Setup.exe application contained on the ISL Application Software CD. Follow the prompts as
shown in the series of screen captures below. After double-clicking the Setup.exe ICON the opening
screen is shown.
continued
Page 7
ISL-3200
TM
DIGITAL IMAGING SENSOR INTERFACE
Quick Start Guide
ISL-3200TM Quick Start Guide Document Number 210-0008-02 Page 7 of 22
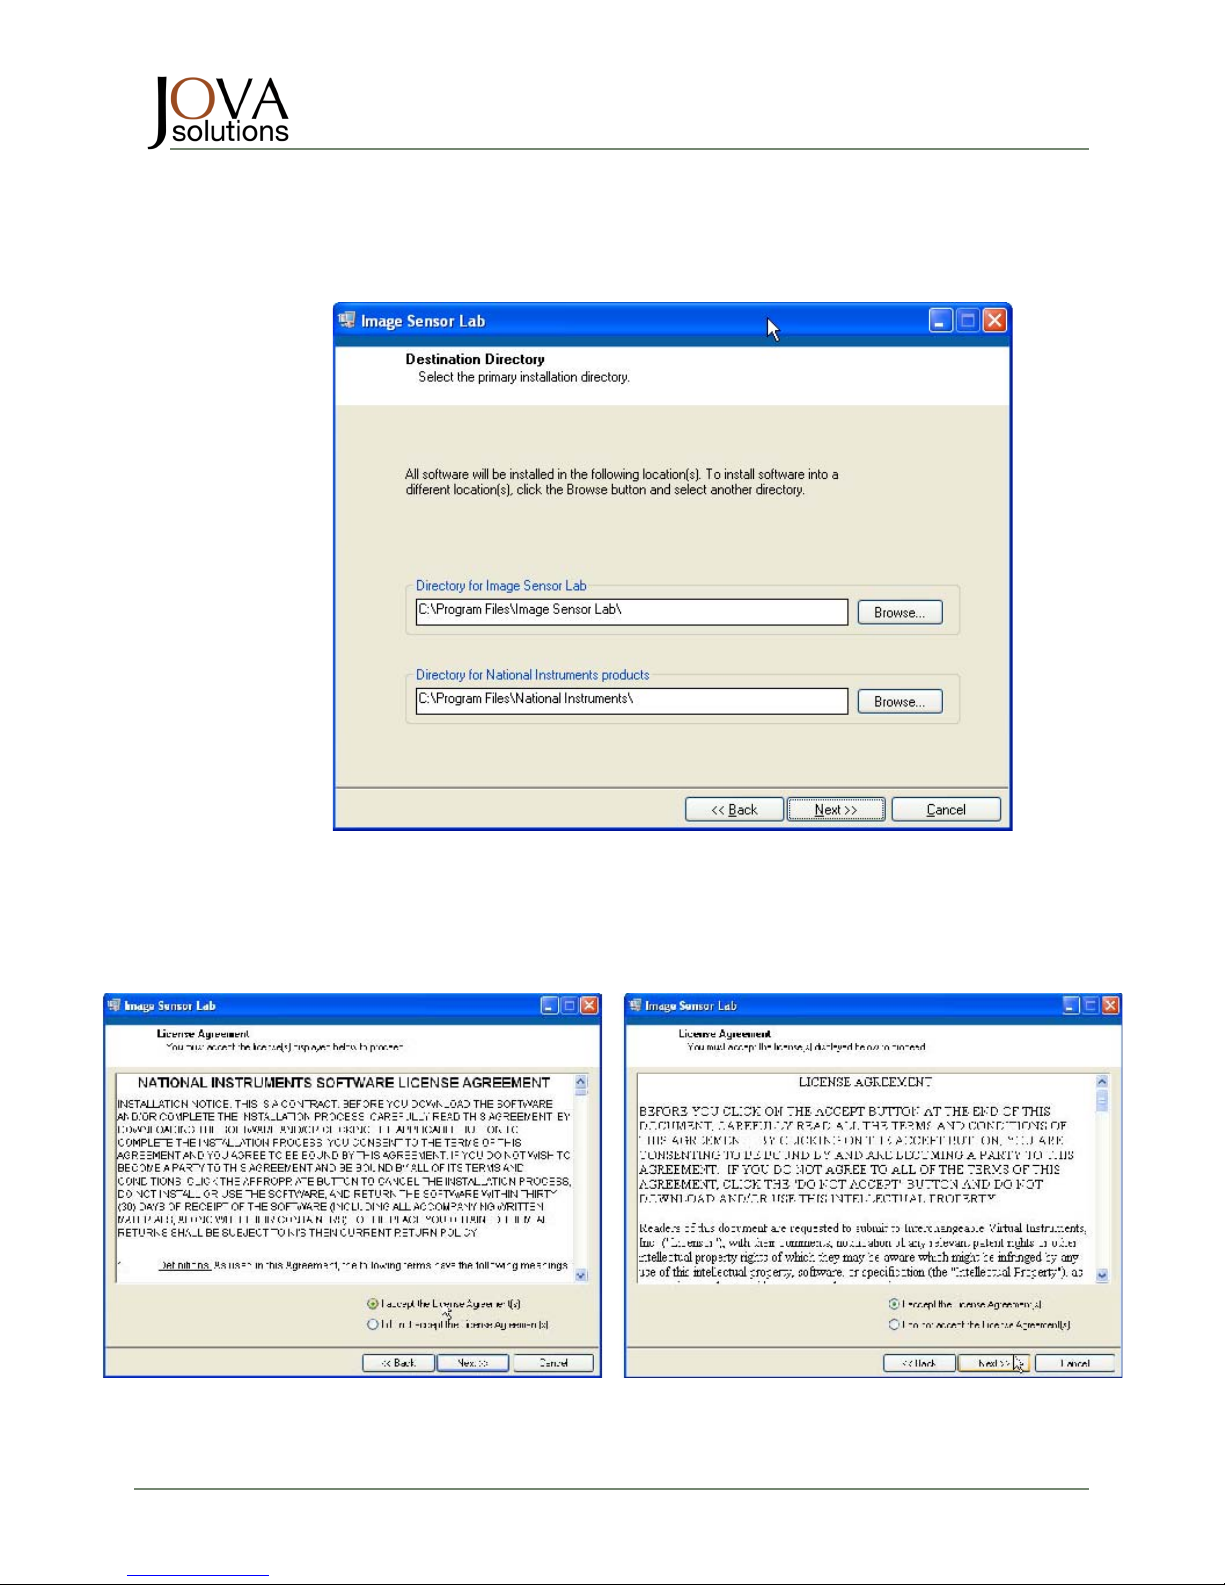
The next screen contains the destination directory settings for both the ISL application
software and the National Instruments support code.
5.3 ACCEPTING NATIONAL INSTRUMENTS’ (NI) LICENSE AGREEMENT
After verifying the default destination directory paths, press the “Next>>” button to display the License
Agreement acceptance forms from National Instruments. Click the “I accept the License Agreement(s)”
radio buttons on each screen before clicking the “Next>>” button.
Page 8
ISL-3200
TM
DIGITAL IMAGING SENSOR INTERFACE
Quick Start Guide
ISL-3200TM Quick Start Guide Document Number 210-0008-02 Page 8 of 22
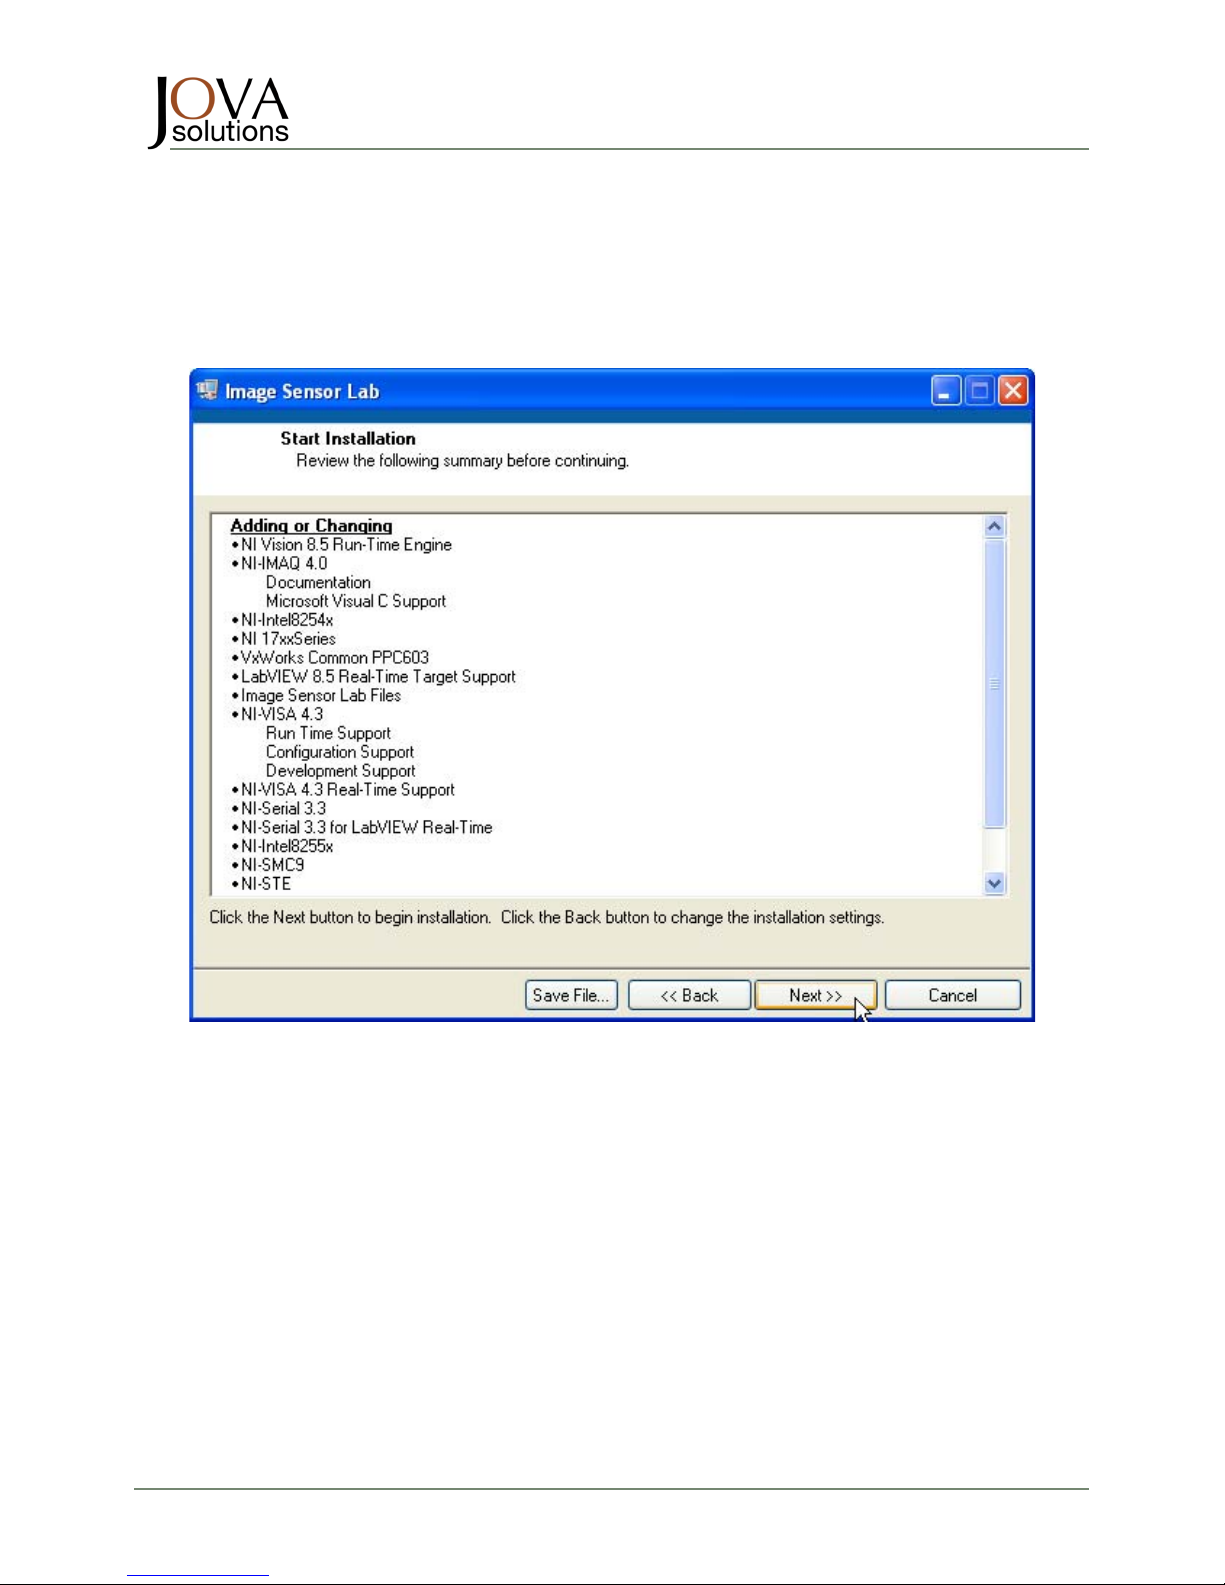
5.4 REVIEW THE NI COMPONENTS TO BE INSTALLED
The next screen is informational only and displays a list of components that will be installed.
Hit the “Next>>” button. The NI Vision component automatically installs these components.
Page 9
ISL-3200
TM
DIGITAL IMAGING SENSOR INTERFACE
Quick Start Guide
ISL-3200TM Quick Start Guide Document Number 210-0008-02 Page 9 of 22
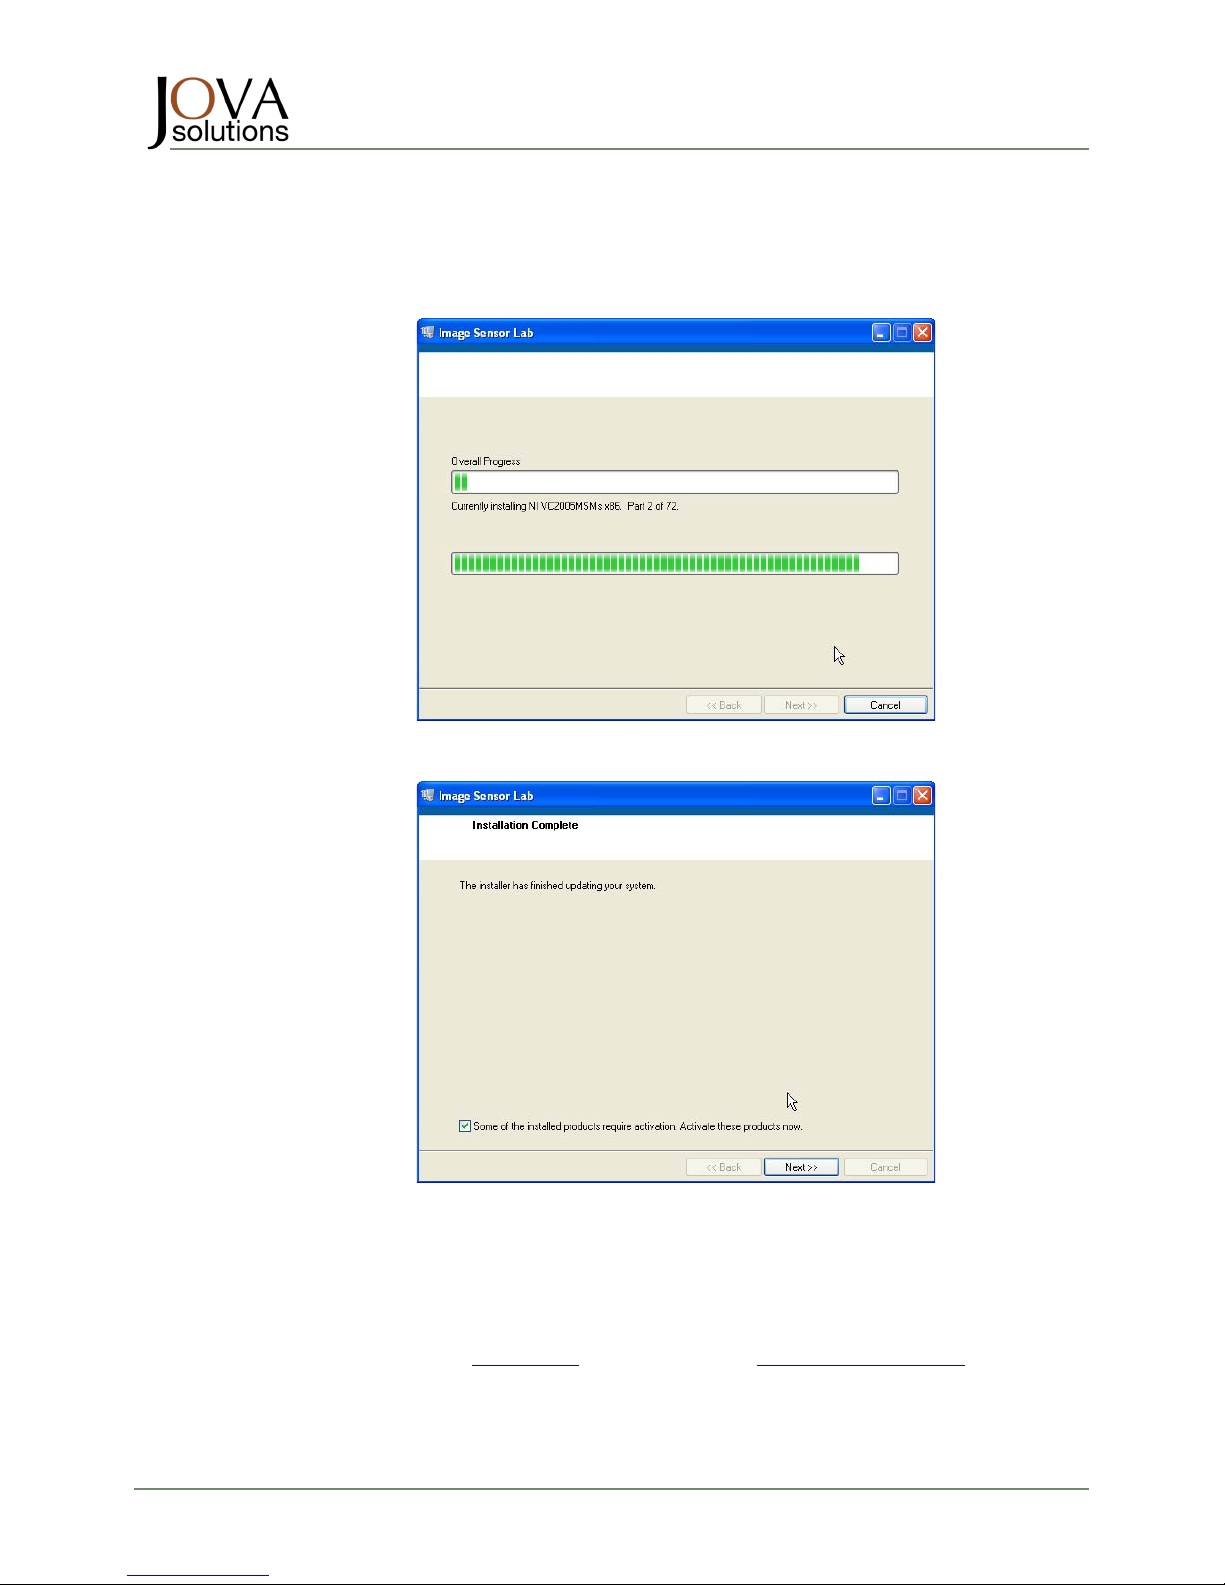
5.5 MONITOR INSTALLATION PROGRESS
The installation process begins, and the screen below is shown displaying the installation progress.
Once the installation completes, the following screen is displayed.
A message at the bottom of the screen indicates that a software component needs to be
activated, via the Internet, in order for the software to function properly. The software
component that needs to be activated is the NI-Vision component. If this software component
is already installed on the target computer this screen is not shown and activation is not
required. If this screen is shown activation is required and you will need to obtain a license for
the NI-Vision component.
Contact National Instruments (www.ni.com) or Jova Solutions (www.jovasolutions.com) for
more information on obtaining a license key for the NI-Vision software component.
The following screen is displayed when the activation checkbox is selected.
Page 10
ISL-3200
TM
DIGITAL IMAGING SENSOR INTERFACE
Quick Start Guide
ISL-3200TM Quick Start Guide Document Number 210-0008-02 Page 10 of 22
5.6 ACTIVATE AND REGISTER NI VISION
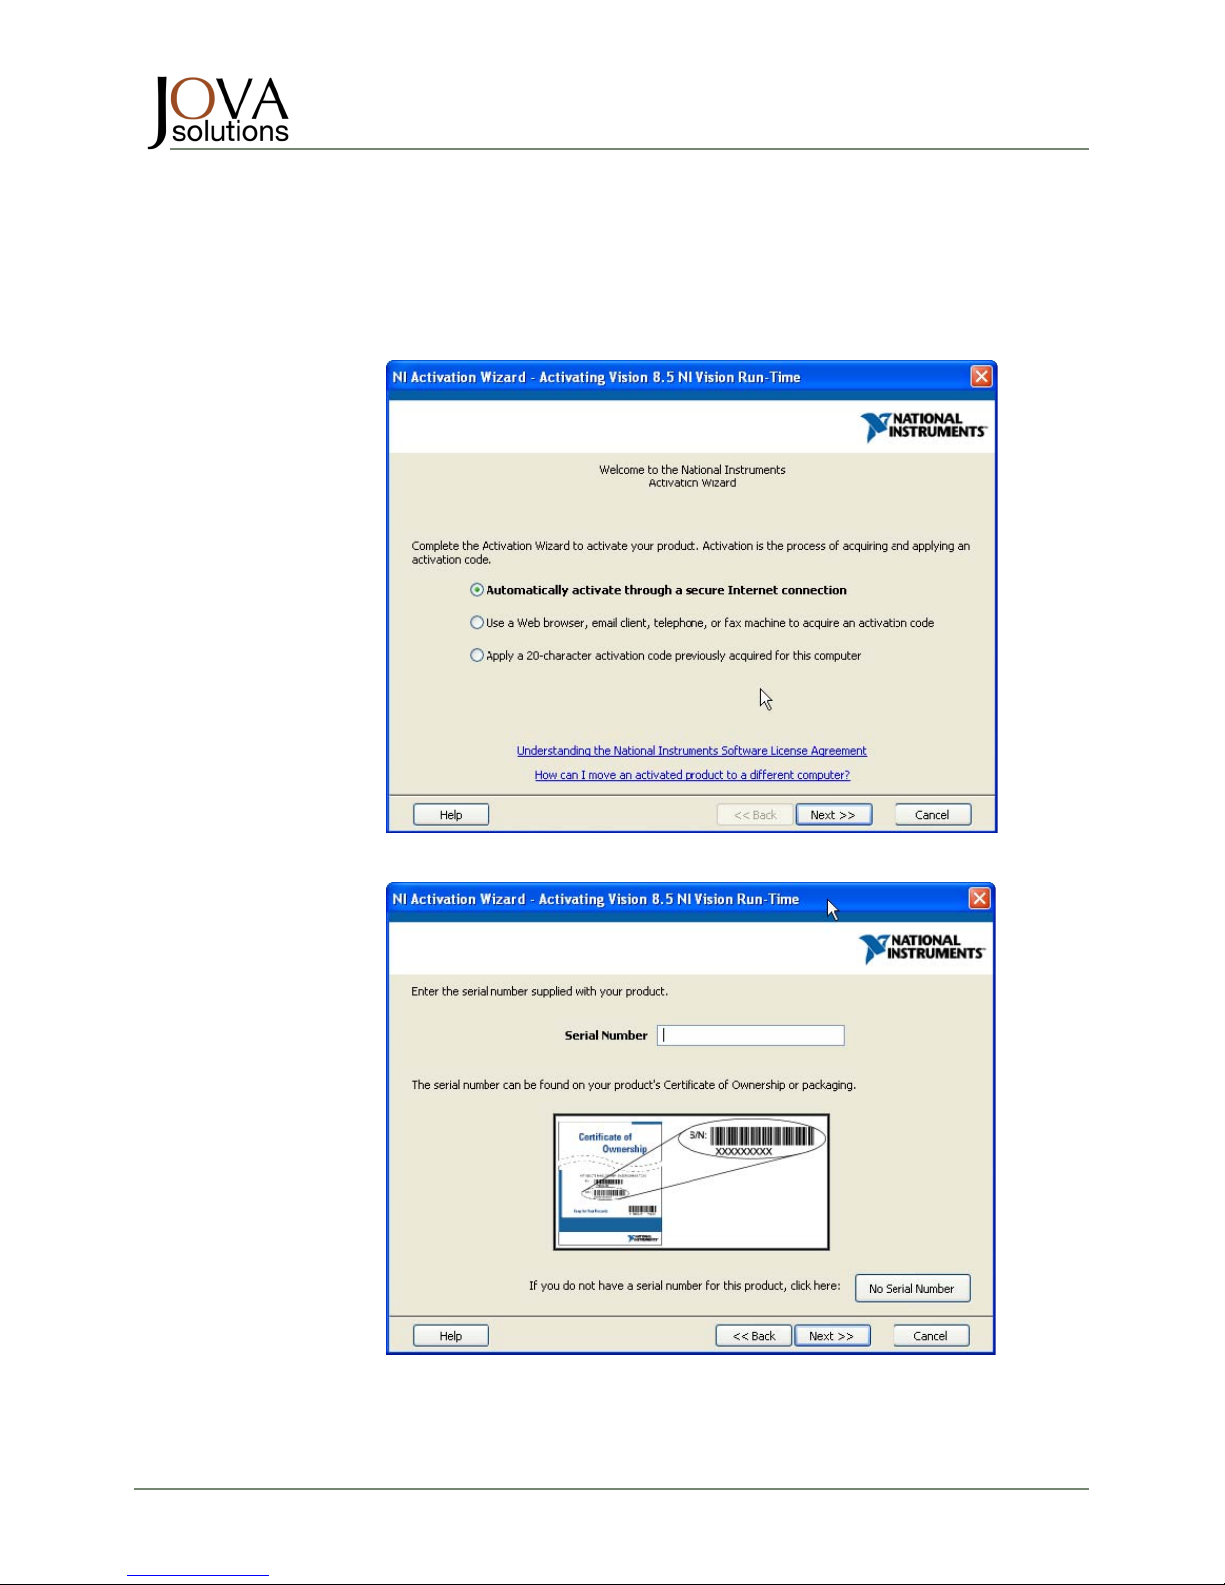
NI Vision is activated over the Internet.
Choose “Automatically activate through a secure Internet connection” and press the “Next>>”
button.
Enter the Serial Number in the highlighted text entry box and press the “Next>>” button.
continued
Page 11
ISL-3200
TM
DIGITAL IMAGING SENSOR INTERFACE
Quick Start Guide
ISL-3200TM Quick Start Guide Document Number 210-0008-02 Page 11 of 22
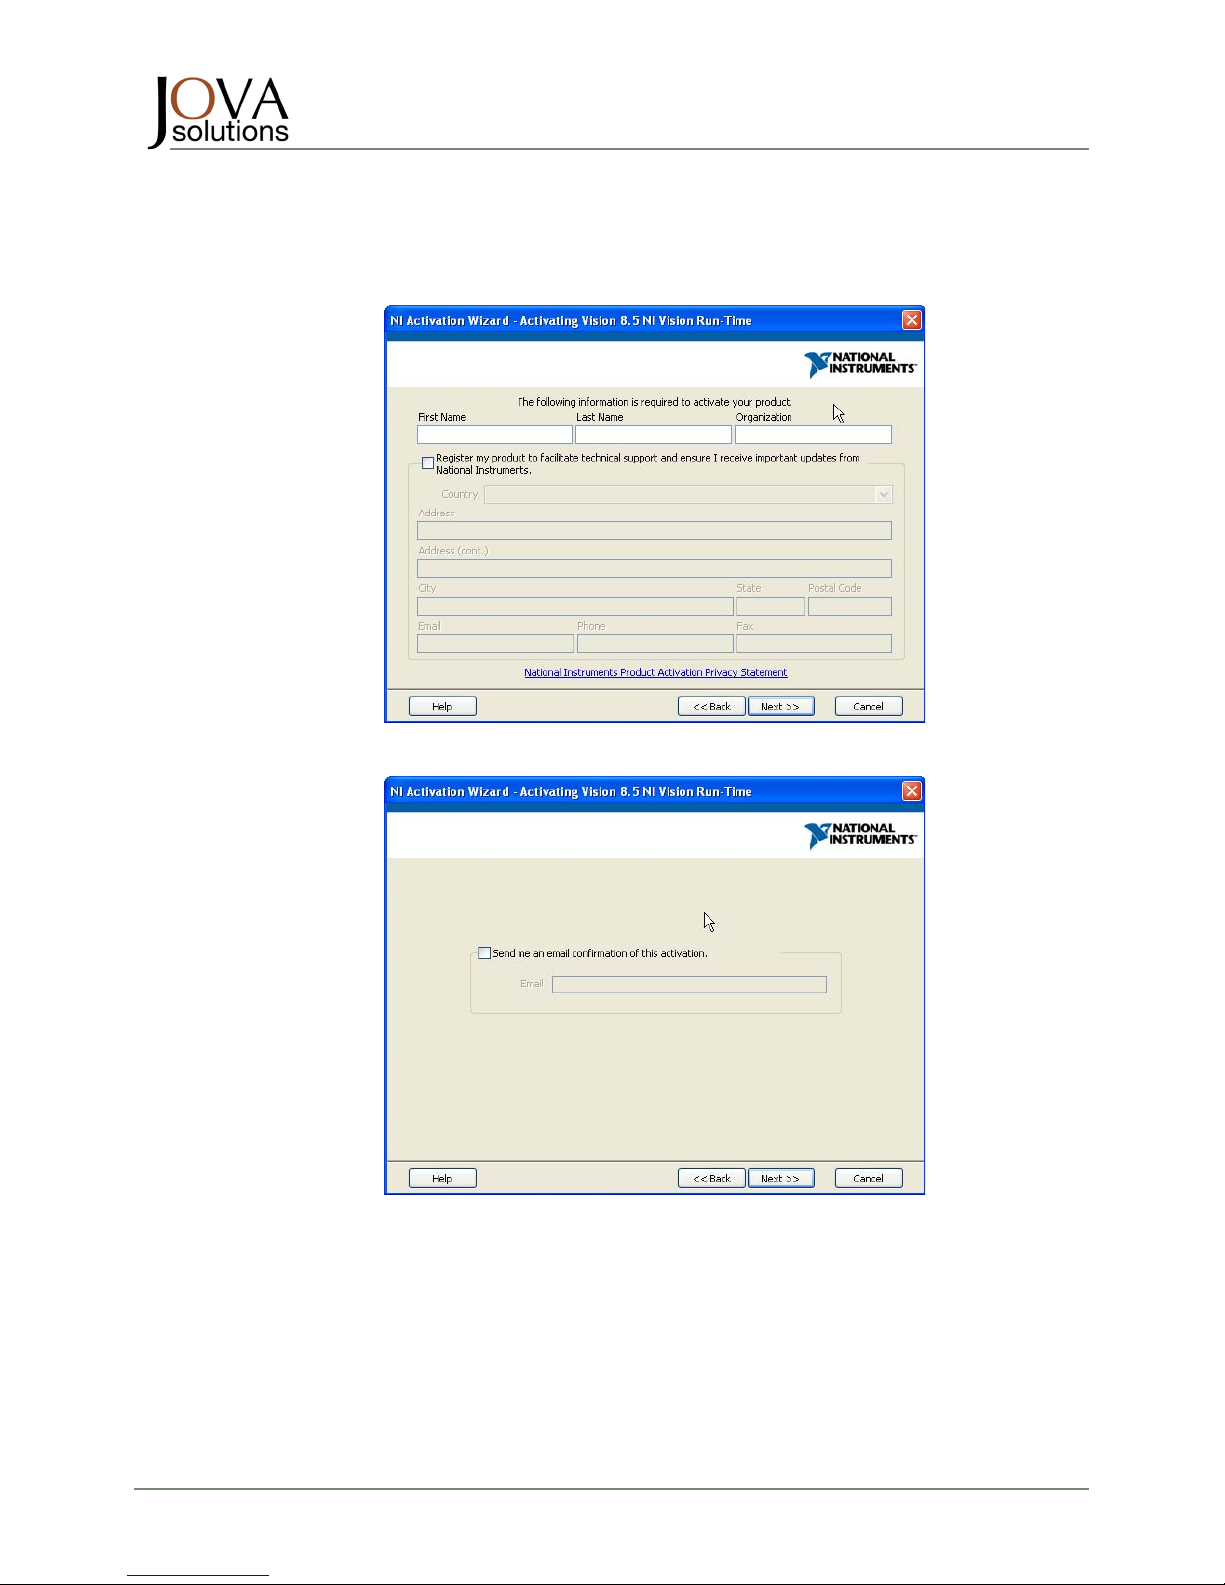
On the next screen, uncheck “Register…” then enter your First Name, Last Name, and Organization
before clicking the “Next>>” button.
The next screen gives the option of receiving an email confirmation after the activation process.
continued
Page 12
ISL-3200
TM
DIGITAL IMAGING SENSOR INTERFACE
Quick Start Guide
ISL-3200TM Quick Start Guide Document Number 210-0008-02 Page 12 of 22
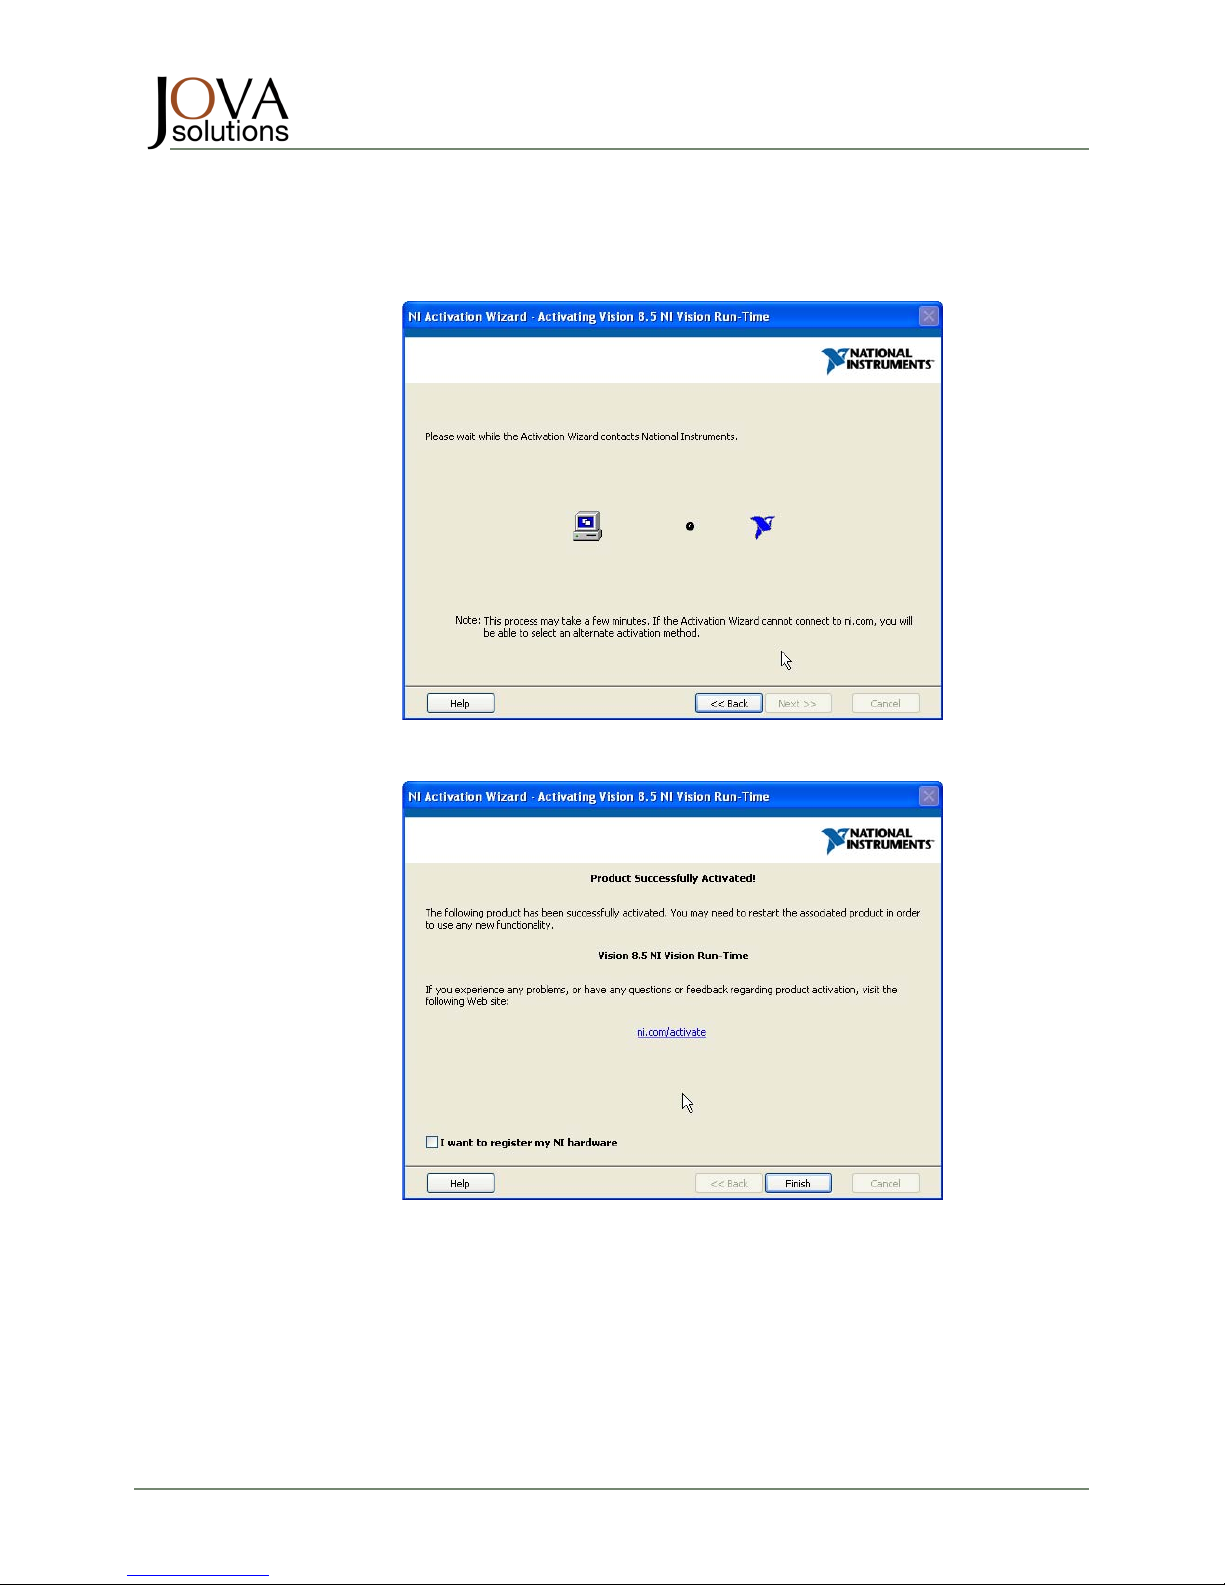
While the software is being activated over the Internet, the following screen is displayed.
After successful activation, the following screen is displayed.
Page 13
ISL-3200
TM
DIGITAL IMAGING SENSOR INTERFACE
Quick Start Guide
ISL-3200TM Quick Start Guide Document Number 210-0008-02 Page 13 of 22
6. INSTALL THE USB DRIVER
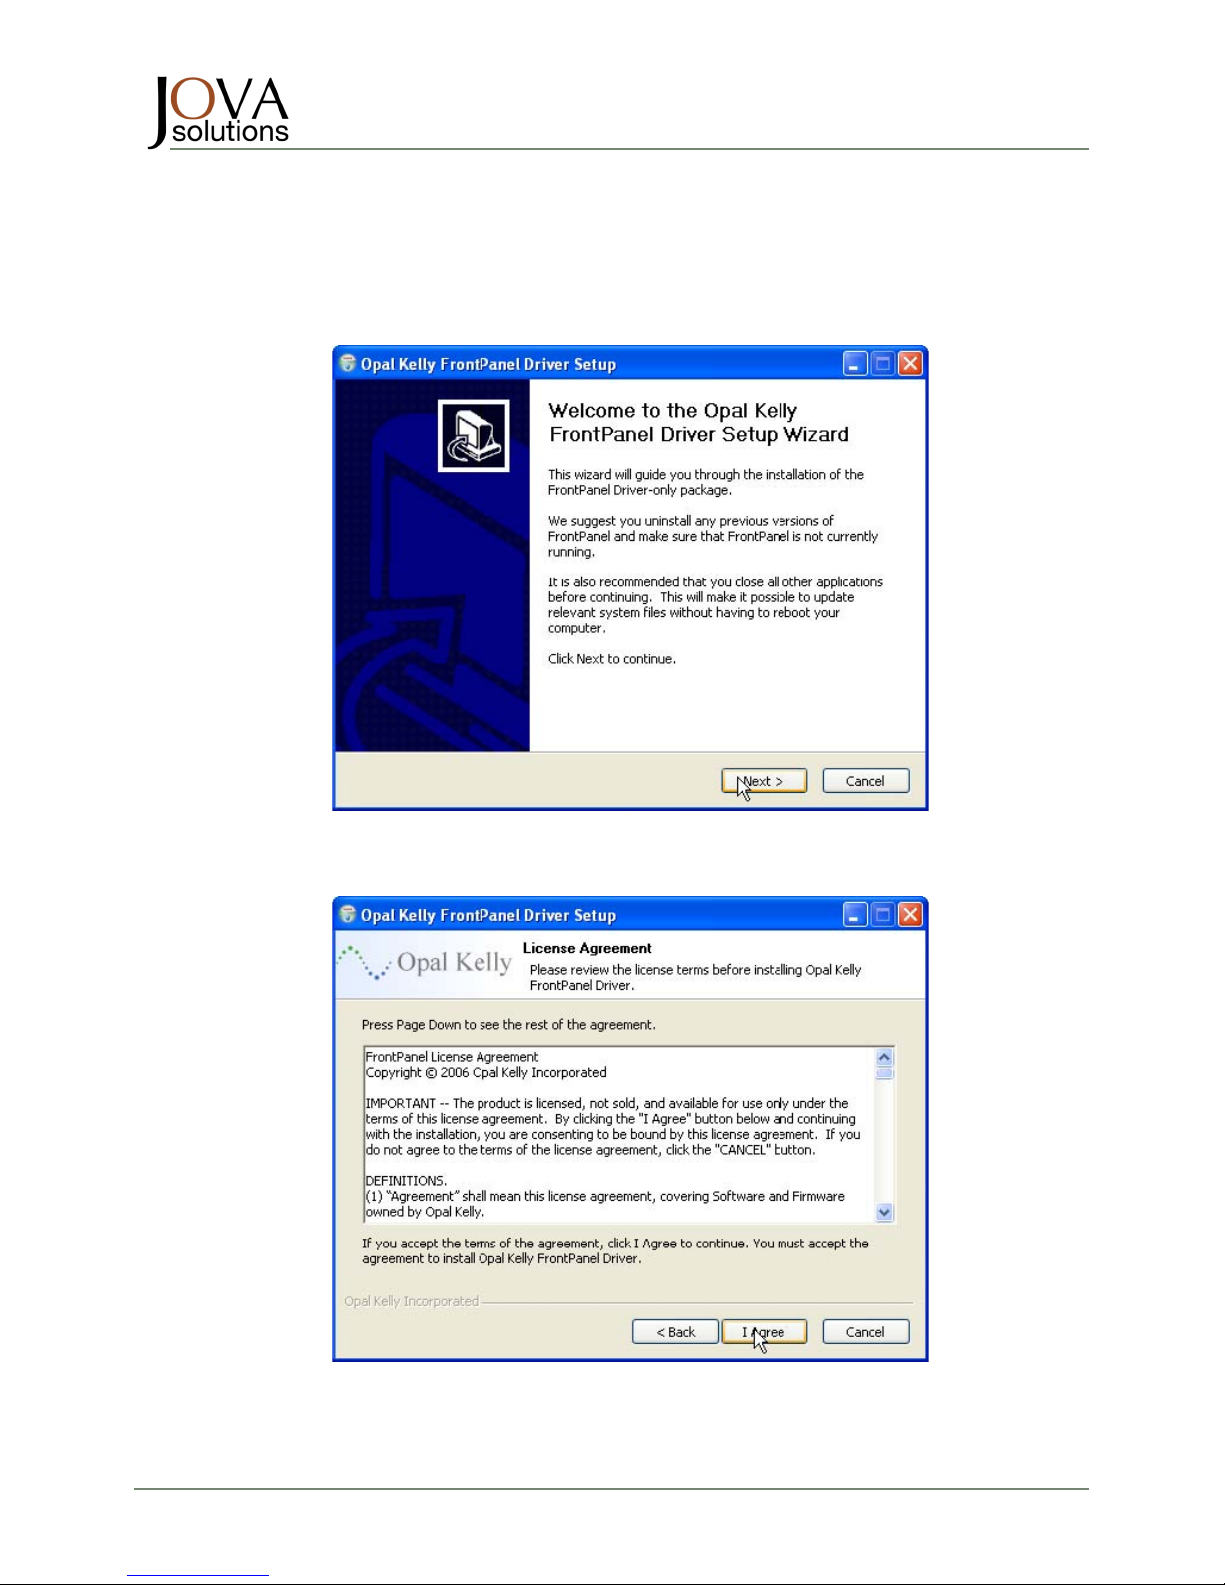
The installer will now install the Opal Kelly USB driver. The initial screen is shown below.
Click “Next >” to proceed to the License Agreement screen.
Click “I Agree” to proceed.
Page 14
ISL-3200
TM
DIGITAL IMAGING SENSOR INTERFACE
Quick Start Guide
ISL-3200TM Quick Start Guide Document Number 210-0008-02 Page 14 of 22
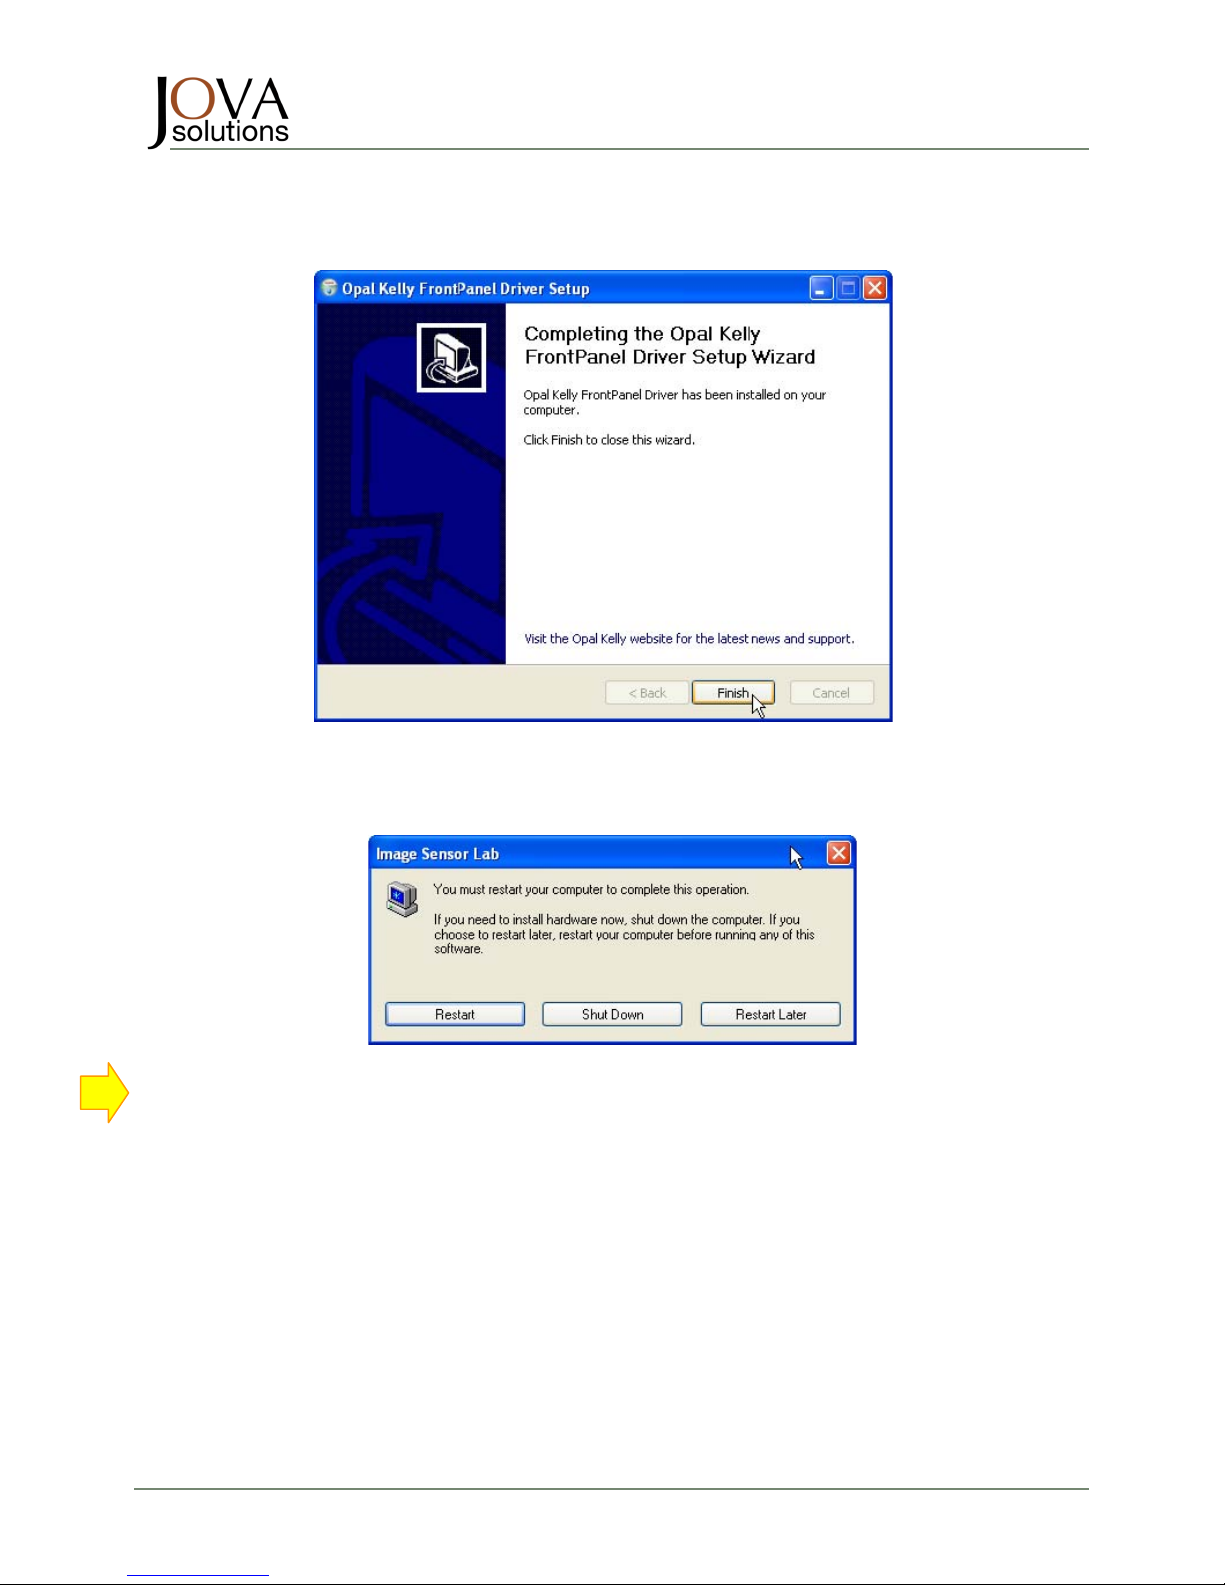
Click “Finish” to complete the USB Driver installation.
Press the “RESTART” button shown in the screen shot below.
If your ISL-3200 has the PCIe interface, skip to Section 6 to complete the installation.
If your ISL-3200 has the USB interface, you are now ready to install the hardware. Follow the instructions
that begin on the following page.
Page 15
ISL-3200
TM
DIGITAL IMAGING SENSOR INTERFACE
Quick Start Guide
ISL-3200TM Quick Start Guide Document Number 210-0008-02 Page 15 of 22
7. INSTALL THE ISL USB HARDWARE
Now that all the drivers and the ISL application software have been installed, it is safe to
connect the ISL Hardware to the host computer USB 2.0 High Speed port using a USB 2.0
high-speed cable, or using a PCIe connection to the host computer.
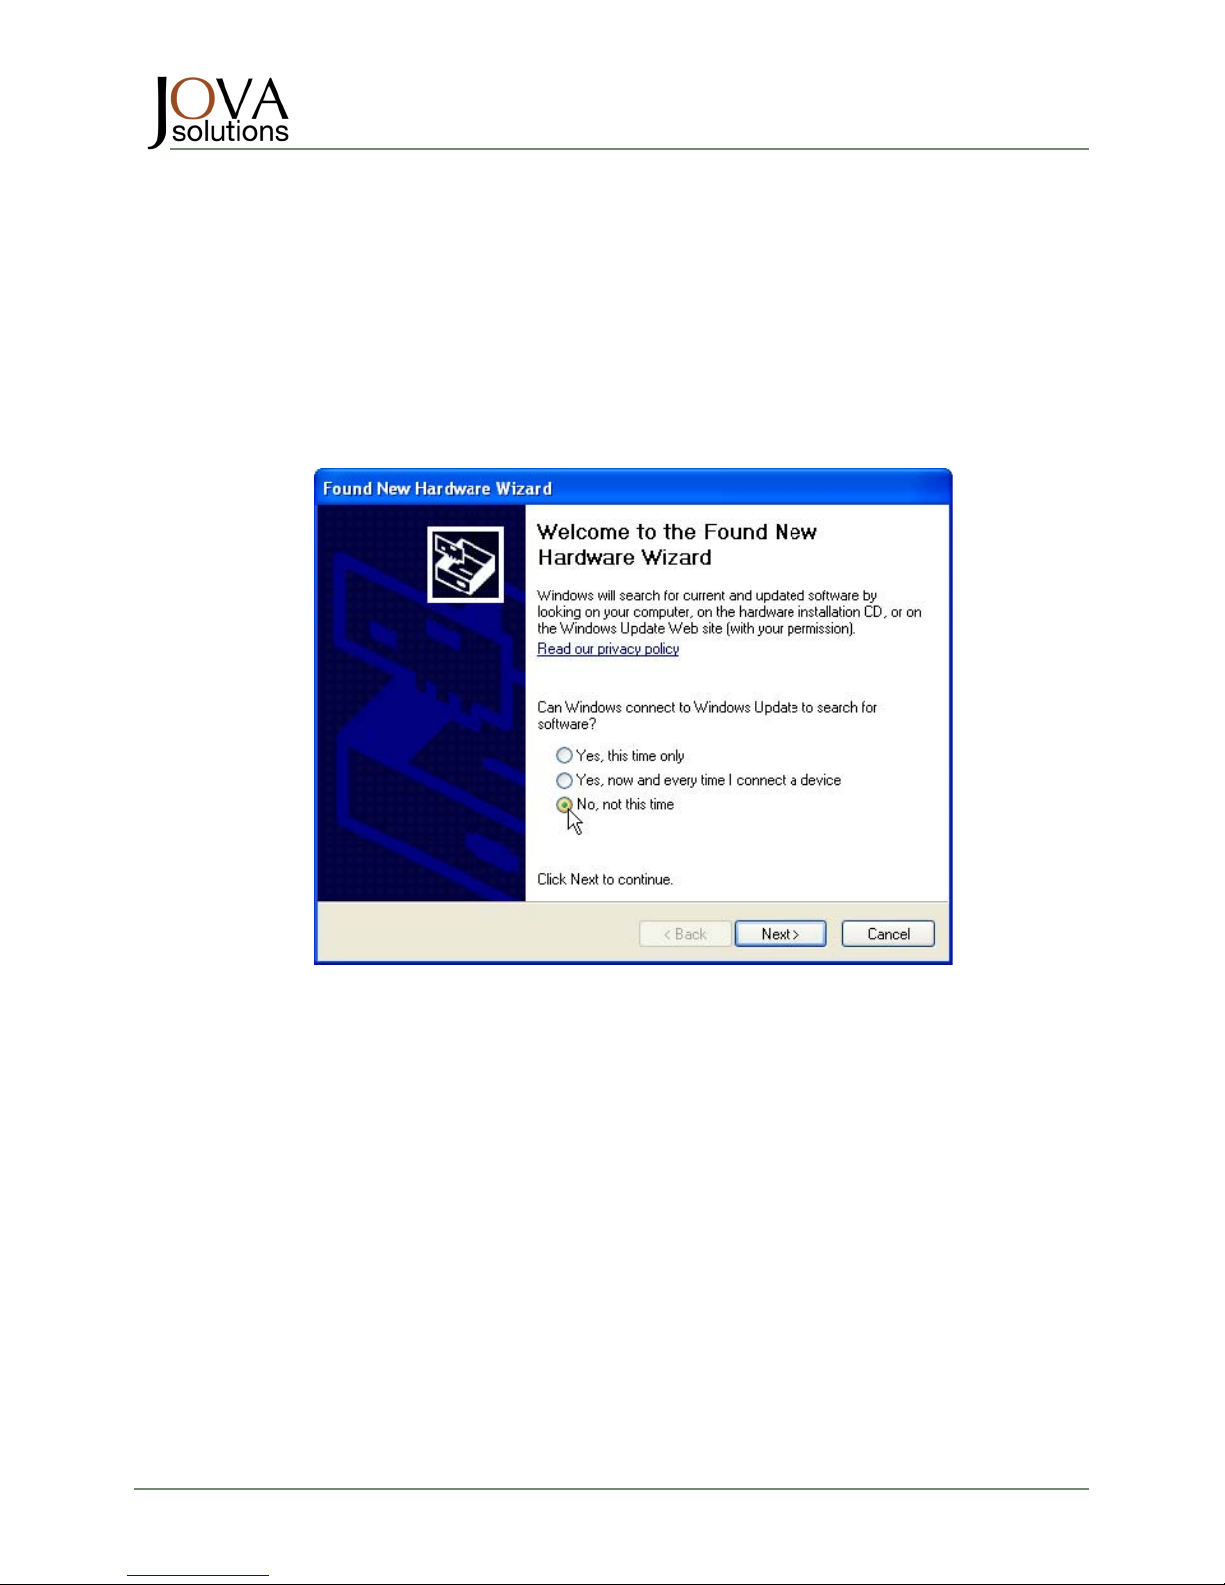
When first connecting the ISL Hardware to the host computer, the Windows operating system
will launch and run the “Found New Hardware Wizard”. Follow the prompts as shown below
to complete the wizard.
Select the “No, not at this time” radio button and press the “Next >” button.
Page 16
ISL-3200
TM
DIGITAL IMAGING SENSOR INTERFACE
Quick Start Guide
ISL-3200TM Quick Start Guide Document Number 210-0008-02 Page 16 of 22
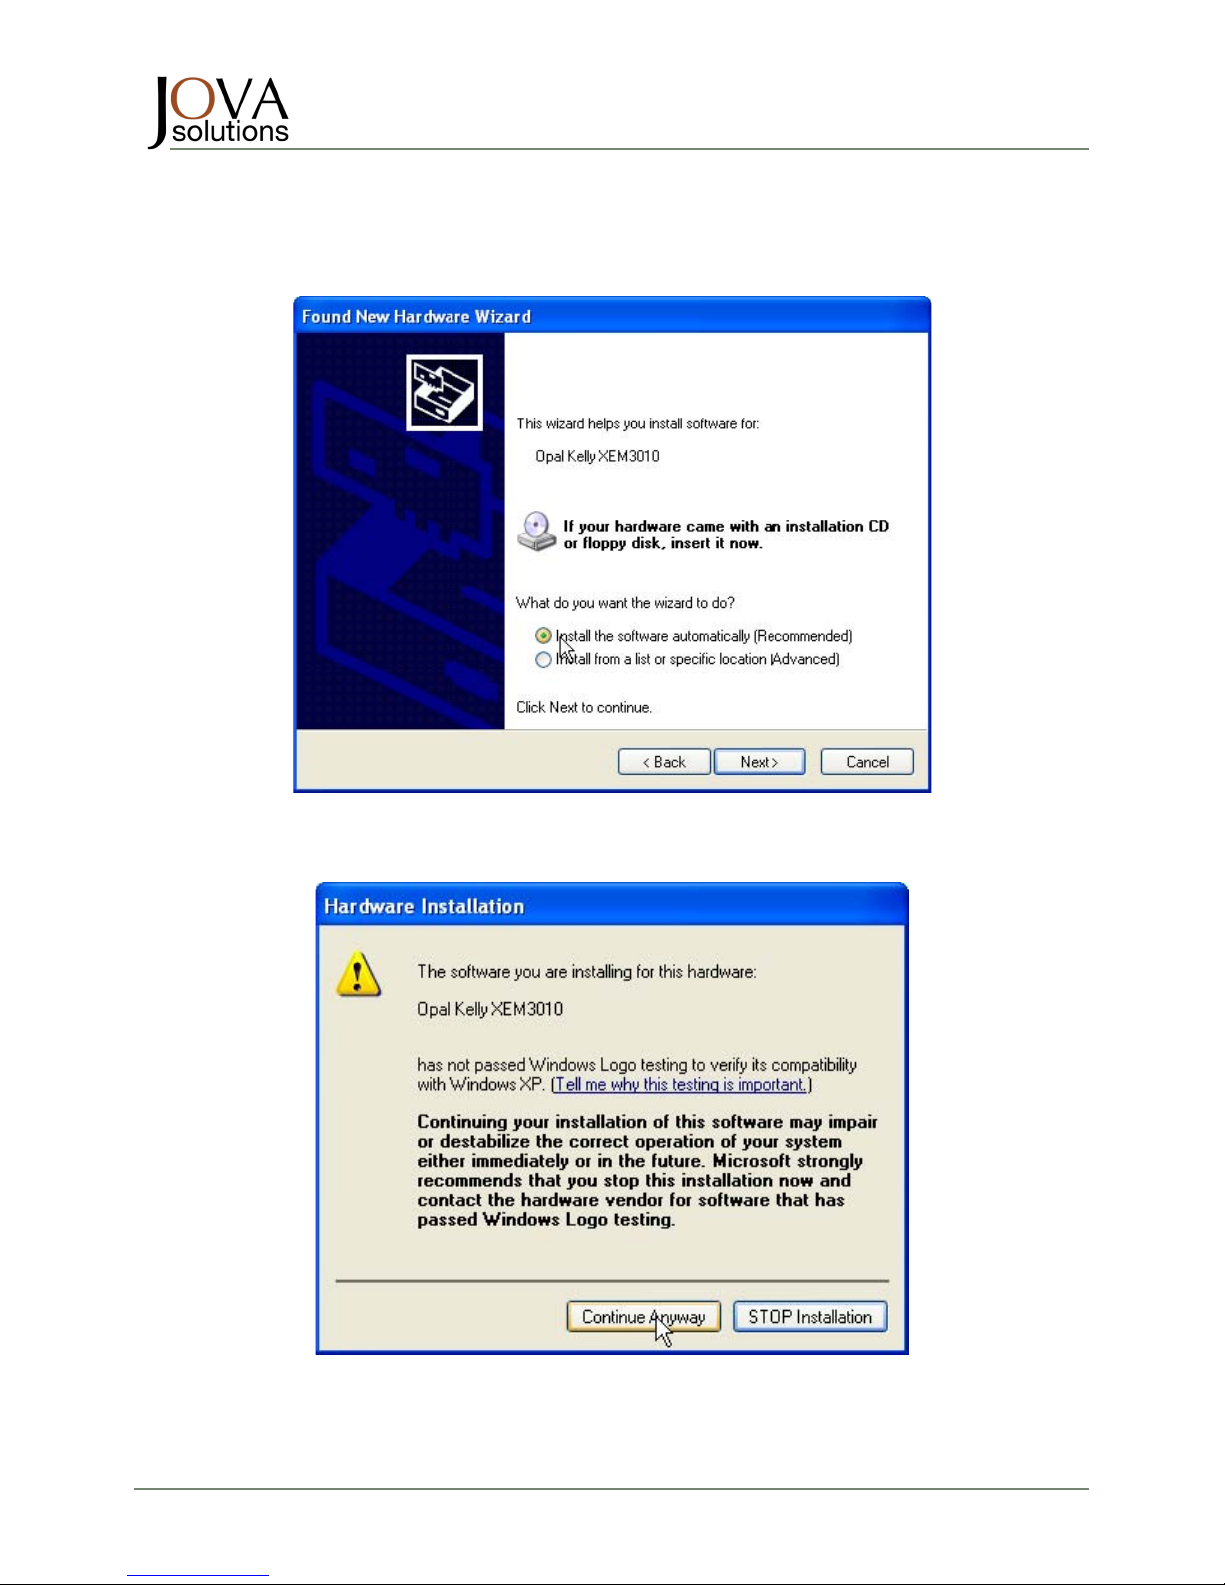
Select the “Install the software automatically (Recommended)” radio button and press the “Next >”
button.
Choose the “Continue Anyway” button.
Page 17
ISL-3200
TM
DIGITAL IMAGING SENSOR INTERFACE
Quick Start Guide
ISL-3200TM Quick Start Guide Document Number 210-0008-02 Page 17 of 22
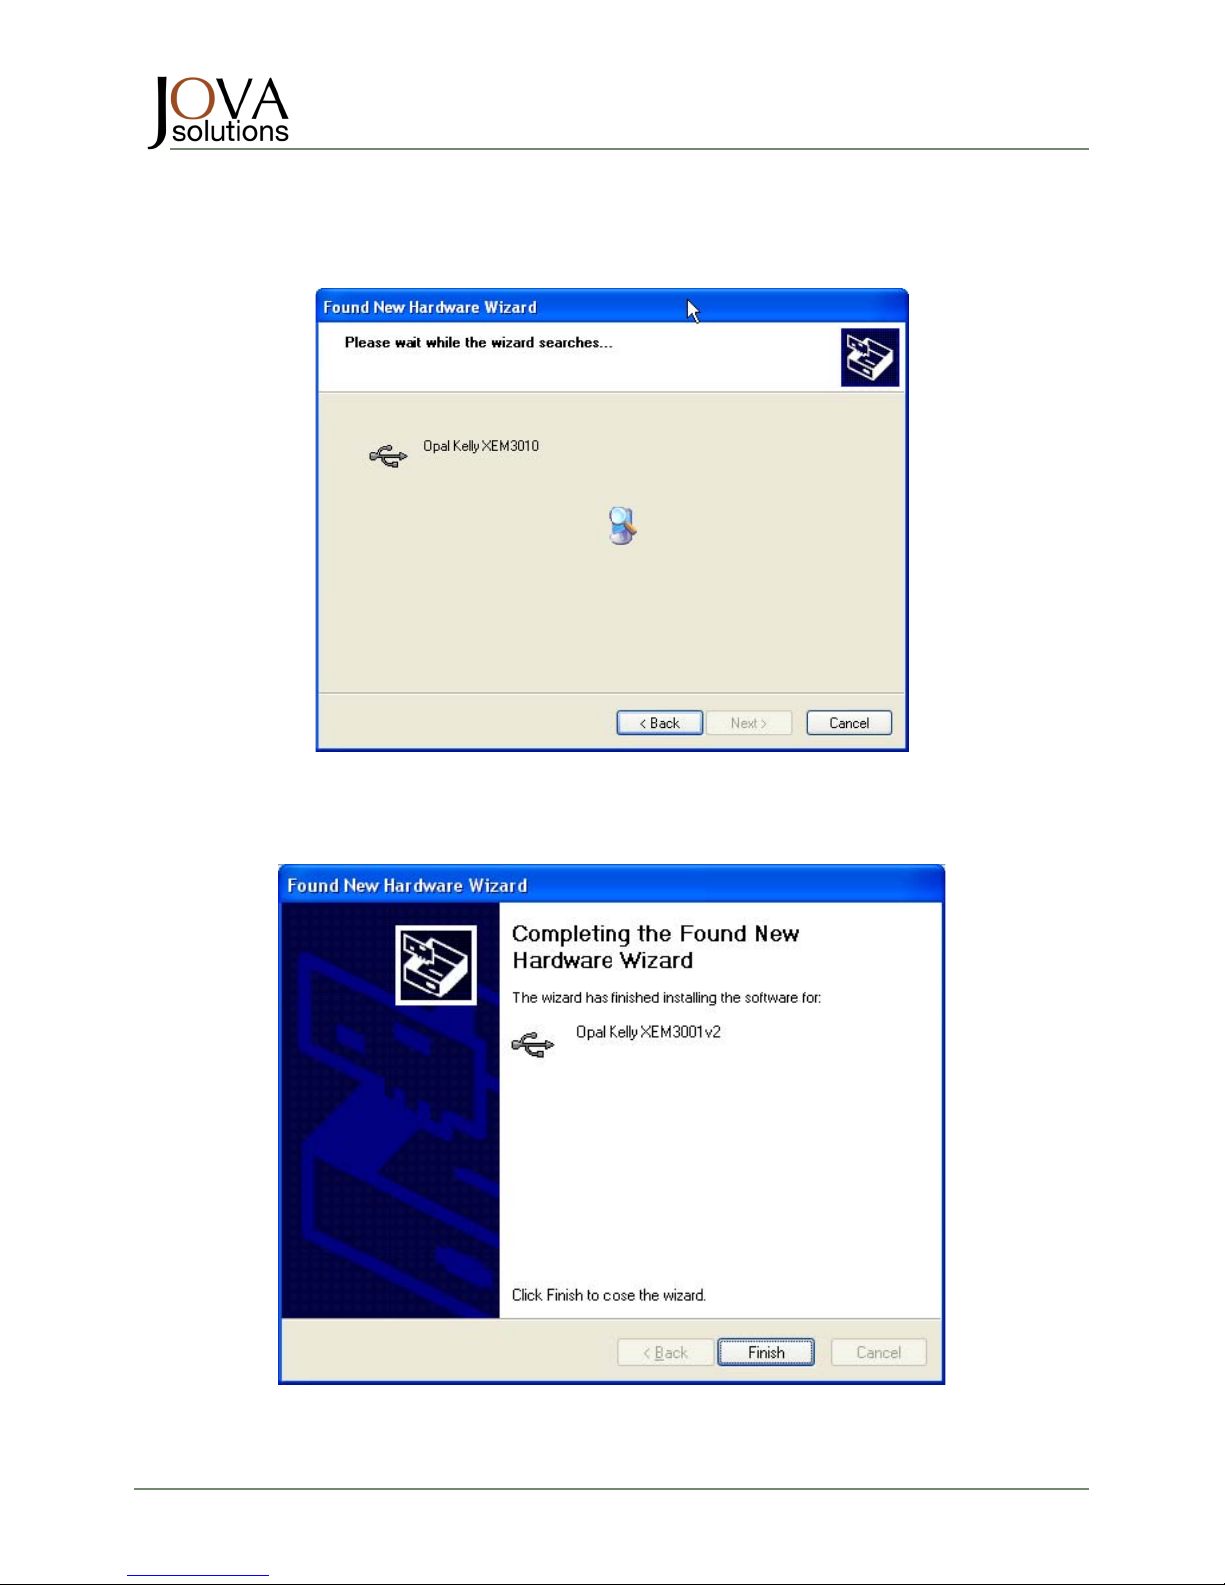
Allow the installation to continue through this screen:
Press the “Finish” button to complete the installation. Your system is now configured and you are
now ready to launch and run the Image Sensor Lab.exe application software and use your ISL-3200
with the USB interface.
Page 18
ISL-3200
TM
DIGITAL IMAGING SENSOR INTERFACE
Quick Start Guide
ISL-3200TM Quick Start Guide Document Number 210-0008-02 Page 18 of 22
8. STANDARD INSTALLATION OF EXTERNAL PCI EXPRESS (PCIE) OPTIONAL INTERFACE
Completion of these steps is required only if you have the PCIe interface.
The ISL PCIe driver is built on top of the National Instruments NI-VISA™ Kernel level PCI Driver and
can be used on workstations with PCIe slots or laptop computers with a PCIe (Express) slots.
The ISL software installer installs the NI-VISA platform and also adds a WINDOWS .inf file (Jova
PCIe.inf) to the WINDOWS\INF directory. When the ISL PCIe device is attached to the host
computer for the first time the WINDOWS system detects the new device and launches the Found
New Hardware wizard.
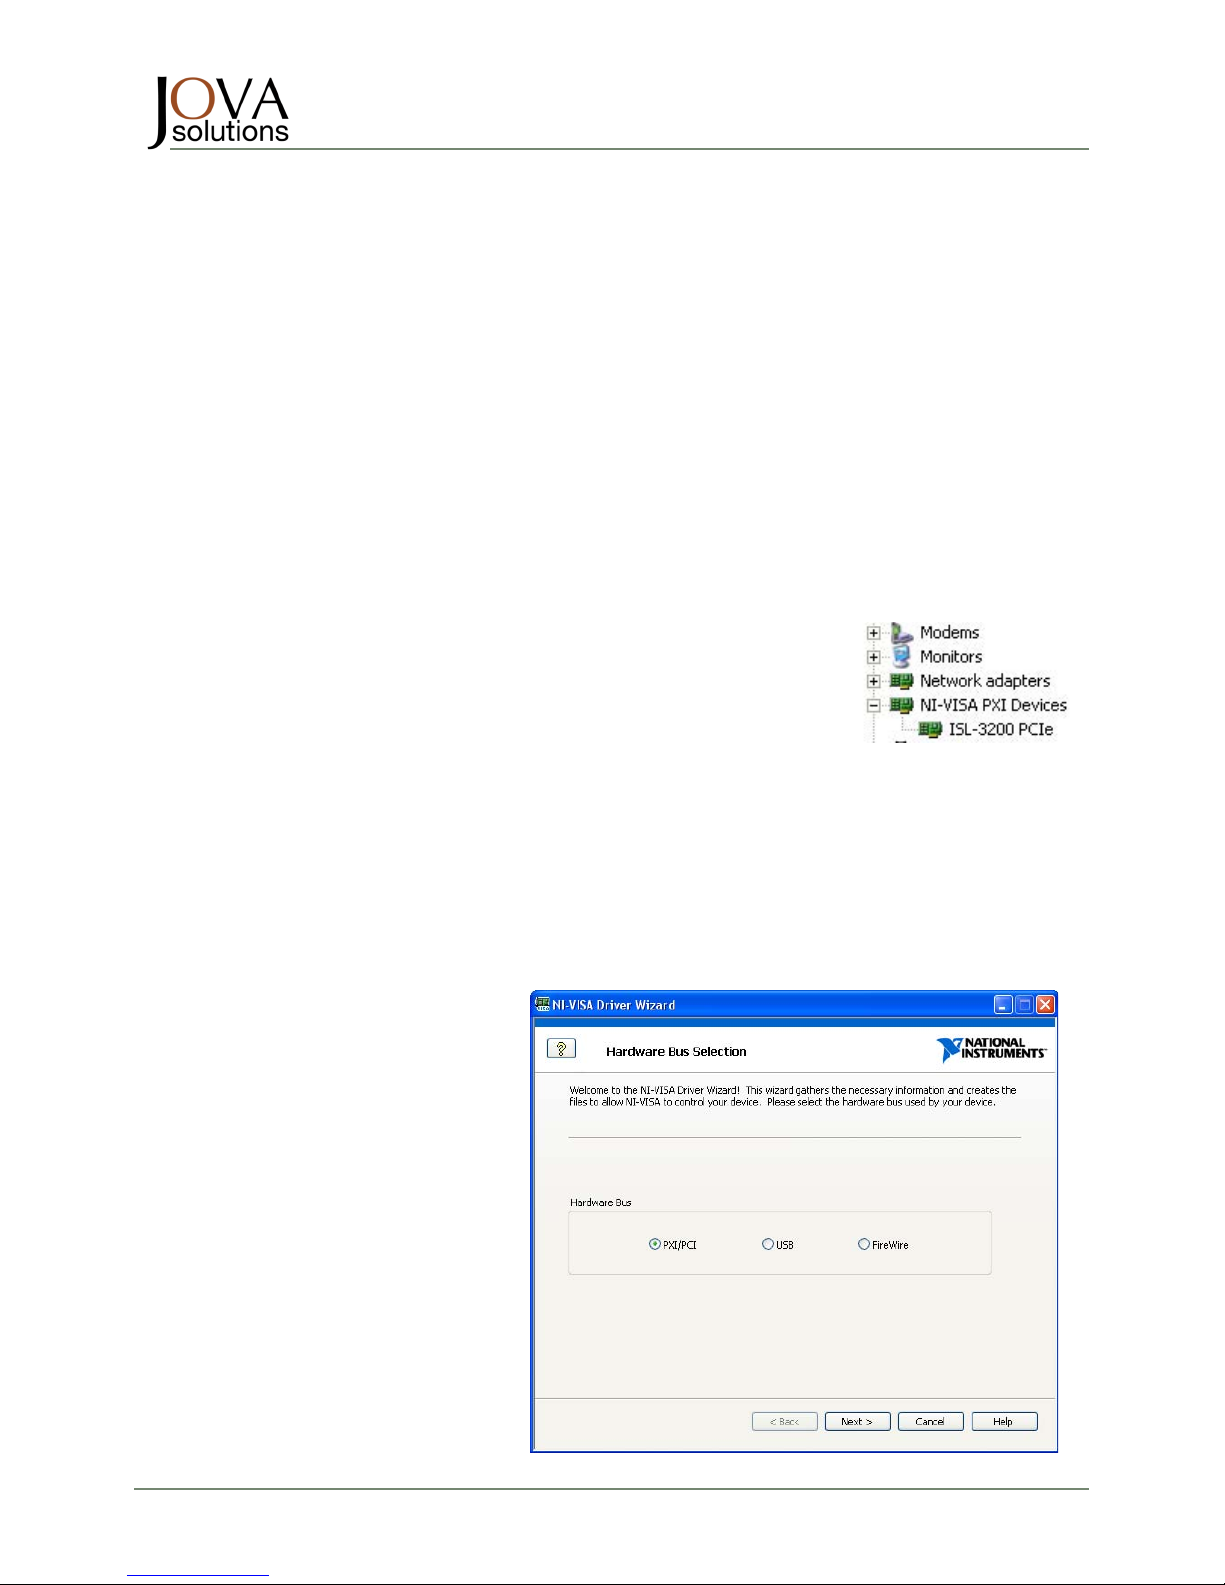
When the Found New Hardware wizard completes, the ISL PCIe device shows up in the Device
Manager as shown in the screen shot to the right.
NOTE: Do not connect or disconnect the ISL PCIe cable or interface cards when the WINDOWS
system is booted and running. The computer must be powered down to connect/disconnect the PCIe
device or to power up or down the ISL device.
On modern computers with good PCIe support, the ISL-3200 PCIe device
can be disabled/enabled from the Device Manager by right clicking on the
ISL-3200 PCIe device and selected the desired option. Make sure you are
not currently running any software that might have an active connection
open to the ISL PCIe device.
Once the PCIe device is disabled the PCIe device may be
connected/disconnected or the power applied or removed.
After the ISL PCIe driver has been installed and the device shows up under the Device Manager, the
ISL PCIe device can be accessed using any of the ISL software interfaces (Application software
.exe, LabVIEW drivers, DLL interface, or TestStand step types.) The software interfaces are
universal and support both USB and PCIe interfaces.
8.1 ALTERNATE PCIE DRIVER INSTALLATION
In rare cases, an alternate PCIe driver installation method may be required. This method uses the
NI-VISA Driver Wizard to generate the
.inf file and install the file in the
WINDOWS system.
Start by launching the wizard at: Start\All
Programs\National
Instruments\VISA\Driver Wizard. The
following screen is displayed.
Choose “PXI/PCI“ for the Hardware Bus
and then click on the “Next >” button.
Page 19
ISL-3200
TM
DIGITAL IMAGING SENSOR INTERFACE
Quick Start Guide
ISL-3200TM Quick Start Guide Document Number 210-0008-02 Page 19 of 22
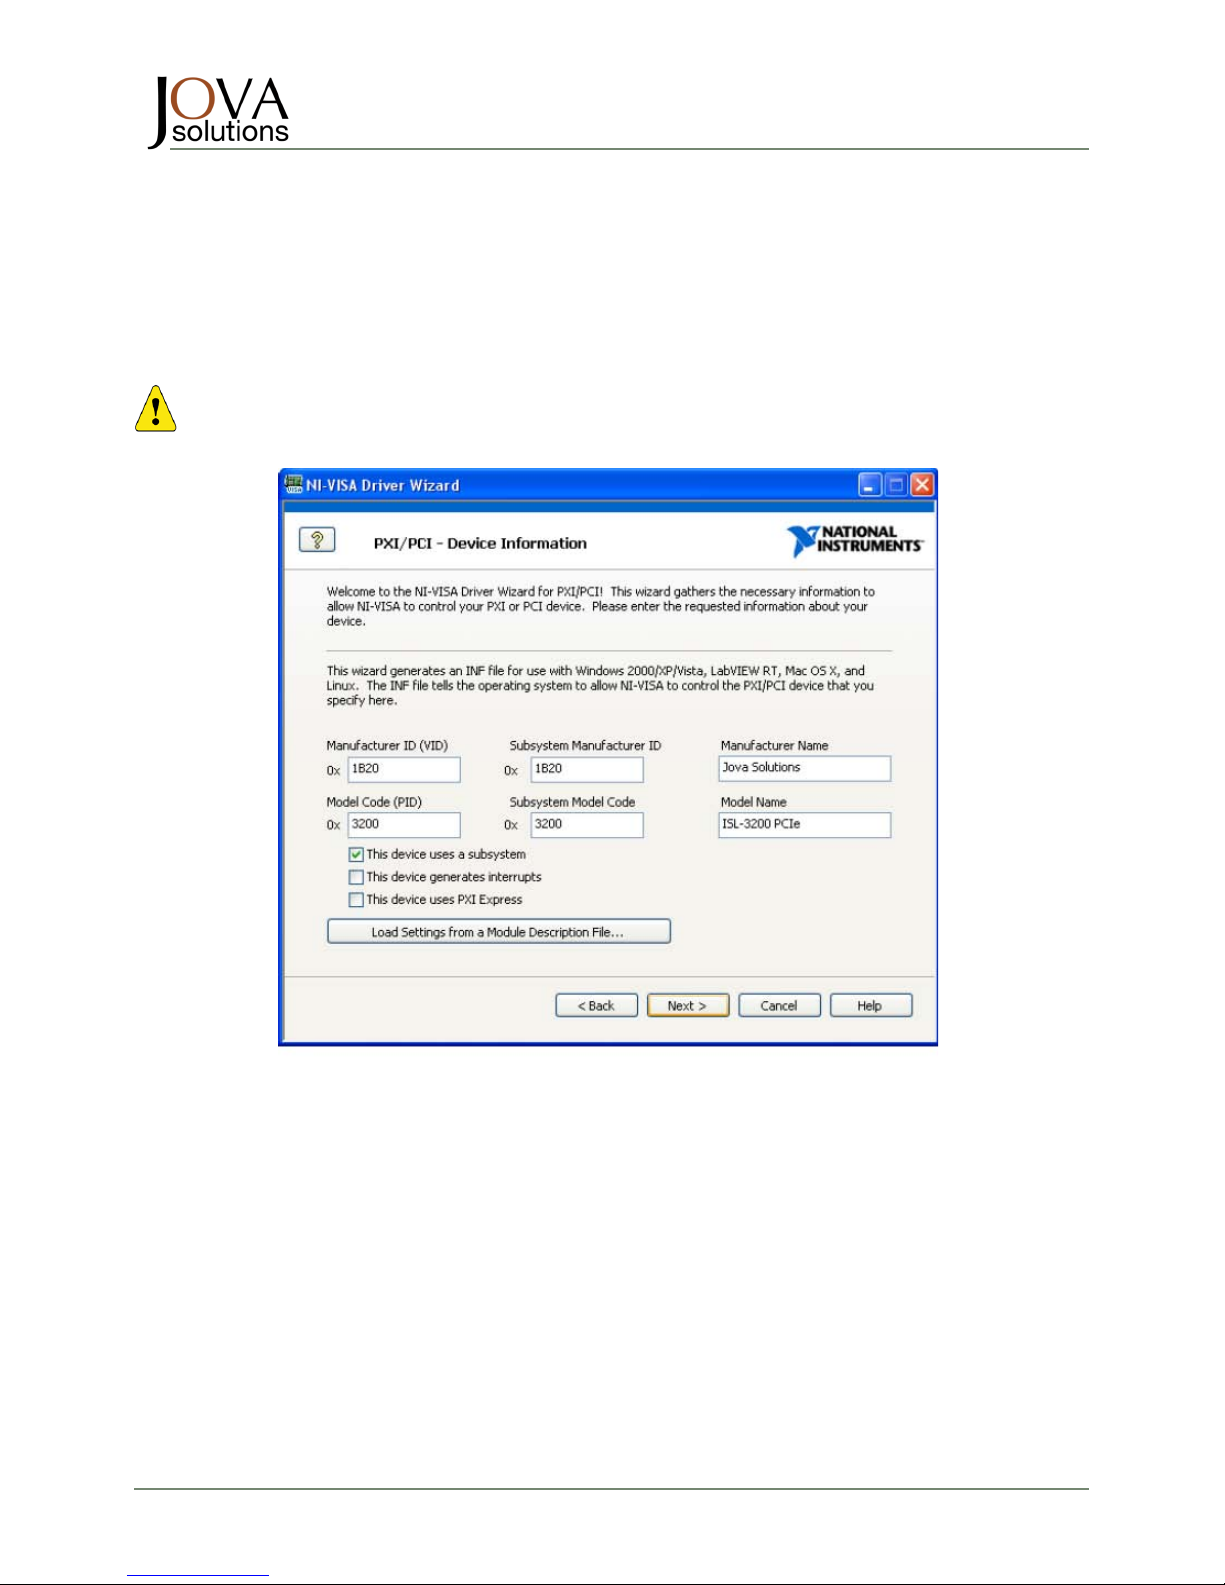
Fill in the PXI/PCI Device Information form with the values shown in the upper screen shot. The Jova
Solutions unique VID is 0x1B20 and the Model Code is 0x3200. The device uses a Subsystem with
the same VID and Model.
Be sure that the “This device uses a subsystem” checkbox is checked, before pressing the
“Next >” button.
Even though this device is a PCI Express device DO NOT check the “This device uses PXI
Express” checkbox. This option is reserved for PXI specific devices.
Page 20
ISL-3200
TM
DIGITAL IMAGING SENSOR INTERFACE
Quick Start Guide
ISL-3200TM Quick Start Guide Document Number 210-0008-02 Page 20 of 22
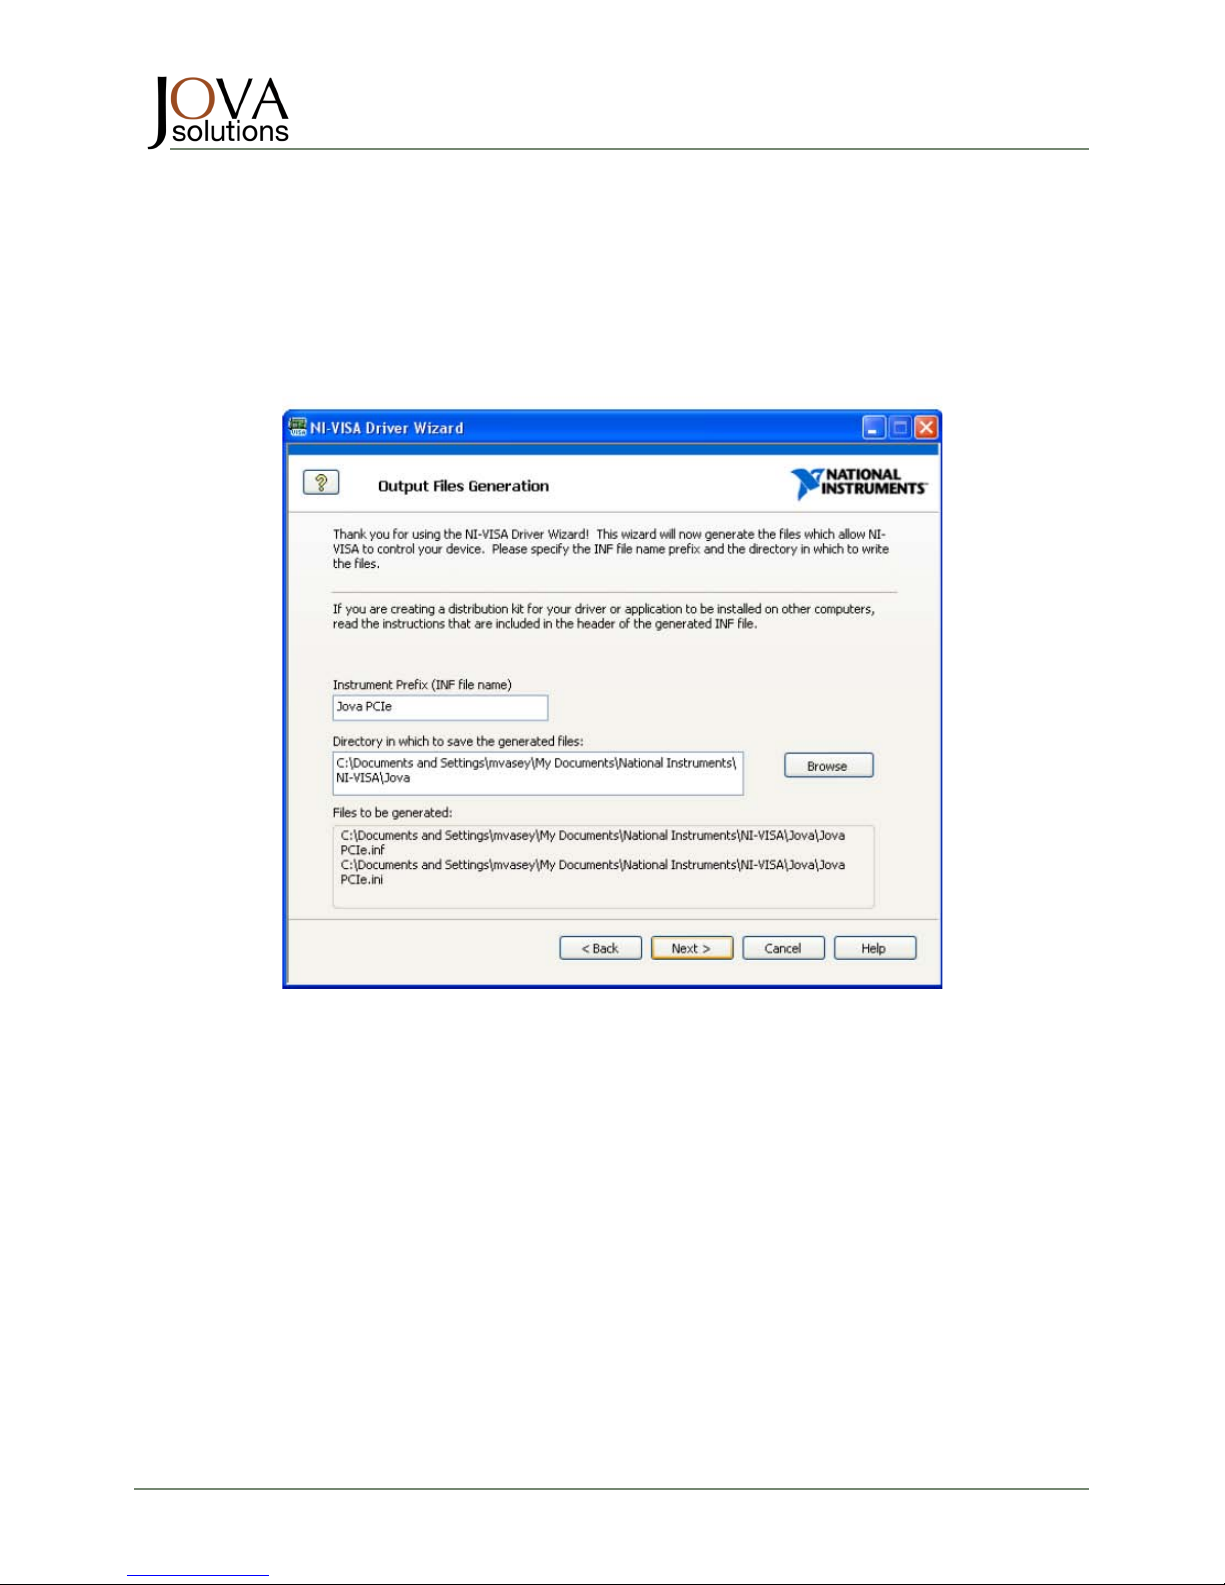
The next screen allows the user to specify the prefix names for the .inf file and to call out a specific
location for the output of the wizard.
Use the values shown in the screen shot to the right when generating files for the ISL PCIe interface.
Launch the wizard by going to Start\All Programs\National Instruments\VISA\Driver Wizard. The
introductory screen on the next page will be displayed
continued
Page 21
ISL-3200
TM
DIGITAL IMAGING SENSOR INTERFACE
Quick Start Guide
ISL-3200TM Quick Start Guide Document Number 210-0008-02 Page 21 of 22
If problems occur during the initial installation of the ISL PCIe device you may need to clean up certain
WINDOWS system files by hand before the ISL PCIe device can be recognized again by the System.
First power-down the system, disconnect the PCIe device, and re-power and boot your system.
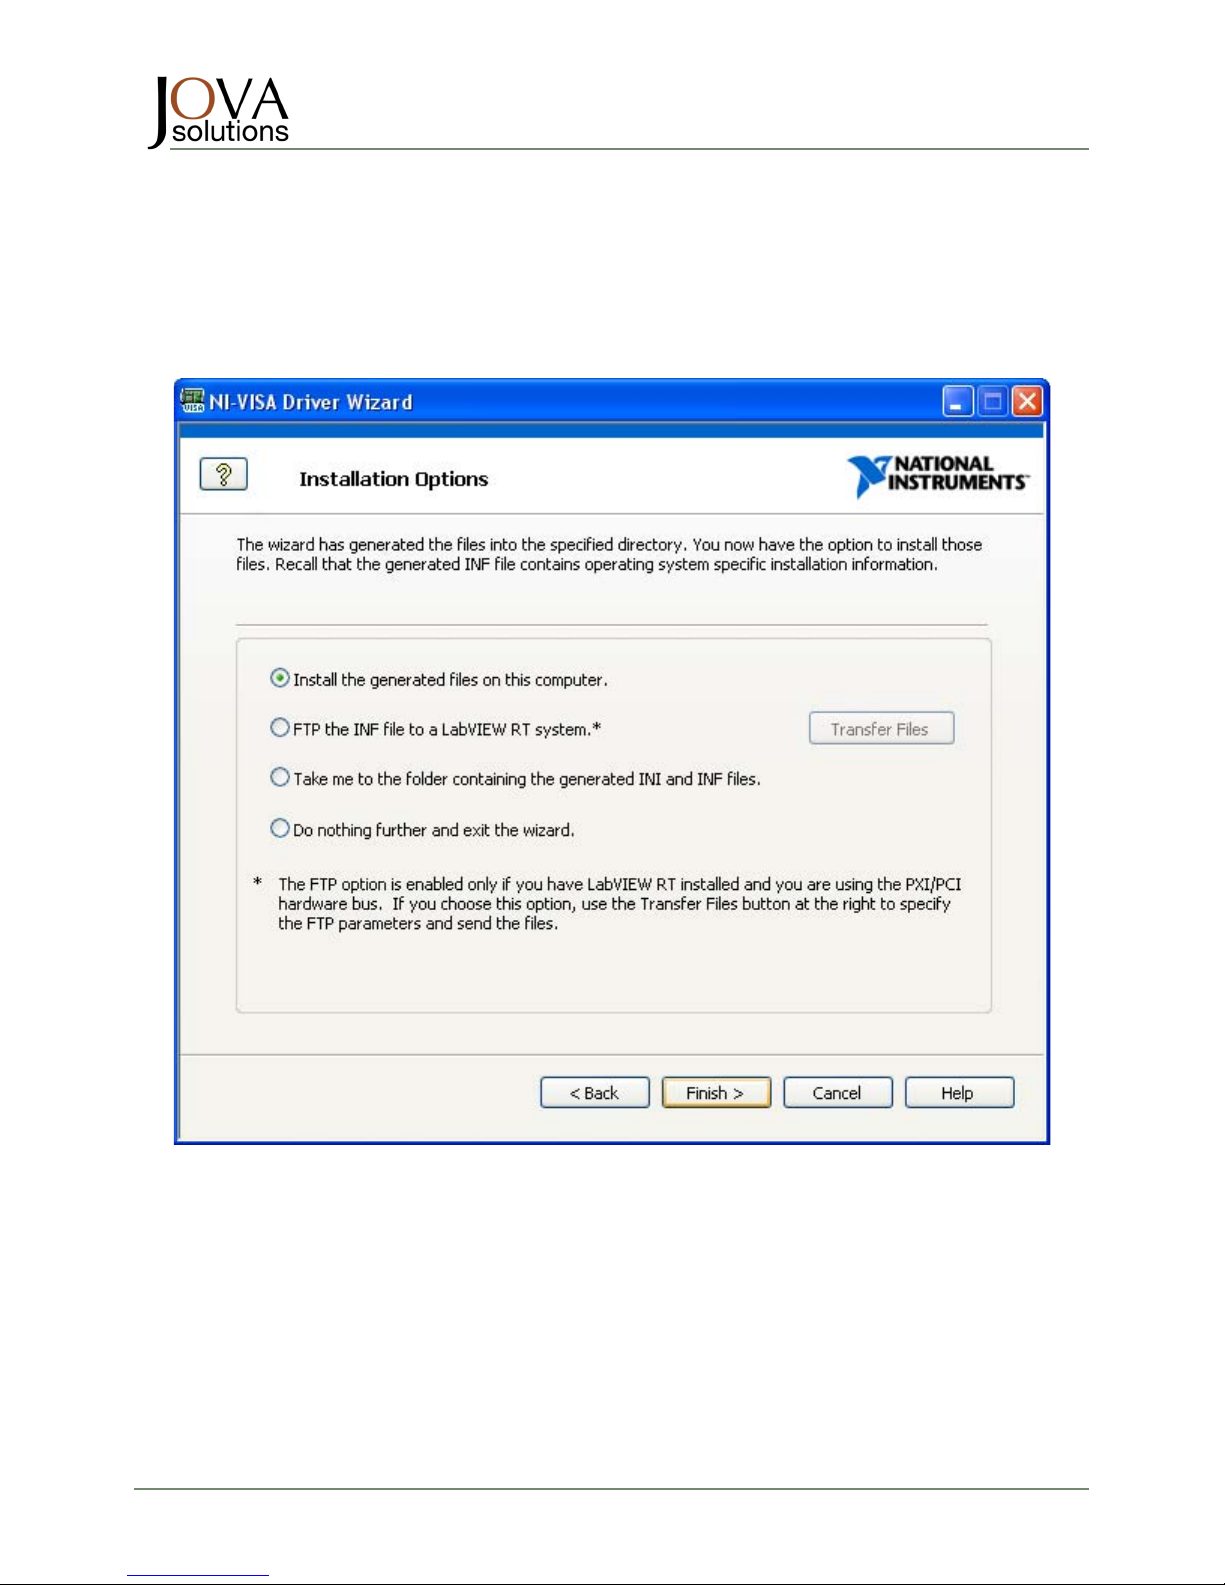
The next screen shows the Installation Options
continued
Page 22
ISL-3200
TM
DIGITAL IMAGING SENSOR INTERFACE
Quick Start Guide
ISL-3200TM Quick Start Guide Document Number 210-0008-02 Page 22 of 22
8.2 PCIE DRIVER RE-INSTALLATION
If problems occur during the initial installation of the ISL PCIe device, you may need to manually edit
certain WINDOWS system files, before the ISL PCIe device can be recognized again by the System.
First, power the system down, disconnect the PCIe device, and apply power and re-boot your system.
Then, remove the Jova PCIe.inf and Jova PCIe.pnf files in the WINDOWS\INF directory.
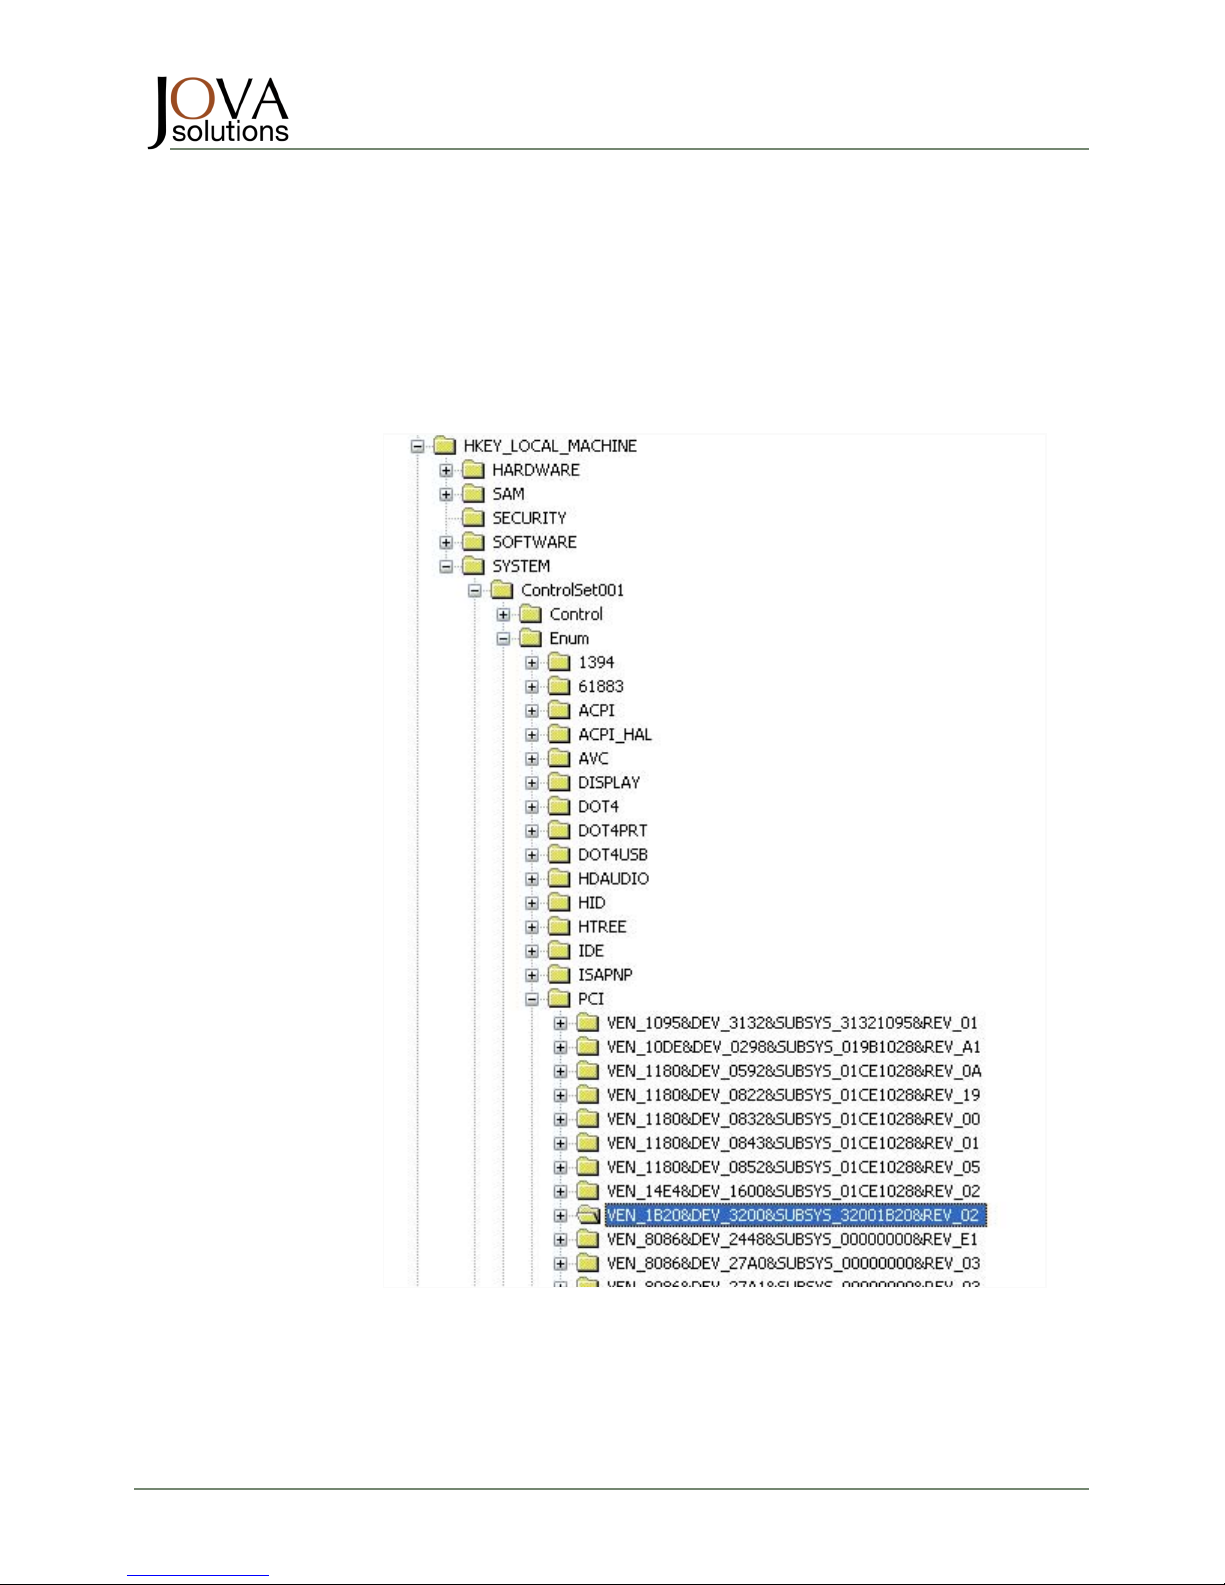
Next, edit the WINDOWS Registry by first navigating to the location shown in the screen capture below.
Delete the key that is labeled “VEN_1B20DEV…” (You may have to first right click on the item and set the
permissions to “Full” for the logged on user.)
Restart the computer, and again, DO NOT connect the ISL PCIe hardware. After the computer has
restarted, regenerate the PCIe driver using the Alternate method described in Section 8.1 (using the NIVISA Driver Wizard).
 Loading...