

Page 1
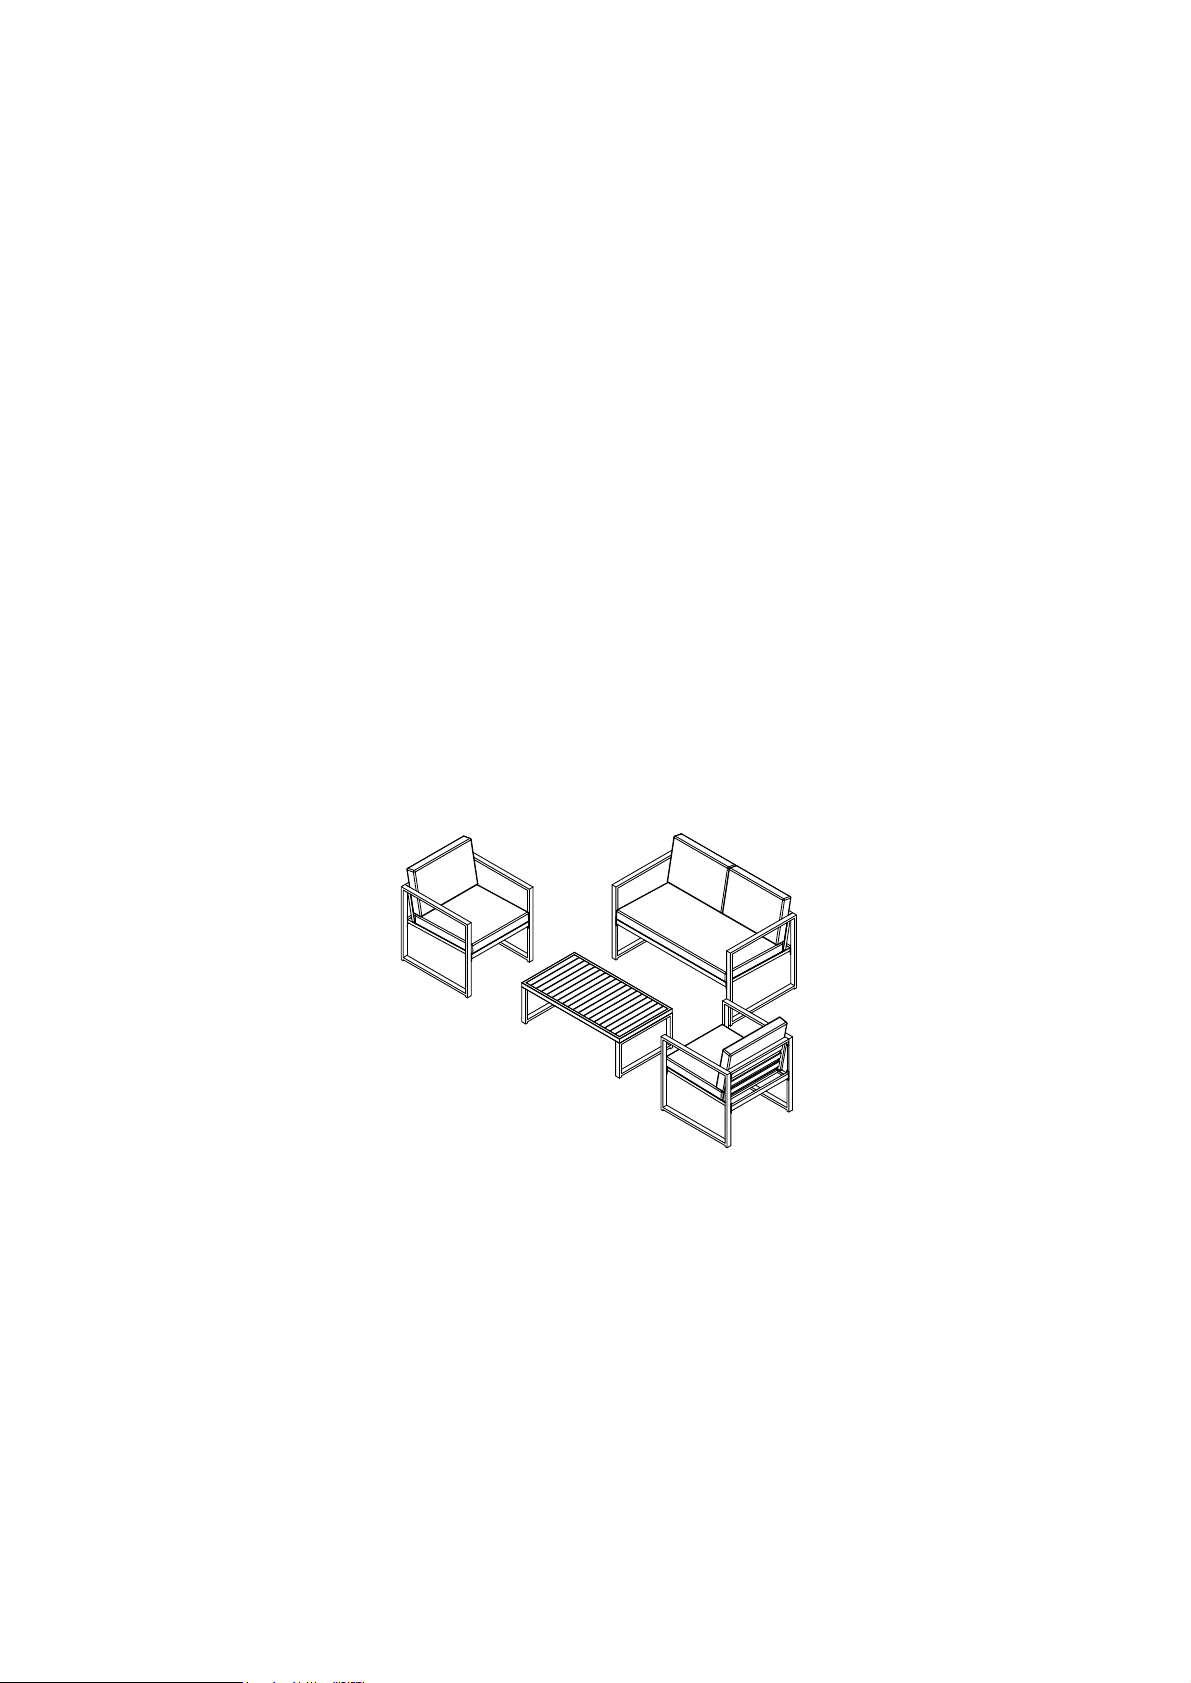
4 Piece Multiple Chairs
Seating Group with Cushions
Page 2
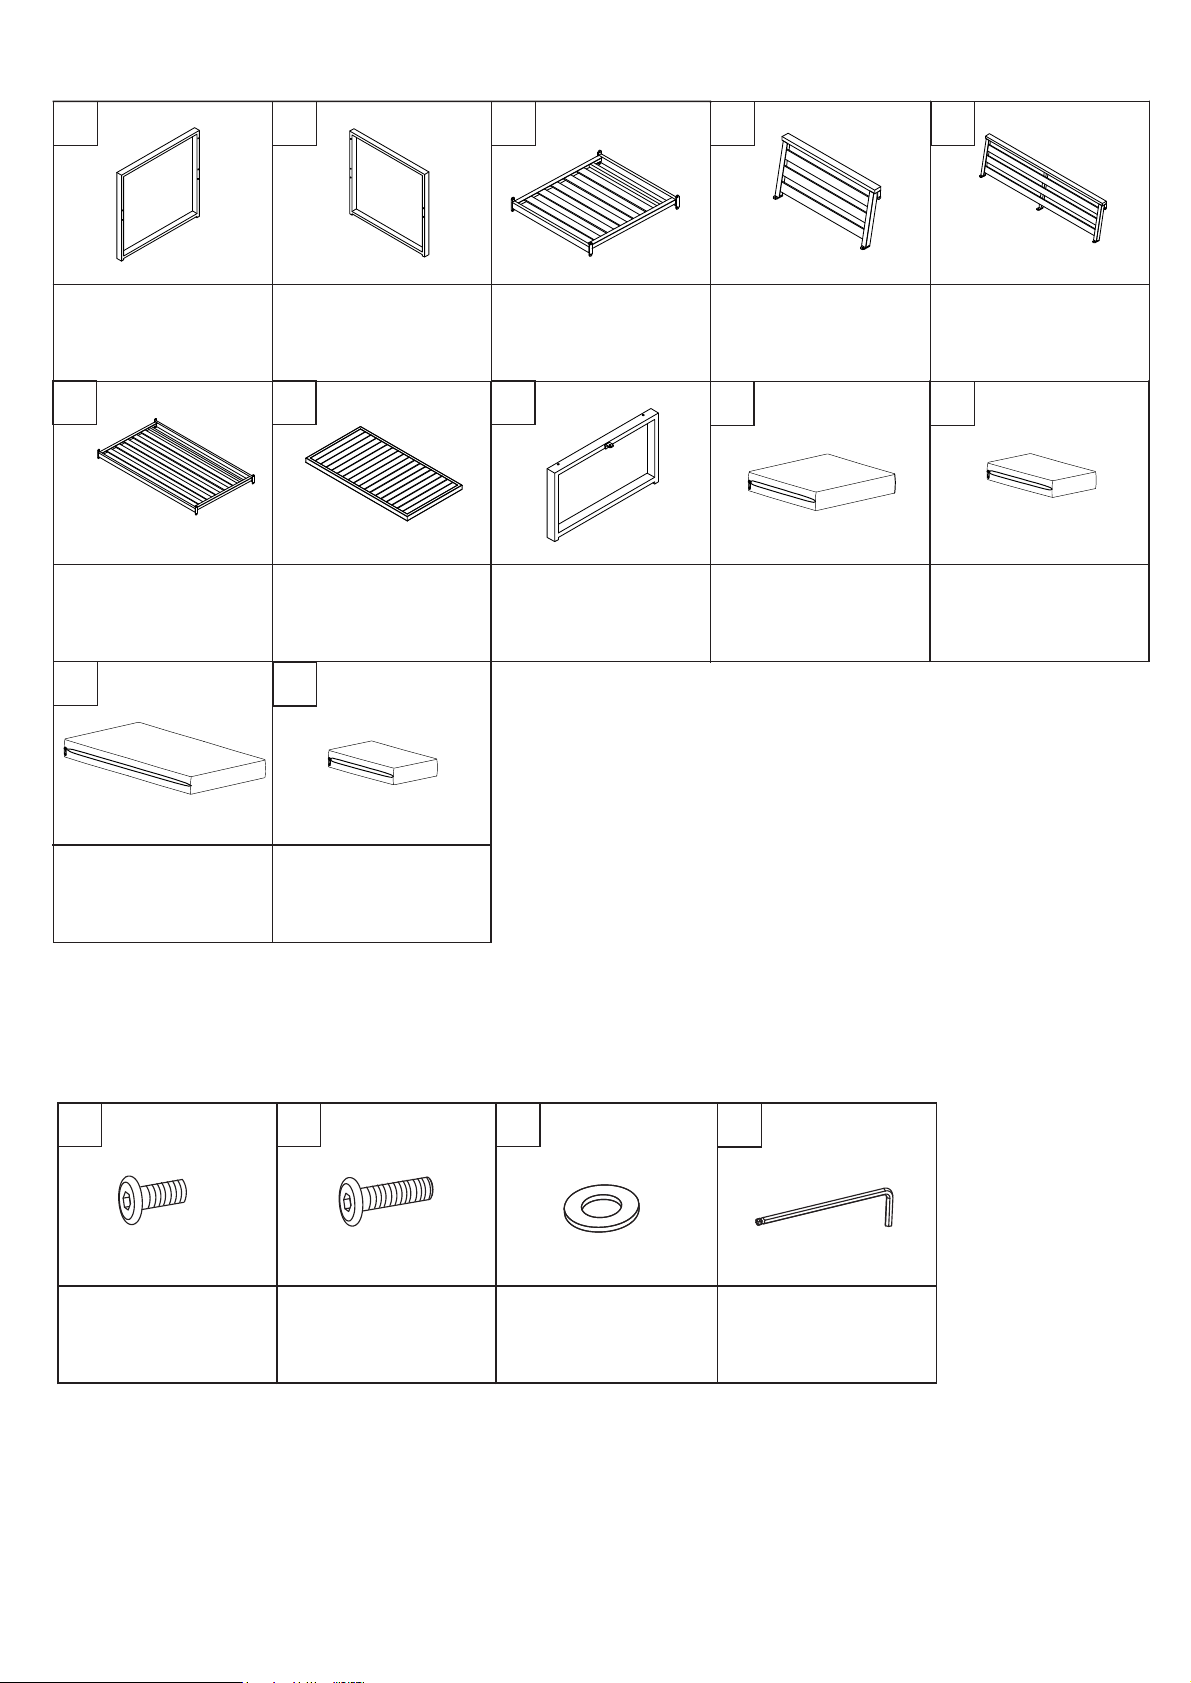
PART LIST
A
Left Arm Panel
3 PCS
F
(loveseat) (arm chair)
Seat Panel
1 PC
K
B
Right Arm Panel
3 PCS
G
Top Panel
1 PC
L
C D
(arm chair)
Seat Panel
2 PCS
H I
Side Panel
2 PCS
(arm chair)
Back Panel
2 PCS
Seat Cushion
2 PCS
E
(loveseat)
Back Panel
1 PC
J
(arm chair)
Back Cushion
2 PCS
(loveseat)
Seat Cushion
1 PC
(loveseat)
Back Cushion
2 PCS
HARDWARE LIST
#1
M6*15mm
Short Bolt
39 PCS (Extra 2)
#2 #3
M6*30mm
Long Bolt
4 PCS (Extra 2)
M6mm
Flat Washer
43 PCS (Extra 2)
#4
M6mm
Allen Wrench
1 PC
2
Page 3
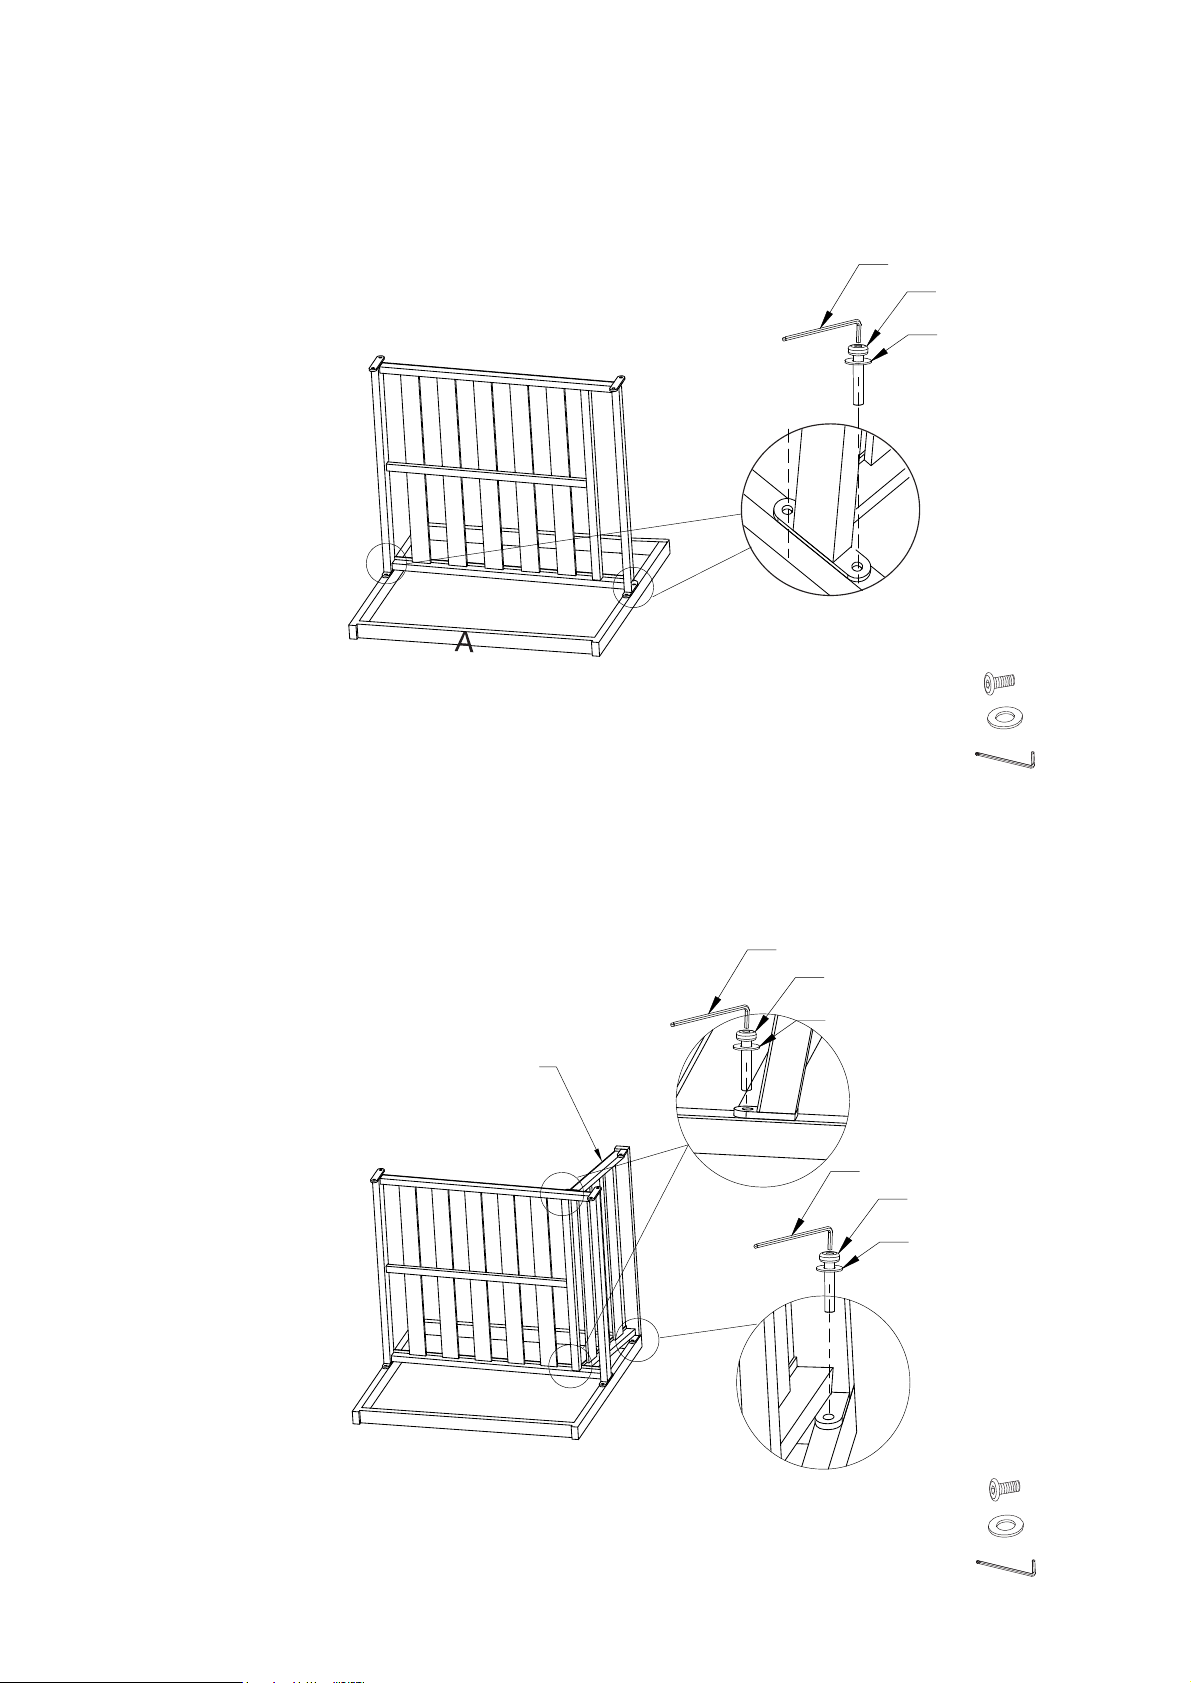
Step 1. Lay left arm panel (part A) upside down on a soft flat surface, such as carpet, as shown below.
Attach seat panel (part C) to left arm panel (part A) using short bolts (part #1), flat washers
(part #3) and allen wrench (part #4).
NOTE: Please do not fully tighten bolts until unit is fully assembled.
#4
#1
#3
C
#1
#3
#4
Step 2. Attach back panel (part D) to assembled unit (parts A & C) using short bolts (part #1), flat
washers (part #3) and allen wrench (part #4).
NOTE: Please do not fully tighten bolts until unit is fully assembled.
#4
#1
#3
D
#4
#1
C
#3
x4
x4
x1
A
#1
#3
#4
3
x3
x3
x1
Page 4
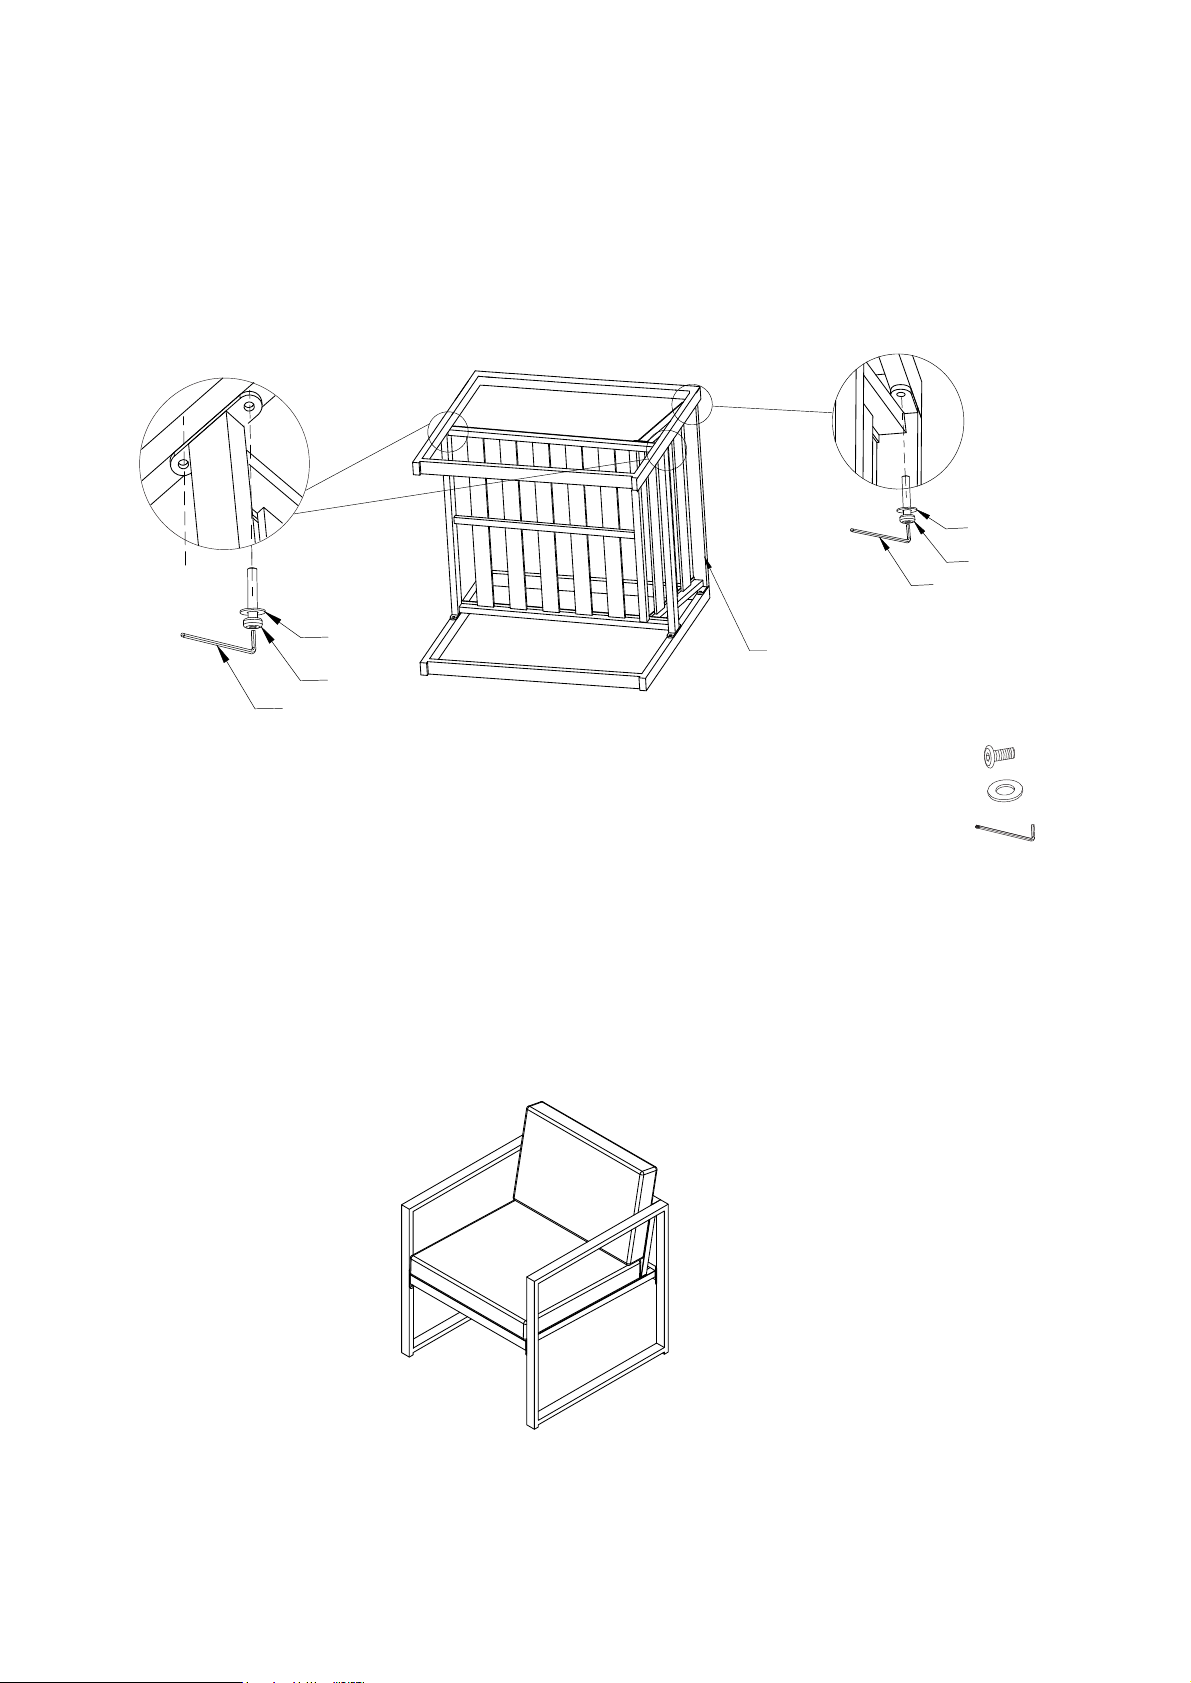
Step 3. Attach right arm panel (part B) to back panel (part D) and seat panel (part C) using short bolts
(part #1), flat washers (part #3) and allen wrench (part #4).
NOTE: Please fully tighten all bolts at this time.
B
C
#3
#3
#1
#4
D
#1
#4
#1
#3
#4
Step 4. Carefully turn unit upright. Place seat cushion (part I) and back cushion (part J) as shown below.
Repeat steps 1-4 to assemble remaining chair.
x5
x5
x1
J
I
4
Page 5
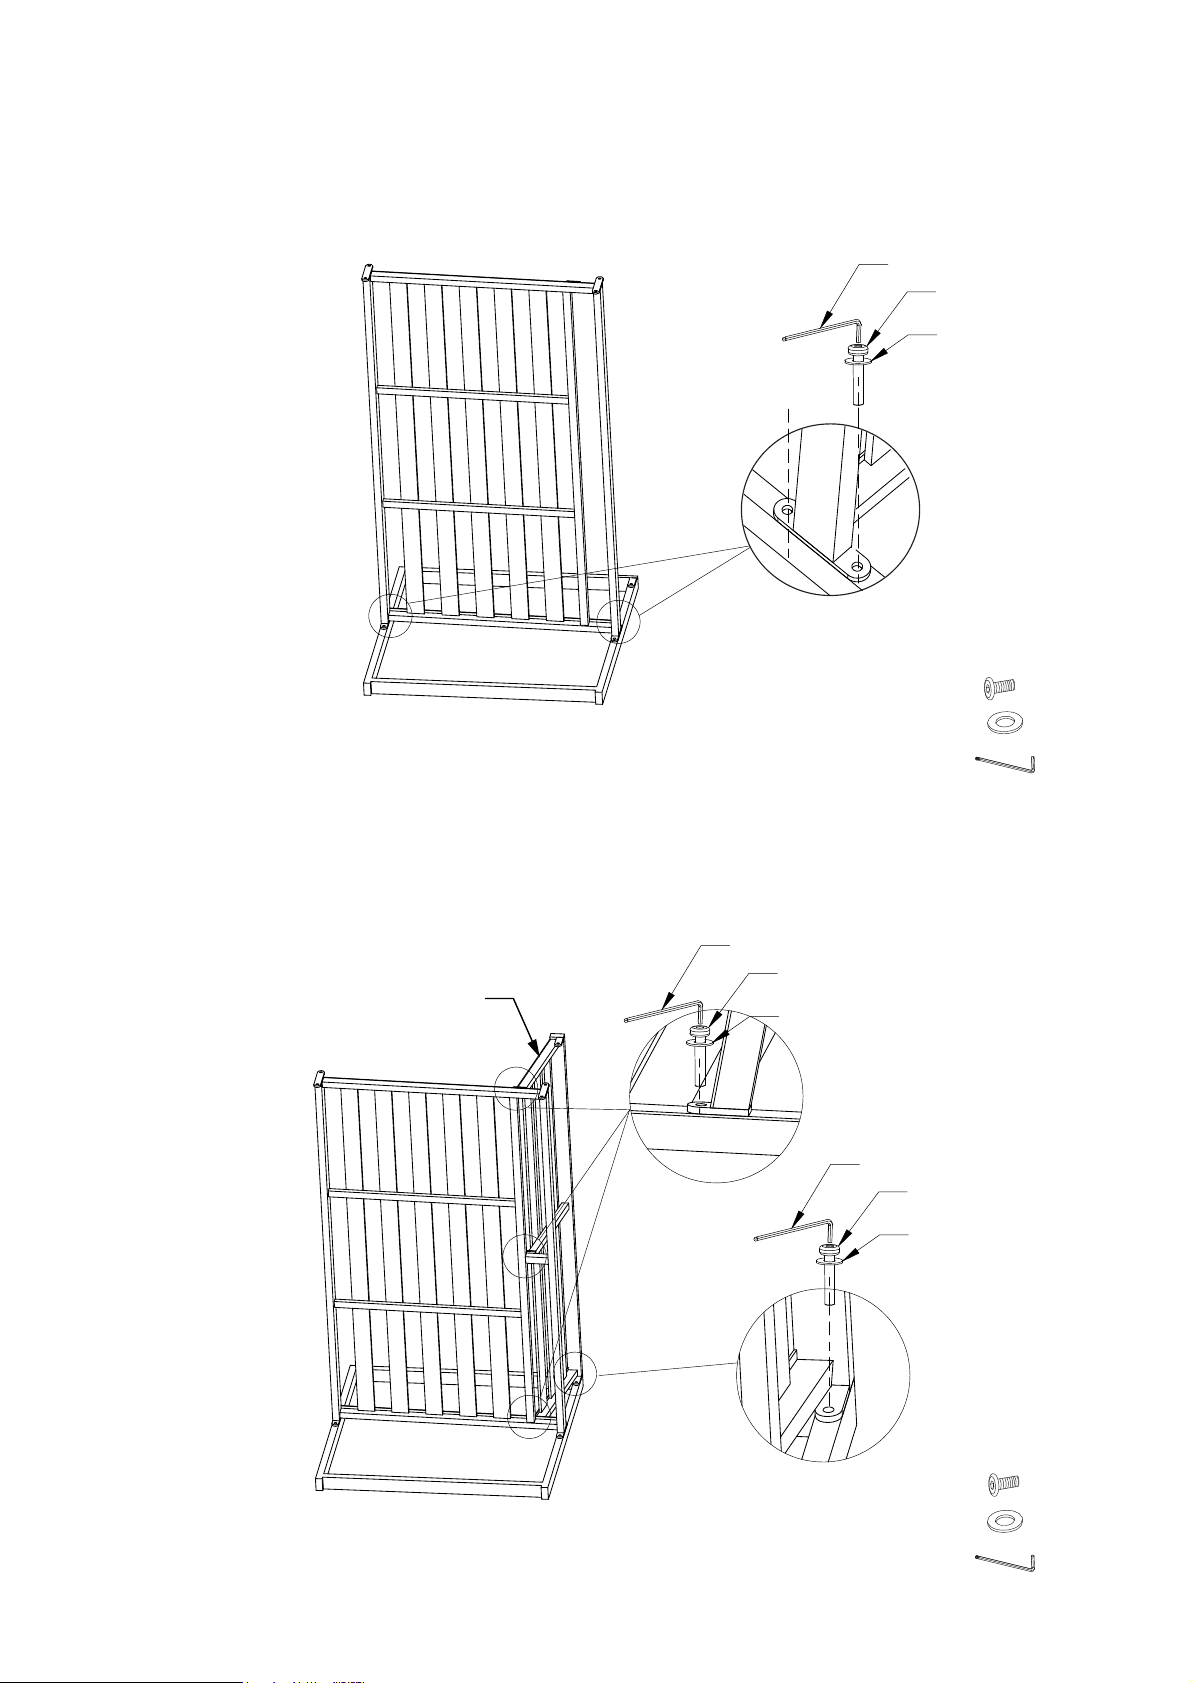
Step 5. Lay left arm panel (part A) upside down on a soft flat surface, such as carpet, as shown below.
Attach seat panel (part F) to left arm panel (part A) using short bolts (part #1), flat washers
(part #3) and allen wrench (part #4).
NOTE: Please do not fully tighten bolts until unit is fully assembled.
#4
#1
#3
F
A
Step 6. Attach back panel (part E) to assembled unit (parts A & F) using short bolts (part #1), flat
washers (part #3) and allen wrench (part #4).
NOTE: Please do not fully tighten bolts until unit is fully assembled.
#4
#1
#1
#3
#4
E
#3
#4
#1
#3
F
x4
x4
x1
A
#1
#3
#4
5
x4
x4
x1
Page 6
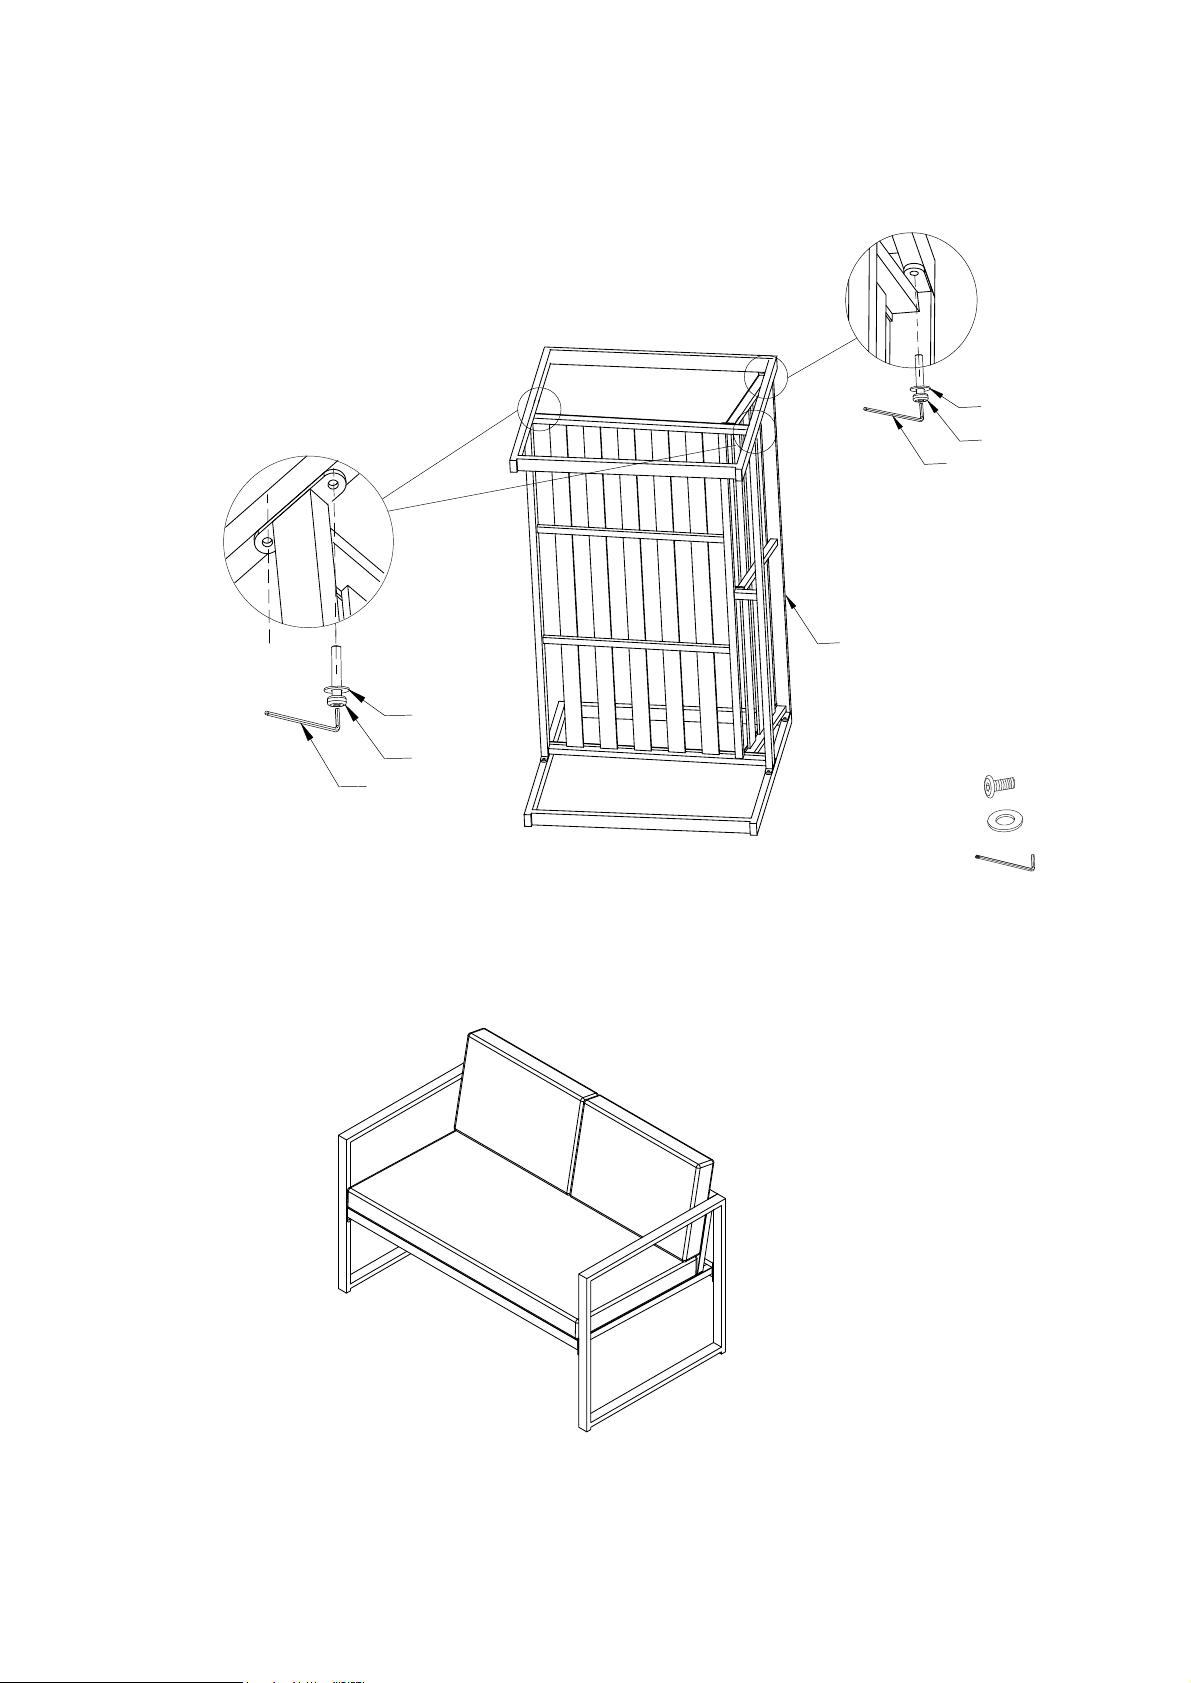
Step 7. Attach right arm panel (part B) to back panel (part E) and seat panel (part F) using short bolts
(part #1), flat washers (part #3) and allen wrench (part #4).
NOTE: Please fully tighten all bolts at this time.
B
#3
#1
#4
F
E
#3
#1
#4
Step 8. Carefully turn unit upright. Place seat cushion (part K) and back cushions (part L) as shown below.
#1
#3
#4
x5
x5
x1
L
L
K
6
Page 7
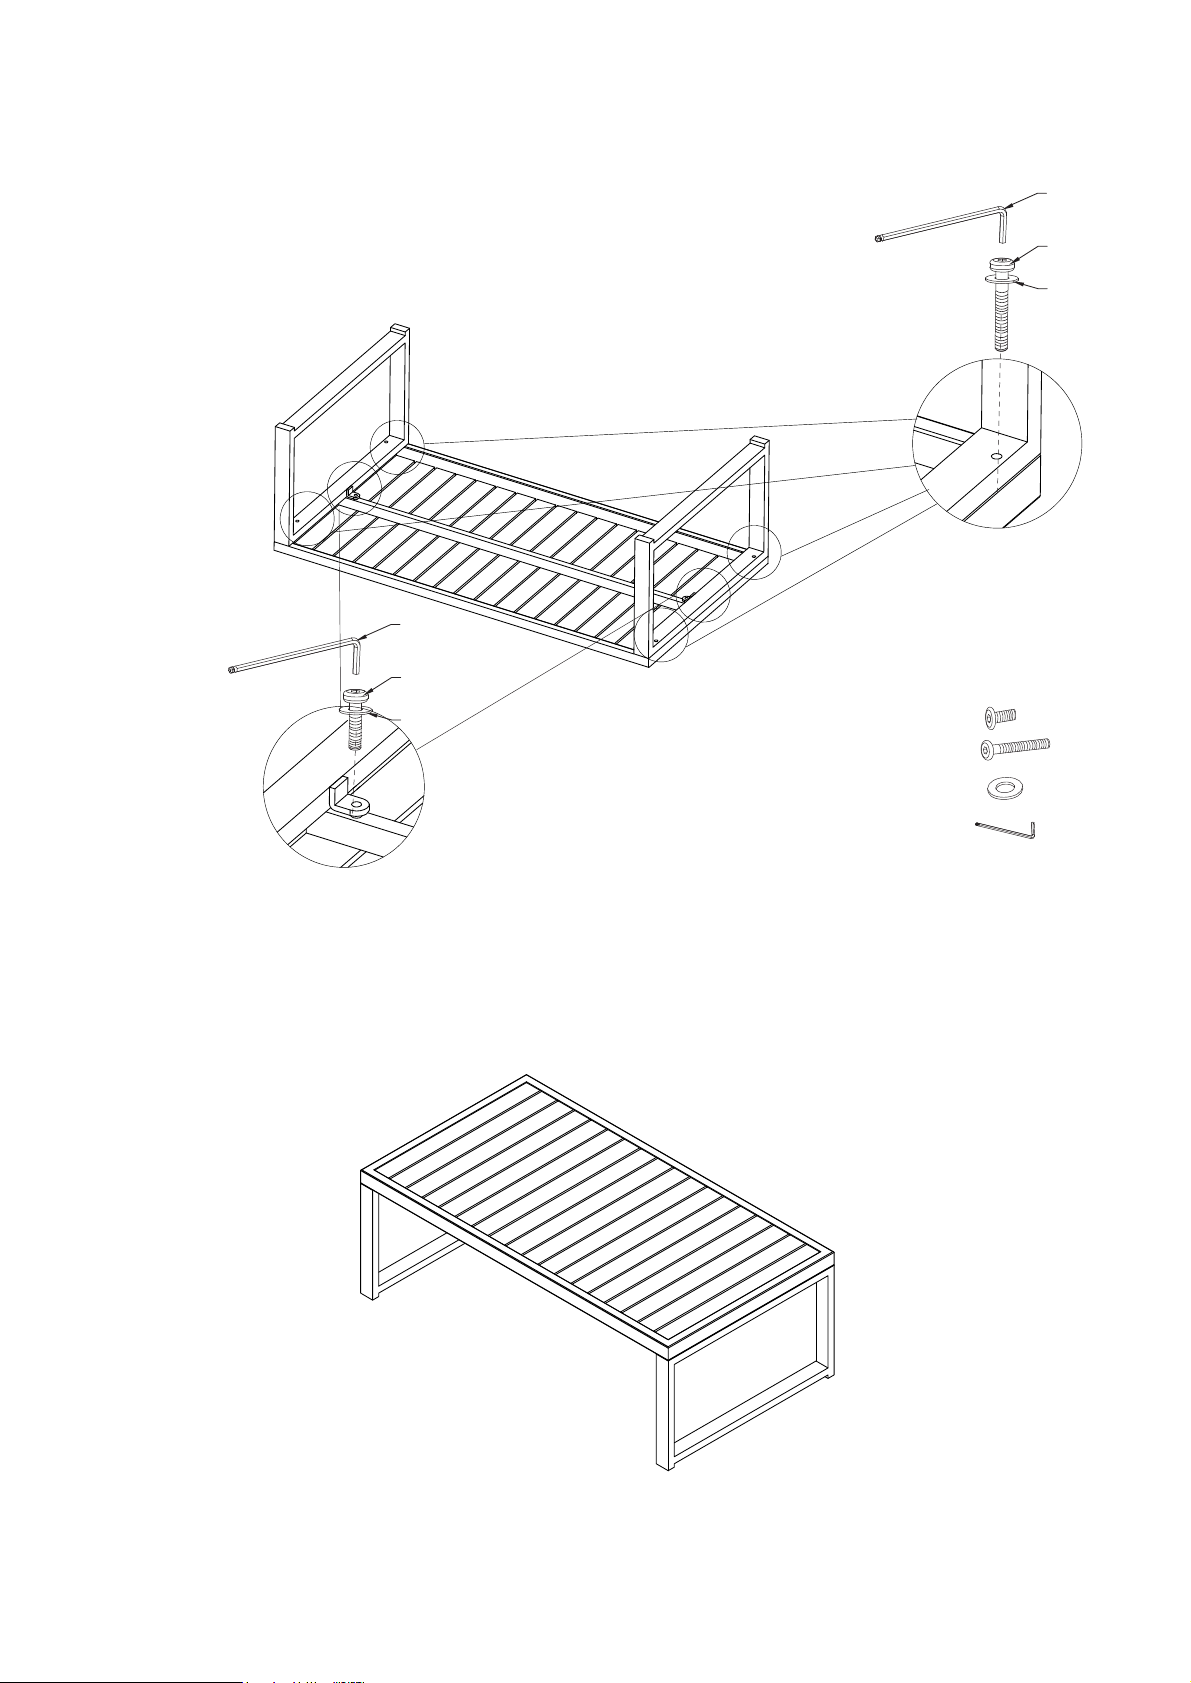
Step 9.
Attach side panels (part H) to top panel (part G) using short bolts (part #1), long bolts
(part #2), flat washers (part #3) and allen wrench (part #4).
Lay top panel (part G) upside down on a soft flat surface, such as carpet, as shown below.
NOTE: Please fully tighten all bolts at this time.
H
G
#4
#1
#3
H
#1
#2
#4
#2
#3
x2
x4
Step 10. Carefully turn unit upright.
#3
#4
x6
x1
7
 Loading...