

Page 1
A
INSTALLATION INSTRUCTIONS
GENERAL
1. To insure the success of the fixture installation, the following instructions and diagram(s) should be read and understood.
2. All electrical connections must be made in accordance with the National Electric code and local codes and ordinances.
If you are uncertain of the methods of installing electrical wiring and lighting fixtures secure the services of a qualified licensed electrician.
3. TOOLS NEEDED: Blade screwdriver, phillips screwdriver, slip joint pliers or small adjustable wrench, wire cutter/stripper, electrical current tester,
stepladder, electrical tape and (if installed outdoors) weatherproof caulking or silicone sealant.
NOTE: The important safeguards and instructions outlined on this sheet are not meant to cover all possible conditions and situations that may
occur. It must be understood that common sense, caution and care are factors that cannot be built into any product.
Caution and care must be supplied by the person(s) installing, operating and maintaining this lighting fixture.
INSTALLATION PREPARATION
1. TURN OFF THE ENTIRE ELECTRICAL CIRCUIT TO WHICH THE LIGHTING FIXTURE IS TO BE ATTACHED.
Move the appropriate circuit breaker to the “off position or completely remove the fuse controlling the circuit.
2. This fixture is designed to be mounted as portable & hardwire, this is a convertible fixture.
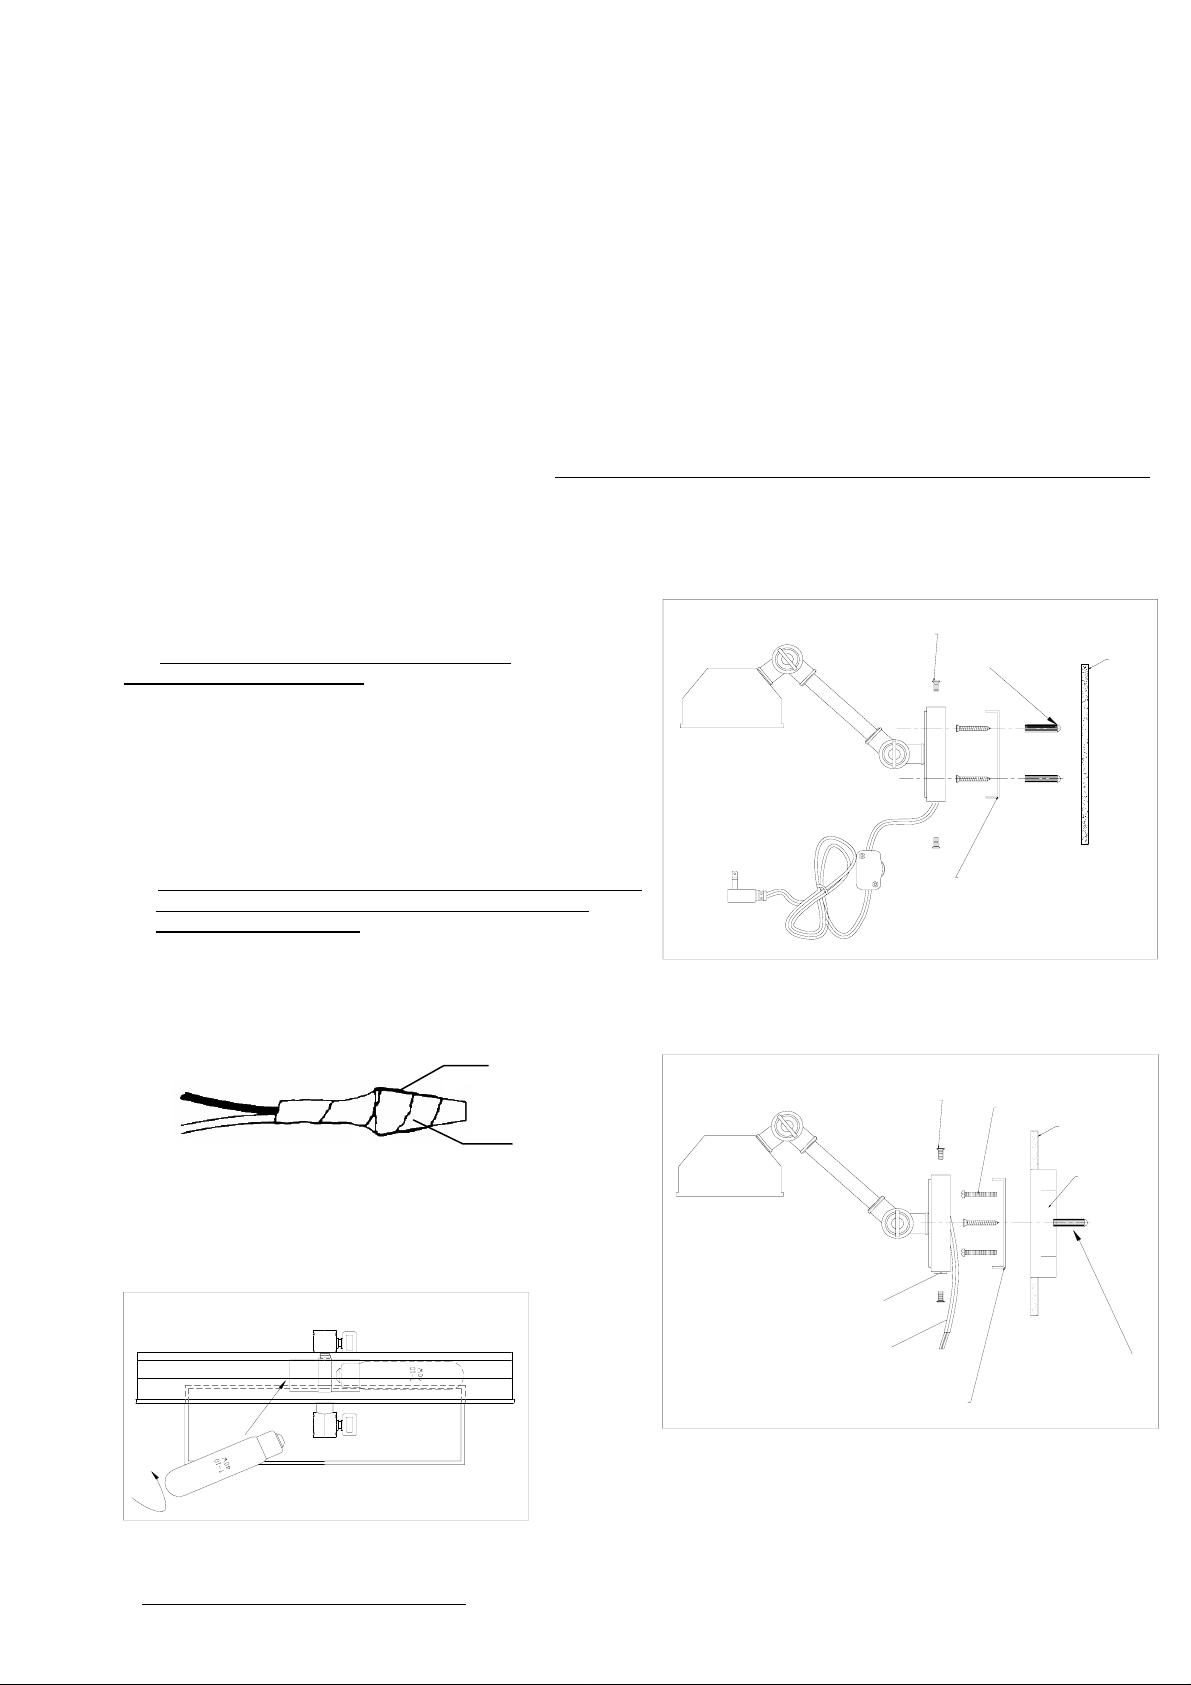
FIXTURE INSTALLATION (portable mounting)
1. Remove the fixture, shade and parts bag(s) from the carton.
Before discarding the carton, double check packing to make certain that all parts are found.
Remove the setscrews that hold the mounting plate to the fixture.
2. Place the mounting plate to the wall, make sure the plate is horizontal, drill holes.
3. Put the wall anchors into the holes, mount the mountig plate with the mounting screws.
4. Mount the fixture onto the mounting plate with the setscrews
5. Plug the wire into the power outle
t.
.
Portable Mounting
FIXTURE INSTALLATION (hardwire mounting)
1. Remove the fixture, shade and parts bag(s) from the carton.
Before discarding the carton, double check packing to
Setscrews
Wall Anchor
make certain that all parts are found.
2. Remove the setscrews that hold the mounting plate to the fixture.
3. Cut the lead wire to 8” length, split back 4” and strip plastic on 2 leads 3/4”.
Attach the mounting plate to the outlet box with the mounting screw. Drill
holes to place the anchors(if included), and fasten the back plate wit
the mounting screws(if included) as reinforce mountin
g.
h
Pull the wires in the outlet box through the center hole of the mounting plate.
(The green ground screw should face ou
t).
4. Fasten the green fixture wire to the green or bare copper wire in the box
or fasten it to the mounting cup with green screw provided.
NEVER FASTEN THE GROUND WIRE TO THE BLACK OR “HOT” WIRE!
FAILURE TO FOLLOW THIS INSTRUCTION COULD RESULT IN
SERIOUS INJURY OR DEATH!
Mounting plate
5. Fasten the rib fixture wire to the white wire in the outlet box.
Fasten the wires to together with an approved fastener (wire nut).
Starting about 1” below the fastener, tightly wrap connection with
electrical tape so that the tape seals the end of the fastener.
Make sure that there is no exposed wire or strands that
could cause a dangerous short circuit!
Electrical tape
Hardwire Mounting
Setscrews
Mounting Screws
6. Connect the smooth fixture wires to the black wire
in the outlet box. Fasten the joined wires as in step 5.
(Wire nut)
pproved fastener
7. Place the fixture over the mounting plate and fasten it in place with the
setscrews, use the wire hole cover to close the wire hole on the fixture.
INSTALL THE LAMP
Lamp Install
Wire hole cover
Wall
Wall
Outlet box
8" Wire
Mounting plate
Wall Anchor
DO NOT EXCEED RECOMMENDED WATTAGE!
Restore power to circuit at breaker or fuse box.
 Loading...