

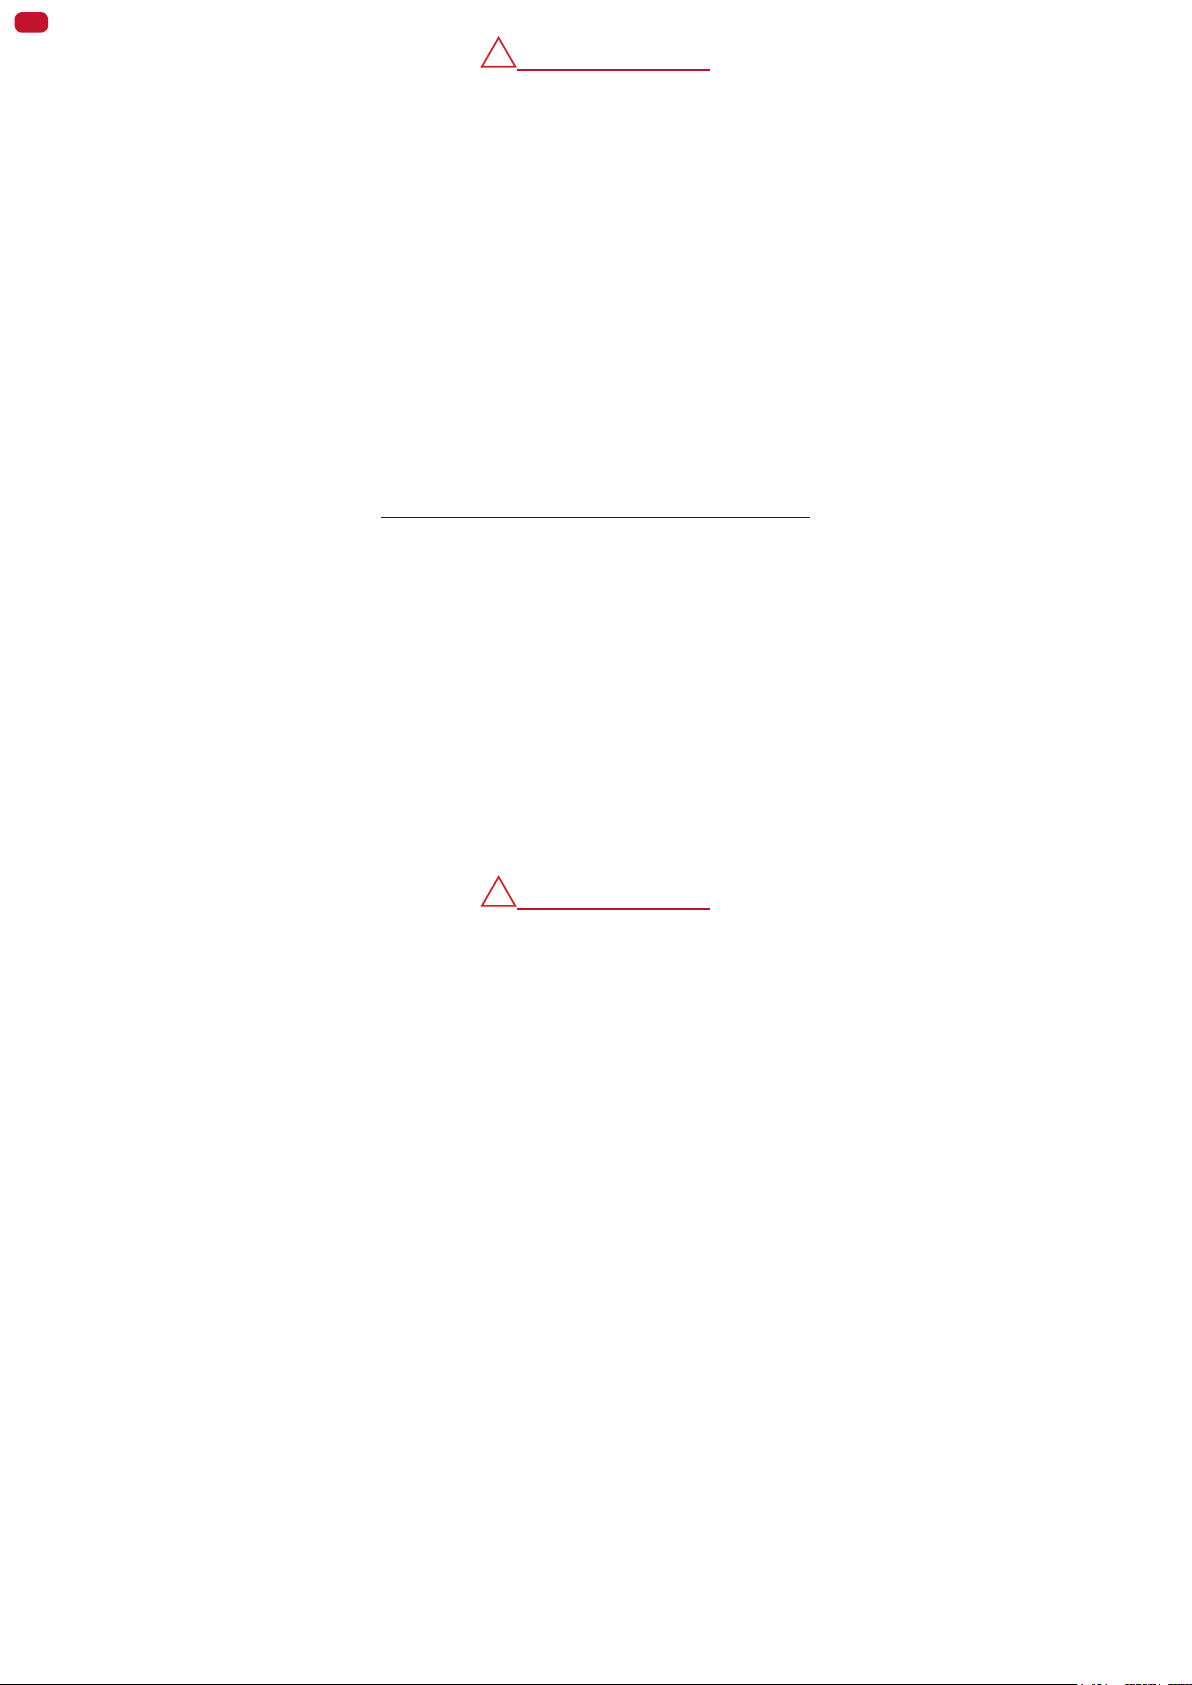
Toy Caboose™
04X
© Joovy 2017 • 170109
USA: Joovy • 2919 Canton Street • Dallas, TX 75226 • Tel: (877) 456-5049 • Fax: (214) 761-1774 • Email: customerservice@joovy.com • Website: www.joovy.com
CANADA: ISSI Inc. • 4500 Thimens Blvd, Suite 100 • St-Laurent, QC, H4R 2P2 • Tel: (800) 667-4111 • Montreal: (514) 344-3045 • Email: service@issibaby.ca
EN
FR ES
!
WARNING
Please read these instructions carefully before use and keep them for future reference.
• This product is a TOY stroller for dolls or stuffed toys ONLY.
• NEVER use this toy to carry a baby or child for any purpose whatsoever. Death or Serious Injury may occur.
• Maximum weight allowed = 5 lbs. (2.28 kg) in EACH seat.
• DO NOT stand on platform. Riding is for dolls or stuffed toys ONLY.
• This product contains small parts. Adult assembly is required.
• The maximum weight that can be carried in the storage basket is 5 lbs. (2.28 kg).
• Discard all packaging materials properly. Do not allow children to play with them.
• Discontinue use of this toy should it malfunction or become damaged.
• Please contact our customer service department to arrange for repair or obtain replacement parts.
• Do not use this toy on stairways or escalators.
• Hanging bags or other toys from the handlebars or any other parts of this toy may change its balance and cause a
hazardous unstable condition.
• When installing a toy infant carrier onto the stroller, ALWAYS use the restraining strap to secure the carrier in place.
Please do not return this product to the store
If you experience any difculty with the assembly or use of this product, or if you have a question regarding these
instructions, please contact our Customer Service Department:
UNITED STATES – Joovy: (877) 456-5049, Hours 8:30 am – 5:00 pm Central Time.
CANADA – ISSI Inc.: (800) 667-4111, Hours 8:30 am – 5:00 pm Eastern Time.
Please note: Styles and colors may vary.
1 Unpacking the Product
• Remove everything from the box and identify the parts using Figure 1.1. (not to scale)
A: stroller, B: canopy, C: tray, D: car seat carrier support, E: front wheels (2), F: rear wheels (2), G: rear axle, H: hubcaps (2),
I: washers (2), J: axle locks (2), K: axle caps (2), and documents (not shown)
• Discard all packaging materials properly including plastic coverings.
• DO NOT allow children to play with any packaging materials.
!
WARNING
Adult assembly required. No tools required. Package contains small parts.
Keep small parts out of children’s reach during assembly.
2 Unfolding the Stroller
• Orient the stroller with the handle bar away from you.
• Release the locking latch located on the lower right side by lifting up the lever. See Figure 2.1.
• Lift up on the stroller handle with both hands until the stroller is in the open position and both side frame bars snap into place in their
holders.
3 Installing the Rear Wheels
• Turn your stroller upside down so that it is resting on the seatback.
• Locate the rear axle and slide it through the holes into the frame near the platform.
• Locate a metal washer and slide the washer onto one end of the axle. See Figure 3.1.
• Locate a rear wheel and slide the wheel onto the axle.
IMPORTANT NOTE: The left and right side wheels are slightly different. The correct wheel will have the arrow shapes on the tire tread
pointed towards the REAR of the stroller. BE CERTAIN that the wheels are placed on the correct side of the axle, because this is intended
to be a one-time assembly.
• Locate an axle lock. While holding the axle from the opposite side, orient the axle lock with the larger side closest to the wheel and snap it
onto the axle. See Figure 3.2.
• Fit a rear axle cap over the attachment. You will hear this piece snap into place. See Figure 3.3.
• While holding the wheel, line up the four prongs on the hubcap with the holes in the spoke of the wheel and snap into place. BE CERTAIN
that all four prongs snap into place. Pull on the hubcap to be sure it is installed securely.
• Repeat these steps on the other side.
• Ensure that each wheel assembly is secure before using this toy. Pull on the wheels to be sure they are installed correctly.
EN
4 Installing/Removing the Front Wheels
• Tilt the stroller backward, on a clean surface, so that it rests on the handlebar and the rear wheels.
• Take one of the front wheels and insert the post into the front wheel housing until an audible click is heard. See Figure 4.1.
• Pull outward on the wheel to ensure the wheel is installed properly.
• Repeat this procedure for the other wheel.
5 Installing and Operating the Canopy
• To attach the canopy, orient the canopy on the stroller with the wide front edge toward the front of the stroller.
• Line up the ttings on the canopy with the ttings near the center of the stroller and slide the canopy on until it snaps into place.
See Figure 5.1.
• The canopy will open, close and ratchet forward or backward.
• To remove the canopy, slide the canopy off the ttings.
6 Attaching/Detaching the Front Tray
• To attach the front tray, line up the tray with the tubing on the front of the stroller and push inward until the tray snaps into place.
See Figure 6.1. Pull outward on the tray sides to be sure both are snapped securely in place.
• To remove the front tray, press the button on the bottom of each of the tray ttings while pulling outward on the tray. See Figure 6.2.
7 Adjusting the Footrest
The footrest can be adjusted to two positions, horizontal or all the way down.
• To place the footrest into the horizontal position, pull up on the footrest and the metal bar until the footrest catches into position. See
Figure 7.1.
• To place the footrest all the way to its down position, pull up on the footrest to release the bar from the slot, and then slowly lower the
footrest.
FR ES
8 Securing the Front (Seated) Doll
• Unlatch the harness buckle by pressing down on button in the center of the buckle and removing the male sides.
• Place the doll in the stroller seat with the shoulder straps over their shoulders and chest and the crotch strap between the doll’s legs.
• Bring the seat belt around the doll’s waist and snap the buckle together. See Figure 8.1. Tighten the seat belt to be snug around the doll’s
waist.
• Both the shoulder straps and the waist/crotch straps may be adjusted using the sliding buckles on these straps.
!
WARNING
This product is a TOY stroller for dolls or stuffed toys ONLY.
NEVER use this toy to carry a baby or child for any purpose whatsoever. Death or Serious Injury may occur.
Maximum weight allowed = 5 lbs. (2.28 kg) in EACH seat.
9 Seatback Positioning
The front seat has two positions.
• To place the seat in the upright position, push the bar on the rear of the seat toward the front of the stroller and rotate the seatback
towards the front of the stroller until this bar is locked in its lowest position. See Figure 9.1.
• To recline the seat, pull the bar on the rear of the seat toward the rear of the stroller and rotate the seatback down until this bar is again in
its lowest position.
10 Securing a Rear Standing Doll
• Push the bench seat to its most forward position.
• Position the doll on the platform on the back of the stroller facing forward with both of their hands on the handles. See Figure 10.1.
• Position the safety belt around the doll’s waist and under the armpit and secure it tightly.
!
WARNING
Children should NEVER stand on the platform.
Riding is for dolls ONLY.
11 Using the Bench Seat
• Push the bench seat to its most rearward position.
• Position the doll on the bench seat facing backward with their feet on the platform.
• Unlatch the seat belt buckle by pressing down the button in the center of the buckle and removing the male sides of the buckle.
• Place the seat belt completely around the doll’s waist, place the crotch strap between the doll’s legs and snap the buckle together. See
Figure 11.1.
• Adjust the seat belt to be snug around the doll’s waist by using the adjustment strap near the buckle.
EN
FR ES
!
WARNING
This product is a TOY stroller for dolls or stuffed toys ONLY.
NEVER use this toy to carry a baby or child for any purpose whatsoever. Death or Serious Injury may occur.
Maximum weight allowed = 5 lbs. (2.28 kg) in EACH seat.
12 Storage Basket
• The maximum weight that can be carried in the storage basket is 5 lbs. (2.28 kg).
NOTE: There are Velcro® attachments on the underside of the basket to stow the car seat carrier support when it is not in use. To stow
the car seat carrier support, simply secure it to the basket as shown in Figure 12.1.
13 Using the stroller as a Doll Car Seat Carrier
• To use the stroller to carry a doll car seat carrier, you must replace the Front Tray with the Car Seat Carrier Support.
• Remove the Front Tray by pressing in on the buttons under the female tting and pulling the tray off the brackets.
• Line up the Car Seat Carrier Support to the metal tubing on the front of the stroller and push inward until the support snaps into place. See
Figure 13.1. Pull outward on the support sides to be sure both are snapped securely in place.
• Adjust the backrest to its reclined position.
• If necessary, remove the infant carrier from the car seat base.
• Place the infant carrier onto the top of the stroller in a REAR FACING POSITION, locating the head end of the carrier so that it rests on
the car seat support and the feet end of the carrier so that it rests against the seatback. See Figure 13.2.
• Insure that the infant carrier is pushed down into this position rmly and that it is centered side to side.
• Remove the carrier restraining strap from the pouches on the sides of the front seat. Buckle it in place over the LOWEST part of the
carrier sides. Adjust the strap so that it is tight around the carrier. Pull up on the carrier to be sure it is held on securely. See Figure 13.3.
!
WARNING
ALWAYS install the doll carrier in a REAR FACING POSITION.
ALWAYS secure the carrier with the restraint strap.
14 Folding the Stroller
• Orient the stroller with the handle bar closest to you.
• Place the canopy into its closed position and push it as far forward toward the front of the stroller as it will go.
• Pull upwards on the trigger mechanisms on both sides of the stroller. See Figure 14.1.
• While these mechanisms are in the upward position, push forward and down on the stroller using the handle bar.
• Secure the stroller in the folded position by engaging the locking latch located on the right side of the stroller over the extended rivet on
the right side of the stroller. See Figure 14.2.
Maintenance
All of the ttings, snaps, locks, rivets, and other hardware and plastic parts on the stroller should be inspected periodically to insure that they
are secured properly and not damaged or malfunctioning. The seat belts and safety harnesses, as well as all other straps and fabric items
and their stitching should also be inspected periodically to insure that they are secured properly and not loose, torn or otherwise damaged.
All moving parts, such as wheels, brakes, and hinges should also be checked periodically to insure they are operating properly.
Any missing, broken, or worn components should be replaced immediately, and the stroller should not be used until they are replaced. Only
original manufacturer’s components should be used. If needed, please contact Joovy (USA) or ISSI Inc. (Canada) at our toll-free phone
number.
Fabric fading may occur if the stroller is left in direct sunlight for long periods of time. When not in use, store the stroller out of direct sun.
Cleaning
The fabric material on this stroller can be cleaned using a cloth dampened with warm water. Always allow the fabric to completely air dry
before using the stroller.
The frame and wheels should always be kept clean and free of dirt and foreign matter, especially after operating the stroller in rain, snow, or
other harsh environments. Use a cloth dampened with warm water and a mild detergent cleaner to clean the wheels after such use.
SATISFACTION GUARANTEED
We want you to be completely satised with your purchase of this product. Should you experience any difculty in
assembling or using this product, or if you have any questions, please contact our Customer Service Department:
UNITED STATES – Joovy: (877) 456-5049, Hours 8:30 am – 5:00 pm Central Time.
CANADA – ISSI Inc.: (800) 667-4111, Hours 8:30 am – 5:00 pm Eastern Time.
Please log onto www.joovy.com to register your new Joovy product.

FR
!
MISE EN GARDE
EN
ES
Veuillez lire ces instructions attentivement avant chaque utilisation et les conserver pour référence ultérieure.
• Ce produit est une poussette JOUET pour les poupées ou peluches UNIQUEMENT.
• NE JAMAIS utiliser ce jouet pour transporter un bébé ou un enfant pour une quelconque utilisation. Un décès ou
des blessures graves pourraient survenir.
• Poids maximum autorisé = 2,28 kg (5 lbs.) dans CHAQUE siège.
• NE PAS se tenir debout sur la plateforme. Le produit est conçu pour transporter des poupées et peluches
UNIQUEMENT.
• Ce produit contient de petites pièces. L’assemblage par un adulte est requis.
• Le poids maximal pouvant être transporté dans le panier de rangement est de 2,28 kg (5 lbs).
• Veuillez disposer adéquatement de tous les matériaux d’emballage. Ne laissez pas les enfants jouer avec ceux-ci.
• Veuillez cesser d’utiliser ce jouet s’il ne fonctionne plus adéquatement ou est endommagé.
• Veuillez contacter notre département de service à la clientèle pour planier une réparation ou obtenir des pièces de
rechange.
• Ne pas utiliser ce jouet dans les escaliers et escaliers roulants.
• La suspension de sacs ou d’autres jouets sur les poignées ou toute autre partie de ce jouet pourrait affecter
l’équilibre et entrainer une condition d’instabilité dangereuse.
• Lors de l’installation d’un siège jouet pour enfant dans la poussette, TOUJOURS utiliser la courroie de retenue
pour xer le siège en place.
NE PAS retourner ce produit au magasin
En cas de difculté durant l’assemblage ou l’utilisation, ou pour toute question relative aux présentes instructions,
communiquer avec notre service à la clientèle:
ÉTATS UNIS – Joovy: (877) 456-5049, de 8h30 à 17h, heure du Centre.
CANADA – ISSI Inc.: (800) 667-4111, de 8h30 à 17h, heure de l’Est.
S’il vous plaît noter: Styles et couleurs peuvent varier.
1 Déballage du produit
• Vider la boîte et s’assurer d’avoir toutes les pièces illustrées à la Figure 1.1 (non à l’échelle).
A: poussette, B: auvent, C: tablette, D: support pour siège de d’auto, E: roues avant (2), F: roues arrière (2), G: essieu arrière,
H: enjoliveurs (2), I: rondelles (2), J: verrous d’essieu (2), K: protections d’essieu (2), et documents (non illustrés).
• Jeter tous les emballages de façon appropriée, y compris les éléments de recouvrement en plastique.
• Ne PAS laisser un enfant jouer avec les emballages.
!
MISE EN GARDE
Assemblage par un adulte nécessaire. Aucun outil requis.
L’emballage pourrait contenir de petites pièces.
Gardez les petites pièces hors de la portée des enfants pendant l’assemblage.
2 Dépliage de la poussette
• Orientez la poussette en plaçant la poignée éloignée de vous.
• Libérez la sangle de verrouillage située sur le côté inférieur droit en soulevant le levier. Voir image 2.1.
• Tirez la poignée de la poussette vers le haut avec les deux mains jusqu’à ce que la poussette soit en position ouverte et que les deux
barres latérales soient xées en place dans leurs supports.
3 Installation des roues arrière
• Tournez la poussette vers le bas de façon à ce qu’elle repose sur le dossier du siège.
• Localisez l’essieu arrière et glissez-le à travers les orices dans le cadre près de la plateforme.
• Localisez la rondelle de métal et glissez la rondelle sur une des extrémités de l’essieu. Voir image 3.1.
• Localisez une roue arrière et glissez la roue sur l’essieu.
NOTE IMPORTANTE: La roue de droite et de gauche sont légèrement différentes. La bonne roue aura les formes de èches sur le pneu
pointant vers l’ARRIÈRE de la poussette. ASSUREZ-VOUS que les roues sont placées du bon côté de l’essieu, car l’assemblage doit être
effectué une seule fois.
• Localisez le mécanisme de verrouillage de l’essieu. Tout en tenant l’essieu du côté opposé, orientez le mécanisme de verrouillage de
l’essieu avec la partie la plus grande plus près de la roue avec xez-le sur l’essieu. Voir image 3.2.
• Installez une protection d’essieu arrière sur la xation. Vous entendrez cette pièce s’enclencher en place. Voir image 3.3.

FR
EN
ES
• Tout en tenant la roue, alignez les quatre tiges de l’enjoliveur avec les orices sur le rayon de la roue et enclenchez-le en place.
ASSUREZ-VOUS que les quatre tiges s’enclenchent en place. Tirez sur l’enjoliveur pour vous assurer qu’il est bien xé en place.
• Répétez ces étapes de l’autre côté.
• Assurez-vous que chaque assemblage de roue est bien xé en place avant d’utiliser ce jouet. Tirez sur les roues pour vous assurer
qu’elles sont bien installées.
4 Installation/Retrait des roues avant
• Faites basculer la poussette vers l’arrière, sur une surface propre, de façon à ce qu’elle repose sur la poignée et les roues arrière.
• Prenez une des roues avant et insérez-la dans l’espace pour la roue jusqu’à ce qu’un clic audible se fasse entendre. Voir image 4.1.
• Tirez la roue vers l’extérieur pour vous assurer qu’elle est correctement installée.
• Répétez cette procédure pour l’autre roue.
5 Installation et fonctionnement de l’auvent
• Pour poser l’auvent, orientez l’auvent sur la poussette avec la bordure large avant orientée vers l’avant de la poussette.
• Alignez les xations de l’auvent avec les xations se trouvant près du centre de la poussette et glissez l’auvent jusqu’à ce qu’il
s’enclenche en place. Voir image 5.1.
• L’auvent s’ouvre, se ferme et se plie vers l’avant ou l’arrière
• Pour retirer l’auvent, faites glisser l’auvent hors des xations.
6 Pose/Retrait de la tablette avant
• Pour poser la tablette avant, alignez la tablette avec les tubes à l’avant de la poussette et poussez vers l’intérieur jusqu’à ce que la
tablette s’enclenche en place. Voir image 6.1. Tirez les côtés de la tablette vers l’extérieur an de vous assurer que les deux côtés sont
bien xés en place.
• Pour retirer la tablette avant, appuyez sur le bouton au bas de chaque xation de la tablette tout en tirant la tablette vers l’extérieur. Voir
image 6.2.
7 Ajustement du repose-pieds
Le repose-pieds peut être ajustés en deux positions, horizontale ou complètement au bas.
• Pour placer le repose-pieds en position horizontale, tirez vers le haut sur le repose-pieds et la barre de métal jusqu’à ce que le repose-
pieds se place en bonne position. Voir image 7.1.
• Pour placer le repose-pieds en position complètement au bas, tirez sur le repose-pieds pour libérer la barre de la fente, et abaissez
ensuite doucement le repose-pieds.
8 Fixation de la poupée avant (assise)
• Défaites la boucle du harnais en appuyant sur le bouton au centre de la ceinture et en retirant les parties mâles.
• Placez la poupée dans le siège de la poussette avec les sangles d’épaules au-dessus de ses épaules et de sa poitrine, et la sangle
d’entrejambe placée entre les jambes de la poupée.
• Faites passer la ceinture autour de la taille de la poupée et enclenchez la boucle. Voir image 8.1. Serrez la ceinture an qu’elle soit bien
ajustée autour de la taille de la poupée.
• Les deux sangles d’épaules ainsi que les sangles de taille et d’entrejambe peuvent être ajustées à l’aide des boucles coulissantes se
trouvant sur ces sangles.
!
MISE EN GARDE
Ce produit est une poussette JOUET pour les poupées ou peluches UNIQUEMENT.
NE JAMAIS utiliser ce jouet pour transporter un bébé ou un enfant pour une quelconque utilisation.
Un décès ou des blessures graves pourraient survenir.
Poids maximum autorisé = 2,28 kg (5 lbs.) dans CHAQUE siège.
9 Positionnement du dossier
Le siège avant offre deux positions.
• Pour placer le siège en position droite, poussez la barre à l’arrière du siège vers l’avant de la poussette et ramenez le dossier vers l’avant
de la poussette jusqu’à ce que cette barre soit verrouillée dans la position la plus basse. Voir image 9.1.
• Pour pencher le siège vers l’arrière, tirez la barre se trouvant à l’arrière du siège vers l’arrière de la poussette et abaissez le siège jusqu’à
ce que la barre soit à nouveau dans la position la plus basse.
10 Fixation d’une poupée en position debout
• Poussez la banquette dans la position la plus vers l’avant.
• Positionnez la poupée sur la plateforme au dos de la poussette, faisant face vers l’avant avec ses deux mains placées sur les poignées.
Voir image 10.1.
• Positionnez la ceinture autour de la taille de la poupée et sous ses aisselles et serrez-la bien.

FR
EN
!
MISE EN GARDE
Les enfants ne devraient JAMAIS se tenir debout sur la plateforme.
Seules les poupées devraient être transportées dans de ce produit.
11 Utilisation de la banquette
• Poussez la banquette dans la position la plus vers l’arrière.
• Positionnez la poupée sur la banquette, face vers l’arrière et les pieds sur la plateforme.
• Détachez la ceinture en appuyant sur le bouton au centre de la boucle et en retirant les parties mâles de la boucle.
• Placez la ceinture autour de la taille de la poupée, placez la sangle d’entrejambe entre les jambes de la poupée et refermez la boucle.
Voir image 11.1.
• Ajustez la ceinture an qu’elle soit bien ajustée autour de la taille de la poupée en utilisant la sangle d’ajustement près de la boucle.
!
MISE EN GARDE
Ce produit est une poussette JOUET pour les poupées ou peluches UNIQUEMENT.
NE JAMAIS utiliser ce jouet pour transporter un bébé ou un enfant pour une quelconque utilisation.
Un décès ou des blessures graves pourraient survenir.
Poids maximum autorisé = 2,28 kg (5 lbs.) dans CHAQUE siège
12 Panier de rangement
• Le poids maximal pouvant être transporté dans le panier de rangement est de 5 lbs (2,28 kg)
NOTE: Il y a des bandes de Velcro® sur le côté inférieur du panier pour ranger le support pour siège d’auto lorsqu’il n’est pas utilisé. Pour
ranger le support pour siège d’auto, xez le simplement au panier tel qu’illustré à l’image 12.1.
ES
13 Utilisation de la poussette en tant que support pour siège d’auto de poupée
• Pour utiliser la poussette pour transporter un siège d’auto, vous devez replacez la tablette avant par le support pour siège d’auto.
• Retirez la tablette avant en appuyant sur les boutons situés
sous le raccord femelle et en tirant la tablette hors des crochets.
• Alignez le support pour siège d’auto avec les tubes de métal se trouvant à l’avant de la poussette et poussez-le vers l’intérieur jusqu’à ce
que le support s’enclenche en place. Voir image 13.1. Tirez sur les côtés du support vers l’extérieur pour vous assurer qu’ils sont tous les
deux bien xés en place.
• Ajustez le dossier en position couchée.
• Si nécessaire, retirez le siège pour enfant de la base du siège d’auto.
• Placez le siège pour enfant sur le dessus de la poussette en POSITION VERS L’ARRIÈRE, en positionnant la tête du siège de façon à ce
qu’il repose sur le support pour siège d’auto et que l’extrémité des pieds du siège repose contre l’arrière du siège. Voir image 13.2.
• Assurez-vous que le siège pour enfant est bien installé et qu’il est centré entre les côtés.
• Retirez la courroie de retenue du siège des pochettes se trouvant sur les côtés du siège avant. Bouclez en placez sur la partie LA PLUS
BASSE des côtés du siège. Ajustez la courroie de façon à ce qu’elle soit bien serrée autour du siège. Tirez sur le siège pour vous assurer
qu’il tient bien en place. Voir image 13.3.
!
MISE EN GARDE
TOUJOURS installer le siège pour poupée EN POSITION VERS L’ARRIÈRE.
TOUJOURS xer le siège à l’aide de la courroie de retenue.
14 Pliage de la poussette
• Orientez la poussette avec la barre de la poignée la plus près de vous possible.
• Placez l’auvent en position fermée et poussez-le aussi loin que possible vers l’avant de la poussette.
• Tirez les mécanismes de déclenchement vers le haut sur les deux côtés de la poussette. Voir image 14.1.
• Alors que les mécanismes sont placés vers le haut, poussez sur la poussette vers l’avant et le bas en utilisant la barre de la poignée.
• Fixez la poussette en position pliée en arrimant la sangle de verrouillage située sur le côté droit de la poussette au rivet protubérant situé
sur le côté droit de la poussette. Voir image 14.2.
Entretien
Les glissières, les boutons-pression, les verrous, les rivets et les autres pièces de quincaillerie ou en plastique de la poussette doivent être
inspectés régulièrement pour vérier leur solidité, leur état et leur fonctionnement. Le harnais de sécurité, ainsi que les autres sangles, les
pièces en tissu et leurs coutures doivent également être inspectées périodiquement pour vérier leur solidité et s’assurer qu’elles ne sont
pas déchirées ou endommagées. De plus, le fonctionnement de toutes les pièces mobiles – roues, freins, articulations, etc. – doit aussi faire
l’objet d’une vérication régulière.
Toutes les pièces manquantes, brisées ou usées doivent être remplacées le plus rapidement possible; la poussette ne doit pas être utilisée
tant que ces pièces ne sont pas remplacées. Seuls les composants d’origine du fabricant doivent être utilisés. Au besoin, communiquer avec
Joovy (États-Unis) ou ISSI Inc. (Canada) au numéro sans frais fourni.

FR
EN
ES
Le cadre et les roues doivent être gardés propres, exempts de poussière et de tout corps étranger, en particulier lorsque la poussette a
été utilisée sous la pluie, dans la neige ou dans toute autre condition difcile. Nettoyer alors les roues à l’aide d’une éponge ou d’un linge
humide et d’une solution d’eau tiède et de détergent doux.
Nettoyage
Le matériel en tissu de la poussette peut être nettoyé à l’aide d’un détergent ou savon doux et d’eau tiède sur une éponge ou un chiffon
propre. Laissez le tissu sécher entièrement avant d’utiliser la poussette.
Le cadre et les roues devraient toujours être propres et exempts de saletés ou de corps étrangers, particulièrement après avoir utilisé la
poussette dans la pluie, la neige ou tout autre environnement hostile. Utilisez une éponge ou un chiffon imbibé d’eau tiède ainsi qu’un
détergent ou savon doux pour nettoyer les roues après une telle utilisation.
SATISFACTION GARANTIE
Nous voulons que nos clients soient entièrement satisfaits de l’achat de ce produit. En cas de difculté durant
l’assemblage ou l’utilisation, ou pour toute question, communiquer avec notre service à la clientèle:
ÉTATS-UNIS – Joovy: (877) 456-5049, de 8h30 à 17 h, heure du Centre.
CANADA – ISSI Inc.: (800) 667-4111, de 8h30 à 17 h, heure de l’Est.
Pour inscrire un nouveau produit Joovy, consulter notre site Web à l’adresse www.joovy.com.

EN FR ES
!
ADVERTENCIA
Por favor lea estas instrucciones cuidadosamente antes de usar el producto
y consérvelas para utilizarlas como referencia en el futuro.
• Este producto es un cochecito de JUGUETE SOLO para muñecas y peluches.
• NUNCA use este juguete para llevar a un bebé o niño bajo ningún concepto. Podría resultar gravemente dañado o
morir.
• Peso máximo permitido = 2.28 kg (5 lbs.) en CADA asiento.
• NO permita que el niño se pare en la plataforma. SOLO se pueden llevar muñecas y peluches.
• Este producto contiene piezas pequeñas. Debe ser armado por un adulto.
• El peso máximo que puede llevarse en la canasta es de 2.28 kg (5 lbs.).
• Elimine correctamente los materiales de embalaje. No permita que los niños jueguen con ellos.
• Deje de usar este juguete si funciona mal o resulta dañado.
• Por favor, contáctese con nuestro departamento de atención al cliente para solicitar una reparación o piezas de
repuesto.
• No utilice este juguete en escaleras o escaleras mecánicas.
• Colgar carteras u otros juguetes del manillar u otras partes del cochecito puede desequilibrarlo y provocar una
inestabilidad peligrosa.
• Al instalar un portabebés de juguete en el cochecito, use SIEMPRE las correas de sujeción para sujetar bien el
portabebés.
Por favor no devuelva este producto a la tienda
Si tiene dicultades con el ensamblaje o el uso de este producto, o si tiene consultas relacionadas a estas
instrucciones, por favor póngase en contacto con nuestro Departamento de Atención al Cliente:
ESTADOS UNIDOS – Joovy: (877) 456-5049, entre las 8:30 am y 5:00 pm Hora Central.
CANADÁ – ISSI Inc.: (800) 667-4111, entre las 8:30 am y 5:00 pm Hora del Este.
Nota: Los estilos y colores pueden variar.
1 Desembalaje del producto
• Retire todo de la caja e identique las partes usando la Figura 1.1. (no hecha a escala)
A: cochecito, B: capota, C: bandeja, D: soporte del asiento para automóvil, E: ruedas delanteras (2), F: ruedas traseras (2),
G: eje trasero, H: tazas (2), I: arandelas (2), J: trabas del eje (2), K: tapas del eje (2), y documentos (no se muestran).
• Deshágase de todos los materiales de embalaje adecuadamente, incluyendo las cubiertas de plástico
• NO permita que los niños jueguen con ningún material de embalaje.
!
ADVERTENCIA
Debe ser armado por un adulto. No se necesitan herramientas.
El paquete contiene piezas pequeñas.
Mantenga las piezas pequeñas fuera del alcance de los niños durante el armado.
2 Cómo abrir el cochecito
• Oriente el cochecito con el manillar alejado de usted.
• Suelte la traba ubicada abajo, a la derecha, levantando la palanca. Ver Figura 2.1.
• Levante el manillar con ambas manos hasta que el cochecito se abra y ambas barras laterales se traben correctamente.
3 Instalación de las ruedas traseras
• Dé vuelta el cochecito de manera que quede apoyado sobre el asiento trasero.
• Tome el eje trasero y deslícelo por los agujeros del armazón que están cerca de la plataforma.
• Tome una arandela de metal y deslícela por uno de los extremos del eje. Ver Figura 3.1.
• Tome una rueda trasera y deslícela por el eje.
NOTA IMPORTANTE: Las ruedas izquierdas y derechas son levemente diferentes. Para saber cuál es la rueda correcta, observe las
echas dibujadas en la supercie de la rueda. Las echas deben mirar hacia la parte TRASERA del cochecito. ASEGÚRESE de que las
ruedas estén colocadas del lado correcto del eje, ya que el cochecito debe armarse una sola vez.
• Tome una traba del eje. Sosteniendo el otro extremo del eje, coloque la traba con el lado más grande hacia la rueda e insértela a presión
en el eje. Ver Figura 3.2.
• Coloque una tapa del eje sobre la jación. Debe escuchar que la pieza encaje en su lugar. Ver Figura 3.3.
• Sosteniendo la rueda, alinee las cuatro pestañas de la taza con los agujeros del centro de la rueda y encájelas a presión. ASEGÚRESE
de que las cuatro pestañas queden bien encajadas. Tire de la taza para vericar que esté bien instalada.
• Repita estos pasos del otro lado.asegurarse de que estén bien instaladas.

EN FR ES
4 Instalación/desinstalación de las ruedas delanteras
• En una supercie limpia, incline el cochecito hacia atrás apoyándolo sobre el manillar y las ruedas traseras.
• Tome una de las ruedas delanteras e inserte el caño en el alojamiento de la rueda delantera hasta escuchar un clic. Ver Figura 4.1.
• Tire de la rueda para asegurarse de que esté bien instalada.
• Repita este procedimiento con la otra rueda.
5 Instalación y uso de la capota
• Para colocar la capota, colóquela sobre el cochecito con el borde delantero ancho mirando hacia adelante.
• Alinee las jaciones de la capota con las jaciones que están cerca del centro del cochecito y deslice la capota hasta escuchar un clic.
Ver Figura 5.1.
• La capota se abre, cierra y acomoda hacia adelante o hacia atrás.
• Para sacar la capota, deslícela hacia afuera por las jaciones.
6 Instalación/desinstalación de la bandeja delantera
• Para instalar la bandeja delantera, alinee los brazos de la bandeja con los caños del frente del cochecito y empuje la bandeja hacia
adentro hasta que encaje en su lugar. Ver Figura 6.1. Tire de los costados de la bandeja hacia afuera para asegurarse de que esté bien
sujeta.
• Para sacar la bandeja delantera, presione el botón que está debajo de cada jación de la bandeja y tire de la bandeja hacia afuera. Ver
Figura 6.2.
7 Ajuste del apoyapiés
El apoyapiés puede ajustarse en dos posiciones: horizontal o totalmente abajo.
• Para colocar el apoyapiés en posición horizontal, levante el apoyapiés y la barra de metal hasta que el apoyapiés se enganche en su
lugar. Ver Figura 7.1.
• Para bajar por completo el apoyapiés, levántelo para liberar la barra de la ranura y luego bájelo lentamente.
8 Sujeción de la muñeca en el asiento delantero
• Desabroche la hebilla del arnés presionando el botón del centro de la hebilla y retirando los extremos machos.
• Coloque la muñeca en el asiento del cochecito pasando las correas de los hombros por encima de sus hombros y pecho, y la correa de la
entrepierna entre las piernas de la muñeca.
• Pase la correa de la cintura por la cintura de la muñeca y abróchela. Ver Figura 8.1. Ajuste la correa de la cintura de manera que sujete
bien la cintura de la muñeca.
• Las correas de los hombros, cintura y entrepierna pueden ajustarse usando sus hebillas deslizables.
!
ADVERTENCIA
Este producto es un cochecito de JUGUETE SOLO para muñecas y peluches.
NUNCA use este juguete para llevar a un bebé o niño bajo ningún concepto.
Podría resultar gravemente dañado o morir.
Peso máximo permitido = 2.28 kg (5 lbs.) en CADA asiento.
9 Ajuste del respaldo del asiento
El asiento delantero tiene dos posiciones.
• Para colocar el asiento en posición vertical, empuje la barra que está detrás del asiento hacia adelante y gire el respaldo hacia adelante
hasta que la barra se trabe en su posición más baja. Ver Figura 9.1.
• Para reclinar el asiento, tire de la barra que está detrás del asiento hacia atrás y gire el respaldo hacia abajo hasta que la barra vuelva a
su posición más baja.
10 Sujeción de la muñeca que va parada atrás
• Empuje el asiento hacia adelante hasta el tope.
• Coloque la muñeca sobre la plataforma trasera del cochecito mirando hacia adelante, con ambas manos en el manillar. Ver Figura 10.1.
• Pase el cinturón de seguridad alrededor de la cintura de la muñeca y por debajo de las axilas y sujételo bien.
!
ADVERTENCIA
Los niños NUNCA deben pararse en la plataforma.
SOLO se pueden llevar muñecas y peluches.
11 Uso del banco
• Empuje el banco bien hacia atrás.
• Coloque la muñeca en el banco mirando hacia atrás con sus pies en la plataforma.
• Desabroche la hebilla del cinturón presionando el botón del centro de la hebilla y retirando los extremos machos.

EN FR ES
• Pase el cinturón por la cintura de la muñeca y la correa de la entrepierna por entre las piernas de la muñeca y abroche la hebilla. Ver
Figura 11.1.
• Ajuste bien el cinturón alrededor de la cintura de la muñeca usando la correa de ajuste que está cerca de la hebilla.
!
ADVERTENCIA
Este producto es un cochecito de JUGUETE SOLO para muñecas y peluches..
NUNCA use este juguete para llevar a un bebé o niño bajo ningún concepto.
Podría resultar gravemente dañado o morir.
Peso máximo permitido = 2.28 kg (5 lbs.) en CADA asiento.
12 Canasto
• El peso máximo que se puede llevar en el canasto es de 2.28 kg (5 lbs).
NOTA: En la parte de abajo, el canasto tiene sujeciones de Velcro® para guardar el soporte del adaptador del asiento para automóvil
cuando no se usa. Para guardar el adaptador, simplemente sujételo con Velcro® al canasto, como se muestra en la Figura 12.1.
13 Uso del cochecito como asiento para automóvil de juguete
• Para usar el cochecito como asiento para automóvil para muñecas, debe quitar la bandeja delantera y colocar el soporte del adaptador
para el asiento de automóvil.
• Retire la bandeja presionando los botones que están debajo de la traba hembra y sacando la bandeja de los soportes.
• Alinee el soporte del asiento para automóvil con los caños de metal de la parte delantera del cochecito y empuje el soporte hacia adentro
hasta que encaje en su lugar. Ver Figura 13.1. Tire de los laterales del soporte hacia afuera para asegurarse de que esté bien sujeto.
• Recline el respaldo por completo.
• Si es necesario, retire el portabebés de la base del asiento para automóvil.
• Coloque el portabebés sobre el cochecito MIRANDO HACIA ATRÁS, de manera que el lado de la cabeza se apoye en el soporte del
asiento para automóvil y el lado de los pies se apoye sobre el respaldo del asiento. Ver Figura 13.2.
• Asegúrese de que el portabebés esté bien trabado y centrado.
• Saque la correa de sujeción del portabebés de los bolsillos que están a los costados del asiento delantero. Abróchela por la parte
INFERIOR de los costados del portabebés. Ajuste la correa para que el portabebés quede bien sujeto. Tire del portabebés hacia arriba
para asegurarse de que esté bien sujeto. Ver Figura 13.3.
!
ADVERTENCIA
Coloque SIEMPRE el portabebés MIRANDO HACIA ATRÁS.
SIEMPRE sujete el portabebés con la correa de sujeción.
14 Cómo cerrar el cochecito
• Oriente el cochecito con el manillar hacia usted.
• Cierre la capota y empújela hacia adelante hasta donde llegue.
• Tire de los mecanismos de traba a ambos lados del cochecito hacia arriba. Ver Figura 14.1.
• Mientras esos mecanismos están hacia arriba, empuje el cochecito hacia adelante y hacia abajo usando el manillar.
• Una vez cerrado, enganche la traba que está del lado derecho en el remache alargado que está de ese mismo lado para que el cochecito
no se abra. Ver Figura 14.2.
Mantenimiento
Todos los accesorios, cierres, seguros, remaches y otros elementos y partes plásticas del cochecito deben ser inspeccionados
regularmente para garantizar que estén correctamente asegurados y que no estén dañados ni funcionen mal. El arnés de seguridad, así
como todas las otras correas y objetos de tela y sus costuras también deben ser inspeccionados periódicamente para garantizar que estén
correctamente asegurados y que no estén ojos, rotos o dañados de otra manera. Todas las partes movibles, como las ruedas, frenos y
bisagras, también deben ser inspeccionadas con regularidad para garantizar su correcto funcionamiento.
Todos los componentes faltantes, rotos o desgastados deben ser remplazados inmediatamente y el cochecito no debe ser utilizado hasta
que se remplacen. Se deben utilizar solamente componentes originales de fábrica. De ser necesario, por favor póngase en contacto con
Joovy (Estados Unidos) o ISSI Inc. (Canadá) a nuestra línea telefónica gratuita.
Pérdida de color se puede producir si el cochecito se deja en la luz solar directa durante largos periodos de tiempo. Cuando no esté en uso,
guarde el cochecito de la luz solar directa.
Limpieza
La tela del cochecito se puede limpiar con jabón o detergente suave de uso doméstico y agua tibia, con esponja o paño limpio. Seque la
tela al aire libre y vuelva a colocarla cuando esté completamente seca.

EN FR ES
El armazón y las ruedas siempre deben estar limpios, sin suciedad ni materias extrañas, especialmente después de usar el cochecito en la
lluvia, nieve u otros ambientes hostiles. Utilice una esponja o paño humedecido en agua tibia y jabón o detergente suave de uso doméstico
para limpiar las ruedas después de usar el cochecito en estas condiciones.
SATISFACCIÓN GARANTIZADA
Queremos que usted esté completamente satisfecho con la compra de este producto. Si tiene alguna dicultad en
el ensamblaje o el uso de este producto, o si tiene alguna consulta - Por favor póngase en contacto con nuestro
Departamento de Atención al Cliente:
ESTADOS UNIDOS – Joovy: (877) 456-5049, entre las 8:30 am y 5:00 pm Hora Central.
CANADÁ – ISSI Inc.: (800) 667-4111, entre las 8:30 am y 5:00 pm Hora del Este.
Por favor entre en www.joovy.com para registrar su nuevo producto Joovy.
USA: Joovy • 2919 Canton Street • Dallas, TX 75226 • Tel: (877) 456-5049 • Fax: (214) 761-1774 • Email: customerservice@joovy.com • Website: www.joovy.com
CANADA: ISSI Inc. • 4500 Thimens Blvd, Suite 100 • St-Laurent, QC, H4R 2P2 • Tel: (800) 667-4111 • Montreal: (514) 344-3045 • Email: service@issibaby.ca
 Loading...