

Instruction Manual
Manuel d’Instructions
Manual de Instrucciones
取扱説明書
사용 지침서
使用手册
818X
© Joovy 2017 • 170828


Table of Contents
English
Safety and Warnings ........................................................................................................................ 4
Parts List .......................................................................................................................................... 6
Stroller Assembly .............................................................................................................................. 8
Stroller Operation ........................................................................................................................... 14
Congurations ................................................................................................................................ 20
Optional Accessories ..................................................................................................................... 22
Care and Maintenance ................................................................................................................... 38
Contact ........................................................................................................................................... 39
Francais
Sécurité et Mise en Gardes ............................................................................................................ 40
Liste des Pièces ............................................................................................................................. 42
Assemblage de la Poussette .......................................................................................................... 44
Utilisation de la Poussette .............................................................................................................. 50
Congurations ................................................................................................................................ 56
Accessoires Optionnels .................................................................................................................. 58
Entretien et Maintenance ................................................................................................................ 76
Contact ........................................................................................................................................... 77
Español
Seguridad y Advertencias .............................................................................................................. 78
Lista de Partes ................................................................................................................................ 80
Ensamblaje del Cochecito .............................................................................................................. 82
Uso del Cochecito .......................................................................................................................... 88
Conguraciones ............................................................................................................................. 94
Accesorios Opcionales ................................................................................................................... 96
Cuidado y Mantenimiento ............................................................................................................ 114
Contacto ....................................................................................................................................... 115
日本語
安全と警 告 .................................................................................................................................... 116
部 品リスト ..................................................................................................................................... 118
ベビーカーの組立 ......................................................................................................................... 120
ベビーカーの操作 ......................................................................................................................... 126
構成 .............................................................................................................................................. 132
オプションのアクセサリ ................................................................................................................. 134
保存取り扱い ................................................................................................................................. 150
連絡する ........................................................................................................................................ 151
한국어
안전 및 경고 .................................................................................................................................... 152
부품 목록 ........................................................................................................................................ 154
유모차 조립 ..................................................................................................................................... 156
유모차 운전 ..................................................................................................................................... 162
배치 ............................................................................................................................................... 168
옵션 액세서리 .................................................................................................................................. 170
관리 및 유지 방법 ............................................................................................................................. 186
문의하기 ......................................................................................................................................... 187
中文版
安全和警告 .................................................................................................................................... 188
零件清单 ....................................................................................................................................... 190
婴儿车装配 .................................................................................................................................... 192
婴儿车操作 .................................................................................................................................... 198
配置 .............................................................................................................................................. 204
选购附件 ....................................................................................................................................... 206
保养与维护 .................................................................................................................................... 222
联系我们 ....................................................................................................................................... 223

Safety and Warnings
IWARNING
Please read these instructions carefully before use
and keep them for future reference.
• Failure to follow these instructions could result in serious injury or death.
• Never leave child unattended.
• Ensure that all the locking devices are engaged before use.
• Avoid serious injury from falling or sliding out.
• Always use restraint system and ensure that children are positioned
according to these instructions.
• Be certain that the stroller is fully opened, the safety latch is in position,
and the wheel brakes are on before allowing children near the stroller.
• The parking device should always be engaged during the loading and
unloading of children.
• The front seat is not suitable for a child under 6 months.
• The maximum height of a child the product is designed to carry is 44 in
(111.8 cm).
• The maximum weight of a child the product is designed to carry is 55
lbs. (25 kg).
• When used for carrying 2 children at the same time or 3 children at the
same time, the total weight of all children must not exceed 110 lbs. (50
kg). Exceeding this total weight will cause excessive wear and stress on
the stroller and may cause a hazardous unstable condition.
• When carrying 3 children at the same time, one of which is in the bench
seat, note specically that the rear bench seat is designed for a child
that is at least 3 years old but LESS than 44 inches (111.76 cm) tall and
less than 55 lbs. (25 kg).
• Never allow a child to step on the leg support or footrest to get into or
out of the stroller.
• Do not use the stroller on stairways or escalators.
• Do not add any attachment not specically recommended by Joovy.
• To avoid injury, ensure that your child is kept away when unfolding and
folding this product.
• Any load attached to the handle aects the stability of the stroller.
Hanging purses, totes, parcels, changing bags or other accessory items
from handles or any other parts of the stroller may change the balance
of the stroller and cause a hazardous unstable condition.
• The maximum weight that can be carried in the storage basket is 25
lbs. (11.3 kg). Excessive weight may result in a hazardous unstable
condition.
• Never allow your stroller to be used as a toy.
4

• Do not let your child play with this product.
• This product is not suitable for running or skating.
• Discard all packaging materials properly. Do not allow children to play
with them.
• Check your stroller for loose rivets, snaps, worn parts, and torn material
or stitching on a regular basis.
• Discontinue use of the stroller should it malfunction or become
damaged.
CAUTION: While unfolding the stroller, be careful to keep your ngers
from being pinched by moving parts.
Please do not return this product to the store.
If you experience any of diculty with the assembly or use of this product, or if you have a question
regarding these instructions, please contact our Customer Service Department (page 39).
Please note: Styles and colors may vary.
5

Parts List
Water-resistant
UV Canopy
Stroller Frame
Rear
Wheels (2)
Seat
Bumper Bar
Seat Brackets (2)
Front
Wheels (2)
6
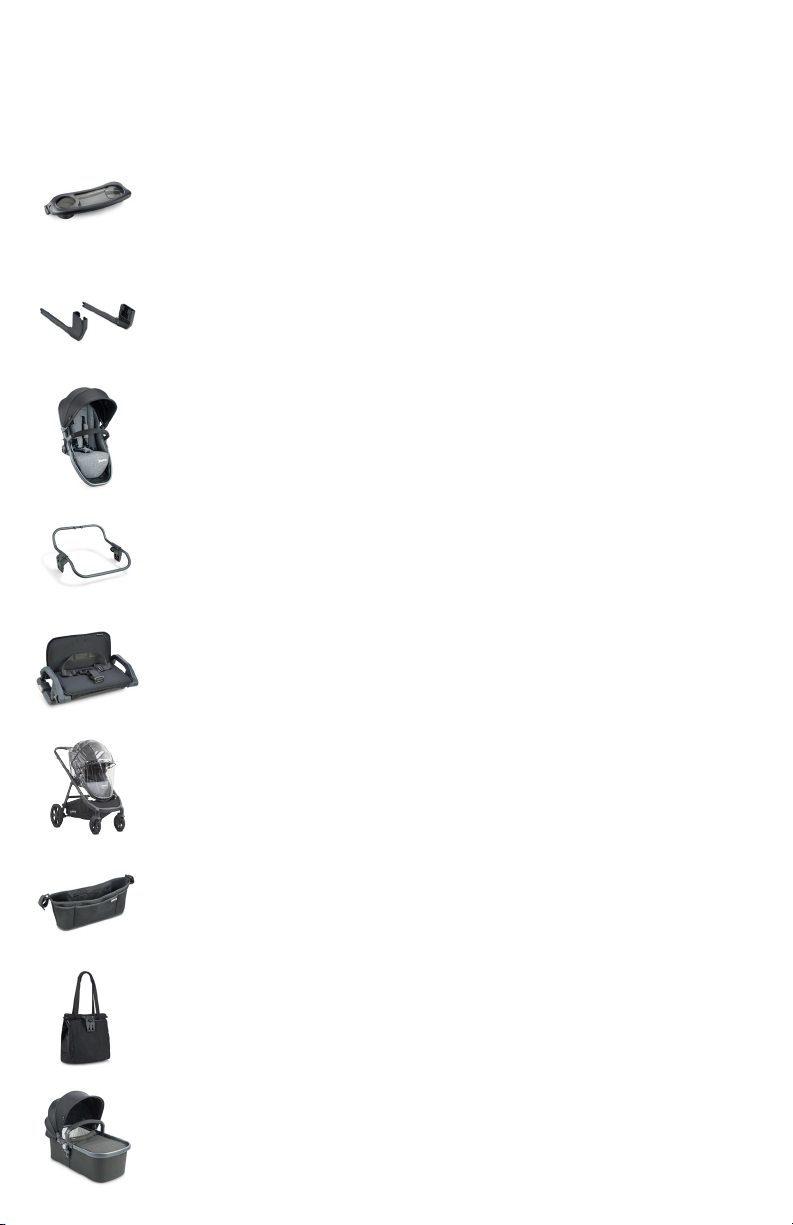
Additional Accessories (sold separately)
Customize your ride with a number of optional accessories for added functionality. All accessories
are sold separately.
Tray
• Swing-open tray from either side
• Deep cup holder
Front Adapters
• Required for placing accessory in
the front position
Second Seat
• Forward or rear-facing
• High, middle or front positions
Car Seat Adapters
• Compatibility with 10+ car seats
• Click-in installation
Bench Seat
• Click-in installation
• Holds a child from 3 years up to
55 lbs.
• Recessed snack area
• Clear tray cover is removable/
dishwasher-safe
• Compatible with Second Seat, Bassinet
and Car Seat Adapter
• Removable/machine-washable
seat fabric
• Front Adapter required
• Forward or rear-facing
• High, middle and front positions
• Built-in footrest and 3-point harness
• Stays in place when folded
Rain Cover
• Custom t
• All-weather protection
Parent Organizer
• Large neoprene organizer
• Two cup holders
Tote
• Largest on the market, 14” deep
• Carries up to 25 lbs.
• Four interior mesh pockets
Bassinet
• High, middle or front positions
• Ultra-soft interior and mattress pad
• Adjustable ventilated canopy
• Vented
• Easy to install
• Six individual compartments; one
zippered pocket
• Multiple positions
• Easy click-in installation
• Easily removed and carried as an
independent tote
• Zippered cover
• Machine-washable mattress pad cover
• Birth to 20 lbs.
• Front Adapter required
7

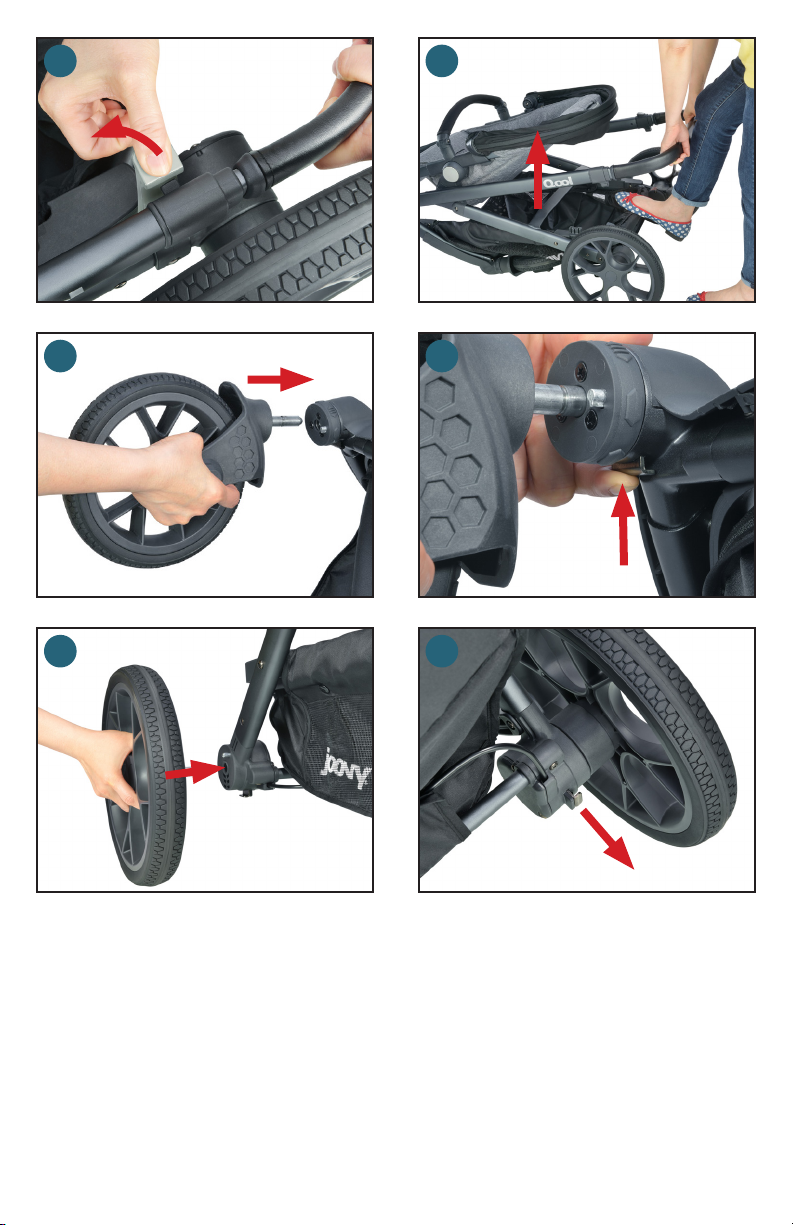
Stroller Assembly
IWARNING: Adult assembly is required for this product. No
tools required.
Unfolding the Stroller
NOTE: Remove packing foam from rear frame assembly to ensure stroller locks in the open position.
• Orient the stroller with the handle facing upward and closest to you. Release the safety latch
located on the left side of the stroller. (1)
• Pull upwards on the handle while putting one foot on top of the basket’s rear bar. Keep pulling until
the stroller is fully erected and the latching mechanism on each side engages. (2)
• Visually check and gently push downward on the handle to ensure that the stroller is completely
opened and locked before ANY use of the product.
IWARNING: Keep children away from stroller while
unfolding. ALWAYS secure the safety latch on the left side of the stroller
when it is in the unfolded position. This will prevent collapse of the stroller.
Possible pinching hazard – Be careful when unfolding the stroller.
Installing/Removing the Front Wheels
• Slide one front wheel onto the front wheel post until it clicks in place. (3) Repeat for other wheel.
Pull on the wheels to ensure they are installed properly.
• To remove, press the release metal button on the back of the front wheel and pull away from the
stroller. (4)
Installing/Removing the Rear Wheels
• Install a rear wheel by sliding the axle into the hole in the wheel hub until it clicks into place. (5)
Repeat for other wheel. Pull on the wheels to ensure they are installed properly.
• To remove, pull down the release metal buttons beneath the rear axle bar and pull the wheels from
the stroller. (6)
8
1 2
3 4
5 6
9
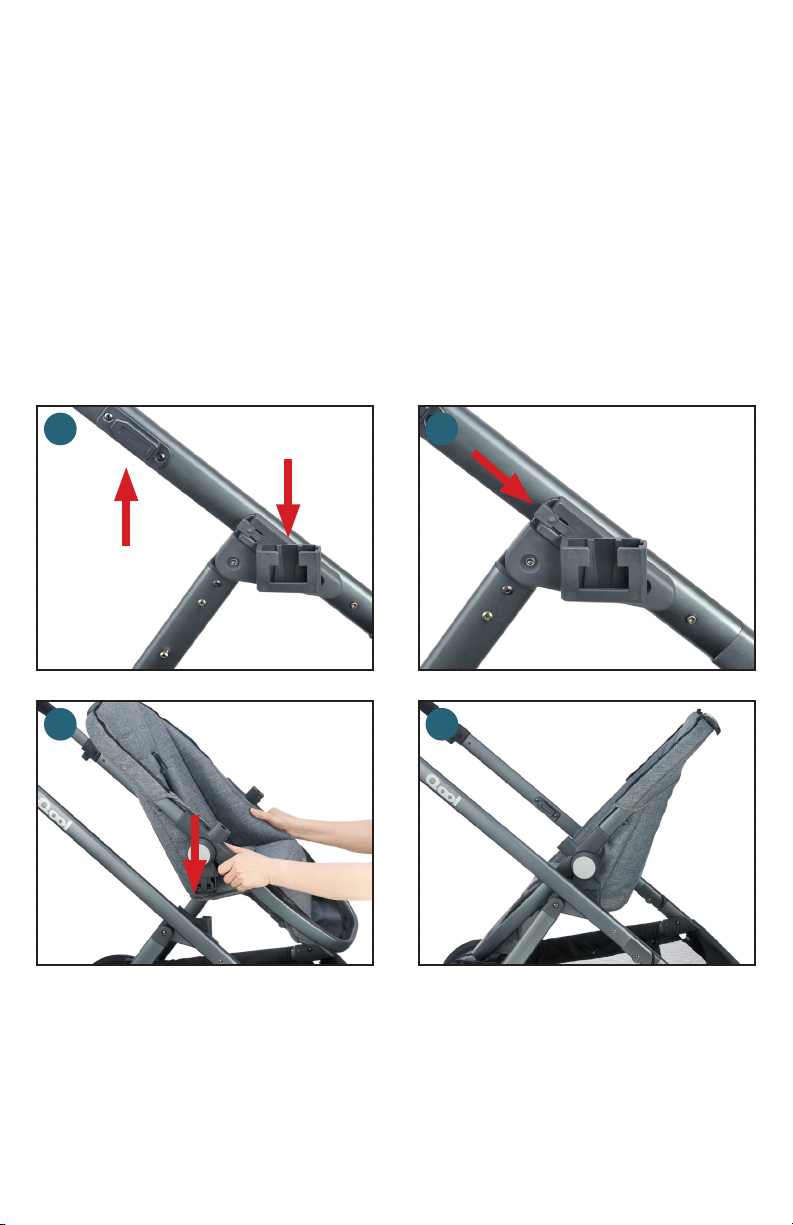
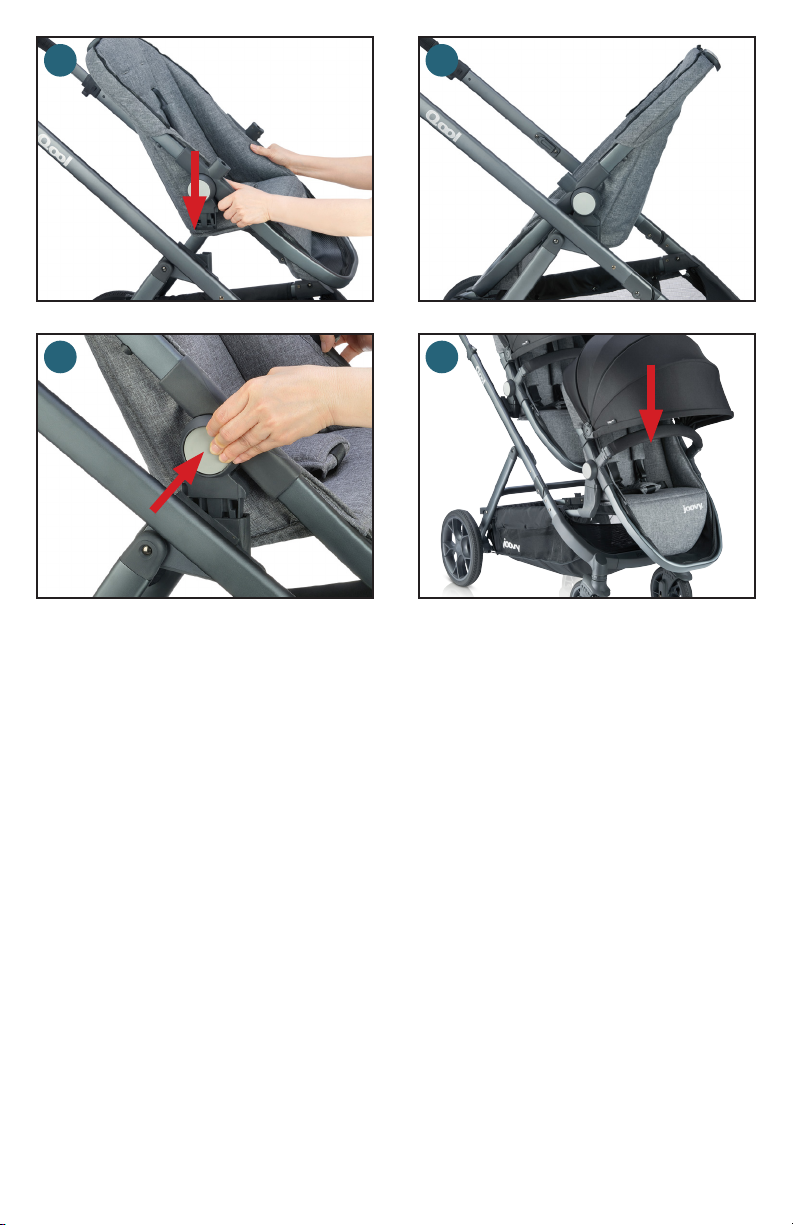
Installing/Removing the Seat
• Seat brackets can be placed in the rear (higher) or middle (lower) position on the stroller frame. (7)
• Slide the seat brackets onto the stroller frame at the desired height until they click into place. (8)
Both seat brackets must be at the same height.
• Place the seat on the stroller so that the male brackets on the bottom of the seat line up with the
female brackets on the stroller frame.
• Push down on both sides of the seat until both sides snap into place. (9) Pull up on the seat on
both sides to ensure it is secure.
• The seat can be placed on the stroller forward-facing or rear-facing. (10)
• To remove the seat, push both round buttons on both sides of the seat and pull away from the
stroller. (11)
• To remove the seat brackets when changing the seat into another seat location, push the lever
near the top and slide the bracket o. (12)
• To use the seat in the front position, front adapters (sold separately) must be installed. See
Optional Accessories for more information on usage.
87
10
109

11 12
11

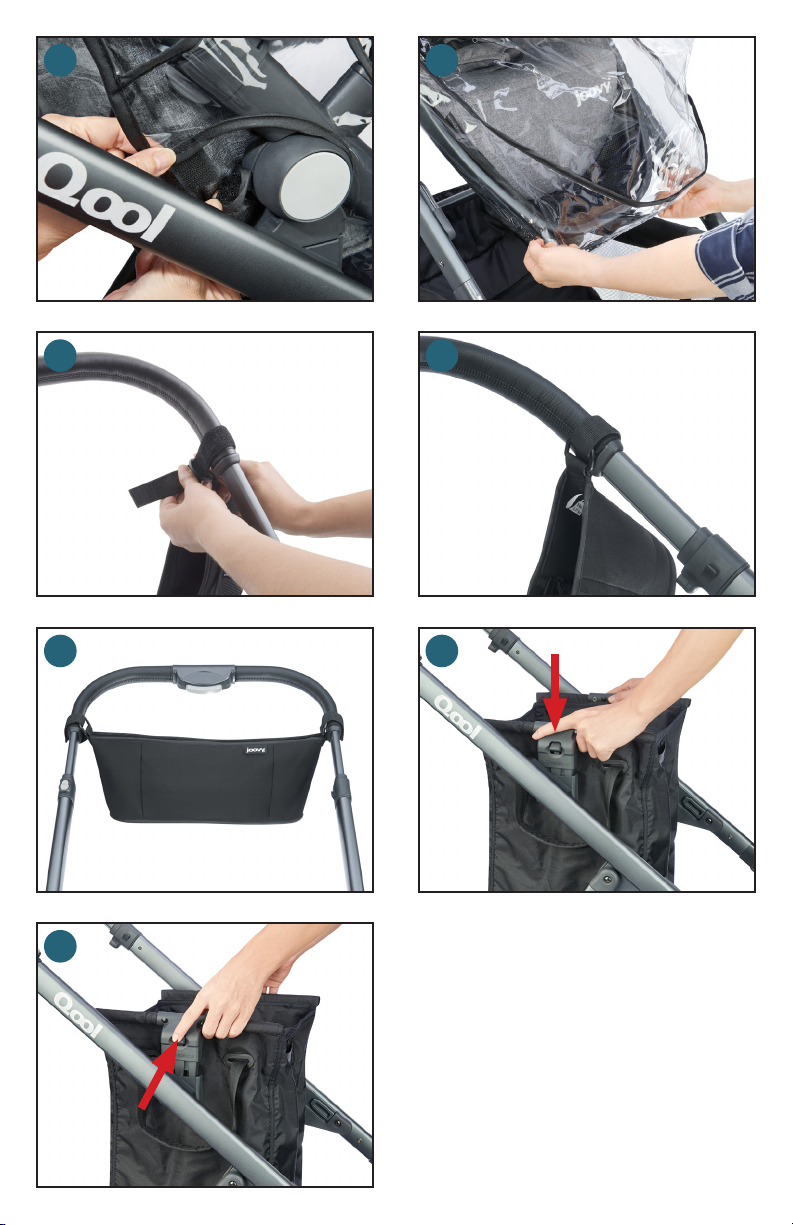
Installing the Canopy
• Zip the back of the canopy to the top of the seat. (13)
• Attach the canopy’s brackets to the sides of the seat frame by hooking them into place. (14)
• The canopy can be adjusted to be fully opened or closed. (15)
• The canopy can be made larger by unzipping the extension zipper and pulling the canopy open.
(16)
• The mesh window can be left opened or closed. Unfold the fabric ap on the back of the canopy
for the opened position. Fold the fabric ap over the mesh for the closed position. (17)
IWARNING: Possible pinching hazard – Be careful when
closing and opening the side hinges so as not to pinch your ngers.
ALWAYS zip canopy onto the stroller frame when in use. NEVER operate
the stroller without the canopy completely zipped.
Installing/Removing the Bumper Bar
• Remove the two safety caps from the seat mount points by pressing the release button and pulling
each cap o.
• To attach the bumper bar, orient it with the male tting pointed towards the seat. While holding the
male ttings straight, insert the male ttings on the bumper bar into the female ttings located on
both sides of the seat until it snaps into place. (18) Pull outward on the bumper bar to ensure it is
secure.
• To remove, press the buttons located on the underside of both male ttings inward and pull the
bumper bar away from the seat. (19)
• When using the stroller without the bumper bar, always replace the safety caps.
12

13
14
15
17
16
18
19
13

Stroller Operation
Front Wheel Swivel Locks
• To set the front wheels to either lock or swivel mode, twist the ring near the top of the wheel to the
desired mode. (20)
Rear Wheel Brakes
• Always engage rear brakes before placing child in or removing a child from the stroller.
• The rear wheel brakes can be engaged by pushing down on the brake lever and released by
pulling up on the brake lever. (21)
NOTE: Rock the stroller back and forth to ensure the brake is fully engaged.
IWARNING: ALWAYS set BOTH wheels to the same mode
before using stroller. Always make sure the wheel brakes are engaged
when the stroller is not being pushed so that the stroller will not roll away.
Never leave stroller unattended, especially on a hill or incline, as the
stroller may tip over or slide.
Securing the Seated Child
• There are three height adjustment positions for the shoulder harness. Adjust the height to the
closest height above your child’s shoulders.
• To remove the shoulder harness, turn the plastic ends sideways and push them through the slots
in the seatback. Reattach the harness at the proper height by reinserting the plastic ends through
the slots. Ensure both straps are the same height. (22)
• To unlatch the buckle press the center button and remove the male ends of each buckle. (23)
• Carefully place the child in the seat with the shoulder straps over their shoulders and chest. Then
place the crotch strap between the child’s legs.
• Push the shoulder/waist latch posts into the crotch buckle until all parts snap into place. (24)
• Tighten the waist belt to be snug around the child’s waist.
• The shoulder, waist, and crotch straps may be adjusted using the sliding plastic rings.
• Push down on the seatback to be sure it is secure. NEVER allow a child to step onto or sit on the
leg support or footrest. This may cause the stroller to tip over.
IWARNING: This seat is not suitable for children under 6
months. The maximum height of a child the product is designed to carry is
44 in (111.8 cm). The maximum weight of a child the product is designed
to carry is 55 lbs. (25 kg). When used for carrying 2 children at the
same time or 3 children at the same time, the total weight of all children
must not exceed 110 lbs. (50 kg). Exceeding this total weight will cause
excessive wear and stress on the stroller and may cause a hazardous
unstable condition. Never leave child unattended. Avoid serious injury
from falling or sliding out. Always use the restraint system.
14

20 21
22
24
23
15

Adjusting the Seat
• The seat has 4 positions. To adjust, pull up on the recline mechanism and pull the seat to the
desired position. (25)
• When the recline mechanism is pulled, the seat may also be pushed all the way forward.
IWARNING: ALWAYS make certain that the recline
mechanism is engaged before placing the child in the seat, whether the
seat is upright or reclined.
Adjusting the Handle
• The handle can be adjusted to 3 positions. To adjust the handle height, press and hold the button
in the middle of the handle grip, and slide the handle to the desired position. (26) The handle will
click into one of the pre-set positions when the button is released.
Storage Basket
• The storage basket should not be removed.
IWARNING: The maximum weight that can be carried in
the storage basket is 25 lbs. (11.3 kg). Excessive weight may result in a
hazardous unstable condition.
Folding the Stroller
• Rear wheel brake lever MUST be engaged before folding the stroller.
• The stroller can be folded with the seat facing forward in the middle lower or rear higher position.
• Close the canopy if the seat is attached.
• Make sure the front wheels are in swivel mode and NOT locked.
• Press the grey button on the right side of the stroller, below the handle. (27)
• Pull up on the triggers on both sides of the handle and slowly guide the handle down towards the
rear wheels and safety latch. (28) The stroller should automatically lock into place. (29) DO NOT
force the stroller closed.
• Pull up on the handle to ensure the safety latch is secure.
IWARNING: Rear wheel brakes MUST be engaged before
folding the stroller. DO NOT force the stroller closed. ALWAYS keep
children away from the stroller when folding. Possible pinching hazard –
Be careful when folding the stroller. Do not fold the stroller with two seats
and make sure to remove the front seat before folding.
16

25 26
27 28
29
17

Seat Fabric
• The seat fabric is removable for washing. First, unsnap both sides of the seat, for a total of 4
snaps. (30)
• Unzip the footrest fabric from the seat frame. (31)
• Pull out the top of the seat fabric from around the seat recline mechanism. (32)
• Pull the seat o the seat frame completely.
• Remove the covers around the harness, including the shoulder straps and crotch strap. (33)
• Remove the shoulder, waist, and crotch straps from the slots in the seat. (34)
• Open the zipper pocket at the back of the seat. Remove the plastic board out of the seat. (35)
• Open the zipper pocket underneath the seat. Remove the plastic board out of the seat. (36)
• Open the zipper pocket at the bottom of the footrest fabric. Remove the plastic board out of the
footrest. (37) The seat fabric is ready for washing.
• To reassemble the front seat, simply reverse the disassembly steps. Ensure all zippers and snaps
are securely closed.
18
30
31
32 33
34
35
36 37
19
Congurations
Single
Double
Triple
Bassinet
Car Seat
20
Car Seat (cont.)
Bench Seat
Tote
21

Optional Accessories
A number of optional accessories can be purchased for the Qool in order to expand its versatility.
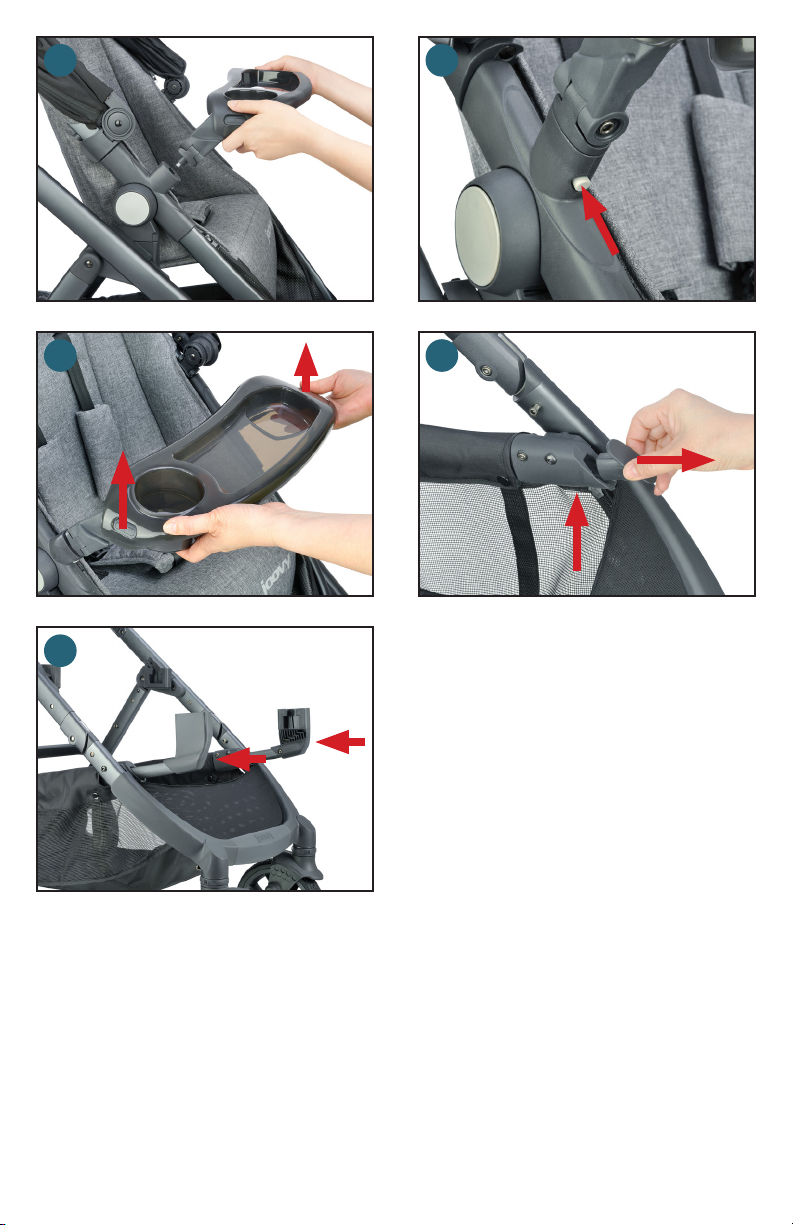
Tray (Optional)
• If the safety caps are installed, remove the two safety caps from the seat mount points by pressing
the button and pulling each cap o.
• If the bumper bar is installed, remove the bumper bar by pressing the buttons located on the
underside of both male ttings inward and pulling the bumper bar away from the seat.
• To attach the tray, orient it with the male tting pointed towards the seat. Insert the male ttings on
the tray into the female ttings located on both sides of the seat until it snaps into place. (38) Pull
outward on the tray to ensure it is secure.
• To remove the tray, squeeze the release buttons located under the tray arms and pull the tray up.
(39)
• To use the tray’s swing arm, release one side of the tray by squeezing the release button and rotate
the tray upward.
• The tray insert is removable and dishwasher safe. To remove the tray insert, pull outward and
upward on the hook attachments on both sides of the tray insert. (40)
• To attach the tray insert, t the tray insert into the tray until both sides snap into place.
• When using the stroller without the tray, always replace the safety caps.
IWARNING: For use ONLY on the Joovy Qool Stroller. The
tray is not a restraint device. ALWAYS secure your child with the restraint
system. NEVER lift the stroller by the tray. Use caution when attaching the
tray when there is a child seated in the stroller. The maximum weight that
can be carried in the tray is 2 lbs. (0.9 kg). This product is not a toy. DO
NOT allow children to play with it.
Front Adapters (Optional)
• Remove the two safety caps from the lower frame mount points by pressing the release button
and pulling each cap o. (41) Store the safety caps in a safe place for future use.
• Insert one front adapter into one of the mounting slots until it clicks into place. Repeat for the other
side. (42) The front adapters can only be used in this position.
• The front seat adapters allow for the seat, second seat, bassinet and car seat adapters to be used
in the front position on the stroller. The second seat, bassinet, and car seat adapters are sold
separately.
• Install safety caps on the holes of both slots when using the stroller without the front adapters.
IWARNING: For use ONLY on the Joovy Qool stroller. This
product is not a toy. DO NOT allow children to play with it.
22
38 39
40 41
42
23

Second Seat (Optional)
• To use the second seat in the rear (higher) or middle (lower) position, place the seat brackets at
the desired height and place the seat on the stroller so that the male brackets on the bottom of the
seat line up with the female brackets on the stroller frame.
• Push down on both sides of the seat until both sides snap into place. (43) Pull up on the seat on
both sides to ensure it is secure.
• The seat can be placed on the stroller forward-facing or rear-facing. (44)
• To remove the seat, push both round buttons on both sides of the seat and pull away from the
stroller. (45)
• To use the second seat in the front position, front adapters (sold separately) must be installed
prior to being able to install the second seat. See the Front Adapters section for information on
installation.
• Place the seat on the front adapters so that the male brackets on the bottom of the seat line up
with the female brackets on the front adapters.
• Push down on both sides of the seat until both brackets snap into place. (46) Pull up on the seat
on both sides to ensure it is secure.
• The seat can be placed on the stroller forward-facing or rear-facing.
IWARNING: For use ONLY on the Joovy Qool stroller. This
seat is not suitable for children under 6 months. The maximum height of
a child the product is designed to carry is 44 in (111.8 cm). The maximum
weight of a child the product is designed to carry is 55 lbs. (25 kg). When
used for carrying 2 children at the same time or 3 children at the same
time, the total weight of all children must not exceed 110 lbs. (50 kg).
Exceeding this total weight will cause excessive wear and stress on the
stroller and may cause a hazardous unstable condition. Never leave child
unattended. Avoid serious injury from falling or sliding out. Always use the
restraint system. This product is not a toy. Do not allow children to play
with it.
24
4443
4645
25

Car Seat Adapter (Graco/Chicco) (Optional)
• To use the car seat adapter in the rear (higher) or middle (lower) position, rst ensure the stroller
seat is removed.
• Note where the car seat adapter pieces are labeled “A,” “B,” “C,” and “D.”
• Arrange the car seat adapter pieces so that “A” connects to “A,” “B” connects to “B,” and so on.
(47)
• To assemble, depress the spring pin and slide each adapter piece end into the corresponding tube
on the center bracket until the spring pin clicks into place.
IWARNING: Before proceeding, be certain that all four
spring pins have clicked into place. Pull on each adapter piece to be sure
it is securely attached to the center bracket.
• Place the seat brackets at the desired height.
• The car seat adapter can be mounted to enable the car seat to be either forward-facing or rearfacing. The car seat will face the direction that the arrow diagrams are pointing on each side of the
car seat adapter. (48)
• For the car seat to be mounted forward-facing, orient the car seat adapter so that the arrow
diagrams on the adapter point toward the front of the stroller.
• For the car seat to be mounted rear-facing, orient the car seat adapter so that the arrow diagrams
on the adapter point toward the rear of the stroller.
• Insert the car seat adapter into the seat brackets. (49) Pull on the adapter to ensure it is secure.
• Orient the car seat to face the same direction as the arrow diagrams on the adapter.
• Hold the car seat by the carry handle and lower the car seat onto the stroller so that the hook on
the rear of the car seat latches onto the car seat adapter. (50) Pull up on car seat to ensure it is
secure.
• To remove the car seat, pull the release lever (the same lever used to release the car seat from its
base) and lift up.
• To remove the adapter from the stroller, squeeze upward on both triggers and pull it o the stroller.
(51)
• To use the car seat adapter in the front position, front adapters (sold separately) must be installed
prior to being able to install the car seat adapter. See the Front Adapters section for information on
installation.
• Place the car seat adapter onto both of the front adapters. (52) Pull on the adapter to ensure it is
secure. The car seat adapter can be mounted forward-facing or rear-facing.
• Hold the car seat by the carry handle and lower the car seat onto the stroller so that the hook on
the rear of the car seat latches onto the car seat adapter. (53) Pull up on car seat to ensure it is
secure.
• To remove the car seat, pull the release lever (the same lever used to release the car seat from its
base) and lift up.
• To remove the adapter from the stroller, squeeze upward on both triggers and pull it o the stroller.
(51)
• Before folding, remove any infant car seat. The stroller can be folded with the infant car seat
adapter in place.
IWARNING: For use ONLY on the Joovy Qool Stroller.
ALWAYS position the infant car seat so that it securely snaps into place
into the infant car seat adapter. Always extend the handle to max. height
when using car seat in the upper rear position. The infant car seat adapter
is for use ONLY with specic car seats. DO NOT use other infant car seat
models that are not in the Car Seat Compatibility List (see page 28). This
product is not a toy. DO NOT allow children to play with it.
26

47
48
D
C
49
51 52
A
D
C
A
B
B
50
53
27

Car Seat Adapters (Britax/B.O.B. B-Safe) (Optional)
• To use the car seat adapters in the rear (higher) or middle (lower) position, rst ensure the stroller
seat is removed.
• Place the seat brackets at the desired height. Insert both car seat adapters into the seat brackets.
(54) Pull on the adapters to ensure they are secure. The car seat can be mounted forward-facing
or rear-facing.
• Hold the car seat by the carry handle and lower the car seat onto the stroller so that the hook on
the rear of the car seat latches onto the car seat adapters. (55) Pull up on car seat to ensure it is
secure.
• To remove the car seat, pull the release lever (the same lever used to release the car seat from its
base) and lift up.
• To remove the adapters from the stroller, squeeze upward on the side trigger for one adapter and
pull it o the stroller. (56) Repeat for other side.
• To use the car seat adapters in the front position, front adapters (sold separately) must be installed
prior to being able to install the car seat adapters. See the Front Adapters section for information
on installation.
• Place the car seat adapters onto both of the front adapters. (57) Pull on the adapters to ensure
they are secure. The car seat can be mounted forward-facing or rear-facing.
• Hold the car seat by the carry handle and lower the car seat onto the stroller so that the hook on
the rear of the car seat latches onto the car seat adapters. (58) Pull up on car seat to ensure it is
secure.
• To remove the car seat, pull the release lever (the same lever used to release the car seat from its
base) and lift up.
• To remove the adapters from the stroller, squeeze upward on the side trigger for one adapter and
pull it o the stroller. (56) Repeat for other side.
• Before folding, remove any infant car seat. The stroller can be folded with the infant car seat
adapter in place.
IWARNING: For use ONLY on the Joovy Qool Stroller.
ALWAYS position the infant car seat so that it securely snaps into place
into the infant car seat adapter. Always extend the handle to max. height
when using car seat in the upper rear position. The infant car seat adapter
is for use ONLY with specic car seats. DO NOT use other infant car seat
models that are not in the Car Seat Compatibility List (see below). This
product is not a toy. DO NOT allow children to play with it.
IMPORTANT NOTE
When using your stroller as an infant car seat, the following are the compatible infant car seat
models that the Qool will accommodate:
Graco® SnugRide Click Connect 30
Graco® SnugRide Click Connect 35
Graco® SnugRide Click Connect 35 LX
Graco® SnugRide SnugLock 35 DLX
Graco® SnugRide Click Connect 40
Chicco® KeyFit
Chicco® KeyFit 30
For the most updated list of compatible infant car seats,
please check our website at www.joovy.com.
28
Chicco® KeyFit 30 Magic
Chicco® KeyFit 30 Zip
Chicco® KeyFit 30 Zip Air
Britax®/BOB® B-Safe
Britax® B-Safe 35
Britax® B-Safe 35 Elite

54
55
56
58
57
29

Bench Seat (Optional)
• The bench seat can be installed in conjunction with the seat or seats in the middle (lower)
position and/or front position using front adapters. The seat in the middle (lower) position can
only be forward-facing if used with the bench seat. The second seat and front adapters are sold
separately.
• The bench seat can be installed in conjunction with the bassinet in the front position using front
adapters. The bassinet and front adapters are sold separately.
• The bench seat can be installed in conjunction with the car seat in the middle (lower) position or
front position using front adapters. The car seat in the middle (lower) position can only be forwardfacing if used with the bench seat. Car seat adapters and front adapters are sold separately.
• See the Congurations section for examples of these congurations.
• To install the bench seat, place the bench seat on the back of the stroller so that the male brackets
on the bottom of the bench seat line up with the female brackets on the stroller frame.
• Push down on both sides of the bench seat until both brackets snap into place. (59) Pull up on the
bench seat on both sides to ensure it is secure.
• To fold the bench seat on the stroller, pull up on the lever at the back of the bench seat and fold
the seatback down. (60)
• Squeeze both buttons near the top of the footrest and fold the footrest up. (61)
• To remove the bench seat from the stroller, squeeze both buttons on the sides and pull the seat o
the stroller. (62)
• The bench seat fabric is removable for washing. Open the Velcro at the back of the seat. Flip the
bench seat over and open the Velcro at the bottom of the seat. Remove the plastic board. (63) Pull
o the seat fabric from the rear seat frame.
• To reassemble the bench seat, simply reverse the disassembly steps. Ensure all zippers are
securely closed.
IWARNING: For use ONLY on the Joovy Qool stroller. Avoid
serious injury from falling or sliding out. Always use restraint system and
ensure that children are positioned according to these instructions. When
used for carrying 2 children at the same time or 3 children at the same
time, the total weight of all children must not exceed 110 lbs. (50 kg).
Exceeding this total weight will cause excessive wear and stress on the
stroller and may cause a hazardous unstable condition. When carrying
3 children at the same time, one of which is in the bench seat, note
specically that the rear bench seat is designed for a child that is at least 3
years old but LESS than 44 inches (111.8 cm) tall and less than 55 lbs. (25
kg). Never allow a child to step on the leg support or footrest to get into or
out of the stroller. This product is not a toy. Do not allow children to play
with it.
30

59
60
61
63
62
31

Rain Cover (Optional)
NOTE: The rain cover should only be used with the canopy attached.
• Make sure the canopy is in the open position. Carefully open the rain cover to its fullest.
• Place the rain cover over the seat on the stroller. Make sure the front seam is over the front edge of
the canopy.
• Pull the rain cover down and attach the 2 Velcro® attachments together around the frame bar on
BOTH sides of the seat frame. (64)
• Pull the bottom of the rain cover over the footrest until it ts snugly. (65)
IWARNING: For use ONLY on the Joovy Qool stroller. Never
leave this cover in place with child in stroller when exposed to direct
sun or high temperature, as temperature inside may be excessive. This
product is not a toy. DO NOT allow children to play with it.
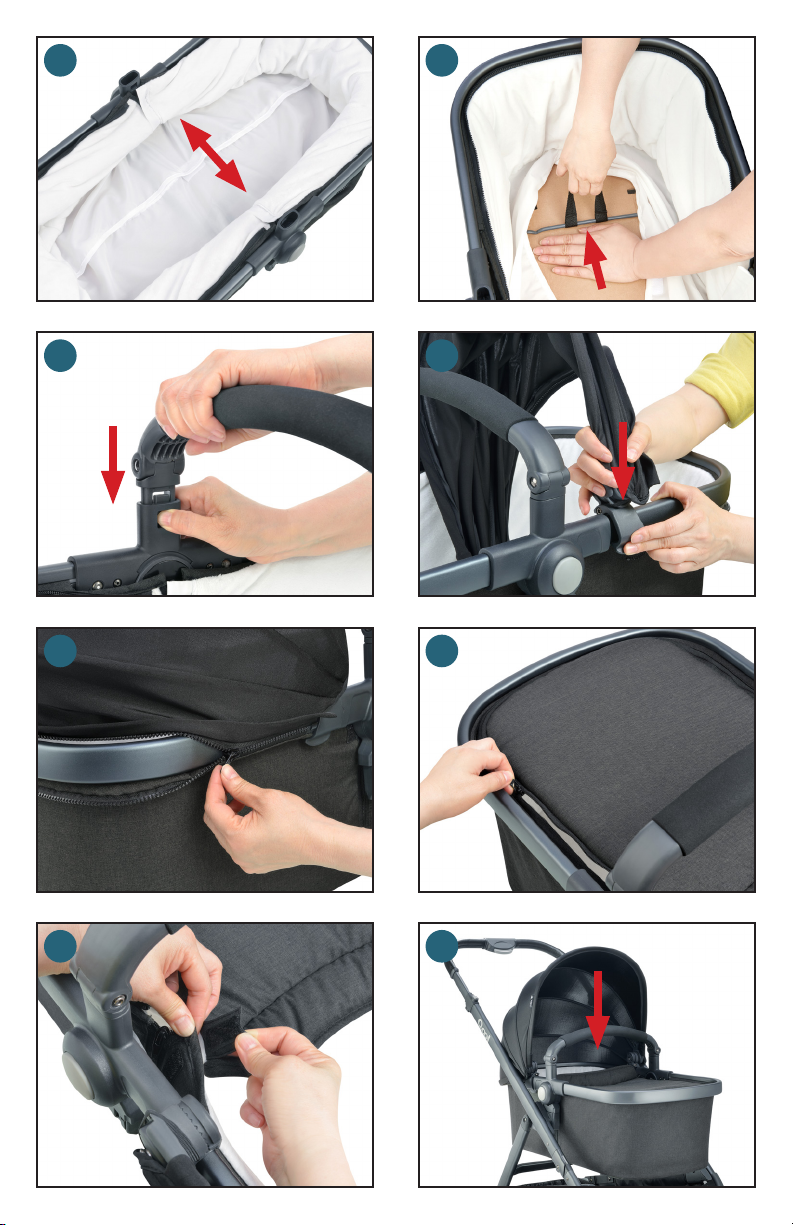
Parent Organizer (Optional)
• Loop one strap of the parent organizer around one side of the handle. Loop the strap back through
the D-ring in the parent organizer. (66)
• Loop the rest of the strap back around the handle to attach the Velcro. (67)
• Repeat for the other side. (68) Ensure the parent organizer is secure.
IWARNING: For use ONLY on the Joovy Qool stroller.
NEVER carry hot beverages or open containers in this product. The
maximum weight that can be carried in the parent organizer is 5 lbs. (2.3
kg). This product is not a toy. DO NOT allow children to play with it.
Tote (Optional)
• The tote can only be used in the rear (higher) or middle (lower) position.
• Place the seat brackets at the desired height.
• To install, place the tote on the stroller so that the male brackets line up with the female brackets
on the stroller frame.
• Push down on both sides of the tote brackets until both sides snap into place. (69) Pull up on the
tote on both sides to ensure it is secure.
• To remove the tote, squeeze upward on both triggers and pull it o the stroller. (70)
• See the Congurations section for examples of applicable congurations.
• The stroller can be folded with the tote installed.
IWARNING: For use ONLY on the Joovy Qool stroller.
NEVER lift the stroller by the tote. Use caution when attaching the tote
when there is a child seated in the stroller. The maximum weight that can
be carried in the tote is 25 lbs. (11.3 kg). This product is not a toy. DO NOT
allow children to play with it.
32
64 65
66 67
68 69
70
33

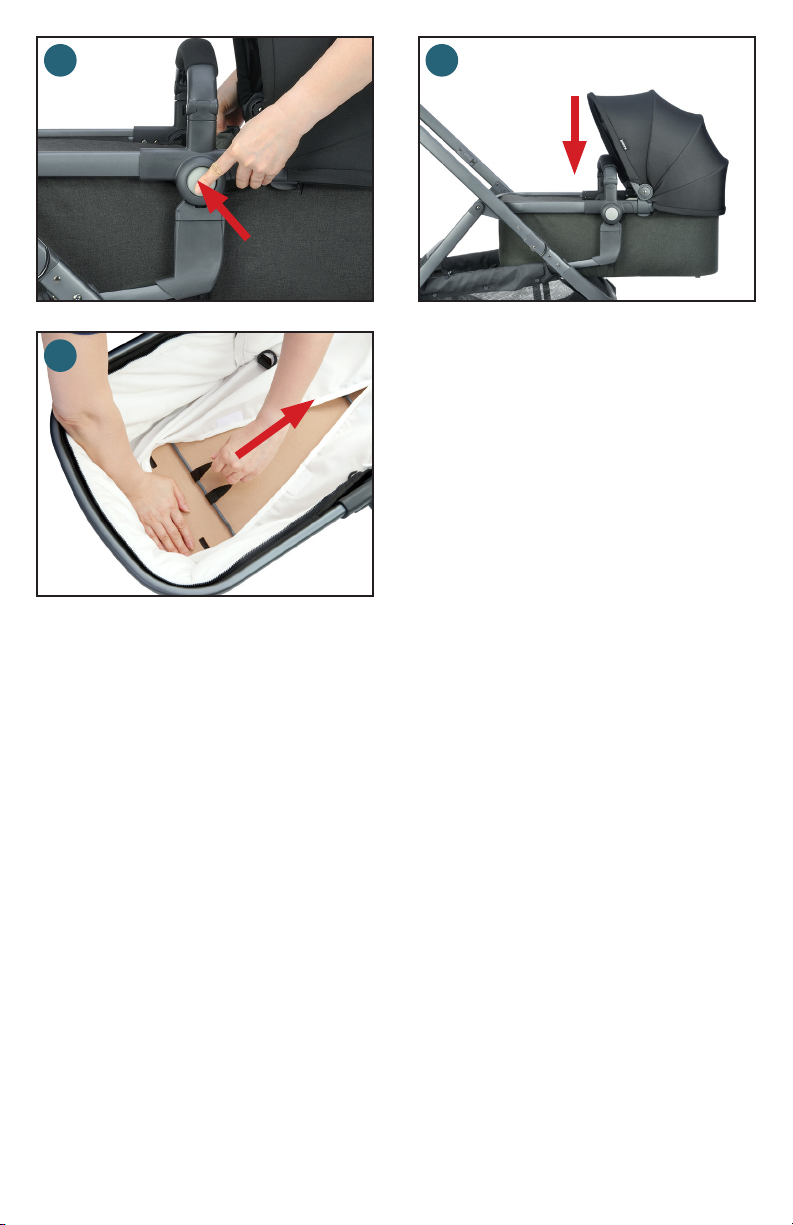
Bassinet (Optional)
• To assemble the bassinet, remove the mattress and unfasten the Velcro within. (71)
• With one hand braced against the bottom of the bassinet, use your free hand to rmly pull the loop
on the bassinet bracket until the bracket ts into the grooves at the bottom of the bassinet. (72)
Repeat on the other side. The bassinet should now hold its shape.
• NOTE: You may need to unzip the bassinet for easier access to the other side.
• Replace the mattress. Rezip the bassinet if you have unzipped it.
• Attach the bassinet handle by sliding both posts into the mounts on the bassinet. (73)
• Attach the canopy’s brackets to the sides of the bassinet frame by hooking them into place. (74)
Locate the side zipper and zip the canopy to the bassinet fabric. (75)
• Zip up the bassinet cover. (76) Attach the Velcro of the bassinet cover to the bassinet frame. (77)
• The bassinet can be placed on the stroller forward-facing or rear-facing.
• To use the bassinet in the rear (higher) or middle (lower) position, rst ensure the stroller seat is
removed.
• Place the seat brackets at the desired height. Place the bassinet on the stroller so that the male
brackets on the bottom of the bassinet line up with the female brackets on the stroller frame.
• Push down on both sides of the bassinet until both brackets snap into place. (78) Pull up on the
bassinet on both sides to ensure it is secure.
• To remove the bassinet, push both round buttons on both sides of the bassinet and pull away from
the stroller. (79)
• To use the bassinet in the front position, front adapters (sold separately) must be installed prior to
being able to install the bassinet. See the Front Adapters section for information on installation.
• Place the bassinet on the front adapters so that the male brackets on the bottom of the bassinet
line up with the female brackets on the front adapters.
• Push down on both sides of the bassinet until both brackets snap into place. (80) Pull up on the
bassinet on both sides to ensure it is secure.
• To disassemble the bassinet, remove the mattress, and unfasten the Velcro at the bottom of the
bassinet. With one hand braced against the bottom of the bassinet, use your free hand to rmly
pull on the loops attached to the brackets until it disconnects from the grooves and lies down at.
(81) Repeat for the other side. The bassinet should now lie at for storage.
• The mattress fabric is washable. Remove the fabric from the foam pad and place the fabric into a
mesh washing bag when washing.
• Before folding, remove the bassinet.
34
7271
73
74
75 76
77
78
35
79
81
80
36

IWARNING
Failure to follow these warnings and the instructions could result
in serious injury or death. Read all the instructions before use of
the bassinet. Keep instructions for future use.
• The bassinet is designed for use ONLY on the Joovy Qool and Caboose
S strollers. DO NOT use on any other product.
• The bassinet must be fully assembled per Joovy’s instructions
before using. Do not modify the bassinet or add any attachments not
specically recommended by Joovy.
• Do not use the bassinet if it is damaged or broken.
• To help prevent falls, do not use this product when the infant begins to
roll over, push up on hands and knees or has reached over 20 lbs. (9.1
kg), whichever comes rst.
• Use bassinet with only one child at a time.
• Use ONLY the pad provided by Joovy.
• To reduce the risk of SIDS, pediatricians recommend healthy infants
be placed on their backs to sleep, unless otherwise advised by your
physician.
• If a sheet is used with the pad, use only the one provided by Joovy
which is specically designed to t the dimension of this bassinet
mattress.
• Suocation Hazard: Bassinet can roll over on soft surfaces and suocate
child. NEVER place bassinet on beds, sofas or other soft surfaces.
• Fall Hazard: Child’s activity can move bassinet. NEVER place bassinet
on counter tops, tables or any other elevated surface.
• NEVER use this bassinet as a means to transport an infant in a motor
vehicle.
• Do not place any cord, strap or similar item in or near this bassinet that
could become wrapped around a child’s neck.
• Do not place this bassinet near a window or patio door where a child
could reach the cord of a blind or curtain and be strangled.
• Check this bassinet regularly before using it and do not use it if any
parts are loose or missing or if there are any signs of damage. Do not
substitute parts. Contact the manufacturer if replacement parts or
additional instructions are needed.
• Use a bassinet mattress that is no thicker than 3.8 cm and is of such
a size that, when it is pushed rmly against any side of the bassinet, it
does not leave a gap of more than 3 cm between the mattress and any
part of the sides of the bassinet.
• Children can suocate on soft bedding. Do not place pillows, comforters
or soft mattresses in this bassinet.
37

Care & Maintenance
Maintenance
All of the ttings, snaps, locks, rivets, and other hardware and plastic parts on the stroller should be
inspected periodically to ensure that they are secured properly and not damaged or malfunctioning.
The safety harness, as well as all other straps and fabric items and their stitching should also be
inspected periodically to ensure that they are secured properly and not loose, torn or otherwise
damaged. All moving parts, such as wheels, brakes, and hinges should also be checked periodically
to ensure they are operating properly.
Any missing, broken, or worn components should be replaced immediately, and the stroller should
not be used until they are replaced. Only original manufacturer’s components should be used. If
needed, please contact Joovy at our toll-free phone number.
Cleaning
The fabric material on this stroller can be cleaned using mild household soap or detergent and warm
water on a sponge or clean cloth. Seat fabric is machine-washable. Remove the metal frame and PE
boards from the seat before washing. Do not use solvents, caustic or abrasive cleaning materials.
To minimize shrinkage, simply reattach the seat to the frame to dry. Do not press, iron, dry clean,
tumble dry or wring the fabric. Always allow the fabric to completely air dry before using the stroller.
The frame and wheels should always be kept clean and free of dirt and foreign matter, especially
after operating the stroller in rain, snow, or other harsh environments. Use a sponge or cloth
dampened with warm water and a mild detergent cleaner to clean the wheels after such use.
Storage
Direct sunlight may fade fabric and dry out wheels. Store stroller indoors to prolong its appearance.
DO NOT store outdoors. Ensure that the stroller is dry before storing for prolonged periods. Always
store the stroller in a dry environment. Store the stroller in a safe place when not in use (i.e. away
from children). DO NOT place heavy objects on top of the stroller. DO NOT store the stroller near a
direct heat source such as a radiator or open re.
38

Contact
Please do not return this product to the store.
If you experience any of diculty with the assembly or use of this product, or if you have a question
regarding these instructions, please contact our Customer Service Department:
United States
Joovy
(877) 456-5049, 8:30 am – 5:00 pm Central Time
customerservice@joovy.com
Canada
ISSI Inc.
(800) 667-4111, 8:30 am – 5:00 pm Eastern Time
Korea
Joy Partners Limited Korea
(822) 2248-3384, 9:00 am – 6:00 pm GMT+9
39
 Loading...