

Instruction Manual
Manuel d’Instructions
Manual de Instrucciones
取扱説明書
사용 지침서
使用手册
820X
© Joovy 2018 • 180119


Table of Contents
English
Safety and Warnings ........................................................................................................................ 4
Parts List .......................................................................................................................................... 6
Stroller Assembly .............................................................................................................................. 8
Stroller Operation ........................................................................................................................... 14
Congurations ................................................................................................................................ 25
Optional Accessories ..................................................................................................................... 26
Care and Maintenance ................................................................................................................... 48
Customer Service ........................................................................................................................... 49
Francais
Sécurité et Mise en Gardes ............................................................................................................ 50
Liste des Pièces ............................................................................................................................. 52
Assemblage de la Poussette .......................................................................................................... 53
Utilisation de la Poussette .............................................................................................................. 54
Congurations ................................................................................................................................ 71
Accessoires Optionnels .................................................................................................................. 72
Entretien et Maintenance ................................................................................................................ 98
Service à la Clientèle ...................................................................................................................... 99
Español
Seguridad y Advertencias ............................................................................................................ 100
Lista de Partes .............................................................................................................................. 102
Ensamblaje del Cochecito ............................................................................................................ 104
Uso del Cochecito ........................................................................................................................ 110
Conguraciones ........................................................................................................................... 121
Accesorios Opcionales ................................................................................................................. 122
Cuidado y Mantenimiento ............................................................................................................ 146
Servicio al Cliente ......................................................................................................................... 147
日本語
安全と警 告 .................................................................................................................................... 148
部 品リスト ..................................................................................................................................... 150
ベビーカーの組立 ......................................................................................................................... 152
ベビーカーの操作 ......................................................................................................................... 158
構成 .............................................................................................................................................. 169
オプションのアクセサリ ................................................................................................................. 170
保存取り扱い ................................................................................................................................. 192
顧客サービス ................................................................................................................................ 193
한국어
안전 및 경고 .................................................................................................................................... 194
부품 목록 ........................................................................................................................................ 196
유모차 조립 ..................................................................................................................................... 198
유모차 운전 ..................................................................................................................................... 204
배치 ............................................................................................................................................... 215
옵션 액세서리 .................................................................................................................................. 216
관리 및 유지 방법 ............................................................................................................................. 238
고객 서비스 ..................................................................................................................................... 239
中文版
安全和警告 .................................................................................................................................... 240
零件清单 ....................................................................................................................................... 242
婴儿车装配 .................................................................................................................................... 244
婴儿车操作 .................................................................................................................................... 250
配置 .............................................................................................................................................. 261
选购附件 ....................................................................................................................................... 262
保养与维护 .................................................................................................................................... 284
客户服务 ....................................................................................................................................... 285

Safety and Warnings
IWARNING
Please read these instructions carefully before use
and keep them for future reference.
• Failure to follow these instructions could result in serious injury or death.
• Never leave child unattended.
• Ensure that all locking devices are engaged before use.
• Avoid serious injury from falling or sliding out.
• Always use restraint system and ensure that children are positioned
according to these instructions.
• Be certain that the stroller is fully opened, the safety latch is in position,
and the wheel brakes are engaged before allowing children near the
stroller.
• The parking device should always be engaged during the loading and
unloading of children.
• This seat is not suitable for children under 3 months. (US ASTM F833,
Canada SOR/2016 standards).
• The maximum weight of the child that can be seated in the front seat is
55 lbs. (25 kg).
• The maximum height of a child the product is designed to carry is 44 in
(111.8 cm).
• The bench seat is designed for a child that is at least 2 ½ years old but
LESS than 44 inches (111.8 cm) tall and less than 55 lbs. (25 kg).
• Use of the stroller with two children weighing more than 55 lbs. (25 kg)
each, or children totaling more than 110 lbs. (50 kg), will cause excessive
wear and stress on the stroller and may cause a hazardous unstable
condition.
• Never use this stroller to carry more than 2 children at the same time.
• Never allow a child to step on the footrest to get into or out of the
stroller.
• Do not use the stroller on stairways or escalators.
• Do not add any attachment not specically recommended by Joovy.
• To avoid injury, ensure that your child is kept away when unfolding and
folding this product.
• Any load attached to the handle aects the stability of the stroller.
Hanging purses, shopping bags, parcels, changing bags or other
accessory items from handle bars or any other parts of the stroller may
change the balance of the stroller and cause a hazardous unstable
condition.
4

• The maximum weight that can be carried in the storage basket is 25
lbs. (11.3 kg). Excessive weight may result in a hazardous unstable
condition.
• The maximum weight that can be carried in the tray is 2 lbs. (0.9 kg).
• Never allow your stroller to be used as a toy. Do not let your child play
with this product.
• Do not let your child play with this product.
• This product is not suitable for running or skating.
• Discard all packaging materials properly. Do not allow children to play
with them.
• Check your stroller for loose rivets, snaps, worn parts, and torn material
or stitching on a regular basis.
• Discontinue use of the stroller should it malfunction or become
damaged.
• CAUTION: While unfolding the stroller, be careful to keep your ngers
from being pinched by moving parts.
Please do not return this product to the store.
If you experience any of diculty with the assembly or use of this product, or if you have a question
regarding these instructions, please contact our Customer Service Department (page 49).
Please note: Styles and colors may vary.
5
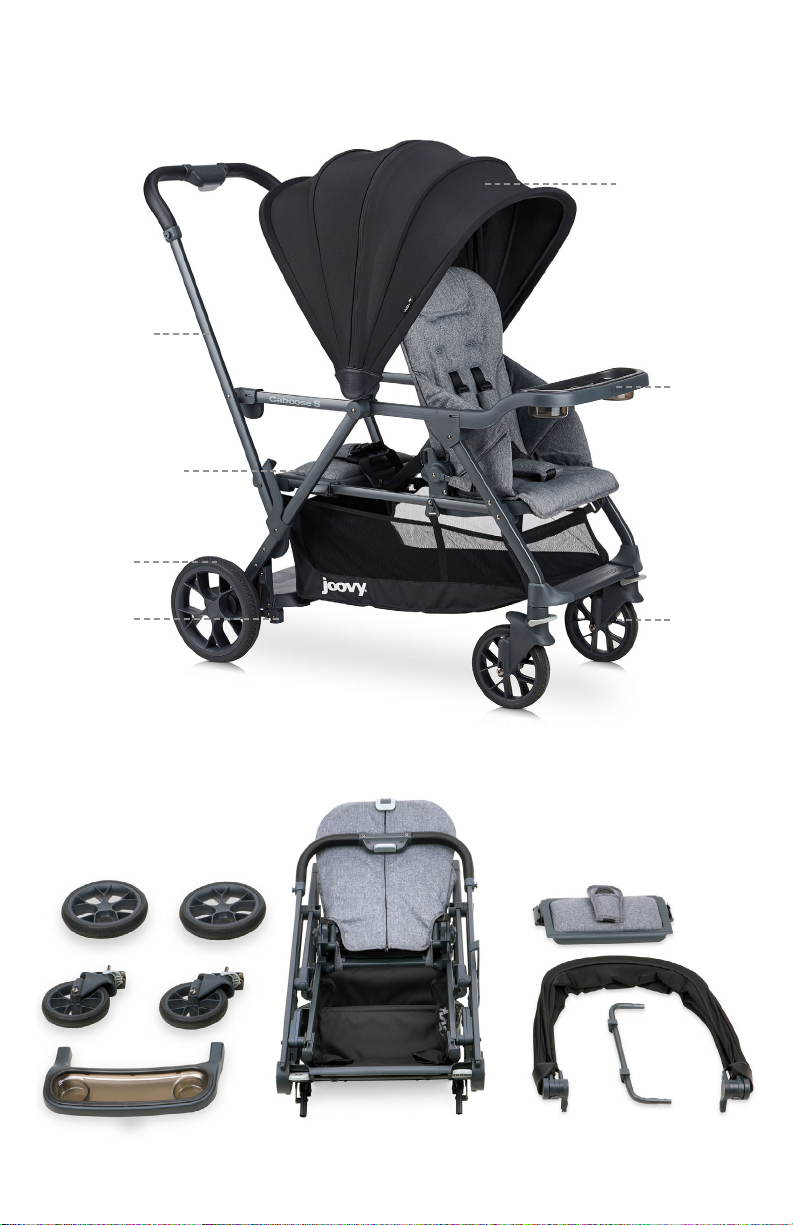
Parts List
Stroller Frame
Bench Seat
Rear
Wheels (2)
Standing
Bar
Water-resistant
UV Canopy
Tray
Front
Wheels (2)
6
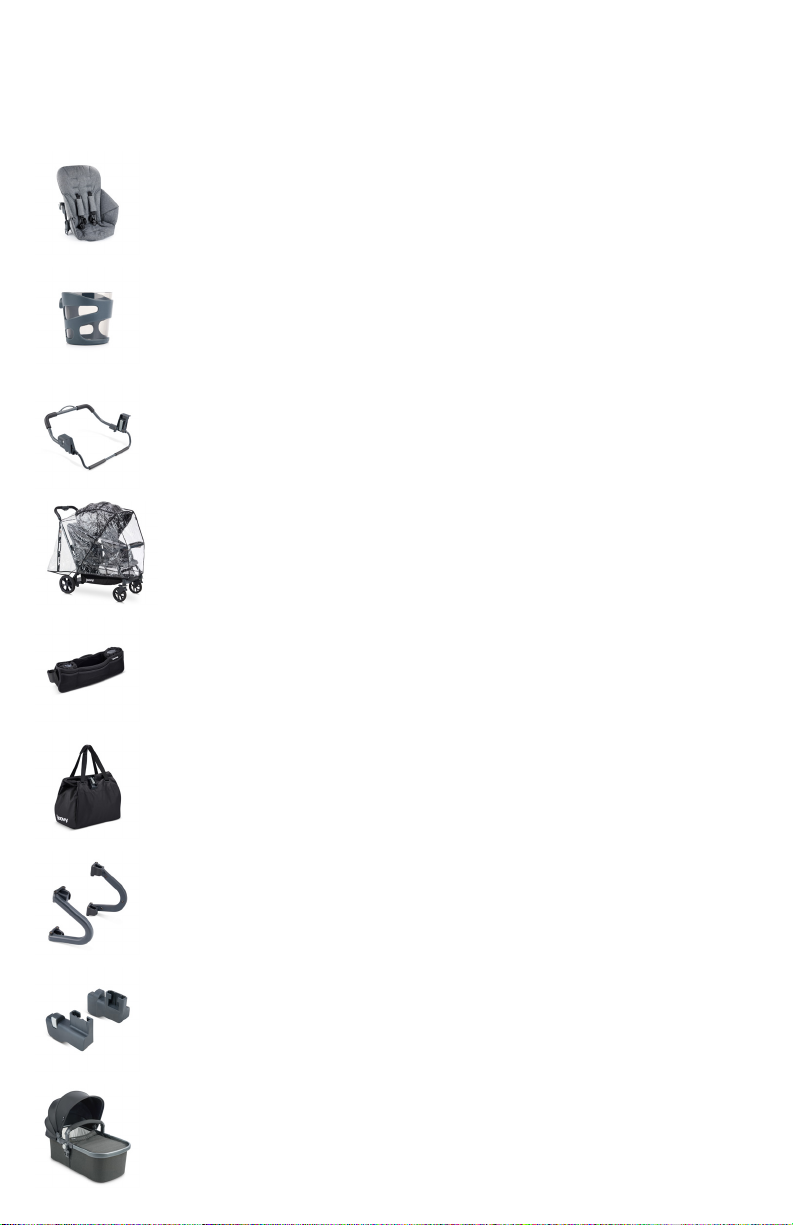
Additional Accessories (sold separately)
Customize your ride with a number of optional accessories for added functionality. All accessories
are sold separately.
Rear Seat
• 3 recline position
• High, middle or front positions
Cup Holder
• Includes clear inner cup
• Deep cup holder
Car Seat Adapters
• Compatibility with 20+ car seats
• Click-in installation
Rain Cover
• Custom t
• All-weather protection
Parent Organizer
• Large neoprene organizer
• Two Insulated cup holders
• Removable/machine-washable seat
fabric
• Removable/dishwasher-safe
• Rear-facing
• Front and rear positions
• Vented
• Easy to install
• 7 individual compartments; one
zippered pocket
Tote
• Largest tote, 14″ deep
• Carries up to 25 lbs.
• Four interior mesh pockets
Handles
• Snap on handles
• Easy to install
Bassinet Adapters
• Required for bassinet use on front
position
Bassinet
• For use in the front position
• Ultra-soft interior and mattress pad
• Adjustable ventilated canopy
• Rear position
• Easy click-in installation
• Easily removed and carried as an
independent tote
• Front and rear facing adjustment
• Large holding area
• Zippered cover
• Machine-washable mattress pad cover
• Birth to 20 lbs.
• Bassinet Adapters required
7

Stroller Assembly
IWARNING: Adult assembly is required for this product. No
tools required. NOTE: Remove all packing foam from frame assembly to
ensure stroller locks in the open position.
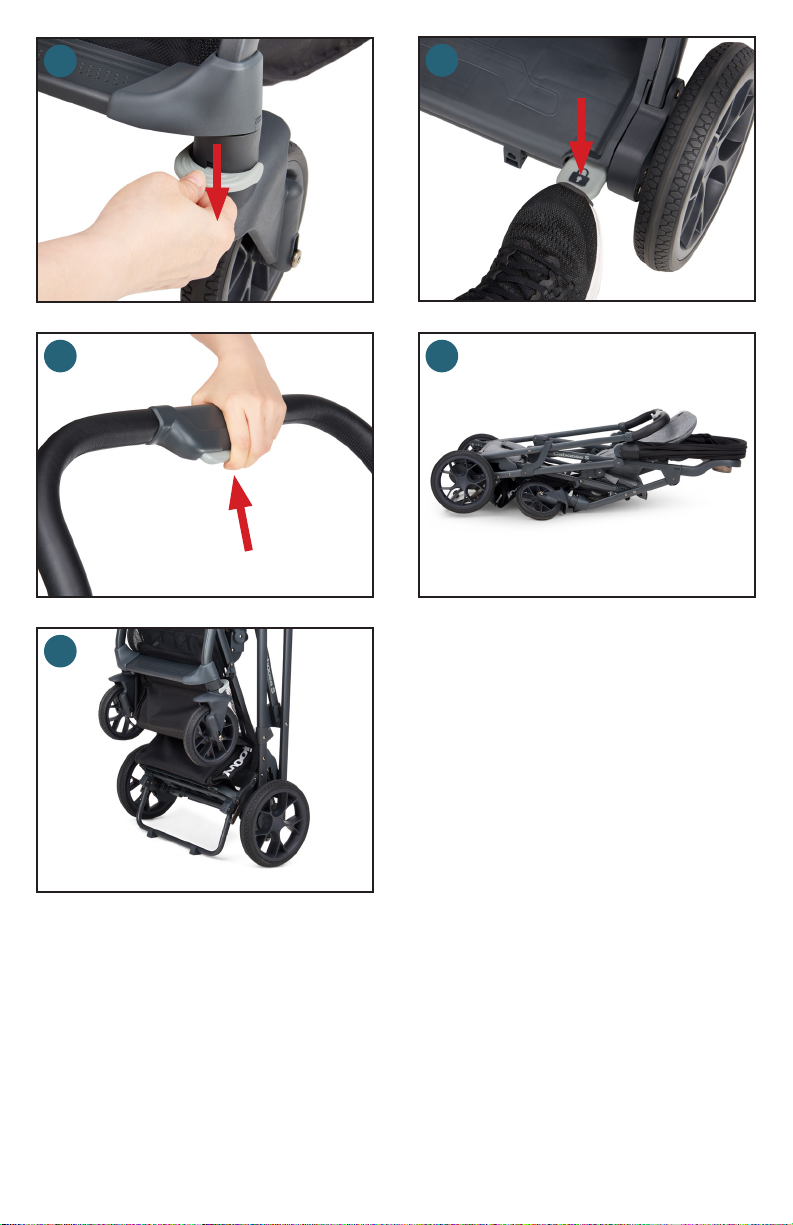
Unfolding the Stroller
• Put the stroller upside down with the handlebar on the ground.
• Stand opposite the handlebar facing the light gray brake pedals.
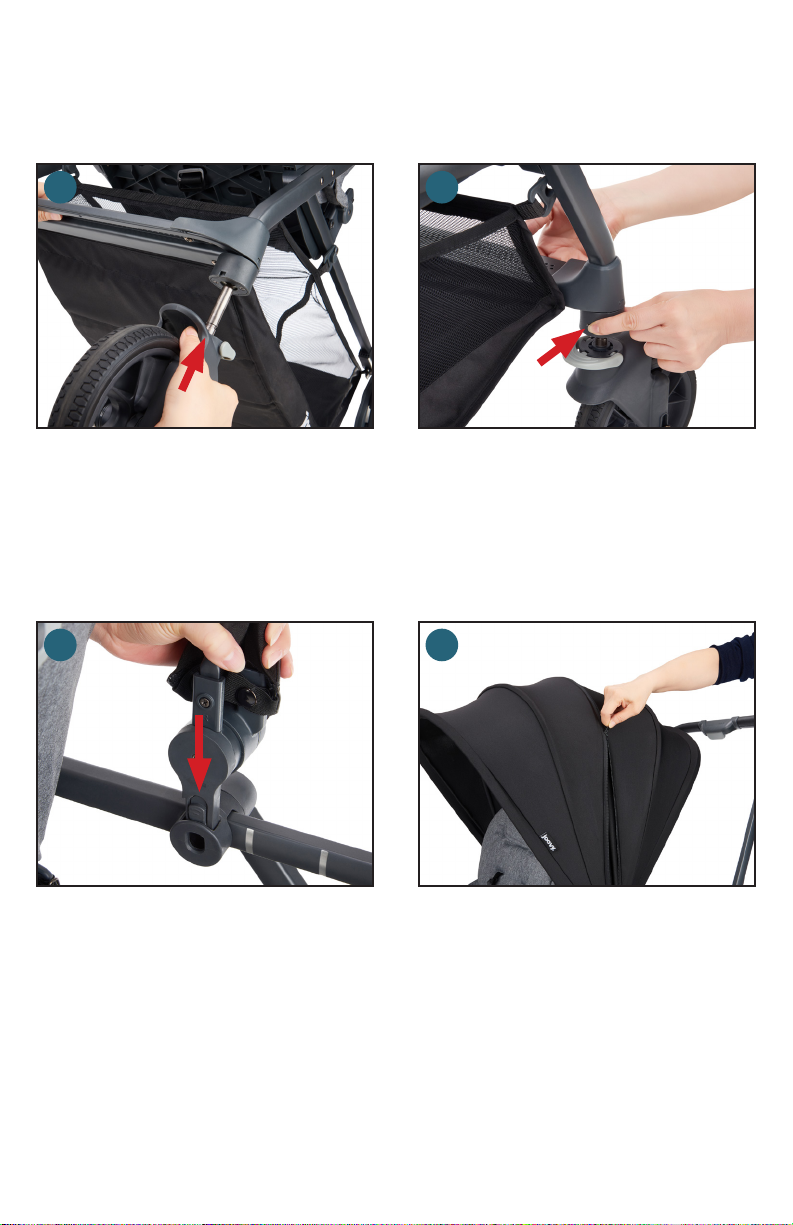
• Insert the standing bar (1) into the rear tubing by sliding both sides at the same time. Depress the
spring pins until they click into place.
• Flip the stroller over with the handlebar on top.
• Release the safety latch (located on the right side) by pulling the lock lever away from the frame.
(2)
• Pull the handlebar upward while putting one foot on top of the stand-on platform. (3) Keep pulling
until the stroller is fully open and the latching mechanism on each side engages. Make sure to hear
an audible click. (4)
• Visually check and gently push downward on the handle to ensure that the stroller is completely
opened and locked before ANY use of the product.
IWARNING: Keep children away from stroller while
unfolding. ALWAYS ensure the folding mechanism on each side of bottom
of the handlebar is fully engaged when the stroller is in the opened
position. This action will prevent collapse of the stroller. Possible pinching
hazard – Be careful when unfolding the stroller.
Installing/Removing the Rear Wheels
• Install a rear wheel by sliding the axle into the hole in the wheel hub until it clicks into place. (5)
Repeat for the other wheel. Pull on the wheels to ensure they are installed properly. (6)
• To remove, pull down the metal release button on the rear wheel bracket and pull the wheels from
the stroller. (7)
8
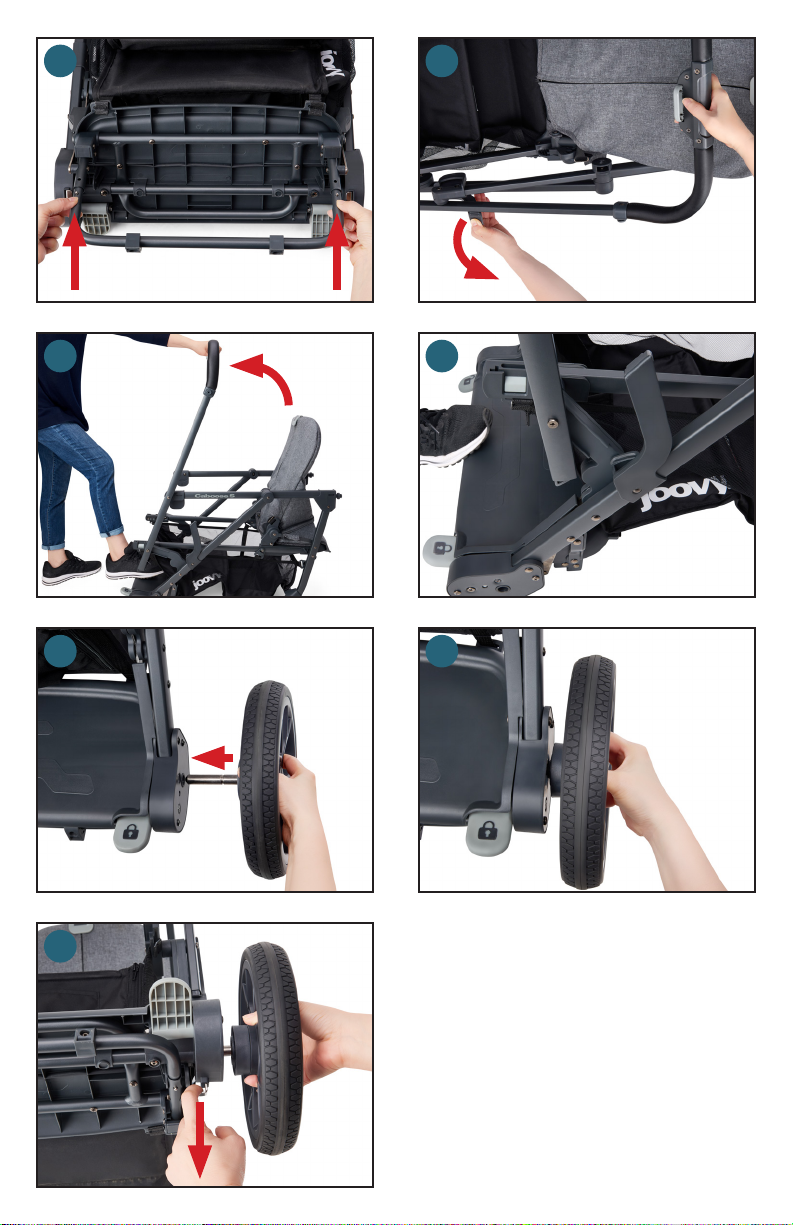
1 2
3
5
4
6
7
9
Installing/Removing the Front Wheels
• Slide one front wheel into the front wheel housing until it clicks into place. (8) Repeat for the other
wheel. Pull on the wheels to ensure they are installed properly.
• To remove, press the metal release button on the back of the front wheel housing and pull away
from the stroller. (9)
8 9
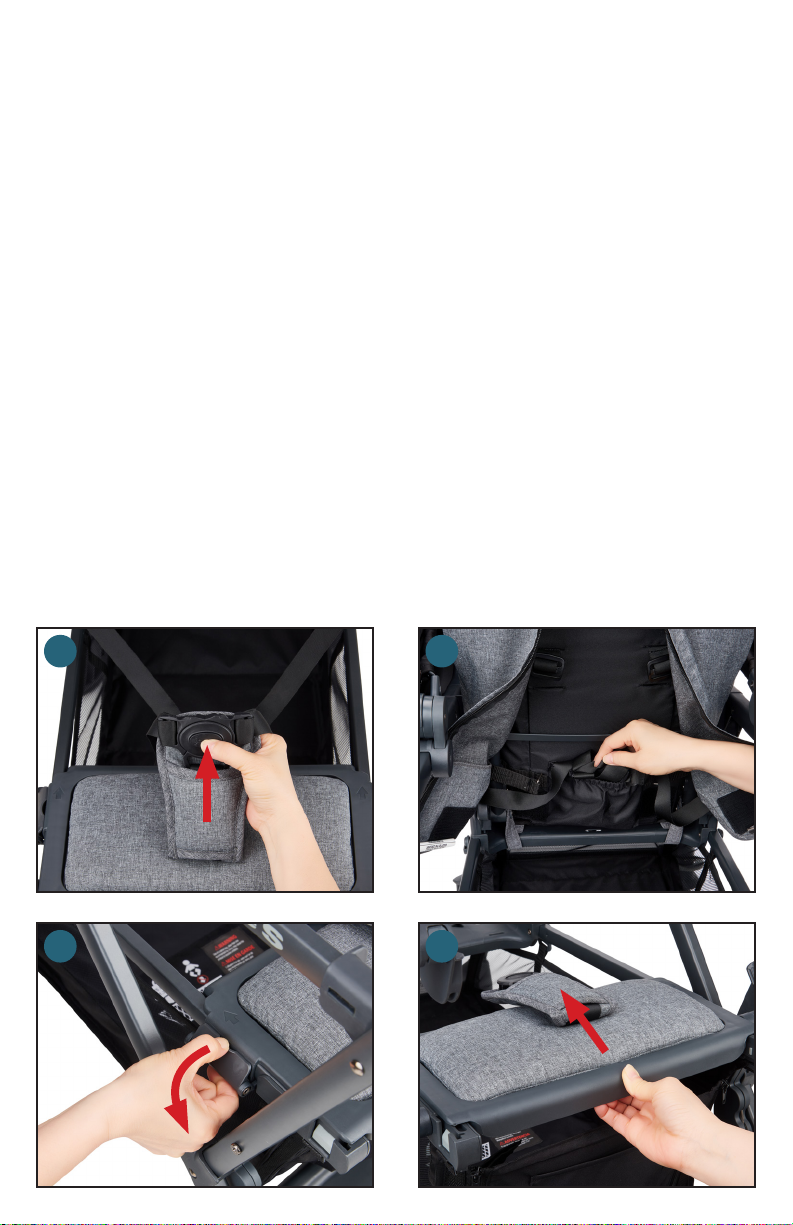
Installing the Canopy
• Identify the arrows on the inside of the canopy clip.
• Insert the canopy clips (with the arrows facing forward) into the frame mounts on BOTH sides.
Ensure they snap into place. (10)
• The canopy can be adjusted to be fully opened or closed.
• The canopy can be extended by unzipping the extension zipper and pulling the canopy open. (11)
Rezip to close.
10
11
IWARNING: Possible pinching hazard – Be careful of the
side hinges when opening and closing the canopy.
Installing/Removing the Tray
• Attach the tray by aligning the tray arms with the mounts. (12)
• Press the tray down onto the mount until it snaps into place. (13)
• To remove the tray, squeeze the release buttons located under the tray arms and pull the tray up.
(14)
10
12 13
14
11

Installing/Removing the Bench Seat
• The bench seat should be installed in the back of the stroller.
• Locate the arrows on top of the bench seat.
• Place the bench seat on the horizontal rails with the arrows facing forward. (15)
• Slide the seat backward to the end of the rails.
• Push down the bench seat onto the stroller frame.
• To lock the seat, pull the plastic clamps upward from EACH side of the bench seat and press up.
(16) Ensure the seat is secured.
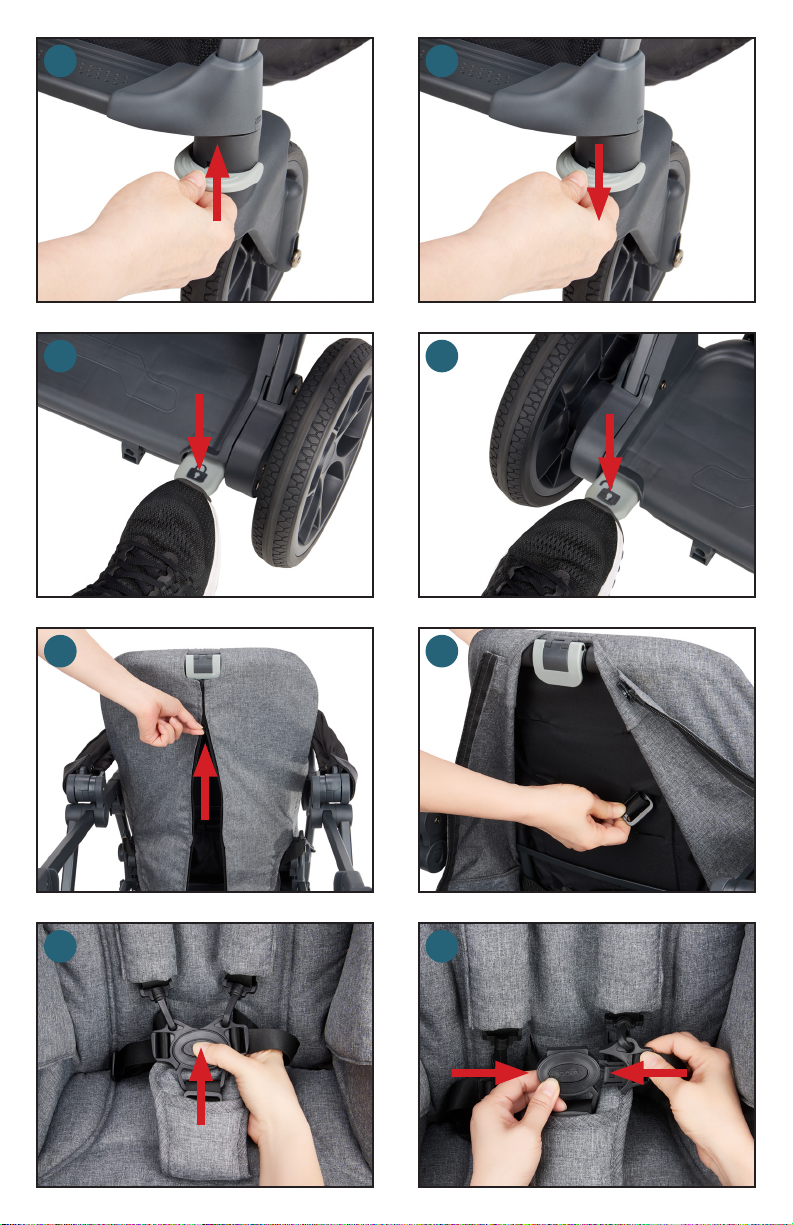
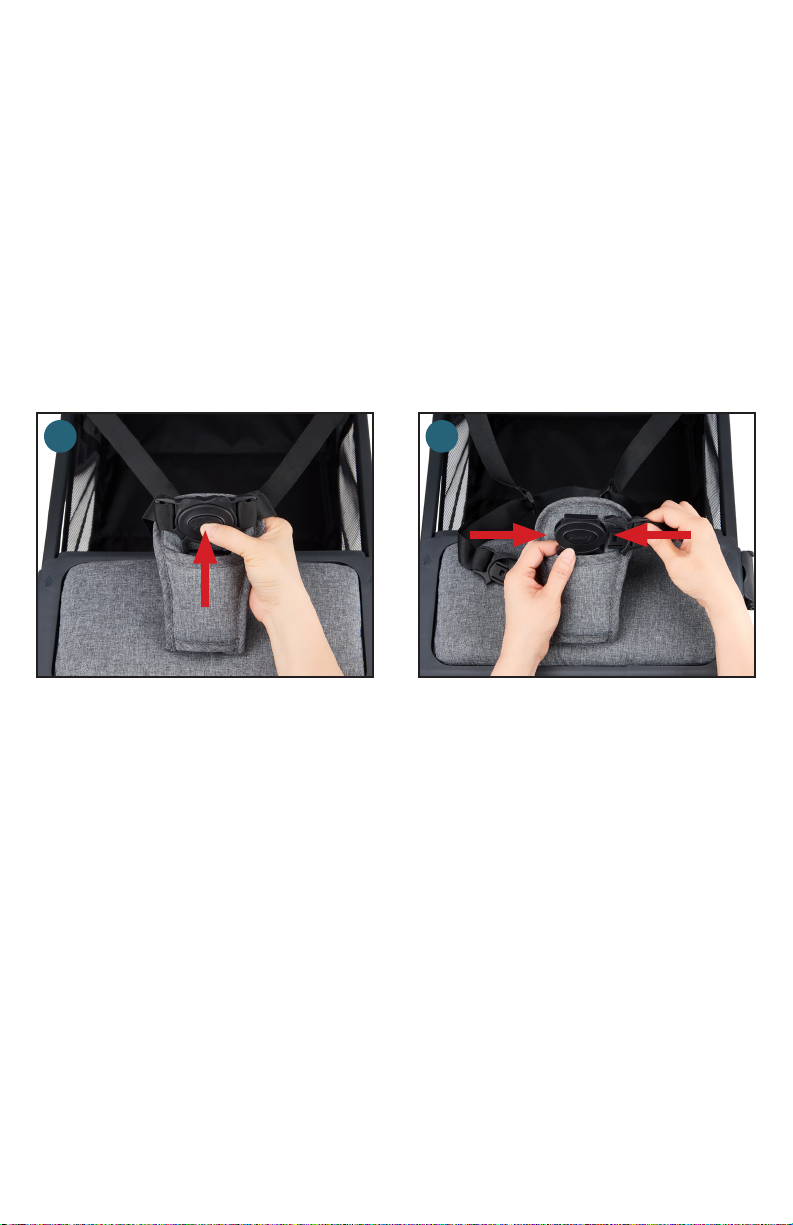
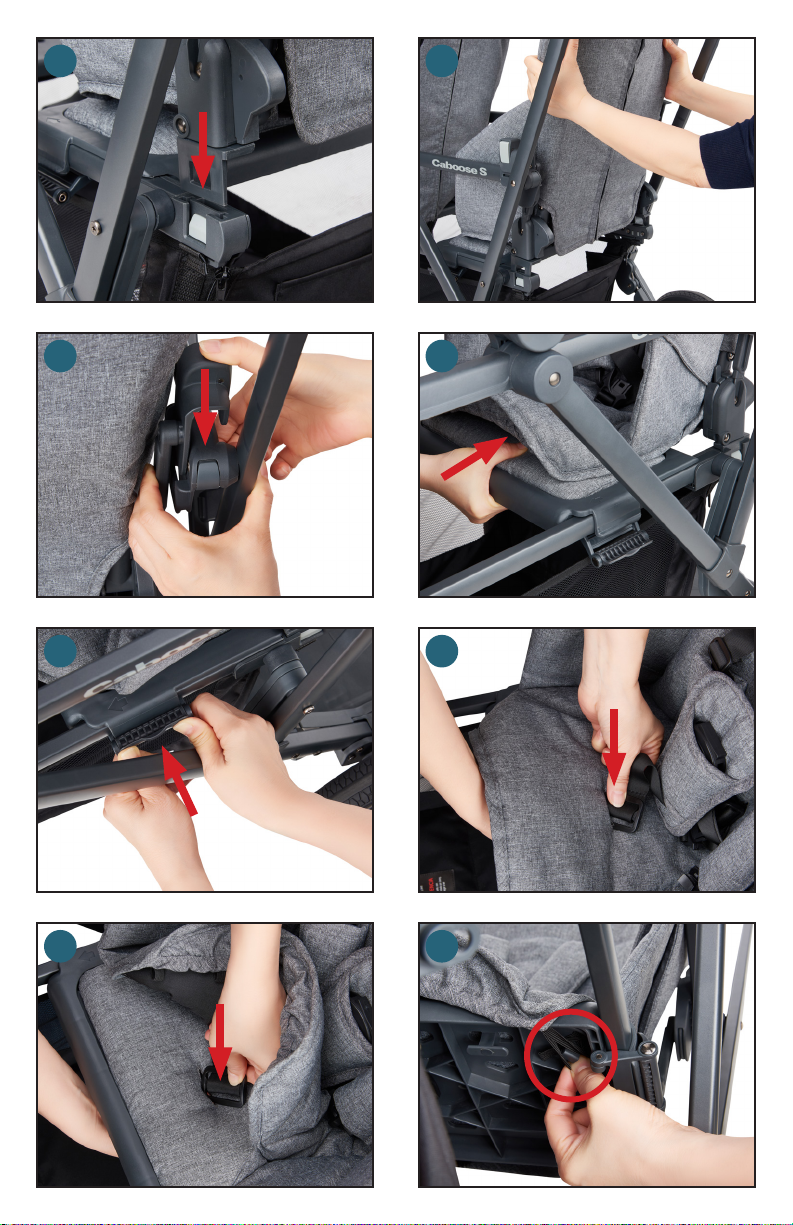
• Unzip the zipper on the front seat back.
• Take out the waist strap from the pocket on the seat back. (17)
• Buckle the waist and crotch strap harness when using the stroller. (18)
• To unlatch the buckle, press the center button and remove both harness clips. (19)
• Store the waist strap in the pocket of the front seat back when not in use.
• To remove, release the clamps on each side of the bench seat and pull the bench from the stroller.
(20)
12

15 16
17
19
18
20
13

Stroller Operation
Front Wheel Swivel Locks
The front wheels can be set to lock by pulling up on the locking lever located on the front wheel. (21)
Or, set to swivel by pushing down on the locking lever. (22)
Rear Wheel Brakes
• Always engage rear wheel brakes before placing a child in or removing a child from the stroller.
• To engage, push down on the RIGHT brake lever. (23)
• To release, push down on the LEFT brake lever. (24)
NOTE: Gently push the stroller back and forth to ensure the brake is fully engaged.
IWARNING: ALWAYS set BOTH front wheels to the same
mode before using stroller. Always make sure the wheel brakes are
engaged when the stroller is not being pushed so that the stroller will not
roll away. Never leave stroller unattended, especially on a hill or incline, as
the stroller may tip over or slide.
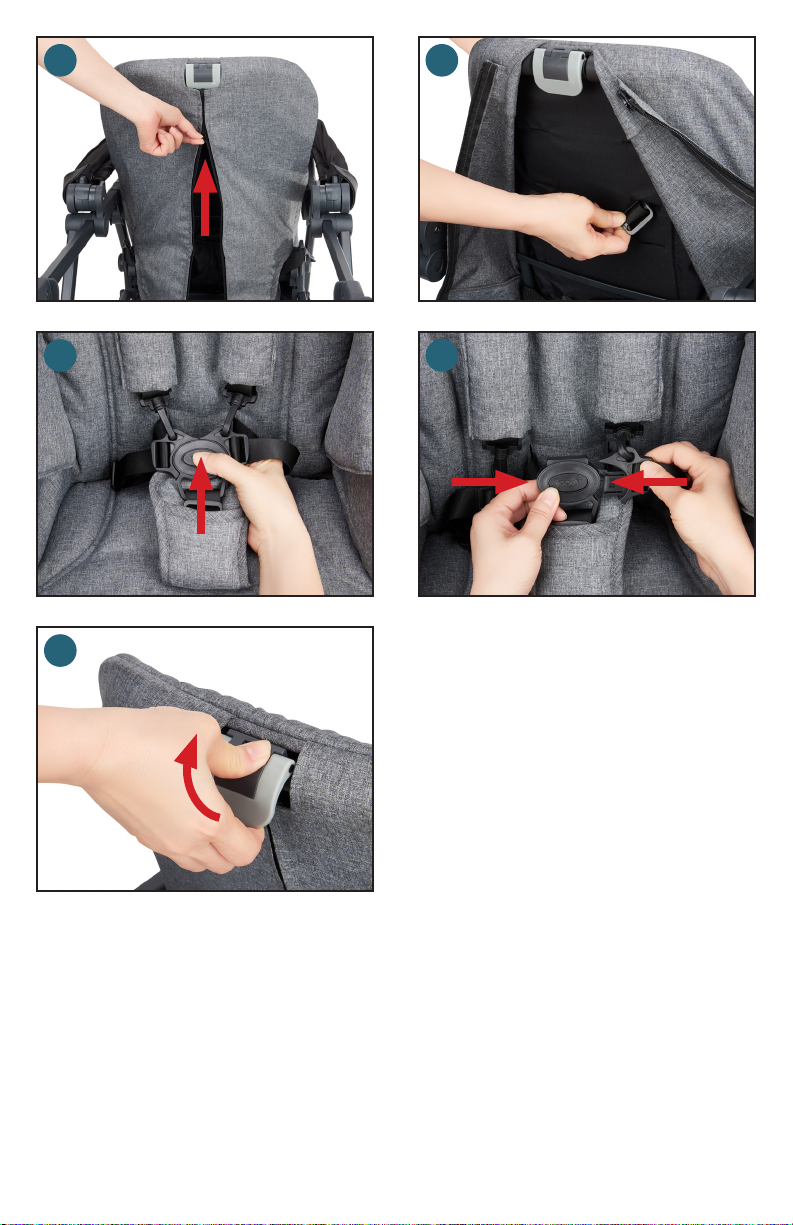
Securing the Seated Child
• There are three height adjustment positions for the shoulder harness. Adjust the height to the
closest height above your child’s shoulders.
• To remove the shoulder harness, rst unzip the fabric on the back of backrest. (25)
• To turn the plastic ends sideways and push them through the slots in the backrest. (26) Reattach
the harness at the proper height by reinserting the plastic ends through the slots. Ensure both
straps are the same height.
• To unlatch the buckle, press the center button and remove the male ends of each side. (27)
• Carefully place the child in the seat with the shoulder straps and pads over their shoulders and
chest. Then place the crotch strap between the child’s legs.
• Push the shoulder/waist buckles into the crotch buckle until all parts snap into place. (28)
• Tighten the waist belt to be snug around the child’s waist.
• The shoulder, waist, and crotch straps may be adjusted using the sliding plastic rings.
• Push down the backrest and make sure it is in the same recline position. NEVER allow a child to
step onto or sit on the leg support. This may cause the stroller to tip over.
IWARNING: This seat is not suitable for children under
3 months (For US ASTM F833 and Canada SOR/2016 standards). The
maximum height of a child the product is designed to carry is 44 in (111.8
cm). The maximum weight of a child the product is designed to carry is
55 lbs. (25 kg). When used for carrying 2 children at the same time, the
total weight of all children must not exceed 110 lbs. (50 kg). Exceeding
this total weight will cause excessive wear and stress on the stroller and
may cause a hazardous unstable condition. Never leave child unattended.
Avoid serious injury from falling or sliding out. Always use the restraint
system.
14
21 22
23 24
25
26
27 28
15

Adjusting the Seat
• The front seat has 3 recline positions.
• To adjust, pull up on the recline mechanism on
the top of the seatback and pull the seat to the
desired position. (29) Ensure that the recline
mechanism has engaged.
• For a more upright seat position, push the
backrest forward.
29
IWARNING: ALWAYS
make certain that the recline
mechanism is engaged in the same
position before placing the child
in the seat, whether the seat is upright or reclined. Push down on the
backrest to be sure it is secure.
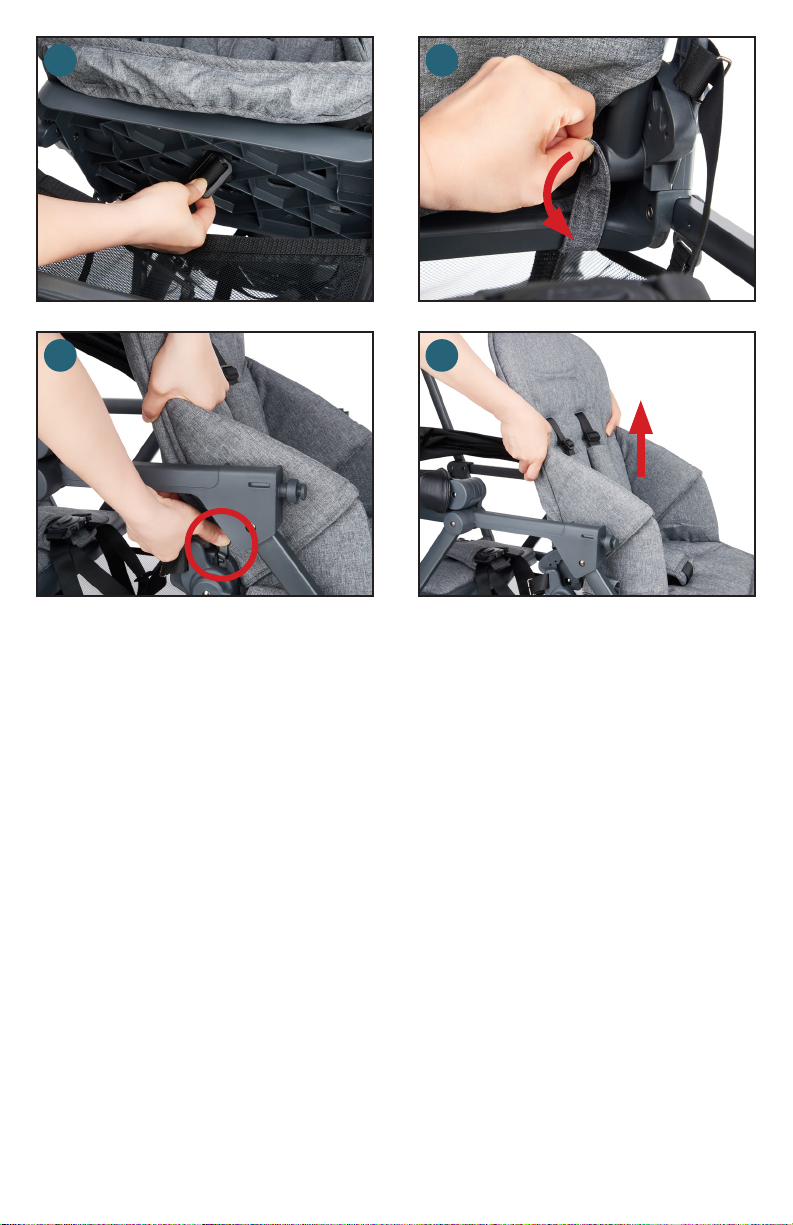
Installing/Removing the Front Seat
• Line up the male brackets and insert them into the female brackets on the stroller frame bottom.
(30)
• Push the seat downward into the position.
• Thread the supporting fabric strap into the slot of the seat back base. (31)
• Pull the supporting fabric strap downward tightly (32) and attach the strap onto the knob on
bottom of the seat frame. (33) Repeat for other side.
• Thread the crotch strap through the slot of the seat base. (34)
• Attach the Velcro® on both sides of the seat. (35)
• Attach the elastic loops underneath both sides of the seat base. (36)
• Attach the bottom panel of the seat fabric underneath the front of the seat base. (37)
NOTE: Removing the front seat is required for installing the car seat or bassinet in front
position.
• Detach the bottom panel of the seat fabric underneath the front of the seat base.
• Detach the elastic loops underneath both sides of seat base.
• Detach the Velcro® from both sides of the seat.
• Thread the crotch strap through the slot of the seat base. (38)
• Detach the two supporting straps at the bottom of the seat back from the nubs on the backrest.
(39)
• Push the lever inward on each side of the seat. (40)
• Pull the backrest with the fabric from the stroller. (41)
16

30 31
32 33
34
35
36 37
17
38 39
4140
Folding the Stroller
• Keep children away from the stroller while folding.
• Make sure the front wheels are in swivel mode. (42)
• Adjust the front seat to the most upright position.
• Rear wheel brake lever MUST be engaged before folding the stroller. (43)
• Close the canopy and move it all the way forward.
• Under the center of the handlebar, ip open the release button, squeeze the button into the
handlebar and push the handle fully forward. (44)
• The locking latch on the right side of the stroller should automatically engage. If it is not engaged,
gently push the stroller together until you hear an audible click. (45)
• Ensure that the stroller is locked by pulling up on the handlebar.
CAUTION: While folding the stroller, be careful to keep your ngers from being pinched by moving
parts.
• The stroller can be stored in a standing position when folded. (46)
IWARNING: Rear wheel brakes MUST be engaged before
folding the stroller. Make sure the front wheels are in swivel mode and
NOT locked. DO NOT force the stroller closed. ALWAYS keep children
away from the stroller when folding. Possible pinching hazard – Be careful
when folding the stroller.
18
42
43
44
46
45
19

Front Seat Fabric
NOTE: The front seat fabric is removable for washing.
• Remove the seat.
• Unzip the fabric on the seat back. (47)
• Release the Velcro® at the bottom of the seat back.
• Locate the two supporting straps wrapped around the base of the seat back.
• To remove, slip the strap through the gap of the rectangular metal ring. (48)
• Repeat on the other side.
• Remove the seat fabric from the frame. (49)
• Remove the shoulder straps, waist straps and crotch straps completely through the slots from
front seat. (50)
• Open the Velcro® (below the pocket) (51) and take out the plastic seat board. (52)
• To reassemble the front seat, simply reverse the disassembly steps. Ensure all zippers and straps
are securely closed.
Basket
• The storage basket should not be removed.
• The back panel can be unzipped for access to the basket contents. (53, 54)
• Zip up the back panel of the basket before the child stands or sits in the rear position.
IWARNING: The maximum weight that can be carried in
the storage basket is 25 lbs. (11.3 kg). Excessive weight may result in a
hazardous unstable condition.
20

47
48
49 50
51
53
52
54
21
Bench Seat
• Press the center button and remove both latch posts. (55)
• Have the child sit on the bench seat facing backward with their feet on the platform.
NOTE: You may need to adjust the recline position of the front seat to allow for more room for the
child to sit.
• Place the crotch strap between the child’s legs.
• Push the harness clips into the crotch buckle until all parts snap into place. (56)
• Adjust the seat belt to be snug around the child’s waist.
• Be sure that BOTH of the child’s feet are fully on the platform at all times.
• Be sure that BOTH of the child’s hands are holding the stroller frame.
IWARNING: NEVER allow a rear seated child to use the
canopy as a hand hold. Always use the crotch strap in combination with
the waist belt. Avoid serious injury from falling or sliding out. The rear
bench seat is suitable ONLY for children at least 2 ½ years old, but LESS
than 44 inches (111.8 cm) tall and less than 55 lbs (25 kg).
55
56
Bench Seat Pad
The bench seat pad is removable for washing.
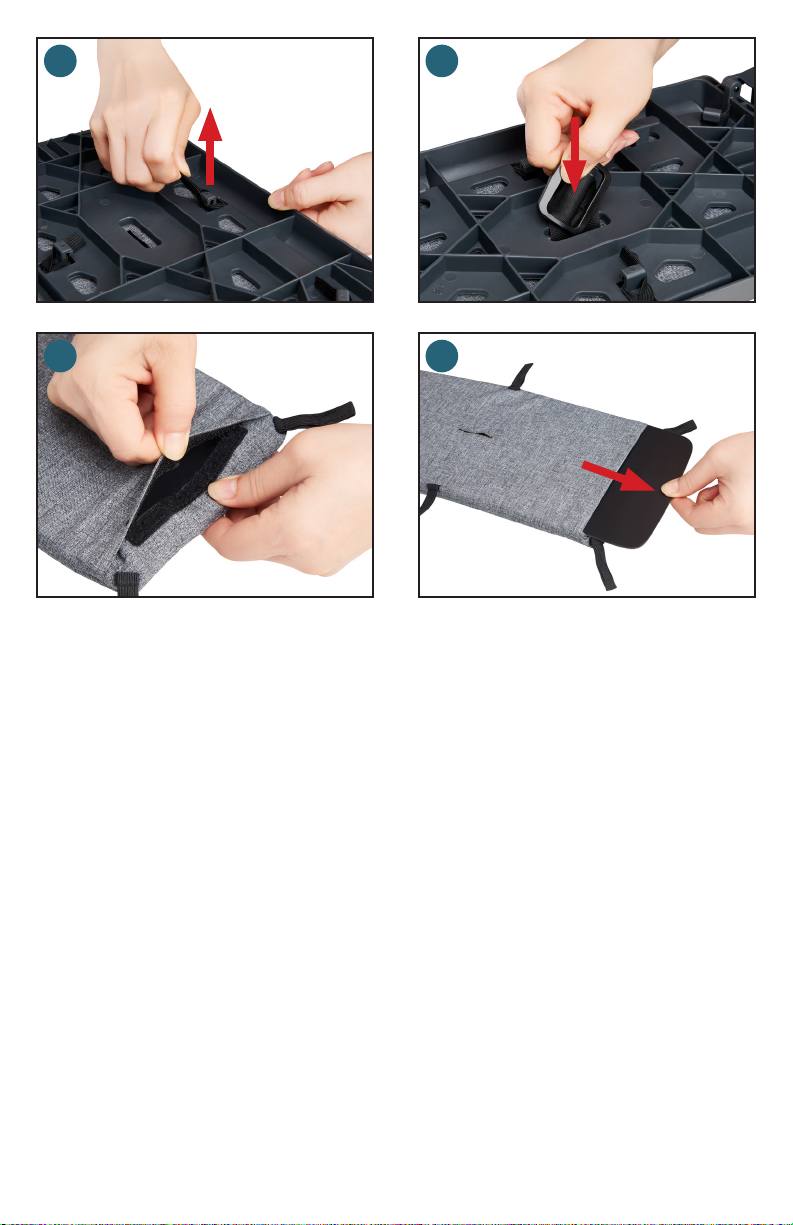
• Detach the 6 elastic loops underneath the bench seat. (57)
• Remove the crotch strap by turning the plastic anchor sideways and pushing through the slot on
the seat bottom. (58)
• Open the Velcro® and take out the plastic board from inside the seat pad. (59, 60)
• To reassemble the bench seat pad, simply reverse the steps.
• Pull the crotch strap to ensure it’s secured.
Stand-on Platform
• Zip up the back panel of the basket before the child stands on the platform.
• The child should stand facing forward with BOTH hands holding the frame or optional handles.
• Be sure that BOTH of the child’s feet are fully on the stand-on platform at all times.
IWARNING: The rear stand-on platform and the rear bench
seat are designed for a child that is at least 2 ½ years old but LESS than
44 inches (111.8 cm) tall and less than 55 lbs (25 kg). Use of the stroller
with 2 children totaling more than 110 lbs (50 kg). will cause excessive
wear and stress on the stroller and may cause a hazardous, unstable
condition. NEVER allow a standing child to use the canopy as a hand hold.
NEVER use this stroller to carry more than 2 children at the same time.
22
57 58
59
60
23
Tray
• Attach the tray, by aligning the tray arms with the tray mounts. (61)
• Press the tray down onto the mounts until it snaps into place. (62)
• To remove the tray, squeeze the release buttons located under the tray arms and pull the tray up.
(63)
• To use the tray’s swing arm, release one side of the tray by squeezing the release button and rotate
the tray upward. (64)
• The transparent insert tray is not removable.
IWARNING: For use ONLY on the Joovy Caboose S
Stroller. The tray is not a restraint device. ALWAYS secure your child
with the restraint system. NEVER lift the stroller by the tray. Use caution
when attaching the tray when there is a child seated in the stroller. The
maximum weight that can be carried in the tray is 2 lbs. (0.9 kg). This
product is not a toy. DO NOT allow children to play with it.
61 62
24
63
64

Congurations
25
Optional Accessories
A number of optional accessories can be purchased for the Caboose S in order to expand its
versatility.
Rear Seat (Optional)
Installing/Removing
• Ensure the bench seat harness is unbuckled (65) and store the waist strap in the pocket on the
front seat back. (66)
• Detach the bench seat by pushing down the plastic clamps on each side of the bench seat. (67)
• Move the bench seat forward (68) and remove the crotch strap by turning the crotch anchor
sideways and push through the slot on the seat bottom.
• Line up the rear seat adapter and insert them into the female bracket on stroller frame bottom.
These are right and left specic (standing behind the stroller). (69) Pull the seat up on both sides to
ensure it is secure. (70)
• Insert the rear seat adapter into the top frame bracket. (71)
• Slide the bench seat backward until it touches the rear seat adapter. (72)
• To lock the bench seat, pull the plastic clamps upward from each side of the rear seat and press
up. (73) Ensure the seat is secure.
• Insert the crotch strap into the slot in the rear seat (74) and bench seat. (75)
• Locate the elastic loops underneath the rear seat.
• Hook the 4 elastic loops under of bench seat base. (76)
• To remove the rear seat, simply reverse the disassembly steps.
67 68
26
6665
7069
71 72
73 74
75 76
27

Securing the Seated Child
• There are three height adjustment positions for the shoulder harness. Adjust the height to the
closest height above your child’s shoulders.
• To remove the shoulder harness, rst unzip the fabric on the back of backrest. (77)
• To turn the plastic ends sideways and push them through the slots in the backrest. (78) Reattach
the harness at the proper height by reinserting the plastic ends through the slots. Ensure both
straps are the same height.
• To unlatch the buckle, press the center button and remove the male ends of each side. (79)
• Carefully place the child in the seat with the shoulder straps and pads over their shoulders and
chest. Then place the crotch strap between the child’s legs.
• Push the shoulder and waist latch posts into the crotch buckle until all parts snap into place. (80)
• Tighten the waist belt to be snug around the child’s waist.
• The shoulder, waist, and crotch straps may be adjusted using the sliding plastic rings.
• Push down the backrest and make sure it is in the same recline position. NEVER allow a child to
step onto or sit on the leg support. This may cause the stroller to tip over.
Adjusting the Rear Seat
• The rear seat has 3 recline positions.
• To adjust, pull up on the recline mechanism and pull the seat to the desired position. (81) Ensure
that the recline mechanism has engaged.
• For a more upright seat position, push the backrest forward.
IWARNING: ALWAYS make certain that the recline
mechanism is engaged in the same position before placing the child in the
seat, whether the seat is upright or reclined. Push down on the backrest to
be sure it is secure.
IWARNING: This seat is not suitable for children under
3 months (For US ASTM F833 and Canada SOR/2016 standards). The
maximum height of a child the product is designed to carry is 44 in (111.8
cm). The maximum weight of a child the product is designed to carry is
55 lbs. (25 kg). When used for carrying 2 children at the same time, the
total weight of all children must not exceed 110 lbs. (50 kg). Exceeding
this total weight will cause excessive wear and stress on the stroller and
may cause a hazardous unstable condition. Never leave child unattended.
Avoid serious injury from falling or sliding out. Always use the restraint
system.
28
7877
79 80
81
29

Removing the Seat Fabric
• Remove the seat.
• Unzip the fabric on the seat back. (82)
• Release the Velcro® at the bottom of the seat back.
• Locate the two supporting straps wrapped around the base of the seat back.
• To remove, slip the strap through the gap of the rectangular metal ring. (83)
• Repeat on the other side.
• Remove the 2 fabric straps on the bottom sides of the seat back from the metal knobs. (84)
• Take out whole seat fabric from frame.
• Remove the shoulder straps, waist straps and crotch straps completely through the slots from
front seat fabric. (85)
• Open the Velcro® below the pocket (86) and take out the plastic seat board. (87)
• To reassemble the Rear Seat, simply reverse the disassembly steps. Ensure all zippers and straps
are securely closed.
30

82
83
84 85
86
87
31

Car Seat Adapter (Graco/Chicco) (Optional)
• To use the car seat adapter in the front position, rst ensure the front seat is removed.
• Line up the male brackets on the bottom of the car seat adapter with the female brackets on the
stroller frame. (88)
• Push down on both sides of the car seat adapter until both brackets click into place. (89) Pull up
the car seat adapter on both sides to ensure it is secured.
• The car seat can only face backward.
• Hold the car seat by the carry handle and lower the car seat onto the stroller so that the hook on
the rear of the car seat latches onto the car seat adapter. Pull up on car seat to ensure it is secure.
• To remove the car seat, pull the release lever (the same lever used to release the car seat from its
base) and lift up. (90)
• To remove the car seat adapter from the stroller, push the trigger on both side and pull it up o the
stroller. (91)
• To use the car seat adapter in the rear position, ensure the front seat is fully upright.
• Line up the male brackets on the bottom of the car seat adapter with the female brackets on the
stroller frame. (92)
• Push down on both sides of the infant car seat adapter until both brackets click into place. Pull up
on the infant car seat adapter on both sides to ensure it is secured. (93)
• The car seat can only face backward.
• Hold the car seat by the carry handle and lower the car seat onto the stroller so that the hook on
the rear of the car seat latches onto the car seat adapter. (94) Pull up on car seat to ensure it is
secure.
• To remove the car seat, pull the release lever (the same lever used to release the car seat from its
base) and lift up.
• To remove the adapter from the stroller, press the trigger on both sides. Pull up and remove. (95)
NOTE: The stroller can be folded with the car seat adapter installed in front position or rear
position when bench seat is not installed.
IWARNING: For use ONLY on the Joovy Caboose S™
stroller. ALWAYS install the infant car seat so that the child is facing toward
the rear (handlebar) of the stroller. ALWAYS position the infant car seat so
that it securely snaps into the infant car seat adapters. The infant car seat
adapter is for use ONLY with specic infant car seats. DO NOT use other
infant car seat models that are not in the Car Seat Compatibility List (page
36). This product is not a toy. DO NOT allow children to play with it.
32

88
89
90 91
92
93
94 95
33

Car Seat Adapter (Britax/B.O.B. B-Safe) (Optional)
• To use the car seat adapter in the front position, rst ensure the front seat is removed.
• Line up the male brackets on the bottom of the car seat adapter with the female brackets on the
stroller frame. (96) Make sure the arrow mark on the adapter faces backward.
• Push down on each side of the car seat adapter until both brackets click into place. (97) Pull up
the car seat adapter on both sides to ensure it is secured.
• The car seat can only face backward.
• Hold the car seat by the carry handle and lower the car seat onto the stroller so that the bracket on
the car seat latches onto the car seat adapter. Pull up on car seat to ensure it is secure.
• To remove the car seat, pull the release lever (the same lever used to release the car seat from its
base) and lift up. (98)
• To remove the car seat adapter from the stroller, push the trigger on each adapter and pull it up o
the stroller. (99)
• To use the car seat adapter in the rear position, ensure the front seat is fully upright.
• Line up the male brackets on the bottom of the car seat adapter with the female brackets on the
stroller frame. (100) Make sure the arrow mark on the adapter faces backward.
• Push down on each side of the infant car seat adapter until both brackets click into place. (101)
Pull up on the infant car seat adapter on both sides to ensure it is secured.
• The car seat can only face backward.
• Hold the car seat by the carry handle and lower the car seat onto the stroller so that the hook on
the rear of the car seat latches onto the car seat adapter. Pull up on car seat to ensure it is secure.
• To remove the car seat, pull the release lever (the same lever used to release the car seat from its
base) and lift up. (98)
• To remove the adapter from the stroller, press the trigger on the adapter and pull it up o the
stroller. (99)
NOTE: The stroller can be folded with the car seat adapters when it’s installed in the front or rear
position.
IWARNING: For use ONLY on the Joovy Caboose S™
stroller. ALWAYS install the infant car seat so that the child is facing toward
the rear (handlebar) of the stroller. ALWAYS position the infant car seat so
that it securely snaps into the infant car seat adapters. The infant car seat
adapter is for use ONLY with specic infant car seats. DO NOT use other
infant car seat models that are not in the Car Seat Compatibility List (page
36). This product is not a toy. DO NOT allow children to play with it.
34

96
97
98
100
99
101
35

Car Seat Adapter (Maxi-Cosi/Cybex/Nuna) (Optional)
• To use the car seat adapter in the front position, rst ensure the front seat is removed.
• Line up the male brackets on the bottom of the car seat adapter with the female brackets on the
stroller frame. (102) Make sure the arrow mark on the adapter faces backward.
• Push down on each side of the car seat adapter until both brackets click into place. (103) Pull up
the car seat adapter on both sides to ensure it is secured.
• The car seat can only face backward.
• Hold the car seat by the carry handle and lower the car seat onto the stroller so that the bracket on
car seat latches onto the car seat adapter. Pull up on car seat to ensure it is secure.
• To remove the car seat, press the release buttons on each side of the car seat and lift up.
• To remove the adapters from the stroller, press each side trigger and pull it up o the stroller. (104)
• To use the car seat adapter in the rear position, ensure the front seat is fully upright.
• Line up the male brackets on the bottom of the car seat adapter with the female brackets on the
stroller frame. (105) Make sure the arrow mark on the adapter faces backward.
• Push down on each side of the infant car seat adapter until both brackets click into place. (106)
Pull up on the infant car seat adapter on both sides to ensure it is secured.
• The car seat can only face backward.
• Hold the car seat by the carry handle and lower the car seat onto the stroller so that the hook on
the rear of the car seat latches onto the car seat adapter. Pull up on car seat to ensure it is secure.
• To remove the car seat, press the release buttons on each side of the car seat and lift up. (107)
• To remove the adapter from the stroller, press the trigger on adapter and pull it up o the stroller.
NOTE: The stroller can be folded with the infant car seat adapters when it’s installed in the front or
rear position.
IWARNING: For use ONLY on the Joovy Caboose S™
stroller. ALWAYS install the infant car seat so that the child is facing toward
the rear (handlebar) of the stroller. ALWAYS position the infant car seat so
that it securely snaps into the infant car seat adapters. The infant car seat
adapter is for use ONLY with specic infant car seats. DO NOT use other
infant car seat models that are not in the Car Seat Compatibility List (see
below). This product is not a toy. DO NOT allow children to play with it.
IMPORTANT NOTE
When using your stroller with an infant car seat, the following are the compatible infant car seat
models that the Caboose S will accommodate:
Graco® SnugRide Click Connect 30
Graco® SnugRide Click Connect 35
Graco® SnugRide Click Connect 35 LX
Graco® SnugRide SnugLock 35 DLX
Graco® SnugRide Click Connect 40
Chicco® KeyFit
Chicco® KeyFit 30
Chicco® KeyFit 30 Magic
Chicco® KeyFit 30 Zip
Chicco® KeyFit 30 Zip Air
Chicco® Fit2 2-Year
Britax®/BOB® B-Safe
Britax® B-Safe 35
Britax® B-Safe 35 Elite
For the most updated list of compatible infant car seats,
please check our website at www.joovy.com.
36
Cybex® Aton 2
Cybex® Aton Q
Cybex® Cloud Q
Maxi-Cosi® Mico
Maxi-Cosi® Mico 30
Maxi-Cosi® Mico Max 30
Maxi-Cosi® Mico AP
Maxi-Cosi® Mico NXT
Maxi-Cosi® Pebble
Nuna® Pipa

102
103
104
105
106 107
37

Rain Cover (Optional)
NOTE: The rain cover should only be used with the canopy attached.
• Make sure the canopy is in the fully extended (open) position. Carefully open the rain cover to its
fullest.
• Place the rain cover over the stroller. Make sure the front seam is over the front edge of the
canopy. (Joovy tag is towards the front with the long ap towards the rear of the stroller) (108)
• Release the Velcro® and pull the long ap through the rear handlebars just above the cup holder
mounts on both sides of the stroller. Pull each of the rear sides of the rain cover around the outside
of the handlebars.
• Attach elastic loop onto the cup holder mounts on both sides of the handlebar. (109)
• Pull the long ap down and attach the 4 Velcro® attachments together around the vertical frame to
secure this long ap in place. (110) Do this for both sides.
• Pull the rain cover down toward the front wheels and attach the Velcro® straps around the frame
corner. (111) Do this for both sides.
• Unzip the side zipper for easy access. (112)
• Locate the Velcro® at the bottom corner and attach at the seam near the Joovy logo. (113)
IWARNING: For use ONLY on the Joovy Caboose S™
stroller. Never leave this cover in place with child in stroller when exposed
to direct sun or high temperature, as temperature inside may be excessive.
This product is not a toy. DO NOT allow children to play with it.
108 109
110 111
38

112 113
Parent Organizer (Optional)
• Loop one strap of the parent organizer around one side of the handlebar. (114)
• Loop the rest of the strap back around the handlebar to attach the Velcro®. (115)
• Repeat for the other side. Ensure the parent organizer is secure.
• Unzip and zipped zipper on the pocket of Parent Organizer for storage. (116)
IWARNING: For use ONLY on the Joovy Caboose S™
Stroller. NEVER carry hot beverages or open containers in this product.
The maximum weight that can be carried in the parent organizer is 5 lbs.
(2.3 kg). This product is not a toy. DO NOT allow children to play with it.
114 115
116
39

Cup Holder (Optional)
• To attach a cup holder on each side of the handlebar, line up the back of the cup holder clamp to
the post on the cup holder mount. (117)
• Push the cup holder down onto the mount until it snaps into place.
NOTE: The cup holders can be attached on the front of the stroller instead the tray.
• First remove the tray if attached.
• To attach a cup holder, line up the back of the cup holder clamp to the post on the tray mount.
(118)
• Push the cup holder down onto the mount until it snaps into place. (119)
• Slide the cup holder up to remove.
IWARNING: For use ONLY on the Joovy Caboose S™
stroller. The total weight that can be placed in the cup holder should be
less than 1 lbs. (0.45 kg). NEVER carry hot beverages or open containers
in this product.
118117
119
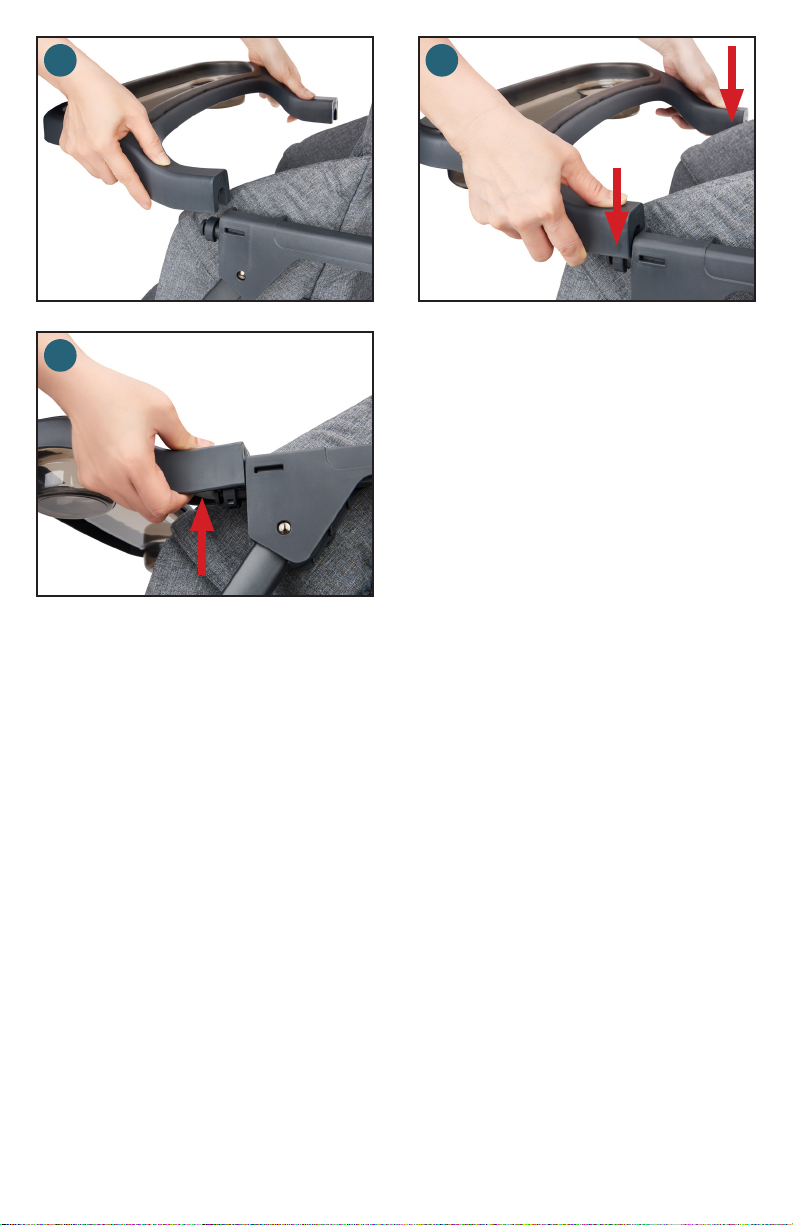
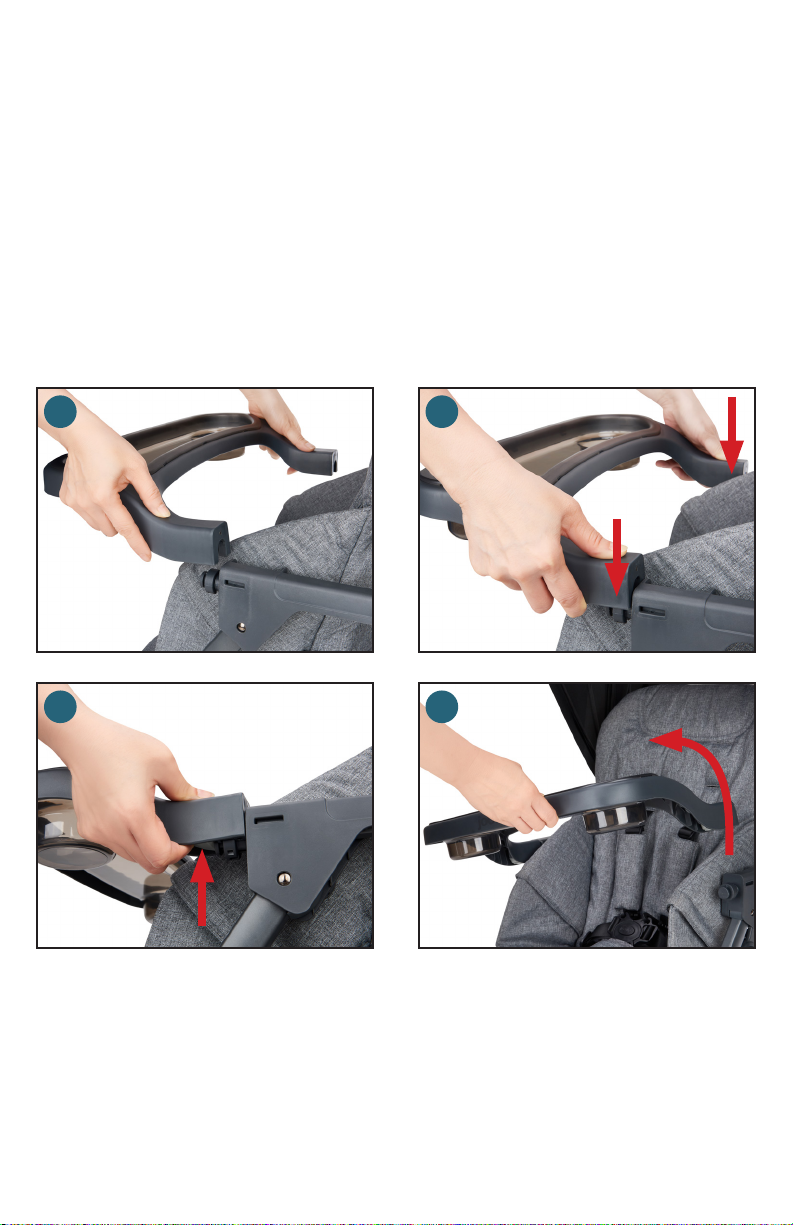
Handles (Optional)
• The handles can be attached on the vertical rear frame of the stroller in two directions forward or
backward. (120, 121)
• The attachment location is above the line marked on the inside of the handlebar. (122)
• Line up the handle and push both clamps on the stroller frame.
• To lock the handles, turn both side tabs (123) and press them until they snap into place. (124)
Repeat on the other side.
• Pull up on the handles on both sides to ensure they are secured. (125)
40

120 121
122 123
125124
41

Tote (Optional)
• The tote can only be used in the rear position.
• To unlatch the buckle, press the center button and remove both latch posts. (126)
• Store the waist strap in the pocket of the seat back.
• Push down the plastic hooks on each side of the bench and pull the bench from the stroller. (127)
• Unzip zipper of basket (128) and make basket at in the rear position. (129)
• To install, place the tote on the stroller so that the male brackets line up with the female brackets
on the stroller frame.
• Push down on both sides of the tote brackets until both sides snap into place. (130) Pull up on the
Tote on both sides to ensure it is secure.
• To remove the tote, squeeze inward on both triggers and pull it o the stroller. (131)
• See the Congurations section for examples of applicable congurations.
• The stroller can be folded with the tote installed.
IWARNING: For use ONLY on the Joovy Caboose S stroller.
NEVER lift the stroller by the tote. Use caution when attaching the tote
when there is a child seated in the stroller. The maximum weight that can
be carried in the tote is 33 lbs. (15 kg). This product is not a toy. DO NOT
allow children to play with it.
42

126 127
128
129
130 131
43

Bassinet Adapters (Optional)
• To install the bassinet adapters in the front position, rst ensure the front seat and tray are
removed.
• Place the bassinet adapters onto both sides of the stroller frame. Line up the male brackets on the
bottom of the bassinet adapter with the female brackets on the stroller frame. (132)
• Push down on both sides of the bassinet adapter until both brackets snap into place. Pull up the
bassinet adapter on both sides to ensure they are secured.
• Hold the bassinet by the carry handle and lower the bassinet onto the stroller so that the male
bracket on the bassinet latches onto the bassinet adapters. (133) Pull up on the bassinet handle to
ensure it is secure.
• To remove the bassinet, push both round buttons on both sides of the bassinet and pull away from
the stroller. (134)
• To remove the bassinet adapters from the stroller, press the adapter trigger and pull it up o the
stroller. (135)
NOTE: The stroller folds with the bassinet adapters installed on the front of the stroller.
Bassinet (Optional)
• To assemble the bassinet, remove the mattress and unfasten the Velcro® within. (136)
• With one hand braced against the bottom of the bassinet, use your free hand to rmly pull the loop
on the bassinet bracket until the bracket ts into the grooves at the bottom of the bassinet. (137)
Repeat on the other side. The bassinet should now hold its shape.
NOTE: You may need to unzip the bassinet cover for easier access to the other side.
• Replace the mattress. Rezip the bassinet cover if you have unzipped it.
• Attach the bassinet handle by sliding both posts into the mounts on the bassinet. (138)
• Attach the canopy’s brackets to the sides of the bassinet frame by hooking them into place. (139)
• Locate the side zipper and zip the canopy to the bassinet fabric. (140)
• Zip up the bassinet cover. (141) Attach the Velcro® of the bassinet cover to the bassinet frame.
(142)
• To install the Bassinet Adapters in the front position, rst ensure the front seat is removed.
• Place the Bassinet Adapters onto both female brackets of the stroller frame, the arrow diagrams
are facing backward, the male brackets of the Bassinet Adapters line up with the female brackets
on the stroller frame. (143)
• Push down on both sides of the bassinet until both brackets snap into place. Pull up on the
bassinet on both sides to ensure it is secure.
• To remove the bassinet, push both round buttons on both sides of the bassinet and pull away from
the stroller. (144)
• To remove the bassinet adapters from the stroller, press outward on both adapter triggers and pull
it up o the stroller. (145)
• To disassemble the bassinet, remove the mattress, and unfasten the Velcro® at the bottom of the
bassinet. With one hand braced against the bottom of the bassinet, use your free hand to rmly
pull on the loops attached to the brackets until it disconnects from the grooves and lies down at.
(146) Repeat for the other side. The bassinet should now lie at for storage.
• The mattress fabric is washable. Remove the fabric from the foam pad and place the fabric into a
mesh washing bag when washing.
• Before folding, remove the bassinet
44

132
133
134
135
136 137
138 139
45

140
141
142 143
46
144
146
145

IWARNING
Failure to follow these warnings and the instructions could result
in serious injury or death. Read all the instructions before use of
the bassinet. Keep instructions for future use.
• The bassinet is designed for use ONLY on the Joovy Qool and Caboose
S strollers. DO NOT use on any other product.
• The bassinet must be fully assembled per Joovy’s instructions
before using. Do not modify the bassinet or add any attachments not
specically recommended by Joovy.
• Do not use the bassinet if it is damaged or broken.
• To help prevent falls, do not use this product when the infant begins to
roll over, push up on hands and knees or has reached over 20 lbs. (9.1
kg), whichever comes rst.
• Use bassinet with only one child at a time.
• Use ONLY the pad provided by Joovy.
• To reduce the risk of SIDS, pediatricians recommend healthy infants
be placed on their backs to sleep, unless otherwise advised by your
physician.
• Only use the mattress cover provided by Joovy.
• Suocation Hazard: Bassinet can roll over on soft surfaces and suocate
child. NEVER place bassinet on beds, sofas or other soft surfaces.
• Fall Hazard: Child’s activity can move bassinet. NEVER place bassinet
on counter tops, tables or any other elevated surface.
• NEVER use this bassinet as a means to transport an infant in a motor
vehicle.
• Do not place any cord, strap or similar item in or near this bassinet that
could become wrapped around a child’s neck.
• Do not place this bassinet near a window or patio door where a child
could reach the cord of a blind or curtain and be strangled.
• Check this bassinet regularly before using it and do not use it if any
parts are loose or missing or if there are any signs of damage. Do not
substitute parts. Contact the manufacturer if replacement parts or
additional instructions are needed.
• Use a bassinet mattress that is no thicker than 3.8 cm and is of such
a size that, when it is pushed rmly against any side of the bassinet, it
does not leave a gap of more than 3 cm between the mattress and any
part of the sides of the bassinet.
• Children can suocate on soft bedding. Do not place pillows, comforters
or soft mattresses in this bassinet.
47

Care & Maintenance
Maintenance
All of the ttings, snaps, locks, rivets, and other hardware and plastic parts on the stroller should be
inspected periodically to ensure that they are secured properly and not damaged or malfunctioning.
The safety harness, as well as all other straps and fabric items and their stitching should also be
inspected periodically to ensure that they are secured properly and not loose, torn or otherwise
damaged. All moving parts, such as wheels, brakes, and hinges should also be checked periodically
to ensure they are operating properly.
Any missing, broken, or worn components should be replaced immediately, and the stroller should
not be used until they are replaced. Only original manufacturer’s components should be used. If
needed, please contact Joovy at our toll-free phone number.
Cleaning
The fabric material on this stroller can be cleaned using mild household soap or detergent and warm
water on a sponge or clean cloth. Seat fabric is machine-washable. Remove the metal frame and PE
boards from the seat before washing. Do not use solvents, caustic or abrasive cleaning materials.
To minimize shrinkage, simply reattach the seat to the frame to dry. Do not press, iron, dry clean,
tumble dry or wring the fabric. Always allow the fabric to completely air dry before using the stroller.
The frame and wheels should always be kept clean and free of dirt and foreign matter, especially
after operating the stroller in rain, snow, or other harsh environments. Use a sponge or cloth
dampened with warm water and a mild detergent cleaner to clean the wheels after such use.
See the Seat Fabric section for information on removing the seat fabric for washing (page 20).
Storage
Direct sunlight may fade fabric and dry out wheels. Store stroller indoors to prolong its appearance.
DO NOT store outdoors. Ensure that the stroller is dry before storing for prolonged periods. Always
store the stroller in a dry environment. Store the stroller in a safe place when not in use (i.e. away
from children). DO NOT place heavy objects on top of the stroller. DO NOT store the stroller near a
direct heat source such as a radiator or open re.
48

Customer Service
Please do not return this product to the store.
If you experience any of diculty with the assembly or use of this product, or if you have a question
regarding these instructions, please contact our Customer Service Department:
United States
Joovy
(877) 456-5049, 8:30 am – 5:00 pm Central Time
joovy.com LiveChat, 8:30 am – 9:00 pm Central Time
customerservice@joovy.com
@joovy
Canada
Elfe Juvenile Products
(800) 667-8184, 8:30 am – 5:00 pm Eastern Time
service@elfe.ca
Korea
Joy Partners Limited Korea
(822) 2248-3384, 9:00 am – 6:00 pm GMT+9
49

Sécurité et Mise en Gardes
IMISE EN GARDE
Lire les présentes instructions attentivement avant
d’utiliser le produit et les conserver pour usage ultérieur.
• Tout manquement au respect de ces instructions pourrait entraîner des
blessures graves ou un décès.
• Ne laissez jamais un enfant sans surveillance.
• Assurez-vous que tous les dispositifs de verrouillage sont enclenchés
avant l’utilisation.
• Évitez les blessures graves pouvant résulter d’un glissement ou d’un
chute.
• Utilisez en tout temps le système de retenue et veillez à ce que les
enfants soient positionnés conformément à ces instructions.
• Assurez-vous que la poussette soit complètement ouverte, que le loquet
de sécurité soit en place, et que les freins soient enclenchés avant de
permettre aux enfants de s’approcher de la poussette.
• Le dispositif de verrouillage doit toujours être enclenché lors de
l’installation et du retrait des enfants.
• Ce siège ne convient pas aux enfants de moins de 3 mois. (Normes
2016: ASTM F833 / États-Unis, DORS / Canada DORS).
• Le siège avant est conçu pour transporter un enfant d’un poids maximal
de 55 lbs. (25 kg).
• Le produit est conçu pour transporter un enfant d’une hauteur maximale
de 44 pouces (111,8 cm).
• La banquette est conçue pour un enfant d’au moins 2 ans et demi,
mais mesurant moins de 44 pouces (111,8 cm) de haut et d’un poids de
moins de 55 livres. (25 kg).
• L’utilisation de la poussette avec deux enfants de plus de 55 livres. (25
kg) chacun, ou d’un poids totalisant plus de 110 livres. (50 kg), pourrait
entrainer une usure excessive de la poussette, ce qui pourrait entrainer
une situation d’instabilité dangereuse.
• Ne jamais utiliser cette poussette pour transporter plus de 2 enfants à la
fois.
• Ne laissez jamais un enfant utiliser le repose-pied pour entrer ou sortir
de la poussette.
• Ne pas utiliser la poussette dans les escaliers ou les escaliers roulants.
• Ne pas ajouter d’accessoire n’étant pas spéciquement recommandé
par Joovy.
• Pour éviter les blessures, assurez-vous que votre enfant demeure à
l’écart lors du dépliage et pliage de ce produit.
50

• Toute charge xée à la poignée aecte la stabilité de la poussette.
Tout sac à main, sac de magasinage, sac à langer ou autre accessoire
placé sur la poignée ou toute autre partie de la poussette peut modier
l’équilibre de la poussette et engendrer une condition d’instabilité
dangereuse
• Le poids maximum qui peut être transporté dans le panier de rangement
est de 25 livres. (11,3 kg). Un poids excédentaire pourrait entraîner une
condition d’instabilité dangereuse.
• Le poids maximal pouvant être transporté sur le plateau est de 2 lbs.
(0,9 kg).
• Ne laissez pas la poussette être utilisée en tant que jouet. Ne laissez pas
votre enfant jouer avec ce produit.
• Ne laissez pas votre enfant jouer avec ce produit.
• Ce produit ne convient pas pour la course ou le patinage.
• Disposez adéquatement de tous les matériaux d’emballage. Ne laissez
pas les enfants jouer avec ces derniers.
• Vériez fréquemment votre poussette an de déceler tout rivet ou
bouton mal xé, pièce endommagée, couture ou tissu déchiré.
• Cesser l’utilisation de la poussette en cas de mauvais fonctionnement
ou de bris.
• ATTENTION: Lors du dépliage de la poussette, évitez de coincer vos
doigts dans les pièces mobiles.
Veuillez ne pas retourner ce produit en magasin.
Si vous rencontrez des dicultés lors de l’assemblage ou de l’utilisation de ce produit, ou si vous
avez une question au sujet de ces instructions, veuillez communiquer avec notre service à la
clientèle (page 99).
Veuillez noter: Les styles et les couleurs peuvent varier.
51

Liste des pièces
Cadre de la
Poussette
Banquette
Roues
Arrière (2)
Barre
d’Appui
Auvent UV
Résistant à l’Eau
Plateau
Roues
Avant (2)
52

Accessoires Supplémentaires (vendus séparément)
Personnalisez votre produit avec divers accessoires oerts en option, an d’obtenir des
fonctionnalités supplémentaires. Tous les accessoires sont vendus séparément.
Siège arrière
• 3 positions d’inclinaison
• Position haute, intermédiaire ou avant
Porte-gobelet
• Doté d’un gobelet intérieur transparent
• Porte-gobelet de grande taille
Adaptateurs de sièges d’auto
• Compatibilité avec plus de 20 sièges
d’auto
• Installation en un clic
Protection contre la pluie
• Ajustement personnalisé
• Protection contre toutes les
intempéries
Organisateur parent
• Grand organisateur en néoprène
• Deux porte-gobelets isolés
• Tissu de siège amovible / lavable à la
machine
• Amovible / va au lave-vaisselle
• Orientation vers l’arrière
• Positions avant et arrière
• Ventilée
• Facile à installer
• 7 compartiments individuels; une
poche à fermeture-éclair
Sac de magasinage
• Le sac de magasinage de plus grande
taille, d’une profondeur de 14”
• Peut transporter jusqu’à 25 livres
• Quatre poches intérieures en let
Poignées
• Poignées à xation encliquetable
• Facile à installer
Adaptateurs pour bassinette
• Nécessaire pour l’utilisation de la
bassinette en position avant
Bassinette
• Pour utilisation en position avant
• Intérieur et matelas ultra-doux
• Auvent ventilé réglable
• Position arrière
• Installation facile en un clic
• Peut facilement être enlevé et utilisé en
guise de sac de magasinage indépendant
• Ajustement pour faire face vers l’avant
ou l’arrière
• Grande surface de prise
• Couverture à fermeture éclair
• Protège-matelas lavable à la machine
• De la naissance à 20 livres
• Adaptateurs de bassinette requis
53

Assemblage de la Poussette
IMISE EN GARDE: L’assemblage par un adulte est
requis pour ce produit. Aucun outil nécessaire. NOTE: Retirez toute la
mousse d’emballage du cadre an de vous assurer que les mécanismes
de verrouillage de la poussette sont en position ouverte.
Dépliage de la poussette
• Mettez la poussette à l’envers, le guidon au sol.
• Demeurez du côté opposé à la poignée faisant face à la pédale de frein gris clair.
• Insérer la barre d’appui (1) dans le tube arrière en faisant glisser les deux côtés en même temps.
Enfoncer les tiges à ressorts jusqu’à ce qu’elles s’enclenchent en place.
• Retournez la poussette, le guidon vers le haut.
• Ouvrez le loquet de sécurité (situé sur le côté droit) en tirant le levier de verrouillage à l’écart du
cadre. (2)
• Tirez le guidon vers le haut tout en mettant un pied sur le dessus de la plateforme d’appui. (3)
Continuez à tirer jusqu’à ce que la poussette soit complètement ouverte et que le mécanisme de
verrouillage de chaque côté s’enclenche en place. Assurez-vous d’entendre un clic audible. (4)
• Vériez visuellement et poussez doucement la poignée vers le bas pour vous assurer que la
poussette est complètement ouverte et verrouillée avant toute utilisation du produit.
IMISE EN GARDE: Gardez les enfants à l’écart de la
poussette lors du dépliage. Assurez toujours que le mécanisme de pliage
de chaque côté au bas du guidon est complètement engagé lorsque
la poussette est en position ouverte. Cette action permettra d’éviter
l’aaissement de la poussette. Risque de pincement – Faites preuve de
prudence lorsque vous dépliez la poussette.
Installation / retrait des roues arrière
• Installez une roue arrière en glissant l’essieu dans le trou du moyeu de la roue jusqu’à ce qu’il
s’enclenche en place. (5) Répéter pour l’autre roue. Tirez sur les roues pour vous assurer qu’elles
sont correctement installées. (6)
• Pour retirer, abaissez le bouton métallique de déverrouillage situé sous le support de roue arrière et
retirez les roues de la poussette. (7)
54

1 2
3
5
4
6
7
55

Installation / retrait des roues avant
• Faites glisser une roue avant dans le compartiment de roue avant jusqu’à ce qu’elle s’enclenche
en place. (8) Répétez pour l’autre roue. Tirez sur les roues pour vous assurer qu’elles sont
correctement installées.
• Pour retirer, abaissez le bouton métallique de déverrouillage à l’arrière du compartiment de roue
avant et retirez de la poussette. (9)
8 9
Installation de l’auvent
• Localisez les èches à l’intérieur des pinces de l’auvent.
• Insérer les pinces de l’auvent (avec les èches tournées vers l’avant) dans les montants de cadre
des DEUX côtés. Assurez-vous qu’elles s’enclenchent en place. (10)
• L’auvent peut être ajusté pour être complètement ouvert ou fermé.
• La longueur de l’auvent peut être prolongée en ouvrant la fermeture éclair d’extension et en tirant
sur l’auvent pour l’ouvrir. (11) Montez la fermeture éclair pour fermer.
IMISE EN GARDE: Risque de pincement – Faites
preuve de prudence avec les charnières latérales lors de l’ouverture et la
fermeture de l’auvent.
10
Installation / retrait du plateau
• Fixez le plateau en alignant les bras du plateau aux supports. (12)
• Pressez le plateau contre la base jusqu’à ce qu’il s’enclenche en place. (13)
• Pour retirer le plateau, appuyez sur les boutons de déverrouillage situés sous les bras du plateau
et soulevez le plateau. (14)
56
11

12 13
14
57

Installation / Retrait de la banquette
• La banquette doit être installée à l’arrière de la poussette.
• Localisez les èches sur le dessus de la banquette.
• Placez la banquette sur les rails horizontaux, les èches vers l’avant. (15)
• Faire glisser la banquette vers l’arrière jusqu’à l’extrémité des rails.
• Pressez la banquette sur le cadre de la poussette.
• Pour verrouiller le siège, tirez les pinces en plastique vers le haut de CHAQUE côté de la banquette
et appuyez vers le haut. (16) Vériez que le siège est bien xé.
• Ouvrez la fermeture éclair au dos du siège avant.
• Retirez la ceinture de la poche au dos du siège. (17)
• Bouclez la ceinture et la sangle d’entrejambe lors de l’utilisation de la poussette. (18)
• Pour ouvrir la boucle, appuyez sur le bouton central et retirez les deux pinces de sangle. (19)
• Rangez la ceinture dans la poche du dossier de siège avant lorsqu’elle n’est pas utilisée.
• Pour retirer, ouvrez les pinces de chaque côté de la banquette et retirez la banquette de la
poussette. (20)
58

15 16
17
19
18
20
59

Utilisation de la Poussette
Système de verrouillage de roue avant pivotantes
Les roues avant peuvent être verrouillées en tirant sur le levier de verrouillage situé sur la roue avant.
(21) ou être mises en mode pivotant en appuyant sur le levier de verrouillage. (22)
Freins de roues arrière
• Toujours engager les freins de roues arrière avant de placer ou de retirer un enfant de la poussette.
• Pour engager, appuyez sur le levier de frein DROIT. (23)
• Pour libérer, appuyez sur le levier de frein GAUCHE. (24)
• NOTE: Poussez doucement la poussette d’avant vers l’arrière pour vous assurer que le frein est
bien engagé.
IMISE EN GARDE: TOUJOURS régler les DEUX
roues avant en même mode avant d’utiliser la poussette. Assurez-vous
toujours que les freins de roue sont engagés lorsque la poussette n’est
pas utilisée, an que celle-ci ne puisse pas être déplacée. Ne jamais
laisser la poussette sans surveillance, en particulier dans une colline ou
pente, car la poussette pourrait basculer ou glisser.
Sécurisation de l’enfant assis
• Il existe trois positions de réglage en hauteur pour le harnais de sécurité. Ajustez la hauteur à celle
étant juste au-dessus des épaules de votre enfant.
• Pour retirer le harnais de sécurité, ouvrez d’abord la fermeture éclair derrière le dossier. (25)
• Tournez les extrémités en plastique sur le côté et poussez-les à travers les fentes dans le dossier
du siège. (26) Remettez en place le harnais en réinsérant les extrémités en plastique à la bonne
hauteur à travers les fentes. Vériez que les deux sangles soient à la même hauteur.
• Pour déverrouiller la boucle, appuyez sur le bouton central et retirez les extrémités mâles de
chaque boucle. (27)
• Placez délicatement l’enfant dans le siège en positionnant les bretelles sur ses épaules et sa
poitrine. Ensuite, placez la sangle d’entrejambe entre les jambes de l’enfant.
• Poussez les montants de verrouillage épaule / ceinture dans la boucle d’entrejambe jusqu’à ce que
toutes les parties s’enclenchent en place. (28)
• Serrez la ceinture autour de la taille de l’enfant.
• Les sangles d’épaule, de taille, et d’entrejambe peuvent être ajustées en utilisant des anneaux de
plastique.
• Appuyez sur le dossier du siège pour vous assurer qu’il est bien xé. Ne laissez JAMAIS un enfant
monter ou s’asseoir sur le support de jambe ou le repose-pieds. Cela pourrait faire basculer la
poussette.
IMISE EN GARDE: Ce siège ne convient pas aux
enfants de moins de 3 mois normes 2016 - ASTM F833 aux États-Unis
et F833 DORS au Canada). Le produit est conçu pour transporter un
enfant d’une hauteur maximale de 44 pouces (111,8 cm). Le produit est
conçu pour transporter un enfant d’un poids maximal de 55 livres. (25
kg). Lorsqu’il est utilisé pour transporter 2 enfants en même temps, le
poids total de tous les enfants ne doit pas dépasser 110 livres. (50 kg).
Le dépassement de ce poids total causera une usure excessive de la
poussette et pourrait entraîner une condition d’instabilité dangereuse. Ne
laissez jamais un enfant sans surveillance. Évitez les blessures graves
pouvant être causées par une chute ou un glissement. Toujours utiliser le
système de retenue.
60

21 22
23 24
25
26
27 28
61

Réglage du siège
• Le siège avant ore 3 positions d’inclinaison.
• Pour l’ajuster, tirez sur le mécanisme
d’inclinaison au haut de l’arrière du siège
et placez le siège à la position désirée. (29)
Assurez-vous que le mécanisme d’inclinaison
vers l’arrière est engagé.
• Pour une position assise à la verticale, poussez
le dossier vers l’avant.
29
IMISE EN GARDE:
Assurez-vous que le mécanisme
d’inclinaison du dossier est
TOUJOURS engagé avant de placer l’enfant dans le siège, que le siège
soit en position verticale ou inclinée. Appuyez sur le dossier pour vous
assurer qu’il est sécurisé.
Installation / Retrait du siège avant
• Alignez les prises mâles et insérez-les dans les prises femelles bas du cadre de la poussette. (30)
• Pousser le siège vers le bas pour bien le positionner.
• Faites glisser la sangle de soutien en tissu dans la fente à la base de l’arrière du siège. (31)
• Tirez fermement la sangle de soutien en tissu vers le bas (32) et xez la sangle sur le bouton au
bas du cadre du siège. (33) Répétez pour l’autre côté.
• Faites glisser la sangle d’entrejambes à travers la fente de la base du siège. (34)
• Fixez le Velcro® des deux côtés du siège. (35)
• Attachez les boucles élastiques sous les deux côtés de la base du siège. (36)
• Fixez le panneau inférieur du tissu du siège sous la partie avant de la base du siège. (37)
• NOTE: Le retrait du siège avant est nécessaire pour l’installation du siège d’auto ou de la
bassinette en position avant.
• Détachez le panneau inférieur du tissu du siège sous la partie avant de la base du siège.
• Détacher les boucles élastiques en dessous des deux côtés de la base du siège.
• Détacher la Velcro® des deux côtés du siège.
• Faites glisser la sangle d’entrejambes à travers la fente de la base du siège. (38)
• Détachez les deux sangles de soutien au bas de l’arrière du siège des prises du dossier. (39)
• Poussez le levier vers l’intérieur de chaque côté du siège. (40)
• Retirez le dossier et son tissu de la poussette. (41)
62

30 31
32 33
34
35
36 37
63

38 39
4140
Pliage de la poussette
• Gardez les enfants à l’écart de la poussette lors du pliage.
• Assurez-vous que les roues avant sont en mode pivotant. (42)
• Réglez le siège avant en position verticale.
• Le levier de frein de roue arrière DOIT être engagé avant le pliage de la poussette. (43)
• Fermez l’auvent et le placez-le complètement vers l’avant.
• Sous le centre du guidon, faites basculer le bouton de déverrouillage, appuyez sur le bouton dans
le guidon et poussez la poignée complètement vers l’avant. (44)
• Le loquet de verrouillage du côté droit de la poussette devrait automatiquement s’enclencher.
S’il ne s’est pas enclenché, ramenez doucement la poussette ensemble jusqu’à ce que vous
entendiez un déclic. (45)
• Assurez-vous que la poussette est verrouillée en tirant sur le guidon.
• ATTENTION: En pliant la poussette, veillez à protéger vos doigts an d’éviter d’être pincé par des
pièces mobiles.
• La poussette peut être entreposée en position debout lorsqu’elle est pliée. (46)
IMISE EN GARDE: Les freins de roue arrière
DOIVENT être engagés avant de plier la poussette. Assurez-vous que
les roues avant sont en mode pivotant et non verrouillé. NE PAS forcer
pour fermer la poussette. TOUJOURS garder les enfants à l’écart de la
poussette lors du pliage. Risque de pincement - Soyez prudent lorsque
vous pliez la poussette.
64

42
43
44
46
45
65

Tissu de sièges avant
• NOTE: Le tissu du siège avant est amovible et peut être lavé.
• Retirez le siège.
• Ouvrez la fermeture éclair du tissu à l’arrière du siège. (47)
• Retirez le Velcro® au bas de l’arrière du siège.
• Localisez les deux sangles de soutien enroulées autour de la base de l’arrière du siège.
• Pour retirer, glissez la sangle à travers la fente de l’anneau métallique rectangulaire. (48)
• Répétez de l’autre côté.
• Retirez le tissu du siège du cadre. (49)
• Retirez le harnais, les sangles de ceinture et d’entrejambe à travers les fentes du siège avant. (50)
• Retirez le Velcro® (sous la poche) (51) et retirez la plaque de siège en plastique. (52)
• Pour réassembler le siège avant, inversez les étapes de démontage. Assurez-vous que toutes les
fermetures éclair et sangles sont bien fermées.
Panier
• Le panier de rangement ne doit pas être retiré.
• Le panneau arrière peut être ouvert pour accéder au contenu du panier. (53, 54)
• Fermez la fermeture éclair du panneau arrière du panier avant que l’enfant ne se place debout ou
en position assise à l’arrière.
IMISE EN GARDE: Le poids maximum pouvant
transporté dans le panier de rangement est de 25 livres. (11,3 kg).
Un poids excédentaire pourrait entraîner une condition d’instabilité
dangereuse.
66

47
48
49 50
51
53
52
54
67

Banquette
• Appuyez sur le bouton central et retirez les deux montants de loquet. (55)
• Assoyez l’enfant sur la banquette, face vers l’arrière, les pieds sur la plateforme.
• NOTE: Vous devrez peut-être ajuster la position d’inclinaison du siège avant pour laisser plus de
place à l’enfant pour s’asseoir.
• Placez la sangle d’entrejambe entre les jambes de l’enfant.
• Poussez les pinces du harnais dans la boucle d’entrejambe jusqu’à ce que toutes les parties
s’enclenchent ensemble. (56)
• Ajustez la ceinture de sécurité autour de la taille de l’enfant.
• Assurez-vous que les DEUX pieds de l’enfant demeurent sur la plateforme en tout temps.
• Assurez-vous que les DEUX mains de l’enfant tiennent le cadre de la poussette.
IMISE EN GARDE: Ne laissez jamais un enfant assis
à l’arrière utiliser l’auvent en guise de support. Toujours utiliser la sangle
d’entrejambes avec la ceinture. Évitez les blessures graves pouvant
résulter d’un glissement ou d’un chute. La banquette arrière convient
UNIQUEMENT pour les enfants d’au moins 2 ans et demi, mais mesurant
moins de 44 pouces (111,8 cm) et d’un poids de moins de 55 livres (25
kg).
55 56
Coussin de banquette
• Le coussin de banquette est amovible et peut être lavé.
• Détachez les 6 boucles élastiques sous la banquette. (57)
• Retirez la sangle d’entrejambe en faisant tourner l’élément d’ancrage en plastique sur le côté et en
le poussant à travers la fente au fond du siège. (58)
• Ouvrez le Velcro® et retirez le panneau en plastique à l’intérieur du coussin de siège. (59, 60)
• Pour réassembler le coussin de banquette, inversez les étapes.
• Tirez sur la sangle d’entrejambe pour assurer qu’elle est bien xée.
68

57 58
59
Plateforme d’appui
• Montez la fermeture éclair du panneau arrière du panier avant que l’enfant ne monte sur la
plateforme.
• L’enfant doit se tenir face vers l’avant avec les DEUX mains tenant le cadre ou les poignées en
option.
• Assurez-vous que les deux pieds de l’enfant demeurent sur la plateforme d’appui en tout temps.
60
IMISE EN GARDE: La plateforme d’appui arrière et
la banquette arrière sont conçus pour un enfant d’au moins 2 ans et demi,
mais mesurant moins de 44 pouces (111,8 cm) et d’un poids de moins
de 55 livres (25 kg). L’utilisation de la poussette avec 2 enfants totalisant
plus de 110 livres (50 kg) causera une usure excessive de la poussette
et pourrait entraîner une condition d’instabilité dangereuse. Ne laissez
JAMAIS un enfant debout utiliser l’auvent comme soutien. N’utilisez
JAMAIS cette poussette pour transporter plus de 2 enfants à la fois.
69

Plateau
• Fixez le plateau en alignant les bras du plateau aux montants. (61)
• Pressez le plateau contre la base jusqu’à ce qu’il s’enclenche en place. (62)
• Pour retirer le plateau, appuyez sur les boutons de déverrouillage situés sous les bras du plateau
et soulevez le plateau. (63)
• Pour utiliser le bras pivotant du plateau, libérez un côté du plateau en appuyant sur le bouton de
déverrouillage et faire pivoter le plateau vers le haut. (64)
• L’insertion transparente du plateau est non amovible.
IMISE EN GARDE: Utilisez UNIQUEMENT sur la
poussette Joovy Caboose S. Le plateau n’est pas un dispositif de retenue.
Attachez toujours votre enfant à l’aide du système de retenue. NE JAMAIS
soulever la poussette par le plateau. Soyez prudent lors de l’ajout du
plateau lorsqu’il y a un enfant assis dans la poussette. Le poids maximal
pouvant être transporté dans le plateau est de 2 lbs. (0,9 kg). Ce produit
n’est pas un jouet. NE PAS laisser les enfants jouer avec celui-ci.
61 62
63 64
70

Congurations
71

Accessoires optionnels
Plusieurs accessoires optionnels peuvent être achetés pour le Caboose S an d’accroître sa
polyvalence.
Siège arrière (en option)
Installation / retrait
• Assurez-vous que le harnais de la banquette est détaché (65) et placez la sangle de ceinture dans
la poche à l’arrière du siège avant. (66)
• Détachez la banquette en poussant, vers le bas, les pinces en plastique de chaque côté de la
banquette. (67)
• Déplacez la banquette vers l’avant (68) et retirez la sangle d’entrejambe en faisant tourner
l’élément d’ancrage d’entrejambe vers le côté et en le poussant à travers la fente au bas de siège.
• Alignez l’adaptateur de siège arrière et insérez-le dans la prise femelle au bas du cadre de la
poussette. Ceux-ci sont diérents à droite et à gauche (derrière la poussette). (69) Soulevez le
siège des deux côtés pour vous assurer qu’il est bien sécurisé. (70)
• Insérez l’adaptateur de siège arrière dans le support de cadre supérieur. (71)
• Faites glisser la banquette vers l’arrière jusqu’à ce qu’elle entre en contact avec l’adaptateur de
siège arrière. (72)
• Pour verrouiller la banquette, tirez les pinces en plastique vers le haut de chaque côté du siège
arrière et soulevez. (73) Vériez que le siège est sécurisé.
67 68
72
6665

7069
71 72
73 74
75 76
73

• Insérez la sangle d’entrejambe dans la fente à l’arrière du siège (74) et de a banquette. (75)
• Localisez les boucles élastiques sous le siège arrière.
• Attachez les 4 boucles élastiques sous la base de la banquette. (76)
• Pour retirer le siège arrière, inversez les étapes de démontage.
Sécurisation de l’enfant assis
• Il existe trois positions de réglage en hauteur pour le harnais de sécurité. Ajustez la hauteur à celle
étant juste au-dessus des épaules de votre enfant.
• Pour retirer le harnais de sécurité, ouvrez d’abord la fermeture éclair derrière le dossier. (77)
• Tournez les extrémités en plastique sur le côté et poussez-les à travers les fentes dans le dossier
du siège. (78) Remettez en place le harnais en place en réinsérant les extrémités en plastique à la
bonne hauteur à travers les fentes. Vériez que les deux sangles soient à la même hauteur.
• Pour détacher la boucle, appuyez sur le bouton central et retirez les extrémités mâles de chaque
côté. (79)
• Placez délicatement l’enfant dans le siège en positionnant les bretelles sur ses épaules et sa
poitrine. Ensuite, placez la sangle d’entrejambe entre les jambes de l’enfant.
• Poussez les loquets de verrouillage épaule / ceinture dans la boucle d’entrejambe jusqu’à ce que
toutes les parties s’enclenchent en place. (80)
• Serrez la ceinture autour de la taille de l’enfant.
• Les sangles d’épaule, de taille, et d’entrejambe peuvent être ajustées en utilisant des anneaux de
plastique.
• Appuyez sur le dossier du siège pour vous assurer qu’il est bien xé. Ne laissez JAMAIS un enfant
monter ou s’asseoir sur le support pour les jambes ou le repose-pieds. Cela pourrait faire basculer
la poussette.
Réglage du siège arrière
• Le siège arrière est doté de 3 positions d’inclinaison.
• Pour l’ajuster, soulevez le mécanisme d’inclinaison et tirez le siège à la position désirée. (81)
Assurez-vous que le mécanisme d’inclinaison vers l’arrière est engagé.
• Pour une position à la verticale, pousser le dossier vers l’avant.
IMISE EN GARDE: Assurez-vous TOUJOURS que le
mécanisme d’inclinaison du dossier est engagé avant de placer l’enfant
dans le siège, que le siège soit en position verticale ou inclinée. Appuyez
sur le dossier pour vous assurer qu’il est sécurisé.
IMISE EN GARDE: Ce siège ne convient pas aux
enfants de moins de 3 mois normes 2016 - ASTM F833 aux États-Unis
et F833 DORS au Canada). Le produit est conçu pour transporter un
enfant d’une hauteur maximale de 44 pouces (111,8 cm). Le produit est
conçu pour transporter un enfant d’un poids maximal de 55 livres. (25
kg). Lorsqu’il est utilisé pour transporter 2 enfants en même temps, le
poids total de tous les enfants ne doit pas dépasser 110 livres. (50 kg).
Le dépassement de ce poids total causera une usure excessive de la
poussette et pourrait entraîner une condition d’instabilité dangereuse. Ne
laissez jamais un enfant sans surveillance. Évitez les blessures graves
pouvant être causées par une chute ou un glissement. Toujours utiliser le
système de retenue.
74

7877
79 80
81
75

Retrait du tissu du siège
• Retirez le siège.
• Ouvrez la fermeture éclair du tissu à l’arrière du siège. (82)
• Retirez le Velcro® au bas de l’arrière du siège.
• Localisez les deux sangles de soutien enroulées autour de la base à l’arrière du siège.
• Pour retirer, glissez la sangle à travers la fente de l’anneau métallique rectangulaire. (83)
• Répétez de l’autre côté. Retirer les 2 sangles de tissu des côtés inférieurs de l’arrière du siège des
boutons en métal. (84)
• Retirez le tissu du siège du cadre.
• Retirez le harnais, les sangles de ceinture et d’entrejambe à travers les fentes du tissu de siège
avant. (85)
• Retirez le Velcro® sous la poche (86) et retirez la plaque de siège en plastique. (87)
• Pour réassembler le siège arrière, inversez les étapes de démontage. Assurez-vous que toutes les
fermetures éclair et sangles sont bien fermées.
76

82
83
84 85
86
87
77

Adaptateur pour siège d’auto (Graco / Chicco) (en option)
• Pour utiliser l’adaptateur de siège d’auto en position avant, assurez-vous d’abord que le siège
avant est retiré.
• Alignez les prises mâles au bas de l’adaptateur de siège d’auto avec les prises femelles sur le
cadre de la poussette. (88)
• Appuyez sur les deux côtés de l’adaptateur de siège d’auto jusqu’à ce que les prises
s’enclenchent ensemble. (89) Soulevez l’adaptateur de siège d’auto des deux côtés pour assurer
qu’il est bien xé.
• Le siège d’auto peut uniquement faire face vers l’arrière.
• Tenez le siège d’auto par la poignée et abaissez le siège sur la poussette de façon à ce que le
crochet à l’arrière du siège d’auto s’attache à l’adaptateur de siège d’auto. Tirez sur le siège
d’auto pour vous assurer qu’il est bien xé.
• Pour retirer le siège d’auto, tirez sur le levier de déverrouillage (le même levier que celui utilisé pour
libérer le siège d’auto de sa base) et soulevez. (90)
• Pour retirer l’adaptateur de siège d’auto de la poussette, poussez le bouton de déverrouillage des
deux côtés et retirez-le de la poussette. (91)
• Pour utiliser l’adaptateur de siège d’auto en position arrière, vériez que le siège avant est en
position entièrement verticale.
• Alignez les prises mâles au bas de l’adaptateur de siège d’auto avec les prises femelles sur le
cadre de la poussette. (92)
• Appuyez sur les deux côtés de l’adaptateur de siège d’auto jusqu’à ce que les prises
s’enclenchent. ensemble. Soulevez l’adaptateur de siège d’auto des deux côtés pour assurer qu’il
est bien xé. (93)
• Le siège d’auto peut uniquement faire face vers l’arrière.
• Tenez le siège d’auto par la poignée et abaissez le siège sur la poussette de façon à ce que le
crochet à l’arrière du siège d’auto s’attache à l’adaptateur de siège d’auto. (94) Tirez sur le siège
d’auto pour vous assurer qu’il est bien xé.
• Pour retirer le siège d’auto, tirez sur le levier de déverrouillage (le même levier que celui utilisé pour
libérer le siège d’auto de sa base) et soulevez.
• Pour retirer l’adaptateur de siège d’auto de la poussette, appuyez sur le bouton de déverrouillage
des deux côtés. Soulevez et retirez. (95)
• NOTE: La poussette peut être pliée avec l’adaptateur de siège d’auto installé en position avant ou
arrière, lorsque la banquette n’est pas installée.
IMISE EN GARDE: Utilisez UNIQUEMENT sur la
poussette Caboose Joovy S ™. TOUJOURS installer le siège d’auto an
que l’enfant soit face vers l’arrière (guidon) de la poussette. TOUJOURS
placer le siège d’auto an qu’il soit enclenché dans les adaptateurs
de siège d’auto. L’adaptateur de siège d’auto est destiné à être utilisé
UNIQUEMENT avec des certains sièges d’auto spéciques. NE PAS
utiliser avec des modèles de sièges d’auto ne se trouvant pas dans la liste
de sièges d’auto compatibles (voir page 84). Ce produit n’est pas un jouet.
NE laissez PAS les enfants jouer avec celui-ci.
78

88
89
90 91
92
93
94 95
79

Adaptateur de siège de voiture (Britax / BOB B-Safe) (en option)
• Pour utiliser l’adaptateur de siège d’auto en position avant, assurez-vous d’abord que le siège
avant est retiré.
• Alignez les prises mâles au bas de l’adaptateur de siège d’auto avec les prises femelles sur le
cadre de la poussette. (96) Assurez-vous que la èche sur l’adaptateur fait face vers l’arrière.
• Appuyez sur les deux côtés de l’adaptateur de siège d’auto jusqu’à ce que les prises
s’enclenchent ensemble. (97) Soulevez l’adaptateur de siège d’auto des deux côtés pour assurer
qu’il est bien xé.
• Le siège d’auto peut uniquement faire face vers l’arrière
• Tenez le siège d’auto par la poignée et abaissez le siège sur la poussette de façon à ce que le
crochet à l’arrière du siège d’auto s’attache à l’adaptateur de siège d’auto. Tirez sur le siège
d’auto pour vous assurer qu’il est bien xé.
• Pour retirer le siège d’auto, tirez sur le levier de déverrouillage (le même levier que celui utilisé pour
libérer le siège d’auto de sa base) et soulevez. (98)
• Pour retirer l’adaptateur de siège d’auto de la poussette, poussez le bouton de déverrouillage de
chaque adaptateur et retirez-le de la poussette. (99)
• Pour utiliser l’adaptateur de siège d’auto en position arrière, vériez que le siège avant est en
position entièrement verticale.
• Alignez les prises mâles au bas de l’adaptateur de siège d’auto avec les prises femelles sur le
cadre de la poussette. (100) Assurez-vous que la èche sur l’adaptateur fait face à l’arrière.
• Appuyez sur les deux côtés de l’adaptateur de siège d’auto jusqu’à ce que les prises
s’enclenchent ensemble. (101) Soulevez l’adaptateur de siège d’auto des deux côtés pour assurer
qu’il est bien xé.
• Le siège d’auto peut uniquement faire face vers l’arrière.
• Tenez le siège d’auto par la poignée et abaissez le siège sur la poussette de façon à ce que le
crochet à l’arrière du siège d’auto s’attache à l’adaptateur de siège d’auto. Tirez sur le siège
d’auto pour vous assurer qu’il est bien xé.
• Pour retirer le siège d’auto, tirez sur le levier de déverrouillage (le même levier que celui utilisé pour
libérer le siège d’auto de sa base) et soulevez. (98)
• Pour retirer l’adaptateur de siège d’auto de la poussette, appuyez sur le bouton de déverrouillage
de l’adaptateur. Soulevez et retirez. (99)
• NOTE: La poussette peut être pliée avec l’adaptateur de siège d’auto installé en position avant ou
arrière.
IMISE EN GARDE: Utiliser UNIQUEMENT sur la
poussette Caboose Joovy S ™. TOUJOURS installer le siège d’auto an
que l’enfant soit face vers l’arrière (guidon) de la poussette. TOUJOURS
placer le siège d’auto an qu’il soit enclenché dans les adaptateurs
de siège d’auto. L’adaptateur de siège d’auto est destiné à être utilisé
UNIQUEMENT avec des certains sièges d’auto spéciques. NE PAS
utiliser avec des modèles de sièges d’auto ne se trouvant pas dans la liste
de sièges d’auto compatibles (voir page 84). Ce produit n’est pas un jouet.
NE laissez PAS les enfants jouer avec celui-ci.
80

96
97
98
100
99
101
81

Adaptateur de siège de voiture (Maxi-Cosi / Cybex / Nuna) (en option)
• Pour utiliser l’adaptateur de siège d’auto en position avant, assurez-vous d’abord que le siège
avant est retiré.
• Alignez les prises mâles au bas de l’adaptateur de siège d’auto avec les prises femelles sur le
cadre de la poussette. (102) Assurez-vous que la èche sur l’adaptateur fait face à l’arrière.
• Appuyez sur les deux côtés de l’adaptateur de siège d’auto jusqu’à ce que les prises
s’enclenchent ensemble. (103) Soulevez l’adaptateur de siège d’auto des deux côtés pour assurer
qu’il est bien xé.
• Le siège d’auto peut uniquement faire face vers l’arrière
• Tenez le siège d’auto par la poignée et abaissez le siège sur la poussette de façon à ce que le
crochet à l’arrière du siège d’auto s’attache à l’adaptateur de siège d’auto. Tirez sur le siège
d’auto pour vous assurer qu’il est bien xé.
• Pour retirer le siège d’auto, appuyez sur les boutons de déverrouillage des deux côtés et soulevez.
• Pour retirer l’adaptateur de siège d’auto de la poussette, appuyez sur chaque bouton latéral de
déverrouillage et retirez-le de la poussette. (104)
• Pour utiliser l’adaptateur de siège d’auto en position arrière, vériez que le siège avant est en
position entièrement verticale.
• Alignez les prises mâles au bas de l’adaptateur de siège d’auto avec les prises femelles sur le
cadre de la poussette. (105) Assurez-vous que la èche sur l’adaptateur fait face à l’arrière.
• Appuyez sur les deux côtés de l’adaptateur de siège d’auto jusqu’à ce que les prises
s’enclenchent ensemble. (106) Soulevez l’adaptateur de siège d’auto des deux côtés pour assurer
qu’il est bien xé.
• Le siège d’auto peut uniquement faire face vers l’arrière.
• Tenez le siège d’auto par la poignée et abaissez le siège sur la poussette de façon à ce que le
crochet à l’arrière du siège d’auto s’attache à l’adaptateur de siège d’auto. Tirez sur le siège
d’auto pour vous assurer qu’il est bien xé.
• Pour retirer le siège d’auto, appuyez sur les boutons de déverrouillage et soulevez. (107)
• Pour retirer l’adaptateur de la poussette, appuyer sur le bouton de déverrouillage de l’adaptateur
et retirez-le de la poussette.
• NOTE: La poussette peut être pliée avec l’adaptateur de siège d’auto installé en position avant ou
arrière.
IMISE EN GARDE: Utiliser UNIQUEMENT sur la
poussette Caboose Joovy S ™. TOUJOURS installer le siège d’auto an
que l’enfant soit face vers l’arrière (guidon) de la poussette. TOUJOURS
placer le siège d’auto an qu’il soit enclenché dans les adaptateurs
de siège d’auto. L’adaptateur de siège d’auto est destiné à être utilisé
UNIQUEMENT avec des certains sièges d’auto spéciques. NE PAS
utiliser avec des modèles de sièges d’auto ne se trouvant pas dans la liste
de sièges d’auto compatibles (voir page 84). Ce produit n’est pas un jouet.
NE laissez PAS les enfants jouer avec celui-ci.
82

102
103
104
105
106 107
83

NOTE IMPORTANTE
Lorsque vous utilisez votre poussette comme siège d’auto pour bébé, les modèles de sièges d’auto
pour bébé suivants sont compatibles avec le Caboose S:
Graco® SnugRide Click Connect 30
Graco® SnugRide Click Connect 35
Graco® SnugRide Click Connect 35 LX
Graco® SnugRide SnugLock 35 DLX
Graco® SnugRide Click Connect 40
Chicco® KeyFit
Chicco® KeyFit 30
Chicco® KeyFit 30 Magic
Chicco® KeyFit 30 Zip
Chicco® KeyFit 30 Zip Air
Chicco® Fit2 2-Year
Britax®/BOB® B-Safe
Britax® B-Safe 35
Britax® B-Safe 35 Elite
Pour obtenir la liste mise à jour des sièges d’auto pour bébé compatibles,
veuillez consulter notre site Web au www.joovy.com.
Cybex® Aton 2
Cybex® Aton Q
Cybex® Cloud Q
Maxi-Cosi® Mico
Maxi-Cosi® Mico 30
Maxi-Cosi® Mico Max 30
Maxi-Cosi® Mico AP
Maxi-Cosi® Mico NXT
Maxi-Cosi® Pebble
Nuna® Pipa
Protection contre la pluie (en option)
• NOTE: La protection contre la pluie doit uniquement être utilisée en la xant sur l’auvent.
• Assurez-vous que l’auvent est en position entièrement déployée (ouverte). Ouvrez soigneusement
la protection contre la pluie à son maximum.
• Placez la protection contre la pluie sur la poussette. Assurez-vous que la couture avant se trouve
sur le rebord avant de l’auvent. (L’étiquette Joovy est vers l’avant et le long rabat est vers l’arrière
de la poussette) (108)
• Retirez le Velcro® et tirez le long rabat à travers le guidon arrière, juste au-dessus des portegobelets, des deux côtés de la poussette. Tirer les deux côtés arrière de la protection contre la
pluie autour du guidon.
• Attachez la boucle élastique sur les supports des porte-gobelets, des deux côtés du guidon. (109)
• Tirez le long rabat vers le bas et xez ensemble les 4 attaches Velcro® autour du cadre vertical
pour xer ce rabat en place. (110) Eectuez ceci des deux côtés.
• Tirez la protection contre la pluie vers le bas, vers les roues avant, et xez les bandes Velcro®
autour du coin du cadre. (111) Eectuez ceci des deux côtés.
• Ouvrez la fermeture éclair latérale pour un accès facile. (112)
• Localisez le Velcro® dans le coin inférieur et xez-le à la couture se trouvant près du logo Joovy.
(113)
IMISE EN GARDE: Utiliser UNIQUEMENT sur la
poussette Caboose Joovy S™. Ne laissez jamais cette protection en place
lorsque l’enfant se trouve dans la poussette et que celle-ci est exposée au
soleil ou à une température élevée, car la température à l’intérieur pourrait
grimper dangereusement. Ce produit n’est pas un jouet. NE laissez PAS
les enfants jouer avec celui-ci.
84

108 109
110 111
112 113
85

Organisateur parent (en option)
• Faites glisser une sangle de l’organisateur du parent autour d’un côté du guidon. (114)
• Enroulez le reste de la sangle autour du guidon pour xer le Velcro®. (115)
• Répétez l’opération de l’autre côté. Assurez-vous que l’organisateur parent est bien xé.
• Ouvrez et fermez la fermeture éclair sur la poche de l’organisateur parent pour y mettre et y
prendre des articles. (116)
IMISE EN GARDE: Utiliser UNIQUEMENT sur la
poussette Caboose Joovy S ™. NE JAMAIS transporter des boissons
chaudes ou de contenants ouverts dans ce produit. Le poids maximum
qui peut être transporté dans l’organisateur parent est de 5 lbs. (2,3 kg).
Ce produit n’est pas un jouet. NE PAS laisser les enfants jouer avec celui-
ci.
Porte-gobelet (en option)
• Pour xer un porte-gobelet de chaque côté du guidon, alignez l’arrière de la pince du portegobelet sur le montant se trouvant sur la xation de porte-gobelet. (117)
• Abaissez le porte-gobelet sur la xation jusqu’à ce qu’il s’enclenche en place.
• NOTE: Les porte-gobelets peuvent être xés à l’avant de la poussette, à la place du plateau.
• Retirez d’abord le plateau s’il est xé.
• Pour xer un porte-gobelet, alignez l’arrière de la pince du porte-gobelet sur le montant de la
xation de plateau. (118)
• Abaissez le porte-gobelet sur la xation jusqu’à ce qu’il s’enclenche en place. (119)
• Faites glisser le porte-gobelet pour le retirer.
IMISE EN GARDE: Utiliser UNIQUEMENT sur la
poussette Caboose Joovy S ™. Le poids total qui peut être placé dans
le porte-gobelet doit être de moins de 1 lbs. (0,45 kg). NE JAMAIS
transporter des boissons chaudes ou de contenants ouverts dans ce
produit.
86

114 115
116
117
119118
87

Poignées (en option)
• Les poignées peuvent être xées sur le cadre vertical arrière de la poussette dans deux directions,
soit vers l’avant ou vers l’arrière. (120, 121)
• La zone de xation se trouve au haut de la ligne indiquée à l’intérieur du guidon. (122)
• Alignez la poignée et poussez les deux pinces sur le cadre de la poussette.
• Pour verrouiller les poignées, tournez les deux languettes latérales (123) et appuyez jusqu’à ce
qu’elles s’enclenchent en place. (124) Répétez l’opération de l’autre côté.
• Tirez sur les poignées des deux côtés pour vous assurer qu’elles sont bien xées. (125)
88

120 121
122 123
125124
89

Sac de magasinage (en option)
• Le sac de magasinage peut uniquement être utilisé en position arrière.
• Pour déverrouiller la boucle, appuyez sur le bouton central retirez les deux attaches. (126)
• Rangez la sangle de taille dans la poche à l’arrière du siège.
• Abaissez les crochets en plastique de chaque côté de la banquette et tirez la banquette à l’écart
de la poussette. (127)
• Ouvrez la fermeture éclair du panier (128) et placez le panier en position plate à l’arrière. (129)
• Pour installer, placez le sac de magasinage sur la poussette pour que les prises mâles soient
alignées avec les prises femelles du cadre de la poussette.
• Abaissez les deux côtés des prises du sac jusqu’à ce que les deux côtés s’enclenchent en place.
(130) Soulevez le sac de magasinage à partir des deux côtés pour vous assurer qu’il est bien
installé.
• Pour retirer le sac de magasinage, appuyez vers l’intérieur sur les deux mécanismes de
déverrouillage et retirez la poussette. (131)
• Consultez la section Congurations pour des exemples de congurations possibles.
• La poussette peut être pliée lorsque le sac de magasinage est installé.
IMISE EN GARDE: Utiliser UNIQUEMENT sur la
poussette Caboose Joovy S. NE JAMAIS soulever la poussette par
le sac de magasinage. Soyez prudent lorsque vous installer le sac de
magasinage et qu’un enfant est assis dans la poussette. Le poids maximal
pouvant être transporté dans le sac de magasinage est de 33 lbs. (15 kg).
Ce produit n’est pas un jouet. NE laissez PAS les enfants jouer avec celui-
ci.
90

126 127
128
129
130 131
91

Adaptateurs de bassinette (en option)
• Pour installer les adaptateurs de bassinette en position avant, assurez-vous d’abord que le siège
avant et le plateau soient retirés.
• Placez les adaptateurs de bassinette des deux côtés du cadre de la poussette. Alignez les prises
mâles au bas de l’adaptateur de bassinette avec les prises femelles sur le cadre de la poussette.
(132)
• Appuyez sur les deux côtés de l’adaptateur de bassinette jusqu’à ce que les deux prises
s’enclenchent en place. Soulevez l’adaptateur de bassinette des deux côtés pour vous assurer
qu’il est bien xé.
• Tenez la bassinette par la poignée de transport et abaissez la bassinette sur la poussette de façon
à ce que la prise mâle de la bassinette s’enclenche sur les adaptateurs de la bassinette. (133) Tirez
sur la poignée de la bassinette pour vous assurer qu’elle est bien xée.
• Pour retirer la bassinette, appuyez sur les deux boutons ronds des deux côtés de la bassinette et
retirez de la poussette. (134)
• Pour retirer les adaptateurs de bassinette de la poussette, appuyer sur le mécanisme de
verrouillage de l’adaptateur et retirez de la poussette. (135)
• NOTE: La poussette se plie avec les adaptateurs de bassinette installés à l’avant de la poussette.
Bassinette (en option)
• Pour assembler la bassinette, retirez le matelas et détachez le Velcro® se trouvant à l’intérieur.
(136)
• Avec une main placée au fond de la bassinette, utilisez votre main libre pour tirer fermement sur
l’anneau se trouvant sur le support de la bassinette jusqu’à ce que le support s’insère dans les
rainures au fond de la bassinette. (137) Répétez de l’autre côté. La bassinette devrait maintenant
conserver sa forme.
• NOTE: Vous devrez peut-être ouvrir la fermeture éclair du recouvrement de bassinette pour faciliter
l’accès de l’autre côté.
• Replacez le matelas. Refermez la fermeture éclair du recouvrement de la bassinette si vous l’avez
ouverte.
• Fixez la poignée de la bassinette en faisant glisser les deux tiges dans les supports de la
bassinette. (138)
• Fixez les supports de l’auvent aux parties latérales du cadre de la bassinette en les xant en place.
(139)
• Localisez la fermeture éclair latérale et xez la fermeture éclair de l’auvent au tissu de la
bassinette. (140)
• Fermez la fermeture éclair du recouvrement de la bassinette. (141) Fixez le Velcro® du
recouvrement de la bassinette au cadre de la bassinette. (142)
• Pour installer les adaptateurs de la bassinette en position avant, assurez-vous d’abord que le
siège avant est retiré.
• Placer les adaptateurs de bassinette dans les deux prises femelles du cadre de la poussette, les
èches faisant face vers l’arrière, les prises mâles des adaptateurs de bassinette étant alignés
avec les prises femelles sur le cadre de la poussette. (143)
• Abaissez les deux côtés de la bassinette jusqu’à ce que les deux xations s’enclenchent en place.
Soulevez la bassinette des deux côtés pour vous assurer qu’elle st bien xée.
• Pour retirer la bassinette, appuyez sur les deux boutons ronds des deux côtés de la bassinette et
retirez de la poussette. (144)
• Pour retirer les adaptateurs de bassinette de la poussette, poussez les deux mécanismes de
déverrouillage de l’adaptateur vers l’extérieur et retirez de la poussette. (145)
• Pour démonter la bassinette, retirez le matelas et détachez le Velcro® au fond de la bassinette.
utilisez votre main libre pour tirer fermement sur l’anneau se trouvant sur le support de la
bassinette jusqu’à ce que qu’il se détache des rainures et repose à plat. (146) Répétez pour l’autre
côté. La bassinette devrait maintenant être à plat pour l’entreposage.
92

• Le tissu du matelas est lavable. Retirer le tissu du coussin en mousse et placez le tissu dans un
sac de lavage en maille pour le laver.
• Avant de plier, retirez la bassinette.
93

132
133
134
135
136 137
138 139
94

140
141
142 143
144
146
145
95

IMISE EN GARDE
Le non-respect de ces avertissements et les instructions pourrait
entraîner des blessures graves, voire mortelles. Lisez toutes les
instructions avant l’utilisation du moïse. Conserver les instructions
pour une utilisation ultérieure.
• Le moïse est conçu pour être utilisé sur les poussettes Joovy Qool et
Caboose S. NE PAS utiliser sur tout autre produit.
• Le moïse doit être entièrement assemblé selon les instructions de Joovy
avant l’utilisation. Ne pas modier le moïse ou ajouter d’accessoires qui
ne sont pas spéciquement recommandés par Joovy.
• Ne pas utiliser le moïse s’il est endommagé ou brisé.
• Pour aider à prévenir les chutes, ne pas utiliser ce produit lorsque
le bébé commence à se tourner, se soulever sur ses mains et ses
genoux ou atteint plus de 20 livres. (9,1 kg), selon la première de ces
éventualités.
• Utilisez moïse pour un seul enfant à la fois.
• Utilisez uniquement le matelas fourni par Joovy.
• Pour réduire le risque de mort subite du nourrisson, les pédiatres
recommandent que les enfants en bonne santé soient placés sur le dos
pour dormir, sauf avis contraire de votre médecin.
• Utilisez uniquement la protection de matelas fournie par Joovy.
• Risque de suocation: Sur des surfaces moelleuses, le moïse peut se
déplacer et asphyxier l’enfant. NE JAMAIS placer le moïse sur des lits,
canapés ou autres surfaces molles.
• Risque de chute: les mouvements de l’enfant peut entraîner le
déplacement du moïse. NE JAMAIS placer le moïse sur des comptoirs,
tables ou toute autre surface élevée.
• NE JAMAIS utiliser ce moïse comme moyen pour transporter un enfant
dans un véhicule automobile.
• Ne placez aucun cordon, bracelet ou un objet similaire dans ou près du
moïse, car il pourrait s’enrouler autour du cou d’un enfant.
• Ne placez pas ce moïse près d’une fenêtre ou porte de patio où un
enfant pourrait atteindre le cordon d’un store ou un rideau et s’étrangler.
• Vériez régulièrement ce moïse avant de l’utiliser et ne pas utiliser si
des pièces sont mal xées ou manquantes ou s’il y a des dommages.
Ne pas remplacer les pièces. Contactez le fabricant si des pièces de
rechange ou des instructions supplémentaires sont nécessaires.
96

• Utiliser un matelas de couchette qui n’est pas plus épais que 3,8 cm et
est d’une taille telle que, lorsqu’il est poussé fermement contre un côté
quelconque de la couchette, il ne laisse pas un écart de plus de 3 cm
entre le matelas et un des côtés de la nacelle.
• Les enfants peuvent suoquer sur de la literie moelleuse. Ne pas placer
des oreillers, des couettes ou des matelas moelleux dans ce moïse.
97

Entretien et Maintenance
Entretien
Tous les accessoires, boutons-pression, serrures, rivets et autre quincaillerie et pièces de plastique
de la poussette doivent être inspectés périodiquement an de s’assurer qu’ils sont adéquatement
xés et non endommagés ou défectueux. Le harnais de sécurité, ainsi que toutes les autres sangles
et pièces en tissu et leurs coutures doivent également être inspectés périodiquement an d’assurer
qu’ils sont adéquatement xés et ne sont pas mal posés, déchirés ou endommagés. Toutes les
pièces amovibles, telles que les roues, les freins et les charnières doivent également être vériées
périodiquement an d’assurer leur bon fonctionnement.
Tout composante manquante, brisée ou usée doit être remplacée immédiatement, et la poussette
ne doit pas être utilisée jusqu’à ce que le remplacement ait été eectué. Seules les composantes du
fabricant d’origine doivent être utilisées. Si nécessaire, veuillez contacter Joovy via notre numéro de
téléphone sans frais.
Nettoyage
Le tissu sur cette poussette peut être nettoyé avec du savon doux ou un détergent et de l’eau tiède
sur une éponge ou un chion propre. Le tissu du siège est lavable à la machine. Retirez le cadre
métallique et les panneaux PE du siège avant le lavage. Ne pas utiliser de solvants, produits de
nettoyage caustiques ou abrasifs. Pour minimiser le rétrécissement, rexez simplement le siège au
châssis pour sécher. Ne pas presser, repasser, nettoyer à sec, sécher à la machine ou tordre le tissu.
Toujours laisser le tissu sécher complètement à l’air avant d’utiliser la poussette.
Le cadre et les roues doivent toujours être propres et exempts de saleté et de matières étrangères,
surtout après l’utilisation de la poussette sous la pluie, la neige ou dans d’autres environnements
diciles. Utilisez une éponge ou un chion humide avec de l’eau tiède et un détergent doux pour
nettoyer les roues après une telle utilisation.
Consultez la sectionsur le recouvrement de siège pour les informations relatives au retrait du
recouvrement de siègepour le lavage (page 66).
Espace de rangement
La lumière directe du soleil pourrait entraîner la décoloration du tissu et le durcissement des roues.
Gardez la poussette à l’intérieur pour prolonger son apparence. NE PAS entreposer à l’extérieur.
Assurez-vous que la poussette est sèche avant de la ranger pour des périodes prolongées. Toujours
entreposer la poussette dans un environnement sec. Rangez la poussette dans un endroit sécuritaire
lorsqu’elle n’est pas utilisée. (soit à l’écart des enfants). NE PAS placer des objets lourds sur le
dessus de la poussette. Ne pas ranger la poussette à proximité d’une source de chaleur directe,
comme un radiateur ou un feu ouvert.direct heat source such as a radiator or open re.
98

Service à la Clientèle
Veuillez ne pas retourner ce produit en magasin.
Si vous rencontrez des dicultés lors de l’assemblage ou de l’utilisation de ce produit, ou si vous
avez une question au sujet de ces instructions, veuillez communiquer avec notre service à la
clientèle:
États Unis
Joovy
(877) 456-5049, 8h30 – 17h00, heure du Centre
Discussion en direct joovy.com, 8h30 – 21h00, heure du Centre
customerservice@joovy.com
@joovy
Canada
Elfe Juvenile Products
(800) 667-8184, 8h30 – 17h00, heure de l’Est
Corée
Joy Partners Limited Korea
(822) 2248-3384, 9h00 – 18h00 GMT+9
99

Seguridad y Advertencias
IADVERTENCIA
Por favor lea estas instrucciones cuidadosamente antes de usar el
producto y consérvelas para utilizarlas como referencia en el futuro.
• No acatar estas instrucciones podría provocar lesiones graves o la
muerte.
• Nunca deje al niño solo.
• Asegúrese de que todas las trabas estén colocadas antes de usarlo.
• Evite lesiones graves provocadas por caídas o deslizamientos.
• Use siempre los cinturones de seguridad y asegúrese de que todos los
niños estén posicionados como lo indican las instrucciones.
• Asegúrese de que el cochecito esté bien abierto, que la traba
de seguridad esté colocada y que los frenos de las ruedas estén
accionados antes de permitir a los niños acercarse al cochecito.
• La traba de estacionamiento siempre debe estar accionada al colocar y
retirar al niño del cochecito.
• Este asiento no es apto para niños menores de 3 meses. (Normas US
ASTM F833, Canadá SOR/2016).
• El peso máximo del niño que puede ir sentado en el asiento delantero es
de 55 libras. (25 kg).
• La altura máxima del niño que puede viajar en este producto es de 44
pulgadas (111.8 cm)
• El asiento trasero está diseñado para niños mayores de 2½ años pero
que midan MENOS de 44 pulgadas (111.8 cm) de altura y pesen menos
de 55 libras. (25 kg).
• El uso del cochecito con 2 niños que pesen más de 55 libras (25 kg)
cada uno, o más de 110 libras (50 kg) entre los dos, provocará un
desgaste y esfuerzo excesivo del cochecito y puede ser peligroso.
• No use nunca este cochecito para llevar a más de 2 niños a la vez.
• Nunca permita que un niño se pare en el apoyapiés para subirse o
bajarse del cochecito.
• No utilice el cochecito en escaleras ni escaleras mecánicas.
• No agregue ningún accesorio que no esté especícamente
recomendado por Joovy.
• Para evitar accidentes, asegúrese de que su hijo se mantenga alejado al
abrir y cerrar este producto.
• Todo peso que se cuelgue del manillar afecta la estabilidad del
cochecito. Colgar carteras, bolsas, paquetes, bolsos de pañales
u otros accesorios del manillar u otras partes del cochecito puede
desequilibrarlo y provocar una inestabilidad peligrosa.
100
 Loading...